

Page 1
+
–
+
–
+
–
+
–
C
3X
LASERVISION®QUBE™System
LASER RADIATION
Avoid Direct Eye Exposure
DANGER
Maximum Output Power < 5 mW @ 650 nm
Class IIIa Laser Product
This product complies with standards
applicable to 21 CFR parts 1040.10
and 1040.11
+
+
+
™
™
Power Button and
Indicator Panel
damages, so the above limitations and/or exclusions may not apply to
you, and further (ii) this warranty gives you specific legal rights and
you may also have other rights which vary from state to state.
Return product freight prepaid with proof of purchase date (dated
sales receipt) and $5.00 to cover postage and handling, to:
Be sure to include your name and return address. Out of warranty
service and repair, where proof of purchase is not provided,shall be
returned with repairs charged C.O.D. Allow 4 to 6 weeks for delivery.
Pate nts Pending
©2004 Zircon Corporation • P/N 59664 Rev A 07/04
QUBE
Zircon Corporation
*Attn: Returns Department
1600 Dell Avenue, Unit K
Campbell, CA 95008-6992 USA
Customer Service: 1-800-245-9265 or 1-408-963-4550
E-mail: info@zircon.com
The Zircon LASERVISION®QUBE
System is the fastest, most
versatile way to find level and
plumb. With the simple-to-use
modular system, magnetic QUBE
lasers snap to the base and to
each other creating perfect lines
and angles.
Zircon Corporation, (“Zircon”) warrants this product to be free from
defects in materials and workmanship for one year from the date of
purchase. Any in-warranty defective product returned to Zircon*, freight
prepaid with proof of purchase date and $5.00 to cover postage and
handling, will be repaired or replaced at Zircon’s option. This warranty is
limited to the electronic circuitry and original case of the product and
specifically excludes damage caused by abuse, unreasonable use or
neglect. This warranty is in lieu of all other warranties, express or
implied, and no other representations or claims of any nature shall bind
or obligate Zircon. Any implied warranties applicable to this product are
limited to the one year period following its purchase.
IN NO EVENT WILL ZIRCON BE LIABLE FOR ANY SPECIAL,INCIDENTAL
OR CONSEQUENTIAL DAMAGES RESULTING FROM POSSESSION, USE OR
MALFUNCTION OF THIS PRODUCT.
In accordance with government regulations, you are advised that:
(i) some states do not allow limitations on how long an implied warranty
lasts and/or the exclusion or limitation of incidental or consequential
LIMITED 1 YEAR WARRANTY
SAFETY INSTRUCTIONS
™
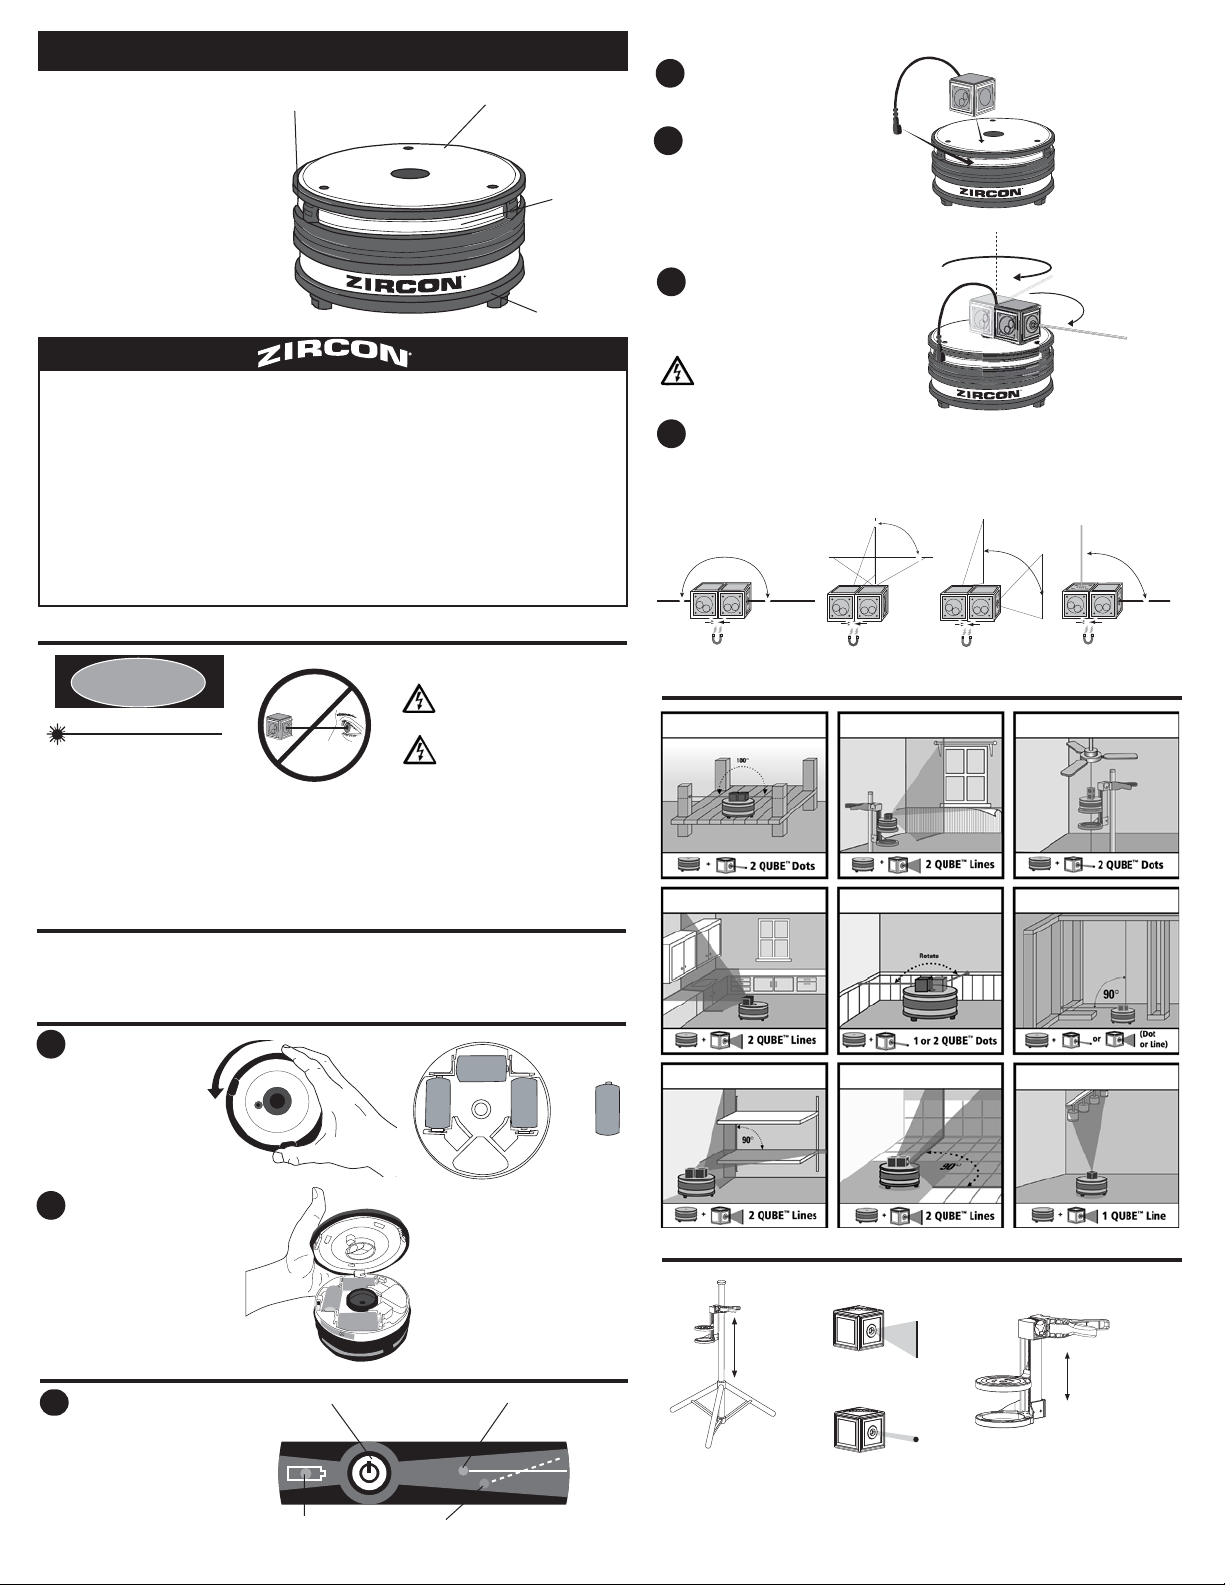
Contact Plate
Power Strip
Battery Cover
Place QUBE™laser on contact
4
plate. Attach QUBE
™
power strip.
Laser will turn on
5
automatically when
full contact is made.
Rotate or flip QUBE™laser
6
to desired position.
Warn ing
Disconnect when not in
use to avoid eye contact.
QUBE™lasers can be used in com-
7
bination for many possible effects.
™
lasers magnetically snap
QUBE
together to form perfect angles.
180°
cable to
90°
90°
90°
Warning: read and understand all
instructions prior to operating this
laser tool.
Warn ing: laser light. Avoid direct eye
exposure. Do not look into beam.
• Do not stare directly at the laser beam.
• Do not project the laser beam in a manner that would cause others to look into the beam.
• Do not use any other optical devices in conjunction with the laser tool.
• Do not operate near children.
• Always turn off the laser tool when not in use.
SPECIFICATIONS
• Self-levels within ±5 degrees
• Red laser diode: 650 nm Class IIIa
• Accuracy: typically within
1
⁄4 in. at 50 ft. (6 mm at 15 m)
• Operating temp: 20° –110°F (-7° – 43°C)
• Batteries: 3 C 1.5 volt alkaline
INSTALLING THE BATTERIES
Unscrew bottom cover
1
counter-clockwise and
lift. Place 3 C batteries
in the compartment,
matching (+) and (-)
terminals from
battery to case.
Replace battery door and
2
rotate shut. Batteries will
last approximately 2 years
under normal conditions.
SYSTEM APPLICATIONS
Decks
Decorating Floor to Ceiling
Kitchen/Bath Molding Remodeling
Storage Tile Ceiling Lights
ACCESSORIES
OPERATION
Place unit on a stable, flat surface
3
and press the Power Button.
Level Indicator light will flash
while scanning for level, and shine solid
when the platform is level. If the unit is
unstable or at an incline of more than 5
degrees auto level cannot function and
the Out of Auto Level Range Indicator
will shine red. Power down and
reposition the unit.
™
Laser Line
QUBE
Power Button Scan/Level Indicator
Low Battery Indicator
Out of Auto Level Range Indicator
Jamb Pole with
Tripod Legs
QUBE™Laser Dot
Bracket with Multiposition Clamp
Page 2

Sistema LaserVision®Qube
PELIGRO
Emisión máxima: < 5mW @ 650 nm
Clase IIIa Producto Láser
RADIACIÓN LÁSER
Evite la exposición directa a los ojos
Este producto cumple con estándares
aplicables de 21 CFR partes 1040.10
y 1040.11
+
–
+
–
+
–
+
–
C
3X
+
+
+
El Sistema Zircon LaserVision®Qube
es la manera más rápida y versátil
para localizar el nivel o la plomada.
Con el sistema modular, fácil de usar,
los cubos láser magnéticos se
adhieren a la base y entre sí, para
obtener líneas y ángulos perfectos.
™
Botón de encendido y
panel indicador
™
Placa de contacto
para cubos
Banda para
tomas múltiples
Coloque el cubo láser en la
4
placa de contacto. Conecte
el cable del cubo al
contacto múltiple.
El láser se encenderá
5
automáticamente cuando se
logre el contacto completo.
Zircon Corporation (“Zircon”) garantiza este producto como libre de
defectos en materiales y mano de obra por un año a partir de la fecha de
compra. Cualquier producto defectuoso dentro de la garantía enviado a
Zircon* con el envio pagado, comprobante de fecha de compra y $5.00
para cubrir porte y manejo, se reparará o reemplazará a opción de Zircon.
Esta garantía se limita a los circuitos electrónicos y a la caja original
del producto y excluye específicamente los daños provocados por uso
indebido, uso no razonable o descuido.Esta garantía está en lugar de todas
las demás garantías, expresas o implícitas,y ninguna otra declaración o
reclamo de cualquier naturaleza será obligatoria para Zircon. Cualquier
garantía implícita aplicable para este producto se limita al
periodo de un año inmediato a su compra.
EN NINGUN CASO, ZIRCON SERA RESPONSABLE DE NINGUN DAÑO
ESPECIAL, INCIDENTAL O RESULTANTE DE LA POSESION,USO O MAL
FUNCIONAMIENTO DE ESTE PRODUCTO.
De conformidad con las reglamentaciones gubernamentales, se le
notifica que:
(i) en algunos estados no se permiten limitaciones del tiempo de vigencia
de una garantía implícita y/o de la exclusión o limitación de daños
incidentales o consecutivos; así que las limitaciones y/o exclusiones
GARANTIA LIMITADA DE 1 AÑO
anteriores tal vez no se apliquen para usted, y además, (ii) esta garantía
le otorga derechos legales específicos y usted tal vez tenga otros derechos
que varían de estado en estado. Devuelva el producto con envio pagado y
comprobante de la fecha de compra (recibo de venta fechado) y $5.00 para
cubrir el porte y el manejo, a:
Zircon Corporation
*Attn: Returns Department
1600 Dell Avenue, Unit K
Campbell, CA 95008-6992 USA
Asegúrese de incluir su nombre y dirección. El servicio y reparación fuera de
garantía donde no se incluya el comprobante de compra se regresará con
cargos de reparación C.O.D.Permita de 4 a 6 semanas para la entrega.
Servicio a clientes: 1-800-245-9265 ó 1-408-963-4550
A la dirección de correo electrónico: info@zircon.com
Patentes Pendiente
©2004 Zircon Corporation • P/N 59664 Rev A 07/04
INSTRUCCIONES DE SEGURIDAD
Advertencia: Lea y comprenda todas
las instrucciones antes de utilizar
esta herramienta láser.
Advertencia: Luz láser. Evite la
exposición directa de los ojos. No
mire directamente al rayo.
• No mire directamente al rayo láser.
• No proyecte el rayo láser de manera que haga que otras personas lo miren directamente.
• No use ningún otro dispositivo óptico con la herramienta láser
• No la utilice cerca de los niños.
• Siempre apague la herramienta láser cuando no la use.
ESPECIFICACIONES
• Niveles automáticos ± 5 grados
• Diodo láser rojo: 650 nm Clase IIIa
• Accuracy: typically within
1
⁄4 in. at 50 ft. (6 mm at 15 m)
• Temp. de funcionamiento: 20 – 110°F (-7 – 43°C)
• Baterías: 3 baterías alcalinas C, de 1.5 voltios
INSTALACION DE LAS BATERIAS
Desenrosque la tapa de
1
la base en el sentido contrario de las agujas del
reloj y levántela. Coloque
3 baterías C en el compartimento, haciendo coincidir los polos (+) y (-) con
las marcas del compartimento.
Vuelva a colocar la tapa
2
del compartimento de
baterías y ciérrela hasta
que enrosque. Las
baterías duran aproximadamente 2 años en
condiciones normales.
Tapa de las
baterías
Gire o dé vuelta el cubo láser hasta
6
colocarlo en la posición deseada
Advertencia
Desconecte el sistema cuando
no lo utilice para evitar el
contacto con los ojos.
Se puede utilizar una combinación de cubos
7
láser para obtener muchos efectos posibles.
Los cubos láser se adhieren magnéticamente
para formar ángulos perfectos.
90°
180°
90°
APLICACIONES DEL SISTEMA
Plataformas
Decoración
Piso a techo
Cocina/Baño Molduras Remodelación
Almacenamiento Azulejos Luces de techo
ACCESORIOS
90°
FUNCIONAMIENTO
Coloque la unidad en una superficie
3
plana y estable, y presione el Botón de
encendido. El Indicador de nivel emitirá
una luz intermitente cuando esté explorando
el nivel, y una luz fija cuando la plataforma
esté nivelada. Si la unidad no está estable o
tiene una inclinación de más de 5 grados, el
nivel automático no puede funcionar y el
Indicador Fuera de rango de nivel automático
emitirá una luz roja. Apague la unidad y
vuelva a colocarla en posición.
Botón de encendido Indicador de
Indicador de batería baja
exploración/nivel
Indicador fuera de rango
de nivel automático
Tripie
Cubo de láser de línea
Cubo de láser de punto
Dispositivo de montaje con
abrazadera de múltiples posiciones
 Loading...