Zircon StudSensor 4 Owner's Manual

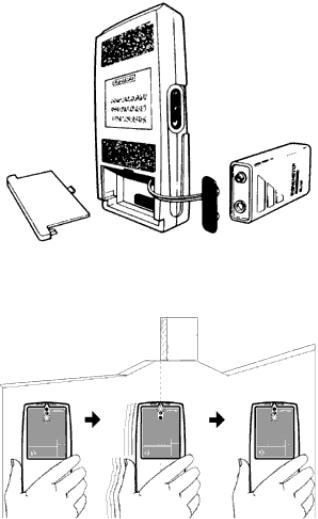
Installing the Battery
1.Slide open battery door on back of case.
2.Connect a 9-volt battery to battery clip.
3.Insert battery into case and replace battery door.
Battery will last approximately two years under normal conditions.
Scanning for Studs
1.Place the StudSensor™ stud finder against the wall. Hold as shown. (Figure 2).
2.Press and hold the ON/OFF switch. Slide the tool slowly across the wall.
3.LED display indicates increasing density. Top LED indicates stud edge. Mark this spot.
Note: Top LED may not always light when scanning through some dense surfaces. In that case, a lower LED indicates max density and therefore stud edge.
4.Continue moving across the stud until the top LED turns off, and then, still holding the switch in, reverse direction and locate the other edge of the stud. Mark this spot.
5.The midpoint between the two marks is the center of the stud.
6.DeepScan® Mode: For scanning through thick, built up surfaces like flooring, paneling, or shear wall.
To activate DeepScan® mode, click button twice until DeepScan® LED is lit.
Flashing lights! Error indicator
The StudSensor™ tool finds dense objects beneath the wall surface. The position where you start is important.
To work right, the tool must start (by holding the button) over a part of the wall that is not dense.
 Loading...