

Page 1

The design and specifications of this product may change without prior notice to enhance its quality.
www.zalman.co.kr www.zalmanusa.com
English version
◈ Please read this manual thoroughly before installation.
◈ Please visit our website and watch the HD160XT Plus installation video to
assist you in the installation process.
E-mail: zalman@zalman.co.kr
HD160XT Plus
Page 2
2
The design and specifications of this product may change without prior notice to enhance its quality.
HD160XT Plus
Congratulations on your purchase of Zalman’s HD160XT Plus Home Theatre PC
Enclosure! You are now about to experience Zalman’s world of silent computing.
The HD160XT Plus is designed for ultra quiet home theatre PC operation, utilizing
optimized ventilation and anti-vibration reinforcements, making it ideal for
environments that require silence such as living rooms, bedrooms, educational
facilities, and offices.
1. Cautionary Notes 3
2. Components 4
3. Specifications 5
4. Front Panel Buttons & I/O Ports 6
5. Installation Guide 7
6. Recommended Use 13
▣ Introduction
▣ Contents
Page 3

3
English
The design and specifications of this product may change without prior notice to enhance its quality.
HD160XT Plus
1
Cautionary Notes
(1) Check the condition of the product and its components before installation. If
there is a problem with the product and/or its components, please contact the
retailer for replacement.
(2) Avoid inserting any objects into the system while the power is ON. It may be
harmful for the user and product.
(3) Check the manual when connecting cables. Incorrect connections can
lead to fire resulting from short circuit.
(4) The air vents on four sides of the unit must not be blocked.
(5) Keep this unit away from heat sources and direct sunlight, as well as from
water, oil, and humidity. Place the unit on a flat, leveled, solid, and wellventilated area.
(6) Do not clean the product surface with chemicals or wet cloth. (chemicals:
industrial brightener, wax, benzene, alcohol, paint thinner, mosquito repellent,
aromatics, lubricant, detergent etc.)
(7) If this unit is to be transported long distance, then remove all HDDs (Hard
Disk Drive) for separate transport. And place the HD160XT Plus in its own
box.
◈◈
Disclaimer
Zalman Tech Co., Ltd. is not responsible for any damages due to external
causes, including but not limited to, improper use, problems with electrical power,
accident, neglect, alteration, repair, improper installation, or improper testing.
Page 4
4
The design and specifications of this product may change without prior notice to enhance its quality.
HD160XT Plus
2
Components
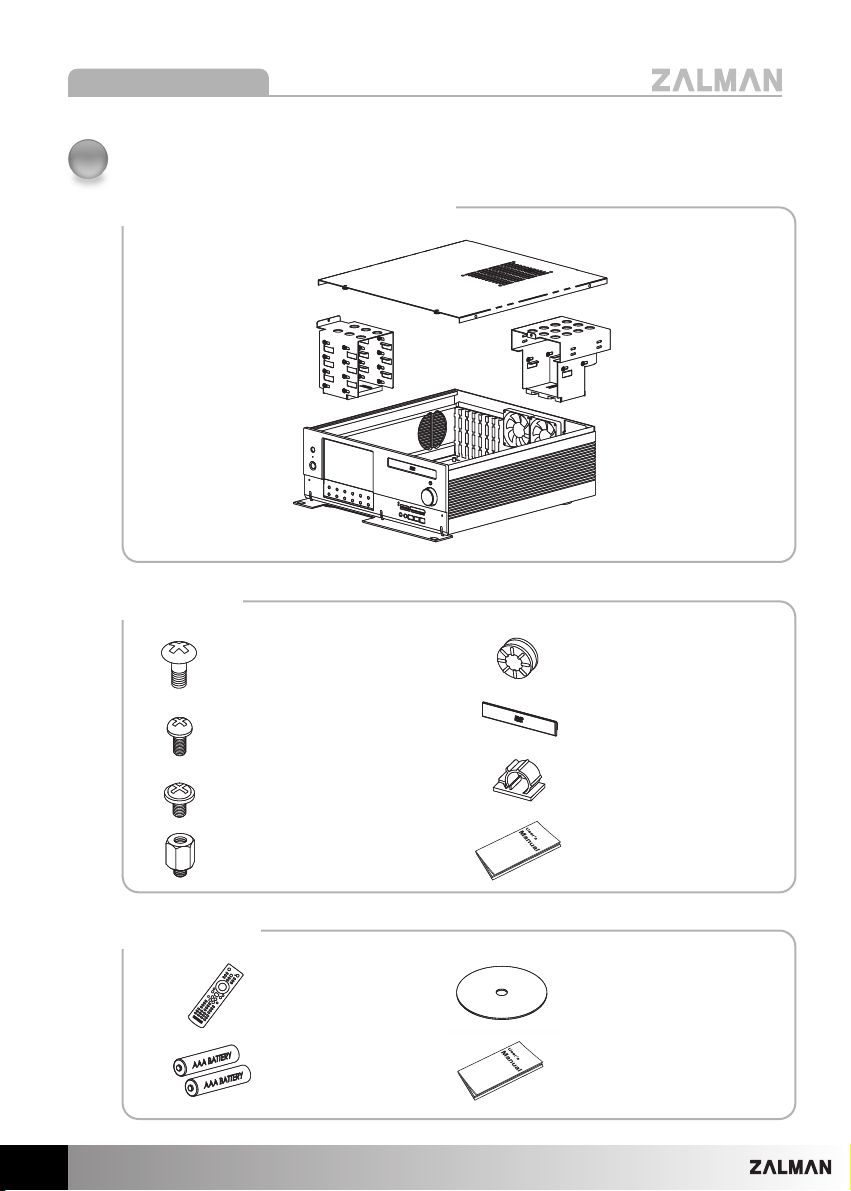
(1) HD160XT Plus Main Components
(2) Case Parts
(3) iMON Parts
HDD Chassis
Top Panel
ODD Chassis
Main Chassis
20 HDD Bolts
(PH #6-32X10)
4 Power Supply Bolts
(PH #6-32X6)
18 ODD / Motherboard Bolts
(PWH M3X5)
2 micro ATX Stand Offs (M3)
20 Dampers
1 ODD Aluminum Bezel
1 Clamp
1 User’s Manual
1 Remote Control
2 Batteries (AAA)
1 Installation CD
1 User’s Manual
Page 5
5
English
The design and specifications of this product may change without prior notice to enhance its quality.
HD160XT Plus
3
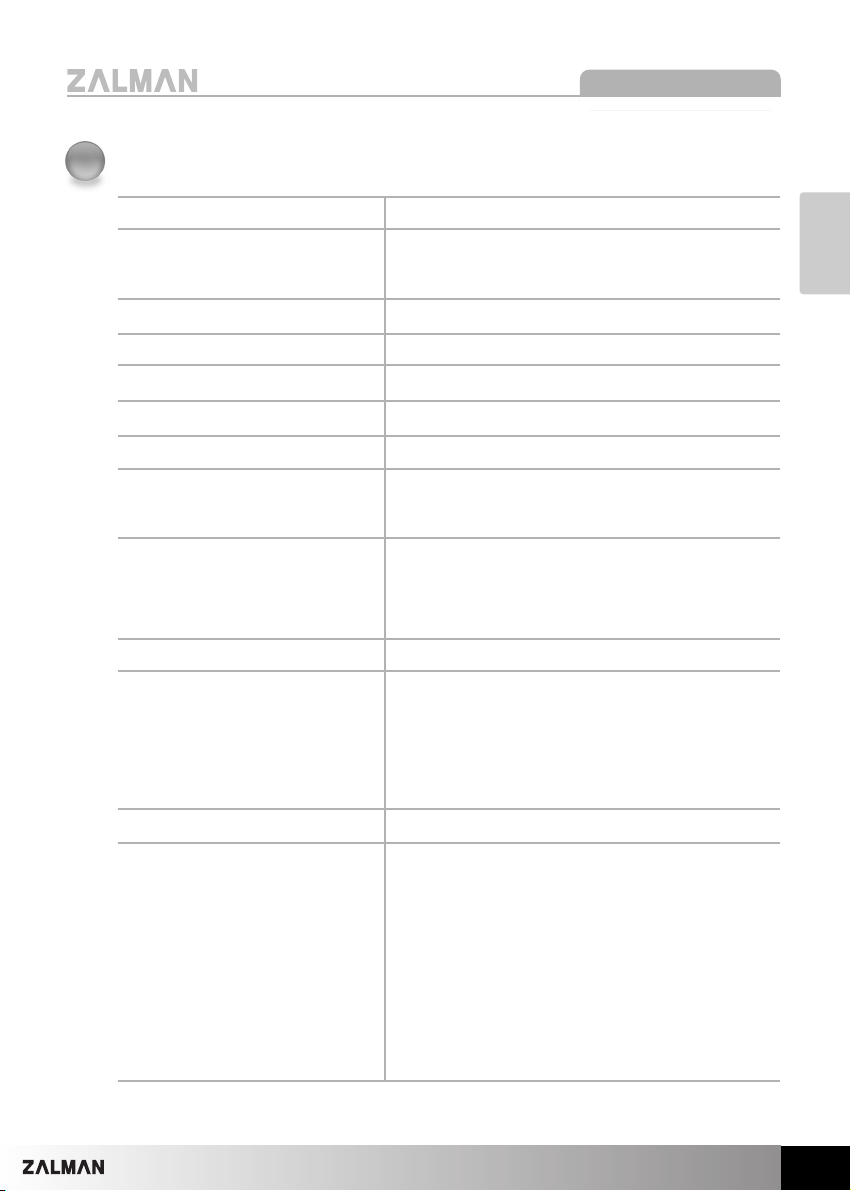
Specifications
Enclosure Type Desktop
Dimensions (DXWXH) 460mm X 435mm X 160mm
(18.1” X 17.1” X 6.3”)
Weight 6.8kg (14.9lb)
Material Aluminum
Motherboard Compatibility Standard ATX / micro ATX
Power Supply Compatibility Standard ATX / ATX12V
PCI/AGP Card Compatibility Full Size
Drive Bays 5 X 3.5" Internal Drive Bays
1 X 5.25" External Drive Bay
Cooling Components Rear Panel : 2 X 80mm Exhaust Fans
Bottom Panel : 1 X 80mm Exhaust Fan
Side Panel : 1 X 92mm Exhaust Fan
Expansion Slots 7 Slots
Front I/O Ports 2 X USB Ports
1 X IEEE1394(FireWire) Port
1 X Microphone
1 X Headphones
Available Colors Silver / Black
LCD Screen Size : 7" Wide LCD
Screen Ratio : 15:9
Maximum Resolution : 1024 x 768
Screen Output : D-Sub
Power Input : 12V DC
Touch Screen
ZPD (Zero Pixel Defect) LCD
Page 6

6
The design and specifications of this product may change without prior notice to enhance its quality.
HD160XT Plus
4
Front Panel Buttons & I/O Ports
① Remote Control Receiver
② System Power Indicator
③ Power Button
④ iMON Control Buttons
⑤ AUDIO (Headphones, Mic) Port
IEEE1394 (FireWire) Port
USB Port
⑥ Card Reader Slot (MS/Pro/Duo, CF/Micro Drive, MMC, SD,SM)
⑦ Volume Control / Mute
⑧ ODD Tray OPEN / Close
①
②
③
④
⑧
⑦
⑥
⑤
MCE CLOSE LAUNCHER BLACK Up ENTER
START MENU TASK.S/W Left Down Right
Page 7
7
English
The design and specifications of this product may change without prior notice to enhance its quality.
HD160XT Plus
5
Installation Guide
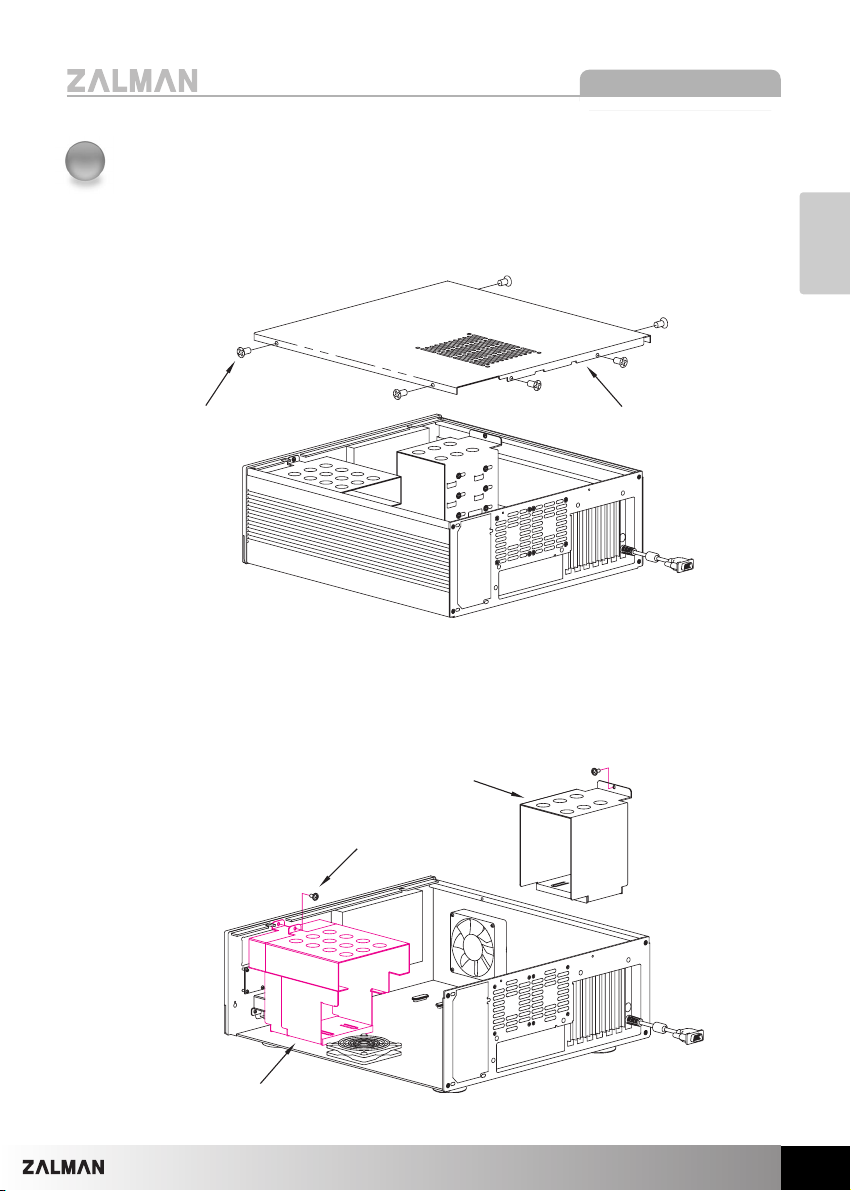
(1) Opening the Enclosure
To remove the Top Panel of the enclosure, unscrew the six Bolts (FH M3x6).
(2) Removing the ODD and HDD Chassis
Remove the Bolts (PWH M4x5), and horizontally pull the ODD and HDD Chassis
approximately 15mm (0.6inch) away from the Front and Side Panels, then lift them
out of the enclosure.
Bolt (FH M3x6)
Top Panel
HDD Chassis
Bolt (PWH M4x5)
ODD Chassis
Page 8
8
The design and specifications of this product may change without prior notice to enhance its quality.
HD160XT Plus
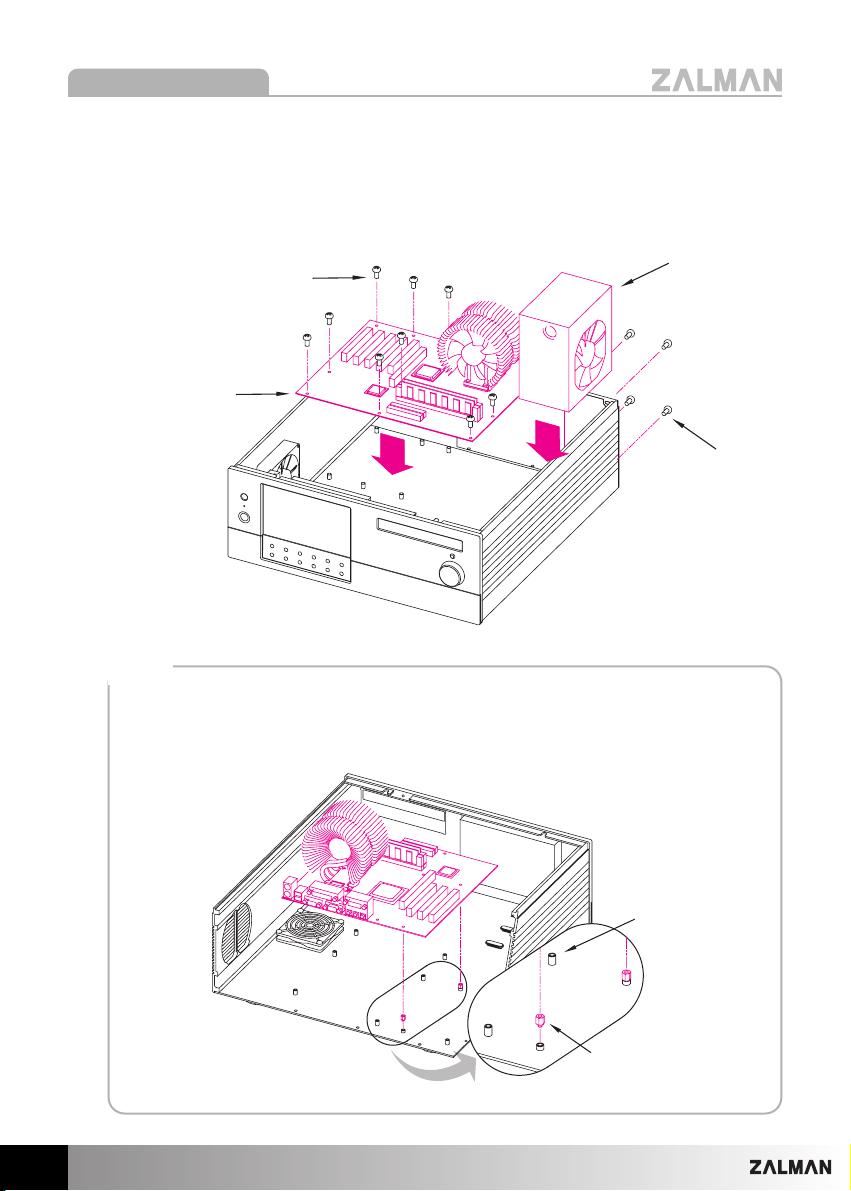
(3) Assembling the Motherboard and Power Supply
Mount the motherboard and power supply by using appropriate bolts. Mount the computer
components (CPU, VGA, RAM etc.) onto the motherboard.
To mount a microATX motherboard, first install the two enclosed microATX
Stand Offs and align their height with the ATX Stand Offs.
Note)
Bolt (PWH M3x5)
Motherboard
Power Supply
Bolt (PH #6-32X6)
ATX Stand Off
microATX Stand Off
Page 9

9
English
The design and specifications of this product may change without prior notice to enhance its quality.
HD160XT Plus
(4) Installing 5.25 and 3.5 Drives
(1) Install the 5.25” drive (ODD) and 3.5” drive (HDD) onto the ODD and HDD Chassis
with the appropriate bolts.
(2) Slide the ODD and HDD Chassis onto the enclosure’s Front Panel and Side Panel,
then secure them onto the panels with the Fixing Bolts(PWH M4x5).
This product is provided with one 5.25
bay and five 3.5 bays.
For optimal HDD cooling, install in the order mentioned in the diagram below.
Note)
Bolt (PWH M4x5)
Damper
Bolt (PWH M3x5)
Bolt
(PH #6-32x10)
OODDDD ((55..2255””))
HHDDDD--⑤⑤((33..55””))
CCaarrdd RReeaaddeerr
FFrroonntt II//OO
HHDDDD--④④((33..55””))
HHDDDD--②②((33..55””))
HHDDDD--③③((33..55””))
HHDDDD--①①((33..55””))
Page 10
10
The design and specifications of this product may change without prior notice to enhance its quality.
HD160XT Plus
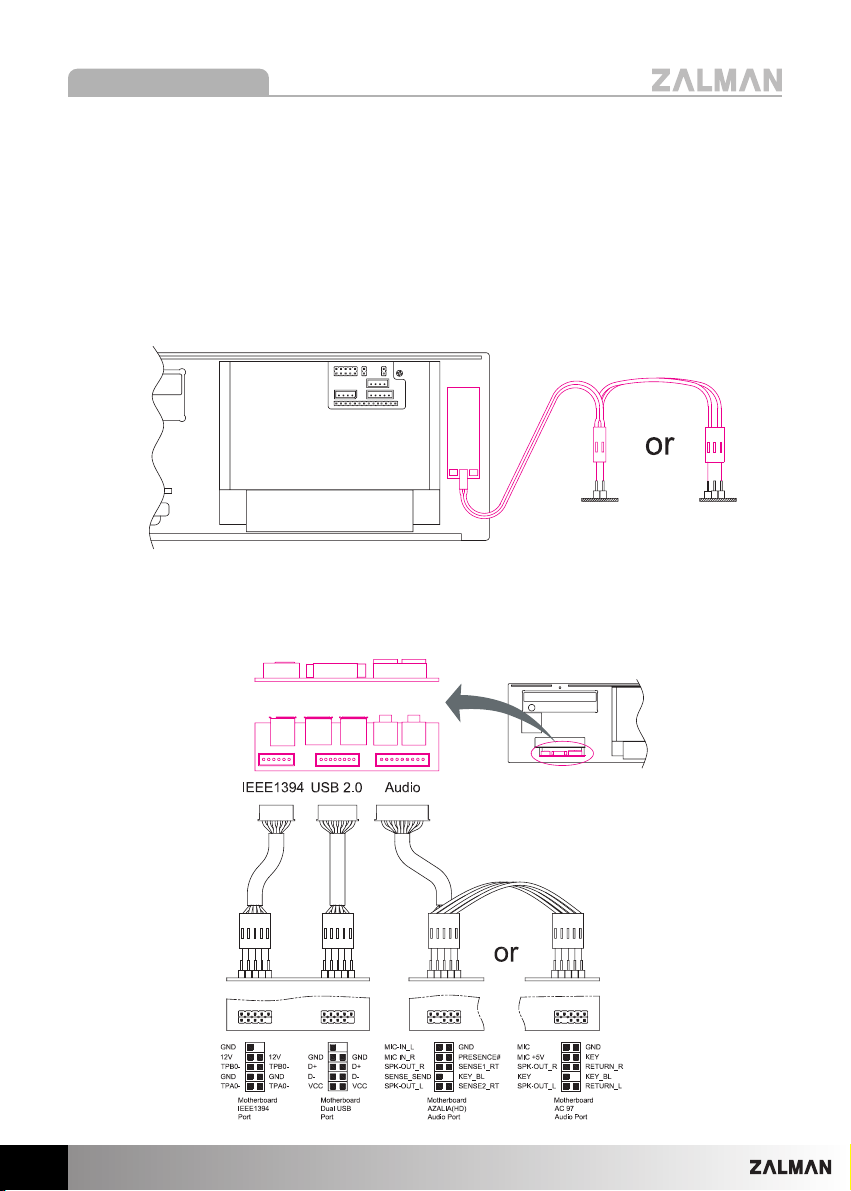
(5) Connecting the Cables
1) Power and Data Transmission Cables
Connect the Power and Data Transmission Cables (IDE or SATA) required for the HDD,
ODD, FDD, VGA etc.
2) Power LED Cable
Connect the Power LED Cable (2-Pin or 3-Pin) to the motherboard’s Front Panel Port
(refer to the motherboard’s manual).
3) Front I/O Cable
Connect the USB Cable, IEEE1394(FireWire) Cable, and Audio Cable to the
motherboard (Refer to the motherboard’s manual).
PPoowweerr LLEEDD CCaabbllee
MMootthheerrbbooaarrdd
FFrroonntt PPaanneell PPoorrttss
Page 11

11
English
The design and specifications of this product may change without prior notice to enhance its quality.
HD160XT Plus
4) LCD and Card Reader PCB Cables
① Connect the D-SUB (RGB) Cable to the system’s (VGA or motherboard) D-SUB
(RGB) Port.
② Connect the Dual USB Cable that is connected to the USB Cable of the LCD and Card
Reader PCB to the motherboard’s USB Port.
③ Connect the System Power Switch Cable (2-Pin) with the motherboard’s Front Panel
Port (Refer to the motherboard manual).
④ Connect the Standby Power Cable (20-Pin or 24-Pin) to the motherboard and power
supply.
If the individual USB connectors of the LCD and
Card Reader PCB get disconnected from the Dual
USB Cable, the VCC (red) wires MUST be aligned
when reconnecting the individual USB connectors
of the LCD and Card Reader PCB to the Dual USB
Cable. Incorrect alignment will cause a short circuit,
damage the components, and can be a fire hazard.
CAUTION)
Red
Red
M/B
PSU
Page 12
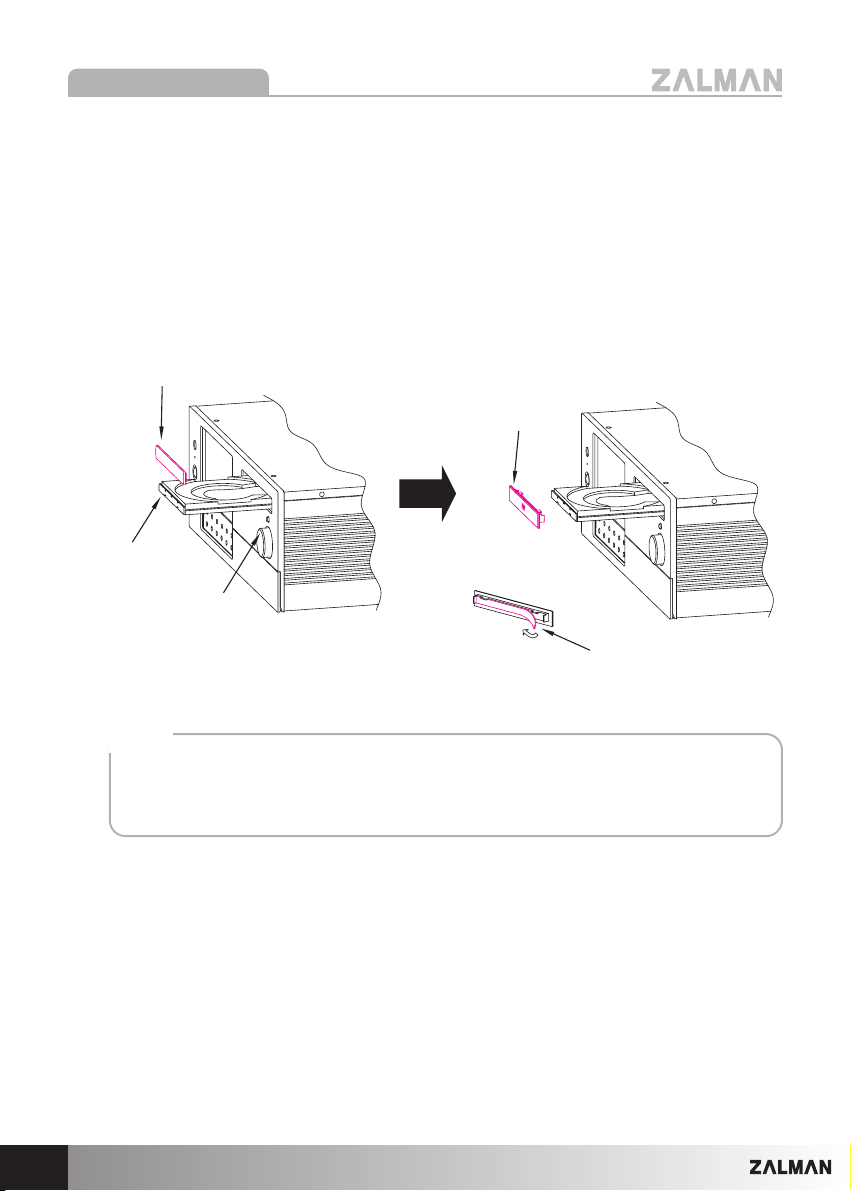
If you are facing difficulties in removing the plastic ODD Bezel, please contact the place
of purchase or the ODD manufacturer.
Note)
(6) Attaching the Aluminum ODD Bezel
1)Connect power to the assembled system. Press the ODD Eject Button to eject the ODD Tray.
2)Remove the Plastic ODD Bezel.
3)Remove the Tape Film on the back side of the Aluminum ODD Bezel, and stick the Aluminum
ODD Bezel onto the ODD Tray.
((77)) IInnssttaalllliinngg tthhee MMuullttiimmeeddiiaa SSooffttwwaarree
Refer to the enclosed iMON Quick Guide manual to install the software.
Plastic ODD Bezel
Aluminum ODD Bezel
ODD Tray
ODD
Eject Button
Tape Film
12
The design and specifications of this product may change without prior notice to enhance its quality.
HD160XT Plus
Page 13
13
English
The design and specifications of this product may change without prior notice to enhance its quality.
HD160XT Plus
6
Recommended Use
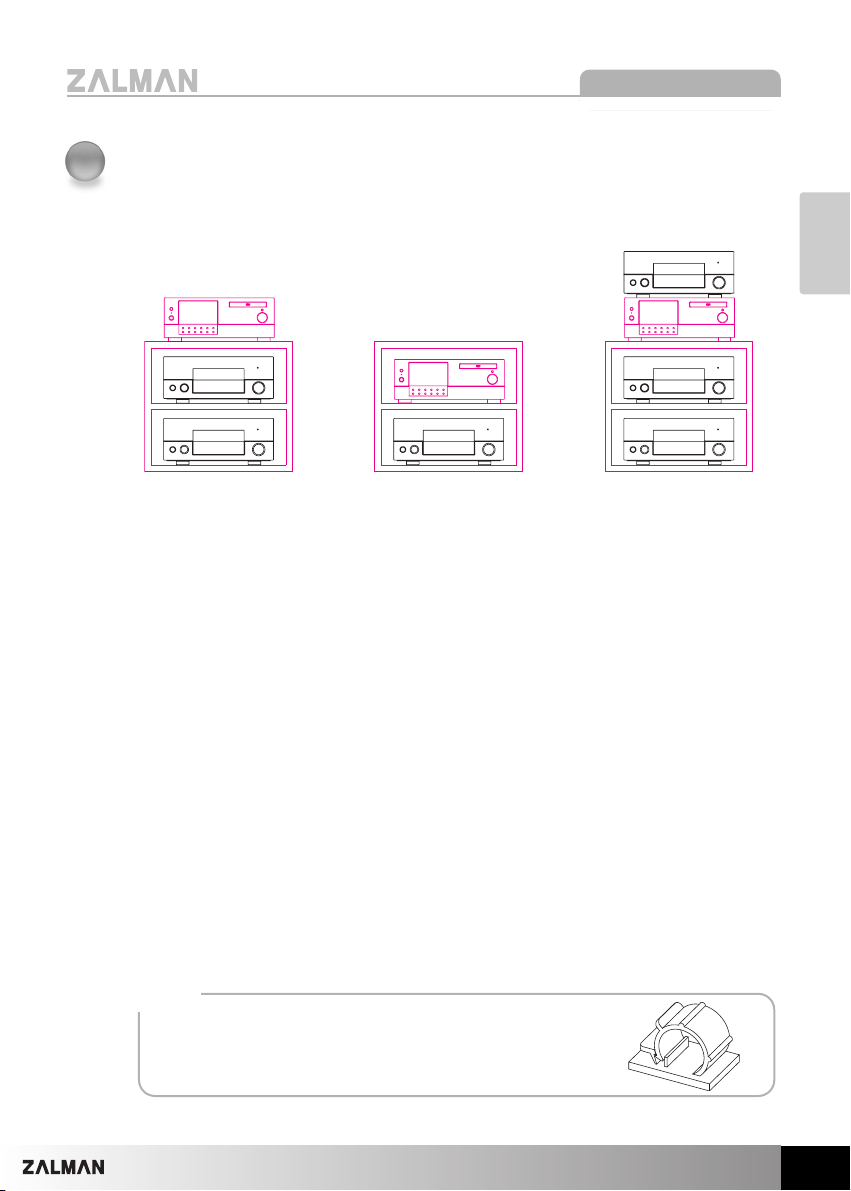
(1) Recommended Placement for the HD160XT Plus
(2) Management of the System’s Internal Cables
The internal airflow of the system has a significant impact on the cooling of the
computer components. Even though the design of the enclosure itself is very important,
organized management of internal cables is the best method for optimizing internal
airflow. Pay special attention to make sure that the air vents and intake/exhaust fans
are not blocked by the cables.
Placement of this system on a well-ventilated area (good intake of cold air and
release of hot air) allows efficient cooling of computer components even in low RPM
mode, for ultra quiet operation. The noise level of the power supply (main factor of
noise emission) will also significantly decrease due to better cooling efficiency.
There must be good front to back airflow when placing the HD160XT Plus in cabinets.
When the Top Panel’s vent is opened, placement of other devices above the
HD160XT Plus can hinder CPU cooling performance.
Manage cables with the enclosed Clamps, and fix
them onto the Bottom panel.
Note)
(O) (O) (X)
Page 14

14
The design and specifications of this product may change without prior notice to enhance its quality.
HD160XT Plus
(3) Recommended Computer Components for an Ultra Quiet Home Theatre PC
CPU : Any CPU on the market
CPU Cooler : Ultra Quiet CPU Cooler with great cooling performance
VGA : VGA card that is either equipped with an Ultra Quiet VGA cooler or is capable of
being equipped with an Ultra Quiet VGA cooler
VGA Cooler : Ultra Quiet VGA Cooler
Power Supply : Power Supply equipped with a 120mm fan (HD160XT Plus has a
dedicated Air Vent for power supplies equipped with a 120mm fan)
Motherboard : Standard Full-ATX motherboard with no fans
Northbridge Cooler : Fanless Northbridge cooler
Recommended Zalman products for the HD160XT Plus
Note)
CNPS 9500 VF1000 LED VNF100 ZM600-HP ZM-NBF47
 Loading...