


User
’’
s Manual
Zalman Tech Co., Ltd.
CNPS2005-Plus
CNPS3000-Plus
CNPS3100-Plus
CNPS3100-GP
(Gold Plus)
http://www.zalman.co.kr E-mail:zalman@zalman.co.kr
User
’’
s Manual
Zalman’s CNPS2005-Plus / 3000-Plus / 3100-Plus / 3100-GP coolers include a new fan
assembly (FB123) with an adjustable bracket and a bigger fan for increased cooling
performance. The new fan assembly can be positioned to provide optimal cooling
in almost any motherboard/case configuration and allows an additional fan to be
installed for cooling a NP VGA Card.
1. Features :
1) Zalman’s CPU Coolers do not generate noise and vibration in Silent Mode.
2) The heat dissipating material of the Flower HeatSink (FHS) is 100% Aluminum or Copper.
3) Separation of the FHS from the CPU fan prevents transfer of the fan's vibration to the CPU.
4) By utilizing a 92mm fan, both the CPU and the motherboard chipset are cooled.
5) The cooling fan can be mounted at any desired location, making it compatible with virtually al l
computer cases and motherboards (Note: computer cases that have the power supply covering the
CPU cannot be used).
6) CPU can be cooled to a temperature sufficiently below the temperature required by the CPU
manufacturer in Silent Mode.
7) Zalman’s CPU Coolers enable very stable operation of a CPU in an OVERCLOCKED environment.
* If you try OVERCLOCKING, please make sure that the fan is in Normal Mode.
* Zalman Tech. Co., Ltd. is not responsible for any damage to systems or CPUs caused by CPU
OVERCLOCKING.
2. Components :
1) FHS (Flower HeatSink) : ZM6548BC-XXXX 2) NP FAN & Bracket : FB123
3) Thermal Grease 4) Screw bolts (Inch-sized/mm-sized bolts)
5) Clip 6) One Noiseless Connector RC56
7) Heatsink Installation Tool (Clip Mate)
3. Specifications :
1) FHS
- 1 -
The specifications of the cooler may change without prior notice to improve the performance thereof.
CNPS2005-Plus, CNPS3000-Plus,
CNPS3100-Plus, CNPS3100-GP
(Gold Plus)
CNPS2005-Plus
ZM6548BC-Al
CNPS3000-Plus
ZM6548BC-AlCu
95~110(L) × 52(W) × 65(H)
2000~2100
CNPS3100-Plus
ZM6548BC-Cu
CNPS3100-GP
(Gold Plus)
ZM6548BC-Gold
Model
Spec.
Part No.
Dimensions (mm)
Dissipating Area (㎠㎠)
Base Material
Weight (g)
Thermal
Resistance
(℃/W)
Silent
Mode
Normal
Mode
Pure Aluminum
Pure Aluminum
+ Pure Copper
Pure Copper
with Gold Plating
Pure Copper
119
148
296 296
0.41
0.39
0.34
0.34
0.34
0.32
0.26 0.26

- 2 -
The specifications of the cooler may change without prior notice to improve the performance thereof.
2) Fan
① Dimensions : 92(L) X 92(H) X 25(W)mm ② Weight : 85g
③ Speed : Silent mode :1400 RPM ± 10% ④ Noise : Silent mode : 20.0dB ± 10%
Normal mode : 2800 RPM ± 10% Normal mode : 35.0dB ± 10%
⑤ Bearing Type : 2-Ball
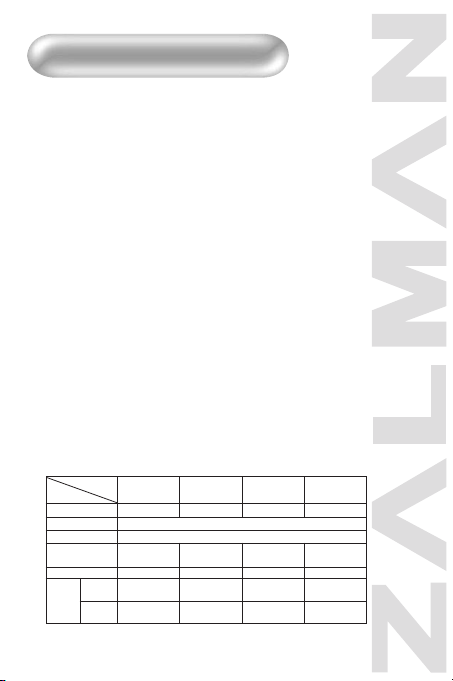
4. Compatible with Socket Type CPUs, including :
AMD Athlon (Socket A), AMD Duron, INTEL Pentium III, INTEL Celeron, VIA C3
5. Please keep the following in mind for a noiseless computer :
1) For a noiseless computer, a Noise Prevention (NP) Power Supply, a NP HDD, a NP CD-ROM and
a NP VGA Card should be used together with this cooler.
2) Zalman affixes a Computer Noise Prevention System (CNPS) Mark to each of its parts and
components used for noiseless computers.
3) For a high-performance NP VGA Card, it is preferable to use a VGA FHS.
4) When buying a new VGA Card, it is recommended to buy a VGA Card without a fan.
6. Patent Applications :
◇ Korean Patent Application No. 01-11056
◇ Patent Applications Pending in over 20 nations around the world, including the U.S., EU, and Japan
Exploded drawing of the product
< Fig. 1 >
CPU & Socket
FHS
Clip
Fan
Br123
Fan Fix 1
FB123
}
CNPS2005-Plus
CNPS3000-Plus
CNPS3100-Plus
CNPS2005-GP
UP to 1.0㎓
1.4㎓
UP to 1.2㎓
UP to 1.33㎓
(1500+)
UP to 1.53㎓
(1800+)
UP to 1.33㎓
(1500+)
UP to 1.67㎓
(2000+)
UP to 1.53㎓
(1800+)
Over 2.13㎓(2600+)
Over 2.13㎓(2600+)
UP to 1.53㎓
(1800+)
UP to 1.6㎓
(1900+)
UP to 1.73㎓
(2100+)
UP to 1.6㎓
(1900+)
UP to 2.13㎓
(2600+)
UP to 1.73㎓
(2100+)
UP to 1.73㎓
(2100+)
1.4㎓
INTEL,VIA AMD
Pentium
III,
C3
Duron Athlon Athlon XP
Athlon XP
(T-Bird)
Supports all
current CPU
clock speeds
Supports all
current CPU
clock speeds
CPU Type
Model
Silent mode
Normal mode
Silent mode
Normal mode
Silent mode
Normal mode
Silent mode
Normal mode

- 3 -
The specifications of the cooler may change without prior notice to improve the performance thereof.
Installation
1. Installation of FHS
1) Spread the thermal grease thinly onto the CPU core’s surface that comes in contact with the FHS
as shown in FIG. 2.
2) Install the clip across the FHS as shown in FIG. 2
3) Hook the short leg of the clip onto the socket first, then hook the long leg on by pushing the hole
in the leg with the heatsink installation tool or an ordinary screw driver as shown in FIG. 3.
4) If you need to reinstall the FHS, remove the clip by inserting the heatsink installation tool into
the clip’s hole and pushing outward, as shown in FIG. 4, or inserting an ordinary flathead screw
driver into the clip’s slit and pushing outward, as shown in FIG. 5.
< Fig. 2 > < Fig. 3 >
< Fig. 4 > < Fig. 5 >
Thermal Grease

- 4 -
The specifications of the cooler may change without prior notice to improve the performance thereof.
< Fig. 6 >
< Fig. 7 > < Fig. 8 >
2. Installation of Fan Bracket
1) As shown in FIG. 7, you can freely place the fan and the bracket in any desired location with
the FB123. Therefore, place the fan in an ideal location as shown in FIG. 6. You can also place an
additional fan on the FB123 to maximize the cooling of the VGA Card as shown in FIG. 8.
2) Screw on the FB123 firmly at the VGA Card slot hole and the expansion slot hole next to it with
the included bolts. (Caution! The included bolts are of two types : inch-sized and mm-sized.
Use the appropriate type for the slot holes.)

- 5 -
The specifications of the cooler may change without prior notice to improve the performance thereof.
For more information on this product, visit our homepage at www.zalman.co.kr.
3. Setting the Fan Operation Mode
1) Silent Mode
① Connect the noiseless connector (RCXX) to the FB123 fan’s 3-pin connector. Then, connect
the noiseless connector to the motherboard’s CPU fan connector (3-pin) as shown in FIG. 9.
Note 1) The separate speed noiseless connector will be on sale afterwards (See FIG. 10). Refer to
the manual when using it.
② Turn on the computer after the assembly is finished.
③ If analarm sound is generated to indicate that the rotation of the CPU fan is slow after the system
monitoring program starts to operate during booting of the computer, please unplug the noiseless
connector from the fan and set “CPU Fan Detected” to “Disable” in the BIOS settings, or set the
slowest rotation of the CPU fan in the system monitoring program, to less than or equal to
1500 RPM. Then, reconnect the noiseless connector to the CPU fan connector.
Note 2) Some motherboards do not boot if the RPM of the CPU fan is not measured. In this case,
please boot the computer with the Cooler fan in Normal Mode, i.e. after removing the
noiseless connector. If the BIOS settings are updated, Silent Mode can be used by
reconnecting the noiseless connector. For information on updating the BIOS, please refer
to the motherboard manufacturer’s web site.
< Fig. 9 > < Fig. 10 >
Variable Speed Noiseless Connector
Motherboard
Noiseless Connector
CPU fan Connector (3-pin)
Fan Connector(3-pin)
(2) Normal Mode
① Connect the 3-pin connector of the fan directly
to the fan connector (3-pin) of the motherboard
as shown in FIG. 11.
② Turn on the computer after the assembly is finished.
③ If an alarm sound is generated to indicate that
the rotation of the CPU fan is slow after the
system monitoring program starts to operate
during booting of the computer, please set
“CPU Fan Detected” to “Disable” in the BIOS
settings, or set the slowest rotation of the CPU fan
to less than or equal to 1500 RPM.
< Fig. 11 >
Motherboard
CPU fan Connector (3-pin)
Fan Connector(3-pin)
 Loading...