

Page 1

Owner’s Guide
Page 2

Congratulations !
You are the proud owner of a Yamaha PortaTone. Your PortaTone is a
high-quality musical instrument that incorporates advanced Yamaha digital
technology and many versatile features. In order to obtain maximum per
formance and enjoyment from your PortaTone, we urge you to read this
Owner’s Guide thoroughly while trying out the various features described.
Keep the Owner’s Guide in a safe place for later reference.
CONTENTS
BEFORE YOU BEGIN
Power Supply.........................................................1
Setting Up the Music Stand
Maintenance
NOMENCLATURE.........................................................2
Top Panel Controls.................................................3
Rear Panel Connectors..........................................3
SELECTING AND PLAYING VOICES...........................4
SUSTAIN........................................................................5
DUAL
.............................................................................
TRANSPOSE
THE SPLIT MODE
RHYTHM ACCOMPANIMENT.......................................7
AUTO ACCOMPANIMENT............................................9
Single Finger Accompaniment..............................9
Fingered Accompaniment
AUTO HARMONY
THE CHORD MEMORY...............................................11
Recording
Bank Playback
Chain Playback
SONG BOOK
MOVING UP TO MIDI
A Brief Introduction to MIDI
PSR-300M MIDI Settings & Functions
TROUBLESHOOTING.................................................17
SPECIFICATIONS
FINGERING CHART....................................................19
“SONG BOOK” SCORES
.................................................................
.............................................................
...............................................................
..................................................
..................................
...........................................................
.........................................................
...................................
.......................................................
......................................................
.....................................................
..................................................
.................................
................
.......................................................
...........................................
10
11
11
12
12
13
14
14
15
18
23
1
1
1
5
5
6
"Sing,” “Happy Birthday to You," "Something," and "Edelweiss," included in the PSR-300M SONG BOOK, are published for Yamaha Corporation by Hal Leonard Publishing Corporation.
Page 3
BEFORE YOU BEGIN
Power Supply
Your PSR-300M will run either from a supplied power adap
tor or optional batteries. Follow the instructions below accord
ing to the power source you intend to use.
Using the supplied AC Power Adaptor
Plug the DC output cable firom the supplied Yamaha PA-3
AC Power Adaptor into the DC IN jack on the rear panel of the
PSR-3CX)M, then plug the AC Power Adaptor into a convenient
wall AC power socket.
The internal batteries are automatically disconnected when an
AC Power Adaptor is used. Disconnect the AC Power Adaptor
when not using your PSR-300M.
Jse the supplied Yamaha PA-3 AC Power Adaptor (also PA-4 or PA-
40 can be used) to power your instrument from the AC mains. Other
adaptors may cause serious damage to your PSR-300M.
Using BatteriOS (sold separately)
Six 1.5V D size (SUM-1 or R-20) or equivalent batteries
must first be installed in the battery compartment.
• Before replacing the batteries, make sure that the power is turned off.
During battery replacement the memory will be backed up for approxi
mately 1 minute.
1. Open the battery compartment cover located on the instru
ment’s bottom panel.
2.
Insert the six batteries, being careful to follow the polarity
markings on the cabinet.
3.
Replace the compartment cover, making sure that it locks
firmly in place.
'QilDCJ'QCZICD '
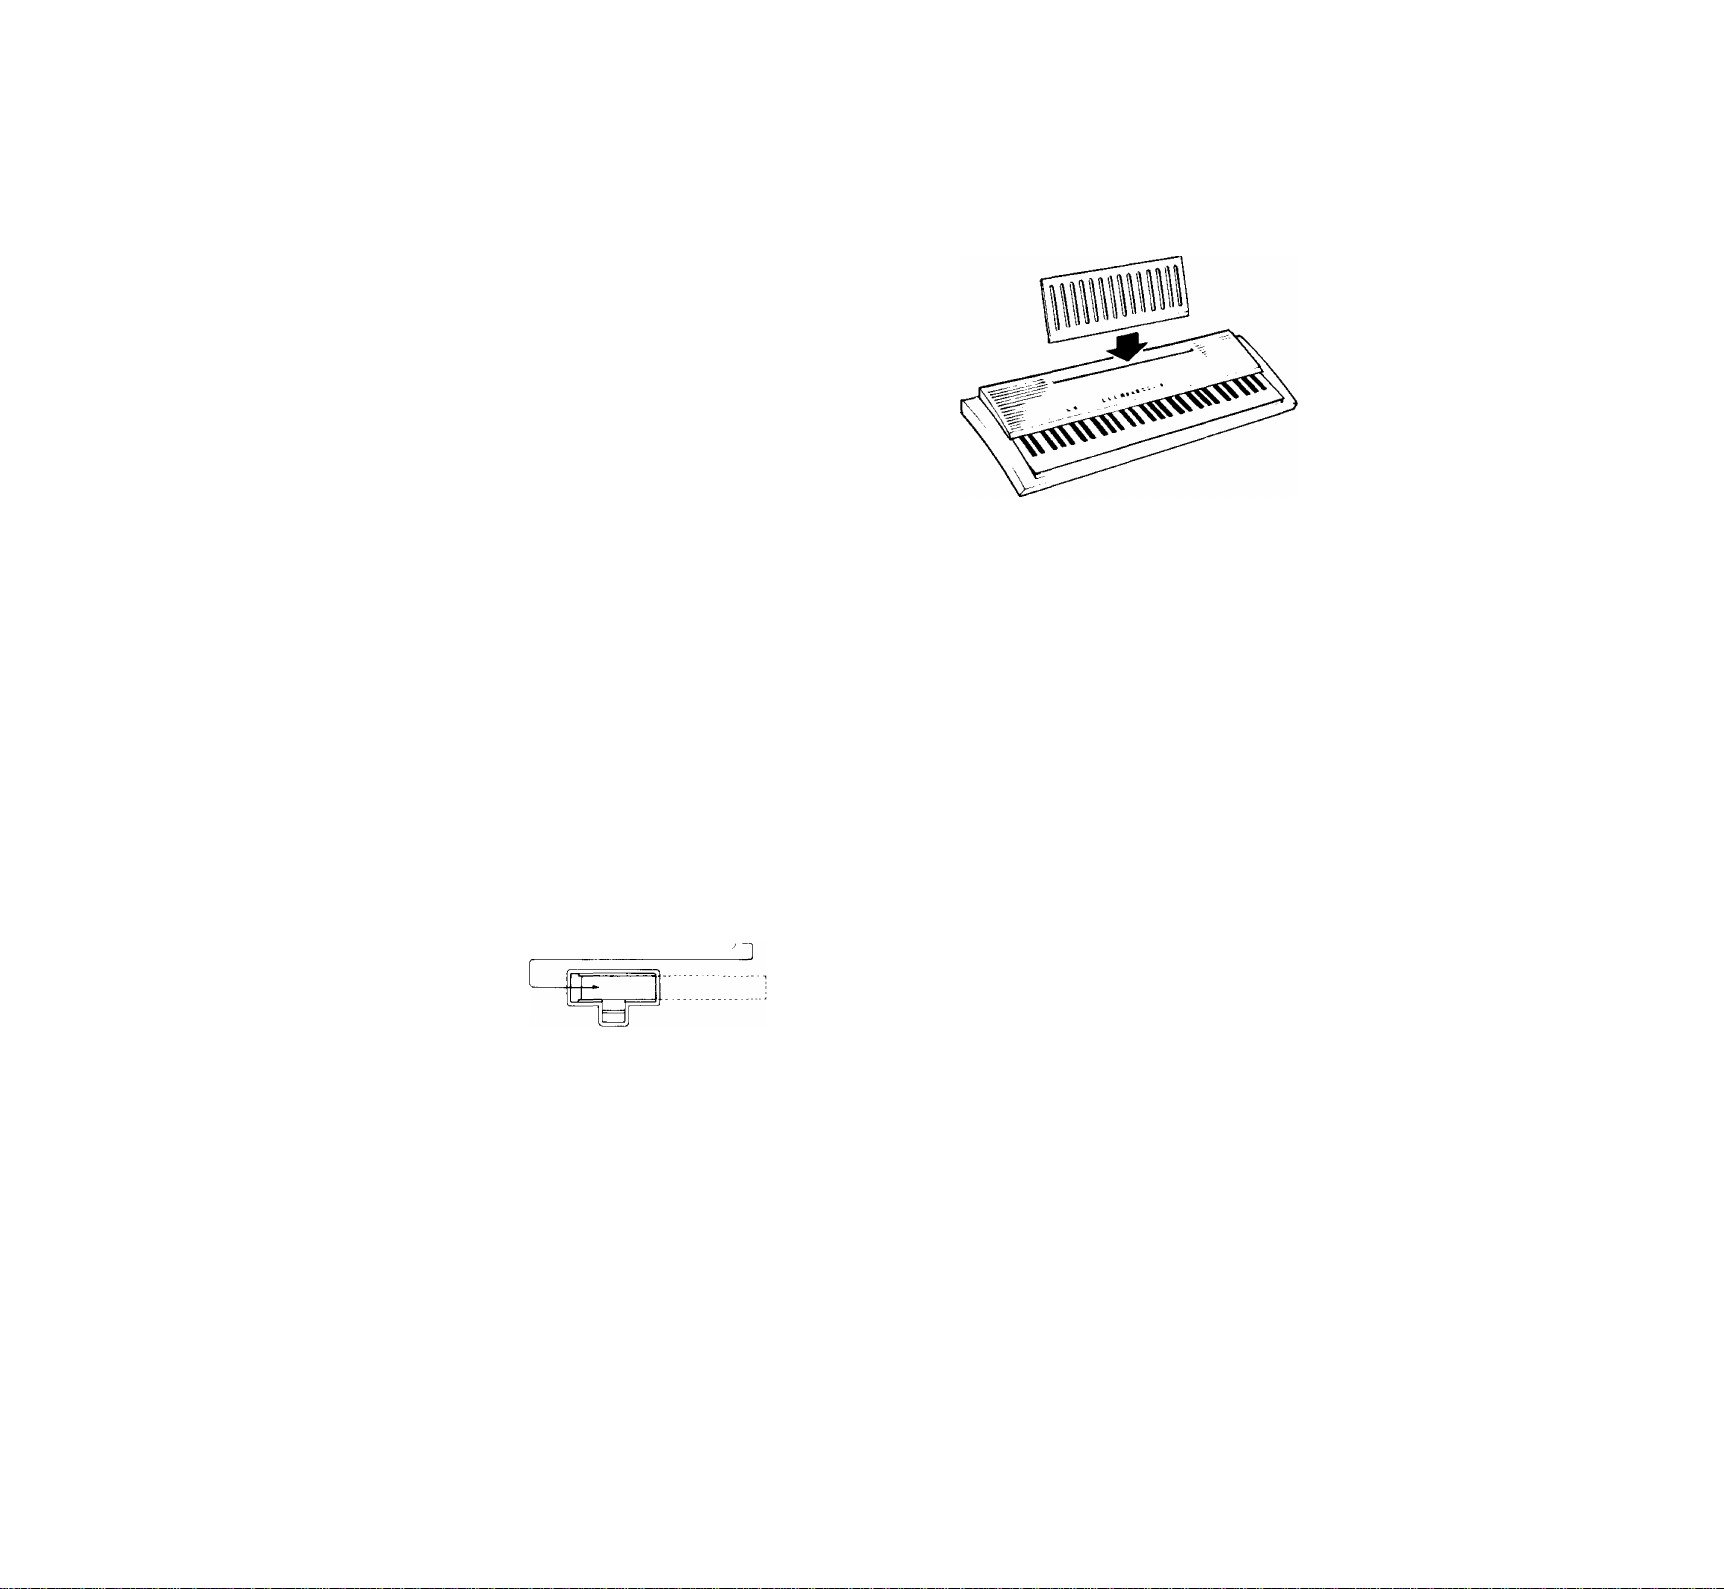
Setting Up the Music Stand
Insert the bottom edge of the music stand into the slot
located at the rear of the PSR-300M control panel.
Maintenance
• Location
Avoid exposure to direct sunlight or other sources of heat.
Never leave it inside a car where it can get very hot. It may
cause discoloration or deformation. Vibration, excessive
dust, cold, low or high humidity can also cause malfunction.
• Handling
Avoid rough handling. Don’t drop or jolt the PSR-3(XJM as
this can damage the internal circuitry. Pressing too hard on
keys or controls may lead to malfunctions. When cords are
plugged into the rear panel jacks, pay particular attention not
to apply excessive force to them since this may damage the
terminals.
• Cleaning
Clean the exterior with a soft, dry cloth. Using chemical
solvents will damage the finish.
Caution:
1. When the batteries run down, replace them with a complete
set of six new batteries. NEVER mix old and new batteries.
2. Do not use different kinds of batteries at the same time.
3. In case electrolyte has leaked into the battery compartment,
wipe it off completely before installing new batteries.
4. To prevent possible damage due to battery leakage, remove
the batteries from the instrument if it is not to be used for an
extended period of time.
Auto Power OFF
To prevent unnecessary battery drainage, the PSR-300M
features an Auto Power OFF function that automatically turns
the power OFF if the instrument is not used for approximately
10 minutes.
The Auto Power OFF function docs not operate when the
PSR-300M is powered from the supplied AC Power Adaptor, as
described above.
• Interference Through Electromagnetic Fields
Do not use your PSR-3(X)M close to television sets or other
equipment receiving electromagnetic signals as this could
cause interference noise in the other appliance.
• Service and Modifications
Your PSR-300M contains no user serviceable parts. Open
ing it or tampering with it in any way can lead to electrical
shock as well as damage. Refer all servicing to qualified
YAMAHA personnel.
YAMAHA is NOT responsible for damage caused by improper use.
Page 4
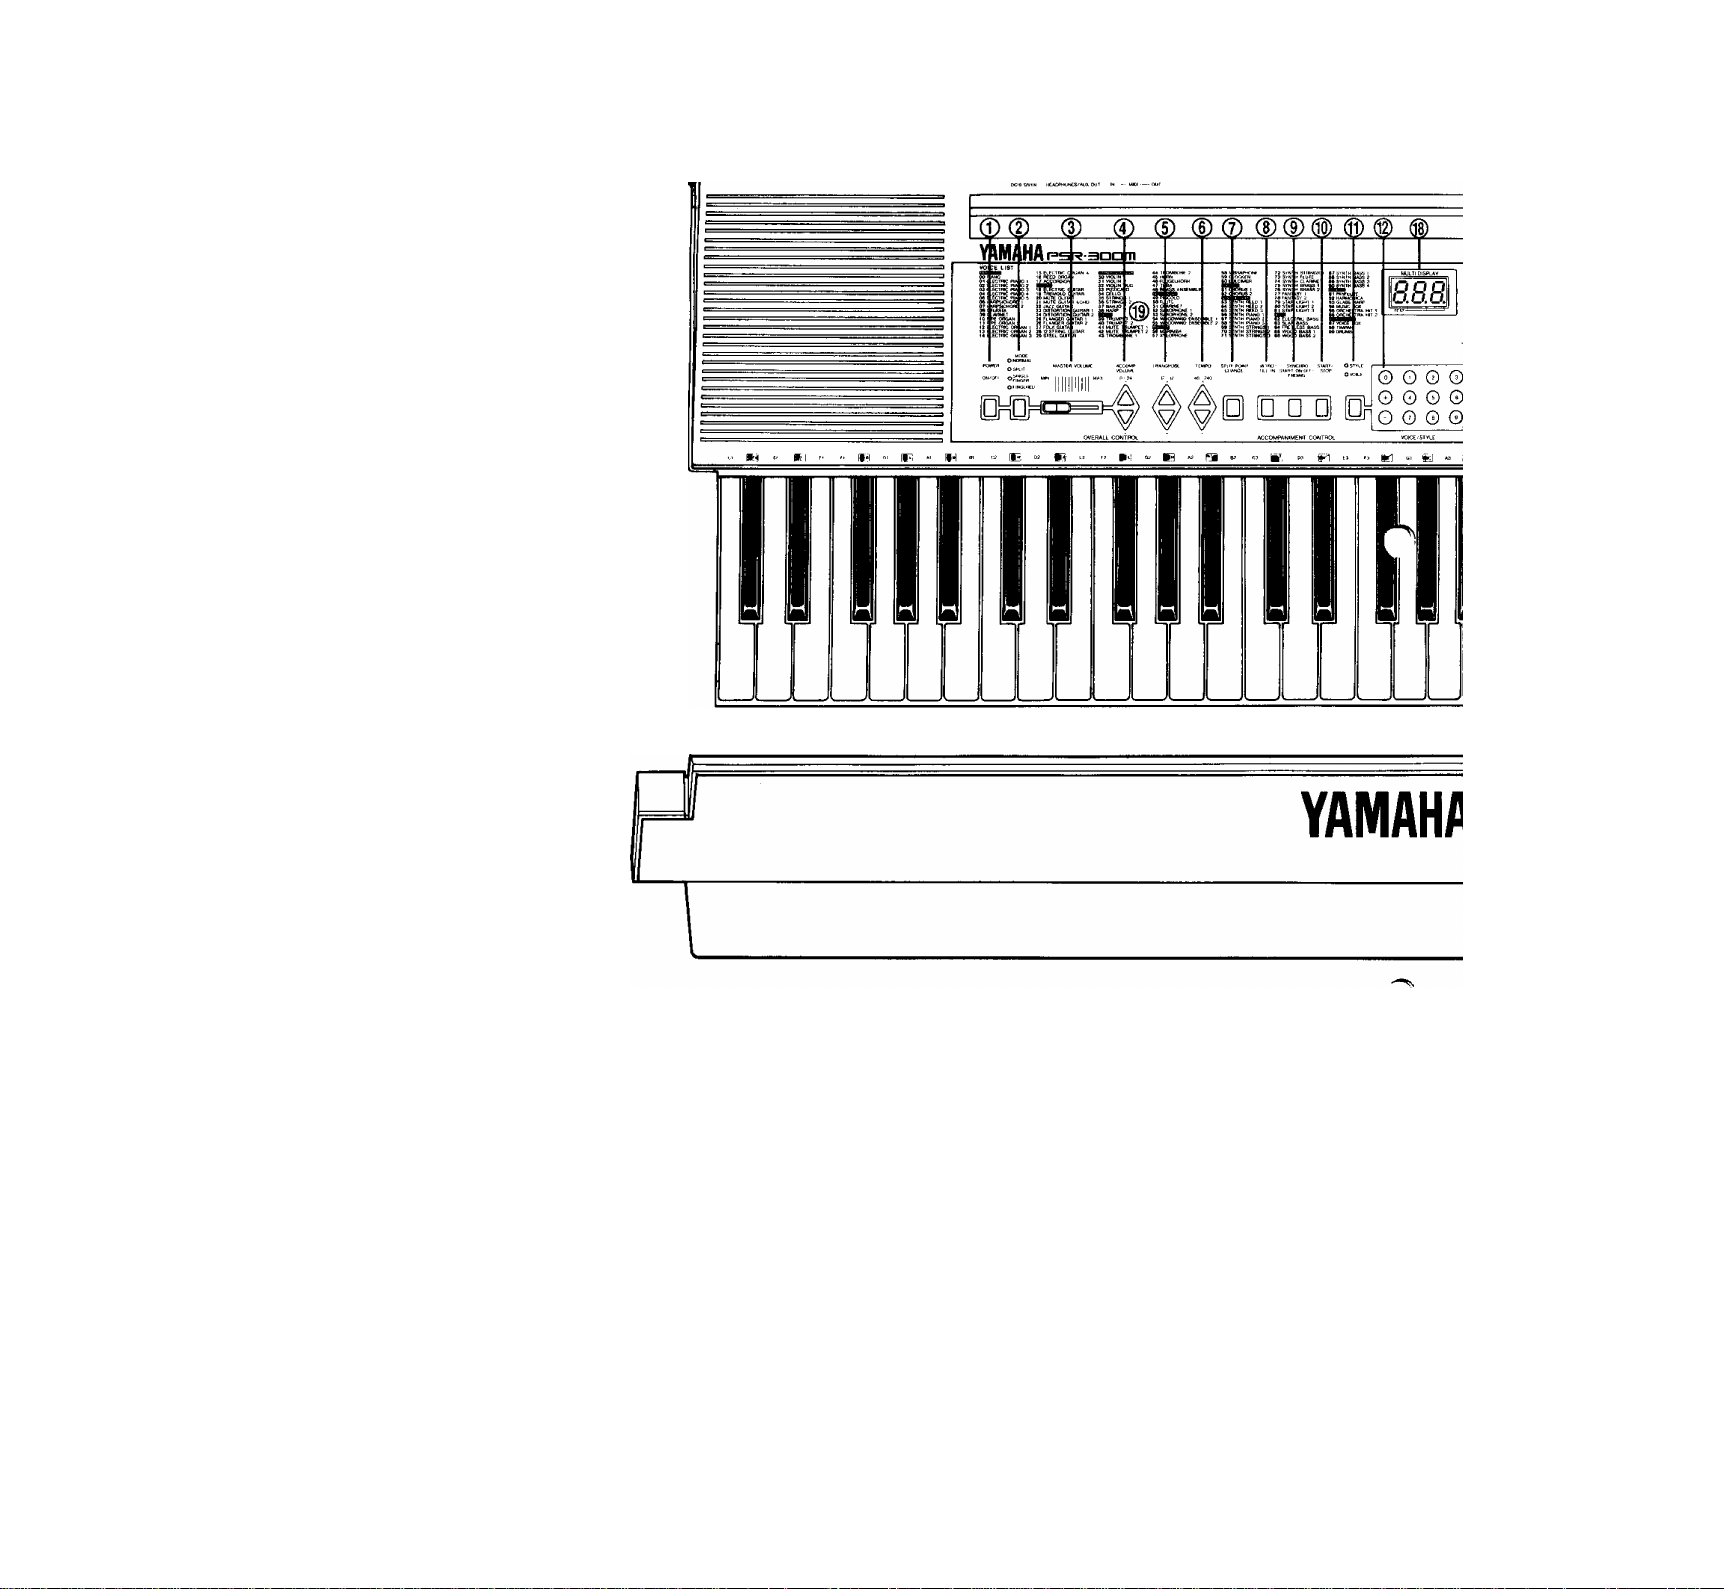
NOMENCUTURE
~rc3i_i[r;h~i f=lBsp3C3ns
Top Panel Controls
© [POWER] Button..............................................page 4
@ [MODE] Button....................................page 6, 9,10
@ [MASTER VOLUME] Control..........................page 4
© [ACCOMPANIMENT VOLUME] Buttons
...................................................................
® [TRANSPOSE] Buttons
® [TEMPO] Buttons...............................page 7,10,11
® [SPLIT POINT CHANGE] Button
® [INTRO/FILL IN] Button
® [SYNCHRO START/ENDING] Button
.....................................................
® [START/STOP] Button
...................................
........
.................
page7,8,9,10,12
..............
page 7, 8, 9,10,12
pages, 10
page 5
page 6,9,10
page 8,9,10,12
® [VOICE/STYLE] Button.........................page 4, 6, 7
® Numeric VOICE/STYLE Buttons
® [DUAL VOICE] Button................................page 5
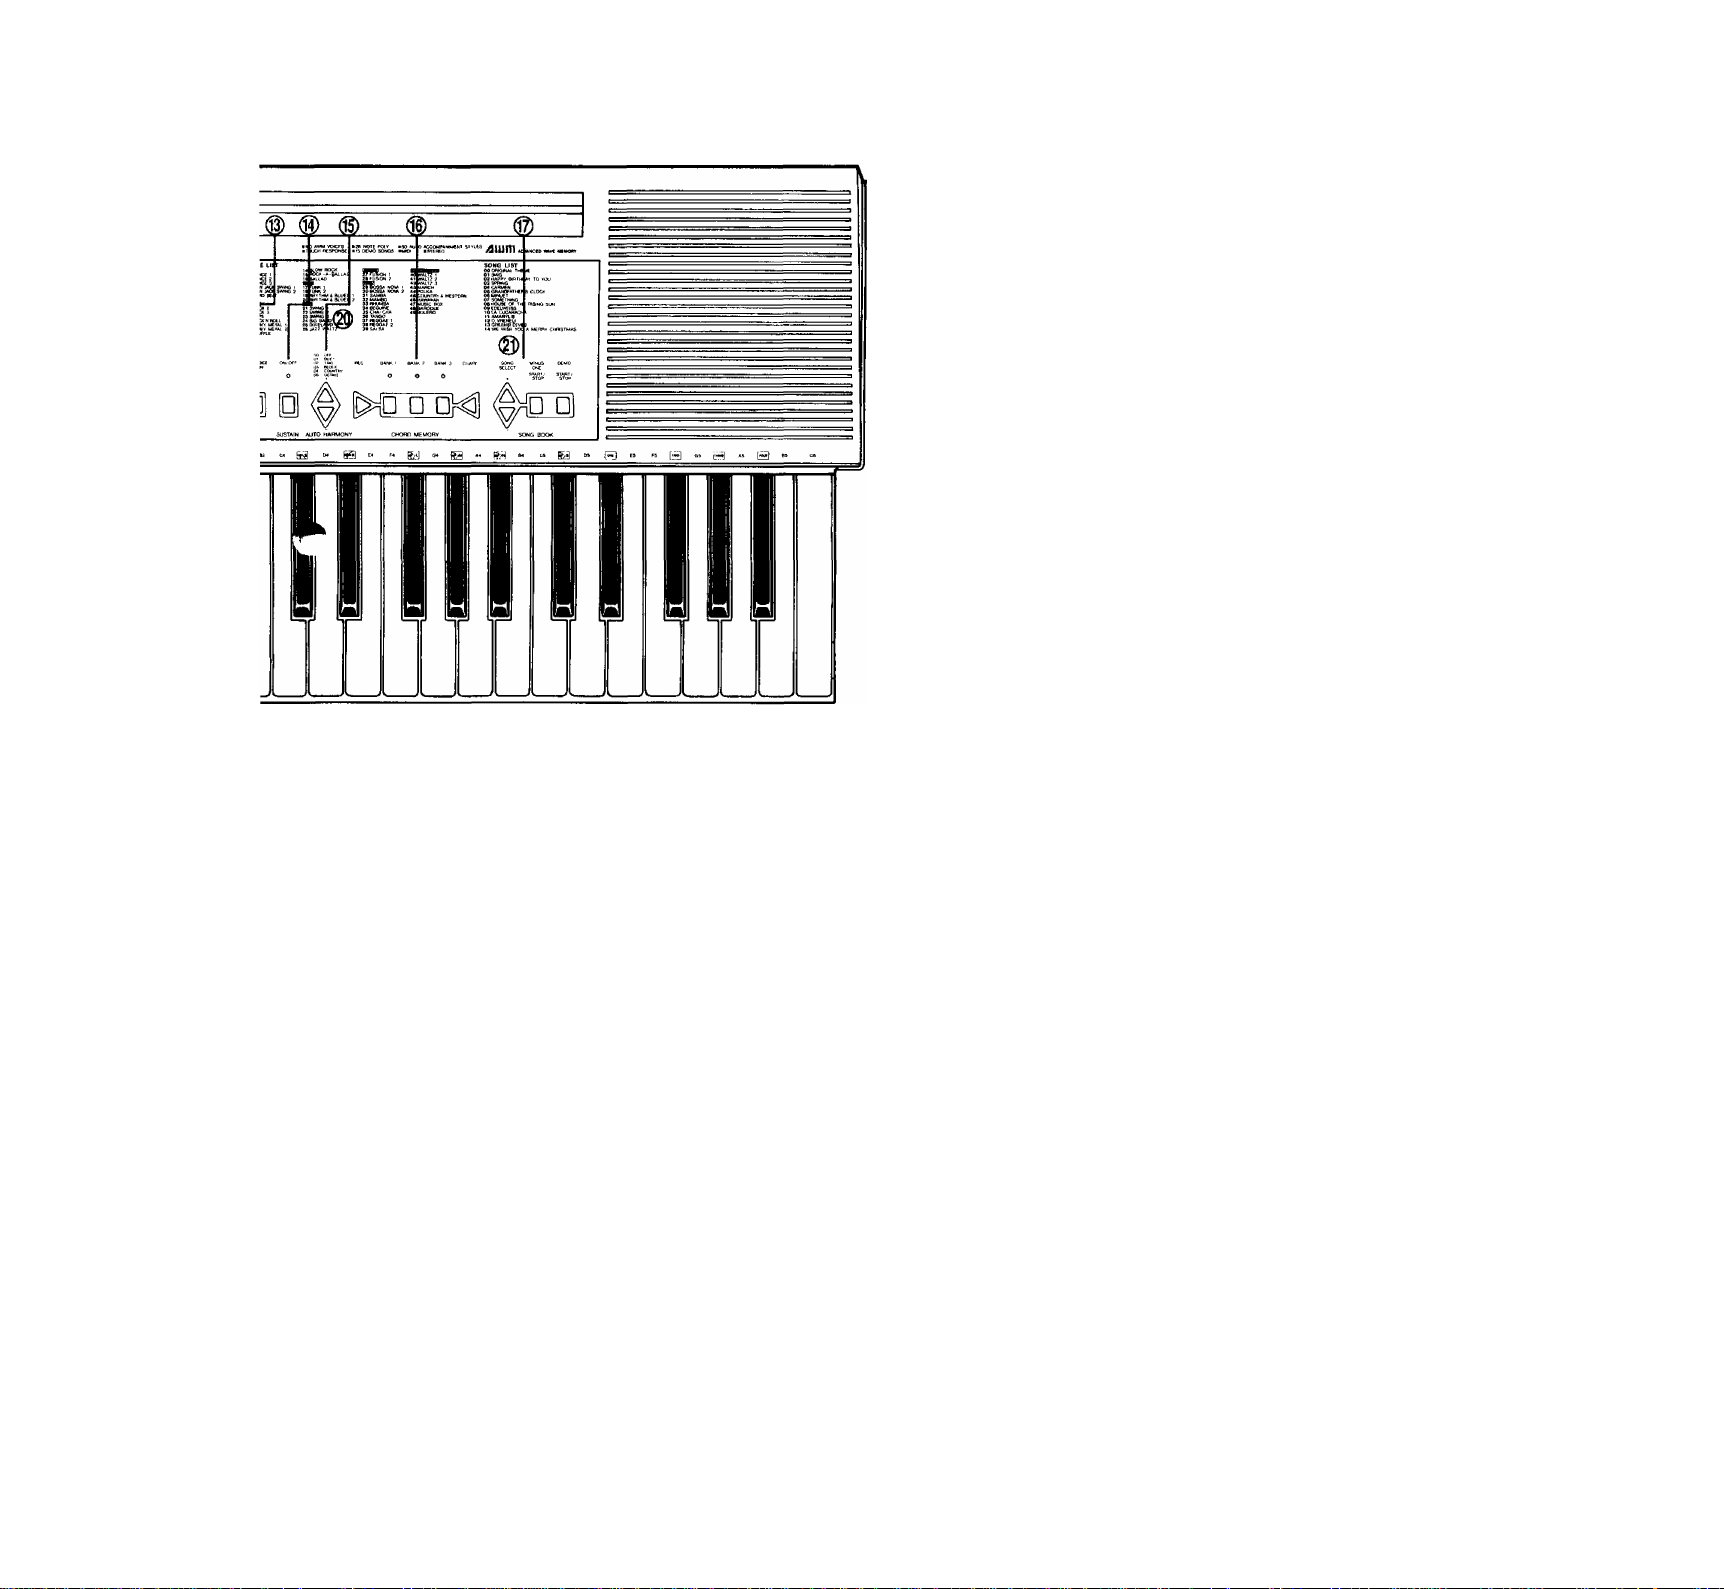
® [SUSTAIN] Button
® [AUTO HARMONY] Buttons......................page 11
® [CHORD MEMORY] Buttons
® [SONG BOOK] Buttons
® MULTI DISPLAY
©VOICE LIST..................................................page 4
©STYLE LIST
©SONG LIST
..................................................
..................................................
......................................
............... .......
..............................
.............
..........
page 4, 7
page 5
page 11,12,13
page 13,14
page 4 ~ 11,13
page7
page 13
Page 5
H EAtJVHOH fcSJ OC «M 2V II
© @ I
@ @
Hear Panel Connectors
® DC IN Jack
The DC output cord from the supplied Yamaha PA-3
AC Power Adaptor should be plugged in here when the
PSR-300M is to be powered from the AC mains supply
(refer to “Power Supply” on page 1 for more details).
® HEADPHONES/AUX, OUT Jack
A standard pair of stereo headphones can be plugged in
here for private practice or late-night playing. The internal
speaker system is automatically shut off when a pair of
headphones is plugged into the HEADPHONES jack. The
HEADPHONES/AUX. OUT jack can also be used to de
liver the output of the PSR-300M to a keyboard amplifier,
stereo sound system, mixing console or tape recorder.
MIDI IN and OUT Connectors
The MIDI IN connector receives MIDI data from an
external MIDI device which can be used to control the
PSR-300M. The MIDI OUT connector transmits MIDI
data generated by the PSR-300M (e.g. note and velocity
data produced by playing the keyboard).
More details on MIDI are given in “MOVING UP TO
MIDI” on page 14.
Page 6

SELEGING AND PLAYING VOICES
1. Press the [POWER] button to turn the power ON. The
MULTI DISPLAY will light when the power is ON.
5. The selected voice can now be played on the instrument’s
2. Slide the [MASTER VOLUME] control to a position
about half way between the “MIN” and “MAX” setting.
You can set this control for the most comfortable vol
ume level after you begin playing.
MASTER VOLUME
MIN I I I I I I I I I I I MAX
>
3. If the VOICE indicator is not lit, press the [VOICE/
STYLE] button once so that it does light. The number of
the currently selected voice will appear on the MULTI
DISPLAY when the VOICE indicator is lit.
O STYLE!
•voice
MULTI DISPLAY
nn
uu
O
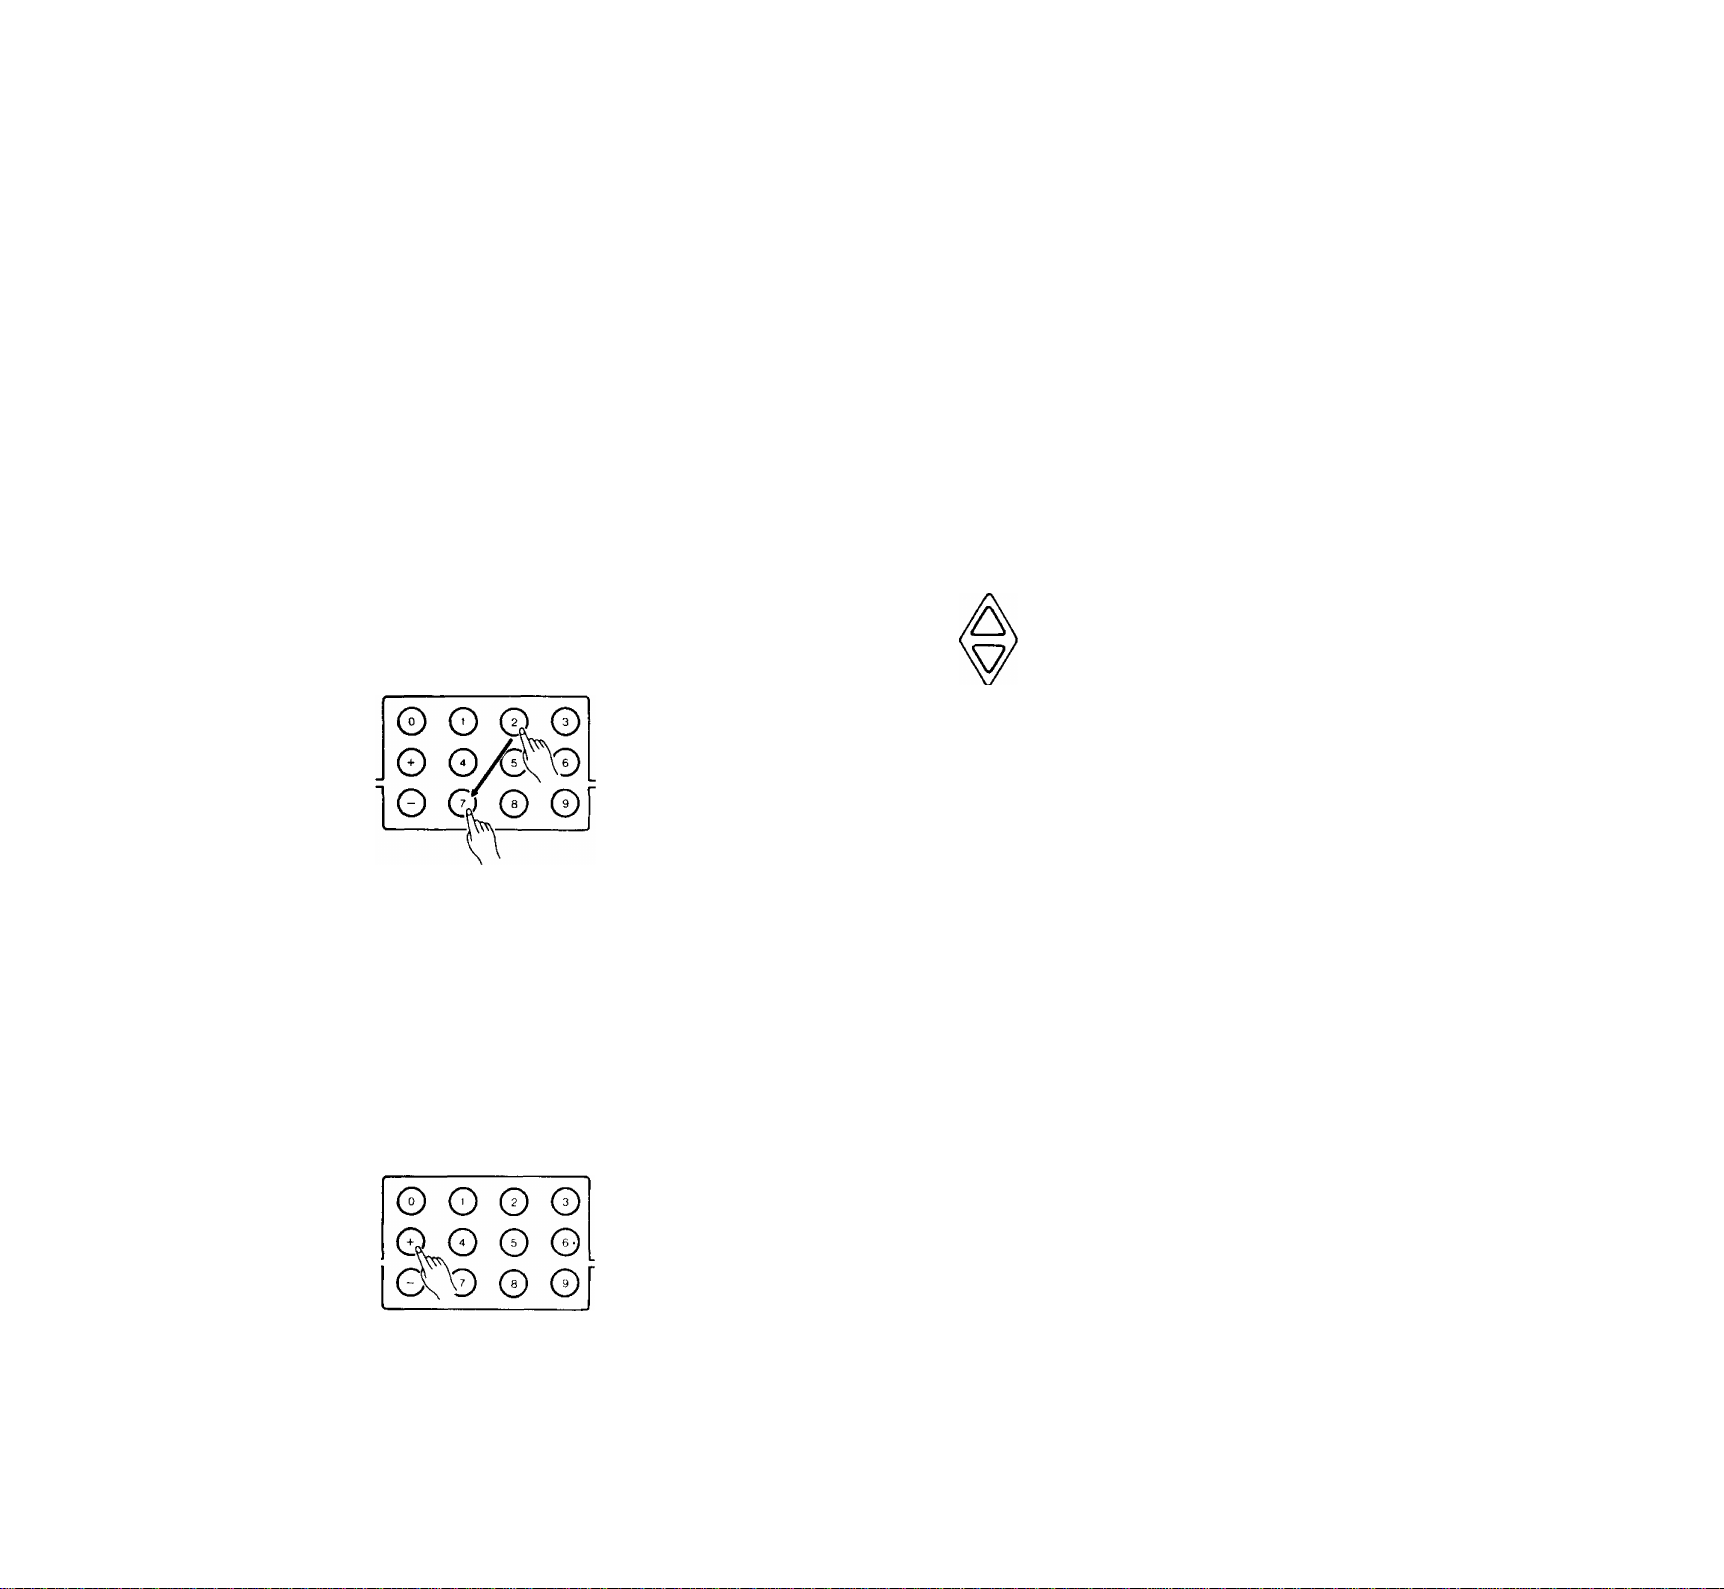
4- Select any of the PSR-300M’s 100 voices by using one of
the following methods:
Voice Selection Method 1:
Choose one of the 100 voices — numbered “00”
through “99” — shown on the VOICE LIST then enter its
number using the numeric VOICE SELECT buttons. To
select “ELECTRIC ORGAN 1” (number 12), for example,
first press “1” and then “2.” The number “12” should then
appear on the MULTI DISPLAY.
keyboard.
• Note that the PSR-300M‘s keyboard is “touch response" — tfiat
is, you can control the loudness of the sound to a certain
degree according to how hard you play the keys. The degree of
touch sensitivity is different for each voice.
• The PSR-300M features a maximum polyphony of 28-notes
(depending in some cases on the selected voice), so up to 28
notes can be played simultaneously, including extra notes
played when the automatic accompaniment, split, or dual voice
features of this instrument are used. “Full” will appear on the
MULTI DISPLAY if the 28-note limit is exceeded.
• When the power is initially turned ON, the PIANO voice is auto
matically selected and its number (“00") is shown on the MULTI
DISPLAY.
Keyboard Percussion
When the DRUMS voice is selected (voice number 99), you
can play 25 different drum and percussion instruments on the
black keys. The percussion instruments played by the various
keys are marked by symbols above the black keys (the white
keys produce no sound).
• The TRANSPOSE function described on page 5 does not affect the
DRUMS sound.
DRUM & PERCUSSION INSTRUMENT KEY
ASSIGNMENTS
Key Instrument
Citi BD Reverb
Bass Drum
Diti
Fih Bass Tom [E
MULTI DISPLAY
Symbol Key Instrument
Gita Hi-Hat Foot
B
Atta Crash Cymbal
E
Ctt4 Splash Cymbal H
lг
Symbol
m
© Glj©
O
MULTI DISPLAY
I D
tL
O 0 0 0
Voice Selection Method 2:
The [+] and [-] buttons in the numeric button group can
be used to increment (increase by one) or decrement (de
crease by one) the current voice number. Press the [-i-]
button briefly to select the voice one number higher than
the current voice, or the [-] button to select the voice one
number lower than the current voice. If you hold the [-1-] or
[-] button down, the voice number will increment or dec
rement continuously — simply release the button when
the desired voice number has been reached.
Giti Lo Tom
Atti Mid Tom
Hi Tom
Ctt2
Dtt2 Snare Reverb
Fi2 Snare Lo
Gtt2 Snare Hi
Snare Open Rim
M 2
Srtare Closed Rirri
Cita
Hi-Hat Closed
Dits
Hi-Hat Open
Fit3
m D U Ride Cymbal
Ftt4 Synth Lo Tom
E
Gtt4
(E
m
m
m
a
m
e
Synth Mid Tom
Att4 Synth Hi Tom
Synth Snare
Cits
Voice "One”
Dits
Fits Voice "Two"
Gits Voice "Three"
Voice "Four"
Atta
Adjusting the Volume
Adjust the [MASTER VOLUME] control while playing to
set the desired overall volume level.
H
S3
s
S3
S3
H
B
|thr^
H
Page 7

SUSTAIN
Press the [SUSTAIN] button once
(the indicator will light) and notes
played on the keyboard will decay
gradually after you lift your fingers
from the keys. Press the [SUSTAIN]
button a second time (the indicator will
go out) to turn the sustain effect off.
ON-OFF
О
□
SUSTAIN
DUAL
The PSR-300M DUAL feature makes it possible to select
play two different voices simultaneously.
To activate the DUAL feature press the [DUAL ON/OFF]
button (the indicator will light). When ON, the voice selected
prior to turning the DUAL feature ON will sound simultane
ously with a second “dual” voice. When the PSR-3(X)M is
initially turned ON, the STAR LIGHT 2 voice (number 80) is
assigned as the dual voice. Any other voice can be selected as
the dual voice while the DUAL feature is ON. DUAL VOICE
The DUAL feature can be turned ""o '
OFF by pressing the [DUAL ON/OFF]
button again.
Jn
■y
• The SUSTAIN effect cannot be applied to accompaniment or rhythm.
• When the DUAL function is engaged, sustain is applied to both
voices.
• Sustain can be applied independently to the left- and right-hand
voices In the split mode (see "The Split Mode" on page 6). Press a
key to the right of the split point to select the right-hand voice, then
turn sust^n on or off for that voice. Press a key to the left of the split
point to select the left-hand voice, then turn sustain on or off for that
voice.
• Sustain can be turned on or off for the melody voice during DEMO
playback.
• Sustain does not affect voice 97 (VOICE BOX) and voice 99
(DRUMS).
SPLIT POINT
MULTI DISPLAY
шшт
SPLIT POINT
¡11
I
1I
80
MULTI OISPIAV
8 I
• When the DUAL function is used with the SPLIT mode (see page 6)
different dual voices can be assigned to the left- and right-hand
sections of the keyboard. Press a key to the right of the split point to
select the right-hand voice, then turn DUAL on and select the righthand dual voice. Press a key to the left of the split point to select
the left-hand voice, then turn DUAL on and select the left-hand dual
voice.
RANSPOSE
The PSR-300M [TRANSPOSE] buttons makes it possible
to shift the pitch of the entire keyboard up or down in semi
tone intervals up to a maximum of 12 semitones (one octave).
Transposing the pitch of the PSR-300M keyboard makes it
easier to play in difficult key signatures, and you can simply
match the pitch of the keyboard to the range of a singer or
other instrumentalist.
The TRANSPOSE [A] and [T] buttons are used for trans
position. The first time the TRANSPOSE [A] or [T] button is
pressed the current transpose value will appear on the MULTI
DISPLAY. While the current transpose value is still showing
on the display, press the TRANSPOSE [A] button to increase
the pitch of the keyboard, or the [T] button to lower the pitch.
The selected degree of transposition will be displayed on the
MULTI DISPLAY while the TRANSPOSE [A] or [T] button
is pressed, and for approximately 2 seconds after either
TRANSPOSE button is released.
• When the SINGLE FINGER or FINGERED accompaniment mode is
selected, the DUAL feature applies only to the right-hand section of
the keyboard.
The transposition range is from -12 to -t-12, with -12 corre
sponding to downward transposition by 12 semitones (one
octave, and -i-12 corresponding to upward transposition by 12
semitones. 0 is the “normal” keyboard pitch value. The normal
transpose value (0) can be recalled at any time by pressing
both the TRANSPOSE [A] and [T] buttons at the same time.
MULTI DISPLAY
_ I D
I C
• The transpose value is automatically set to 0 whenever the power
switch is turned ON.
MULTI dispUv
n
и
18
Page 8
THE SPLIT MODE
The PSR-300M SPLIT mode allows you to play two voices
at once — one with the left hand and one with the right. The
left-hand voice can be played to the left of the “split point,” set
as described below, and the right-hand voice can be played to
the right of the split point.
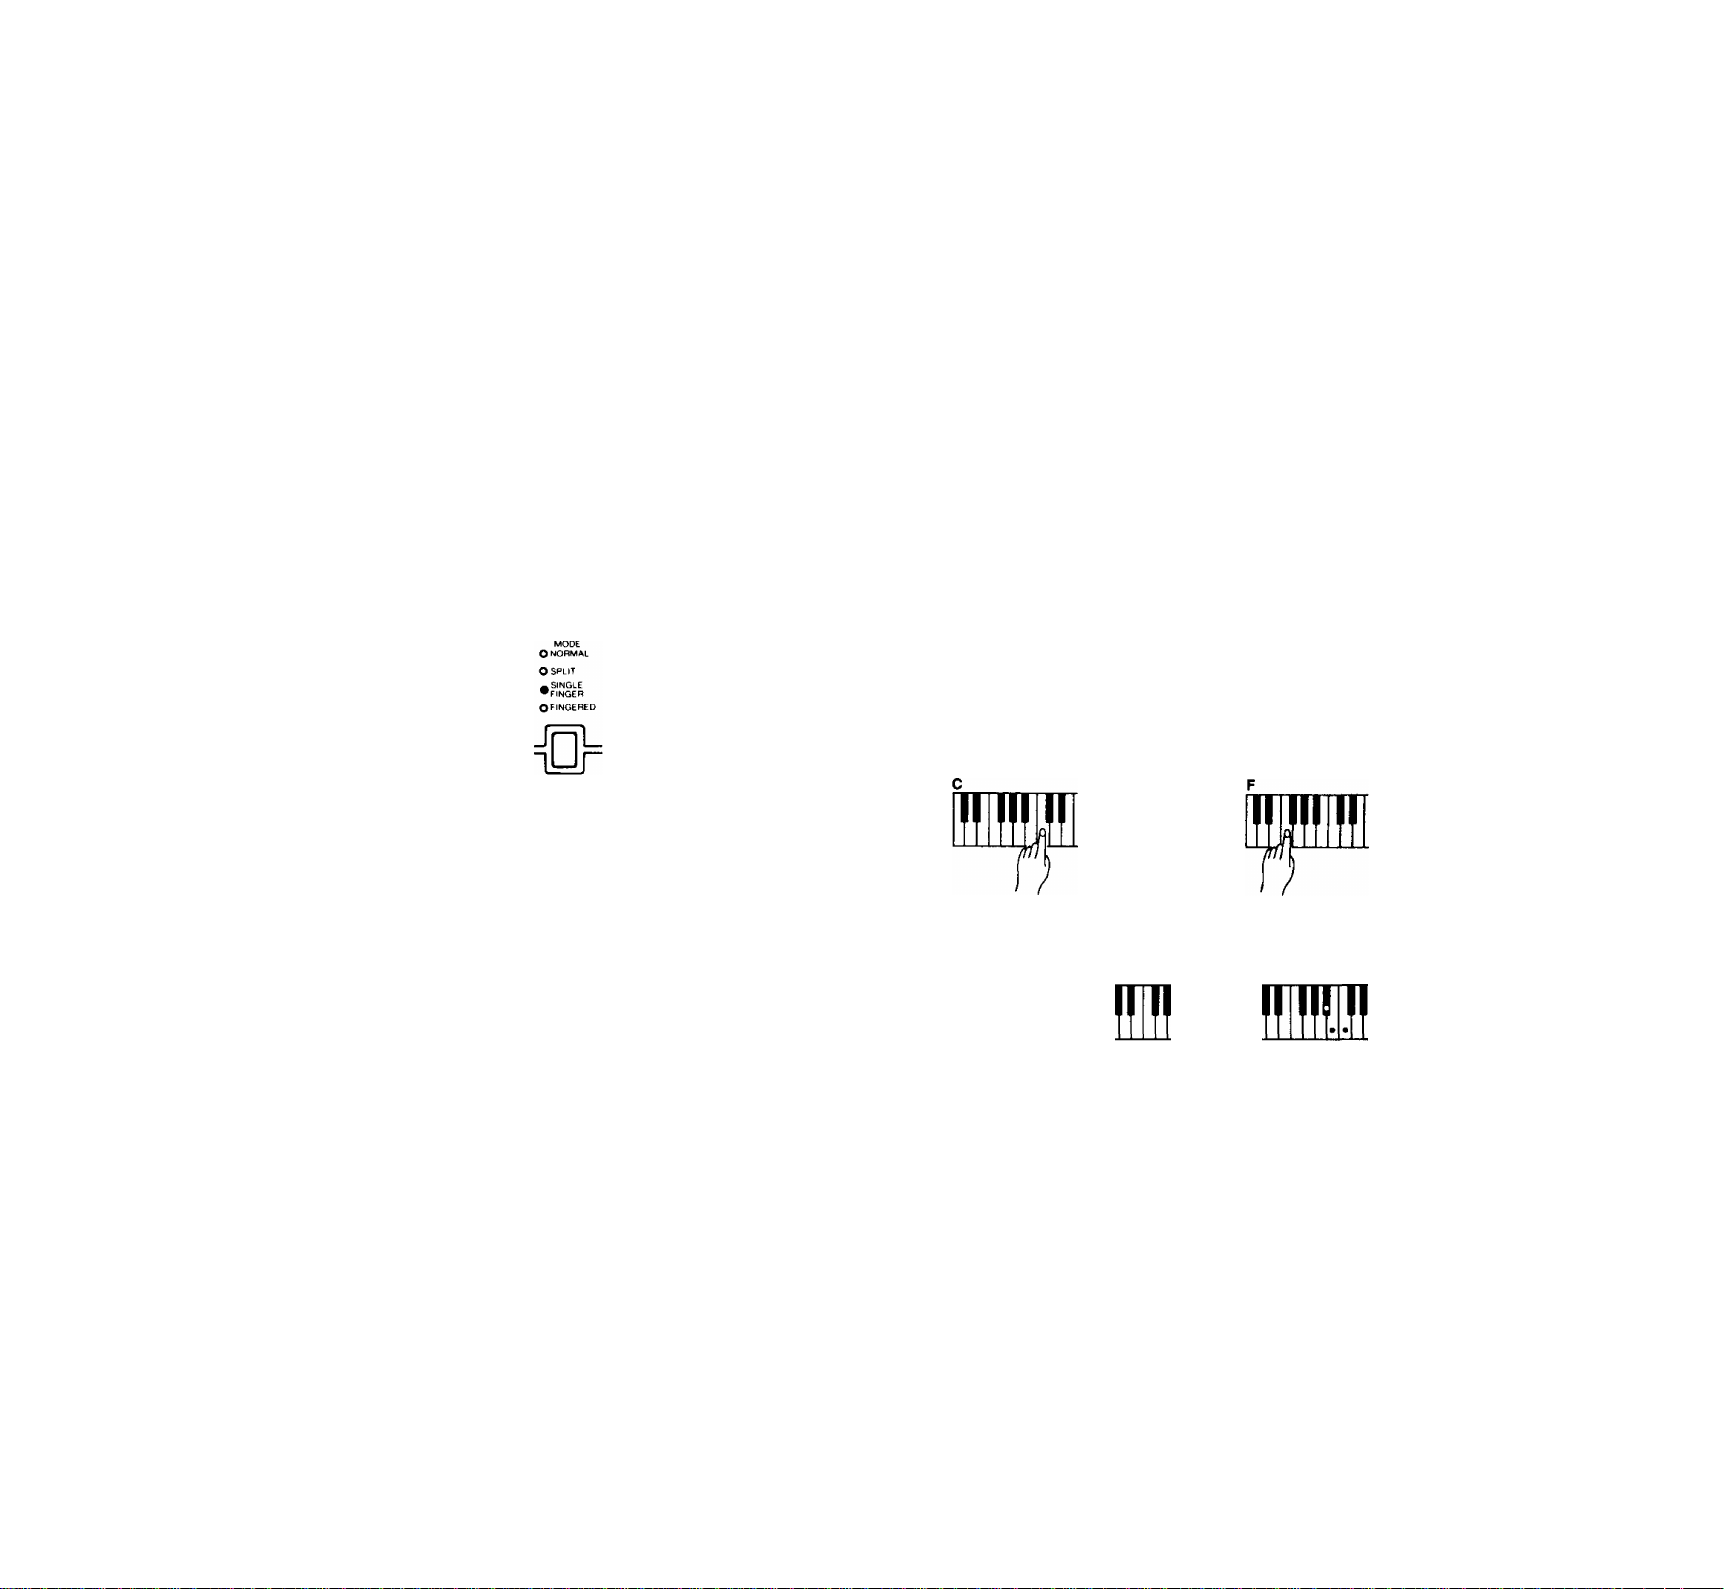
1. Press the [MODE] button as many times as necessary
until the SPLIT indicator lights — this selects the SPLIT
mode.
2. If necessary, set the split point as described below:
Setting the SPLIT Mode Split Point;
The split point for the SPLIT mode is initially set at the
C3 key. It can be set to any other key by pressing the de
sired split-point key while holding the [SPLIT POINT
CHANGE] button.
The split point is shown on the MULTI DISPLAY for
as long as the [SPLIT POINT CHANGE] button is held.
The C3 key, for example, would be displayed as “C 3”.
Ftt2 would be displayed as “F'2”. The sharp is indicated
by the lit bar between the “F” and the “2.”
The SPLIT mode split point is retained in memory and
will be recalled whenever the SPLIT mode is selected.
Note that the split-point key is included in the righthand section of the keyboard.
MODE
Onormal
♦ split '
SINGLE
^FINGER
O fingered
JnU
3. Select the right-hand and left-hand voices as required.
When the SPLIT mode is first selected the current voice
is assigned to the right-hand keys. If no other left-hand
voice has been selected since the PSR-300M was turned
ON, the ELECTRIC BASS voice (number 82) will be
assigned to the left-hand keys.
• The left-hand voice is octave-shifted to provide the best sound
in the left-hand range.
Changing the Right and Left-hand Voices;
Make sure the [VOICE/STYLE] button VOICE indicator
is lit (press the [VOICE/STYLE] button once if it isn’t).
To change the right-hand voice press a key to the right
of the split point. The current right-hand voice number
will be shown on the MULTI DISPLAY and a new righthand voice can be selected in the normal way.
To change the left-hand voice press a key to the left o'^
the split point. The current left-hand voice number will be
shown on the MULTI DISPLAY and a new left-hand
voice can be selected in the normal way.
SPLIT POINT
multi display
n I
Ostyle
♦voice
il
1
SPLIT POINT
I1
15
U t
MULTI DISPLAY
83
D
MULTI DISPU^Y
3
rxr—TT-T
C3
• To initialize the split point to its original default value, turn the
[POWER] button on while holding the [SPLIT POINT CHANGE]
button. The SINGLE FINGER and FINGERED split points (de
scribed later) are also initialized by this procedure.
MULTI display
L
F#2
• When playing in the SPLIT mode, the MULTI DISPLAY wilt switch
between the left- and right-hand voice numbers according to whether
notes are played on the left- or right-hand section of the keyboard.
The DUAL indicator flashes according to the left- and right-hand
section DUAL mode settings when the SPLIT and DUAL modes are
used together.
Page 9
RHYTHM ACCOMPANIMENT
Selecting an Accompaniment Style
1 ■ If the STYLE indicator is not lit, press the [VOICE/
STYLE] button once so that it does light. The number of
the currently selected style will appear on the MULTI
DISPLAY when the STYLE indicator is lit.
•style
O VOICE
2. Select any of the PSR-300M’s 50 accompaniment styles
by using one of the two following methods:
^ 1: Choose one of the 50 accompaniment styles — num
bered “00” through “49” — shown on the STYLE LIST
then enter its number using the numeric VOICE/STYLE
buttons. To select FUSION 1 (number 27), for example,
first press “2” and then “7.” The number “27” should then
be displayed on the MULTI DISPLAY.
MULTI DISPLAY
jn
C I
Setting the Tempo
The first time the TEMPO [A] or [T] button is pressed the
current tempo will appear on the MULTI DISPLAY. While the
current tempo value is still showing on the display, press the
TEMPO [A] button to increase the tempo, or the TEMPO [T]
button to decrease the tempo. The selected tempo will be dis
played on the MULTI DISPLAY (in quarter-note beats per
minute) while the TEMPO [A] or [▼] button is pressed, and for
approximately 2 seconds after either TEMPO button is released.
The available tempo range is from 40 to 240 beats per
minute. Each accompaniment style has a different “default”
tempo which is automatically set whenever a new style is se
lected (but not when a new style is selected while the accompa
niment is playing). The default tempo for the currently selected
accompaniment style can be recalled at any time by pressing
both the TEMPO [A] and [T] buttons at the same time.
MULTI DISPLAY
u n
nu
• The tempo is automatically set to the default value for the DANCE1
style whenever the power switch is turned ON.
• It is also possible to adjust the tempo after starting playback of the
accompaniment. This allows you to set the optimum tempo by ear.
MULTI DISPLAY
2: The [+] and [-] buttons in the VOICE/STYLE group
can be used to increment (increase by one) or decrement
(decrease by one) the current accompaniment style
number. Press the [+] button briefly to select the accompa
niment style one number higher than the current accompa
niment style, or the [-] button to select the accompaniment
style one number lower than the cuirent accompaniment
style. If you hold the [+] or [-] button down, the accompa
niment style number will increment or decrement continu
ously — simply release the button when the desired ac
companiment style number has been reached.
MULTI DISPLAY
3 II
C I
When the power is initially turned ON, the 00 DANCE1 style is
automatically selected.
Starting the Accompaniment
Press the [START/STOP] button to start the selected accom
paniment immediately, or press the [SYNCHRO START/ENDING] button if you want the accompaniment to start when you
play the first note on the keyboard. If you press the [SYNCHRO
START/ENDING] button, the three dots along the bottom of
the MULTI DISPLAY will flash at the selected tempo.
SYNCHRO START/
START ON OFF/ STOP
ENDING
The three LED dots at the bottom of the MULTI DISPLAY provide a
visual indication of the selected tempo as follows:
1st. Beat 0EAT-L
2nd. Beat beat-L
3rd. Beat beat-L
4th. Beat beat-L
If neither the FINGERED or SINGLE FINGER mode is selected, the
accompaniment will consist only of rhythm (drums & percussion)
sounds. Operation of the AUTO ACCOMPANIMENT SINGLE FINGER
and FINGERED modes is described on page 9 and 10.
A different accompaniment style can be selected at any time while the
accompaniment is playing. The style number display will change as
soon as the selection is made, but the new style will begin playback
from the top of the next measure. The tempo will not change when the
new style begins playing.
7
Page 10

RHYTHM ACCOMPANIMENT
Starting the Accompaniment with an Introduction
Any of the PSR-300M accompaniment patterns can be
started with an appropriate introduction by pressing the
[INTRO/FILLbutton. The intro pattern will repeat as long
as the [INTRO/FILL IN] button is held. Once the button is
released, the normal pattern will begin playing from the top of
the next measure.
INTRO/
FILL IN
Adding Fill-ins
To add a short fill-in (rhythm variation) at any time while
the accompaniment is playing, press the [INTRO/FILL IN]
button. If you hold the [INTRO/FILL IN] button, the fill-in
pattern will repeat until the button is released, then the normal
rhythm will begin from the beginning of the next measure.
INTRO/
FILL IN
Adjusting the Accompaniment Volume
Although the MASTER VOLUME control can be used to
set the overall volume level, the ACCOMPANIMENT VOL
UME [A] and [T] buttons can be used to adjust the volume of
the selected accompaniment in relation to the right-hand
melody voice. The first time the ACCOMPANIMENT VOL
UME [A] or [T] button is pressed the current volume will
appear on the MULTI DISPLAY. While the current volume is
still showing on the display, press the ACCOMPANIMENT
VOLUME [A] button to increase the volume, or the [▼] but
ton to decrease the volume. The selected volume level will be
displayed on the MULTI DISPLAY while the volume is being
adjusted, and for approximately 2 seconds after either VOL
UME button is released. ^
The volume range is from 0 to 24, with 0 being the lowest
volume and 24 the highest. The default accompaniment vol
ume value (21) can be recalled at any time by pressing both
the ACCOMPANIMENT VOLUME [A] and [▼] buttons at
the same time.
MULTI DISPLAY
г I
• If the [INTRO/FILL IN] button is pressed within one 1/4 beat from the
beginning of a beat, the fill in will begin immediately. If pressed at
any other time the fill in will begin on the beginning of the next beat.
Stopping the Accompaniment
An accompaniment in progress can be stopped immediately
by pressing the [START/STOP] button, or it can be stopped
with an appropriate ending by pressing the [SYNCHRO
START/ENDING] button.
SYNCHRO start/
START ON OFF/ STOP
ENDING
• If the [SYNCHRO START/ENDING] button is pressed within one 1/4
beat from the beginning of a measure, the ending will begin immedi
ately. If pressed at any other time the ending will begin on the begin
ning of the next measure.
• If the [INTRO/FILL IN] button is pressed while the ending pattern is
playing, a fill-in will be played, followed by a return to the normal
pattern.
•
• The accompaniment volume is automatically set to 21 whenever the
power switch is turned ON.
Page 11
AUTO ACCOMPANIMENT
The PSR-300M includes a sophisticated Auto accompani
ment system that can provide automated bass and chordal
backing in a number of ways.
• The maximum number of notes that can be played simultaneously
on the PSR-300M keyboard is reduced when the Auto Accompani
ment feature is used.
SINGLE FINGER accompaniment makes it simple to pro
duce beautifully orchestrated accompaniment using major,
seventh, minor and minor-seventh chords by pressing a mini
mum number of keys in the left-hand section of the keyboard.
The bass and chord accompaniment produced is perfectly
^^j^tched to the currently selected accompaniment style.
1. Press the [MODE] button as many times as necessary
until the SINGLE FINGER indicator lights — this selects
the SINGLE FINGER mode.
Select the desired accompaniment style in the normal
way. Although you can select the melody (upper key
board) voice you intend to use, the PSR-3(X)M automati
cally determines the voices to be used for the accompani
ment part according the accompaniment style you select.
Press the [START/STOP] button, [SYNCHRO START/
ENDING] button or the [INTRO/nLL IN] buttons to
determine how the accompaniment will be started (see
page 7). If you press the [START/STOP] button or the
[INTRO/FILL IN] button, the rhythm will begin playing
immediately without bass and chord accompaniment.
INTRO/ SYNCHRO START/
FILL IN START ON-OFF/ STOP
ENDING
Press any key to the left of the split point to start the auto
matic accompaniment. If you press a “C” key, for exam
ple, a C-major accompaniment will be played. Press an
other key in the left-hand section of the keyboard to se
lect a new chord. The key you press will always deter
mine the “root” of the chord played (i.e. “C” for a C
chord).
2. If necessary, set the split point as described below:
Setting the SINGLE FINGER Mode Split Point:
The split point for the SINGLE FINGER mode is initially
set at the D2 key. It can be set to any other key by press
ing the desired split-point key while holding the [SPLIT
POINT CHANGE] button.
^ The split point is shown on the MULTI DISPLAY for
as long as the [SPLIT POINT CHANGE] button is held.
The D2 key, for example, would be displayed as “d 2”.
Ftt2 would be displayed as “F2”. The sharp is indicated
by the lit bar between the “F” and the “2.”
The SINGLE FINGER mode split point is retained in
memory and will be recalled whenever the SINGLE FIN
GER mode is selected, A method of initializing the SIN
GLE FINGER mode split point to its original default
value is described on page 6.
MULTI DISPLAY
d d
/j-
mmSM
MULTI DISPLAY
D2
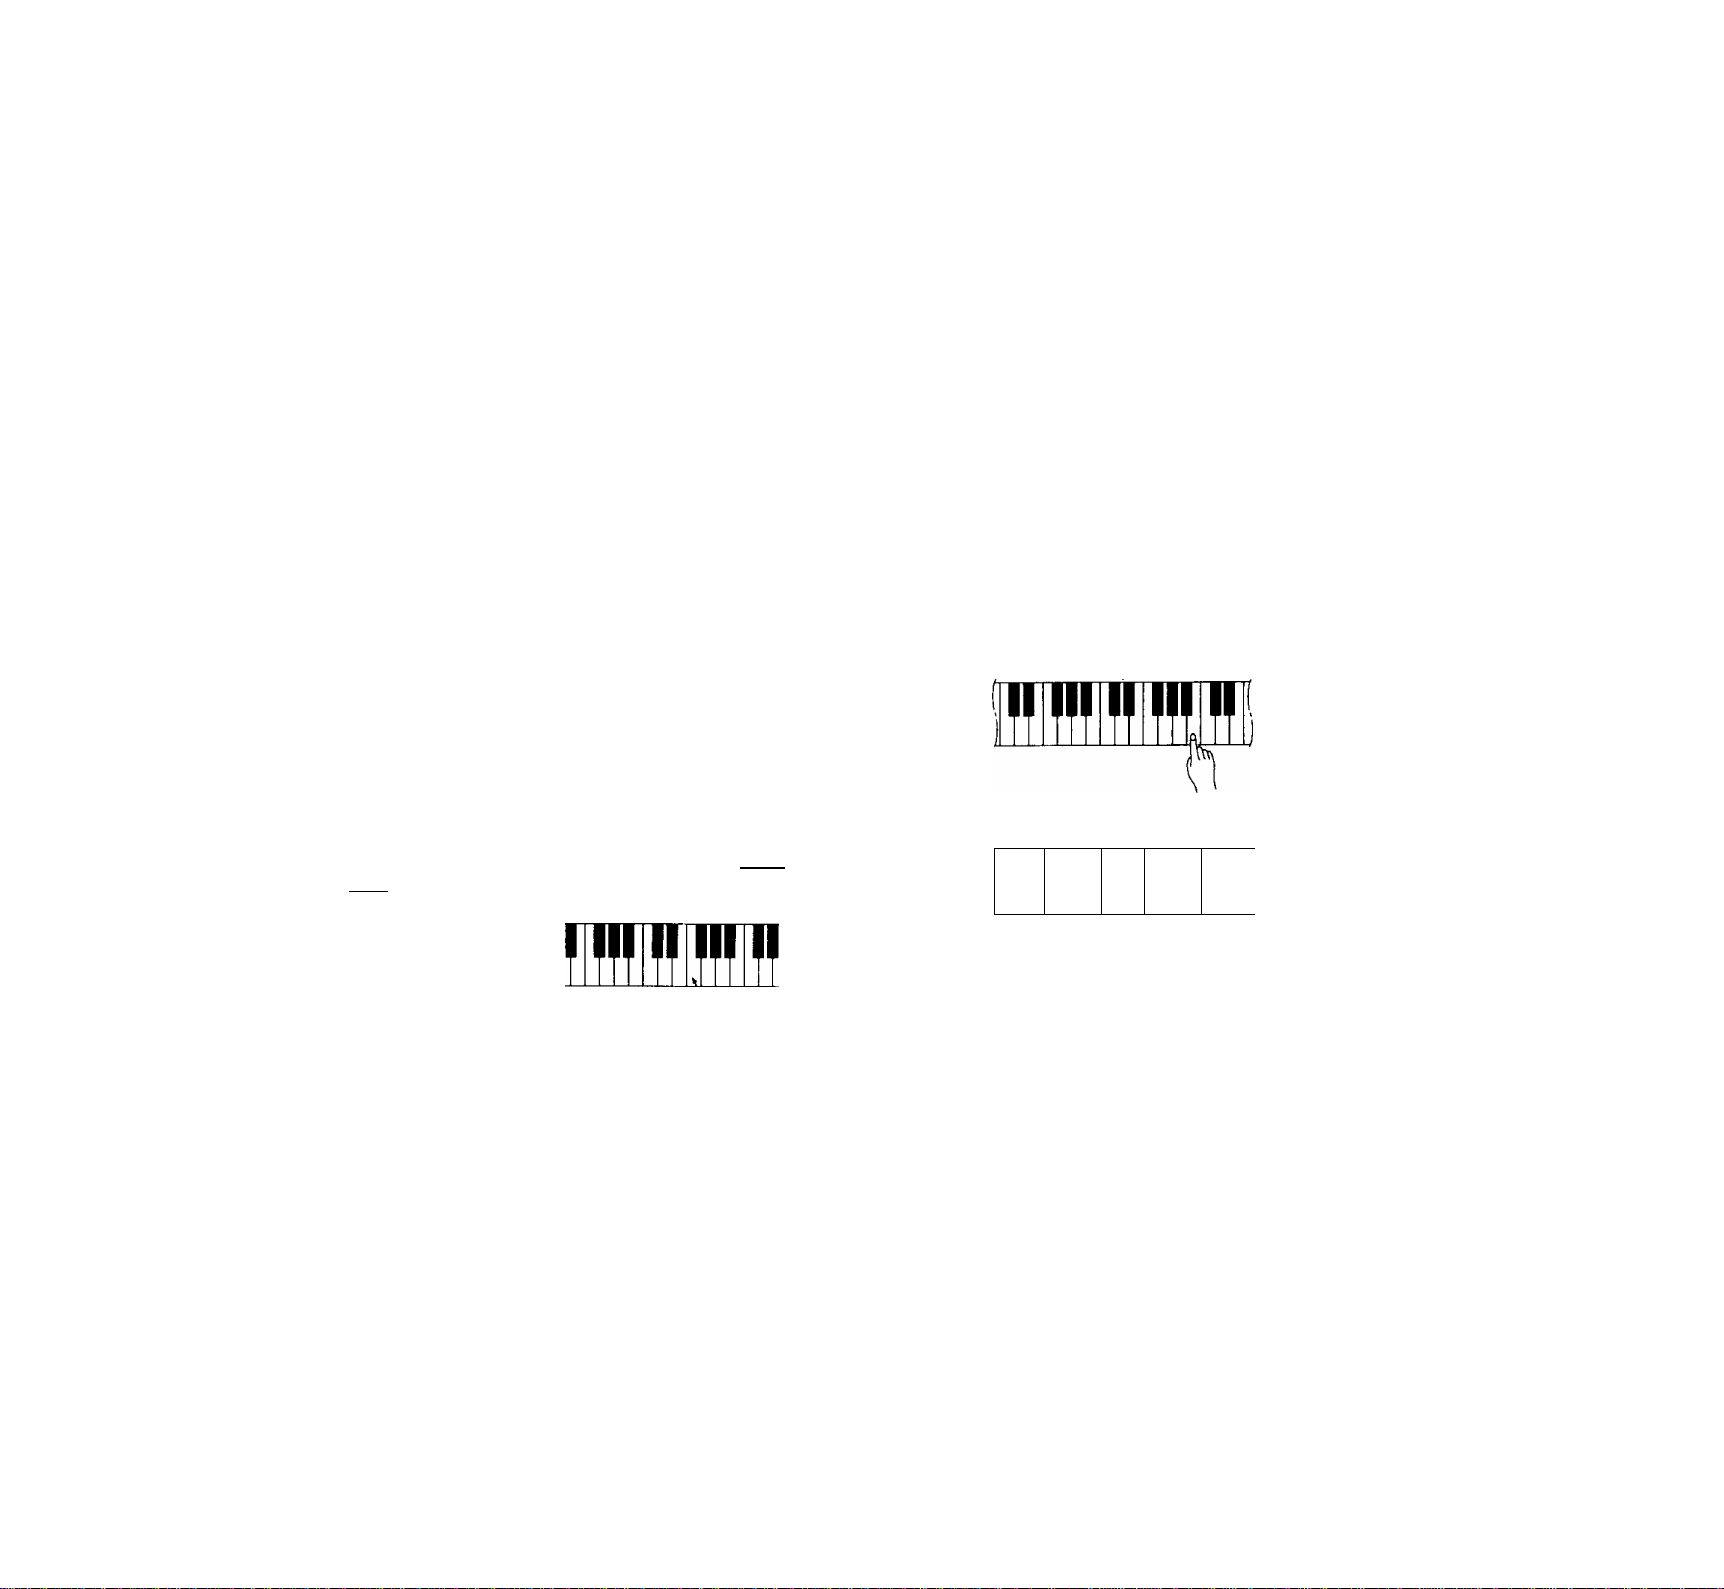
Playing Minor, Seventh, and Minor-seventh Chords in the Single-finger Mode
Cm
Ct
Cm 7
I
■ For a minor chord, press the root key and a black key
to its left.
■ For a seventh chord, press the root key and a white key
to its left.
■ For a minor-seventh chord, press the root key and both
a white and black key to its left.
• The automatic accompaniment will continue playing even if you lift
your fingers from the Auto Accompaniment keys. You only need to
press the Auto Accompaniment keys when changing cords.
6. Press the [START/STOP] button or the [SYNCHRO
START/ENDING] button to stop the Accompaniment.
F#2
Page 12

AUTO ACCOMPANIMENT
Setting the Accompaniment Voiume
Set the volume of the Auto Accompaniment sound using the
ACCOMPANIMENT VOLUME buttons. The MASTER
VOLUME control can be used to set the overall volume level.
MASTER VOLUME
ACCOMP
VOLUME
imi
Setting the Tempo
Use the TEMPO buttons to set the desired accompaniment
tempo (see ^‘Setting the Tempo” on page 7 for details).
• The [INTRO/FILL IN] button can be used in the Auto Accompani
ment mode to create pattern variations in the same way that it is with
rhythm accompaniment patterns (refer to "Adding Fill-ins” on page 8
for details).
Fingered Accompaniment
The FINGERED mode is ideal if you already know how to
play chords on a keyboard, since it allows you to supply your
own chords for the Auto Accompaniment feature.
1 Press the [MODE] button as many times as necessary
until the FINGERED indicator lights — this selects the
FINGERED mode. mode
o NORMAL
O SPLIT
— SINGLE
^FINGER
• fingered
&
2. If necessary, set the split point as described below:
Setting the FINGERED Mode Split Point:
The split point for the FINGERED mode is initially set at
the G2 key. It can be set to any other key by pressing the
desired split-point key while holding the [SPLIT POINT
CHANGE] button.
The split point is shown on the MULTI DISPLAY for
as long as the [SPLIT POINT CHANGE] button is held.
The G2 key, for example, would be displayed as “g 2”.
Fi2 would be displayed as “F2”. The sharp is indicated
by the lit bar between the “F” and the “2.”
The FINGERED mode split point is retained in
memory and will be recalled whenever the FINGERED
mode is selected, A method of initializing the FINGERED
mode split point to its original default value is described
on page 6.
s г
G2
P HffW
MULTI DISPLAY
F'г
Ftt2
• The PSR-300M memorizes separate SINGLE FINGER, FINGERED,
and SPLIT mode split points. The corresponding split point is auto
matically recalled when one of these modes is selected.
3. Select the desired accompaniment style in the normal way.
Although you can select the melody (upper keyboard)
voice you intend to use, the PSR-300M automatically de
termines the voices to be used for the accompaniment nart^
according the accompaniment style you select. ^
4. Press Ihe [START/STOP] button, [SYNCHRO START/
ENDING] button or the [INTRO/FILL IN] buttons to de
termine how the accompaniment will be started (see page
7). If you press the [START/STOP] button or the [INTRO/
FILL IN] button, the rhythm will begin playing immedi
ately without bass and chord accompaniment.
5. As soon as you play any chord in the Auto Accompaniment
section of the keyboard, the PSR-300M will automatically
begin to play the chord along with the selected rhythm and
an appropriate bass line. The accompaniment will continue
playing even if you release the Auto Accompaniment keys.
The PSR-300M will accept the following chord types
(see fingering chart on page 19):
Chord Abbreviation
Major
Minor
Major seventh
Minor major seventh
Minor sixth
Minor seventh
Minor seventh flatted fifth
Seventh
Seventh flatted fifth
Seventh suspended fourth
Suspended fourth
Augmented
Diminished
■ Notes in parentheses may be omitted.
M
m 1-1.3-5
M7
mM7
m6 1-1.3-5-6
m7
m7-5
7 1-3-(5)-l.7
7-5
7sus4
sus4
aug
dim 1-|.3-l.5-(6)
Minor sixth chords will only be properly detected if
they are played in “root position”. Seventh flatted fifth
chords will only be recognized if either the root or flatted
seventh is the lowest note. For diminished and augmented
chords, the lowest key pressed is assumed to be the root.
• An octave — i.e. two notes played exactly one octave apart —
will be detected as a chord suitable for major or minor, with the
note played as the root note.
• All other FINGERED mode operations are the same as in the
SINGLE FINGER mode.
Normal Voicing
1-3-5
1-3-{5)-7
1-l.3-(5)-7
1-l.3-(5)-l.7
1-l.3-l,5-l,7
1-3-t5-t7
1-4-5-I.7
1-4-5
1-3-115
10
Page 13

AUTO HARMONY
THE CHORD MEMORY
This sophisticated feature automatically adds appropriate
harmony notes to a melody you play on the keyboard. You can
choose from 5 different types of harmony.
• Only a single note can be played at a time on the keyboard (or the
right-hand section of the keyboard when in the SPLIT mode) when
the AUTO HARMONY feature is used.
1. Use the [AUTO HARMONY] buttons to select a harmony
type between *‘01” and “05.”
The first time the AUTO HARMONY [A] or [T] but
ton is pressed the current harmony type number will
appear on the MULTI DISPLAY. While the current har
mony type is still showing on the display, press the AUTO
HARMONY [A] button briefly to increment (increase by
one) the harmony type number, or the [T] button to decrement (decrease by one) the harmony type number. Hold
ing either button causes continuous incrementing or
decrementing. The selected harmony type number will be
shown on the MULTI DISPLAY while the [AUTO HAR
MONY] [A] or [T] button is pressed (the letter “H” will
appear before the harmony type number).
00 Off
01 out T
02 TfiiO
OJ BLOCK
04 COUNTRY
0i> octave
MULTI DISPLAY
u n n
nuu
AUTO HARMONY
MULTI DISPLAY
nu D
c.
PSR-300M Harmony Types
00
OFF
01 DUET
02 TRIO
03 BLOCK
04 COUNTRY
05 OCTAVE
• ITie OFF setting can be selected at any time by pressing both
the [AUTO HARMONY] buttons simultaneously.
2. Play.
• In the SINGLE FINGER or FINGERED mode, the left-hand
chords determine the harmony notes that will be applied to the
right-hand melody.
• In the NORMAL mode, all harmony is based on a C major
chord.
• If AUTO HARMONY is used at the same time as the SPLIT
feature (see page 6), harmony will be not be applied to the lefthand voice. Left-hand chord fingerings are used to determine
the harmony applied to the right-hand voice. Usable fingerings
are the same as for the FINGERED mode,
• If AUTO HARMONY is used at the same time as the DUAL
feature (see page 5), harmony will be not be applied to the
second “dual" voice.
• if the synchro start mode is turned off by pressing the
[SYNCHRO START/ENDING] button prior to playing, right-hand
melody and harmony without accompaniment can be produced
— but the left-hand chords will still have to be fingered to pro
duce the appropriate harmony.
The PSR-300M CHORD MEMORY allows you to “record”
and play back chord sequences created using the Auto Accom
paniment feature. You can record a complete accompaniment
part, for example, and then play along with it using both hands
— you’re free to use the entire keyboard for your performance
rather than being limited to only the upper keyboard area.
The CHORD MEMORY also has three separate “banks”
that can be used to record different accompaniments. The
banks can be “chained” — i.e. they will play back in any
specified order. This allows you to record a verse and chorus
in different banks, for example, then “chain” them in the de
sired order for playback.
• Chord sequences containing a maximum of 60 different chords can
be recorded in each bank.
• Material recorded using the CHORD MEMORY is retained in
memory even when the POWER switch is turned OFF (if batteries
are present).
1. Pick out an accompaniment style that is appropriate for
the type of music you want to record.
2. Press the [BANK 1], [BANK 2], or [BANK 3] button
while holding the CHORD MEMORY [REC] button. This
engages the “record ready” mode for the selected bank.
The bank indicator will flash, the metronome will sound,
and the three dots along the bottom of the MULTI DIS
PLAY will flash at the currently selected tempo. Press the
[REC] button again if you want to disengage the record
ready mode and perform some other function.
If the NORMAL or SPLIT mode is selected, the FIN
GERED mode is automatically selected when the record
ready mode is engaged. If the FINGERED or SINGLE
FINGER mode is selected, no change occurs.
REC BANK ) BANK ? SANK 3 CHAIN
o o
CHORD MEMORY
3p Before actually beginning to record, you should set a
tempo that will be easy to record at using the [TEMPO]
buttons.
11
Page 14

THE CHORD MEMORY
4» Recording will begin as soon a$ you play a chord on the
loR^haiMl section of the kcybtiord (SYNCHRO START
operation).
Recording can also be slancd by pressing the (START/
STOP) or [JNTRO/FILL IN| button. In this cast on the
rhythm will begin without baju and chord accompaniment
until you play the first chord on the leftdiand section of
the keyboard.
5» Play the required chords.
6* Presseiihcr the (START/STOP) button or the
(SYNCHRO START/ENDING] buuon to stop recording.
# Evtou recorded by Vie chord memory iie: St^le N^miber. Chord
Timing. Ohordl. Intro. PUI In. Endng
• Whenever you record ue«r^ the CHORD MEMORY, any prev^ily
reoordDd material m Vio same bank w^ll be erased.
# H you mike a rmstske wNIe recorefcr^. limply proti tie |8TArtT/
stop) button and begn again trom slop 2. above
• tl the AC power adi^r is dsconneoled with no baltones irwened.
Re coniontt ol Re memory wN be lest
0 Hthe chord memory becomes M wh4o recording *ErMf wU appear
on the MULTI DISPLAY
1. Press the (CHAIN) button while playback b stopped to
2. Press the (BANK 1). (BANK 2).and (BANKS] buttons in
Chain Playback
engage ihc *'choin ready mode.** You can disengage the
chain ready mode by pressing the (CHAIN] button again.
the order that you warn them to play bock — up to 8 steps
can be prognunmed. A synthesized voice will announce
the order of the programmed banks each time a BANK
button is presKd. The voice will stop if you attempt to
program more than 8 steps.
7 CAM >
Bank Playback
1. Press ihc (BANK IJ. (BANK 2]. or IBANK 3) buuon to
begin playback of that brmk. Ifyou press a difTcrent
BANK button during playback, pbybock of the newly
scicciod bank will begin from the top of ibe nest measure.
•av AMS >
0 0
{□ □ □[
2. Play along on the PSR-300M keyboard if you like. You
can also add fill-ins using ihe |INTRO/Fll.l. IN) button,
or change the tempo during playback.
3. Playback will stop automatically when the cikJ of the re
corded sequence is reached if the ISYNCHRU START/
ENDING) buuon was used to stop recording, otherwise
the chord sc(|ucncc will be repeated until stopped by ci*
Ihcr the (START/STOP) or (SYNCHRO START/ENDINO] button.
{□“TO
3» Press the (START/STOP) buium to begin chain playback.
4a Playback will stop automatically when an ending b en^
couniered (i.e. ihe ISYNCHRO START/ENOING] button
wax used to slop recording), otherwise the cmâre chain
will be repemed unul skipped by either the (START/
STOP) or ISYNCHRO START/BNOINO) button.
• Aprvwouily rooofdad chan can bd played sb^ply by prossRgRa ^
[CHAIN] bvtioo and tho ÍSTART/8TOP) buRon
R The cómanla ol Re CHAIN memory is rotainod ovan when Ro
power b lumod od
r
12
Page 15

SONG BOOK
Initial Data
When the PSR-300M is initially shipped, the Chord
Memory BANKs contain the following data:
Initial bank data
BANK1
BANK 2
BANK3
The CHAIN is initial set up as follows:
Initial chain data
Style 01
C7
1
Bl.7
E1.7
1
F7 Et7
C
1
Dm7
1
___A^____1______G7__1______
I BANK1 I BANK2 I BANKS |
F7
Style 21
I
i
Style 05
C7
I
A
1
Bt.7
A
Bl.7
1
A
Am7
1
F7(RII in)
1 1
A
A
I 1
A
I 1
y:(Fill in)
A
\ \
A{F\W in)
1 j
Enjoy the Demonstration
To give you an idea of the PSR-300M’s sophisticated capa
bilities, it is programmed with 15 demonstration songs that
you can select and play.
Use the [SONG SELECT] buttons to select a song number
between “00” and “14.”
The first time the [A] or [T] button is pressed the
current song number will appear on the MULTI
DISPLAY. While the current song number is still showing
on the display, press the SONG SELECT [A] button
briefly to increment (increase by one) the song number, or
the [T] button to decrement (decrease by one) the song
number. Holding either button causes continuous
incrementing or decrementing. The selected song number
will be shown on the MULTI DISPLAY while the SONG
SELECT [A] or [T] button is pressed — “d” appears
before the demonstration song number.
MULTI DISPLAY
Ji $ u
O I I
□ □
MULTI DISPLAY
^ n n
Ouu
The BANK data can be recalled at any time by turning the
[POWER] button on while holding the button of the desired
[BANK], The CHAIN data can be recalled by turning the
[POWER] button on while holding the [CHAIN] button.
SONG BOOK
PSR-300M Demo Song List
00 ORIGINAL THEME
01 SING
02
03 SPRING
04
05
06
07
08
09 EDELWEISS
10
11
12 O.VRENELI
13 GREENSLEEVES
14
HAPPY BIRTHDAY TO YOU
CARMEN
GRANDFATHER’S CLOCK
MINUET
SOMETHING
HOUSE OF THE RISING SUN
LA CUCARACHA
AMARYLIS
WE WISH YOU A MERRY CHRISTMAS
2i Press the [DEMO START/STOP] button to start demo
playback.
The demonstration will play continuously until the
[DEMO START/STOP] button is pressed again.
• A different melody voice, tempo, transposition, or melody effect
parameter (sustain, harmony, or dual) can be selected at any
time while the demonstration is playing. Refer to the appropriate
sections of this manual for instructions.
13
Page 16

SONG BOOK
Music-minus-one
This is a feature that plays the accompaniment to a selected
tune while you play a melody or ad-lib phrases on the
keyboard. The tunes are the same as the demo tunes, and are
selected in the same way.
1. Use the [SONG SELECT] buttons to select a song number
between “00” and‘T4,”
Press the [A] button briefly to increment (increase by
one) the song number, or the [T] button to decrement
(decrease by one) the song number. Holding either button
causes continuous incrementing or decrementing. The
selected song number will be shown on the MULTI DIS
PLAY while the SONG SELECT [A] or [T] button is
pressed,
2. Press the [MINUS ONE START/STOP] button to start
playback of the selected song without the melody line.
• When Minus One playback begins, the same voice as for the
corresponding demo melody is selected. The DUAL setting and
harmony type are also the same.
3. Play along on the keyboard.
• Only the NORMAL and SPLIT modes can be used during mi
nus-one playback. The NORMAL mode will automatically be
selected if FINGERED or SINGLE FINGER is engaged when
minus-one playback is started.
4. Playback will continue until the [MINUS ONE START/
STOP] button is pressed again.
• If you press the [DEMO START/STOP] button during minus-one
playback, the melody part will reappear and playback will con
tinue in the DEMO mode.
On the other hand, if you press the [MINUS ONE START/
STOP] button during demo playback, the melody part will be
muted and playback will continue in the MINUS ONE mode.
• The following functions can be used during minus-one
playback:
SPLIT
DUAL
VOICE selection
SUSTAIN
TEMPO
ACCOMPANIMENT VOLUME
TRANSPOSE
SPLIT POINT CHANGE
AUTO HARMONY (applies to notes played on the
keyboard)
• The "Demo Tunes" of this keyboard are "Demonstration" purposes
only. It may not be possible to reproduce the “Demo Tunes" 100%
manually.
•
MOVING UP TO MIDI
MIDI, the Musical Instrument Digital Interface, is a worldstandard communication interface that allows MIDI-compat
ible musical instruments and equipment to share musical infor
mation and control one another. This makes it possible to cre
ate “systems” of MIDI instruments and equipment that offer
far greater versatility and control than is available with iso
lated instruments.
The PSR-300M MIDI Connectors
The PSR-300M MIDI IN connector receives MIDI data
from an external MIDI device which can be used to control the
PSR-300M. The MIDI OUT connector transmits MIDI data
generated by the PSR-300M (e.g. note and velocity data pro
duced by playing the keyboard).
Simple MIDI Control
Most MIDI keyboards (including the PSR-300M, of course)
transmit note and velocity (touch response) information via the
MIDI OUT connector whenever a note is played on the key
board. If the MIDI OUT connector is connected to the MIDI
IN connector of a second keyboard (synthesizer, etc.) or a tone
generator (essentially a synthesizer with no keyboard), the
second keyboard or tone generator will respond precisely to
notes played on the original transmitting keyboard. The result
is that you can effectively play two instruments at once, pro
viding thick multi-instrument sounds. The PSR-300M also
transmits “program change” data when one of its voices is
selected. Depending on how the receiving device is set up, the
corresponding voice will be automatically selected on the
receiving keyboard or tone generator whenever a voice is se
lected on thePSR-300M.
The PSR-300M is capable of receiving the same MIDI data,
so a second MIDI keyboard connected to the PSR-300M MIDI
IN connector can be used to remotely play the PSR-300M and
select voices as required.
14
Page 17

MIDI Sequence Recording
The same type of musical information transfer described
above is used for MIDI sequence recording, A MIDI sequence
recorder can be used to *Tecord” MIDI data received from a
PSR-300M, for example. When the recorded data is played
back, the PSR-300M automatically “plays” the recorded per
formance in precise detail.
PLAYBACK
&
Functions
The Remote Control Mode
The Remote Control mode should be used when the PSR-
300M is to be connected to a second keyboard which it is to
control. If the PSR-300M is being used as the receiving de
vice, it can be played from an external keyboard while the
panel controls — including auto accompaniment — operate
normally.
• If the TEMPO [A] or [T] button is pressed during external sync
mode is engaged, "EC" (External Clock) will appear on the
display.
• External synchronization Is automatically selected when MIDI
clock is received. If the external MIDI clock data is not received,
internal clock operation is automatically resumed.
• Velocity sensitivity is dependent on the selected voice.
• Refer to the Remote Control Mode “MIDI
Implementation Chart” on page 34 for more details.
Remote Control Mode Transmission
The following points apply to MIDI data transmitted by
the PSR-300M in the Remote Control mode.
• Transmitted note numbers are not affected by the Transpose
setting.
• In the NORMAL or SPLIT mode, all keyboard data is transmitted
via the specified MIDI transmit channel. When the FINGERED or
SINGLE FINGER mode is used, only MIDI data corresponding to
notes played on the right-hand section of the keyboard is
transmitted via the MIDI OUT connector on the specified MID!
transmit channel.
Remote Control Mode MIDI Transmission
• Normal Mode
Remote Control Mode Selection
The Remote Control mode is automatically selected
whenever the PSR-300M is turned ON. If the Multi Voice
Mode has been selected (see below), however, the Remote
Control mode can be re-selected by pressing the numeric
VOICE/STYLE [0] button while holding the CHORD
MEMORY [REC] button, “rc” will appear on the display.
MULTI DISPLAY
r c
Remote Control Mode Reception
The following points apply to MIDI data received by the
PSR-300M in the Remote Conlrol mode.
• MIDI start messages control PSR-300M rhythm, chord memory
record start, and chain play start in the same way as the panel
[START/STOPl button.
• MIDI stop messages have the same effect as pressing the panel
[START/STOPl button when a function is running.
• OMNI ON means that reception can occur simultaneously on all
available channels (1 through 16). When a single receive channel
is selected, reception only occurs on the specified channel.
• In addition to note and velocity data, the PSR-300M responds to
program change, sustain ON/OFF, start, stop, and MIDI clock
messages.
• Transpose settings affect received MIDI note numbers.
Specified MIDI
transmit channel.
MIDI transmission.
SPLIT Mode
SPLIT POINT
Specified MIDI
transmit channel.
MIDI transmission.
Data from the left- and right-hand sections of the keyboard is
mixed and transmitted over the same MIDI channel.
• FINGERED, SINGLE FINGER Mode
SPLIT POINT
Specified MIDI
transmit channel.
Not transmited. MIDI transmission.
Data from the left-hand section of the keyboard is not transmitted.
15
Page 18

MOVING UP TO MIDI
• The MIDI program change number corresponding to the number
of the selected voice is transmitted when a voice is selected.
• A MIDI START message is transmitted whenever the rhythm or
accompaniment Is started, and a MIDI STOP message is
transmitted whenever the rhythm or accompaniment is stopped.
The same applies to demo and chord memory start/stop
operations.
• Accompaniment style, demo, chord memory, and transpose data
is not transmitted.
*Refer to the Remote Control Mode “MIDI
Implementation Chart” on page 34 for more details.
The Multi Mode
The Multi mode should be used when the PSR-300M is to
be used as a tone generator, for example, receiving data from a
second MIDI device (such as a sequencer). In this mode the
PSR-300M can receive on multiple MIDI channels, each chan
nel corresponding to a different voice. The PSR-300M panel
controls will not function when the Multi mode is selected.
Multi Mode Selection
If the Remote Control mode is currently selected, the
Multi mode can be re-selected by pressing the numeric
VOICE/STYLE [0] button while holding the CHORD
MEMORY [REC] button. “I J” will appear on the display.
MULTI DISPLAY
I I
I
___
Multi Mode Reception
In the Multi mode the PSR-300M functions as a multitimbre tone generator, allowing different voices to played
on all 16 MIDI channels (channel 16 is reserved for rhythm
only). Since the PSR-300M employs the Yamaha Dynamic
Voice Allocation system, it is not necessary to specify the
number of notes that can be played via each channel. A
maximum of 28 notes can be played simultaneously via all
channels.
• MIDI note and velocity messages received on a MIDI channel will
affect only the voice selected for that channel.
• Velocity sensitivity for each voice is set to a dynamic range of 48
dB linear.
• SUSTAIN ON/OFF messages are ignored.
• A program change number will select the voice controlled via the
channel on which it is received. The new voice number is shown
on the display for approximately 2 seconds. The program change
number is the same as the voice number (00 — 99).
• Program change messages on channel 16 are ignored.
• MIDI start, stop, and clock data will be ignored.
• Refer to the Multi Mode “MIDI Implementation Chart” on
page 35 for more details.
Multi Mode Transmission
The default transmit channel in the Multi mode is the
same as that in the Remote Control mode, and can be set
via the same procedure (see below). The transmitted data is
also the same as in the Remote Control mode, except that
no MIDI start/stop message transmission occurs.
• Keyboard note ON/OFF data is transmitted via the specified MIDI
transmit channel, but the internal tone generator does not sound
(LOCAL OFF).
• The transmitted note numbers are not affected by the instrument’s
TRANSPOSE setting.
• When a new voice is selected, the corresponding MIDI program
change message is transmitted on the specified MIDI transmit
channel. The internal voice assigned to that transmit channel will
also change accordingly. The program change number is the
same as the voice number.
• The channel-16 program change number will not be transmitted.
d
• Refer to the Multi-mode MIDI Implementation Chart” on
page 35 for more details.
MiPI |ve d
Press the numeric VOICE/STYLE [2] button while holding
the CHORD MEMORY [REC] button. The current MIDI
receive channel number or “ALL” will appear on the display.
While still holding the [REC] button press the key
corresponding to the desired receive channel (Cl ... E2),
confirm that the desired channel has been selected on the
MULTI DISPLAY, then release the [REC] button. The E2 key
selects the OMNI ON mode — “ALL” appears on the display.
The receive channel setting only applies in the remote
control mode.
7911 14 16
I I I I i rn I
3 5 6 8 10 12 13 15 ALL
MIDI TransiYilt ChfAnel Spit^ion
Press the numeric VOICE/STYLE [1] button while holding
the CHORD MEMORY [REC] button. The current MIDI
transmit channel number will appear on the display. While still
holding the [REC] button press the key corresponding to the
desired transmit channel (Cl ... Et2), confirm that the desired
channel has been selected on the MULTI DISPLAY, then
release the [REC] button.
The transmit channel is automatically set to channel 1 and
the receive channel is automatically set to OMNI ON when the
power is initially turned ON.
7 9
I I I I I I I I 1
3 5 6 8 10 1213 15
16
Page 19

• If MIDI note numbers higher than CÍ6 are received
when the DRUMS voice is selected (in either the
Remote Control or Multi mode), the corresponding
percussion sounds are produced.
C#6 = Voice "Five”
D#6 « Voice "Six”
F#6 - Voice "Seven”
Gi6- Voice "Eight”
AI6 « Click Lo
C#7 * Click Hi
• Data received via the MIDI IN connector is n^ re
transmitted via the MIDI OUT connector (i.e. no
echo-back) in either the Remote Control or Multi
mode.
TROUBLESHOOTING
Something not working as it should? In many cases what
appears to be a malfunction can be traced to a simple error that
can be remedied immediately. Before assuming that your
PSR-300M is faulty, please check the following points.
1. PROBLEM
■ The PSR-300M speakers produce a “pop” sound when
ever the power is turned ON or OFF.
CHECK
• This is normal and is no cause for alarm.
2. PROBLEM
• No sound.
CHECK
• Are the MASTER VOLUME control and accompani
ment volume levels turned up high enough?
3. PROBLEM
• Rhythm won’t start or no rhythm sound.
CHECK
• Is the accompaniment volume turned up high enough?
• Are you sure you pressed the START button?
• Perhaps the PSR-300M is in the SYNCHRO START
mode, so all you have to do is start playing.
4. PROBLEM
• Auto accompaniment won’t function. No lower key
board sound.
CHECK
• Auto accompaniment won’t function if the FINGERED
mode is selected and you’re using SINGLE FINGER
type fingering or improper chord fingering.
• Are you sure you’re playing in the left-hand section of
the keyboard when the FINGERED or SINGLE FIN
GER mode is selected?
• The left-hand section of the keyboard will produce no
sound if synchro start is disengaged in the FINGERED
or SINGLE FINGER mode.
5. PROBLEM
• The accompaniment key changes while you’re playing.
CHECK
• Perhaps you accidentally pressed a key in the left-hand
range.
6. PROBLEM
• Auto accompaniment chords don’t seem to change prop
erly.
CHECK
• Arc you playing chords that the PSR-300M can recog
nize (see fingering chart on page 19)?
7. PROBLEM
• The sound is distorted or intermittent.
CHECK
• In this case, your batteries are probably flat and need
replacement.
17
Page 20

TROUBLESHOOTING
SPECIFiaTIONS
8. PROBLEM
• Sustain produces little or no effect.
CHECK
• The sustain effect may not sound as deep as it normally
does when used during accompaniment or demo
playback. This is normal.
9. PROBLEM
• Abnormal operation not listed above. Complete lack of
control.
CHECK
• The internal microprocessor may have been “locked up”
due to static electricity or other causes. Turn the instru
ment OFF for a minute or so, then turn it ON again.
• If the power can not be turned off by using the
[POWER] button, remove the batteries and/or unplug the
AC power adaptor.
Keyboard:
61 keys (C1-C6) with touch response.
Voices:
100 voices
Accompaniment styies:
50 styles
Song Book:
15 songs
Other Controls:
OVERALL CONTROL; POWER (ON/OFF), MODE (NORMAL/
SPLIT/SINGLE FINGER/FINGERED). MASTER VOLUME.
ACCOMP. VOLUME (+/-), TRANSPOSE (+/-), TEMPO (+/-), SPLIT
POINT CHANGE ^
ACCOMPANIMENT CONTROL; INTRO/FILL IN, SYNCHRO
START ON OFF/ENDING, START/STOP
VOICE/STYLE; STYLEA/OICE, 0~9, +, DUAL VOICE ON/OFF
SUSTAIN; ON/OFF
AUTO HARMONY; +/CHORD MEMORY; REC., BANK 1, BANK 2. BANK 3, CHAIN
SONG BOOK; SONG SELECT {+/-). MINUS ONE (START/STOP).
DEMO (START/STOP)
Auxiliary Jacks:
HEADPHONES/AUX. OUT, DC(9-12V) IN, MIDI IN/OUT
Main Amplifiers:
\ 2.0W X 2
SpeaReFs:
10cm (3-15/16") X 2
Rated Voltage:
DC 9V
Batteries:
Six SUM-1,"D" size, R-20 or equivalent batteries
AC Power Adaptor:
PA-3 (Also PA-4 or PA-40 can be used.)
Dimensions (W x D x H):
931mm X 347mm x 137mm (36-5/8" x 13-11/16" x 5-3/8"
Weight:
4.7kg (10.4lbs.) excluding batteries
Supplied Accessory:
• Music Stand
• Yamaha PA-3 AC Power Adaptor
• Owner's Guide
18
Page 21

FINGERING CHART
All fingerings shown are simple root-position types.
ctt
(Dt)
D#
(Et.)
F#
Major
I
I
I
1
Cm
Citm
{Dt m)
Dm
D#m
(Etm)
Em
Fm
Fitm
(Gt»m)
Minor
Seventh
O7
C#7
(DI-7)
D7
mm -mm
D#7
(&7)
ffl
F#7
(Gt7)
Minor seventh
Cm 7
Cffm7
(I>m7)
D#m7
(Etm?)
Em 7
Fm7
F#m7
(Gl-m7)
G#
(A^
AD
(Bl)
Gm
I
G#m
(Atm)
Am
A#m
(Btm)
Bm
G?
G#7
iAl-7)
A7
A#7
B7
i
Gm7
G#m7
(Atm 7)
Am 7
A#m7
iBVm7)
Bm7
19
Page 22

FINGERING CHART
Major seventh
CM 7
Jl1F
C#M7
(Dl^wiy)
DM7
D#M7
(E^M7)
EM 7
wF
F
1 1
FM7
F
F#M7
(G1^M7)
F
Minor major seventh Augmented
III CmM7
F1F
III C#mM7
Ill DmM7
III D#mM7
fTf (El-mM?)
Ill EmM7
III FmM7
(DtmM?)
F
F F
1
F
F
III F#mM7
fff (Gl-mM?)
•
III Caug
III CFaug
fff (Dl-aug)
III Daug
F
III D#aug
III (El>aug)
III Eaug
F
III Faug
III F#aug
Jll (Gl»aug)
F
1F
F F
F1F
F
F
Diminished
III Cdim
III C#dim
III (Dtdim)
III Ddim
III OFdim
III (Etdim)
III Edim
III Fdim
III F№
Tff (Gtdim)
Bffir
mm
GM7
G#M7
(AI>M7)
AM 7
Am?
(B1-M7)
BM7
1I E
20
III GmM7
1F
III G#mM7
TfJ (Ai^mM7)
1F
• 1
III AmM?
Ill AftnMr
{B.H1M7)
*1 I«!
1F
Ill BmM7
III Gaug
F1F
F1F
F Ft F
III Aaug
•
1
F
F1F
F1 » FfflF
Baug
F1F
III Gdim
III Gfdim
TTT (A^dim)
III
•
III A#dim
III (Bl-dim)
F ““
ni l
Page 23

Suspended fourth
Minor seventh flatted fifth
Minor sixth
Seventh suspended
fourth
CSUS4
^ C#SUS4
(DI»SUS4)
DSUS4
D4tsus4
(Et sus 4)
EsUS4
FsUS4
F#SUS4
(Gt sus 4)
GsUS4
1
mil fflii
!!
Cm 7-5
C|tm7-5
(Dt m7*5)
Dm 7-5
D#m7-5
(Etm7*5)
Fm7'5
F#m7-5
(Gt m7-5)
Gm7-5
ÎÎ
ÏÏ
H
H
C7SUS4
C#7SUS4
(Dt7SUS4)
D7SUS4
D#7SUS 4
(Et7SUS4)
E7SUS4
F7SUS4
F#7SUS4
(Gt7SUS4)
G7SUS4
MU
0
0
GtsUS4
(AtsUS4)
AsUS4
A#SUS4
(BtsUS4)
BsUS4
MI
G#m7-5
(Atm 7-5)
Bm7-5
G#7SUS4
(At7SUS4)
A7SUS4
A#7SUS4
(Bt7SUS4)
B7SUS4
fflffl!
21
Page 24

FINGERING CHART
Seventh flatted fifth
C7'5
II
C#7-5
(D^7-5)
III
D7-5
II
HIII
D#7-5
(El-7-5)
HIII
E7-5
III II
F7-5
F#7-5
(GI-7-5)
MlII
G7-5
MI II
G#7-5
(Al-7-5)
A7-5
Ml
A#7-5
(81-7-5)
MI II
II
M II
II
B7-5
MI
22
II
Page 25

"SONG BOOK" SCORES
STYLE; 05 EURO BEAT
V: = VOICE
H::= AUTO HARMONY
J - 128
-jA
____________
—-
-----------
^ INTRO
B^
■
---*----9----
_
_____________
P I* 9
____1___m____
i J r ir or
00: ORIGINAL THEME
bI-
—M
____________
— —p— —
C
J*
_______
-----gpJ—lx—Ei—
■
-------
___M___
----------------------------^--------------------------
V; 81
H: 05
c Bl-
^ ^
_______________________o____
_________
m
_________
h rra
■X, J
YAMAHA Original
B^
FILL IN
D7
É
V: 75
D? Dm? G?
Am?
> r J r l[ji - U f n
|rr ^EBTCrlr .
'^'Coda
C
* Repetition is also performed when returned by the D.S,
Bl»
D7 Dm?
bI' c c
ENDING
G?
-0-
Bm?
«rnr
FILL IN D_S.
Fine
23
Page 26

//
SONG BOOK" SCORES
STYLE: 06 ROCK 1
V: = VOICE
H; = AUTO HARMONY
J - 144
01: SING
Music by Joe Raposo
Fmaj7 Gm7
m.wT j)| ^
INTRO
Fmaj7
Gm7
C7
r J’lr r ^
Gm7
Bl’7
á
XE
XE
F7 Cm
i
C7 Fmaj7
y_i - jip. =
.............
a r.........................- -
.
U
-----------------^----------
V: 78
H: 00
jyCY-
Dm7
Gm 7 Gm7
' %y
Gm7
Fmaj7 Gm7
F7 bI-
FILL IN
G7
£
m—
H—\—^
■'
LJ. no
G m7
...
"j fj J
....
.........m__
Fmaj7 Cm7
-5
Bm7
È
F7
> r iCrr r r irrri’ vPltTr
H: 00
C7
r pi lrCfPr¡;1f CfPr pirCff
International Copyright Secured All Rights Reserved
F
Copyright & 1971 Jonico Music, Inc.
Fmai7
Gm7 A7 Dm
ENDING
Fine
24
Page 27

STYLE: 26 JAZZ WALTZ
V; = VOICE
H: = AUTO HARMONY
J = 120
i
INTRO
G7
02: HAPPY BIRTHDAY TO YOU
G7
J j II- J J=^
J II- ^ J r
~t ^ V : 59 + 08
H: 00 {2nd. time H: 02)
C fill in p
Mildred J. Hilt and Patty S. Hilt
1
C
G7
Music by
s È
G7
________
ni.n n
FILL IN
Copyright fc) 1935 Summy-Birchard Music, a division of Birch Tree Group Ltd,
Copyright Renewed International Copyright Secured All Rights Reserved
STYLE; 17 FUNK 1
V; = VOICE
H: = AUTO HARMONY
J = 116
C7
C7
^ INTRO FILL IN ^-32
1—t
FILL IN
03: SPRING
G7
G C
H: 01
m
_
G7
m
ENDING
Music by Vivaldi
Fine
H: 02
C
•Cf^ pietre; LF-T^ti:rvprxrr:t.F
G7 C
ENDING
H: 01
Fine
25
Page 28

"SONG BOOK" SCORES
STYLE: 43 MARCH
V: = VOICE
H: = AUTO HARMONY
J = 120
INTRO
Gm
---------------
i i~tW
1 [■
H: 02
Gm C7
.....
r
^ V; 39
1 00
^Coda
jP 1 ^^
F
-----------------
-----------
V: 39
f r m
--
D m
\{\n
“Ti 0~m~ • d
F
G7 C7
04: CARMEN
J
L_5_l t
\nn
--
-----
Am
1 r-f
__
----------
F
^ jW,-
F F
^ FILL IN ENDING
STYLE: 48 BAROOUE
Gm C7 F Dm G7 C
f
E7
*
r3j 1 1 h-=F=^
^ FILL IN
Music by Bizet
D.S.
-----
-----
Fine
1
1
V: = VOICE
H: = AUTO HARMONY
j = 116
G D7
05: GRANDFATHER’S CLOCK
1
0
----
m-
m
INTRO
G D7 G G • •
' II 2. G ^ A г^
¿»rtrrmf ) ffjir ) trr
•J PH I IM
Em
A7 D7
Ü
G G C G G
V: 58 + 77
H; 04
r If r rT
C Cm G D7
FILL IN
G D7 G
Pv> P,| ifiTtfr tr ir pi
p., , P,, tTiP
D7
V
G D7 G C
l|.r rrr rT|ffffr IT
V: 68 + 77
H: 01
C Cm G D7
C G G
i
G
i9~
SL.
Music by Henry Clay Work
G _ C
m
ENDING
26
Fine
Page 29

STYLE; 09 POPS
V: = VOICE
H: = AUTO HARMONY
4** r
V ; 00
06: MINUET
m
Music by Bach
STYLE; 14 SLOW ROCK
V: =VOICE
H; = AUTO HARMONY
j-76
INTRO FILL IN
Et G7 A
FILL IN
1.
A
hk
FILL IN
F G7 C
1
D7
I
FILL IN
FILL IN
07: SOMETHING
Cmaj7
i ^
V; 02
(D.S —H; 01)
— M. u 1^
G
G Am AmM7 Am?
i I •''^'laefEËEr' i
D.S.
ct,
H; 01
*^Coda
^ FILL IN
ptm pltm?
F El' G7 C
ENDING
Music by George Harrison
C7
•ëTST '' ^
Fine
International Copyright Secured All Rights Reserved
<i; 1969 HARRISONGS LTD.
27
Page 30

//
SONG BOOK" SCORES
STYLE: 38 REGGAE 2
V: = VOICE
H: = AUTO HARMONY
, = 120
^ ^
—4-----------------
INTRO
08: HOUSE OF THE RISING SUN
E7
Am
------
^^i—T"
FILL IN
Am
t i F
'j
V: 34
.- -
...^.......
1J ^ ^ ^
■•• K?-! ,
E7
- i
J j)rJ: -j
Am C
J M p ^ ^ r I r
E7 Am E7 r-.?-n
i J>j i IJ JiiJ- M- i ) |T
*J L.JJ
•i ~'L.0J '-S-'
Am C
'-5-'
1 - _ —
---
^—c
j J)
E7
Am
American Folk Song
UJ-J
&
E7
Pif r ir
E7
(| ~ i- ^ ^
♦J ‘-5-'
Am
rpif r
.....
>,f—t I- >
ENDING
E7
331
E7 a
Fii
28
Page 31

STYLE; 40 WALTZ 1
V: = VOICE
H: = AUTO HARMONY
J - 112
G7
09: EDELWEISS
Music by Richard Rodgers
G7
l9-=-
INTRO
G7
V; 17
H: 02
FILL IN
Am Dm
G7
É i
G7
1.
G7
C
V: 74
i
V: 74
H: 00
G7
G7
5
G7
i
f
C7 Fm
2.
F Fi
G7
FILL IN
D7
$
s
FILL IN
Copyright © 1959 by Richard Rodgers and Oscar Hammerstein II
WILLIAMSON MUSIC owner of publication and allied nights throughout the world.
International Copyright Secured All Rights Reserved
Copyright Renewed
m
i
ENDING
r i Ml
Fine
29
Page 32

//
SONG BOOK" SCORES
STYLE: 31 SAMBA
V; A = VOICE: 11+01
V: B = VOICE: 06 + 89
J = 108
I
...
^ I ^
10: LA CUCARACHA
G7
Traditional
G7
G7 G7
G7
G7
affCr»
V: A
G7
G7
....
^
G7 C
V: B
V: B
V: B
V: A
V: A
C
G7
fe
\/ ■ D PNiniNir;
-------- -------------- -------------
V: A
-------------------------------------
:3EEEE#
----
-------------------------------------
V: B
c
G7
*-0mP0
V; B
C G7
V: B
G7
-
.. ............................ ..... ....
V: A ^
II
1
30
Page 33

STYLE; 47 MUSIC BOX
V: = VOICE
H: = AUTO HARMONY
J -80
G7
11: AMARYLIS
Music by Louis \lll
C F G7
*
INTRO
c
J iJ ::J
^ r*
Fm B^l Cm Cm G7
I ^
L
____
J L. ■ -J
H: 00 H: 00 H: 00 H; 00
-5
Dm7 G7
i .... J
H: 00
STYLE: 44 POLKA
V; = VOICE
H: = AUTO HARMONY
. = 124
FILL IN V: 59
C F G7
...
G7
FILL IN V:59 D.S.
H: 00
F
toi^C Cm G7 Cm G7 Cm
IJ J
•^Coda
12: 0, VRENELI
C7
i
m
3
i
V: 00
H: 02
Cm G7 Cm
IJ
C
ENDING
Ì...J J.=j3
H: 00
Fine
Swiss Folk Song
i
INTRO FILL IN ^ ^ ^ ^ ^
Bt F C7 F Bi’
V: 92
31
Page 34

//
SONG BOOK" SCORES
STYLE; 41 WALTZ 2
V: = VOICE
H: = AUTO HARMONY
J
= 1I2
1
INTRO
Am
13: GREENSLEEVES
Am
D m
Am
V: 55
^ 1^ . I* I J- i^jf...-if J |J- J)J ||^ J IJ ^
Am E7
J itJ- ..>1^
E m
1 1 1
Am
_j
-.-
e) ;=
_pj
zftiz^fcEzzz::
_________
¿= :
»
-
i—1 1 1 ^ j 1
r r 1
H: 02
B7
E m
Em
English Folk Song
D
2
Am
■
E m
I
r ^ ij
Am E7 Am Am Am Am
FILL IN
ft J ItfJ- J I ^ il ^
FILL IN ENDING
r 1^' “T
Am
U
Fn
32
Page 35

STYLE: 42 WALTZ 3
V: = VOICE
H: = AUTO HARMONY
, = 136
14: WE WISH YOU A MERRY CHRISTMAS
English Folk Song
G7
h > J ir C/LTl;
INTRO
D7
C
Dm G7 C
FILL IN V: 77
(
:
■
G7
- - - - -
m
- - - -m- - - - - - -
c
H: 02
w.—W
D7
I I I
E7
Dm
r r r If r
f
- - - - - -M- - - - - - -
*^Coda
C
V: 73
Am Dm G7 C
J- J j J J J J-
E7
J ir rrrr Ir^
D7
h C
■ : P
I
- - - - -
. . . . . . . . . . . .
c
- - -
^ I
FILL IN
Am
F
^ j
_ _ _ _4_ _ _
I
i
$
D.S.
V: 73
H: 00
ENDING
Fine
33
Page 36

YAMAHA [Portatone]
Model PSR-300M Remote control mode MIDI Implementation Chart
Date : 03/07,1991
Version : 1.0
Transmitted
Function
Basic Default
Channel Changed
Default
Mode Messages
Altered
Note
Number : True voice ********** 24-127
Velocity Note ON
Note OFF
After Key’s
Touch Ch’s
Pitch Bender
Control 64
Change
O 9nH, V = 1-127
X 9nH, V = 0
1
1-16
3
X
36-96
X
X
X
X
Recognized Remarks
OMNI
1-16, OMNI
1
X
X
24-127
O 9nH, V = 1-127
X 9nH, V = 0, 8nH
X
X
X
o
M
SUSTAIN ON/OFF
Program
Change : True#
System Exclusive
System : Song Pos
: Song Sel
Common ; Tune
System : Clock
Real Time : Commands
Aux : Local ON/OFF
: All Notes OFF
Messages : Active Sense
Notes :
*1 : External clock sync selected when external clock signal received.
Mode 1 : OMNI ON, POLY Mode 2 : OMNI ON, MONO
Mode 3 : OMNI OFF, POLY Mode 4 : OMNI OFF, MONO
O 0-99
**********
X
X
X
X
o
o
X
X
o
O 0-99
0-99
X
X
X
X
0(*1)
o START/STOP
X
X
o
O: Yes
X : No
34
Page 37

YAMAHA [Portatone]
Model PSR-300M Multi mode
MIDI Implementation Chart
Date : 03/07,1991
Version : 1.0
Function
Basic Default
Channel Changed
Default
Mode Messages
Altered
Note
Number : True voice
Velocity Note ON
Note OFF
Kfter Key’s
Touch Ch’s
Pitch Bender
Control
Change
Transmitted
1
1-16
1
X
36-96
**iic *%* + **%
O 9nH,v= 1-127
X 9nH, V - 0
X
X
X
X
Recognized Remarks
1-16
1-16
1(*1)
X
X
24-127
24-127
O 9nH,v= 1-127
X 9nH, V = 0, 8nH
X
X
X
X
Program
Change : True#
System Exclusive
ystem ; SongPos
: Song Sel
Common : Tune
System : Clock
Real Time : Commands
Aux ; Local ON/OFF
: All Notes OFF
Messages : Active Sense
Notes:
*1 : 16-channel multi-timbre. Dynamic Voice Allocation.
*2 : Not received on channel 16 (rhythm only).
Mode 1 : OMNI ON, POLY Mode 2 : OMNI ON, MONO
Mode 3 : OMNI OFF, POLY Mode 4 : OMNI OFF, MONO
O 0-99
X
X
X
X
X
X
X
X
o
O 0-99 (*2)
0-99
X
X
X
X
X
X
X
X
o
O; Yes
X : No
35
Page 38

FCC INFORMATION (U.S.A.)
1. IMPORTANT NOTICE: DO NOT MODIFY THIS UNIT!
This product, when installed as indicated in the instructions contained in this manual, meets FCC require
ments. Modifications not expressly approved by Yamaha may void your authority, granted by the FCC, to use
the product.
2. IMPORTANT: When connecting this product to accessories and/or another product use only high quality
shielded cables. Cable/s supplied with this product MUST be used. Follow all installation instructions. Failure
to follow instructions could void your FCC authorization to use this product in the USA.
3. NOTE: This product has been tested and found to comply with the requirements listed in FCC Regulations, Part
15 for Class “B" digital devices. Compliance with these requirements provides a reasonable level of assurance
that your use of this product in a residential environment will not result in harmful interference with other elec
tronic devices. This equipment generates/uses radio frequencies and, if not installed and used according to
the instructions found in the users manual, may cause interference harmful to the operation of other elec
tronic devices. Compliance with FCC regulations does not guarantee that interference will not occur in all
installations. If this product is found to be the source of interference, which can be determined by turning the
unit “OFF" and “ON", please try to eliminate the problem by using one of the following measures:
Relocate either this product or the device that is being affected by the interference.
Utilize power outlets that are on different branch (circuit breaker or fuse) circuits or install AC line filter/s.
In the case of radio or TV interference, relocate/reorient the antenna. If the antenna lead-in is 300 ohm ribbon
lead, change the lead-in to co-axial type cable.
If these corrective measures do not produce satisfactory results, please contact the local retailer authorized
to distribute this type of product. If you can not locate the appropriate retailer, please contact Yamaha Corpo
ration of America, Electronic Service Division, 6600 Orangethorpe Ave, Buena Park, CA90620
The above statements apply ONLY to those products distributed by Yamaha Corporation of America or its
subsidiaries.
36
WARNING: CHEMICAL CONTENT NOTICE!
The solder used in the manufacture of this product contains LEAD. In addition, the electrical/electronic and/or plastic (where
applicable) components may also contain traces of chemicals found by the California Health and Welfare Agency (and possi
bly other entities) to cause cancer and/or birth defects or other reproductive harm.
DO NOT REMOVE ANY ENCLOSURE COMPONENTS! There are no user serviceable parts inside. All service
should be performed by a service representative authorized by Yamaha to perform such service.
IMPORTANT MESSAGE: Yamaha strives to produce products that are both user safe and environmentally “friendly”. We
sincerely believe that our products meet these goals. However, in keeping with both the spirit and the letter of various statutes
we have included the messages shown above and others in various locations in this manual.
Page 39

YAMAHA
IMPORTANT
PLEASE RECORD THE SERIAL NUMBER OF YOUR UNIT IN THE
SPACE BELOW.
MODEL: PSR-300M
SERIAL NO:
THE SERIAL NUMBER IS LOCATED ON THE BOTTOM OF THE UNIT.
RETAIN THIS OWNER'S GUIDE IN A SAFE PLACE FOR FUTURE REFER
ENCE.
________
_____________
_____________________________
YAMAHA CORPORATION
RO.Box 1, Hamamatsu, Japan
© 1991 YAMAHA CORPORATION
O^^IOS VM475I0 Printed in Japan
 Loading...