

Page 1

Owner’s Manual
Page 2

Congratulations!
You are the proud owner of a Yamaha PortaTone. Your PortaTone is a
high-quality musical instrument that incorporates advanced Yamaha digital
technology and many versatile features. In order to obtain maximum performance and enjoyment from your PortaTone, we urge you to read this
Owner’s Manual thoroughly while trying out the various features described. Keep the Owner’s Manual in a safe place for later reference.
CONTENTS
BEFORE YOU BEGIN
Power Supply
Setting Up the Music Stand
Maintenance
NOMENCLATURE
Top Panel Controls
Rear
Panel
SELECTING AND PLAYING VOICES
SUSTAIN
DUAL (PSR-300 only)
TRANSPOSE
THE SPLIT MODE
RHYTHM ACCOMPANIMENT
AUTO ACCOMPANIMENT
Single Finger Accompaniment
Fingered Accompaniment
AUTO HARMONY..
THE CHORD MEMORY
Recording
Bank Playback
Chain Playback
SONG BOOK
MOVING UP TO MIDI
A Brief Introduction to MIDI
PSR-300 MIDI Settings & Functions
TROUBLESHOOTING
SPECIFICATIONS
FINGERING CHART
“SONG BOOK” SCORES
...................................................................
.......................................................
..........................................................
Connectors
............................................................
............................................................
..........................................................
.............................................
...................................
...................................................
................................................
........................................
................................................
...................................................
...............................
...................................
.............................
..................................
...............................................
........................................
.....................................................
...................................................
(PSR-300 only)
.................................
..........................................
................................................
.............................................
....................................
................
.................
..................
1
1
1
1
2
3
3
4
5
5
5
6
7
9
9
10
11
11
11
12
12
13
14
14
15
17
18
19
23
“Sing,” “Happy Birthday to You,” “Something,” and “Edelweiss,” included in the PSR-200/300 SONG BOOK, are published for Yamaha Corporation by Hal Leonard Publishing Corporation.
Page 3
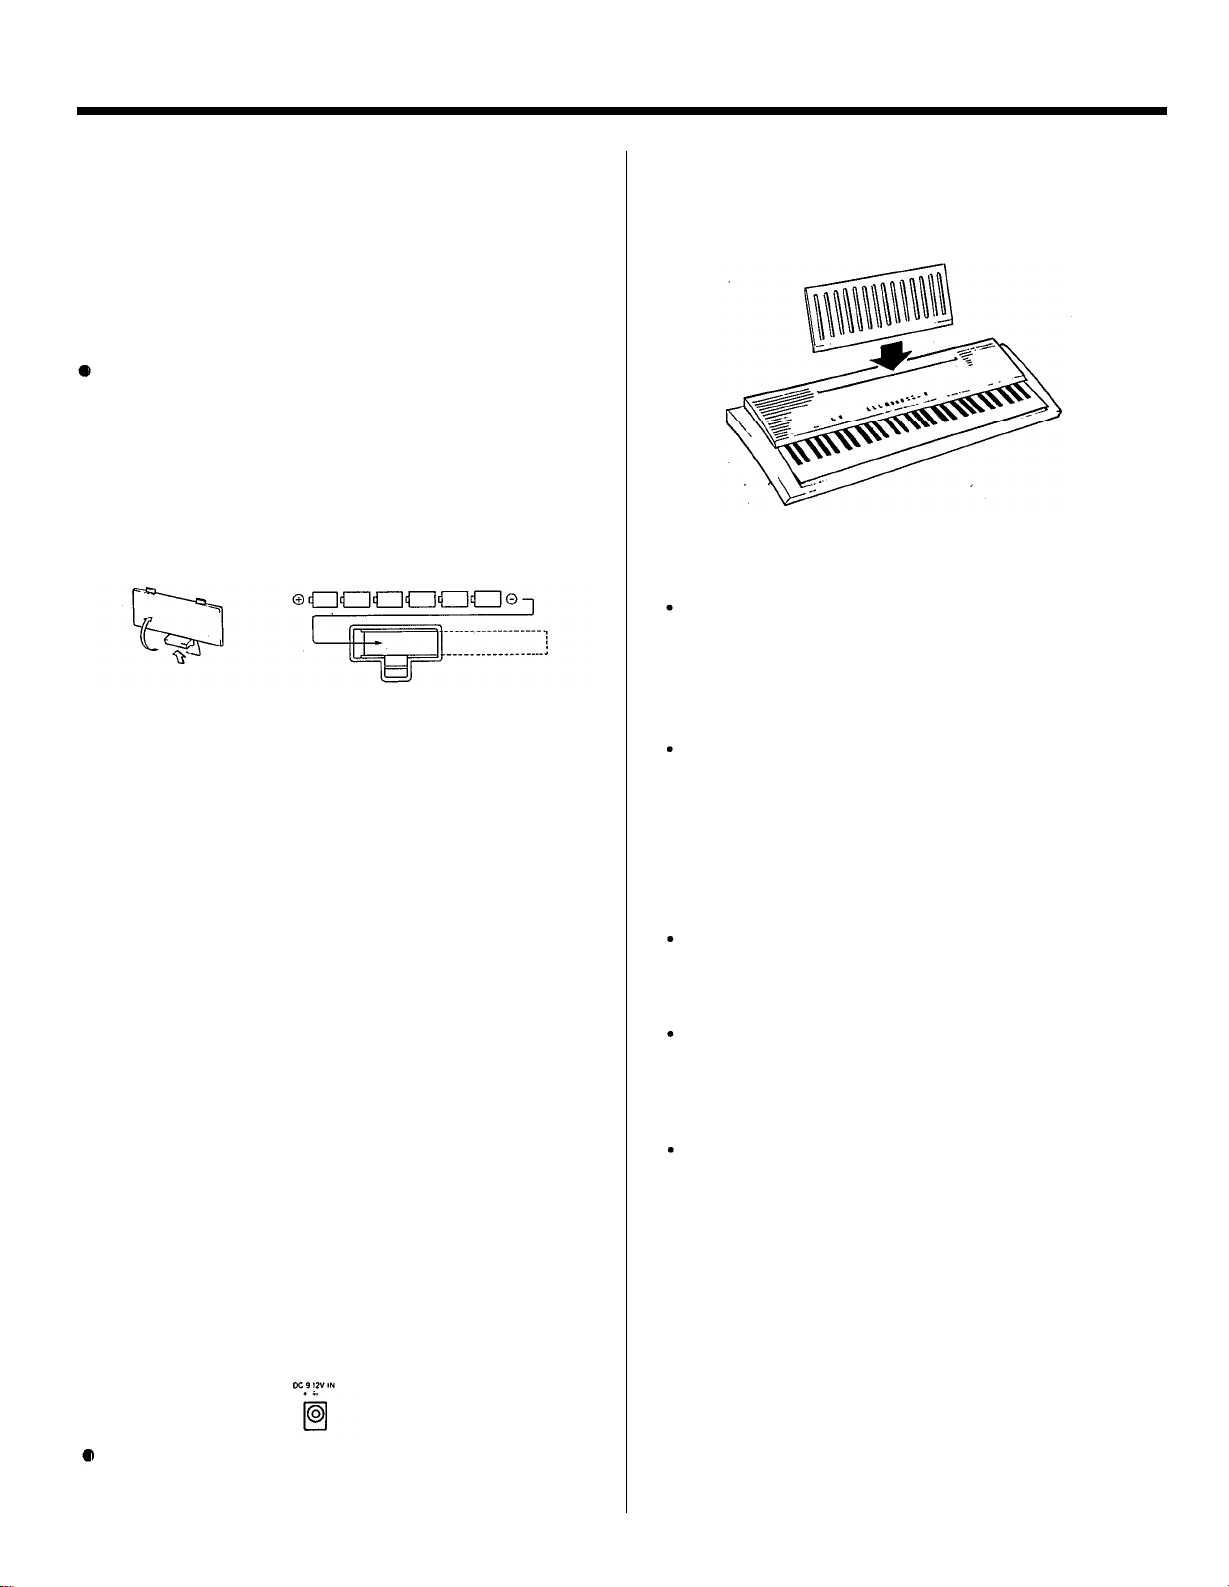
BEFORE YOU BEGIN
Power Supply
Your PSR-200 or PSR-300 will run either from batteries or
an optional power adapter. Follow the instructions below according to the power source you intend to use.
Using Batteries
Six 1.5V D size (SUM-1 or R-20) or equivalent batteries
must first be installed in the battery compartment.
Before replacing the batteries, make sure that the power is turned off.
During battery replacement the memory will be backed up for approximately 1 minute.
1.
Open the battery compartment cover located on the instrument’s bottom panel.
2.
Insert the six batteries, being careful to follow the polarity
markings on the cabinet.
Replace the compartment cover, making sure that it locks
3.
firmly in place.
* The included batteries are for testing purposes. Their service life might
be considerably shortened due to storage conditions, etc.
Caution:
1. When the batteries run down, replace them with a complete
set of six new batteries. NEVER mix old and new batteries.
2. Do not use different kinds of batteries at the same time.
3. In case electrolyte has leaked into the battery compartment,
wipe it off completely before installing new batteries.
4. To prevent possible damage due to battery leakage, remove
the batteries from the instrument if it is not to be used for an
extended period of time.
Auto Power OFF
To prevent unnecessary battery drainage, the PSR-200/PSR300 features an Auto Power OFF function that automatically
turns the power OFF if the instrument is not used for
approximately 10 minutes.
The Auto Power OFF function does not operate when the
PSR-200/PSR-300 is powered from an optional AC Power
Adaptor, as described below.
Using An Optional AC Power Adaptor
Plug the DC output cable from an optional Yamaha PA-3,
PA-4, or PA-40 AC Power Adaptor into the DC IN jack on the
rear panel of the PSR-200/PSR-300, then plug the AC Power
Adaptor into a convenient wall AC power socket.
The internal batteries are automatically disconnected when
an AC Power Adaptor is used. Disconnect the AC Power
Adaptor when not using your PSR-200/PSR-300.
Setting Up the Music Stand
Insert the bottom edge of the music stand into the slot
located at the rear of the PSR-200/PSR-300 control panel.
Maintenance
Location
Avoid exposure to direct sunlight or other sources of heat.
Never leave it inside a car where it can get very hot. It may
cause discoloration or deformation. Vibration, excessive
dust, cold, low or high humidity can also cause malfunction.
Handling
Avoid rough handling. Don’t drop or jolt the PSR-200/300
as this can damage the internal circuitry. Pressing too hard
on keys or controls may lead to malfunctions. When cords
are plugged into the rear panel jacks, pay particular attention
not to apply excessive force to them since this may damage
the terminals.
Cleaning
Clean the exterior with a soft, dry cloth. Using chemical
solvents will damage the finish.
Interference Through Electromagnetic Fields
Do not use your PSR-200/300 close to television sets or
other equipment receiving electromagnetic signals as this
could cause interference noise in the other appliance.
Service and Modifications
Your PSR-200/300 contains no user serviceable parts.
Opening it or tampering with it in any way can lead to electrical shock as well as damage. Refer all servicing to qualified YAMAHA personnel.
YAMAHA is NOT responsible for damage caused
by improper use.
Use ONLY a Yamaha PA-3, PA-4, or PA-40 AC Power Adaptor to
power your instrument from the AC mains. Other adaptors may
cause serious damage to your PSR-200/PSR-300.
1
Page 4
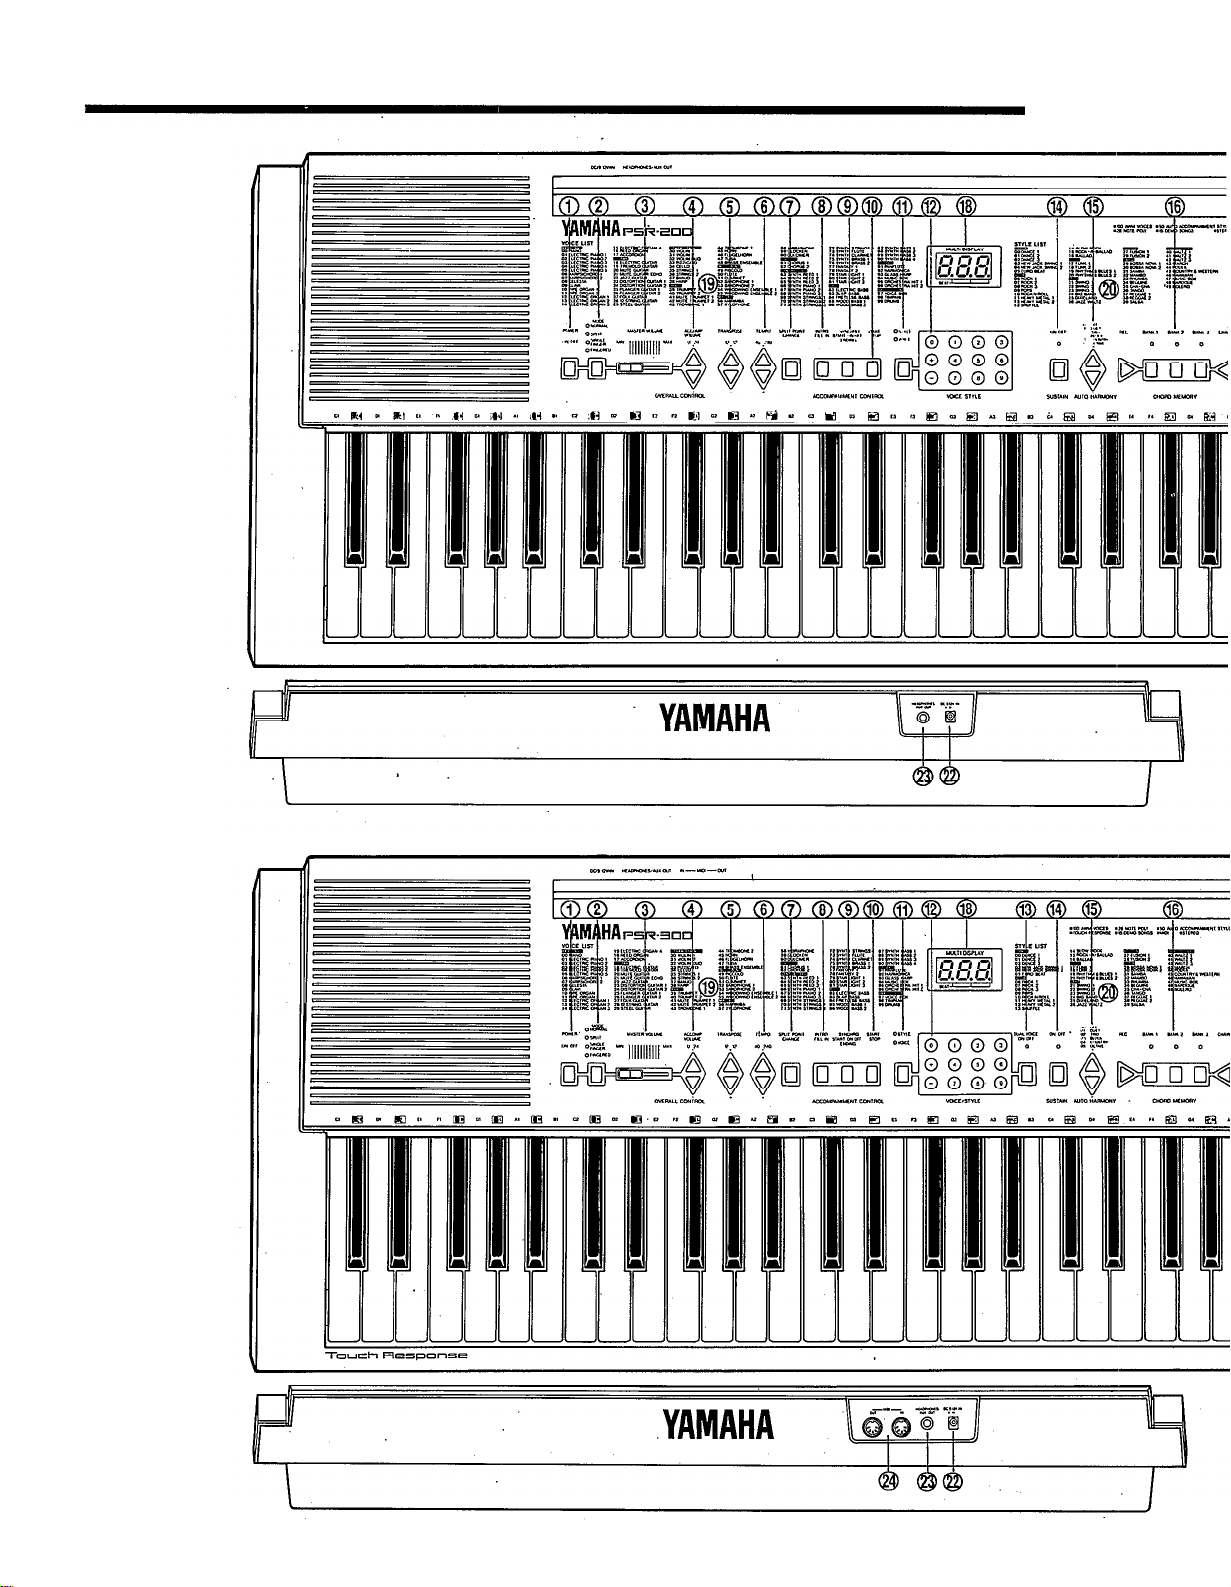
NOMENCLATURE
PSR-200
PSR-300
2
Page 5

Top Panel Controls
[POWER] Button
[MODE]Button
[MASTER VOLUME] Control
[ACCOMPANIMENT VOLUME]Buttons
[TRANSPOSE] Buttons
[TEMPO] Buttons
[SPLIT POINT CHANGE] Button
[INTRO/FILL
[SYNCHRO START/ENDING] Button
[START/STOP] Button
[VOICE/STYLE] Button
Numeric VOICE/STYLE Buttons
[DUAL VOICE] Button (PSR-300 only)
[SUSTAIN] Button
[AUTO HARMONY] Buttons
[CHORDMEMORY]Buttons
[SONG BOOK] Buttons
MULTIDISPLAY
VOICE LIST
STYLE LIST
SONG LIST
.........................................................................
..................................................................
..................................................
...........................................................
..........................................................
..................................
IN]
Button
.........................................................
...............................................................................
...............................................................................
...............................................................................
..............................................
.................
........................................
..................................................
......................................
...................................
.....................................................................
................................................
.....................................
..................................................
page
.........................
page 7,
page 6,9,10
page 8,
page 7, 8, 9,
7,8,9,10,12
page
page4,6,
page
page
page4~
page 4
6,9,10
page
page
10,
9,
10,
10,
4,7
page
page 5
page
13,14
11,13
page
page
13
10
11
12
12
11
4
7
page 8,
page
11,12,13
page
4
5
7
5
Rear Panel Connectors
DC IN Jack
The DC output cord from an optional Yamaha PA-3, PA-4, or PA-40 AC
Power Adaptor should be plugged in here when the PSR-200 or PSR-300 is to
be powered from the AC mains supply (refer to “Power Supply” on page 1 for
more details).
HEADPHONES/AUX. OUT Jack
A standard pair of stereo headphones can be plugged in here for private practice or late-night playing. The internal speaker system is automatically shut off
when a pair of headphones is plugged into the HEADPHONES jack. The
HEADPHONFS/AUX. OUT jack can also be used to deliver the output of the
PSR-200/PSR-300 to a keyboard amplifier, stereo sound system, mixing console
or tape recorder.
MIDI IN and OUT Connectors (PSR-300 only)
The MIDI IN connector receives MIDI data from an external MIDI device
which can be used to control the PSR-300. The MIDI OUT connector transmits
MIDI data generated by the PSR-300 (e.g. note and velocity dam produced by
playing the keyboard).
More details on MIDI are given in “MOVING UP TO MIDI” on page 14.
3
Page 6

SELECTING AND PLAYING VOICES
1.
Press the [POWER] button to turn the power ON. The
MULTI DISPLAY will light when the power is ON.
2.
Slide the [MASTER VOLUME] control to a position
about half way between the “MIN” and “MAX” setting.
You can set this control for the most comfortable vol-
ume level after you begin playing.
3.
If the VOICE indicator is not lit, press the [VOICE/
STYLE] button once so that it does light. The number of
the currently selected voice will appear on the MULTI
DISPLAY when the VOICE indicator is lit.
4.
Select any of the PSR-200/PSR-300’s 100 voices by using
one of the following methods:
Voice Selection Method 1:
Choose one of the 100 voices — numbered “00”
through “99” — shown on the VOICE LIST then enter its
number using the numeric VOICE SELECT buttons. To
select “ELECTRIC ORGAN 1” (number 12), for example,
first press “1” and then “2.” The number “12” should then
appear on the MULTI DISPLAY.
5.
The selected
voice can now be played on the instrument’s
keyboard.
Note that the PSR-300’s keyboard is “touch response” — that
is, you can control the loudness of the sound to a certain
degree according to how hard you play the keys. The degree of
touch sensitivity is different for each voice.
The PSR-200 and PSR-300 feature a maximum polyphony of
28-notes (depending in some cases on the selected voice), so
up to 28 notes can be played simultaneously, including extra
notes played when the automatic accompaniment, split, or dual
voice features of this instrument are used. “Full” will appear on
the MULTI DISPLAY if the 28-note limit is exceeded.
When the power is initially turned ON, the PIANO voice is auto-
matically selected and its number (“00”) is shown on the MULTI
DISPLAY.
Keyboard Percussion
When the DRUMS voice is selected (voice number 99), you
can play 25 different drum and percussion instruments on the
black keys. The percussion instruments played by the various
keys are marked by symbols above the black keys (the white
keys produce no sound).
The TRANSPOSE function described on page 5 does not affect the
DRUMS sound.
DRUM & PERCUSSION INSTRUMENT KEY
ASSIGNMENTS
Instrument
Key Symbol
C#1
BD Reverb
Bass Drum A#3
D#1
F#1
Bass Tom
Instrument
Key
G#3
Hi-Hat Foot
Crash Cymbal
C#4 Splash Cymbal
Symbol
Voice Selection Method 2:
The [+] and [-] buttons in the numeric button group can
be used to increment (increase by one) or decrement (de-
crease by one) the current voice number. Press the [+]
button briefly to select the voice one number higher than
the current voice, or the [-] button to select the voice one
number lower than the current voice. If you hold the [+] or
[-] button down, the voice number will increment or decrement continuously — simply release the button when
the desired voice number has been reached.
4
Lo Tom
G#1
A#1
Mid Tom
Hi Tom
C#2
Snare Reverb
D#2
F#2
Snare Lo
Snare Hi
G#2
Snare Open Rim
A#2
C#3
Snare Closed Rim
Hi-Hat Closed
D#3
Hi-Hat Open
D#3
D#4
Ride Cymbal
Synth Lo Tom
F#4
G#4
Synth Mid Tom
Synth Hi Tom
A#4
C#5
Synth Snare
D#5
Voice “One”
Voice “Two”
F#5
G#5
Voice “Three”
Voice “Four”
A#5
Adjusting the Volume
Adjust the [MASTER VOLUME] control while playing to
set the desired overall volume level.
Page 7

SUSTAIN
Press the [SUSTAIN] button once
(the indicator will light) and notes
played on the keyboard will decay
gradually after you lift your fingers
from the keys. Press the [SUSTAIN]
button a second time (the indicator will
go out) to turn the sustain effect off.
DUAL
The PSR-300 DUAL feature makes it possible to select and
play two different voices simultaneously.
To activate the DUAL feature press the [DUAL ON/OFF]
button (the indicator will light). When ON, the voice selected
prior to turning the DUAL feature ON will sound simultaneously with a second “dual” voice. When the PSR-300 is initially turned ON, the STAR LIGHT 2 voice (number 80) is
assigned as the dual voice. Any other voice can be selected as
the dual voice while the DUAL feature is ON.
The DUAL feature can be turned
OFF by pressing the [DUAL ON/OFF]
button again.
(PSR-300 only)
The SUSTAIN effect cannot be applied to accompaniment or rhythm,
When the PSR-300 DUAL function is engaged, sustain is applied to
both voices.
Sustain can be applied independently to the left- and right-hand
voices in the split mode (see “The Split Mode” on page 6). Press a
key to the right of the split point to select the right-hand voice, then
turn sustain on or off for that voice. Press a key to the left of the split
point to select the left-hand voice, then turn sustain on or off for that
voice.
Sustain can be turned on or off for the melody voice during DEMO
playback.
Sustain does not affect voice 97 (VOICE BOX) and voice 99
(DRUMS).
When the DUAL function is used with the SPLIT mode (see page 6)
different dual voices can be assigned to the left- and right-hand
sections of the keyboard. Press a key to the right of the split point to
select the right-hand voice, then turn DUAL on and select the righthand dual voice. Press a key to the left of the split point to select
the left-hand voice, then turn DUAL on and select the left-hand dual
voice.
TRANSPOSE
The PSR-200/PSR-300 [TRANSPOSE] buttons makes it
possible to shift the pitch of the entire keyboard up or down in
semitone intervals up to a maximum of 12 semitones (one
octave). Transposing the pitch of the PSR-200/PSR-300 keyboard makes it easier to play in difficult key signatures, and
you can simply match the pitch of the keyboard to the range of
a singer or other instrumentalist.
The TRANSPOSE
position. The first time the TRANSPOSE
pressed the current transpose value will appear on the MULTI
DISPLAY. While the current transpose value is still showing
on the display, press the TRANSPOSE
the pitch of the keyboard, or the
The selected degree of transposition will be displayed on the
MULTI DISPLAY while the TRANSPOSE
is pressed, and for approximately 2 seconds after either
TRANSPOSE button is released.
and
buttons are used for trans-
or
button is
button to increase
button to lower the pitch
or
button
When the SINGLE FINGER or FINGERED accompaniment mode is
selected, the DUAL feature applies only to the right-hand section of
the keyboard.
The transposition range is from -12 to +12, with -12 corre-
sponding to downward transposition by 12 semitones (one
octave, and +12 corresponding to upward transposition by 12
semitones. 0 is the “normal” keyboard pitch value. The normal
transpose value (0) can be recalled at any time by pressing
both the TRANSPOSE
The transpose value is automatically set to 0 whenever the power
switch is turned ON.
and
buttons at the same time.
5
Page 8

THE SPLIT MODE
The PSR-200/PSR-300 SPLIT mode allows you to play two
voices at once — one with the left hand and one with the right.
The left-hand voice can be played to the left of the “split
point,” set as described below, and the right-hand voice can be
played to the right of the split point.
1.
Press the [MODE] button as many times as necessary
until the SPLIT indicator lights — this selects the SPLIT
mode.
2.
If necessary, set the split point as described below:
Setting the SPLIT Mode Split Point:
The split point for the SPLIT mode is initially set at the
C3 key. It can be set to any other key by pressing the desired split-point key while holding the [SPLIT POINT
CHANGE] button.
The split point is shown on the MULTI DISPLAY for
as long as the [SPLIT POINT CHANGE] button is held.
The C3 key, for example, would be displayed as “C3”.
F#2 would be displayed as “F-2”. The sharp is indicated
by the lit bar between the “F” and the “2.”
The SPLIT mode split point is retained in memory and
will be recalled whenever the SPLIT mode is selected.
Note that the split-point key is included in the righthand section of the keyboard.
3.
Select the right-hand and left-hand voices as required.
When the SPLIT mode is first selected the current voice
is assigned to the right-hand keys. If no other left-hand
voice has been selected since the PSR-200/PSR-300 was
turned ON, the ELECTRIC BASS voice (number 82) will
be assigned to the left-hand keys.
The left-hand voice is octave-shifted to provide the best sound
in the left-hand range.
Changing the Right and Left-hand Voices:
Make sure the [VOICE/STYLE] button VOICE indicator
is lit (press the [VOICE/STYLE] button once if it isn’t).
To change the right-hand voice press a key to the right
of the split point. The current right-hand voice number
will be shown on the MULTI DISPLAY and a new righthand voice can be selected in the normal way.
To change the left-hand voice press a key to the left of
the split point. The current left-hand voice number will be
shown on the MULTI DISPLAY and a new left-hand
voice can be selected in the normal way.
When playing in the SPLIT mode, the MULTI DISPLAY will switch
between the left- and right-hand voice numbers according to whether
notes are played on the left- or right-hand section of the keyboard.
The PSR-300 DUAL indicator flashes according to the left- and righthand section DUAL mode settings when the SPLIT and DUAL
modes are used together.
To initialize the split point to its original default value, turn the
[POWER] button on while holding the [SPLIT POINT CHANGE]
button. The SINGLE FINGER and FINGERED split points (described later) are also initialized by this procedure.
6
Page 9

RHYTHM ACCOMPANIMENT
Selecting an Accompaniment
Style
1.
If the STYLE indicator is not lit, press the [VOICE/
STYLE] button once so that it does light. The number of
the currently selected style will appear on the MULTI
DISPLAY when the STYLE indicator is lit.
2.
Select any of the PSR-200/PSR-300’s 50 accompaniment
styles by using one of the two following methods:
1:
Choose one of the 50 accompaniment styles — numbered “00” through “49” — shown on the STYLE LIST
then enter its number using the numeric VOICE/STYLE
buttons. To select FUSION1 (number 27), for example,
first press “2” and then “7.” The number “27” should then
be displayed on the MULTI DISPLAY.
Setting the Tempo
The first time the TEMPO
current tempo will appear on the MULTI DISPLAY. While the
current tempo value is still showing on the display, press the
TEMPO
button to decrease the tempo. The selected tempo will be displayed on the MULTI DISPLAY (in quarter-note beats per
minute) while the TEMPO
approximately 2 seconds after either TEMPO button is released.
The available tempo range is from 40 to 240 beats per
minute. Each accompaniment style has a different “default”
tempo which is automatically set whenever a new style is se-
lected (but not when a new style is selected while the accompaniment is playing). The default tempo for the currently selected
accompaniment style can be recalled at any time by pressing
both the TEMPO
The tempo is automatically set to the default value for the DANCE1
style whenever the power switch is turned ON.
It is also possible to adjust the tempo after starting playback of the
accompaniment. This allows you to set the optimum tempo by ear.
button to increase the tempo, or the TEMPO
or
and
buttons at the same time.
button is pressed the
or
button is pressed, and for
2:
The [+] and [-] buttons in the VOICE/STYLE group
can be used to increment (increase by one) or decrement
(decrease by one) the current accompaniment style
number. Press the [+] button briefly to select the accompaniment style one number higher than the current accompaniment style, or the [-] button to select the accompaniment
style one number lower than the current accompaniment
style. If you hold the [+] or [-] button down, the accompaniment style number will increment or decrement continuously – simply release the button when the desired accompaniment style number has been reached.
When the power is initially turned ON, the 00 DANCE1 style is
automatically selected.
Starting the Accompaniment
Press the [START/STOP] button to start the selected accompaniment immediately, or press the [SYNCHRO START/ENDING] button if you want the accompaniment to start when you
play the first note on the keyboard. If you press the [SYNCHRO
START/ENDING] button, the three dots along the bottom of
the MULTI DISPLAY will flash at the selected tempo.
The three LED dots at the bottom of the MULTI DISPLAY provide a
visual indication of the selected tempo as follows:
1st. Beat
2nd. Beat
3rd. Beat
4th. Beat
If neither the FINGERED or SINGLE FINGER mode is selected, the
accompaniment will consist only of rhythm (drums & percussion)
sounds. Operation of the AUTO ACCOMPANIMENT SINGLE FINGER
and FINGERED modes is described on page 9 and 10.
A different accompaniment style can be selected at any time while the
accompaniment is playing. The style number display will change as
soon as the selection is made, but the new style will begin playback
from the top of the next measure. The tempo will not change when the
new style begins playing.
7
Page 10

RHYTHM ACCOMPANIMENT
Starting the Accompaniment with
an Introduction
Any of the PSR-200/PSR-300 accompaniment patterns can
be started with an appropriate introduction by pressing the
[INTRO/FILL IN] button. The intro pattern will repeat as long
as the [INTRO/FILL IN] button is held. Once the button is
released, the normal pattern will begin playing from the top of
the next measure.
Adding Fill-ins
To add a short fill-in (rhythm variation) at any time while
the accompaniment is playing, press the [INTRO/FILL IN]
button. If you hold the [INTRO/FILL IN] button, the fill-in
pattern will repeat until the button is released, then the normal
rhythm will begin from the beginning of the next measure.
Adjusting the Accompaniment
Volume
Although the MASTER VOLUME control can be used to
set the overall volume level, the ACCOMPANIMENT VOL-
UME
the selected accompaniment in relation to the right-hand
melody voice. The fist time the ACCOMPANIMENT VOL-
UME
appear on the MULTI DISPLAY. While the current volume is
still showing on the display, press the ACCOMPANIMENT
VOLUME
ton to decrease the volume. The selected volume level will be
displayed on the MULTI DISPLAY while the volume is being
adjusted, and for approximately 2 seconds after either VOLUME button is released.
The volume range is from 0 to 24, with 0 being the lowest
volume and 24 the highest. The default accompaniment volume value (21) can be recalled at any time by pressing both
the ACCOMPANIMENT VOLUME
the same time.
and
or
buttons can be used to adjust the volume of
button is pressed the current volume will
button to increase the volume, or the
and
but-
buttons at
If the [INTRO/FILL IN] button is pressed within one 1/4 beat from the
beginning of a beat, the fill in will begin immediately. If pressed at
any other time the fill in will begin on the beginning of the next beat.
Stopping the Accompaniment
An accompaniment in progress can be stopped immediately
by pressing the [START/STOP] button, or it can be stopped
with an appropriate ending by pressing the [SYNCHRO
START/ENDING] button.
If the [SYNCHRO START/ENDING] button is pressed within one 1/4
beat from the beginning of a measure, the ending will begin immediately. If pressed at any other time the ending will begin on the beginning of the next measure.
If the [INTRO/FILL IN] button is pressed while the ending pattern is
playing, a fill-in will be played, followed by a return to the normal
pattern.
The accompaniment volume is automatically set to 21 whenever the
power switch is turned ON.
8
Page 11

AUTO ACCOMPANIMENT
3.
The PSR-200/PSR-300 includes a sophisticated Auto accompaniment system that can provide automated bass and
chordal backing in a number of ways.
The maximum number of notes that can be played simultaneously
on the PSR-200/PSR-300 keyboard is reduced when the Auto Accompaniment feature is used.
Single Finger Accompaniment
SINGLE FINGER accompaniment makes it simple to produce beautifully orchestrated accompaniment using major,
seventh‚ minor and minor-seventh chords by pressing a minimum number of keys in the left-hand section of the keyboard.
The bass and chord accompaniment produced is perfectly
matched to the currently selected accompaniment style.
1.
Press the [MODE] button as many times as necessary
until the SINGLE FINGER indicator lights — this selects
the SINGLE FINGER mode.
2.
If necessary, set the split point as described below:
Select the desired accompaniment style in the normal
way. Although you can select the melody (upper keyboard) voice you intend to use, the PSR-200/PSR-300
automatically determines the voices to be used for the
accompaniment part according the accompaniment style
you select.
4.
Press the [START/STOP] button, [SYNCHRO START/
ENDING] button or the [INTRO/FILL IN] buttons to
determine how the accompaniment will be started (see
page 7). If you press the [START/STOP] button or the
[INTRO/FILL IN] button, the rhythm will begin playing
immediately without bass and chord accompaniment.
any key to the left of the split point to start the auto-
Press
5.
matic accompaniment. If you press a “C” key, for example, a C-major accompaniment will be played. Press another key in the left-hand section of the keyboard to select a new chord. The key you press will always determine the “root” of the chord played (i.e. “C” for a C
chord).
Setting the SINGLE FINGER Mode Split Point:
The split point for the SINGLE FINGER mode is initially
set at the D2 key. It can be set to any other key by pressing the desired split-point key while holding the [SPLIT
POINT CHANGE] button.
The split point is shown on the MULTI DISPLAY for
as long as the [SPLIT POINT CHANGE] button is held.
The D2 key, for example, would be displayed as “d 2”.
F#2 would be displayed as “F-2”. The sharp is indicated
by the lit bar between the “F” and the “2.”
The SINGLE FINGER mode split point is retained in
memory and will be recalled whenever the SINGLE FINGER mode is selected. A method of initializing the SINGLE FINGER mode split point to its original default
value is described on page 6.
Playing Minor, Seventh, and Minor-seventh
Chords in the Single-finger Mode
For a minor chord, press the root key and a black key
to its left.
For a seventh chord, press the root key and a white key
to its left.
For a minor-seventh chord, press the root key and both
a white and black key to its left.
The automatic accompaniment will continue playing even if you lift
your fingers from the Auto Accompaniment keys. You only need to
press the Auto Accompaniment keys when changing cords.
6.
Press the [START/STOP] button or the [SYNCHRO
START/ENDING] button to stop the Accompaniment.
9
Page 12

AUTO ACCOMPANIMENT
Setting the Accompaniment
Volume
Set the volume of the Auto Accompaniment sound using the
ACCOMPANIMENT VOLUME buttons. The MASTER
VOLUME control can be used to set the overall volume level.
Setting the Tempo
Use the TEMPO buttons to set the desired accompaniment
tempo (see “Setting the Tempo” on page 7 for details).
The [INTRO/FILL IN] button can be used in the Auto Accompaniment mode to create pattern variations in the same way that it is with
rhythm accompaniment patterns (refer to “Adding Fill-ins” on page 8
for details).
Fingered Accompaniment
The FINGERED mode is ideal if you already know how to
play chords on a keyboard, since it allows you to supply your
own chords for the Auto Accompaniment feature.
1. Press the [MODE] button as many times as necessary
until the FINGERED indicator lights — this selects the
FINGERED mode.
2.
If necessary, set the split point as described below:
Setting the FINGERED Mode Split Point:
The split point for the FINGERED mode is initially set at
the G2 key. It can be set to any other key by pressing the
desired split-point key while holding the [SPLIT POINT
CHANGE] button.
The split point is shown on the MULTI DISPLAY for
as long as the [SPLIT POINT CHANGE] button is held.
The G2 key, for example, would be displayed as “g 2”.
F#2 would be displayed as “F–2”. The sharp is indicated
by the lit bar between the “F” and the “2.”
The FINGERED mode split point is retained in
memory and will be recalled whenever the FINGERED
mode is selected. A method of initializing the FINGERED
mode split point to its original default value is described
on page 6.
The PSR-200/300 memorizes separate SINGLE FINGER, FINGERED, and SPLIT mode split points. The corresponding split point
is automatically recalled when one of these modes is selected.
3.
Select the desired accompaniment style in the normal way.
Although you can select the melody (upper keyboard)
voice you intend to use, the PSR-200/PSR-300 automatically determines the voices to be used for the accompaniment part according the accompaniment style you select.
4.
Press the [START/STOP] button, [SYNCHRO START/
ENDING] button or the [INTRO/FILL IN] buttons to determine how the accompaniment will be started (see page
7). If you press the [START/STOP] button or the [INTRO/
FILL IN] button, the rhythm will begin playing immediately without bass and chord accompaniment.
5.
As soon as you play any chord in the Auto Accompaniment
section of the keyboard, the PSR-200/PSR-300 will automatically begin to play the chord along with the selected
rhythm and an appropriate bass line. The accompaniment
will continue playing even if you release the Auto Accompaniment keys.
The PSR-200/PSR-300 will accept the following chord
types (see fingering chart on page 19):
Chord
Major
Minor
Major seventh
Minor major seventh
Minor sixth
Minor seventh m7
Minor seventh flatted fifth
Seventh
Seventh flatted fifth 7-5
Seventh suspended fourth 7sus4
Suspended fourth
Augmented
Diminished dim
Notes in parentheses may be omitted.
Abbreviation Normal Voicing
M
m
M7
mM7
m6
m7-5
7
sus4
aug
Minor sixth chords will only be properly detected if
they are played in “root position”. Seventh flatted fifth
chords will only be recognized if either the root or flatted
seventh is the lowest note. For diminished and augmented
chords, the lowest key pressed is assumed to be the root.
An octave — i.e. two notes played exactly one octave apart —
will be detected as a chord suitable for major or minor, with the
note played as the root note.
All other FINGERED mode operations are the same as in the
SINGLE FINGER mode.
10
Page 13

AUTO HARMONY
THE CHORD MEMORY
This sophisticated feature automatically adds appropriate
harmony notes to a melody you play on the keyboard. You can
choose from 5 different types of harmony.
Only a single note can be played at a time on the keyboard (or the
right-hand section of the keyboard when in the SPLIT mode) when
the AUTO HARMONY feature is used.
1.
Use the [AUTO HARMONY] buttons to select a harmony
type between “01” and “05.”
The first time the AUTO HARMONY
or
button is pressed the current harmony type number will
appear on the MULTI DISPLAY. While the current harmony type is still showing on the display, press the AUTO
HARMONY
one) the harmony type number, or the
button briefly to increment (increase by
button to dec-
rement (decrease by one) the harmony type number. Holding either button causes continuous incrementing or
decrementing. The selected harmony type number will be
shown on the MULTI DISPLAY while the [AUTO HAR-
MONY]
or
button is pressed (the letter “H” will
appear before the harmony type number).
The PSR-200/PSR-300 CHORD MEMORY allows you to
“record” and play back chord sequences created using the
Auto Accompaniment feature. You can record a complete
accompaniment part, for example, and then play along with it
using both hands — you’re free to use the entire keyboard for
your performance rather than being limited to only the upper
keyboard area.
The CHORD MEMORY also has three separate “banks”
that can be used to record different accompaniments. The
banks can be “chained” — i.e. they will play back in any
specified order. This allows you to record a verse and chorus
in different banks, for example, then “chain” them in the de-
sired order for playback.
Chord sequences containing a maximum of 60 different chords can
be recorded in each bank.
Material recorded using the CHORD MEMORY is retained in
memory even when the POWER switch is turned OFF (if batteries
are present).
Recording
1.
Pick out an accompaniment style that is appropriate for
the type of music you want to record.
PSR-200/PSR-300 Harmony Types
00
OFF
01
DUET
02
TRIO
03
BLOCK
04
COUNTRY
05
OCTAVE
The OFF setting can be selected at any time by pressing both
the [AUTO HARMONY] buttons simultaneously.
2.
Play.
In the SINGLE FINGER or FINGERED mode, the left-hand
chords determine the harmony notes that will be applied to the
right-hand melody.
In the NORMAL mode, all harmony is based on a C major
chord.
If AUTO HARMONY is used at the same time as the SPLIT
feature (see page 6) harmony will be not be applied to the lefthand voice. Left-hand chord fingerings are used to determine
the harmony applied to the right-hand voice. Usable fingerings
are the same as for the FINGERED mode.
If AUTO HARMONY is used at the same time as the DUAL
feature (see page 5) harmony will be not be applied to the
second “dual” voice.
If the synchro start mode is turned off by pressing the
[SYNCHRO START/ENDING] button prior to playing, right-hand
melody and harmony without accompaniment can be produced
— but the left-hand chords will still have to be fingered to produce the appropriate harmony.
2.
Press the [BANK 1], [BANK 2], or [BANK 3] button
while holding the CHORD MEMORY [REC] button. This
engages the “record ready” mode for the selected bank.
The bank indicator will flash, the metronome will sound,
and the three dots along the bottom of the MULTI DIS-
PLAY will flash at the currently selected tempo. Press the
[REC] button again if you want to disengage the record
ready mode and perform some other function.
If the NORMAL or SPLIT mode is selected, the FINGERED mode is automatically selected when the record
ready mode is engaged. If the FINGERED or SINGLE
FINGER mode is selected, no change occurs.
3.
Before actually beginning to record, you should set a
tempo that will be easy to record at using the [TEMPO]
buttons.
11
Page 14

THE CHORD MEMORY
4.
Recording will begin as soon as you play a chord on the
left-hand section of the keyboard (SYNCHRO START
operation).
Recording can also be started by pressing the [START/
STOP] or [INTRO/FILL IN] button. In this case on the
rhythm will begin without bass and chord accompaniment
until you play the first chord on the left-hand section of
the keyboard.
5.
Play the required chords.
6.
Press either the [START/STOP] button or the
[SYNCHRO START/ENDING] button to stop recording.
Events recorded by the chord memory are: Style Number, Chord
Timing, Chords, Intro, Fill In, Ending.
Whenever you record using the CHORD MEMORY, any previously
recorded material in the same bank will be erased.
If you make a mistake while recording, simply press the [START/
STOP] button and begin again from step 2, above.
If the AC power adaptor is disconnected with no batteries inserted,
the contents of the memory will be lost.
If the chord memory becomes full while recording, “End” will appear
on the MULTI DISPLAY.
1.
Press the [CHAIN] button while playback is stopped to
engage the “chain ready mode.” You can disengage the
chain ready mode by pressing the [CHAIN] button again.
2.
Press the [BANK 1], [BANK 2], and [BANK 3] buttons in
the order that you want them to play back — up to 8 steps
can be programmed. A synthesized voice will announce
the order of the programmed banks each time a BANK
button is pressed. The voice will stop if you attempt to
program more than 8 steps.
1.
Press the [BANK 1], [BANK 2], or [BANK 3] button to
begin playback of that bank. If you press a different
BANK button during playback, playback of the newly
selected bank will begin from the top of the next measure.
2.
Play along on the PSR-200/PSR-300 keyboard if you like.
You can also add fill-ins using the [INTRO/FILL IN]
button, or change the tempo during playback.
3.
Playback will stop automatically when the end of the re-
corded sequence is reached if the [SYNCHRO START/
ENDING] button was used to stop recording, otherwise
the chord sequence will be repeated until stopped by either the [START/STOP] or [SYNCHRO START/ENDING] button.
3.
Press the [START/STOP] button to begin chain playback.
4.
Playback will stop automatically when an ending is en-
countered (i.e. the [SYNCHRO START/ENDING] button
was used to stop recording), otherwise the entire chain
will be repeated until stopped by either the [START/
STOP] or [SYNCHRO START/ENDING] button.
A previously recorded chain can be played simply by pressing the
[CHAIN] button and then the [START/STOP] button.
The contents of the CHAIN memory is retained even when the
power is turned off.
12
 Loading...