

Page 1
Multi Editor Essential Owner’s Manual
• Copying of the commercially available music sequence data and/or digital audio files is strictly
prohibited except for your personal use.
• The software and this owner’s manual are exclusive copyrights of Yamaha Corporation.
• Copying of the software or reproduction of this manual in whole or in part by any means is expressly
forbidden without the written consent of the manufacturer.
© 2011-2013 Yamaha Corporation. All rights reserved.
For information about the MIDI settings of the MOTIF XF, MOTIF XS, S90 XS/S70 XS, MOXF6/MOXF8, MOX6/MOX8, and MOTIF-RACK XS refer to the respective manuals.
• Yamaha makes no representations or warranties with regard to the use of the software and
documentation and cannot be held responsible for the results of the use of this manual and the
software.
• The screen displays as illustrated in this Owner’s Manual are for instructional purposes, and may
appear somewhat different from the screens which appear on your devicer.
• Apple, iPad are trademarks of Apple Inc., registered in the U.S. and other countries.
• The company names and product names in this Owner’s Manual are the trademarks or registered
trademarks of their respective companies.
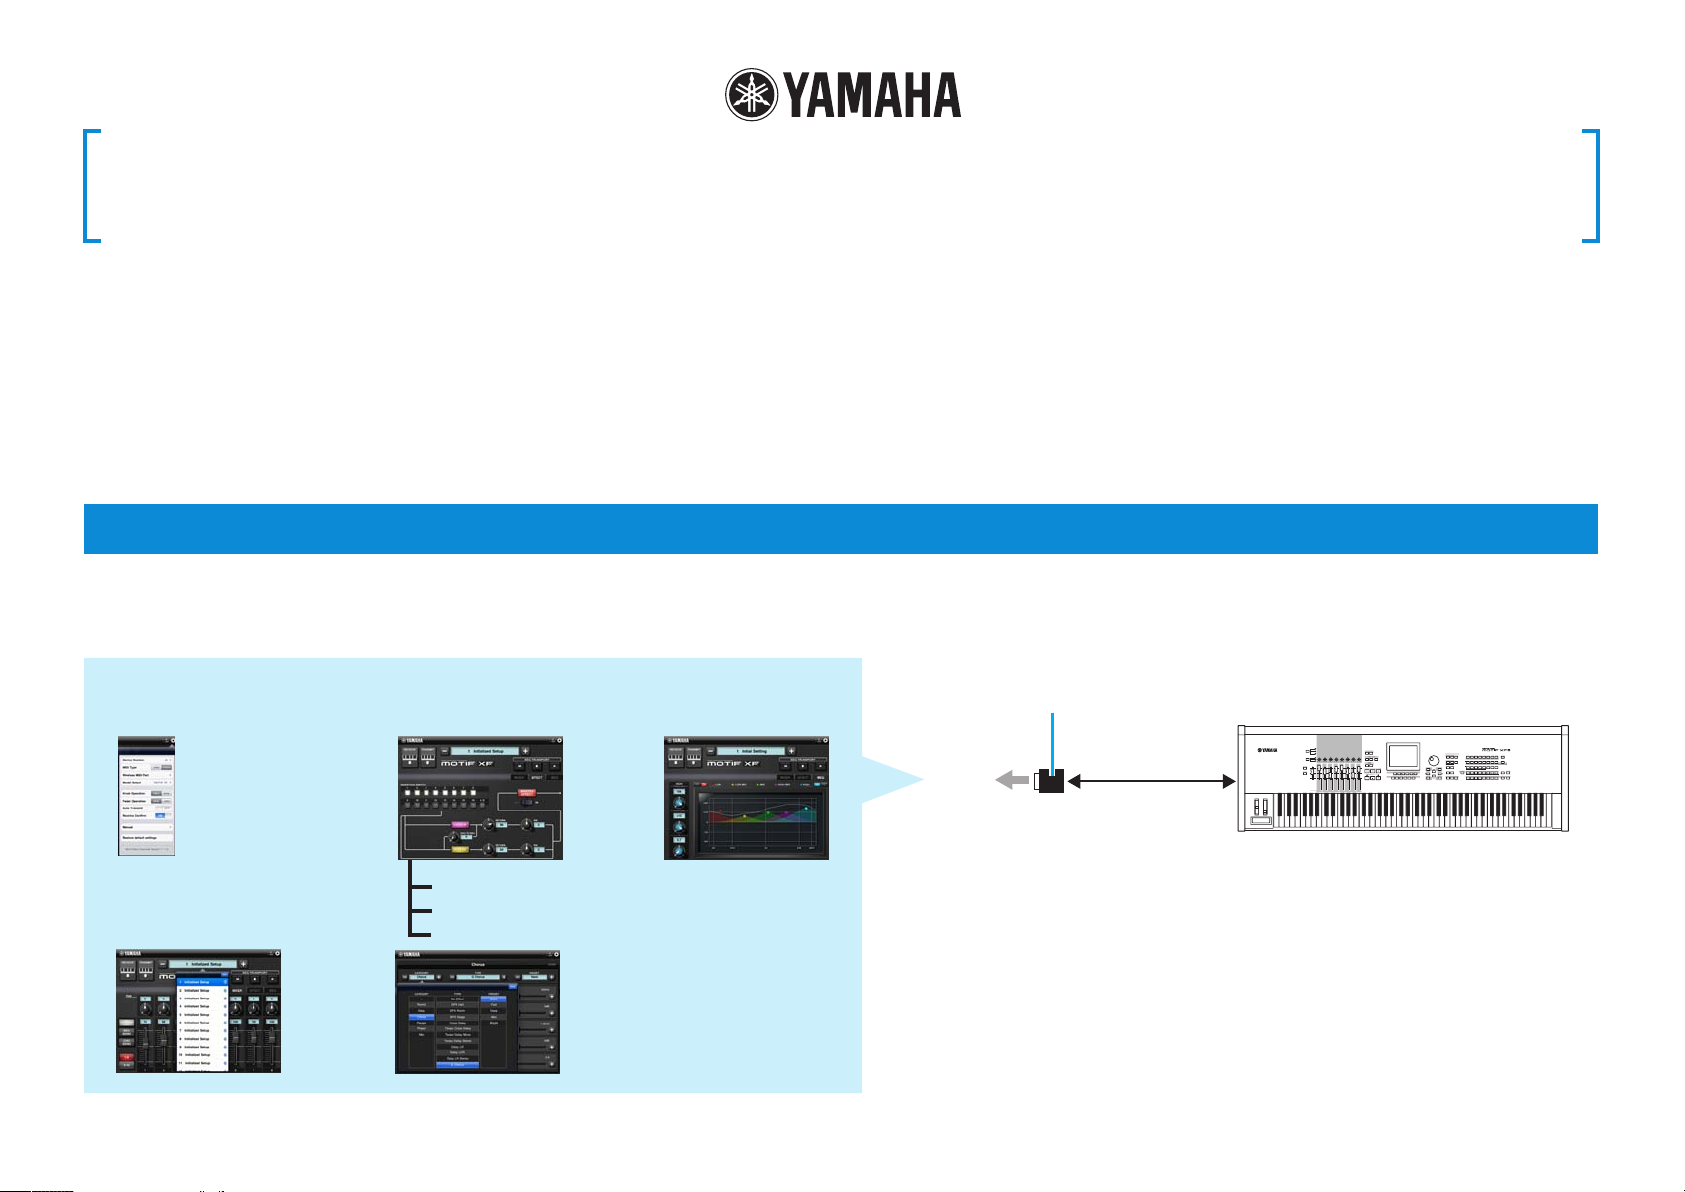
What is Multi Editor Essential?
This application lets you edit the Mixer/Effect/EQ parameters in the Song/Pattern or Multi mode of the MOTIF XF, MOTIF XS, S90 XS/S70 XS, MOXF6/MOXF8, MOX6/MOX8,
MOTIF-RACK XS from your iPad. Select a Song, Pattern or Multi on the instrument, edit the Mixing parameters of the selected Voice on the iPad, then store the edited Mixing
parameters as a Song , Pattern or Multi on the instrument.
Multi Editor Essential
Utility window
For setting the parameters
common to all the displays.
i-MX1 or i-UX1
EFFECT display MEQ display
MIDI
iPad
MOTIF XF, MOTIF XS, S90 XS/S70 XS,
MOXF6/MOXF8, MOX6/MOX8,
MOTIF-RACK XS
Chorus display
Reverb display
MIXER display
The instructions in this manual use the MOTIF XF as an example.
Depending on your particular musical instrument, there may not be equivalent displays or buttons.
Master Effect display
By using a Yamaha i-MX1 or i-UX1, connect the instrument to an iPad.
The MOTIF XF can be connected via wireless Network MIDI.
For details about wireless MIDI connectivity, refer to the “New Functions in
MOTIF XF Version 1.20” Manual.
NOTE
• Before editing, enter the Song, Pattern or Multi mode.
• After editing, store the edited settings as a Song, Pattern or Multi.
• You can connect i-MX1/i-UX1 to devices featuring the Lightning connector via
Apple Lightning to 30 -pin Adapter.
Page 2
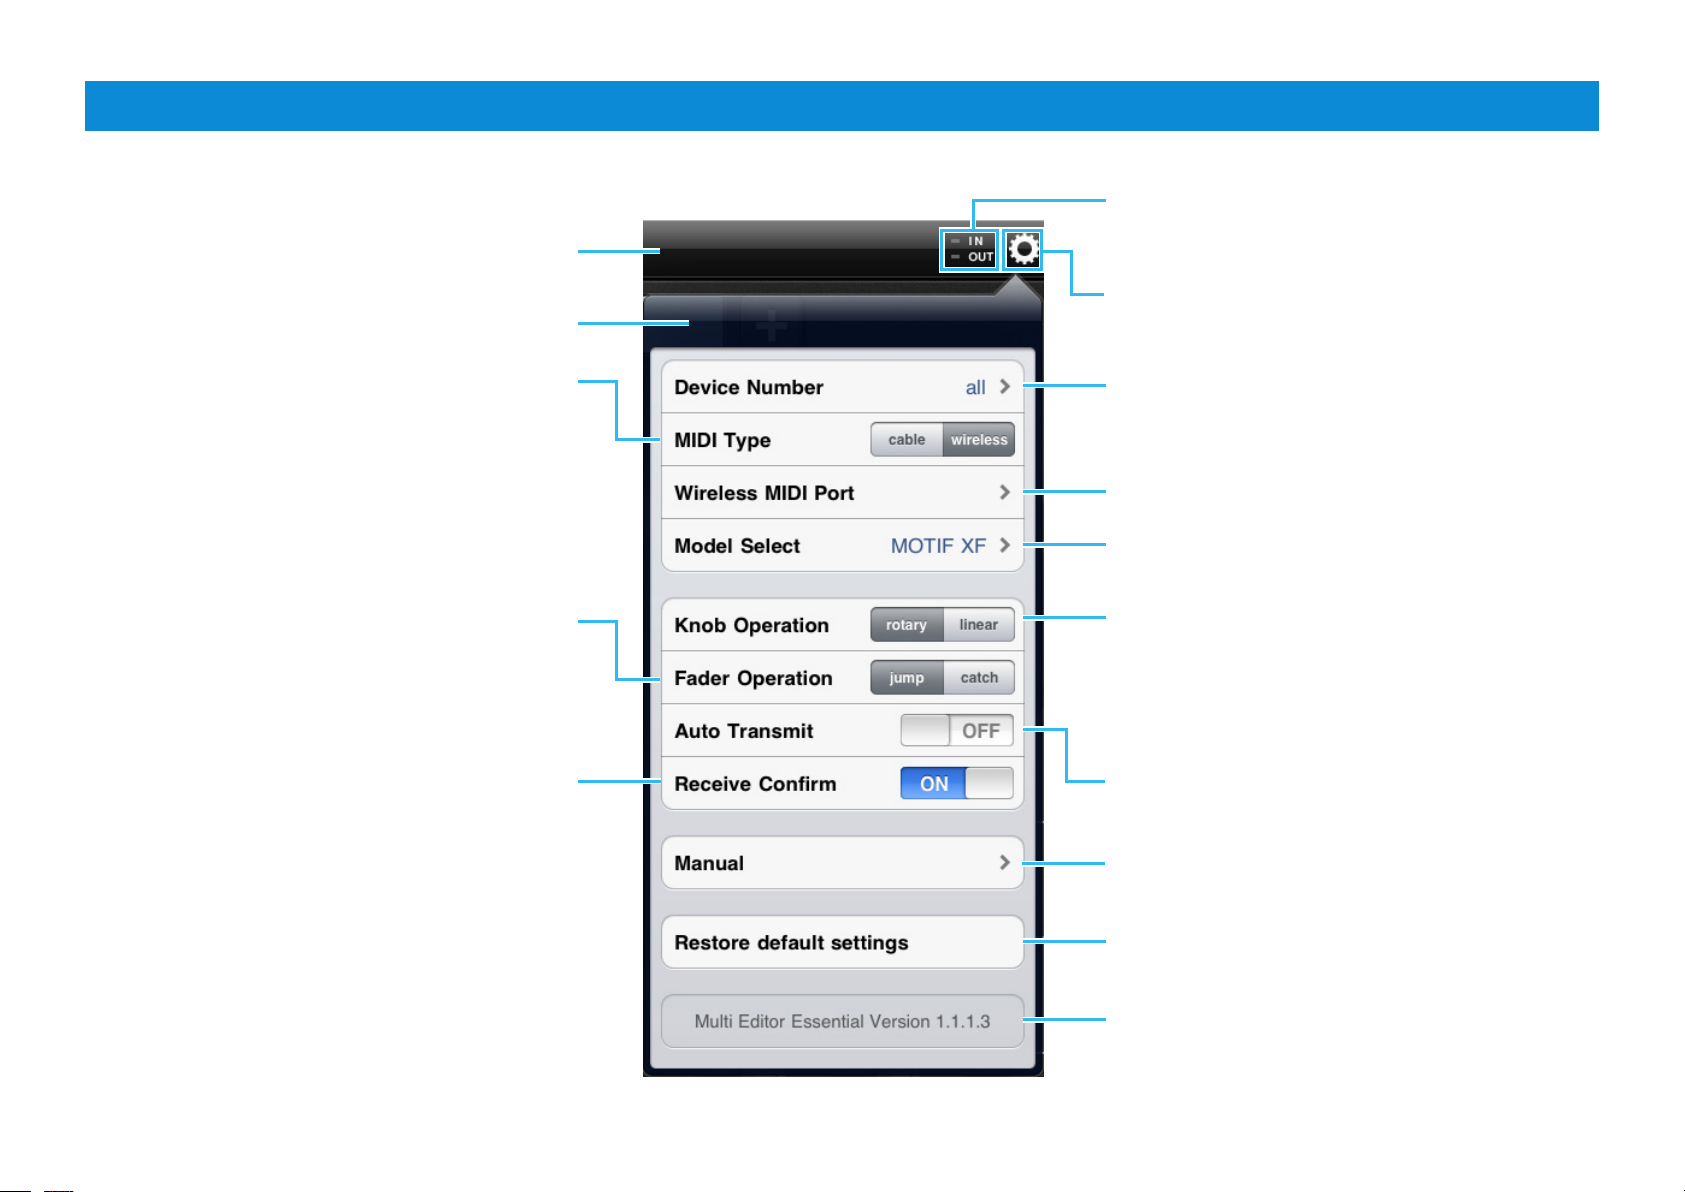
Title bar and Utility window
This window lets you set the parameters common to all the displays.
Title bar
Utility window
Each lamp flashes according to the MIDI in/out
messages.
Tapping this opens or closes the Utility window.
Determines the connection method between the iPad
and MIDI instrument.
cable: Should be selected when connected via the
i-MX1 or i-UX1.
wireless: Should be selected when connected via
wireless Network MIDI.
NOTE
When set to “wireless,” make the Wi-Fi setup in Settings > Wi-Fi in
your iPad.
Determines the Fader behavior.
jump: The Fader jumps to any tapped location in the
Fader area.
catch: The Fader will be “caught” as you drag on it.
When set to on, tapping [RECEIVE] calls up a
confirmation message.
*What is a Template?
Each of the Templates includes the settings of all the
displays, meaning that you can call up all the Effect
settings just by selecting the desired Template. Each
of the Templates can be renamed, called up and
initialized.
Set this to the same number as that of the instrument.
Selects the MIDI port of the instrument in case of
wireless connection.
Selects the connected instrument.
Determines the knob behavior.
rotary: Dragging around the knob will rotate it in the
same direction.
linear: Dragging vertically upward from the knob
rotates the knob clockwise, and dragging downward
rotates counter-clockwise.
When set to on, selecting a Template* transmits the
corresponding settings via MIDI.
Tapping this calls up the Owner’s Manual.
Tapping here initializes all the settings.
Indicates the program version.
Multi Editor Essential Owner’s Manual 2
Page 3
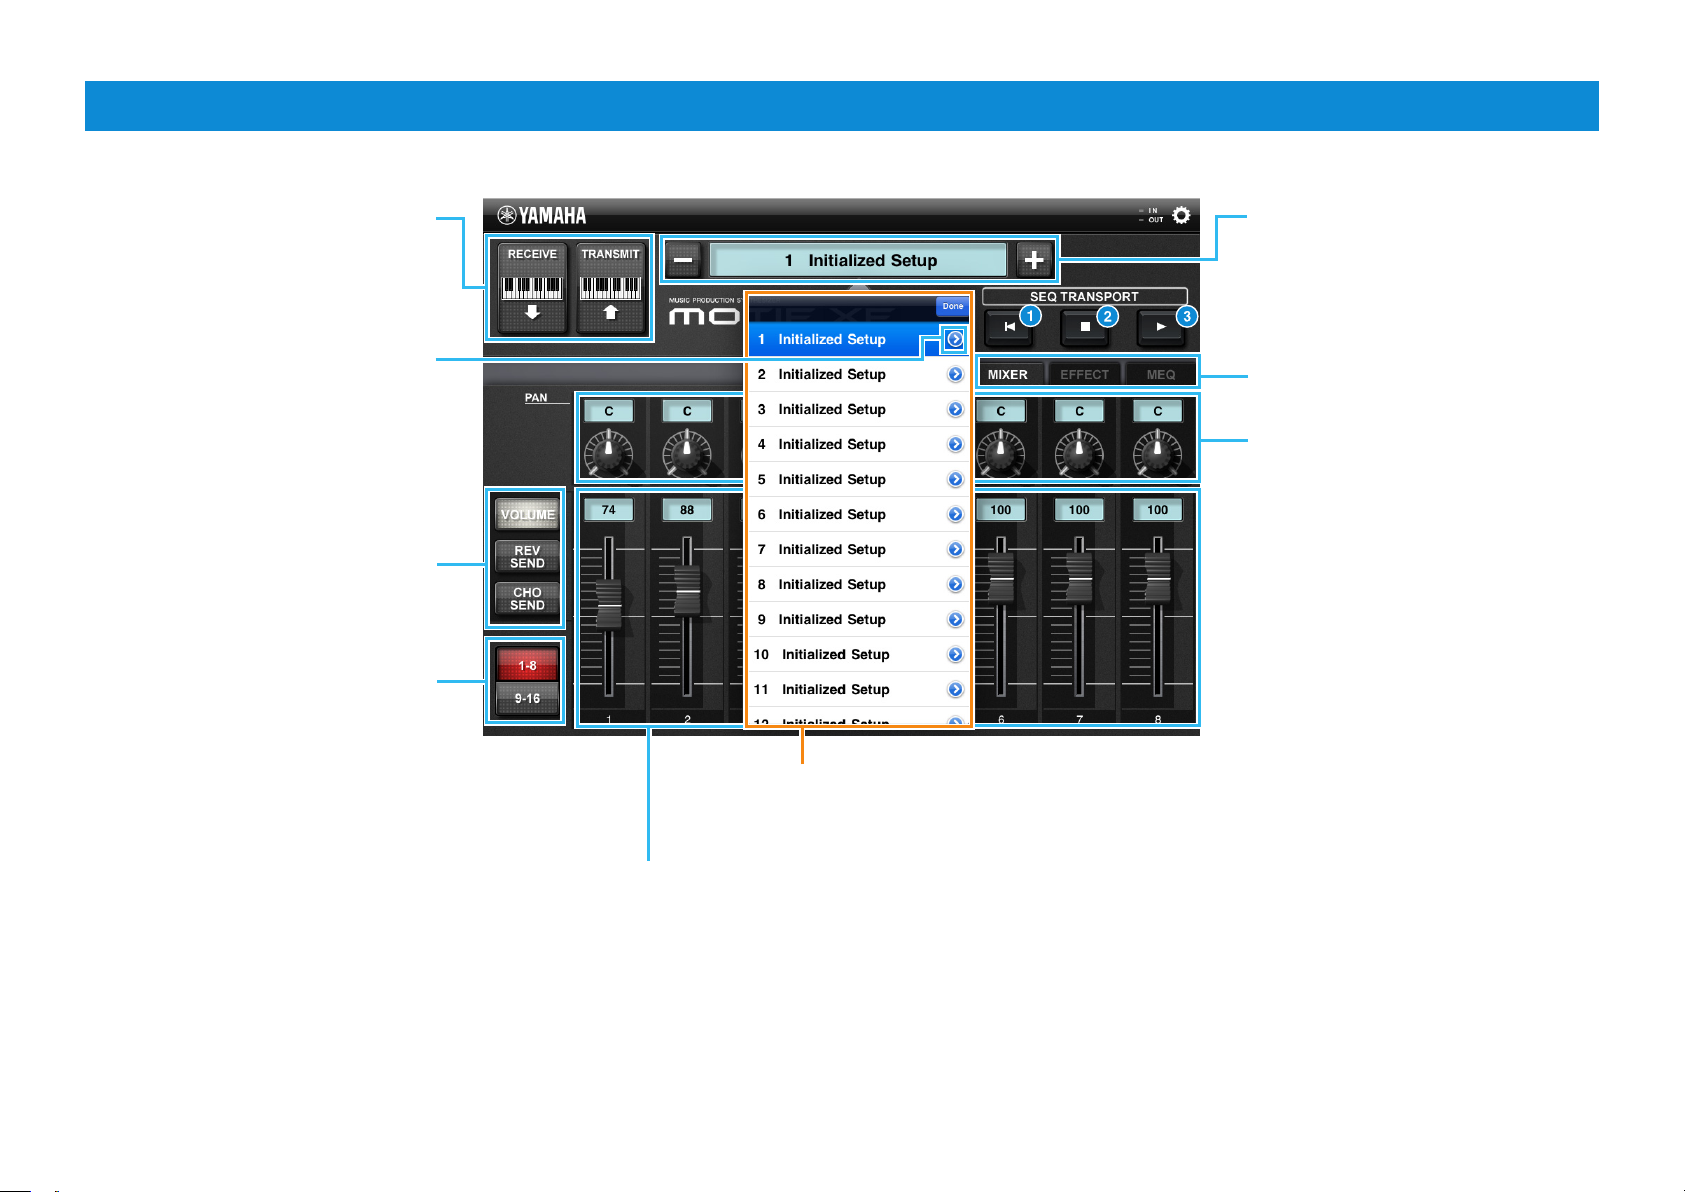
MIXER display
Tapping [RECEIVE] starts reception
of the settings from the instrument.
Tapping [TRANSMIT] starts
transmission of the current settings to
the instrument.
Tapping this icon calls up the onscreen
keyboard for renaming the Template.
Select the parameter controlled via
the Faders.
Select the target Parts for the eight
Faders.
Template list
Called up by tap the Template name. To change
the Template, tap the desired one in this list.
Adjusts the Volume, Reverb Send,
Chorus Send for each Part
Template Name
Selecting a Template calls up all the
settings of all the displays. To change
the Template, tap [+] or [-] . Or tap
Template Name to call up the Template
list, then tap the desired Template.
Tapping here alternately calls up the
MIXER, EFFECT and MEQ displays.
To adjust the Pan for each Part, drag
around the knob or tap the value to
call up the slider for adjusting.
SEQ TRANSPORT
1 Instantly returns to the beginning of
the current Song.
NOTE
• It does not function on Pattern mode.
• It does not function while MOX6/MOX8,
MOXF6/MOXF8 playing Song or Pattern.
2 Tap to stop recording or playback.
3 Tap to start playback from the current
point in the Song or Pattern.
Multi Editor Essential Owner’s Manual 3
Page 4

Same as in the MIXER display.
Lets you set the Insertion Switch to
on or off for each Part.
Tapping here calls up
the CHORUS display.
Tapping here calls up
the REVERB display.
EFFECT display
Tapping here calls up the
MASTER EFFECT display.
Sets the Master Effect ON/OFF.
To adjust each value, drag around
the knob or tap the value to call
up the slider then operate the
slider.
Multi Editor Essential Owner’s Manual 4
Page 5
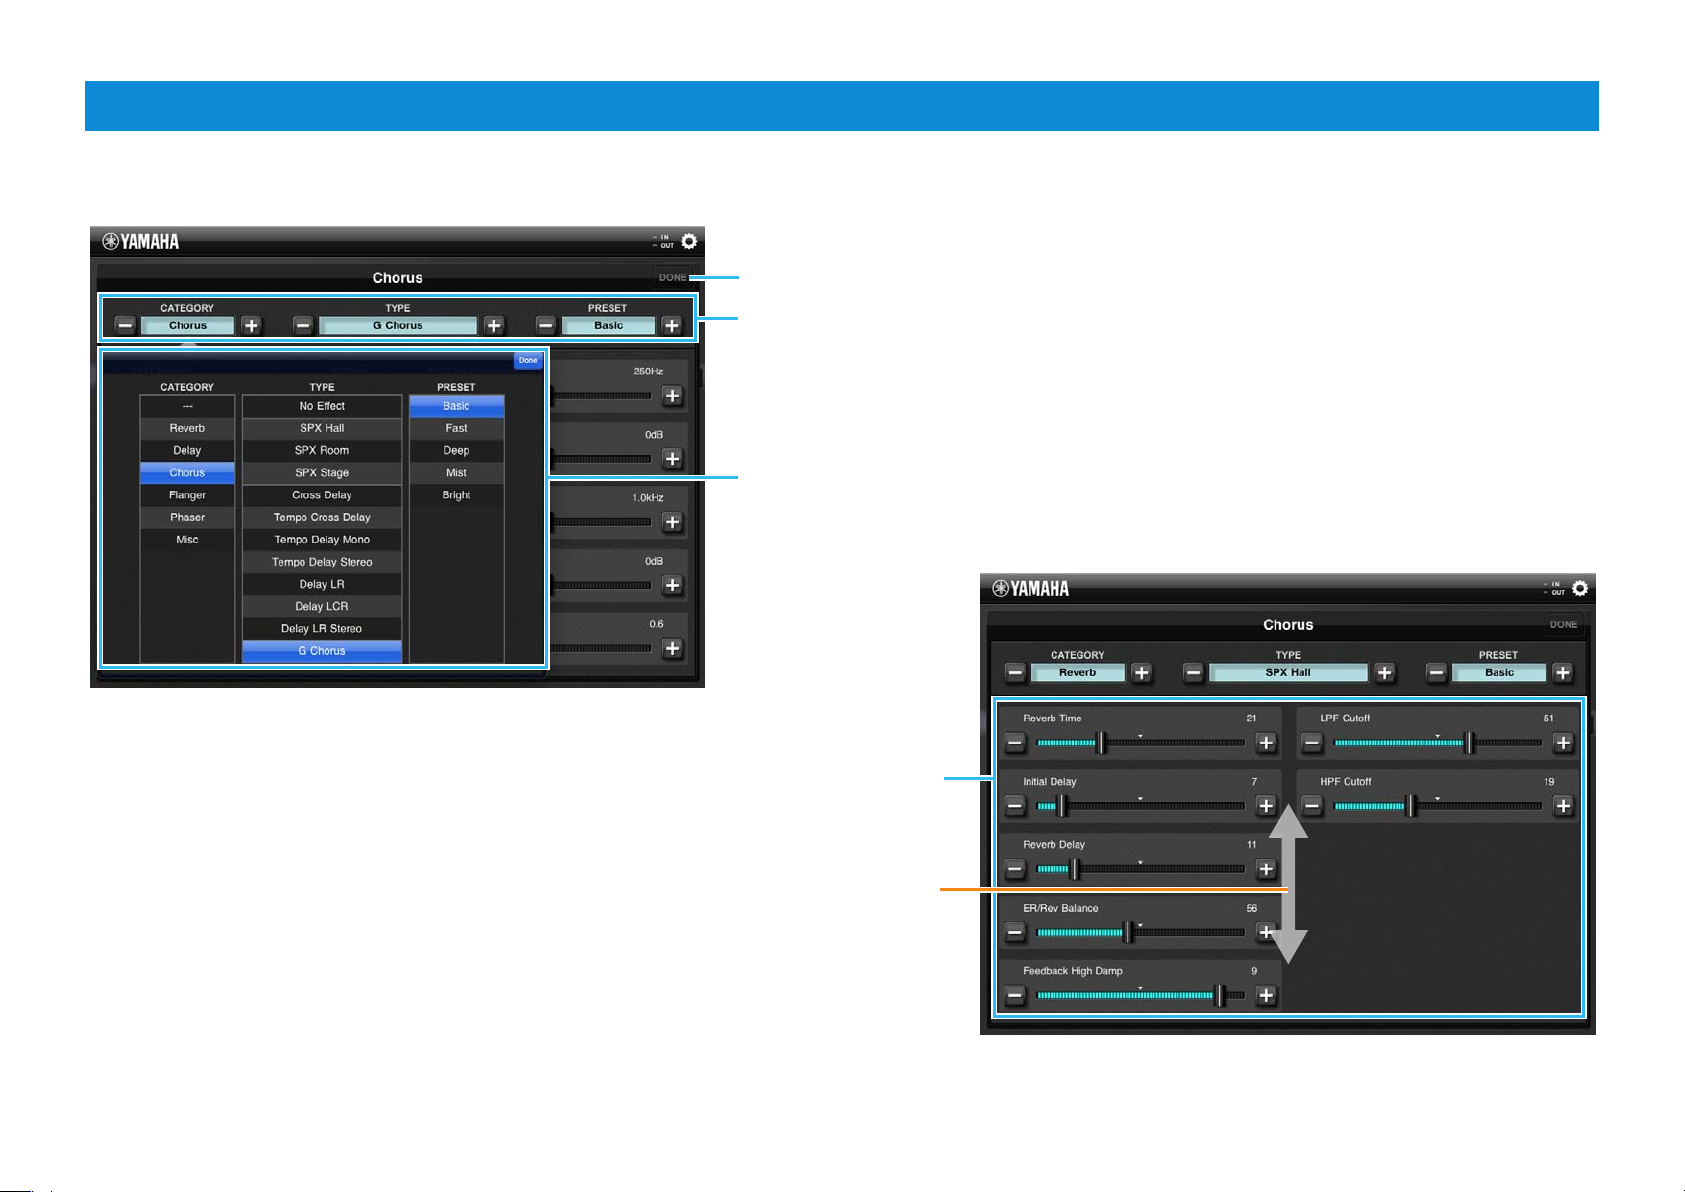
Reverb/Chorus/Master Effect display
From these displays, you can make the Effect settings for the Song/Pattern or Multi currently selected on the instrument. This section covers the operations on these displays
having the same design.
Tapping here returns the screen to the EFFECT display.
To select an Effect Type:
Tap [+]/[-] in this area. Or tap the indicators in this area to call up the Effect
list, tap the desired Category, tap the desired Type, then tap the desired
Preset setting. After selecting, tap [Done] to close the Effect list.
Effect List
To edit the Effect parameter:
Drag the slider of the desired parameter, or tap [+]/[-].
Dragging upward or downward will scroll through the parameters.
Multi Editor Essential Owner’s Manual 5
Page 6
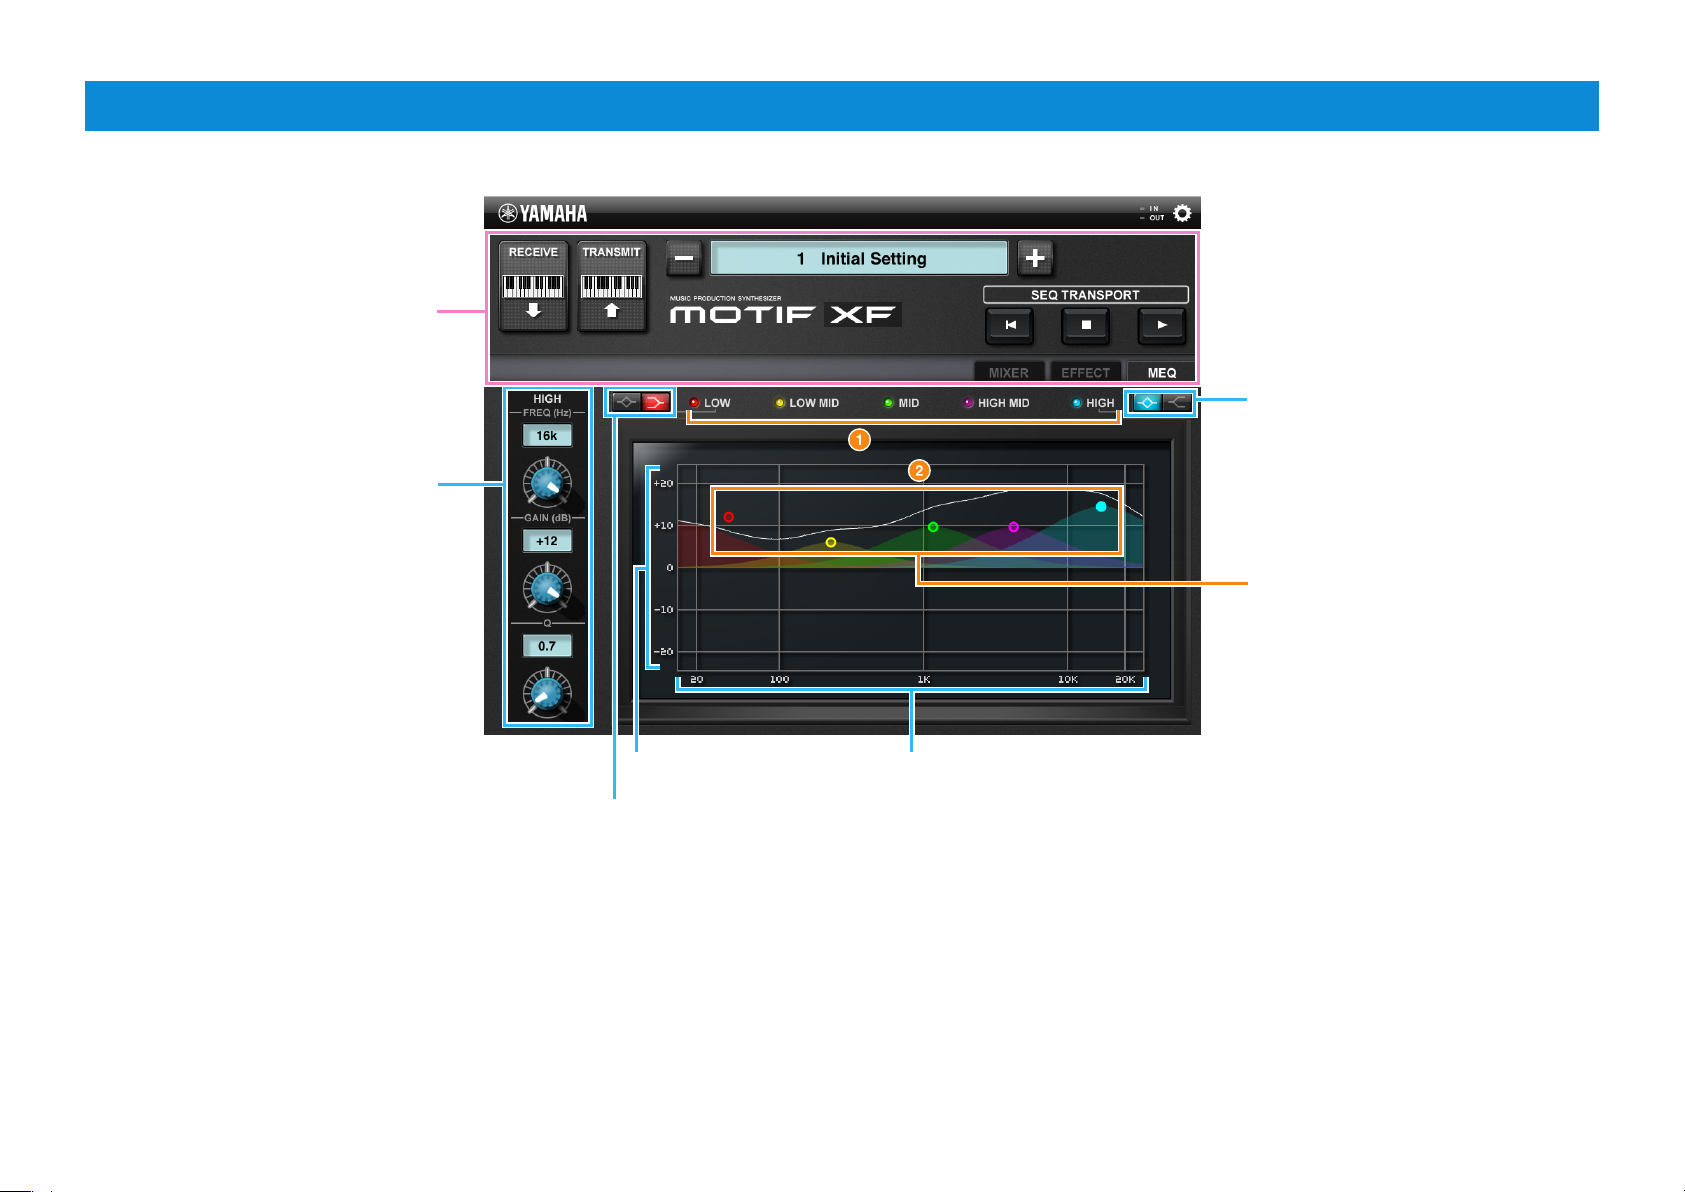
Same as in the MIXER display.
To adjust the EQ parameters for each
Band, tap the desired band at 1 or
2 to correspondingly change the
Knob color, then operate the Knob, or
tap the value to call up the slider for
adjusting.
MEQ display
Select the shape of the HIGH band
from Shelving (left side) and Peaking
(right side).
To edit the EQ setting, drag the dot
with the color corresponding to that
of the desired band (LOW, LOW MID,
MID, HIGH MID or HIGH).
Gain Frequency
Select the shape of the LOW band from
Shelving (left side) and Peaking (right side).
C.S.G., Digital Musical Instruments Division
© 2011-2013 Yamaha Corporation
Multi Editor Essential Owner’s Manual 6
304M W-C0
 Loading...