


ABLV
INTEGRATED AUDIO SYSTEM
ISX-B820
OWNER’S MANUAL MANUAL DE INSTRUCCIONES

CAUTION: READ THIS BEFORE OPERATING YOUR UNIT.
1To assure the finest performance, please read this manual carefully. Keep it in a safe place for future reference.
2Install this unit in a well ventilated, cool, dry, clean place
–away from direct sunlight, heat sources, vibration, dust, moisture and cold. For proper ventilation, allow the following minimum clearances.
Top: 15 cm (6 in) Rear: 2.5 cm (1 in) Sides: 10 cm (4 in)
3Locate this unit away from other electrical appliances, motors, or transformers to avoid humming sounds.
4Do not expose this unit to sudden temperature changes from cold to hot (or vice versa), and do not locate this unit in an environment with high humidity (i.e., a room with a humidifier) to prevent condensation inside this unit, which may cause an electrical shock, fire, damage to this unit, and/or personal injury.
5Avoid installing this unit where foreign object may fall onto this unit and/or this unit may be exposed to liquid dripping or splashing. On the top of this unit, do not place:
–Other components, as they may cause damage and/or discoloration on the surface of this unit.
–Burning objects (i.e., candles), as they may cause fire, damage to this unit, and/or personal injury.
–Containers with liquid in them, as they may fall and liquid may cause electrical shock to the user and/or damage to this unit.
6Do not cover this unit with a newspaper, tablecloth, curtain, etc. in order not to obstruct heat radiation. If the temperature inside this unit rises, it may cause fire, damage to this unit, and/or personal injury.
7Do not plug in this unit to a wall outlet until all connections are complete.
8Do not operate this unit upside-down. It may overheat, possibly causing damage.
9Do not use force on switches, knobs and/or cords.
10When disconnecting the power cable from the wall outlet, grasp the plug; do not pull the cable.
11Do not clean this unit with chemical solvents; this might damage the finish. Use a clean, dry cloth.
12Only voltage specified on this unit must be used. Using this unit with a higher voltage than specified is dangerous and may cause fire, damage to this unit, and/or personal injury. Yamaha will not be held responsible for any damage resulting from use of this unit with a voltage other than specified.
13To prevent damage by lightning, keep the power cable and outdoor antennas disconnected from a wall outlet or this unit during a lightning storm.
14Do not attempt to modify or fix this unit. Contact qualified Yamaha service personnel when any service is needed. The cabinet should never be opened for any reasons.
15When not planning to use this unit for long periods of time (i.e., vacation), disconnect the AC power plug from the wall outlet.
16Be sure to read the “TROUBLESHOOTING” section on common operating errors before concluding that this unit is faulty.
17Before moving this unit, press  to set the system to off, and disconnect the AC power plug from the wall outlet.
18Condensation will form when the surrounding temperature changes suddenly. Disconnect the power cable from the outlet, then leave this unit alone.
19When using this unit for a long time, this unit may become warm. Turn the system off, then leave this unit alone for cooling.
20Install this unit near the wall outlet and where the AC power plug can be reached easily.
21The batteries shall not be exposed to excessive heat such as sunshine, fire or the like.
–Keep the batteries in a location out of reach of children. Batteries can be dangerous if a child were to put in his or her mouth.
–If the batteries grow old, the effective operation range of the remote control decreases considerably. If this happens, replace the batteries with two new ones as soon as possible.
–Do not use old batteries together with new ones.
–Do not use different types of batteries (such as alkaline and manganese batteries) together. Read the packaging carefully as these different types of batteries may have the same shape and color.
–Exhausted batteries may leak. If the batteries have leaked, dispose of them immediately. Avoid touching the leaked material or letting it come into contact with clothing, etc. Clean the battery compartment thoroughly before installing new batteries.
–If you plan not to use the unit for a long period of time, remove the batteries from the unit. Otherwise, the batteries will wear out, possibly resulting in a leakage of battery liquid that may damage the unit.
–Do not throw away batteries with general house waste. Dispose of them correctly in accordance with your local regulations.
This unit is not disconnected from the AC power source as long as it is connected to the wall outlet, even if this unit itself is turned off by  . In this state, this unit is designed to consume a very small quantity of power.
WARNING
TO REDUCE THE RISK OF FIRE OR ELECTRIC SHOCK, DO NOT EXPOSE THIS UNIT TO RAIN OR MOISTURE.
CAUTION
Danger of explosion if battery is incorrectly replaced. Replace only with the same or equivalent type.
There is a chance that placing this unit too close to a CRTbased (Braun tube) TV set might impair picture color. Should this happen, move this unit away from the TV set.
CAUTION
Use of controls or adjustments or performance of procedures other than those specified herein may result in hazardous radiation exposure.
i En

CONTENTS
NAMES OF PARTS AND THEIR FUNCTIONS |
.........................2 |
ADJUSTING THE CLOCK......................................................... |
5 |
LISTENING TO iPod.................................................................. |
6 |
LISTENING TO CD AND USB DEVICES .................................. |
7 |
LISTENING TO MUSIC |
|
FROM YOUR Bluetooth COMPONENT ................................. |
10 |
LISTENING TO FM STATIONS ............................................... |
12 |
LISTENING TO EXTERNAL SOURCES ................................. |
13 |
USING THE ALARM FUNCTION ............................................ |
14 |
USING THE SLEEP TIMER ..................................................... |
17 |
TONE CONTROL..................................................................... |
17 |
ADJUST BRIGHTNESS OF FRONT PANEL DISPLAY ......... |
17 |
TROUBLESHOOTING ............................................................. |
18 |
NOTES ON DISCS AND USB DEVICES................................. |
21 |
SPECIFICATIONS ................................................................... |
22 |
Features
•Play back music on external devices such as iPod/iPhone models, audio/data CDs and USB devices, and tune in to the FM radio.
•By the Bluetooth technology, you can enjoy clear sound without wired connections.
•Use your favorite music or set of beeps as an alarm. The music you select is played at a volume of your own choice at the set alarm time, giving you the best possible start to the day (IntelliAlarm function) ( P. 14).
•Store/call up to five of your favorite FM stations easily.
•The 3-band equalizer (bass, middle, treble) can be set so that music sounds exactly how you want it.
•Two types of clocks (with hour hands) that match the design of the unit can be shown.
About this manual
•The phrase “iPod” used throughout this manual also includes the “iPhone”.
•If both the unit and remote control buttons can be used to operate a feature, the manual will describe steps using the buttons on the unit.
•Note indicates precautions for use of the unit and its feature limitations.
•y indicates supplementary explanations for better use.
Supplied accessories
Power cable |
Remote control |
Batteries x 2 |
Dock cover |
FM antenna |
|
|
(AA, LR6, UM-3) |
|
|
English
USB cap
Note
Keep the USB cap out of reach of children so as to ensure that it is not mistakenly swallowed.
Owner’s Manual |
Assembly Guide |
|
Bracket |
|||||||||
|
||||||||||||
(this manual) |
|
|||||||||||
|
|
|
|
|
|
|
|
|
Pole |
|||
|
|
|
|
|
|
|
|
|
|
|
|
|
|
|
|
|
|
|
|
|
|
|
|
|
Base |
|
|
|
|
|
|
|
|
|
|
|
||
ISX-B820 |
|
|
|
|
|
|
|
|
|
Support |
||
|
|
|
|
|
|
|
|
|
|
|
|
Cable clamp |
|
|
|
|
|
|
|
|
|
|
|
|
|
|
|
|
|
|
|
|
|
|
|
|
||
|
|
|
|
|
|
|
|
|
|
|
||
|
|
|
|
|
|
|
|
|
|
|
|
Screw set |
|
|
|
|
|
|
|
|
|
|
|
|
|
Note
Use these items to assemble the stand. Read the separate Assembly Guide for information on how to assemble the stand.
How to use the remote control
Insert the batteries into the remote control in the correct direction (+ and –).
Point the remote control at the remote control signal receiver (on the front panel) and use within the range shown below.
6 m (20')
1 En

NAMES OF PARTS AND THEIR FUNCTIONS
Top panel
|
|
|
|
AUTO 2 |
SET 2 |
BEEP |
SOURCE + BEEP |
|
|
|
|
1 |
1 |
|
SOURCE |
|
|
|
|
DIMMER |
CLOCK |
ALARM TYPE |
|
|
|
USB |
|
|
LABEL SIDE |
|
|
|
|
VOLUME |
SOURCE |
ALARM |
SNOOZE SLEEP |
PRESET |
|
|
1 |
2 3 4 5 6 7 8 9 j k l |
|||||
a |
(Power) |
|
|
|
|
gSNOOZE/SLEEP |
|
Press to turn the system on/off. Time is displayed on the front panel even when the system is off.
y
•Press and hold  on the top of the unit for more than 3 seconds to set the system to power save mode. No information on the front panel is
displayed in power save mode. This can reduce power consumption. To cancel power save mode, press  again.
•Even in system off/power save mode, the alarm function is available.
biPod dock
Connect an iPod.
cUSB port
Connect a USB device (P. 9).
Set the sleep timer or switch the alarm to snooze mode (P. 16, 17).
hPRESET
Store/call up FM stations, or switch the playback folder (when playing music on data CDs or USB devices).
i
 /
/ 

Skip the playback track/file, or tune the radio.
Holding the button down while playing a track/file will search backward/forward the track/file.
j /
/ 


Play/pause the track being played.
dVOLUME –/+
Adjust the volume.
eSOURCE
Switch the source to be played.
fALARM
Turns the alarm on/off, and allows various alarm settings to be adjusted (P. 15, 16).
k
Eject the CD.
lDisc slot
Insert a CD.
Connecting an iPod to the iPod dock
y
•An iPod will be recharged while it is connected to the dock. The iPod will not be recharged when the unit is in power save mode.
•Be sure to use a dock adaptor that is compatible with your iPod. If you do not use the adaptor or the adaptor is not compatible, the connection could be loose or poor, which could cause damage to the connector. For details on dock adaptor information, please visit official Apple’s website.
Dock adaptor |
• |
If an iPod in protective case is connected by force, the connector may be damaged. Remove |
||||||||||
|
the protective case before connection. |
|||||||||||
|
|
|
|
|
|
|
|
|
|
|
|
|
|
|
|
|
|
|
|
|
|
|
|
• |
When the iPod is not in use, set the iPod dock cover to protect the connector. |
|
|
|
|
|
|
|
|
|
|
|
|
|
|
|
|
|
|
|
|
|
|
|
|
|
|
|
|
|
|
|
|
|
|
|
|
|
|
|
|
|
|
|
|
|
|
|
|
|
|
|
|
|
|
|
|
|
|
|
|
|
|
|
|
|
|
|
|
|
|
|
|
|
|
|
|
|
|
2 En
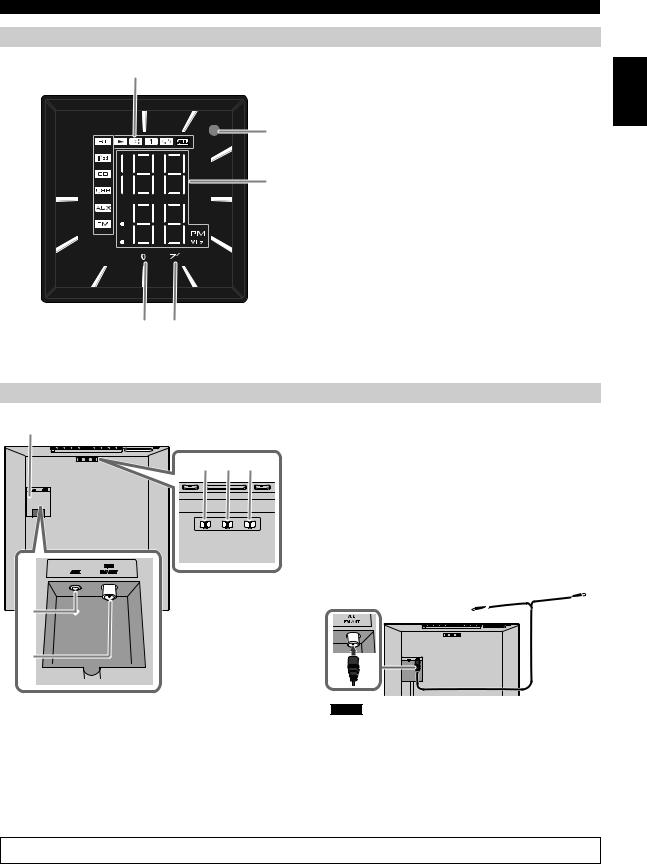
Front panel display
1
2

3
4
NAMES OF PARTS AND THEIR FUNCTIONS
|
1Play/shuffle/repeat indicator |
|
Displays the playback mode (P. 6, 9). |
|
bRemote control signal receiver |
|
cClock indicator |
9 |
Shows the clock hour hand (P. 5). |
|
dSource indicator |
|
Shows selected source. |
8 |
eBluetooth indicator |
Turns on if this unit is connecting via Bluetooth (P. 10, 11).


 7 fSleep indicator
Turns on if the sleep timer has been set (P. 17).
gAlarm indicator
Turns on if the alarm has been set (P. 14).
hMulti-function indicator
Displays various information, including the clock time, track number being played or FM station.
5 6 |
iIllumination sensor |
Detects ambient lighting. Do not cover this sensor.
Rear panel |
|
6 |
aALARM TYPE |
Switches the alarm type (P. 15). |
|
|
bCLOCK |
1 2 3 |
Switches the type of clock display or allows the time to be set |
|
(P. 5). |
|
cDIMMER |
|
Adjusts the brightness of the front panel display (P. 17). |
|
dAUX |
|
Connects an external device. |
|
eFM antenna terminal |
|
Connects the supplied FM antenna or an outdoor antenna. |
4 |
Supplied |
|
FM antenna |
5
Notes
• The antenna should be stretched out. If radio reception is poor, change the height, direction, or placement of the antenna.
• If you use a commercially available outdoor antenna instead of the supplied FM antenna, reception may be better.
fTerminal cover
Remove the terminal cover before connecting external devices to AUX, and/or connecting the FM antenna to antenna terminal.
If you pass the outdoor antenna cable and/or external device cable through the pole of the stand, read the separate Assembly Guide.
English
3 En

NAMES OF PARTS AND THEIR FUNCTIONS
Remote control
1
2
3
4
Bluetooth
aRemote control signal transmitter
b (Power)
Press to turn the system on/off.
cALARM
Switches the alarm on/off.
dSNOOZE/SLEEP
Set the sleep timer or switch the alarm to snooze mode (P. 16, 17).
eSource button
Switch the source to be played.
5 |
fFOLDER |
Switch the playback folder when playing music on data CDs or
USB devices.
g
 /
/

Skip the playback track/file.
Holding the button down while playing a track/file will search 6
 backward/forward the track/file.
h
7 |
|
Play/pause. |
|
|
8 |
i |
|
|
|
|
Stop playback. |
|
||
9 |
|
|
||
j |
(Repeat)/ |
(Shuffle) |
||
|
||||
j |
|
Play music on an iPod, audio/data CD or USB device in repeat/ |
||
|
shuffle (P. 6, 9). |
|
||
|
|
|
||
p |
kEQ LOW/MID/HIGH |
|||
o |
|
Adjust the bass, middle or treble sound quality (P. 17). |
||
|
|
lPRESET |
/ |
k |
|
Select a preset FM station. |
|
|
|
mMEMORY |
|
l |
n |
Store the FM station (P. 12). |
|
|
|
||
m |
|
nTUNING |
/ |
|
Tune the radio. |
||
oVOLUME +/–
Adjust the volume.
pMUTE
Mute/resume the sound.
iPod control buttons
4 En
|
|
|
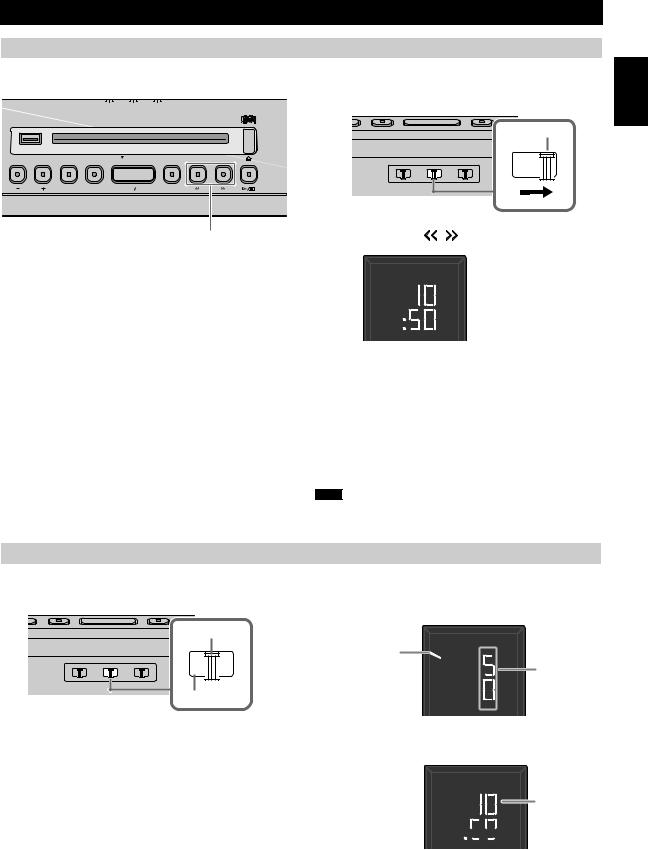
ADJUSTING THE CLOCK |
|
Setting the time |
|
|
|
|
Top panel |
|
|
|
1Move the CLOCK switch on the rear panel to SET. |
|
|
|
|
|
1 |
1 |
SOURCE |
SOURCE + BEEP |
Rear panel |
AUTO 2 |
SET 2 |
BEEP |
|
|
DIMMER |
CLOCK |
ALARM TYPE |
|
|
|
|
|
|
SET |
USB |
LABEL SIDE |
|
|
|
VOLUME SOURCE ALARM |
SNOOZE SLEEP |
PRESET |
|
|
|
|
|
2 |
2Set the time with / . |
 Set time (flashing)
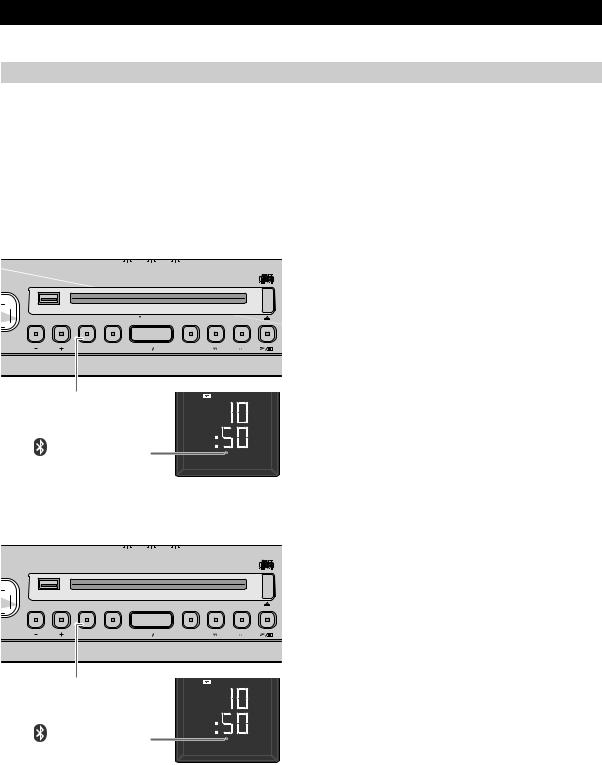
Switching the clock type
Move the CLOCK switch on the rear panel to switch the clock type.
Rear panel
CLOCK 1
CLOCK 2
3Move the CLOCK switch on the rear panel to
CLOCK1 or CLOCK2.
y
•Connecting an iPod to the iPod dock in step 2 will copy the time on the iPod to the unit. If the iPod is already connected to the iPod dock when CLOCK is set to SET, the time in the iPod will not be copied.
•Pressing SNOOZE/SLEEP in step 2will switch between the 12 and 24 hour clock display.
•The “PM” indicator will be shown only when you select the 12 hour clock display.
Note
The time settings will be reset if the unit is not powered for more than one week.
Clock display mode 1 (CLOCK 1)
Eg: 10:50
Analog clock |
|
hour hand |
Minute |
(hour) |
Clock display mode 2 (CLOCK 2)
Eg: 10:50
Hour


 Minute
English
5 En

LISTENING TO iPod
Playing the iPod
For details on compatible iPod models, refer to “SPECIFICATIONS” (P. 22).
Top panel
AUTO |
2 |
SET |
2 |
BEEP |
SOURCE + BEEP |
|
1 |
|
1 |
|
SOURCE |
DIMMER |
CLOCK |
ALARM TYPE |
|||
1Connect an iPod to the iPod dock.
2Press SOURCE and set iPod as the playback source.
3Play the iPod by pressing  /
/ 


 .
.
USB |
LABEL SIDE |
Playback can be controlled with either the remote control, |
|
|
iPod or the top panel on this unit.
VOLUME |
SOURCE |
ALARM |
SNOOZE SLEEP |
PRESET |
Button |
Function |
|
|
|
|
|
|
|||
|
|
|
|
|
|
/ |
Play/Pause |
|
2 |
|
|
3 |
Top |
|
Skip |
|
|
|
Panel |
/ |
Search backward/forward |
||
|
|
|
|
|
|
||
|
|
|
|
|
|
|
(press and hold down) |
Remote control |
|
|
|
|
|
Play/Pause |
|
|
|
|
|
|
|
|
Skip |
|
|
|
|
|
Remote |
/ |
Search backward/forward |
|
|
|
|
|
|
(press and hold down) |
|
|
|
|
|
|
control |
|
|
|
|
|
|
|
|
FOLDER/ |
|
|
|
|
|
|
|
MENU/ |
iPod menu control |
|
|
|
|
|
|
ENTER |
|
|
|
|
|
|
y |
|
|
• You can remove the iPod during playback.
• If the system is turned off, it will turn on automatically when music/video on the iPod is played.
• If iPod is selected as the playback source, the system will automatically turn off when 60 minutes have elapsed without a device being connected to the iPod dock nor any operation performed.
Repeat/shuffle playback
The playback mode can be checked with the play/shuffle/repeat indicator on the front panel display.
Remote control
 REPEAT
Notes
•Repeat/shuffle may not operate correctly depending on the type of iPod used.
•The repeat/shuffle playback order may differ depending on the type of iPod used.
|
Repeat playback |
|
SHUFFLE |
Press REPEAT on the remote control to select a playback mode |
|
from the following. |
||
|
||
|
: One |

 : All
: All
No display: Off
Shuffle playback
Press SHUFFLE on the remote control to select a playback mode from the following.
 : Songs
 : Albums
No display: Off
6 En
LISTENING TO CD AND USB DEVICES
The unit will operate as follows when playing back tracks/files on CD/USB devices. |
|
||
• If the CD/USB device being played back is stopped, the track that was being played back will start playing from the beginning of the |
|
||
|
|||
track the next time playback begins. |
English |
||
• If you press on the remote control while playback is stopped, the next time playback begins, the unit will play tracks as follows: |
|||
|
|||
– For audio CD : |
from the first track of the CD. |
|
|
– For data CD/USB device: from the first track of the folder that contains the track that was played last. |
|
||
• This system turns off automatically if no operation has been performed for 60 minutes after CD/USB device playback is stopped. |
|
||
|
|||
y
For details on playable discs and files, refer to “NOTES ON DISCS AND USB DEVICES” (P. 21).
Listening to an audio CD |
|
|||||||
|
|
|
|
|
|
|
|
1Press SOURCE to set CD as the playback source. |
Top panel |
|
|
|
|
|
|
|
2Insert the audio CD into the Disc slot with the |
|
|
|
|
|
|
|
|
|
|
|
DIMMER |
CLOCK |
ALARM TYPE |
label side facing toward the front of the unit. |
|||
|
|
AUTO |
2 |
SET |
2 |
BEEP |
SOURCE + BEEP |
|
|
|
|
1 |
|
1 |
|
SOURCE |
|
|
|
|
|
|
|
|
|
Playback starts automatically. The track number is shown for a |
|
|
|
|
|
|
|
|
while when starting playback or skipping tracks. |
USB |
|
|
|
LABEL SIDE |
|
|
||
VOLUME |
SOURCE |
ALARM |
|
SNOOZE SLEEP |
PRESET |
CD |
||
|
|
|
|
|
|
|
|
Track number |
|
1 |
|
|
|
|
|
|
2 |
|
|
|
|
|
|
|
|
Use the following buttons to control the unit while playing |
|
|
|
|
|
|
|
|
back tracks on audio CDs. |
Button |
Function |
||
|
/ |
Play/Pause |
|
Top |
|
Skip |
|
/ |
Search backward/forward |
||
Panel |
|||
|
(press and hold down) |
||
|
|
||
|
|
Eject the CD |
|
|
|
Play/Pause |
|
Remote |
|
Skip |
|
/ |
Search backward/forward |
||
control |
|||
|
|
(press and hold down) |
|
|
|
Stop |
|
Note |
|
|
|
CDs cannot be inserted or ejected when the system is in power save mode ( P. 2).
7 En
LISTENING TO CD AND USB DEVICES |
|
|
|
|||||
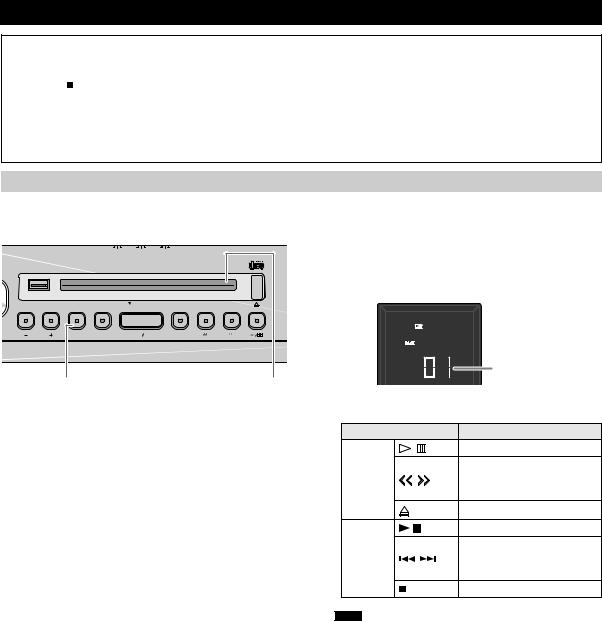
Listening to a data CD |
|
|||||||
Top panel |
|
|
|
|
|
|
|
1Press SOURCE to set CD as the playback source. |
|
|
|
|
|
|
|
|
|
|
|
AUTO |
2 |
SET |
2 |
BEEP |
SOURCE + BEEP |
2Insert the data CD into the Disc slot with the |
|
|
|
1 |
|
1 |
|
SOURCE |
label side facing toward the front of the unit. |
|
|
DIMMER |
CLOCK |
ALARM TYPE |
|
|||
|
|
|
|
|
|
|
|
Playback starts automatically. The folder/file number is shown |
|
|
|
|
|
|
|
|
for a while when starting playback or skipping tracks. |
USB |
|
|
|
LABEL SIDE |
|
|
||
VOLUME |
SOURCE |
ALARM |
|
SNOOZE SLEEP |
PRESET |
Folder number |
||
|
|
|
|
|
|
|
|
|
|
|
|
|
|
|
|
|
File number |
|
1 |
|
|
|
|
|
|
2 |
Use the following buttons to control the unit while playing back tracks on data CDs.
Button |
Function |
|
|
/ |
Play/Pause |
|
|
Skip |
Top |
/ |
Search backward/forward |
Panel |
|
(press and hold down) |
|
PRESET |
Change the playback folder |
|
|
Eject the CD |
|
|
Play/Pause |
|
|
Skip |
Remote |
/ |
Search backward/forward |
control |
|
(press and hold down) |
|
|
Stop |
|
FOLDER |
Change the playback folder |
8 En
|
LISTENING TO CD AND USB DEVICES |
|
|
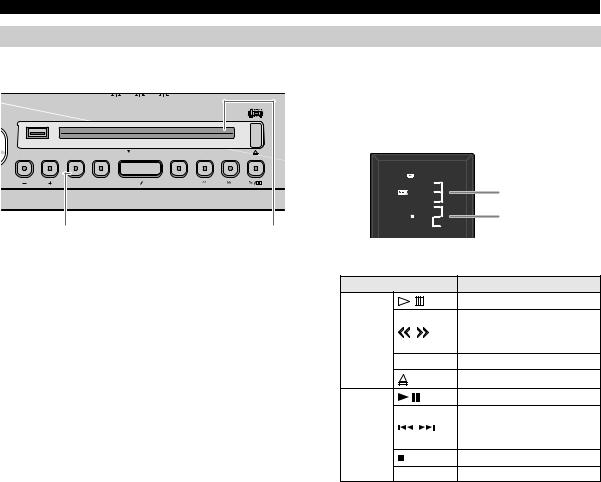
Listening to a USB device |
|
Top panel |
1Press SOURCE and set USB as the playback |
|
source. |
|
|
|
AUTO |
2 |
SET |
2 |
BEEP |
SOURCE + BEEP |
|
|
|
|
|
|
|
1 |
|
1 |
|
SOURCE |
2Connect a USB device to the USB port. |
||
|
|
|
DIMMER |
CLOCK |
ALARM TYPE |
||||||
|
|
|
|
|
|
|
|
|
Playback starts automatically. The folder/file number is shown |
||
|
|
|
|
|
|
|
|
|
for a while when starting playback or skipping tracks. |
||
|
USB |
|
|
|
LABEL SIDE |
|
|
|
|
||
|
VOLUME |
SOURCE |
ALARM |
|
SNOOZE SLEEP |
PRESET |
|
|
|
||
|
|
|
|
|
|
|
|
|
|
|
Folder number |
2 |
|
1 |
|
|
|
|
|
|
|
|
File number |
|
|
|
|
|
|
|
|
|
|
||
|
|
|
|
|
|
|
|
|
Use the following buttons to control the unit while playing |
||
Note |
|
|
|
|
|
|
|
|
back tracks on USB devices. |
|
|
When a USB device is connected, tracks are played back in the |
Button |
Function |
|||||||||
following order: |
|
|
|
|
|
|
|
||||
|
|
|
|
|
|
|
|
/ |
Play/Pause |
||
– |
Folder playback order: |
|
|
|
|
|
|
||||
|
folders are played in alphabetical order of the first 3 characters |
Top |
|
Skip |
|||||||
|
of the folder name. Folder containing characters other than the |
/ |
Search backward/forward |
||||||||
|
alphabet are played after alphabet character folders. |
Panel |
|||||||||
– |
File playback order: |
|
|
|
|
|
|
|
(press and hold down) |
||
|
|
|
|
|
|
|
|
||||
|
files will be played back in order from files with the oldest wrote |
|
PRESET |
Change the playback folder |
|||||||
|
date. |
|
|
|
|
|
|
|
|
|
Play/Pause |
|
|
|
|
|
|
|
|
|
|
|
|
|
|
|
|
|
|
|
|
|
|
|
Skip |
|
|
|
|
|
|
|
|
|
Remote |
/ |
Search backward/forward |
|
|
|
|
|
|
|
|
|
control |
|
(press and hold down) |
|
|
|
|
|
|
|
|
|
|
|
Stop |
|
|
|
|
|
|
|
|
|
|
FOLDER |
Change the playback folder |
|
|
|
|
|
|
|
|
|
y |
|
|
|
|
|
|
|
|
|
|
|
Stop playback before removing the USB device. |
||
Repeat/shuffle playback
The playback mode can be checked with the play/shuffle/repeat indicator on the front panel display.
Remote control

 REPEAT


 SHUFFLE
y
If the selected source contains folders, each folder will be played in repeat/ shuffle mode.
Repeat playback
Press REPEAT on the remote control to select a playback mode from the following.
 : All tracks within the folder (data CD/USB device only)

 : All tracks

 : 1 track
No display: Repeat mode off
Shuffle playback
Press SHUFFLE on the remote control to select a playback mode from the following.
 : All tracks within the folder (data CD/USB device only)

 : All tracks
No display: Shuffle mode off
English
9 En
LISTENING TO MUSIC FROM YOUR Bluetooth COMPONENT
This unit provides Bluetooth functionality. You can enjoy wireless music playback from your Bluetooth component (mobile phone, digital audio player, etc.). Please also refer to the owner’s manual of your Bluetooth component.
Pairing this unit with your Bluetooth component
Pairing is an operation that registers the communicating component (subsequently called “the other component”) with this unit. You’ll need to perform the pairing operation the first time you use your Bluetooth component with this unit, or if the pairing settings have been deleted. Once pairing has been completed, subsequent reconnection will be easy even after the Bluetooth connection is disconnected. If pairing is not
successful, refer to the item “Bluetooth” in “TROUBLESHOOTING” (P. 20). y
•This unit can be paired with up to eight other components. When pairing with the ninth component has succeeded, pairing data for the component with the oldest connection date will be deleted.
•If this unit is connected via Bluetooth to another component, hold down SOURCE button on this unit or Bluetooth on the remote control to disconnect the Bluetooth connection before you perform the pairing operation.
If using an iPod touch/iPhone/iPad
Top panel |
1Press the SOURCE button to switch the playback |
|
source to Bluetooth. |
AUTO |
2 |
SET |
2 |
BEEP |
SOURCE + BEEP |
|
1 |
|
1 |
|
SOURCE |
DIMMER |
CLOCK |
ALARM TYPE |
|||
2On your iPod touch/iPhone/iPad, turn [Settings] 
[General]  [Bluetooth] on.
The Bluetooth connection list will appear in [Devices].
USB |
LABEL SIDE |
(This procedure or display may differ depending on the type of |
|
|
|
|
|
your iPod touch/iPhone/iPad.) |
VOLUME |
SOURCE ALARM SNOOZE SLEEP PRESET |
|
|
|
3From the Bluetooth connection list of the other |
|
|
component, choose this unit (ISX-B820 Yamaha). |
|
1 |
When pairing has been completed, your iPod touch/iPhone/ |
|
iPad will indicate “Connected”. |
|
|
|
|
|
|
The Bluetooth indicator on the front panel display of this unit |
|
|
will light. |
Bluetooth indicator |
|
|
If using other than an iPod touch/iPhone/iPad |
||
Top panel |
|
1Press the SOURCE button to switch the playback |
|
|
source to Bluetooth. |
AUTO |
2 |
SET |
2 |
BEEP |
SOURCE + BEEP |
|
1 |
|
1 |
|
SOURCE |
DIMMER |
CLOCK |
ALARM TYPE |
|||
USB  LABEL SIDE
2Perform Bluetooth pairing on the other component.
For details refer to the owner’s manual of the other component.
|
|
3From the Bluetooth connection list of the other |
VOLUME |
SOURCE ALARM SNOOZE SLEEP PRESET |
component, choose this unit (ISX-B820 Yamaha). |
|
|
When pairing has been completed, the Bluetooth indicator on |
|
|
the front panel display of this unit will light for about 1 |
|
1 |
second. |
|
y |
|
|
|
|
|
|
If you are asked to enter a password, enter the numerals “0000”. |
Bluetooth indicator |
|
|
10 En

|
|
|
|
|
LISTENING TO MUSIC FROM YOUR Bluetooth COMPONENT |
Listening to a Bluetooth component |
|
||||
Top panel |
|
|
|
|
1Press the SOURCE button to switch the playback |
|
|
|
|
SOURCE + BEEP |
source to Bluetooth. |
|
AUTO 2 |
SET 2 |
BEEP |
|
|
|
1 |
1 |
|
SOURCE |
2Connect this unit and your other component via |
|
DIMMER |
CLOCK |
ALARM TYPE |
||
|
|
|
|
|
Bluetooth. |
USB |
|
LABEL SIDE |
|
3Play back music from your Bluetooth component. |
|
|
|
|
|
|
Note |
VOLUME |
SOURCE ALARM |
SNOOZE SLEEP |
PRESET |
Take care that the volume setting of this unit is not too high. We |
|
|
|
|
|
|
|
|
|
|
|
|
recommend that you adjust the volume on the other component. |
y
• If you connect via Bluetooth from your other component and play 1 back music while this unit is turned off the system, this unit will
automatically turn on the system.
• If you disconnect the Bluetooth connection from your other component while the playback source is set to Bluetooth, this unit
will automatically turn off the system.
• If Bluetooth is selected as the playback source, this unit will
automatically turn off the system when 60 minutes have elapsed without any Bluetooth connection nor any operation performed.
Connecting an already-paired component via Bluetooth
Once pairing has been completed, connecting a Bluetooth will be easy the next time.
Connecting from this unit
Top panel |
|
|
|
1Press the SOURCE button to switch the playback |
|
|
AUTO 1 2 |
SET 1 2 |
BEEP SOURCE SOURCE + BEEP |
source to Bluetooth. |
|
|
DIMMER |
CLOCK |
ALARM TYPE |
The Bluetooth indicator will blink on the front panel display; |
|
|
|
|
|
this unit will search for the other component that was most |
|
|
|
|
|
recently connected via Bluetooth, and will then establish a |
|
USB |
|
LABEL SIDE |
connection (You must first turn on the Bluetooth setting of the |
||
|
|
|
|
other component). |
|
VOLUME |
SOURCE ALARM |
SNOOZE SLEEP PRESET |
When the Bluetooth connection has been established, the |
||
Bluetooth indicator will light. |
|||||
|
|
|
|
||
|
|
|
|
Note |
|
|
1 |
|
|
Yamaha does not guarantee all connections between this unit and |
|
|
|
|
Bluetooth component. |
||
 Bluetooth indicator

Connecting from the other component
1In the Bluetooth settings of the other component, turn Bluetooth on.
2From the Bluetooth connection list of the other component, choose this unit (ISX-B820 Yamaha).
The Bluetooth connection will be established, and the Bluetooth indicator on the front panel display of this unit will light.
Note
Bluetooth connections cannot be established from the other component when this unit is in power save mode. Turn the system on.
Disconnecting a Bluetooth connection
If any of the following operations are performed while a Bluetooth connection is being used, the Bluetooth connection will be disconnected.
•Hold down SOURCE button on this unit or Bluetooth on the remote control.
•Turn the system off.
•Turn off the Bluetooth setting of the other component.
y
When you connect an iPod touch/iPhone/iPad via Bluetooth, the Bluetooth connection may be disconnected if you switch the playback source to iPod while another iPod is connected to the iPod dock.
11 En
English

LISTENING TO FM STATIONS
Selecting the FM station
1Press SOURCE and set FM as the playback source.
Top panel
AUTO |
2 |
SET |
2 |
BEEP |
SOURCE + BEEP |
|
1 |
|
1 |
|
SOURCE |
DIMMER |
CLOCK |
ALARM TYPE |
|||
|
|
|
|
|
|
Reception |
|
|
|
|
|
FM |
frequency |
USB |
LABEL SIDE |
|
|
|
|
|
VOLUME |
SOURCE ALARM SNOOZE SLEEP |
PRESET |
2Press |
/ |
to tune the FM station. |
|
|
|
|
|
|
Tuning type |
|
Operation |
||||
1 |
2 |
Automatic |
Press and hold down |
||||
|
Top |
tuning |
or . |
|
|
||
|
panel |
Manual |
|
|
|
|
|
Note |
|
Press |
or |
|
repeatedly. |
||
|
tuning |
|
|||||
If you tune to an FM station manually, the sound will be in monaural. |
|
|
|
|
|||
Automatic |
Press and hold down |
||||||
|
|
||||||
|
Remote |
tuning |
TUNING |
|
or . |
||
|
control |
Manual |
Press TUNING |
or |
|||
|
|
||||||
|
|
tuning |
repeatedly. |
|
|
||
Storing FM stations (preset)
Use the preset function to store your favorite 5 stations.
Top panel |
|
|
|
|
1Press |
/ to tune into your favorite FM station. |
|
|
|
|
|
|
|
|
1 |
1 |
SOURCE |
SOURCE + BEEP |
2Press and hold down PRESET. |
|
|
AUTO 2 |
SET 2 |
BEEP |
|
|
|
|
DIMMER |
CLOCK |
ALARM TYPE |
|
|
|
USB |
|
LABEL SIDE |
|
|
|
|
|
|
|
|
|
|
FM |
VOLUME |
SOURCE ALARM |
SNOOZE SLEEP |
PRESET |
|
Preset |
|
|
number |
|||||
|
|
|
|
|
|
|
|
|
|
|
|
|
Using the remote control |
|
|
234 1 |
|
Press and hold down MEMORY. |
||
3Press PRESET and select the preset number to store the FM station.
Using the remote control
Press PRESET  /
/  .
.
4Press and hold down PRESET to store the preset station.
This stores the FM station.
Using the remote control
Press MEMORY.
12 En

Selecting a preset FM station
Top panel
AUTO |
2 |
SET |
2 |
BEEP |
SOURCE + BEEP |
|
1 |
|
1 |
|
SOURCE |
DIMMER |
CLOCK |
ALARM TYPE |
|||
USB |
|
|
LABEL SIDE |
|
VOLUME |
SOURCE |
ALARM |
SNOOZE SLEEP |
PRESET |
1 2
LISTENING TO EXTERNAL SOURCES
1Press SOURCE and set FM as the playback source.
2Press PRESET repeatedly to select the preset FM station.
Using the remote control
Press PRESET  /
/  .
.
English
LISTENING TO EXTERNAL SOURCES
Top panel
2
|
|
|
Turn the system off before connecting audio cables. Remove the |
||
|
|
|
terminal cover before connecting external devices. |
|
|
|
AUTO 2 |
SET |
|
|
|
|
1 |
|
1Connect external audio device to AUX on the rear |
||
|
DIMMER |
CL |
|||
|
|
|
panel using a commercially available 3.5 mm (1/8 in) |
||
|
|
|
stereo mini plug cable. |
|
|
USB |
|
LA |
|
|
|
VOLUME |
SOURCE ALARM |
SNOOZ |
|
75 Ω |
AUX |
|
|
|
AUX |
FM ANT |
|
3
Note
Turn down the volume of the unit and your external audio device before connection.
2Press  to turn the system on.
3Press SOURCE and set AUX as the playback source.
4Start playback on the connected external audio device.
13 En

USING THE ALARM FUNCTION
The unit includes an alarm function (IntelliAlarm) that plays back music sources or set of beeps at the set time in a variety of different methods. The alarm function has following features.
3 types of alarms
Select from 3 alarm types, combining music and beep sounds.
|
The selected audio source and beep sound are played at the set time. This mode is recommended for |
|
|
the best possible start to the day. |
|
SOURCE + BEEP |
3 minutes before the set time: the source music begins to fade in and the volume gradually increases |
|
|
|
as the alarm time approaches. |
|
Alarm time: |
a beeping sound also begins playing. |
|
|
|
SOURCE |
The selected audio source is played at the set time. The volume fades in gradually and increases to |
|
the set volume. |
|
|
|
|
|
|
|
|
BEEP |
Only beep sound is played back at the set time. |
|
|
|
|
Various music sources
The iPod, audio CD, data CD, USB device and radio can be selected. The following can also be selected depending on the audio source:
Source |
Playback method |
Function |
|
|
|
|
|
|
|
The unit resumes play from the last track you played. |
|
|
|
If you’ve created a playlist* with the name “ALARM Yamaha DTA” in |
|
iPod |
Resume |
advance, the playlist stored on the iPod can be played back |
|
repeatedly. |
|||
|
|
When entering the playlist name, use single-byte spaces to separate |
|
|
|
words, and enter single-byte characters, taking care that uppercase/ |
|
|
|
lowercase letters are used correctly. |
|
|
|
|
|
Audio CD |
Selected track |
The selected track is played repeatedly. |
|
|
|
||
Resume |
The track you listened to last time is played back. |
||
|
|||
|
|
|
|
Data CD/USB |
Folder |
The selected folder is played repeatedly. |
|
|
|
||
Resume |
The track you listened to last time is played back. |
||
|
|||
|
|
|
|
FM |
Preset station |
The selected preset FM station is played. |
|
|
|
||
Resume |
The FM station you listened to last time is played back. |
||
|
|||
|
|
|
* For information on creating a playlist, refer to the instructions for your iPod or iTunes.
Snooze
The snooze function can be enabled to replay the alarm after 5 minutes.
14 En
 Loading...