

Page 1

Spartan-6 FPGA
PCB Design and
Pin Planning Guide
UG393 (v1.1) April 29, 2010
Page 2
Xilinx is disclosing this user guide, manual, release note, and/or specification (the "Documentation") to you solely for use in the development
of designs to operate with Xilinx hardware devices. You may not reproduce, distribute, republish, download, display, post, or transmit the
Documentation in any form or by any means including, but not limited to, electronic, mechanical, photocopying, recording, or otherwise,
without the prior written consent of Xilinx. Xilinx expressly disclaims any liability arising out of your use of the Documentation. Xilinx reserves
the right, at its sole discretion, to change the Documentation without notice at any time. Xilinx assumes no obligation to correct any errors
contained in the Documentation, or to advise you of any corrections or updates. Xilinx expressly disclaims any liability in connection with
technical support or assistance that may be provided to you in connection with the Information.
THE DOCUMENTATION IS DISCLOSED TO YOU “AS-IS” WITH NO WARRANTY OF ANY KIND. XILINX MAKES NO OTHER
WARRANTIES, WHETHER EXPRESS, IMPLIED, OR STATUTORY, REGARDING THE DOCUMENTATION, INCLUDING ANY
WARRANTIES OF MERCHANTABILITY, FITNESS FOR A PARTICULAR PURPOSE, OR NONINFRINGEMENT OF THIRD-PARTY
RIGHTS. IN NO EVENT WILL XILINX BE LIABLE FOR ANY CONSEQUENTIAL, INDIRECT, EXEMPLARY, SPECIAL, OR INCIDENTAL
DAMAGES, INCLUDING ANY LOSS OF DATA OR LOST PROFITS, ARISING FROM YOUR USE OF THE DOCUMENTATION.
© 2009–2010 Xilinx, Inc. XILINX, the Xilinx logo, Virtex, Spartan, ISE, and other designated brands included herein are trademarks of Xilinx
in the United States and other countries. All other trademarks are the property of their respective owners.
Revision History
The following table shows the revision history for this document.
Date Version Revision
09/21/09 1.0 Initial Xilinx release.
04/29/10 1.1 Changed guide title and added Chapter 6 and Appendix A. Replaced
Ta bl e 2 -1 .
Spartan-6 FPGA PCB Design and Pin Planning www.xilinx.com UG393 (v1.1) April 29, 2010
Page 3

Table of Contents
Revision History . . . . . . . . . . . . . . . . . . . . . . . . . . . . . . . . . . . . . . . . . . . . . . . . . . . . . . . . . . . . . 2
Preface: About This Guide
Guide Contents . . . . . . . . . . . . . . . . . . . . . . . . . . . . . . . . . . . . . . . . . . . . . . . . . . . . . . . . . . . . . . 7
Additional Documentation . . . . . . . . . . . . . . . . . . . . . . . . . . . . . . . . . . . . . . . . . . . . . . . . . . . 7
Additional Support Resources. . . . . . . . . . . . . . . . . . . . . . . . . . . . . . . . . . . . . . . . . . . . . . . . 8
Chapter 1: PCB Technology Basics
PCB Structures . . . . . . . . . . . . . . . . . . . . . . . . . . . . . . . . . . . . . . . . . . . . . . . . . . . . . . . . . . . . . . . 9
Traces . . . . . . . . . . . . . . . . . . . . . . . . . . . . . . . . . . . . . . . . . . . . . . . . . . . . . . . . . . . . . . . . . . . . 9
Planes . . . . . . . . . . . . . . . . . . . . . . . . . . . . . . . . . . . . . . . . . . . . . . . . . . . . . . . . . . . . . . . . . . . . 9
Vias . . . . . . . . . . . . . . . . . . . . . . . . . . . . . . . . . . . . . . . . . . . . . . . . . . . . . . . . . . . . . . . . . . . . . 10
Pads and Antipads . . . . . . . . . . . . . . . . . . . . . . . . . . . . . . . . . . . . . . . . . . . . . . . . . . . . . . . . 10
Lands . . . . . . . . . . . . . . . . . . . . . . . . . . . . . . . . . . . . . . . . . . . . . . . . . . . . . . . . . . . . . . . . . . . 10
Dimensions . . . . . . . . . . . . . . . . . . . . . . . . . . . . . . . . . . . . . . . . . . . . . . . . . . . . . . . . . . . . . . 10
Transmission Lines . . . . . . . . . . . . . . . . . . . . . . . . . . . . . . . . . . . . . . . . . . . . . . . . . . . . . . . . . 11
Return Currents . . . . . . . . . . . . . . . . . . . . . . . . . . . . . . . . . . . . . . . . . . . . . . . . . . . . . . . . . . . . . 12
Chapter 2: Power Distribution System
PCB Decoupling Capacitors . . . . . . . . . . . . . . . . . . . . . . . . . . . . . . . . . . . . . . . . . . . . . . . . . 13
Recommended Capacitors per Device . . . . . . . . . . . . . . . . . . . . . . . . . . . . . . . . . . . . . . . 13
Required PCB Capacitor Quantities . . . . . . . . . . . . . . . . . . . . . . . . . . . . . . . . . . . . . . . . 14
Capacitor Specifications . . . . . . . . . . . . . . . . . . . . . . . . . . . . . . . . . . . . . . . . . . . . . . . . . . . 16
PCB Bulk Capacitors. . . . . . . . . . . . . . . . . . . . . . . . . . . . . . . . . . . . . . . . . . . . . . . . . . . . 16
PCB High-Frequency Capacitors . . . . . . . . . . . . . . . . . . . . . . . . . . . . . . . . . . . . . . . . . . 16
Capacitor Consolidation Rules . . . . . . . . . . . . . . . . . . . . . . . . . . . . . . . . . . . . . . . . . . . . . 17
PCB Capacitor Placement and Mounting Techniques . . . . . . . . . . . . . . . . . . . . . . . . . . 17
PCB Bulk Capacitors. . . . . . . . . . . . . . . . . . . . . . . . . . . . . . . . . . . . . . . . . . . . . . . . . . . . 17
0805 Ceramic Capacitor . . . . . . . . . . . . . . . . . . . . . . . . . . . . . . . . . . . . . . . . . . . . . . . . . 18
0402 Ceramic Capacitor . . . . . . . . . . . . . . . . . . . . . . . . . . . . . . . . . . . . . . . . . . . . . . . . . 19
Basic PDS Principles . . . . . . . . . . . . . . . . . . . . . . . . . . . . . . . . . . . . . . . . . . . . . . . . . . . . . . . . 20
Noise Limits . . . . . . . . . . . . . . . . . . . . . . . . . . . . . . . . . . . . . . . . . . . . . . . . . . . . . . . . . . . . . 20
Role of Inductance . . . . . . . . . . . . . . . . . . . . . . . . . . . . . . . . . . . . . . . . . . . . . . . . . . . . . . . . 22
Capacitor Parasitic Inductance. . . . . . . . . . . . . . . . . . . . . . . . . . . . . . . . . . . . . . . . . . . . . . 22
PCB Current Path Inductance . . . . . . . . . . . . . . . . . . . . . . . . . . . . . . . . . . . . . . . . . . . . . . 24
Capacitor Mounting Inductance . . . . . . . . . . . . . . . . . . . . . . . . . . . . . . . . . . . . . . . . . . . 24
Plane Inductance . . . . . . . . . . . . . . . . . . . . . . . . . . . . . . . . . . . . . . . . . . . . . . . . . . . . . . . . . 25
FPGA Mounting Inductance . . . . . . . . . . . . . . . . . . . . . . . . . . . . . . . . . . . . . . . . . . . . . . 26
PCB Stackup and Layer Order . . . . . . . . . . . . . . . . . . . . . . . . . . . . . . . . . . . . . . . . . . . . 27
Capacitor Effective Frequency . . . . . . . . . . . . . . . . . . . . . . . . . . . . . . . . . . . . . . . . . . . . . . 28
Capacitor Anti-Resonance . . . . . . . . . . . . . . . . . . . . . . . . . . . . . . . . . . . . . . . . . . . . . . . . . 30
Capacitor Placement Background . . . . . . . . . . . . . . . . . . . . . . . . . . . . . . . . . . . . . . . . . . . 30
V
Stabilization Capacitors . . . . . . . . . . . . . . . . . . . . . . . . . . . . . . . . . . . . . . . . . . . . . . . 31
REF
Power Supply Consolidation . . . . . . . . . . . . . . . . . . . . . . . . . . . . . . . . . . . . . . . . . . . . . . . 31
Unconnected V
Pins . . . . . . . . . . . . . . . . . . . . . . . . . . . . . . . . . . . . . . . . . . . . . . . . . . . 32
CCO
Spartan-6 FPGA PCB Design and Pin Planning www.xilinx.com 3
UG393 (v1.1) April 29, 2010
Page 4

Simulation Methods . . . . . . . . . . . . . . . . . . . . . . . . . . . . . . . . . . . . . . . . . . . . . . . . . . . . . . . . 32
PDS Measurements . . . . . . . . . . . . . . . . . . . . . . . . . . . . . . . . . . . . . . . . . . . . . . . . . . . . . . . . . 33
Noise Magnitude Measurement . . . . . . . . . . . . . . . . . . . . . . . . . . . . . . . . . . . . . . . . . . . . 33
Noise Spectrum Measurements . . . . . . . . . . . . . . . . . . . . . . . . . . . . . . . . . . . . . . . . . . . . . 35
Optimum Decoupling Network Design . . . . . . . . . . . . . . . . . . . . . . . . . . . . . . . . . . . . . . 37
Troubleshooting . . . . . . . . . . . . . . . . . . . . . . . . . . . . . . . . . . . . . . . . . . . . . . . . . . . . . . . . . . . . 37
Possibility 1: Excessive Noise from Other Devices on the PCB . . . . . . . . . . . . . . . . . . 37
Possibility 2: Parasitic Inductance of Planes, Vias, or Connecting Traces . . . . . . . . . . 37
Possibility 3: I/O Signals in PCB are Stronger Than Necessary . . . . . . . . . . . . . . . . . . 38
Possibility 4: I/O Signal Return Current Traveling in Sub-Optimal Paths . . . . . . . . . 38
Chapter 3: SelectIO Signaling
Interface Types. . . . . . . . . . . . . . . . . . . . . . . . . . . . . . . . . . . . . . . . . . . . . . . . . . . . . . . . . . . . . . 39
Single-Ended versus Differential Interfaces. . . . . . . . . . . . . . . . . . . . . . . . . . . . . . . . . . . 39
SDR versus DDR Interfaces . . . . . . . . . . . . . . . . . . . . . . . . . . . . . . . . . . . . . . . . . . . . . . . . 40
Single-Ended Signaling . . . . . . . . . . . . . . . . . . . . . . . . . . . . . . . . . . . . . . . . . . . . . . . . . . . . . 40
Modes and Attributes . . . . . . . . . . . . . . . . . . . . . . . . . . . . . . . . . . . . . . . . . . . . . . . . . . . . . 40
Input Thresholds . . . . . . . . . . . . . . . . . . . . . . . . . . . . . . . . . . . . . . . . . . . . . . . . . . . . . . . . . 40
Chapter 4: PCB Materials and Traces
How Fast is Fast? . . . . . . . . . . . . . . . . . . . . . . . . . . . . . . . . . . . . . . . . . . . . . . . . . . . . . . . . . . . . 41
Dielectric Losses . . . . . . . . . . . . . . . . . . . . . . . . . . . . . . . . . . . . . . . . . . . . . . . . . . . . . . . . . . . . 41
Relative Permittivity . . . . . . . . . . . . . . . . . . . . . . . . . . . . . . . . . . . . . . . . . . . . . . . . . . . . . . 41
Loss Tangent . . . . . . . . . . . . . . . . . . . . . . . . . . . . . . . . . . . . . . . . . . . . . . . . . . . . . . . . . . . . . 42
Skin Effect and Resistive Losses . . . . . . . . . . . . . . . . . . . . . . . . . . . . . . . . . . . . . . . . . . . . 42
Choosing the Substrate Material . . . . . . . . . . . . . . . . . . . . . . . . . . . . . . . . . . . . . . . . . . . . 42
Traces. . . . . . . . . . . . . . . . . . . . . . . . . . . . . . . . . . . . . . . . . . . . . . . . . . . . . . . . . . . . . . . . . . . . . . . 43
Trace Geometry . . . . . . . . . . . . . . . . . . . . . . . . . . . . . . . . . . . . . . . . . . . . . . . . . . . . . . . . . . 43
Trace Characteristic Impedance Design for High-Speed Transceivers . . . . . . . . . . . . 43
Trace Routing . . . . . . . . . . . . . . . . . . . . . . . . . . . . . . . . . . . . . . . . . . . . . . . . . . . . . . . . . . . . 45
Plane Splits . . . . . . . . . . . . . . . . . . . . . . . . . . . . . . . . . . . . . . . . . . . . . . . . . . . . . . . . . . . . . . 45
Return Currents . . . . . . . . . . . . . . . . . . . . . . . . . . . . . . . . . . . . . . . . . . . . . . . . . . . . . . . . . . 45
Simulating Lossy Transmission Lines. . . . . . . . . . . . . . . . . . . . . . . . . . . . . . . . . . . . . . . . 46
Cable . . . . . . . . . . . . . . . . . . . . . . . . . . . . . . . . . . . . . . . . . . . . . . . . . . . . . . . . . . . . . . . . . . . . . . . 46
Connectors . . . . . . . . . . . . . . . . . . . . . . . . . . . . . . . . . . . . . . . . . . . . . . . . . . . . . . . . . . . . . . 46
Skew Between Conductors . . . . . . . . . . . . . . . . . . . . . . . . . . . . . . . . . . . . . . . . . . . . . . . . . 46
Chapter 5: Design of Transitions for High-Speed Signals
Excess Capacitance and Inductance . . . . . . . . . . . . . . . . . . . . . . . . . . . . . . . . . . . . . . . . . . 47
Time Domain Reflectometry . . . . . . . . . . . . . . . . . . . . . . . . . . . . . . . . . . . . . . . . . . . . . . . . 47
BGA Package . . . . . . . . . . . . . . . . . . . . . . . . . . . . . . . . . . . . . . . . . . . . . . . . . . . . . . . . . . . . . . . 49
SMT Pads. . . . . . . . . . . . . . . . . . . . . . . . . . . . . . . . . . . . . . . . . . . . . . . . . . . . . . . . . . . . . . . . . . . 49
Differential Vias . . . . . . . . . . . . . . . . . . . . . . . . . . . . . . . . . . . . . . . . . . . . . . . . . . . . . . . . . . . . 53
P/N Crossover Vias. . . . . . . . . . . . . . . . . . . . . . . . . . . . . . . . . . . . . . . . . . . . . . . . . . . . . . . . . . 56
SMA Connectors . . . . . . . . . . . . . . . . . . . . . . . . . . . . . . . . . . . . . . . . . . . . . . . . . . . . . . . . . . . . 56
Backplane Connectors. . . . . . . . . . . . . . . . . . . . . . . . . . . . . . . . . . . . . . . . . . . . . . . . . . . . . . . 56
Microstrip/Stripline Bends . . . . . . . . . . . . . . . . . . . . . . . . . . . . . . . . . . . . . . . . . . . . . . . . . . 56
4 www.xilinx.com Spartan-6 FPGA PCB Design and Pin Planning
UG393 (v1.1) April 29, 2010
Page 5

Chapter 6: I/O Pin and Clock Planning
Configuration Modes . . . . . . . . . . . . . . . . . . . . . . . . . . . . . . . . . . . . . . . . . . . . . . . . . . . . . . . 61
Configuration Pin Planning Considerations . . . . . . . . . . . . . . . . . . . . . . . . . . . . . . . . . . 61
Multi-function Configuration . . . . . . . . . . . . . . . . . . . . . . . . . . . . . . . . . . . . . . . . . . . . . 61
Configuration Options . . . . . . . . . . . . . . . . . . . . . . . . . . . . . . . . . . . . . . . . . . . . . . . . . . 62
Memory Controller Block . . . . . . . . . . . . . . . . . . . . . . . . . . . . . . . . . . . . . . . . . . . . . . . . . . . 62
MCB Pin Planning Considerations . . . . . . . . . . . . . . . . . . . . . . . . . . . . . . . . . . . . . . . . . 62
MCB Clocking Considerations. . . . . . . . . . . . . . . . . . . . . . . . . . . . . . . . . . . . . . . . . . . . . . 63
PCI . . . . . . . . . . . . . . . . . . . . . . . . . . . . . . . . . . . . . . . . . . . . . . . . . . . . . . . . . . . . . . . . . . . . . . . . . 63
GTP Transceivers . . . . . . . . . . . . . . . . . . . . . . . . . . . . . . . . . . . . . . . . . . . . . . . . . . . . . . . . . . . 63
GTP Transceiver Pin Planning Considerations . . . . . . . . . . . . . . . . . . . . . . . . . . . . . . . . 63
GTP Transceiver Clocking Considerations . . . . . . . . . . . . . . . . . . . . . . . . . . . . . . . . . . . 64
PCI Express . . . . . . . . . . . . . . . . . . . . . . . . . . . . . . . . . . . . . . . . . . . . . . . . . . . . . . . . . . . . . . 64
Other GTP Transceiver Based Tools . . . . . . . . . . . . . . . . . . . . . . . . . . . . . . . . . . . . . . . . . 64
Global and I/O Clocking . . . . . . . . . . . . . . . . . . . . . . . . . . . . . . . . . . . . . . . . . . . . . . . . . . . . 64
GCLK Pin Assignment . . . . . . . . . . . . . . . . . . . . . . . . . . . . . . . . . . . . . . . . . . . . . . . . . . . . 64
BUFIO2 I/O Clock Buffer Usage . . . . . . . . . . . . . . . . . . . . . . . . . . . . . . . . . . . . . . . . . . . . 65
Overview of BUFIO2 Resource Usage per Interface Type . . . . . . . . . . . . . . . . . . . . . . . 66
Bidirectional I/O. . . . . . . . . . . . . . . . . . . . . . . . . . . . . . . . . . . . . . . . . . . . . . . . . . . . . . . 66
Serializing Interfaces. . . . . . . . . . . . . . . . . . . . . . . . . . . . . . . . . . . . . . . . . . . . . . . . . . . . . . . . 66
Pin Planning Considerations . . . . . . . . . . . . . . . . . . . . . . . . . . . . . . . . . . . . . . . . . . . . . . . 66
Single-Ended SerDes. . . . . . . . . . . . . . . . . . . . . . . . . . . . . . . . . . . . . . . . . . . . . . . . . . . . 66
Differential SerDes . . . . . . . . . . . . . . . . . . . . . . . . . . . . . . . . . . . . . . . . . . . . . . . . . . . . . 67
Power Management—Using Suspend/Awake. . . . . . . . . . . . . . . . . . . . . . . . . . . . . . . . 67
I/O Standards and I/O Banking Rules . . . . . . . . . . . . . . . . . . . . . . . . . . . . . . . . . . . . . . . 67
Simultaneous Switching Output (SSO) Management . . . . . . . . . . . . . . . . . . . . . . . . 67
Running Design Rule Checks . . . . . . . . . . . . . . . . . . . . . . . . . . . . . . . . . . . . . . . . . . . . . . . 67
Density Migration . . . . . . . . . . . . . . . . . . . . . . . . . . . . . . . . . . . . . . . . . . . . . . . . . . . . . . . . . . 68
Appendix A: Recommended PCB Design Rules
Recommended PCB Design Rules for QFP Packages . . . . . . . . . . . . . . . . . . . . . . . . . 69
Recommended PCB Design Rules for BGA and CSP Packages . . . . . . . . . . . . . . . 70
Spartan-6 FPGA PCB Design and Pin Planning www.xilinx.com 5
UG393 (v1.1) April 29, 2010
Page 6

6 www.xilinx.com Spartan-6 FPGA PCB Design and Pin Planning
UG393 (v1.1) April 29, 2010
Page 7

About This Guide
This guide provides information on PCB design for Spartan®-6 devices, with a focus on
strategies for making design decisions at the PCB and interface level.
Guide Contents
This guide contains the following chapters:
• Chapter 1, PCB Technology Basics, discusses the basics of current PCB technology
focusing on physical structures and common assumptions.
• Chapter 2, Power Distribution System, covers the power distribution system for
Spartan-6 FPGAs, including all details of decoupling capacitor selection, use of
voltage regulators and PCB geometries, simulation and measurement.
• Chapter 3, SelectIO Signaling, contains information on the choice of SelectIO™
standards, I/O topographies, and termination strategies as well as information on
simulation and measurement techniques.
• Chapter 4, PCB Materials and Traces, provides some guidelines on managing signal
attenuation to obtain optimal performance for high-frequency applications.
• Chapter 5, Design of Transitions for High-Speed Signals, addresses the interface at
either end of a transmission line. The provided analyses and examples can greatly
accelerate the specific design.
Preface
Additional Documentation
The following documents are also available for downloaded at
http://www.xilinx.com/support/documentation/spartan-6.htm
• Spartan-6 Family Overview
This overview outlines the features and product selection of the Spartan-6 family.
• Spartan-6 FPGA Data Sheet: DC and Switching Characteristics
This data sheet contains the DC and switching characteristic specifications for the
Spartan-6 family.
• Spartan-6 FPGA Packaging and Pinout Specifications
This specification includes the tables for device/package combinations and maximum
I/Os, pin definitions, pinout tables, pinout diagrams, mechanical drawings, and
thermal specifications.
• Spartan-6 FPGA Configuration User Guide
Spartan-6 FPGA PCB Design and Pin Planning www.xilinx.com 7
UG393 (v1.1) April 29, 2010
.
Page 8

Preface: About This Guide
• Spartan-6 FPGA SelectIO Resources User Guide
•Spartan-6 FPGA Clocking Resources User Guide
• Spartan-6 FPGA Configurable Logic Block User Guide
• Spartan-6 FPGA Block RAM Resources User Guide
• Spartan-6 FPGA DSP48A1 Slice User Guide
• Spartan-6 FPGA Memory Controller User Guide
This all-encompassing configuration guide includes chapters on configuration
interfaces (serial and parallel), multi-bitstream management, bitstream encryption,
boundary-scan and JTAG configuration, and reconfiguration techniques.
This guide describes the SelectIO™ resources available in all Spartan-6 devices.
This guide describes the clocking resources available in all Spartan-6 devices,
including the DCMs and PLLs.
This guide describes the capabilities of the configurable logic blocks (CLBs) available
in all Spartan-6 devices.
This guide describes the Spartan-6 device block RAM capabilities.
This guide describes the architecture of the DSP48A1 slice in Spartan-6 FPGAs and
provides configuration examples.
This guide describes the Spartan-6 FPGA memory controller block, a dedicated
embedded multi-port memory controller that greatly simplifies interfacing Spartan-6
FPGAs to the most popular memory standards.
• Spartan-6 FPGA GTP Transceiver User Guide
This guide describes the GTP transceivers available in the Spartan-6 LXT FPGAs.
Additional Support Resources
To search the Answer Database of silicon, software, and IP questions and answers, or to
create a technical support WebCase, see the Xilinx website at:
http://www.xilinx.com/support/mysupport.htm
.
8 www.xilinx.com Spartan-6 FPGA PCB Design and Pin Planning
UG393 (v1.1) April 29, 2010
Page 9

PCB Technology Basics
Printed circuit boards (PCBs) are electrical systems, with electrical properties as
complicated as the discrete components and devices mounted to them. The PCB designer
has complete control over many aspects of the PCB; however, current technology places
constraints and limits on the geometries and resulting electrical properties. The following
information is provided as a guide to the freedoms, limitations, and techniques for PCB
designs using FPGAs.
This chapter contains the following sections:
• PCB Structures
• Transmission Lines
• Return Currents
PCB Structures
Chapter 1
Tr ac e s
Planes
PCB technology has not changed significantly in the last few decades. An insulator
substrate material (usually FR4, an epoxy/glass composite) with copper plating on both
sides has portions of copper etched away to form conductive paths. Layers of plated and
etched substrates are glued together in a stack with additional insulator substrates
between the etched substrates. Holes are drilled through the stack. Conductive plating is
applied to these holes, selectively forming conductive connections between the etched
copper of different layers.
While there are advancements in PCB technology, such as material properties, the number
of stacked layers used, geometries, and drilling techniques (allowing holes that penetrate
only a portion of the stackup), the basic structures of PCBs have not changed. The
structures formed through the PCB technology are abstracted to a set of physical/electrical
structures: traces, planes (or planelets), vias, and pads.
A trace is a physical strip of metal (usually copper) making an electrical connection
between two or more points on an X-Y coordinate of a PCB. The trace carries signals
between these points.
A plane is an uninterrupted area of metal covering the entire PCB layer. A planelet, a
variation of a plane, is an uninterrupted area of metal covering only a portion of a PCB
layer. Typically, a number of planelets exist in one PCB layer. Planes and planelets
distribute power to a number of points on a PCB. They are very important in the
Spartan-6 FPGA PCB Design and Pin Planning www.xilinx.com 9
UG393 (v1.1) April 29, 2010
Page 10

Chapter 1: PCB Technology Basics
transmission of signals along traces because they are the return current transmission
medium.
Vias
A via is a piece of metal making an electrical connection between two or more points in the
Z space of a PCB. Vias carry signals or power between layers of a PCB. In current platedthrough-hole (PTH) technology, a via is formed by plating the inner surface of a hole
drilled through the PCB. In current microvia technology (also known as High Density
Interconnect or HDI), a via is formed with a laser by ablating the substrate material and
deforming the conductive plating. These microvias cannot penetrate more than one or two
layers, however, they can be stacked or stair-stepped to form vias traversing the full board
thickness.
Pads and Antipads
Because PTH vias are conductive over the whole length of the via, a method is needed to
selectively make electrical connections to traces, planes, and planelets of the various layers
of a PCB. This is the function of pads and antipads.
Pads are small areas of copper in prescribed shapes. Antipads are small areas in prescribed
shapes where copper is removed. Pads are used both with vias and as exposed outer-layer
copper for mounting of surface-mount components. Antipads are used mainly with vias.
For traces, pads are used to make the electrical connection between the via and the trace or
plane shape on a given layer. For a via to make a solid connection to a trace on a PCB layer,
a pad must be present for mechanical stability. The size of the pad must meet drill
tolerance/registration restrictions.
Antipads are used in planes. Because plane and planelet copper is otherwise
uninterrupted, any via traveling through the copper makes an electrical connection to it.
Where vias are not intended to make an electrical connection to the planes or planelets
passed through, an antipad removes copper in the area of the layer where the via
penetrates.
Lands
For the purposes of soldering surface mount components, pads on outer layers are
typically referred to as lands or solder lands. Making electrical connections to these lands
usually requires vias. Due to manufacturing constraints of PTH technology, it is rarely
possible to place a via inside the area of the land. Instead, this technology uses a short
section of trace connecting to a surface pad. The minimum length of the connecting trace is
determined by minimum dimension specifications from the PCB manufacturer. Microvia
technology is not constrained, and vias can be placed directly in the area of a solder land.
Dimensions
The major factors defining the dimensions of the PCB are PCB manufacturing limits, FPGA
package geometries, and system compliance. Other factors such as Design For
Manufacturing (DFM) and reliability impose further limits, but because these are
application specific, they are not documented in this user guide.
The dimensions of the FPGA package, in combination with PCB manufacturing limits,
define most of the geometric aspects of the PCB structures described in this section (PCB
Structures), both directly and indirectly. This significantly constrains the PCB designer. The
10 www.xilinx.com Spartan-6 FPGA PCB Design and Pin Planning
UG393 (v1.1) April 29, 2010
Page 11

Transmission Lines
package pin or ball pitch (1.0 mm for FG packages) defines the land pad layout. The
minimum surface feature sizes of current PCB technology define the via arrangement in
the area under the device. Minimum via diameters and keep-out areas around those vias are
defined by the PCB manufacturer. These diameters limit the amount of space available
in-between vias for routing of signals in and out of the via array underneath the device.
These diameters define the maximum trace width in these breakout traces. PCB
manufacturing limits constrain the minimum trace width and minimum spacing.
The total number of PCB layers necessary to accommodate an FPGA is defined by the
number of signal layers and the number of plane layers.
• The number of signal layers is defined by the number of I/O signal traces routed in
and out of an FPGA package (usually following the total User I/O count of the
package for array packages).
• The number of plane layers is defined by the number of power and ground plane
layers necessary to bring power to the FPGA and to provide references and isolation
for signal layers.
PCBs for larger FPGAs can range from 4 to 22 layers.
System compliance often defines the total thickness of the board. Along with the number
of board layers, this defines the maximum layer thickness, and therefore, the spacing in the
Z direction of signal and plane layers to other signal and plane layers. Z-direction spacing
of signal trace layers to other signal trace layers affects crosstalk. Z-direction spacing of
signal trace layers to reference plane layers affects signal trace impedance. Z-direction
spacing of plane layers to other plane layers affects power system parasitic inductance.
Z-direction spacing of signal trace layers to reference plane layers (defined by total board
thickness and number of board layers) is a defining factor in trace impedance.Trace width
(defined by FPGA package ball pitch and PCB via manufacturing constraints) is another
factor in trace impedance. A designer often has little control over trace impedance in area
of the via array beneath the FPGA. When traces escape the via array, their width can
change to the width of the target impedance (usually 50Ω single-ended).
Decoupling capacitor placement and discrete termination resistor placement are other
areas of trade-off optimization. DFM constraints often define a keep-out area around the
perimeter of the FPGA (device footprint) where no discrete components can be placed. The
purpose of the keep-out area is to allow room for assembly and rework where necessary.
For this reason, the area just outside the keep-out area is one where components compete
for placement. It is up to the PCB designer to determine the high priority components.
Decoupling capacitor placement constraints are described in Chapter 2, Power
Distribution System. Termination resistor placement constraints must be determined
through signal integrity simulation, using IBIS or SPICE.
Transmission Lines
The combination of a signal trace and a reference plane forms a transmission line. All I/O
signals in a PCB system travel through transmission lines.
For single-ended I/O interfaces, both the signal trace and the reference plane are necessary
to transmit a signal from one place to another on the PCB. For differential I/O interfaces,
the transmission line is formed by the combination of two traces and a reference plane.
While the presence of a reference plane is not strictly necessary in the case of differential
signals, it is necessary for practical implementation of differential traces in PCBs.
Good signal integrity in a PCB system is dependent on having transmission lines with
controlled impedance. Impedance is determined by the geometry of the traces and the
Spartan-6 FPGA PCB Design and Pin Planning www.xilinx.com 11
UG393 (v1.1) April 29, 2010
Page 12

Chapter 1: PCB Technology Basics
dielectric constant of the material in the space around the signal trace and between the
signal trace and the reference plane.
The dielectric constant of the material in the vicinity of the trace and reference plane is a
property of the PCB laminate materials, and in the case of surface traces, a property of the
air or fluid surrounding the board. PCB laminate is typically a variant of FR4, though it can
also be an exotic material.
While the dielectric constant of the laminate varies from board to board, it is fairly constant
within one board. Therefore, the relative impedance of transmission lines in a PCB is
defined most strongly by the trace geometries and tolerances. Impedance variance can
occur based on the presence or absence of glass in a local portion of the laminate weave,
but this rarely poses issues except in high-speed (>6 Gb/s) interfaces.
Return Currents
An often neglected aspect of transmission lines and their signal integrity is return current.
It is incorrect to assume that a signal trace by itself forms a transmission line. Currents
flowing in a signal trace have an equal and opposite complimentary current flowing in the
reference plane beneath them. The relationship of the trace voltage and trace current to
reference plane voltage and reference plane current defines the characteristic impedance of
the transmission line formed by the trace and reference plane. While interruption of
reference plane continuity beneath a trace is not as dramatic in effect as severing the signal
trace, the performance of the transmission line and any devices sharing the reference plane
is affected.
It is important to pay attention to reference plane continuity and return current paths.
Interruptions of reference plane continuity, such as holes, slots, or isolation splits, cause
significant impedance discontinuities in the signal traces. They can also be a significant
source of crosstalk and contributor to Power Distribution System (PDS) noise. The
importance of return current paths cannot be underestimated.
12 www.xilinx.com Spartan-6 FPGA PCB Design and Pin Planning
UG393 (v1.1) April 29, 2010
Page 13

Power Distribution System
This chapter documents the power distribution system (PDS) for Spartan®-6 FPGAs,
including decoupling capacitor selection, placement, and PCB geometries. A simple
decoupling method is provided for each device in the Spartan-6 family. Basic PDS design
principles are covered, as well as simulation and analysis methods. This chapter contains
the following sections:
• PCB Decoupling Capacitors
• Basic PDS Principles
• Simulation Methods
• PDS Measurements
• Troubleshooting
PCB Decoupling Capacitors
Chapter 2
Recommended Capacitors per Device
A simple PCB-decoupling network for each Spartan-6 device is listed in Tab le 2 -1 .
Decoupling methods other than those presented in Ta bl e 2- 1 can be used, but the
decoupling network should be designed to meet or exceed the performance of the simple
decoupling networks presented here. The impedance of the alternate network must be less
than or equal to that of the recommended network across frequencies from 100 KHz to
500 MHz.
Because device capacitance requirements vary with CLB and I/O utilization, PCB
decoupling guidelines are provided on a per-device basis. V
are listed as the quantity per device, while V
I/O bank. Device performance at full utilization is equivalent across all devices when
using these recommended networks.
and V
capacitors are listed as the quantity per
CCO
CCINT
CCAUX
capacitors
Spartan-6 FPGA PCB Design and Pin Planning www.xilinx.com 13
UG393 (v1.1) April 29, 2010
Page 14
Chapter 2: Power Distribution System
Required PCB Capacitor Quantities
Tab le 2 -1 lists the PCB decoupling capacitor guidelines per VCC supply rail.
CCO
(1)
V
CCO
Bank 2
in µF
V
CCO
Bank 3
in µF
V
CCO
Bank 4
in µF
V
CCO
Bank 5
in µF
Tot al
Table 2-1: Required PCB Capacitor Quantities per Device
V
Bank 1
in µF
Package
Device
(XC6S)
V
V
CCINT
in µF
100 4.7 0.47 100 4.7 0.47 100 4.7 0.47 100 4.7 0.47 100 4.7 0.47 100 4.7 0.47 100 4.7 0.47 100 4.7 0.47
V
CCAUX
in µF
CCO
Bank 0
in µF
TQG144LX4 051073012012012012 28
TQG144LX9 112073012012012012 26
CPG196LX4 051113112112112112 27
CPG196LX9 112113112112112112 25
CPG196LX16 124 11 3112 112 11211 2 28
CSG225LX4 051124123123123123 37
CSG225LX9 012124123123123123 34
CSG225LX16 124 12 4123 12 3123 123 38
CSG324LX9 112135123124123124 39
CSG324LX16 124 13 6124 12 4134 124 46
CSG324LX25 137 13 6124 12 4134 124 50
CSG324 LX25T 1 3 7 1 2 5 1 1 1 1 2 4 1 3 4 1 2 4 44
(2)
CSG324LX45 2612136 12 3124 13 4124 58
CSG324 LX45T 2 6 12 1 2 5 1 1 1 1 2 4 1 3 4 1 2 4 53
FT(G)256LX9 112125123124123124 38
FT(G)256LX16 12412 5 123 12 4123 12 4 41
FT(G)256LX25 13712 5 123 12 4123 12 4 45
CSG484LX45 2612148 12 3148 12 4147
71
CSG484 LX45T 2 6 12 1 4 7 1 2 3 1 4 7 1 2 4 1 4 7 69
CSG484LX75 31020148124148124148 86
CSG484 LX75T 3 10 20 1 4 7 1 2 3 1 4 7 1 2 4 1 4 7
82
CSG484 LX100 4 13 27 1 4 9 1 2 4 1 4 8 1 3 5 1 4 8 100
CSG484 LX100T 4 13 27 1 4 7 1 2 3 1 4 7 1 2 4 1 4 7 93
CSG484 LX150 7 20 40 1 4 9 1 2 4 1 4 8 1 3 5 1 4 8 123
CSG484 LX150T 7 20 40 1 4 7 1 2 3 1 4 7 1 2 4 1 4 7 11 6
FG(G)484LX25 13 7137 124 13413 613 4 55
FG(G)484 LX25T 1 3 7 1 3 6 1 2 3 1 3 4 1 3 6 1 3 4
53
FG(G)484LX45 261214812 3 136 14 7146 72
FG(G)484 LX45T 2 6 12 1 4 7 1 2 3 1 3 6 1 3 6 1 3 6 68
14 www.xilinx.com Spartan-6 FPGA PCB Design and Pin Planning
UG393 (v1.1) April 29, 2010
Page 15

PCB Decoupling Capacitors
CCO
(1)
(Continued)
V
CCO
Bank 2
in µF
V
CCO
Bank 3
in µF
V
CCO
Bank 4
in µF
V
CCO
Bank 5
in µF
Tot al
Table 2-1: Required PCB Capacitor Quantities per Device
V
Bank 1
in µF
Package
Device
(XC6S)
V
V
CCINT
in µF
100 4.7 0.47 100 4.7 0.47 100 4.7 0.47 100 4.7 0.47 100 4.7 0.47 100 4.7 0.47 100 4.7 0.47 100 4.7 0.47
V
CCAUX
in µF
CCO
Bank 0
in µF
FG(G)484LX75 31020149135136147146 89
FG(G)484 LX75T 3 10 20 1 4 7 1 2 3 1 3 6 1 3 6 1 3 6 81
FG(G)484 LX100 4 13 27 1 4 8 1 3 5 1 3 6 1 4 6 1 4 6 98
FG(G)484 LX100T 4 13 27 1 4 7 1 2 3 1 3 6 1 3 6 1 3 6 92
FG(G)484 LX150 7 20 40 1 4 8 1 3 5 1 3 6 1 4 6 1 4 6 121
FG(G)484 LX150T 7 20 40 1 4 7 1 2 3 1 3 6 1 3 6 1 3 6 115
FG(G)676LX45 261215913 5 136 14 6148 78
FG(G)676 LX75 3 10 20 2 6 12 1 4 6 1 4 6 1 4 7 1 4 7 1 2 4 1 2 4 113
FG(G)676 LX75T 3 10 20 1 5 10 1 3 6 1 2 4 1 3 6 1 3 5 1 2 4 1 2 4 99
FG(G)676 LX100 4 13 27 2 6 12 1 4 6 1 4 6 1 4 7 1 4 7 1 2 4 1 2 4 124
FG(G)676 LX100T 4 13 27 1 5 10 1 3 5 1 2 4 1 3 5 1 3 5 1 2 3 1 2 4 107
FG(G)676 LX150 7 20 40 2 6 12 1 4 6 1 4 6 1 4 7 1 4 7 1 2 4 1 2 4 147
(2)
FG(G)676 LX150T 7 20 40 1 5 10 1 3 5 1 2 4 1 3 5 1 3 5 1 2 3 1 2 4 130
FG(G)900 LX100T 4 13 27 2 6 13 1 4 6 1 4 7 1 4 7 1 5 8 1 2 4 1 2 4 128
FG(G)900 LX150 7 20 40 2 7 15 1 5 9 1 4 7 1 5 9 1 5 8 1 2 4 1 2 4 161
FG(G)900 LX150T 7 20 40 2 7 14 1 5 8 1 4 7 1 5 8 1 5 8 1 2 4 1 2 4 158
Notes:
1. PCB Capacitor specifications are listed in Tab le 2- 2.
2. Total includes all capacitors for all supplies, accounting for the number of I/O banks in the device.
Spartan-6 FPGA PCB Design and Pin Planning www.xilinx.com 15
UG393 (v1.1) April 29, 2010
Page 16
Chapter 2: Power Distribution System
Capacitor Specifications
The electrical characteristics of the capacitors in Tab le 2 -1 are described in this section.
Characteristics of the PCB bulk and high-frequency capacitors are specified in Ta bl e 2 -2 ,
followed by guidelines on acceptable substitutions. The equivalent series resistance (ESR)
ranges specified for these capacitors can be over-ridden. However, this requires analysis of
the resulting power distribution system impedance to ensure that no resonant impedance
spikes result.
Table 2-2: PCB Capacitor Specifications
Ideal
Val ue
100 µF C > 100 µF 1210
4.7 µF C > 4.7 µF 0805
0.47 µF C > 0.47 µF
PCB Capacitor Substitution Rules:
1. Values can be larger than specified.
2. Body size can be smaller than specified.
3. ESR must be within the specified range.
4. Voltage rating can be higher than specified.
Val ue
Range
(1)
Body
(2)
Size
0204 or
0402
Typ e
2-Terminal
Ceramic
X7R or X5R
2-Terminal
Ceramic
X7R or X5R
2-Terminal
Ceramic
X7R or X5R
PCB Bulk Capacitors
The purpose of the bulk capacitors is to cover the low-frequency range between where the
voltage regulator stops working (~100 KHz) and where the high-frequency capacitors start
working (~2 MHz). As specified in Ta bl e 2 -1 , all FPGA supplies require bulk capacitors.
The bulk capacitors in Tab le 2 -1 and Ta bl e 2- 2 are not necessarily in addition to the voltage
regulator output capacitors required by the regulator manufacturer, provided there is no
inductor, ferrite bead, choke, or other filter between the FPGA and the bulk capacitors.
However, if the FPGA bulk and regulator output requirements are merged, the total
capacitance of this network must not be less than the total bulk specified in Ta bl e 2- 1 and
Tab le 2 -2, and must comply with the regulator manufacturer’s output capacitor
requirements.
ESL
Maximum
5nH 10mΩ <ESR<60mΩ 6.3V GRM32ER60J107ME20L
2nH 10mΩ <ESR<60mΩ 6.3V
1.5 nH 10 mΩ <ESR<60mΩ 6.3V
ESR Range
(3)
Volt ag e
Rating
(4)
Suggested
Part Number
The bulk PCB capacitors specified in Ta ble 2 -1 are ceramic capacitors from Murata, a
capacitor manufacturer. This capacitor was selected for its value, size, and low-cost. It is
also RoHS compliant. If another manufacturer’s capacitors or another type of capacitor
(e.g., tantalum or high-performance electrolytic) meet the specifications listed in Tab le 2 -2 ,
substitution is acceptable.
PCB High-Frequency Capacitors
There are two high-frequency capacitor values in Tab le 2 -2 : the 4.7 µF capacitor in an 0805
package and the 0.47 µF capacitor in an 0402 or 0204 package. Substitutions can be made
for some characteristics, but not others; see the notes attached to Tab le 2 -2 for details.
16 www.xilinx.com Spartan-6 FPGA PCB Design and Pin Planning
UG393 (v1.1) April 29, 2010
Page 17

Capacitor Consolidation Rules
Sometimes a number of I/O banks are powered from the same voltage (e.g., 1.8V) and the
recommended guidelines call for multiple bulk capacitors. This is also the case for V
and V
fewer (larger value) bulk capacitors provided the electrical characteristics of the
consolidated capacitors (ESR and ESL) are equal to the electrical characteristics of the
parallel combination of the recommended capacitors.
in the larger devices. These many smaller capacitors can be consolidated into
CCAUX
PCB Decoupling Capacitors
CCINT
For most consolidations of V
CCO
, V
CCINT
, and V
CCAUX
capacitors, large bulk capacitors
(ceramic, tantalum, or high-performance electrolytic) with sufficiently low ESL and ESR
are readily available. High-frequency capacitors cannot be consolidated as the usefulness
of high-frequency capacitors depends on the number of PCB vias accessed.
Example
This example is of an FPGA with a single interface spanning three I/O banks, all powered
from the same voltage. The required PCB capacitor table (Tabl e 2- 1) calls for one 100 µF
capacitor per bank. These three capacitors can be consolidated into one capacitor since
three 100 µF capacitors can be covered by one 330 µF capacitor. The following is then true:
• The ESL of the combination must be one-third of the specified capacitor. Three
capacitors at 5 nH are equivalent to one capacitor at 1.7 nH. This implies that a 330 µF
capacitor is acceptable provided its ESL is less than 1.7 nH.
• The ESR of the combination must be one-third of the specified capacitor. Three
capacitors each in the range of 10 mΩ to 60 mΩ are equivalent to one capacitor in the
range of 3.3 mΩ to 20 mΩ. A 330 µF capacitor is acceptable provided its ESL is in this
range.
• Three 100 µF capacitors with 3 nH ESL and 20 mΩ ESR are replaced by one 330 µF
capacitor with a 0.5 nH ESL and a 15 mΩ ESR.
PCB Capacitor Placement and Mounting Techniques
Placement and mounting restrictions presented in this section are unique to each capacitor
type listed in the Capacitor Specifications section.
PCB Bulk Capacitors
Bulk capacitors can be large and difficult to place very close to the FPGA. Fortunately, this
is not a problem because the low-frequency energy covered by bulk capacitors is not as
sensitive to capacitor location. Bulk capacitors can be placed almost anywhere on the PCB,
but the best placement is as close as possible to the FPGA. Capacitor mounting should
follow normal PCB layout practices, tending toward short and wide shapes connecting to
power planes with multiple vias.
Spartan-6 FPGA PCB Design and Pin Planning www.xilinx.com 17
UG393 (v1.1) April 29, 2010
Page 18
Chapter 2: Power Distribution System
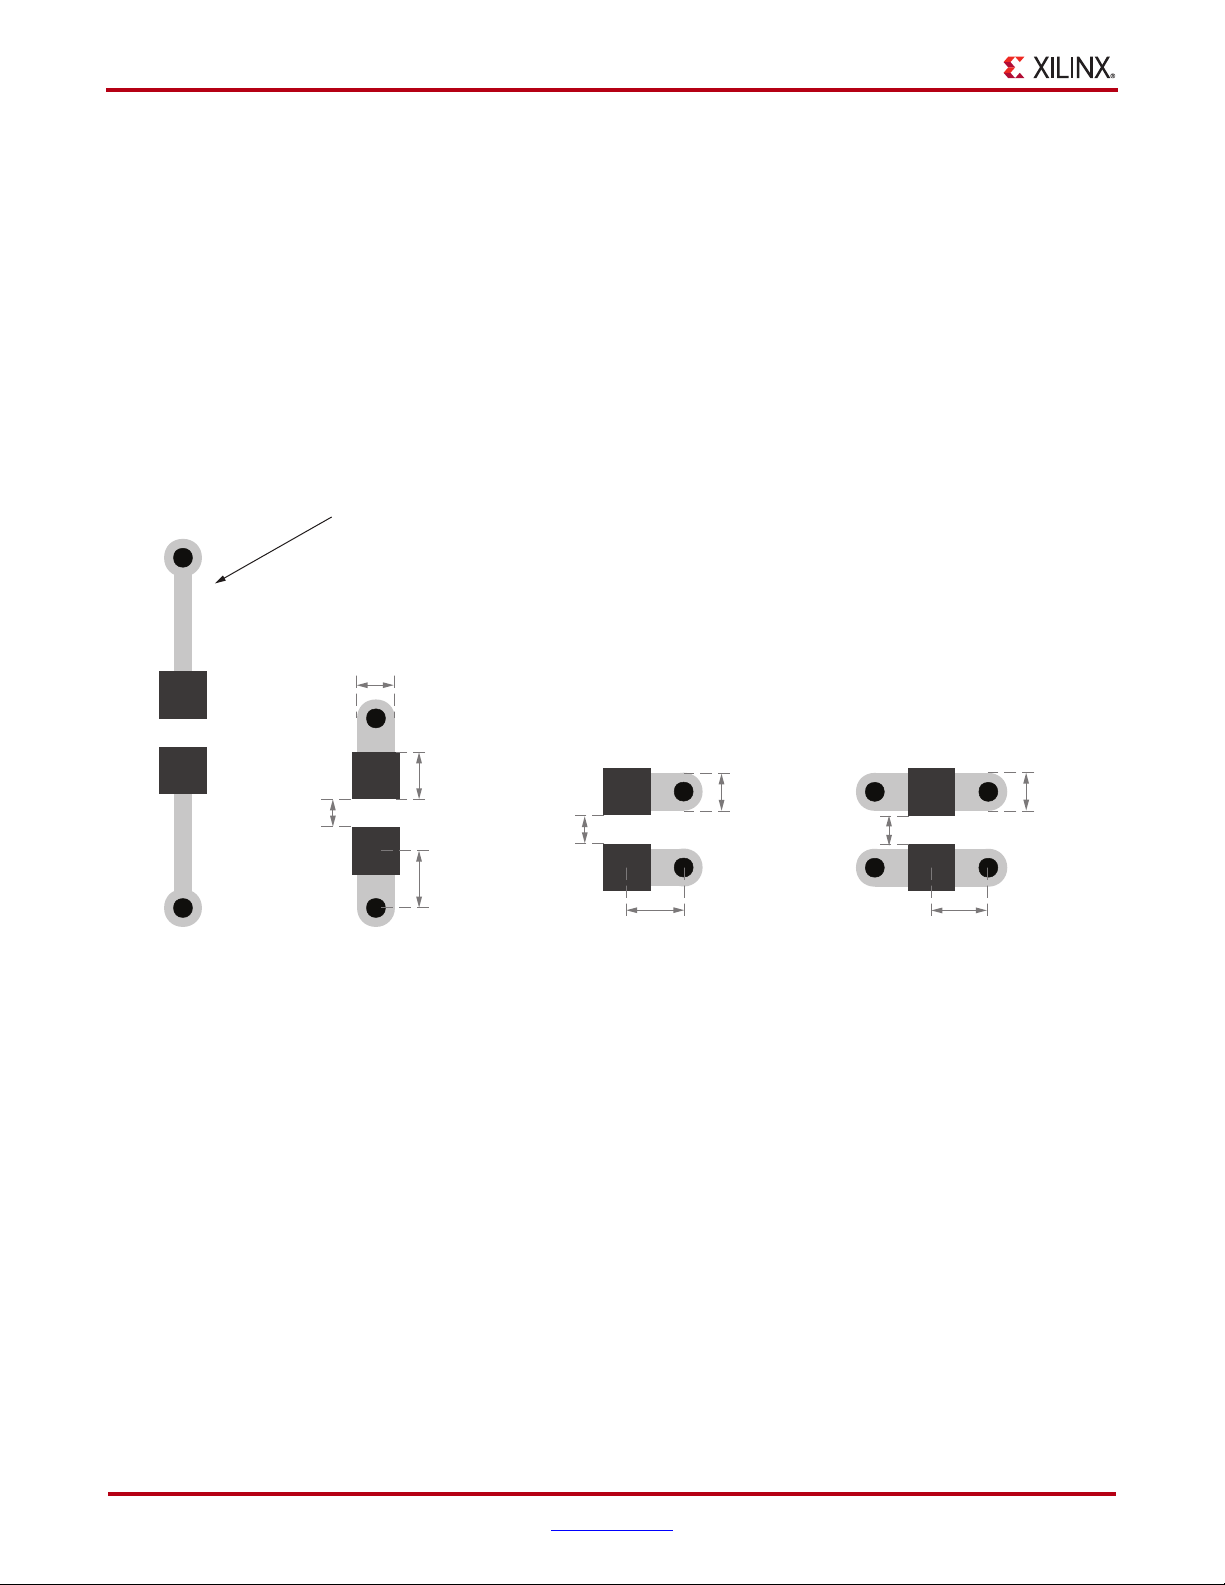
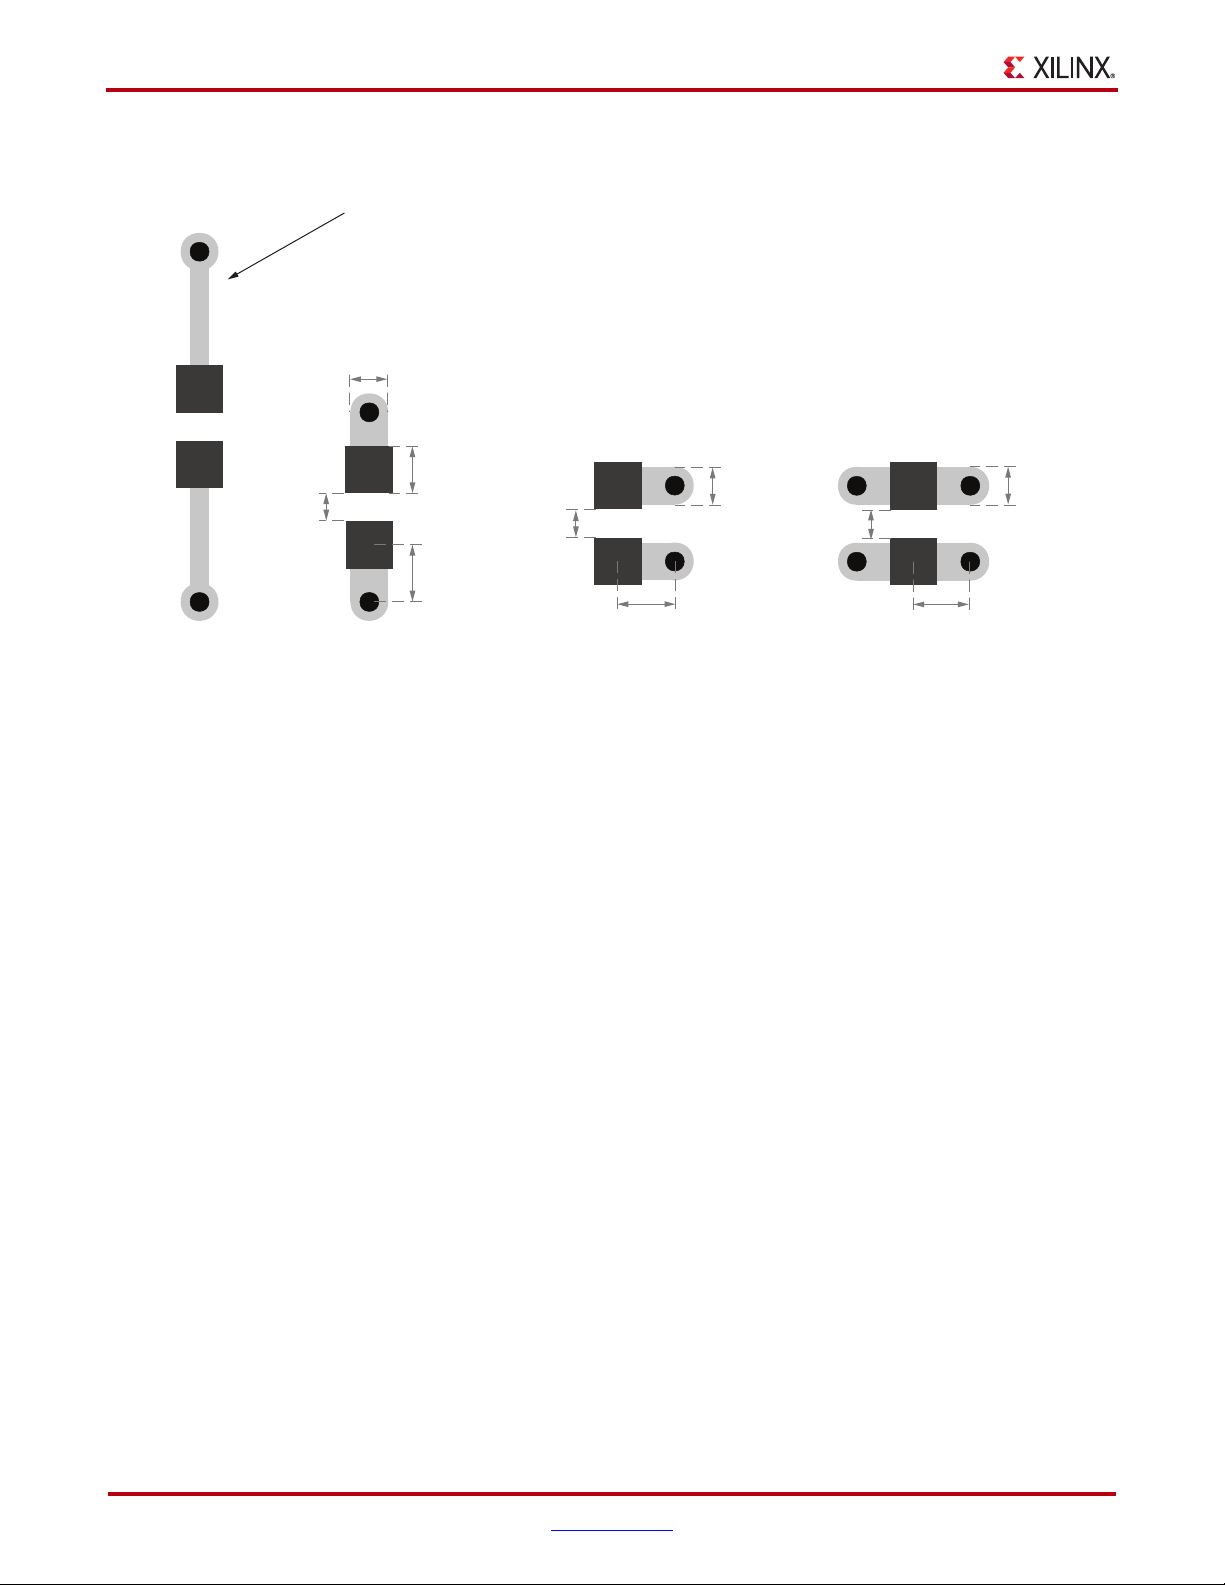
0805 Land Pattern
End Vias
Long Traces
(A)
UG393_c2_01_091809
(B)
0805 Land Pattern
End Vias
Not Recommended.
Connecting Trace is Too Long
1.27 mm
(50 mils)
0.61mm
(24 mils)
1.07 mm
(42 mils)
0.61mm
(24 mils)
(C)
0805 Land Pattern
Side Vias
1.12 mm
(44 mils)
0.61 mm
(24 mils)
0.61mm
(24 mils)
(D)
0805 Land Pattern
Double Side Vias
0.61mm
(24 mils)
0.61 mm
(24 mils)
1.12 mm
(44 mils)
0805 Ceramic Capacitor
The 4.7 µF 0805 capacitor covers the middle frequency range. Placement has some impact
on its performance. The capacitor should be placed as close as possible to the FPGA. Any
placement within two inches of the device’s outer edge is acceptable.
The capacitor mounting (solder lands, traces, and vias) should be optimized for low
inductance. Vias should be butted directly against the pads. Vias can be located at the ends
of the pads (see Figure 2-1B), but are more optimally located at the sides of the pads (see
Figure 2-1C). Via placement at the sides of the pads decreases the mounting’s overall
parasitic inductance by increasing the mutual inductive coupling of one via to the other.
Dual vias can be placed on both sides of the pads (see Figure 2-1D) for even lower parasitic
inductance, but with diminishing returns.
X-Ref Target - Figure 2-1
18 www.xilinx.com Spartan-6 FPGA PCB Design and Pin Planning
Figure 2-1: Example 0805 Capacitor Land and Mounting Geometries
UG393 (v1.1) April 29, 2010
Page 19

PCB Decoupling Capacitors
0402 Ceramic Capacitor
The 0.47 µF 0402 capacitor covers the high-middle frequency range. Placement and
mounting are critical for these capacitors.
The capacitor should be mounted as close to the FPGA as possible (achieves the least
parasitic inductance possible).
For PCBs with a total thickness of < 1.575 mm (62 mils), the best placement location is on
the PCB backside, within the device footprint (in the empty cross with an absence of vias).
V
and GND vias corresponding to the supply of interest should be identified in the via
CC
array. Where space is available, 0402 mounting pads should be added and connected to
these vias.
For PCBs with a total thickness > 1.575 mm (62 mils), the best placement location could be
on the PCB top surface. The depth of the V
factor: if the V
surface is optimal; if the V
plane is in the PCB stackup’s top half, capacitor placement on the top PCB
CC
plane is in the PCB stackup’s bottom half, capacitor
CC
placement on the bottom PCB surface is optimal.
Any 0402 capacitors placed outside the device footprint (whether on the top or bottom
surface) should be within 0.5 inch of the device’s outer edge.
The capacitor mounting (solder lands, traces, and vias) must be optimized for low
inductance. Vias should be butted against the pads with no trace length in-between. These
vias should be at the sides of the pads if at all possible (see Figure 2-2C). Via placement at
the sides of the pads decreases the mounting’s parasitic inductance by increasing the
mutual inductive coupling of one via to the other. Dual vias can be placed on both sides of
the pads (see Figure 2-2D) for even lower parasitic inductance, but with diminishing
returns.
plane of interest in the PCB stackup is the key
CC
Many manufacturing rules prevent mounting any device within 0.1 inch of the FPGA on
the PCB top surface. Manufacturing rules can also prevent capacitor placement on the PCB
backside within the device footprint, whether because backside mounting is prohibited or
geometries necessary to fit mounting pads in the tight spaces between vias are too small
for reliable soldering. These rules decrease the available options for capacitor placement
but do not preclude meeting the Xilinx placement recommendations. Discuss any specific
concerns with a PCB fabrication, assembly, and/or quality department.
Spartan-6 FPGA PCB Design and Pin Planning www.xilinx.com 19
UG393 (v1.1) April 29, 2010
Page 20
Chapter 2: Power Distribution System
0402 Land Pattern
End Vias
Long Traces
(A) (C)(B) (D)
UG393_c2_02_091809
0402 Land Pattern
End Vias
0.381 mm
(15 mils)
0.635 mm
(25 mils)
1.07 mm
(42 mils)
0.61mm
(24 mils)
0402 Land Pattern
Double Side Vias
0.762 mm
(30 mils)
0.381 mm
(15 mils)
0.61mm
(24 mils)
0402 Land Pattern
Side Vias
0.762 mm
(30 mils)
0.381 mm
(15 mils)
0.61mm
(24 mils)
Not Recommended.
Connecting Trace is Too Long
X-Ref Target - Figure 2-2
Basic PDS Principles
Figure 2-2: Example 0402 Capacitor Land and Mounting Geometries
Noise Limits
The purpose of the PDS and the properties of its components are discussed in this section.
The important aspects of capacitor placement, capacitor mounting, PCB geometry, and
PCB stackup recommendations are also described.
In the same way that devices in a system have a requirement for the amount of current
consumed by the power system, there is also a requirement for the cleanliness of the
power. This cleanliness requirement specifies a maximum amount of noise present on the
power supply, often referred to as ripple voltage (V
all Spartan-6 FPGAs, require that V
V
value. This means that the peak-to-peak V
CC
nominal V
power supplies: V
. In this document the term VCC is used generically for the following FPGA
CC
CCINT
, V
CCO
supplies not fluctuate more than ±5% of the nominal
CC
RIPPLE
, V
CCAUX
, and V
REF
exactly the nominal value provided in the data sheet. If not, then V
). Most digital devices, including
RIPPLE
must be no more than 10% of the
. This assumes that nominal VCC is
must be adjusted
RIPPLE
to a value correspondingly less than 10%.
The power consumed by a digital device varies over time and this variance occurs on all
frequency scales, creating a need for a wide-band PDS to maintain voltage stability.
• Low-frequency variance of power consumption is usually the result of devices or
large portions of devices being enabled or disabled. This variance occurs in time
frames from milliseconds to days.
• High-frequency variance of power consumption is the result of individual switching
events inside a device. This occurs on the scale of the clock frequency and the first few
harmonics of the clock frequency up to about 1 GHz.
20 www.xilinx.com Spartan-6 FPGA PCB Design and Pin Planning
UG393 (v1.1) April 29, 2010
Page 21
Basic PDS Principles
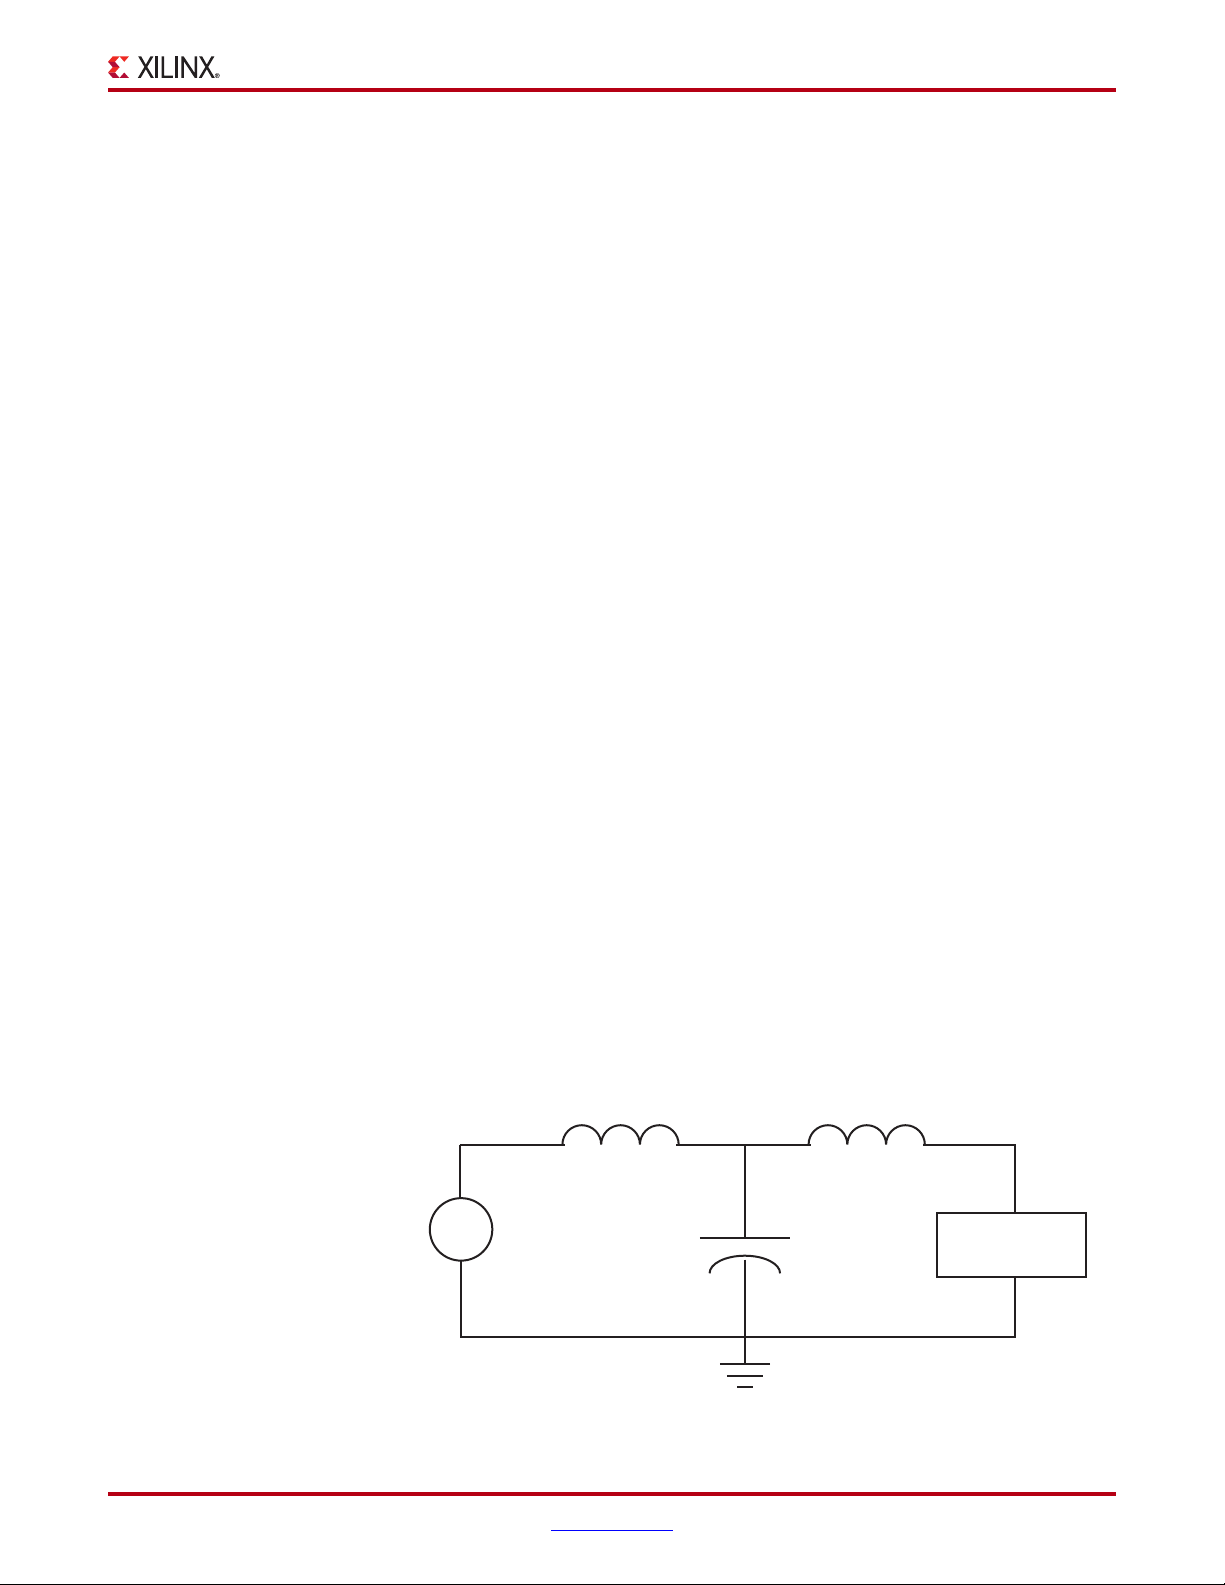
+
FPGA
L
REGULATOR
L
DECOUPLING
C
DECOUPLING
Voltage
Regulator
V
UG393_c2_03_091809
Because the voltage level of VCC for a device is fixed, changing power demands are
manifested as changing current demand. The PDS must accommodate these variances of
current draw with as little change as possible in the power-supply voltage.
When the current draw in a device changes, the PDS cannot respond to that change
instantaneously. As a consequence, the voltage at the device changes for a brief period
before the PDS responds. Two main causes for this PDS lag correspond to the two major
PDS components: the voltage regulator and decoupling capacitors.
The first major component of the PDS is the voltage regulator. The voltage regulator
observes its output voltage and adjusts the amount of current it is supplying to keep the
output voltage constant. Most common voltage regulators make this adjustment in
milliseconds to microseconds. Voltage regulators effectively maintain the output voltage
for events at all frequencies from DC to a few hundred kHz, depending on the regulator
(some are effective at regulating in the low MHz). For transient events that occur at
frequencies above this range, there is a time lag before the voltage regulator responds to
the new current demand level.
For example, if the device’s current demand increases in a few hundred picoseconds, the
voltage at the device sags by some amount until the voltage regulator can adjust to the
new, higher level of required current. This lag can last from microseconds to milliseconds.
A second component is needed to substitute for the regulator during this time, preventing
the voltage from sagging.
This second major PDS component is the decoupling capacitor (also known as a bypass
capacitor). The decoupling capacitor works as the device’s local energy storage. The
capacitor cannot provide DC power because it stores only a small amount of energy
(voltage regulator provides DC power). This local energy storage should respond very
quickly to changing current demands. The capacitors effectively maintain power-supply
voltage at frequencies from hundreds of kHz to hundreds of MHz (in the milliseconds to
nanoseconds range). Decoupling capacitors are not useful for events occurring above or
below this range.
For example, if current demand in the device increases in a few picoseconds, the voltage at
the device sags by some amount until the capacitors can supply extra charge to the device.
If current demand in the device maintains this new level for many milliseconds, the
voltage-regulator circuit, operating in parallel with the decoupling capacitors, replaces the
capacitors by changing its output to supply this new level of current.
Figure 2-3 shows the major PDS components: the voltage regulator, the decoupling
capacitors, and the active device being powered (FPGA).
X-Ref Target - Figure 2-3
Spartan-6 FPGA PCB Design and Pin Planning www.xilinx.com 21
UG393 (v1.1) April 29, 2010
Figure 2-3: Simplified PDS Circuit
Page 22
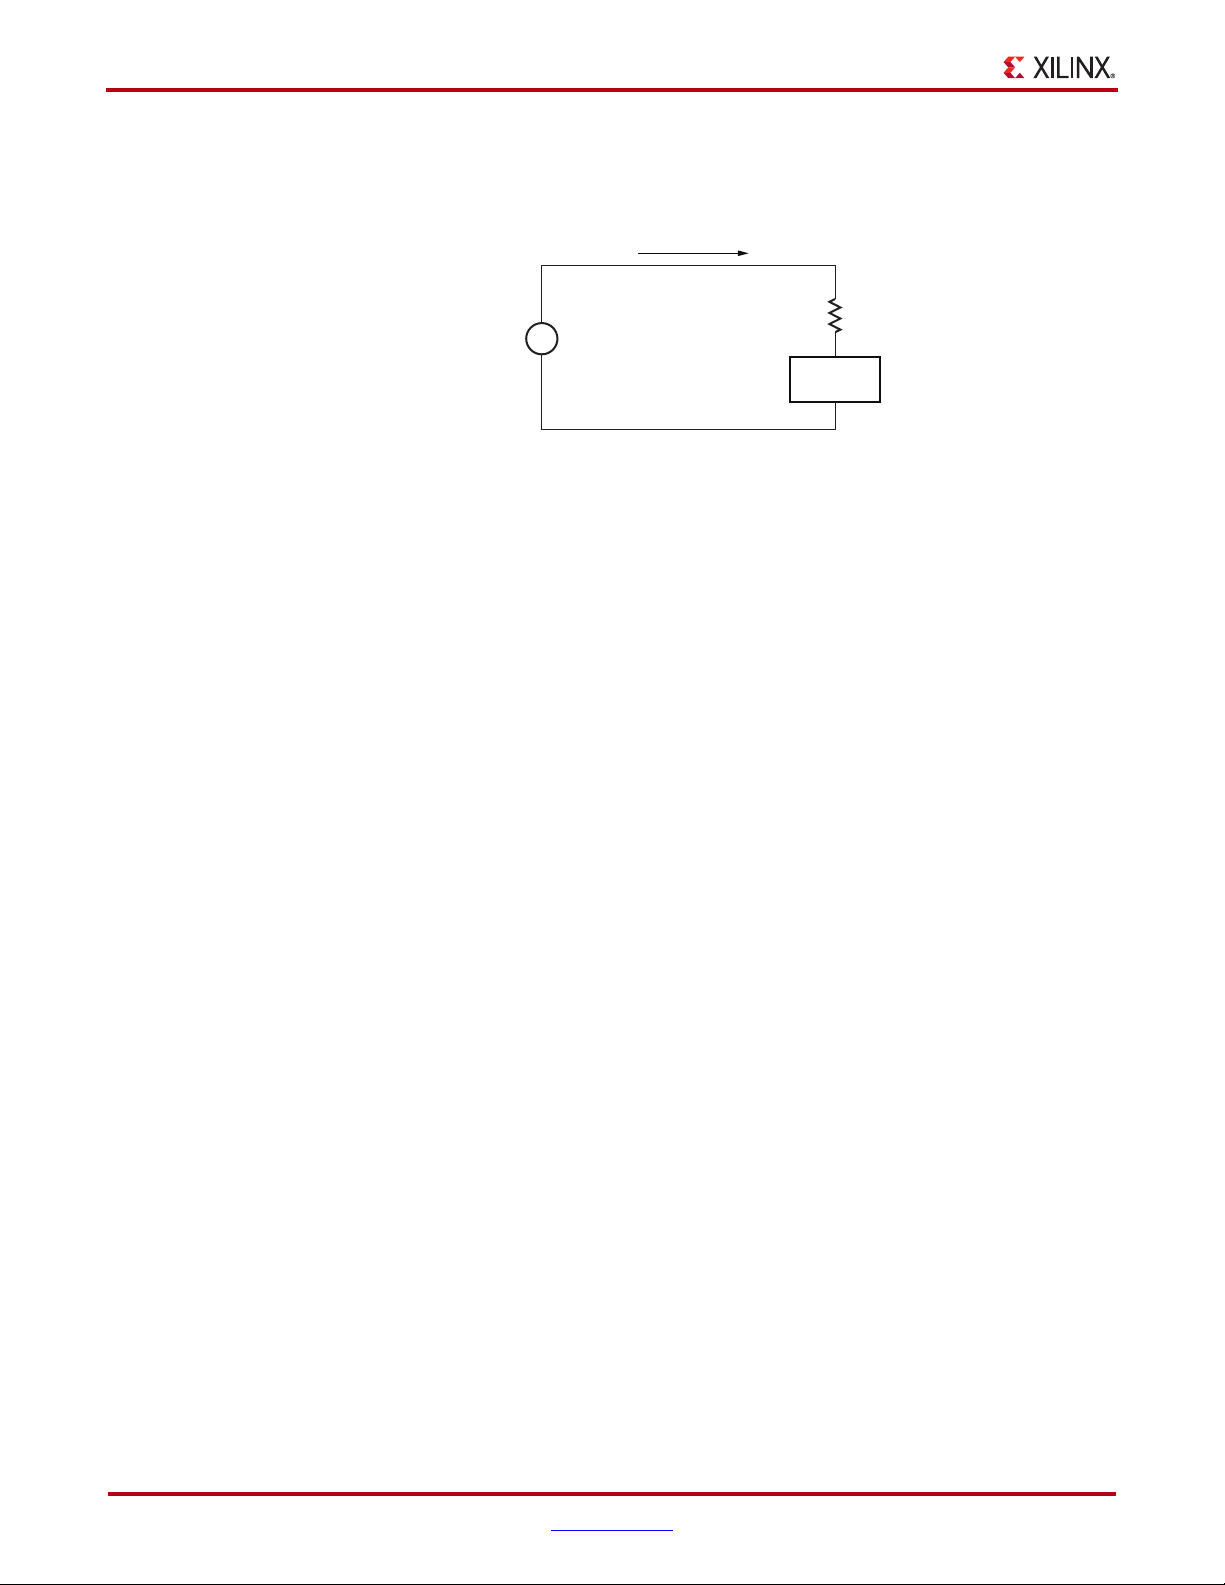
Chapter 2: Power Distribution System
l
TRANSIENT
FPGA
ug393_c2_04_091809
Z
P
(f)
V
RIPPLE
+
−
+
V
Figure 2-4 shows a simplified PDS circuit with all reactive components represented by a
frequency-dependent resistor.
X-Ref Target - Figure 2-4
Role of Inductance
Inductance is the property of the capacitors and the PCB current paths that slows down
changes in current flow. Inductance is the reason why capacitors cannot respond
instantaneously to transient currents or to changes that occur at frequencies higher than
their effective range.
Figure 2-4: Further Simplified PDS Circuit
Inductance can be thought of as the momentum of charge. Charge moving through a
conductor represents some amount of current. If the level of current changes, the charge
moves at a different rate. Because momentum (stored magnetic-field energy) is associated
with this charge, some amount of time and energy is required to slow down or speed up
the charge flow. The greater the inductance, the greater the resistance to change, and the
longer the time required for the current level to change. A voltage develops across the
inductance as this change occurs.
The PDS, made up of a regulator and multiple stages of decoupling capacitors,
accommodates the device current demand and responds to current transients as quickly as
possible. When these current demands are not met, the voltage across the device's power
supply changes. This is observed as noise. Inductance in the current path of the capacitors
should be minimized, because it retards the ability of decoupling capacitors to quickly
respond to changing current demands.
Inductances occur between the FPGA device and capacitors and between the capacitors
and the voltage regulator (see Figure 2-3). These inductances occur as parasitics in the
capacitors and in all PCB current paths. It is important that each of these parasitics be
minimized.
Capacitor Parasitic Inductance
The capacitance value is often considered the bypass capacitors’s most important
characteristic. In power system applications, the parasitic inductance (ESL) has the same or
greater importance. Capacitor package dimensions (body size) determine the amount of
parasitic inductance. Physically small capacitors usually have lower parasitic inductance
than physically large capacitors.
22 www.xilinx.com Spartan-6 FPGA PCB Design and Pin Planning
UG393 (v1.1) April 29, 2010
Page 23

Basic PDS Principles
Requirements for choosing decoupling capacitors:
• For a specific capacitance value, choose the smallest package available.
- or -
• For a specific package size (essentially a fixed inductance value), choose the highest
capacitance value available in that package.
Surface-mount chip capacitors are the smallest capacitors available and are a good choice
for discrete decoupling capacitors:
• For values from 100 µF to very small values such as 0.01 µF, X7R or X5R type
capacitors are usually used. These capacitors have a low parasitic inductance and a
low ESR, with an acceptable temperature characteristic.
• For larger values, such as 100 µF to 1000 µF, tantalum capacitors are used. These
capacitors have a low parasitic inductance and a medium ESR, giving them a low Q
factor and consequently a very wide range of effective frequencies.
If tantalum capacitors are not available or cannot be used, low-ESR, low-inductance
electrolytic capacitors can be used, provided they have comparable ESR and ESL values.
Other new technologies with similar characteristics are also available (Os-Con, POSCAP,
and Polymer-Electrolytic SMT).
A real capacitor of any type then not only has capacitance characteristics but also
inductance and resistance characteristics. Figure 2-5 shows the parasitic model of a real
capacitor. A real capacitor should be treated as an RLC circuit (a circuit consisting of a
resistor (R), an inductor (L), and a capacitor (C), connected in series).
X-Ref Target - Figure 2-5
ESR
ESL
C
ug393_c2_05_091809
Figure 2-5: Parasitics of a Real, Non-Ideal Capacitor
Figure 2-6 shows a real capacitor’s impedance characteristic. Overlaid on this plot are
dashed-line curves corresponding to the capacitor’s capacitance and parasitic inductance
(ESL). These two curves combine to form the RLC circuit’s total impedance characteristic,
softened or sharpened by the capacitor’s ESR.
Spartan-6 FPGA PCB Design and Pin Planning www.xilinx.com 23
UG393 (v1.1) April 29, 2010
Page 24

Chapter 2: Power Distribution System
Frequency
Impedance
Capacitive
Contribution (C)
Inductive
Contribution (ESL)
To tal Impedance Characteristic
ug393_c2_06_091809
X-Ref Target - Figure 2-6
Figure 2-6: Contribution of Parasitics to Total Impedance Characteristics
As capacitive value is increased, the capacitive curve moves down and left. As parasitic
inductance is decreased, the inductive curve moves down and right. Because parasitic
inductance for capacitors in a specific package is fixed, the inductance curve for capacitors
in a specific package remains fixed.
As different capacitor values are selected in the same package, the capacitive curve moves
up and down against the fixed inductance curve, as shown in Figure 2-8.
The low-frequency capacitor impedance can be reduced by increasing the value of the
capacitor; the high-frequency impedance can be reduced by decreasing the inductance of
the capacitor. While it might be possible to specify a higher capacitance value in the fixed
package, it is not possible to lower the inductance of the capacitor (in the fixed package)
without putting more capacitors in parallel. Using multiple capacitors in parallel divides
the parasitic inductance, and at the same time, multiplies the capacitance value. This
lowers both the high and low frequency impedance at the same time.
PCB Current Path Inductance
The parasitic inductance of current paths in the PCB have three distinct sources:
•Capacitor mounting
• PCB power and ground planes
•FPGA mounting
Capacitor Mounting Inductance
Capacitor mounting refers to the capacitor's solder lands on the PCB, the trace (if any)
between the land and via, and the via.
The vias, traces, and capacitor mounting pads of a 2-terminal capacitor contribute
inductance between 300 pH to 4 nH depending on the specific geometry.
Because the current path’s inductance is proportional to the loop area the current traverses,
it is important to minimize this loop size. The loop consists of the path through one power
plane, up through one via, through the connecting trace to the land, through the capacitor,
through the other land and connecting trace, down through the other via, and into the
other plane, as shown in Figure 2-7.
24 www.xilinx.com Spartan-6 FPGA PCB Design and Pin Planning
UG393 (v1.1) April 29, 2010
Page 25

X-Ref Target - Figure 2-7
Solderable End Terminal
0402 Capacitor Body
Surface Trace
Capacitor Solder Land
Via
PCB
GND
V
CC
Power and
Ground Planes
Mounted Capacitor Current Loop
UG393_c2_07_091809
Basic PDS Principles
Figure 2-7: Example Cutaway View of PCB with Capacitor Mounting
A connecting trace length has a large impact on the mounting’s parasitic inductance and if
used, should be as short and wide as possible. When possible, a connecting trace should
not be used (Figure 2-1A) and the via should butt up against the land (Figure 2-1B).
Placing vias to the side of the capacitor lands (Figure 2-1C) or doubling the number of vias
(Figure 2-1D), further reduces the mounting’s parasitic inductance.
Some PCB manufacturing processes allow via-in-pad geometries, an option for reducing
parasitic inductance. Using multiple vias per land is important with ultra-low inductance
capacitors, such as reverse aspect ratio capacitors that place wide terminals on the sides of
the capacitor body instead of the ends.
PCB layout engineers often try to squeeze more parts into a small area by sharing vias
among multiple capacitors. This technique should not be used under any circumstances. PDS
improvement is very small when a second capacitor is connected to an existing capacitor’s
vias. For a larger improvement, reduce the total number of capacitors and maintain a oneto-one ratio of lands to vias.
The capacitor mounting (lands, traces, and vias) typically contributes about the same
amount or more inductance than the capacitor's own parasitic self-inductance.
Plane Inductance
Some inductance is associated with the PCB power and ground planes. The geometry of
these planes determines their inductance.
Current spreads out as it flows from one point to another (due to a property similar to skin
effect) in the power and ground planes. Inductance in planes can be described as spreading
inductance and is specified in units of henries per square. The square is dimensionless; the
shape of a section of a plane, not the size, determines the amount of inductance.
Spartan-6 FPGA PCB Design and Pin Planning www.xilinx.com 25
UG393 (v1.1) April 29, 2010
Page 26

Chapter 2: Power Distribution System
Spreading inductance acts like any other inductance and resists changes to the amount of
current in a power plane (the conductor). The inductance retards the capacitor’s ability to
respond to a device’s transient currents and should be reduced as much as possible.
Because the designer’s control over the X-Y shape of the plane can be limited, the only
controllable factor is the spreading inductance value. This is determined by the thickness
of the dielectric separating a power plane from its associated ground plane.
For high-frequency power distribution systems, power and ground planes work in pairs,
with their inductances coexisting dependently with each other. The spacing between the
power and ground planes determines the pair’s spreading inductance. The closer the
spacing (the thinner the dielectric), the lower the spreading inductance. Approximate
values of spreading inductance for different thicknesses of FR4 dielectric are shown in
Tab le 2 -3.
Table 2-3: Capacitance and Spreading Inductance Values for Different Thicknesses
of FR4 Power-Ground Plane Sandwiches
Dielectric Thickness Inductance Capacitance
(micron) (mil) (pH/square) (pF/in
102 4 130 225 35
51 2 65 450 70
2
) (pF/cm2)
25 1 32 900 140
Decreased spreading inductance corresponds to closer spacing of V
When possible, place the V
stackup. Facing V
use of V
– GND sandwiches was not necessary in the past for previous technologies
CC
and GND planes are sometimes referred to as sandwiches. While the
CC
planes directly adjacent to the GND planes in the PCB
CC
and GND planes.
CC
(lead frames, wire bond packages), the speeds involved and the sheer amount of power
required for fast, dense devices often demand it.
Besides offering a low-inductance current path, power-ground sandwiches also offer some
high-frequency decoupling capacitance. As the plane area increases and as the separation
between power and ground planes decreases, the value of this capacitance increases.
Capacitance per square inch is shown in Ta bl e 2-3 .
FPGA Mounting Inductance
The PCB solder lands and vias that connect the FPGA power pins (VCC and GND)
contribute an amount of parasitic inductance to the overall power circuit. For existing PCB
technology, the solder land geometry and the dogbone geometry are mostly fixed, and
parasitic inductance of these geometries does not vary. Via parasitic inductance is a
function of the via length and the proximity of the opposing current paths to one another.
The relevant via length is the portion of the via that carries transient current between the
FPGA solder land and the associated V
power plane and the PCB backside) does not affect the parasitic inductance of the via (the
shorter the via between the solder lands and the power plane, the smaller the parasitic
inductance). Parasitic via inductance in the FPGA mounting is reduced by keeping the
relevant V
and GND planes as close to the FPGA as possible (close to the top of the PCB
CC
stackup).
or GND plane. Any remaining via (between the
CC
Device pinout arrangement determines the proximity of opposing current paths to one
another. Inductance is associated with any two opposing currents (for example, current
flowing in a V
26 www.xilinx.com Spartan-6 FPGA PCB Design and Pin Planning
and GND via pair). A high degree of mutual inductive coupling between
CC
UG393 (v1.1) April 29, 2010
Page 27

Basic PDS Principles
the two opposing paths reduces the loop’s total inductance. Therefore, when given a
choice, V
The via field under an FPGA has many V
and GND vias should be as close together as possible.
CC
and GND vias, and the total inductance is a
CC
function of the proximity of one via to another:
•For core V
supplies (V
CC
CCINT
and V
), opposing current is between the VCC
CCAUX
and GND pins.
•For I/O V
current path, whether carried by a V
supplies (V
CC
), opposing current is between any I/O and its return
CCO
or GND pin.
CCO
To reduce parasitic inductance:
•V
and GND are placed in a checkerboard arrangement in the center area of the
CCINT
BGA packages.
•V
and GND pins are distributed among the I/O pins.
CCO
In BGA packages, FPGA pinout arrangement determines the PCB via arrangement. The
PCB designer cannot control the proximity of opposing current paths but has control over
the trade-offs between the capacitor’s mounting inductance and FPGA’s mounting
inductance:
• Both mounting inductances are reduced by placing power planes close to the PCB
stackup’s top half and placing the capacitors on the top surface (reducing the
capacitor’s via length).
• If power planes are placed in the PCB stackup’s bottom half, the capacitors must be
mounted on the PCB backside. In this case, FPGA mounting vias are already long, and
making the capacitor vias long (by coming down from the top surface) is a bad
practice. A better practice is to take advantage of the short distance between the
underside of the PCB and the power plane of interest, mounting capacitors on the
underside.
PCB Stackup and Layer Order
VCC and ground plane placement in the PCB stackup (the layer order) has a significant
impact on the parasitic inductances of power current paths. Layer order must be
considered early in the design process:
• High-priority supplies should be placed closer to the FPGA (in the PCB stackup’s top
half)
• Low-priority supplies should be placed farther from the FPGA (in the PCB stackup’s
bottom half)
Power supplies with high transient current should have the associated V
the top surface (FPGA side) of the PCB stackup. This decreases the vertical distance (V
and GND via length) that currents travel before reaching the associated V
planes. To reduce spreading inductance, every V
plane should have an adjacent GND
CC
plane in the PCB stackup. The skin effect causes high-frequency currents to couple tightly,
and the GND plane adjacent to a specific V
current complementary to that in the V
plane tends to carry the majority of the
CC
plane. Thus, adjacent VCC and GND planes are
CC
treated as a pair.
Not all V
and GND plane pairs reside in the PCB stackup’s top half because
CC
manufacturing constraints typically require a symmetrical PCB stackup around the center
(with respect to dielectric thicknesses and etched copper areas). The PCB designer chooses
the priority of the V
and GND plane pairs: high priority pairs carry high transient
CC
planes close to
CC
and GND
CC
CC
Spartan-6 FPGA PCB Design and Pin Planning www.xilinx.com 27
UG393 (v1.1) April 29, 2010
Page 28

Chapter 2: Power Distribution System
F
1
2π LC
-------------------=
currents and are placed high in the stackup, while low priority pairs carry lower transient
currents (or can tolerate more noise) and are placed in the lower part of the stackup.
Capacitor Effective Frequency
Every capacitor has a narrow frequency band where it is most effective as a decoupling
capacitor. This band is centered at the capacitor’s self-resonant frequency F
effective frequency bands of some capacitors are wider than others. A capacitor’s ESR
determines the capacitor’s quality (Q) factor, and the Q factor can determine the width of
the effective frequency band:
• Tantalum capacitors generally have a very wide effective band.
• Ceramic chip capacitors with a lower ESR, generally have a very narrow effective
frequency band.
An ideal capacitor only has a capacitive characteristic, whereas real non-ideal capacitors
also have a parasitic inductance (ESL) and a parasitic resistance (ESR). These parasitics
work in series to form an RLC circuit (Figure 2-5). The RLC circuit’s resonant frequency is
the capacitor’s self-resonant frequency.
To determine the RLC circuit’s resonant frequency, use Equation 2-1:
. The
RSELF
Equation 2-1
Another method of determining the self-resonant frequency is to find the minimum point
in the impedance curve of the equivalent RLC circuit. The impedance curve can be
computed or generated in SPICE using a frequency sweep. See the Simulation Methods
section for other ways to compute an impedance curve.
It is important to distinguish between the capacitor's self-resonant frequency and the
mounted capacitor’s effective resonant frequency when the capacitor is part of the system,
F
. This corresponds to the resonant frequency of the capacitor with its parasitic
RIS
inductance, plus the inductance of the vias, planes, and connecting traces between the
capacitor and the FPGA.
The capacitor’s self-resonant frequency, F
higher than its effective mounted resonant frequency in the system, F
, (capacitor data sheet value) is much
RSELF
RIS
. Because the
mounted capacitor's performance is most important, the mounted resonant frequency is
used when evaluating a capacitor as part of the greater PDS.
Mounted parasitic inductance is a combination of the capacitor's own parasitic inductance
and the inductance of: PCB lands, connecting traces, vias, and power planes. Vias traverse
a full PCB stackup to the device when capacitors are mounted on the PCB backside. For a
board with a finished thickness of 1.524 mm (60 mils), these vias contribute approximately
300 pH to 1,500 pH, (the capacitor’s mounting parasitic inductance, L
MOUNT
) depending
on the spacing between vias. Wider-spaced vias and vias in thicker boards have higher
inductance.
To determine the capacitor’s total parasitic inductance in the system, L
parasitic inductance, L
, is added to the mounting’s parasitic inductance, L
SELF
L
IS
= L
SELF
+ L
MOUNT
, the capacitor's
IS
MOUNT
Equation 2-2
:
For example, using X7R Ceramic Chip capacitor in 0402 body size:
C=0.01μF (selected by user)
L
= 0.9 nH (capacitor data sheet parameter)
SELF
28 www.xilinx.com Spartan-6 FPGA PCB Design and Pin Planning
UG393 (v1.1) April 29, 2010
Page 29

Basic PDS Principles
F
RIS
1
2π L
IS
C
-------------------------=
F
RIS
1
2π 1.7
9–
×10 H()0.016–×10 F()⋅
------------------------------------------------------------------------------------
38
6
×10 Hz==
F
L
To determine the effective in-system parasitic inductance (L
= 53 MHz (capacitor data sheet parameter)
RSELF
MOUNT
= 0.8 nH (based on PCB mounting geometry)
L
IS=LSELF+LMOUNT
L
= 1.7 nH Equation 2-3
IS
), add the via parasitics:
IS
=0.9nH+0.8nH
The values from the example are used to determine the mounted capacitor resonant
frequency (F
). Using Equation 2-1:
RIS
Equation 2-4
Equation 2-5
F
RSELF
is 53 MHz, but F
is lower at 38 MHz. The addition of mounting inductances
RIS
shifts the effective-frequency band down.
A decoupling capacitor is most effective at the narrow-frequency band around its resonant
frequency, and thus, the resonant frequency must be reviewed when choosing a capacitor
collection to build up a decoupling network. This being said, capacitors can be effective at
frequencies considerably higher and lower than their resonant frequency. Recall that
capacitors of differing values in the same package share the same inductance curve. As
shown in Figure 2-8, for any given frequency along the inductive portion of the curve, the
capacitors are equally effective.
X-Ref Target - Figure 2-8
Inductance (Z)
Figure 2-8: Effective Frequency Example
0805
4.7 μF
0805
0.47 μF
Frequency
Z Value at F2 is Equal
Inductive
Portion
F
2
ug393_c2_08_091809
Spartan-6 FPGA PCB Design and Pin Planning www.xilinx.com 29
UG393 (v1.1) April 29, 2010
Page 30

Chapter 2: Power Distribution System
Capacitor Anti-Resonance
One problem associated with combinations of capacitors in a PDS of an FPGA is antiresonant spikes in the PDS aggregate impedance. The cause for these spikes is a bad
combination of energy storage elements in the PDS (intrinsic capacitances, discrete
capacitors, parasitic inductances, and power and ground planes).
Anti-resonance can arise between the high-frequency PCB capacitors and the PCB plane
capacitance. The inter-plane capacitance of the power and ground planes generally has a
high-Q factor. If the high-frequency PCB capacitors also are high-Q, the crossover point
between the high-frequency discrete capacitors and the plane capacitance might exhibit a
high-impedance anti-resonance peak. If the FPGA has a high transient current demand at
this frequency (as a stimulus), a large noise voltage can occur.
To correct this type of problem, the characteristics of the high-frequency discrete capacitors
or the characteristics of the V
shifted to a different frequency away from the resonance.
Capacitor Placement Background
To perform the decoupling function, capacitors should be close to the device being
decoupled.
and ground planes must be changed, or FPGA activity
CC
Increased spacing between the FPGA and decoupling capacitor increases the current flow
distance in the power and ground planes, and it often increases the current path’s
inductance between the device and the capacitor.
The inductance of this current path (the loop followed by current as it travels from the V
side of the capacitor to the V
to the GND side of the capacitor[s]), is proportional to the loop area. Inductance is
decreased by decreasing the loop area.
Shortening the distance between the device and the decoupling capacitor reduces the
inductance, resulting in a less impeded transient current flow. Because of typical PCB
dimensions, this lateral plane travel tends to be less important than the phase relationship
between the FPGA noise source and the mounted capacitor.
The phase relationship between the FPGA’s noise source and the mounted capacitor
determines the capacitor’s effectiveness. For a capacitor to be effective in providing
transient current at a certain frequency (for example, the capacitor’s resonant frequency),
the phase relationship must be within a fraction of the corresponding period.
The capacitor’s placement determines the length of the transmission line interconnect (in
this case, the power and ground plane pair) between the capacitor and FPGA. The
propagation delay of this interconnect is the key factor.
FPGA noise falls into certain frequency bands, and different sizes of decoupling capacitors
take care of different frequency bands. Thus, capacitor placement is determined by each
capacitor’s effective frequency.
When the FPGA initiates a current demand change, it causes a small local disturbance in
the PDS voltage (a point in the power and ground planes). To counteract this, the
decoupling capacitor must first sense a voltage difference.
pin[s] of the FPGA, and from the GND pin[s] of the FPGA
CC
CC
30 www.xilinx.com Spartan-6 FPGA PCB Design and Pin Planning
UG393 (v1.1) April 29, 2010
Page 31

Basic PDS Principles
Time Delay
Distance from the FPGA power pins to the capacitor
Signal propagation speed through FR4 dielectric
------------------------------------------------------------------------------------------------------------------------------------------=
A finite time delay (Equation 2-6) occurs between the start of the disturbance at the FPGA
power pins and the point when the capacitor senses the disturbance.
Equation 2-6
The dielectric is the substrate of the PCB where the power planes are embedded.
Another delay of the same duration occurs when the compensation current from the
capacitor flows to the FPGA. For any transient current demand in the FPGA, a round-trip
delay occurs before any relief is seen at the FPGA.
• Negligible energy is transferred to the FPGA with placement distances greater than
one quarter of a demand frequency’s wavelength.
• Energy transferred to the FPGA increases from 0% at one-quarter of a wavelength to
100% at zero distance.
• Energy is transferred efficiently from the capacitor to the FPGA when capacitor
placement is at a fraction of a quarter wavelength of the FPGA power pins. This
fraction should be small because the capacitor is also effective at some frequencies
(shorter wavelengths) above its resonant frequency.
One-tenth of a quarter wavelength is a good target for most practical applications and
leads to placing a capacitor within one-fortieth of a wavelength of the power pins it is
decoupling. The wavelength corresponds to the capacitor's mounted resonant frequency,
F
.
RIS
When using large numbers of external termination resistors or passive power filtering for
transceivers, priority should be given to these over the decoupling capacitors. Moving
away from the device in concentric rings, the termination resistors and transceiver supply
filtering should be closest to the device, followed by the smallest-value decoupling
capacitors, then the larger-value decoupling capacitors.
V
Stabilization Capacitors
REF
In V
supply stabilization, one capacitor per pin is placed as close as possible to the V
REF
pin. The capacitors used are in the 0.022 µF - 0.47 µF range. The V
function is to reduce the V
Since no low-frequency energy is needed, larger capacitors are not necessary.
Power Supply Consolidation
To design for reduced noise-levels on the V
provided for V
both V
CCAUX
and V
recommended operating conditions for the V
Spartan-6 FPGA Data Sheet. Similarly, this is also true if V
considered for combination, when using a 1.2V V
V
pins should never be combined with other rails on the board.
CC
and any of the V
CCAUX
CCO
pins (at either 2.5V or 3.3V) is allowed as long as the
capacitor’s primary
node impedance, which in turn reduces crosstalk coupling.
REF
supply, separate supplies should be
CCAUX
voltage rails. However, a common supply to
CCO
inputs are met, as specified in the
CC
CCO
. The supplies for the GTP transceiver
CCO
REF
and V
CCINT
are being
REF
Spartan-6 FPGA PCB Design and Pin Planning www.xilinx.com 31
UG393 (v1.1) April 29, 2010
Page 32

Chapter 2: Power Distribution System
Unconnected V
In some cases, one or more I/O banks in an FPGA are not used (for example, when an
FPGA has far more I/O pins than the design requires). In these cases, it might be desirable
to leave the bank’s associated V
constraints (less voiding of power and ground planes from via antipads, less obstacles to
signals entering and exiting the pinout array, more copper area available for other
planelets in the otherwise used plane layer).
Leaving the V
on these pins and the I/O pins in the bank. ESD events at the unconnected solder balls in
the inner rows of a BGA pinout array are unlikely and not considered a high risk.
However, ESD events at exposed pins on the perimeter of a QFP-type package are likely.
In these packages, the V
a neighboring I/O bank.
Simulation Methods
Simulation methods, ranging from very simple to very complex, exist to predict the PDS
characteristics. An accurate simulation result is difficult to achieve without using a fairly
sophisticated simulator and taking a significant amount of time.
Basic lumped RLC simulation is one of the simplest simulation methods. Though it does
not account for the distributed behavior of a PDS, it is a useful tool for selecting and
verifying that combinations of decoupling capacitor values will not lead to large antiresonances.
CCO
Pins
pins unconnected, as it can free up some PCB layout
CCO
pins of unused I/O banks floating reduces the level of ESD protection
CCO
pins of unused I/O banks should be connected to the V
CCO
CCO
of
Lumped RLC simulation is performed either in a version of SPICE or other circuit
simulator, or by using a mathematical tool like MathCAD or Microsoft Excel. Istvan Novak
publishes a free Excel spreadsheet for lumped RLC impedance calculation (among other
useful tools for PDS simulation) on his website:
http://www.electrical-integrity.com
Tab le 2 -4 also lists a few EDA tool vendors for PDS design and simulation. These tools
span a wide range of sophistication levels.
Table 2-4: EDA Tools for PDS Design and Simulation
Tool Vendor Website URL
ADS Agilent http://www.agilent.com
SIwave, HFSS Ansoft http://www.ansoft.com
Specctraquest Power Integrity Cadence http://www.cadence.com
Speed 2000, PowerSI, PowerDC,
OptimizePI
Hyperlynx PI Mentor http://www.mentor.com
Sigrity http://www.sigrity.com
32 www.xilinx.com Spartan-6 FPGA PCB Design and Pin Planning
UG393 (v1.1) April 29, 2010
Page 33

PDS Measurements
Measurements can be used to determine whether a PDS is adequate. PDS noise
measurements are a unique task, and many specialized techniques have been developed.
This section describes the noise magnitude and noise spectrum measurements.
Noise Magnitude Measurement
Noise measurement must be performed with a high-bandwidth oscilloscope (minimum
3 GHz oscilloscope and 1.5 GHz probe or direct coaxial connection) on a design running
realistic test patterns. The measurement is taken at the device’s power pins or at an unused
I/O driven High or Low (referred to as a spyhole measurement).
PDS Measurements
V
CCINT
and V
can only be measured at the PCB backside vias. V
CCAUX
can also be
CCO
measured this way, but more accurate results are obtained by measuring static (fixed logic
level) signals at unused I/Os in the bank of interest.
When making the noise measurement on the PCB backside, the via parasitics in the path
between the measuring point and FPGA must be considered. Any voltage drop occurring
in this path is generally in opposition to the noise, and therefore is not accounted for in the
oscilloscope measurement.
PCB backside via measurements also have a potential problem: decoupling capacitors are
often mounted directly underneath the device, meaning the capacitor lands connect
directly to the V
and GND vias with surface traces. These capacitors confuse the
CC
measurement by acting like a short circuit for the high-frequency A C current. To make sure
the measurements are not shorted by the capacitors, remove the capacitor at the
measurement site (keep all others to reflect the real system behavior).
When measuring V
noise, the measurement can be taken at an I/O pin configured as a
CCO
driver to logic 1 or logic 0. In most cases, the same I/O standard should be used for this
“spyhole” as for the other signals in the bank. Measuring a static logic 0 shows the
crosstalk (via field, PCB routing, package routing) induced on the victim. Measuring a
static logic 1 shows all the same crosstalk components as well as the noise present on the
V
net for the I/O bank. By subtracting (coherently in time) the noise measured on static
CCO
logic 0 from the noise measured on static logic 1, the noise on V
at the die can be
CCO
viewed. For an accurate result, the static logic 0 and static logic 1 noise must be measured
at the same I/O location. This means storing the time-domain waveform information from
both logic states and performing the subtraction operation on the two waveforms in a postprocess math computation tool such as MATLAB or Excel.
Oscilloscope Measurement Methods
There are two basic ways of using the oscilloscope to view power system noise, each for a
different purpose. The first surveys all possible noise events, while the second is useful for
focusing on individual noise sources.
• Place the oscilloscope in infinite persistence mode to acquire all noise over a long time
period (many seconds or minutes). If the design operates in many different modes,
using different resources in different amounts, these various conditions and modes
should be in operation while the oscilloscope is acquiring the noise measurement.
• Place the oscilloscope in averaging mode and trigger on a known aggressor event.
This can show the amount of noise correlated with the aggressor event (any events
asynchronous to the aggressor are removed through averaging).
Power system noise measurements should be made at a few different FPGA locations to
ensure that any local noise phenomena are captured.
Spartan-6 FPGA PCB Design and Pin Planning www.xilinx.com 33
UG393 (v1.1) April 29, 2010
Page 34

Chapter 2: Power Distribution System
Figure 2-9 shows an averaged noise measurement taken at the V
pins of a sample
CCO
design. In this case, the trigger was the clock for an I/O bus interface sending a 1-0-1-0
pattern at 250 Mb/s.
X-Ref Target - Figure 2-9
Figure 2-9: Averaged Measurement of V
Patterns at 250 Mb/s
ug393_c2_09_091809
Supply with Multiple I/O Sending
CCO
34 www.xilinx.com Spartan-6 FPGA PCB Design and Pin Planning
UG393 (v1.1) April 29, 2010
Page 35

PDS Measurements
ug393_c2_10_091809
Figure 2-10 shows an infinite persistence noise measurement of the same design with a
wider variety of I/O activity. Because the infinite persistence measurement catches all
noise events over a long period, both correlated and non-correlated with the primary
aggressor, all power system excursions are shown.
X-Ref Target - Figure 2-10
Figure 2-10: Infinite Persistence Measurement of Same Supply
The measurement shown in Figure 2-9 and Figure 2-10 represents the peak-to-peak noise.
If the peak-to-peak noise is outside the specified acceptable voltage range (data sheet
value, V
± 5%), the decoupling network is inadequate or a problem exists in the PCB
CC
layout.
Noise Spectrum Measurements
Having the necessary information to improve the decoupling network requires additional
measurements. To determine the frequencies where the noise resides, noise power
spectrum measurement is necessary. A spectrum analyzer or a high-bandwidth
oscilloscope coupled with FFT math functionality can accomplish this.
The FFT math function can be built into the oscilloscope, however, many of these functions
do not have resolution sufficient to give a clear picture of the noise spectrum. Alternatively,
a long sequence of time-domain data can be captured from an oscilloscope and converted
to frequency domain using MATLAB or other post-processing software supporting FFT.
This method has the advantage of showing as much resolution as the user is willing to
process. If neither math capacity is available, the noise frequency content can be
approximated by visually examining the time-domain waveform and estimating the
individual periodicities present in the noise.
A spectrum analyzer is a frequency-domain instrument, showing the frequency content of
a voltage signal at its inputs. Using a spectrum analyzer, the user sees the exact frequencies
where the PDS is inadequate.
Spartan-6 FPGA PCB Design and Pin Planning www.xilinx.com 35
UG393 (v1.1) April 29, 2010
Page 36

Chapter 2: Power Distribution System
UG393_c2_11_091809
Excessive noise at a certain frequency indicates a frequency where the PDS impedance is
too high for the device’s transient current demands. Using this information, the designer
can modify the PDS to accommodate the transient current at the specific frequency. This is
accomplished by either adding capacitors with effective frequencies close to the noise
frequency or otherwise lowering the PDS impedance at the critical frequency.
The noise spectrum measurement should be taken in the same manner as the peak-to-peak
noise measurement, directly underneath the device, or at a static I/O driven High or Low.
A spectrum analyzer takes its measurements using a 50Ω cable instead of an active probe.
• A good method attaches the measurement cable through a coaxial connector tapped
into the power and ground planes close to the device. This is not available in most
cases.
• Another method attaches the measurement cable at the lands of a decoupling
capacitor in the vicinity of the device that has been removed. The cable’s center
conductor and shield are soldered directly to the capacitor lands. Alternatively, a
probe station with 50Ω RF probes can be used to touch the decoupling capacitor
lands.
To protect the spectrum analyzer’s sensitive front-end circuitry, add a DC blocking
capacitor or attenuator in line. This isolates the spectrum analyzer from the device supply
voltage.
Figure 2-11 is an example of a noise spectrum measurement of the V
noise, with multiple I/O sending patterns at 100 MHz.
X-Ref Target - Figure 2-11
power-supply
CCO
Figure 2-11: Screenshot of Spectrum Analyzer Measurement of V
36 www.xilinx.com Spartan-6 FPGA PCB Design and Pin Planning
UG393 (v1.1) April 29, 2010
CCO
Page 37

Optimum Decoupling Network Design
If()
Vf()From Spectrum Analyzer
Zf()From Network Analyzer
-------------------------------------------------------------------------------------=
If a highly optimized PDS is needed, measurements and simulations of a prototype system
can inform the PDS design. Using knowledge of the noise spectrum generated by the
prototype system along with knowledge of the system’s power system impedance, the
unique transient current of the design can be determined and accommodated.
To measure the noise spectrum of the design under operating conditions, use either a
spectrum analyzer or an oscilloscope with FFT. The power system impedance can be
determined either through direct measurement or simulation, or a combination of these
two as there are often many variables and unknowns.
Both the noise spectrum and the impedance are functions of frequency. By examining the
quotient of these per frequency point, transient current as a function of frequency is
computed (Equation 2-7):
Using the data sheet’s maximum voltage ripple value, the impedance value needed at all
frequencies can be determined. This yields a target impedance as a function of frequency.
A specially designed capacitor network can accommodate the specific design’s transient
current.
Troubleshooting
Equation 2-7
Troubleshooting
In some cases the proper design work is done up-front, but noise problems still exist. This
next section describes possible issues and suggested resolution methods.
Possibility 1: Excessive Noise from Other Devices on the PCB
Sometimes ground and/or power planes are shared among many devices, and noise from
an inadequately decoupled device affects the PDS at other devices. Common causes of this
noise are:
• RAM interfaces with inherently high-transient current demands resulting either from
• Large ASICs
When unacceptable amounts of noise are measured locally at these devices, the local PDS
and the component decoupling networks should be analyzed.
Possibility 2: Parasitic Inductance of Planes, Vias, or Connecting Traces
Sometimes the decoupling network capacitance is adequate, but there is too much
inductance in the path from the capacitors to the FPGA.
Possible causes are:
• Wrong decoupling capacitor connecting-trace geometry or solder-land geometry
• The path from the capacitors to the FPGA is too long
temporary periodic contention or high-current drivers
- and/or -
• A current path in the power vias traverses an exceptionally thick PCB stackup.
For inadequate connecting trace geometry and capacitor land geometry, review the loop
inductance of the current path. If the vias for a decoupling capacitor are spaced a few
Spartan-6 FPGA PCB Design and Pin Planning www.xilinx.com 37
UG393 (v1.1) April 29, 2010
Page 38

Chapter 2: Power Distribution System
millimeters from the capacitor solder lands on the board, the current loop area is greater
than necessary (see Figure 2-1A).
To reduce the current loop area, vias should be placed directly against capacitor solder
lands (see Figure 2-1B). Never connect vias to the lands with a section of trace (see
Figure 2-1A).
Other improvements of geometry are via-in-pad (via under the solder land), not shown,
and via-beside-pad (vias straddle the lands instead of being placed at the ends of the
lands), shown in Figure 2-1C. Double vias also improve connecting trace geometry and
capacitor land geometry (see Figure 2-1D).
Exceptionally thick boards (> 2.3 mm or 90 mils) have vias with higher parasitic
inductance.
To reduce the parasitic inductance, move critical V
/GND plane sandwiches close to the
CC
top surface where the FPGA is located, and place the highest frequency capacitors on the
top surface where the FPGA is located.
Possibility 3: I/O Signals in PCB are Stronger Than Necessary
If noise in the V
can be reduced. This applies to both outputs from the FPGA and inputs to the FPGA. In
severe cases, excessive overshoot on inputs to the FPGA can reverse-bias the IOB clamp
diodes, injecting current into the V
If large amounts of noise are present on V
be decreased, or different termination should be used (on input or output paths).
PDS is still too high after refining the PDS, the I/O interface slew rate
CCO
PDS.
CCO
, the drive strength of these interfaces should
CCO
Possibility 4: I/O Signal Return Current Traveling in Sub-Optimal Paths
I/O signal return currents can also cause excessive noise in the PDS. For every signal
transmitted by a device into the PCB (and eventually into another device), there is an equal
and opposite current flowing from the PCB into the device's power/ground system. If a
low-impedance return current path is not available, a less optimal, higher impedance path
is used. When I/O signal return currents flow over a less optimal path, voltage changes are
induced in the PDS, and the signal can be corrupted by crosstalk. This can be improved by
ensuring every signal has a closely spaced and fully intact return path.
Methods to correct a sub-optimal return current path:
• Restrict signals to fewer routing layers with verified continuous return current paths.
• Provide low-impedance paths for AC currents to travel between reference planes
(decoupling capacitors at PCB locations where layer transitions occur).
38 www.xilinx.com Spartan-6 FPGA PCB Design and Pin Planning
UG393 (v1.1) April 29, 2010
Page 39

SelectIO Signaling
The Spartan-6 FPGA SelectIO resources are the general-purpose I/O and its various
settings. With numerous I/O standards and hundreds of variants within these standards,
these SelectIO resources offer a flexible array of choices for designing I/O interfaces.
This chapter provides some strategies for choosing I/O standard, topography, and
termination, and offers guidance on simulation and measurement for more detailed
decision making and verification. In many cases, higher-level aspects of the system (other
device choices or standards support) define the I/O interfaces to be used. In cases where
such constraints are not defined, it is up to the system designer to choose I/O interface
standards and optimize them according to the purpose of the system.
This chapter contains the following sections:
• Interface Types
• Single-Ended Signaling
Chapter 3
Interface Types
To better address the specifics of the various interface types, it is necessary to first break
interfaces into categories. Two relevant divisions are made:
• Single-Ended versus Differential Interfaces
• SDR versus DDR Interfaces
Single-Ended versus Differential Interfaces
Traditional digital logic uses single-ended signaling – a convention that transmits a signal
and assumes a GND common to the driver and receiver. In single-ended interfaces, a
signal’s assertion (whether it is High or Low) is based on its voltage level relative to a fixed
voltage threshold that is referenced to GND. When the voltage of the signal is higher than
the V
than the V
single-ended I/O standard.
To reach higher interface speeds and increase noise margin, some single-ended I/O
standards rely on a precise dedicated local reference voltage other than GND. HSTL and
SSTL are examples of I/O standards that rely on a V
thought of as a fixed comparator input.
Higher-performance interfaces typically make use of differential signaling – a convention
that transmits two complementary signals referenced to one another. In differential
interfaces, a signal’s assertion (whether it is High or Low) is based on the relative voltage
levels of the two complementary signals. When the voltage of the P signal is higher than
the voltage of the N signal, the state is considered High. When the voltage of the N signal
threshold, the state is considered High. When the voltage of the signal is lower
IH
threshold, the state is considered Low. TTL is one common example of a
IL
to resolve logic levels. V
REF
REF
can be
Spartan-6 FPGA PCB Design and Pin Planning www.xilinx.com 39
UG393 (v1.1) April 29, 2010
Page 40

Chapter 3: SelectIO Signaling
is higher than the voltage of the P signal, the state is considered Low. Typically the P and N
signals have similar swing, and have a common-mode voltage above GND (although this
is not always the case). LVDS is one common example of a differential I/O standard.
SDR versus DDR Interfaces
The difference between Single Data Rate (SDR) and Double Data Rate (DDR) interfaces has
to do with the relationship of the data signals of a bus to the clock signal of that bus. In SDR
systems, data is only registered at the input flip-flops of a receiving device on either the
rising or the falling edge of the clock. One full clock period is equivalent to one bit time. In
DDR systems, data is registered at the input flip-flops of a receiving device on both the
rising and falling edges of the clock. One full clock period is equivalent to two bit times.
The distinction of SDR and DDR has nothing to do with whether the I/O standard carrying
the signals is single-ended or differential. A single-ended interface can be SDR or DDR,
and a differential interface can also be SDR or DDR.
Single-Ended Signaling
A variety of single-ended I/O standards are available in the Spartan-6 FPGA IOB
configuration options.
Modes and Attributes
Some of these I/O standards can be used only in unidirectional mode, while some can be
used in bidirectional mode or unidirectional mode.
Some I/O standards have attributes to control drive strength and slew rate, as well as the
presence of weak pull-up or pull-down, and weak-keeper circuits (not intended for use as
parallel termination), and stronger input-termination resistors. Drive strength, slew rate,
and in some cases specifying untuned output driver impedance can be used to tune an
interface for adequate speed while not overdriving the signals. Weak pull-ups, weak pulldowns, and weak keepers can be used to ensure a known or steady level on a floating or 3stated signal. See the Spartan-6 FPGA SelectIO Resources User Guide for more information.
Input Thresholds
The input circuitry of the single-ended standards fall into two categories: those with fixed
input thresholds and those with input thresholds set by the V
has three advantages:
• It allows for tighter control of input threshold levels
• It removes dependence on die GND for the threshold reference
• It allows for input thresholds to be closer together, which reduces the need for a large
voltage swing of the signal at the input receiver
Two 1.8V I/O standards that illustrate this are LVCMOS18 and SSTL18 Class 1. When a
Spartan-6 FPGA is receiving, the input thresholds, V
for the SSTL18 standard.
voltage. The use of V
REF
and VIH, are much closer together
IL
REF
This smaller required swing allows for higher frequency of operation in the overall link. A
smaller swing at the driver means reduced DC power is required with less transient
current. The one drawback to the use of V
bank cannot be used as I/Os – they must all be connected to an external reference voltage
with a decoupling capacitor for each V
and decoupling of all other supplies, see Chapter 2, Power Distribution System.
40 www.xilinx.com Spartan-6 FPGA PCB Design and Pin Planning
is that the semi-dedicated V
REF
pin. For more information on V
REF
UG393 (v1.1) April 29, 2010
pins of the
REF
decoupling
REF
Page 41

PCB Materials and Traces
The choice of transmission media, whether PCB materials or cable type, can have a large
impact on system performance. Although any transmission medium is lossy at gigahertz
frequencies, this chapter provides some guidelines on managing signal attenuation so as to
obtain optimal performance for a given application.
How Fast is Fast?
Signal edges contain frequency components called harmonics. Each harmonic is a multiple
of the signal frequency and has significant amplitude up to a frequency determined by
Equation 4-1:
f ≈ 0.35 / T Equation 4-1
Where:
Chapter 4
Because dielectric losses in a PCB are frequency dependent, a bandwidth of concern must
be determined to find the total loss of the PCB. Frequencies must start at the operation
frequency and extend to the frequency in Equation 4-1. For example, a 10 Gb/s signal with
a 10 ps rise time has a bandwidth from 10 GHz to 35 GHz.
Dielectric Losses
The amount of signal energy lost into the dielectric is a function of the materials
characteristics. Some parameters used to describe the material include relative permittivity
ε
(also known as the dielectric constant) and loss tangent. Skin effect is also a contributor
r
to energy loss at line speeds in the gigahertz range.
Relative Permittivity
Relative permittivity is a measure of the effect of the dielectric on the capacitance of a
conductor. The higher the relative permittivity, the slower a signal travels on a trace and
the lower the impedance of a given trace geometry. A lower ε
Although the relative permittivity varies with frequency in all materials, FR4 exhibits wide
variations in ε
a spread of impedance values with increasing frequency. While this spread can be
insignificant at 1.125 Gb/s, it can be a concern at 10 Gb/s operation.
f = Frequency in GHz
T = The smaller of signal rise (T
with frequency. Because εr affects impedance directly, FR4 traces can have
r
) or fall (Tf) time in ns
r
is almost always preferred.
r
Spartan-6 FPGA PCB Design and Pin Planning www.xilinx.com 41
UG393 (v1.1) April 29, 2010
Page 42

Chapter 4: PCB Materials and Traces
Loss Tangent
Loss tangent is a measure of how much electromagnetic energy is lost to the dielectric as it
propagates down a transmission line. A lower loss tangent allows more energy to reach its
destination with less signal attenuation.
As frequency increases, the magnitude of energy loss increases as well, causing the highest
frequency harmonics in the signal edge to suffer the most attenuation. This appears as a
degradation in the rise and fall times.
Skin Effect and Resistive Losses
The skin effect is the tendency for current to flow preferentially near the outer surface of a
conductor. This is mainly due to the magnetic fields in higher frequency signals pushing
current flow in the perpendicular direction towards the perimeter of the conductor.
As current density near the surface increases, the effective cross-sectional area through
which current flows decreases. Resistance increases because the effective cross-sectional
area of the conductor is now smaller. Because this skin effect is more pronounced as
frequency increases, resistive losses increase with signaling rates.
Resistive losses have a similar effect on the signal as loss tangent. Rise and fall times
increase due to the decreased amplitude of the higher harmonics, with the highest
frequency harmonics being most affected. In the case of 10 Gb/s signals, even the
fundamental frequency can be attenuated to some degree when using FR4.
For example, an 8 mil wide trace at 1 MHz has a resistance on the order of 0.06Ω/inch,
while the same trace at 10 Gb/s has a resistance of just over 1Ω/inch. Given a 10 inch trace
and 1.6V voltage swing, a voltage drop of 160 mV occurs from resistive losses of the
fundamental frequency, not including the losses in the harmonics and dielectric loss.
Choosing the Substrate Material
The goal in material selection is to optimize both performance and cost for a particular
application.
FR4, the most common PCB substrate material, provides good performance with careful
system design. For long trace lengths or high signaling rates, a more expensive substrate
material with lower dielectric loss must be used.
Substrates, such as Nelco, have lower dielectric loss and exhibit significantly less
attenuation in the gigahertz range, thus increasing the maximum bandwidth of PCBs. At
3.125 Gb/s, the advantages of Nelco over FR4 are added voltage swing margin and longer
trace lengths. At 10 Gb/s, a low-loss dielectric like Nelco is necessary unless high-speed
traces are kept very short.
The choice of substrate material depends on the total length of the high-speed trace and
also the signaling rate.
What-if analysis can be done in HSPICE simulation to evaluate various substrate
materials. By varying the dielectric constant, loss tangent, and other parameters of the PCB
substrate material. The impact on eye quality can be simulated to justify the use of higher
cost materials. The impact of other parameters such as copper thickness can also be
explored.
42 www.xilinx.com Spartan-6 FPGA PCB Design and Pin Planning
UG393 (v1.1) April 29, 2010
Page 43

Traces
Traces
Trace Geometry
For any trace, its characteristic impedance is dependent on its stackup geometry as well as
the trace geometry. In the case of differential traces, the inductive and capacitive coupling
between the tightly coupled pair also determines the characteristic impedance of the
traces.
The impedance of a trace is determined by its inductive and capacitive coupling to nearby
conductors. For example, these conductors can be planes, vias, pads, connectors, and other
traces, including the other closely coupled trace in a differential pair. The substrate
properties, conductor properties, flux linkage area, and distance to a nearby conductor
determine the amount of coupling and hence, the contribution to the final impedance.
2D field solvers are necessary in resolving these complex interactions and contribute to the
calculation of the final impedance of the trace. They are also a useful tool to verify existing
trace geometries.
Wider traces create a larger cross-sectional area for current to flow and reduce resistive
losses in high-speed interfaces. Use the widest traces that space constraints allow. Because
trace width tolerances are expressed in absolute terms, a wider trace also minimizes the
percentage variation of the manufactured trace, resulting in tighter impedance control
along the length of the transmission line.
Sometimes, striplines are preferred over microstrips because the reference planes on both
sides of the trace provide radiation shielding. Microstrips are shielded on only one side (by
the reference plane) because they run on the top-most or bottom-most layers, leaving the
other side exposed to the environment.
For best results, the use of a 2D or 3D field solver is recommended for verification.
Trace Characteristic Impedance Design for High-Speed Transceivers
Because the transceivers use differential signaling, the most useful trace configurations are
differential edge-coupled stripline and differential microstrip. While some backplanes use
the differential broadside-coupled stripline configuration, it is not recommended for
10 Gb/s operation, because the P and N vias are asymmetrical and introduce commonmode non-idealities.
With few exceptions, 50Ω characteristic impedance (Z
the channel. In general, when the width/spacing (W/S) ratio is greater than 0.4 (8 mil wide
traces with 20 mil separation), coupling between the P and N signals affects the trace
impedance. In this case, the differential traces must be designed to have an odd mode
impedance (Z
Z
=2xZ0O.
DIFF
The same W/S ratio also must be less than 0.8, otherwise strong coupling between the
traces requires narrower, lossier traces for a Z
mode impedance (Z
Figure 4-1 through Figure 4-4 show example cross sections of differential structures.
) of 50Ω , resulting in a differential impedance (Z
0O
of 50Ω. To clarify, with Z0O at 50Ω, an even
) of 60Ω or below is desired.
0E
0O
) is used for transmission lines in
0
) of 100Ω , because
DIFF
Spartan-6 FPGA PCB Design and Pin Planning www.xilinx.com 43
UG393 (v1.1) April 29, 2010
Page 44

Chapter 4: PCB Materials and Traces
X-Ref Target - Figure 4-1
X-Ref Target - Figure 4-2
X-Ref Target - Figure 4-3
h
d=2h+t
wws
Er
t
h
UG393_c4_01_091809
Figure 4-1: Differential Edge-Coupled Centered Stripline
t
d=3h+2t
h
h
orthogonal lines
wws
t
Er
h
UG393_c4_02_091809
Figure 4-2: Differential Edge-Coupled Offset Stripline
h
t
w
Er
d=4h+2t
2h
t
h
UG393_c4_03_091809
Figure 4-3: Centered Broadside-Coupled Stripline
X-Ref Target - Figure 4-4
t
wws
h
Er = 1
Er
UG393_c4_04_091809
Figure 4-4: Differential Microstrip
A good PCB manufacturer understands controlled impedance and allows fine adjustments
for line widths to produce a Z
of 50Ω . The PCB manufacturer also provides the
0O
parameters necessary for the specific PCB layout. Some parameters can be calculated or
simulated from the guideline outlined in the example. Although ±10% tolerance on Z
0O
is
typical and can provide adequate performance, the additional cost of a tighter tolerance
results in better channel performance.
44 www.xilinx.com Spartan-6 FPGA PCB Design and Pin Planning
UG393 (v1.1) April 29, 2010
Page 45

Trace Routing
High-speed serial differential traces are routed with the highest priority to ensure that the
optimal path is available to these critical traces. This reduces the need for bends and vias
and minimizes the potential for impedance transitions. Traces must be kept straight, short,
and with as few layer changes as possible. The impact of vias is discussed in Differential
Vias, page 53.
Routing of high-speed traces must be avoided near other traces or other potential sources
of noise. Traces on neighboring signal planes should run perpendicular to minimize
crosstalk.
Striplines are to be used whenever possible, as are the uppermost and lowermost stripline
layers to minimize via stubs. When the stackup is being planned, these layers must be
placed as close to the top and bottom layers whenever possible.
Design constraints might require microstrips for the BGA exit path or from via to
connector launch or SMT pads. In such cases, the microstrip trace must be kept as short as
possible.
Mitered 45-degree bends are recommended (as opposed to 90-degree bends). At a
90-degree bend, the effective width of the trace changes, causing an impedance
discontinuity due to the capacitive coupling of the additional conductor area to the
reference plane.
Traces
The two traces of a differential pair must be length-matched to eliminate skew. Skew
creates mismatches in the common mode and reduces the differential voltage swing as a
result.
Plane Splits
Ground planes should be used as reference planes for signals, as opposed to noisier power
planes. Each reference plane should be contiguous for the length of the trace, because
routing over plane splits creates an impedance discontinuity. In this case, the impedance of
the trace changes because its coupling to the reference plane is changed abruptly at the
plane split.
Return Currents
Routing over plane splits also creates issues with the return current. High-speed signals
travel near the surface of the trace due to the skin effect mentioned in Dielectric Losses,
page 41. Meanwhile, the return current also travels near the surface of the tightly coupled
reference plane.
Because of the tight coupling, the return current has the tendency to travel close to the
original signal-carrying trace. At the plane split, the return current can no longer follow the
same path parallel to the trace, but must instead find an alternative route.
A plane split causes a suboptimal current return path and increases the current loop area,
thereby increasing the inductance of the trace at the plane split, changing the impedance of
the trace.
Spartan-6 FPGA PCB Design and Pin Planning www.xilinx.com 45
UG393 (v1.1) April 29, 2010
Page 46

Chapter 4: PCB Materials and Traces
Simulating Lossy Transmission Lines
Due to the different modeling implementations used by various circuit simulators
(frequency-domain versus time-domain techniques), it is important to check that the
models accurately reflect actual losses. One method is to compare the models against
known published configurations.
Cable
Cables are controlled-impedance transmission lines due to the constant physical
dimensions of conductor and dielectric along the length of the cable. The highest quality
cable shows little variation in these dimensions and also has a wide bandwidth with low
loss at high frequencies.
Connectors
The connectors attached to cables should exhibit low parasitic inductance, low-parasitic
capacitance, and low crosstalk for high bandwidth operation.
Skew Between Conductors
When selecting a cable, look for a specification of the skew between the conductors in a
cable. If the conductors are not length matched, the skew appears in the common mode
and directly reduces the eye height.
46 www.xilinx.com Spartan-6 FPGA PCB Design and Pin Planning
UG393 (v1.1) April 29, 2010
Page 47

Chapter 5
Design of Transitions for High-Speed Signals
Each transition in the channel must be designed to minimize any negative impact on the
link performance. This chapter addresses the interface at either end of a transmission line.
Transmission lines have defined and controlled characteristic impedance along their
length. However, the three-dimensional structures that they interface do not have easily
defined or constant impedance along the signal path. Software tools such as 3D field
solvers are necessary for computing the impedance that a 10 Gb/s signal sees as it passes
through these structures, while 2D field solvers are sufficient for computing transmission
line characteristic impedance.
PCB designers can use the analyses and examples in this chapter to assist the design of
such a channel. Cases not covered in this chapter might need further simulation and
analysis.
Excess Capacitance and Inductance
Most differential transitions are overly capacitive. The P and N paths couple to each other,
increasing capacitance. Many transitions have a frequency response identical to that of a
lumped capacitor over a wide frequency band.
By design, adding inductance cancels this excess capacitance in many cases except when
impacted by density concerns and physical limitations. While techniques such as blind
vias, solder balls on a larger pitch, and very small via pads reduce capacitance, they are not
always feasible in a design.
Time domain reflectometry (TDR) techniques, either through simulation or measurement,
allow the designer to identify excess capacitance or excess inductance in a transition.
Time Domain Reflectometry
To make TDR measurements, a step input is applied to the interconnect. The location and
magnitude of the excess capacitance or inductance that the voltage step experiences as it
traverses the interconnect can be determined through observing the reflected signal.
A shunt capacitance (see Figure 5-1) causes a momentary dip in the impedance, while a
series inductance (see Figure 5-2) causes an impedance discontinuity in the opposite
direction. Td is the propagation delay through the first transmission line segment on the
left. The reflected wave due to the impedance discontinuity takes 2 * Td to return to the
TDR port. If the signal propagation speed through the transmission line is known, the
location of the excess capacitance or inductance along the channel can be calculated.
Spartan-6 FPGA PCB Design and Pin Planning www.xilinx.com 47
UG393 (v1.1) April 29, 2010
Page 48

Chapter 5: Design of Transitions for High-Speed Signals
C
2
Z
0
------–
V
tdr
t() V
step
–
V
step
-------------------------------------
dt
t1
t2
∫
=
L 2Z
0
V
tdr
t() V
step
–
V
step
-------------------------------------
dt
t1
t2
∫
=
t
2
Shaded area goes into the
integral for Equation 13-2
UG393_c5_03_091809
t
1
X-Ref Target - Figure 5-1
Td
2Td
Figure 5-1: TDR Signature of Shunt Capacitance
X-Ref Target - Figure 5-2
C50Ω
UG393_c5_01_091809
50Ω
UG393_c5_02_091809
Figure 5-2: TDR Signature of Series Inductance
The magnitude of this excess capacitance (C) or inductance (L) can also be extracted from
the TDR waveform by integrating the normalized area of the transition’s TDR response.
The respective equations for capacitance and inductance are:
Equation 5-1
Equation 5-2
Figure 5-3 shows the integration of the normalized TDR area.
X-Ref Target - Figure 5-3
48 www.xilinx.com Spartan-6 FPGA PCB Design and Pin Planning
Figure 5-3: Integration of Normalized TDR Area
UG393 (v1.1) April 29, 2010
Page 49

BGA Package
Line
- 5.2 mils wide over 3 mil FR4 Dielectric
- L = 288 nH/m
- C = 116 pF/m
- Zo = 50Ω
5 Mil Trace
Pad
- 28 mils wide over 3 mil FR4
- L = 98 nH/m
- C = 404 pF/m
- Zo = 16Ω
28 Mil Pad
UG393_c5_04_091809
SMT Pads
BGA Package
The results using these equations are not sensitive to rise time variation and are valid for
simulated TDR measurements provided that the leading and trailing transmission lines
are very close to 50Ω. However, for actual measurements, accuracy is very dependent on
Z
.
0
The transceiver signal paths within the BGA package are optimized using a 3D full-wave
solver. Package traces are designed to be 50Ω high-speed transmission lines, while solder
ball and bump regions are tuned to 50Ω.
For applications that require AC coupling between transmitter and receiver, SMT pads are
introduced in the channel to allow coupling capacitors to be mounted. Standard SMT pads
have excess capacitance due to plate capacitance to a nearby reference plane. In the
Figure 5-4 example, a 5 mil trace with a Z
of 50Ω transitions to an 0402 SMT pad that is
0
28 mils wide, all over 3 mils of FR4.
X-Ref Target - Figure 5-4
Spartan-6 FPGA PCB Design and Pin Planning www.xilinx.com 49
UG393 (v1.1) April 29, 2010
Figure 5-4: 2D Field-Solver Analysis of 5 Mil Trace and 28 Mil Pad
Using a 2D field solver on these dimensions yields a Z
of 50Ω for the 5 mil trace. The Z0 for
0
the 0402 pad is 16Ω because the pad has too much capacitance and too little inductance,
resulting in an impedance of less than 50Ω . Performance of this transition can be
optimized in one of two ways.
The first method makes the trace the same width as the pad and moves the ground plane
deeper into the stackup to maintain the Z
of the transition at 50Ω. This method does not
0
require any special analysis, but there might be some error due to the fringing capacitance
of the SMT capacitor body. Trace density is limited because traces are now 28 mils wide.
The second method, shown in Figure 5-5, clears the ground plane underneath the pad,
which removes much of the excess capacitance caused by the plate capacitance between
the pad and the ground plane. This technique allows for greater trace density than the first
method, but requires 3D field-solver analysis or measurement along with several board
iterations to get the desired performance.
Page 50

Chapter 5: Design of Transitions for High-Speed Signals
- L = 241 nH/m
- C = 89 pF/m
- Zo = 52Ω
28 Mil Pad
UG393_c5_05_091809
UG393_c5_06_091809
Z
Y
X
X-Ref Target - Figure 5-5
Figure 5-5: Transition Optimization
The 2D field-solver example shows that close to 50Ω can be achieved if the ground plane
under the pad footprint is cleared out. A 3D field solver is then used to verify this result to
a greater degree of accuracy.
Figure 5-6 shows the ground plane cleared away exactly as it was for the 2D simulation.
Using frequency domain analysis within HFSS, there is a 20 dB (10x) improvement in
return loss using this technique.
X-Ref Target - Figure 5-6
50 www.xilinx.com Spartan-6 FPGA PCB Design and Pin Planning
Figure 5-6: Ansoft HFSS Model of Pad Clear-Out
Figure 5-7 shows the return loss comparison between 0402 pad structures with linear scale.
UG393 (v1.1) April 29, 2010
Page 51

SMT Pads
0
-20
-40
-60
024 6
Frequency, GHz
8
Cleared Planes
Uncleared Planes
10
dB(S(3,3))
dB(S(1,1))
UG393_c5_07_091809
0
-20
-40
-60
1E8 1E9
Frequency, Hz
+40dB/Decade RL Slope Shows a
Good Fit to Lumped Capacitance
1E10
dB(S(3,3))
dB(S(1,1))
UG393_c5_08_091809
X-Ref Target - Figure 5-7
Figure 5-7: Return Loss Comparison Between 0402 Pad Structures
The approximately –40 dB/decade slope in Figure 5-8 shows good fit to the frequency
response of a lumped capacitor.
X-Ref Target - Figure 5-8
Figure 5-8: Return Loss Comparison Between 0402 Pad Structures on Log
Next, using simulated measurements on the same transition modeled in HFSS, the timedomain performance of this transition can be measured by doing a TDR on the
S-parameter results from the earlier frequency domain analysis.
In Figure 5-9 and Figure 5-10, the red curve with the large capacitive dip corresponds to
the SMT pad without the ground plane cleared from underneath. The blue curve shows
Spartan-6 FPGA PCB Design and Pin Planning www.xilinx.com 51
UG393 (v1.1) April 29, 2010
that clearing out the ground plane removes much of the excess capacitance. This
improvement can be quantified using Equation 5-1 and Equation 5-2.
(Frequency) Scale
Page 52

Chapter 5: Design of Transitions for High-Speed Signals
X-Ref Target - Figure 5-9
600
500
400
300
200
VtdrPlaneCleared, mV
100
VtdrPlaneNotCleared, mV
0
0.0 0.5 1.0 1.5
Figure 5-9: TDR Results Comparing 0402 Pad Structures
X-Ref Target - Figure 5-10
550
Time, ns
2.0 2.5 3.0
UG393_c5_09_091809
500
450
400
350
VtdrPlaneCleared, mV
VtdrPlaneNotCleared, mV
300
0.60 0.65 0.70 0.75 0.800.85 0.90 0.95 1.000.55 1.05
Time, ns
UG393_c5_10_091809
Figure 5-10: TDR Results Comparing 0402 Pad Structures
As shown from Figure 5-11 and Figure 5-12, clearing the ground plane under SMT pads
yields a significant improvement in the performance of an SMT pad transition. Excess
capacitance is reduced by 15x, and return loss is improved by 20 dB.
52 www.xilinx.com Spartan-6 FPGA PCB Design and Pin Planning
UG393 (v1.1) April 29, 2010
Page 53

X-Ref Target - Figure 5-11
550
500
450
400
350
300
0.55 0.60 0.65 0.70 0.80 0.90 0.95 1.000.850.75
Time, ns
m1
VtdrPlaneNotCleared, mV
VtdrPlaneCleared, mV
UG393_c5_11_091809
m2
550
500
450
400
350
300
0.55 0.60 0.65 0.70 0.80 0.90 0.95 1.000.850.75
Time, ns
m1
VtdrPlaneNotCleared, mV
VtdrPlaneCleared, mV
UG393_c5_12_091809
m2
X-Ref Target - Figure 5-12
Differential Vias
Figure 5-11: 840 fF Excess Capacitance with Ground Plane Intact
Figure 5-12: 57 fF Excess Capacitance with Ground Plane Intact
Differential Vias
The most common transition is the differential via where the signal pair must transition
from an upper stripline layer or top microstrip to a lower stripline layer or bottom
microstrip.
Figure 5-13 shows a Ground-Signal-Signal-Ground (GSSG) type differential via. Ground
vias are connected to each ground plane in the stackup, while signal layers only contain
pads for the entry and exit layers.
Spartan-6 FPGA PCB Design and Pin Planning www.xilinx.com 53
UG393 (v1.1) April 29, 2010
Page 54

Chapter 5: Design of Transitions for High-Speed Signals
X-Ref Target - Figure 5-13
Via Diameter = 12 mils (0.012 inches)
Pad Diameter = 22 mils
Annular Ring = 5 mils
GSSG Via Pitch = 40 mils
Oblong Antipads = ~55 mils x 95 mils,
aligned with ground pads
Figure 5-13: Differential Via Design Example
UG393_c5_13_091809
A key advantage of a GSSG via is that it allows for the signal’s return current to flow in the
ground via near the corresponding signal via, reducing excess inductance. The signal path
is also symmetrical between the P and N halves of the differential signal, which is critical
in controlling common-mode artifacts due to P/N imbalance.
The larger oblong antipads reduce excess fringing capacitance between the via body and
the surrounding planes edges. Unused pads are also removed.
A good starting point is to use the dimensions shown in Figure 5-13 as an example
differential via design for an 80 mil board. To accommodate density constraints or the lack
thereof, the dimensions can be scaled accordingly to preserve the ratios of each dimension
relative to the others. Such scaling preserves the impedance performance of the differential
via while allowing variation in overall size to better suit specific applications. These final
dimensions are limited by manufacturability and density constraints.
While the via length can be varied by a small amount to suit boards that are thicker or
thinner than the 80 mil example, changing the ratio of the via length relative to other
dimensions affects the via’s impedance. For this and other configurations of differential
vias, it is best to simulate a model using 3D field-solver tools to ensure that performance
targets are met.
54 www.xilinx.com Spartan-6 FPGA PCB Design and Pin Planning
UG393 (v1.1) April 29, 2010
Page 55

Differential Vias
X-Ref Target - Figure 5-14
From Pin L11, Exiting at Lower Layer From Pin L6, Exiting at Middle Layer
UG393_c5_14_091809
Figure 5-14: Differential GSSG Via in 16-Layer PCB from Pins L11 and L6
As a general rule, the P and N paths need to be kept at equal lengths through a transition.
Where possible, via stub length should be kept to a minimum by traversing the signal
through the entire length of the vias. The analysis shown in Figure 5-15 compares the
S-parameter return loss for common-mode (SCC11) and differential (SDD11) responses.
X-Ref Target - Figure 5-15
0
-20
-40
dB(Scc11_L6)
dB(Sdd11_L6)
dB(Scc11_L11)
dB(Sdd11_L11)
-60
-80
1E91E8 1E10
Frequency, Hz
UG393_c5_15_091809
Figure 5-15: Simulated Return Loss Comparing Differential and Common-Mode
Losses for L11 and L6 GSSG Vias
From the graph in Figure 5-15, the common-mode response is 20 dB worse in terms of
return loss. The much worse common-mode response relative to the differential response
is the reason why it is a good idea to reduce P/N skew as much as possible before entering
a transition. The 60/40 rule of thumb is 40 dB of return loss at 1 GHz, which implies 60 fF
of excess capacitance. Because excess capacitance is a single pole response, simple
extrapolation rules can be used. For example, a shift to 34 dB return loss doubles the excess
capacitance. Due to the excellent performance characteristics of GSSG vias, even long via
stubs only double the differential via’s capacitance at the most.
Spartan-6 FPGA PCB Design and Pin Planning www.xilinx.com 55
UG393 (v1.1) April 29, 2010
Page 56

Chapter 5: Design of Transitions for High-Speed Signals
P/N Crossover Vias
Some transceivers offer the ability to independently switch the polarity of the transmit and
receive signal pairs. This functionality eliminates the need to cross over the P/N signals at
the board level, which in turn significantly enhances signal integrity. If possible, P/N
crossover vias are to be avoided and the polarity switch of the transceiver should be used.
SMA Connectors
Well-designed SMA connectors can reduce debugging time and allow a high-performance
channel to be designed correctly on the first pass. SMA connectors that perform well at
10 Gb/s need to be simulated, designed, and manufactured to meet this performance
target. Vendors can also offer design services that ensure that the connector works well on
a specific board. Assembly guidelines are crucial in ensuring that the process of mating the
connector to the board is well-controlled to give the specified performance.
Xilinx uses precision SMA connectors from Rosenberger and other precision connector
manufacturers because of their excellent performance and because of the points listed in
the previous paragraph.
Backplane Connectors
There are numerous signal integrity issues associated with backplane connectors
including:
• P/N signal skew
•Crosstalk
• Stubs due to connector pins
Some connector manufacturers offer not only S parameters, models, and layout guidelines
for their connectors but also design support, seminars, and tutorials.
Microstrip/Stripline Bends
A bend in a PCB trace is a transition. When routing differential traces through a 90° corner,
the outer trace is longer than the inner trace, which introduces P/N imbalance. Even
within a single trace, signal current has the tendency to hug the inside track of a corner,
further reducing the actual delay through a bend.
To minimize skew between the P and N paths, 90° turns in microstrips or striplines are
routed as two 45° bends to give mitered corners. The addition of a jog-out also allows the
trace lengths to be matched. Figure 5-16 shows example bends in traces.
56 www.xilinx.com Spartan-6 FPGA PCB Design and Pin Planning
UG393 (v1.1) April 29, 2010
Page 57

X-Ref Target - Figure 5-16
Microstrip/Stripline Bends
Plane
Cut-Outs
Jog-Out
Tw o
45°
Turns
UG393_c5_16_091809
Figure 5-16: Example Design for 90 Degree Bends in Traces
Turns add capacitance because the trace at a 90° corner is 41% wider. That difference is
reduced to 8% with a 45° turn. The addition of plane cutouts to a depth of 30 mils act to
reduce this amount of excess capacitance. The trace was not widened to maintain 50Ω with
the plane cutouts in place.
When this mitered bend is simulated with the jog-out and plane cutouts, excess
capacitance is reduced and P/N length and phase matching is improved. Without jog-outs,
the P/N length mismatch is 16 mils. Given FR4 material, the 16 mil difference translates to
a phase mismatch of 4.8° at 5 GHz, or 2.68 ps (0.0268 UI) at 10 Gb/s.
Figure 5-17 through Figure 5-19 show that phase mismatch is reduced to 0.75° with jog-
outs and 0.3° with jog-outs and plane cutouts. The combination of jog-outs and plane
cutouts yields simulation results that show the excess capacitance of the structure is
reduced to 65 fF.
Designers are tempted to widen lines to compensate for the characteristic impedance
increase as the lines are separated and couple less strongly. However, even without
widening the lines, the combined capacitance of the corners and jog-outs is still overly
capacitive, and therefore the uncoupled section of the jog-out must not be widened.
Spartan-6 FPGA PCB Design and Pin Planning www.xilinx.com 57
UG393 (v1.1) April 29, 2010
Page 58

Chapter 5: Design of Transitions for High-Speed Signals
-10
-20
-30
-40
-50
-60
1E8 1E9
Frequency, Hz
1E10
5E10
dB(Sdd11x)
dB(Sdd11)
UG393_c5_18_091809
X-Ref Target - Figure 5-17
2.5
2.0
1.5
1.0
vtdr_dutp, V
vtdr_dutp2, V
vtdr_dutn, V
0.5
0.0
-0.5
vtdr_dutn2, V
X-Ref Target - Figure 5-18
0.0 0.2 0.4 0.6
Time, ns
0.8 1.0
UG393_c5_17_091809
Figure 5-17: Simulated TDR of 45 Degree Bends with Jog-Outs
Figure 5-18: Simulated TDR of 45 Degree Bends with Jog-Outs
58 www.xilinx.com Spartan-6 FPGA PCB Design and Pin Planning
UG393 (v1.1) April 29, 2010
Page 59

X-Ref Target - Figure 5-19
Microstrip/Stripline Bends
-75
-76
Phase(S(7,5))
Phase(S(4,2))
Phase(S(3,1))
Phase(S(8,6))
-77
4.95
Frequency, GHz
Figure 5-19: Simulated Phase Response of 45 Degree Bends with Jog-Outs
For wide traces, curved routing can also be helpful as shown in Figure 5-20.
X-Ref Target - Figure 5-20
No Jog-outs
No Jog-outs
50 mV, 200 ps Per Div.
With Jog-outs
With Jog-outs
UG393_c5_19_091809
5.00
Turns
10 mV, 100 ps Per Div.
Skew
Turns & Jog-outs
UG393_c5_20_091809
Figure 5-20: Measured TDR of 45 Degree Bends with and without Jog-Outs
Spartan-6 FPGA PCB Design and Pin Planning www.xilinx.com 59
UG393 (v1.1) April 29, 2010
Page 60

Chapter 5: Design of Transitions for High-Speed Signals
60 www.xilinx.com Spartan-6 FPGA PCB Design and Pin Planning
UG393 (v1.1) April 29, 2010
Page 61

I/O Pin and Clock Planning
This chapter contains guidelines for pin-planning and clocking considerations when
designing with Spartan-6 FPGAs. Choosing the correct resources enables a faster and
cleaner design process. Xilinx recommends using the ISE® software PlanAhead tool to
select the pins for the design. Follow these guidelines to avoid board layout, pin
assignment, and FPGA resource conflicts. Using these guidelines also provides confidence
in initial design pin assignments. After following these guidelines for the I/O and clock
structures, run the design through the ISE software for a final check against the design
rules for possible warnings or errors.
Configuration Modes
Configuration Pin Planning Considerations
Chapter 6
The best designs remove any possibility of signal contention on the multi-function
configuration pins during configuration. The simplest method is to prohibit the
multi-function configuration pins from being used as user I/O, this is only possible when
there is enough available I/O for the design.
The Package Pins view in the PlanAhead tool lists all the dedicated and multi-function
pins for the selected configuration mode. The Spartan-6 FPGA Configuration Guide can be
used to identify the pins used in each mode.
Multi-function Configuration
The multi-function configuration pins must be examined for overlaps with other design
functionality requirements.
GCLK
In x16 configuration modes, D13, D14, and D15 of the upper data bus uses the same I/O as
the GCLK inputs. Since clock signals are typically not easy to 3-state during configuration,
most designs must account for three fewer GCLK pins when using the x16 modes.
V
Pins, and BPI and SelectMAP Configuration Modes
REF
In bank 2, the Slave SelectMAP configuration mode requires the use of the RDWR pin,
which also doubles as a V
require V
configuration mode. Designers need to review the tradeoffs before dedicating
multi-function pins.
in bank 2 (such as SSTL or HSTL) while using the Slave SelectMap
REF
pin. Therefore, a design cannot include I/O standards that
REF
Similarly, in bank 1 the BPI configuration mode requires the use of some multi-function
pins that also serve as V
Spartan-6 FPGA PCB Design and Pin Planning www.xilinx.com 61
UG393 (v1.1) April 29, 2010
pins. Therefore, designs cannot include both I/O standards
REF
Page 62

Chapter 6: I/O Pin and Clock Planning
that require V
to review the tradeoffs before dedicating multi-function pins.
Designs using the Master SelectMAP configuration mode must be able to manage toggling
pins during configuration since the address bus A[25:0], and the BUSY, FOE_B, FCS_B, and
FWE_B multi-function pins can toggle during the configuration process.
pins in bank 1 and also use the BPI configuration mode. Designers need
REF
Memory Controller Block
The BPI configuration mode cannot be used when the design uses the memory controller
block (MCB) in bank 1. Conversely, when configuring in BPI mode, the MCB in bank 1 can
not be used.
Configuration Options
Proper design planning considers any pins required by the configuration options.
Readback
Ensure that the configuration pins that will persist as configuration pins for readback are
not used as user I/O by the design. The table in the Reserving Dual-Purpose Configuration
Pins (Persist) section (Chapter 5) of the Spartan-6 FPGA Configuration Guide lists the pins
that will persist for each configuration mode.
Readback CRC
Readback CRC requires that the INIT_B pin be used as the CRC error flag. Therefore, the
INIT_B pin is not available as a user I/O unless the CRC error flag is disabled by using the
constraint: POST_CRC_INIT_FLAG = DISABLE. Chapter 8 of the Spartan-6 FPGA
Configuration Guide contains more details on Readback CRC including a UCF file design
implementation example.
External Clock Option for Master Configuration Modes
The USERCCLK option for the Master configuration modes uses the same I/O as the
GCLK0 pin.
Memory Controller Block
MCB Pin Planning Considerations
The Spartan-6 FPGA MCB shares multi-function I/O pins with other functions such as
GCLK and configuration pins. When using these pins for the MCB, they cannot be used for
the other functions. The Memory Interface Generator (MIG) tool in the Core Generator
software generates the specific pin assignments for each MCB.
Note:
the MCBs in other I/O banks whenever possible.
In addition to the typical interface pins associated with memory interfaces, two additional
user I/O pins are usually required: RZQ and ZIO. The MIG tool adds these two additional
I/O pins automatically. See the Spartan-6 FPGA Memory Controller User Guide for more
information on their usage and required terminations.
The MCB in I/O bank 1 has the most multi-function pin conflicts. To avoid these conflicts, use
62 www.xilinx.com Spartan-6 FPGA PCB Design and Pin Planning
UG393 (v1.1) April 29, 2010
Page 63

PCI
All supported MCB interfaces (with the exception of LPDDR) require the use of the V
pins to provide the appropriate voltage reference. Therefore, for all memory interfaces
(except LPDDR), the multi-function pins with V
the I/O bank that contains an MCB.
MCB Clocking Considerations
When designing with MCBs, examine the MIG generated pin assignment and note the
GCLK pins that are used, since they are not available for general use.
Larger devices have two additional I/O banks, banks 4 and 5. When two MCBs are both
used on the same side of the device in a design (example: the MCBs in I/O banks 1 and 5),
they must be clocked with the same BUFPLL_MCB. The two MCBs share a common clock
rate. See Chapter 3 of the Spartan-6 FPGA Memory Controller User Guide for recommended
PLL and BUFPLL_MCB usage.
PCI
To generate valid pin placements for PCI, use the Core Generator tool. The IRDY and
TRDY pins are used for PCI core designs and are multi-functional with the GCLK pins.
Whenever a PCI core is used in a particular I/O bank, the IRDY and TRDY pins in that
bank will not be available to use for GCLK.
GTP Transceivers
will not be available as user I/O within
REF
REF
GTP Transceiver Pin Planning Considerations
Spartan-6 devices that contain GTP transceiver pins must be correctly connected,
regardless of whether any GTP transceivers are used. See the board design guideline
(chapter 5) in UG386
Use GTP0 when only using one GTP transceiver of a GTPA1_DUAL transceiver pair and
ensure that the incoming reference clock is connected to the REFCLK pins on GTP0. The
REFCLK for GTP1 will not be powered. Tie all unused GTP transceiver pins to ground,
including the power pins.
Do not share the GTP transceiver’s REFCLKs from the top half of the device with the
bottom half REFCLKs. The GTP transceivers located on the top half of the device (I/O
bank 0) are independent of the GTP transceivers located on the bottom half of the device
(I/O bank 2), and must have their own REFCLKs connected to them.
For the best signal integrity, avoid assigning user I/O pins to SelectIO locations directly
adjacent to GTP transceiver power or data pins. Diagonally adjacent pins are acceptable.
Transceiver speeds require very specific board-level termination. Recommended
terminations and signal conditioning are outlined in the BUFIO2 Input Conflicts for SDR
Data Rates and BUFIO2 Input Conflicts for DDR Data Rates tables (Chapter 1) of the Spartan-6
FPGA Clocking Resources User Guide.
: Spartan-6 FPGA GTP Transceivers User Guide for further details.
Spartan-6 FPGA PCB Design and Pin Planning www.xilinx.com 63
UG393 (v1.1) April 29, 2010
Page 64

Chapter 6: I/O Pin and Clock Planning
GTP Transceiver Clocking Considerations
GTP transceivers use BUFIO2 clock buffers to reach the DCM, PLL, and BUFG resources
for FPGA logic clocking. From one to all eight BUFIO2s on a side can be used by the GTP
transceivers. Monitoring how many specific BUFIO2s are used ensures that the desired
pinout does not require more BUFIO2s than are available. The SelectIO interfaces and the
GCLK pin to DCM/PLL connectivity also compete for the same BUFIO2 clock buffers as
the GTP transceivers. This is described in the BUFIO2 I/O Clock Buffer Usage section.
The connectivity between the GTP transceiver output clocks and BUFIO2 is described in
Chapter 1 of the Spartan-6 FPGA Clocking Resources User Guide.
PCI Express
The best designs define the pin placement and GTP transceiver usage with the integrated
block for PCI Express® before any other GTP transceiver based IP is planned. To ensure
proper timing, the integrated block for PCI Express uses the closest GTP transceivers.
Both the Core Generator tool and the Spartan-6 FPGA Integrated Endpoint Block for PCI
Express User Guide are helpful when defining the pin placement and GTP transceiver
usage. The integrated block for PCI Express only allows using the GTP transceivers on the
top half of the device. The supported GTP transceiver locations are described in a table in
the Supported Core Pinouts section (Chapter 7) of the Spartan-6 FPGA Integrated Endpoint
Block for PCI Express User Guide.
Other GTP Transceiver Based Tools
To support the desired core, and ensure enough GTP transceivers are available, use the
Core Generator tool to generate valid pin placements for Xilinx provided cores. Multi-lane
cores require adjacent GTP transceivers.
Global and I/O Clocking
Defining the best clocking structure for a design is an important aspect of pin planning.
Before locking the pin placement, the designer must make sure that the design does not
require more clock buffers or clock I/O pins than are available in any given region, and
that the connectivity is valid. For simple designs, those with only a few I/O, global, or GTP
transceiver derived clocks, this determination can be accomplished using the guidelines in
this chapter. For designs with a high utilization of clock resources in any given region, the
I/O interfaces, clock structures, and any IP required specific clock buffers should be
entered into the design and run through the ISE software. The ISE software provides the
design rule checks (DRCs) for valid clock usage and I/O pin assignments.
GCLK Pin Assignment
The memory controller blocks, the PCI core interfaces, and the 16-bit wide configuration
modes all share multi-function pins with GCLKs. The availability of GCLK pins for a given
package should be checked to ensure that the pins are not needed for other shared
functions.
The clock column in the PlanAhead Package Pins view can group all the GCLK pins in a
single list by deselecting the Group by I/O Bank icon on the left, and then using the clock
header to sort the column.
64 www.xilinx.com Spartan-6 FPGA PCB Design and Pin Planning
UG393 (v1.1) April 29, 2010
Page 65

Global and I/O Clocking
A GCLK pin to BUFG connectivity check will ensure that there are no GCLK pin
assignment conflicts for the same BUFG global clock line. See the Shared Global Clocking
Resources tables (Chapter 1) of the Spartan-6 FPGA Clocking Resources User Guide for more
details. The 16 GCLK pins in I/O banks 0 and 1 share the same eight BUFG buffers. The 16
GCLK pins in I/O banks 2 and 3 share the same eight BUFG buffers.
The GCLK pins that are intended to drive DCMs or PLLs must have the required BUFIO2
available to connect them. The GCLK pin to BUFIO2 connectivity is shown in the BUFIO2
Input Conflicts for SDR Data Rates and BUFIO2 Input Conflicts for DDR Data Rates tables
(Chapter 1) of the Spartan-6 FPGA Clocking Resources User Guide.
BUFIO2s (and therefore the high-speed connections from their GCLK pins) on the top half
of the device (BUFIO2 regions TL, TR, LT, and RT) can connect to the clock management
tiles (CMTs) in the top half of the device; BUFIO2s on the bottom half (BUFIO2 regions BL,
BR, LB, and RB) can connect to CMTs on the bottom half of the device. This connectivity is
important when a clock needs to drive multiple PLLs, or when both BUFIO2s and CMTs
are being floorplanned, or when the design over-utilizes BUFIO2 resources on one side of
the device.
When assigning differential clock inputs, always ensure the master side of the clock is
assigned to the P side of the differential clock pin pair, and the slave side of the clock to the
N side.
BUFIO2 I/O Clock Buffer Usage
Each side of the Spartan-6 device (top, bottom, left, and right) has two BUFIO2 clock
regions. There are four BUFIO2 clock buffers available per clock region. Therefore, each
side of the device has eight BUFIO2 clock buffers. For the smaller device/package
combinations, a side encompasses only one I/O bank (banks 0, 1, 2, and 3). However, on
some larger device/package combinations there are additional I/O banks 4 and 5. The
devices with banks 1 and 5 share the clock resources on the right side, and banks 3 and 4
share the clock resources on the left side. Within each BUFIO2 clock region, there are three
competing uses for the BUFIO2 clock buffers: high-speed I/O clocks, GCLK pin
connectivity to the DCMs and PLLs, and GTP clock connectivity to the DCMs, PLLs, and
BUFGs. These three competing uses must be balanced when defining pin assignments,
requiring no more than four buffers per BUFIO2 clock region.
It is important to ensure that a design will require no more than four BUFIO2 clock buffers
per BUFIO2 clock region. Each BUFIO2 clock region contains enough routing resources to
support up to eight clocks total (including clocks driven by BUFIO2 buffers, as well as
other clock buffers).
Four I/O clocks can be driven by BUFIO2 clock buffers, each limited to that single BUFIO2
clock region. Xilinx recommends keeping the BUFIO2 driven interfaces to a single BUFIO2
clock region to conserve BUFIO2 clock buffers. Splitting a single interface across two
BUFIO2 clock regions requires two BUFIO2 clock buffers; in contrast, the same interface
within a single BUFIO2 clock region only requires one BUFIO2 buffer.
When two I/O clocks are driven by a BUFPLL, each spans the two BUFIO2 clock regions
on a side.
There are two global clocks that can be driven from any of the 16 global clock lines.
Spartan-6 FPGA PCB Design and Pin Planning www.xilinx.com 65
UG393 (v1.1) April 29, 2010
Page 66

Chapter 6: I/O Pin and Clock Planning
Overview of BUFIO2 Resource Usage per Interface Type
• Each single-ended SDR interface consumes one BUFIO2 buffer.
• Each single-ended DDR interface consumes two BUFIO2 buffers.
• Each differential interface requires two BUFIO2 buffers.
• Each GCLK clock input to the DCM or PLL connections use one BUFIO2 buffer.
• Each GTP transceiver clock used to clock the FPGA logic resources uses one BUFIO2
buffer.
Bidirectional I/O
Valid clock buffer combinations for bidirectional I/O are further described in the Possible
Clock Structures for Bidirectional I/O table (Chapter 2) in the Spartan-6 FPGA SelectIO
Resources User Guide.
Ensure that each of the four BUFIO2 clock buffers per BUFIO2 clock region can be driven
from the desired GCLK input or a GTP transceiver. The GCLK and GTP-to-BUFIO2
connectivity is shown in the BUFIO2 Input Conflicts for SDR Data Rates and BUFIO2 Input
Conflicts for DDR Data Rates tables (Chapter 1) in the Spartan-6 FPGA Clocking Resources
User Guide.
Any BUFIO2 clocked interfaces using the IODELAY2 clock delay adjustment must be
limited to a single BUFIO2 clock region. The IODELAY2 primitive is limited to a single
fanout GCLK-to-BUFIO2 connection, and cannot support the GCLK to two BUFIO2s
connection required for interfaces that span two BUFIO2 regions.
Serializing Interfaces
The SelectIO wizard (in the ISE software) is used to create the proper I/O and clocking
structure. The Spartan-6 FPGA I/Os include many innovations not available in previous
Spartan FPGA generations. Serialized I/O interfaces must be designed specifically for the
latest devices. See X
Mb/s) for detailed examples of different I/O interfaces.
Pin Planning Considerations
Single-Ended SerDes
Single-ended I/O can be serialized (4:1) on any given I/O. For serializations of greater than
4:1, multiple input pins are cascaded. Cascades must always start with a P pin.
Serialization will consume the SerDes and the appropriate input or output register of the
associated N pin. The N pin can still be used as an unrelated I/O, minus the SerDes and
associated input or output register.
Examples
APP1064, Source-Synchronous Serialization and Deserialization (up to 1050
• An 8-bit, 4:1 SerDes uses eight I/O, or four P/N pairs.
• An 8-bit, 8:1 SerDes uses eight P pins to start each of the eight SerDes, plus the eight
associated N pins for the second half of the two cascaded 4:1 SerDes.
The N pins can still be used for unrelated I/O, as long as they do not use a SerDes.
However, these other signals must be interleaved with the SerDes bus for board routing.
66 www.xilinx.com Spartan-6 FPGA PCB Design and Pin Planning
UG393 (v1.1) April 29, 2010
Page 67

Power Management—Using Suspend/Awake
Differential SerDes
Differential I/O can be serialized up to 8:1 with each P/N differential pair.
Power Management—Using Suspend/Awake
When using the Suspend function, the functionality of the AWAKE pin is also required.
Consequently, the AWAKE pin can not be used as user I/O. When using the multi-pin
wakeup option, the SCP[0:7] pins become multi-function pins.
A complete description of Suspend/Awake is outlined in UG394
Management User Guide.
I/O Standards and I/O Banking Rules
The I/O standards and other I/O attributes must be defined for each I/O pin in the design.
Chapter 1 of the Spartan-6 FPGA SelectIO Resources User Guide describes all of the I/O
banking rules associated with the available standards and attributes, particularly the
section on I/O Standard Bank Compatibility. For example, for many differential standards,
the outputs are only available in banks 0 and 2. To check I/O standard compatibility and
for any I/O banking restrictions, run the DRCs in the PlanAhead tool.
Simultaneous Switching Output (SSO) Management
Proposed pin placements must be checked against the SSO limits table in the Spartan-6
FPGA Data Sheet: DC and Switching Characteristics. If violations are determined, first try to
spread the offending outputs into other I/O banks (if possible).
Read the Simultaneous Switching Outputs section of the Spartan-6 FPGA SelectIO Resources
User Guide for a more detailed discussion on SSOs, and for specific recommendations for
pin-planning to avoid issues related to SSOs.
Running Design Rule Checks
, Spartan-6 FPGA Power
The DRCs, available in the software tools, are used to validate clocking and pin
assignments. Basic DRCs can be run with as little as a pin-list with defined I/O standards.
Full DRCs for pin placement validation are run when compiling the design in the ISE
software. The more complete the I/O and clocking structures are in the design, the more
complete the DRCs. To completely validate pin placements, ensure that all I/O interfaces
and clocking structures have been entered into the design.
I/O banking rule DRCs can be accessed in the PlanAhead tool with as little as a pin-lis t and
defined I/O standards and attributes. Clock topology and resource DRCs are available by
running the design through the ISE software.
Confirm in the clocking and I/O DRCs that all Intellectual Property with unique clocking
requirements have been entered into the design.
In designs that require regional clocks in addition to global clocks, ensure that each
regional clock is entered in the design and has at least a few representative loads attached.
Any I/O clocks with regional requirements should have all loads defined.
In addition to pin planning to avoid DRC violations, planning the pinout to optimize
performance of a particular design is also important as well as considering the overall flow
Spartan-6 FPGA PCB Design and Pin Planning www.xilinx.com 67
UG393 (v1.1) April 29, 2010
Page 68

Chapter 6: I/O Pin and Clock Planning
of routing through the device (from inputs, to internal logic, to outputs). See WP311:
Improving Performance in Spartan-6 FPGA Designs for a discussion on this topic.
Density Migration
When migrating a design to a different density in the same package, it is important to
ensure that the pins selected during the pin-planning process are available across the
available devices. Chapter 7 of the Spartan-6 FPGA Packaging and Pinouts Specification
provides more details on density migration.
68 www.xilinx.com Spartan-6 FPGA PCB Design and Pin Planning
UG393 (v1.1) April 29, 2010
Page 69

Appendix A
Recommended PCB Design Rules
This appendix outlines the recommended design rules for all the available Spartan-6 FPGA
packages.
Recommended PCB Design Rules for QFP Packages
X-Ref Target - Figure A-1
M
ID
M
e
e
e
M
IE
b
2
I
2
e
ug393_aA_01_030210
Figure A-1: EIA Standard Board Layout of Soldered Pads for QFP Packages
Tab le A - 1 : PCB Land Pad Dimensions for Quad Flat Pack Packages
(1)
Dimension TQG144
M
M
ID
IE
19.80
19.80
e0.50
b
2
I
2
Notes:
1. Dimensions in millimeters.
0.3–0.4
1.60
Spartan-6 FPGA PCB Design and Pin Planning www.xilinx.com 69
UG393 (v1.1) April 29, 2010
Page 70

Appendix A: Recommended PCB Design Rules
Non Solder Mask Defined Land Patterns or
Land Defined Land Patterns are recommended for FG packages
e
VH
L
M
VL
D
W
Mask Opening
Outside of Land
ug393_aA_01_030210
Recommended PCB Design Rules for BGA and CSP Packages
Xilinx provides the diameter of a land pad on the component side. This information is
required prior to the start of the board layout so the board pads can be designed to match
the component-side land geometry. The typical values of these land pads are described in
Figure A-2 and summarized in Tab le A -2 .
For Spartan-6 FPGA BGA packages, non-solder mask defined (NSMD) pads on the board
are suggested to allow a clearance between the land metal (diameter L) and the solder
mask opening (diameter M) as shown in Figure A-2. The space between the NSMD pad
and the solder mask and the actual signal trace widths depends on the capability of the
PCB vendor. The cost of the PCB is higher when the line width and spaces are smaller. In
Figure A-2, the 3 x 3 matrix is for illustration only, one land pad shown with via
connection.
X-Ref Target - Figure A-2
Figure A-2: Suggested Board Layout of Soldered Pads for BGA and CSP Packages
70 www.xilinx.com Spartan-6 FPGA PCB Design and Pin Planning
UG393 (v1.1) April 29, 2010
Page 71

Recommended PCB Design Rules for BGA and CSP Packages
Tab le A - 2 : Recommended PCB Design Rules (mm) for BGA Packages
FG(G)484
Design Rule FT(G)256
FG(G)676
FG(G)900
Component land pad diameter (SMD)
(1)
0.40 0.45
Solder land (L) diameter 0.40 0.40
Opening in solder mask (M) diameter 0.50 0.50
Solder (ball) land pitch (e) 1.00 1.00
Line width between via and land (w) 0.13 0.13
Distance between via and land (D) 0.70 0.70
Via land (VL) diameter 0.61 0.61
Through hole (VH) diameter 0.300 0.300
Notes:
1. Component land pad diameter refers to the pad opening on the component side (solder mask defined).
The space between the NSMD pad and the solder mask, as well as the actual signal trace widths,
depend on the capability of the PCB vendor. PCB costs increase as the line width and spaces become
smaller.
Tab le A - 3 : Recommended PCB Design Rules (mm) for CSP Packages
CSG225
Design Rule
CSG324
CPG196
CSG484
Component land pad diameter (SMD)
(1)
0.40 0.30
Solder land (L) diameter 0.37 0.27
Opening in solder mask (M) diameter 0.47 0.35
Solder (ball) land pitch (e) 0.80 0.50
Line width between via and land (w) 0.13 0.13
Distance between via and land (D) 0.56 0.35
Via land (VL) diameter 0.51 0.27
Through hole (VH) diameter 0.25 0.15
Notes:
1. Component land pad diameter refers to the pad opening on the component side (solder mask defined).
Spartan-6 FPGA PCB Design and Pin Planning www.xilinx.com 71
UG393 (v1.1) April 29, 2010
Page 72

Appendix A: Recommended PCB Design Rules
72 www.xilinx.com Spartan-6 FPGA PCB Design and Pin Planning
UG393 (v1.1) April 29, 2010
 Loading...