


Whirlpool WTW5505VQ, WTW5300VW, WTW5200VQ, WTW5100VQ, WTW5590VQ Owner's Manual
...WASHER |
INSTRUCTIONS |
USER |
D’UTILISATION |
INSTRUCTIONS |
DE LA LAVEUSE |
Para una version de estas instrucciones en español, visite www.Whirlpool.com
Table of Contents |
|
WASHER SAFETY.......................................................... |
1 |
CONTROL PANEL AND FEATURES............................. |
3 |
WASHER USE....................................................................... |
5 |
WASHER CARE.................................................................... |
6 |
TROUBLESHOOTING.......................................................... |
7 |
WARRANTY................................................................... |
9 |
ACCESSORIES............................................................ |
19 |
ASSISTANCE OR SERVICE.............................. |
Back Cover |
Table des matières |
|
SÉCURITÉ DE LA LAVEUSE....................................... |
10 |
TABLEAU DE COMMANDE |
|
ET CARACTÉRISTIQUES............................................ |
11 |
UTILISATION DE LA LAVEUSE...................................... |
13 |
ENTRETIEN DE LA LAVEUSE........................................ |
14 |
DÉPANNAGE...................................................................... |
16 |
GARANTIE.................................................................... |
18 |
ACCESSOIRES............................................................ |
19 |
ASSISTANCE OU SERVICE................. |
Couverture arrière |
WASHER SAFETY
W10330947A |
W10331732A - SP |

2
CONTROL PANEL AND FEATURES
|
|
|
|
|
|
|
|
|
|
|
|
|
|
|
|
|
|
|
|
|
|
|
|
|
|
|
|
|
|
|
|
|
|
|
|
|
|
|
|
|
|
|
|
|
|
|
|
|
|
|
|
|
|
|
|
|
|
|
|
|
|
|
|
|
|
|
|
|
|
|
|
|
|
|
|
|
|
|
|
|
|
|
|
|
|
|
|
|
|
|
|
|
|
|
|
|
|
|
|
|
|
|
|
|
|
|
|
|
|
|
|
|
|
|
|
|
|
|
|
|
|
|
|
|
|
|
|
|
|
|
|
|
|
|
|
|
|
|
|
|
|
|
|
|
|
|
|
|
|
|
|
|
|
|
|
|
|
|
|
|
|
|
|
|
|
|
|
|
|
|
|
|
|
|
|
|
|
|
|
|
|
|
|
|
|
|
|
|
|
|
|
|
|
|
|
|
|
|
|
1 |
|
|
2 |
3 |
4 |
|
|
|
|
|
|
|
|
|
|
|
|
|
|
|
|
|
|
|
|
|
|
|
|
|
|
|
|
|
|
|
|
|
|
|
|
|
|
|
|||||
|
|
|
|
|
|
|
|
|
|
|
|
|
|
|
|
|
|
|
|
|||||
|
|
|
|
|
|
|
|
|
|
|
|
|
|
|
|
|
|
|
|
|||||
|
|
|
|
|
|
|
|
|
|
|
|
|
|
|
|
|
|
|
|
|||||
|
|
|
|
|
|
|
|
|
|
|
|
|
|
|
|
|
|
|
|
|||||
|
|
|
|
|
|
|
|
|
|
|
|
|
|
|
|
|
|
|
|
|||||
|
|
|
|
|
|
|
|
|
|
|
|
|
|
|
|
|
|
|
|
|||||
|
|
|
|
|
|
|
|
|
|
|
5 |
|
|
|
|
|
|
|
||||||
|
|
|
|
|
|
|
|
|
|
|
|
|
|
|
|
|
|
|
|
|
|
|
|
|
|
|
|
|
|
|
|
|
|
|
|
|
|
|
|
|
|
|
|
|
|
|
|
|
|
|
|
|
|
|
|
|
|
|
|
|
|
|
|
|
|
|
|
|
|
|
|
|
|
|
|
|
|
|
|
|
|
|
|
|
|
|
|
|
|
|
|
|
|
|
|
|
|
|
|
|
|
|
|
|
|
|
|
|
|
|
|
|
|
|
|
|
|
|
|
|
|
|
|
|
|
|
|
|
|
|
|
|
|
|
|
|
|
|
|
|
|
|
|
|
|
|
|
|
|
|
|
|
|
|
|
|
|
|
|
|
|
|
|
|
|
|
|
|
|
|
|
|
|
|
|
|
|
|
|
|
|
|
|
|
|
|
|
|
|
|
|
|
|
|
|
|
|
|
|
|
|
|
|
|
|
|
|
|
|
|
|
|
|
|
|
|
|
|
|
|
|
|
|
|
|
|
|
|
|
|
|
|
|
|
|
|
|
|
|
|
|
|
|
|
|
|
|
|
|
|
|
|
|
|
|
|
|
|
|
|
|
|
|
|
|
|
|
|
|
|
|
|
|
|
|
|
|
|
|
|
|
|
|
|
|
|
|
|
|
|
|
|
|
|
|
|
|
|
|
|
|
|
|
|
|
|
|
|
|
|
|
|
|
|
|
|
|
|
|
|
|
|
|
|
|
|
|
|
|
|
|
|
|
|
|
|
|
|
|
|
|
|
|
|
|
|
|
|
|
|
|
|
|
|
|
|
|
|
|
|
|
|
|
|
|
|
|
|
|
|
|
|
|
|
|
|
|
|
|
|
|
|
|
|
|
|
|
|
|
|
|
|
|
|
|
|
|
|
|
|
|
|
|
|
|
|
|
|
|
|
|
|
|
|
|
|
|
|
|
|
|
|
|
|
1 |
2 |
3 |
4 |
5 |
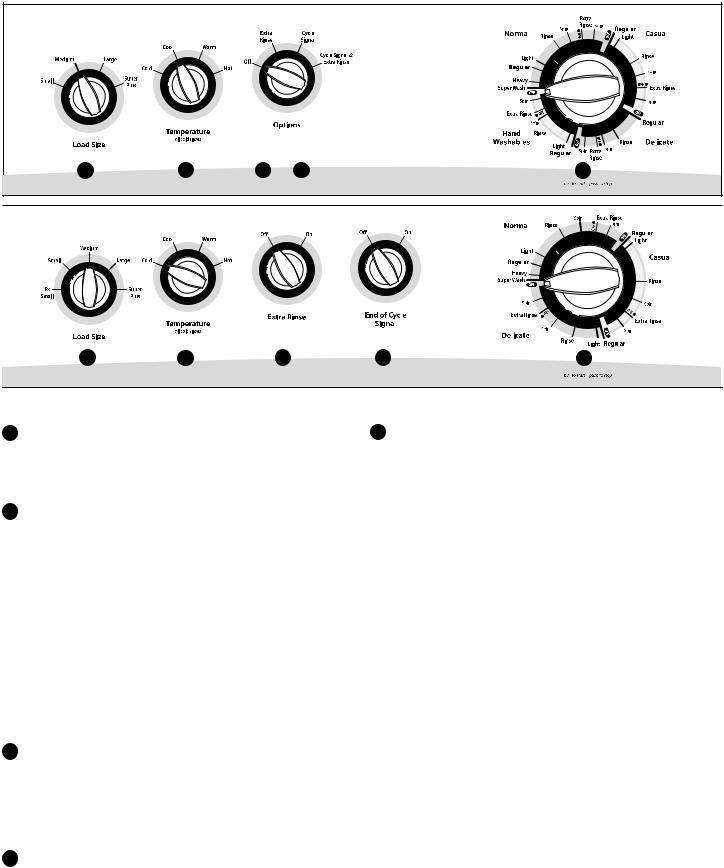
Not all features and options are available on all models.
Appearance may vary.
1Load Size Control
Use this option to adjust the amount of water used with your load size. Use enough water to allow the load to move freely.
2Temperature Control
Temperature Control senses and maintains uniform water temperatures by regulating incoming hot and cold water.
■■Warm and hot water will be cooler than what your previous washer provided.
■■Even in Cool wash, some warm water is let into washer to maintain a consistent minimum temperature.
Select a wash temperature based on the type of fabric and soils being washed. For best results, follow the garment label instructions, using the warmest wash water safe for your fabric. See “Wash Temperature” Chart.
NOTE: In wash water temperatures colder than 60° F (15.6° C), detergents do not dissolve well and soils can be difficult to remove.
3Extra Rinse
If you desire an extra rinse at the end of your regular cycle, turn the Extra Rinse knob to ON.
On models without the Extra Rinse knob, choose a second rinse by pushing the Cycle Control knob in and rotating it to any of the “Rinse” cycle settings.
4End of Cycle Signal
The End of Cycle Signal sounds when the cycle is complete.
5Cycle Control knob
Select the wash cycle best suited for your type of fabric. See “Cycle Guide” for more details.
Wash Temperature |
Suggested Fabrics |
|
|
Hot |
Whites and pastels |
Some cold water is added to |
Durable garments |
save energy. This will be cooler |
Heavy soils |
than your hot water heater setting. |
|
|
|
Warm |
Bright colors |
Some cold water will be added, |
Moderate to light soils |
so this will be cooler than what |
|
your previous washer provided. |
|
|
|
Cool - brights/darks |
Colors that bleed or fade |
Warm water is added to assist |
Light soils |
in soil removal and to help |
|
dissolve detergents. |
|
|
|
Cold |
Dark colors that bleed |
This is the temperature from |
or fade |
your faucet. |
Light soils |
|
|
3

CYCLE GUIDE
Types of Fabric |
Soil |
Spin Speed & Wash Time* |
Cycle |
Cycle Details: |
|
|
Level |
4 Speed |
2 Speed |
|
|
|
|
combinations |
combinations |
|
|
|
|
|
|
|
|
Cottons, linens, |
Heavy |
High/High |
High/High |
Normal |
Use this cycle for normally soiled cottons |
synthetic fabrics |
Regular |
12-15 |
10-14 |
|
and mixed fabric loads |
|
|
|
|
||
|
|
|
|
|
|
Sturdy fabrics, |
Super Wash |
High/High |
High/High |
Normal |
Use this cycle for heavily soiled cottons |
Colorfast items |
Heavy |
15-18 |
14-16 |
|
or sturdy fabrics. |
|
|
|
|
||
|
|
|
|
|
|
Machine wash silks, |
Regular |
Intermittent |
N/A |
Hand |
Use for special care items. Brief low-speed |
hand wash fabrics |
|
Low/Low |
|
Washables |
agitations/ spins and short soaks provide |
|
|
6 |
|
|
the gentlest cleaning while minimizing |
|
|
|
|
wrinkling. |
|
|
|
|
|
|
|
Washable knits, |
Regular |
Low/Low |
Intermittent |
Delicate |
Use for special care items. Brief agitations |
machine washable |
|
|
High/High |
|
and short soaks provide gentler cleaning. |
silks |
|
6 |
6 |
|
|
|
|
|
|
||
|
|
|
|
|
|
Work shirts and |
Regular |
High/Low |
High/High |
Casual |
Use this cycle to wash no-iron fabrics |
pants, synthetic |
Light |
6-9 |
8-10 |
|
and blends to minimize wrinkling. |
fabrics |
|
|
|
||
|
|
|
|
|
|
|
|
|
|
|
|
* Approximate time in minutes
Not all cycles are available on all models. Refer to the cycle control knob on your washer.
4
WASHER USE
STARTING YOUR WASHER
IMPORTANT: When washing any article of clothing, always follow fabric care labels and manufacturer’s directions.
1.Measure detergent and add to the bottom of the washer. If desired, add oxi or color-safe bleach products to the bottom of the washer as well.
2.Loosely add sorted load of clothes to wash basket.
■■ Load evenly to maintain washer balance.
■■ Mix large and small items.
■■ Use garment bags for smaller items.
Do not wrap large items such as sheets around the agitator. Items need to move freely for best cleaning and to reduce wrinkling and tangling.
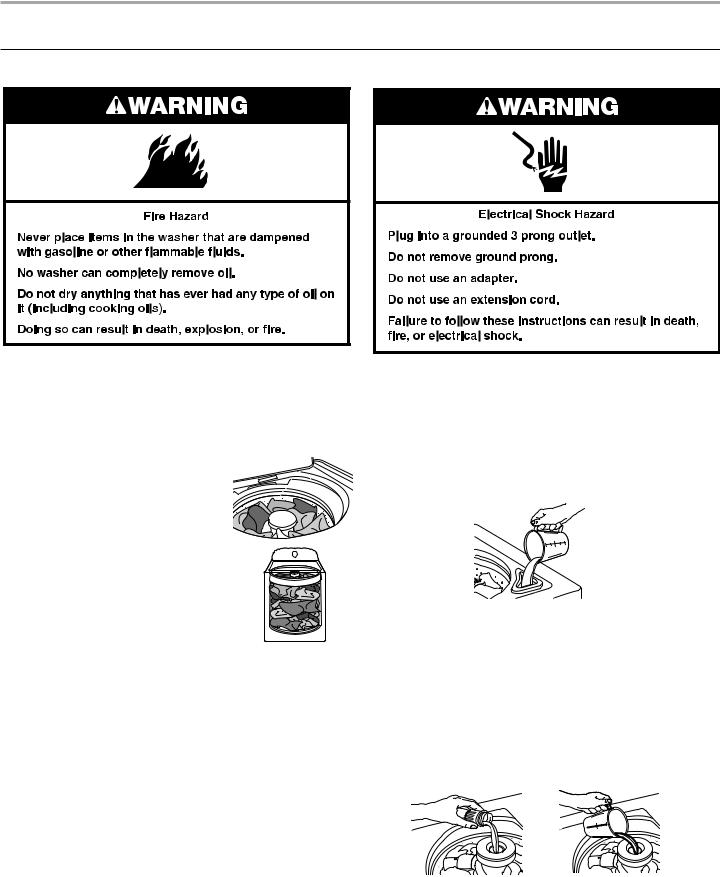
3.Add only liquid chlorine bleach to the dispenser. Bleach is immediately added into the washer and is diluted automatically during the wash cycle.
NOTE: Do not use this dispenser to add powdered chlorine or color-safe bleach to your load.
Style 1: Without liquid chlorine bleach dispenser (on some models)
■■ Let the washer fill and begin agitating the load.
■■ Add bleach 5 minutes into the wash cycle for best dispensing. Pour bleach around the agitator, not directly onto the load to avoid damaging clothing or other items in the load.
Style 2: With liquid chlorine bleach dispenser (on some models.)
■■ Using a cup with a pouring spout, measure amount of bleach. Do not allow bleach to spill, splash, drip, or run into the basket or on load. Do not use more than the recommended amount.
NOTE: Undiluted bleach will damage any fabric it touches. Damage may appear several washings later as rips, tears, holes, and color loss.
4.Add liquid fabric softener to dispenser. Fabric softener is added automatically during the final rinse cycle.
Style 1: With liquid fabric softener dispenser (on some models.)
■■ Measure recommended amount of liquid fabric softener. Do not allow liquid fabric softener to spill, splash, drip, or run into the basket or on load. Do not use more than the recommended amount.
■■ Always dilute liquid fabric softener by filling the dispenser with warm water until reaching the Max Fill Line arrows. Undiluted fabric softener can stain fabrics.
Style 2: Without liquid fabric softener dispenser (on some models.)
■■ In the final rinse only, add fabric softener that has been diluted with 1/2 to 1 cup (125 to 250 mL) warm water.
5
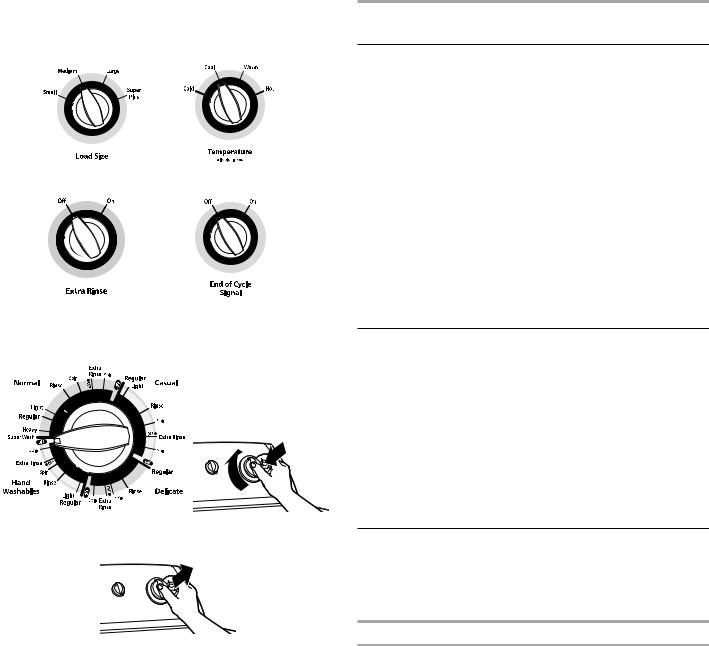
5.Close the washer lid. Washer will not operate with lid open.
6.Select Load Size and Temperature Options.
7. Select Extra Rinse Option and End of Cycle Signal, if desired.
8.Select Cycle.
Push the Cycle Control knob in and turn clockwise to the cycle you want.
9.Start the washer by pulling out the Cycle control knob.
■■ To stop at any time, push in the Cycle Control knob.
■■ To restart, close the lid and pull out the Cycle Control knob.
WASHER CARE
Cleaning Your Washer
Use a soft, damp cloth or sponge to wipe up any spills such as detergent or bleach from the outside of your washer.
Clean your washer interior by mixing 1 cup (250 mL) of chlorine bleach and enough detergent to equal twice the manufacturer’s recommended amount for a normal wash load. Pour this mixture into your washer and run it through a complete cycle using hot water. Repeat this process if necessary.
Remove any hard water deposits using only cleaners labeled as washer safe.
Cleaning the liquid fabric softener dispenser
1.Remove dispenser by grasping top with both hands and squeezing, while pushing upward with thumbs.
2.Rinse dispenser under warm water, then replace it.
NOTE: To avoid damage to the washer or clothing, do not wash clothes with the liquid fabric softener dispenser removed.
Water Inlet Hoses
This washer does not include water inlet hoses. Whirlpool Corporation recommends use of factory specified parts. See “Accessories” for a list of factory specified hoses available for separate purchase. These hoses are manufactured and tested to meet Whirlpool Corporation’s specifications.
Replace inlet hoses after 5 years of use to reduce the risk of hose failure. Periodically inspect and replace inlet hoses if bulges, kinks, cuts, wear, or leaks are found.
When replacing your inlet hoses, mark the date of replacement on the label with a permanent marker.
Moving and Storage
Because some water may stay in the hoses, freezing can damage your washer. If storing or moving your washer during freezing weather, winterize it.
Winterizing your washer
1.Shut off both water faucets. Disconnect and drain water inlet hoses. Pour 1 qt (1 L) of R.V.-type antifreeze into the basket.
2.Run washer on a drain and spin setting for about 30 seconds to mix the antifreeze and remaining water.
3.Unplug washer or disconnect power.
6
 Loading...