


WT1626N
Whirlpool WT1626N, WT1636N, WT1800N, WT1656A, WT1840N Use And Care Manual
...
Nominal Electrical Characteristics
Rated Current
6.0 A
Frequency
60 Hz
Rated Voltage
127 V ~
STM W10883319 Rev. A NP W10883319 Rev. A
Use and Care
This guide contains useful information. Please read it carefully.
This Use and Care Guide applies to the following models: WT1626N, WT1636N, WT1656A, WT1800N,
Manufactured by Industrias Acros Whirlpool S.A. de C.V.
Tel. (01-81) 83 29 21 00
Important safety instructions
!
• Connect to a grounded 3-prong plug wall outlet.
Replace all components and panels before
• This appliance has been designed for use in the
maker (in models that include the ice maker
sensory or mental capacity or with a lack of
!
Install properly
Before connecting the refrigerator
How to install the refrigerator
NOTE:
Style 1- R ollers with leveling scre ws. To raise or
Figure 1.
Style 2- Levelers. To raise or lower your
Grounding instructions
installed by a qualified electrician.
Water Storage Tank
Water Dispenser (some models)
Filling the water storage tank
How to use the water dispenser:
Cleaning the dispenser
2. Finall y, use both hands to reattach the tank to th e door, tilting it slightly upward.
How to use the refrigerator with electronic control (some models):
Temperature Control
• This is the coldest temperature (Coldest) in the
temperature.
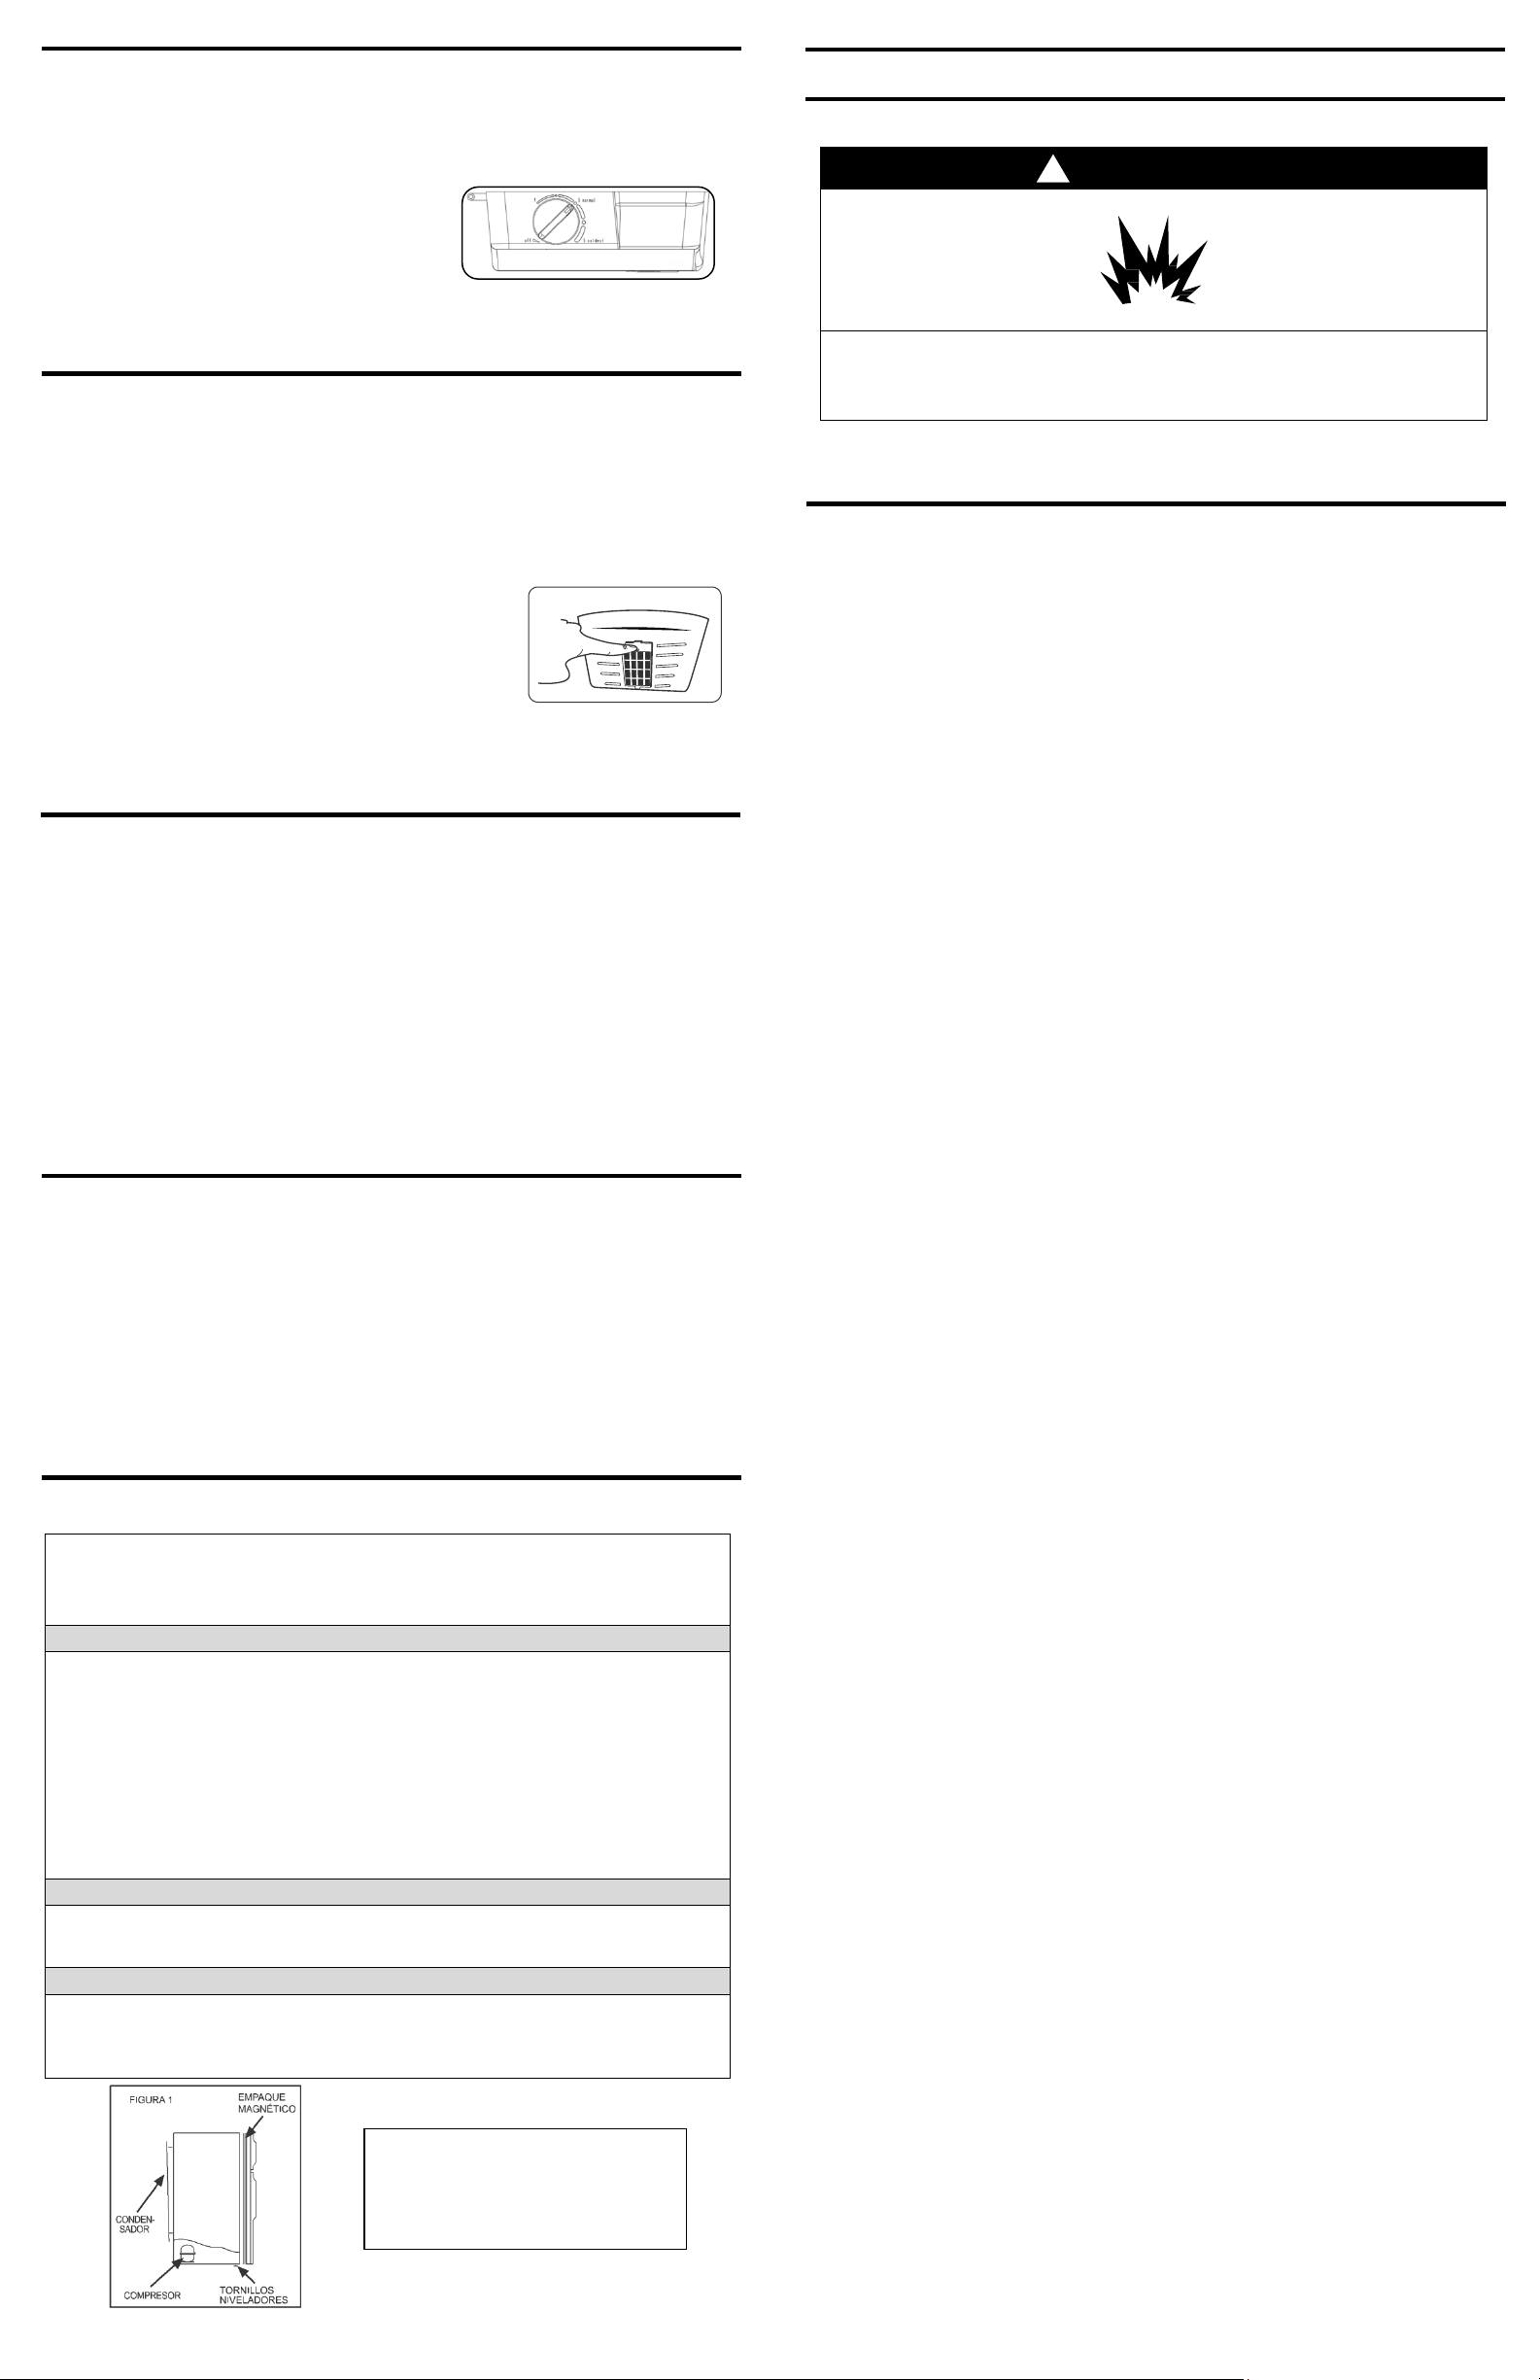
NOTE: T o switch off the refrigeration system, press the “Setting” button for 4 seconds and t hen release it.
SAVE THESE INSTRUCTIONS
Guide
To fill the water st orage tank, rotate t he small lid on t he cover and remov e it.
Then add water using a jug.
NOTE: For sa fety reasons, the small l id cannot be completel y removed from
the cover of the storage tank.
IMPORTANT: Always fill the storage tank with water when it is properly
attached to the door.
WARNING: Fill only with potable water.
WT1840N, WT1860A, WT1865A, WT1616N, WT1617A, WT1618A, WT1816A, WT1818A.
Antigua carretera a Roma Km 9
Col. Milagro
Apodaca N.L.
Mexico 66600
WARNING
• Do not remove the ground prong.
• Do not use an adapter.
• Do not use an extension cord.
• Disconnect the power supply befor e perform ing any
maintenance.
•
operating it.
• If the power cord gets damaged it should be
replaced by the manufacturer, the latter's service
agent or by qualified personnel.
• Monitor children to make su re that th ey do not play
with the appliance.
• Remove the doors of your old refrigerator.
• Use a non-inflammable cleaner.
• Keep inflammable materials and vapors, such as
petrol, well away from the refrigerator.
• Use two or more people to move and install the
refrigerator.
To reduce the risk of fire, electrical shock or injuries when using the
refrigerator, take these basic precautions:
household setting and for similar applications, such
as: kitchen areas for pers onnel in shops, offices and
other work environm ents; farms and g uests at hotels,
motels and other residential settings; premises such
as boarding hous es or hotels that provide bre akfast;
meal services and similar application s other than the
retail setting.
• Disconnect the power supply befo re installing the ice
installation kit).
• This appliance has not been designed for use by
people (including children) with impaired physical,
experience and kno wledge, unless they do so under
supervision or fol lowing the i nstructions for use of the
apparatus, overse en by a person resp onsible for thei r
safety.
• Do not keep explosive substa nces, such as aerosol s
with inflammable propellant, inside this appliance.
WARNING
-This refrigerator must be grounded.
-DO NOT alter the power cord. If it does not fit in the electrical ou tlet, have a suitable
outlet installed by a qualified electrician.
-DO NOT use an extension cord with this refrigerator.
-Consult a qualified electrician if you are not sure whether the refrigerator is duly
grounded.
-Failure to take the precautions listed above may result in serious injury or death.
• Keep the refrigerat or a way fr om the eff ec ts of weather.
• Only connect the refrigerator to an appropriate grounded outlet with the correct power supply.
• Do not store food in the refrigerator before it has cooled appropriately.
• Use the refrigerator only as specified in this guide.
• Make sure the refrigerator is not operated by people without the skills to do so as instructed.
Electric Shock Hazard
1. Press a sturdy glass or pitcher against the center of the dispenser paddle.
2. Once the neces sary wat er is o btain ed, stop p ressin g agains t the p addle, b ut do not
remove the glass or pitcher until the water completely stops running.
IMPORTANT: Always hold the glass (or container) in your hand when dispensing
water. Do not try to leave a glass unattend ed i n the dispenser well.
NOTE: The water may taste strange if the dispenser is not used periodically.
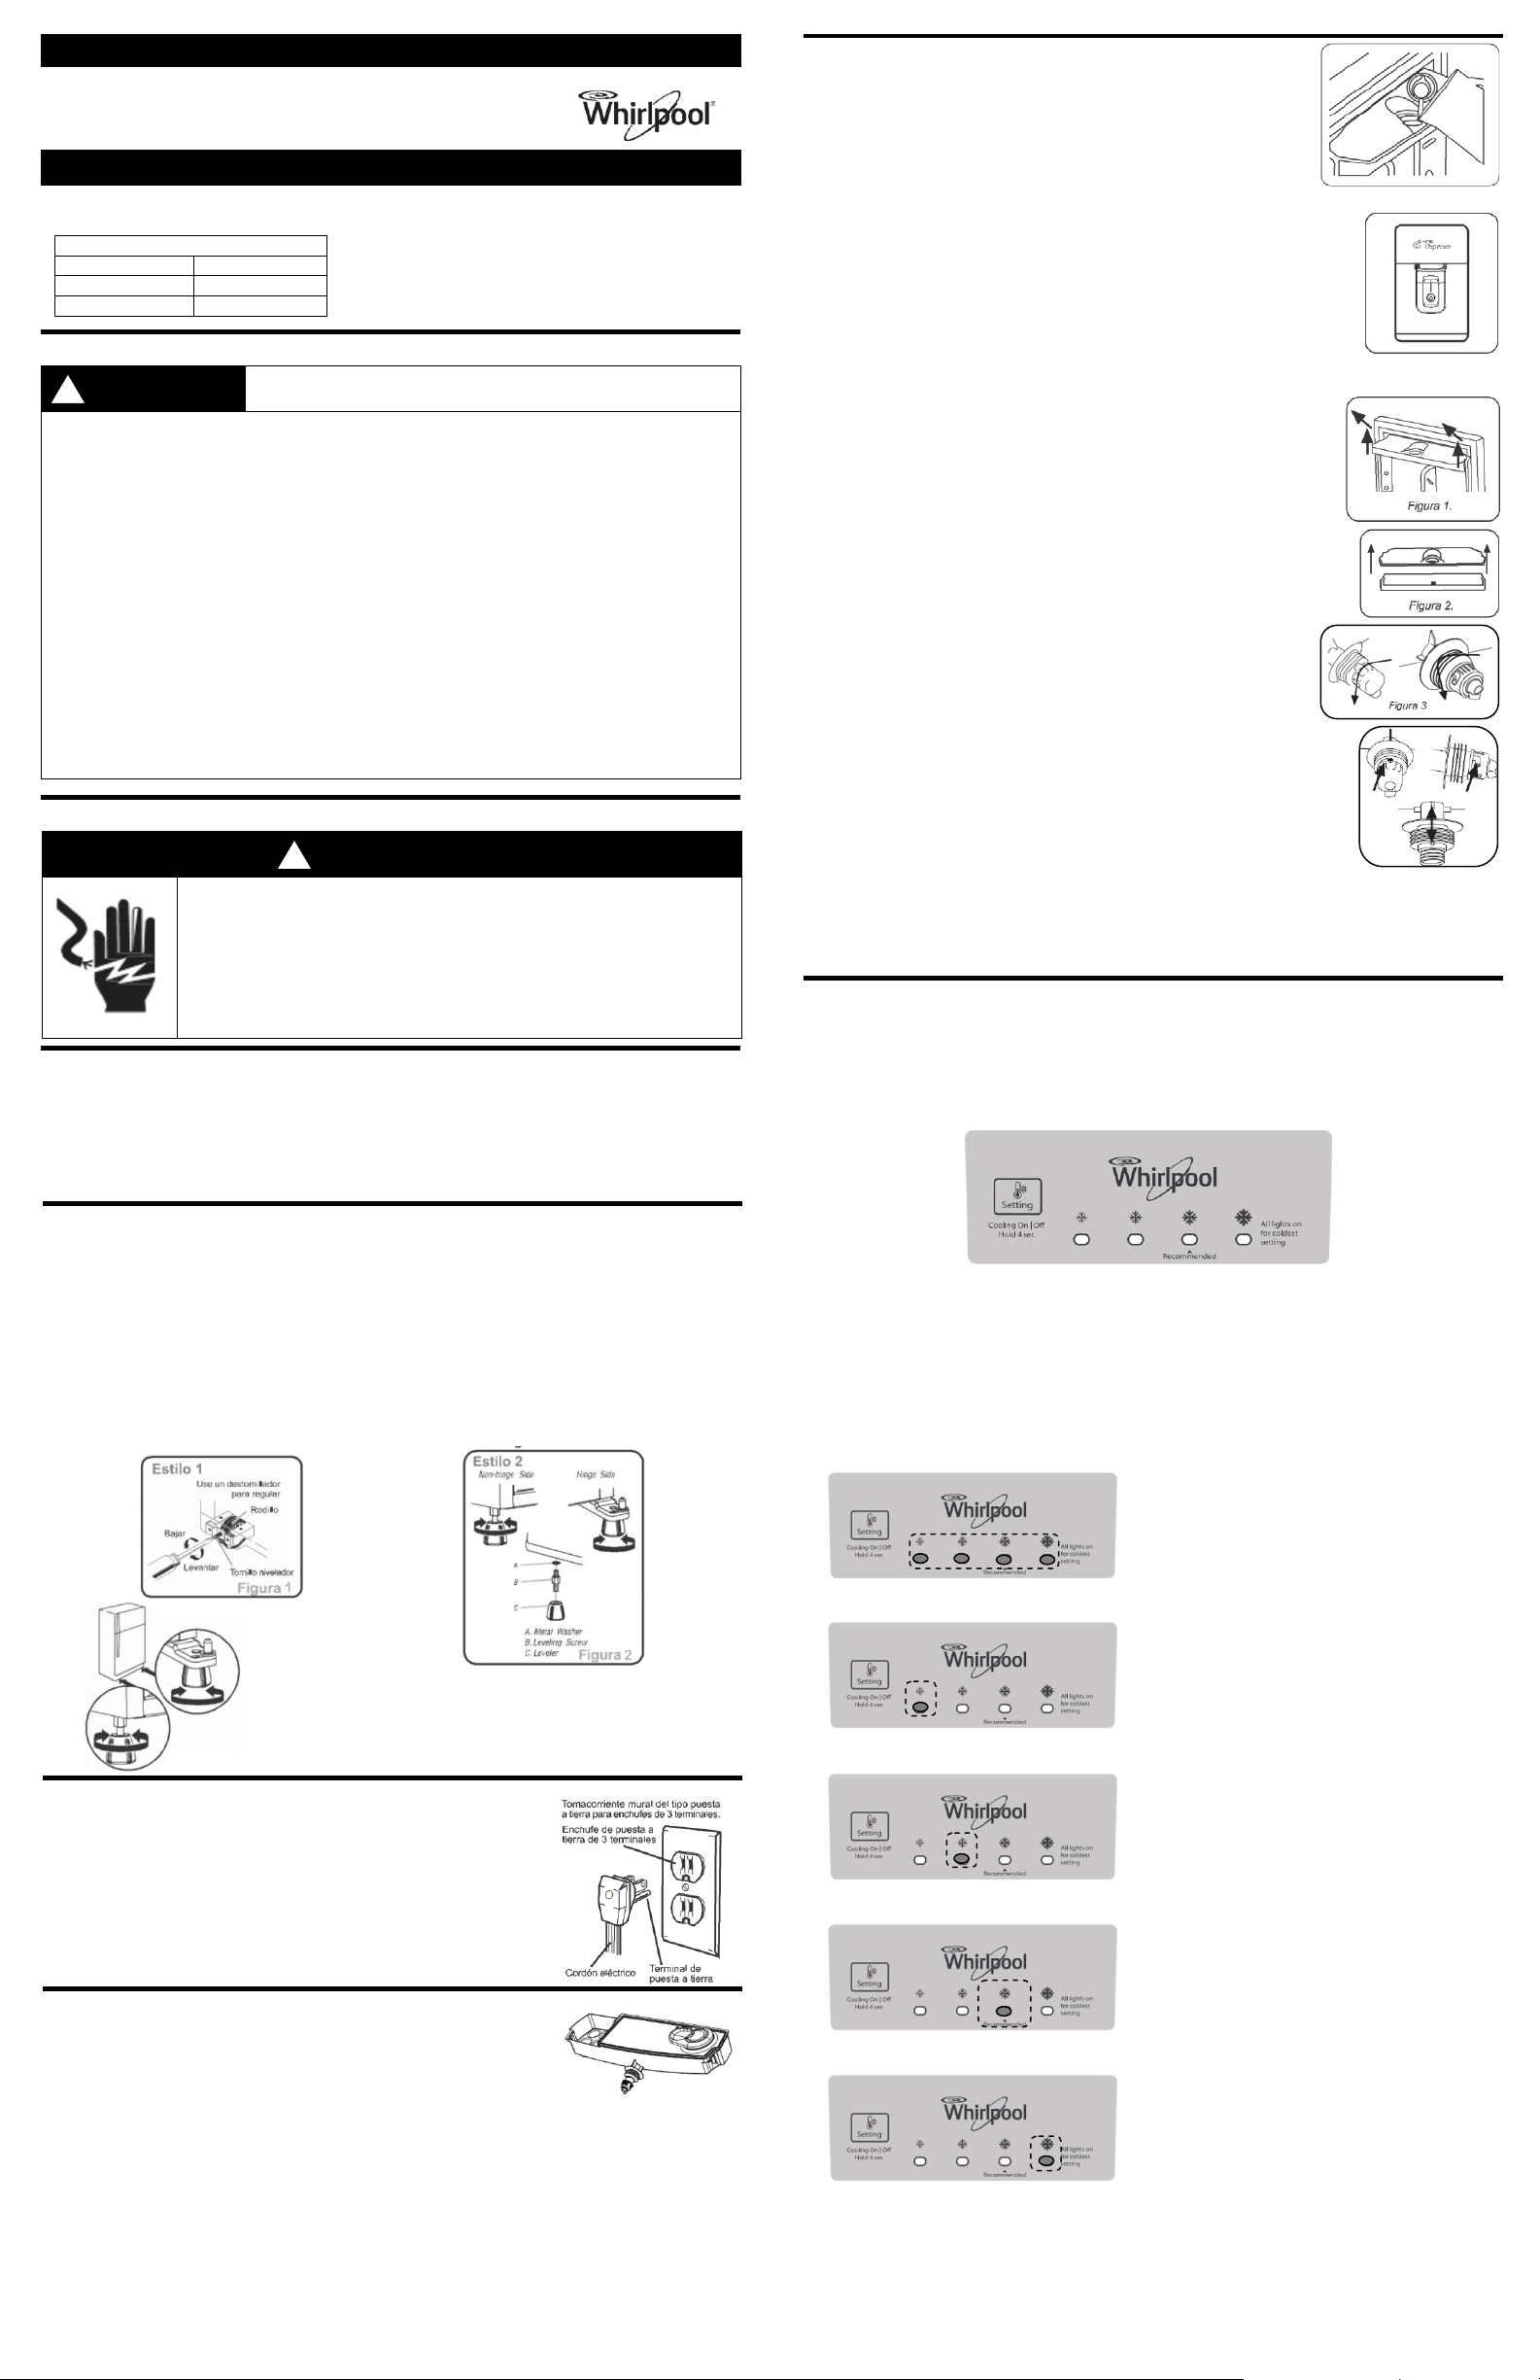
1. With both hands, grasp the water storage tank and tilt it slightly backwards.
Then pull upwards until the tank completely disengages from the refrigerator door
(See Figure 1).
2. Place the tank on a flat surface and remove the cover by pulling upwards
(See Figure 2).
3. Release the valve by rotating it counter-clockwise (see Figure 3) and clean it
carefully.
NOTE: Your refrigerator may have either one of the 2 types of valves illustrated
here.
4. Use a damp sponge or soft cloth with a neutral soap or detergent. Rinse
thoroughly and mak e sure no soap r es idu e is left be hi n d. Fin al l y, dr y with a clean,
soft cloth.
NOTE: Do not use coarse fibers to clean the water storage tank, as this can
damage the finish.
IMPORTANT: Before reattaching the storage tank to the door, make sure that:
•The valve has been properl y att ach ed. Make sure the valve stop is making
contact with the stop located on the storage tank.
•The isolation ring is properly placed on the tank, as shown in the following
figure.
To reattach the storage tank to the refrigerator door:
1. Attach t he val ve t o the tank b y rotati ng i t cloc kwis e, ins ert the t ank cov er lid s tra p,
and reposition the cover.
Secure it to the si de brackets on t he inside of the do or and push down unti l it fits
firmly in place.
NOTE: Make sur e the storage ta nk has been correctly secu red to the do or, and that
there is no chance it will fall.
Your refrigerato r h as a hi g h-t ech , e asy-to-use electronic control feature loc ated on the inside of the refrigera tor
compartment.
The first time you plug in the refrigerator:
The first time you plug in your refrigerator, all of the electronic control indicators will flash simultaneously.
Follow these steps before connecting the new refrigerator:
1. Remove the attachments from the packaging, including the interior accessories.
2. Place the refrigerator as recommended below:
• Leave at least 7.5 cm (3") of space between the top of the refrigerator and the cabinets.
• Leave at least 5 cm (2") of space between the condenser on the back of the refrigerator and the wall.
• Leave 1.25 cm (½") of space on each side of the appliance to facilitate installation.
• If the refrigerator is to be placed against a side wall, leave additi on al spac e to allo w the do or to op en wi de r.
3. Level the refrigerator, depending on the model, as follows:
lower your refrigerator, follow the instructions in
• For greater acc uracy, check with a carpenter's l evel placed on top of
the refrigerator. If it does not move when the door is opened and
Grounding method
Your refrigerator is equipped wi th an electrical cord with a grounded 3-prong
plug. To minimize th e risk of el ectrical shock, the co rd must be c onnected t o a
3-prong wall outlet gr ounded in accordance with t he National Electrical Co de
and all local codes and regulations. If no such outlet is available, it is the
customer's respo nsibilit y and obli gation to have a duly gro unded 3 -prong outlet
Your new refrigerator has an innovative water dispenser on the door to keep
chilled water available and decrease the number of times you open the
refrigerator door, which helps reduce the product's power consumption.
The water storage tank is filled manuall y, and is located on the insi de of the refrigerator com partment door.
It has a maximum capacity of 3.5 liters of water.
IMPORTANT:
• Clean the syst em b efore using i t f or th e firs t time . To do s o, fill th e stor age t ank with c lea n wat er and p ress
the water dispens er paddle with a la rge glass or pitcher until you have removed at least a liter of water.
Discard that water. This process will help clean the system and flush air from the dispenser valve.
• Once the system is clean, wait until the water chills before using the dispenser again.
• The dispenser sho uld be used onl y with liquids. Dri nks such as milk , juices with pul p and seeds may cl og
the valve and cause the dispenser to malfunction.
• The manufacture r is not responsible for damag es to the dispenser an d its dispensing s ys tem c aused by the
use of liquids other than liquids without pulp.
NOTES:
- After 2 hours, carbonated drinks can lose their fizz.
- Wash the tank before filling it with another beverage (see Cleaning the Dispenser).
closed, the refrigerator is leveled.
• We recommend t hat it lean backwards slightl y so that the door will
tend to swing closed.
refrigerator, follow the instructions in Figure 2.
Your refrigerator is equipped with a smart temperature control. You can use it to set the refrigerator
compartment temper atu re as ne ede d.
To set the refrigerator com partment temperature:
The product is set to t he recommende d temperature at the factory. To adjust that temperature, si mply press
the “Setting” button. This will de crease the ref rigerat or tem perature . The s etting change is unidi rection al, from
Cold to Coldest (left t o right). Once t he control is i n the Coldest posi tion, it will mov e to the least c old setting
(Cold) if pressed ag ain.
product. All the indicators will be on.
• The least cold temperature setting will be shown with
the first indicator (left to right) on.
• The median minimum temperature will be displayed
when you press the “Setting” button once from the
least cold temperature. The second indicator will be
on.
• The "recommended" tem perature will be shown with
the third indicator on.
• The fourth indicator will come on when you press the
“Setting” button once from the recommended
No indicator will remain on. This will lead the refrige rator and free zer to stop coolin g, but the elect ricity is not
disconnected.
To switch the refrigeration system back on, press the “Setting” button for 4 seconds and then release it.
How to use the refrigerator with mechanical control (some models)
When connecting it for the first time:
Anti-Bacterial® air filter (some models)
To replace the Anti-Bacterial® filter :
To replace the refrigerator/f reezer bulb
Sounds you may hear
Before calling a technician
CORRECTLY AND HAVE QUESTIONS ABOUT THE REFRIGERATOR'S OPERATION, THIS GUIDE
IF THE REFRIGERATOR DOES NOT WORK
TAKING CARE OF THE REFRIGERATOR
!
Cleaning
Both the refrigerator and the freezer section defrost automatically. Nevertheless, clean both sections more or
Cleaning the outside
USE
DO NOT USE
USE
DO NOT USE
NOTE: Paper towels may dark en the s ee-through fi nish of t he painted door. T o avoid p ossible dam age, use
Adjusting the temperat ur e co ntr ol
The temperature control is located inside the refrigerator compartment.
• Set the temperatu re control to 3 (normal). The control goes
from 1 “Min” (least cold) to 5 “Max” (coldest).
• When the control is set to “Off”, the refrigerator and f reezer
stop cooling, but the electric it y is not disconnected.
• Give the refrigerator time to cool completely before putting
food in it. It may tak e sev eral hours for the refrige rator to cool.
Adjust the temperature control to keep the food as cold as
desired. The settin gs suggested above are correc t for normal
home use.
WARNING
Your refrigerato r has an Anti-Bacterial® air filter that h elps mai ntain a clea ner interi or envi ronment by slo wing
the growth of bacteria present in meats and vegetables.
Remember that the Anti-Bacterial® filter must be replaced every 6 months. After that time, it loses its
antimicrobial p roperties. W e recommend t hat you call the service d epartment for informatio n on replac ement
filters and how to install them.
1. Locate the Anti-Bacterial® filter inside the refrigerator, in the ventilation
grille on the insi de wal l, j ust ab ov e the cris p er dr a wer cov er .
2. Press wi th you r inde x finge r and c ar eful ly pull on the upper tab of the
filter cartridge until it disengages (see illustration).
3. Insert the new filter in the same place, making sure that it enters
perfectly. Push softly until it snaps into place and you hear a click.
1. Unplug the refrigerator.
2. Remove the light cover.
3. Remove the plastic cover (snap in).
4. Remove the bulb located behind the panel.
5. Replace it with a number W10574850 (3.6 W) LED bulb or a 25 W bulb for household appliances. Order it
from our service department or your nearest appliance parts supplier.
NOTE: Some replacement LED bulbs are not recommended for damp/wet environments. The refrigerator and
freezer compartments are regarded as damp/wet environments. If you use a LED bulb brand other than
Whirlpool-recommended bulbs, read and follow the instructions on the LED's packaging before installing it.
6. Reattach the cover.
7. Plug in the refrigerator.
NOTE: Not all bulbs are suitable. Be sure to replace it with another bulb of the same size, shape and electrical
characteristics.
Your new refrigerator may make sounds, and most of them are normal. However, hard surfaces such as the
floor, the kitchen walls, and the refrigerator can make them louder.
Soft murmuring or whistling
This might be the fan and blowing air.
Clicking or rattling
The thermostat makes a well-define d clicking sound when the refrigerator stops, and also when it starts
operating again. The freezer control clock makes the same sound when the defrost cycle begins.
Water sounds
After the refrige rat or s to ps, yo u m ight hear a drippin g noise in the pipe fo r a few minutes. Yo u m ight also hear
water running to the water collection tray, and a peculiar sizzling sound during the defrost cycles.
Use a non-inflammable cleaner.
Failure to follow this instruction may lead to death, explosion or a fire.
less once a month in order to prevent the accumulation of odors. Clean any spillages immediately.
Refer to the information related to the cleaning of the outside of your specific model.
Style - Color or Stainless Steel smooth finish door
IMPORTANT: The warr anty does not cover dama ge to the smooth finish caus ed by undue use of cleanin g
products or non-recommended cleaning products. Sharp or blunt utensils damage the finish.
✔ Soft and clean cloth
✔ Luke warm soapy water / Use a mild detergent
only soft and clean cloths to polish and clean the door.
Avoid exposing stai nles s steel appliances to causti c or c orr osi v e el em e nts such as high concentrati ons o f sal t ,
high humidity or damp environments. Use only recommended cleaners and cloths for stainless steel.
Explosion haz ar d
✘ Coarse cloths
✘ Paper towels or newspa per
✘ Steel wool scouring pads
✘ Abrasive powders or liquids
✘ Window-cleaning sprays
✘ Chlorine
✘ Ammonia
✘ (Citric) acid- or vinegar-based cleaners
✘ Oven cleaners
✘ Non-flammable liquids
NOTES:
■ In the event of unintentional contact, clean the plastic part with a sponge and a mild detergent in lukewarm
water. Dry thoroughly with a soft cloth.
■ The fact that a cleaning product is liquid does not mean that it is not abrasive. Several liquid cleaners
formulated to be mild on tiles and smooth surfaces can still damage stainless steel.
■ Citric acid causes stainless steel to fade permanently. To prevent damage to your refrigerator's stainless
steel finish.
Remove the following substances immediately from the finish:
✘ Mustard
✘ Citric-based sauce
✘ Tomato juice
✘ Citric-based products
✘ Sauce for marinating
IT IS THE USER'S RESPONSIBILITY TO VERIFY THE FOLLOWING INFORMATION BEFORE CALLING A
TECHNICIAN. IF YOU FOLLOWED THE INSTRUCTIONS IN THE INSTALLATION, USE AND CARE GUIDE
OFFERS SOLUTIONS TO PROBLEMS YOU CAN DETECT AND CORRECT AT HOME.
IF THE REFRIGERATOR DOES NOT WORK
•Plug it in directly and properly, WITHOUT USING EXTENSION CORDS.
•Check the ELEC TRICAL CONTACT, W HICH COULD BE DAMAGED. Plug i n another appliance to test
whether it works.
•Avoid operating several appliances at the same time, AS THE ELECTRICAL INSTALLATION MAY
BECOME OVERLOADED.
•Make sure the refrigerator IS NOT CLOSE TO A HEAT SOURCE SUCH as an oven, stove or direct
sunlight.
•THE DOORS SHOULD CLOSE HERMETICALLY. Check the magnetic lining on the doors.
•LEVEL THE REFRIGERATOR. Remove the wooden bases and adjust the leveling screws (FIGURE 1).
•DO NOT OVERLOAD THE REFRIGERATOR, as the cold air circulation might be insufficient.
•Set the TEMPERATURE CONTROL KNOB TO NOR MAL (medium cold) and wait for at least 24 hours
before changing the temperature again.
IF YOU NOTICE THAT THE REFRIGERATOR WORKS FOR LONG PERIO DS OF TIME
•Check that the CONDENSER IS FREE OF DUST AND LINT (FIGURE 1).
•AVOID OPENING THE DOOR CONTINUOUSLY or for long periods of time.
•DO NOT PUT HOT FOOD INTO THE REFRIGERATOR, and keep food covered.
•Check WHETHER THERE ARE OBJECTS ON OR BEHIND THE REFRIGERATOR.
•IF THE COMPRESS OR IS NOT WORKING C ORRECTL Y, the volt age may be l ow. Check the inte nsity of
the light. If it is low, that indicates low voltage. Ask your power company to correct the power supply
(FIGURE 1).
VERY IMPORTANT:
IF YOU HEAR STRANGE SOUNDS
AFTER YOU HAVE FOLLOWED ALL THE
INSTRUCTIONS IN THIS GUIDE, CONTACT
OUR NATIONAL CALL CENTRE.
Tel. (01-81) 83 29 21 00
www.Whirlpool.com.mx/Servicio
 Loading...