


WRIBT24WA
Whirlpool WRIBT24WA, WRIBT26WA, WRIBT29WB, WRIBT34MB, WRIBT36WB Owner's Instructions Manual
...
OWNER’S INSTRUCTIONS
WHIRLPOOL TOP MOUNT REFRIGERATOR 200-299L/300-399L/400-499L
Before operating the unit, please read this manual
thoroughly and retain for future reference
THE
BUTLER
SERIES
I
C
E
M
A
T
E
T
H
A
W
Z
O
N
E
W
A
I
T
E
R
G
O
F
L
A
T
S
T
A
C
K
D
R
I
N
K
S
P
L
U
S
Z
O
N
E
W10550471_Whirlpool_Manual Butler.indd iW10550471_Whirlpool_Manual Butler.indd i 04/11/12 3:38 PM04/11/12 3:38 PM

CONTENTS
THE BUTLER PROFESSIONAL SERIES – OWNER’S INSTRUCTIONS
1. The Butler Professional Series
3. Installation
5. Operating
7. Maintenance
10. Storage Tips
12. Troubleshooting
13. FAQS
15. Technical Specifi cations
17. Ice Mate
18. Thaw Zone
19. Waiter Go
21. Flat Stack
22. Drinks Plus Zone
24. More Innovations
W10550471_Whirlpool_Manual Butler.indd iiW10550471_Whirlpool_Manual Butler.indd ii 04/11/12 4:47 PM04/11/12 4:47 PM

WHIRLPOOL REFRIGERATOR 200-299/300-399L/400-499L – THE BUTLER SERIES
1
Dear Homemaker,
Congratulations on bringing home your new Whirlpool
®
appliance!
I would like to welcome you to a very special family of Whirlpool
®
homemakers from around the world, who believe that happiness begins
at home and that their families deserve nothing but the best.
With its 100 years of expertise, Whirlpool
®
brings to consumers, across
the globe, products that are designed to meet their speci c needs.
Whirlpool
®
makes life easier for homemakers, helping them to create happier
homes. For Whirlpool
®
, this is more than just a task as everything we do
enables us in building lifelong relationships with our consumers. In our
centenary year, we pledge to create many more happy homes by delivering
products of outstanding performance, design, quality and sustainability.
Do go through this easy-to-read guide and follow the instructions to
get the best out of your appliance. If you have any further queries
simply call the Whirlpool
®
After Sales Service number. We wish you
many years of happiness and look forward to a lasting relationship.
Yours sincerely,
Whirlpool
®
Oceania
THE BUTLER SERIES
W10550471_Whirlpool_Manual Butler.indd 1W10550471_Whirlpool_Manual Butler.indd 1 04/11/12 4:47 PM04/11/12 4:47 PM
Suffocation Hazard
Remove doors from your old refrigerator.
Failure to do so can result in death
or brain damage.
SAFETY PRECAUTIONS
THE BUTLER SERIES – OWNER’S INSTRUCTIONS
2
Your safety and the safety of others is very important
We have provided many important safety messages in this manual and
on your appliance. Always read and obey all safety messages.
This is the safety alert symbol.
This symbol alerts you to hazards that can hurt you and others.
All safety messages will be preceded by the safety alert
symbol and the word “DANGER” or “WARNING”
These words mean:
DANGER – You will be seriously injured if you don’t follow instructions.
WARNING – You can be seriously injured if you don’t follow instructions.
All safety messages will identify the hazard, tell you how to reduce the chance
of injury and what can happen if the instructions are not followed.
Proper disposal of your Old Refrigerator is Important
Child entrapment or suffocation are not the problems of the past. Abandoned
refrigerators are dangerous even if they are left unattended
for a few days. If you are getting rid of your old refrigerator, please
follow these instructions to prevent accidents.
Before you throw away your old refrigerator or freezer
Ô
Take out the doors
Ô
Leave the shelves in place so that children don’t climb inside easily
W10550471_Whirlpool_Manual Butler.indd 2W10550471_Whirlpool_Manual Butler.indd 2 04/11/12 4:47 PM04/11/12 4:47 PM
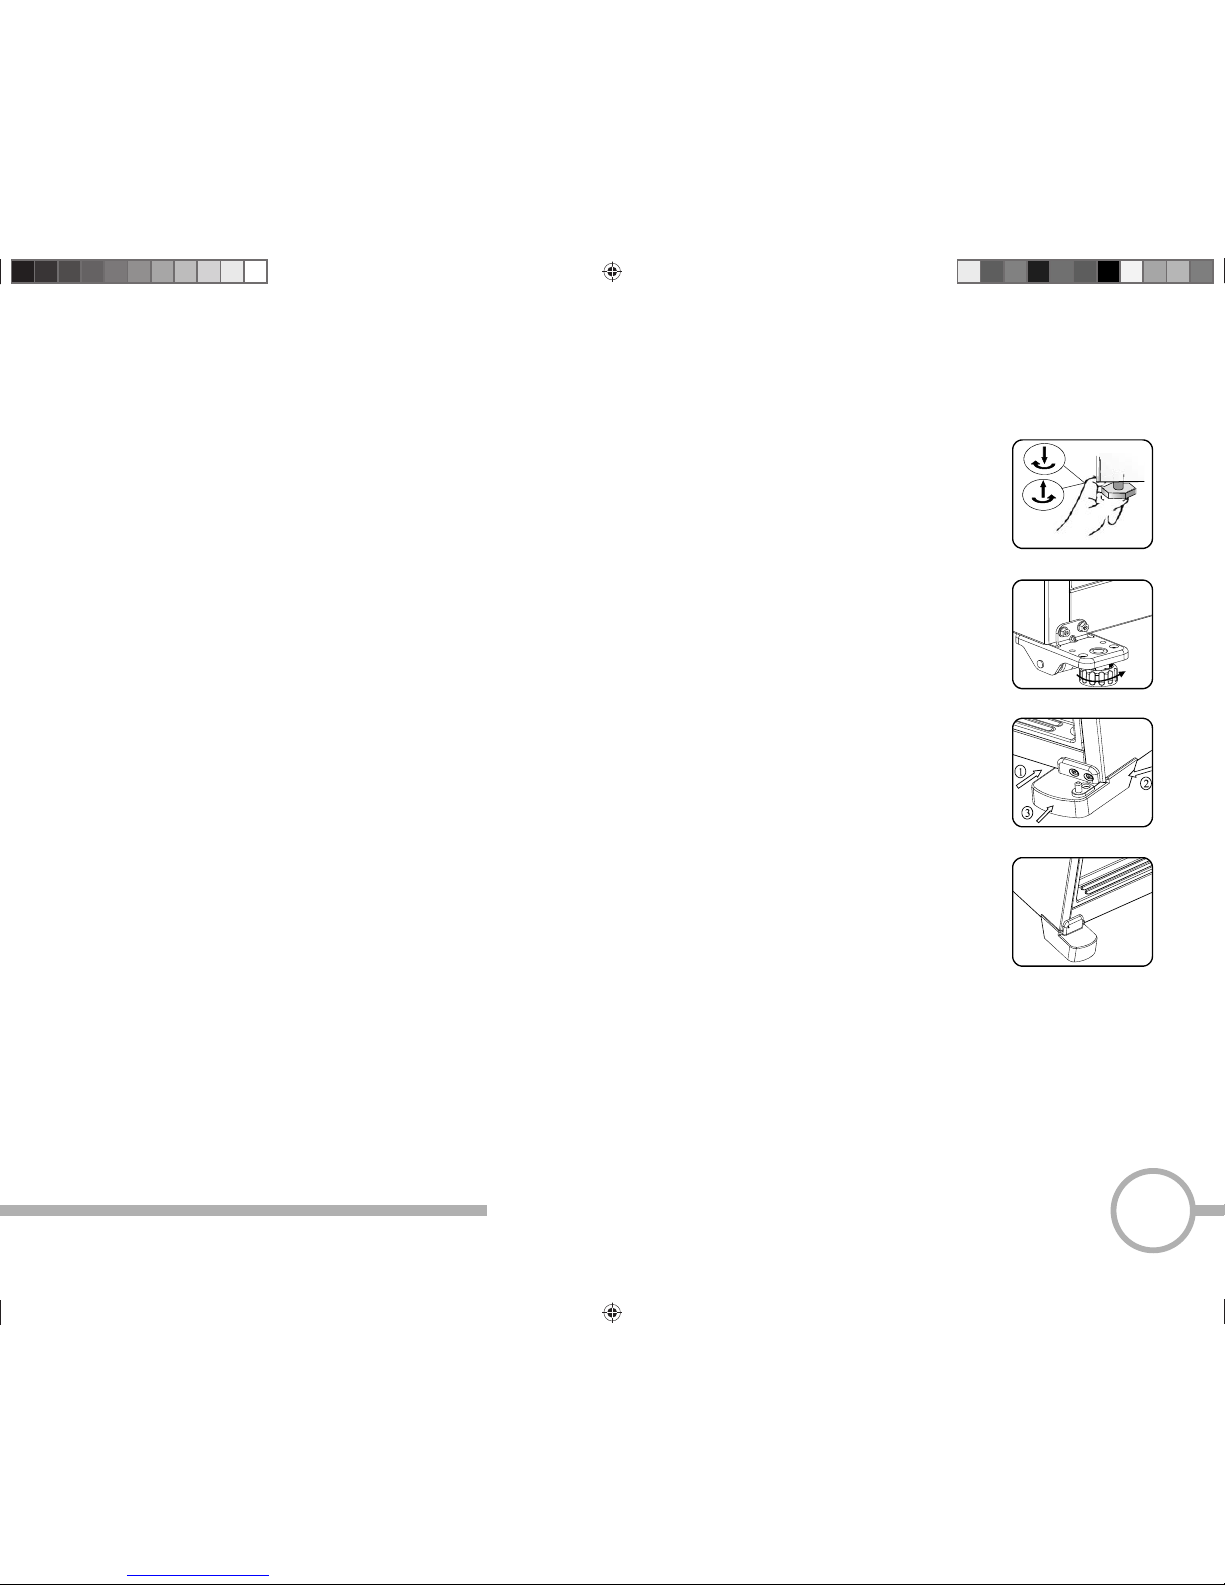
Fig. 1aFig. 1a
Fig. 1
Fig. 3
WHIRLPOOL REFRIGERATOR 200-299/300-399L/400-499L – INSTALLATION
3
INSTALLATION
Steps for installation of The Butler Series (Alfred & Niles ranges):
Step 1: Remove the outer carton. Inspect the refrigerator to make sure
it has arrived safely at your home. In case you nd any transit damage to
your refrigerator, report to your dealer within 24 hours of delivery.
Step 2: After you unpack the refrigerator, select a well-ventilated spot
close to an electrical point. Allow suf cient clearance for dispersion of heat,
preferably 6 inches (150 mm) at the back, on the sides and top.
Step 3: You can shift the refrigerator by raising the front slightly and sliding it on the rear castors.
Step 4: Rotate the two front levellers, provided below your refrigerator, clockwise
to raise the front and anticlockwise to lower it (refer g.1a). The front should
be slightly above the rear so that the door shuts gently when left open.
Things to keep in mind:
Ô
Keep the refrigerator away from direct sunlight and other high
temperature sources like oven and cooking range
Ô
Avoid damp, exposed locations
Ô
Avoid carpeted areas. A stable installation minimizes noise and prevents tilting
Ô
This appliance is not intended for use by person (including children)
with reduced physical, memory or metal capabilities lack of experience
& knowledge unless they have been given supervision or introduction
concerning use of appliance by a person responsible for the safety
Ô
Children should be supervised to insure that they so not play with the appliance
Ô
This appliance is not designed for use in vehicles or on board ships
or aircraft, additional requirements may be necessary
Ô
If the supply cord is damaged, it must be replaced by the manufacturer, its
service agent or similarly quali ed person in order to avoid a hazard
W10550471_Whirlpool_Manual Butler.indd 3W10550471_Whirlpool_Manual Butler.indd 3 04/11/12 4:47 PM04/11/12 4:47 PM
Electric Shock Hazard
Do not remove ground prong.
Do not use an adapter.
Do not use an extension cord.
Failure to follow these instructions can
INSTALLATION
THE BUTLER SERIES – OWNER’S INSTRUCTIONS
4
Getting Connected
Plug the cord of the refrigerator into a 3 prong grounded outlet.
Adjust the cooling settings (refer pages 4 & 5 for instructions).
Ensure that the electrical point is properly earthed. Avoid extension cords.
Run refrigerator for 2-3 hours so that it is cooled suf ciently before keeping food inside.
Note : It is advisable to get your refrigerator installed by an authorised Whirlpool® Servic e Representative
W10550471_Whirlpool_Manual Butler.indd 4W10550471_Whirlpool_Manual Butler.indd 4 04/11/12 4:47 PM04/11/12 4:47 PM
WHIRLPOOL REFRIGERATOR 200-299/300-399L/400-499L – OPERATING
5
OPERATING
For models without electronic user interface
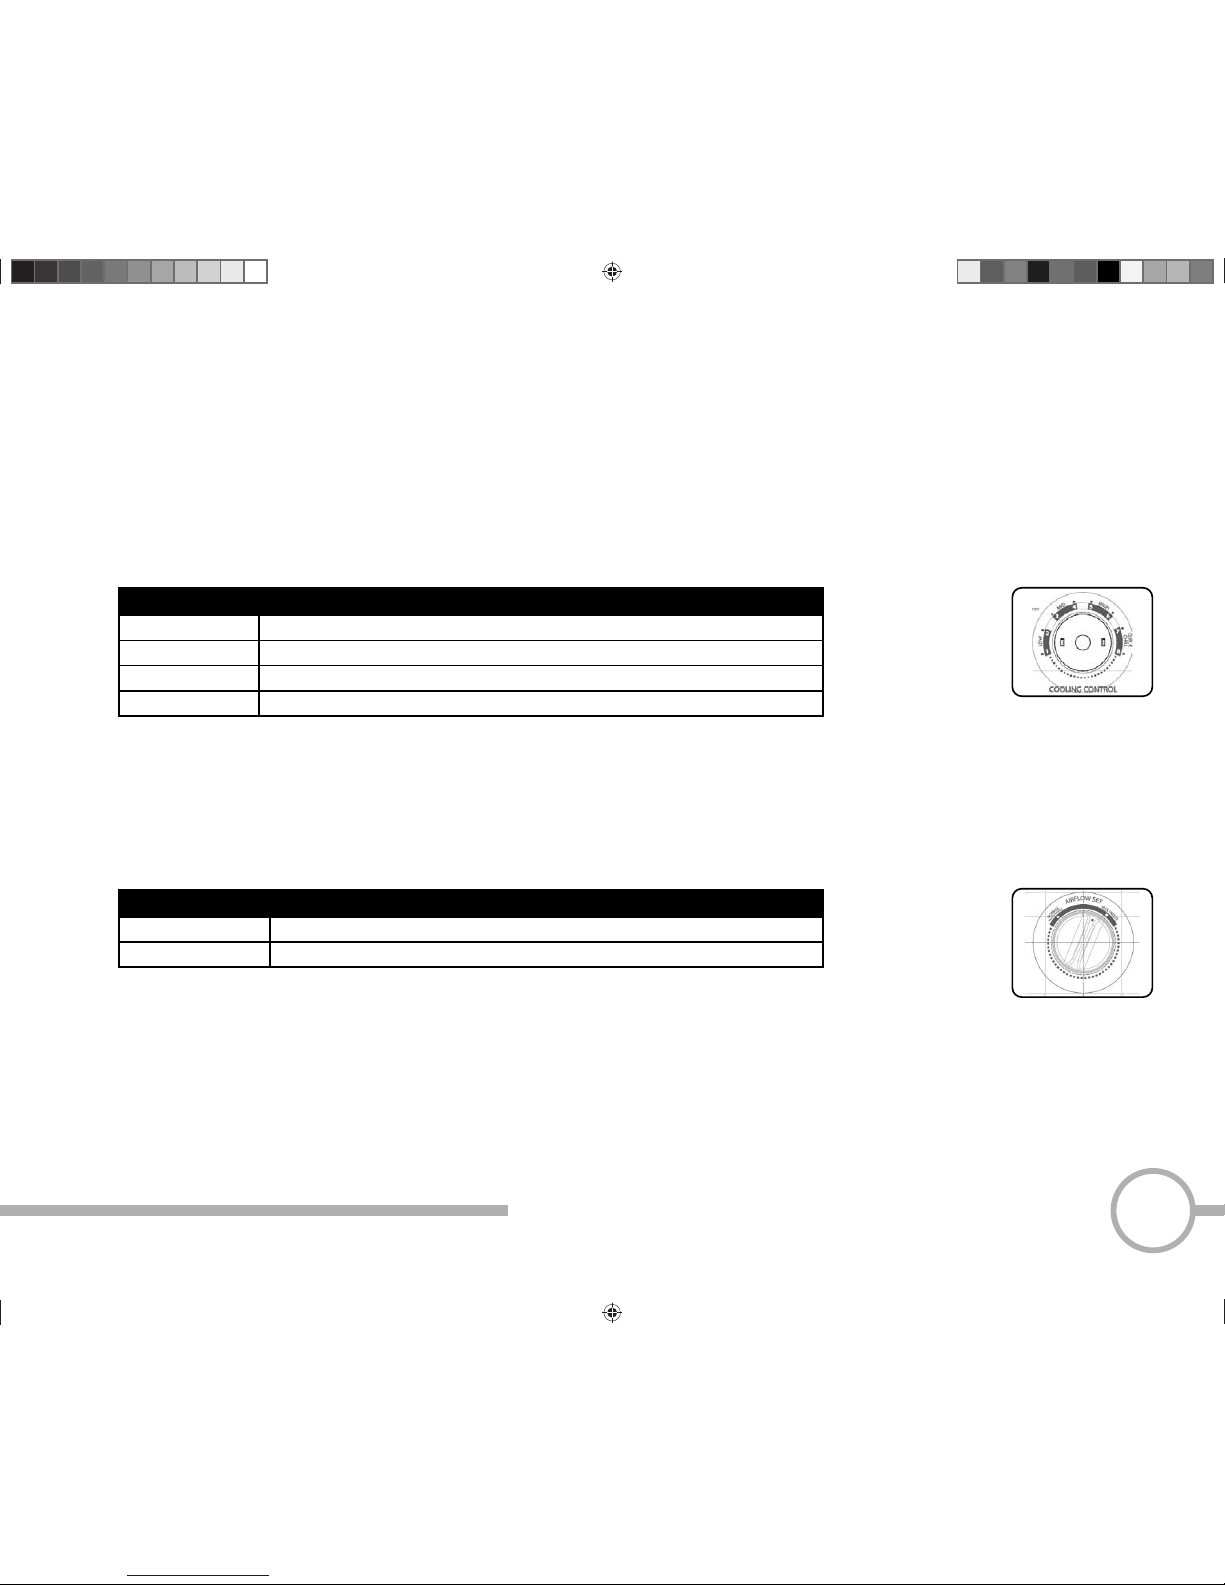
Temperature Control
To control the temperature of your refrigerator, turn the knob according to your requirement.
This control is provided inside the refrigerator section. Turn knob to the left to reduce
the cooling and to the right to increase the cooling. It is preset to the middle position.
POSITION USAGE CONDITION
Low (1-2) During winter conditions or when there is not much food stored in the refrigerator.
Mid (3-4) This is the default & recommended setting. Can be used in normal usage.
High (5-6) During summers or when there is a lot of food stored in the refrigerator.
Quick Chill* (7-8) During extreme summers or when you want faster cooling.
*Quick chill mode setting to be monitored af ter every 12 hours to avoid freezing of food, drinks ,bottle cracking, etc.
Air Flow Control
The Air Flow Control in the freezer controls the distribution of cold air between the
refrigerator compartment and freezer compartment. Turn knob to the left for ‘Normal
Ice’ and to the right for ‘Fast Ice’ setting. It is preset to the middle position as shown
in the picture for uniform cooling in freezer and refrigerator compartments.
KNOB POSITIONS USAGE CONDITION
Normal For normal ice in freezer and strong cooling in your refrigerator compartment.
Max Freeze For quick ice in your freezer compartment
For even cooling in both the refrigerator compartment and freezer
compartment, set the air ow knob in mid position.
W10550471_Whirlpool_Manual Butler.indd 5W10550471_Whirlpool_Manual Butler.indd 5 04/11/12 4:47 PM04/11/12 4:47 PM
THE BUTLER SERIES – OWNER’S INSTRUCTIONS
6
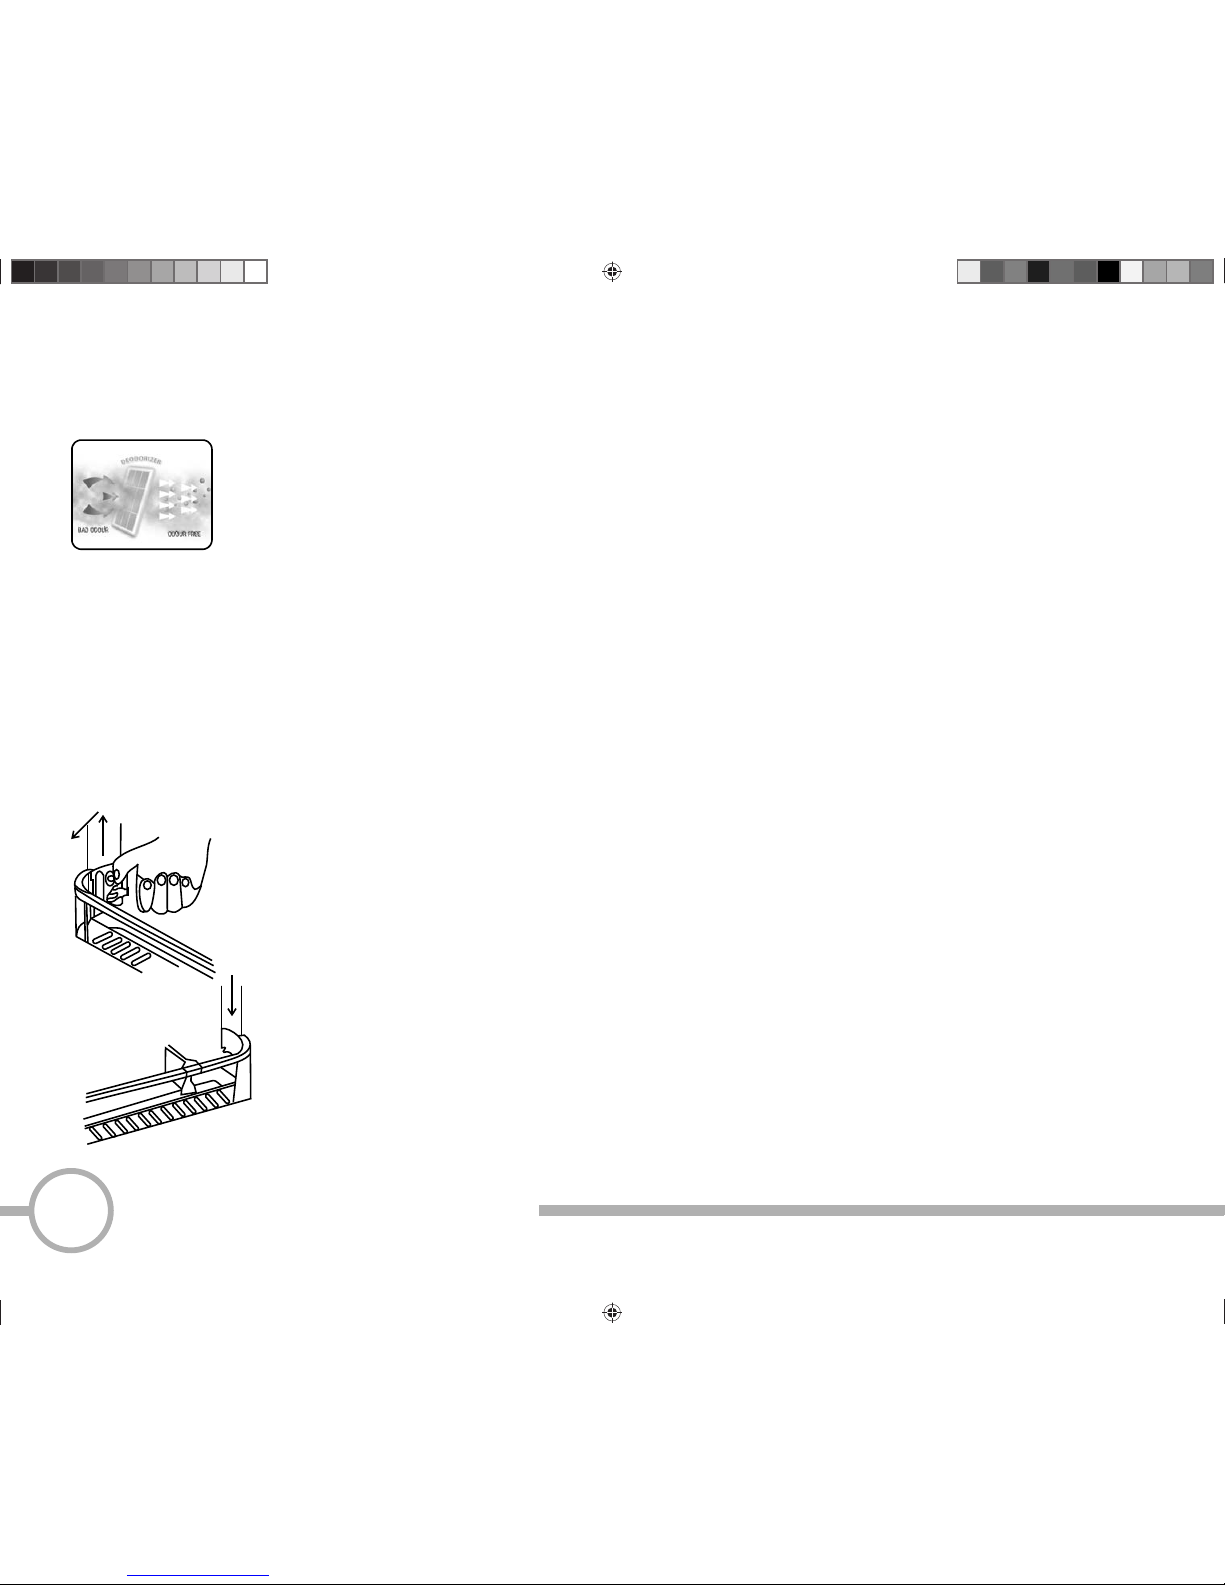
Replacement of Activ Deo with TimeStrip
Ô
Activ Deo should ideally be replaced every 6 months
Ô
Snap out the Activ Deo cover
Ô
Replace Activ Deo strip (available with Whirlpool® After Sales Service) with a new one
Ô
Press and snap back the cover
Ô
Please contact Whirlpool® After Sales Service for replacement
Ô
The Timestrip provided along with the product indicates the time for replacing the product
Ô
To activate the Timestrip, simply squeeze the bubble on the front
A line in the indicator window will start colouring
Ô
Replace Activ Deo when the Timestrip indicator turns Black/Red
Replacing the LED/bulb* Illumination Panels
Ô
Please contact Whirlpool® After Sales Service for replacement.
Removal of Door bin
Ô
The new door bins has been designed for easy removability
Ô
Hold the door bin at corners with both the hands and
slide the bin upward and pull it outward (a)
Ô
To replace the door bin insert the bin along the door liner till it ts into perfect position (b)
(b)
(a)
W10550471_Whirlpool_Manual Butler.indd 6W10550471_Whirlpool_Manual Butler.indd 6 04/11/12 4:47 PM04/11/12 4:47 PM
WHIRLPOOL REFRIGERATOR 200-299/300-399L/400-499L – MAINTENANCE
7
MAINTENANCE
Cleaning your Whirlpool Refrigerator
Before cleaning, always switch-off the power supply and remove
the plug from the socket.
Ô
Remove all food items from the refrigerator
Ô
Remove all shelves and bins. To remove refrigerator shelves, push
them up gently from the rear of the shelf and then pull out
Ô
Tilt the chiller downwards and pull out gently
Ô
Remove the refrigerator and freezer door bins by pushing up and pulling out
Ô
Hold the vegetable crisper using the handle, raise the front slightly and pull out
Ô
Use a soft cloth and mild detergent to clean the refrigerator
thoroughly. Take care not to damage the door seals
Ô
Allow the refrigerator to dry by leaving the door open for some time
Ô
Dry the parts and place them back in the refrigerator
Ô
Plug the power cord in and switch the mains on. Allow the refrigerator
to cool for some time before placing food inside
Caution
Ô
Do not splash water directly on the refrigerator
Ô
Do not work with ammable sprays or solvent based cleaners
Ô
Be sure to check the voltage before inserting the power supply cord into the socket
Ô
Be sure not to re-insert the power supply socket within
5 minutes of removing it from the socket
Ô
Ensure that the water does not get into the light bulb socket
or other electrical components of your refrigerator
W10550471_Whirlpool_Manual Butler.indd 7W10550471_Whirlpool_Manual Butler.indd 7 04/11/12 4:47 PM04/11/12 4:47 PM

MAINTENANCE
THE BUTLER SERIES – OWNER’S INSTRUCTIONS
8
Ô
Don’t allow water to collect at the bottom of the refrigerator
Ô
This appliance is not intended for use by person (including children)with reduced physical,
sensory or mental capabilities or lack of experience and knowledge unless they have
been given instruction concerning use of the appliance by a person responsible for their
safety children should be supervised to ensure that they do not play with the appliance
Ô
Do not store volatile chemicals such as ether and benzene in the refrigerator
The fumes, besides damaging food, can build up and cause an explosion
Tips
Ô
Apply a good silicon or wax polish on the outside of your refrigerator
to keep it looking new for an extended period of time
Steps for removal of the Chiller Tray and Glass Shelves
Going on Vacation
Short Vacation
During an average short length vacation, it is usually best to leave
the refrigerator and freezer in regular operation
W10550471_Whirlpool_Manual Butler.indd 8W10550471_Whirlpool_Manual Butler.indd 8 04/11/12 4:47 PM04/11/12 4:47 PM
 Loading...