


WRSA15SNHZ01
Whirlpool WRSA15SNHZ01, WRS325SDHB00, WRS325SDHV00, WRS325SDHW00, WRS325SDHW01 Owner’s Manual
...
Table of Contents/Table des matières
INSTALLATION INSTRUCTIONS
AND OWNER’S MANUAL
Side by Side Refrigerator
Do Not Throw Away - Additional important safety information included.
Para las instrucciones en español, visite nuestro sitio de internet.
INSTRUCTIONS D’INSTALLATION
ET MANUEL D’UTILISATION
Réfrigérateur côte à côte
Ne pas jeter — Autres consignes de sécurité importantes ci-jointes.
REFRIGERATOR SAFETY .............................................................. 2
INSTALLATION INSTRUCTIONS ...................................................3
Unpack the Refrigerator ...............................................................3
Door Removal, Leveling, and Alignment .....................................4
Handle Installation and Removal .................................................6
Location Requirements ................................................................7
Electrical Requirement .................................................................7
Water Supply Requirements ........................................................7
Connect Water Supply .................................................................8
REFRIGERATOR CARE ...............................................................10
Cleaning .....................................................................................10
Lights ..........................................................................................11
Vacation and Moving Care .........................................................11
TROUBLESHOOTING ..................................................................12
PERFORMANCE DATA SHEET ................................................... 17
SÉCURITÉ DU RÉFRIGÉRATEUR...............................................18
INSTRUCTIONS D’INSTALLATION ............................................. 19
Déballage du réfrigérateur .........................................................19
Retrait, réglage de l’aplomb et alignement des portes .............20
Installation et dèmontage des poignèes ....................................22
Exigences d’emplacement .........................................................23
Spécifications électriques ..........................................................23
Spécifications de l’alimentation en eau .....................................23
Raccordement de la canalisation d’eau ....................................24
ENTRETIEN DU RÉFRIGÉRATEUR ............................................26
Nettoyage ...................................................................................26
Lampes .......................................................................................27
Entretien avant les vacances ou lors d’un déménagement ......27
DÉPANNAGE .................................................................................28
FEUILLE DE DONNÉES SUR LA PERFORMANCE ...................34
W11105301A
2
You can be killed or seriously injured if you don't immediately
You
can be killed or seriously injured if you don't
follow
All safety messages will tell you what the potential hazard is, tell you how to reduce the chance of injury, and tell you what can
happen if the instructions are not followed.
Your safety and the safety of others are very important.
We have provided many important safety messages in this manual and on your appliance. Always read and obey all safety
messages.
This is the safety alert symbol.
This symbol alerts you to potential hazards that can kill or hurt you and others.
All safety messages will follow the safety alert symbol and either the word “DANGER” or “WARNING.”
These words mean:
follow instructions.
instructions.
DANGER
WARNING
REFRIGERATOR SAFETY
IMPORTANT SAFETY INSTRUCTIONS
WARNING:
To reduce the risk of fire, electric shock, or injury when using your refrigerator, follow these basic precautions:
SAVE THESE INSTRUCTIONS
■ Plug into a grounded 3 prong outlet.
■ Do not remove ground prong.
■ Do not use an adapter.
■ Do not use an extension cord.
■ Disconnect power before servicing.
■ Replace all parts and panels before operating.
■ Remove doors from your old refrigerator.
■ Connect to a potable water supply only.
■ Use nonflammable cleaner.
■ Keep flammable materials and vapors, such as gasoline,
away from refrigerator.
■ Use two or more people to move and install refrigerator.
■ Disconnect power before installing ice maker (on ice maker
kit ready models only).
■ Use a sturdy glass when dispensing ice (on some models).
■ Do not hit the refrigerator glass doors (on some models).
■ This appliance is not intended for use by persons (including
children) with reduced physical, sensory or mental
capabilities, or lack of experience and knowledge, unless
they have been given supervision or instruction concerning
use of the appliance by a person responsible for their
safety.
■ Children should be supervised to ensure that they do not
play with the appliance.
State of California Proposition 65 Warnings:
WARNING: This product contains one or more chemicals known to the State of California to cause cancer.
WARNING: This product contains one or more chemicals known to the State of California to cause birth defects or other
reproductive harm.

3
Proper Disposal of
Your Old Refrigerator
WARNING
Suffocation Hazard
Remove doors from your old refrigerator.
Failure to do so can result in death or brain damage.
IMPORTANT: Child entrapment and suffocation are not
problems of the past. Junked or abandoned refrigerators are
still dangerous—even if they will sit for “just a few days.” If
you are getting rid of your old refrigerator, please follow these
instructions to help prevent accidents.
Before You Throw Away Your Old Refrigerator or Freezer:
■ Take off the doors.
■ Leave the shelves in place so that children may not easily
climb inside.
Important information to know about disposal of
refrigerants:
Dispose of refrigerator in accordance with Federal and Local
regulations. Refrigerants must be evacuated by a licensed,
EPA certified refrigerant technician in accordance with
established procedures.
INSTALLATION INSTRUCTIONS
Unpack the Refrigerator
WARNING
Excessive Weight Hazard
Use two or more people to move and install
refrigerator.
Failure to do so can result in back or other injury.
Important information to know about glass shelves
and covers:
Do not clean glass shelves or covers with warm water when
they are cold. Shelves and covers may break if exposed to
sudden temperature changes or impact, such as bumping.
Tempered glass is designed to shatter into many small,
pebble-size pieces. This is normal. Glass shelves and covers
are heavy. Use both hands when removing them to avoid
dropping.
When Moving Your Refrigerator:
Your refrigerator is heavy. When moving the refrigerator for
cleaning or service, be sure to cover the oor with
cardboard or hardboard to avoid oor damage. Always pull
the refrigerator straight out when moving it. Do not wiggle or
“walk” the refrigerator when trying to move it, as oor
damage could occur.
Remove packing materials. Do not use sharp instruments,
rubbing alcohol, flammable fluids, or abrasive cleaners to
remove tape or glue. These products can damage the surface of
your refrigerator. For more information, see “Refrigerator Safety.”

4
Door Removal, Leveling, and Alignment
Gather the required tools and parts and read all instructions before starting installation. Save these instructions for future reference.
NOTE: Before moving your product into your home, measure the doorway of your home to see whether you need to remove the
refrigerator and freezer doors. If door removal is necessary, see the instructions below.
IMPORTANT: Before you begin, unplug refrigerator or disconnect power. Remove food, the ice storage bin (on some models), and
any adjustable door or utility bins from doors.
TOOLS NEEDED: Bubble level; flat-blade screwdriver; 5/16" and 11/16" wrench; 1/4", 3/8", and 5/16" hex-head socket wrenches,
TORX
®
T30
®†
screwdriver.
WARNING
Electrical Shock Hazard
Disconnect power before removing doors.
Failure to do so can result in death or electrical shock.
9
10
11
3
2
12
7
6
Do not remove A screws
5
A CB
4
A
A
A. Wiring plugs
B. Wiring clip
C. Grommets
A. Face of fitting
A. Pull to the right for extraction.
B. Twist and pass underneath door.
Pull toward you.
Raise
Lower
5/16"
wrench
Tighten
Loosen
11/16"
wrench
Raise
Lower
Lower
Raise
Do not remove B screws
A
†TORX® and T30 are registered trademarks of Acument Intellectual Properties, LLC.
1
Full Refrigerator
Left and Right Bottom Hinge
Door Removal
Top Left Hinge
Wiring
Water Dispenser
Tubing
Base Grille
Water Filter Door and
Base Grille
Alignement Screw
Locking Nut
Leveling screws
8
Do not remove A screws
A
Top Right Hinge
Cabinet
Freezer
door
Water
filter door
Base
grille
Refrigerator
door
Adjustable front wheels
5
Remove the Doors
If your refrigerator does not fit through the doorway or you are
getting rid of your old refrigerator, follow the steps below for
door removal.
WARNING
Electrical Shock Hazard
Disconnect power before removing doors.
Failure to do so can result in death or electrical shock.
1. Unplug refrigerator or disconnect power.
2. Fully open both doors. See graphic 1.
3. If your model has water dispensing, please open the water
filter door by pulling it toward you. See graphic 2. It is not
necessary to remove the water filter itself.
4. Pull the base grille toward you from the sides and then from
the center until it dislodges. See graphic 2.
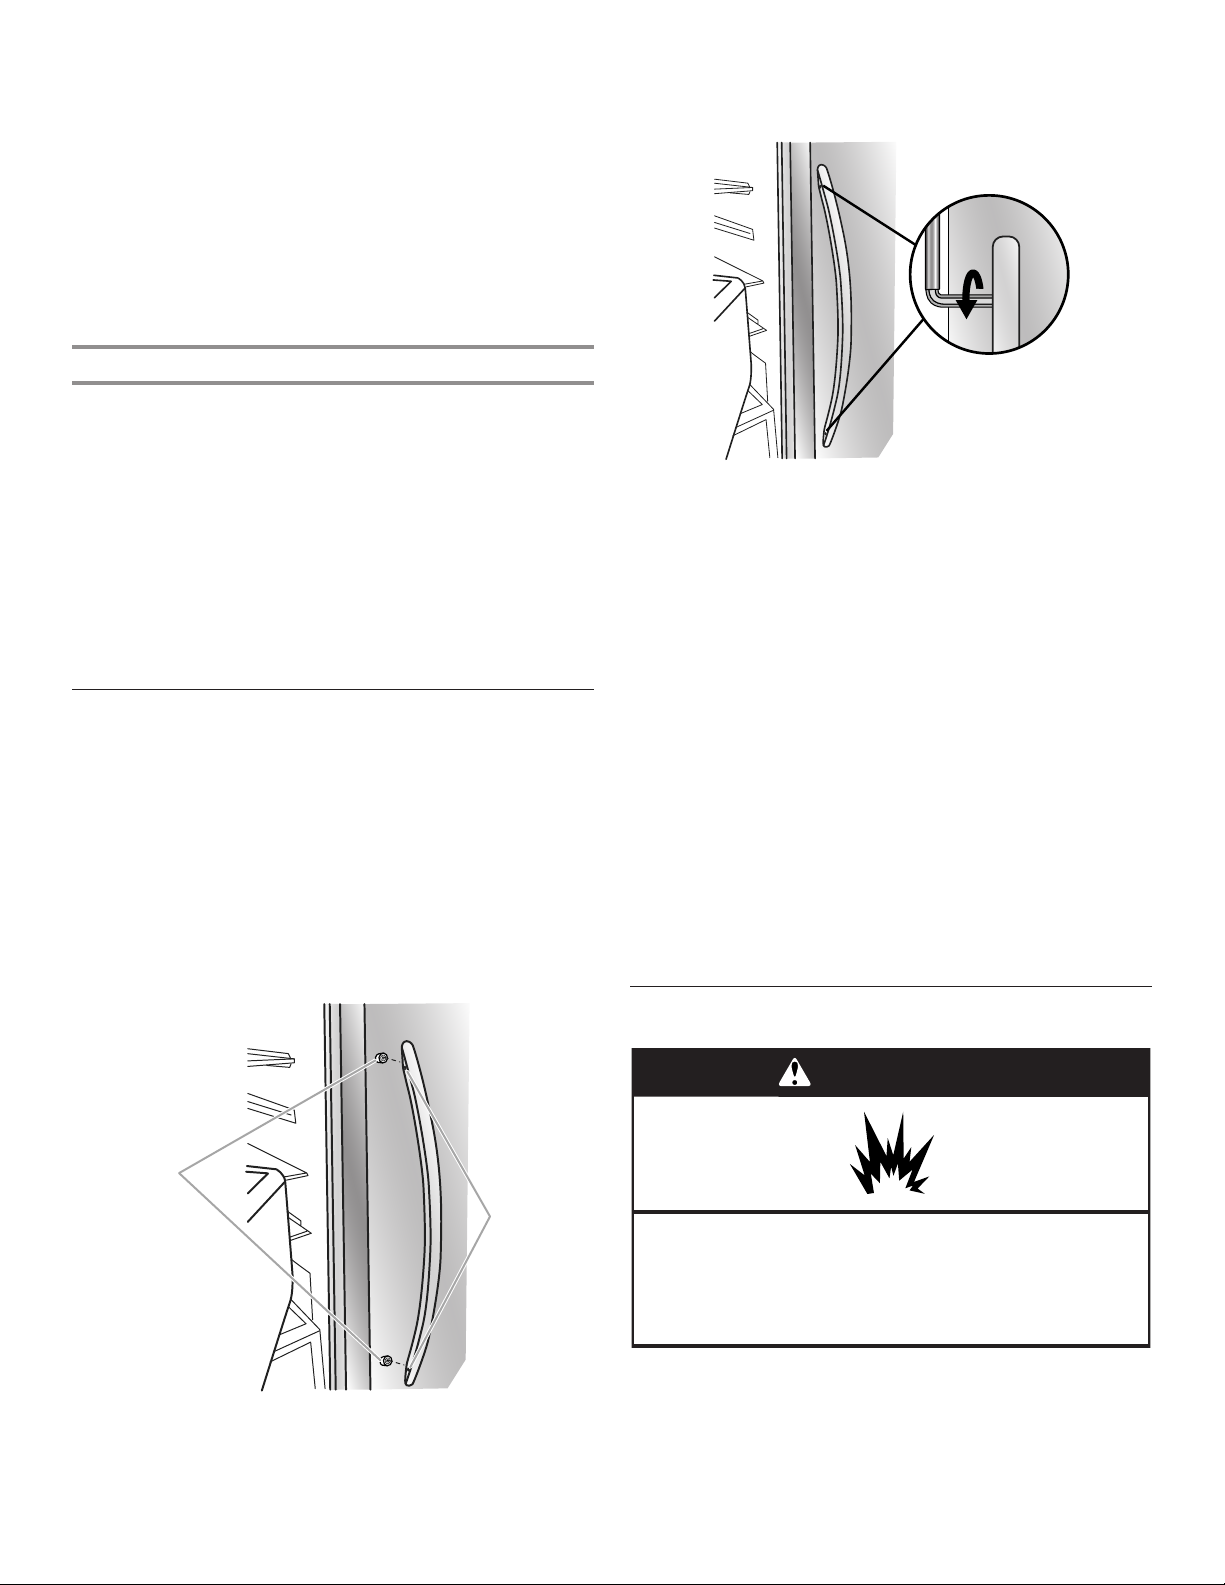
5. To remove the base grille, twist and pull the right side
until this side passes underneath the refrigerator door.
See graphic 3. Then pull the left side of the base grille for
complete removal.
6. If your model has water dispensing in the door, disconnect
the water dispenser tubing located below the freezer door.
■ Press the blue outer ring against the face of fitting and
pull the dispenser tubing free. See graphic 4.
NOTE: Keep the water tubing connector attached to the
tube that runs underneath the freezer. The door cannot
be removed if the connector is still attached to the tube
that runs through the door hinge.
7. If your model has water dispensing in the door, disconnect
the wiring located below the freezer door. See graphic 5.
■ Remove the wiring clip and the bracket wire using a 1/4"
hexagonal head socket wrench.
■ Disconnect the wiring plugs from the bracket wire.
8. Close the freezer door and use a TORX
®
T30
®
screwdriver
to remove the top hinge completely. See graphic 6.
IMPORTANT: Do not remove either screw A. Hold the door
while hinge is being removed.
9. Lift the freezer door straight up off from the bottom hinge.
See graphic 7. The water dispenser tubing and wiring will
remain attached to the freezer door.
NOTE: This may require two people, one to lift the door and
another to feed the water tubing and wiring into the bottom
hinge pin.
IMPORTANT: Rest the door on its side on a soft, clean
surface, such as a towel, blanket, or piece of cardboard. This
will help to avoid scratching or damaging the door, water
tubing, and wiring.
10. Close the refrigerator door and use a TORX
®
T30
®
screwdriver to remove completely top hinge. See graphic 8.
IMPORTANT: Do not remove either screw A. Hold the door
while hinge is being removed.
11. Lift the refrigerator door straight up off from the bottom
hinge. See graphic 7.
IMPORTANT: Rest the door on its side on a soft, clean
surface, such as a towel, blanket, or piece of cardboard.
This will help to avoid scratching or damaging the door.
12. If your refrigerator without doors does not pass through the
doorway, you may remove both bottom hinges. Use a 5/16"
nut driver to remove these. See graphic 9.
IMPORTANT: Do not remove either screw B.
Replacing or Reinstalling Door and Hinges
If your doors and bottom hinges have been removed, please
follow the next instructions for reinstallation:
1. Reinstall both bottom hinges using a 5/16" nut driver to
tighten screws. See graphic 9.
2. If your model has water dispensing in the door:
■ Lift the freezer door enough to feed the water dispenser
tubing and wiring through the bottom hinge pin.
NOTE: This may require two people, one to lift the door
and the other to feed the water tubing and wiring into the
bottom hinge pin. See graphic 7.
■ Insert the freezer door into the bottom hinge pin.
IMPORTANT: Hold the door while hinge is being installed
3. Close the freezer door to align and reinstall the top hinge.
Use a TORX
®
T30
®
screwdriver to tighten the screws. See
graphic 8.
IMPORTANT: Provide additional support for the door while
top hinge is being reinstalled. Do not depend on the door
magnets to assure the door to the cabinet.
4. If your model has water dispensing in the door, connect the
water dispenser tubing. For the connection, push the tubing
into the dispenser tubing until black mark touches the face of
fitting. See graphic 4.
5. Connect the wiring. See graphic 5.
6. Reinstall the wiring clip & the bracket wire using a 1/4"
hexagonal head socket wrench.
7. Connect the wiring plugs from the bracket wire.
8. Lift the refrigerator door enough to insert the door into the
bottom hinge pin. See graphic 7.
IMPORTANT: Hold the door while hinge is being installed.
9. Close the refrigerator door to align and reinstall the top
hinge. Use a TORX
®
T30
®
screwdriver to tighten the screws.
See graphic 6.
IMPORTANT: Provide additional support for the door while
top hinge is being reinstalled. Do not depend on the door
magnets to assure the door to the cabinet.
Leveling and Door Closing
Your refrigerator has two front adjustable wheels. See graphic 1.
These are used to level the refrigerator under uneven floor
conditions or want the doors to close more easily. Please follow
the instructions below:
1. Place the refrigerator into its final location in the kitchen and
open both doors.
2. Fully open both doors. See graphic 1.
3. If your model has water dispensing in the door, please open
the water filter door by pulling it toward you. See graphic 2. It
is not necessary to remove the water filter itself.
4. Pull the base grille toward you from the sides and then from
the center until it dislodges. See graphic 2.
5. To remove the base grille, twist and pull the right side
until this side passes underneath the refrigerator door.
See graphic 3. Then pull the left side of the base grille for
complete removal.
6. Use a 3/8" nut driver to turn the leveling screws located in
both sides of the refrigerator. See graphic 10. Depending
on uneven floor conditions, you must turn one or both
screws to the right or left several times to raise or lower the
refrigerator. Until the refrigerator is steady, use a bubble level
if necessary.
6
7. Close both doors and check that they close as easily as
you like. If not, turn both screws to the right to raise the
refrigerator by tiling it more to the back until the doors close
as easily as you like.
8. Check and make sure to the technician sheet is placed in the
base grille cavity before assembling this into the cabinet.
9. Reinstall the base grille into the cabinet, introducing the
left side first and then the right side of the base grille. See
graphic 3. You may accommodate the water dispenser
tubing and wiring into base grille cavity below the left bottom
hinge.
10. Attach the base grille pushing into the cabinet clips. See
graphic 2.
Door Alignment
The refrigerator doors are designed to be slightly misaligned
vertically when the refrigerator is empty. Please follow the next
steps to align the refrigerator doors.
1. Use an 11/16" open-ended wrench tool to loosen the locking
nut located below the refrigerator door. See graphic 11.
Accommodate the wrench tool so that it fits in the space.
2. Use a 5/16" open-ended wrench tool to turn the alignment
screw. See picture 12. Depending on how the refrigerator
door is misaligned in relation to the freezer door, you must
turn the screw to the right to raise or to the left to lower
the refrigerator door until both doors have been aligned
vertically.
3. Tighten the 11/16" locking nut with the wrench tool.
4. Attach the base grille if it was dislodged.
Handle Installation and Removal
PARTS INCLUDED: Door handles (2), 1/8" hex key, spare
setscrew(s)
To Install the Handles:
NOTE: The handle mounting setscrews are preinstalled in the
handle.
1. Remove the handles, which are packed inside the
refrigerator.
NOTE: To avoid scratching the finish, place the handles on
a towel or other soft surface.
2. Open the freezer door. On the refrigerator door, place the
handle on the shoulder screws with the setscrews facing
the freezer.
B
A
A. Shoulder screws
B. Setscrews inside the handle
3. Firmly push the handle toward the door until the handle base
is flush against the door.
4. While holding the handle, insert the short end of the hex key
into the upper hole and slightly rotate the hex key until it is
engaged in the setscrew.
5. Using a clockwise motion, tighten the setscrew until it begins
to contact the shoulder screw.
6. Repeat steps 4 and 5 to begin fastening the lower setscrew.
7. Once both setscrews have been partially tightened as
outlined in the previous steps, fully tighten both the upper
and lower setscrews.
IMPORTANT: When the screws feel tight, tighten them an
additional quarter-turn. The handle is not properly installed
without this extra tightening.
8. Open the refrigerator door and close the freezer door. Repeat
steps 2 through 7 to install the other handle onto the freezer
door with the setscrews facing the refrigerator.
9. Save the hex key and all instructions.
To Remove the Handles:
1. While holding the handle, insert the short end of the hex key
into the lower setscrew hole and slightly rotate the hex key
until it is engaged in the setscrew.
2. Using a counterclockwise motion, loosen the setscrew a
quarter-turn at a time.
3. Repeat steps 1 and 2 for the upper setscrew. Gently pull the
handle away from the door.
4. If necessary, use a Phillips screwdriver to remove the
shoulder screws from the door.
Location Requirements
WARNING
Explosion Hazard
Keep flammable materials and vapors, such as
gasoline, away from refrigerator.
Failure to do so can result in death, explosion, or fire.
IMPORTANT: This refrigerator is designed for indoor household
use only.
 Loading...