


WRI51ABTWW
Whirlpool WRI51ABTWW, WRI51AKTWW, WRI51ABDWC, WRS49AKTWW, WRI51AKDWC Use Instructions
...
REFRIGERATOR
FREEZER
Use Instructions
Page 2
REFRIGERADOR
CONGELADOR
Instrucciones de uso
Pagina 23
W10000002 05/11/2015
Models/Modelos
WRS49/WRI51

TABLE OF CONTENTS
ÍNDICE
REFRIGERATORS WHIRLPOOL ........................................3
REFRIGERATOR SAFETY ..................................................4
Important safety instructions ........................................4
Proper disposal of your old refrigerator .......................5
INSTALLATION INSTRUCTIONS ........................................5
Unpacking the refrigerator ............................................5
Door removal, leveling and alignment ..........................6
Handle removal .............................................................8
Location requirements ..................................................9
Electrical requirements ...............................................10
Water supply requirements .........................................10
Connecting water supply ............................................10
REFRIGERATOR USE.......................................................11
Refrigerator compartment ..........................................12
Using the controls .......................................................12
Water and ice dispensers ...........................................13
Ice maker and storage bin ..........................................15
Smart Ice ....................................................................15
Water filtration system ................................................15
REFRIGERATOR CARE ....................................................16
Cleaning ......................................................................16
LED lights ....................................................................16
Water purifier/filter ......................................................16
Vacation care ..............................................................17
PROBLEM SOLVER..........................................................17
ACCESSORIES ................................................................ 22
REFRIGERADORES WHIRLPOOL .....................................3
SEGURIDAD DEL REFRIGERADOR ................................23
Instrucciones de seguridad importantes ....................23
Cómo deshacerse adecuadamente de su
refrigerador antiguo ....................................................24
INSTRUCCIONES DE INSTALACIÓN...............................24
Cómo desempacar el refrigerador ..............................24
Cómo remover las puertas, nivelar y alinear ..............25
Cómo remover las manijas .........................................27
Requisitos de ubicación .............................................28
Requisitos eléctricos ..................................................29
Requisitos del suministro de agua .............................29
Conexión del suministro de agua ...............................29
USO DE SU REFRIGERADOR .........................................30
Compartimiento refrigerador ......................................31
Uso de los controles ...................................................31
Dispensador de agua y hielo ......................................32
Ice Maker (Fábrica de hielo) y depósito de hielo .......34
Smart Ice ....................................................................34
Sistema de filtración de agua .....................................34
CUIDADO DE SU REFRIGERADOR .................................35
Limpieza ......................................................................35
Luces LED ...................................................................35
Purificador/filtro de agua ............................................35
Cuidado en periodo de vacaciones ............................36
SOLUCIÓN DE PROBLEMAS ..........................................36
ACCESORIOS .................................................................. 41
ENGLISH
2
REFRIGERATORS WHIRLPOOL
REFRIGERADORES WHIRLPOOL
MANUFACTURED BY: / FABRICADO POR:
Hefei Hualing Co. Ltd
No. 176 Jinxiu Road, Economic and
Development Zone, Hefei city,
Anhui, China
Gross Volume
Volumen Bruto
Freezer (liters)
Congelador (litros)
Refrigerator (liters)
Refrigerador (litros)
Total (liters)
Total (litros)
Storage Volume
Volumen de Almacenamiento
Freezer (liters)
Congelador (litros)
Refrigerator (liters)
Refrigerador (litros)
Total (liters)
Total (litros)
Climatic Class
Clase Climática
Refrigerant Type and Mass
Tipo de Refrigerante y Masa
WRI51ABTWW
WRI51AKTWW
T - Tropical
239
345
584
183
344
527
R600a
70 g
Models/ Modelos
WRI51ABDWC
WRI51AKDWC
239
345
584
183
344
527
T - Tropical
R600a
78 g
WRS49AKTWW
223
345
568
163
341
504
ST - Subtropical
R600a
95 g
WRS49ABDWC
WRS49AKDWC
223
345
568
163
341
504
T - Tropical
R600a
95 g
Electric
Eléctrico
Voltage (V)
Voltaje (V)
Frequency (Hz)
Frecuencia (HZ)
Water
Agua
Potable cold water inlet
Entrada de agua fría potable
Water Filter
Filtro de Agua
Coiled tube
Tubo en espiral
COUNTRY
PAÍS
Colombia
Ecuador
Uruguay
Paraguay
Bolivia
Chile
Peru
IMPORTED BY:
IMPORTADO POR:
Whirlpool Colombia S.A.S - Nit: 830.010.181-9. Calle 72 #8-56 P 10
Whirlpool Ecuador S.A. - Av. De las Americas Edif. de las Americas, piso 3 oficina 301 - Guayaquil, Ecuador
Barraca Europa S.A. - Cuareim 1844 - 18000 Montevideo, Uruguay. Teléfono 2-924 94 84
Nicolas Gonzales Odoñes ( NGO ) S.A.E.C.A. - RC 80014137-7 Rca. Dominicana y Vía Ferrea. Asunción, Paraguay.
Tel: 595 21 288 0000
Dismatec S.A. - Av Principal Parque Industrial Mz. 14, Santa Cruz de la Sierra, Santa Cruz, Bolivia - Tel.: (591) 347 3030
Whirlpool Chile - Alcantara 44, piso 7, Las Condes, Santiago
Whirlpool Peru S.R.L. - Avenida Benavides 1890, Miraflores, Lima
Smart Ice
110
60
No
No
Smart Ice
220
50
No
No
Ice Maker
110
60
Yes
Si
Yes
Si
Ice Maker
220
50
Yes
Si
Yes
Si
ENGLISH
3
REFRIGERATOR SAFETY
Your safety and the safety of others are very important.
We have provided many important safety messages in this manual and on your appliance. Always read and obey all
safety messages.
This is the safety alert symbol.
This symbol alerts you to potential hazards that can kill or hurt you and others.
All safety messages will follow the safety alert symbol and either the word “DANGER” or
“WARNING.” These words mean:
You can be killed or seriously injured if you don’t
immediately follow instructions.
You can be killed or seriously injured if you don’t
follow instructions.
All safety messages will tell you what the potential hazard is, tell you how to reduce the chance of injury, and tell you
what can happen if the instructions are not followed.
IMPORTANT SAFETY INSTRUCTIONS
WARNING: To reduce the risk of fire, electric shock, or injury when using your refrigerator, follow these basic
precautions:
■
Plug into a grounded (earthed) outlet.
■
Do not remove ground prong.
■
Do not use an adapter.
■
Do not use an extension cord.
■
Disconnect power before servicing.
■
Replace all parts and panels before operating.
■
Remove doors from your old refrigerator.
■
Use nonflammable cleaner.
■
Keep flammable materials and vapors, such as
gasoline, away from refrigerator.
■
Use two or more people to move and install
refrigerator.
■
Disconnect power before installing ice maker (on ice
maker kit ready models only).
■
A qualified service technician must install the water
line and ice maker.
■
Use a sturdy glass when dispensing ice (on some
models).
■
This appliance is not intended for use by persons
(including children) with reduced physical, sensory or
mental capabilities, or lack of experience and
knowledge, unless they have been given supervision
or instruction concerning use of the appliance by a
person responsible for their safety.
■
Children should be supervised to ensure that they do
not play with the appliance.
■
If the power supply cord is damaged, it must be
replaced by the manufacturer or its service agent or a
similarly qualified person in order to avoid a hazard.
■
Do not store explosive substances, such as aerosol
cans with a flammable propellant, in this appliance.
■
This appliance is intended to be used in household
and similar applications such as: staff kitchen areas in
shops, offices and other working environments; farm
houses and by clients in hotels, motels and other
residential type environments; bed and breakfast type
environments; and catering and similar non-retail
applications.
ENGLISH
SAVE THESE INSTRUCTIONS
4
Proper disposal of
your old refrigerator
Before you throw away your old
refrigerator or freezer:
■
Take off the doors.
■
Leave the shelves in place so that children may
not easily climb inside.
Suffocation Hazard
Remove doors from your old refrigerator.
Failure to do so can result in death or brain damage.
IMPORTANT: Child entrapment and suffocation are not
problems of the past. Junked or abandoned refrigerators are still
dangerous, even if they will sit for “just a few days”.
If you are getting rid of your old refrigerator, please follow these
instructions to help prevent accidents.
Important information to know about disposal of refrigerants:
Dispose of refrigerator in accordance with Federal and Local regulations. Refrigerants must be evacuated by a licensed, EPA
certified refrigerant technician in accordance with established procedures.
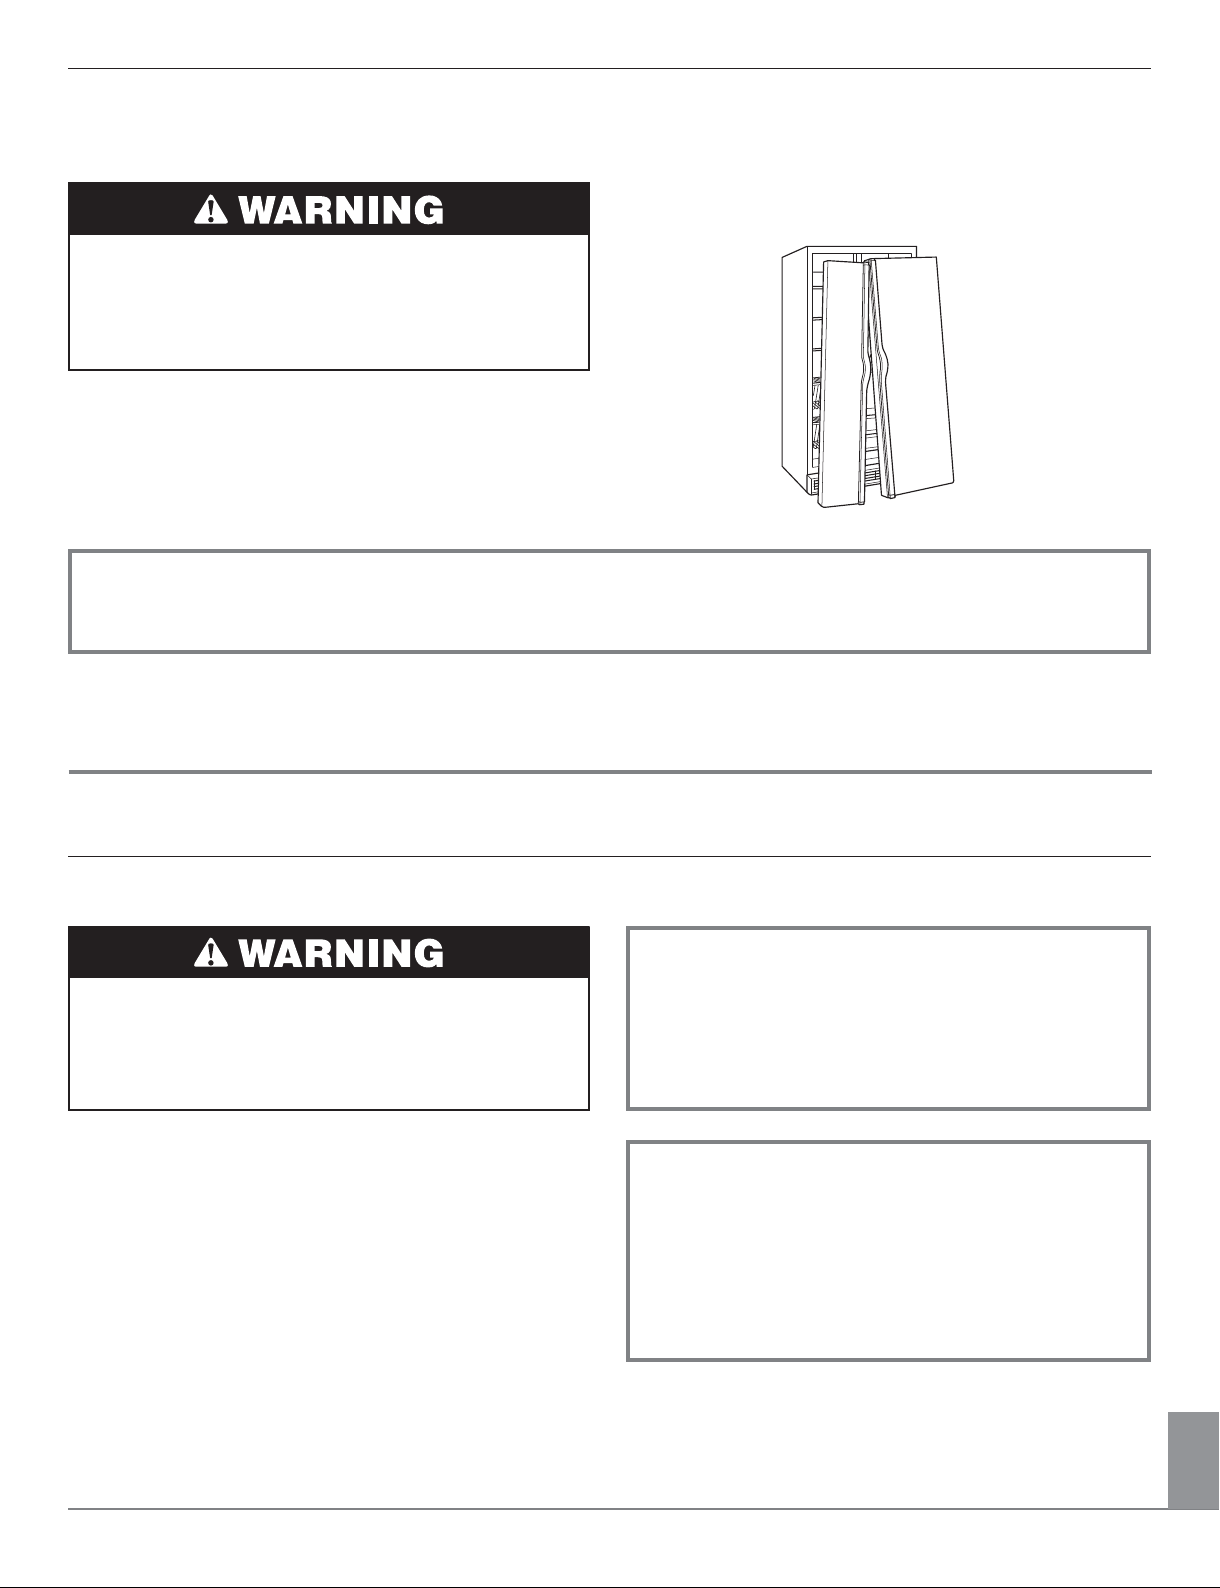
INSTALLATION INSTRUCTIONS
Unpacking the refrigerator
Excessive Weight Hazard
Use two or more people to move and install refrigerator.
Failure to do so can result in back or other injury.
Remove packaging materials. Do not use sharp instruments,
rubbing alcohol, flammable fluids, or abrasive cleaners to
remove tape or glue. These products can damage the surface of
your refrigerator. For more information, see “Refrigerator safety”.
When moving your refrigerator:
Your refrigerator is heavy. When moving the refrigerator for
cleaning or service, be sure to cover the floor with cardboard
or hardboard to avoid floor damage. Always pull the
refrigerator straight out when moving it. Do not wiggle or
“walk” the refrigerator when trying to move it, as floor
damage could occur.
Important information to know about glass shelves and
covers:
Do not clean glass shelves or covers with warm water when
they are cold. Shelves and covers may break if exposed to
sudden temperature changes or impact, such as bumping.
Tempered glass is designed to shatter into many small,
pebble-size pieces. This is normal. Glass shelves and covers
are heavy. Use both hands when removing them to avoid
dropping.
ENGLISH
5
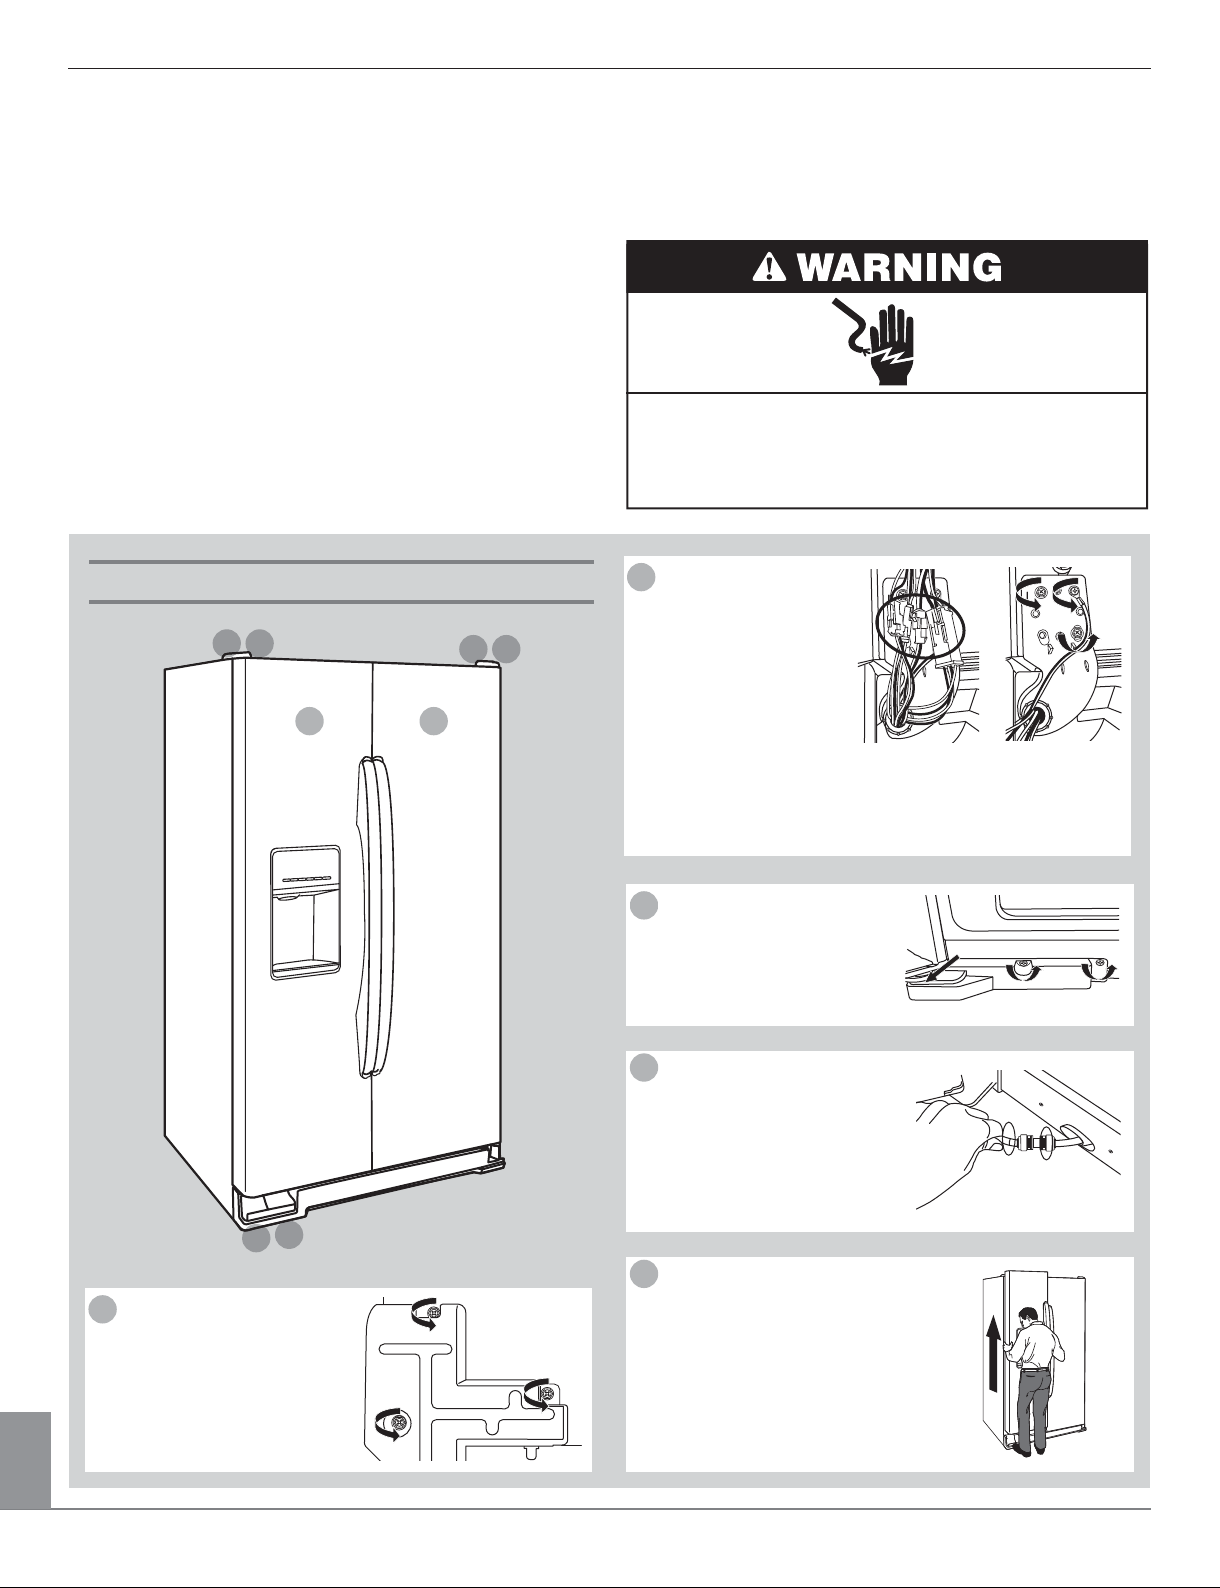
Door removal, leveling and alignment
IMPORTANT: We recommend that the door removal operation
must be done by a qualified service technician.
Gather the required tools and parts and read all instructions
before starting installation. Save these instructions for future
reference.
IMPORTANT: The graphics on this page are for models with the
ice storage bin on the door. On models with the ice storage bin
inside the freezer, the wiring and water dispenser tubing
configurations are simpler than what is shown in these graphics.
Please read all instructions on the next few pages for more
information.
NOTE: Before moving your product into your home, measure the
doorway of your home to see whether you need to remove the
refrigerator and freezer doors. If door removal is necessary, see
the instructions below.
Freezer door
2
1
5 8
6
7
IMPORTANT: Before you begin, turn the refrigerator control OFF
or turn cooling off. Unplug refrigerator or disconnect power.
Remove food, the ice storage bin (on some models), and any
adjustable door or utility bins from doors.
Electrical Shock Hazard
Disconnect power before removing doors.
Failure to do so can result in death or electrical shock.
Dismantle 4 terminals
2
manually, use cross
screwdriver or socket
wrench to disengage 2
M5 screws and 1
grounding screw
counterclockwise, and
take down the top
hinge after the
dismantlement.
4
3
Use screwdriver to unscrew
1
3 setscrews and take down
the top hinge, as shown in
the figure.
Note: You should ensure that the cooler door is fitting to
the cabinet before dismantling the top hinge screws, or
there exists the hidden danger of door falling.
Use cross screwdriver to
3
disengage the fastening
screws of bottom beam
cover counterclockwise
Then, pull out the bottom
beam cover.
Take down the spacing
4
washers at both ends of
coupler connector as shown
in the red circle, and then pull
out the water pipe by
simultaneously jamming both
ends of coupler connector
(for models equipped with).
5
Lift the freezer door upward
to separate the bottom hinge
shaft from door axle hole,
take down the door and
place it at an appropriate
position.
ENGLISH
6

Refrigerator door
Use screwdriver to unscrew
6
3 setscrews and take down
the top hinge, as shown in
the figure.
Remove 2 M5 screws and 1
7
grounding screw counterclockwise,
and take down the top hinge after the
removing screws.
Note: You should ensure that the
cooler door is fitting to the cabinet
before dismantling the top hinge
screws, or there exists the hidden
danger of door falling.
Lift the Cooler door upward
8
to separate the bottom hinge
shaft from door axle hole,
take down the door and
place it at an appropriate
position.
Excessive Weight Hazard
Use two or more people to lift the freezer door.
Failure to do so can result in back or other injury.
Replace the doors and hinges
IMPORTANT: We recommend that the door replace operation
must be done by a qualified service technician.
1. Replace both bottom hinges, if removed. Make sure that the
leveler brackets are assembled behind the hinges.
Tighten the screw.
IMPORTANT: When the screws are tightened properly, there
should not be any gaps between the refrigerator, leveler
bracket and hinge.
Excessive Weight Hazard
Use two or more people to lift the freezer door.
Failure to do so can result in back or other injury.
2. Before replacing the freezer door on the bottom left hinge,
feed the wiring and water tubing through the hinge.
■
Feed the small wiring bundle through the hinge.
Assistance may be needed.
IMPORTANT: Do not feed the large wiring bundle through
the hinge. This bundle is intended to run directly from the
door to the connections beneath the freezer. Forcing the
large bundle through the hinge may damage the door and/or
the wiring, and will keep the door from closing properly.
■
Feed both water tubes through the bottom left hinge, then
replace the freezer door on the hinge. Assistance may be
needed.
NOTE: Provide additional support for the doors while the
top hinges are being replaced. Do not depend on the door
magnets to hold the doors in place while you are working.
3. Align and replace the top left hinge as shown.
Tighten the screws.
4. Reconnect water tubing and wiring.
IMPORTANT: Do not intertwine the water tubing and wiring
bundles when reconnecting them.
Electrical Shock Hazard
Plug into a grounded 3 prong outlet.
Do not remove ground prong.
Do not use an adapter.
Do not use an extension cord.
Failure to follow these instructions can result in death,
fi re, or electrical shock.
5. Plug refrigerator into a grounded 3 prong outlet.
ENGLISH
7
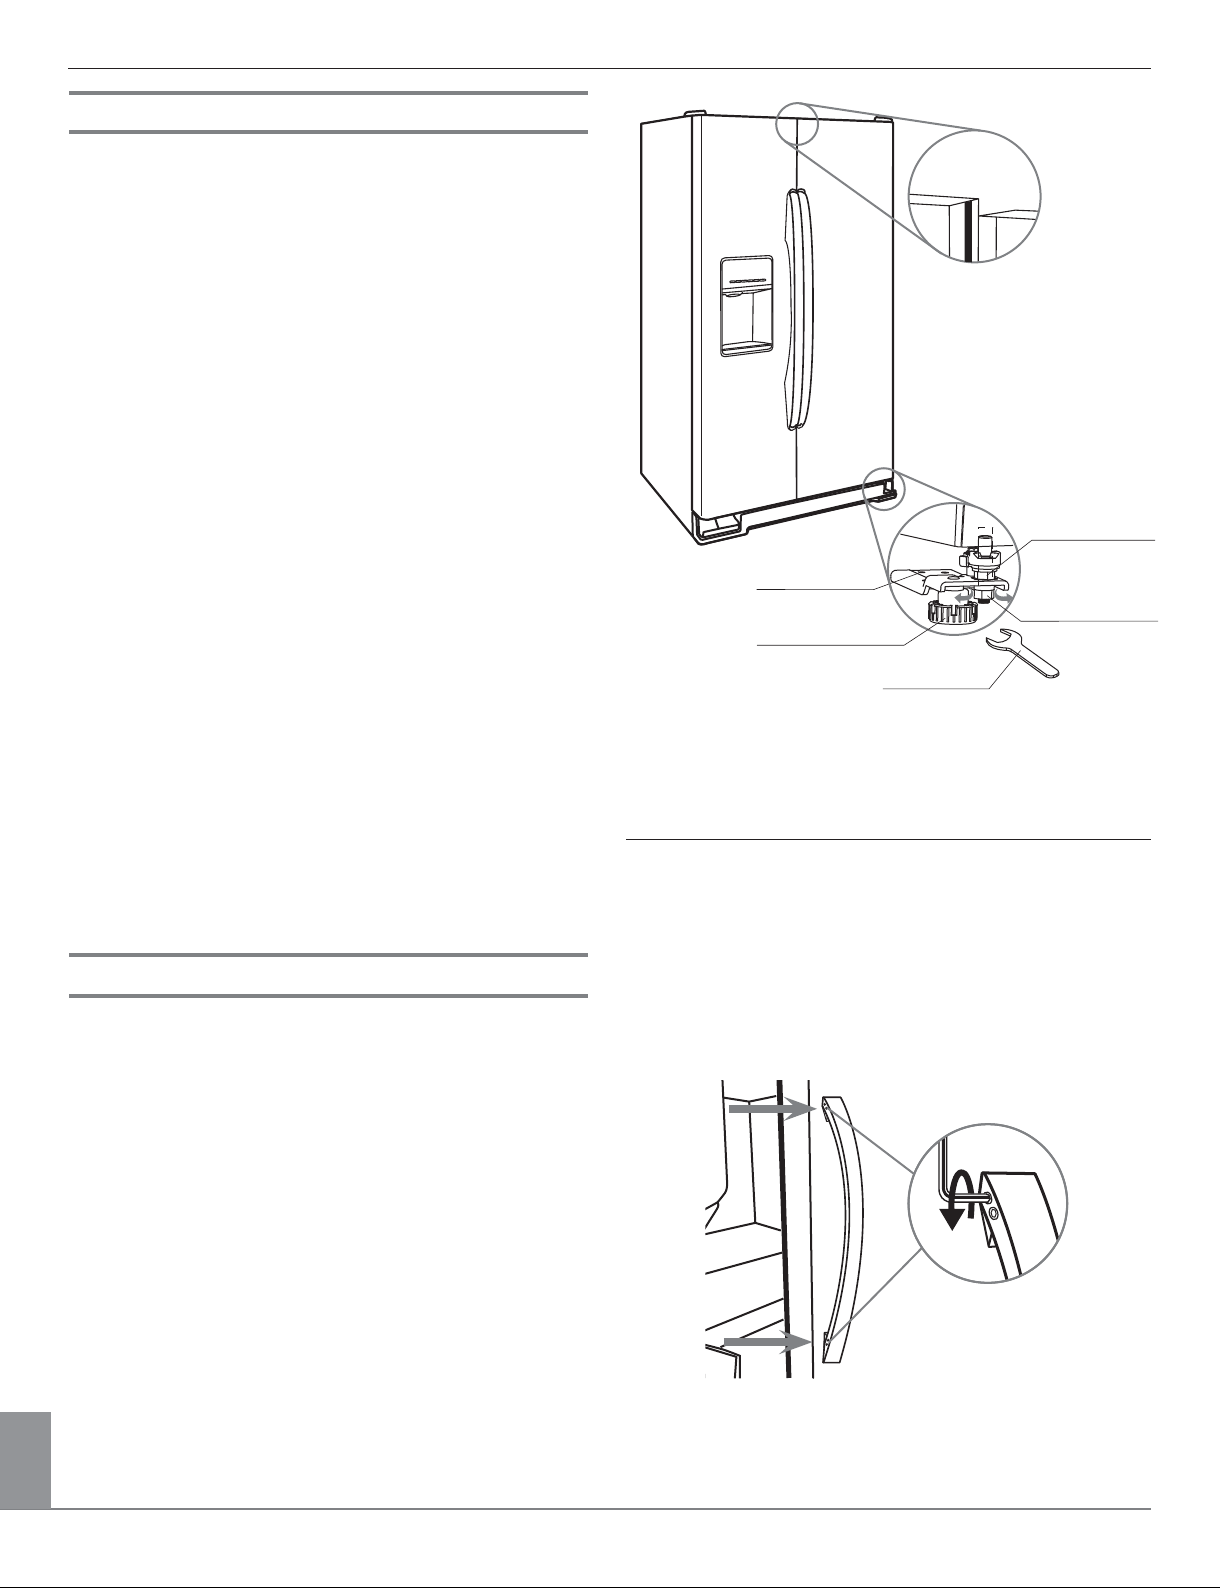
Leveling and door closing
Your refrigerator has two adjustable front feet — one on the
right and one on the left. In most cases, the refrigerator
should be steady when both feet are touching the floor.
If your refrigerator seems unsteady or if you want the doors
to close more easily, adjust the refrigerator’s tilt using the
instructions below:
1. Move the refrigerator into its final location. If necessary,
open both doors to 90°.
2. The two leveling feet are located on the brackets on each
side of the product.
NOTE: Having someone push against the top of the
refrigerator takes some weight off the leveling feet.
This makes it easier to make adjustments.
3. Turn the leveling foot to the left to raise that side of the
product, or turn it to the right to lower that side of the
product.
NOTE: Both leveling feet should be snug against the floor,
and the rollers should not touch the floor. This keeps the
refrigerator from rolling forward when opening the doors.
4. Open both doors again and check that they close as easily
as you like. If not, tilt the refrigerator slightly more to the
rear by turning the leveling feet to the left.
It may take several more turns, and you should turn both
leveling feet the same amount.
No leveled
Adjusting nut
Bottom hinge
Locking nut
Levelling feet
Wrench
5. Use a bubble level to check the leveling of the refrigerator.
NOTE: Whenever you need to move the refrigerator, turn
the leveling feet to the right until they are no longer
touching the ground. This will allow the refrigerator to roll
more easily.
Door alignment
The doors are designed to be slightly different heights when the
refrigerator is empty, in order to account for the weight of food
that will be placed on the doors. If the doors are still not aligned
after checking the leveling and loading the refrigerator with food,
follow the steps below to adjust the door alignment.
1. Loose the locking nut: with a wrench, rotate 2 turns
counterclockwise the locking nut.
2. Adjust as required: open the door and rotate the adjusting nut
counterclockwise to lift up the door and rotate the adjusting
nut clockwise to lower the door.
Maximum adjustment is 5 mm.
3. Tight back the locking nut: once the door’s height is adjusted
as required, tight back the locking nut by rotating it clockwise
with a wrench.
Handle removal
To remove the handles:
1. Remove the handles, using hexagon spanner tool according
shown picture.
NOTE: To avoid scratching the finish, place the handles on a
towel or other soft surface.
ENGLISH
The handle can be removed by hexagon spanner
directly.
8
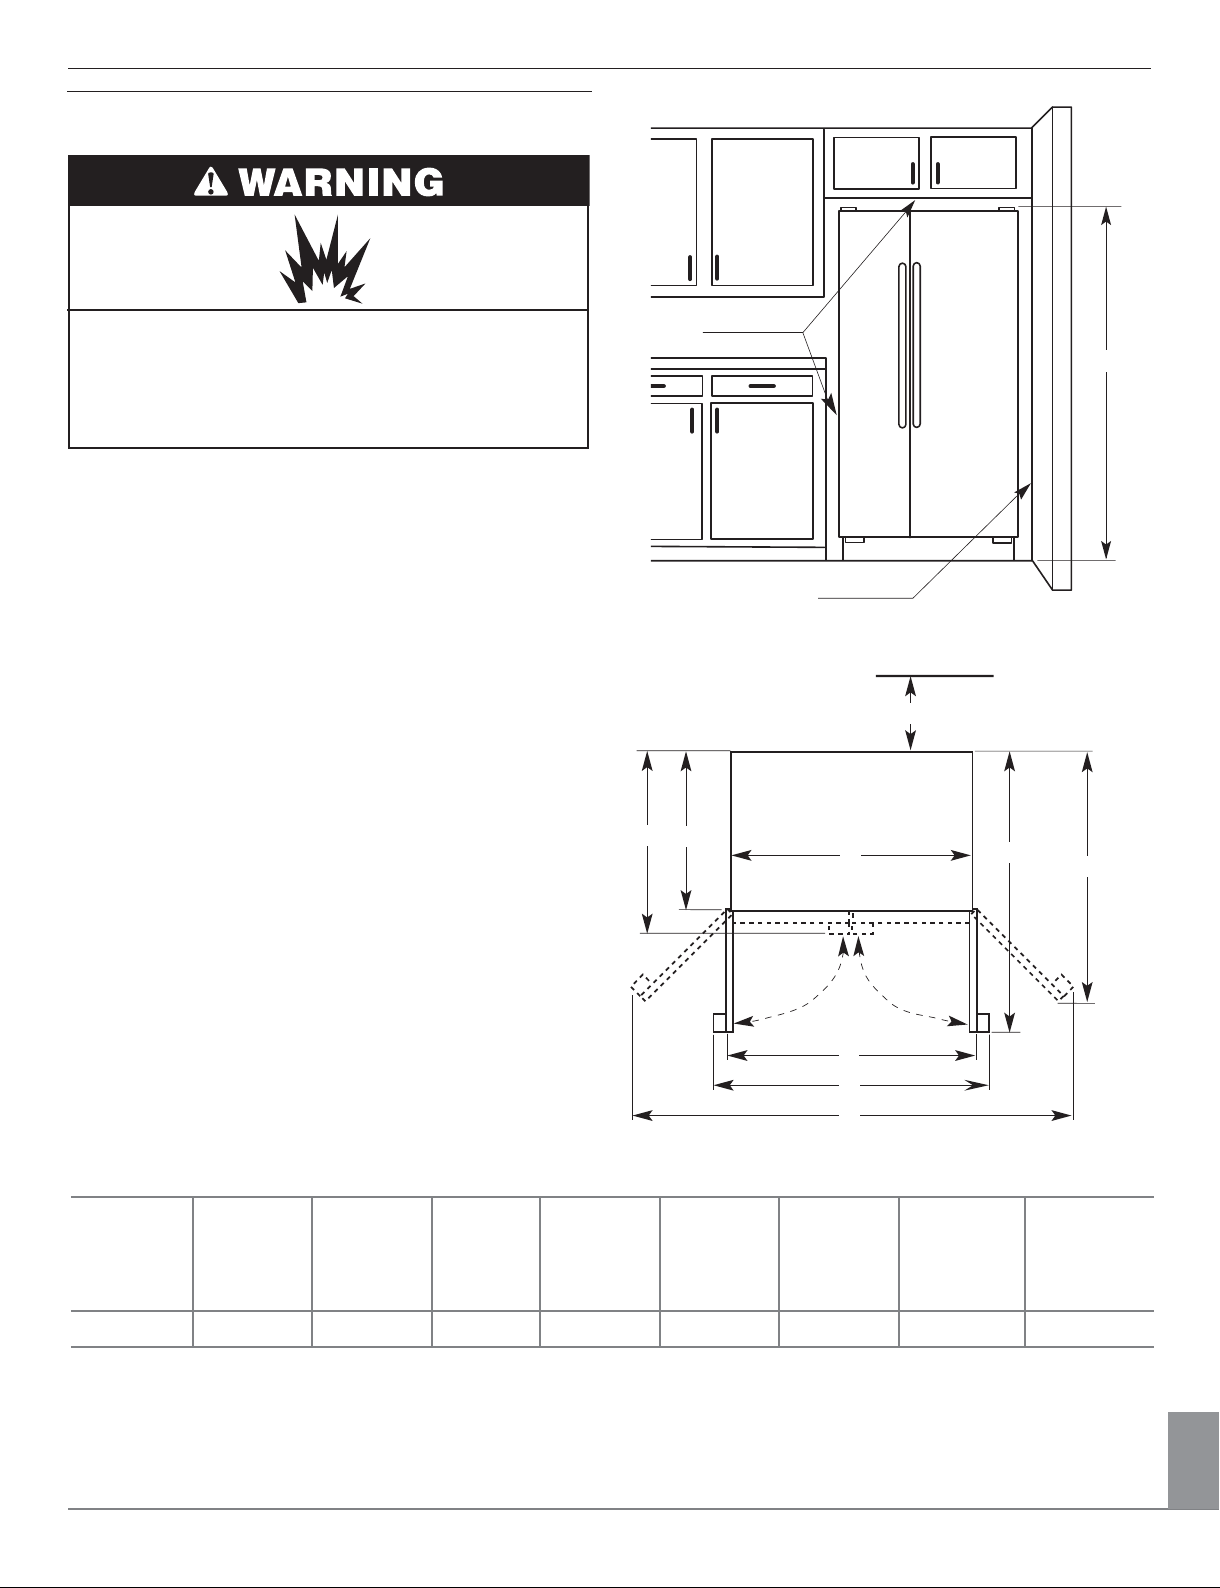
Location requirements
Explosion Hazard
Keep fl ammable materials and vapors, such as gasoline,
away from refrigerator.
Failure to do so can result in death, explosion, or fi re.
IMPORTANT: This refrigerator is designed for indoor household
use only.
To ensure proper ventilation for your refrigerator, allow for
1/2” (1.27 cm) of space on each side and at the top.
Allow for 3” (7.5 cm) of space behind the refrigerator.
If your refrigerator has an ice maker, allow extra space at the
back for the water line connections. When installing your
refrigerator next to a fixed wall, leave a 4” (10,1 cm) minimum
space on each side (depending on your model) to allow the
doors to swing open.
NOTES:
■
This refrigerator is intended for use in a location where the
temperature ranges from a minimum of 55 °F (10 °C) to a
maximum of 110 °F (43 °C). The preferred room temperature
range for optimum performance, which reduces electricity
usage and provides superior cooling, is between 60 °F
(15 °C) and 90 °F (32 °C). It is recommended that you do
not install the refrigerator near a heat source, such as an
oven or radiator.
B
1/2” (1,27 cm)
C
4” (10,1 cm)
3” (7,5 cm)
D
C
E
F
■
Normal minimum cabinet cut-out width required for product
installation is 36” (91.44 cm). However, if the product is
placed against an extended wall and the ability to remove
the crisper pans is desired, an additional 18” (45.72 cm) of
cabinet width is required, so a total cabinet opening width
of 54” (137.16 cm) is recommended.
Overall
height
A
Depth
w/handle
B
Depth
C
Cab.
width
D
69,074,5178,8 89,5 113,0 100,0 97,0 109,0 160,0
NOTE: All dimensions in cm (if not specified)
Depth
doors
open 90°
E
9
Depth
open door
stopper
F
90°
Width
doors
open 90°
G
90°
G
H
I
Width w/
handle
doors
open 90°
H
Width w/
handle
open door
stopper
I
ENGLISH
Electrical requirements
Electrical Shock Hazard
Plug into a grounded 3 prong outlet.
Do not remove ground prong.
Do not use an adapter.
Do not use an extension cord.
Failure to follow these instructions can result in death,
fi re, or electrical shock.
Before you move your refrigerator into its final location, it is
important to make sure you have the proper electrical
connection.
Recommended grounding method
A correct power source (see table on page 3) electrical supply
is required. It is recommended that a separate circuit serving
only your refrigerator be provided.
Use an outlet that cannot be turned off by a switch.
Do not use an extension cord.
NOTE: Before performing any type of installation or cleaning,
disconnect the refrigerator from the electrical source.
When you are finished, reconnect the refrigerator to the
electrical source and to the desired setting.
See “Using the controls” in the User Instructions, User Guide,
or Use & Care Guide.
Water supply requirements
Connecting water supply
Read all directions before you begin.
IMPORTANT:
■
Plumbing shall be installed in accordance with the
international Plumbing Code and any local codes and
ordinances.
■
The white water tubing on the back of the refrigerator (which
is used to connect to the household water line) is a PEX
(cross-linked polyethylene) tube. Copper and PEX tubing
connections from the household water line to the refrigerator
are acceptable, and will help avoid off-taste or odor in your
ice or water. Check for leaks.
■
Install tubing only in areas where temperatures will remain
above freezing.
■
Ensure the pipes length is not beyond 8 meter and be careful
not to kink together.
Complete the installation
Electrical Shock Hazard
Plug into a grounded 3 prong outlet.
Do not remove ground prong.
Do not use an adapter.
Do not use an extension cord.
IMPORTANT: All installations must meet local plumbing code
requirements.
Water pressure
A cold water supply with water pressure of between 22 and 120
psi (147 and 834 kPa) is required to operate the water dispenser
and ice maker. If you have questions about your water pressure,
call a licensed, qualified plumber.
■
If your refrigerator has a water dispenser: After installation is
complete, use the water dispenser to check the water
pressure.
■
With the water filter removed, dispense 1cup (237 ml) of
water. If 1 cup of water is dispensed in 8 seconds or less,
the water pressure to the refrigerator meets the minimum
requirement.
■
If it takes longer than 8 seconds to dispense 1 cup of water,
the water pressure to the refrigerator is lower than
recommended. See “Problem solver” for suggestions.
ENGLISH
Failure to follow these instructions can result in death,
fi re, or electrical shock.
1. Plug into a grounded 3 prong outlet.
2. Flush the water system. See “Water and ice dispensers” in
the User Instructions or User Guide.
NOTE: Allow 24 hours to produce the first batch of ice.
Allow 72 hours to completely fill ice container.
(Ice production can be slower depending on door openings
and ambient temperature).
10
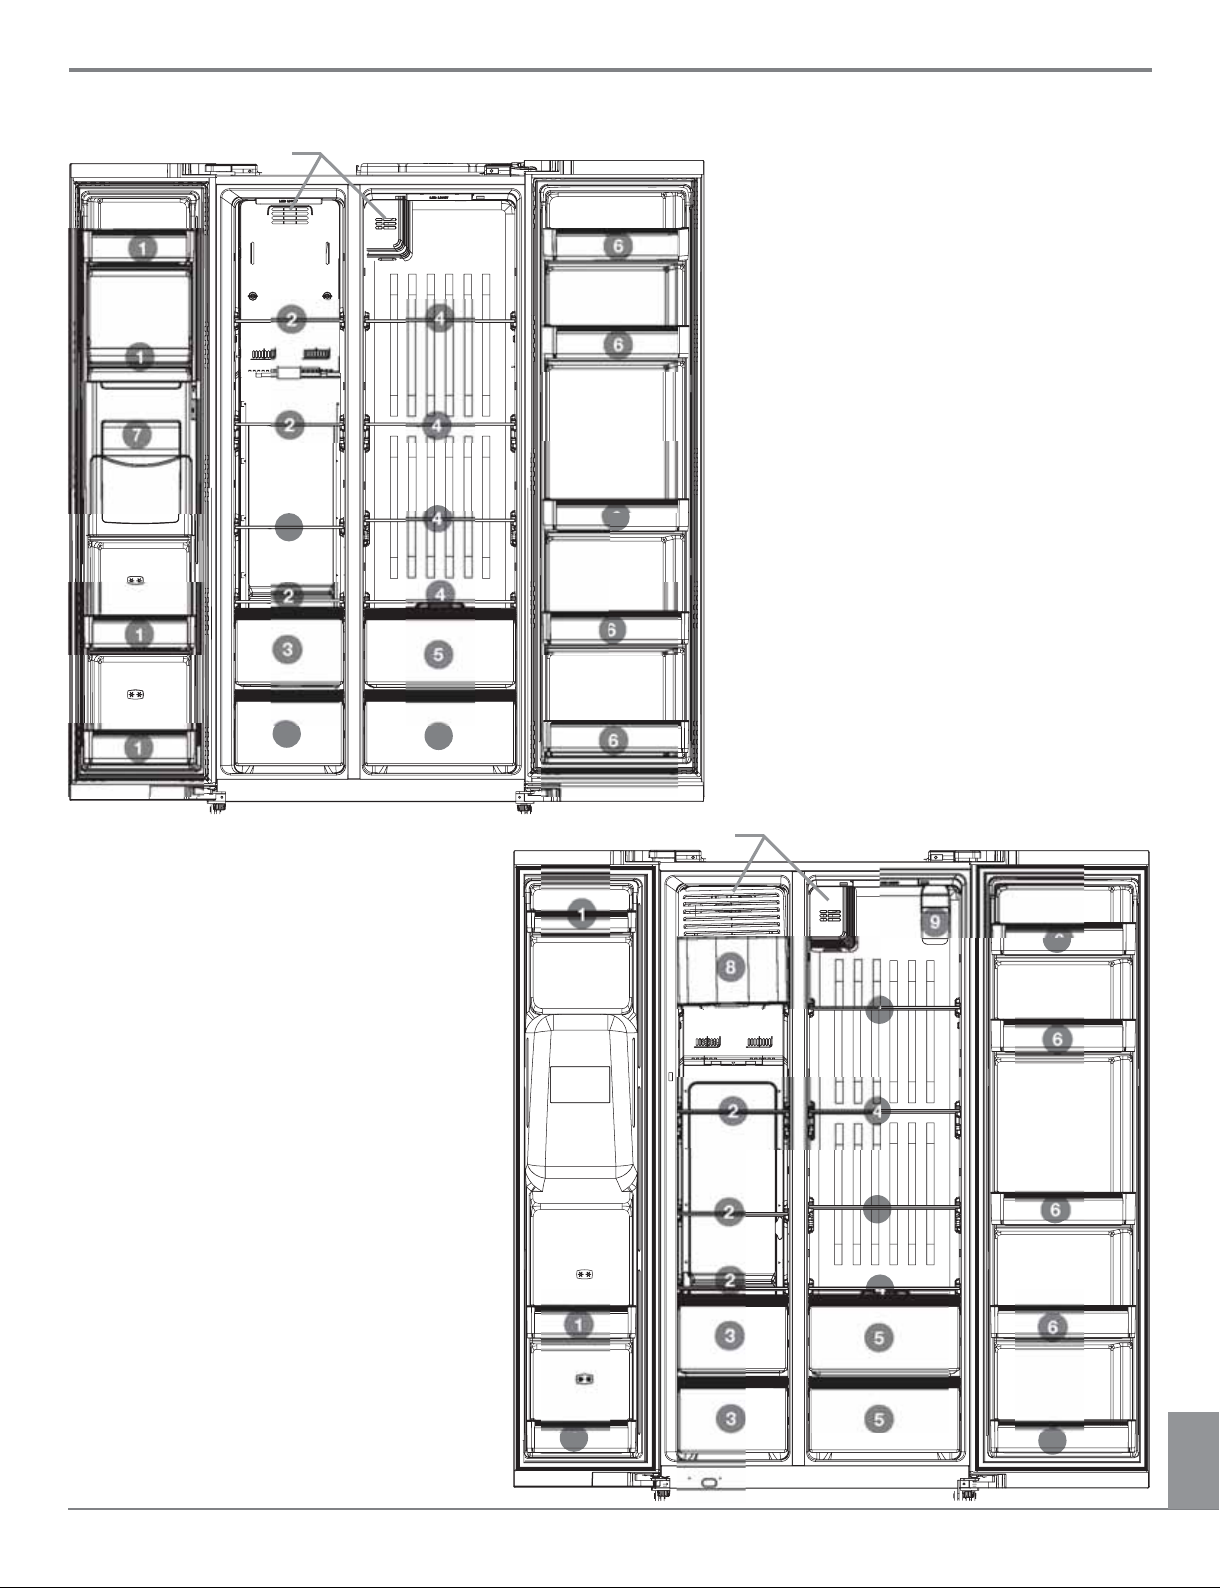
REFRIGERATOR USE
a
1- Freezer door bins
2- Freezer compartment glass shelfs
1
6
3- Freezer compartment drawers
2
1
7
1
1
2
2
2
3
3
4
6
4
4
4
5
5
6
6
6
4- Refrigerator compartment glass shelfs
5- Refrigerator vegetable crisper
6- Refrigerator door bins
7- Smart Ice
8- Ice maker and Ice storage bin
9- Water filter
a) Note: When loading foods, do not
block air outlets
a
1
8
2
2
2
1
1
3
3
9
4
4
4
4
5
5
6
6
6
6
6
11
ENGLISH
Refrigerator compartment
Using the controls
Put the food which are short-term storage or to eat
at any time in the refrigerator compartment.
Although regulating temperature will enable average
temperature of the majority of regional cold rooms maintain
between 2 °C – 8 °C, it can not make long-term preservation
of food. Therefore, refrigerator compartment only use as a
shortterm food storage.
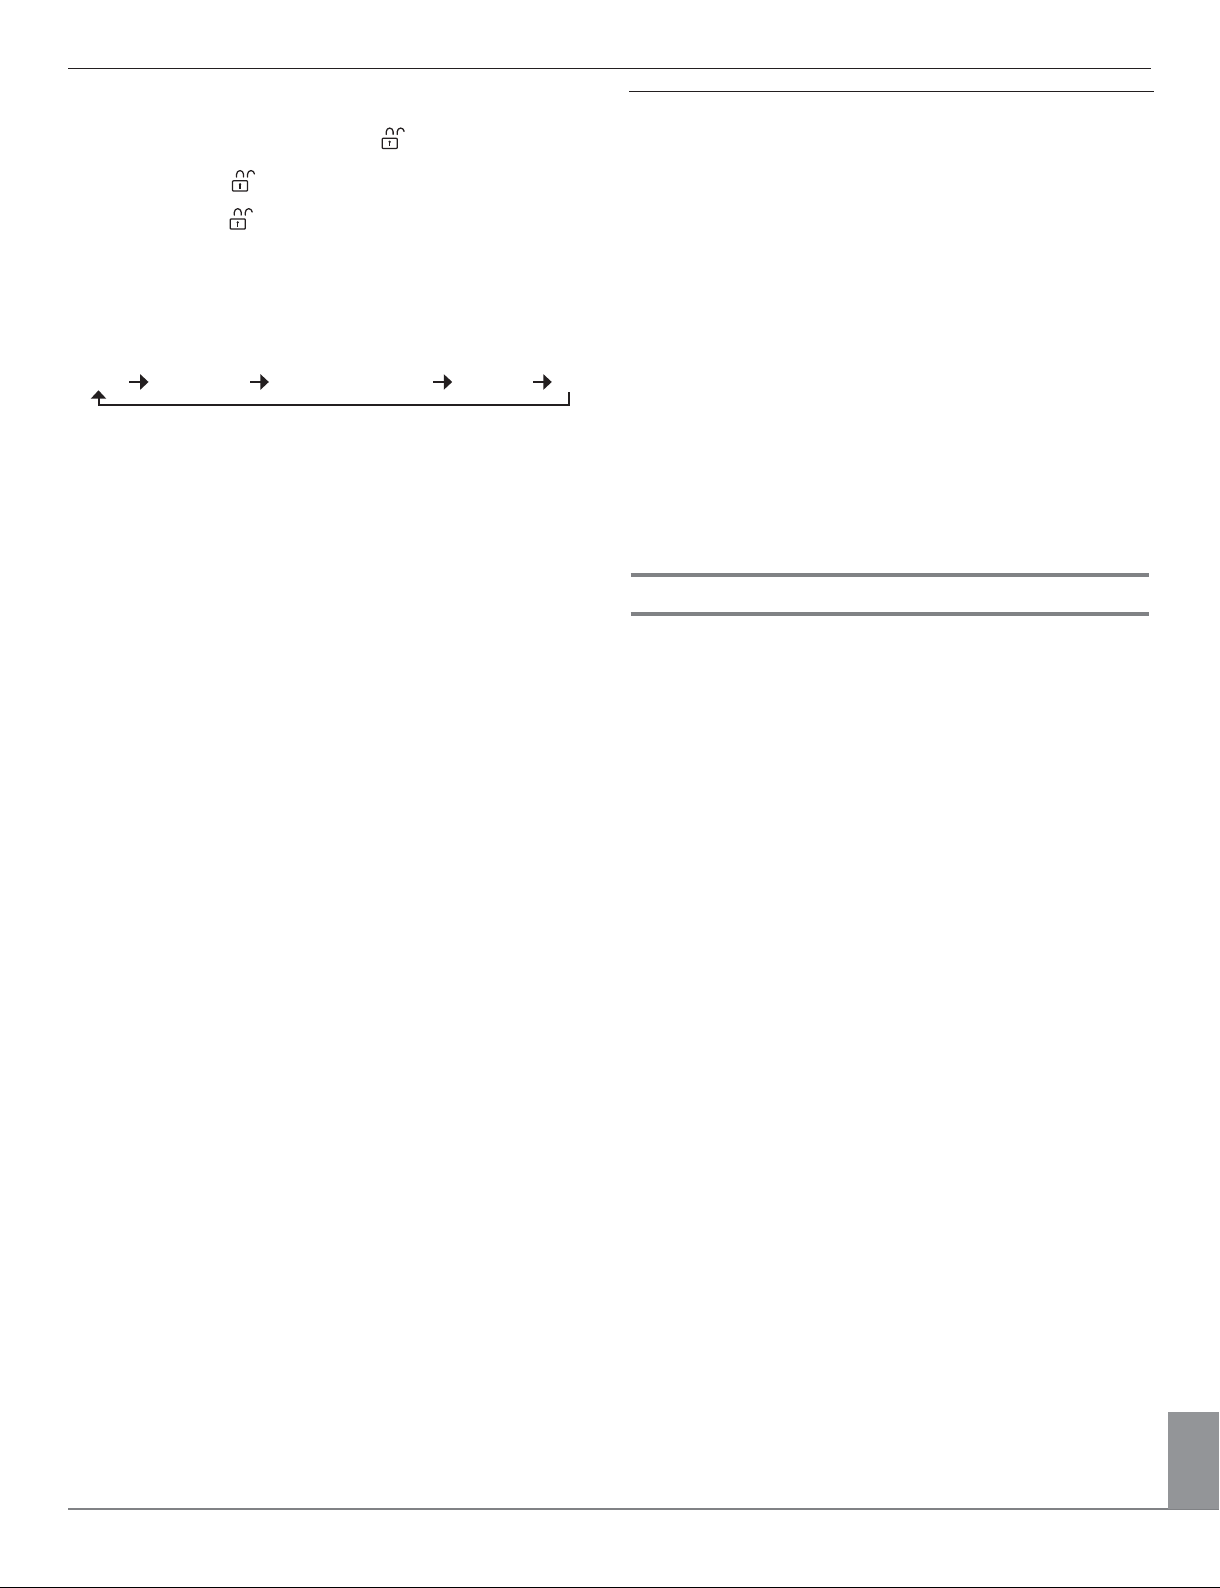
Shelf adjustment
According to the needs of food storage, you can adjust the
shelf to proper position.
To facilitate the use of it or adjustment the location, the shelf
can be set to slip so that you can use and adjust it easily when
you want to clear the shelf, please move the shelf by the
direction, then turn the shelf in the direction for 90° until it is
Perpendicular to the original direction, pull out the shelf by the
direction.
Height adjustment and cleaning of bin
A
B
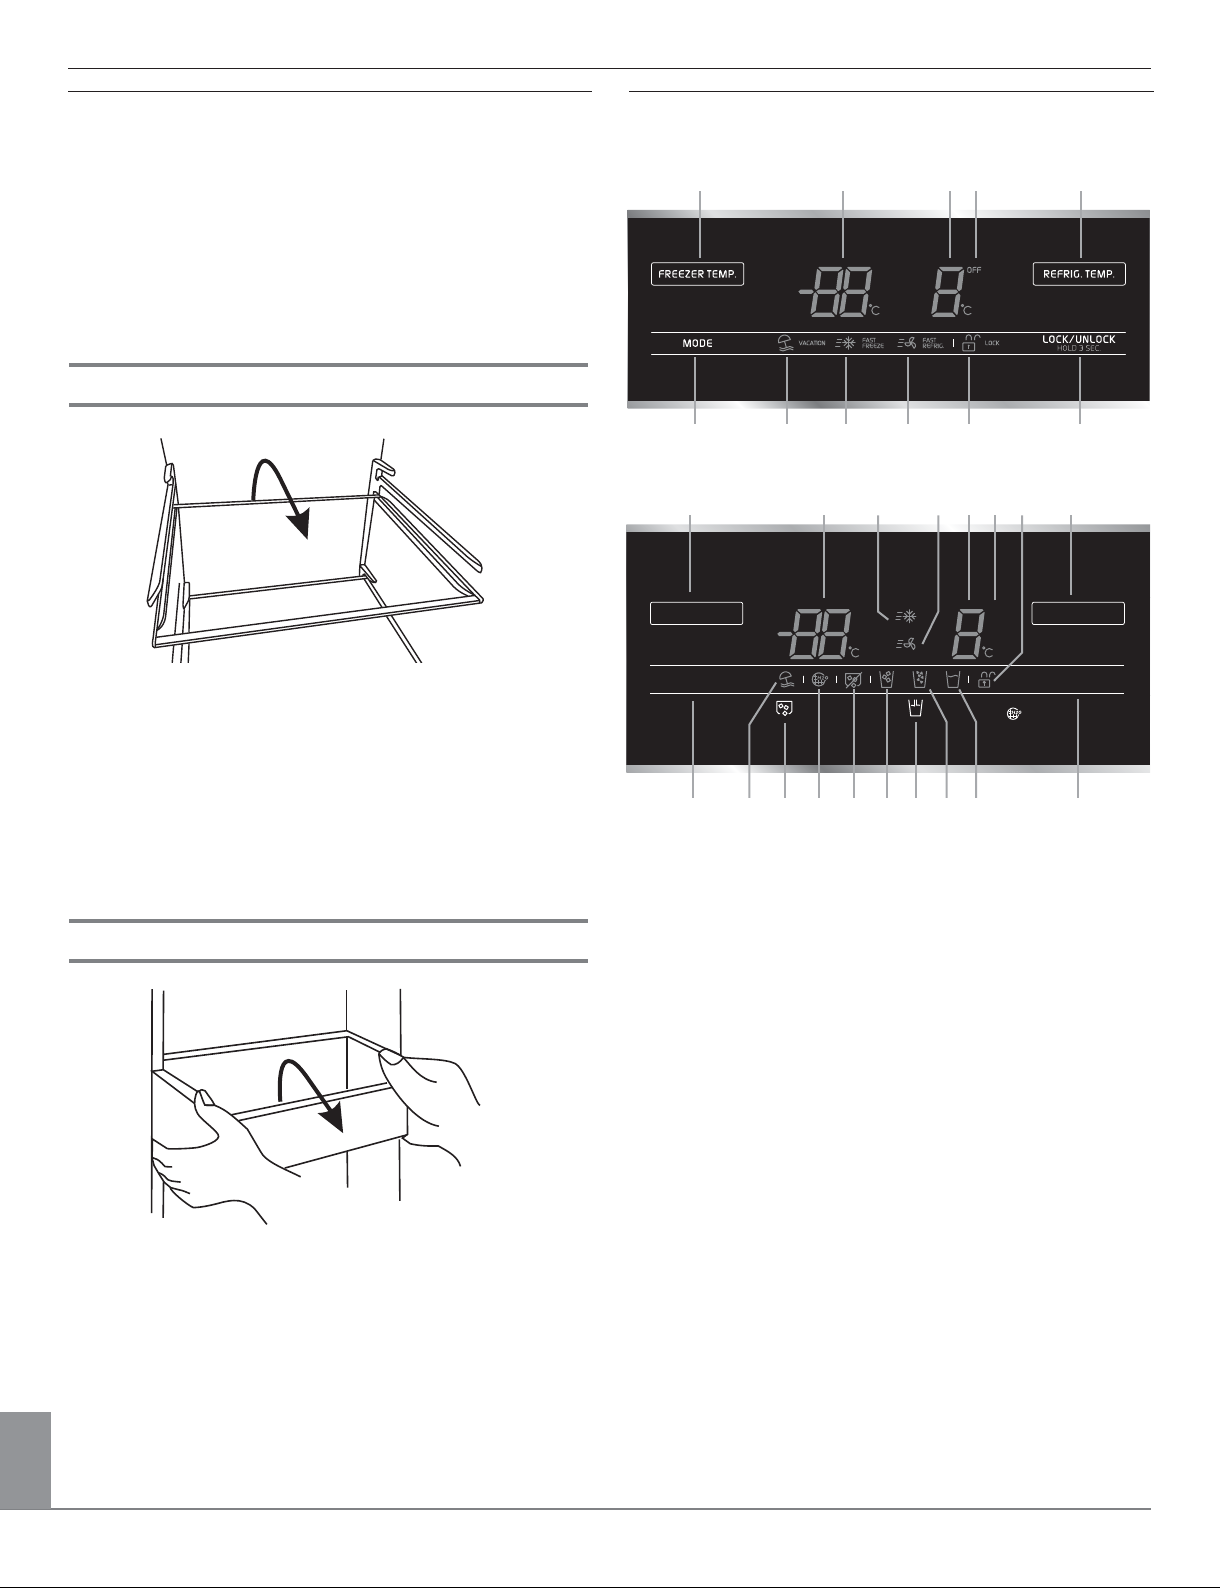
A
FREEZER TEMP. REFRIG. TEMP.
MODE
B
1- Button operation
A- Freezer compartment temperature adjustment
B- Mode settings
C- Refrigerator compartment temperature adjustment
D- Lock/Unlock controls
E- Ice Maker ON/OFF
F- Dispenser
E1
5
1
2
3
52 3 4
FAST FRZ.
FAST REFRIG.
ICE MAKER
ON/OFF
7
6
4
6
DISPENSER
FILTER RESET/3 SEC.
F8 9 10 1211
7
OFF
C
LOCK/UNLOCK
C
D
HOLD 3 SEC.
D
Lift the bin by the direction, hold both the sides, then pull it out
by the direction. After cleaning, to install the bin by the
opposite direction. You can also adjust the position according
to the height of stored food.
ENGLISH
2- Display
1- Vacation mode ON
2- Quick-freezer mode ON
3- Quick-cold mode ON
4- Controls lock
5- Freezer compartment temperature
6- Refrigerator compartment temperature
7- Refrigerator OFF
8- Water filter change
9- Ice Maker disabled
10- Cubed ice
11- Crushed ice
12- Water
12
3- Lock/Unlock
At non-lock state (the 4 icon shows ), Press D key for 3
seconds, the refrigerator will go into the state of Locked and
the 4 icon shows .
Press D key for 3 seconds persistently at the Locked state,
the 4 icon shows and the Locked state releases.
The following functions must be in operation under the
unlocked state.
Press mode button (button B), you can choose running mode
as the following.
Vacation Quick-freezer Quick-cold and freezer Quick-cold None
The following settings must be valid upon locking.
4- Vacation mode
Press B key to select Vacation mode, the 1 icon shows, then
press D key to confirm, the refrigerator will be running
according to Vacation mode.
5- Rapid cooling mode
Press B key to select Rapid cooling mode, the 3 icon shows,
then press D key to confirm, the refrigerator will be running
according to Rapid cooling mode.
6- Quick-freezer mode
Press B key to choose Quick-freeze mode, the 2 icon shows,
then press D key to confirm, the refrigerator will be running
according to Quick-freezer mode.
7- Refrigerator compartment temperature settings
Press C key once, the Refrigerator compartment temperature
displays with flashing, press C key again and you can set the
temperature, the range of temperature is from 2 °C to 8 °C.
8- Freezer compartment temperature settings.
Press A key once, the freezer compartment temperature
displays with flashing, press D key again and you can set the
temperature, the range of temperature is from -16 °C to -24 °C.
Water and ice dispensers
NOTES:
■
The dispensing system will not operate when freezer door is
open.
■
Allow 24 hours for the refrigerator to cool down and chill
water.
■
Allow 24 hours to produce the first batch of ice. Discard the
first three batches of ice produced. Wait 72 hours for full ice
production.
■
The display control screen on the freezer door panel will turn
off automatically and enter “sleep” mode when the control
buttons and dispenser pads have not been used for 2
minutes or more. While in “sleep” mode, the first press of a
control button will only reactivate the display screen, without
changing any settings.
Flush the water system
Air in the water dispensing system can cause the water
dispenser to drip. After connecting the refrigerator to a water
source or replacing the water filter, flush the water system.
Flushing the water dispensing system forces air from the water
line and filter, and prepares the water filter for use.
NOTE: As air is cleared from the system, water may spurt out
of the dispenser.
1. Using a sturdy container, depress and hold the water
dispenser pad for 5 seconds, then release it for 5 seconds.
2. Repeat Step 1 until water begins to flow.
3. Once water begins to flow, continue depressing and releasing
the dispenser pad (5 seconds on, 5 seconds off) until a total
of 3 gal (12 L) has been dispensed.
Additional flushing may be required in some households.
NOTE: When the set temperature of freezer changes, if set
relevant function mode (e.g. quick-cold mode, quick-freezer
mode, quick-cold and freezer mode, vacation mode), the
relevant function mode should be quitted or canceled at once.
ENGLISH
13
 Loading...