


EL03PPXMQ00
REFRIGERATOR
For questions about features, operation/performance
parts, accessories or service, call: 1-800-253-1301.
In Canada, call for assistance 1-800-461-5681, for installation
and service, call: 1-800-807-6777
or visit our website at...
www.whirlpool.com or www.whirlpool.com/canada
REFRIGERADOR
Si tiene preguntas respecto alas caracterfsticas, funcionamiento,
rendimiento, piezas, accesorios o servicio, Ilame al: 1-800-253-1301.
En Canada, Ilame para obtener ayuda al 1-800-461-5681, para la
instalaci6n y el servicio t_cnico, Ilame al: 1-800-807-6777
o visite nuestro sitio web en...
www.whirlpool.com o www.whirlpool.com/canada
# #
REFRIGERATEUR
Au Canada, pour assistance, composez le 1-800-461-5681, pour
installation ou service, le 1-800-807-6777
ou visitez notre site web &
www.whirlpool.com/canada
Table of Contents/[ndice/Table des matieres ....... 2
326031822
TABLEOFCONTENTS
REFRIGERATOR SAFETY ............................................................. 3
Proper Disposal of Your Old Refrigerator .................................... 3
INSTALLATION INSTRUCTIONS .................................................. 4
Unpack the Refrigerator ............................................................... 4
Location Requirements ................................................................ 4
Electrical Requirements ............................................................... 4
Reverse the Door Swing .............................................................. 5
Reverse the Lock ......................................................................... 7
Adjust the Door Closing ............................................................... 7
Normal Sounds ............................................................................ 7
REFRIGERATOR USE .................................................................... 8
Using the Control ......................................................................... 8
REFRIGERATOR FEATURES ........................................................ 8
Key Eject Lock ............................................................................. 8
Refrigerator Shelves ..................................................................... 8
Dual Action Shelf .......................................................................... 8
Crisper and Crisper Cover ........................................................... 9
Convertible Compartment ............................................................ 9
Door Features ............................................................................... 9
REFRIGERATOR CARE ............................................................... 10
Clean the Refrigerator ................................................................ 10
Defrost and Clean the Freezer ................................................... 10
Vacation and Moving Care ......................................................... 11
Power Interruptions .................................................................... 11
TROUBLESHOOTING .................................................................. 11
ASSISTANCE OR SERVICE ......................................................... 12
In the U.S.A ................................................................................ 12
In Canada ................................................................................... 12
WAR RANTY .................................................................................. 13
#
INDICE
SEGURIDAD DEL REFRIGERADOR ........................................... 14
Como deshacerse adecuadamente de su refrigerador viejo .... 14
INSTRUCCIONES DE INSTALACION ......................................... 15
Desempaque el refrigerador ...................................................... 15
Requisitos de Iocalizacion .......................................................... 15
Requisitos electricos .................................................................. 16
Como invertir el cierre de la puerta ............................................ 16
Como invertir la cerradura ......................................................... 18
Como ajustar el cierre de la puerta ............................................ 18
Sonidos normales ...................................................................... 19
USO DE SU REFRIGERADOR ..................................................... 19
Uso del control ........................................................................... 19
CARACTERiSTICAS DEL REFRIGERADOR .............................. 19
Cerradura con mecanismo eyector de Ilave.............................. 19
Estantes del refrigerador ............................................................ 19
Estante de accion dual ............................................................... 20
Cajon para verduras y tapa ........................................................ 20
Compartimiento convertible ....................................................... 20
Caracteristicas de la puerta ....................................................... 20
CUIDADO DE SU REFRIGERADOR ............................................ 21
Limpieza del refrigerador ........................................................... 21
Como descongelar y limpiar el congelador ............................... 21
Cuidado durante lasvacaciones y mudanzas ........................... 22
Cortes de corriente ..................................................................... 22
SOLUCION DE PROBLEMAS ...................................................... 22
AYUDA O SERVICIO TleCNICO ................................................... 23
En los EE.UU .............................................................................. 23
En Canada .................................................................................. 23
GARANTiA ..................................................................................... 24
TABLEDESMATIERES
SleCURITle DU RleFRIGleRATEUR .............................................. 25
Mise au rebut de votre vieux refrig6rateur ................................. 25
INSTRUCTIONS D'INSTALLATION ............................................ 26
Deballage du refrig6rateur ......................................................... 26
Emplacement d'installation ........................................................ 26
Specifications electriques .......................................................... 27
Inversion de I'ouverture de la porte ........................................... 27
Inversion de la serrure ................................................................ 29
Reglage de la fermeture de la porte .......................................... 29
Bruits normaux ........................................................................... 30
UTILISATION DU RleFRIGleRATEUR .......................................... 30
Utilisation de lacommande ....................................................... 30
CARACTleRISTIQUES DU RleFRIGleRATEUR ........................... 30
Serrure a ejection de cle ............................................................ 30
Tablettes du refrig6rateur ........................................................... 31
Tablette a double action ............................................................. 31
Bac & legumes et couvercle ....................................................... 31
Compartiment convertible .......................................................... 31
Caracteristiques de la porte ....................................................... 31
ENTRETIEN DU RleFRIGleRATEUR ............................................ 32
Nettoyage du refrig6rateur ......................................................... 32
Degivrage et nettoyage du congelateur ..................................... 32
Entretien avant les vacances et avant un dem6nagement ........33
Pannes de courant ..................................................................... 33
DI_PANNAGE ................................................................................. 34
ASSISTANCE OU SERVICE ......................................................... 34
GARANTIE ..................................................................................... 35
Wh 1°
2
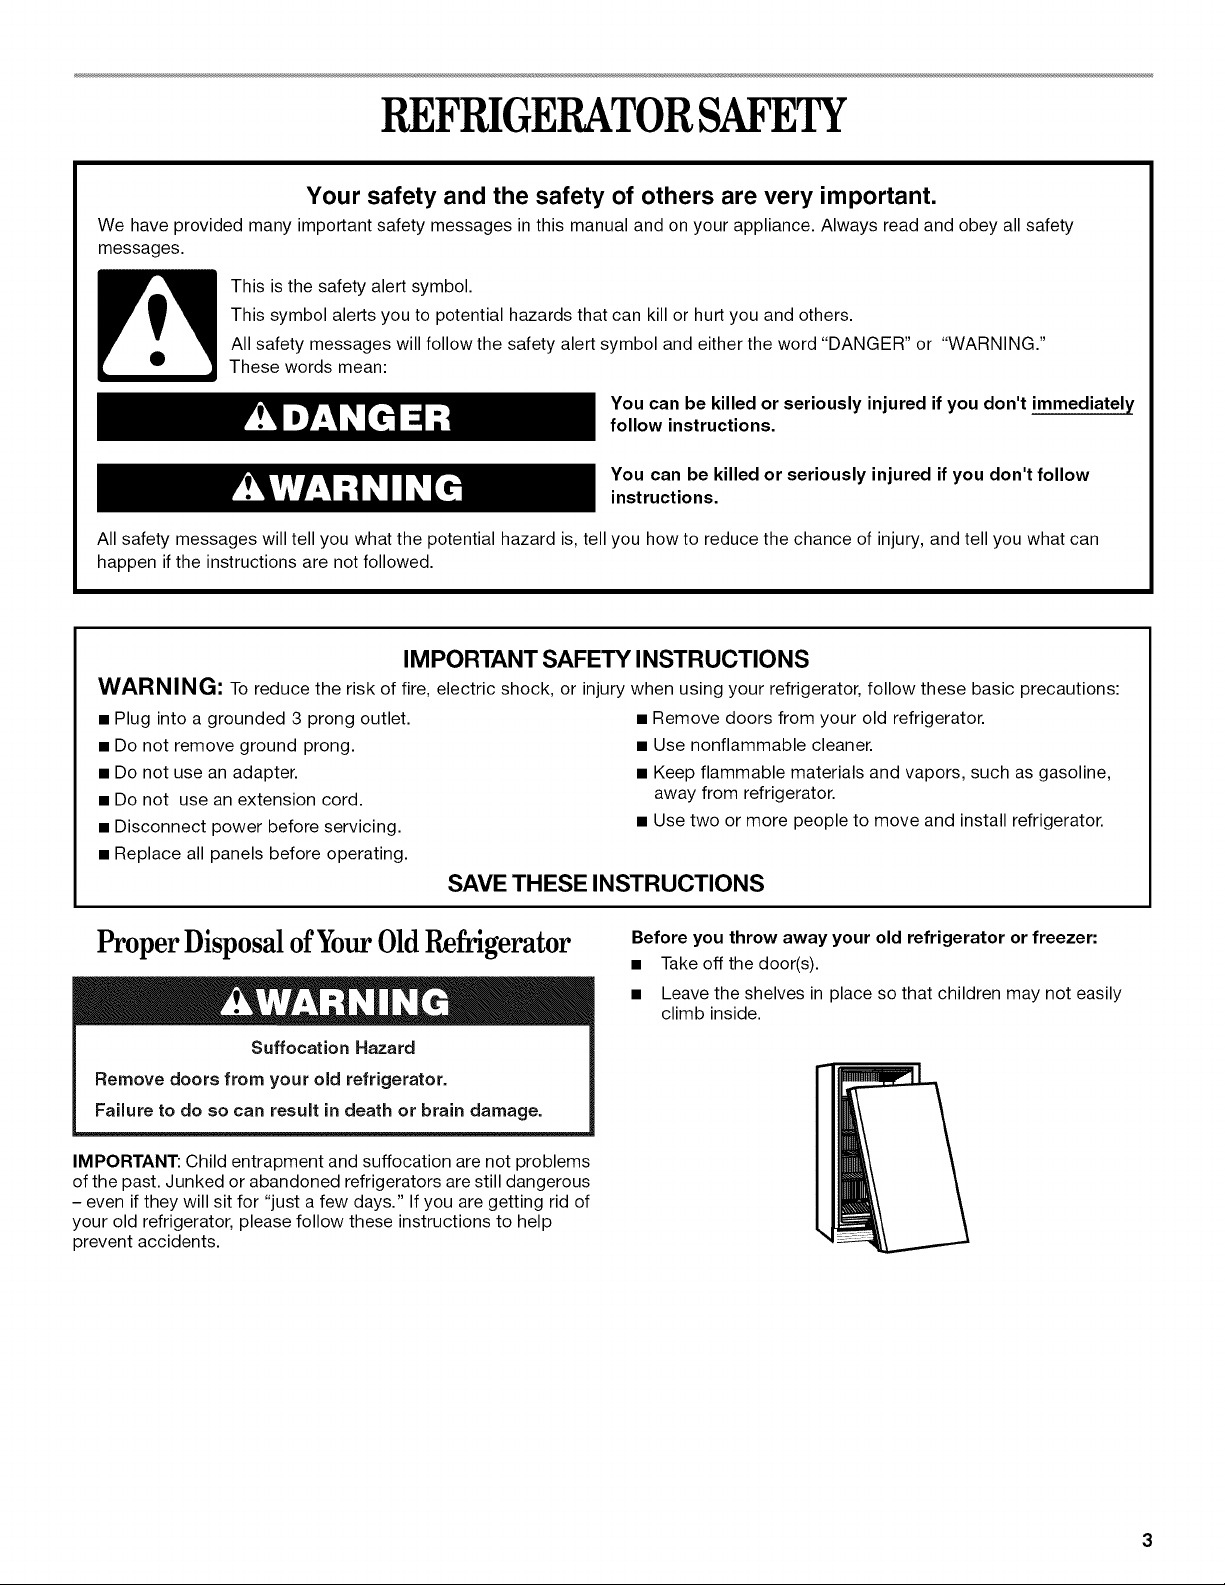
REFRIGERATORSAFETY
Your safety and the safety of others are very important.
We have provided many important safety messages in this manual and on your appliance. Always read and obey all safety
messages.
This is the safety alert symbol.
This symbol alerts you to potential hazards that can kill or hurt you and others.
All safety messages will follow the safety alert symbol and either the word "DANGER" or "WARNING."
These words mean:
You can be killed or seriously injured if you don't immediately
follow instructions.
You can be killed or seriously injured if you don't follow
instructions.
All safety messages will tell you what the potential hazard is, tell you how to reduce the chance of injury, and tell you what can
happen if the instructions are not followed.
IMPORTANT SAFETY INSTRUCTIONS
WARNING: To reduce the risk of fire, electric shock, or injury when using your refrigerator, follow these basic precautions:
• Plug into a grounded 3 prong outlet.
• Do not remove ground prong.
• Do not use an adapter.
• Do not use an extension cord.
• Disconnect power before servicing.
• Replace all panels before operating.
• Remove doors from your old refrigerator.
• Use nonflammable cleaner.
• Keep flammable materials and vapors, such as gasoline,
away from refrigerator.
• Use two or more people to move and install refrigerator.
SAVE THESE INSTRUCTIONS
ProperDisposalofYourOldRefrigerator
Suffocation Hazard
Remove doors from your old refrigerator.
Failure to do so can result in death or brain damage.
Before you throw away your old refrigerator or freezer:
• Take off the door(s).
• Leave the shelves in place so that children may not easily
climb inside.
IMPORTANT: Child entrapment and suffocation are not problems
of the past. Junked or abandoned refrigerators are still dangerous
- even if they will sit for "just a few days." If you are getting rid of
your old refrigerator, please follow these instructions to help
prevent accidents.
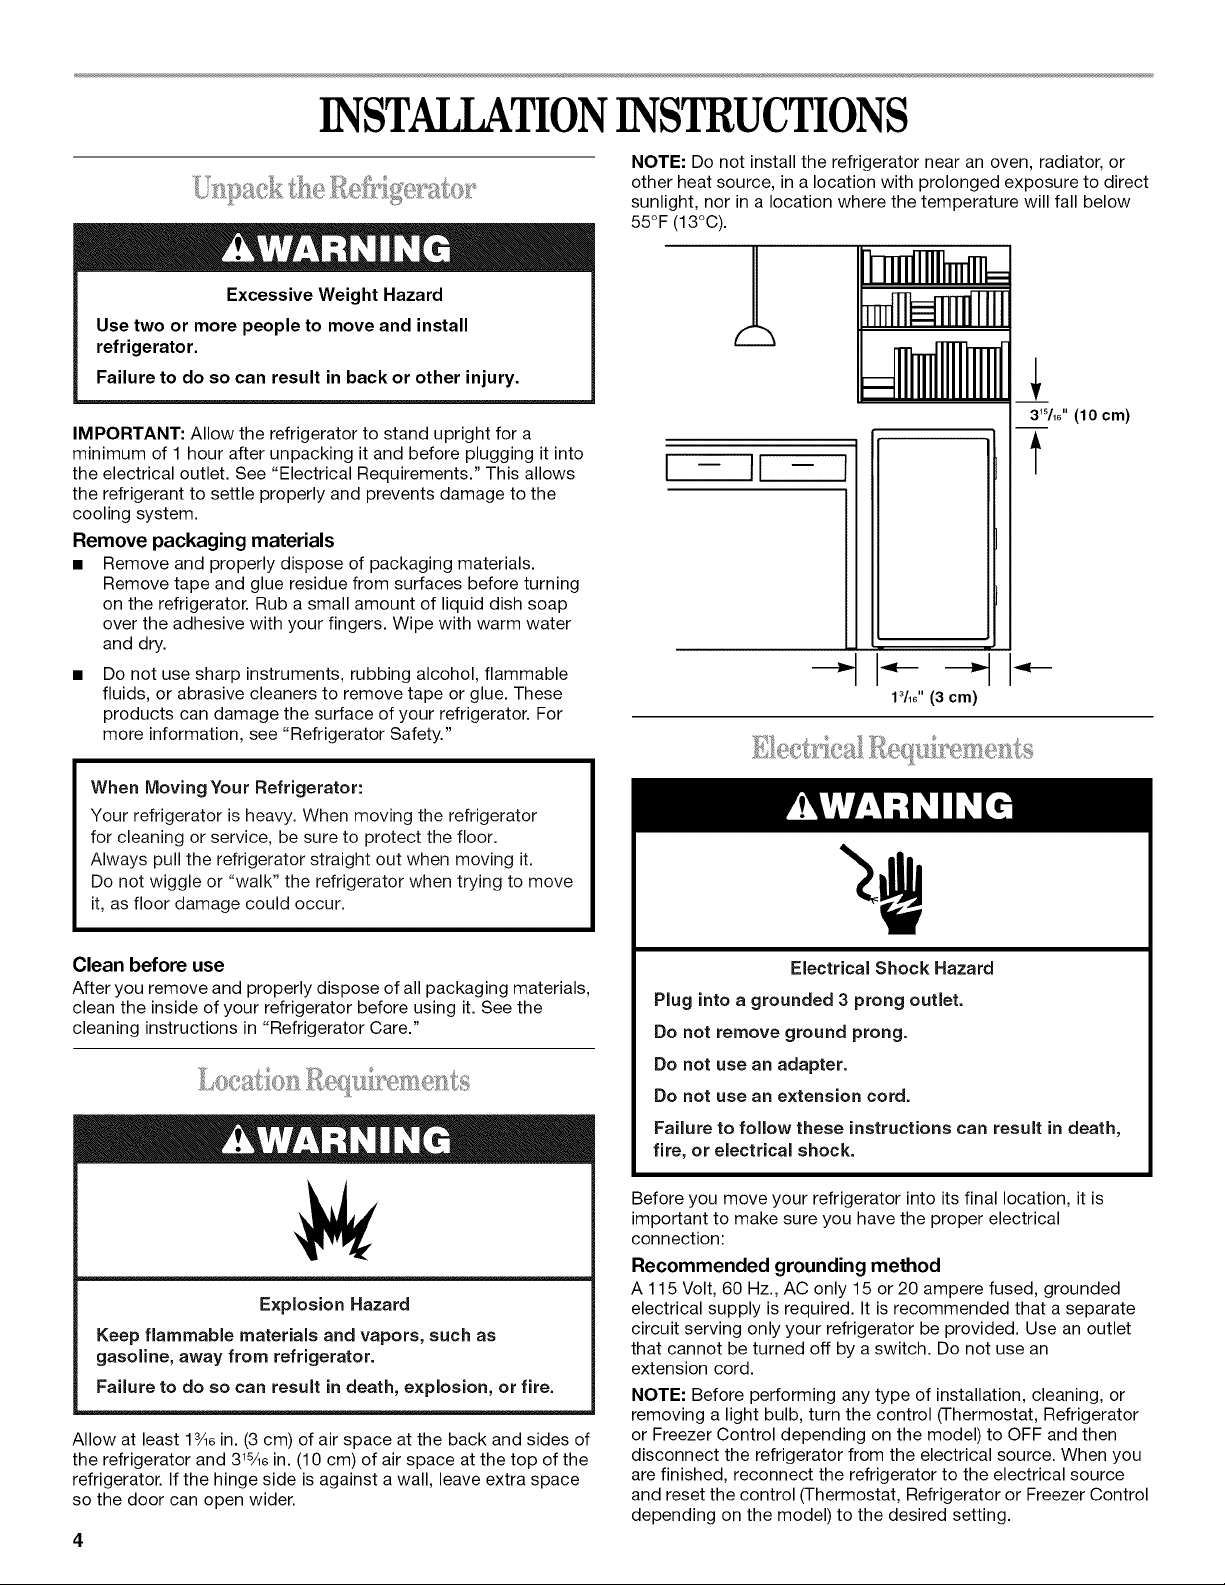
INSTALLATIONINSTRUCTIONS
Excessive Weight Hazard
Use two or more people to move and install
refrigerator.
Failure to do so can result in back or other injury.
IMPORTANT: Allow the refrigerator to stand upright for a
minimum of 1 hour after unpacking it and before plugging it into
the electrical outlet. See "Electrical Requirements." This allows
the refrigerant to settle properly and prevents damage to the
cooling system.
Remove packaging materials
• Remove and properly dispose of packaging materials.
Remove tape and glue residue from surfaces before turning
on the refrigerator. Rub a small amount of liquid dish soap
over the adhesive with your fingers. Wipe with warm water
and dry.
• Do not use sharp instruments, rubbing alcohol, flammable
fluids, or abrasive cleaners to remove tape or glue. These
products can damage the surface of your refrigerator. For
more information, see "Refrigerator Safety."
When Moving Your Refrigerator:
Your refrigerator is heavy. When moving the refrigerator
for cleaning or service, be sure to protect the floor.
Always pull the refrigerator straight out when moving it.
Do not wiggle or "walk" the refrigerator when trying to move
it, as floor damage could occur.
Clean before use
After you remove and properly dispose of all packaging materials,
clean the inside of your refrigerator before using it. See the
cleaning instructions in "Refrigerator Care."
Explosion Hazard
Keep flammable materials and vapors, such as
gasoline, away from refrigerator.
Failure to do so can result in death, explosion, or fire.
Allow at least 1¾e in. (3cm) of air space at the back and sides of
the refrigerator and 315/16in. (10 cm) of air space at the top of the
refrigerator. If the hinge side is against a wall, leave extra space
so the door can open wider.
NOTE: Do not install the refrigerator near an oven, radiator, or
other heat source, in a location with prolonged exposure to direct
sunlight, nor in a location where the temperature will fall below
55°F (13°C).
[-][-
13/,6'' (3 cm)
31s/16'' (10 cm)
Electrical Shock Hazard
Plug into a grounded 3 prong outlet.
Do not remove ground prong.
Do not use an adapter.
Do not use an extension cord.
Failure to follow these instructions can result in death,
fire, or electrical shock.
Before you move your refrigerator into its final location, it is
important to make sure you have the proper electrical
connection:
Recommended grounding method
A 115 Volt, 60 Hz., AC only 15 or 20 ampere fused, grounded
electrical supply is required. It is recommended that a separate
circuit serving only your refrigerator be provided. Use an outlet
that cannot be turned off by a switch. Do not use an
extension cord.
NOTE: Before performing any type of installation, cleaning, or
removing a light bulb, turn the control (Thermostat, Refrigerator
or Freezer Control depending on the model) to OFF and then
disconnect the refrigerator from the electrical source. When you
are finished, reconnect the refrigerator to the electrical source
and reset the control (Thermostat, Refrigerator or Freezer Control
depending on the model) to the desired setting.
Excessive Weight Hazard
Use two or more people to move and install
refrigerator.
Failure to do so can result in back or other injury.
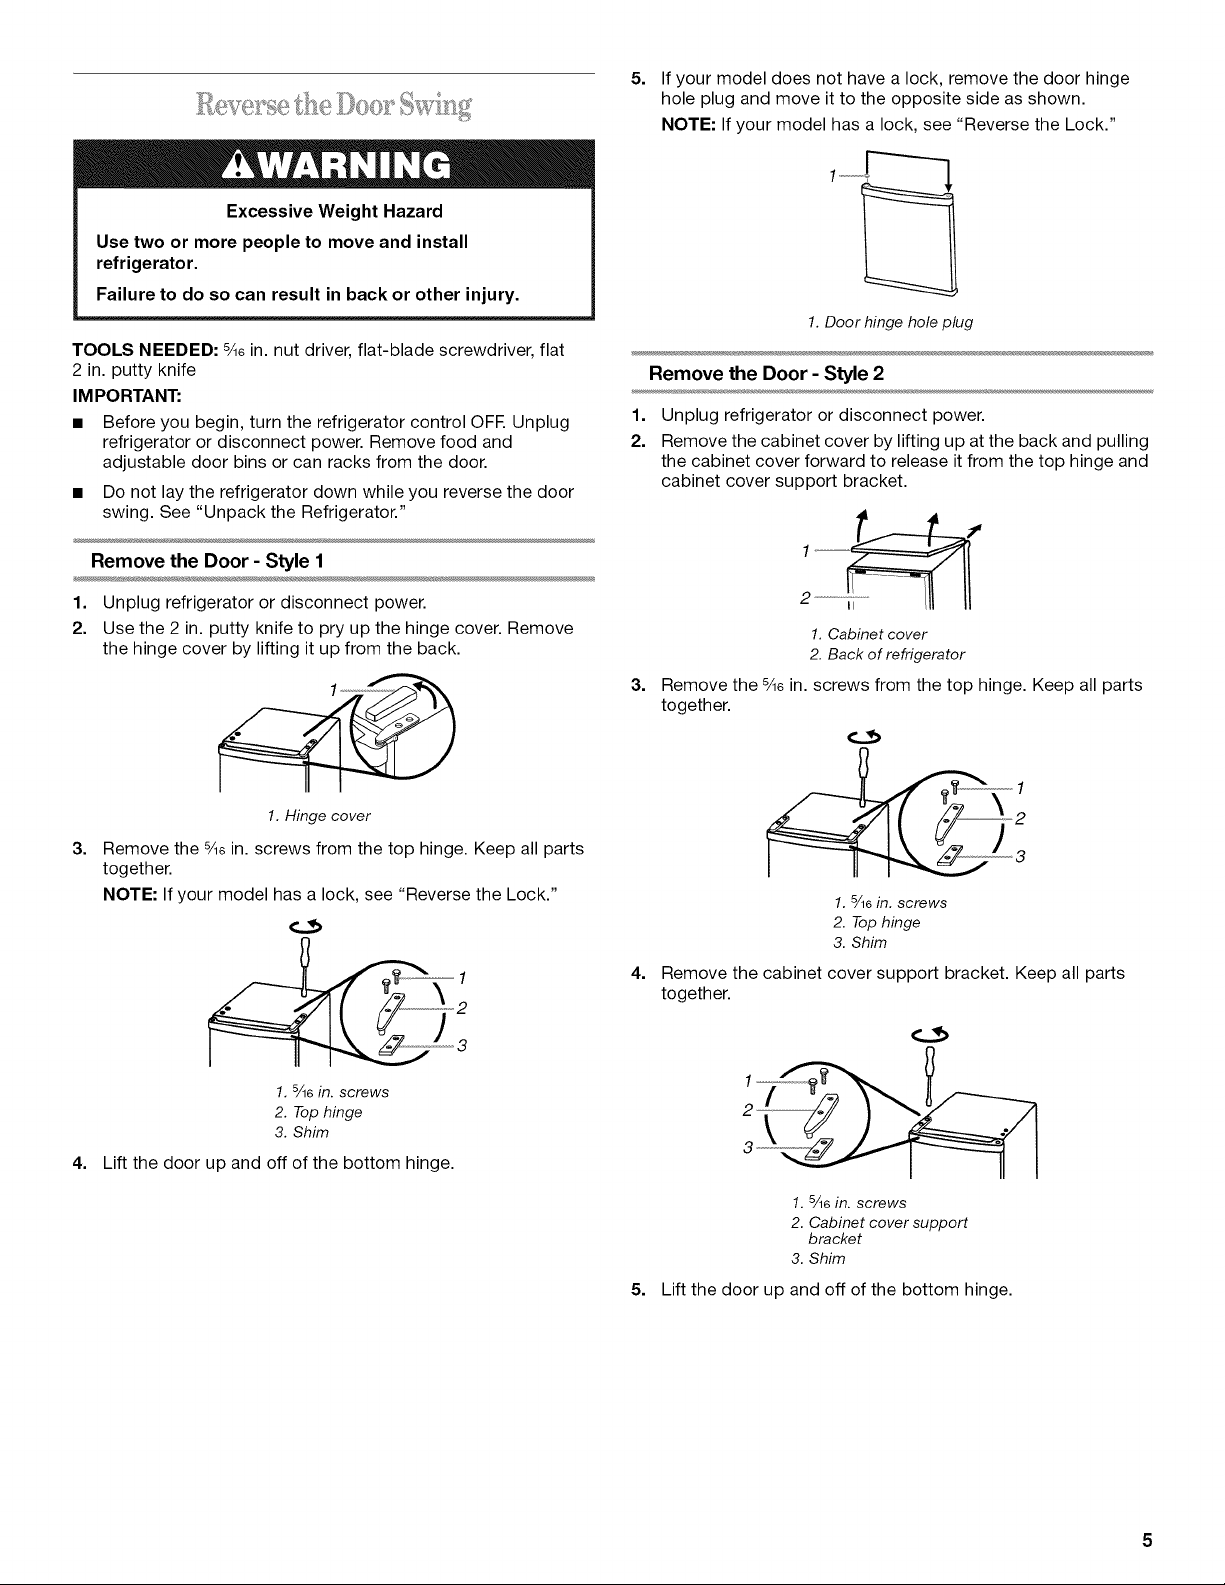
TOOLS NEEDED: %e in. nut driver, flat-blade screwdriver, flat
2 in. putty knife
IMPORTANT:
• Before you begin, turn the refrigerator control OFE Unplug
refrigerator or disconnect power. Remove food and
adjustable door bins or can racks from the door.
• Do not lay the refrigerator down while you reverse the door
swing. See "Unpack the Refrigerator."
Remove the Door - Style 1
1. Unplug refrigerator or disconnect power.
2. Use the 2 in. putty knife to pry up the hinge cover. Remove
the hinge cover by lifting it up from the back.
1. Hinge cover
3. Remove the 5/lein. screws from the top hinge. Keep all parts
together.
NOTE: If your model has a lock, see "Reverse the Lock."
............................ 2
3
1. sA6in. screws
2. Top hinge
3. Shim
4. Lift the door up and off of the bottom hinge.
5. If your model does not have a lock, remove the door hinge
hole plug and move it to the opposite side as shown.
NOTE: If your model has a lock, see "Reverse the Lock."
1.Doorhinge hole plug
Remove the Door - Style 2
1=
2.
Unplug refrigerator or disconnect power.
Remove the cabinet cover by lifting up at the back and pulling
the cabinet cover forward to release it from the top hinge and
cabinet cover support bracket.
3=
1.Cabinet cover
2. Back of refrigerator
Remove the 5/lein. screws from the top hinge. Keep all parts
together.
4=
1.5/16in. screws
2. Top hinge
3. Shim
Remove the cabinet cover support bracket. Keep all parts
together.
1.5/16 in. screws
2. Cabinet cover support
bracket
3. Shim
5. Lift the door up and off of the bottom hinge.
Reverse the Hinges - All Styles
1=
2.
3=
4.
Tilt the refrigerator up at the front to no more than a 45°
angle.
Turn the "old" top hinge upside down so that the hinge pin
points up. Place the hinge on the bottom opposite side of the
refrigerator. Be sure to align the straight edge with the side of
the refrigerator.
NOTE: Do not use the shim for the bottom hinge. Keep it for
use with the new top hinge.
1. Top hinge turns upside down.
2. Shim does not move to the bottom.
Attach the new bottom hinge securely with the screws.
Reverse the leveling legs:
• Remove the leveling leg and spacer and move them to
the opposite side near the "old" bottom hinge.
Remove the cap and unscrew the other leveling leg from
the "old" bottom hinge. Replace it on the opposite side in
the new bottom hinge. This leveling leg also functions as
the door stop.
1. Leveling leg in new bottom hinge
2. Leveling leg and spacer near "old" bottom hinge
5. Remove the "old" bottom hinge.
Replace the Door - Style 1
1. Remove cabinet hinge hole plugs and move them to the
opposite side hinge holes as shown.
3=
4=
Turn the "old" bottom hinge upside down so the hinge pin
points down.
1. Bottom hinge turns upside down.
2. 5/16in. screws
Put the shim and top hinge together and insert the hinge pin
into the door. Tighten the screws.
NOTE: Be sure to align the straight edge with the side of the
refrigerator.
5=
6.
1. %6 in. screws
2. Tophinge
3. Shim
Replace the hinge cover.
Plug in refrigerator or reconnect power.
Replace the Door - Style 2
1. Replace the cabinet cover support bracket on the opposite
side as shown.
1.5/16in.screws
2. Cabinet cover support
bracket
3. Shim
2. Replace the door on the new bottom hinge.
1.Cabinet hinge hole plugs
2. Replace the door on the new bottom hinge.
6
3.
4.
Turn the "old" bottom hinge upside down so the hinge pin
points down.
1. Bottom hinge turns upside down.
2. 5/16in. screws
Put the shim and top hinge together and insert the hinge pin
into the door. Tighten the screws.
NOTE: Be sure to align the straight edge with the side of the
refrigerator.
1, 5/16 in. screws
2. Top hinge
3. Shim
5. Replace the cabinet cover by sliding it back over the top
hinge and cabinet cover support bracket. Push down on the
back to be sure the cabinet cover is firmly in place.
6. Plug in refrigerator or reconnect power.
!0[__0_: (i_
The lock is located on the non-hinge side of the refrigerator.
1. Pry up the lock cover from the front using the 2 in. putty knife.
2. Remove the _e in. screws and then the lock plate. Keep all
parts together.
3. Remove the lock barrel using a flat-blade screwdriver. Turn
the lock plate over and reinstall the lock barrel.
4. Place the lock plate on the opposite side where the top hinge
was removed.
5. Replace the lock cover.
1
Your refrigerator has 2 adjustable leveling legs in the front. If your
refrigerator seems unsteady or you want the doors to close
easier, adjust the refrigerator's tilt using these instructions.
1. Move the refrigerator into its final position.
2. Lower the leveling legs just enough to lift the cabinet up off of
the floor.
3. Adjust the leveling legs to level the refrigerator:
• Turn the leveling leg to the right to lower that side of the
refrigerator.
• Turn the leveling leg to the left to raise that side of the
refrigerator.
4.
5.
Check with a level.
Open and close the door to check to make sure that it closes
as easily as you like.
i siOII_HIII/[I,I ©, ,,II_,I :_
Your new refrigerator may make sounds that your old one didn't
make. Because the sounds are new to you, you might be
concerned about them. Most of the new sounds are normal. Hard
surfaces, such as the floor, walls, and cabinets, can make the
sounds seem louder. The following describes the kinds of sounds
and what may be making them.
• You may hear a cracking noise from ice melting during
defrosting.
• Rattling noises may come from the flow of refrigerant or items
stored on top of the refrigerator.
• You may hear a gurgling sound due to the refrigerant flowing
in your refrigerator.
• You may hear water running into the defrost pan during the
defrost cycle.
• You may hear clicking sounds when the refrigerator starts or
stops running.
1. Lock cover 4. Lock barrel
2. 5/16in. screws 5. Lock screw
3. Lock plate

REFRIGERATORUSE
'...." '
The refrigerator control is located on the inside of your
refrigerator. For your convenience, your refrigerator control is
preset at the factory. When you first install your refrigerator, make
sure that the control is still preset to the mid-setting as shown.
OFF
MAX.#_'-_
MED.I _
MIN._)
NOTE: To turn your refrigerator off, turn the refrigerator control to
OFE Your product will not cool when the refrigerator control is set
to OFE
OFF
Adjusting the Control
Give your refrigerator time to cool down completely before
adding food. It is best to wait 24 hours before you put food into
the refrigerator. The control is set correctly when milk or juice is
as cold as you like. Move the dial one setting at a time and wait
24 hours between adjustments.
IMPORTANT: If you add food before the refrigerator has cooled
completely, your food may spoil. Turning the control to a higher
(colder) than recommended setting will not cool the compartment
any faster.
Setting Recommended for Room
Temperature
Minimum Refrigerator empty Up to 65° (18°C)
Occasional door opening
Medium Refrigerator partially From 65°F to 85°F
loaded (18°C to 30°C)
Maximum Refrigerator full Above 85°F (30°C)
Frequent door opening
REFRIGERATOR
FEATURES
NOTE: The features in your model may vary slightly from those
shown in these illustrations.
To lock or unlock the refrigerator, you must hold the key in the
lock while turning. The lock is spring loaded, so the key cannot
be left in the lock.
1. Insert the key into the hole in the end cap on the non-hinge
side as shown.
2. Turn the key clockwise to lock the door and counterclockwise
to unlock the door.
If the key is lost, contact your dealer for a replacement. Always
give the model and serial number of your refrigerator when
requesting a replacement key.
Store similar foods together and adjust the shelves to fit different
heights. This reduces the time the refrigerator door is open and
saves energy.
1. Remove the shelf by pulling it forward.
2. Replace the shelf by sliding it back into place.
You can use this shelf as either a full- or half-width shelf to allow
taller items to be stored on the shelf below.
1. Slide the front portion of the shelf toward the back of the
refrigerator to create the half-width shelf.
NOTE: Check to make sure that shelf is securely in position.
2.
Return the shelf to the full-width position by pulling the shelf
forward until it is firmly in place.
8
1.
2.
, 4 ® "i _"_ ® " I
Remove the crisper by sliding it straight out.
Lift and slide the crisper cover out to remove it. Replace the
crisper cover by sliding it back into place.
Door Bins (on some models)
Can Racks
Style I
3. Replace the crisper by sliding it back into place.
Fruit and Vegetable Storage Guide
• Fruit: Wash, let dry and store in refrigerator in plastic bag in
crisper. Do not wash or hull berries until they are ready to use.
Sort and keep berries in original container in crisper.
• Vegetables with skins: Place in plastic bag or plastic
container and store in crisper.
• Leafy vegetables: Wash in cold water, drain and trim or tear
off bruised or discolored areas. Place in plastic bag or plastic
container and store in crisper.
Os %:>sesed_%)
The convertible compartment stays colder than the rest of the
refrigerator to keep foods fresh longer. It can also chill beverages
more quickly.
1. Remove the compartment by sliding it straight out to the
stop. Lift the front of the compartment and slide it out the rest
of the way.
2. Replace the compartment by sliding it back in fully past the
stop.
Style 2
Bottle Trivets (bottle separator on some models)
Style I
Style 2
Style 3
The refrigerator door storage compartments can be moved to
meet your changing storage needs.
1. Remove the storage compartment by pulling up on both
ends.
2. Replace the storage compartment in the desired location by
sliding the compartment securely into place.
1
1. Bottle separator
REFRIGERATOR CARE
Explosion Hazard
Use nonflammable cleaner.
Failure to do so can result in death, explosion, or fire.
Clean the refrigerator about once a month to prevent odors from
building up. Wipe up spills immediately.
1. Unplug refrigerator or disconnect power.
2. Remove all removable parts from inside, such as shelves,
crispers, etc.
3. Hand wash, rinse, and dry removable parts and interior
surfaces thoroughly. Use a clean sponge or soft cloth and a
mild detergent in warm water.
• Do not use abrasive or harsh cleaners such as window
sprays, scouring cleansers, flammable fluids, cleaning
waxes, concentrated detergents, bleaches or cleansers
containing petroleum products on plastic parts, interior
and door liners or gaskets. Do not use paper towels,
scouring pads, or other harsh cleaning tools. These can
scratch or damage materials.
• To help remove odors, you can wash interior walls with a
mixture of warm water and baking soda (2tbs. to 1 qt.
[26 g to .95 L] of water).
4. Replace the removable parts.
5. Plug in refrigerator or reconnect power.
6. Set the control to the maximum setting for 24 hours, and then
adjust the control to the desired setting. Give the refrigerator
and freezer time to cool down completely before adding food.
See "Using the Control."
Defrost and clean the freezer when the ice thickness is 3/8in.
(1 cm). In high-humidity areas, the freezer may need more
frequent defrosting and cleaning.
Do not use abrasive cleaners on your freezer. Do not use cleaning
waxes, concentrated detergents, bleaches, or cleaners
containing petroleum on plastic parts. Damage can occur.
1. Turn the refrigerator control to OFF.
OFF
2.
3.
Unplug refrigerator or disconnect power.
Remove all food from the refrigerator and freezer
compartments. Store it in a cooler with ice, in an additional
refrigerator-freezer, or in a cool area.
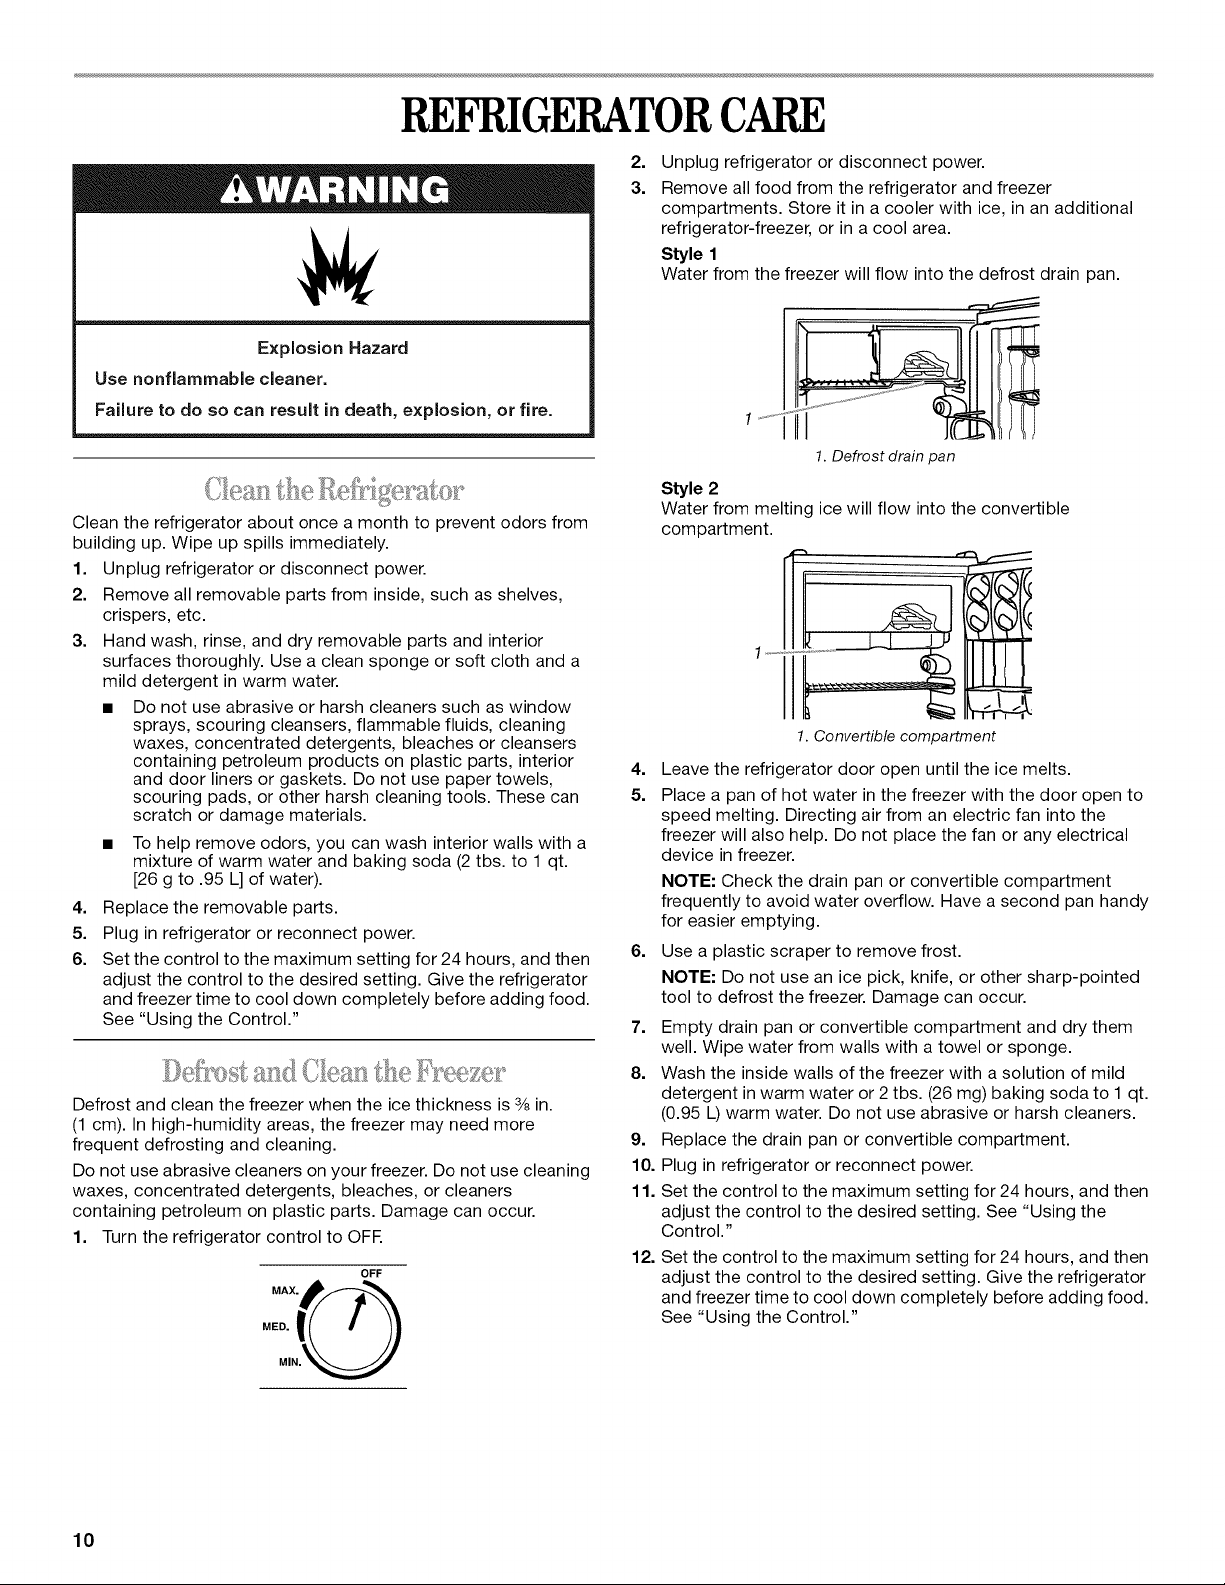
Style 1
Water from the freezer will flow into the defrost drain pan.
1.Defrost drain pan
Style 2
Water from melting ice will flow into the convertible
compartment.
1.Convertible compartment
4. Leave the refrigerator door open until the ice melts.
5. Place a pan of hot water in the freezer with the door open to
speed melting. Directing air from an electric fan into the
freezer will also help. Do not place the fan or any electrical
device in freezer.
NOTE: Check the drain pan or convertible compartment
frequently to avoid water overflow. Have a second pan handy
for easier emptying.
6. Use a plastic scraper to remove frost.
NOTE: Do not use an ice pick, knife, or other sharp-pointed
tool to defrost the freezer. Damage can occur.
7. Empty drain pan or convertible compartment and dry them
well. Wipe water from walls with a towel or sponge.
8. Wash the inside walls of the freezer with a solution of mild
detergent in warm water or 2 tbs. (26 mg) baking soda to 1 qt.
(0.95 L)warm water. Do not use abrasive or harsh cleaners.
9. Replace the drain pan or convertible compartment.
10. Plug in refrigerator or reconnect power.
11. Set the control to the maximum setting for 24 hours, and then
adjust the control to the desired setting. See "Using the
Control."
12. Set the control to the maximum setting for 24 hours, and then
adjust the control to the desired setting. Give the refrigerator
and freezer time to cool down completely before adding food.
See "Using the Control."
10
Vacations
If you choose to leave the refrigerator on while you're away, use
up any perishables and freeze other items.
If you choose to turn the refrigerator off before you leave, follow
these steps.
1. Remove all food from the refrigerator and freezer
compartments.
2. Turn the control to the off position. See "Using the Control"
and "Defrost and Clean the Freezer."
3. Clean the refrigerator, and dry it well.
4. Tape rubber or wood blocks to the door or doors (depending
on your model) to prop them open far enough for air to get in.
This stops odor and mold from building up.
Moving
When you are moving your refrigerator to a new home, follow
these steps to prepare it for the move.
1. Remove all food from the refrigerator and freezer
compartments.
2. Turn the control to the off position. See "Using the Control"
and "Defrost and Clean the Freezer."
3. Unplug the refrigerator.
4. Empty the water from the defrost pan.
5. Clean, wipe, and dry thoroughly.
6. Take out all removable parts, wrap them well, and tape them
together so they don't shift and rattle during the move.
7. Tape the door or doors (depending on your model) shut and
the power cord to the refrigerator cabinet.
When you get to your new home, put everything back and see
the "Installation Instructions" section for proper installation.
If the power will be out for 24 hours or less, keep the door or
doors closed (depending on your model) to help food stay cold
and frozen.
If the power will be out for more than 24 hours, do one of the
following:
• Remove all frozen food and store it in a frozen food locker.
• Place 2 Ibs (907 g) of dry ice in the freezer for every cubic foot
(28 L) of freezer space. This will keep the food frozen for 2 to
4 days.
• If neither a food locker nor dry ice is available, consume or
can perishable food at once.
REMEMBER: A full freezer stays cold longer than a partially filled
one. A freezer full of meat stays cold longer than a freezer full of
baked goods. If you see that food contains ice crystals, it may be
refrozen, although the quality and flavor may be affected. If the
condition of the food is poor, dispose of it.
TROUBLESHOOTING
Trythe solutions suggested here first in order to avoid the
cost of an unnecessary service call.
The refrigerator isn*tcooling
• Is the temperature control set at the mid-setting? The
control is preset at the factory to the correct mid-setting.
After connecting power, wait 1 hour before checking
temperature.
NOTE: Adjusting the control to coldest setting will not cool either
compartment more quickly.
Temperature is too warm
Check the following:
• Is the door opened often?
• Has a large amount of food just been added to the
refrigerator or freezer?
• Is the control set correctly for the surrounding conditions?
The motor seems to run too much
Check the following:
• Is the room temperature hotter than normal?
• Has a large amount of food just been added to the
refrigerator?
• Is the door opened often?
• Is the door not closed completely?
There is interior moisture buildup
Check the following:
• Is the door opened often?
• Is the room humid?
• Is the control set correctly for the surrounding conditions?
The door will not close completely
Check the following:
• Are food packages blocking the door open?
• Are the ice cube trays out of position?
• Was the door removed during product installation and not
properly replaced?
The door is difficult to open
• Is the gasket dirty or sticky? Clean gaskets with mild soap
and warm water.
11
 Loading...