

Page 1

Welltech Computer Co., Ltd.
Welltech Computer Co., Ltd.
W ellSIP Telephony Server – V2.0
ellSIP Te lephony Server – V2.0
W
- 1 -
- 1 -
Page 2

Welltech Computer Co., Ltd.
CONTENTS
Chapter 1 WellRTP 5100 Introduction.........................................................3
WR5100 Appearance Description ................................................................4
Chapter 2 WR5100 Quick Start ....................................................................5
Logon WR5100 ............................................................................................6
Network ........................................................................................................7
System Time.................................................................................................8
Apply Change...............................................................................................9
System ....................................................................................................... 11
Debug.........................................................................................................12
Chapter 3 System Control Reference........................................................13
System .......................................................................................................13
System Time...............................................................................................13
Network ......................................................................................................15
Account Manager ....................................................................................... 15
Upgrade .....................................................................................................16
Relogin .......................................................................................................16
Chapter 4 System Monitor Reference......................................................17
Event Log ...................................................................................................17
Debug Info..................................................................................................18
Ping ............................................................................................................18
Chapter 5 Telnet & RS-232 Configuration.................................................19
Chapter 6 LCD Display Configuration.......................................................26
Appendix 1 Time zone to Country Mapping List......................................29
Quick Function Reference ..........................................................................31
Index .............................................................................................................33
W ellSIP Telephony Server – V2.0
- 2 -
Page 3

Welltech Computer Co., Ltd.
Chapter 1 WellRTP 5100 Introduction
WellRTP 5100 is a dedicate RTP resource server for WellSIP 6500. It frees
the limitation of 384 concurrent RTP proxy sessions and greatly decreased
the WellSIP 6500 loading. Multiple WellRTP 5100s will be automatically backup and the preferred RTP resource server can be set for each subscriber on
WellSIP 6500.
Feature List:
‧ Full Integrated with WellSIP 6500 SIP Proxy Telephone Server
‧ Extended WellSIP 6500 RTP Handling
‧ Up-to 384 Full Duplex RTP Proxy
‧ Auto-backup between WellRTP 5100 RTP resource server
‧ Preferred RTP resource server selection on WellSIP 6500
W ellSIP Telephony Server – V2.0
- 3 -
Page 4
Welltech Computer Co., Ltd.
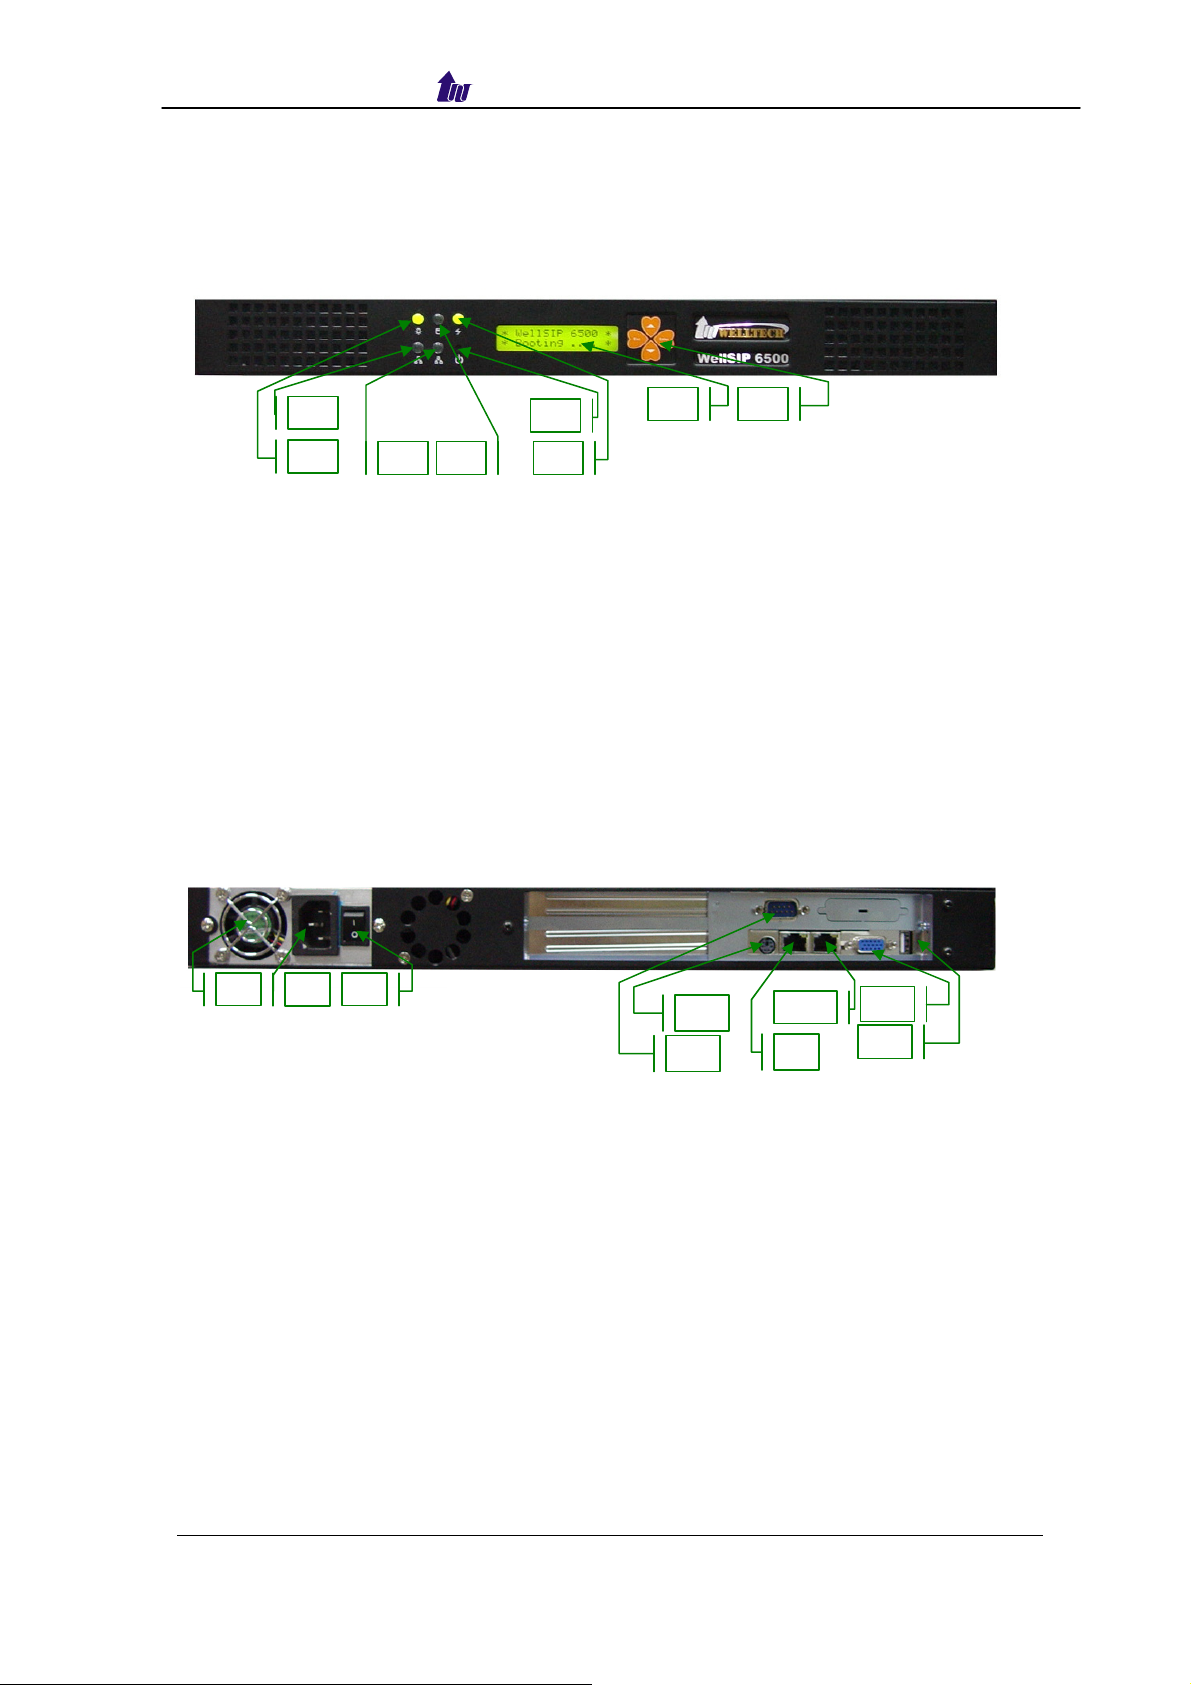
WR5100 Appearance Description
WR5100 Front Panel:
Functions:
1: Power LED
2: Network1 Interface LED (not used)
3: Network2 Interface LED (not used)
4: H/D LCD
5: Power Switch
6: System Status LED
7: LCD Panel
8: LCD Touch Panel
WR5100 Rear Panel:
2
1
3
4
5
6
7
8
1 2 3
Functions:
1: Electric Fan
2: AC Power outlet
3: AC Power switch
4: Keyboard/Mouse
5: Console port
6: SIP Service Ethernet port
7: Management Ethernet port
8: VGA
9: USB (not used)
W ellSIP Telephony Server – V2.0
- 4 -
4
5
6
7
8
9
Page 5
Welltech Computer Co., Ltd.
Chapter 2 WR5100 Quick Start
After connected Ethernet cables into the WR5100 Management Interface
& SIP interface, turned on the power. The first step is to logon the system
and set up the IP address.
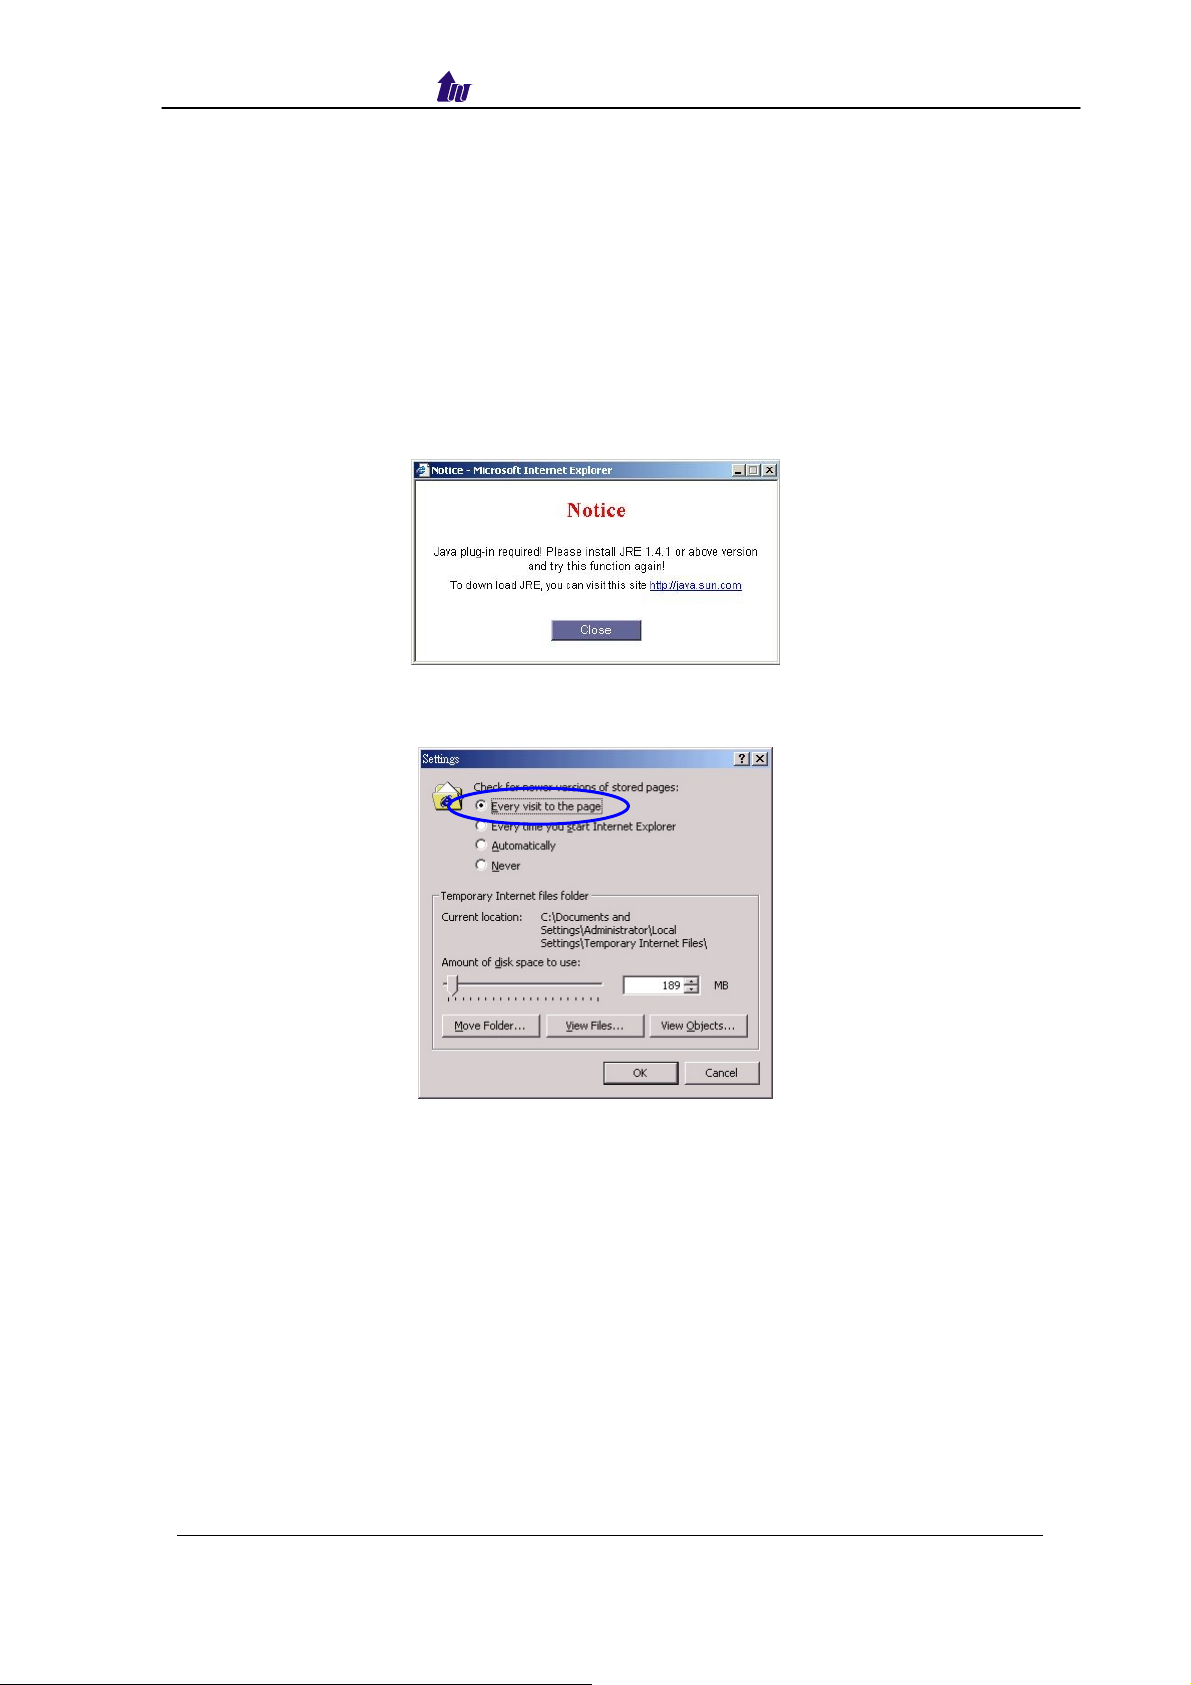
Before you can use the browser to config WR5100, you need to install
Java Plug-in before using subscriber status, call detail, debug info, remote
terminal and upgrade. Please confirm your JRE version is 1.4.1 (preferred &
tested) if your PC has already installed Java.
You also need to set newer versions of stored pages. Click Tool > Internet
Option > General > Setting.
After success, restart your browser to take effect.
W ellSIP Telephony Server – V2.0
- 5 -
Page 6
Welltech Computer Co., Ltd.
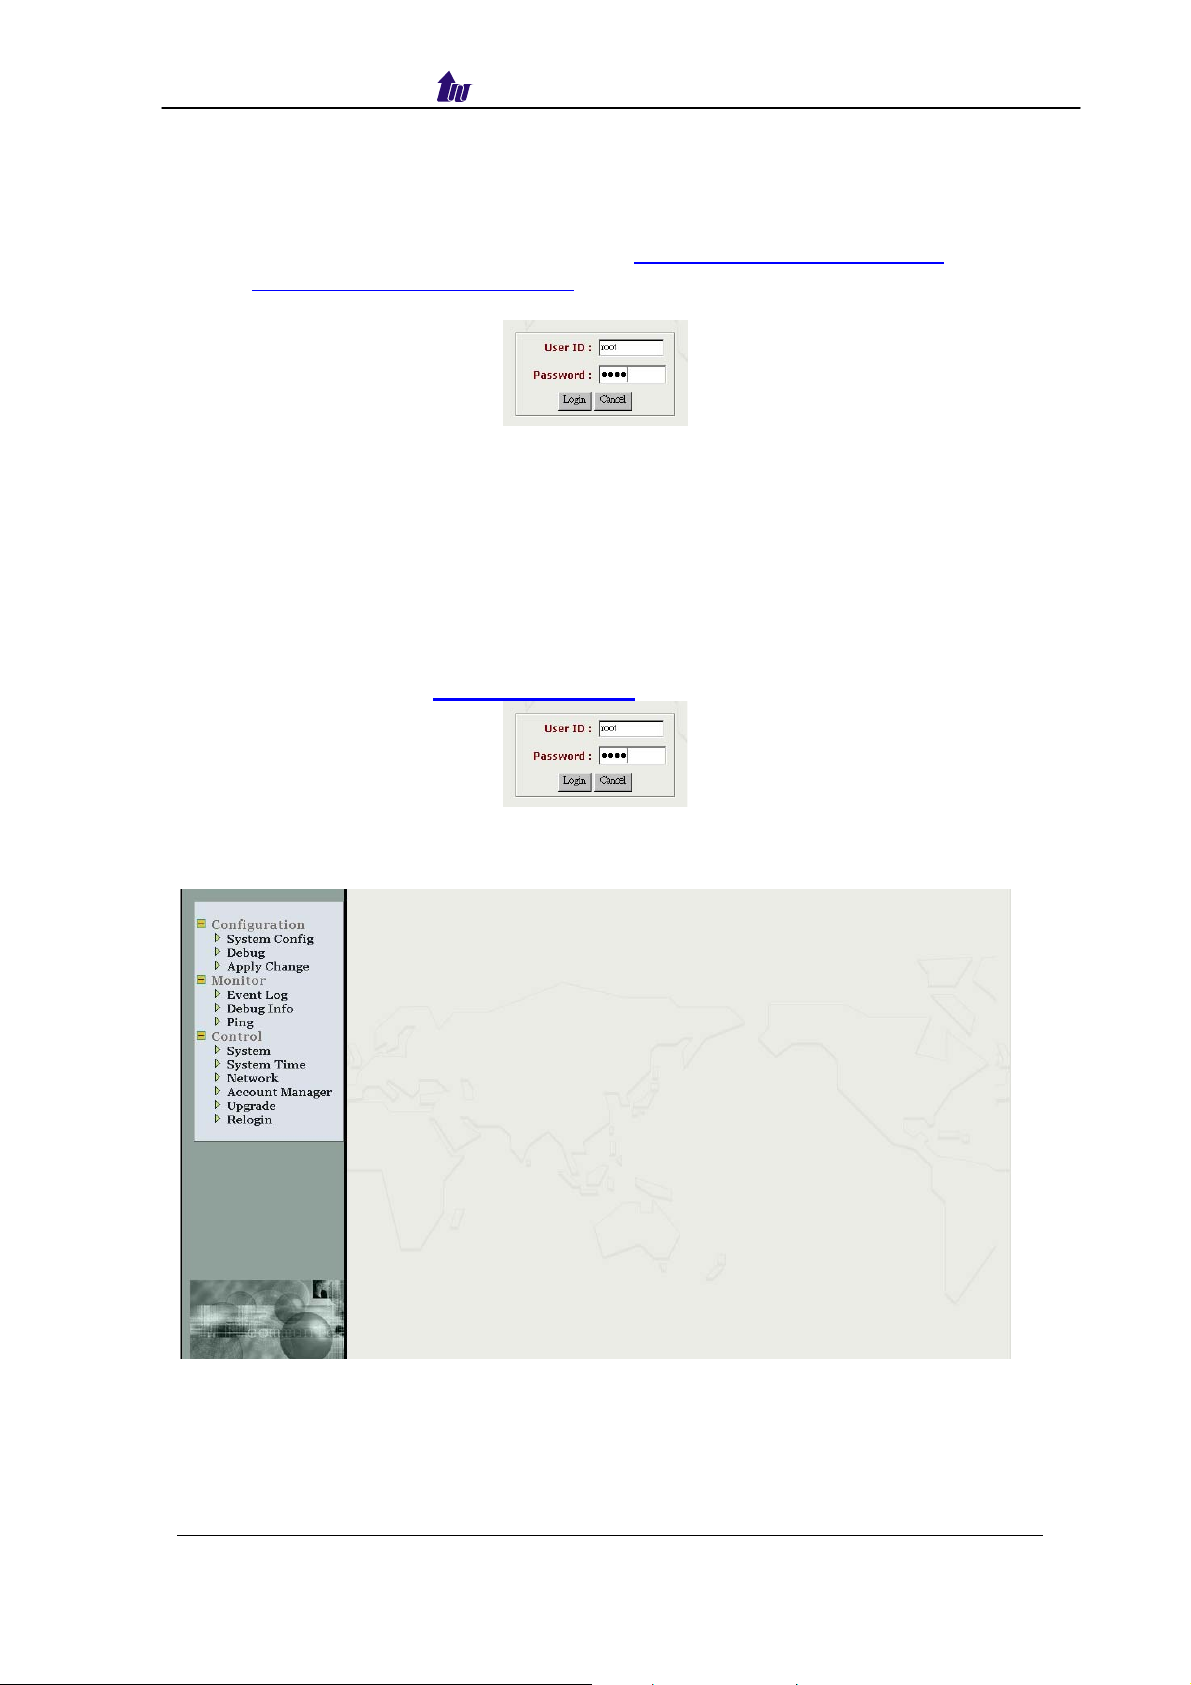
Logon WR5100
Setp1: Start IE6.0 (or later version) to navigate WR5100 web management
system by typing the default URL is http://192.168.131.111:10087 or
https://192.168.131.111:10087 The screen will display User ID and
Password as figure 2.1-1.
Figure 2.1-1
☺Note: The default network IP address is:
SIP Service Interface: 192.168.131.111 255.255.0.0 192.168.111.254
Management Interface: 192.168.131.2 255.255.0.0
Step 2: Enter login user name and password (the default user id is root and
user password is root). You can manage your user account via web
(refer to section “
Account Manager”) later.
Figure 2.1-2
Step 3: The screen shows the Home Page of WR5100 as figure 2.1-3.
Figure 2.1-3
W ellSIP Telephony Server – V2.0
- 6 -
Page 7
Welltech Computer Co., Ltd.
Network
WR5100 has 2 network interfaces:
- Management interface: it is used for management purpose
- SIP service interface: provide SIP service over this network
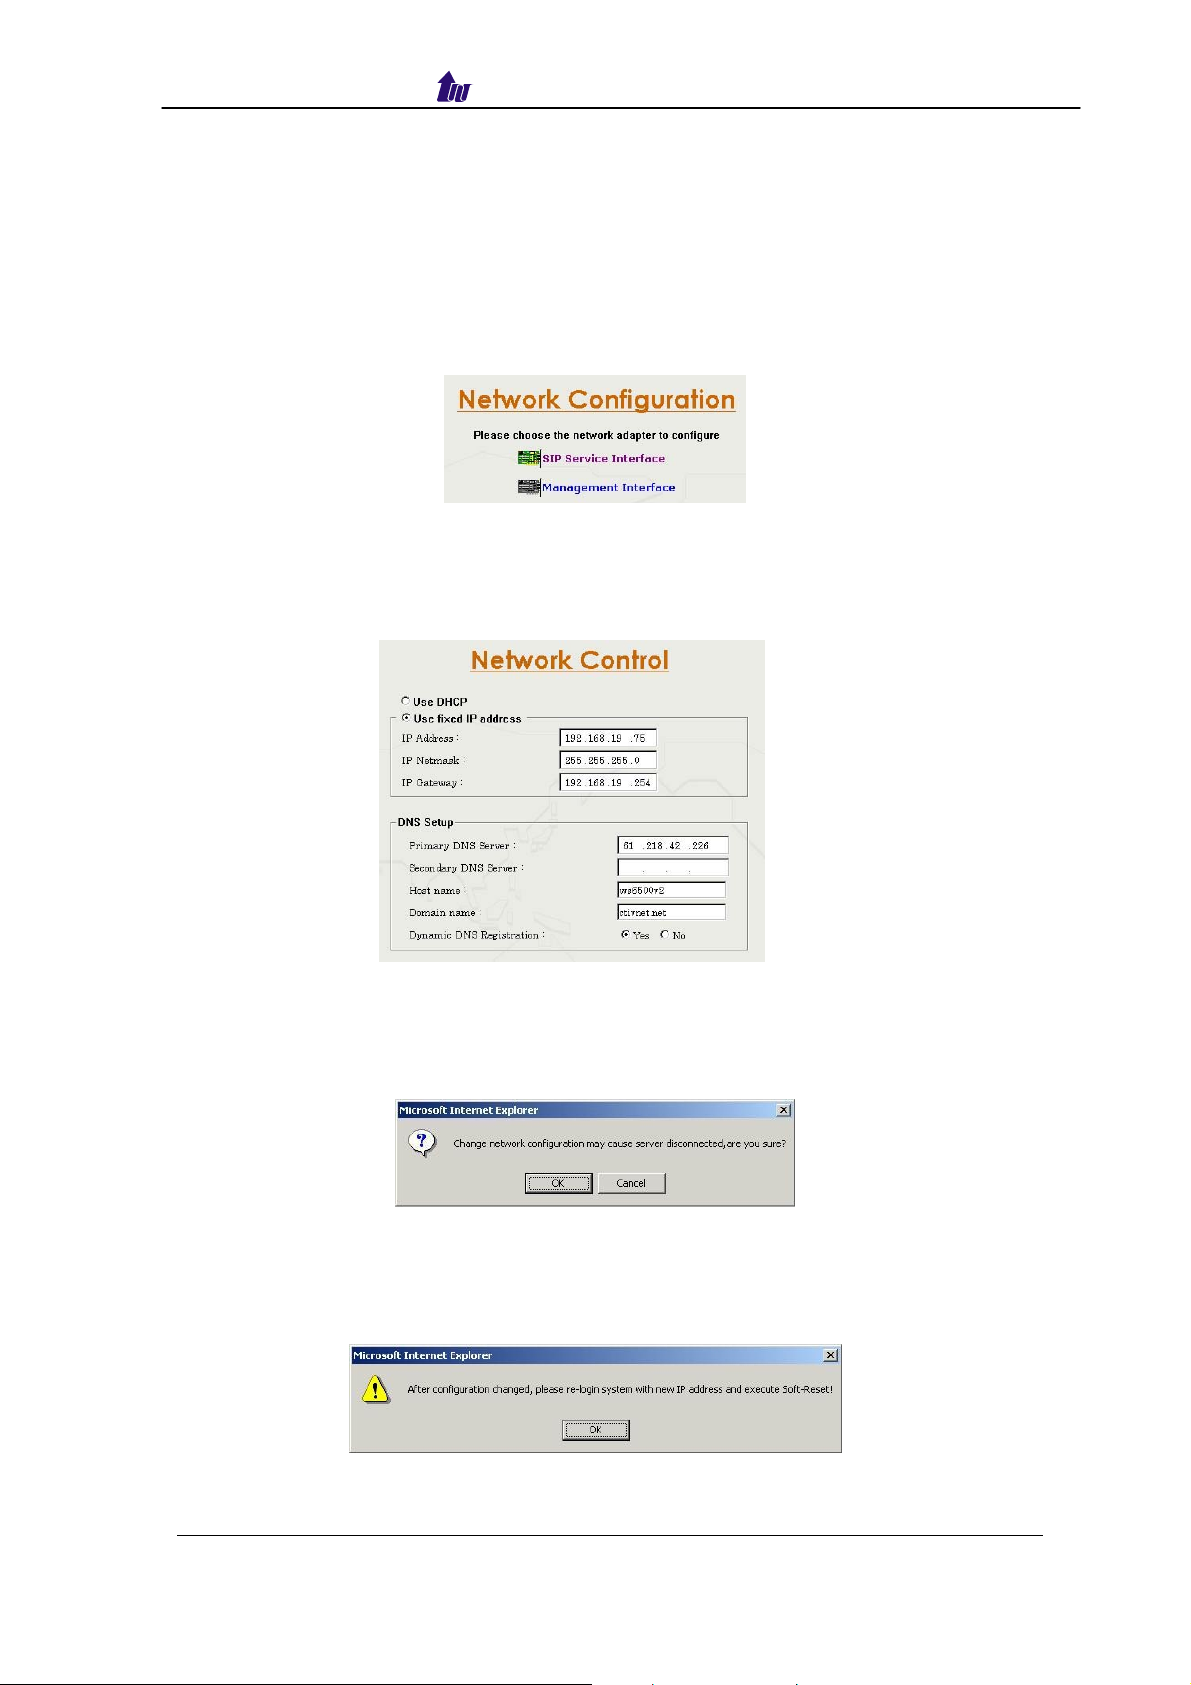
Step 1: After successfully logon to the system, we need to change the
network configuration. Click Control > Network to setup the SIP
Service Interface parameters as figure 2.2-1.
Figure 2.2-1
Step 2: Enter the deserved IP address, Submask and default gateway or
selected to “Use DHCP”. Apply the change by clicking apply button as
figure 2.2-2.
Figure 2.2-2
Step 3: When screen shows “Change network configuration may cause
server disconnected, are you sure?” click on OK button to changes
IP address as figure 2.2-3.
Figure 2.2-3
Step 4: When screen shows “After configuration changed, please re-login
system with new IP address and execute Soft-Reset!” click OK
button as figure 2.2-4.
Figure 2.2-4
W ellSIP Telephony Server – V2.0
- 7 -
Page 8
Welltech Computer Co., Ltd.
Step 5: Follow Step 1 to 4 to change management interface network
configuration as figure 2.2-5.
Figure 2.2-5
☺ Note: “Network Control” takes around 5-second to apply the new
network configuration. Please logon again with new IP address
after 5 seconds.
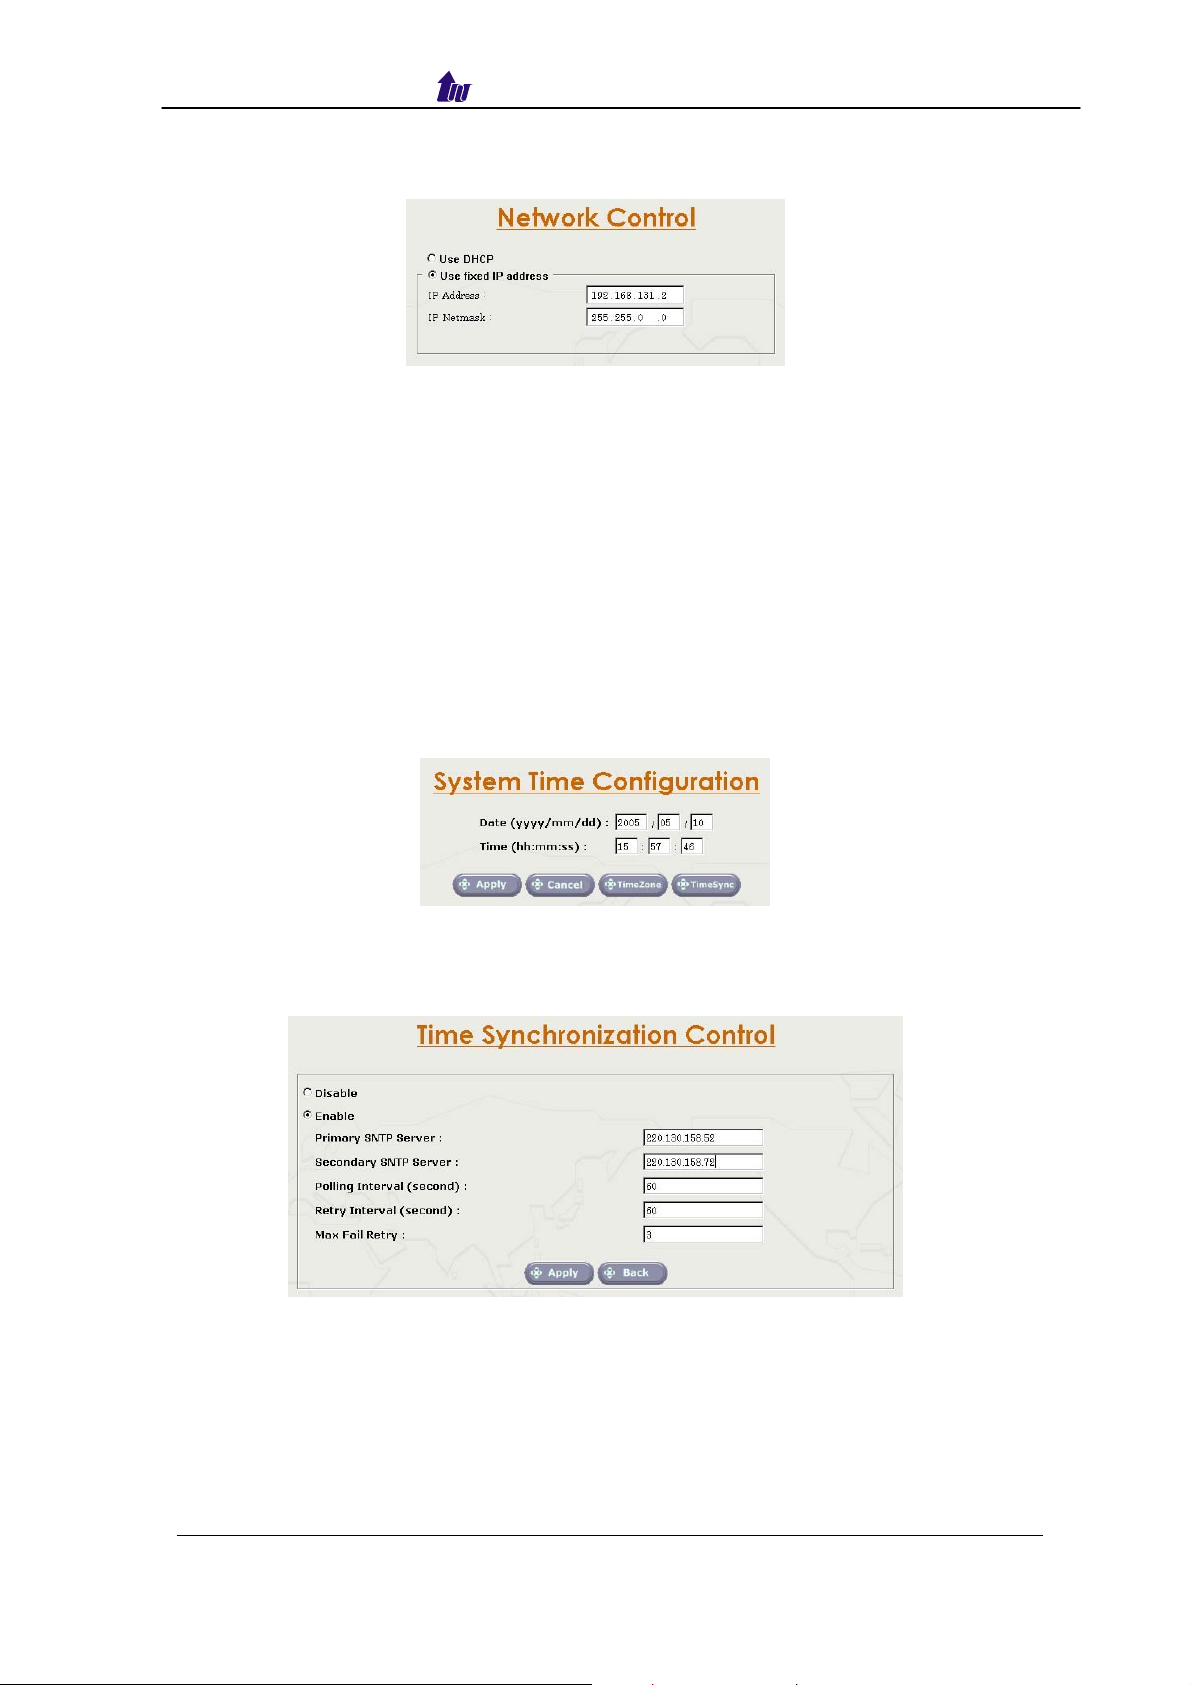
System Time
Step 1: When relogon to the new IP address, the next is to setup the system
time zone. Click Control > System Time Zone to setup the system.
Enter current date and time. Apply the change by clicking Apply button
as figure 2.3-1.
Figure 2.3-1
Step 2: If you would like to use SNTP to sync time with a SNTP V4 Server,
click Time Syn c button to setup it as figure 2.3-2.
Figure 2.3-2
W ellSIP Telephony Server – V2.0
- 8 -
Page 9
Welltech Computer Co., Ltd.
Step 3: After successfully base setup, restart WR5100 to take effect as figure
2.3-3.
Figure 2.3-3
Apply Change
When you loaded a new working or configuration or changed
any configurations, you need click “Apply Change” to take effect as
figure 2.4-1.
Figure 2.4-1
W ellSIP Telephony Server – V2.0
- 9 -
Page 10

Page 11

Welltech Computer Co., Ltd.
System
Start Path: Configuration > System
Figure 3.1-1
Parameter Description:
• SIP Proxy IP Address: SIP proxy IP
• RTP Start Prot: RTP used port
• Prot Interval: UDP port used for RTP stream, each channel needs 3 RTP
ports and must be started by a multiple of 10
• Enable System Log: Enable to send system information to syslogD
server or not
• SyslogD Server IP 1, 2: syslogd server IP address
• SMTP Server: SMTP server host for email notice
• Email From: Email sender account
• Email To: Email receiver (semicolon is used for multiple receiver)
• Subject: Email subject to be send to receiver. The following variable
parameters can be used to create dynamic subject for system notice:
o $LOGLEVEL$: Information Level
o $HOSTNAMEZ$: Host name
o $HOSTIP$: Host IP address
Advance System Configuration:
Start Path: Configuration > System > License
Figure 3.1-3
License Parameter Description:
• Feature: System parameter
• Serial No: System parameter
W ellSIP Telephony Server – V2.0
- 11 -
Page 12

Welltech Computer Co., Ltd.
• License Key: System parameter
☺ Note: Please don’t change it unless under Welltech’s instruction
Debug
Debug can be turn on or off based on each system module and level to
minimum the debug information. Please only turn on the debug information
for debug purpose under Welltech FAE's instruction and turn off when
complete. Or the system performance will be greatly hit.
Start Path: Configuration > Debug
Figure 3.2-1
W ellSIP Telephony Server – V2.0
- 12 -
Page 13

Welltech Computer Co., Ltd.
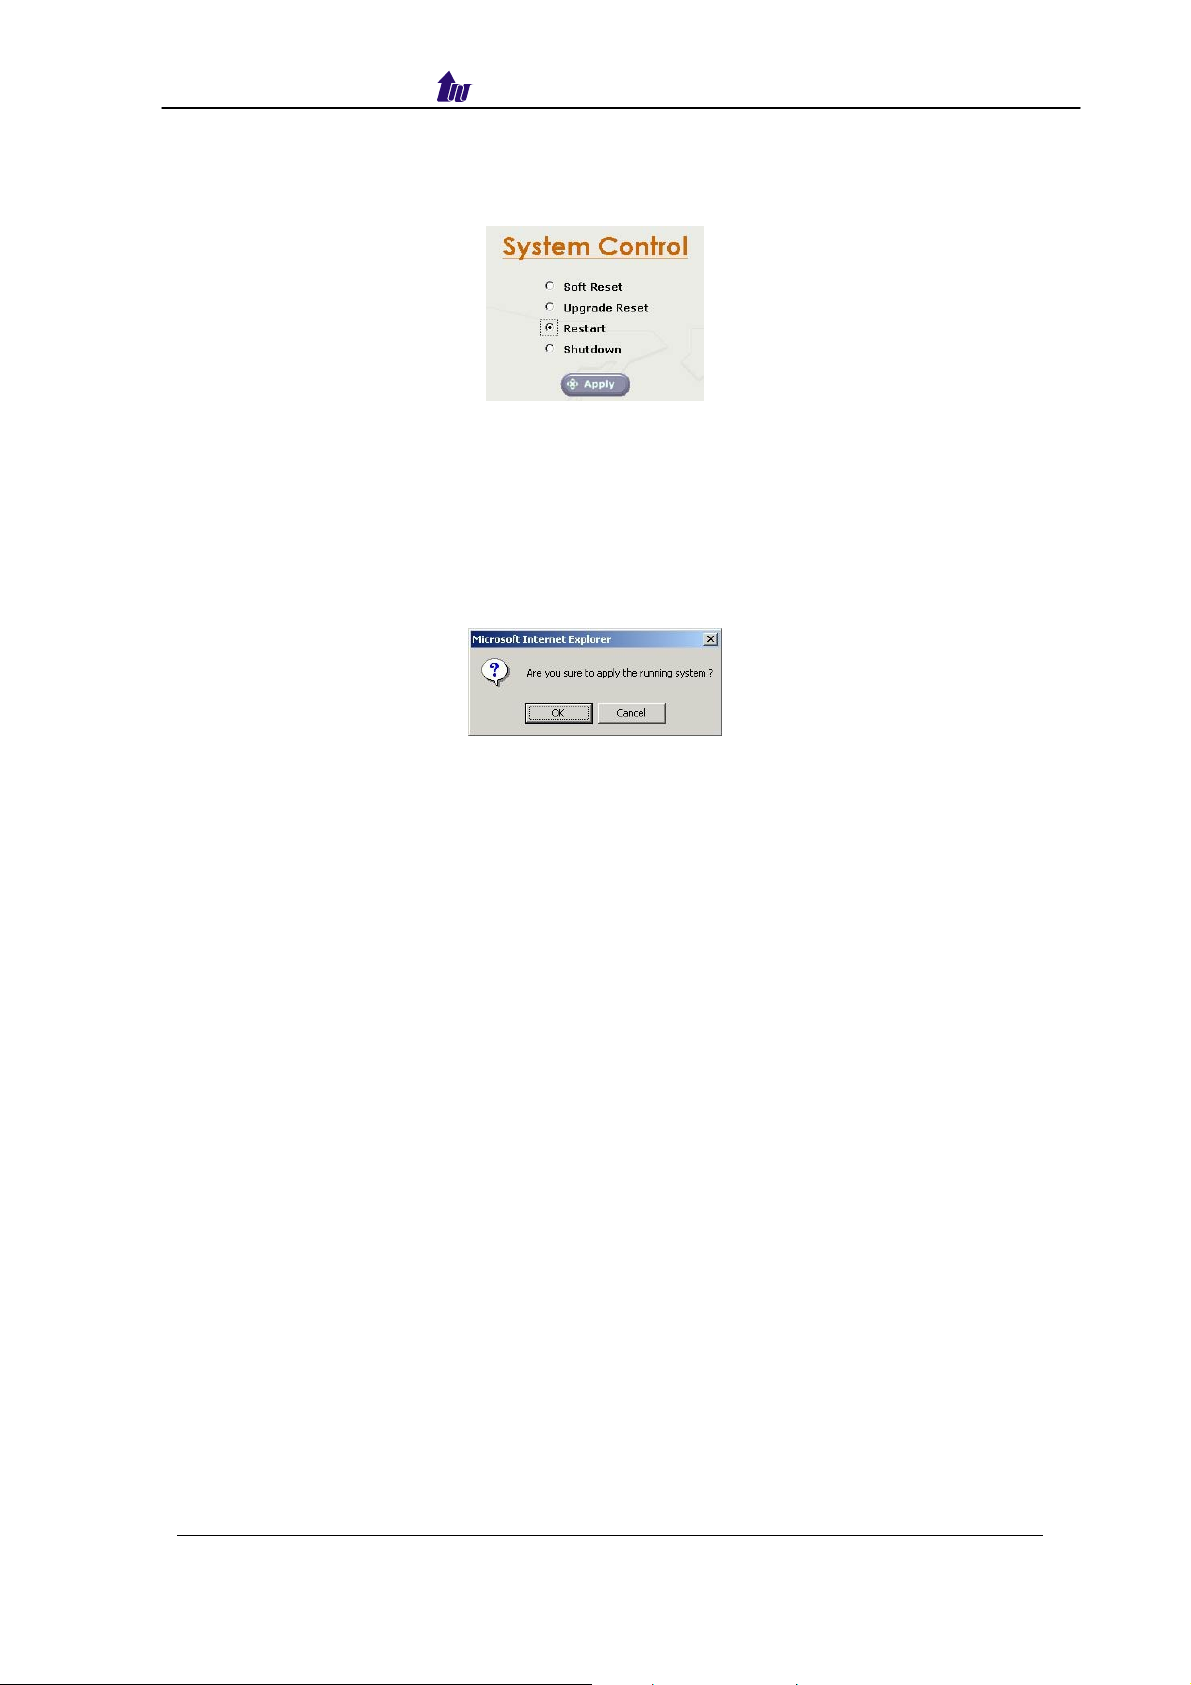
Chapter 3 System Control Reference
System
Start path: Click Control > System
Figure 4.1-1
Parameter:
• Soft Reset: Soft Reset at WR5100
• Upgrade Reset: Soft reset after application upgrade. The new
application image will be extracted and executed without reboot.
• Restart: Restart the WR5100
• Shutdown: Shutdown the WR5100
System Time
Timezone Setting
Step 1: If you would like to use timezone, click T imezone button to setup the
system timezone as figure 4.2-1.
Figure 4.2-1
Standard:
Step 2: Select the Standard option to setup the system predefined time zone
as figure 4.2-2
Figure 4.2-2
Parameter:
• Time Zone:
W ellSIP Telephony Server – V2.0
- 13 -
Page 14

Welltech Computer Co., Ltd.
o Standard: Use a predefined standard time zone (Refer to section
“Timezone to Country Mapping List” )
o Customize: Use a user defined time zone
• Auto Daylight Saving: Auto adjust daylight saving time or not
User defined timezone :
Step 3: Select the Customized option and enter the time zone bias to set a
user defined timezone as figure 4.2-3
Figure 4.2-3
Parameter:
• Daylight Bias: The offset added to the Bias when the time zone is in
daylight saving time
• Daylight Start: The date that a time zone enters daylight time
o Month: 01 to 12
o Week Day: Sunday to Saturday
o Apply Week (Day:01 to 05, Specifies the occurrence of day in the
month; 01 = First occurrence of day, 02 = Second occurrence of
day, ...and 05 = Last occurrence of day)
o Hour: 00 to 23
• Standard Start: The date that a time zone enters daylight time
o Month: 01 to 12
o Week Day: Sunday to Saturday
o Apply Week (Day:01 to 05, Specifies the occurrence of day in the
month; 01 = First occurrence of day, 02 = Second occurrence of
day, ...and 05 = Last occurrence of day)
o Hour: 00 to 23
W ellSIP Telephony Server – V2.0
- 14 -
Page 15

Welltech Computer Co., Ltd.
Network
Management interface it’s used for management purpose. If you have
DNS record, also you must be setup DNS server to effect.
☺Note: SIP Service and Manager Interface Setting: Please refer to
section “Network Configuration”
DNS Server Setting:
Step 1: Enter correct DNS server IP address, host name, domain name and
dynamic DNS registration to “Yes”. Apply change by click Apply button
as figure 4.3-1.
Figure 4.3-1
Parameter:
• Primary DNS Server: Primary DNS Server IP network
• Secondary DNS Server: Secondary DNS Server IP network
• Host Name: Host name used to register to DNS Server
• Domain Name: Domain name used to
• Dynamic DNS Registration: Enable Dynamic DNS registration or not
Account Manager
You can manage (Modify, Add and Delete) the login user account as
follows:
Step 1: Click Control > Account Manager as figure 4.5-1
Field Description:
• User ID: Login User ID
W ellSIP Telephony Server – V2.0
Figure 4.5-1
- 15 -
Page 16

Welltech Computer Co., Ltd.
• Password: Login Password
• Confirm Password: Confirm new password again
☺Note: The system provides 2 USER ID by default:
User 1: “root” Password: “root”
User 2: “admin” Password: “admin”
Upgrade
WR5100 provide upgrade new version at remote side. You can
upgrade it from Welltech technical support web page by yourself.
Step 1: Click “Control > Upgrade” to upgrade the software as figure 4.7-1.
Figure 4.7-1
Field Description:
• File Name: Upload the software file name
• Upload: Remote Upload the software at WR5100
Relogin
Step 1: Click Control > Relogin to relogon by another user account as figure
4.8-1.
Figure 4.8-1
W ellSIP Telephony Server – V2.0
- 16 -
Page 17

Welltech Computer Co., Ltd.
Chapter 4 System Monitor Reference
It provides a way to monitor the system status.
Event Log
Show system event log status.
Start Path: Configuration > Event Log
Figure 5.6-1
Field Description:
• Type: Event Log type
- Information
- Warring
- Error
• Date: Event created date
• Time: Event created time
• Source: Executable program
• Category: Event type (none, Welltech Sys…)
• Event ID: Event Log
☺ Note: You can click Clear button to clear all event log.
See the detail event log:
Click the event log or select the log and click detail to see the log detail.
W ellSIP Telephony Server – V2.0
Figure 5.6-2
- 17 -
Page 18
Welltech Computer Co., Ltd.
Event Description:
Event
ID
8000 NAT Proxy Proxy didn't set this host
9500
9530 APLogger NATProxy Started
9600
NAT Proxy Register to Proxy Success
TelnetSvr TelnetSvr Started
SNTP client
application started
Event
Description
SNTP is started
Debug Info
Shows detail trace level messages.
Start Path: Click “Monitor > Debug Info”
Description
Figure 5.7-1
Filed Description:
• Get Log: Get debug logs (-1~999)
• Clear: Clear logs
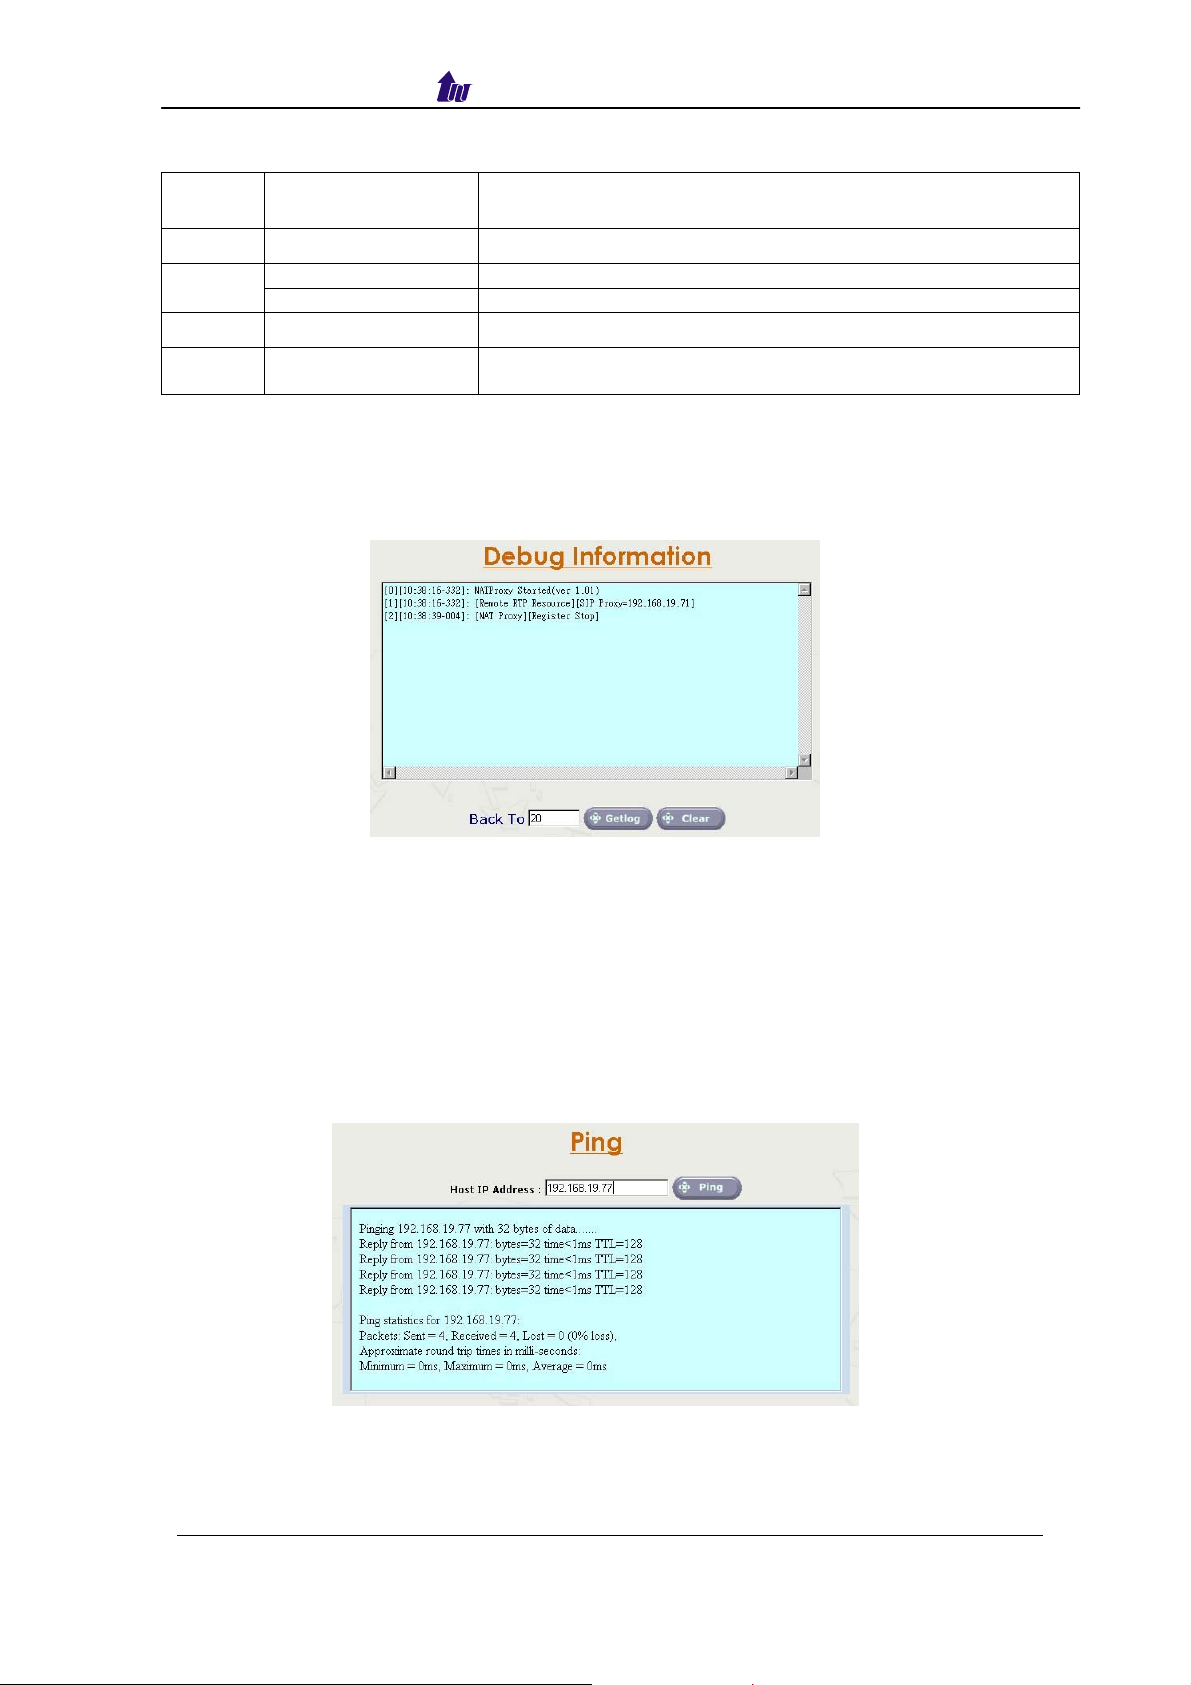
Ping
You can use the “Ping” to check an IP is active or not.
Start Path: Configuration > Ping
Figure 5.8-1
Field Description:
• Host IP Address: The IP address to ping
W ellSIP Telephony Server – V2.0
- 18 -
Page 19

Welltech Computer Co., Ltd.
Chapter 5 Telnet & RS-232 Configuration
WR5100 also can support to be managed by Telnet or Console port
(RS-232) for basic operations.
Interface:
Network: TCP/IP Telnet (i.e. telnet 192.168.67.1 10086)
RS232:
- Connect using: COM1
- Baud Rate: 9600
- Data bits: 8
- Parity: None
- Stop bits: 1
- Flow Control: None
- Wire: Null modem line (crossed)
Logon WR5100 by Telnet
Use Windows build-in Hyper Terminal or other telnet terminal emulator
to login (e.g. telnet 192.168.67.1:10086). User ID & password will be required
for login (default login user id: admin, password: admin & user id: root,
password: root).
Command List:
Command
echo Auto echo on or off
eventlog Clean or show system log message
exit Quit the current session
ipconfig Configure or show network1,2 information
ping Check an IP address is available or not
reboot Reboot
reset Soft-reset
shutdown Shutdown
time Reset or show system time.
timezone Setup or show system timezone
useradmin Manage user account.
help & ? View command list
Echo: auto echo on or not
Command Purpose
[root#]echo ?
Usage: echo on/off
Example: echo on
[root#]echo on Echo is on
[root#]echo off Echo is off (default value)
Eventlog: show system log message
Description
W ellSIP Telephony Server – V2.0
- 19 -
Page 20

Welltech Computer Co., Ltd.
Command Purpose
[root#]eventlog ?
[root#]eventlog
Usage: eventlog [-clear]
Example: eventlog
eventlog -clear
Show system eventlog:
Eventlog example:
[root#] eventlog
Time: 2005-05-12 15:18:26 Event ID: 9600
Type: Information Source : sntpclient
Description: Failed to connect SNTP Server
Time: 2005-05-12 15:13:16 Event ID: 9600
Type: Information Source : sntpclient
Description: Failed to connect SNTP Server
Time: 2005-05-12 15:08:05 Event ID: 9600
Type: Information Source : sntpclient
Description: Failed to connect SNTP Server
[root#]eventlog -
Press any key to continue or press 'Q' to quit
Clear all event log
clear
Exit: Quit the current session
Command Purpose
[root#]exit Quit the current session
Ipconfig: Configuration or show network information
Command Purpose
[root#] ipconfig ?
[root#]ipconfig
[root#]ipconfig network
1 –delete dns
Usage: ipconfig [-network boardno][-delete dns] [-dhcp] [dns IPAddress1 IP
Address2 ] [-ip IPAddress -mask Mask -gateway Gateway]
Example: ipconfig -network 1 -ip 192.168.67. 1 -mask
255.255.0.0 -gateway 1
92.168.5.254
example : ipconfig -network 1 -dhcp
example : ipconfig -network 1 -dns 192.168.1.1
example : ipconfig -network 1 -delete dns
Show current network configuration
[Network 1] Local Area Connection
USE FIXED IP (or DHCP)
IP Address : 192.168.5.7
Subnet Mask : 255.255.0.0
Default Gateway : 192.168.5.254
DNS Servers :
[Network 2] Local Area Connection 2
USE FIXED IP
IP Address : 192.168.5.8
Subnet Mask : 255.255.0.0
Default Gateway :
DNS Servers :
Delete the DNS servers setting
[Network 1] Local Area Connection
USE FIXED IP
IP Address : 192.168.5.113
W ellSIP Telephony Server – V2.0
- 20 -
Page 21

Welltech Computer Co., Ltd.
Subnet Mask : 255.255.0.0
Default Gateway : 192.168.1.254
DNS Servers :
[root#]ipconfig network 1–
dhcp
[root#]ipconfig network 1–
ip 61.220.126 28 –mask
255.255.0.224 –gateway
61.220.126.1
[root#]ipconfig network 1–
ip 61.220.126.115
[root#]ipconfig network 1–
dns 210.59.126.53
Enable DHCP
[Network 1] Local Area Connection
USE DHCP
IP Address : 192.168.5.10
Subnet Mask : 255.255.0.0
Default Gateway : 192.168.1.254
DNS Servers : 192.168.5.1
168.95.1.1
Use fixed network configuration
[Network 1] Local Area Connection
USE FIXED IP
IP Address : 61.220.126.28
Subnet Mask : 255.255.255.1
Default Gateway : 61.220.126.254
DNS Servers :
Changes IP address only.
[Network 1] Local Area Connection
USE FIXED IP
IP Address : 61.220.126.115
Subnet Mask : 255.255.255.1
Default Gateway : 61.220.126.254
DNS Servers :
Changes DNS configuration only.
[Network 1] Local Area Connection
USE FIXED IP
IP Address : 61.220.126.115
Subnet Mask : 255.255.255.1
Default Gateway : 61.220.126.254
DNS Servers : 210.59.126.53
Ping: Check an IP address is available or not
Command Purpose
[root#] ping ? Usage: ping IP.
Example: ping 127.0.0.1
[root#]ping 61.220.126.1
Ping result
Reply from 61.220.126.1 bytes=64 time=1ms TTL=29
Reply from 61.220.126.1 bytes=64 time=1ms TTL=29
Reply from 61.220.126.1 bytes=64 time=1ms TTL=29
Reply from 61.220.126.1 bytes=64 time=1ms TTL=29
Reboot:
Command Purpose
[root#] reboot ?
[root#]reboot
Are You Sure?(Y/N)y
Reboot System
Are You Sure? (Y/N)
WR5100 are rebooting
Shutdown:
Command Purpose
[root#] shutdown ?
[root#]shutdown
Shutdown System
Are You Sure? (Y/N)
WR5100 are shutting down
W ellSIP Telephony Server – V2.0
- 21 -
Page 22

Welltech Computer Co., Ltd.
Are You Sure?(Y/N)y
Reset:
Command Purpose
[root#] reset ?
[root#]reset
Soft reset System
Are You Sure? (Y/N)
Are You Sure?(Y/N)y
Time: Reset or show system time
Command Purpose
[root#] time ?
[root#]time
[root#]time 2003-07-29
Usage : time YYYY-MM-DD HH:NN:SS
Example : Time 2002-01-01 12:00:00
Show current time
The current time is 2003-06-20 15:17:30
Change system bios time
23:14:53
Timezone: Setup or show system timezone
Command Purpose
W ellSIP Telephony Server – V2.0
- 22 -
Page 23

Welltech Computer Co., Ltd.
[root#] timezone ?
Fixed Zone List:
01. Afghanistan Standard Time
03. Arab Standard Time
05. Arabic Standard Time
07. AUS Central Standard Time
09. Azores Standard Time
11. Cape Verde Standard Time
13. Cen. Australia Standard Time
15. Central Asia Standard Time
17. Central European Standard
Time
19. Central Standard Time
21. Dateline Standard Time
23. E. Australia Standard Time
25. E. South America Standard
Time
27. Egypt Standard Time
29. Fiji Standard Time
31. GMT Standard Time
33. Greenwich Standard Time
35. Hawaiian Standard Time
37. Iran Standard Time
39. Korea Standard Time
41. Mexico Standard Time 2
43. Mountain Standard Time
45. N. Central Asia Standard
Time
47. New Zealand Standard Time
49. North Asia East Standard
Time
51. Pacific SA Standard Time
53. Romance Standard Time
55. SA Eastern Standard Time
57. SA Western Standard Time
59. SE Asia Standard Time
61. South Africa Standard Time
63. Taipei Standard Time
65. Tokyo Standard Time
67. US Eastern Standard Time
69. Vladivostok Standard Time
71. W. Central Africa Standard
Time
73. West Asia Standard Time
75. Yakutsk Standard Time
02. Alaskan Standard Time
04. Arabian Standard Time
06. Atlantic Standard Time
08. AUS Eastern Standard Time
10. Canada Central Standard
Time
12. Caucasus Standard Time
14. Central America Standard
Time
16. Central Europe Standard
Time
18. Central Pacific Standard
Time
20. China Standard Time
22. E. Africa Standard Time
24. E. Europe Standard Time
26. Eastern Standard Time
28. Ekaterinburg Standard Time
30. FLE Standard Time
32. Greenland Standard Time
34. GTB Standard Time
36. India Standard Time
38. Israel Standard Time
40. Mexico Standard Time
42. Mid-Atlantic Standard Time
44. Myanmar Standard Time
46. Nepal Standard Time
48. Newfoundland Standard
Time
50. North Asia Standard Time
52. Pacific Standard Time
54. Russian Standard Time
56. SA Pacific Standard Time
58. Samoa Standard Time
60. Singapore Standard Time
62. Sri Lanka Standard Time
64. Tasmania Standard Time
66. Tonga Standard Time
68. US Mountain Standard Time
70. W. Australia Standard Time
72. W. Europe Standard Time
74. West Pacific Standard Time
W ellSIP Telephony Server – V2.0
- 23 -
Page 24

Welltech Computer Co., Ltd.
[root#]timezone
[root#]timezone 40 n
[root#]timezone custom +08:00 01:00 05-00-01-03
09-00-05-03
Usage1 : timezone Zone (1 to 75) AutoDaylight (Y or N)
Example1 : timezone 1 Y
Usage2 : timezone -custom Bias DaylightBias DaylightStart
StandardStart
Bias : -12:00 to +13:00
DaylightBias : -12:00 to +13:00
DaylightStart :
MM (Month: 01 to 12) ;
WD (Day of week: 00 to 06)
DD (Day:01 to 05 ;Specifies the occurrence of day in the
month;
01 = First occurrence of day,
02 = Second occurrence of day, ..., 05 = Last occurrence of
day
HH (Hour:00 to 23)
StandardStart :
MM (Month: 01 to 12) ;
WD (Day of week: 00 to 06)
DD (Day:01 to 05 ;Specifies the occurrence of day in the
month;
01 = First occurrence of day,
02 = Second occurrence of day, ..., 05 = Last occurrence of
day
HH (Hour:00 to 23)
Example2 : timezone -custom +08:00 -01:00 04-00-01-02 10-0005-02
Show current timezone info
Time Zone : (40) Mexico Standard Time (GMT -06:00)
Daylight Bias : -01:00
Daylight Start : 05-00-01 02:00
Standard Start : 09-00-05 02:00
Auto Daylight : Y
Use pre-defined timezone
Time Zone : (40) Mexico Standard Time (GMT -06:00)
Daylight Bias : -01:00
Daylight Start : 05-00-01 02:00
Standard Start : 09-00-05 02:00
Auto Daylight : n
Use customized timezone
Time Zone : (99) Customized (GMT 08:00)
Daylight Bias : -01:00
Daylight Start : 05-00-01 03:00
Standard Start : 09-00-05 03:00
Auto Daylight : Y
Useradmin: Manager User account
Command Purpose
[root#] useradmin ?
[root#]useradmin
[root#]useradmin -list
Usage: useradmin [-add User] [-delete User] [password User]
Example: useradmin -add irene
Show the current login user account
root
Show the current user account list
admin
W ellSIP Telephony Server – V2.0
- 24 -
Page 25

Welltech Computer Co., Ltd.
[root#] useradmin -add irene
Password : irene
Confirm : irene
Add user Success.
[root#] useradmin -delete
1111
Are You Sure?(Y/N)y
[root#] useradmin -password
root
New Password : 1234
Confirm : 1234
root
irene
Add the new user account: irene
Delete the user: 1111
Change the user: root’s password.
W ellSIP Telephony Server – V2.0
- 25 -
Page 26

Welltech Computer Co., Ltd.
Chapter 6 LCD Display Configuration
WR5100 provides a front panel LCD for basic operations.
Button List:
Button List
When the WR5100 is ready, the LCD screen shows as blow
Ready |
04-03-03 16:40
Press Enter to select command
Enter
Event Log
IP Config
ESC Quit the current command
▲ Up or previous edit mode
▼ Next or previous edit mode
Command Tree:
Main Menu
Event Log
IP Config
Reboot
Reset
PWD
Soft Reset
Shut
Down
No
Event Log:
Description
Show system log message
Network 1
Network 2
Yes
No
Yes
No
Yes
No
Yes
Show IP Info
Use DHCP Use
Fixed IP
W ellSIP Telephony Server – V2.0
- 26 -
Page 27

Welltech Computer Co., Ltd.
Configure
LCD Display
▲ Previous event log
▼ Next event log
Enter Show detail event log
▲ Previous line
▼ Next line
ESC Quit detail event log viewing
ESC Quit to main menu
IP Config:
Configure
LCD Display
▲ Select Network1 or Network2 configuration
▼ Select Network1 or Network2 configuration
Enter Configure Network1 or Network2
▲ Select Network configuration
▼ Select Network configuration
Enter Configure Network
▲ Increase the digit apply to network setting
▼ Decrease the digit apply to network setting
Enter Apply change to network information
ESC Quit network setting
ESC Quit to main menu
Reboot:
Configure
LCD Display
▲ Select Reboot or not
▼ Select Reboot or not
Enter Reset user: root’s (or admin) user password
ESC Quit Reboot configure
ESC Quit to main menu
Reset:
Configure
LCD Display
▲ Select user to change password
▼ Select user to change password
Enter Change user password
▲ Increase the alphabet apply to user password setting
▼ Decrease the alphabet apply to user password setting
ESC Quit Reset configure
ESC Quit to main menu
Soft Reset:
Configure
LCD Display
▲ Select Reset or not
W ellSIP Telephony Server – V2.0
- 27 -
Page 28

Welltech Computer Co., Ltd.
▼ Select Reset or not
Enter Reset or not
ESC Quit Reset configure
ESC Quit to main menu
Shutdown:
Configure
LCD Display
▲ Select Shutdown or not
▼ Select Shutdown or not
Enter Shutdown or not
ESC Quit Shutdown configure
ESC Quit to main menu
W ellSIP Telephony Server – V2.0
- 28 -
Page 29

Welltech Computer Co., Ltd.
Appendix 1 Time zone to Country Mapping List
Greenwich Mean Time & Country List
21. Dateline Standard Time (GMT-12:00) International Date Line West
58. Samoa Standard Time (GMT-11:00) Midway Island, Samoa
35. Hawaiian Standard Time (GMT-10:00) Hawaii
02. Alaskan Standard Time (GMT-09:00) Alaska
(GMT-08:00) Pacific Time (US & Canada);
Tijuana
(GMT-06:00) Guadalajara, Mexico City,
Monterrey
(GMT) Greenwich Mean Time: Dublin, Edinburgh,
Lisbon, London
(GMT+01:00) Brussels, Copenhagen, Madrid,
Paris
(GMT+01:00) Belgrade, Bratislava, Budapest,
Ljubljana, Prague
(GMT+01:00) Amsterdam, Berlin, Bern, Rome,
Stockholm, Vienna
(GMT+02:00) Helsinki, Kyiv, Riga, Sofia, Tallinn,
Vilnius
(GMT+02:00) Bucharest 24. E. Europe Standard Time
52. Pacific Standard Time
43. Mountain Standard Time (GMT-07:00) Mountain Time (US & Canada)
41. Mexico Standard Time 2 (GMT-07:00) Chihuahua, La Paz, Mazatlan
68. US Mountain Standard Time (GMT-07:00) Arizona
10. Canada Central Standard Time (GMT-06:00) Saskatchewan
40. Mexico Standard Time
19. Central Standard Time (GMT-06:00) Central Time (US & Canada)
14. Central America Standard Time (GMT-06:00) Central America
67. US Eastern Standard Time (GMT-05:00) Indiana (East)
26. Eastern Standard Time (GMT-05:00) Eastern Time (US & Canada)
56. SA Pacific Standard Time (GMT-05:00) Bogota, Lima, Quito
51. Pacific SA Standard Time (GMT-04:00) Santiago
57. SA Western Standard Time (GMT-04:00) Caracas, La Paz
06. Atlantic Standard Time (GMT-04:00) Atlantic Time (Canada)
48. Newfoundland Standard Time (GMT-03:30) Newfoundland
32. Greenland Standard Time (GMT-03:00) Greenland
55. SA Eastern Standard Time (GMT-03:00) Buenos Aires, Georgetown
25. E. South America Standard Time (GMT-03:00) Brasilia
42. Mid-Atlantic Standard Time (GMT-02:00) Mid-Atlantic
11. Cape Verde Standard Time (GMT-01:00) Cape Verde Is.
09. Azores Standard Time (GMT-01:00) Azores
31. GMT Standard Time
33. Greenwich Standard Time (GMT) Casablanca, Monrovia
71. W. Central Africa Standard Time (GMT+01:00) West Central Africa
17. Central European Standard Time (GMT+01:00) Sarajevo, Skopje, Warsaw, Zagreb
53. Romance Standard Time
16. Central Europe Standard Time
72. W. Europe Standard Time
38. Israel Standard Time (GMT+02:00) Jerusalem
30. FLE Standard Time
61. South Africa Standard Time (GMT+02:00) Harare, Pretoria
27. Egypt Standard Time (GMT+02:00) Cairo
Time Zone
W ellSIP Telephony Server – V2.0
- 29 -
Page 30

Welltech Computer Co., Ltd.
(GMT+05:30) Chennai, Kolkata, Mumbai, New
Delhi
(GMT+08:00) Beijing, Chongqing, Hong Kong,
Urumqi
(GMT+11:00) Magadan, Solomon Is., New
Caledonia
34. GTB Standard Time (GMT+02:00) Athens, Istanbul, Minsk
22. E. Africa Standard Time (GMT+03:00) Nairobi
54. Russian Standard Time (GMT+03:00) Moscow, St. Petersburg, Volgograd
03. Arab Standard Time (GMT+03:00) Kuwait, Riyadh
05. Arabic Standard Time (GMT+03:00) Baghdad
37. Iran Standard Time (GMT+03:30) Tehran
12. Caucasus Standard Time (GMT+04:00) Baku, Tbilisi, Yerevan
04. Arabian Standard Time (GMT+04:00) Abu Dhabi, Muscat
01. Afghanistan Standard Time (GMT+04:30) Kabul
73. West Asia Standard Time (GMT+05:00) Islamabad, Karachi, Tashkent
28. Ekaterinburg Standard Time (GMT+05:00) Ekaterinburg
36. India Standard Time
46. Nepal Standard Time (GMT+05:45) Kathmandu
62. Sri Lanka Standard Time (GMT+06:00) Sri Jayawardenepura
15. Central Asia Standard Time (GMT+06:00) Astana, Dhaka
45. N. Central Asia Standard Time (GMT+06:00) Almaty, Novosibirsk
44. Myanmar Standard Time (GMT+06:30) Rangoon
50. North Asia Standard Time (GMT+07:00) Krasnoyarsk
59. SE Asia Standard Time (GMT+07:00) Bangkok, Hanoi, Jakarta
63. Taipei Standard Time (GMT+08:00) Taipei
70. W. Australia Standard Time (GMT+08:00) Perth
60. Singapore Standard Time (GMT+08:00) Kuala Lumpur, Singapore
49. North Asia East Standard Time (GMT+08:00) Irkutsk, Ulaan Bataar
20. China Standard Time
75. Yakutsk Standard Time (GMT+09:00) Yakutsk
39. Korea Standard Time (GMT+09:00) Seoul
65. Tokyo Standard Time (GMT+09:00) Osaka, Sapporo, Tokyo
07. AUS Central Standard Time (GMT+09:30) Darwin
13. Cen. Australia Standard Time (GMT+09:30) Adelaide
69. Vladivostok Standard Time (GMT+10:00) Vladivostok
64. Tasmania Standard Time (GMT+10:00) Hobart
74. West Pacific Standard Time (GMT+10:00) Guam, Port Moresby
08. AUS Eastern Standard Time (GMT+10:00) Canberra, Melbourne, Sydney
23. E. Australia Standard Tim (GMT+10:00) Brisbane
18. Central Pacific Standard Time
29. Fiji Standard Time (GMT+12:00) Fiji, KamChapterka, Marshall Is.
47. New Zealand Standard Time (GMT+12:00) Auckland, Wellington
66. Tonga Standard Time (GMT+13:00) Nuku'alofa
W ellSIP Telephony Server – V2.0
- 30 -
Page 31

Welltech Computer Co., Ltd.
Quick Function Reference
A
Account Manager………………………………………………………… 15
Confirm Password……………………………………………………… 16
Password…………………………………………………………………16
User ID..…………………………………………………………………. 16
Apply Change………………………………………………………………. 9
D
Debug…………………………………………………………………………. 12
Debug Info…………………………………………………………………… 18
Clear…………………………………………………………………...... 18
Get Log............................................................................................ 53
Event Log…………………………………………………………………… 17
Category………………………………………………………………….. 17
Date.……………………………………………………………………… 17
Event ID…………………………………………………………………. 17
Time……………………………………………………………………… 17
Type……………………………………………………………………… 17
Source……………………………………………………………………. 17
M
Monitor……………………………………………………………………… 17
N
Network………………………………………………………………………. 15
Domain name…………………………………………………………….. 15
Dynamic DNS Registration……………………………………………… 15
Host Name………………………………………………………………. 15
Primary DNS Server…………………………………………………….. 15
Secondary DNS Server………………………………………………….. 15
P
Ping……………………………………………………………………………
Host IP Address………………………………………………………….. 19
19
W ellSIP Telephony Server – V2.0
- 31 -
Page 32

Welltech Computer Co., Ltd.
R
Relogin………………………………………………………………………. 16
S
System (Configuration)……………………………………………………. 11
Email From………………………………………………………………. 11
Email To………………………………………………………………….. 11
Enable System Log…………………………………………………….. 11
RTP Start Port……………………………………………………………. 11
Port Interval……………………………………………………………….. 11
SMTP Server…………………………………………………………….. 11
Subject……………………………………………………………………. 11
SIP Proxy IP Address…………………………………………………… 11
SyslogD Server IP………………………………………………………. 11
System (License)…………………………………………………………. 11
License Key…………………………………………………………….. 12
Feature………………………………………………………………….. 11
Serial……………………………………………………………………. 11
System (Control)……………………………………………………………. 13
Restart…………………………………………………………………… 13
Shutdown………………………………………………………………… 13
Soft Reset………………………………………………………………… 13
System Time………………………………………………………………… 13
Auto Daylight Saving……………………………………………………. 14
Timezone…………………………………………………………………. 14
Daylight Bias…………………………………………………………….. 14
Daylight Start…………………………………………………………….. 14
Standard Start……………………………………………………………. 14
U
Upgrade……………………………………………………………………….
16
Apply………………………………………………………………………. 16
File Name………………………………………………………………… 16
Upgrade Reset………………………………………………………….. 16
Upload……………………………………………………………………. 16
W ellSIP Telephony Server – V2.0
- 32 -
Page 33

Welltech Computer Co., Ltd.
Index
A
Account Manager………………………………………………………….. 15
Apply Change………………………………………………………………. 9
D
Debug…………………………………………………………………………. 12
Debug Info…………………………………………………………………… 18
E
Event Log…………………………………………………………………… 17
M
Monitor……………………………………………………………………… 17
N
Network………………………………………………………………………. 15
P
Ping……………………………………………………………………………
R
Relogin………………………………………………………………………. 16
S
System (Configuration)…………………………………………………….
System (License)…………………………………………………………. 11
System (Control)……………………………………………………………. 13
System Time………………………………………………………………… 13
U
Upgrade……………………………………………………………………… 16
19
11
W ellSIP Telephony Server – V2.0
- 33 -
 Loading...