


GS 55SL-GVi
V-ZUG GS 55SL-GVi, GS 60SL-GVi, Adora 60 SL, GS 60SL-Vi, GS 55SL-Vi Operating Instructions Manual
...
Dishwasher
Fully integrated Adora SL
Operating instructions
V-ZUG Ltd

2
Thank you for choosing to buy one of our products. Your appliance is made
to high standards and is easy to use. Nevertheless, please take the time to
read these operating instructions in order to familiarize yourself with the
appliance and get the best use out of it.
Please follow the safety precautions.
Modifications
Text, diagrams and data correspond to the technical standard of the appliance at the time these operating instructions went to press. The right to make
technical modifications for the purpose of the further development of the
appliance is reserved.
Symbols used
➤ Indicates step-by-step instructions.
– Describes how the appliance reacts to the steps taken.
• Indicates a list.
Validity
The model number corresponds to the first 3 digits on the identification plate.
These operating instructions apply to the models:
Variations depending on the model are noted in the text.
© V-ZUG Ltd, CH-6301 Zug, 2013
Denotes important safety precautions. Failure to observe said
precautions can result in injury or damage to the appliance or
fittings!
Denotes useful tips for the user.
Model Type Model no. Size system
Adora 55 SL GS 55SL-Vi 235 SMS 55
Adora 55 SL GS 55SL-GVi 237 SMS 55
Adora 60 SL GS 60SL-Vi 239 EURO 60
Adora 60 SL GS 60SL-GVi 261 EURO 60

3
Contents
1 Safety precautions 5
1.1 Before using for the first time . . . . . . . . . . . . . . . . . . . . . . . . . . . . . . . . . . 5
1.2 Correct use . . . . . . . . . . . . . . . . . . . . . . . . . . . . . . . . . . . . . . . . . . . . . . . . 6
1.3 Children in the home . . . . . . . . . . . . . . . . . . . . . . . . . . . . . . . . . . . . . . . . 7
1.4 Note on use . . . . . . . . . . . . . . . . . . . . . . . . . . . . . . . . . . . . . . . . . . . . . . . 7
2 Your appliance 10
2.1 Appliance description . . . . . . . . . . . . . . . . . . . . . . . . . . . . . . . . . . . . . . . 10
2.2 Appliance construction . . . . . . . . . . . . . . . . . . . . . . . . . . . . . . . . . . . . . . 11
2.3 Operating and display elements . . . . . . . . . . . . . . . . . . . . . . . . . . . . . . . 12
3 Programme overview 14
3.1 Additional functions . . . . . . . . . . . . . . . . . . . . . . . . . . . . . . . . . . . . . . . . 17
3.2 Fondue/Raclette programme . . . . . . . . . . . . . . . . . . . . . . . . . . . . . . . . . 18
4 User settings 20
4.1 Language . . . . . . . . . . . . . . . . . . . . . . . . . . . . . . . . . . . . . . . . . . . . . . . . 22
4.2 Resetting the language . . . . . . . . . . . . . . . . . . . . . . . . . . . . . . . . . . . . . 22
4.3 Contrast . . . . . . . . . . . . . . . . . . . . . . . . . . . . . . . . . . . . . . . . . . . . . . . . . 23
4.4 Acoustic signal . . . . . . . . . . . . . . . . . . . . . . . . . . . . . . . . . . . . . . . . . . . . 24
4.5 «All in 1» detergent . . . . . . . . . . . . . . . . . . . . . . . . . . . . . . . . . . . . . . . . . 25
4.6 Childproof lock . . . . . . . . . . . . . . . . . . . . . . . . . . . . . . . . . . . . . . . . . . . . 26
4.7 Rinse agent dosage . . . . . . . . . . . . . . . . . . . . . . . . . . . . . . . . . . . . . . . . 27
4.8 Water hardness . . . . . . . . . . . . . . . . . . . . . . . . . . . . . . . . . . . . . . . . . . . 28
4.9 Hot water connection . . . . . . . . . . . . . . . . . . . . . . . . . . . . . . . . . . . . . . . 30
4.10 Temperature unit . . . . . . . . . . . . . . . . . . . . . . . . . . . . . . . . . . . . . . . . . . 31
4.11 Restoring factory settings . . . . . . . . . . . . . . . . . . . . . . . . . . . . . . . . . . . . 32
5Operation 33
5.1 Preparing the appliance . . . . . . . . . . . . . . . . . . . . . . . . . . . . . . . . . . . . . 33
5.2 Loading the baskets . . . . . . . . . . . . . . . . . . . . . . . . . . . . . . . . . . . . . . . . 34
5.3 Loading tips for the upper basket . . . . . . . . . . . . . . . . . . . . . . . . . . . . . 35
5.4 Loading tips for the lower basket . . . . . . . . . . . . . . . . . . . . . . . . . . . . . . 40
5.5 Adding the detergent . . . . . . . . . . . . . . . . . . . . . . . . . . . . . . . . . . . . . . . 44
5.6 Selecting a programme . . . . . . . . . . . . . . . . . . . . . . . . . . . . . . . . . . . . . 46
5.7 Selecting the economy programme . . . . . . . . . . . . . . . . . . . . . . . . . . . . 46
5.8 Selecting additional functions . . . . . . . . . . . . . . . . . . . . . . . . . . . . . . . . . 47
5.9 Saving additional functions . . . . . . . . . . . . . . . . . . . . . . . . . . . . . . . . . . . 48
5.10 Delayed start . . . . . . . . . . . . . . . . . . . . . . . . . . . . . . . . . . . . . . . . . . . . . 49
5.11 Interrupting a programme . . . . . . . . . . . . . . . . . . . . . . . . . . . . . . . . . . . . 50
5.12 Aborting a programme . . . . . . . . . . . . . . . . . . . . . . . . . . . . . . . . . . . . . . 50
5.13 End of programme . . . . . . . . . . . . . . . . . . . . . . . . . . . . . . . . . . . . . . . . . 51
5.14 Operation with childproof lock activated . . . . . . . . . . . . . . . . . . . . . . . . 52

4
6 Care and maintenance 53
6.1 Cleaning the interior . . . . . . . . . . . . . . . . . . . . . . . . . . . . . . . . . . . . . . . . 53
6.2 Cleaning the exterior . . . . . . . . . . . . . . . . . . . . . . . . . . . . . . . . . . . . . . . 53
6.3 Cleaning the filter system . . . . . . . . . . . . . . . . . . . . . . . . . . . . . . . . . . . . 54
6.4 Cleaning the spray arms . . . . . . . . . . . . . . . . . . . . . . . . . . . . . . . . . . . . 55
6.5 Filling with regeneration salt . . . . . . . . . . . . . . . . . . . . . . . . . . . . . . . . . 56
6.6 Filling with rinse agent . . . . . . . . . . . . . . . . . . . . . . . . . . . . . . . . . . . . . . 57
6.7 Cleaning the water inlet filter . . . . . . . . . . . . . . . . . . . . . . . . . . . . . . . . . 58
7 Trouble-shooting 59
7.1 What to do if … . . . . . . . . . . . . . . . . . . . . . . . . . . . . . . . . . . . . . . . . . . . . 59
7.2 Power failure . . . . . . . . . . . . . . . . . . . . . . . . . . . . . . . . . . . . . . . . . . . . . 66
8 Dishwashing tips 67
9 Accessories and spare parts 68
10 Technical data 70
10.1 Note for testing institutes (SMS 55) . . . . . . . . . . . . . . . . . . . . . . . . . . . . 71
10.2 Note for testing institutes (EURO 60) . . . . . . . . . . . . . . . . . . . . . . . . . . . 73
10.3 Noise measurement . . . . . . . . . . . . . . . . . . . . . . . . . . . . . . . . . . . . . . . . 75
11 Disposal 76
12 Notes 77
13 Index 80
14 Repair service 83

5
1 Safety precautions
In accordance with the requirements of IEC 60335-1:
• This appliance is not intended for use by persons (including children) with
reduced physical, sensory or mental capabilities, or lack of experience and
knowledge, unless supervised or unless they have been given instruction
concerning the use of the appliance by a person responsible for their
safety.
1.1 Before using for the first time
• The appliance must be installed and connected up to the electricity supply
in accordance with the separate installation instructions. Have the
necessary work carried out by a qualified fitter/electrician.
• Dispose of the packaging material in accordance with local regulations.
• Fill the salt reservoir with approximately 1.5 l water and 1 kg regeneration
salt.
• Run a wash programme without any dishes ( programme with
detergent) in order to remove traces of grease left behind from the
manufacturing process.
The appliance corresponds to recognised technology standards
and the relevant safety regulations. Proper use of the appliance is
however essential to avoid damage and accidents. Please
therefore follow the precautions given in these operating
instructions.
For hygiene reasons, regeneration salt is also recommended for use
with low water hardness and detergents.
The appliance was tested with water before being shipped. There may
therefore still be traces of water left in the appliance.

1 Safety precautions
6
1.2 Correct use
• The appliance is only suitable for washing household dishes and cutlery
with water and standard dishwasher detergent. The appliance is for use in
the home and for the intended purpose only. No liability is assumed for any
damage caused by improper or incorrect use.
• Any repairs, modifications or manipulations to the appliance, especially
any electrically live parts, may only be carried out by the manufacturer, its
Customer Services or similarly qualified persons. Repairs if carried out
incorrectly may cause serious injury, damage to the appliance and fittings,
as well as affect the functioning of the appliance. If the appliance is not
working properly or in case of a repair order, follow the instructions given
in the R
EPAIR SERVICE section. If necessary, please contact our Customer
Services.
• Use original spare parts only.
• Retain these operating instructions for future reference. If you sell or pass
the appliance on to a third party, please ensure these operating instructions accompany the appliance, together with the instructions on installation. In this way, the new owner can inform themselves about how to use
the appliance correctly and read the pertinent safety precautions.

1 Safety precautions
7
1.3 Children in the home
• Packaging material (e.g. plastic, polystyrene) can be dangerous for
children. Danger of suffocation! Keep packaging material away from
children.
• The appliance is designed for use by adults who are familiar with these
operating instructions. Children are often unable to recognize the danger
of electrical appliances. Ensure proper supervision and do not allow
children to play with the appliance – there is a danger that children could
get locked inside.
• The water in the appliance is not to be used as drinking water. Detergent
residue in the appliance could cause eye or skin irritation! You should keep
children away from the open appliance.
• Detergents can irritate the eyes, mouth and throat and even cause choking!
You should keep detergent, regeneration salt and rinse agent out of the
reach of children.
• Use the childproof lock facility.
1.4 Note on use
• If the appliance is visibly damaged, do not use it. Contact our Customer
Services.
• If the appliance is not operating properly, turn off the water tap and
disconnect the appliance from the electricity supply immediately.
• If the mains cable of the appliance is damaged, it must be replaced by
Customer Services in order to avoid hazard.
• Ensure that the mains cables of other electrical appliances do not get
caught in the door of the appliance. The electrical cable insulation could
become damaged.
When the power is off, the built-in overflow protection system is
disabled.

1 Safety precautions
8
• Do not sit or lean on the appliance door. After loading or unloading the
appliance, do not leave the appliance door open as it can pose a risk –
danger of tripping and bruising!
• Due to risk of injury, place knives and cutlery with sharp edges or points
into the cutlery basket in such a way that they do not stick out (points facing
downwards). Knives and cutlery may also be placed horizontally in the
upper basket.
• Do not lean on the upper basket – risk of accident!
• Keep animals away from the appliance.
• To protect your dishes and cutlery, read the D
ISHWASHING TIPS section.
• Only use detergent, rinse agent and regeneration salt explicitly recommended for use with your appliance by the manufacturer in the operating
instructions. Follow the manufacturer’s instructions carefully.
• Do not use the appliance without any or too little detergent – risk of causing
damage to the appliance.
• Do not use washing-up liquid as it can cause excessive foaming, causing
your appliance to malfunction.
• Store detergent and regeneration salt in a cool, dry place. Lumpy detergent
can cause problems. Follow the safety warnings issued by the detergent
and rinse agent manufacturers carefully.
• After filling the salt reservoir, run the programme without dishes.
• Never fill the rinse agent reservoir or the regeneration salt reservoir with
detergent. If this were to happen, however, do not operate the appliance
under any circumstances, as this could cause expensive damage to it. Call
our Customer Services.
• Do not wash objects that are soiled with inflammable or corrosive solvent,
paint, wax, chemicals (acids or bases) or iron chippings or that can shed
fibres in the appliance.
• Do not use solvents (e.g. turpentine, benzine) instead of, or in addition to,
water in the appliance – fire or explosion hazard!

1 Safety precautions
9
• Before closing the appliance door and starting a programme ensure that
there are no foreign objects or pets in the appliance. Foreign objects, such
as nails and paper clips, can damage parts of the appliance as well as the
dishes.
• Never operate the appliance without the filter system in place.
• Only use soft materials for cleaning beneath the filter system. Never use
metal objects for cleaning.
• Avoid opening the appliance door unnecessarily during operation. The
dishes and the water may be hot – scalding hazard! The steam that
escapes can damage wood combination fascias. Spectacles can steam
up, impairing your vision.
• Do not leave the premises for a longer period of time when the appliance
is in operation.
• During longer absences, always turn off the water tap before cutting the
power going to the appliance by pulling out the plug or switching off the
fuse. Never pull the plug out of the mains socket by the cable. The mains
socket and the water connection are generally located in the cabinet
adjacent to the appliance (under the kitchen sink, behind the waste bin).
• Do not spray the outside of the appliance with water. Do not use a steam
cleaner.
• From time to time, check the drain hose for tears, kinks, twists, bends, etc.
• Ventilation openings on the base of the appliance must be kept clear and
not become blocked (e.g. through carpet).

10
2 Your appliance
2.1 Appliance description
•Capacity
12 international place settings (SMS 55)
13 international place settings (EURO 60)
•9 programmes
«Automatic»
«Daily Quick»
«Sprint»
«Glass»
«Intensive»
«Fondue/Raclette»
«Hygiene»
«Pre-rinsing»
«Economy programme»
• Additional functions
«Energy saving»
«SteamFinish»
«Partial load»
«Delayed start»
• Language selection
•«All in 1» detergent
• Childproof lock
•Acoustic signal
• Function light
• Hot water connection
• Automatic water softener with limescale sensor
• Water hardness control
• Automatic rinse agent dosage
• Soil sensor
2 Your appliance
11
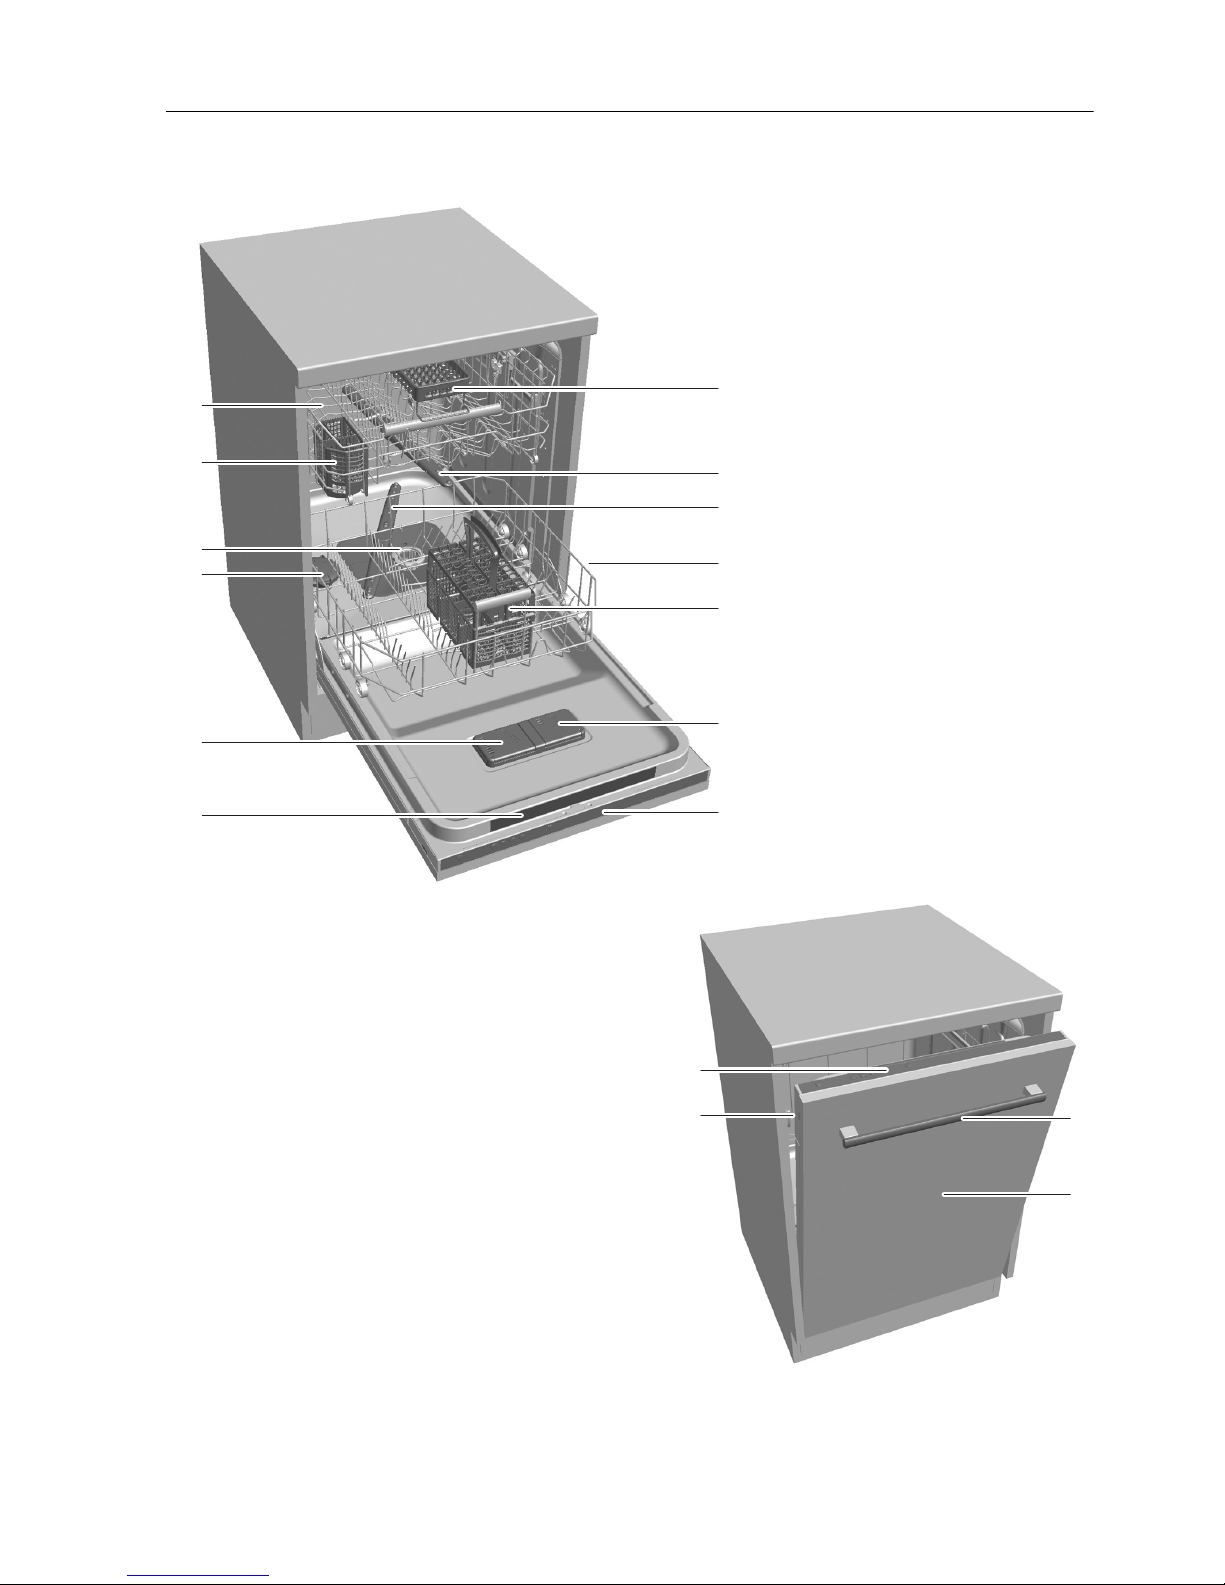
2.2 Appliance construction
1 Appliance door
2 Door handle
3 Operating and display elements
4 Function light
5 Baskets
6 Filter system
7 Salt reservoir
8 Detergent dispenser
9 Rinse agent reservoir
10 Quick operating instructions
11 Cutlery basket
12 «Small» cutlery basket
13 Vario cutlery basket insert
14 Spray arms
14
14
11
5
9
5
7
8
10
6
13
3
12
3
2
1
4
2 Your appliance
12
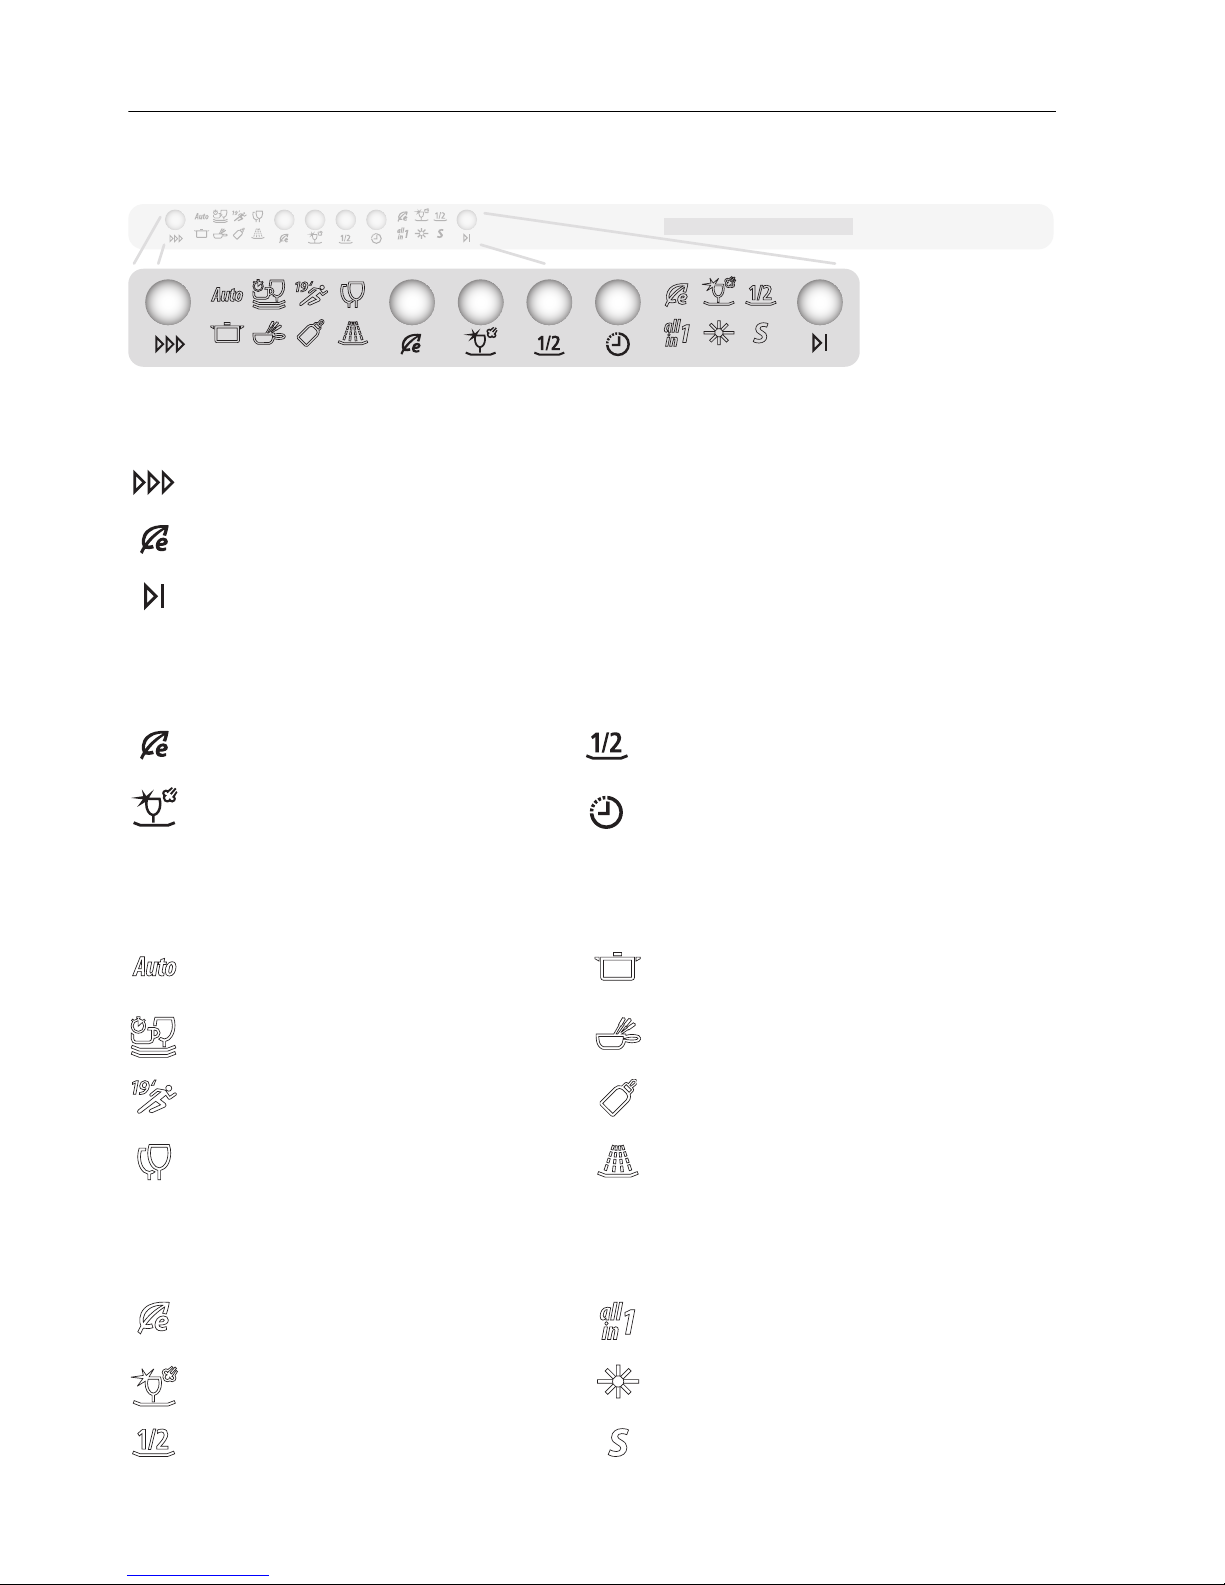
2.3 Operating and display elements
Programme buttons
Additional functions (buttons)
Programme symbols
Additional functions/indicators (symbols)
Programme selection
Economy programme
End of programme
Energy saving Partial load
SteamFinish Delayed start
Automatic Intensive
Daily Quick Fondue/Raclette
Sprint Hygiene
Glass Pre-rinsing
Energy saving «All in 1» detergent
SteamFinish Rinse agent refill indicator
Partial load Salt refill indicator

2 Your appliance
13
Display (plain text display)
Various information appears in the display during the programme selection
and the programme sequence.
• Programme name with duration/temperature
• Programme progress and time remaining
• Additional functions
• Delayed start
• Childproof lock
• Hints and trouble-shooting
Acoustic signal
An acoustic signal is emitted at the end of the programme and in the event
of a malfunction.
Function light
• Illuminates during the programme sequence
• Flashes during the drying phase and then goes out
A
utomatic
1h1
5
Automatic 1h15
14
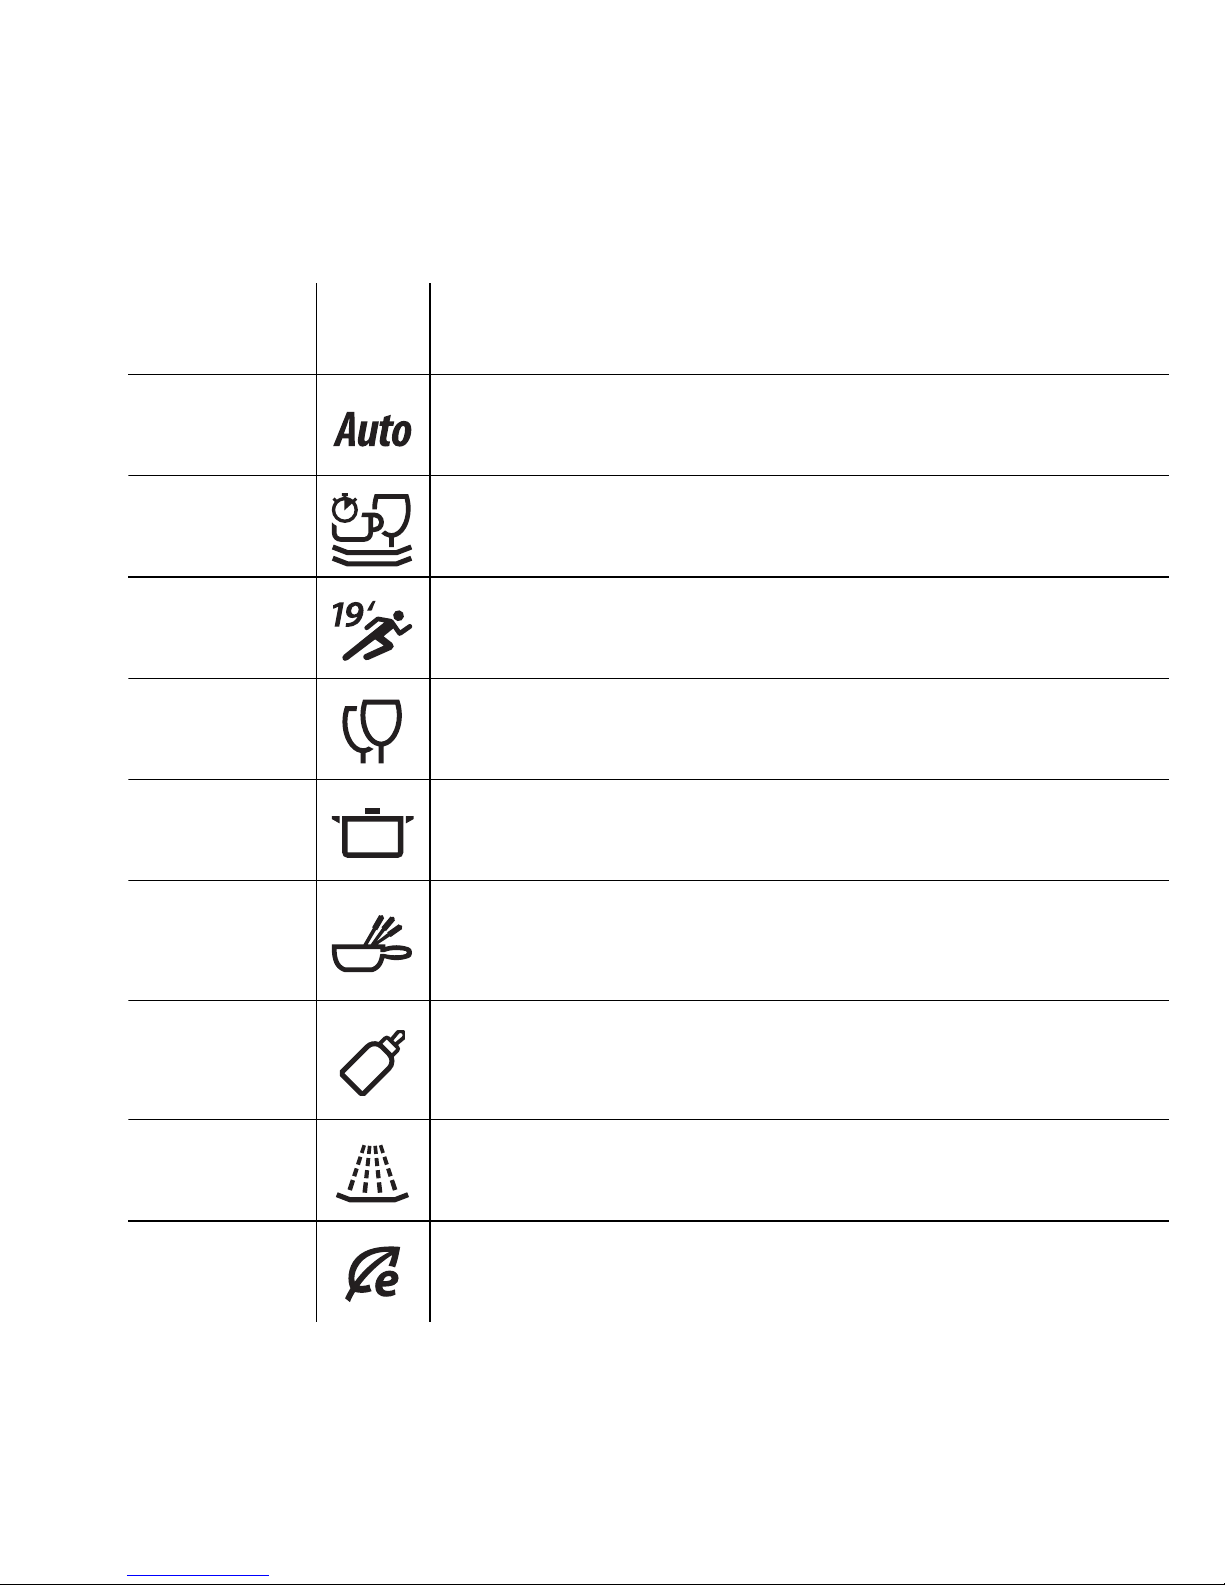
3 Programme overview
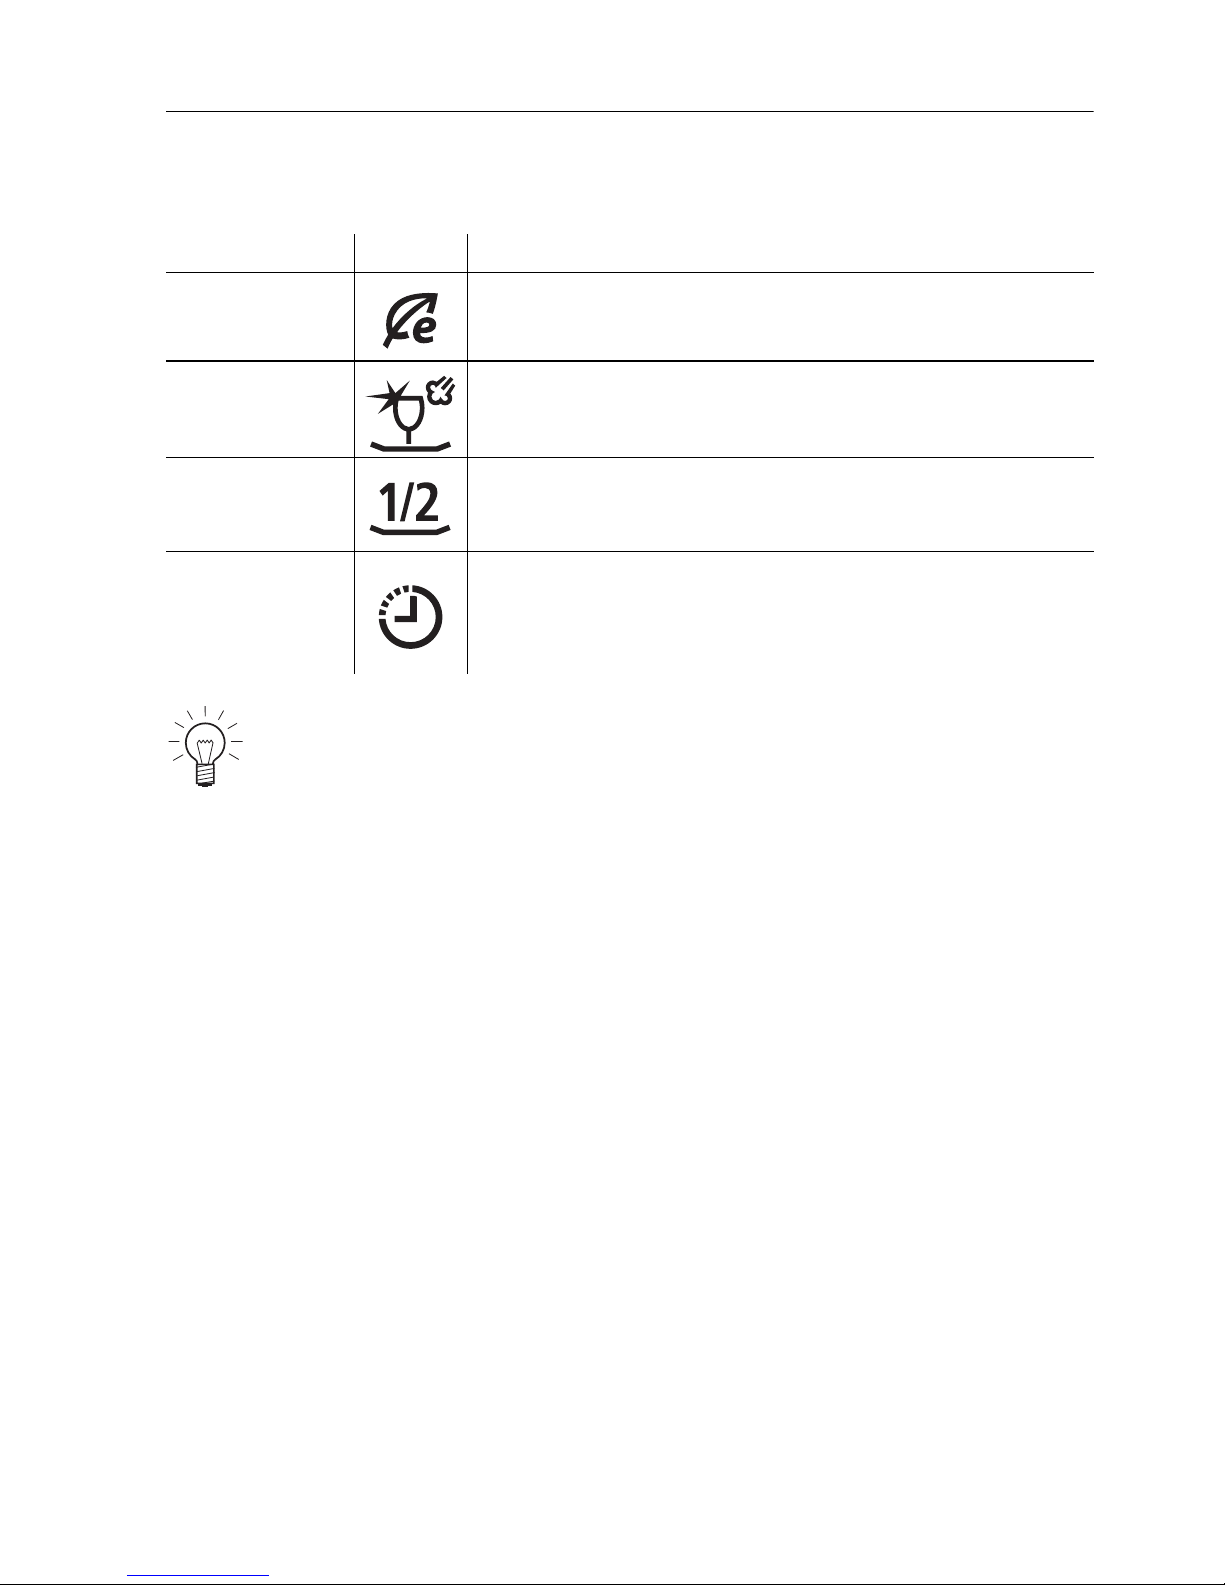
Programme Symbol Use
Automatic
Optimum cleaning results with minimal water and energy
consumption. For normal soiling. Not suitable for burned-on or driedon soiling.
Daily Quick
Quick programme for normal soiling. Cleans with higher spray
pressure.
Sprint
Quick programme for light soiling, e.g. aperitif dishware and tea and
coffee cups and saucers. With the «All in 1» setting, the programme
is extended by 10 minutes. Not suitable for slowly dissolving tabs.
Glass Gentle programme for glasses.
Intensive
For heavy soiling. Particularly suitable for starchy soiling (mashed
potato, rice...).
Fondue/
Raclette
For heavy soiling. Particularly suitable for burned-on soiling (fondue
and raclette pans, gratin dishes...). Only use dishwasher-safe fondue
pans. Add detergent to the pre-rinsing compartment to improve the
cleaning results.
Hygiene
For sanitizing the appliance and the water outlet. Where hygiene
requirements are high (baby bottles, cutting boards...), items can be
cleaned at a higher temperature. Clean the filter system before
starting the programme.
Pre-rinsing
To prevent soiling drying on if intending to start a wash programme
later.
Economy
programme
Economical programme for normal soiling (declaration programme).

3 Programme overview
15
Programme sequence/consumption data
Pre-
rinsing
[°C]
Cleaning
[°C]
Inter-
mediate
rinsing
Rinsing with
rinse agent
[°C]
Drying Duration *
Water
[l]
Energy
[kWh]
If required 50–60 If required 65 Yes
0h45
–
1h35
7
–
18
0.80
–
1.20
If required 60 Yes 60 Quick 0h45 14 1.10
No 55 No 60 Quick 0h19 7 0.80
No 45 Yes 60 Yes 0h45 11 0.80
If required 65 Yes 65 Yes 1h35
16
–
21
1.20
–
1.30
Soaking 65 Yes 65 Yes 2h15
14
–
18
1.40
–
1.50
60 70 Yes 70 Yes 1h40 13 1.65
Yes No No No No 0h06 4 0.05
No 50 Yes 60 Yes 2h35 10
0.92
–
0.93
* For single-phase 230 V, 10 A connections, the duration of the programme is extended by up to
15 minutes.
Duration without final drying

3 Programme overview
16
3 Programme overview
17
3.1 Additional functions
Function Symbol Use
Energy saving
Reduces the wash temperature during cleaning by 5 °C, providing
energy savings of about 10 % and gentle washing for glassware.
SteamFinish
An active steam phase runs while rinsing with rinse agent. The steam
hits the dishes, resulting in sparkling, dry dishes. The programme
duration is extended by about 15 minutes.
Partial load
With partial load, the programme is adapted to the smaller load. The
amount of water is reduced significantly. This saves between 1 and
6l of water.
Delayed start
The delayed start allows you to wash during off-peak hours (e.g. at
off-peak electricity rates). A delayed start of between 30 minutes and
24 hours can be set. The delayed start duration last entered is shown
as a suggestion.
With the additional «Partial load» function, the programme duration is
shortened by up to 30 minutes.
3 Programme overview
18
3.2 Fondue/Raclette programme
Uses
• Removes cheese which tends to stubbornly stick to fondue and raclette
pans and dishes.
• Removes food burned on to gratin dishes.
• Can be used to clean all other dishes.
Tips for best results
Fondue pans made of enamelled metal or stoneware can be cleaned in the
appliance.
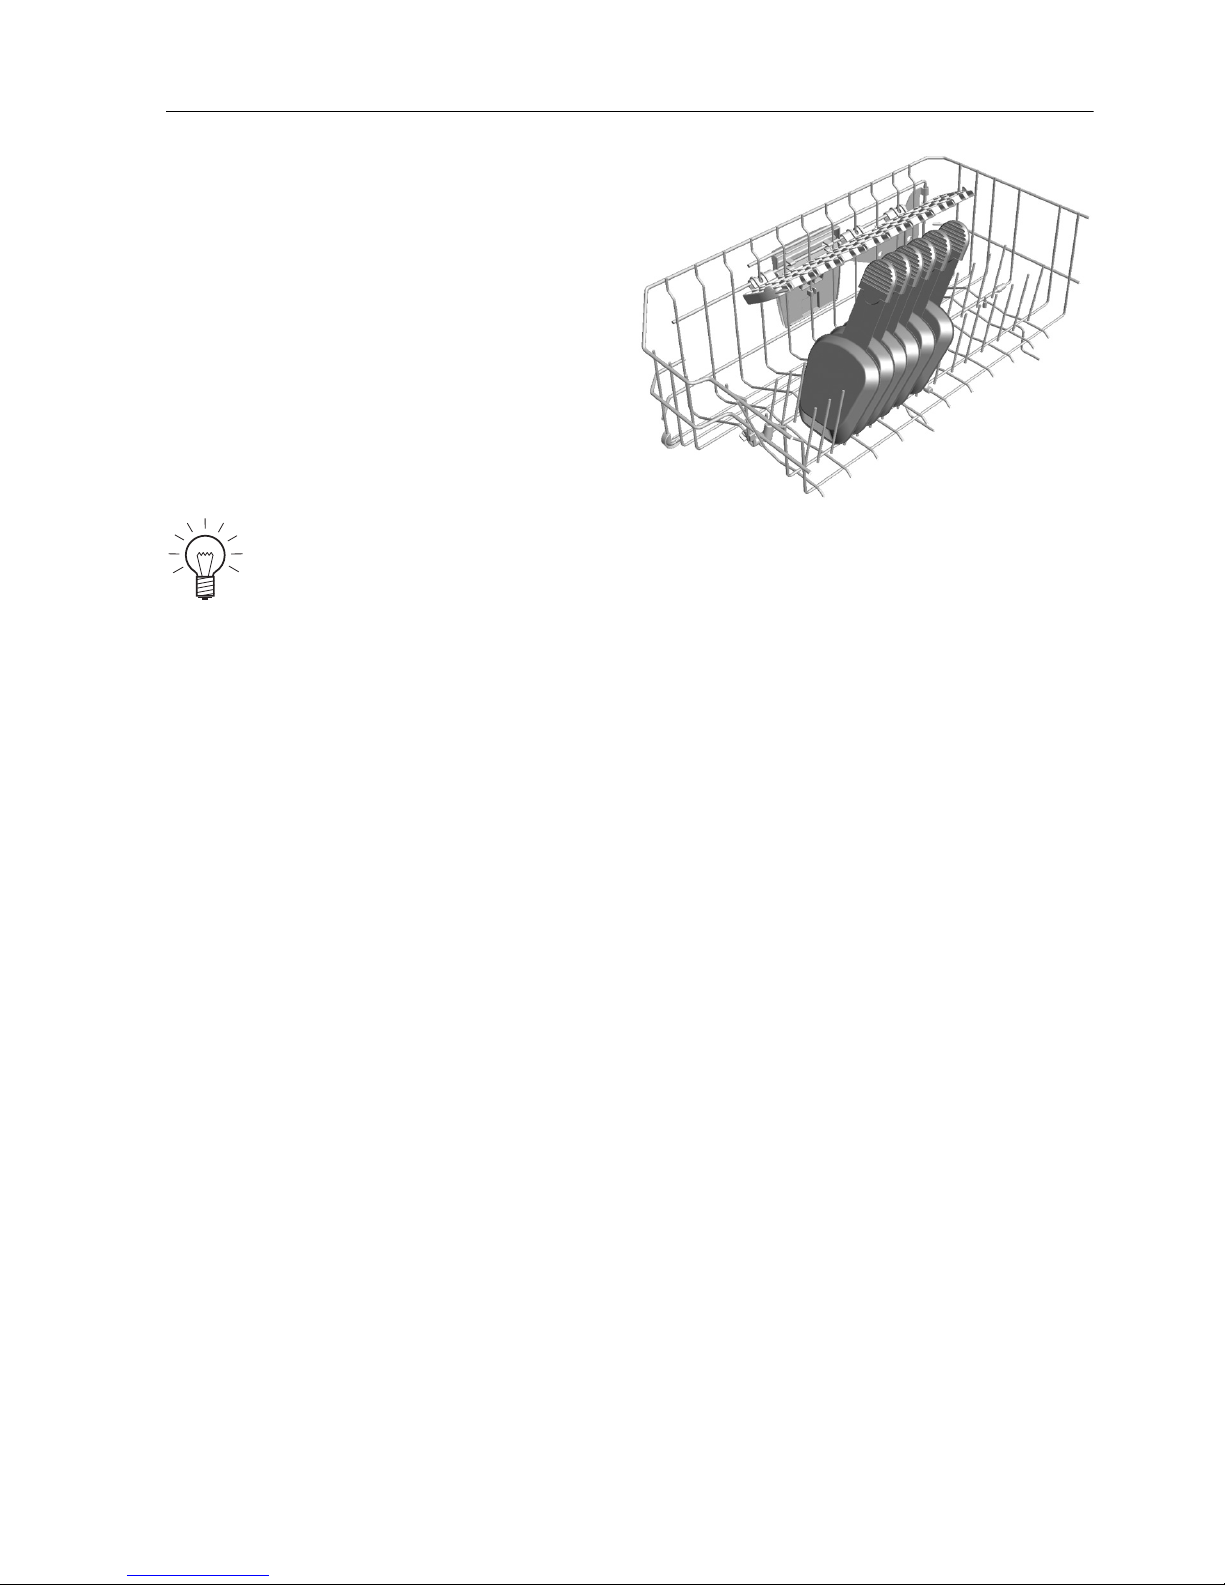
➤ Place the fondue pan facing
downwards so that residual water can
drain away.
Fondue pans made of earthenware (red-brown colour) should not be
washed in the appliance as these absorb water.
Fondue pans with a large opening in the handle are suitable for
washing in the appliance.
3 Programme overview
19
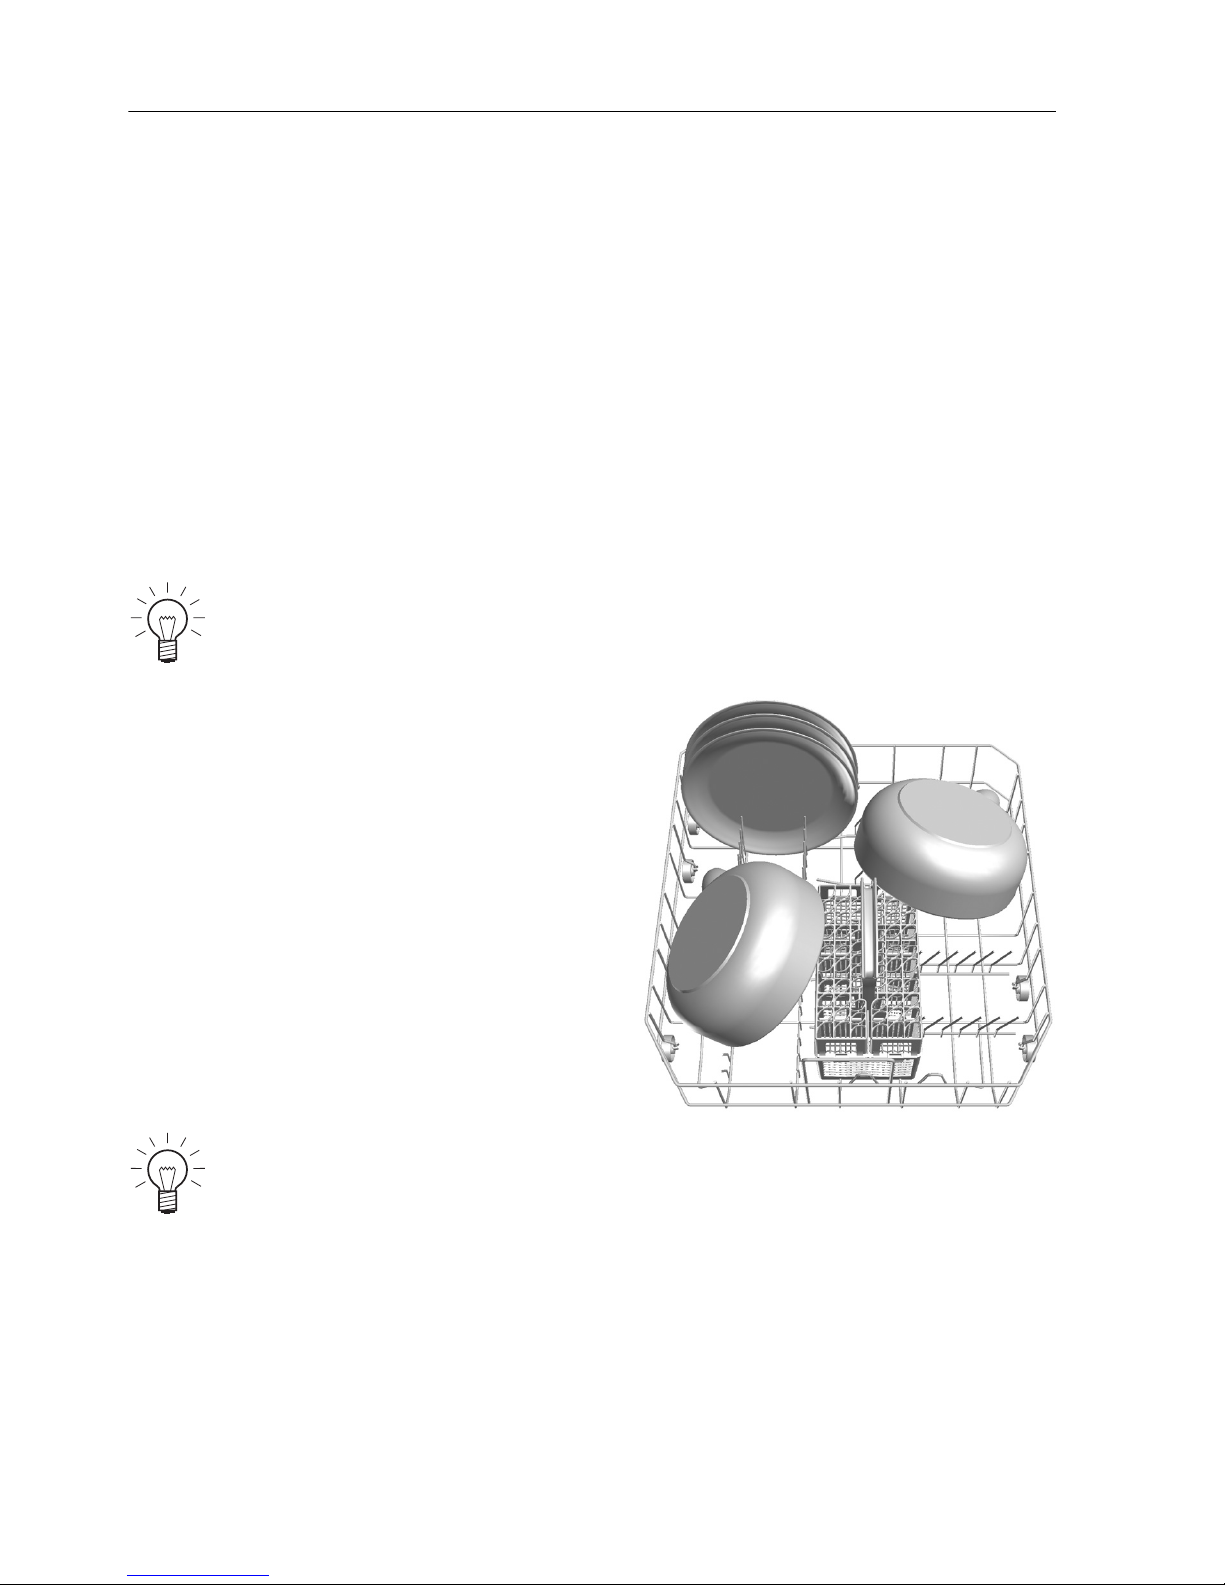
➤ Load raclette dishes in the upper
basket as shown in the diagram.
In addition to the detergent, add about 1 tablespoon of detergent to
the pre-rinsing compartment. You will improve the cleaning results in
the case of heavily burned-on food residue.
Use an aluminium heat distribution plate between the burner and the
fondue pan to protect the fondue pan and prevent heavily burned-on
soiling. Charred food residue cannot be completely removed through
washing in the appliance.
20
4 User settings
User settings can only be changed when no programme is running. The
procedure is generally the same for all settings.
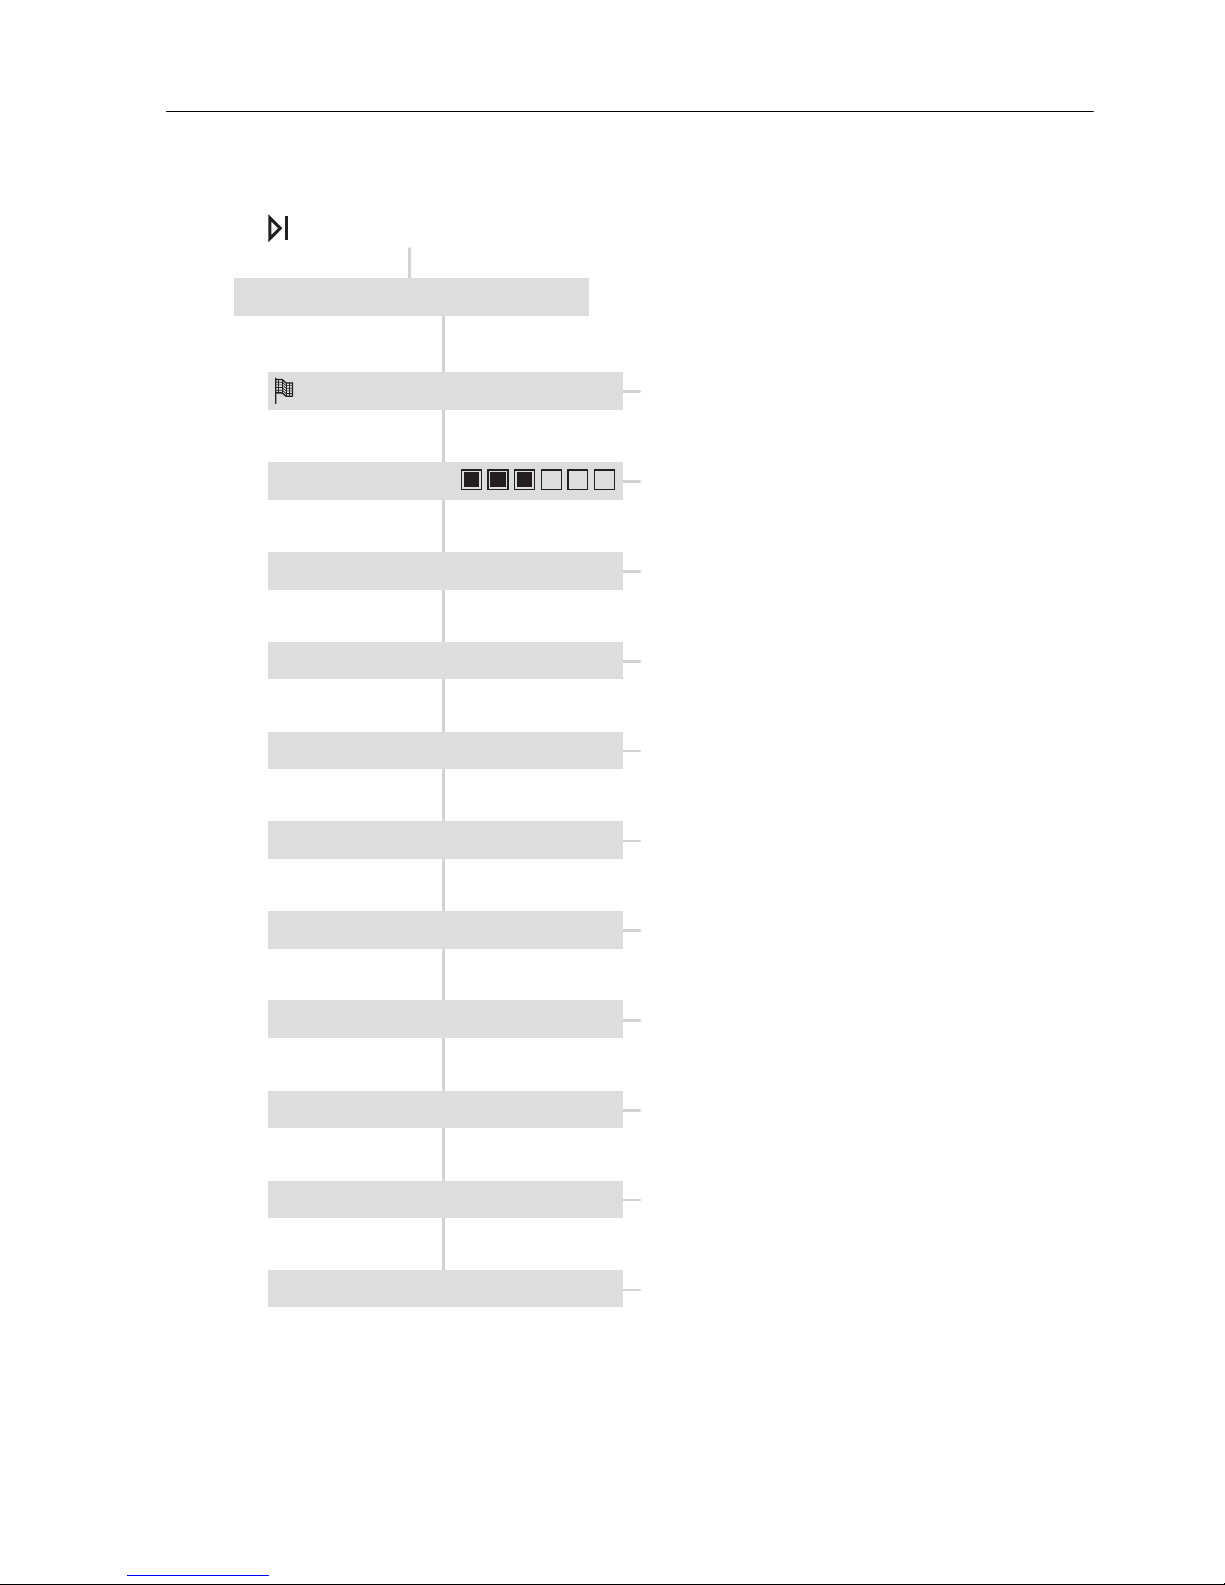
Changing user settings
Exiting user settings
➤ Hold the button depressed for
5 seconds.
➤ Press the button repeatedly until the
required setting appears in the display,
e.g.:
➤ To change, press the button.
– The symbol for the programme
selection button flashes.
– The setting is accepted.
➤ Press the button repeatedly until in the
display appears:
If no button is pressed within about 15 seconds, the user settings are
saved and the display goes out.
User settings
Childproof lock OFF
Childproof lock ON
Configuration saved
4 User settings
21
The following diagram gives an overview of the possible user settings.
Hold the button depressed for 5 seconds
• Contrast in 0..1..2..3 *..4..5..6
• Off *
• On
• Deutsch
• Français
• Italiano
• Rumantsch
• English
• ...
• Off
• Low
• High *
* Factory setting
• Off *
• On
• Automatic *
• 0–5 ... 81–120 (˚fH)
• 0–3 ... 46–65 (˚dH)
• Automatic *
• Off
• 1..2..12
• ˚fH *
• ˚dH
• No *
• Yes
• No *
• Yes
• No heating
• ˚C *
• ˚F
User settings
Language ENGLISH
Contrast
Acoustic signal HIGH
All in 1 OFF
Childproof lock OFF
Rinse agent AUTOMATIC
Water hardness unit ˚fH
Water hardness AUTOMATIC
Hot water NO
Temperature unit ˚C
Factory settings NO
4 User settings
22
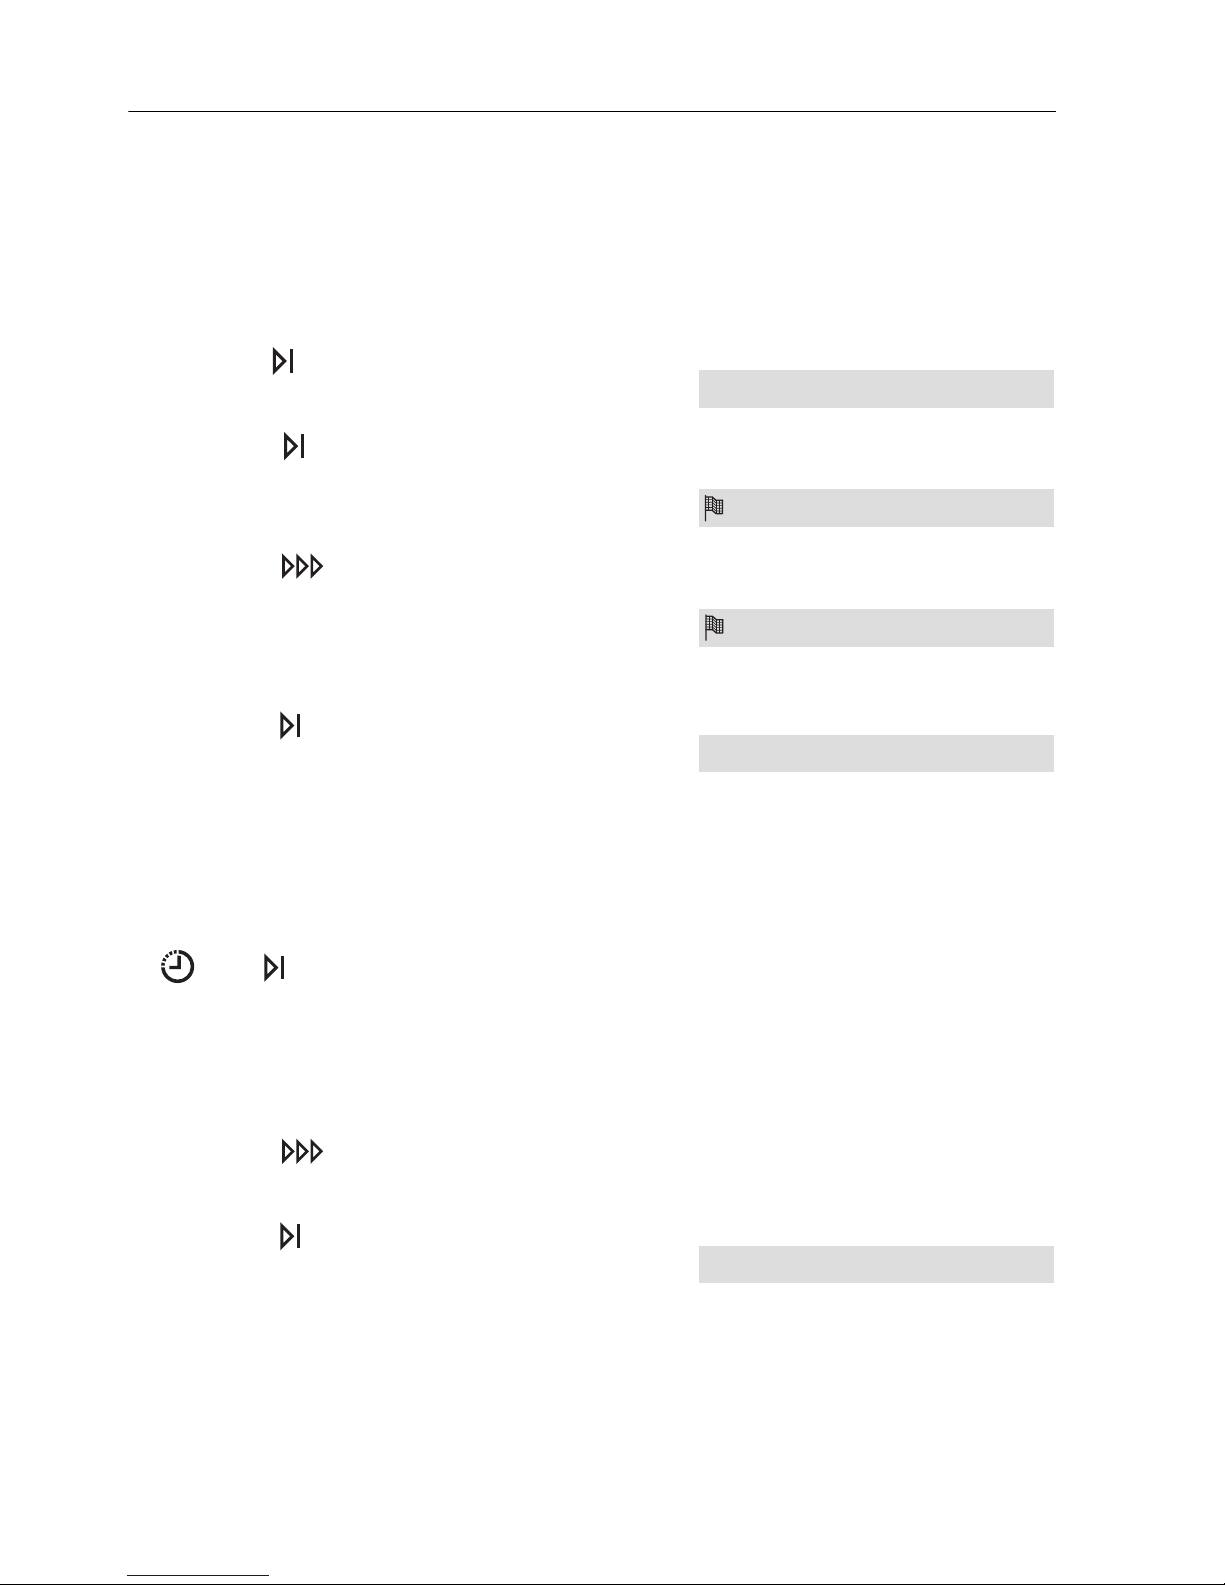
4.1 Language
The language in the display can be changed.
Changing the language
4.2 Resetting the language
➤ Hold the button depressed for
5 seconds.
➤ Press the button repeatedly until the
current language appears in the display,
e.g.:
➤ Press the button repeatedly until the
required language appears in the display,
e.g.:
– The setting is accepted.
➤ Press the button repeatedly until in the
display appears:
➤ With the appliance switched off, hold the
and buttons depressed for
10 seconds.
– User settings are started and the
language setting appears in the
display in a predefined language.
➤ Press the button repeatedly until the
required language appears in the display.
➤ Press the button repeatedly until in the
display appears:
User settings
Sprache DEUTSCH
Language ENGLISH
Configuration saved
Configuration saved
4 User settings
23
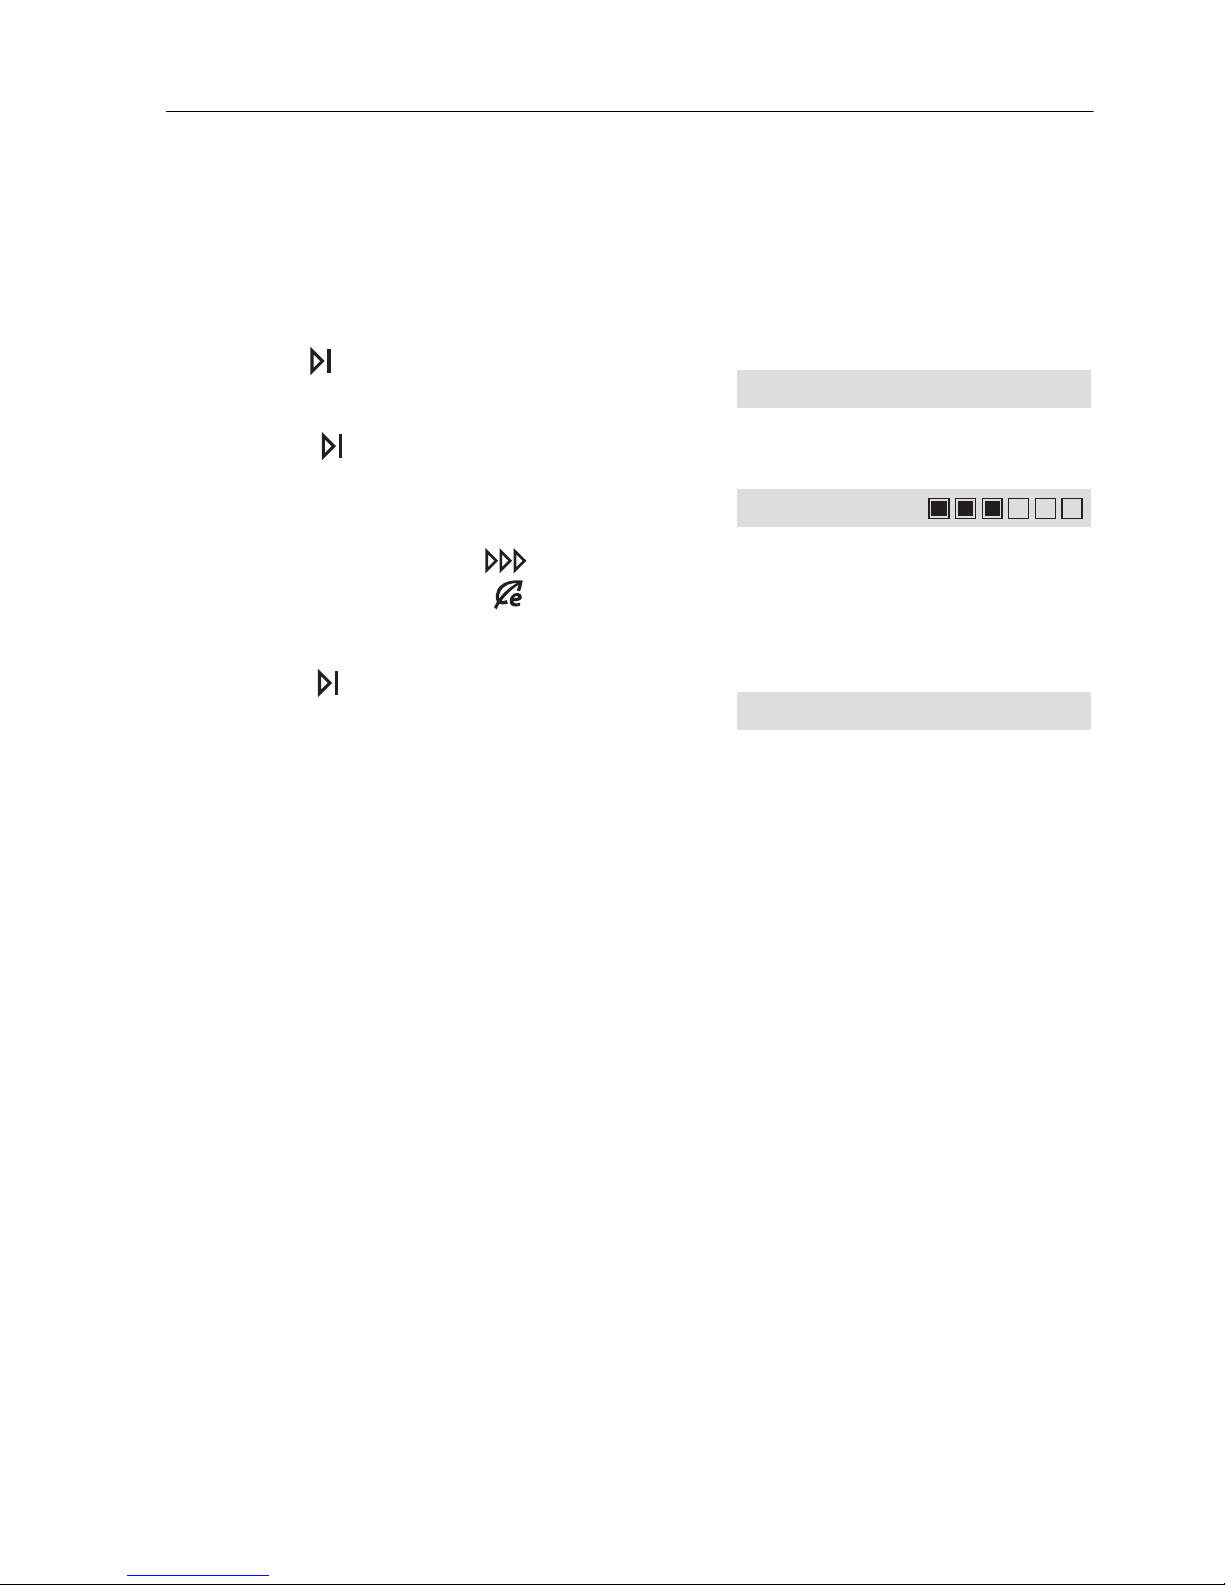
4.3 Contrast
With this function, the contrast of the display can be changed.
Changing the contrast
➤ Hold the button depressed for
5seconds.
➤ Press the button repeatedly until the
current setting appears in the display,
e.g.:
➤ Increase contrast:
Decrease contrast:
button
button
– The setting is accepted.
➤ Press the button repeatedly until in the
display appears:
User settings
Contrast
Configuration saved

4 User settings
24
4.4 Acoustic signal
An acoustic signal is emitted at the end of a programme and if the appliance
malfunctions. It can be set at one of three levels («Off», «Low», «High»).
Changing the loudness
In the event of a malfunction, an acoustic signal is emitted even if it is
set to off.
If a delayed start has been set, no acoustic signal is emitted at the
end of the programme.
➤ Hold the button depressed for
5 seconds.
➤ Press the button repeatedly until the
current setting appears in the display,
e.g.:
➤ Press the button repeatedly until the
required setting appears in the display,
e.g.:
– The setting is accepted.
➤ Press the button repeatedly until in the
display appears:
User settings
Acoustic signal HIGH
Acoustic signal LOW
Configuration saved
4 User settings
25
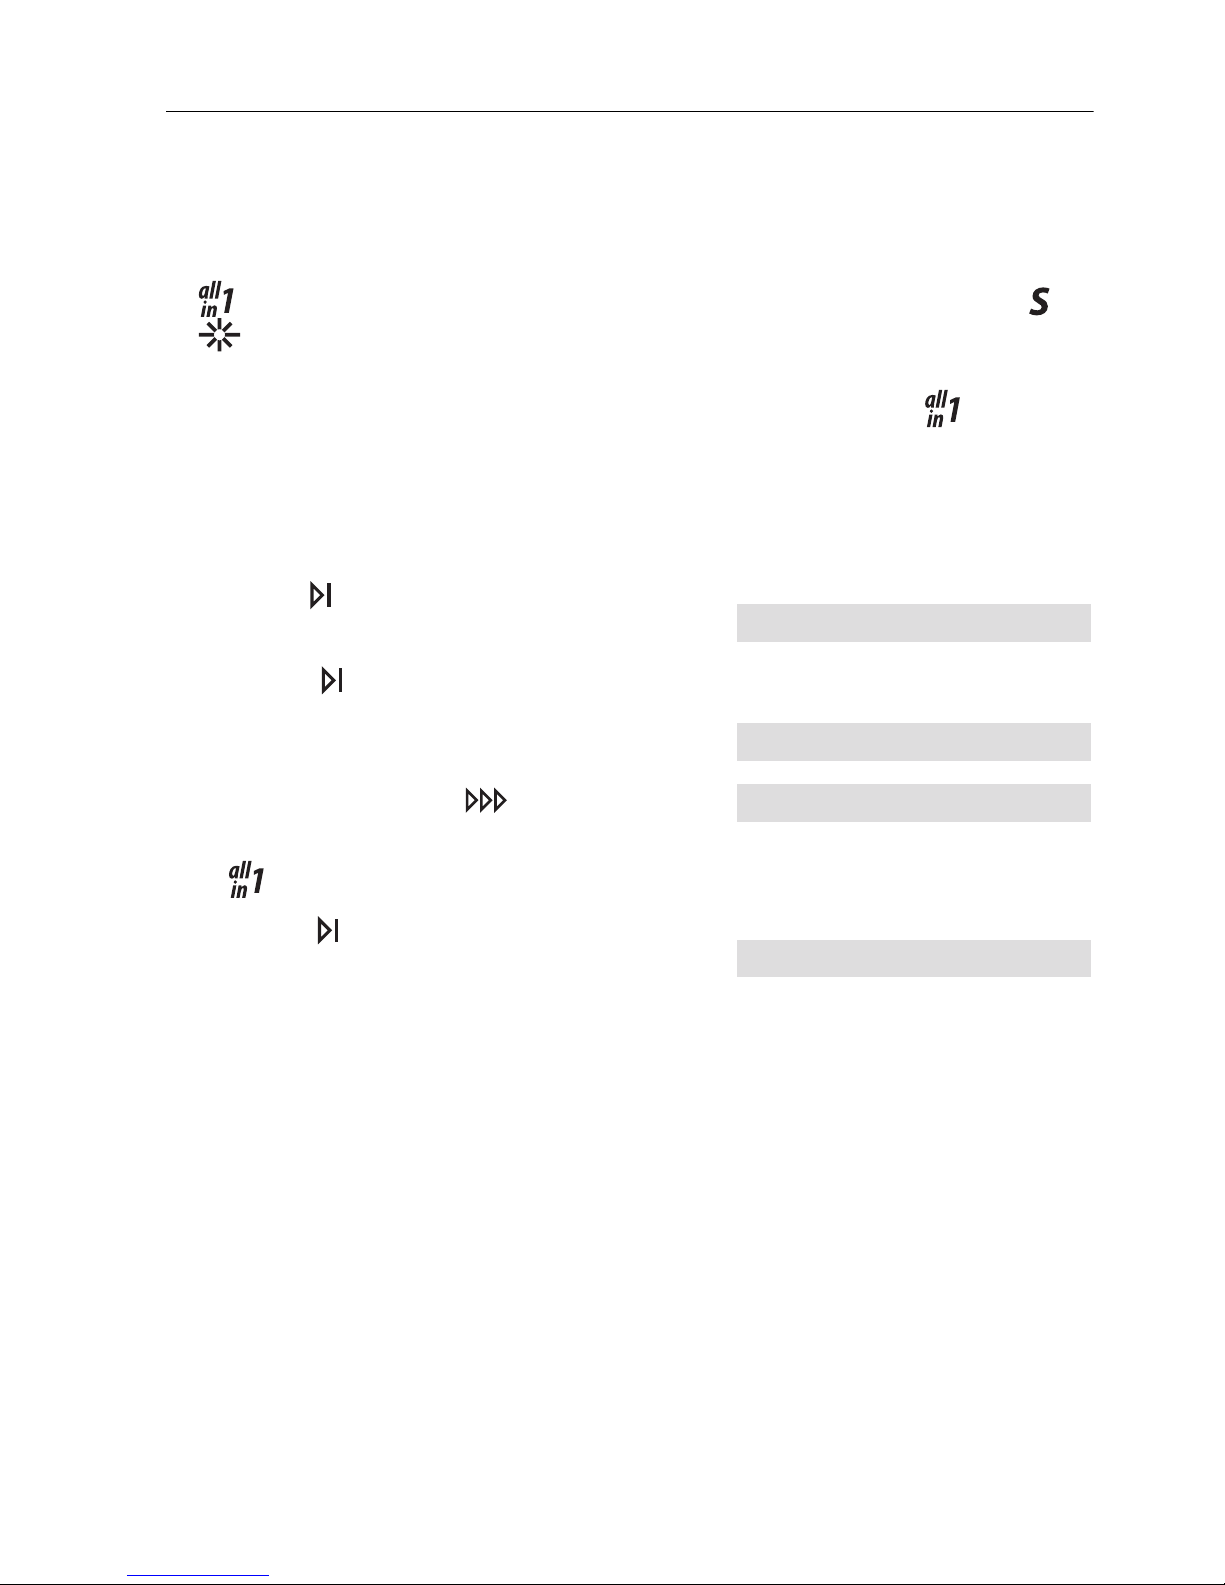
4.5 «All in 1» detergent
The «All in 1» setting adapts the programme for use with detergent with
integrated salt and rinse agent function in an optimal way.
• products can only be used up to a certain water hardness. If the or
refill indicators illuminate, still refill with regeneration salt or rinse
agent.
• The duration of very short programmes is extended because detergent
takes longer to dissolve.
Setting for «All in 1» detergent
➤ Hold the button depressed for
5seconds.
➤ Press the button repeatedly until the
current setting appears in the display,
e.g.:
➤ To change, press the button.
– The setting is accepted.
– illuminates.
➤ Press the button repeatedly until in the
display appears:
User settings
All in 1 OFF
All in 1 ON
Configuration saved
4 User settings
26
4.6 Childproof lock
The childproof lock prevents a programme from being started accidentally. If
the childproof lock is on, a programme can only be started by pressing two
buttons simultaneously.
Setting the childproof lock
➤ Hold the button depressed for
5 seconds.
➤ Press the button repeatedly until the
current setting appears in the display,
e.g.:
➤ To change, press the button.
– The setting is accepted.
➤ Press the button repeatedly until in the
display appears:
User settings
Childproof lock OFF
Childproof lock ON
Configuration saved
 Loading...