


(¬p.2)
(¬p.5)
(¬S.6)
(¬p.7)
(¬p.8)
 Vox Amplification Ltd.
1 Harrison Close, Knowlhill, Milton Keynes, MK5 8PA. UK
© 2017 VOX AMPLIFICATION LTD. |
www.voxamps.com |
Precautions
Location
Using the unit in the following locations can result in a malfunction.
•In direct sunlight
•Locations of extreme temperature or humidity
•Excessively dusty or dirty locations
•Locations of excessive vibration
•Close to magnetic fields
Power supply
Be sure to turn off the power when the unit is not in use. Remove the battery in order to prevent it from leaking when the unit is not in use for extended periods.
Interference with other electrical devices
Radios and televisions placed nearby may experience reception interference. Operate this unit at a suitable distance from radios and televisions.
Handling
To avoid breakage, do not apply excessive force to the switches or controls.
Care
If the exterior becomes dirty, wipe it with a clean, dry cloth. Do not use liquid cleaners such as benzene or thinner, or cleaning compounds or flammable polishes.
Keep this manual
After reading this manual, please keep it for later reference.
Keeping foreign matter out of your equipment
Never set any container with liquid in it near this equipment. If liquid gets into the equipment, it could cause a breakdown, fire, or electrical shock. Be careful not to let metal objects get into the equipment.
Notice regarding disposal (EU only)
If this symbol is shown on the product, manual, battery, or package, you must dispose of it in the correct manner to avoid harm to human health or damage to the environment. Contact your local administrative body for details on the correct disposal method. If the battery contains heavy metals in excess of the regulated amount, a chemical symbol is displayed below the symbol on the battery or battery package.
THE FCC REGULATION WARNING (for USA)
NOTE: This equipment has been tested and found to comply with the limits for a Class B digital device, pursuant to Part 15 of the FCC Rules. These limits are designed to provide reasonable protection against harmful interference in a residential installation. This equipment generates, uses, and can radiate radio frequency energy and, if not installed and used in accordance with the instructions, may cause harmful interference to radio communications. However, there is no guarantee that interference will not occur in a particular installation. If this equipment does cause harmful interference to radio or television reception, which can be determined by turning the equipment off and on, the user is encouraged to try to correct the interference by one or more of the following measures:
•Reorient or relocate the receiving antenna.
•Increase the separation between the equipment and receiver.
•Connect the equipment into an outlet on a circuit different from that to which the receiver is connected.
•Consult the dealer or an experienced radio/TV technician for help.
If items such as cables are included with this equipment, you must use those included items.
Unauthorized changes or modification to this system can void the user’s authority to operate this equipment.
- 1 -
This device complies with Part 15 of the FCC Rules.
Operation is subject to the following two conditions: (1) This device may not cause harmful interference, and (2) this device must accept any interference received, including interference that may cause undesired operation.
CAN ICES-3 B / NMB-3 B
IMPORTANT NOTICE TO CONSUMERS
This product has been manufactured according to strict specifications and voltage requirements that are applicable in the country in which it is intended that this product should be used. If you have purchased this product via the internet, through mail order, and/or via a telephone sale, you must verify that this product is intended to be used in the country in which you reside.
WARNING: Use of this product in any country other than that for which it is intended could be dangerous and could invalidate the manufacturer’s or distributor’s warranty. Please also retain your receipt as proof of purchase otherwise your product may be disqualified from the manufacturer’s or distributor’s warranty.
*All product names and company names are the trademarks or registered trademarks of their respective owners.
Précautions
Emplacement
L’utilisation de cet instrument dans les endroits suivants peut en entraîner le mauvais fonctionnement.
•En plein soleil
•Endroits très chauds ou très humides
•Endroits sales ou fort poussiéreux
•Endroits soumis à de fortes vibrations
•A proximité de champs magnétiques
Alimentation
Lorsque vous n’utilisez pas l’appareil, n’oubliez pas de le mettre hors tension. Retirez les piles pour éviter toute fuite lorsque l’appareil ne sera pas utilisé pendant de longues périodes de temps.
Interférences avec d’autres appareils électriques
Les postes de radio et de télévision situés à proximité peuvent par conséquent souffrir d’interférences à la réception. Veuillez dès lors faire fonctionner cet appareil à une distance raisonnable de postes de radio et de télévision.
Maniement
Pour éviter de les endommager, manipulez les commandes et les boutons de cet instrument avec soin.
Entretien
Lorsque l’instrument se salit, nettoyez-le avec un chiffon propre et sec. Ne vous servez pas d’agents de nettoyage liquides tels que du benzène ou du diluant, voire des produits inflammables.
Conservez ce manuel
Après avoir lu ce manuel, veuillez le conserver soigneusement pour toute référence ultérieure.
Evitez toute intrusion d’objets ou de liquide
Ne placez jamais de récipient contenant du liquide près de l’instrument. Si le liquide se renverse ou coule, il risque de provoquer des dommages, un court-circuit ou une électrocution. Veillez à ne pas laisser tomber des objets métalliques dans le boîtier (trombones, par ex.).
Note concernant les dispositions (Seulement EU)
Si ce symbole apparait sur le produit, le manuel, les piles ou les packs de piles, cela signifie que vous devez le recycler d’une manière correcte afin de prévenir les dommages pour la santé humaine et les dommages po-
tentiels pour l’environnement. Contactez votre administration locale pour de plus amples renseignements concernant la bonne méthode de recyclage. Si la pile contient des métaux lourds au-delà du seuil réglementé, un symbole chimique est affiché en dessous du symbole de la
poubelle barrée d’une croix sur la pile ou le pack de piles.
REMARQUE IMPORTANTE POUR LES CLIENTS
Ce produit a été fabriqué suivant des spécifications sévères et des besoins en tension applicables dans le pays où ce produit doit être utilisé. Si vous avez acheté ce produit via l’internet, par vente par correspondance ou/et vente par téléphone, vous devez vérifier que ce produit est bien utilisable dans le pays où vous résidez.
ATTENTION: L’utilisation de ce produit dans un pays autre que celui pour lequel il a été conçu peut être dangereuse et annulera la garantie du fabricant ou du distributeur. Conservez bien votre récépissé qui est la preuve de votre achat, faute de quoi votre produit ne risque de ne plus être couvert par la garantie du fabricant ou du distributeur.
*Tous les noms de produits et de sociétés sont des marques commerciales ou déposées de leur détenteur respectif.

 VOX amPlug 2 Owner’s Manual
Thank you for purchasing the VOX amPlug 2 Headphone Guitar Amplifier. To take full advantage of this product and to ensure trouble-free operation, please read this owner’s manual carefully and use the product as directed.
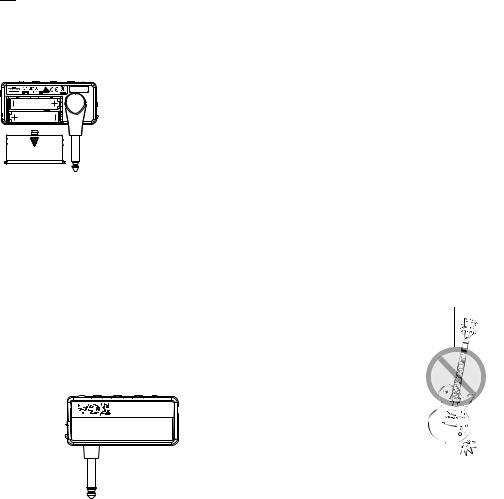
Installing Batteries
Remove the battery compartment cover. Insert two AAA batteries as shown in the figure to the left. Be sure to observe the correct polarity when installing the batteries. If
you’ll be using amPlug 2 for an extended period of time, we recom- mend that you use alkaline batteries. Replace the batteries when the indi-
cator becomes dark.
NOTE: Depleted batteries must be removed from the amPlug 2 immediately. If you leave them in, malfunctions such as bat- tery leakage may occur. You should also remove the batteries if you will not be using the amPlug 2 for an extended period of time.
Auto Power-Off Function
amPlug 2 is equipped with an auto power-off function. If no buttons or controls are used or there is no user input for ap- proximately 30 minutes, the amPlug 2 automatically turns off.
NOTE: When the input level is extremely low or there is very little change in the sound, the amPlug 2 may conclude that there is no input. In addition, depending on the settings and environment, the amPlug 2 may interpret noise as input, even if the guitar is not being played.
Guided Panel Tour
3 4 5 6 7

 8 2
8 2

1
1. Input plug: This is where you would connect your guitar. Swivel the plug as shown in Fig. 1 (¬p.4). Adjust the plug angle according to the guitar being used.
2. STANDBY/ON/MODE button, indicator: Hold down this button for approximately one second to turn the amPlug 2 on or off. Pressing this button after the amPlug 2 has been turned on switches the mode. The indicator lights up in a different color depending on the mode.
|
Mode 1 (green) |
Mode 2 (orange) |
Mode 3 (red) |
Clean |
Pure Clean |
Twin Clean |
Boutique OD |
Blues |
Clean |
Crunch |
Lead |
Lead |
Boost 1 |
Boost 2 |
Boost 3 |
3. AUX jack (stereo): This is where you would connect an external audio device. Adjust the playback volume on the connected player accordingly.
4.GAIN control: This adjusts the amp gain.
5.TONE control: This adjusts the tone.
6.VOLUME control: This adjusts the overall volume of the amplifier.
7.FX button: This selects an effect. Each press of this but- ton switches the setting in the following order: Chorus ¬ Delay ¬ Reverb ¬ Effect off ¬ Chorus ... In addition, one of three variations for the selected effect can be selected by holding down the FX button and pressing the STANDBY/ON/MODE button. The variation is indicated by the number of beeps produced when the button is pressed.
8.PHONES jack: This is where you would connect headphones, portable speakers, a mixer or a recording device.
Caution
•When connecting amPlug 2 to external equipment such as a mixer or recorder, turn down the volume to the minimum position on your external equipment before you connect amPlug 2 to it. After connecting it, power-on amPlug 2 and then adjust the volume of your external equipment accordingly.
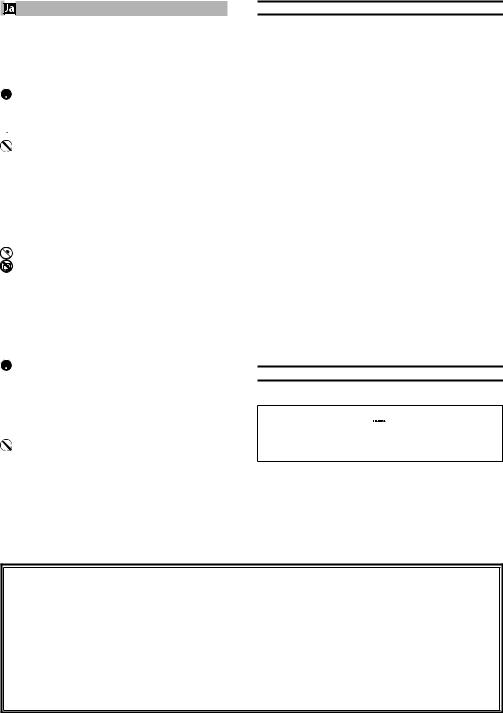
•When disconnecting amPlug 2 from your guitar, you must grasp amPlug 2 near the base of its Input plug. If you grasp it at the end, you risk breaking amPlug 2.
•Disconnect amPlug 2 from
your guitar before leaning your guitar against a wall or laying it on the floor. If you fail to do so, amPlug 2 or your guitar may strike the floor and be damaged.
Specifications
Power supply: twoAAA batteries
Battery life:
11 hours / 17 hours (FX on / FX off, alkaline) 4 hours / 9 hours (FX on / FX off, zinc-carbon)
Dimensions (W x D x H):
86 x 38 x 31 (mm) / 3.39” x 1.50” x 1.22” (minimum)
Weight: 40 g / 1.41 oz. (Not including batteries)
Included items:
Owner’s Manual
twoAAA batteries (zinc-carbon)
*Specifications and appearance are subject to change without notice for improvement.
- 2 -

 ○ ○
○ ○

・振動の多い場所で使用や保管はしない。 ・ホコリの多い場所で使用や保管はしない。


・本製品の上に、花瓶のような液体が入ったものを置かない。 ・本製品に液体をこぼさない。


・
・
・
ンド質、強燃性のポリッシャーは使用しない。
合は、保証規定によって無償修理いたします。
1.1
も、修理した日より3
This warranty is valid only in Japan.
■


PHS
10:00 17:00
●
168-0073 1-18-16 2F
: KORG Import Division206-0812 4015-2 http://www.korg.com/jp/kid/
VOX amPlug 2 |
|
Clean / Blues / Lead |
- 3 -
 Loading...