

Page 1

6601_IM.indd 16601_IM.indd 1 18.03.2009 12:33:4318.03.2009 12:33:4
Page 2
Page 3

ENGLISH
CLOCK RADIO
Please read these instructions carefully before connecting, operating
or adjusting the unit. Follow all warnings and operating recommendations in this manual.
Keep this manual for future reference.
CAUTION
Risk of electric shock
DO NOT OPEN
Warning: To prevent fire or shock hazard do not expose the appliance to
rain or moisture. To prevent shock hazard do not remove the cover yourself.
Apply to a service centre for repair and maintenance.
This lightning flash with arrowhead symbol, within an equilateral triangle, is intended to alert the user to the presence of
uninsulated “dangerous voltage” within the product’s enclosure that may be of sufficient magnitude to constitute a risk of
electric shock to persons.
The exclamation point within an equilateral triangle is intended
to alert the user to the presence of important operating
and maintenance (servicing) instructions in the manual
accompanying the appliance.
PRECAUTIONS
• Check, whether the electricity supply in your home sockets corresponds to the voltage
specified on the housing of the
unit.
• To prevent fire or shock hazard
do not expose the appliance to
rain or moisture.
• To prevent fire or shock hazard do not use this unit near
water for example, near a bath
tub, wash bowl, kitchen sink or
laundry tub, in a wet basement,
or near a swimming pool and
such like places. Prevent the
unit from dripping and splashing.
• Do not overload wall outlets
or extension cords as this can
result in a risk of fire or electric
shock.
• Place the unit in a way that you
could easily pull out the plug
from the socket if there are
some damages.
3
6601_IM.indd 36601_IM.indd 3 18.03.2009 12:33:4618.03.2009 12:33:4
Page 4

ENGLISH
• For additional protection during
lighting and in cases when you
are not going to use the unit for
a long time, unplug the unit. It
will prevent the unit from failure
during lighting and power surges.
• To unplug the unit, hold it by the
plug. Do not pull by the cord.
• In order to avoid electric shock
do not remove the cover yourself. Do not repair and do
not modify the unit. Technical
maintenance must be performed only by qualified service personnel.
• Install the unit in places with
proper ventilation. Do not
block the ventilation openings of the unit.
• Do not connect the FM-antenna with the external antenna.
• The product should be situated
away from heat sources such
as radiators, heat registers,
stoves, or other products that
produce heat. Do not expose
the unit to direct sunlight, excessive dust or mechanical
shocks. Do not place the unit
near sources of open fire, such
as candles.
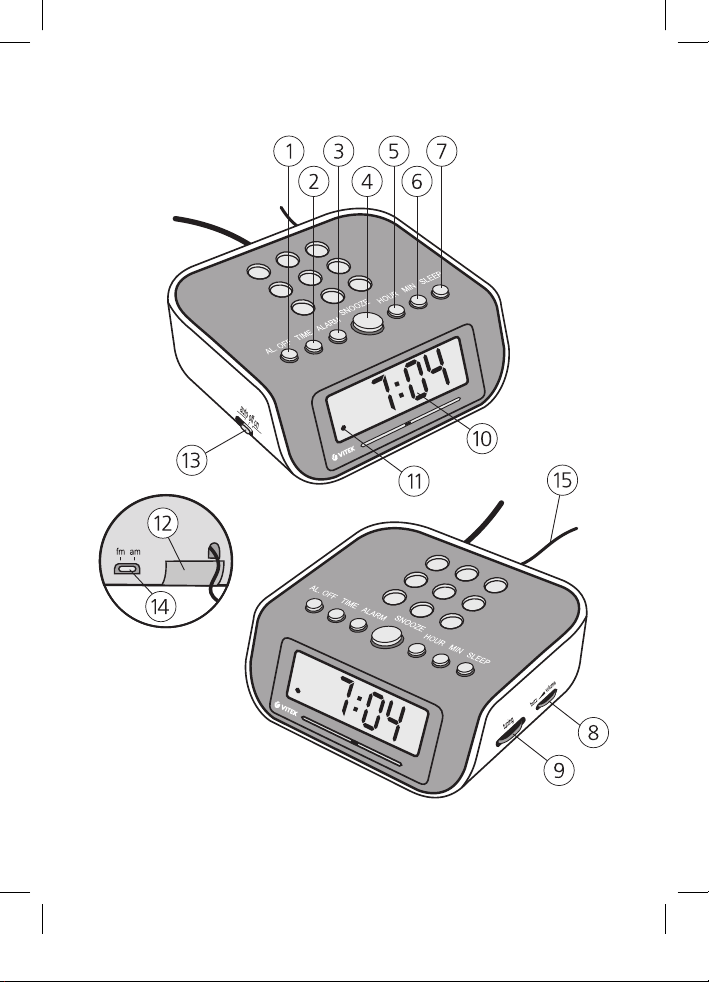
DESCRIPTION
1 – The AL. OFF button
2 – The TIME setting button
3 – The ALARM on button
4 – The SNOOZE button
5 – The HOUR setting button
6 – The MIN setting button
7 – The SLEEP button
8 – The VOLUME control/ BUZZ
button
9 – The TUNING knob
10 – Display
11 – The AUTO indication
12 – Battery compartment
13 – The AUTO/ON/OFF switch
14 – The FM/АМ switch
15 – The FM-antenna cord
OPEARTING INSTRUCTIONS
Inserting batteries
• Open the battery compartment
lid and insert a 9 V battery, following the polarity.
• Close the battery compartment
lid.
Note:
The unit is intended for operation from the mains, battery
operation is a reserve variant.
Batteries help to store the settings while switching off, or
absence of power.
Remove the battery if you are
not going to use the unit for a
long time.
Before connecting the unit,
make sure, that the electricity
4
Page 5

ENGLISH
supply in your home sockets
corresponds to the voltage
specified on the housing of the
unit.
Insert the plug into the socket.
Listening to the radio
1. Set the AUTO/ON/OFF switch
to the ON position.
2. Select the required range, by
setting the FM/AM switch to
the FM or AM position.
3. Rotate the TUNING knob to
tune to the desired radio station.
4. Use the VOLUME knob to set
the required volume level.
5. After you finish listening to the
radio, set the AUTO/ON/OFF
switch to the OFF position.
Note: For better receipt of FM
stations we recommend full
unwinding of the FM-antenna
cord and its optimal location.
Setting the current time
1. While connecting of the unit the
“0:00” indication will appear on
the display.
2. Press and hold the TIME but-
ton. Press the HOUR button
to set hours, the MIN button minutes.
Setting the alarm on-time
1. Press and hold the ALARM
button. Press the HOUR button
to set hours, the MIN button minutes.
2. If you want to use radio as the
alarm signals, set the required
volume level by using the volume knob that is set the VOL-
UME knob to the BUZZ position.
3. Set the AUTO/OFF/ON switch
to the AUTO position.
4. When the time is reached the
alarm will switch on. Press the
AL OFF button to switch off the
alarm, the next day the alarm
will switch on at the preset time
again. To switch the alarm off
set the AUTO/OFF/ON switch
to the OFF position.
Alarm snooze
You can switch off the alarm signal for 9 minutes by pressing of
the SNOOZE button. In 9 minutes
the alarm signal will be repeated.
Auto switching off of the radio
You can set the time for the radio
to switch off. Press the SLEEP
button, the “00:59” will be displayed, and the radio will switch
off in 59 minutes. To reduce the
time, press the MIN button, by
pressing and holding the SLEEP
5
6601_IM.indd 56601_IM.indd 5 18.03.2009 12:33:4618.03.2009 12:33:4
Page 6

ENGLISH
button. To increase the time by 1
hour, press the HOUR button by
pressing and holding the SLEEP
button. In the present time the radio will switch off.
If you want to switch off the radio
before the preset time, press the
SNOOZE button.
Note: Auto switching off of
the radio is impossible while
setting of the AUTO/OFF/ON
switch to the ON position.
Auto switching off of the radio
and waking up to radio
1. Set the alarm time as described
in the “Setting the Alarm on
time” chapter and set the
AUTO/OFF/ON switch to the
AUTO position.
2. Set the radio off time as described in the “Auto switching
off of the radio” chapter.
3. The radio will switch off at the
preset time and will switch on
the next day at the preset time.
Note: Electromagnetic interferences can influence operation of the unit. In this case disconnect the unit from the power sources, and then connect
again. If necessary change the
location of the unit.
Clean and care
Before cleaning unplug the unit.
Use a soft cloth to clean the unit.
Do not use liquid or aerosol substances for cleaning.
Specifications
Power supply: 240V AC, 50 Hz DC 9V
Power consumption: Мах 3,5 W
Accuracy movement: 3 sec/day
Frequency range: AM: 535 – 1605
kHz; FM: 64 – 108 MHz
The manufacturer reserves the
right to make changes to the
characteristics of the device without prior notice.
The service life of the device is
no less than 3 years.
Guarantee
Details regarding guarantee conditions can be obtained from the
dealer from whom the appliance
was purchased. The bill of sale or
receipt must be produced when
making any claim under the terms
of this guarantee.
This product conforms to
the EMC-Requirements as
laid down by the Council
Directive 89/336/EEC
and to the Low Voltage
Regulation (73/23 EEC)
6
Page 7

РУССКИЙ
РАДИОЧАСЫ
Перед подключением, использованием и настройкой устройства
внимательно прочитайте инструкцию. Необходимо соблюдать все
предупреждения и рекомендации по эксплуатации устройства,
приведенные в этой инструкции.
Сохраните инструкцию, используйте ее в дальнейшем в качестве
справочного материала.
ВНИМАНИЕ!
Опасность удара электрическим током!
Предупреждение: Во избежание возникновения пожара или поражения электри-
ческим током не подвергайте устройство воздействию дождя или влаги. Во избежа-
ние удара электрическим током не открывайте корпус устройства самостоятельно.
Сервисное обслуживание должно осуществляться только квалифицированными
Значок молнии в равностороннем треугольнике указывает
пользователю на наличие опасного напряжения внутри корпуса
устройства, которое может привести к поражению электрическим током.
Значок восклицательного знака в равностороннем треугольнике
указывает пользователю на наличие важных рекомендаций по
эксплуатации и техническому обслуживанию в инструкции по
эксплуатации.
НЕ ВСКРЫВАТЬ!
специалистами сервисных центров.
МЕРЫ ПРЕДОСТОРОЖНОСТИ
• Проверьте, соответствует ли
напряжение в электрической
сети рабочему напряжению
устройства.
• Во избежание возникновения пожара или поражения
электрическим током не
подвергайте устройство воздействию дождя или влаги.
• Запрещается погружать при-
бор в воду. Во избежание
возникновения пожара или
поражения электрическим
током не размещайте это
устройство в условиях повышенной влажности (около
ванн, тазов с водой, кухонных
раковин, стиральных машин,
рядом с плавательным бассейном, в сырых подвалах и
т.д.) Не допускайте попада-
7
6601_IM.indd 76601_IM.indd 7 18.03.2009 12:33:4618.03.2009 12:33:4
Page 8

РУССКИЙ
ния на устройство капель или
брызг.
• Не допускайте перегрузки
розеток или удлинителей,
так как это может привести к
пожару или поражению электрическим током.
• Установите это устройство таким образом, чтобы в случае
неисправности вилку сетевого провода можно было немедленно вынуть из розетки.
• Для дополнительной защиты
устройства во время грозы,
а также в тех случаях, когда
вы не собираетесь использовать его в течение длительного времени, отключите его
от розетки электросети. Это
исключит выход устройства
из строя из-за ударов молнии или скачков напряжения
в электросети.
• Для отсоединения сетевого
шнура беритесь непосредственно за сетевую вилку, ни
в коем случае не тяните за
шнур.
• Во избежание удара электрическим током не открывайте корпус устройства самостоятельно. Не ремонтируйте прибор и не вносите в
него изменения. Сервисное
обслуживание должно осуществляться только квали-
фицированными специалистами сервисных центров.
• Установите устройство в
местах с достаточной вентиляцией. Не закрывайте
вентиляционные отверстия прибора.
• Не соединяйте FM-антенну с
наружной антенной.
• Не размещайте устройство
вблизи источников тепла,
например, радиаторов, электрообогревателей, духовок
или других устройств, являющихся источниками тепла,
а также в местах, подверженных воздействию прямых
солнечных лучей, чрезмерному запылению или механическим ударам. Не ставьте на
устройство источники открытого пламени, такие как свечи.
ОПИСАНИЕ
1 – кнопка выключения бу-
дильника AL. OFF
2 – кнопка установки текущего
времени TIME
3 – кнопка установки време-
ни включения будильника
ALARM
4 – кнопка
будильника SNOOZE
5 – кнопка установки часов
HOUR
8
повтора сигналов
Page 9

РУССКИЙ
6 – кнопка установки минут
MIN
7 – кнопка автоматического
отключения радио SLEEP
8 – регулятор уровня гром-
кости VOLUME/управление сигналом будильника
BUZZ
9 – регулятор настройки ра-
диостанций TUNING
10 – дисплей
11 – индикатор режима AUTO
12 – батарейный отсек
13 – переключатель режимов
работы AUTO/ON/OFF
14 – переключатель диапазонов
FM/АМ
15 – провод FM-антенны
ИНСТРУКЦИЯ ПО ЭКСПЛУАТАЦИИ
Установка батареек
• Откройте крышку батарейно-
го отсека и установите батарейку 9В, соблюдая полярность.
• Закройте крышку батарейно-
го отсека.
Примечание:
Устройство предназначено
для работы от сети, работа
от батареек является резервным вариантом. Наличие
батарейки сохраняет настройки текущего времени
при отключении, или пропадании основного питания.
Вынимайте батарейку, если
устройство не будет использоваться в течение длительного времени.
Перед подключением устройства к сети убедитесь, что напряжение в электрической сети
соответствует рабочему напряжению устройства.
Вставьте вилку сетевого шнура
в розетку.
Прослушивание радио
1. Установите переключатель
AUTO/OFF/ON в положение
ON.
2. Выберите желаемый диапазон, установив переключатель диапазонов FM/AM в
положение FM или AM.
3. Вращая ручку настройки
радиостанций TUNING, настройтесь на желаемую радиостанцию.
4. Для установки желаемого
уровня громкости используйте ручку регулировки громкости VOLUME.
5. По окончании прослушивания установите переключатель AUTO/OFF/ON в положение OFF.
9
6601_IM.indd 96601_IM.indd 9 18.03.2009 12:33:4618.03.2009 12:33:4
Page 10

РУССКИЙ
Примечание: Для обеспечения наилучших условий приема станций FM диапазона
рекомендуется размотать
провод FM-антенны на всю
длину и расположить его оптимальным образом.
Установка текущего времени
1. При подключении устройства
к сети на дисплее будет мигать индикация «0:00».
2. Нажмите и удерживайте
кнопку TIME. Нажимая при
этом кнопку HOUR, установите часы, кнопку MIN - минуты.
Установка времени включения будильника
1. Нажмите и удерживайте
кнопку ALARM. Нажимая при
этом кнопку HOUR, установите часы, кнопку MIN - минуты.
2. Если вы хотите использовать радио в качестве сигнала будильника, установите
желаемую громкость при
помощи регулятора уровня
громкости, иначе установите
регулятор уровня громкости
VOLUME в положение BUZZ.
3. Установите переключатель
AUTO/OFF/ON в положение
AUTO.
10
4. По достижении установленного времени включится сигнал будильника. Для выключения сигнала будильника
нажмите кнопку AL. OFF, при
этом на следующий день будильник вновь включится по
достижении установленного
времени. Для отключения
будильника установите переключатель AUTO/OFF/ON в
положение OFF.
Повтор сигнала будильника
Сигнал будильника можно отключить на 9 минут нажатием
кнопки SNOOZE. Через 9 минут
сигнал будильника повторится.
Автоматическое отключения
радио
Вы можете установить время,
по истечении которого радио
автоматически выключится.
Нажмите кнопку SLEEP, на
дисплее отобразится время
«00:59», и радио автоматически выключится через 59 минут.
Чтобы уменьшить время, нажав
и удерживая кнопку SLEEP,
нажимайте кнопку MIN. Чтобы
увеличить время на 1 час, нажав и удерживая кнопку SLEEP,
нажмите кнопку HOUR. Через
установленное время радио
выключится. Для отключения
Page 11

РУССКИЙ
радио до истечения ранее установленного времени нажмите
кнопку SNOOZE.
Примечание: Автоматическое отключение радио не
возможно при установке переключателя AUTO/OFF/ON в
положение ON.
Автоматическое отключение
радио и пробуждение под
сигнал радио
1. Установите время срабатывания будильника, как описано в разделе «Установка времени включения будильника»
и установите переключатель
AUTO/OFF/ON в положение
AUTO.
2. Установите время выключения радио, как описано в
разделе «Автоматическое отключение радио».
3. Радио выключится по истечении установленного времени
и включится на следующий
день по достижении установленного времени.
Примечание: Электромагнитные помехи могут оказывать влияние на работу
устройства. В этом случае
отключите устройство от источников питания, а затем
подключите снова. При необходимости переместите
прибор.
Уход за устройством
Перед чисткой выключите устройство из розетки. Для чистки
устройства используйте мягкую
ткань. Запрещается использовать для этих целей жидкие или
аэрозольные чистящие средства.
Технические характеристики
Питание: 240V AC, 50 Hz DC 9V
Потребляемая мощность:
Мах 3,5 Вт
Точность хода часов: 3 сек/сутки
Диапазон принимаемых частот:
AM: 535 – 1605 кГц;
FM: 64 – 108 МГц
Производитель оставляет за собой
право изменять характеристики приборов без предварительного уведомления
Срок службы прибора не менее
3-х лет
Данное изделие соответс-
твует всем требуемым европейским и российским стандартам безопасности и
гигиены.
Производитель: АН-ДЕР ПРОДАКТС
ГмбХ, Австрия
Нойбаугюртель 38/7А, 1070 Вена,
Австрия
11
6601_IM.indd 116601_IM.indd 11 18.03.2009 12:33:4618.03.2009 12:33:4
Page 12

УКРАЇНЬСКИЙ
РАДІОГОДИННИК
Перед підключенням, використанням або налаштуванням пристрою
уважно прочитайте інструкцію. Необхідно дотримуватись всіх
застережень та рекомендацій з експлуатації пристрою, наведених
в цій інструкції.
Збережіть інструкцію, використовуйте її в подальшому як
довідковий матеріал.
УВАГА!
Небезпека ураження електричним струмом!
Попередження: Задля уникнення виникнення пожежі або ураження електричним
струмом не піддавайте пристрій впливові дощу або вологи. Щоб уникнути ураження електричним струмом, не відкривайте корпус пристрою самостійно. Сервісне
обслуговування повинно здійснюватись тільки кваліфікованими спеціалістами сервісних центрів.
Символ блискавки в рівносторонньому трикутнику вказує
користувачеві на наявність всередині корпусу пристрою небезпечної напруги, здатної призвести до ураження електричним
струмом.
Знак оклику в рівносторонньому трикутнику вказує користувачеві на наявність важливих рекомендацій з експлуатації та технічного обслуговування в інструкції з експлуатації.
НЕ ВІДКРИВАТИ!
ЗАПОБІЖНІ ЗАХОДИ
• Перевірте, чи відповідає
напруга в електромережі
робочій напрузі пристрою.
• Задля уникнення виникнення
пожежі або ураження
електричним струмом не
піддавайте пристрій впливові
дощу або вологи.
• Забороняється занурювати
прилад у воду. Щоб уникнути
виникнення пожежі або
12
ураження електричним
струмом, не розташовуйте цей
пристрій в умовах підвищеної
вологості (біля ванн, тазів з
водою, кухонних раковин,
пральних машин, поряд з
плавальним басейном, в
сирих підвалах і т.д.). Не
допускайте попадання на
пристрій крапель або бризок.
• Не допускайте
перенавантаження розеток
Page 13

УКРАЇНЬСКИЙ
або подовжувачів, так як це
може призвести до пожежі
або ураження електричним
струмом.
• Встановлюйте цей пристрій
таким чином, щоб у
випадку несправності вилку
мережного проводу можна
було негайно вийняти з
розетки.
• Для додаткового захисту
пристрою під час грози,
а також в тих випадках,
коли ви не збираєтесь
використовувати його
продовж тривалого часу,
відключіть пристрій від
розетки електромережі. Це
виключить вихід приладу
з ладу внаслідок ударів
блискавки або стрибків
напруги в електромережі.
• Для від'єднання
мережного шнуру беріться
безпосередньо за мережну
вилку, в жодному разі не
тягніть за шнур.
• Щоб уникнути ураження
електричним струмом,
не відкривайте корпус
пристрою самостійно.
Не ремонтуйте прилад і
не вносьте в нього змін.
Сервісне обслуговування
повинно здійснюватись
тільки кваліфікованими
13
спеціалістами сервісних
центрів.
• Встановлюйте пристрій
в місцях з достатньою
вентиляцією. Не
закривайте вентиляційні
отвори приладу.
• Не з'єднуйте FM-антену з
зовнішньою антеною.
• Не розташовуйте пристрій
поблизу джерел тепла,
наприклад, радіаторів,
електрообігрівачів, духовок
або іншими пристроїв, які
самі є джерелами тепла, а
також в місцях, що піддаються
впливові прямих сонячних
променів чи надмірному
запиленню. Не ставте на
прилад джерела відкритого
полум'я, такі як свічі.
ОПИС
1 – кнопка вимкнення
будильника AL. OFF
2 – кнопка встановлення
поточного часу TIME
3 – кнопка встановлення часу
ввімкнення будильника
ALARM
4 – кнопка повторення сигналів
будильника SNOOZE
5 Кнопка встановлення годин
Hour
6 Кнопка встановлення
хвилин MIN
6601_IM.indd 136601_IM.indd 13 18.03.2009 12:33:4618.03.2009 12:33:4
Page 14

УКРАЇНЬСКИЙ
7 – кнопка автоматичного
відключення радіо SLEEP
8 – регулятор рівня гучності
VOLUME/керування
сигналом будильника
BUZZ
9 – регулятор налаштування
радіостанцій TUNING
10 – дисплей
11 – індикатор режиму AUTO
12 - батарейний відсік
13 – перемикач режимів роботи
AUTO/ON/OFF
14 – перемикач діапазонів FM/
АМ
15 – провід FM-антени
ІНСТРУКЦІЯ З ЕКСПЛУАТАЦІЇ
Встановлення батарейок
• Відкрийте кришку
батарейного відсіку і
встановіть батарейку 9 В,
дотримуючись полярності.
• Закрийте кришку батарейного
відсіку.
Примітка:
Пристрій призначений для
роботи від мережі, робота
від батарейок є резервним
варіантом. Наявність
батарейки зберігає
налаштування поточного
часу при відключенні, або
пропаданні основного
живлення.
Виймайте батарейку,
якщо пристрій не буде
використовуватись протягом
тривалого часу.
Перед підключенням пристрою
до мережі переконайтесь, що
напруга в електричній мережі
відповідає робочій напрузі
пристрою.
Вставте вилку мережного шнура
в розетку.
Прослуховування радіо
1. Встановіть перемикач AUTO/
ON/OFF в положення ON.
2. Виберіть бажаний діапазон,
встановивши перемикач
діапазонів FM/AM в
положення FM або AM.
3. Обертаючи ручку
налаштування радіостанцій
TUNING, налаштуйтесь на
бажану радіостанцію.
4. Для встановлення бажаного
рівня гучності використовуйте
ручку регулювання гучності
VOLUME.
5. По завершенні
прослуховування встановіть
перемикач AUTO/ON/OFF в
положення OFF.
Примітка: Для забезпечення
найкращих умов прийому
14
Page 15

УКРАЇНЬСКИЙ
станцій FM діапазону
рекомендується розмотати
провід FM-антени на всю
довжину і розмістити його
оптимальним чином.
Встановлення поточного часу
1. При підключенні пристрою
до мережі на дисплеї
відобразиться індикація
«0:00».
2. Натисніть і утримуйте кнопку
TIME. Натискаючи при цьому
кнопку HOUR, встановіть
години, кнопку MIN хвилини.
Встановлення часу
увімкнення будильника
1. Натисніть і утримуйте
кнопку ALARM. Натискаючи
при цьому кнопку HOUR,
встановіть години, кнопку
MIN - хвилини.
2. Якщо ви хочете
використовувати радіо як
сигнал будильника, встановіть
бажаний рівень гучності за
допомогою регулятора рівня
гучності, інакше встановіть
регулятор гучності VOLUME в
положення BUZZ.
3. Встановіть перемикач AUTO/
OFF/ON в положення AUTO.
4. Після досягнення
встановленого часу
ввімкнеться сигнал
будильника. Для вимкнення
сигналу будильника
натисніть кнопку AL.OFF,
при цьому на наступний день
будильник знову ввімкнеться
після досягнення
встановленого часу. Для
відключення будильника
встановіть перемикач AUTO/
OFF/ON в положення OFF.
Повторення сигналу
будильника
Сигнал будильника можна
відключити на 9 хвилин
натисканням кнопки SNOOZE.
Через 9 хвилин сигнал
будильника повториться.
Автоматичне відключення
радіо
Ви можете встановити час,
після якого радіо автоматично
вимкнеться. Натисніть
кнопку SLEEP, на дисплеї
відобразиться час «00:59», і
радіо автоматично вимкнеться
через 59 хвилин. Щоб
зменшити час, натиснувши
і утримуючи кнопку SLEEP,
натискайте кнопку MIN. Щоб
збільшити час на 1 годину,
натиснувши і утримуючи кнопку
SLEEP, натисніть кнопку HOUR.
Через встановлений час радіо
15
6601_IM.indd 156601_IM.indd 15 18.03.2009 12:33:4618.03.2009 12:33:4
Page 16

УКРАЇНЬСКИЙ
вимкнеться. Для відключення
радіо до того, як пройде раніше
встановлений час натисніть
кнопку SNOOZE.
Примітка: Автоматичне
відключення радіо не
можливе при встановленні
перемикача AUTO/OFF/ON в
положення ON.
Автоматичне відключення радіо
і прокидання під сигнал радіо
1. Встановіть час
спрацьовування будильника,
як описано в розділі
«Встановлення часу
ввімкнення будильника» і
встановіть перемикач AUTO/
OFF/ON в положення AUTO.
2. Встановіть час вимкнення
радіо, як описано в розділі
«Автоматичне відключення
радіо».
3. Радіо вимкнеться після
встановленого часу і
ввімкнеться на наступний
день після досягнення
встановленого часу.
Примітка: електромагнітні
шуми можуть впливати на
роботу пристрою. У цьому
випадку відключіть пристрій
від джерел живлення, а
потім підключіть знову. За
16
необхідності перемістіть
прилад.
Догляд за приладом
Перед чищенням вимкніть
пристрій з розетки. Для чищення
пристрою використовуйте
м’яку тканину. Забороняється
використовувати з цією метою
рідкі або аерозольні засоби для
чищення.
Технічні характеристики
Живлення: 240V AC, 50 Hz DC 9V
Споживана потужність: Мах 3,5 Вт
Точність ходу годинника: 3 сек/доба
Діапазон частот, що
приймаються: AM: 535 – 1605
кГц; FM: 64 - 108 МГц;
Ви роб ник за ли шає за со бою пра во змінюва ти ха рак те рис ти ки при ладів без по переднь о го повідом лен ня.
Термін служ би при ла ду не менш 3
років
Га рантія
Док ладні умо ви га рантії мож на от ри ма ти
в ди ле ра, що про дав да ну апа ра ту ру. При
пред’яв ленні будь-якої пре тензії про тя гом
терміну дії да ної га рантії вар то пред’яви ти
чек або кви танцію про по куп ку.
Даний виріб відповідає ви могам до елект ро магнітної
сумісності, що пред’яв ля ють ся
ди рек ти вою 89/336/ЄЕС Ра ди
Євро пи й роз по ряд жен ням
73/23 ЄЕС по низь ко вольт них
апа ра ту рах.
Page 17

ҚАЗАҚ
РАДИОСАҒАТ
Құрылғыны қосу, қолдану жəне баптау алдында нұсқаулықты мұқият
оқып шығыңыз. Осы нұсқаулықта берілген ұсыныстар мен ескертулер
қатаң сақтану керек.
Нұсқаулықты сақтап, келешекте оны ақпарат құралы ретінде
қолданыңыз.
НАЗАР АУДАРЫҢЫЗ!
Электр тогымен зақымдану қаупі!
Ескерту: Өрт қауіпінің немесе электр тоғымен зақымданудың алдын алу үшін
Электр тоғымен зақымданудың алдын алу үшін құрылғының корпусын өздігіңізбен
Сервистік қызметті тек сервис орталығының маман қызметкерлері көрсету керек.
құрылғыны ылғалдан немесе жауыннан сақтаңыз
Теңбұрышты үшбұрыштың ішіндегі найзағай белгісі қолданушыға
құрылғының корпусындағы электр тоғымен зақымдануға əкеліп
соқтыратын қауіпті кернеудің бар екенін көрсетеді.
Теңбұрышты үшбұрыштың ішіндегі леп белгісі қолданушыға қолдану
жөніндегі нұсқаулықтағы қолдану жəне техникалық қызмет көрсету
туралы маңызды ұсыныстардың бар екенін көрсетеді.
САҚТЫҚ ШАРАЛАРЫ
• Электр желісінің кернеуі
құрылғының жұмыс кернеуіне
сəйкес келетінін тексеріңіз
• Өрт қауіпінан жəне электр
тоғының зақымынан
сақтану үшін құрылғыны
су тамшыларынан немесе
жоғары ылғалдықтан
сақтаңыз.
• Құрылғыны суға батыруға
тиым салынады. Өрт
қауіпінан жəне электр
АШПАҢЫЗ!
ашпаңыз.
тоғының зақымынан сақтану
үшін құрылғыны жоғары
ылғалдылық жағдайында
(ванна,су құйылған кірше,
ас бөлмесіндегі қолжуғыш,
кіржуғыш машина, жүзу
бассейін жанына, ылғал
төледе) орналастырмаңыз.
• Құрылғыны су тамшыларынан
сақтаңыз.
• Тоқ көзіне немесе
ұзартқыштарға салмақ түсуп
кетуіне жол бермеңіз, өйткені
17
6601_IM.indd 176601_IM.indd 17 18.03.2009 12:33:4618.03.2009 12:33:4
Page 18

ҚАЗАҚ
ол өрт қауіпіне немесе электр
тогымен зақымдануға əкеліп
соқтырады.
• Ақау пайда болған жағдайда
құрылғыны тез арада желіден
айыру мүмкүндігі болу үшін
құрылғыны ыңғайлы жерде
орналастырыңыз.
• Жауынды күні немесе
құрылғыны ұзақ қолданбайтын
кезде, қосымша сақтық шарасы
ретінде, электрожеліден
айырып тастаңыз. Бұл
құрылғының найзағай əсерінен
немесе электрожелідегі
кернеудің ауытқуынан істен
шығуын алдын алады.
• Желілік шнурын желіден
айыру үшін желі ашасынан
ұстап суырыңыз, ешкашанда
шнурдан тартпаңыз.
• Электр тоғымен зақымданбау
үшін құрылғының корпусын
өздігіңізбен ашпаңыз.
Құрылғыны жөндемеңіз жəне
оған өзгерістер енгізбеңіз.
Сервистік қызметті тек
сервис орталығының маман
қызметкерлері көрсету керек.
• Құрылғыны жақсы желденетін
жерде орнатыңыз. Құрылғының
желдену көздерін бітемеңіз.
• FM-толқынжиманы сыртқы
толқынжимамен біріктірмеңіз.
• Құрылғыны жылу көздерінің,
мысалы, радиаторлар,
18
электрожылытушылар,
духовкалар мен жылу көздері
болып табылатын басқада
құрылғылардың (сонымен
қатар, күшейткіштердің)
жанына, сондай ақ, тікелей
күн сəулесі түсетін, қатты шаң
басатын немесе механикалық
соққы тиетін жерлерге
орнатпаңыз.
• Құрылғының үстіне оттың
ашық көздерін, мысалы,
шырақтарды, қоймаңыз.
СИПАТТАМАСЫ
1 – қоңырауды қосу түймешесі
AL. OFF
2 – ағымдағы уақытты орнату
түймешесі TIME
3 – қоңыраудың қосылу
уақытын орнату түймешесі
ALARM
4 – қоңыраудың
белгісін қайталау
түймешесіSNOOZE
5 – сағатты ортану түймешесі
HOUR
6 – минутты орнату түймешесі
MIN
7 – радионы автоматты сөндіру
түймешесі радио SLEEP
8 – дыбыс деңгейінің реттеуіші
VOLUME/қоңырау белгісін
басқару түймешесі BUZZ
9 – радиостанцияларды баптау
реттеуіші TUNING
Page 19

ҚАЗАҚ
10 – дисплей
11 – тəртіп индикаторы AUTO
12 – батарея бөлімшесі
13 – жұмыс тəртібінің
ауыстырғыштары AUTO/
ON/OFF
14 – диапазондар ауыстырғышы
FM/АМ
15 – FM-толқынжимасының тетігі
ҚОЛДАНУ ЖӨНІНДЕГІ
НҰСҚАУЛЫҚ
Батареяларды орнату
• Батарея бөлімшесінің
қақпағын ашып,9В
батареясын, полярлыгын
сақтап, орнатыңыз.
• Батарея бөлімшесінің
қақпағын ашыңыз.
Ескерту:
Құрылғы желіден жұмыс істеуге
көзделген, батареядан жұмыс
істеу резервті вариант болып
табылады. Батарея салынып
тұрса, негізгі қуаттану
сөнгенде немесе жоғалғанда
сағат баптамалары сақталып
қалады.
Егер құрылғы ұзақ уақыт
бойы қосылмайтын болса,
батареяны алып қойыңыз.
Құрылғыны желіге қосу
алдында, электр желісінің
кернеуі құрылғының жұмыс
кернеуіне сəйкес келетінін
тексеріңіз.
Желі шнурының ашасын
розеткаға салыңыз.
Радионы тыңдау
1. AUTO/OFF/ON
ауыстырғышын ON
жағдайына орнатыңыз.
2. FM/AM диапазондар
ауыстырғышын FM
немесе AM жағдайына
орнатып,қалаған
диапазоныңызды орнатыңыз.
3. TUNING радиостанцияларды
баптау тұтқасын бұрап,
қалаған радиостанцияға
бапталыңыз.
4. Қалаған дыбыс деңгейін
орнату үшін VOLUME дыбыс
деңгейін реттеу тұтқасын
қолданыңыз.
5. Тыңдап болғаннан кейін AUTO/
OFF/ON ауыстырғышын OFF
жағдайына орнатыңыз.
Ескерту: FM диапазонындағы
станциялардың тиімді
қабылдануын қамтамасыз ету
үшін FM-толқынжимасының
тоғын толық тарқатып, оны
ең тиімді жолмен орналастыру
керек.
Ағымдағы уақытты орнату
1. Құрылғыны желіге
19
6601_IM.indd 196601_IM.indd 19 18.03.2009 12:33:4618.03.2009 12:33:4
Page 20

ҚАЗАҚ
қосқанда дисплейде «0:00»
индикациясы жанады.
2. TIME түймешісін басып
тұрыңыз. Оның арасында
HOUR түймешесін басып,
сағатты, ал MIN түймешесін
басып минутты баптаңыз.
Қоңырауды қосу уақытын
баптау
1. ALARM түймешесін
басыңыз. Оның арасында
HOUR түймешесін басып,
сағатты, ал MIN түймешесін
басып минутты баптаңыз.
2. Егер сіз қоңырау белгісі
ретінде радионы қолданғыңыз
келсе, оның бар даусын дыбыс
деңгейінің реттеуіші арқылы
шығарыңыз, немесе VOLUME
дыбыс деңгейінің реттеуішін
BUZZ жағдайына орнатыңыз.
3. AUTO/OFF/ON ауыстырғышын
AUTO жағдайына онатыңыз.
4. Белгіленген уақыт
келгенде қоңырау белгісі
қосылады. Қоңырау белгісін
сөндіру үшін AL. OFF,
түймешесін басыңыз,
ертеңіне қоңырау дəл сол
белгіленген уақыт келгенде
қосылады. Қоңырауды
сөндіру үшін AUTO/OFF/
ON ауыстырғышын OFF
жағдайына орнатыңыз.
20
Қоңырау белгісінің
қайталануы
Қоңырау белгісін SNOOZE
түймешесі арқылы 9 минутқа
кідіртуге болады.
Радионы автоматты сөндіру
Сіз белгілі уақыт біткененнен
кейін радионы автоматты
сөндіруін орната аласыз.
SLEEP түймешесін басыңыз,
дисплейден «00:59» белгісі
көрнеді,сонда радио автоматты
түрде 59 минут өткенен кейін
сөнеді. Уақытты азайту үшін
SLEEP түймешесін басып
тұрып, MIN түймешесін басыңыз.
Уақытты бір сағатқа создыру
үшін SLEEP түймешесін басып
тұрып, HOUR түймешесін
басыңыз. Белгіленген уақыт
өткенен кейін радио сөнеді.
Белгіленген уақыт аяқталғанға
дейін радионы сөндіру үшін
SNOOZE түймешесін басыңыз.
Ескерту: AUTO/OFF/ON
ауыстырғышы ON жағдайына
орнатылған болса радионы
автоматты түрде сөндіруге
болмайды.
Радионы автоматты түрде
сөндіру жəне радионың
белгісіне ояну
1. Қоңыраудың қосылу
Page 21

ҚАЗАҚ
уақытын «Қоңыаудың
қосылу уақытын орнату»
тарауында жазылғандай
орнатыңыз да, AUTO/OFF/
ON ауыстырғышын AUTO
жағдайына орнатыңыз.
2. Урадионың қосылу уақытын
«Радионы автоматты
сөндіру» тарауында
сипатталғандай орнатыңыз.
3. Радио белгіленген уақыт
аяқталғаннан кейін сөнеді
жəне келесі күні сол
белгіленген уақытта қайта
қосылады.
Тұтыну қуаты: Мах 3,5 Вт
Сағаттың жүру туралығы: 3
сек/сутки
Қабылдану жиілігінің
диапазондары : AM: 535 – 1605
кГц; FM: 64 – 108 МГц
Өндiрушi прибордың
характеристикаларын
өзгертуге, алдын ала
ескертусiз өзiнiң құқын
сақтайды
Прибордын қызмет көрсету
уақыты 3 жылға дейiн
Ескерту: Құрылғының
жұмысына электрокедергілер
əсерт етуі мүмкін.Мұндай
жағдайда, құрылғыны
қуаттану көздерінен
ажыратып, қайта қосыңыз.
Қажет болса, құрылғының
орнын ауыстырыңыз.
Құрылғыға күтім жасау
Тазалау алдында құрылғыны
розеткадан ажыратыңыз.
Құрылығыны тазалау үшін
жұмсақ матаны қолданыңыз.
Бұл мақсатта сұйық немесе
аэрозольды тазалағыш заттарды
қолдануға тиым салынады.
Техникалық сипаттамалары:
Қуаттану:240V AC, 50 Hz DC 9V
6601_IM.indd 216601_IM.indd 21 18.03.2009 12:33:4618.03.2009 12:33:4
Гарантиялық мiндеттiлiгi
Гарантиялық жағдайдағы
қаралып жатқан бөлшектер
дилерден тек сатып алынған
адамға ғана берiледi. Осы
гарантиялық мiндеттiлiгiндегi
шағымдалған жағдайда төлеген
чек немесе квитанциясын
көрсетуi қажет.
Бұл тауар ЕМС
– жағдайларға
сəйкес келедi негiзгi
Мiндеттемелер
89/336/EEC
Дерективаның
ережелерiне енгiзiлген
Төменгi Ережелердiң
Реттелуi (73/23 EEC)
21
Page 22

ЎЗБЕК
RADIOSOAT
Buyumni ulash, undan foydalanish va uni sozlashdan avval ushbu
yo’riqnomani diqqat bilan o’qib chiqing. Bu qo’llanmada keltirilgan
buyumdan foydalanish yuzasidan barcha ogohlantirishlarga va
tavsiyalarga amal qilish lozim.
Bu qo’llanmani saqlab qoling, keyinchalik undan ma’lumot uchun yig’ma
materiallar sifatida foydalaning.
DIQQAT!
Elektr tok zarbasining xavfi bor!
OCHILMASIN!
Ogohlantirish: Yong’in kelib chiqishi yoki elektr tokining zarbasi xavfiga yo’l qo’ymaslik
Elektr tokining zarbasidan shikastlanishga yo’l qo’ymaslik uchun buyumning korpusini
o’zingiz mustaqil ochmang. Servis xizmat ko’rsatilishi faqat servis markazlarining
uchun buyumni yomg’ir yoki namlik ta’sirida qoldirmang.
malakali mutaxassislari tomonidan amalga oshirilishi lozim.
Teng tomonli uchburchak ichidagi yashin belgisi foydalanuvchiga buyum
ichidagi xavfli kuchlanish borligini ko’rsatadi, u elektr tokining zarbasi tufayli
shikastlanishga olib kelishi mumkin.
Teng tomonli uchburchak ichidagi undov belgisi foydalanuvchiga buyumdan
foydalanish yo’riqnomasida buyumdan foydalanish va unga texnik xizmat
ko’rsatilishi yuzasidan muhim tavsiyalar borligini ko’rsatadi.
EHTIYOT CHORALARI
• Elektr ta’minot tarmogidagi
kuchlanish buyumning ish
kuchlanishiga mos kelishkelmasligini tekshiring.
• Yong’in kelib chiqishi yoki elektr
tokining zarbasi xavfiga yo’l
qo’ymaslik uchun buyumni
yomg’ir yoki namlik ta’sirida
qoldirmang.
• Buyumni suvga botirish qat’iyan
taqiqlanadi. Yong’in yoki
elektr tokining zarbasi bilan
shikastlanish kelib chiqmasligi
uchun ushbu buyumni yuqori
namlik sharoitlarida (vannalarga
yaqin joyda, suvli idishlar,
oshxona chig’anoqlari, kir
yuvish mashinalari yonida,
suzish havzalari yonida, zax
yerto’lalar ichida va shu kabi
joylarda) joylashtirmang.
22
Page 23

ЎЗБЕК
Buyumga suyuqlik tomchilari
yoki sachragan tomchilar
tushishiga yo’l qo’ymang..
• Elektr rozetkalar yoki uzun
simli uzaytirgichlarga ortiqcha
kuchlanish yuki tushishiga yo’l
qo’ymang, chunki bu yong’inga
yoki elektr tokining zarbasi bilan
shikastlanishga olib kelishi
mumkin.
• Ushbu buyumni shunday tarzda
o’rnatish lozimki, nosozlik yuz
bergan holda tarmoq simining
vilkasini rozetkadan darhol olib
qo’yish mumkin bo’lsin.
• Buyumni chaqmoq va
momaqaldiroq paytida
qo’shimcha himoyalash uchun,
shuningdek undan uzoq
vaqt mobaynida foydalanish
rejalaringiz bo’lmasa, uni elektr
tarmog’ining rozetkasidan
chiqarib olib o’chiring. Bu
chaqmoq urishining oqibatida
yoki elektr tarmog’ida kuchlanish
sakrashi tufayli buyumning
ishdan chiqishining oldini oladi.
• Tarmoq simini rozetkadan olib
o’chirish uchun bevosita tarmoq
vilkasidan ushlab o’chiring,
hech bir holda simdan ushlab
tortmang.
• Elektr tokining zarbasiga yo’l
qo’ymaslik uchun buyumning
korpusini mustaqil holda
o’zingiz ochmang. Buyumni
o’zingiz ta’mirlamang va unga
o’zgarishlar kiritmang. Servis
xizmatlarni ko’rsatilishi faqat
servis markazlarining malakali
mutaxassislari tomonidan
amalga oshirilishi mumkin.
• Buyumni yetarli shamollatish
imkoniyati bo’lgan joylarda
o’rnating. Buyumning
shamollatish tuynukchalarining
ustini yopmang.
• FM-antennani tashqi antennaga
ulamang.
• Ushbu buyumni issiqlik
manbalariga yaqin joyda,
masalan, radiatorlar, elektr
isitkichlar, duxovkalar yoki
issiqlik manbalari bo’lgan boshqa
buyumlar va moslamalarning
yonida, shuningdek to’g’ridanto’g’ri quyosh nurlari
tushadigan, chang o’ta ko’p
bo’lgan yoki mexanik zarbalar
tushishi imkoniyati mavjud
bo’lgan joylarda joylashtirmang.
Buyumning ustiga ochiq alanga
manbalarini, masalan, shamlarni
qo’ymang.
TA’RIFI
1 – budilnikni o’chirish tugmasi
AL. OFF
2 – joriy vaqtni belgilash tugmasi
TIME
3 – budilnikni yoqish vaqtini
belgilash tugmasi ALARM
23
6601_IM.indd 236601_IM.indd 23 18.03.2009 12:33:4718.03.2009 12:33:4
Page 24

ЎЗБЕК
4 – budilnik signallarini takrorlash
tugmasi SNOOZE
5 – soat ko’rsatkichini belgilash
tugmasi HOUR
6 – daqiqa rsatkichini belgilash
tugmasi MIN
7 – radioni avtomatik o’chirish
tugmasi SLEEP
8 – ovoz balandligining darajasini
sozlash dastagi VOLUME/
budilnikning signalini
boshqarish BUZZ
9 – radiostantsiyalarni sozlash
uchun dastak moslamasi
TUNING
10 – displey
11 – AUTO rejimining indikatori
12 – batareykalar bo’limi
13 – ishlash rejimlarini ozgartirish
dastagi AUTO/ON/OFF
14 – diapazonlarni o’zgartirish
dastagi FM/AM
15 – FM-antennaning simi
FOYDALANISH YUZASIDAN
YO’RIQNOMA
Batareykalarni o’rnatish
• Batareykalar bo’limining
qopqog’ini oching va ularning
qutblariga amal qilgan holda, 9
V lik batareykani o’rnating.
• Batareykalar bo’limining
qopqog’ini yoping.
Eslatma:
Moslama elektr tarmog’iga ulanib
ishlash uchun mo’ljallangan,
buyumning batareykalardan
ishlashi rezerv ishlash usulidir.
Batareykaning mavjudligi asosiy
ta’minot o’chirilgan yoki uzilib
qolgan holatida joriy vaqtning
sozlangan ko’rsatkichlarini saqlab
qoladi.
Agar buyum uzoq vaqt davomida
ishlatilmaydigan bo’lsa, uning
ichidan batareykalarni olib
qo’ying.
Buyumni tarmoqqa ulashdan
avval elektr tarmog’idagi elektr
tokining kuchlanishi buyumning
ish kuchlanishiga mos kelishiga
ishonch osil qiling.
Tarmoq simining vilkasini
rozetkaga kiriting.
Radioni tinglash
1. AUTO/OFF/ON OFF ishlash
rejimlarini o’zgartirish dastagini
ON holatiga o’tkazing.
2. FM/AM diapazonlarni
o’zgartirish dastagini FM yoki
AM holatiga o’rnatib, o’zingiz
istagan chastotalar diapazonini
tanlang.
3. TUNING radiostantsiyalarni
sozlash dastasini ohista
aylantirib, o’zingiz istagan
radiostantsiyaga sozlaning.
4. O’zingiz istagan ovoz balandligi
24
Page 25

ЎЗБЕК
darajasini belgilash uchun
VOLUME ovoz balandligini
sozlash dastagidan
foydalaning.
5. Radioni tinglash tugaganidan
keyin AUTO/ON/OFF ishlash
rejimlarini o’zgartirish dastagini
OFF holatiga o’tkazing.
Eslatma: FM diapazonidagi
radiostantsiyalar signalini qabul
qilishning eng yaxshi shartsharoitlarini ta’minlash uchun
FM-antennaning simini butun
uzunasiga ochib yozish hamda uni
optimal yo’nalishda joylashtirish
tavsiya etiladi.
Joriy vaqtni belgilash
1. Buyumning tarmoqqa ulangan
vaqtida displeyda «0:00»
indikatsiyasi yonib-o’chib aks
etadi.
2. TIME tugmasini bosing va
uni ushlab turing. Shu bilan
birga HOUR tugmasini bosib,
soat ko’rsatkichini, MIN
tugmasini bosib turib, daqiqalar
ko’rsatkichini belgilang.
Budilnikning yoqilishi vaqtini
belgilash
1. ALARM tugmasini bosing
va uni ushlab turing. Shu
bilan birga HOUR tugmasini
bosib, soat ko’rsatkichini, MIN
tugmasini bosib turib, daqiqalar
ko’rsatkichini belgilang.
2. Agar Siz radiodan
budilnik signallari sifatida
foydalanmoqchi bo’lsangiz,
ovoz balandligi darajasining
sozlagichi yordamida o’zingiz
istagan ovoz balandligi
darajasini belgilang, aks holda
ovoz balandligi darajasining
sozlagichi VOLUME ni BUZZ
holatiga o’rnating.
3. AUTO/OFF/ON ishlash
rejimlarini o’zgartirish dastagini
AUTO holatiga o’tkazing.
4. Belgilangan vaqtiga yetganda
budilnikning signali yoqiladi.
Budilnikning signalini o’chirish
uchun AL. OFF tugmasini
bosing, bunda keyingi kuni ham
budilnik undagi belgilangan
vaqtiga yetganda yana yoqiladi.
Budilnikni o’chirish uchun
AUTO/OFF/ON ishlash
rejimlarini o’zgartirish dastagini
OFF holatiga o’tkazing.
Budilnikning signallarini
takrorlash
Budilnikning signallarini 9 daqiqa
muddatga SNOOZE tugmasini
bosib, o’chirib qo’yish mumkin.
9 daqiqadan keyin budilnikning
signallari takrorlanadi.
25
6601_IM.indd 256601_IM.indd 25 18.03.2009 12:33:4718.03.2009 12:33:4
Page 26

ЎЗБЕК
Radioning avtomatik o’chirilishi
Siz radio ma’lum vaqt tugaganidan
keyin avtomatik ravishda
o’chiriladigan vaqt ko’rsatkichini
belgilashingiz mumkin. SLEEP
tugmasini bosing, displeyda
«00:59» vaqt ko’rsatkichi aks
etadi, va radio 59 daqiqadan keyin
avtomatik ravishda o’chiriladi.
Ushbu vaqtni kamaytirish uchun
SLEEP tugmasini bosib ushlab
turing va ayni paytda MIN
tugmasini bosing. Ushbu vaqtni bir
soatga ko’paytirish uchun SLEEP
tugmasini bosib ushlab turing
va ayni paytda HOUR tugmasini
bosing. Belgilangan vaqti
tugaganidan keyin radio o’chiriladi.
Avvaldan belgilangan vaqtiga
yetmaganda radioni o’chirish uchun
SNOOZE tugmasini bosing.
Eslatma: Radioning avtomatik
o’chirilishi AUTO/OFF/ON ishlash
rejimlarini o’zgartirish dastagi ON
holatiga o’tkazilgan holda mumkin
bo’lmaydi.
Radioning avtomatik o’chirilishi
va radioning signallari
yordamida uyg’onish
1. «Budilnikning yoqilishi
vaqtini belgilash» bo’limida
ko’rsatilgani kabi budilnikning
yoqilib, ishlaydigan vaqtini
belgilang va AUTO/OFF/ON
26
ishlash rejimlarini o’zgartirish
dastagini AUTO holatiga
o’tkazing.
2. «Radioning avtomatik
o’chirilishi» bo’limida
ko’rsatilgani kabi radioning
o’chirilishi vaqtini belgilang.
3. Radio uning uchun belgilangan
vaqti tugaganda o’chiriladi va
keyingi kuni belgilangan vaqtiga
yetganda yana yoqiladi.
Eslatma: Elektrmagnit shovqinlari
ushbu buyumning ishiga salbiy
ta’sir ko’rsatishi mumkin. Bu
holda buyumni elektr ta’minot
manbalaridan uzib, o’chirib
qo’ying, keyin esa uni yana ulab
yoqing. Zarur bo’lganda buyumni
boshqa joyga ko’chiring.
Buyumni parvarish qilish
Tozalashdan avval buyumni
rozetkadan chiqarib olib o’chiring.
Buyumni tozalash uchun mayin
nam mato bo’lagidan foydalaning.
Bu maqsadda suyuq yoki aerozolli
tozalash vositalaridan foydalanish
taqiqlanadi.
Texnik xususiyatlari
Elektr ta’minoti: 240V AC, 50 Hz
DC 9V
Iste’mol qilinuvchi quvvati: Max
3,5 Vt
Soatning vaqtni aniq ko’rsatishi
Page 27

ЎЗБЕК
darajasi: sutkasiga 3 soniya
Qabul qilinadigan chastotalarning
diapazoni: AM: 535 – 1605 kHz;
FM: 64 – 108 MHz
Ишлаб чиқарувчи олдиндан
огоҳлантирмасдан жиҳоз
хусусиятларини ўзгартириш
ҳуқуқини сақлаб қолади.
Жиҳознинг ишлаш муддати
3йилдан кам эмас
Кафолат шартлари
Ушбу жиҳозга кафолат бериш
масаласида худудий дилер
ёки ушбу жиҳоз харид қилинган
компанияга мурожаат қилинг.
Касса чеки ёки харидни
тасдиқловчи бошқа бир молиявий
ҳужжат кафолат хизматини
бериш шарти ҳисобланади.
Ушбу жиҳоз 89/336/
ЯЕC Кўрсатмаси
асосида белгиланган
ва Қувват
кучини белгилаш
Қонунида (73/23
ЕЭС) айтилган
ЯХС талабларига
мувофиқ келади.
27
6601_IM.indd 276601_IM.indd 27 18.03.2009 12:33:4718.03.2009 12:33:4
Page 28

GB
A production date of the item is indicated in the serial number on the technical data plate. A serial number is an eleven-unit number, with the first four figures indicating the production date.
For example, serial number 0606ххххххх means that the item was manufactured in June (the
sixth month) 2006.
RUS
Дата производства изделия указана в серийном номере на табличке с техническими
данными. Серийный номер представляет собой одиннадцатизначное число, первые
четыре цифры которого обозначают дату производства. Например, серийный номер
0606ххххххх означает, что изделие было произведено в июне (шестой месяц) 2006 года.
KZ
Бұйымның шығарылған мерзімі техникалық деректері бар кестедегі сериялық нөмірде
көрсетілген. Сериялық нөмір он бір саннан тұрады, оның бірінші төрт саны шығару мерзімін
білдіреді. Мысалы, сериялық нөмір 0606ххххххх болса, бұл бұйым 2006 жылдың маусым
айында (алтыншы ай) жасалғанын білдіреді.
UA
Дата виробництва виробу вказана в серійному номері на табличці з технічними даними.
Серійний номер представляє собою одинадцятизначне число, перші чотири цифри якого
означають дату виробництва. Наприклад, серійний номер 0606ххххххх означає, що виріб
був виготовлений в червні (шостий місяць) 2006 року.
UZ
Жиҳоз ишлаб чиқарилган муддат техник хусусиятлар кўрсатилган лавҳачадаги серия
рақамида кўрсатилган. Серия рақами ўн битта сондан иборат бўлиб уларнинг биринчи
тўрттаси ишлаб чиқарилган вақтни ифода этади. Мисол учун 0606ххххххх серия рақами
жиҳоз 2006 йилнинг июн ойида (олтинчи ойда) ишлаб чиқарилганлигини билдиради.
 Loading...