

Page 1

ENGLISH
1
6406_IM.indd 16406_IM.indd 1 12.03.2010 10:19:3812.03.2010 10:19:38
Page 2

6406_IM.indd 26406_IM.indd 2 12.03.2010 10:19:4112.03.2010 10:19:41
Page 3
6406_IM.indd 36406_IM.indd 3 12.03.2010 10:19:4112.03.2010 10:19:41
Page 4

ENGLISH
WEATHER STATION
DESCRIPTION
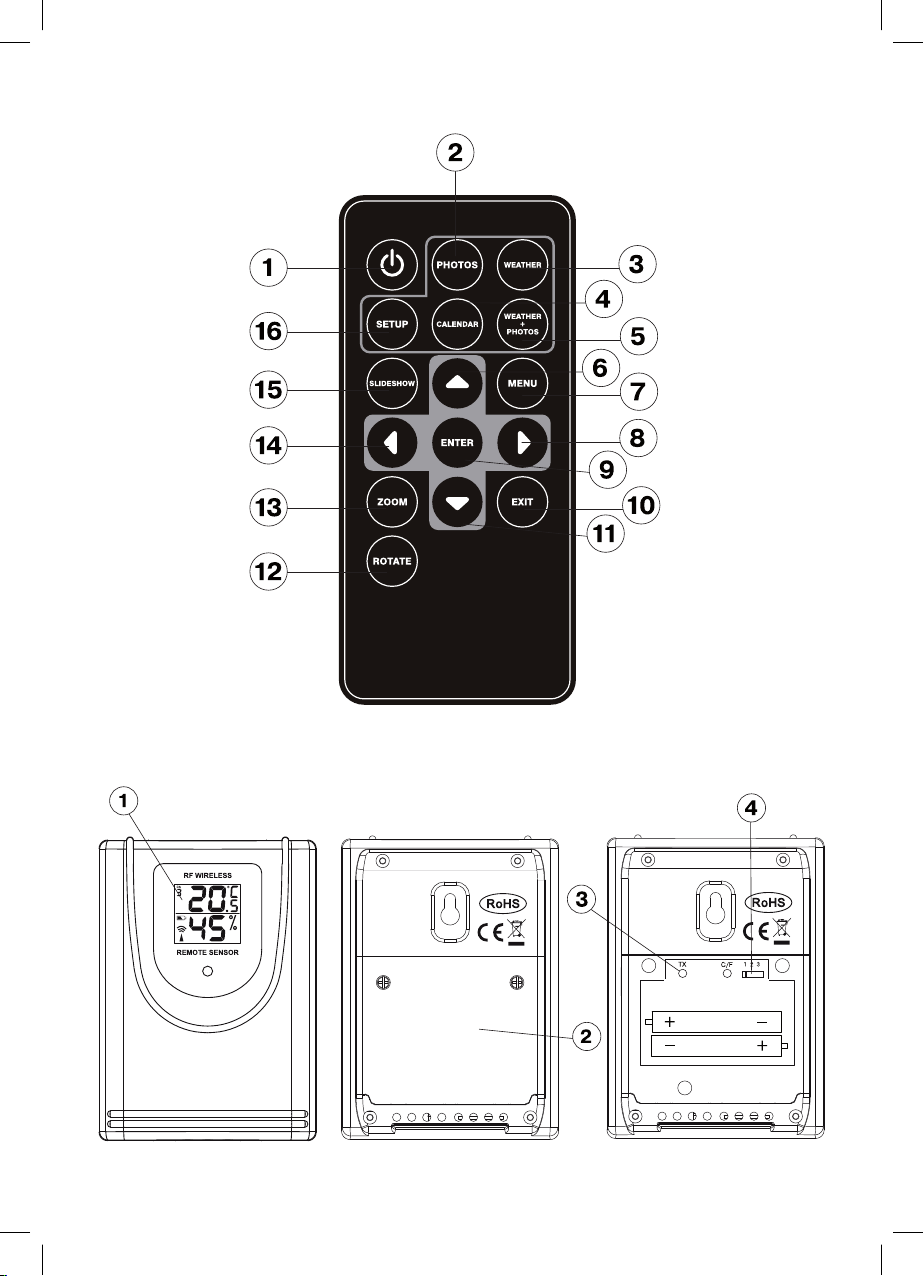
Basic unit (photo frame) (Pic.1)
1 – DISPLAY
2 – Infrared sensor
3 – (
) button
4, 5 –▲/▼ buttons
6, 7 – photo selection and menu/setting mode navigation buttons ►/◄
8 –Enter button
9 –Exit button
10 - SD/MMC jack
11 - USB-jack
12 – power adapter jack
Note: When the display is on, press any button, except the POWER button, to switch on
weather displaying mode during 1 minute.
Remote control (Pic. 2)
1 –
( ) button
2 –PHOTOS button
3 – WEATHER button
4 - CALENDAR button
5 - WEATHER + PHOTOS button
6, 11 – ▲/▼ button
7 - MENU button
8, 14 – photo selection and menu/setting mode navigation buttons ►/◄
9 - ENTER button
10 - EXIT button
12 – ROTATE button
13 –ZOOM button
15 – SLIDESHOW button
16 – SETUP button
Note: When the display is on, press any navigation button ▲/▼ ►/◄, or ENTER, to switch
on weather displaying mode during 1 minute.
Remote sensor (Pic. 3)
1 – display
2 – battery compartment lid
3 – signal express-transfer button
4 – data transfer channel selection switch
PRECAUTIONS
1. Before operating the units, read the instruction carefully.
2. Do not immerse the units into water.
3. Do not use abrasives or substances causing damages of the body and inner parts to
clean the units.
4
6406_IM.indd 46406_IM.indd 4 12.03.2010 10:19:4112.03.2010 10:19:41
Page 5

ENGLISH
4. Do not apply hard efforts to the units, do not subjects the units to strikes (dust and
moisture are also contraindicated), as it can lead to failures and correspondingly to
the reduction of life time, damages of the batteries and to the deformation of the body
details.
5. Do not dismantle the unit; it will lead to the ending of guarantee. There are no details,
demanding attention of the user inside it.
6. Use only new and specified in the manual batteries.
7. Use the net adapter supplied.
Connecting the net adapter to the base unit/placing batteries into the remote control and remote sensor:
Connecting the net adapter to the base unit
1. Make sure that the adapter voltage corresponds to the voltage in the mains.
2. Using the external power supply jack, connect the net adapter to the base unit supplied
(5.0V DC).
Placing batteries in the remote sensor
1. Unscrew the screws on the battery compartment lid.
2. Insert 2 batteries of AAA type, following the polarity.
3. Close the battery compartment lid and tighten up the screws.
Placing batteries in the remote control
The remote control is supplied with the batteries CR 2025 inserted. To activate the remote
control pull out the insulating insert.
To replace the battery follow the instructions on the rear panel. Follow the polarity when
replacing the batteries.
Note: While long operation of the sensor in the conditions of extreme temperatures, the
voltage of its batteries can be lowered, the operation radius of the remote sensor will be
reduced.
Synchronization of operation of the basic unit and the remote sensor
As soon as the power adapter is connected to the base unit, it will start signal searching
from the remote sensor during 4 minutes. Before it, you should open the battery compartment lid; select the data transfer channel, insert batteries in the remote sensor. After the
batteries in the remote sensor are inserted, it will start transfer of data, which will appear
on the display of the base unit.
During signal searching by the base unit, press the TX button inside the battery compartment of the remote sensor for quicker data transfer.
After the data from the remote sensor are received, they will appear on the display of the
base unit.
To find channels from the remote sensor you can do the following procedure.
Enter the main menu, by pressing the 9 Exit button of the base unit or the 7 MENU button
on the remote control. Use the ►/◄ buttons to select the Settings mode. Press ENTER
to confirm the mode. Use the ▼ button to select the Receipt from external sensor item.
Use the ►/◄ buttons to select Search, press Enter to confirm the parameters. The base
5
6406_IM.indd 56406_IM.indd 5 12.03.2010 10:19:4112.03.2010 10:19:41
Page 6

ENGLISH
unit will switch to the weather conditions displaying mode and will start signal search from
the remote sensor, the
Note: All setups from the base unit can be performed from the remote sensor. Press SET-
UP to enter Settings.
Weather conditions display adjustment
To receive more precise weather forecast you should enter your current weather conditions at the initial start-up of the unit.
Enter the main menu, by pressing the 9 Exit button of the base unit or the 7 MENU button
on the remote control. Use the ►/◄ buttons to select the Settings mode. Use the ▲/▼
buttons to select Weather forecast. Use the ►/◄ buttons to select one of the following
items Sunny, Partly cloudy, Cloudy, Rain or Lightning storm as initial weather condi-
tions. Press Enter to confirm the parameters, press Exit to cancel the Settings mode.
Weather forecast is built according to the dynamic of atmosphere pressure measuring.
According to the collected data, the weather station can forecast weather for the next 1224 hours
At radius of 30-50 km. Precision is about 70%.
symbol will be flashing in the upper right angle.
Sunny Partly cloudy Cloudy Rain Lightning storm
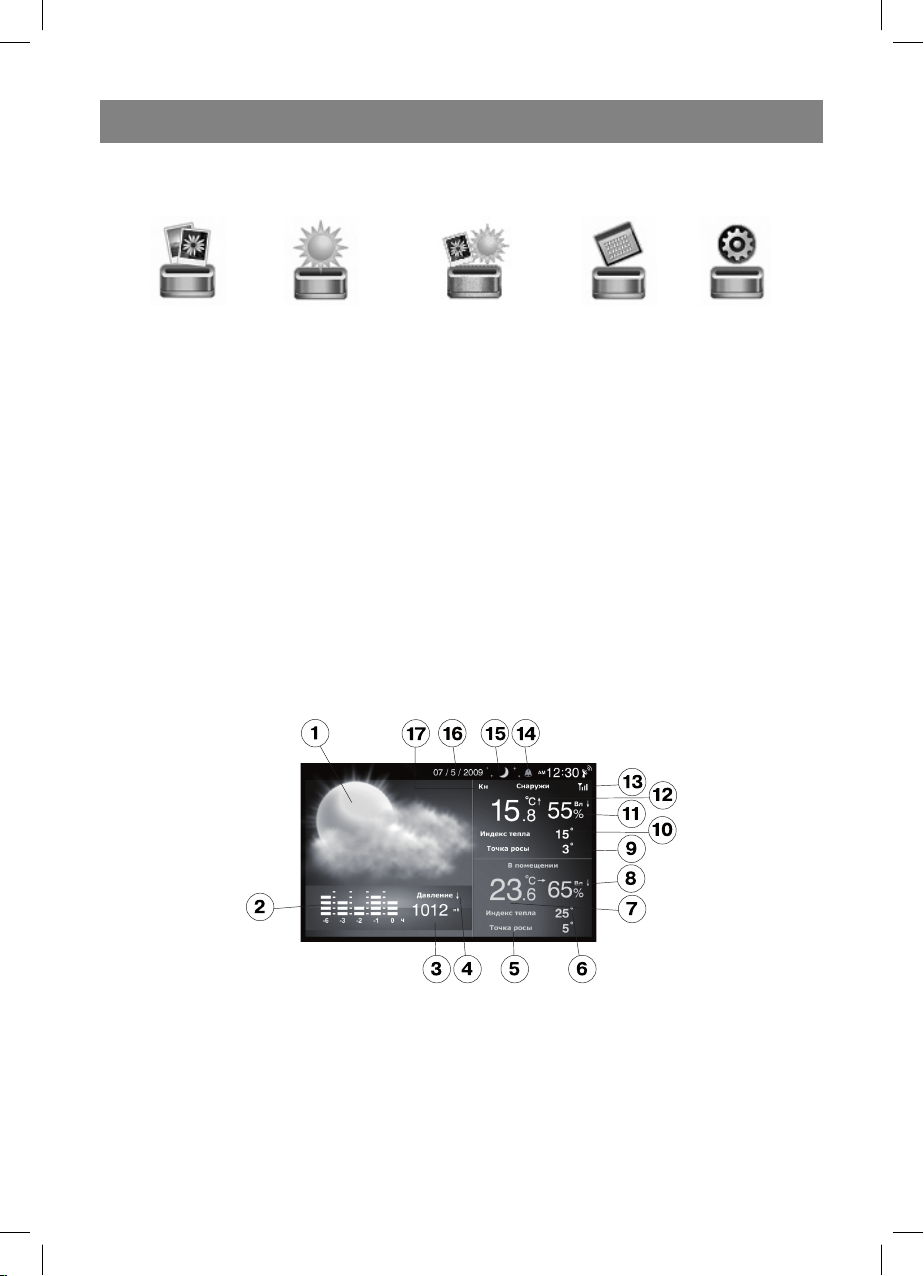
Base unit operation modes
The base unit has five operation modes
Photo album Weather Photo and weather Calendar and clock Settings
Use the ►/◄ buttons to select the desired mode, press Enter to enter the desired mode.
“Photo album” mode
Store photos in the JPEG format on a USB device or a card (SD or MMC). When the base
unit is switched off, insert a device in the corresponding jack.
Enter the “Photo album” mode.
Use the ►/◄ buttons to display the next/previous photo
Press SLIDESHOW on the remote control, to switch on the photo viewing mode.
To change zoom of the photo use the ZOOM button, to rotate a photo – use the ROTATE
button.
6
6406_IM.indd 66406_IM.indd 6 12.03.2010 10:19:4112.03.2010 10:19:41
Page 7

ENGLISH
Time of a photo displaying and slides changing effect can be adjusted in the “Settings”
mode.
“Weather” mode
1 – symbolic weather forecast
2 – pressure changing diagram for the last 6 hours
3 – atmospheric pressure histogram (pressure units are set in the “Settings” mode)
4 – atmospheric pressure changing indicator – arrow reflects changing of atmospheric
pressure (growing, constant, falling).
5 – dew-point indoors in °C
6 – heat index indoors in °C
7 – temperature indoors in °C and temperature changing indicator (growing, constant,
falling)
8 – humidity indoors with the changing indicator (growing, constant, falling)
9 - dew-point outdoors in °C
10 – heat index outdoors in °C
11 - humidity outdoors with the changing indicator (growing, constant, falling)
12 – temperature outdoors in °C with the changing indicator (growing, constant, falling)
13 – signal indicator from the remote sensor (symbol is flashing during a signal searching
from the remote sensor and is constantly lighting, when the search is successfully
finished)
14 – alarm indicator (displayed at the alarm on)
15 – Moon phase indicator (new moon - the symbol is not displayed, growing moon, first
quarter, young moon, full moon, decrescent moon, last quarter, old moon)
16 – date (date format: day/month or month/day is set in the “Settings” mode)
17 – remote sensor channel number.
Note:
1. Temperature and humidity data are used for heat index
2. Dew-point – is the temperature at the current pressure, to which air should cool down,
for vapor to achieve saturation and start condensation into dew.
3. If temperature outdoors is below -20 °C, LL will be displayed, if temperature is above
60°C , HH will be displayed.
7
6406_IM.indd 76406_IM.indd 7 12.03.2010 10:19:4112.03.2010 10:19:41
Page 8

ENGLISH
4. If temperature indoors is below 0 °C, LL will be displayed, if temperature is above 50°C ,
HH will be displayed.
“Photo & weather” mode
1 – alarm indicator (displayed when alarm is on)
2 – symbolic weather forecast
3 – temperature indoors in °C and temperature changing indicator (growing, constant, fall-
ing)
4 - humidity indoors with the changing indicator (growing, constant, falling)
5 - temperature outdoors in °C with the changing indicator (growing, constant, falling)
6 - humidity outdoors with the changing indicator (growing, constant, falling)
7 - signal indicator from the remote sensor (symbol is flashing during a signal searching
from the remote sensor and is constantly lighting, when the search is successfully fin-
ished)
8 - picture
“Calendar & Clock” mode
Use the ►/◄ buttons to display the next/previous month, use the ▲/▼ buttons to display
the year.
“Settings” mode
Language: Screen menu language selection (Russian/English)
Slides changing time: 3 sec, 5 sec, 15sec, 1 min, 15 min or 1 hour
Slide changing effect: Selection of slide changing effect
Repeat photo mode: Selection between displaying all photos, random display or manual
mode
Display mode: Display mode selection
Timer 1 – on: 1-st timer actuation time setting, on or off;
Timer 1 – off: 1-st timer off time setting, on or off;
Timer 2 – on: 2-nd timer actuation time setting, on or off;
Timer 2 – off: 2-nd timer off time setting, on or off.
Note:
To save energy with help of the timers you can select time during a day, when the photo
8
6406_IM.indd 86406_IM.indd 8 12.03.2010 10:19:4212.03.2010 10:19:42
Page 9

ENGLISH
frame will switch on and off automatically
Brightness: Display brightness selection from 1 to 16
Contrast: Display contrast selection from 1 to 16
Saturation: Display saturation selection from 1 to 16
Time zone:
Local time setting, using time shift
Time /date: Date and time setting
Date format: Date format selection: day/month or month/day
Time format: Time format selection: 12 or 24 hours
Alarm: Setting alarm actuation time, switching on and off
Receipt from external sensor:
Automatically– default setting
Search – searching signals from remote sensor
Weather forecast: Weather conditions selection:
Pressure units: Pressure unit selection: hPa, mmHg, inHg & mb
External channel displaying:
Automatically – Data displaying from the found channels
Only 1 channel – Data displaying from the 1 channel
Only 2 channel – Data displaying from the 2 channel
Only 3 channel – Data displaying from the 3 channel
Settings reset: yes/no
Weaving version: W232-R 1.05.200
Notes:
• When electric energy is switched off for 1 minute, synchronization of the base unit with
the remote sensor and weather forecast data are stored. In 1 minute the unit switches
off completely. Further you will have to synchronize operation of the base unit and the
remote sensor again, enter the data, which are necessary for weather forecast.
• Each time after batteries changing in the remote sensor you will have to synchronize
operation of the base unit and the remote sensor again.
• USB- jack should not be used as an energy source or charging device for a USB-device,
different from a USB flash drive, otherwise photo frame can be broken.
• If the base unit does not receive signal from the remote sensor for a long time, check the
batteries in the remote sensor, replace them if necessary and repeat synchronization.
Place the remote sensor within the radius of effective data transfer, as close as possible
to the base unit. Locate the base unit and the remote sensor in places with minimal interferences for better data transfer. Take into account that the radius of data transfer of the
remote sensor depends on the material of partitions of the room and their number. Try
several location variants of the remote sensor and the base unit. Place the remote sensor in such a way, that direct sunlight, rain or snow does not get on it. Home devices
(doorbell, alarm system etc) can interfere when the base unit receives data signal from
the remote sensor. It is normal and does not influence general operation. Transfer and
receipt of data signal will resume after interferences are removed.
• When the remote control operation is unstable reduce distance between the remote
control and the base unit. Check the battery in the remote control and replace it if necessary.
9
6406_IM.indd 96406_IM.indd 9 12.03.2010 10:19:4212.03.2010 10:19:42
Page 10

ENGLISH
SPECIFICATIONS
Temperature measuring:
Base unit from 0 to +50°С
Remote sensor from -20 to +60,0°С
Temperature measuring precision 0,1°С
Relative humidity measuring:
Base unit from 20% to 90%
Remote sensor from 20% to 90%
Relative humidity measuring precision 1%
Number of sensors maximum 3
Operation radius Max. 30m
Power supply:
Base unit Net adapter 5,0V DC
Remote sensor 2 batteries of ААА type
Remote control 1 battery CR 2025
Delivery set
Base unit (photo frame) – 1 pc.
Remote sensor – 1 pc.
Net adapter – 1 pc.
Remote control – 1 pc.
Attention!
- Due to restriction in the printing process, the display in this instruction can differ
from the actual display.
- The manufacturer reserves the right to change the specifications of the unit
without preliminary notice.
The manufacturer reserves the right to make changes to the characteristics of the device
without prior notice.
Service life of appliance - 3 years
Guarantee
Details regarding guarantee conditions can be obtained from the dealer from whom the
appliance was purchased. The bill of sale or receipt must be produced when making any
claim under the terms of this guarantee.
This product conforms to the EMC-Requirements as laid down by the Council Directive 89/336/EEC and to the Low Voltage Regulation (23/73 EEC)
10
6406_IM.indd 106406_IM.indd 10 12.03.2010 10:19:4212.03.2010 10:19:42
Page 11
РУССКИЙ
МЕТЕОСТАНЦИЯ
Руководство по эксплуатации
ОПИСАНИЕ
Базовый блок (фоторамка) (Рис.1)
дисплей
1 –
2 – инфракрасный приемник сигналов пульта дистанционного управления
3 – кнопка включения/выключения базового блока (
4, 5 –кнопки перемещения в режиме настроек /
6, 7 – кнопки выбора фотографий и перемещения в меню/ режиме настроек /
8 – кнопка входа в режим дисплея, подтверждения установленных параметров в режиме настроек Enter
9 – кнопка выхода из текущего режима Exit
10 – разъем для карты памяти SD/MMC
11 – USB-разъем
12 – гнездо для подключения адаптера питания
Примечание: Когда дисплей выключен, нажмите любую кнопку, за исключением
кнопки POWER, для включения режима отображения погоды в течение около 1 минуты.
Пульт дистанционного управления (Рис. 2)
1 -
кнопка включения/выключения устройства базового блока ( )
2 - кнопка входа в режим просмотра фотографий PHOTOS
3 - кнопка входа в режим отображения погоды WEATHER
4 - кнопка входа в режим отображения даты и времени CALENDAR
5 - кнопка входа в режим отображения погоды и просмотра фотографий WEATHER
+ PHOTOS
6, 11 - кнопки перемещения в меню настроек /
7 - кнопка входа в основное меню MENU
8, 14 - кнопки выбора фотографий и перемещения в меню/ режиме настроек /
9 - кнопка входа в режим дисплея, подтверждения установленных параметров в ре-
жиме настроек ENTER
10 - кнопка выхода из текущего режима EXIT
12 - кнопка поворота фотографий ROTATE
13 - кнопка изменения масштаба фотографий ZOOM
15 - кнопка включения/выключения режима просмотра слайдов SLIDESHOW
16 - кнопка входа в режим настроек SETUP
)
Примечание: Когда дисплей выключен, нажмите любую кнопку перемещения /
/, или кнопку ENTER, для включения режима отображения погоды в течение
около 1 минуты.
Дистанционный датчик (Рис. 3)
1 – дисплей
2 – крышка батарейного отсека
11
6406_IM.indd 116406_IM.indd 11 12.03.2010 10:19:4212.03.2010 10:19:42
Page 12

РУССКИЙ
3 – кнопка экспресс-передачи сигнала
4 – переключатель выбора канала перидачи данных
МЕРЫ ПРЕДОСТОРОЖНОСТИ
1. Прежде чем начать работу с приборами, внимательно прочитайте руководство по
эксплуатации.
2. Не погружайте прибор в воду.
3. Не чистите прибор абразивными веществами и веществами, вызывающими пов-
реждение корпуса и внутренних частей.
4. Не подвергайте прибор сильным физическим воздействиям, ударам (пыль и вла-
га также противопоказаны), так как это может привести к появлению неисправностей и, соответственно, к сокращению срока службы, повреждению батареек и
к деформированию деталей корпуса.
5. Не разбирайте прибор, это приведет к снятию с гарантии. Внутри него нет дета-
лей, требующих внимания пользователя.
6. Используйте только новые батарейки и именно такие, как указано в руководстве
по эксплуатации.
7. Используйте только сетевой адаптер, входящий в комплект поставки.
Подключение сетевого адаптера к базовому блоку/установка батареек в
пульт дистанционного управления и дистанционный датчик:
Подключение сетевого адаптера к базовому блоку
1. Убедитесь, что рабочее напряжение сетевого адаптера соответствует напряже-
нию сети.
2. Используя гнездо для подключения внешнего источника питания, подсоедините
к базовому блоку сетевой адаптер, входящий в комплект поставки (5.0V DC).
Установка батареек в дистанционный датчик
1. Открутите винты на крышке батарейного отсека.
2. Установите 2 батарейки типа AAA, соблюдая при этом полярность.
3. Закройте крышку батарейного отсека и закрутите винты.
Установка батареек в пульт дистанционного управления
Пульт дистанционного управления поставляется с установленным элементом питания CR 2025. Для активизации пульта дистанционного управления вытяните изоляционную вставку.
Для замены элемента питания следуйте указаниям на задней панели пульта дистанционного управления. При замене элемента питания соблюдайте полярность.
Примечание: При длительной работе дистанционного датчика в условиях низких
или высоких температур напряжение его батареек может снизиться, сокращая тем
самым радиус действия его передатчика.
Синхронизация работы базового блока и дистанционного датчика
Как только адаптер питания будет подключен к базовому блоку, он начнет
поиск сигнала от дистанционного датчика в течение 4 минут. До этого нужно
12
6406_IM.indd 126406_IM.indd 12 12.03.2010 10:19:4212.03.2010 10:19:42
Page 13

РУССКИЙ
открыть крышку батарейного отсека дистанционного датчика, выбрать номер
канал передачи данных, установить батарейки. После установки батареек в
дистанционный датчик он начнет передачу данных, которые будут отображаться на
дисплее базового блока.
Во время поиска сигнала базовым блоком нажмите кнопку TX внутри батарейного
отсека дистанционного датчика для более быстрой передачи сигнала.
После получения данных с дистанционного датчика, они отобразятся на дисплее
базового блока.
Для поиска каналов от дистанционного датчика вы также можете выполнить
следующую процедуру.
Перейдите в основное меню, нажав кнопку 9 Exit базового блока или кнопку 7
MENU на пульте ДУ. С помощью кнопок /выберите режим Настройки. Для
подтверждения выбранного режима нажмите кнопку ENTER. При помощи кнопки
выберите пункт Прием от внешнего датчика. Кнопками / выберите Поиск,
нажмите кнопку Enter для подтверждения установленных параметров. Базовый
блок переключится в режим отображения погодных условий и начнет поиск сигнала
от дистанционного датчика, при этом в верхнем правом углу дисплея будет мигать
символ
Примечание: Все настройки базового блока можно производить с пульта ДУ. Для
входа в режим Настройки нажмите кнопку SETUP.
Настройка дисплея отображения погодных условий
Для получения более точного прогноза погоды вам нужно ввести ваши текущие
погодные условия при начальном запуске устройства.
Перейдите в основное меню, нажав кнопку 9 Exit базового блока или кнопку 7
MENU на пульте ДУ. С помощью кнопок /выберите режим Настройки. При
помощи кнопок / выберите пункт Прогноз погоды. Кнопками /выберите
один из следующих пунктов Ясно, Переменно, Облачно, Дождь или Гроза в
качестве исходных погодных условий. Нажмите кнопку Enter для подтверждения
установленных параметров кнопку Exit для выхода из режима Настройки.
.
Прогноз погоды строится по динамике изменения атмосферного давления. Исходя
из собранных данных, метеостанция может прогнозировать погоду на предстоящие
12-24 часов в радиусе 30-50 км. Точность показаний составляет около 70%.
Ясно Переменно Облачно Дождь Гроза
13
6406_IM.indd 136406_IM.indd 13 12.03.2010 10:19:4212.03.2010 10:19:42
Page 14
РУССКИЙ
Режимы работы базового блока
Базовый блок имеет пять режимов
Фотоальбом Погода Фото & погода Календарь & часы Настройки
Для выбора желаемого режима используйте кнопки /, для входа в выбранный
режим нажмите кнопку Enter.
Режим отображения фотографий “Фотоальбом”
Сохраните фотографии в формате JPEG на USB –носителе или карте памяти (SD или
MMC). Когда базовый блок выключен, вставьте носитель в соответствующий разъем.
Войдите в режим “Фотоальбом”.
Используйте кнопки / для отображения следующего/предыдущего изображения. Нажмите кнопку SLIDESHOW пульта ДУ, чтобы включить режим просмотра фотографий. Для изменения масштаба изображения используйте кнопку ZOOM, для
поворота – кнопку ROTATE.
Время отображения изображения на дисплее и эффект смены слайдов устанавливаются в режиме “Настройки”.
Режим отображения погодных условий “Погода”
1 - символьный прогноз погоды
2 - диаграмма изменения давления за последние 6 часов
3 - гистограмма атмосферного давления (единицы измерения давления устанав-
ливаются в режиме “Настройки”)
4 - индикатор изменения атмосферного давления в виде стрелки отображает из-
менение атмосферного давления (растет, постоянное, падает).
5 - точка росы внутри помещения в °C
6 - индекс тепла внутри помещения в °C
14
6406_IM.indd 146406_IM.indd 14 12.03.2010 10:19:4212.03.2010 10:19:42
Page 15

РУССКИЙ
7 - температура внутри помещения в °C и индикатор изменения температуры (рас-
тет, постоянная, падает)
8 - влажность внутри помещения с индикатором изменения (растет, постоянная,
падает)
9 - точка росы снаружи помещения в °C
10 - индекс тепла снаружи помещения в °C
11 - влажность снаружи помещения с индикатором изменения (растет, постоянная,
падает)
12 - температура снаружи помещения в °C и индикатор изменения температуры
(растет, постоянная, падает)
13 - индикатор сигнала от дистанционного датчика (символ мигает во время поиска
сигнала от дистанционного датчика и горит постоянно, когда поиск сигнала ус-
пешно завершен)
14 - индикатор будильника (отображается при включенном будильнике)
15 - индикатор фазы Луны (новолуние - символ не отображается, растущая Луна,
первая четверть, молодая Луна, полнолуние,
верть, старая Луна)
16 - дата (формат отображения даты: день/месяц или месяц/день устанавливается
в режиме “Настройки”)
17 - номер канала дистанционного датчика.
Примечания:
1. Данные температуры и влажности используются для индекса тепла (heat index)
2. Точка росы – это температура при данном давлении, до которой должен охладить-
ся воздух, чтобы содержащийся в нём водяной пар достиг состояния насыщения
и начал конденсироваться в росу.
3. Если температура снаружи помещения ниже -20°C, на дисплее будут отображать-
ся символы LL, если температура выше 60°C , на дисплее будут отображаться
символы HH.
4. Если температура внутри помещения ниже 0 °C, на дисплее будут отображаться
символы LL, если температура выше 50°C , на дисплее будут отображаться символы HH.
убывающая Луна, последняя чет-
Режим отображения фотографий погодных условий “Фото & погода»
15
6406_IM.indd 156406_IM.indd 15 12.03.2010 10:19:4212.03.2010 10:19:42
Page 16

РУССКИЙ
1 - индикатор будильника (отображается при включенном будильнике)
2 - символьный прогноз погоды
3 - температура внутри помещения в °C и индикатор изменения температуры (рас-
тет, постоянная, падает)
4 - влажность внутри помещения с индикатором изменения (растет, постоянная, падает)
5 - температура снаружи помещения в °C и индикатор изменения температуры (рас-
тет, постоянная, падает)
6 - влажность снаружи помещения с индикатором изменения (растет, постоянная,
падает)
7 - индикатор сигнала от дистанционного датчика (символ мигает во время поиска
сигнала от дистанционного датчика и горит постоянно, когда поиск сигнала ус-
пешно завершен)
8 - изображение
Режим отображения даты и времени “Календарь & часы”
Используйте кнопки /для отображения следующего/предыдущего месяца, для
отображения года используйте кнопки /.
Режим настроек “Настройки”
Язык:
Выбор языка экранного меню (русский/английский)
Время смены слайдов:
3 сек, 5 сек, 15сек, 1 мин, 15 мин или 1 час
Эффект смены слайдов:
Выбор эффекта смены слайдов
Режим повтора фото:
Выбор между повтором всех фотографий, просмотром фотографий в произвольном
порядке или в ручном режиме
Режим дисплея:
Выбор режима отображения изображений
Таймер 1 – вкл.:
Установка времени включения 1-го таймера, включение или выключение;
Таймер 1 – выкл.:
Установка времени выключения 1-го таймера, включение или выключение
Таймер 2 – вкл.:
Установка времени включения 2-го таймера, включение или выключение
Таймер 2 – выкл.:
Установка времени выключения 2-го таймера, включение или выключение.
Примечание:
В целях экономии электроэнергии при помощи таймеров вы можете выбрать время
в течение дня, когда фоторамка будет включаться и выключаться автоматически
Яркость: Выбор яркости дисплея от 1 до 16
Контраст: Выбор контрастности дисплея от 1 до 16
Насыщение: Выбор насыщенности дисплея от 1 до 16
Часовой пояс: Установка местного времени, используя сдвиг по времени
Время /дата: Настройка даты и времени
16
6406_IM.indd 166406_IM.indd 16 12.03.2010 10:19:4212.03.2010 10:19:42
Page 17

РУССКИЙ
Формат даты: Выбор формата отображения даты: день/месяц или месяц/день
Формат времени: Выбор формата отображения времени: 12 или 24 часа
Будильник: Установка времени срабатывания будильника, включение и выключе-
ние будильника
Прием от внешнего датчика:
Автоматически – установка по умолчанию
Поиск – поиск сигналов от дистанционного датчика
Прогноз погоды: Выбор погодных условий:
Единицы давления: Выбор единиц измерения давления: hPa (кПа), mmHg (мм. рт.
ст.), inHg & mb
Отображение внешнего канала:
Автоматически – Отображение данных с обнаруженных каналов
Только 1 канал – Отображение данных только с 1-го канала
Только 2 канал – Отображение данных только с 2-го канала
Только 3 канал – Отображение данных только с 3-го канала
Сброс настроек: да/нет
Версия прошивки: W232-R 1.05.200
Примечания:
• При отключении электроэнергии в течение 1 минуты сохраняется синхронизация
базового блока с дистанционным датчиком и данные прогноза погоды. По истечении 1 минуты устройство полностью выключается. В дальнейшем вам будет
необходимо заново синхронизировать работу базового блока и дистанционного
датчика, ввести данные, необходимые для прогноза погоды.
• Каждый раз после замены батареек в дистанционном датчике вам необходимо бу-
дет заново синхронизировать работу базового блока и дистанционного датчика.
• USB- разъем не должен использоваться в качестве источника энергии или заряд-
ного устройства для USB-носителя, отличного от USB flash drive, иначе фоторамка
может быть выведена из строя.
• Если базовый блок долгое время не получает сигналов от дистанционного датчи-
ка, проверьте батарейки в дистанционном датчике, при необходимости замените
их и повторите процедуру синхронизации.
пределах радиуса эффективной передачи данных, и как можно ближе к базовому
блоку. Размещайте базовый блок и дистанционный датчик в местах с минимальными помехами для наилучшей передачи данных. Примите во внимание, что радиус передачи данных дистанционного датчика зависит от строительного материала
перегородок помещения и их количества. Попробуйте несколько вариантов размещения дистанционного датчика и базового блока. Дистанционный датчик необходимо установить так, чтобы на него не попадали прямые солнечные лучи, дождь
или снег. Домашние устройства (дверной звонок, сигнализация и т.д.) могут создавать помехи при приеме базовым блоком сигнала данных от дистанционного
датчика. Это представляет собой нормальное явление и не влияет на общую работу. Передача и прием сигнала данных возобновится сразу после исчезновения
временных помех.
• При нестабильной работе пульта дистанционного управления сократите расстоя-
ние между ним и базовым блоком. Проверьте элемент питания в пульте дистанционного управления и при необходимости замените его.
Установите дистанционный датчик в
17
6406_IM.indd 176406_IM.indd 17 12.03.2010 10:19:4212.03.2010 10:19:42
Page 18

РУССКИЙ
ТЕХНИЧЕСКИЕ ХАРАКТЕРИСТИКИ
Измерение температуры:
Базовый блок от 0 до +50°С
Дистанционный датчик от -20 до +60,0°С
Точность измерения температуры 0,1°С
Измерение относительной влажности:
Базовый блок от 20% до 90%
Дистанционный датчик от 20% до 90%
Точность измерения относительной
влажности
Количество подключаемых датчиков максимум 3
Радиус действия макс. 30 м
Питание:
Базовый блок Сетевой адаптер 5,0V DC
Дистанционный датчик 2 батарейки типа «ААА»
Пульт дистанционного управления 1 элемент питания CR 2025
Комплект поставки
Базовый блок (фоторамка) – 1 шт.
Дистанционный датчик – 1 шт.
Сетевой адаптер – 1 шт.
Пульт дистанционного управления – 1 шт.
ВНИМАНИЕ!
- Из-за ограничений в процессе печати дисплей, показанный в этой инструкции,
может отличаться от фактического дисплея.
- Производитель оставляет за собой право изменять характеристики приборов без
предварительного уведомления.
1%
Производитель оставляет за собой право изменять характеристики прибора без
предварительного уведомления.
Срок службы прибора - 3 года
Данное изделие соответствует всем требуемым европейским и российским стандартам безопасности и гигиены.
АНДЕР ПРОДАКТС ГмбХ, Австрия
Нойбаугюртель, 38/7А 1070, Вена, Австрия
18
6406_IM.indd 186406_IM.indd 18 12.03.2010 10:19:4212.03.2010 10:19:42
Page 19

УКРАЇНЬСКИЙ
МЕТЕОСТАНЦІЯ
Інструкція з експлуатації
ОПИС
Базовий блок (фоторамка) (Рис.1)
дисплей
1 2 - інфрачервоний приймач сигналів пульта дистанційного керування
3 - кнопка увімкнення/вимкнення базового блока (
4, 5 - кнопки пересування в режимі налаштувань /
6, 7 - кнопки вибору фотографій та пересування в меню/ режимі налаштувань/
8 - кнопка входу в режим дисплею, підтвердження встановлених параметрів в режимі
налаштувань Enter
9 - кнопка виходу з поточного режиму Exit
10 - роз’єм для карти пам’яті SD/MMC
11 - USB-роз’єм
12 - гніздо для підключення адаптера живлення
Примітка: Коли дисплей вимкнений, натисніть будь-яку кнопку, за виключенням
кнопки POWER, для увімкнення режиму відображення погоди на протязі близько 1
хвилини.
Пульт дистанційного керування (Рис. 2)
1 -
кнопка увімкнення/вимкнення пристрою базового блока ( )
2 - кнопка входу в режим перегляду фотографій PHOTOS
3 - кнопка входу в режим відображення погоди WEATHER
4 - кнопка входу в режим відображення дати та часу CALENDAR
5 - кнопка входу в режим відображення погоди та перегляду фотографій WEATHER
+ PHOTOS
6, 11 - кнопки пересування в меню налаштувань /
7 - кнопка входу в основне меню MENU
8, 14 - кнопки вибору фотографій та пересування в меню/ режимі налаштувань /
9 - кнопка входу в режим дисплею, підтвердження встановлених параметрів в режимі
налаштувань ENTER
10 - кнопка виходу з поточного режиму EXIT
12 - кнопка повороту фотографій ROTATE
13 - кнопка зміни масштабу фотографій ZOOM
15 - кнопка увімкнення/вимкнення режиму перегляду слайдів SLIDESHOW
16 - кнопка входу в режим налаштувань SETUP
)
Примітка: Коли дисплей вимкнений, натисніть будь-яку кнопку пересування /
/, або кнопку ENTER, для увімкнення режиму відображення погоди на протязі
близько 1 хвилини.
Дистанційний датчик (Рис. 3)
1 – дисплей
2 – кришка батарейного відсіку
19
6406_IM.indd 196406_IM.indd 19 12.03.2010 10:19:4212.03.2010 10:19:42
Page 20

УКРАЇНЬСКИЙ
3 – кнопка експрес-передачі сигналу
4 – перемикач вибору каналу передачі даних
ЗАСТЕРЕЖЛИВІ ЗАХОДИ
1. Перш ніж почати роботу з приладами, уважно прочитайте інструкцію з
експлуатації.
2. Не занурюйте прилад у воду.
3. Не чистіть прилад абразивними речовинами та речовинами, що викликають
пошкодження корпусу та внутрішніх деталей.
4. Не піддавайте прилад сильним фізичним впливам, ударам (пил та волога
також протипоказані), оскільки це може призвести до появи несправностей
та, відповідно, до скорочення терміну служби, пошкодження батарейок та до
деформування деталей корпусу.
5. Не розбирайте прилад, це призведе до зняття з гарантії. Всередині нього нема
деталей, які потребують уваги користувача.
6. Використовуйте лише нові батарейки та саме ті, що вказані в інструкції з
експлуатації.
7. Використовуйте лише мережний адаптер, що входить до комплекту поставки.
Підключення мережного адаптера до базового блоку/встановлення батарейок
в пульт дистанційного керування та дистанційний датчик:
Підключення мережного адаптера до базового блоку
1. Переконайтесь, що робоча напруга мережного адаптера відповідає напрузі
мережі.
2. Використовуючи гніздо для підключення зовнішнього джерела живлення,
приєднайте до базового блоку мережний адаптер, що входить до комплекту
поставки (5.0V DC).
Встановлення батарейок в дистанційний датчик
1. Відкрутіть гвинти на кришці батарейного відсіку.
2. Встановіть 2 батарейки типу AAA, дотримуючись при цьому полярності.
3. Закрийте кришку батарейного відсіку та затягніть гвинти.
Встановлення батарейок в пульт дистанційного керування
Пульт дистанційного керування постачається зі встановленим елементом живлення
CR 2025. Для активізації пульта дистанційного керування витягніть ізоляційну
вставку.
Для заміни елементу живлення виконуйте вказівки на задній панелі пульта
дистанційного керування. Під час заміни елементу живлення дотримуйтесь
полярності.
Примітка: В разі тривалої роботи дистанційного датчика в умовах низьких чи високих
температур напруга його батарейок може знизитися, скорочуючи тим самим радіус
дії його передатчика.
20
6406_IM.indd 206406_IM.indd 20 12.03.2010 10:19:4212.03.2010 10:19:42
Page 21

УКРАЇНЬСКИЙ
Синхронізація роботи базового блоку та дистанційного датчика
Щойно адаптер живлення буде підключено до базового блоку, він почне пошук
сигналу від дистанційного датчика впродовж 4 хвилин. До цього слід відкрити
кришку батарейного відсіку дистанційного датчика, вибрати номер каналу передачі
даних, встановити батарейки. Після встановлення батарейок в дистанційний датчик
він почне передачу даних, які відображатимуться на дисплеї базового блоку.
Під час пошуку сигналу базовим блоком натисніть кнопку TX всередині батарейного
відсіку дистанційного датчика для більш швидкої передачі сигналу.
Після отримання даних з дистанційного датчика, вони відобразяться на дисплеї
базового блоку.
Для пошуку каналів від дистанційного датчика ви також можете виконати наступну
процедуру.
Перейдіть в основне меню, натиснувши кнопку 9 Exit базового блоку або кнопку
7 MENU на пульті ДК. За допомоги кнопок / виберіть режим Налаштування.
Для підтвердження обраного режиму натисніть кнопку ENTER. За допомоги кнопки
виберіть пункт Прийом від зовнішнього датчика. Кнопками / виберіть
Пошук, натисніть кнопку Enter для підтвердження встановлених параметрів. Базовий
блок перемикнеться в режим відображення погодних умов та почне пошук сигналу
від дистанційного датчика, при цьому у верхньому правому куті дисплею миготітиме
символ
Примітка: Всі налаштування базового блоку можна здійснювати з пульта ДК. Для
входу в режим Налаштування натисніть кнопку SETUP.
Налаштування дисплею відображення погодних умов
Для отримання більш точного прогнозу погоди вам потрібно ввести ваші поточні
погодні умови під час початкового запуску пристрою.
Перейдіть в основне меню, натиснувши кнопку 9 Exit базового блоку або кнопку 7
MENU на пульті ДК. За допомоги кнопок / виберіть режим Налаштування. За
допомоги кнопок / виберіть пункт Прогноз погоди. Кнопками / виберіть
один з наступних пунктів Ясно, Мінливо, Хмарно, Дощ або Гроза в якості вихідних
погодних умов. Натисніть кнопку Enter для підтвердження встановлених параметрів,
кнопку Exit для виходу з режиму Налаштування.
.
Прогноз погоди будується за динамікою зміни атмосферного тиску. Виходячи із
зібраних даних, метеостанція може прогнозувати погоду на наступні 12-24 годин в
радіусі 30-50 км. Точність показань складає близько 70%.
Ясно Мінливо Хмарно Дощ Гроза
21
6406_IM.indd 216406_IM.indd 21 12.03.2010 10:19:4212.03.2010 10:19:42
Page 22

УКРАЇНЬСКИЙ
Режими роботи базового блоку
Базовий блок має п’ять режимів
Фотоальбом Погода Фото&погода Календар&годинник Налаштування
Для вибору бажаного режиму використовуйте кнопки /, для входу в обраний
режим натисніть кнопку Enter.
Режим відображення фотографій “Фотоальбом”
Збережіть фотографії в форматі JPEG на USB–носії або карті пам’яті (SD або MMC).
Коли базовий блок вимкнений, вставте носій у відповідний роз’єм.
Увійдіть в режим “Фотоальбом”.
Використовуйте кнопки / для відображення наступного/попереднього
зображення
Натисніть кнопку SLIDESHOW пульта ДК, для того щоб увімкнути режим перегляду
фотографій.
Для зміни масштабу зображення використовуйте кнопку ZOOM, для повороту –
кнопку ROTATE.
Час відображення зображення на дисплеї та ефект зміни слайдів встановлюються в
режимі “Налаштування”
Режим відображення погодних умов “Погода”
1 - символьний прогноз погоди
2 - діаграма зміни тиску за останні 6 годин
3 - гістограма атмосферного тиску (одиниці вимірювання тиску встановлюються в
режимі “Налаштування”)
4 - індикатор зміни атмосферного тиску у вигляді стрілки відображає зміну
атмосферного тиску (зростає, стале, падає).
5 - точка роси всередині приміщення в °C
6 - індекс тепла всередині приміщення в °C
22
6406_IM.indd 226406_IM.indd 22 12.03.2010 10:19:4312.03.2010 10:19:43
Page 23

УКРАЇНЬСКИЙ
7 - температура всередині приміщення в °C та індикатор зміни температури
(зростає, стала, падає)
8 - вологість всередині приміщення з індикатором зміни (зростає, стала, падає)
9 - точка роси ззовні приміщення в °C
10 - індекс тепла ззовні приміщення в °C
11 - вологість ззовні приміщення з індикатором зміни (зростає, стала, падає)
12 - температура ззовні приміщення в °C та індикатор зміни температури (зростає,
стала, падає)
13 - індикатор сигналу від дистанційного датчика (символ миготить під час пошуку
сигналу від дистанційного датчика та постійно горить, коли пошук сигналу
завершено вдало)
14 - індикатор будильника (відображається при увімкненому будильнику)
15 - індикатор фази Місяця (новий місяць - символ не відображається, Місяць що
зростає, перша чверть, молодий Місяць, повний місяць,
остання чверть, старий Місяць)
16 - дата (формат відображення дати: день/місяць або місяць/день встановлюється
в режимі “Налаштування”)
17 - номер каналу дистанційного датчика.
Примітки:
1. Дані температури та вологості використовуються для індексу тепла (heat index)
2. Точка роси – це температура при цьому тиску, до якої повинно охолонути повітря,
щоб водяна пара, яка в ньому міститься, досягла стану насичення та почала
конденсуватися в росу.
3. Якщо температура ззовні приміщення нижче -20 °C, на дисплеї відображатимуться
символи LL, якщо температура вище 60°C, на дисплеї відображатимуться символи
HH.
4. Якщо температура ззовні приміщення нижче 0 °C, на дисплеї відображатимуться
символи LL, якщо температура вище 50°C, на дисплеї відображатимуться символи
HH.
Місяць що убуває,
Режим відображення фотографій погодних умов “Фото & погода”
1 - індикатор будильника (відображається при увімкненому будильнику)
2 - символьний прогноз погоди
23
6406_IM.indd 236406_IM.indd 23 12.03.2010 10:19:4312.03.2010 10:19:43
Page 24

УКРАЇНЬСКИЙ
3 - температура всередині приміщення в °C та індикатор зміни температури (зростає,
стала, падає)
4 - вологість всередині приміщення з індикатором зміни (зростає, стала, падає)
5 - температура ззовні приміщення в °C та індикатор зміни температури (зростає,
стала, падає)
6 - вологість ззовні приміщення з індикатором зміни (зростає, стала, падає)
7 - індикатор сигналу від дистанційного датчика (символ миготить під час пошуку
сигналу від дистанційного датчика та постійно горить, коли пошук сигналу
завершено вдало)
8 - зображення
Режим відображення дати та часу “Календар & годинник”
Використовуйте кнопки / для відображення наступного/попереднього місяця,
для відображення року використовуйте кнопки /.
Режим налаштувань “Налаштування”
Мова: Вибір мови екранного меню (російська/англійська)
Час зміни слайдів: 3 сек, 5 сек, 15 сек, 1 хв, 15 хв або 1 год
Ефект зміни слайдів: Вибір ефекту зміни слайдів
Режим повторення фото: Вибір між повторенням всіх фотографій, переглядом
фотографій в довільному порядку або в ручному режимі
Режим дисплея: Вибір режиму відображення зображень
Таймер 1 – увімкн.: Встановлення часу увімкнення 1-го таймеру, увімкнення або
вимкнення;
Таймер 1 – вимкн.: Встановлення часу вимкнення 1-го таймеру, увімкнення або
вимкнення;
Таймер 2 – увімкн.: Встановлення часу увімкнення 2-го таймеру, увімкнення або
вимкнення;
Таймер 2 – вимкн.: Встановлення часу вимкнення 2-го таймеру, увімкнення або
вимкнення;
Примітка:
З метою економії електроенергії за допомоги таймерів ви можете вибрати час
протягом дня, коли фоторамка вмикатиметься та вимикатиметься автоматично
Яскравість: Вибір яскравості дисплею від 1 до 16
Контраст: Вибір контрастності дисплею від 1 до 16
Насиченість: Вибір насиченості дисплею від 1 до 16
Часовий пояс: Встановлення місцевого часу, використовуючи зміщення у часі
Час/дата: Налаштування дати та часу
Формат дати: Вибір формату відображення дати: день/місяць або місяць/день
Формат часу: Вибір формату відображення часу: 12 або 24 години
Будильник: Встановлення часу спрацьовування будильника, увімкнення та
вимикання будильника
Прийом від зовнішнього датчика:
Автоматично – встановлення за умовчанням
Пошук – пошук сигналів від дистанційного датчика
24
6406_IM.indd 246406_IM.indd 24 12.03.2010 10:19:4312.03.2010 10:19:43
Page 25

УКРАЇНЬСКИЙ
Прогноз погоди: Вибір погодних умов:
Одиниці тиску: Вибір одиниць вимірювання тиску: hPa (кПа), mmHg (мм. рт. ст.),
inHg & mb
Відображення зовнішнього каналу:
Автоматично – Відображення даних зі знайдених каналів
Тільки 1 канал – Відображення даних тільки з 1-го каналу
Тільки 2 канал – Відображення даних тільки з 2-го каналу
Тільки 3 канал – Відображення даних тільки з 3-го каналу
Скидання налаштувань: так/ні
Версія прошивки: W232-R 1.05.200
Примітки:
• При відключенні електроенергії на протязі 1 хвилини зберігається синхронізація
базового блоку з дистанційним датчиком та дані прогнозу погоди. Після завершення
1 хвилини пристрій повністю вимикається. В подальшому вам потрібно буде
заново синхронізувати роботу базового блоку та дистанційного датчика, ввести
дані, необхідні для прогнозу погоди.
• Кожен раз після заміни батарейок в дистанційному датчику вам потрібно буде
заново синхронізувати роботу базового блоку та дистанційного датчика.
• USB-роз'єм не повинен використовуватися в якості джерела енергії або зарядного
пристрою для USB-носія, що відрізняється від USB flash drive, інакше фоторамка
може вийти з ладу.
• Якщо базовий блок тривалий час не отримує сигналів від дистанційного датчика,
перевірте батарейки в дистанційному датчику, якщо необхідно замініть їх та
повторіть процедуру синхронізації.
ефективної передачі даних, та якомога ближче до базового блоку. Розташовуйте
базовий блок та дистанційний датчик в місцях з мінімальними завадами для
найкращої передачі даних. Приміть до уваги, що радіус передачі даних дистанційного
датчика залежить від будівельного матеріалу перегородок приміщення та їх
кількості. Спробуйте декілька варіантів розташування дистанційного датчика та
базового блоку. Дистанційний датчик необхідно встановити так, щоб на нього
не потрапляли прямі сонячні промені, дощ чи сніг. Домашні пристрої (дверний
дзвінок, сигналізація та ін.) можуть створювати завади при прийомі базовим
блоком сигналу даних від дистанційного датчика. Це становить нормальне явище
та не впливає на загальну роботу. Передача та прийом сигналу даних відновиться
відразу після зникнення тимчасових завад.
• В разі нестабільної роботи пульта дистанційного керування скоротіть відстань
між ним та базовим блоком. Перевірте елемент живлення в пульті дистанційного
керування та якщо необхідно замініть його.
Встановіть дистанційний датчик в межах радіусу
ТЕХНІЧНІ ХАРАКТЕРИСТИКИ
Вимірювання температури:
Базовий блок від 0 до +50°С
Дистанційний датчик від -20 до +60,0°С
Точність вимірювання температури 0,1°С
25
6406_IM.indd 256406_IM.indd 25 12.03.2010 10:19:4312.03.2010 10:19:43
Page 26

УКРАЇНЬСКИЙ
Вимірювання відносної вологості:
Базовий блок від 20% до 90%
Дистанційний датчик від 20% до 90%
Точність вимірювання відносної вологості 1%
Кількість датчиків, що підключаються максимум 3
Радіус дії макс. 30 м
Живлення:
Базовий блок Мережний адаптер 5,0V DC
Дистанційний датчик 2 батарейки типу «ААА»
Пульт дистанційного керування 1 елемент живлення CR 2025
Комплект поставки
Базовий блок (фоторамка) – 1 шт.
Дистанційний датчик – 1 шт.
Мережний адаптер – 1 шт.
Пульт дистанційного керування – 1 шт.
УВАГА!
- Через обмеження в процесі друку дисплей, вказаний в цій інструкції, може
відрізнятися від фактичного дисплею.
- Виробник залишає за собою право змінювати характеристики приладів без
попереднього повідомлення.
Виробник залишає за собою право змінювати характеристики приладу без
попереднього повідомлення.
Термін служби приладу – 3 роки.
Гарантія
Докладні умови гарантії можна отримати в дилера, що продав дану апаратуру. При
пред’явленні будь-якої претензії протягом терміну дії даної гарантії варто пред’явити
чек або квитанцію про покупку.
Даний виріб відповідає вимогам до електромагнітної сумісності, що
пред’являються директивою 89/336/ЄЕС Ради Європи й розпорядженням
23/73 ЄЕС по низьковольтних апаратурах.
26
6406_IM.indd 266406_IM.indd 26 12.03.2010 10:19:4312.03.2010 10:19:43
Page 27

ҚАЗАҚ
МЕТЕОСТАНЦИЯ
Пайдалану бойынша басшылық
СИПАТТАМАСЫ
Базалық блок (фоторамка) (Сур.1)
1 – Дисплей
2 – қашықтан басқару пультының инфрақызыл қабылдағышы
3 – базалық блокты іске қосу/ажырату батырмасы (
4, 5 – баптау режиміндегі ауысу батырмалары ▲/▼
6, 7 – суреттерді таңдау жəне менюде/баптау режимде ауысу батырмалары ►/◄
8 – дисплей режиміне кіру, баптау режиміндегі орнатылған өлшемдерді растау батырмасы Enter
9 – ағымдағы режимнен шығу батырмасы Exit
10 – жад карталарына арналған ағытпа SD/MMC
11 - USB-ағытпа
12 – қоректендіру бейімдеуішін қосуға арналған ұя
Ескерту: Дисплей сөнулі кезде, 1 минутқа таяу уақыт бойы ауа райын көрсету режимін қосу үшін, POWER батырмасынан басқа, кез-келген батырманы басыңыз.
Қашықтан басқару пульты (Сур. 2)
1 –базалық блок құрылғысын іске қосу/ажырату батырмасы
2 – суреттерді көру режиміне кіру батырмасы PHOTOS
3 – ауа райын көрсету режиміне кіру батырмасы WEATHER
4 – күн мен уақытты көрсету режиміне кіру батырмасы CALENDAR
5 – ауа райын көрсету жəне суреттерді көру режиміне кіру батырмасы WEATHER +
PHOTOS
6, 11 – баптайтын менюде ауысу батырмалары ▲/▼
7 – негізгі менюге кіру батырмасы MENU
8, 14 – суреттерді таңдау жəне менюде/ баптау режимінде ауысу батырмалары ►/◄
9 – дисплей режиміне кіру, баптау режиміндегі орнатылған өлшемдерді растау батырмасы ENTER
10 – ағымдағы режимнен шығу батырмасы EXIT
12 – суреттерді айналдыру батырмасы ROTATE
13 – суреттердің масштабын өзгерту батырмасы ZOOM
15 – слайдтарды көру режимін іске қосу/ажырату батырмасы SLIDESHOW
16 – баптау режиміне кіру батырмасы SETUP
)
( )
Ескерту: Дисплей сөнулі кезде, 1 минутқа таяу уақыт бойы ауа райын көрсету режимін қосу үшін, ауысудың кез-келген батырмасын ▲/▼ ►/◄, немесе ENTER батырмасын басыңыз.
Қашықтағы бергіш (Сур. 3)
1 – дисплей
2 – батареялық бөлімнің қақпағы
3 – белгіні жедел –тасымалдау түймешесі
4 – ақпарат тасымалдау арнасы
27
6406_IM.indd 276406_IM.indd 27 12.03.2010 10:19:4312.03.2010 10:19:43
Page 28

ҚАЗАҚ
САҚТАНДЫРУ ШАРАЛАРЫ
1. Аспаппен жұмыс істеу алдында, пайдалану бойынша нұсқаулықты зейін қойып
оқып шығыңыз.
2. Аспапты суға салмаңыз.
3. Аспапты қажайтын заттармен жəне құрылғы қорабы мен ішкі бөліктерін бүлінуге
əкелетін заттармен тазаламаңыз.
4. Аспапты қатты физикалық əсерге, соққыларға ұшыратпаңыз (шаң мен ылғалдылық
та қарсы көрсетілген), себебі бұл бұзылулардың пайда болуына, яғни, құрылғының
қызмет ету мерзімінің қысқаруына, батарейкалардың бүлінуіне жəне қорап
бөлшектерінің деформациясына əкелуі мүмкін.
5. Аспапты бөлшектемеңіз, бұл кепілдіктің жойылуына əкеледі. Құрылғының ішінде
тұтынушының назарын қажет ететін бөлшектер жоқ.
6. Пайдалануға арналған нұсқаулықта көрсетілген жəне тек жаңа батарейкаларды
қолданыңыз.
7. Жеткізілім жинағына кіретін желілік бейімдеуішті ғана пайдаланыңыз
Базалық блокқа желілік бейімдеуішті қосу/қашықтан басқару пультына жəне
қашықтағы бергішке батарейкаларды орнату:
Базалық блокқа желілік бейімдеуішті қосу
1. Желілік бейімдеуіштің жұмыс істеу кернеуі желідегі кернеуге сəйкес келетініне көз
жеткізіңіз.
2. Сыртқы қоректендіру көзін қосуға арналған ұяны пайдаланып, жеткізілім жинағына
кіретін желілік бейімдеуішті базалық блокқа қосыңыз (5.0V DC).
Батарейкаларды қашықтағы бергішке орнату
1. Батареялық бөлік қақпағындағы бұрандаларды бұрап алыңыз.
2. Үйектілікті сақтай отырып, ААА типті 2 батарейканы орнатыңыз.
3. Батареялық бөлік қақпағын жабыңыз жəне бұрандаларды бұрап қойыңыз.
Қашықтан басқару пультына батарейкаларды орнату
Қашықтан басқару пульты CR 2025 орнатылған қоректендіру элементімен жеткізіледі.
Қашықтан басқару пультын активизациялау үшін оқшаулағыш ендірмені шығарыңыз.
Қоректендіру элементін айырбастау үшін қашықтан басқару пультының артқы панеліндегі нұсқауларды орындаңыз. Қоректендіру элементін ауыстырған кезде үйектілікті
сақтаңыз.
Ескерту: Қашықтағы бергіштің төмен немесе жоғары температуралар жағдайында
ұзақ уақыт бойы жұмыс істеу кезінде оның батарейкаларының кернеуі азайып, соның
салдарынан оның таратқышының əсер радиусы шектеледі.
Негізгі блоктың жəне алыстан белгі бергіштің жұмысын реттеу
Қуаттану адаптеры негізгі блокқа қосылғаннан кейін, ол 4 минут ішінде алыстан
белгі бергіштің белгісін іздей бастайды. Оған дейін, алыстан белгі бергіштің батарея
бөлімшесінің қақпағын ашып, ақпарат тасымалдау арнасының номерін таңдау керек.
Алыстан белгі бергішке батареяларды орнатқаннан кейін, ол ақпарат тасымалдауын
бастайды, олар негізгі блоктың дисплейінде көрінеді.
28
6406_IM.indd 286406_IM.indd 28 12.03.2010 10:19:4312.03.2010 10:19:43
Page 29

ҚАЗАҚ
Негізгі база белгіні іздегенде, алыстан белгі бергіштің батарея бөлімшесінің ішінде,
белгіні жылдамырақ беру мақсатында TX түймешесін басыңыз.
Алыстан белгі бергіштен белгі алынғаннан кейін, олар негізгі блоктың дисплейінен
көрінеді.
Алыстан белгі бергіштің арналарын іздеу үшін сіз келесі үрдісті орындасаңыз болады.
Негізгі мəзірге өтіңіз, ол үшін негізгі блоктағы 9 Exit түймешесін немесе АБ пультындағы
7 MENU түймешесін басыңыз. ►/◄ түймешелері арқылы Баптама тəртібін таңдаңыз.
Таңдалған тəртіпті растау үшін ENTER түймешесін басыңыз. ▼ түймешесі арқылы
Сыртқы белгі бергіштен қабылдау тармағын таңдаңыз. ►/◄ түймешелері арқылы
Іздеуді таңдаңыз, белгіленген параметрлерді растау үшін Enter түймешесін басыңыз.
Негізгі блок ауа райы жағдайын көрсету тəртібіне ауысады жəне алыстан белгі бергіштің
белгісін іздей бастайды, сол кезде дисплейдің жоғарғы оң бұрышында
жанып тұрады.
Ескерту: Негізгі блоктың барлық бапталамарын АБ пультынан орындауға болады.
Баптама тəртібіне кіру үшін SETUP түймешесін басыңыз.
Ауа райы жағдайларын дисплейден көрсету баптамасы
Ауа райының нақтырақ болжамын алу үшін, сіздің ағымдағы ауа райы жағдайларын
құрылғыны алғашқы қосу кезінде енгізу керек.
Негізгі блоктың 9 Exit түймешесін немесе АБ пультының 7 MENU түймешесін басып,
негізгі мəзірге өтіңіз. ►/◄ түймешелері арқылы Баптама тəртібін таңдаңыз. ▲/▼
түймешелері арқылы Ауа райы болжамы тармағын таңдаңыз. ►/◄ түймешелері
арқылы Ашық,Құбылмалы, Жауын немесе Нөсер тармақтарын бастапқы ауа
райы жағдайлары ретінде енгізіңіз. Белгіленген параметрлерді растау үшін Enter
түймешесін басыңыз, Баптама тəртібінен шығу үшін Exit түймешесін басыңыз.
белгісі өшіп
Ауа райы атмосфералық қысым өзгеруінің динамикасы бойынша құрылады.
Жиналған мəліметтерге сүйене отырып, метеостанция келешек 12-24 сағатқа 30-50 км
радиусындағы ауа райын болжай алады. Көрсетілімдер дəлдігі 70% таяуды құрайды.
Ясно Переменно Облачно Дождь Гроза
Базалық блоктың жұмыс істеу режимдері
Базалық блоктың бес режимі бар
Фотоальбом Погода Фото & погода Календарь & часы Настройки
29
6406_IM.indd 296406_IM.indd 29 12.03.2010 10:19:4312.03.2010 10:19:43
Page 30

ҚАЗАҚ
Қажетті режимді таңдау үшін ►/◄ батырмаларын пайдаланыңыз, таңдалған режимге
кіру үшін Enter батырмасын басыңыз.
“Фотоальбом” суреттерді көрсету режимі
Суреттерді JPEG форматында USB –таспаға немесе жад картасына (SD немесе
MMC) сақтаңыз. Базалық блок ажыратулы кезде, сəйкес ағытпаға таспаны салыңыз.
“Фотоальбом” режиміне кіріңіз.
►/◄ батырмаларын дейінгі немесе кейінгі суретті көрсету үшін пайдаланыңыз
Суреттерді көру режимін қосу үшін, қашықтан басқару пультындағы SLIDESHOW батырмасын басыңыз. Бейне масштабын өзгерту үшін ZOOM батырмасын, айналдыру
үшін –ROTATE батырмасын пайдаланыңыз.
Суреттің дисплейде бейнелену уақыты мен слайдтардың ауысу эффектісі “Настрой-
ки” режимінде орнатылады
“Погода” ауа райы жағдайларын бейнелеу режимі
1 – ауа райының таңбалық болжамы
2 – соңғы 6 сағаттағы қысымның өзгеру диаграммасы
3 – атмосфералық қысым гистограммасы (қысымның өлшем бірліктері “Настройки”
режимінде орнатылады)
4 – атмосфералық қысымның бағдар түріндегі көрсеткіші атмосфералық қысымды
көрсетеді (жоғарылайды, тұрақты, төмендейді).
5 – бөлме ішіндегі шық нүктесі °C күйінде
6 – бөлме ішіндегі жылу көрсеткіші °C күйінде
7 – бөлме ішіндегі температура °C күйінде жəне температураның өзгеру көрсеткіші
(жоғарылайды, тұрақты, төмендейді)
8 – өзгеру көрсеткіші бар бөлме ішіндегі ылғалдылық (жоғарылайды, тұрақты,
төмендейді)
9 – бөлме сыртындағы шық нүктесі °C күйінде
10 – бөлме сыртындағы жылу индексі °C күйінде
11 - өзгеру көрсеткіші бар бөлме сыртындағы ылғалдылық (жоғарылайды, тұрақты,
төмендейді)
12 - бөлме сыртындағы температура °C күйінде жəне температураның өзгеру
көрсеткіші (жоғарылайды, тұрақты, төмендейді)
13 – қашықтағы бергіштің сигнал көрсеткіші (таңба қашықтағы бергіштің сигналы
30
6406_IM.indd 306406_IM.indd 30 12.03.2010 10:19:4312.03.2010 10:19:43
Page 31

ҚАЗАҚ
ізделіп жатқанда жанып-сөнеді жəне сигналды іздеу сəтті аяқталғаннан кейін
тұрақты жанып тұрады)
14 – оятар көрсеткіші (оятар іске қосулы кзде көрінеді)
15 – Ай фазасы көрсеткіші (ай жаңасы - таңба көрсетілмейді, Айдың өсуі, алғашқы
тоқсан, жас Ай, айдың толуы,
16 – күні (күннің көрсетілу форматы: күн/ай немесе ай/күн “Настройки” режимінде
орнатылады)
17 – қашықтағы бергіш арнасының номері.
Ескерту:
1. Температура мен ылғалдылық мəліметтері жылу индексі (heat index) үшін пайдала
нылады
2. Шық нүктесі – бұл берілген қысымда ауа құрамындағы судың буы қанығу күйіне жетіп
жəне шыққа қоюлана бастайтын ауаның салқындау температурасы.
3. Егер бөлменің сыртындағы температура -20°C төмен болса, дисплейде LL
таңбалары көрінеді, егер температура 60°C жоғары болса, дисплейде HH таңбалары
көрсетіледі.
4. Егер бөлме ішіндегі температура 0 °C төмен болса, дисплейде LL таңбалары
көрінеді, егер температура 50°C жоғары болса, дисплейде HH көрсетіледі.
“Фото & погода» ауа райы жағдайлары суреттерінің көрсетілу режимі
Айдың кішірейуі, соңғы тоқсан, кəрі Ай)
1 – оятар көрсеткіші (оятар іске қосулы кзде көрінеді)
2 – ауа райының таңбалық болжамы
3 – бөлме ішіндегі температура °C күйінде жəне температураның өзгеру көрсеткіші
(жоғарылайды, тұрақты, төмендейді)
4 - өзгеру көрсеткіші бар бөлме ішіндегі ылғалдылық (жоғарылайды, тұрақты,
төмендейді)
5 - бөлме сыртындағы температура °C күйінде жəне температураның өзгеру
көрсеткіші (жоғарылайды, тұрақты, төмендейді)
6 - өзгеру көрсеткіші бар бөлме сыртындағы ылғалдылық (жоғарылайды, тұрақты,
төмендейді)
7 - қашықтағы бергіштің сигнал көрсеткіші (таңба қашықтағы бергіштің сигналы ізделіп
жатқанда жанып-сөнеді жəне сигналды іздеу сəтті аяқталғаннан кейін тұрақты жанып тұрады)
8 - Бейне
31
6406_IM.indd 316406_IM.indd 31 12.03.2010 10:19:4312.03.2010 10:19:43
Page 32

ҚАЗАҚ
“Календарь & часы” күн мен уақытты көрсету режимі
►/◄ батырмаларын дейінгі/кейінгі айды көрсету үшін, жылды көрсету үшін ▲/▼ батырмаларын пайдаланыңыз.
“Настройки” баптау режимі
Язык: Экрандық менюдің тілін таңдау (орысша/ағылшынша)
Время смены слайдов: 3 сек, 5 сек, 15сек, 1 мин, 15 мин немесе 1 сағат
Эффект смены слайдов: Слайдтардың ауысу эффектісін таңдау
Режим повтора фото: Барлық суреттерді қайталау, суреттерді еркін кезекпен көру
немесе қолмен басқару режимі арасында таңдау
Режим дисплея: Бейнелерді көрсету режимін таңдау
Таймер 1 – вкл.: 1-ші таймердың іске қосылу уақыты, іске қосылу немесе сөну;
Таймер 1 – выкл.: 1-ші таймердың сөну уақыты, іске қосылу немесе сөну;
Таймер 2 – вкл.: 2-ші таймердың іске қосылу уақыты, іске қосылу немесе сөну;
Таймер 2 – выкл.: 2-ші таймердың сөну уақыты, іске қосылу немесе сөну.
Ескерту:
Электр энергиясын үнемдеу мақсатында таймерлер көмегімен сіз фоторамканың
күннің қай уақытында өздігімен іске қосылатынын жəне сөнетінін таңдай аласыз
Яркость: Дисплейдің жарықтылығын таңдау 1-ден 16 дейін
Контраст: Дисплейдің айқындылығын таңдау 1-ден 16 дейін
Насыщение: Дисплейдің қанықтылығын таңдау 1-ден 16 дейін
Часовой пояс: Уақыт бойынша ығысуды пайдаланып, жергілікті уақытты белгілеу
Время /дата: Күн мен уақытты белгілеу
Формат даты: Күнді көрсету форматын таңдау: күн/ай немесе ай/күн
Формат времени: Уақытты көрсету форматын таңдау: 12 немесе 24 сағат
Будильник: Оятардың іске өосылу уақытын орнату, оятарды іске қосу жəне сөндіру
Прием от внешнего датчика:
Автоматически – келісім бойынша бойынша белгілеу
Поиск –қашықтағы бергіш сигналдарын іздеу
Прогноз погоды: ауа райы жағдайларын таңдау:
Единицы давления: Қысым өлшем бірліктерін таңдау: hPa (кПа), mmHg (мм. рт. ст.),
inHg & mb
Отображение внешнего канала:
Автоматически – Табылған арналардағы мəліметтерді көрсету
Только 1 канал – 1-ші арнадағы мəліметтерді ғана көрсету
Только 2 канал – 2-ші арнадағы мəліметтерді ғана көрсету
Только 3 канал – 3-ші арнадағы мəліметтерді ғана көрсету
Сброс настроек: да/нет
Версия прошивки: W232-R 1.05.200
Ескерту:
• Электр энергиясын сөндіргеннен кейін базалық блоктың қашықтағы бергішпен синхро-
низациясы жəне ауа райы мəліметтері 1 минут бойы сақталады. 1минут өткеннен кейін
құрылғы толық сөнеді. Келешекте сізге базалық блок пен қашықтағы бергіш жұмысын
синхронизациялау, ауа райы болжамы үшін қажетті мəліметтерді енгізу қажет болады.
32
6406_IM.indd 326406_IM.indd 32 12.03.2010 10:19:4312.03.2010 10:19:43
Page 33

ҚАЗАҚ
• Қашықтағы бергіштегі батарейкаларды əр ауыстырған сайын, сізге базалық блок
пен қашықтағы бергіш жұмысын синхронизациялау қажет болады.
• USB- ағытпа энергия көзі ретінде немесе USB flash drive-қа ұқсамайтын USB-таспа-
ларды зарядтауға арналған құрылғы ретінде пайдаланылмауы керек, кері жағдайда
фоторамка істен шығуы мүмкін.
• Егер базалық блок ұзақ уақыт бойы қашықтағы бергіштен сигналдарды
қабылдамаса, қашықтағы бергіштің батарейкаларын тексеріңіз, қажетті жағдайда
оларды ауыстырыңыз жəне синхронизация рəсімін қайталаңыз.
мəліметтерді нəтижелі жіберу радиусы аумағында, жəне базалық блокқа неғұрлым
жақын орналастырыңыз. Базалық блок пен қашықтағы бергішті минималды бөгеттер
мен мəліметтер ең жақсы алмасатын жерлерде орналастырыңыз. Қашықтағы
бергіштің мəліметтерді алмасу радиусы бөлме арақабырғаларының құрылыс материалына жəне олардың санына байланысты болады. Қашықтағы бергіш пен базалық
блокты орналастырудың бірнеше амалын тексеріп көріңіз. Қашықтағы бергішті, оған
тікелей күннің көзі, жаңбыр немесе қар тимейтіндей етіп орналастыру қажет. Үй
құрылғылары (есік қоңырауы, дабыл жəне т.с.с.-лар) базалық блоктың қашықтағы
бергіштен мəліметтер сигналын қабылдау кезінде бөгеттер удыруы мүмкін. Бұл
қалыты құбылыс болып табылады жəне жалпы жұмысқа əсер етпейді. Мəліметтер
сигналын жіберу жəне қабылдау уақытша бөгеттер жойылғаннан кейінгі мезетте басталады.
• Қашықтан басқару пультының тұрақсыз жұмыс істеуі кезінде онымен базалық блоктың
арасындағы қашықтықты азайтыңыз. Қашықтан басқару пультындағы қоректендіру
элементін тексеріңіз жəне қажет болғанда оны ауыстырыңыз.
ТЕХНИЧЕСКИЕ ХАРАКТЕРИСТИКИ
Температураның өзгеруі
Базалық блок 0-ден +50°С дейін
Қашықтағы бергіш -20-дан +60,0°С дейін
Температураны өлшеу дəлдігі 0,1°С
Салыстырмалы ылғалдылықты өлшеу
Салыстырмалы ылғалдылықты өлшеудің дəлдігі 20%-дан 90% дейін
Қашықтағы бергіштен мəліметтерді беру 20%-дан 90% дейін
Мəліметтерді беру жиілігі 1%
Қосылатын бергіштер саны максимум 3
Əрекет ету радиусы макс. 30 м
Қореқтендіруі
Базалық блок Желілік бейімдеуіш 5,0V DC
«ААА» типті 2 батарейка
Қашықтағы бергіш 1 қоректендіру элементі CR 2025
Қашықтағы бергішті
Жеткізілім жинағы
Базалық блок (фоторамка) – 1 дана.
Қашықтағы бергіш – 1 дана.
Желілік бейімдеуіш – 1 дана.
Қашықтан басқару пульты – 1 дана.
33
6406_IM.indd 336406_IM.indd 33 12.03.2010 10:19:4312.03.2010 10:19:43
Page 34

ҚАЗАҚ
Назар аударыңыз!
- Баспа процесіндегі шектеулерге байланысты осы нұсқаулықта көрсетілген дис-
плей шын мəніндегі дисплейден айырмашылығы болуы мүмкін.
- Шығарушы алдын-ала ескертусіз аспаптар сипаттамаларын өзгерту құқығына
ие.
Өндіруші өз артынан құқықты қалдырады аспаптың сипаттмаларды өзгертуге
алдына ескертпесіз.
Құралдың қызмет ету мерзімі - 3 жыл
Гарантиялық мiндеттiлiгi
Гарантиялық жағдайдағы қаралып жатқан бөлшектер дилерден тек сатып алынған
адамға ғана берiледi. Осы гарантиялық мiндеттiлiгiндегi шағымдалған жағдайда
төлеген чек немесе квитанциясын көрсетуi қажет.
Бұл тауар ЕМС – жағдайларға сəйкес келедi негiзгi Мiндеттемелер 89/336/
EEC Дерективаның ережелерiне енгiзiлген Төменгi Ережелердiң Реттелуi
(73/23 EEC)
34
6406_IM.indd 346406_IM.indd 34 12.03.2010 10:19:4312.03.2010 10:19:43
Page 35

ЎЗБЕК
METEOSTANTSIYA
Foydalanish qo’llanmasi
TA’RIFI
Asosiy blok (fotoramka) (1-rasm)
1 – Displey
2 – masofadan boshqarish pultining signallarini infraqizil qabul qilish moslamasi
3 – asosiy blokni yoqish/o’chirish tugmasi (
4, 5 – sozlanishlar rejimida o’zgartirish tugmalari ▲/▼
6, 7 – fotosuratlarni tanlash va sozlanishlar menyusida o’zgartirish tugmalari ►/◄
8 – displey rejimiga kirish, sozlanishlar rejimida belgilangan ko’rsatkichlarni tasdiqlash
tugmasi Enter
9 – joriy rejimdan chiqish tugmasi Exit
10 – SD/MMC xotira kartasi uchun uyasi
11 – USB-moslamalar uchun uyasi
12 – ta’minot adapterini ulash uchun uyasi
Eslatma: Displey o’chirilgan holatda, ob-havo ni aks ettirish rejimini 1 minutga yaqin
muddat davomida POWER tugmasidan tashqari istalgan tugmani bosing.
Masofadan boshqarish pulti (2-rasm)
1 – asosiy blok moslamasini yoqish/o’chirish tugmasi (
2 – fotosuratlarni ko’rib chiqish rejimiga kirish tugmasi PHOTOS
3 – ob-havoni aks ettirish rejimiga kirish tugmasi WEATHER
4 – sana va vaqtni aks ettirish rejimiga kirish tugmasi CALENDAR
5 – fotosuratlarni ko’rib chiqish va ob-havoni aks ettirish rejimiga kirish tugmasi WEATHER
+ PHOTOS
6, 11 – sozlanishlar menyusida o’zgartirish tugmalari ▲/▼
7 – asosiy menyuga kirish tugmasi MENU
8, 14 – fotosuratlarni tanlash va sozlanishlar menyusida/ rejimida o’zgartirish tugmalari
►/◄
9 – displey rejimiga kirish, sozlanishlar rejimida belgilangan ko’rsatkichlarni tasdiqlash
tugmasi ENTER
10 – joriy rejimdan chiqish tugmasi EXIT
12 – fotosuratlarni burash tugmasi ROTATE
13 – fotosuratlarning masshtabini o’zgartirish tugmasi ZOOM
15 – slaydlarni ko’rib chiqish rejimini yoqish/o’chirish tugmasi SLIDESHOW
16 – sozlanishlar rejimiga kirish tugmasi SETUP
)
)
Eslatma: Displey o’chirilgan holatda, ob-havo ni aks ettirish rejimini 1 minutga yaqin
muddat davomida istalgan ▲/▼ ►/◄ o’zgartirish tugmasini, yoki ENTER tugmasini
bosing.
Masofadan o’lchash datchigi (3-rasm)
1 – displey
2 – batareyalar bo’linmasining qopqog’i
35
6406_IM.indd 356406_IM.indd 35 12.03.2010 10:19:4312.03.2010 10:19:43
Page 36

ЎЗБЕК
3 – signalni ekspress-uzatish tugmasi
4 – malumotlarni uzatishning kanalini tanlashni o’zgartirish tugmasi
EHTIYOT CHORALARI
1. Asboblar bilan ishni boshlashdan avval foydalanish qo’llanmasini diqqat bilan o’qimb
chiqing.
2. Asbobni suvga botirmang.
3. Asbobni abraziv moddalar bilan hamda korpusning va ichki qismlarning shikastlanishiga
olib keladigan moddalar bilan tozalamang.
4. Asbobni kuchli jismoniy ta’sir yoki zarbalar ta’sirida qoldirmang (chang va namlik ham
mumkin emas), chunki bu nosozliklar paydo bo’lishiga olib kelishi, ya’ni asbobning
xizmat muddati qisqarishiga, batareykalarning shikastlanishiga va korpus detallarining
shakli o’zgarishiga olib kelishi mumkin.
5. Asbobni qismlarga ajratmang, bu uning kafolati bekor qilinishiga olib keladi. Uning ichida
foydalanuvchi e’tiborini talab etadigan detallari yo’q.
6. Faqat yangi batareykalardan va faqat foydalanish qo’llanmasida ko’rsatilgan
batareykalardan foydalaning.
7. Faqat yetkazib berish majmuasiga kiruvchi tarmoq adapteridan foydalaning.
Asosiy blokka tarmoq adapterini ulash/ masofadan boshqarish pultiga va masofadan
o’lchash datchigiga batareykalarni o’rnatish:
Asosiy blokka tarmoq adapterini ulash
1. Tarmoq adapterining ish kuchlanishi tarmoq kuchlanishiga mos ekanligiga ishonch hosil
qiling.
2. Tashqi ta’minot manbaini ulash uchun uyasidan foydalanib, asosiy blokka yetkazib
berish to’plamiga kiruvchi tarmoq adapterini ulang (5.0V DC).
Masofadan o’lchash datchigiga batareykalarni o’rnatish
1. Batareykalar bo’linmasining qopqog’ida vintlarni burab oching.
2. Qutblari yo’nalishiga rioya qilgan holda 2 ta batareykalarni o’rnating.
3. Batareykalar bo’linmasining qopqog’ini yoping va vintlarni burab mahkamlang.
Masofadan boshqarish pultiга batareйkаларни ¢рнатиш
Masofadan boshqarish pulti ichida o’rnatilgan CR 2025 ta’minot elementi bilan yetkazib
beriladi. Masofadan boshqarish pultining ishga tushirilishi uchun izolyatsiya kiritmasini olib
tashlang.
Ta’minot elementini almashtirish uchun masofadan boshqarish pultining orыa panelidagi
ko’rsatmalarga amal qiling. Ta’minot elementini almashtirish paytida qutblariga amal qiling.
Eslatma: masofadan o’lchash datchigi past yoki yuqori harorat sharoitida uzoq ishlaganda
uning batareykalarning kuchlanishi pasayishi mumkin, shu bilan uning uzatish moslamasining
ishlash radiusi kamayadi.
Asosiy blok va masofadan o’lchash datchigining ishlashini sinxronlashtirish
Asosiy blokka tarmoq adapteri ulanishi bilan u avtomatik ravishda masofadan o’lchash
datchigining signalini izlashni boshlaydi, u taxminan 4 minut davom etadi. Bundan avval
batareyalar bo’linmasining qopqog’ini ochib, ma’lumotlarni uzatish kanalining raqamini tanlab
36
6406_IM.indd 366406_IM.indd 36 12.03.2010 10:19:4312.03.2010 10:19:43
Page 37

ЎЗБЕК
belgilash, masofadan o’lchash datchigining bo’linmasiga batareykalarni o’rnatish kerak.
Masofadan o’lchash datchigining ichiga batareykalar o’rnatilganidan keyin u ma’lumotlarni
uzatishni boshlaydi, ular asosiy blokning displeyida aks ettiriladi.
Signalni izlash paytida qabul qilish moslamasiga signalni tezroq uzatish uchun masofadan
o’lchash datchigining batareyalar bo’linmasi ichidagi TX tugmasini bosing.
Masofadan o’lchash datchigidan ma’lumotlar olinganidan keyin ular asosiy blokning
displeyida aks ettiriladi.
Masofadan o’lchash datchigidan signallar kanallarini izlash uchun Siz shuningdek quyidagi
amallarni bajarishingiz mumkin.
Asosiy blokdagi Exit (9) tugmasini yoki masofadan boshqarish pultidagi MENU (7) tugmasini
bosib, asosiy menyuga o’ting. ►/◄ tugmalari yordamida Sozlanishlar rejimini tanlang.
Tanlangan rejimni tasdiqlash uchun ENTER tugmasini bosing. ▼tugmasining yordamida
Tashqi datchikdan qabul qilish punktini tanlang. ►/◄ tugmalari bilan Izlash ni tanlang,
belgilangan ko’rsatkichlarni tasdiqlash uchun Enter tugmasini bosing. Asosiy blok ob-havo
sharoitlarini aks ettirish rejimiga o’tadi va masofadan o’lchash datchigidan kelayotgan
signallarni izlashni boshlaydi, bunda displeyning tepadagi o’ng burchagida.
o’chib turadi.
Eslatma: Asosiy blokning barcha sozlashlarini masofadan boshqarish pultidan amalga
oshirish mumkin. Sozlanishlar rejimiga kirish uchun SETUP tugmasini bosing.
Ob-havoni aks ettirish displeyini sozlash
Aniqroq ob-havo prognozini olish uchun Siz asbobni birinchi marta ishga tushirish paytida
Sizning joriy ob-havo sharoitlaringizni kiritishingiz lozim bo’ladi.
Asosiy menyuga o’ting, va Sozlanishlar rejimini tanlang. ▲/▼ tugmalari yordamida Ob-
havo prognozi punktini tanlang. ►/◄ tugmalari yordamida boshlang’ich ob-havo sharoitlari
sifatida quyidagi punktlardan bittasini tanlang Ochiq havo, O’zgaruvchan havo, Bulutli
havo, Yomg’ir yoki Momaqaldiroq. Belgilangan ko’rsatkichlarni tasdiqlash uchun Enter
tugmasini bosing va Sozlanishlar rejimidan chiqish uchun Exit tugmasini bosing.
belgisi yonib-
Ob-havo prognozi atmosfera bosimining o’zgarishi diamikasining asosida amalga oshiriladi.
Yig’ilgan ma’lumotlardan kelib chiqib, meteostantsiya kelgusi soat davri davomidagi 30-50
km radiusli atrofidagi ob-havoni prognoz qilishi mumkin. Ko’rsatkichlarning aniqligi taxminan
70 % ni tashkil etadi.
Ochiq havo O’zgaruvchan havo Bulutli havo Yomg’ir Momaqaldiroq
37
6406_IM.indd 376406_IM.indd 37 12.03.2010 10:19:4412.03.2010 10:19:44
Page 38

ЎЗБЕК
Asosiy blokning ishlash rejimlari
Asosiy blok beshta ishlash rejimiga ega.
Fotoalbom Ob-havo Foto & Ob-havo Taqvim & soat Sozlanishlar
Istalgan rejimni tanlash uchun ►/◄ tugmalaridan foydalaning, tanlangan rejimga kirish
uchun Enter tugmasini bosing.
Fotosuratlarni aks ettirish rejimi «Fotoalbom»
Fotosuratlarni JPEG formatida USB –tashuvchida yoki xotira kartasida (SD yoki MMC)
saqlab oling. Asosiy blok o’chirilgan holatda xotira tashuvchini tegishli uyaga kiriting.
«Fotoalbom» rejimiga kiring.
Avvalgi/keyingi tasvirni namoyish etish uchun ►/◄ tugmalaridan foydalaning.
Fotosuratlarni ko’rib chiqish rejimini yoqish uchun masofadan boshqarish pultining
SLIDESHOW tugmasini bosing.
Tasvirning masshtabini o’zgartirish uchun ZOOM tugmasidan foydalaning, tasvirni burash
uchun ROTATE tugmasidan foydalaning.
Tasvirni displeyda aks ettirish vaqti va slaydlar almashuvi uslubi «Sozlanishlar» rejimida
belgilanadi.
Ob-havo sharoitlarini aks ettirish rejimi «Ob-havo»
1 – ob-havoning ramzli prognozi
2 – oxirgi 6 soat ichida havo bosimining o’zgarishi diagrammasi
3 – atmosfera bosimining gistogrammasi (atmosfera bosimining o’lchov birliklari
«Sozlanishlar» rejimida belgilanadi)
4 – atmosfera bosimining o’zgarishi indikatori, soat mili shaklida atmosfera bosimining
o’zgarishini aks etttiradi (ortib boradi, doimiy, pasayadi).
5 – xonaning ichidagi shabnam nuqtasi °C larda
6 – xonaning ichidagi issiqlik indeksi °C larda
38
6406_IM.indd 386406_IM.indd 38 12.03.2010 10:19:4412.03.2010 10:19:44
Page 39

ЎЗБЕК
7 – xonaning ichidagi havo harorati °C larda va havo haroratining o’zgarishi indikatori
(ortib boradi, doimiy, pasayadi)
8 – xonaning ichidagi havo namligi va havo namligining o’zgarishi indikatori (ortib boradi,
doimiy, pasayadi)
9 – xonadan tashqari shabnam nuqtasi °C larda
10 – xonadan tashqari issiqlik indeksi °C larda (
11 – xonadan tashqari havo namligi va havo namligining o’zgarishi indikatori (ortib boradi,
doimiy, pasayadi)
12 – xonadan tashqari havo harorati °C larda va havo haroratining o’zgarishi indikatori
(ortib boradi, doimiy, pasayadi)
13 – masofadan o’lchash datchigidan kelayotgan signalning indikatori (uning belgisi
masofadan o’lchash datchigidan kelayotgan signalni izlash paytida yonib-o’chadi va
signalni izlash muvaffaqiyatli tugatilganda doimiy yonib turadi)
14 – budilnikning indikatori (budilnik yoqilganda aks ettiriladi)
15 – Oy fazasining indikatori (yangi Oy - belgisi aks ettirilmaydi, o’sayotgan Oy, birinchi
choragi, yosh Oy, to’liq Oy, kamayib borayotgan Oy, oxirgi choragi, eski Oy)
16 – sana (sanani aks ettirish formati: kun/oy yoki oy/kun «Sozlanishlar» rejimida
belgilanadi)
17 – masofadan o’lchash datchigi kanalining raqami.
Eslatmalar:
1. Havo harorati va namligining ma’lumotlari issiqlik indeksi uchun (heat index)
foydalaniladi.
2. Shabnam nuqtasi – bu eto temperatura pri dannom davlenii, do kotoroy doljen oxladitsya
vozdux, chtobы soderjaщiysya v nyom vodyanoy par dostig sostoyaniya nasыщeniya va
nachal kondensirovatsya v rosu.
3. Agar xonadan tashqarida havo harorati -20 °C dan pastroq bo’lsa, displeyda LL belgilari
aks ettiriladi, agar havo harorati 60°C dan yuqoriroq bo’lsa, displeyda HH belgilari aks
ettiriladi.
4. Agar xonaning ichida havo harorati 0 °C dan pastroq bo’lsa, displeyda LL belgilari aks
ettiriladi, agar havo harorati 50°C dan yuqoriroq bo’lsa, displeyda HH belgilari aks
ettiriladi.
Fotosuratlarni va ob-havo sharoitlarini aks ettirish rejimi «Foto & Ob-havo»
39
6406_IM.indd 396406_IM.indd 39 12.03.2010 10:19:4412.03.2010 10:19:44
Page 40

ЎЗБЕК
1 – budilnikning indikatori (budilnik yoqilganda aks ettiriladi)
2 – ob-havoning ramzli prognozi
3 – xonaning ichidagi havo harorati °C larda va havo haroratining o’zgarishi indikatori
(ortib boradi, doimiy, pasayadi)
4 – xonaning ichidagi havo namligi va havo namligining o’zgarishi indikatori (ortib boradi,
doimiy, pasayadi)
5 – xonadan tashqari havo harorati °C larda va havo haroratining o’zgarishi indikatori
(ortib boradi, doimiy, pasayadi)
6 – xonadan tashqari havo namligi va havo namligining o’zgarishi indikatori (ortib boradi,
doimiy, pasayadi)
7 – masofadan o’lchash datchigidan kelayotgan signalning indikatori (uning belgisi
masofadan o’lchash datchigidan kelayotgan signalni izlash paytida yonib-o’chadi va
signalni izlash muvaffaqiyatli tugatilganda doimiy yonib turadi)
8 – Tasvir
Sana va vaqtni aks ettirish rejimi «Taqvim & soat»
Avvalgi/keyingi oyni aks etirish uchun ►/◄ tugmalaridan foydalaning, yilni aks ettirish
uchun ▲/▼tugmalaridan foydalaning.
Ko’rsatkichlarni sozlash rejimi «Sozlanishlar»
Til: Ekran menyusining tilini tanlash (rus tili/ingliz tili)
Slaydlarni almashtirish vaqti: 3 soniya, 5 soniya, 15 soniya, 1 minut, 15 minut yoki 1 soat.
Slaydlarni almashtirish uslubi: Slaydlarni almashtirish uslubini tanlash
Fotosuratlarni takrorlash rejimi: Barcha fotosuratlarni takrorlash, fotosuratlarni tasodifiy
tartibda namoyish etish yoki qo’lda tanlash rejimlari orasida tanlash
Displey rejimi: Tasvirlarni aks ettirish rejimini tanlash
Taymer 1 – yoqilgan.: 1-taymerning yoqilishi vaqtini belgilash, yoqish yoki o’chirish;
Taymer 1 – o’chirilgan.: 1-taymerning o’chirilishi vaqtini belgilash, yoqish yoki o’chirish
Taymer 2 – yoqilgan.: 2-taymerning yoqilishi vaqtini belgilash, yoqish yoki o’chirish
Taymer 2 – o’chirilgan.: 2-taymerning o’chirilishi vaqtini belgilash, yoqish yoki o’chirish.
Eslatma:
Elektr energiyasini tejash maqsadida Siz taymerlar yordamida kun davomida fotosuratlar
tasvirlari avtomatik ravishda yoqiladigan va o’chiriladigan vaqtni tanlashingiz mumkin.
Yorqinligi: Displey yorqinligi darajasini tanlash, 1 dan 16 gacha
Kontrast: Displey kontrastligi darajasini tanlash, 1 dan 16 gacha
Tasvir to’yinganligi: Displey tasvirining to’yinganligi darajasini tanlash, 1 dan 16 gacha
Soat mintaqasi: Vaqt bo’yicha surilishidan foydalanib, mahalliy vaqtni belgilash
Vaqt /sana: Sanani va vaqtni sozlash
Sananing formati: Sanani aks ettirish formatini tanlash: kun/oy yoki oy/kun
Vaqtni aks ettirish formati: Vaqtni aks ettirish formatini tanlash: 12 yoki 24 soat
Budilnik: Budilnikning ishga tushadigan vaqtini belgilash, budilnikni yoqish va o’chirish
Tashqi datchikdan signalni qabul qilish:
Avtomatik ravishda – ustanovka po umolchaniyu
Izlash – masofadan o’lchash datchigidan kelayotgan signallarni izlash
Ob-havo prognozi: Ob-havo sharoitlarini tanlash:
40
6406_IM.indd 406406_IM.indd 40 12.03.2010 10:19:4412.03.2010 10:19:44
Page 41

ЎЗБЕК
Havo bosimining o’lchov birliklari: Havo bosimining o’lchov birliklarini tanlash: hPa
(kPa), mmHg (mm. rt. st.), inHg & mb
Tashqi kanalni aks ettirish:
Avtomatik ravishda – Aniqlangan kanallardan ma’lumotlarni aks ettirish
Faqat 1 kanal – faqat 1-kanaldan kelayotgan ma’lumotlarni aks ettirish
Faqat 2 kanal – faqat 2-kanaldan kelayotgan ma’lumotlarni aks ettirish
Faqat 3 kanal – faqat 3-kanaldan kelayotgan ma’lumotlarni aks ettirish
Sozlanishlarni bekor qilish: ha/yo’q
Dasturlashtirish turi: W232-R 1.05.200
Eslatmalar:
• Elektr energiyasi 1 minut davomida o’chirilgan holda asosiy blokning masofadan
o’lchash datchigi bilan sinxronlashtirish va ob-havo prognozining ma’lumotlari saqlanib
qoladi. 1 minut o’tganidan keyin moslama to’liq o’chiriladi. Keyinchalik Siz asosiy blok va
masofadan o’lchash datchigining ishlashini qaytadan sinxronlashtirishingiz hamda obhavoning prognozi uchun kerak bo’lgan ma’lumotlarni kiritishingiz lozim bo’ladi.
• Masofadan o’lchash datchigidagi batareykalarni almashtirishdan keyin har gal Siz asosiy
blok va masofadan o’lchash datchigining ishlashini qaytadan sinxronlashtirishingiz lozim
bo’ladi.
• USB- tashuvchining uyasi energiya manbai sifatida yoki USB flash drive dan farqli USB-
tashuvchisi uchun zaryadlash moslamasi sifatida ishlatilishi mumkin emas, aks holda
fotoramka ishdan chiqarilishi mumkin.
• Agar asosiy blok uzoq vaqt mobaynida masofadan o’lchash datchigidan signallarni
olmaydigan bo’lsa, masofadan o’lchash datchigidagi batareykalarni tekshiring, zarur
bo’lgan holda ularni almashtiring va sinxronlashtirish amallarini takrorlang. Masofadan
o’lchash datchigini ma’lumotlarni muvaffaqiyatli uzatish radiusining doirasi ichida, va
asosiy bloka imkon qadar yaqinroq joyda o’rnating. Asosiy blokni va masofadan o’lchash
datchigini ma’lumotlarni eng yaxshi uzatish mumkin bo’lgan, shovqinlar imkoni boricha
kamroq joylarda o’rnating. Masofadan o’lchash datchigining ma’lumotlar uzatish radiusi
xonalardagi devorlar uchun foydalanilgan qurilish materialiga va uning sifatiga bog’liq
ekanligini e’tiborga oling. Masofadan o’lchash datchigi va asosiy blokning bir nechta
joylashtirish usullarini sinab ko’ring. Masofadan o’lchash datchigini shunday joylashtirish
kerakki, uning ustiga to’g’ridan-to’g’ri quyosh nurlari, qor yoki yomg’ir tushmasligi kerak.
Uydagi maishiy moslamalar (eshik qo’ng’irog’i, signalizatsiya va hokazolar) asosiy blok
tomonidan masofadan o’lchash datchigidan ma’lumotlarni va signalni qabul qilishda
shovqinlarni hosil qilishi mumkin. Bu nomalholat bo’lib, buyumning umumiy ishlashiga
ta’sir ko’rsatmaydi. Ma’lumotlar signalini uzatish va qabul qilish vaqtincha shovqinlar
yo’qolganidan keyin darhol tiklanadi.
• Masofadan boshqarish pultining barqaror ishlamagan holatida pult va asosiy blok orasidagi
masofani kamaytiring. Masofadan boshqarish pultidagi ta’minot elementini tekshiring va
zarur bo’lgan holda uni almashtiring.
BUYUMNING TEXNIK XUSUSIYATLARI
Havo haroratini o’lchash:
Asosiy blok 0 dan +50°S gacha
Masofadan o’lchash datchigi -20 dan +60,0°S gacha
Havo haroratini o’lchash aniqligi 0,1°S
41
6406_IM.indd 416406_IM.indd 41 12.03.2010 10:19:4412.03.2010 10:19:44
Page 42

ЎЗБЕК
Havoning nisbiy namligini o’lchash:
Asosiy blok 20% dan 90% gacha
Masofadan o’lchash datchigi 20% dan 90% gacha
Havoning nisbiy namligini o’lchash aniqligi 1%
Ulanadigan datchiklarning soni maksimum 3 ta
Datchiklarning ta’sir qilish radiusi maks. 30 m
Ta’minoti:
Asosiy blok Tarmoq adapteri 5,0V DC
Masofadan o’lchash datchik «AAA» turidagi 2 dona batareyka
Masofadan boshqarish pulti 1 dona CR 2025 turidagi ta’minot elementi
Etkazib berish to’plami
Asosiy blok (fotoramka) – 1 dona.
Masofadan o’lchash datchigi – 1 dona.
Tarmoq adapteri – 1 dona.
Masofadan boshqarish pulti – 1 dona.
DIQQAT!
- Chop etish jarayonidagi cheklanishlar tufayli bu yo’riqnomada ko’rsatilgan displey aslida
bo’lgan displeydan farq qilishi mumkin.
- Ishlab chiqaruvchi buyumning dizayni va texnik xususiyatlarini dastavval xabardor
etmagan holda o’zgartirish huquqini o’zida saqlab qoladi.
Ushbu buyum barcha talab etiladigan Yevropa va Rossiya xavfsizlik va gigiyena standartlariga
mos keladi.
Buyumning xizmat qilishining muddati - 3 yil
Кафолат шартлари
Ушбу жиҳозга кафолат бериш масаласида худудий дилер ёки ушбу жиҳоз харид
қилинган компанияга мурожаат қилинг. Касса чеки ёки харидни тасдиқловчи бошқа бир
молиявий ҳужжат кафолат хизматини бериш шарти ҳисобланади.
Ушбу жиҳоз 89/336/ЯЕC Кўрсатмаси асосида белгиланган ва Қувват кучини
белгилаш Қонунида (73/23 ЕЭС) айтилган ЯХС талабларига мувофиқ
келади.
42
6406_IM.indd 426406_IM.indd 42 12.03.2010 10:19:4412.03.2010 10:19:44
Page 43

GB
A production date of the item is indicated in the serial number on the technical data plate. A serial
number is an eleven-unit number, with the first four figures indicating the production date. For example, serial number 0606ххххххх means that the item was manufactured in June (the sixth month)
2006.
RUS
Дата производства изделия указана в серийном номере на табличке с техническими данными.
Серийный номер представляет собой одиннадцатизначное число, первые четыре цифры которого обозначают дату производства. Например, серийный номер 0606ххххххх означает, что
изделие было произведено в июне (шестой месяц) 2006 года.
UA
Дата виробництва виробу вказана в серійному номері на табличці з технічними даними. Серійний
номер представляє собою одинадцятизначне число, перші чотири цифри якого означають дату
виробництва. Наприклад, серійний номер 0606ххххххх означає, що виріб був виготовлений в
червні (шостий місяць) 2006 року.
KZ
Бұйымның шығарылған мерзімі техникалық деректері бар кестедегі сериялық нөмірде көрсетілген.
Сериялық нөмір он бір саннан тұрады, оның бірінші төрт саны шығару мерзімін білдіреді. Мысалы,
сериялық нөмір 0606ххххххх болса, бұл бұйым 2006 жылдың маусым айында (алтыншы ай)
жасалғанын білдіреді.
UZ
Жиҳоз ишлаб чиқарилган муддат техник хусусиятлар кўрсатилган лавҳачадаги серия рақамида
кўрсатилган. Серия рақами ўн битта сондан иборат бўлиб уларнинг биринчи тўрттаси ишлаб
чиқарилган вақтни ифода этади. Мисол учун 0606ххххххх серия рақами жиҳоз 2006 йилнинг июн
ойида (олтинчи ойда) ишлаб чиқарилганлигини билдиради.
ENGLISH
6406_IM.indd 436406_IM.indd 43 12.03.2010 10:19:4412.03.2010 10:19:44
Page 44

6406_IM.indd 446406_IM.indd 44 12.03.2010 10:19:4412.03.2010 10:19:44
 Loading...