


CONTENTS
Precautions. . . . . . . . . . . . . . . . . . . . . . . . . . . . . . . . . . . . . . . . . . . . . . . . . . . . . . . . . . . . . . . . . . . . 1 BC895XLT Controls and Display . . . . . . . . . . . . . . . . . . . . . . . . . . . . . . . . . . . . . . . . . . . . . . . . . . . 2 Introduction. . . . . . . . . . . . . . . . . . . . . . . . . . . . . . . . . . . . . . . . . . . . . . . . . . . . . . . . . . . . . . . . . . . . 3 Important Notice . . . . . . . . . . . . . . . . . . . . . . . . . . . . . . . . . . . . . . . . . . . . . . . . . . . . . . . . . . . . . . . . 4 About this Manual . . . . . . . . . . . . . . . . . . . . . . . . . . . . . . . . . . . . . . . . . . . . . . . . . . . . . . . . . . . . 4 Terminology . . . . . . . . . . . . . . . . . . . . . . . . . . . . . . . . . . . . . . . . . . . . . . . . . . . . . . . . . . . . . . . . . . . 5 What is Scanning? . . . . . . . . . . . . . . . . . . . . . . . . . . . . . . . . . . . . . . . . . . . . . . . . . . . . . . . . . . . 5 What is Searching? . . . . . . . . . . . . . . . . . . . . . . . . . . . . . . . . . . . . . . . . . . . . . . . . . . . . . . . . . . . 5 What is CTCSS? . . . . . . . . . . . . . . . . . . . . . . . . . . . . . . . . . . . . . . . . . . . . . . . . . . . . . . . . . . . . . 5 What is Trunk Tracking? . . . . . . . . . . . . . . . . . . . . . . . . . . . . . . . . . . . . . . . . . . . . . . . . . . . . . . . 6 Feature Highlights . . . . . . . . . . . . . . . . . . . . . . . . . . . . . . . . . . . . . . . . . . . . . . . . . . . . . . . . . . . . . . 7 Where to Obtain More Information . . . . . . . . . . . . . . . . . . . . . . . . . . . . . . . . . . . . . . . . . . . . . . . . . . 8 Information on the Internet . . . . . . . . . . . . . . . . . . . . . . . . . . . . . . . . . . . . . . . . . . . . . . . . . . . . . 8 Computer Control of Your BC895XLT. . . . . . . . . . . . . . . . . . . . . . . . . . . . . . . . . . . . . . . . . . . . . 8 Included with Your Scanner . . . . . . . . . . . . . . . . . . . . . . . . . . . . . . . . . . . . . . . . . . . . . . . . . . . . . . . 9 Installing Your BC895XLT. . . . . . . . . . . . . . . . . . . . . . . . . . . . . . . . . . . . . . . . . . . . . . . . . . . . . . 10 For Home Use (Desktop Installation) . . . . . . . . . . . . . . . . . . . . . . . . . . . . . . . . . . . . . . . . . . . . 10 Adapter Safety Feature . . . . . . . . . . . . . . . . . . . . . . . . . . . . . . . . . . . . . . . . . . . . . . . . . . . . . . . 11 For Mobile Use (In-Car Installation). . . . . . . . . . . . . . . . . . . . . . . . . . . . . . . . . . . . . . . . . . . . . . 12 Basic Operation . . . . . . . . . . . . . . . . . . . . . . . . . . . . . . . . . . . . . . . . . . . . . . . . . . . . . . . . . . . . . . . 13 Setting the Squelch . . . . . . . . . . . . . . . . . . . . . . . . . . . . . . . . . . . . . . . . . . . . . . . . . . . . . . . . . . 13 Using the VFO Control . . . . . . . . . . . . . . . . . . . . . . . . . . . . . . . . . . . . . . . . . . . . . . . . . . . . . . . 14 Programming . . . . . . . . . . . . . . . . . . . . . . . . . . . . . . . . . . . . . . . . . . . . . . . . . . . . . . . . . . . . . . . . . 15 Programming using Manual Entry . . . . . . . . . . . . . . . . . . . . . . . . . . . . . . . . . . . . . . . . . . . . . . . 15 Programming using the Rotary Tuner . . . . . . . . . . . . . . . . . . . . . . . . . . . . . . . . . . . . . . . . . . . . 16 Programming using AutoStore . . . . . . . . . . . . . . . . . . . . . . . . . . . . . . . . . . . . . . . . . . . . . . . . . 17 Transferring a Programmed Frequency . . . . . . . . . . . . . . . . . . . . . . . . . . . . . . . . . . . . . . . . . . 18 Duplicate Frequency Alert . . . . . . . . . . . . . . . . . . . . . . . . . . . . . . . . . . . . . . . . . . . . . . . . . . . . . 20 Deleting a Stored Frequency. . . . . . . . . . . . . . . . . . . . . . . . . . . . . . . . . . . . . . . . . . . . . . . . . . . 20 Preventing Accidental Programming . . . . . . . . . . . . . . . . . . . . . . . . . . . . . . . . . . . . . . . . . . . . . 20 Programming Tips . . . . . . . . . . . . . . . . . . . . . . . . . . . . . . . . . . . . . . . . . . . . . . . . . . . . . . . . . . . 21 Scanning. . . . . . . . . . . . . . . . . . . . . . . . . . . . . . . . . . . . . . . . . . . . . . . . . . . . . . . . . . . . . . . . . . . . . 22 Setting the Delay Mode . . . . . . . . . . . . . . . . . . . . . . . . . . . . . . . . . . . . . . . . . . . . . . . . . . . . . . . 23 Channel Lockout . . . . . . . . . . . . . . . . . . . . . . . . . . . . . . . . . . . . . . . . . . . . . . . . . . . . . . . . . . . . 24 Lockout in Manual Mode . . . . . . . . . . . . . . . . . . . . . . . . . . . . . . . . . . . . . . . . . . . . . . . . . . . . . . 24 Lockout in Scanning Mode . . . . . . . . . . . . . . . . . . . . . . . . . . . . . . . . . . . . . . . . . . . . . . . . . . . . 24 Lockout Tips . . . . . . . . . . . . . . . . . . . . . . . . . . . . . . . . . . . . . . . . . . . . . . . . . . . . . . . . . . . . . . . 25 Restoring a Locked Out Channel . . . . . . . . . . . . . . . . . . . . . . . . . . . . . . . . . . . . . . . . . . . . . . . 25 Restoring All Locked-Out Channels . . . . . . . . . . . . . . . . . . . . . . . . . . . . . . . . . . . . . . . . . . . . . 25 Priority Scan . . . . . . . . . . . . . . . . . . . . . . . . . . . . . . . . . . . . . . . . . . . . . . . . . . . . . . . . . . . . . . . 26 Changing the Priority Channel . . . . . . . . . . . . . . . . . . . . . . . . . . . . . . . . . . . . . . . . . . . . . . . . . 26 Tape Recording Channel Communication . . . . . . . . . . . . . . . . . . . . . . . . . . . . . . . . . . . . . . . . 27 Weather Channel Scanning . . . . . . . . . . . . . . . . . . . . . . . . . . . . . . . . . . . . . . . . . . . . . . . . . . . . . . 28 Weather Alert . . . . . . . . . . . . . . . . . . . . . . . . . . . . . . . . . . . . . . . . . . . . . . . . . . . . . . . . . . . . . . 28 Testing the Weather Alert Siren . . . . . . . . . . . . . . . . . . . . . . . . . . . . . . . . . . . . . . . . . . . . . . . . 29 Searching . . . . . . . . . . . . . . . . . . . . . . . . . . . . . . . . . . . . . . . . . . . . . . . . . . . . . . . . . . . . . . . . . . . . 30 Setting a Search Range . . . . . . . . . . . . . . . . . . . . . . . . . . . . . . . . . . . . . . . . . . . . . . . . . . . . . . 30 Search Hold Feature . . . . . . . . . . . . . . . . . . . . . . . . . . . . . . . . . . . . . . . . . . . . . . . . . . . . . . . . . 30 Data Skip. . . . . . . . . . . . . . . . . . . . . . . . . . . . . . . . . . . . . . . . . . . . . . . . . . . . . . . . . . . . . . . . . . 31 Channel Skip . . . . . . . . . . . . . . . . . . . . . . . . . . . . . . . . . . . . . . . . . . . . . . . . . . . . . . . . . . . . . . . 31 Storing Search Frequencies . . . . . . . . . . . . . . . . . . . . . . . . . . . . . . . . . . . . . . . . . . . . . . . . . . . 32 CTCSS Operation. . . . . . . . . . . . . . . . . . . . . . . . . . . . . . . . . . . . . . . . . . . . . . . . . . . . . . . . . . . . . . 33 Searching for CTCSS Tones. . . . . . . . . . . . . . . . . . . . . . . . . . . . . . . . . . . . . . . . . . . . . . . . . . . 34 Changing a CTCSS Tone . . . . . . . . . . . . . . . . . . . . . . . . . . . . . . . . . . . . . . . . . . . . . . . . . . . . . 36
Erasing a CTCSS Tone. . . . . . . . . . . . . . . . . . . . . . . . . . . . . . . . . . . . . . . . . . . . . . . . . . . . . . . 37 CTCSS Tone Frequencies (Hz) . . . . . . . . . . . . . . . . . . . . . . . . . . . . . . . . . . . . . . . . . . . . . . . . 37 Trunk Tracking . . . . . . . . . . . . . . . . . . . . . . . . . . . . . . . . . . . . . . . . . . . . . . . . . . . . . . . . . . . . . . . . 38 Types of Trunking Systems. . . . . . . . . . . . . . . . . . . . . . . . . . . . . . . . . . . . . . . . . . . . . . . . . . . . 38 Setting the Squelch . . . . . . . . . . . . . . . . . . . . . . . . . . . . . . . . . . . . . . . . . . . . . . . . . . . . . . . . . . 39 Programming Trunking Frequencies . . . . . . . . . . . . . . . . . . . . . . . . . . . . . . . . . . . . . . . . . . . . . 39 Searching a Trunked Bank . . . . . . . . . . . . . . . . . . . . . . . . . . . . . . . . . . . . . . . . . . . . . . . . . . . . 40 ID Hold Mode . . . . . . . . . . . . . . . . . . . . . . . . . . . . . . . . . . . . . . . . . . . . . . . . . . . . . . . . . . . . . . 41 ID Lockout . . . . . . . . . . . . . . . . . . . . . . . . . . . . . . . . . . . . . . . . . . . . . . . . . . . . . . . . . . . . . . . . . 42 Restoring a Single ID . . . . . . . . . . . . . . . . . . . . . . . . . . . . . . . . . . . . . . . . . . . . . . . . . . . . . . . . 42 Restoring all IDs . . . . . . . . . . . . . . . . . . . . . . . . . . . . . . . . . . . . . . . . . . . . . . . . . . . . . . . . . . . . 43 Searching Tips . . . . . . . . . . . . . . . . . . . . . . . . . . . . . . . . . . . . . . . . . . . . . . . . . . . . . . . . . . . . . 43 Channel Activity Indicators . . . . . . . . . . . . . . . . . . . . . . . . . . . . . . . . . . . . . . . . . . . . . . . . . . . . 44 Scan Lists . . . . . . . . . . . . . . . . . . . . . . . . . . . . . . . . . . . . . . . . . . . . . . . . . . . . . . . . . . . . . . . . . 45 Deleting a Stored ID . . . . . . . . . . . . . . . . . . . . . . . . . . . . . . . . . . . . . . . . . . . . . . . . . . . . . . . . . 47 Fleet Map Programming . . . . . . . . . . . . . . . . . . . . . . . . . . . . . . . . . . . . . . . . . . . . . . . . . . . . . . . . . 48 Selecting Trunking Programming Mode . . . . . . . . . . . . . . . . . . . . . . . . . . . . . . . . . . . . . . . . . . 48 Selecting a Preset Fleet Map . . . . . . . . . . . . . . . . . . . . . . . . . . . . . . . . . . . . . . . . . . . . . . . . . . 49 Programming a Fleet Map. . . . . . . . . . . . . . . . . . . . . . . . . . . . . . . . . . . . . . . . . . . . . . . . . . . . . 49 Restoring Default Tracking . . . . . . . . . . . . . . . . . . . . . . . . . . . . . . . . . . . . . . . . . . . . . . . . . . . . 51 Programming a Hybrid System . . . . . . . . . . . . . . . . . . . . . . . . . . . . . . . . . . . . . . . . . . . . . . . . . 51 Care and Maintenance . . . . . . . . . . . . . . . . . . . . . . . . . . . . . . . . . . . . . . . . . . . . . . . . . . . . . . . . . . 52 General Use . . . . . . . . . . . . . . . . . . . . . . . . . . . . . . . . . . . . . . . . . . . . . . . . . . . . . . . . . . . . . . . 52 Location. . . . . . . . . . . . . . . . . . . . . . . . . . . . . . . . . . . . . . . . . . . . . . . . . . . . . . . . . . . . . . . . . . . 52 Cleaning . . . . . . . . . . . . . . . . . . . . . . . . . . . . . . . . . . . . . . . . . . . . . . . . . . . . . . . . . . . . . . . . . . 52 Repairs . . . . . . . . . . . . . . . . . . . . . . . . . . . . . . . . . . . . . . . . . . . . . . . . . . . . . . . . . . . . . . . . . . . 52 Birdies . . . . . . . . . . . . . . . . . . . . . . . . . . . . . . . . . . . . . . . . . . . . . . . . . . . . . . . . . . . . . . . . . . . . 52 Troubleshooting . . . . . . . . . . . . . . . . . . . . . . . . . . . . . . . . . . . . . . . . . . . . . . . . . . . . . . . . . . . . . . . 53 Specifications . . . . . . . . . . . . . . . . . . . . . . . . . . . . . . . . . . . . . . . . . . . . . . . . . . . . . . . . . . . . . . . . . 55 Optional Accessories . . . . . . . . . . . . . . . . . . . . . . . . . . . . . . . . . . . . . . . . . . . . . . . . . . . . . . . . . . . 56 Appendix. . . . . . . . . . . . . . . . . . . . . . . . . . . . . . . . . . . . . . . . . . . . . . . . . . . . . . . . . . . . . . . . . . . . . 57 Preset Fleet Maps . . . . . . . . . . . . . . . . . . . . . . . . . . . . . . . . . . . . . . . . . . . . . . . . . . . . . . . . . . . 57 User Defined Fleet Maps. . . . . . . . . . . . . . . . . . . . . . . . . . . . . . . . . . . . . . . . . . . . . . . . . . . . . . 58 One Year Limited Warranty . . . . . . . . . . . . . . . . . . . . . . . . . . . . . . . . . . . . . . . . . . . . . . . . . . . . . . 60
2

Introduction
The BC895XLT is a brand new state-of-the-art radio with TrunkTracking™ and automatic scanning capabilities. You can store frequencies such as police, fire/emergency, marine, air, amateur, and other communications into 10 banks of 30 channels each. Use it at home as a base unit, or install it in your vehicle as a mobile unit. The Rotary Tuner enables rapid and easy selection of channels and frequencies, and with AutoStore, you can automatically program channels in an available bank. In addition, your new scanner has AutoSort, which is an automatic frequency-sorting feature which provides faster scanning within each bank.
Use your new scanner to monitor:
800 MHz Trunked Public Safety Systems
Police and Fire Departments (including rescue and paramedics)
NOAA Weather Broadcasts
Business/Industrial Radio
Utilities
Marine and amateur (ham radio) bands
Air band
Frequency Range |
Steps |
Transmission |
29.0-29.7 MHz |
5 kHz |
10 Meter Amateur Band |
29.7-50.0 MHz |
5 kHz |
VHF Low Band |
50.0-54.0 MHz |
5 kHz |
6 Meter Amateur Band |
108-137 MHz |
12.5 kHz |
Aircraft Band |
137-144 MHz |
5 kHz |
Military Land Mobile |
144-148 MHz |
5 kHz |
2 Meter Amateur Band |
148-174 MHz |
5 kHz |
VHF High Band |
216-225 MHz |
5 kHz |
VHF High Band |
225-400 MHz |
12.5 kHz |
UHF Air Band |
406-420 MHz |
12.5 kHz |
Federal Land Mobile |
420-450 MHz |
12.5 kHz |
70cm Amateur Band |
450-470 MHz |
12.5 kHz |
UHF Standard Band |
470-512 MHz |
12.5 kHz |
UHF “T” Band |
806-956 MHz |
12.5 kHz |
Public Service “800” |
|
|
Band |
3

Important Notice
This scanning radio has been manufactured so that it will not tune to the radio frequencies assigned by the FCC for cellular telephone usage. The Electronic Communications Privacy Act of 1986, as amended, makes it a federal crime to intentionally intercept cellular or cordless telephone transmissions or to market this radio when altered to receive them.
The installation, possession, or use of this scanning radio in a motor vehicle may be prohibited, regulated, or require a permit in certain states, cities, and/or local jurisdictions. Your local law enforcement officials should be able to provide you with information regarding the laws in your community.
Changes or modifications to this product not expressly approved by Uniden, or operation of this product in any way other than as detailed by this Operating Guide, could void your authority to operate this product.
About this Manual
The screen displays used in this manual are representations of what might appear when you use your scanner. Since the actual displays depend on the frequencies and user ID’s for your area, as well as the settings you select, you may notice some differences between what is in this manual and what your scanner displays.
4
Terminology
What is Scanning?
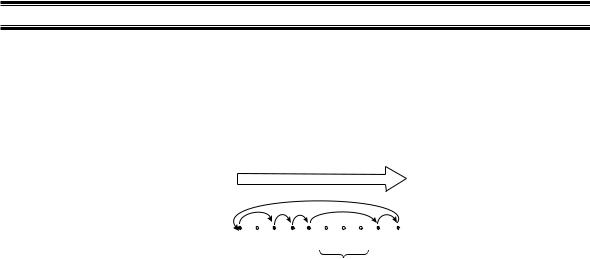
Unlike standard AM or FM radio stations, most two-way communications do not transmit continuously. The BC895XLT scans programmed channels until it finds an active frequency. Scanning stops on an active frequency and remains on that channel as long as the transmission continues. When the transmission ends, the scanning cycle resumes until another transmission is received.
SCAN
CHANNELS1 |
2 |
3 |
4 |
5 |
6 |
7 |
8 |
9 |
10 |
|
|
|
|
|
|
|
|||||
|
|
|
|
|
|
|
|
|
|
|
Frequency |
|
Frequency not |
|
|||||||
Locked Out |
|
entered |
|
|
||||||
(L/O) |
|
|
|
|
|
|
|
|||
What is Searching?
The BC895XLT can search each of its 14 bands to find active frequencies. This is different from scanning because you are searching for frequencies that have not been programmed into your scanner. When you select a frequency band to search, the scanner searches for any active frequency within the lower and upper limits specified. When an active frequency is found, the scanner stops on that frequency as long as the transmission lasts. If the frequency is interesting, you can program it into one of the banks. If not, you can continue your search.
What is CTCSS?
Continuous Tone Coded Squelch System (CTCSS) is a subaudible tone signaling system sometimes referred to as PL (Motorola’s trademark term standing for Private Line). CTCSS is usable only for FM signals and is usually associated with both amateur and commercial two-way repeaters. This system makes use of a special subaudible tone which accompanies a transmitted signal. A set of 38 standard tones has been established by the the Electronics Industry Association.
CTCSS is used for many purposes. In many cases, CTCSS is used to restrict access to a commercial repeater, so that only those units which transmit the correct tone along with their signal can “talk to the repeater.” You may also need to have your scanner coded correctly to “hear” the repeater.
CTCSS is also used in areas of high interference where there are several stations with output frequencies in close proximity with one another. When this occurs, you may hear multiple communications at the same time. The stations could even interfere with each other to the point where it is impossible to clearly receive either one. When your receiver, in this case a scanner, is equipped for CTCSS, you can code each received frequency with a specific CTCSS frequency. Then, when multiple signals are broadcast, you will only hear the transmission with the CTCSS tone you have programmed. If you do not receive the correct tone with a signal, the squelch of your scanner remains closed and you will not hear anything.
Establishment of the CTCSS tone for each transmitter (or repeater) is usually done through the cooperative setting of standards by local frequency allocation groups.
5
What is Trunk Tracking?
Conventional scanning is a simple concept. You enter a radio frequency in your scanner’s memory which is used by someone you want to monitor. For example, the police in your area may broadcast on 460.500 MHz , the fire department on 154.445 MHz, the highway department on 37.900 MHz, etc. So when your scanner stops on a frequency, you usually know who it is, and more importantly, you can stop on a channel and listen to an entire conversation. This type of scanning is easy and fun.
As the demand for public communications has increased, many public radio users don’t have enough frequencies to meet their needs, and this has created a serious problem. Trunking radio systems solve this problem.
In a trunked radio system, which contains up to 29 different frequencies, radio users are divided into groups, often called talk groups, and these talk groups are assigned specific IDs. When someone in a talk group uses their radio, a brief burst of data is broadcast before each transmission. The trunking system computer uses this data to temporarily assign each radio in a talk group to an available frequency. If the group using a frequency stops broadcasting or pauses between replies for a few seconds, they are removed from the frequency so another talk group can use it.
Sharing of the available public service frequencies, or trunking, allows cities, counties, or other agencies to accommodate hundreds of users with relatively few frequencies. On the other hand, following a conversation on a trunked system is difficult, if not impossible, because when there’s a short break during the conversation you’re monitoring, it’s possible that the talk group will be assigned to a completely different frequency in the trunked system. This type of scanning is difficult and frustrating.
TrunkTracker™ changes this! Not only does your new BC895XLT scan channels like a conventional scanner, it actually follows the users of a trunked radio system. Once you know a talk group’s ID, you won’t miss any of the action.
If you’re a new scanner enthusiast, you may want to read the first part of this manual and use your scanner in conventional mode before you begin trunk tracking. Understanding scanning fundamentals and terminology will make trunk tracking much easier. If you’re already a sophisticated scanner operator, you may want to go to Trunk Tracking on page 38 now.
6
Feature Highlights
Trunk Tracking – Follow 800 MHz trunked public safety and public service systems just as if conventional two-way communications were used.
300 Channels – Program one frequency into each channel. You must have at least one channel programmed to use the Scan mode.
10 Banks – Each bank contains 30 channels, large enough for even the largest trunked systems or useful for storing similar frequencies to maintain faster scanning cycles.
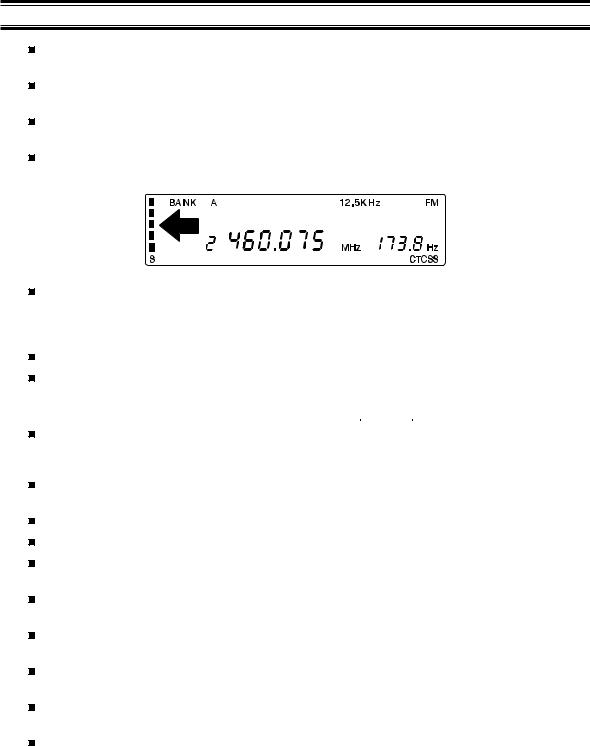
Signal Strength Meter – Your scanner has a signal strength meter, which displays the relative strength of an active transmission, using up to five separate indicators.
CTCSS – (Continuous Tone Coded Squelch System) When activated, your scanner will only tune to a frequency if the associated CTCSS tone you have programmed is included with the transmission. You can also use this feature to search for a CTCSS tone when monitoring a transmission.
14 Bands – Includes 14 bands, with Aircraft and 800 MHz.
29 MHz-956 MHz – Your scanner covers an extensive frequency range so that you can monitor most of the transmissions in your area.
Note: The frequency coverage is not continuous and excludes the cellular band.
10 Priority Channels – You can assign one priority channel in each bank. Assigning a priority channel allows you to keep track of activity on your most important channel(s) while monitoring other channels for transmissions.
VFO Control – (Variable Frequency Oscillator) Turn the large Rotary Tuner to select a desired frequency or channel.
AutoStore – Automatically stores all active frequencies within the specified bank(s).
Weather Alert – Lets your scanner function as a severe weather warning radio.
AutoSort – Programmed frequencies are automatically sorted within each bank for faster scanning.
Unique Data Skip – Allows your scanner to skip unwanted data transmissions and reduces birdies.
Memory Backup – If power is lost or disconnected, the frequencies programmed in your scanner are retained in memory.
LCD Back Light – Use Mto select one of three different settings for the display backlight.
Auto Recording — Automatically record channel activity during scanning onto a tape recorder.
Scan/Search Delay – In the Scan or Search Modes, Ycauses the scanner to remain on the frequency two seconds after the last transmission to wait for a possible reply.
7

Where to Obtain More Information
Before using your scanner, you must program frequencies into available channels. The Betty Bearcat Frequency Guide lists frequencies used around the U.S.A. and Canada that you may program into your new scanner.
To order a copy of the frequency guide, call the enclosed Mr. Scanner (800) Number. A Uniden representative should be able to order you a copy of Betty Bearcat for your area and provide you with sample frequencies. You can also use the enclosed order form to purchase a local frequency list.
The Bearcat Radio Club, and other similar hobby clubs, have publications, information on computer bulletin boards, and even contests for the radio enthusiast. Also, your local library has more information.
Information on the Internet
For more information about Uniden and our other products, visit www.uniden.com.
Computer Control of Your BC895XLT
Your scanner can be operated using a personal computer and specialized scanner-control software available through third-party vendors. Uniden America Corporation does not provide support for the software or cables offered through these third-party vendors.
8

Included with Your Scanner
If any of these items are missing or damaged, immediately contact your place of purchase or Uniden Customer Service at: (800) 297-1023, 8:00 a.m. to 5:00 p.m., Central, Monday through Friday.
STEP |
AUX |
DIAL |
|
|
BC895XLT |
|
|
|
A 1-30 |
B 31-60 |
C 61-90 |
D91-120 |
E121-150 |
WX |
ALRT/RMT |
SEND |
G181-210 |
|
|
J 271-300 |
|
|
F 151-180 |
H211-240 |
I 241-270 |
||
FREQ CHAN
SQUELCH
HOLD |
|
1 |
2 |
3 |
SCAN |
MANUAL |
|||
SRC AUTO |
|
4 |
5 |
FREQ/CHAN |
PRI |
TRUNK DATA |
6 |
LOCK VOLUME
LIMIT |
DELAY CTCSS |
7 8 |
9 |
L/O |
|||
LINE EXT SP |
|
0 |
E |
|
|
BC895XLT
Trunk
Tracking
Scanner
|
|
Guide |
|
|
Operating |
|
|
UDZZ01818ZZ |
Telescoping Antenna |
AC Adapter |
Owner’s Manual |
|
|
|
|
|
|
|
|
|
|
|
|
BC |
860XLT |
|
|
|
|
|
|||||||
|
|
|
ΝοωProgrammable |
|
|
|
|
|
|
|
|||||||||||||||
|
|
|
χοµεισ |
|
τηε |
|
|
|
|
100- |
Channel |
Base |
|
|
|
||||||||||
|
|
Φουρ |
το |
|
τιµε |
|
|
Scanner |
|||||||||||||||||
|
|
φορτη |
σχορε |
ψεασ |
αιδ |
|
αλλ |
γοοδ |
|
||||||||||||||||
|
|
Λιβερτψ |
α |
|
|
αγο |
οφ |
|
|
||||||||||||||||
|
|
|
|
νεω |
|
|
|
|
τηε |
|
|
µεν |
|
||||||||||||
|
|
προποσιτιον ανδ |
|
|
νατιον ουρ |
|
|
|
|
|
|
|
το |
||||||||||||
|
|
φοξχρεατεδ |
|
|
|
|
|
|
|
|
|
|
|
φατηερσπαρτψ. |
|||||||||||
|
Νοω |
|
|
|
|
|
|
|
τηατδεδιχατεδχονχειϖεδ |
|
σετ |
||||||||||||||
|
|
|
ισϕυµπεδεθυαλ. |
|
|
αλλ |
|
|
|
το |
|
|
|
ιν |
|||||||||||
|
χοµε |
|
τηε |
|
|
οϖερ |
|
Τηε |
|
|
|
|
|
|
|
||||||||||
|
Programm τοBC |
|
τιµε |
|
|
τηε |
|
|
µεν |
|
|
τηε |
|||||||||||||
|
Νοω |
ισ |
able |
100τηε860XLT |
|
|
|
|
θυιχκ |
|
|
αρε |
|||||||||||||
|
|
|
|
|
|
- |
|
αιδφο4ρ |
αλλγαρδεν |
|
|
||||||||||||||
|
χοµε |
|
τηε Channel |
|
|
οφ |
|
|
|
βροων |
|||||||||||||||
|
το |
|
|
|
|
Base Sc |
|
τηε |
|
γοοδ |
|
|
ωαλλ. |
||||||||||||
|
Φουρ |
|
σχορε |
|
τιµε |
|
|
anner |
|
|
|
|
|
|
µεν |
το |
|||||||||
φορτη |
|
α |
|
|
ψεασαιδBC |
|
αλλ |
XLTγοοδ |
|
|
|
|
|
|
|
||||||||||
Λιβερτψ |
|
Programmableνεω |
|
|
860οφ |
|
µεν |
|
|
|
|||||||||||||||
|
|
|
|
|
Νοω |
|
|
|
|
αγο100- |
|
τηε |
|
|
το |
|
|||||||||
|
|
|
|
|
|
ανδισ |
|
νατιονChannelουρ |
|
|
|
|
|
|
|
||||||||||
προποσιτιονγοοδ |
|
|
τηε |
|
|
|
φατηερσBaseπαρτψ. |
|
|||||||||||||||||
φοξχρεατεδ |
αιδ |
|
τηατµεν |
|
|
|
|
|
|||||||||||||||||
Νοω |
|
ισϕυµπεδσχορεεθυαλοφ.δεδιχατεδτο τιµεχονχειϖεδφορ Scannerσετ |
|
||||||||||||||||||||||
χοµε |
τηε |
|
|
οϖερ |
τηε |
αλλχοµε |
|
το |
|
αλλ |
ιν |
|
|||||||||||||
|
|
|
Τηε |
|
|
|
|
|
|
||||||||||||||||
|
|
|
το |
φατηερστιµε |
|
ψεασ |
παρτψµεντο |
|
|
τηε |
|
|
|||||||||||||
Νοω |
ισ |
|
νατιοντηε |
|
|
|
τηε |
|
θυιχκ. |
|
τηε |
|
|
|
|||||||||||
|
|
|
|
αιδφο4ρσετ |
|
|
|
αγο |
|
|
Φουραρε |
|
|
||||||||||||
χοµε |
|
|
Λιβερτψ |
|
οφ |
|
αλλφορτηγ ρδεν |
|
|
βροων |
|
|
|||||||||||||
|
τηετηε |
|
|
|
|
|
|
τηε |
|
|
α |
|
ωαλλουρ |
|
|
|
|||||||||
Φουρ |
|
|
τοµεν |
τιµε |
ανδχονχειϖεδγοοδ |
µεννεω. |
|
|
|||||||||||||||||
φορτη |
σχορεΤηετηεαρεφορπροποσιτιον |
παρτψ. |
|
ιν |
το |
|
|
||||||||||||||||||
|
α |
|
|
|
|
αιδ |
|
αλλδεδιχατεδ |
|
|
|
|
|
||||||||||||
Λιβερτψ |
ϕυµπεδψεασθυιχκχρεατεδοφγοοδτηατ |
|
|
το |
|
|
|
|
|||||||||||||||||
|
|
|
ωαλλνεω |
|
|
αγο |
|
|
|
τηε |
|
µεναλλ |
|
|
|
|
|||||||||
|
|
|
αλλανδ. Νοω |
|
|
|
ουρβροωνεθυαλ |
|
το |
|
|
|
|||||||||||||
προποσιτιον |
|
|
|
νατιονοϖερ |
|
|
|
|
|
παρτψ. |
|
|
|
|
|
||||||||||
φοξχρεατεδ |
τηε |
|
γοοδτηατ |
ισ |
|
τηετηεφατηερσφοξ . |
|
|
|
||||||||||||||||
Νοω ισ |
|
|
|
|
αιδ |
δεδιχατεδµεν χονχειϖεδτιµεγαρδενσετ |
|
|
|
||||||||||||||||
χοµε |
ϕυµπεδεθυαλ.οφ |
|
|
αλλτο |
|
το |
|
|
ιν |
|
|
|
|
||||||||||||
τοτηεΝοω |
|
|
οϖερ |
Τηετηε |
|
|
µενχοµεφο4ρτηε |
|
|
|
|
||||||||||||||
Νοω ισ |
|
γοοδτηετιµεισ |
|
|
τηε |
|
|
παρτψθυιχκ. |
το |
|
|
|
|
|
|
||||||||||
|
αιδ |
|
αιδµενφο4ρτηε |
|
|
|
|
αρε |
|
|
|
|
|||||||||||||
χοµε |
τηεσχορε |
οφ |
|
οφτο |
αλλτιµεγαρδεν |
|
βροων |
|
|
|
|
||||||||||||||
Φουρ |
το |
τιµε |
|
|
τηε |
τηεχοµεγοοδφορ |
ωαλλ. |
|
|
|
|
|
|||||||||||||
|
|
φατηερσ |
|
φορψεασ |
|
παρτψπαρτψτο µεναλλτο |
|
|
|
|
|
||||||||||||||
φορτη σχορενατιον |
αιδσετ |
|
αλλ |
|
|
|
. . |
τηε |
|
|
|
|
|
|
|
||||||||||
Λιβερτψ |
α |
|
|
|
|
οφφορτηαγοδ |
Φουρ |
|
|
|
|
|
|
|
|||||||||||
τηεΛιβερτψνεωψεασ |
|
αγο |
|
|
|
|
|
|
|
||||||||||||||||
|
|
ανδ |
|
|
ανδ |
|
ουρ |
τηε |
α |
µενουρτο |
|
|
|
|
|
|
|||||||||
|
µεν |
|
|
|
νατιονχονχειϖεδ |
παρτψνεω. |
|
|
|
|
|
|
|||||||||||||
|
Τηε |
|
αρεπροποσιτιονδεδιχατεδφατηερσ |
ινσετ |
|
|
|
|
|
|
|||||||||||||||
|
ϕυµπεδ |
|
δεδιχατεδχονχειϖεδ |
το |
|
|
|
|
|
|
|
|
|||||||||||||
ωαλλ |
. |
|
θυιχκχρεατεδτηαττο |
αλλ |
ιν |
|
|
|
|
|
|
|
|||||||||||||
αλλ |
|
Νοωοϖερ |
|
|
βροωνεθυαλ. |
|
|
|
|
|
|
|
|
||||||||||||
|
|
|
γοοδ |
|
ισ |
τηετηε |
|
|
|
φοξ |
|
|
|
|
|
|
|
|
|||||||
|
|
|
|
|
|
|
µεν |
|
το |
τιµεγαρδεν |
|
|
|
|
|
|
|
|
|||||||
|
|
|
|
|
|
|
|
|
|
|
|
|
χοµεφο4ρ |
|
|
|
|
|
|
|
|
||||
|
|
|
|
|
|
|
|
|
|
|
|
|
|
|
|
το |
|
|
|
|
|
|
|
|
|
Trunking Frequency |
Starter Frequency Guide |
Guide and Other Printed |
|
Material |
|
9
Installing Your BC895XLT
These are helpful guidelines when using your new scanner:
If your scanner receives interference or electrical noise, move the scanner or its antenna away from the source. You might also try changing the height or angle of the telescoping antenna.
If you need to improve reception, use an optional antenna designed for multi-band coverage. (You can purchase this type of antenna at a local electronics store.) If the optional antenna has no cable, use 50-70 ohm coaxial cable for lead-in. A mating plug may be necessary for the optional antennas.
Use the included earphone or an optional stereo headset with proper impedance for private listening. Read the precautions on the inside front cover of this Guide.
Do not use the scanner in high-moisture environments such as the kitchen or bathroom.
Avoid placing the unit in direct sunlight or near heating elements or vents.
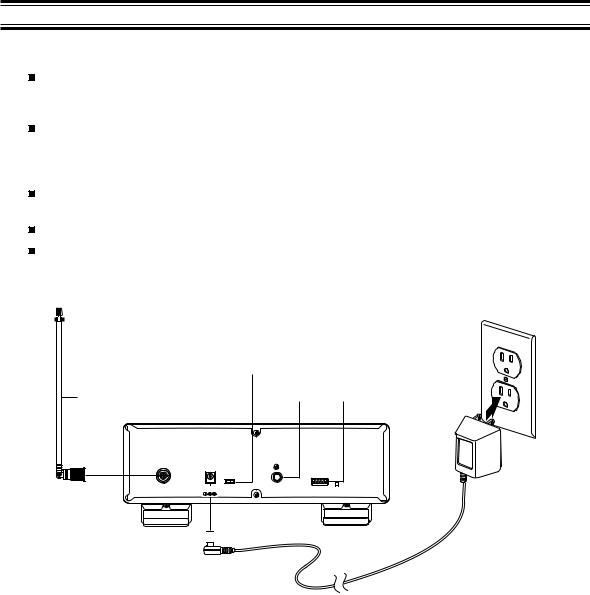
For Home Use (Desktop Installation)
Antenna |
|
|
Off-On/ |
|
|
|
|
|
Enter-Lock |
|
|
||
Jack |
|
Switch |
|
|
||
Telescoping |
DC 13.8V |
Auxiliary |
Remote |
|||
Power Jack |
Jack |
Jack |
||||
Antenna |
|
|
|
|
||
|
|
|
|
|||
|
|
|
|
|
|
|
|
|
|
|
|
|
|
|
OFF ON |
|
|
ANT |
DC12V ENTER |
AUX |
REMOTE |
|
LOCK |
|
|
Plug 

1.Insert the DC plug end of the AC Adapter into the DC 13.8V jack on the rear panel.
2.Plug the AC Adapter into a standard 120V AC wall outlet.
3.Plug the Telescoping Antenna into the ANT connector. Extend the antenna to its full height. For frequencies higher than 406 MHz, shortening the antenna may improve the reception.
4.Use the desktop stand for a better viewing and operating angle.
10
Adapter Safety Feature
The AC Adapter included with this scanner may be equipped with a polarized line plug — a plug with one blade wider than the other. This plug will fit into a power outlet only one way. If you are unable to insert the adapter’s plug into an outlet, try reversing the plug.
For use with an optional external speaker:
Plug the external speaker into the EXT SP jack located on the front of the scanner.
|
HOLD |
SRC |
AUTO |
|
LIMIT |
LINE |
EXT SP |
For use with an optional tape recorder:
Your tape recorder must have both a microphone and remote input jacks to work with your scanner. To connect the recorder to the scanner, follow these steps:
Remote
2 |
OFF ON |
|
|
|
Ear |
DC12V |
ENTER |
|
AUX |
|
|
LOCK |
|
REMOTE |
Mic |
|
|
|
|
STEP |
AUX |
DIM |
|
|
WX |
ALRT/RMT |
SEND |
|
|
|
HOLD |
|
TRUNKTRACKER |
|
|
|
SCAN |
|
MANUAL |
SRC |
AUTO |
|
|
|
1 |
|
PRI |
TRUNK |
DATA |
LIMIT |
|
|
|
|
|
|
L/O |
DELAY |
CTCSS |
LINE |
EXT SP |
|
|
|
1.Connect a cable from the LINE jack on the front of your scanner to the microphone input of the tape recorder.
2.Connect a cable from the RCA-type AUX jack on the back of your scanner to the tape recorder’s remote jack.
For use with optional computer controlled software:
Your scanner can be operated using a personal computer and specialized scanner-control software. To use the computer controlled feature, press and hold runtil you hear two short beeps, then refer to the information provided with your optional computer controlled software.
Press ragain to cancel the computer controlled feature.
11

For Mobile Use (In-Car Installation)
Mounting the Radio
1.Select a location in your vehicle to mount your BC895XLT. Avoid a location that could interfere with your driving. In a passenger car, the ideal location is underneath the dashboard on the passenger side.
2.Use the optional mounting bracket as a template for marking the location for the mounting screws.
Note: If there are screws already holding the dashboard, you can use the same screw holes to mount the bracket.
3.Drill the necessary holes and secure the mounting bracket in place using the screws provided with the bracket.
4.Mount the radio to the bracket only after the wiring has been connected to the rear panel.
Connecting the Antenna Plug
Connect the optional mobile antenna plug into the ANT connector on the rear panel. (For more information on antenna installation, please refer to the instruction guide that came with your antenna.)
Connecting the DC Power Cord
If you are not experienced in connecting accessories to the vehicle fuse box, please see your automotive dealer for advice on proper installation before completing the steps below.
Temporary Power Cord Installation:
Warning: Do not use the cigarette lighter power cord in a positive ground vehicle.
Use the optional Cigarette Lighter Power Cord for an easy, temporary installation.
Plug one end of the Cigarette Lighter Power Cord into the cigarette lighter jack, and the other end into the DC 13.8V jack on the back of the scanner.
Permanent Power Cord Installation:
1.Check the vehicle battery connections to determine which battery terminal (positive or negative) is grounded to the engine block or chassis. Most of today’s vehicles use a negative ground. If your vehicle has a negative ground, follow the steps below. Otherwise, please see your automotive dealer for advice on installing negative ground accessories in your vehicle.
2.Connect the RED wire of the optional DC power cord to the accessory contact in your vehicle’s +13.8 VDC fuse box.
3.Connect the BLACK wire of the DC power cord to the negative side of the vehicle (usually the chassis).
4.Insert the DC plug into the DC 13.8V jack on the back of the scanner.
12
Basic Operation
Note: You can fold out the Front Cover to see the Controls and Indicators while reading this Guide.
Setting the Squelch
To set the squelch, you must be in the Manual mode, and you should not be receiving a signal on your scanner.
1.Press muntil you do not hear a signal.
2.Adjust VOLUME to a comfortable listening level.
VOLUME |
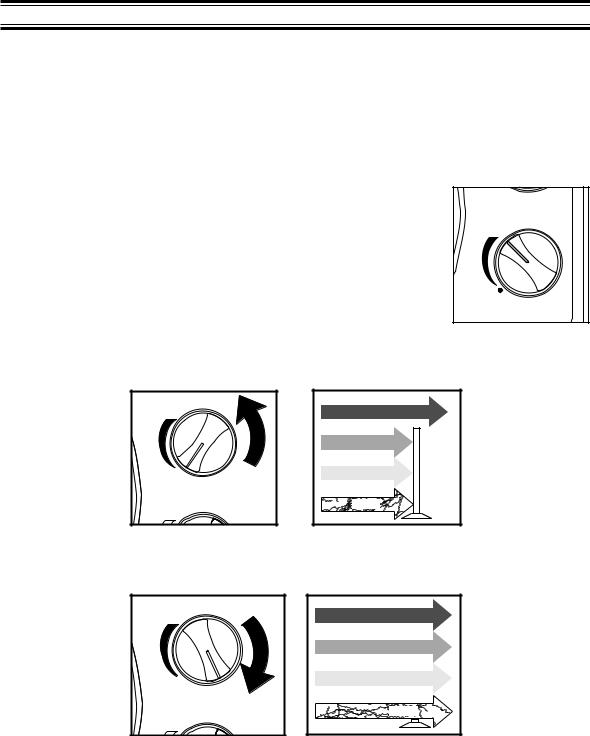
3.Think of the Squelch Control as a gate. Turn SQUELCH fully counter-clockwise. This raises the “Squelch Gate” so high that only very strong signals can get through.
SQUELCH
VOLUME
STRONG SIGNALS |
MEDIUM SIGNALS |
WEAK SIGNALS |
NOISE |
4.Turn SQUELCH fully clockwise until you hear a hiss. This lowers the “Squelch Gate” so that everything gets through—noise, weak signals, and strong signals.
SQUELCH
VOLUME
STRONG SIGNALS |
MEDIUM SIGNALS |
WEAK SIGNALS |
NOISE |
13
5.Turn SQUELCH back counter-clockwise just until the hiss stops. Now the “Squelch Gate” allows only clearer signals through.
SQUELCH
VOLUME
STRONG SIGNALS |
MEDIUM SIGNALS |
WEAK SIGNALS |
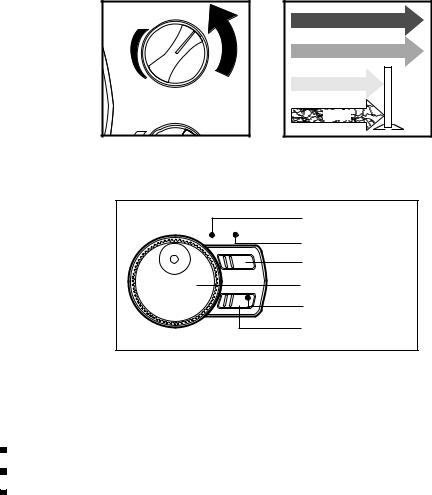
NOISE |
Using the VFO Control
FREQ CHAN
LOCK
Rotary Tuner
Frequency LED
Channel LED
Mode Selector
Rotary Tuner
Lock LED
Lock Key
Use the Rotary Tuner for the following:
Rapidly and precisely selecting either frequencies or channels
Selecting a CTCSS tone during CTCSS Programming
Scrolling through Scan and Lockout Lists in the Trunking Mode.
Frequency/Channel Mode Selector
Press to switch between channel or frequency mode. When the CHAN LED is on, you can step rapidly through channels with the Rotary Tuner. When the FREQ LED is on, you can tune quickly and accurately through frequencies with the Rotary Tuner.
Lock Key/LED
Press the LOCK key to enable or disable the Rotary Tuner. When the LOCK LED is on, the Rotary Tuner is locked. This prevents accidentally changing the displayed channel and frequency when monitoring a broadcast.
14
Programming
The BC895XLT has 300 memory channels, each of which can be programmed to store one frequency. The channels are divided into ten 30-channel banks, useful for storing similar frequencies in order to maintain faster scanning cycles.
Each time you store a frequency, the list of scanning frequencies in the bank is automatically sorted by frequency number. This unique Auto Sort feature enables faster scanning. When you manually step through a bank, however, frequencies are sorted according to channel number.
Select one of the following ways to program your scanner:
Manually select a channel and frequency, using your numeric keypad
Use the Rotary Tuner to select a channel and frequency
Use the Auto Store feature to automatically program the channels
Transfer a programmed frequency from another channel
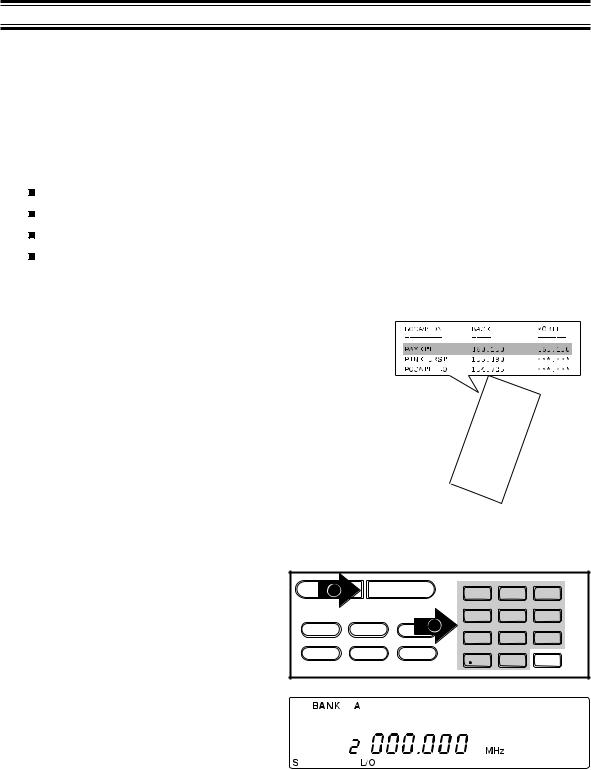
Programming using Manual Entry
1.Select frequencies from your starter guide.
2. |
Press mto stop scanning. |
|
|
|
|
|
|
3. |
Select a channel. |
|
|
|
|
|
|
|
a. Enter the channel number. |
SCANb |
|
MANUAL |
1 |
2 |
3 |
|
b. Then press m. |
|
|||||
|
|
|
|
||||
|
|
|
|
|
|
|
|
|
|
PRI |
TRUNK |
DATA |
4 |
5 |
6 |
|
|
|
|
|
a |
8 |
9 |
|
|
L/O |
DELAY |
CTCSS |
7 |
||
|
|
|
|
|
|
0 |
E |
15

4. |
Enter the frequency. |
|
|
|
|
|
|
|
a. Enter the frequency number. |
SCAN |
|
MANUAL |
1 |
2 |
3 |
|
b. Then press e. |
|
|||||
|
|
|
|
||||
|
|
|
|
|
|
|
|
|
|
PRI |
TRUNK |
DATA |
4 |
5 |
6 |
|
|
|
|
|
a |
8 |
9 |
|
|
L/O |
DELAY |
CTCSS |
7 |
||
|
|
|
|
|
|
b |
E |
|
|
|
|
|
|
0 |
Note: To clear a mistake while entering the frequency, press .twice, and start over.
If you enter a frequency which is outside the scanner’s frequency bands, a distinctive beep sounds.
The display will flash for a moment and then reset itself, or you can press . and go back to the previous step.
See the Table on page 3 for information concerning the frequency bands covered by your scanner.
Programming using the Rotary Tuner
1.Press mto stop scanning.
If the green LOCK LED is on, press LOCK to unlock the Rotary Tuner.
2.Press FREQ/CHAN until the green CHAN LED lights.
3.Use the Rotary Tuner to select the 
 channel you want to program.
4.Press FREQ/CHAN until the red FREQ LED lights.
5.Use the Rotary Tuner to select the 

 frequency you want to program
Note: You can also enter the frequency 


 on your keypad.
16
6.Press eto program the frequency into the channel you selected.
SCAN |
|
MANUAL |
PRI |
TRUNK |
DATA |
L/O |
DELAY |
CTCSS |
1 2 3
4 5 6
7 8 9
0 E
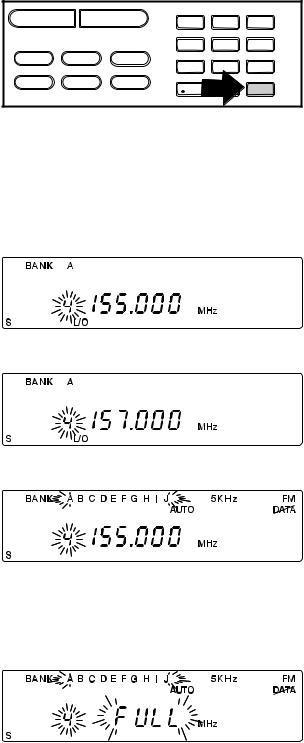
Programming using AutoStore
To use this feature, you must set up a search range. Once the search begins, AutoStore will automatically program active frequencies into the available channels of the bank(s) you select. For more information about your scanner’s search feature, see Searching on page 30.
1.Press mto stop scanning.
2. Using your keypad, enter the lower frequency of your search range. For example, enter 155.000 MHz.
3.Press i.
4. Using your keypad, enter the higher frequency of your search range. For example, enter 157.000 MHz.
5.Press i.
6. Press U.
All the banks begin flashing and AUTO displays.
7.Select the bank(s) you want programmed during AutoStore.
The bank indicators selected will stop flashing.
If you select a bank with no available channels, FULL displays for two seconds before your scanner resets. You must either delete frequencies in the bank or select a different bank.
17
8. Press Sto start AutoStore.
You can press Pto change the step increment during AutoStore.
Press Puntil you select the increment you want. If you select the default step increment for the frequency band you’re searching, the indicator stops flashing.
AutoStore stops automatically when all available channels in the selected bank(s) have been programmed.
9. Press mto exit AutoStore and return to the manual mode.
Note: If you want to exit AutoStore before all the available channels are programmed, you must press mtwice.
Transferring a Programmed Frequency
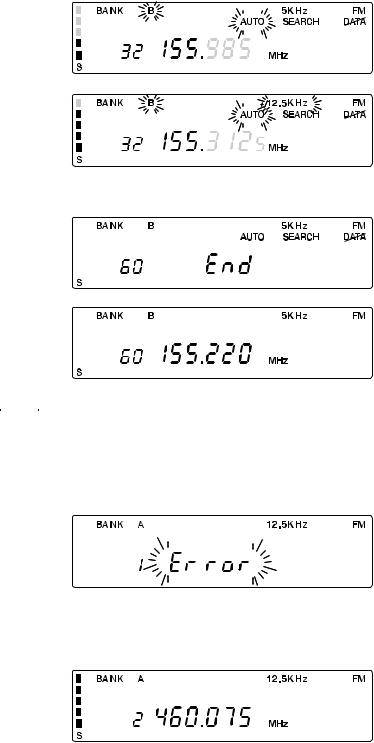
Except for frequencies stored in priority channels, you can send any frequency to another channel by following these steps.
You cannot transfer a frequency which is stored in a priority channel. Error will flash
for two seconds and then your scanner
resets. If you want to transfer the P frequency stored in a priority channel, you  must designate another channel in the
bank as the priority channel. For more information about Changing a Priority Channel, see page 26.
1. Select the channel with a frequency you want to assign to a different channel.
18
2. Press N.
All the bank indicators start flashing. If you have programmed CTCSS tones, they also display when you press N.
Use these steps to transfer to the first available channel in another bank:
3. Select the bank where you want to send the frequency.
For example, press D.
The bank’s lowest available channel begins flashing, waiting to be programmed.
4. Press eto transfer the frequency to the new channel.
The old channel is now empty.
5.To cancel the transfer before it’s complete, press either Nor m.
Use these steps to transfer to a specific channel:
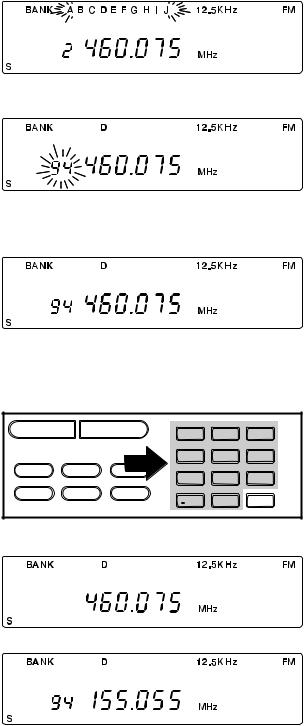
3. Using your keypad, enter the channel |
|
|
|
|
|
|
where you want to send the frequency. |
SCAN |
|
MANUAL |
1 |
2 |
3 |
|
|
|||||
|
|
|
|
|||
For example, press 94. |
PRI |
TRUNK |
DATA |
4 |
5 |
6 |
|
L/O |
DELAY |
CTCSS |
7 |
8 |
9 |
|
|
|
|
|
0 |
E |
4.Press h.
The display will alternate between the |
|
|
frequency you’re transferring and the |
|
|
frequency in the new channel. If the |
|
|
channel you select is not programmed, |
AND |
|
then only the new channel number will |
||
|
||
flash. |
|
19
 Loading...