


TABLE OF CONTENTS
Introduction . . . . . . . . . . . . . . . . . . . . . . . . . . . . . . . . . . . 2 What is Scanning? . . . . . . . . . . . . . . . . . . . . . . . . . . . 2 What is Searching? . . . . . . . . . . . . . . . . . . . . . . . . . . 2 Types of Communications . . . . . . . . . . . . . . . . . . . . . 3 Feature Highlights . . . . . . . . . . . . . . . . . . . . . . . . . . . . . . 4 Where to Obtain More Information . . . . . . . . . . . . . . . . . 5 Included with Your Scanner. . . . . . . . . . . . . . . . . . . . . . . 6 Setup . . . . . . . . . . . . . . . . . . . . . . . . . . . . . . . . . . . . . . . . 7 Installing the Batteries . . . . . . . . . . . . . . . . . . . . . . . . 7 AC Adapter/Charger . . . . . . . . . . . . . . . . . . . . . . . . . . 8 Charging Warning. . . . . . . . . . . . . . . . . . . . . . . . . . . . 8 Adapter Safety Feature . . . . . . . . . . . . . . . . . . . . . . . 9 Flexible Antenna . . . . . . . . . . . . . . . . . . . . . . . . . . . . . 9 Belt Clip . . . . . . . . . . . . . . . . . . . . . . . . . . . . . . . . . . . 9 Basic Operation . . . . . . . . . . . . . . . . . . . . . . . . . . . . . . . 10 Setting the Squelch . . . . . . . . . . . . . . . . . . . . . . . . . 10 Keylock . . . . . . . . . . . . . . . . . . . . . . . . . . . . . . . . . . . 12 Programming . . . . . . . . . . . . . . . . . . . . . . . . . . . . . . . . . 13 Duplicate Frequency Alert . . . . . . . . . . . . . . . . . . . . 14 Programming Tips . . . . . . . . . . . . . . . . . . . . . . . . . . 15 Scanning . . . . . . . . . . . . . . . . . . . . . . . . . . . . . . . . . . . . 16 Channel Lockout. . . . . . . . . . . . . . . . . . . . . . . . . . . . 17 Lockout in Manual Mode . . . . . . . . . . . . . . . . . . . . . 17 Locking a Channel While Scanning . . . . . . . . . . . . . 18 Lockout Tips . . . . . . . . . . . . . . . . . . . . . . . . . . . . . . . 18 Restore a Locked Out Channel . . . . . . . . . . . . . . . . 19 Restore All Locked-out Channels . . . . . . . . . . . . . . . 20 Priority Scan . . . . . . . . . . . . . . . . . . . . . . . . . . . . . . . . . 21 Changing the Priority Channel . . . . . . . . . . . . . . . . . 22 Chain Search . . . . . . . . . . . . . . . . . . . . . . . . . . . . . . . . . 23 Setting a Search Range . . . . . . . . . . . . . . . . . . . . . . 23 Search Hold Feature . . . . . . . . . . . . . . . . . . . . . . . . 26 Channel Skip . . . . . . . . . . . . . . . . . . . . . . . . . . . . . . 27 Storing Search Frequencies . . . . . . . . . . . . . . . . . . . 27 Weather Scan . . . . . . . . . . . . . . . . . . . . . . . . . . . . . . . . 30 Care and Maintenance . . . . . . . . . . . . . . . . . . . . . . . . . 31 General Use . . . . . . . . . . . . . . . . . . . . . . . . . . . . . . . 31 Location . . . . . . . . . . . . . . . . . . . . . . . . . . . . . . . . . . 31 Cleaning . . . . . . . . . . . . . . . . . . . . . . . . . . . . . . . . . . 31 Repairs . . . . . . . . . . . . . . . . . . . . . . . . . . . . . . . . . . . 32 Birdies. . . . . . . . . . . . . . . . . . . . . . . . . . . . . . . . . . . . 32 Troubleshooting . . . . . . . . . . . . . . . . . . . . . . . . . . . . . . . 33 Specifications. . . . . . . . . . . . . . . . . . . . . . . . . . . . . . . . . 34 Accessories and Replacement Parts. . . . . . . . . . . . . . . 35 One Year Limited Warranty . . . . . . . . . . . . . . . . . . . . . . 36
1

Introduction
The BC60XLT-1 Scanner is a sophisticated information radio that allows you to monitor 10 different frequency bands and the NOAA weather information broadcasts. It is a state-of-the-art radio with scanning capabilities, and it can save up to 30 different frequencies in memory.
What is Scanning?
Unlike standard AM or FM radio stations, most two-way communications do not transmit continuously. The BC60XLT-1 scans programmed channels until it finds an active frequency.
Scanning stops on an active frequency and remains on that channel as long as the transmission continues. When the transmission ends, the scanning cycle resumes until another transmission is received.
What is Chain Searching?
You can program five different personal search bands in your new scanner. You simply select a Chain Search location, define the search range, and begin your search. The scanner looks for active communications in the range you’ve specified, so you can locate frequencies in your area which may not be listed in your Betty Bearcat Starter Frequency Guide.
You can set your scanner to search up to all five Chain Search bands at once, or you can turn off those search bands you don’t want. This gives you complete control of the search function.

Types of Communications
Monitor communications such as:
Police and fire department (including rescue and paramedics)
NOAA weather broadcasts (preprogrammed channels)
Business/industrial radio
Motion picture and press relay
Utilities
Land transportation frequencies, such as trucking firms, buses, taxis, tow trucks, and railroads
Marine and amateur (ham radio) bands
And more in these bands:
Frequency |
Transmission |
Range |
|
29-29.7 MHz 10 Meter Amateur Band
29.7-50 MHz VHF Low Band
50-54 MHz 6 Meter Amateur Band
137-144 MHz Military Land mobile
144-148 MHz 2 Meter Amateur Band
148-174 MHz VHF High Band
406-420 MHz Federal Govt. Land Mobile
420-450 MHz 70 cm Amateur Band
450-470 MHz UHF Standard Band
470-512 MHz UHF “T” Band
3

Feature Highlights
30 Channels – Program one frequency into each channel. You must have at least one channel programmed to use the Scan mode.
29 MHz-512 MHz – Search these frequency ranges with your scanner. (The frequency coverage is not totally continuous from 29 MHz to 512 MHz.)
Chain Searching – You can define five different personal search bands, and search up to all five chain locations at once.
Priority Channel Scanning – Allows you to designate a priority channel which is monitored every two seconds when Priority Scanning is selected.
Manual Channel Access – Go directly to any channel.
Memory Backup – Frequencies programmed in channels are retained in memory. If power is completely disconnected, the frequencies are retained for one hour.
Weather Scan – Use as a weather information radio.
Preset Two-second Delay – Scanner waits two seconds after transmission stops before resuming scanning.
LCD Back Light – An orange LCD light remains on for 15 seconds when l is pressed.
4

Where to Obtain More
Information
Before using your scanner, you must program frequencies into available channels. The Betty Bearcat Starter Frequency Guide lists typical frequencies used around the U.S.A. and Canada that you may program into your new scanner.
If the frequencies listed in the starter guide do not work in your area, call the enclosed Mr. Scanner (800) Number. A Uniden representative should be able to provide you with sample frequencies, or use the enclosed order form to purchase a local frequency list.
The Bearcat Radio Club and other similar hobby clubs have publications, information on computer bulletin boards, and even contests for the radio enthusiast. Also, your local library has more information.
5

Included with Your Scanner
If any of these items are missing or damaged, immediately contact your place of purchase or Uniden Customer Service at: (800) 297-1023, 8:00 a.m. to 5:00 p.m., Central, Monday through Friday.
Rubber Antenna |
Belt Clip |
|
(AT218) |
||
with |
||
|
||
|
Screws |
|
|
(BCK150) |
AC Adapter
(AD70U)
Betty Bearcat |
Other |
|
Printed |
||
Starter |
||
Material |
||
Frequency |
||
|
||
Guide |
|
6
Setup
These are helpful guidelines when using your new scanner:
If your scanner receives interference or electrical noise, move the scanner or its antenna away from the source.
If you need to improve reception, use an optional antenna designed for multi-band coverage.(You can purchase this type of antenna at a local electronics store.)
Use the included earphone or an optional stereo headset with proper impedance for private listening. Read the precautions on the inside front cover of this Guide.
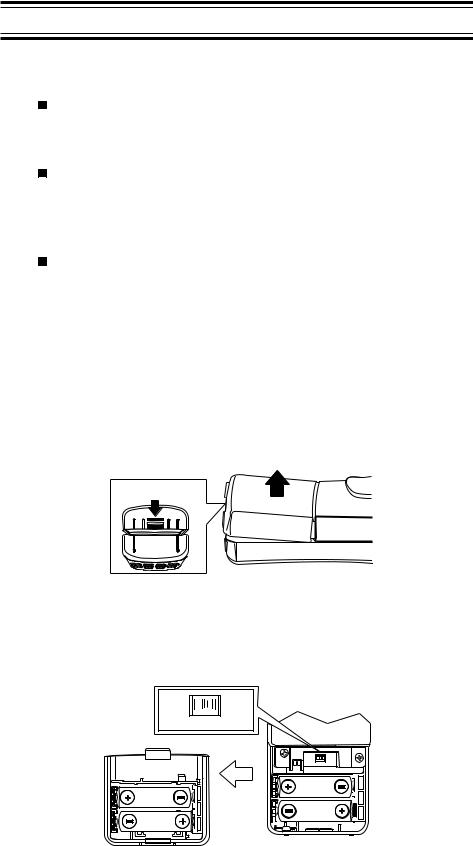
Installing the Batteries
1.Open the cover.
Lift
Press in
2.Insert batteries.
Ni-Cd  REG.
REG.
BATT.  ALK.
ALK.
BATT.
Ni-Cd |
REG. |
BATT. |
ALK. |
|
BATT. |
Inside
of Top
Cover
Note: If you are installing alkaline batteries, set the switch to REG. ALK. BATT. If installing Nickel-Cadmium Batteries, set the switch to Ni-Cd BATT.
7
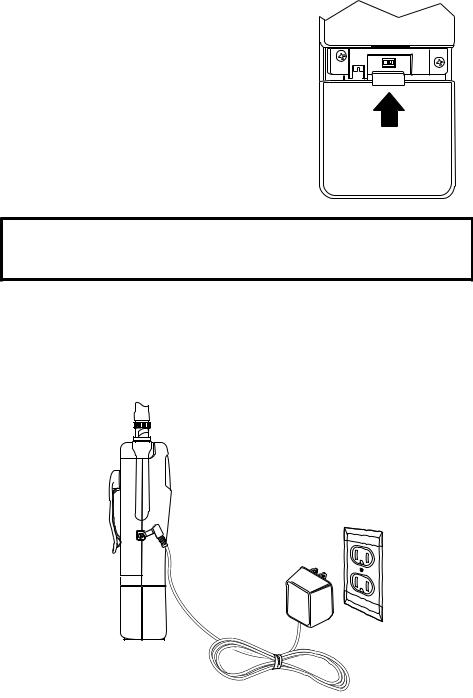
3.Replace cover and
press dow |
n unti |
l it |
click s int o |
place. |
|
N i-Cd
B AT T.
REG.
ALK.
B AT T.
Warning: Do not mix alkaline batteries with Ni-Cd Batteries. Be sure to install four batteries of the same type.
AC Adapter/Charger
Us e |
the AC Adapter/Charge |
r to poweBC 60XLTr the-1 |
||||
fro m |
a n A C outlet. |
|
||||
|
|
|
|
|
|
|
|
|
|
|
|
|
|
|
|
|
|
|
|
|
|
|
|
|
|
|
|
AD-70U
A C Adapter
A C 120V
Outlet
Use only the supplie |
d |
AC Adapter |
|
(AD70U or) on e o f the opt |
iona l power |
||
cord s(UA502 o |
r UA510. |
) |
|
Charging Warning
Do not charg |
e |
alkalin |
e |
batter |
ies i n this scanner |
. Doin |
g so |
|
ma y caus |
e seriou s damage t |
o the produc |
t an d |
voi d |
the |
|||
warranty. Before attemptin |
|
g |
to recharg e |
batter |
ies , make |
|||
sure you hav |
e |
installe |
d |
four rechargeable nickel-cadmium |
|
|||
batterie s an d the selecto |
r switchNi-CsdseBATTt .to |
|
|
|
||||
8

Adapter Safety Feature
The AC Adapter included with this scanner may be equipped with a polarized line plug — a plug with one blade wider than the other. This plug will fit into the power outlet only one way. If you are unable to insert the plug fully into the outlet, try reversing the plug.
Flexible Antenna
Attach the flexible antenna to the
BNC connector.
Belt Clip
Do not tighten the screws too tight.
You can damage the case or clip.
9

Basic Operation
Note: You can fold out the Front Cover to see the Controls and Indicators while reading this Guide.
Setting the Squelch
To set the Squelch, you must be in the Manual Mode. No signal should be present when adjusting squelch.
1. Press Muntil you do not hear a signal.
2.Adjust VOLUME to a comfortable listening
level.
3.Think of the Squelch Control as a gate. Turn SQUELCH fully counter-clockwise. This raises the “Squelch Gate” so high that no signals can get through.
Strong Signals
Medium Signals
Weak Signals |
PHONE SQUELCH VOLUME |
Noise
10
4.Turn SQUELCH fully clockwise until you hear a hiss. This lowers the “Squelch Gate” so that everything gets through—noise, weak signals, and strong signals.
Strong Signals
Medium Signals
Weak Signals |
PHONE SQUELCH VOLUME |
Noise
5.Turn SQUELCH back counter-clockwise just until the hiss stops. Now the “Squelch Gate” allows only strong signals through.
Strong Signals
Medium Signals
Weak Signals |
PHONE SQUELCH VOLUME |
Noise
11

Keylock
Key Lock prevents accidental key entries during scanning.
1. To lock the keypad, press and hold K until the key symbol appears.
2. To unlock the keypad, press and hold K until the key symbol disappears.
12
 Loading...