Uniden BC898T User Manual
Precautions
Before you use this scanner, please read and observe the following.
IMPORTANT!
This scanning radio has been manufactured so that it will not tune to the radio frequencies assigned by the FCC for cellular telephone usage. The Electronic Communications Privacy Act of 1986, as amended, makes it a federal crime to intentionally intercept cellular or cordless telephone transmissions or to market this radio when altered to receive them. The installation, possession, or use of this scanning radio in a motor vehicle may be prohibited, regulated, or require a permit in certain states, cities, and/or local jurisdictions. Your local law enforcement officials should be able to provide you with information regarding the laws in your community.
Changes or modifications to this product not expressly approved by Uniden, or operation of this product in any way other than as detailed by this Operating Guide, could void your authority to operate this product.
EARPHONE WARNING!
Be sure to use only a monaural earphone with this scanner. You can also use an optional 32 Ω stereo headset. Use of an incorrect earphone or stereo headset might be potentially hazardous to your hearing. The output of the phone jack is monaural.
Set the volume to a comfortable audio level coming from the speaker before plugging in the monaural earphone or a stereo headset of the proper impedance (32 Ω). Otherwise, you might experience some discomfort or possible hearing damage if the volume suddenly becomes too loud because of the volume control or squelch control setting. This might be particularly true of the type of earphone that is placed in the ear canal.
WARNING!
Uniden does not represent this unit to be waterproof. To reduce the risk of fire or electrical shock, do not expose this unit to rain or moisture.
Motorola®, SMARTNET®, PL®, Private Line®, and PRIVACY PLUS® are registered trademarks of Motorola, Inc.
LTR® is a registered trademark of E.F. Johnson Co.
EDACS® is a registered trademark of M/A-COM Private Radio Systems, Inc. Uniden® and Bearcat® are registered trademarks of Uniden America Corporation. TrunkTracker™ and Trunk Tracking™ are proprietary trademarks of Uniden America Corporation.
Other trademarks used throughout this manual are the property of their respective holders.
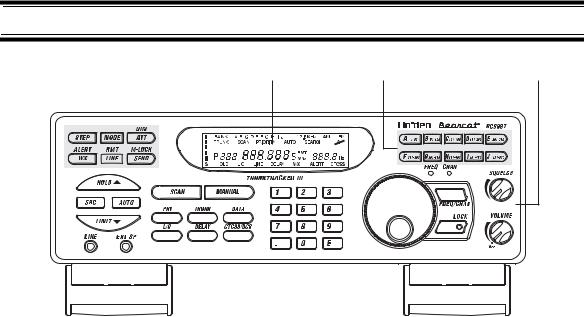
BC898T Controls and Display
1 |
2 |
3 |
4 |
||
|
|
|
|
|
|
 TA
TA
|
|
|
|
|
|
|
|
|
|
|
|
|
|
|
|
|
|
|
|
|
|
|
|
|
|
|
|
|
|
|
|
|
|
|
|
|
|
|
|
|
|
|
|
|
|
|
|
|
|
|
|
|
|
|
|
|
|
|
|
|
|
|
|
|
|
|
|
|
|
|
|
|
|
|
|
|
|
|
|
|
|
|
|
|
|
|
|
|
|
|
|
|
|
|
|
|
|
|
|
|
|
|
|
|
|
|
|
|
|
|
|
|
|
|
|
|
|
|
|
|
|
|
|
|
|
|
|
|
|
|
|
|
|
|
|
|
|
|
|
|
|
|
|
|
|
|
|
|
|
|
|
|
|
|
|
|
|
|
|
|
|
|
|
|
|
|
|
|
|
|
|
|
|
|
|
|
|
|
|
|
|
|
|
|
|
|
|
|
|
|
|
|
|
|
|
|
|
|
|
|
|
|
|
|
|
|
|
|
|
|
|
|
|
|
|
|
|
|
|
|
|
|
|
|
|
|
|
|
|
|
|
|
|
|
|
|
|
|
|
|
|
|
|
|
|
|
|
|
|
|
|
|
|
|
|
|
|
|
|
|
|
|
|
|
10 |
|
9 |
8 |
7 |
6 |
5 |
|
|
|
|
|
|||||||||
1. |
Programming and Status Keys |
|
|
|
|
6. |
Numeric Keypad |
||||||||||||||
2. |
Display |
|
|
|
|
|
|
|
|
7. |
Scan/Manual Keys |
||||||||||
3. |
Bank Keys |
|
|
|
|
|
|
|
|
8. |
Mode Keys |
||||||||||
4. |
Squelch/Volume Controls |
|
|
|
|
|
|
9. |
Search Keys |
||||||||||||
5. |
Rotary Tuner |
|
|
|
|
|
|
|
|
10. |
Line/External Speaker Jacks |
||||||||||

Contents |
|
The FCC Wants You To Know ........................................................................................... |
3 |
Scanning Legally ........................................................................................................ |
3 |
Introduction ........................................................................................................................ |
4 |
Feature Highlights ............................................................................................................. |
5 |
About This Manual ...................................................................................................... |
6 |
Understanding Scanning ................................................................................................... |
7 |
Understanding Banks and Channels .......................................................................... |
7 |
What is Scanning? ....................................................................................................... |
7 |
What is Searching? .................................................................................................... |
7 |
What is CTCSS/DCS? ................................................................................................ |
7 |
Conventional Scanning ............................................................................................... |
8 |
What is Trunk Tracking? ............................................................................................. |
9 |
Trunked Scanning ...................................................................................................... |
10 |
Types of Trunking Systems ........................................................................................ |
11 |
Where To Obtain More Information ............................................................................ |
13 |
Using a Computer to Control Your BC898T ............................................................... |
13 |
Included With Your Scanner ............................................................................................ |
14 |
Installing Your Scanner .................................................................................................... |
15 |
For Home Use (Desktop Installation) ......................................................................... |
15 |
Using An Optional External Speaker/Earphone/Headphone .................................... |
16 |
Using An Optional Tape Recorder ............................................................................. |
16 |
Using the Demo Software .......................................................................................... |
17 |
Installing The Scanner In a Vehicle ............................................................................ |
18 |
Basic Operation ............................................................................................................... |
20 |
Turning On the Scanner ............................................................................................. |
20 |
Setting the Squelch .................................................................................................... |
20 |
Using the Rotary Tuner............................................................................................... |
20 |
Using the Frequency/Channel Mode Selector .......................................................... |
21 |
Using the Lock Key/LED ............................................................................................ |
21 |
Manually Selecting a Channel ................................................................................... |
21 |
Scanning Programmed Channels .............................................................................. |
21 |
Locking/Unlocking Banks ........................................................................................... |
22 |
Locking/Unlocking Channels ..................................................................................... |
22 |
Restoring All Locked Out Channels ........................................................................... |
22 |
Priority Scanning ........................................................................................................ |
22 |
Using the Dimmer ...................................................................................................... |
23 |
Trunk Scanning Options ............................................................................................ |
23 |
Setting the Attenuator ............................................................................................... |
24 |
ID Lockout .................................................................................................................. |
24 |
Searching Tips .......................................................................................................... |
25 |
Scan Lists ................................................................................................................. |
26 |
Searching ........................................................................................................................ |
27 |
Chain Search ............................................................................................................. |
27 |
Holding On An Active Frequency ............................................................................... |
27 |
Setting Data Skip ...................................................................................................... |
28 |
Skipping Frequencies ................................................................................................ |
28 |

Storing Found Frequencies ....................................................................................... |
28 |
Automatically Storing Frequencies ........................................................................... |
29 |
Setting Subaudible Tones for Searching ................................................................... |
29 |
Attenuating All Search Ranges .................................................................................. |
30 |
Setting Delay For All Search Ranges ....................................................................... |
30 |
Searching a Trunked Bank ........................................................................................ |
30 |
Searching for CTCSS/DCS Tones ............................................................................ |
31 |
Using Weather Alert (SAME) ........................................................................................... |
32 |
Turning Weather Alert On/Off .................................................................................... |
32 |
Searching for a Weather Broadcast ........................................................................... |
32 |
Programming a FIPS Code ........................................................................................ |
33 |
Programming ................................................................................................................... |
35 |
Transferring a Programmed Frequency ..................................................................... |
35 |
Duplicate Frequency Alert ......................................................................................... |
36 |
Deleting a Stored Frequency .................................................................................... |
36 |
Programming a Channel With a CTCSS/DCS Tone ................................................ |
36 |
Programming Tips .................................................................................................... |
37 |
Setting the Delay Mode .............................................................................................. |
37 |
Recording Transmissions ......................................................................................... |
38 |
Data Skip .................................................................................................................. |
38 |
Frequency Skip .......................................................................................................... |
38 |
Programming Conventional Channels ............................................................................. |
39 |
Changing the Frequency Step .................................................................................. |
39 |
Setting the Modulation Mode ................................................................................... |
39 |
Setting Priority Channels ........................................................................................... |
40 |
Programming Trunked Systems ...................................................................................... |
41 |
Setting the Scanner to Trunking Programming Mode ............................................... |
41 |
Programming Motorola Systems................................................................................ |
41 |
Programming a Hybrid System ................................................................................... |
44 |
Programming EDACS Systems .................................................................................. |
44 |
Programming LTR Systems ...................................................................................... |
45 |
Care and Maintenance ..................................................................................................... |
46 |
General Use ............................................................................................................... |
46 |
Location ..................................................................................................................... |
46 |
Cleaning .................................................................................................................... |
46 |
Repairs ...................................................................................................................... |
46 |
Birdies......................................................................................................................... |
46 |
Troubleshooting ............................................................................................................... |
47 |
Specifications .................................................................................................................. |
50 |
Optional Accessories....................................................................................................... |
52 |
Appendix ........................................................................................................................ |
53 |
Preset Fleet Maps ...................................................................................................... |
53 |
User Defined Fleet Maps ........................................................................................... |
55 |
2

The FCC Wants You to Know
This scanner has been tested and found to comply with the limits for a scanning receiver, pursuant to Part 15 of the FCC Rules. These limits are designed to provide reasonable protection against harmful interference in a residential installation. This scanner generates, uses, and can radiate radio frequency energy and, if not installed and used in accordance with the instructions, may cause harmful interference to radio communications.
However, there is no guarantee that interference will not occur in a particular installation. If this scanner does cause harmful interference to radio or television reception, which can be determined by turning the scanner on and off, you are encouraged to try to correct the interference by one or more of the following measures:
•Reorient or relocate the receiving antenna
•Increase the separation between the scanner and the receiver
This device complies with Part 15 of the FCC Rules. Operation is subject to the following two conditions: 1) This device may not cause harmful interference, and 2) this device must accept any interference received, including interference that may cause undesired operation.
Scanning Legally
Your scanner covers frequencies used by many different groups, including police and fire departments, ambulance services, government agencies, private companies, amateur radio services, military operations, pager services, and wireline (telephone and telegraph) service providers. It is legal to listen to almost every transmission your scanner can receive. However, there are some transmissions that you should never intentionally listen to. These include:
•Telephone conversations (cellular, cordless, or other private means of telephone signal transmission)
•Pager transmissions
•Any scrambled or encrypted transmissions
According to the Electronic Communications Privacy Act (ECPA), you are subject to fines and possible imprisonment for intentionally listening to, using, or divulging the contents of such a conversation unless you have the consent of a party to the conversation (unless such activity is otherwise illegal). This scanner has been designed to prevent the reception of cellular telephone transmissions and the decoding of scrambled transmissions. This is done to comply with the legal requirement that scanners be manufactured so they are not easy to modify to pick up these transmissions. Do not open your scanner’s case to make any modifications that could allow it to pick up transmissions that are illegal to monitor. Modifying or tampering with your scanner’s internal components or using it in a way other than as described in this manual could invalidate your warranty and void your FCC authorization to operate it.
In some areas, mobile use of this scanner is unlawful or requires a permit. Check the laws in your area. It is also illegal in many areas (and a bad idea everywhere) to interfere with the duties of public safety officials by traveling to the scene of an incident without authorization.
3

Introduction
Your BC898T scanner is a state-of-the-art scanner radio with TrunkTracking™ and automatic scanning capabilities. You can store frequencies such as police, fire/emergency, marine, air, amateur, and other communications into 10 banks of 50 channels each. Use it at home as a base unit, or install it in your vehicle as a mobile unit.
You can use the scanner’s rotary tuner to quickly select channels and frequencies, and you can automatically program channels in an available bank using the AutoStore feature.
Use your scanner to monitor:
•800 MHz trunked public safety systems
•Police and fire departments (including rescue and paramedics)
•NOAA weather transmissions
•Business/Industrial radio
•Utilities
•Marine and amateur (ham radio) bands
•Air band
This table lists the frequency ranges, default frequency step, default mode (AM, FM, or Narrowband FM), and type of transmissions you can hear for each range.
Frequency Range |
Steps |
Mode |
Transmission |
25.0-27.995 MHz |
5 kHz |
AM |
Citizens Band/Business Band |
28.0-29.995 MHz |
5 kHz |
FM |
10 Meter Amateur Band |
30.0-49.995 MHz |
5 kHz |
FM |
VHF Low Band |
|
|
|
|
50.0-54.0 MHz |
5 kHz |
FM |
6 Meter Amateur Band |
108.0-136.9875 MHz |
12.5 kHz |
AM |
Aircraft Band |
137.0-143.995 MHz |
5 kHz |
FM |
Military Band |
|
|
|
|
144.0-147.995 MHz |
5 kHz |
FM |
2 Meter Amateur Band |
148.0-161.995 MHz |
5 kHz |
FM |
VHF High Band |
162.0-174.0 MHz |
12.5 kHz |
FM |
VHF High Band |
|
|
|
|
216.0-224.9875 MHz |
12.5 kHz |
FM |
VHF High Band |
225.0-399.9875 MHz |
12.5 kHz |
AM |
UHF Aircraft Band |
400.0-419.9875 MHz |
12.5 kHz |
NFM |
Federal Land Mobile |
|
|
|
|
420.0-449.9875 MHz |
12.5 kHz |
NFM |
70cm Amateur Band |
450.0-469.9875 MHz |
12.5 kHz |
NFM |
UHF Standard Band |
470.0-512.0 MHz |
12.5 kHz |
NFM |
UHF TV Band |
|
|
|
|
806.0-823.9875 MHz |
12.5 kHz |
NFM |
Public Service “800” Band |
849.0125-868.9875 MHz |
12.5 kHz |
NFM |
Public Service “800” Band |
894.0125-956 MHz |
12.5 kHz |
NFM |
Public Service “800” Band |
|
|
|
|
4
Feature Highlights
Trunk Tracker™ III Operation – Follows conversations on analog Motorola, EDACS, and LTR trunked radio systems.
500 Channels – Program one frequency into each channel. You must have at least one channel programmed to use the scan mode.
10 Banks – Each bank contains 50 channels, large enough for even the largest trunked systems or useful for storing similar frequencies to maintain faster scanning cycles.
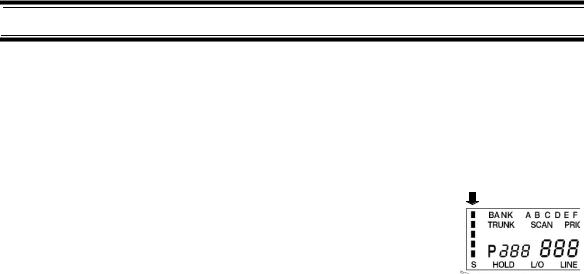
Signal Strength Meter – Your scanner’s signal strength meter displays the relative strength of an active transmission, using up to five separate indicators.
CTCSS and DCS Squelch Modes – prevent interference from stations not using the mode you select.
Subaudible Tone Search – Lets the scanner search for and identify agencies transmitting CTCSS or DCS tones. You can identify up to 50 CTCSS tones and 104 DCS tones. This helps you find stations using these tones.
17 Bands – Includes 17 bands, with Aircraft and 800 MHz.
25 MHz-956 MHz – Your scanner covers an extensive frequency range so you can monitor most of the transmissions in your area.
Note: The scanner’s frequency coverage is not continuous and does not include the cellular telephone band.
10 Priority Channels – You can assign one priority channel in each bank. Assigning a priority channel lets you keep track of activity on your most important channel(s) while monitoring other channels for transmissions.
VFO (Variable Frequency Oscillator) Control – Turn the large rotary tuner to select a desired frequency or channel.
AutoStore – Automatically stores all active frequencies within the specified bank(s).
Weather Alert – Lets your scanner alert you when a SAME weather alert is transmitted on a NOAA weather channel. The scanner also displays information about the SAME alert. This helps you quickly find out about severe weather in your area and lets you avoid false alarms.
Weather Search – Lets your scanner receive your local NOAA weather transmission.
Chain Search – Lets your scanner search up to 10 ranges by selecting specific banks into which you have programmed search ranges.
Frequency Step – Lets you select a frequency step (5, 6.25, 12.5, or 25 kHz) for manual mode and chain search mode.
5

Unique Data Skip – Allows your scanner to skip unwanted data transmissions and reduces birdies.
Memory Backup – If power is lost or disconnected, the scanner retains the frequencies you programmed in its memory.
LCD Back Light – Makes the display easy to see in dim light. You can adjust the back light and even turn it off.
Auto Recording – Automatically record transmissions onto an optional tape recorder (not included).
Scan/Search Delay – You can set the scanner so it remains on a frequency two seconds after the last transmission to wait for a possible reply.
About This Manual
The screen displays used in this manual are representations of what might appear when you use your scanner. Since what you see depends on the frequencies and user ID’s for your area and the settings you select, you might notice some differences between what is in this manual and what appears on your scanner.
To get the most from this manual, review the contents to become familiar with the basic functions available. If you are new to scanning or trunk tracking, be sure to read “Understanding Scanning” on Page 7 for a quick background on the technology behind the hobby. The first thing you’ll need to do is plug the AC adapter into the scanner. Then you need to connect the included antenna to the scanner. See “Installing Your Scanner” on Page 15 if you need any help doing this.
In addition to the information in this manual, the help file included with the free demo software includes more instructions and programming planning worksheets that are very useful for organizing the information you need to program your scanner. Download this software from http://www.uniden.com.
6

Understanding Scanning
This section provides you with background on how scanning works. You don’t really need to know all of this to use your scanner, but some background knowledge will help you get the most from your BC898T.
Understanding Banks and Channels
The memory in your scanner is organized into 10 banks of 50 channels each. Each bank can contain conventional channels as well as 1 trunking system. For each trunking system, each bank can also store 10 groups of 10 talk group ID’s (100 per bank).
What is Scanning?
Unlike standard AM or FM radio stations, most two-way communications do not transmit continuously. Your BC898T scans programmed channels until it finds an active frequency, then stops on that frequency and remains on that channel as long as the transmission continues. When the transmission ends, the scanning cycle resumes until the scanner receives another transmission.
What is Searching?
The BC898T can search each of its 17 bands and up to ten bands together to find active frequencies. This is different from scanning because you are searching for frequencies that have not been programmed into the scanner. When you select frequency bands to search, the scanner searches for any active frequency within the lower and upper limits you specify. When the scanner finds an active frequency, it stops on that frequency as long as the transmission lasts. If you think the frequency is interesting, you can program it into one of the banks. If not, you can continue to search.
What is CTCSS/DCS?
Your scanner can monitor systems using a Continuous Tone Control Squelch (CTCSS) and Digital Coded Squelch (DCS) system, which allow squelch to open only when the tone you have programmed with a specific frequency is received along with a transmission.
CTCSS and DCS are subaudible tone signaling systems sometimes referred to as PL (Motorola’s trademarked term for Private Line). CTCSS and DCS are used only for FM signals and are usually associated with both amateur and commercial two-way repeaters. These systems make use of a special subaudible tone that accompanies a transmitted signal.
CTCSS and DCS are used for many purposes. In many cases, CTCSS and DCS are used to restrict access to a commercial repeater, so that only those units, which transmit the correct tone along with their signal can “talk to the repeater.”
CTCSS and DCS are also used in areas that receive interference where there are several stations with output frequencies close to each other. When this occurs, you might hear multiple communications at the same time. The stations might even interfere with each
7

other to the point where it is impossible to clearly receive any of the stations. A scanner equipped with CTCSS and DCS (like your scanner) can code each received frequency with a specific CTCSS or DCS frequency. Then, when you receive multiple signals, you only hear the transmission with the CTCSS or DCS tone you programmed. If you do not receive the correct tone with a signal, the scanner’s squelch remains closed and you hear nothing.
Local frequency allocation groups set cooperative standards to establish the CTCSS and DCS tone for each transmitter (or repeater).
You can search for the following CTCSS frequencies and DCS codes.
CTCSS Frequencies (Hz)
67.0 |
69.3 |
71.9 |
74.4 |
77.0 |
79.7 |
82.5 |
85.4 |
88.5 |
91.5 |
94.8 |
97.4 |
100.0 |
103.5 |
107.2 |
110.9 |
114.8 |
118.8 |
123.0 |
127.3 |
131.8 |
136.5 |
141.3 |
146.2 |
151.4 |
156.7 |
159.8 |
162.2 |
165.5 |
167.9 |
171.3 |
173.8 |
177.3 |
179.9 |
183.5 |
186.2 |
189.9 |
192.8 |
196.6 |
199.5 |
203.5 |
206.5 |
210.7 |
218.1 |
225.7 |
229.1 |
233.6 |
241.8 |
250.3 |
254.1 |
|
|
|
|
|
|
|
|
||
DCS Codes (Octal) |
|
|
|
|
|
|
|
||
|
|
|
|
|
|
|
|
|
|
023 |
025 |
026 |
031 |
032 |
036 |
043 |
047 |
051 |
053 |
054 |
065 |
071 |
072 |
073 |
074 |
114 |
115 |
116 |
122 |
125 |
131 |
132 |
134 |
143 |
145 |
152 |
155 |
156 |
162 |
165 |
172 |
174 |
205 |
212 |
223 |
225 |
226 |
243 |
244 |
245 |
246 |
251 |
252 |
255 |
261 |
263 |
265 |
266 |
271 |
274 |
306 |
311 |
315 |
325 |
331 |
332 |
343 |
346 |
351 |
356 |
364 |
365 |
371 |
411 |
412 |
413 |
423 |
431 |
432 |
445 |
446 |
452 |
454 |
455 |
462 |
464 |
465 |
466 |
503 |
506 |
516 |
523 |
526 |
532 |
546 |
565 |
606 |
612 |
624 |
627 |
631 |
632 |
654 |
662 |
664 |
703 |
712 |
723 |
731 |
|
|
|
732 |
734 |
743 |
754 |
|
|
|
|
|
|
|
|
|
||||
|
|
|
|
|
|
|
|
|
|
Conventional Scanning
Conventional scanning is a relatively simple concept. Each group of users in a conventional system is assigned a single frequency (for simplex systems) or two frequencies (for repeater systems). Any time one of them transmits, their transmission always goes out on the same frequency. Up until the late 1980’s this was the primary way that radio systems operated.
Even today, there are many 2-way radio users who operate using a conventional system:
8

•Aircraft
•Amateur radio
•FRS/GMRS users
•Broadcast AM/FM/TV stations
•Many business radio users
When you want to store a conventional system, all you need to know is the frequencies they operate on. When you are scanning a conventional system, the scanner stops very briefly on each channel to see if there is activity. If there isn’t, the scanner quickly moves to the next channel. If there is, then the scanner pauses on the transmission until it is over.
Simplex Operation
Simplex systems use a single frequency for both transmit and receive. Most radios using this type of operation are limited to line-of-sight operation. This type of radio is frequently used at construction job sites, and with inexpensive consumer radios such as GMRS/FRS radios. The range is typically 1-8 miles, depending upon the terrain and many other factors.
Repeater Operation
Repeater systems use two frequencies: one transmits from the radio to a central repeater; the other transmits from the repeater to other radios in the system. With a repeater-based system, the repeater is located on top of a tall building or on a radio tower that provides great visibility to the area of operation. When a user transmits (on an input frequency), the signal is picked up by the repeater and retransmitted (on an output frequency). The user’s radios always listen for activity on the output frequency and transmit on the input frequency. Since the repeater is located very high, there is a very large line of sight. Typical repeater systems provide coverage out to about a 25-mile radius from the repeater location.
What is Trunk Tracking?
Your BC898T is designed to track the following types of trunking systems.
•Motorola Type I, Type II, Type IIi, hybrid, SMARTNET, and PRIVACYPLUS analog trunking systems, which are extensively used in 800 MHz communication systems.
•LTR trunking systems
•EDACS trunking systems
When tracking these types of systems, you might want to remember these important points:
•Your scanner defaults to monitor Type II systems; however, you can change this if the system in your area is different. (The types of systems are discussed below.)
•Your scanner can track more than one trunking system at a time and scan conventional and trunked systems at the same time.
9

• The frequencies for many of the 800 MHz public safety systems are listed in the
National Public Safety Trunked System Frequency Guide included with your BC898T scanner.
Conventional scanning is a simple concept. You enter a frequency used by someone you want to monitor into your scanner’s memory. For example, the police in your area might transmit on 460.500 MHz, the fire department on 154.445 MHz, the highway department on 37.900 MHz, etc. So when your scanner stops on a frequency, you usually know who it is, and more importantly, you can stop on a channel and listen to an entire conversation. This type of scanning is easy and fun.
However, as the demand for public communications has increased, many public radio users do not have enough frequencies to meet their needs, creating a serious problem. Trunking radio systems help solve this problem.
Trunked Scanning
While conventional scanning worked great while there were only a few groups wanting to use the frequencies, with the advent of smaller, lower-cost radios more and more agencies and businesses wanted to take advantage of the utility of 2-way radio. As a result, the bands that were used most became full, so new users were not able to take advantage of the technology as quickly as they wanted.
Trunking solved this frequency shortage by allowing multiple groups to use the same set of frequencies in a very efficient way. While each type of trunking system operates a little differently (see the next few sections), they all work on the same basic premise: even in a system with a lot of users, only a few users are ever transmitting at any one time.
Instead of being assigned a frequency, as with conventional systems, each group is assigned a talk group ID. A central computer controls the frequency each group operates on...and this frequency selection is made each time a user transmits. So, while on a conventional system queries, replies, and follow-ups are all on a single frequency, they could each be on completely different frequencies on a trunked system. This semi-random frequency assignment made monitoring such a system impossible prior to Uniden’s invention of the Trunktracking scanner.
Not only does your BC898T scan channels like a conventional scanner, it actually follows the users of a trunked radio system. Once you know a talk group’s ID, you won’t miss any of the action.
If you are a new scanner enthusiast, you might want to read the first part of this manual and use your scanner in conventional mode before you begin trunk tracking. Understanding scanning fundamentals and terminology will make trunk tracking much easier. If you are already an experienced scanner operator, you might want to go to “Programming Trunked Systems” on Page 42 now.
10

Types of Trunking Systems
Trunking systems divide a few frequencies among many different users, but the way that each system does this is slightly different. This section describes some of the technical data behind Motorola, EDACS, and LTR trunked radio systems.
Motorola Trunking
While there are different types of Motorola trunking systems, they all use the same basic trunking method. The system consists of one control channel plus one or more voice channels (typically 10, 20, or 30 total channels). When a user presses Push To Talk (PTT) to transmit, their radio first sends their talk group information to the control channel. The computer then assigns that talk group to a specific voice channel and transmits that data over the control channel. All radios in that talk group switch over to the assigned voice channel and the user can begin speaking. This all typically takes place in about a second...the person transmitting hears a beep from their radio when the channel is assigned and then it is OK to start talking.
The systems in use are:
Motorola Type I – the radios send the radio ID, the fleet and subfleet talk group ID to the control channel each time they transmit. To program a Type I system, you need to know the system’s fleet map. The most common fleet maps are included at the back of this manual. You can also find fleet map resources on the web.
Motorola Type II – the radios only send the radio ID and radio channel code to the control channel. The central computer keeps a database of radio ID’s and which talk group is assigned to which channel code for each radio, so with this system the user’s radio sends
only about 1/3 the data as a Type I system with each transmission. Type II systems do not use Fleet-subfleet talk groups; instead they use a 5-digit ID for each talk group.
Type IIi Hybrid — these systems support a mix of both Type I and Type II users. Like Type I systems, you must know the system’s fleet map to ensure proper tracking.
EDACS Trunking
EDACS trunking works in much the same way as Motorola trunking with a couple of major differences. In an EDACS system, each frequency used by the system is assigned a Logical Channel Number (LCN) so that less data needs to be transmitted by the control channel. Also, talk groups are assigned in an Agency-Fleet-Subfleet (AFS) hierarchy. Also, there is one variation of EDACS called SCAT that your BC898T can monitor.
Logical Channel Numbers – each frequency used by the system is assigned an LCN. This information is programmed into each user radio. When a user presses PTT, their radio sends their AFS information to the control channel. The computer then assigns that talk group to a channel and sends the LCN so that all other radios in that talk group will switch to the correct channel. To program an EDACS system in your scanner, you will need to
11

know both the frequencies used by the system and the LCN for each frequency so that you can program the frequencies in LCN order.
Agency-Fleet-Subfleet – talk group ID’s for EDACS systems are assigned in a way that makes it easy to see at a glance the affiliation of the user. Each radio is assigned a 2-digit agency identifier from 00 – 15. For example, 01 might be used by the police, 02 by ambulance service, 03 by the fire department, and so on. Each agency is then subdivided up to 16 times to provide fleet identification, and then 8 more times to identify subfleets.
For example, the complete AFS for the Police Department West District’s dispatch channel might be 01-062. 01 identifies the agency as the police department, 06 identifies the fleet as the West district, and 2 identifies the subfleet as the dispatch channel. While these assignments are somewhat arbitrary and vary from system to system, there are many resources on the web for finding the assignments for most systems. Because of the logical hierarchy of the AFS system, your BC898T lets you assign wildcard ID’s that let you, for example, use only one ID memory to identify all units in either an agency or a fleet.
EDACS SCAT – EDACS SCAT (Single Channel Autonomous Trunking) systems operate on a single channel and alternate control data with analog voice traffic. While your BC898T cannot track ID’s in this system, it can eliminate the control data so that all you hear is the voice transmissions when you monitor this type of system.
LTR Trunking
LTR (Logic Trunked Radio) systems are trunking systems used primarily by business or private communications service providers, such as taxicabs, delivery trucks, and repair services. These systems encode all control information as digital subaudible data that accompanies each transmission, so there is no separate control channel. Users on an LTR system are assigned to specific talk groups, which are identified by the radio as six digit numbers.
These numbers are in the form AHHUUU, where:
A = Area code (0 or 1)
H = Home repeater (01 through 20)
U = User ID (000 through 254)
When the scanner receives a transmission on a channel set to the LTR mode, it first decodes the LTR data included with the transmission. In the ID search mode, the scanner stops on the transmission and displays the talk group ID on the display. In the ID scan mode, the scanner only stops on the transmission if the LTR data matches a talk group ID that you have stored in the bank’s talk group ID list and have not locked out. LTR systems are frequently programmed so that each radio has a unique user ID. LTR systems also need to be programmed into your scanner in channel order.
Since many LTR systems use only odd-numbered channel slots, you would program these systems using only the corresponding odd-numbered channels in a bank (for example,
12

you would program a system with channels at 1, 3, 5, and 9 into Trunk 2 channels 51, 53, 55, and 59).
Where To Obtain More Information
By itself, this manual really only provides part of what you need to know to have fun scanning – how to program and use the scanner. The two included conventional and trunking frequency guides will give you a good head start on the other part of what you need to know – what frequencies have interesting content.
Information On The Internet
The Internet is a great source for current frequencies and information about scanning. Many web sites have lists of frequencies for your area. You can use a search engine to find and use them.
Make a list of the agencies you want to listen to, then look up the frequencies and systems used by those agencies. Here are a few useful sites:
•http://www.scannermaster.com * - frequency resources and home of Police Call.
You can also call them at 1 800 SCANNER (hours are from 10:00 a.m. to 5:00 p.m. Eastern Time Monday through Friday).
•http://www.radioreference.com * - the Internet's premier source for user-supported radio system information.
•http://www.bearcat1.com - frequency information from National Communications.
•svartifoss2.fcc.gov/reports/index.cfm * - conventional frequency information on file with the US Government
*- This web site is not affiliated with Uniden Corporation.
To purchase another copy of the conventional or trunking frequency guide, contact your local dealer or:
Uniden Parts Department (800) 554-3988
(Hours are from 8:00 a.m. to 5:00 p.m.Central Time Monday through Friday.)
For more information about Uniden and our other products, visit http://www.uniden.com.
Using a Computer to Control Your BC898T
You can operate your scanner using software and a personal computer and cable (not included). Free demo software is available at http://www.uniden.com. You can also purchase a registration key to upgrade the demo software to full functionality.
13
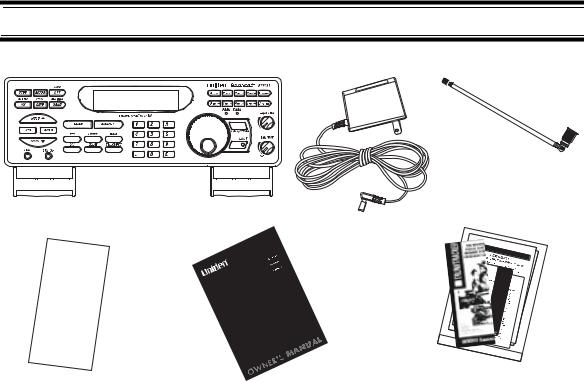
Included With Your Scanner
Antenna
Scanner
AC Adapter
Frequency Guide |
Owners Manual |
National Public Safety |
|
Trunked System |
|||
|
|||
|
|
Frequency Guide |
If any of these items are missing or damaged, immediately contact your place of purchase or Uniden Customer Service at: (800) 297-1023, 8:00 a.m. to 5:00 p.m., Central, Monday through Friday.
14
Installing Your Scanner
These guidelines will help you install and use your new scanner:
•If your scanner receives interference or electrical noise, move the scanner or its antenna away from the source. You might also try changing the height or angle of the telescoping antenna.
•To improve the scanner’s reception, use an optional external antenna designed for multi-band coverage. (You can purchase this type of antenna at a local electronics store). If the optional antenna has no cable, use 50-70 ohm coaxial cable for lead-in. A mating plug might be necessary for the optional antennas.
•Use an optional earphone or stereo headset with proper impedance for private listening. Read the precautions on the inside front cover of this Owners Manual.
•Do not use the scanner in high-moisture environments such as the kitchen or bathroom.
•Avoid placing the scanner in direct sunlight or near heating elements or vents.
For Home Use (Desktop Installation)
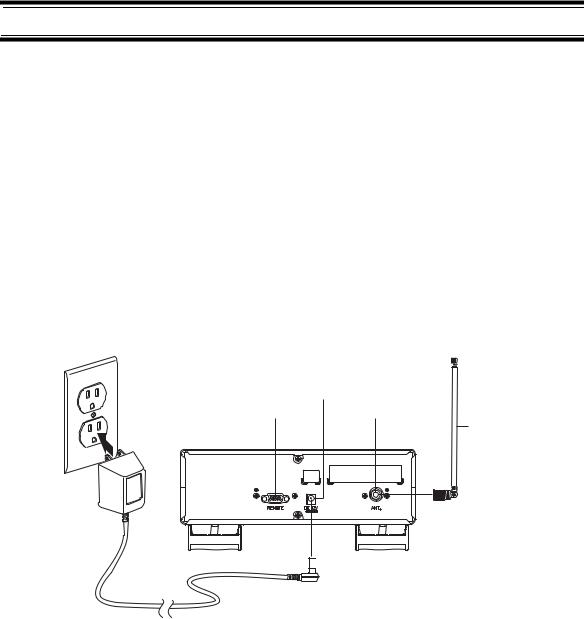
DC 12V |
|
Power Jack |
|
Remote Jack |
Antenna Jack |
|
Telescoping |
|
Antenna |

 Plug
Plug
1.Insert the DC plug end of the included AC adapter into the DC 12V jack on the back of the scanner.
2.Plug the other end of the AC adapter into a standard 120V AC wall outlet.
3.Plug the included telescoping antenna into the ANT connector on the back of the scanner. Then extend the antenna to its full height.
Note: For frequencies higher than 406 MHz, shortening the antenna might improve the reception.
4.Use the scanner’s desktop stand for a better viewing and operating angle.
15
Adapter Safety Feature
The AC adapter included with the scanner might be equipped with a polarized line plug — a plug with one blade wider than the other. This plug fits into a power outlet only one way. If you are unable to insert the adapter’s plug into an AC outlet, try reversing the plug.
Using An Optional External Speaker/Earphone/Headphone
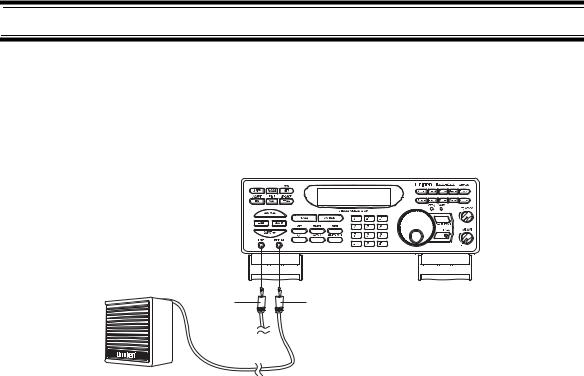
LINE Jack |
External Speaker Jack |
For private listening or for listening in a noisy area, you can plug a 1/8-inch (3.5mm) mini-plug earphone’s or headphone’s or monitor speaker’s (not included) cable into the EXT SP jack on the front of the scanner. This automatically disconnects the scanner’s internal speaker.
Listening Safely
To protect your hearing, follow these guidelines when you use an earphone or headphones.
•Do not use an earphone to listen to the WX alert siren or when in SAME alert mode. The alert tone’s volume is not adjustable and damage to your hearing could occur.
•Do not listen at extremely high volume levels. Extended high-volume listening can lead to permanent hearing loss.
•Set VOLUME to the lowest setting before you begin listening. After you begin listening, adjust VOLUME to a comfortable level.
•Once you set VOLUME, do not increase it. Over time, your ears adapt to the volume level, so a volume level that does not cause discomfort might still damage your hearing.
Using An Optional Tape Recorder
You can use a standard tape recorder or a VOX (Voice Operated Control) tape recorder with the scanner. The tape recorder you use must have a remote jack. You need a cable with a 1/8-inch (3.5 mm) plug (not included) to connect the tape recorder to the scanner. You can get a cable from your local electronics store.
16
Connect one end of the cable to the tape recorder’s remote jack, then connect the other end of the cable to LINE on the front of the scanner.
Remember! You must program a channel for tape recording before you can record it. See “Recording Transmissions” on Page 38 for more information.
Using the Demo Software
You can operate your scanner using a personal computer and the free demo software available at http://www.uniden.com.
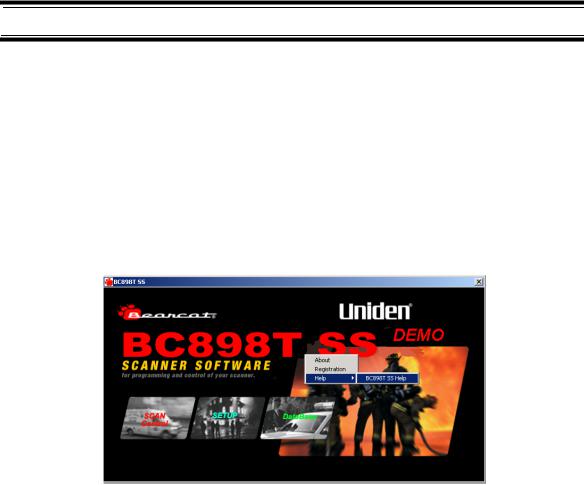
If you have installed the software and it is running, select Help by right clicking anywhere on the opening screen. A selection popup appears. Move the cursor to Help. BC898TSS Help appears. Then click on BC898TSS Help.
To turn on the computer control feature and set the baud rate, hold down RMT on the front of the scanner until you hear two short beeps, turn the rotary tuner until the baud rate you want to select appears, then press E.
To cancel computer control, hold down RMT until you hear two short beeps, turn the rotary tuner until OFF appears, then press E.
Installing The Software
Download the software, then double-click on the install package to begin installation. The BC898T SS Install program installs the software. You must install the software to use the scanner with your computer.
After you install the BC898T SS Install program, start it by double clicking on the desktop icon or by selecting it in the Start Programs list.
You can upgrade the included software to a full version by purchasing a registration key at http://www.uniden.com.
17
 Loading...