


www.uniden.com

Contents |
|
Controls and Indicators...................................................................... |
2 |
Warning! .............................................................................................. |
4 |
Introduction ........................................................................................ |
5 |
Features ........................................................................................... |
5 |
Technical Support and Service ........................................................ |
6 |
Maritime Radio Services Operation ................................................. |
6 |
Included in Your Package ................................................................. |
7 |
Getting Started ................................................................................... |
8 |
Mounting the Cradle ......................................................................... |
8 |
Attaching the Antenna ...................................................................... |
8 |
Attaching the Rechargeable Battery Pack ....................................... |
8 |
Using the Alkaline Battery Case ....................................................... |
9 |
Attaching the Beltclip ........................................................................ |
9 |
Charging the Battery Pack ............................................................. |
10 |
Operation .......................................................................................... |
11 |
Turning On the Unit and Setting Squelch ....................................... |
11 |
Selecting a Channel ....................................................................... |
12 |
One-touch Channel 16/9/TRI ......................................................... |
12 |
Triple Watch ................................................................................... |
13 |
Monitoring Weather Channels ........................................................ |
14 |
Emergency/Weather Alert .............................................................. |
15 |
USA, International and Canadian Channels .................................. |
16 |
Programming a Channel into Memory ........................................... |
16 |
Deleting a Channel from Memory .................................................. |
17 |
Scanning ........................................................................................ |
17 |
Transmitting ................................................................................... |
18 |
Lighted Keys and Display ............................................................... |
18 |
Turning and reactivating the Key Beep .......................................... |
18 |
Battery Indicator ............................................................................. |
19 |
Key Lock ........................................................................................ |
19 |
Marine Channels - USA ................................................................... |
20 |
Marine Channels - International . .................................................... |
22 |
Marine Channels - Canada .............................................................. |
24 |
Optional Parts and Replacement Accessories . ............................ |
26 |
Specifications ................................................................................... |
27 |
Troubleshooting ............................................................................... |
28 |
FCC RF EXPOSURE INFORMATION .............................................. |
29 |
Three-Year Limited Warranty .......................................................... |
30 |
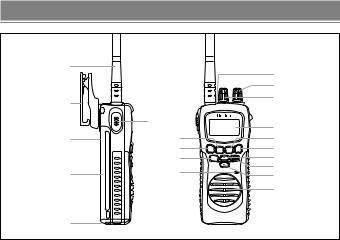
Controls and Indicators
1 |
|
2 |
|
|
6 |
3 |
7 |
|
8 |
|
9 |
4 |
10 |
5 |
|
ATLANTIS 2 5 0
WX |
UIC |
MEN |
SCAN |
ALERT |
|||
1/5W |
|
|
16/9 |
|
|
TRI |
|
LOCK |
|
|
|
|
|
|
MIC |
11
12
13
14
15
16
17
18
19
20
1Antenna
2Belt Clip
3Adapter Jack
4Battery
5Battery Release Clip
6PTT (Push to Talk) Key
7USA/International/Canadian Button (UIC)
8WX Mode/Weather Alert Button (WX/ALERT)
9TX Power/Lock Button (1/5W/LOCK)
10Microphone
11Speaker MIC (Optional) Jack
12Volume/Power Knob (VOL)
13Squelch Knob (SQ)
14LCD Display
15Memory Button (MEM)
16Scan Button (SCAN)
17Channel Up Button (▲)
1816/9 - Triple Watch Button (16/9/TRI)
19Channel Down Button (▼)
20Speaker
2
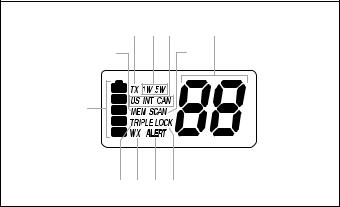
LCD Display
A B C D E F
G
H I J K
ATransmit Indicator
BTX Power Indicator
CUSA/International/Canadian (US/INT/CAN) Indicator
DChannel Number Display
EMemory Indicator
FScan Indicator
GBattery Indicator
HTriple Watch Indicator
I Weather Mode Indicator
J Weather Alert Indicator
K Key Lock Indicator
3

Warning!
•The ATLANTIS 250 is waterproof only when both the antenna and the battery are properly attached.
•Do not operate the transmitter of any radio equipment unless all the Radio Frequency (RF) connectors are secure and any open connectors are properly terminated.
•Do not operate the transmitter of any radio equipment near electrical blasting caps or in an explosive atmosphere.
•Do not let children operate any transmitter-equipped radio equipment without proper supervision.
•Have your radio equipment serviced by a qualified technician.
•Do not operate the transmitter of any radio equipment with the antenna touching or close to the eyes, face, or exposed body parts.
Ni-MH Battery Pack Warning
•This equipment contains a Ni-MH Battery Pack.
•The Ni-MH Battery Pack contained in this equipment may explode if disposed of in a fire.
•Do not short-circuit the Battery Pack.
•Do not charge the Ni-MH Battery Pack used in this equipment with any Adapter other than the one designed to charge this Battery Pack. Using another Adapter may damage the Battery Pack or cause the Battery Pack to explode.
•Ni-MH batteries must be disposed of properly.
The exclamation point within an equilateral triangle is intended to alert the user to the presence of important operating and maintenance (servicing) instructions in the literature accompanying the appliance.
4

Introduction
The ATLANTIS 250 is a waterproof, portable two-way VHF transceiver. It is compact, lightweight, rugged and fits easily in your hand.
This handheld VHF marine radio will give you consistent, outstanding performance in virtually all conditions and situations. To ensure that you get the most from the ATLANTIS 250’s features, please read this operating guide carefully before using the unit.
Features
•Waterproof (meets JIS4 waterproof specifications)
•Triple Watch Mode
•Priority Channel Startup (Channel 16)
•Programmable Memory
•One-Touch Channel 16/9
•10 Weather Channels
•Weather Alert
•Memory Scan
•USA, International and Canadian Channels
•Table-Top Cradle (can also be wall-mounted)
•Rechargeable Ni-MH Battery Pack
•Battery Save Operation
•Key Lock
•Back-Lit Keys and Display
•Belt Clip
•Wrist Strap
•TX Power 1W/5W
•Alkaline Battery Case (Alkaline batteries are not included)
5

Technical Support and Service
Your Uniden dealer can provide you with sales assistance and information. If your marine radio does not perform properly, follow the troubleshooting tips in the back of this operating guide.
For technical support contact Uniden at 1-800-586-0409. The radio contains no user-serviceable parts.
Unauthorized adjustment will void the warranty and may cause illegal radio operation.
Be sure that a qualified technician services your radio equipment.
Caution: Changes or modifications to this product not expressly approved by Uniden, or operation of this product in any way other than as detailed by this Operating Guide, can void your authority to operate this product.
Maritime Radio Services Operation
This transmitter will operate on channels/frequencies that have restricted use in the United States. The channel assignments include frequencies assigned for exclusive use of the U.S. Coast Guard, use in Canada, and use in international waters. Operation in these frequencies without proper authorization is strictly forbidden. For frequencies/channels that are currently for use in the world see page 20~25. Please contact the FCC Call Center at 1-888-CALL- FCC for any additional channel information.
6
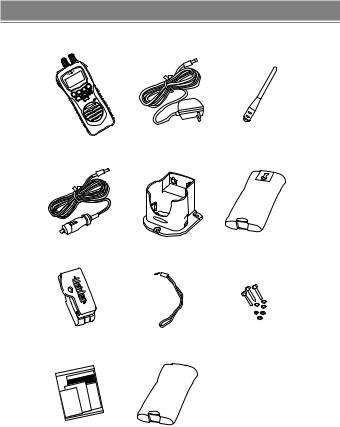
Included in Your Package
250 ANTIS L AT
ATLANTIS 250 |
AC Adapter |
Antenna |
|
(AD-0003) |
(HH9408) |
DC Adapter |
Cradle |
Rechargeable Battery |
|
|
(BP 250) |
Beltclip |
Wrist Strap |
Mounting Screws |
Reference Guide/ |
Alkaline Battery Case |
Printed Material |
(attached to the ATLANTIS) |
If any of these items are missing from the box, contact your Uniden Dealer or the Uniden Parts Department at (800)-554-3988.
7
Getting Started
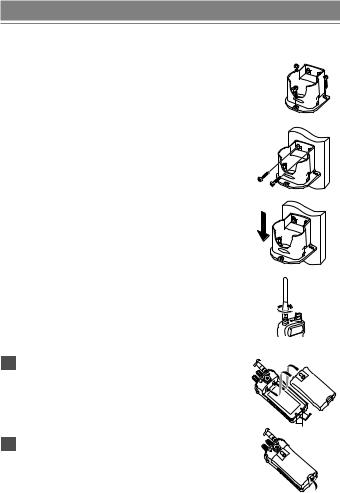
Mounting the Cradle
Mount the Cradle to either a counter or wall.
To counter:
Attach the Cradle using the mounting screws and washers as follows.
To wall:
Apply the Cradle to the wall and insert the two mounting screws into the larger holes of the Cradle
Push down the Cradle until it is firmly seated.
When you remove the Cradle from the wall, loosen the screws and push the Cradle up.
Attaching the Antenna
Apply the antenna to the radio as shown.
Be sure the antenna is firmly seated.
Attaching the Rechargeable Battery Pack
1 Snap the battery release clip out and remove the alkaline battery case. Then
place the rechargeable battery pack onto the back of the radio. It will only fit in one way.
Contacts
2 Snap the battery release clip until it clicks. Be sure the battery pack fits tightly against the body.
8
Using the Alkaline Battery Case
When needed, you can use the battery case with Alkaline AA batteries (not included) instead of the rechargeable battery pack.
To install the batteries:
1Remove the battery case cover by pulling the 2 halves apart applying your fingers to the projections.
2Install 6 AA Alkaline batteries (not included) into the battery case.
Be certain to follow the + and – symbols in the compartment.
3Replace the battery case cover as follows until it clicks into place.
AA |
AA |
|
AA |
AA |
AA |
|
AA |
Attaching the Beltclip
1Hold the beltclip in the direction as illustrated.
2Apply it to the hanger piece on the back of the radio. Then slide it up.
3When you hear a click, the beltclip is firmly attached.
4To take the beltclip off the radio, turn it upside down and slide it up.
9
 Loading...