


i.Beat organix
& i.Beat organix FM
DE
EN
FR
IT
ES
PT
NL
TR
PL
HU
GR
DE  KURZANLEITUNG
Bitte laden Sie den i.Beat organix wie in dieser Kurzanleitung beschrieben vor dem ersten Gebrauch mindestens 5 Stunden auf.
Hinweis:DieausführlicheAnleitungzurBedienungdesi.Beat organixfindenSieaufder beigelegtenInstallations-CDoderaufderSupport-SeiteimInternetunterwww.trekstor.de.
Menüsprache desTrekStor i.Beat organix einstellen
Standardmäßig ist die Menüsprache des i.Beat organix auf Englisch eingestellt. Um die Menüsprache z. B. auf Deutsch umzustellen, führen Sie bitte folgende Schritte aus:
•HaltenSiedieA-Tastefürca.2Sekundengedrückt,umdeni.Beat organix einzuschalten.
•Aktivieren Sie das Hauptmenü durch kurzes Drücken der i-Taste.
•Drücken Sie danach die G-Taste einmal und bestätigen Sie die Auswahl ("LANGUAGE") durch Drücken der l-Taste.
•Wählen Sie nun durch Drücken der G- bzw. H-Taste die gewünschte Sprache aus und bestätigen Sie diese durch Drücken der l-Taste.
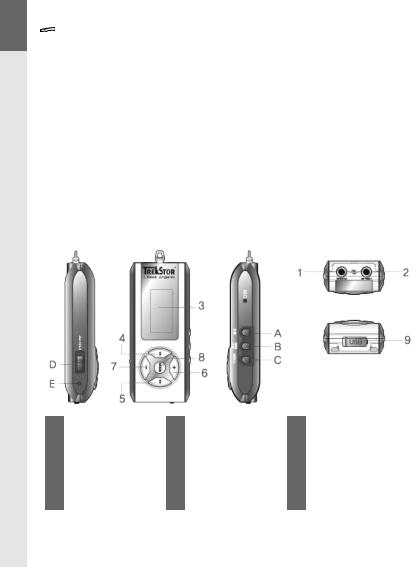
1) Bedienungselemente desTrekStor i.Beat organix
1 |
Kopfhöreranschluss 1 |
6 |
Lautstärke c-Taste |
A |
A-Taste |
|
|
|
|
|
|
2 |
Line-In-Anschluss / |
7 |
Lautstärke d-Taste |
B |
8-Taste |
|
Kopfhöreranschluss 2 |
|
|
|
|
3 |
OLED-Anzeige |
8 |
l-Taste |
C |
i-Taste |
|
|
|
|
|
|
4 |
G Rückspul-Taste |
9 |
USB-Anschluss |
D |
t-Schieber |
|
|
|
|
|
|
5 |
H Vorspul-Taste |
|
|
E |
y-Knopf |
|
|
|
|
|
|
Hinweis:UmeinenResetdurchzuführen,drückenSiebittevorsichtigmiteinemspitzenGegenstand (z.B.eineraufgebogenenBüroklammer)aufdeny-Knopf.DieseristtiefindasGehäuseinnere eingelassen.
– 2 –
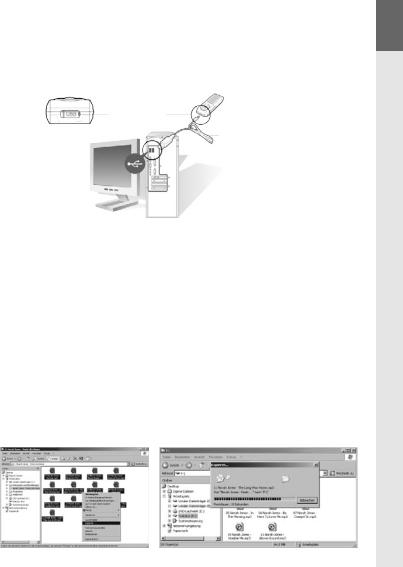
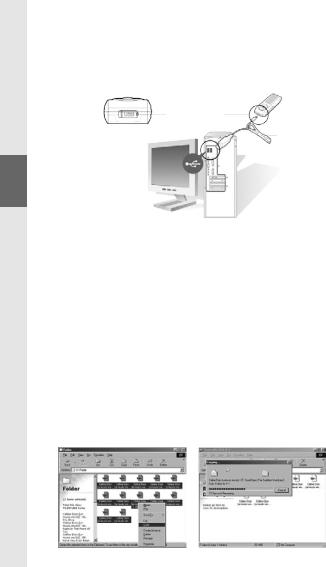
2) Verbinden desTrekStor i.Beat organix mit einem PC |
DE |
HinweisfürBenutzervonWindows®98:InstallierenSiezuerstdenaufdermitgeliefertenCDbefindlichen
Treiber,bevorSiedeni.Beat organixanschließen!
Nutzen Sie das mitgelieferte USB-Verlängerungskabel und schließen Sie den i.Beat organix wie folgt an:
USB-Anschluss
USB-Kabel
3) Laden desTrekStor i.Beat organix
Sobald Sie den i.Beat organix mit einem PC verbinden, wird er automatisch aufgeladen. Nach spätestens 3 Stunden ist der Akku geladen und der Ladevorgang wird automatisch beendet, um ein Überladen zu vermeiden.
Hinweis:DiemaximaleAkkulaufzeitwirderstnachca.10Ladezyklenerreicht.
4) Datenaustausch mitTrekStor i.Beat organix
Nicht kopiergeschützte Dateien
a)Markieren Sie die gewünschten Dateien (z. B. MP3) mit der Maus. Kopieren Sie diese durch Drücken der rechten Maustaste ("KOPIEREN").
b)Wählen Sie im "ARBEITSPLATZ" den Wechseldatenträger "TREKSTOR I.BEAT ORGANIX" aus.
c)Drücken Sie die rechte Maustaste und wählen die Option "EINFÜGEN", um den Kopiervorgang zu starten. Nach Abschluss des Kopiervorgangs sind die Daten auf dem i.Beat organix vorhanden.
– 3 –

DE |
WMA-DRM9-geschützte Dateien |
|
|
Zum Kopieren DRM9-geschützter Dateien müssen Sie diese über den Windows Media® Player |
|
|
kopieren (Referenzversion: Windows Media® Player 9). |
|
|
a) |
Verbinden Sie den MP3-Player mit Ihrem Computer und starten Sie den Windows Media® Player. |
|
b) |
Klicken Sie links in derTaskleiste auf "AUF CD ODER GERÄT KOPIEREN". |
|
c) |
Ziehen Sie die gewünschten Musikdateien (WMA) in die Liste "ZU KOPIERENDE OBJEKTE" auf der |
|
|
linken Seite. |
|
d) |
Wählen Sie im Dropdown-Menü rechts oben den MP3-Player unter "OBJEKTE AUF DEM GERÄT" aus. |
|
e) |
Klicken Sie dann rechts oben auf die Schaltfläche "KOPIEREN". Die ausgewählte Musik wird |
|
|
anschließend automatisch auf Ihren MP3-Player kopiert. |
5) Abmelden desTrekStor i.Beat organix undTrennen vom PC
Windows® 98 (SE) Suchen Sie den i.Beat organix im "GERÄTEMANAGER" (unter "LAUFWERKE") und
klicken Sie das Gerät mit der linken Maustaste an. Wählen Sie den Menüpunkt "ENTFERNEN" aus. Jetzt können Sie den i.Beat organix vom PC trennen.
Windows® 2000/ME/XP Klicken Sie rechts unten in der "TASKLEISTE" auf das Symbol  "HARDWARE
SICHER ENTFERNEN". Wählen Sie nun "USB-MASSENSPEICHERGERÄT – LAUFWERK ENTFERNEN" aus und bestätigen Sie
die Schaltfläche "BEENDEN".
Hinweis:BefolgenSiebittedenempfohlenenAbmeldevorgang,umSchädenamGerätoderDatenverlust zuvermeiden!
6) Firmware-Update desTrekStor i.Beat organix
Die jeweils aktuelle Firmware-Version finden Sie auf derTrekStor Homepage www.trekstor.de.
Warnung:LesenSiebittediekompletteAnleitungdurchundbeachtenSieexaktdieProzedur,um
Schädenami.Beat organixzuvermeiden!
a)Schließen Sie den i.Beat organix an den USB-Anschluss Ihres PCs an.
b)Sichern Sie alle wichtigen Daten Ihres i.Beat organix auf Ihrem PC.
c)Starten Sie die Datei "SETUP.EXE", um die Software für das Firmware-Update auf Ihrem PC zu installieren. Folgen Sie den Installationsanweisungen.
d)Starten Sie über "STARTMENÜ" ‡"PROGRAMME" ‡"TREKSTOR I.BEAT ORGANIX" das "FIRMWARE UPDATE".
e)Klicken Sie "START" um das Firmware-Update durchzuführen.
– 4 –

7) Formatierung desTrekStor i.Beat organix |
DE |
a)Schließen Sie den i.Beat organix an den USB-Anschluss Ihres PCs an.
b)Sichern Sie alle wichtigen Daten Ihres i.Beat organix auf Ihrem PC.
c)Öffnen Sie den"ARBEITSPLATZ" und klicken Sie mit der rechten Maustaste auf"WECHSELDATENTRÄGER".
d)Wählen Sie aus dem Kontextmenü den Punkt "FORMATIEREN…" aus.
e)Klicken Sie auf die Schaltfläche "STARTEN", um das Formatieren durchzuführen.
8) Bedienung desTrekStor i.Beat organix
Einund Ausschalten
Halten Sie die A-Taste für ca. 1 Sekunde gedrückt, um den i.Beat organix einzuschalten. Um den i.Beat organix auszuschalten, halten Sie die A-Taste ebenfalls für ca. 1 Sekunde gedrückt.
Hinweis:AchtenSiedarauf,dasssichdert-SchieberinderrechtenPositionbefindet,die Tastensperrealsoausgeschaltetist.IstdieTastensperreaktiviert,erscheintdasTastensperre-Symboloder eineentsprechendeMeldung.
Die verschiedenen Modi
Der i.Beat organix besitztverschiedeneModi(Wiedergabe,FM-Radio*, Aufnahme,Text lesen, Zeit, Spiele).
Um in einen Modus zu gelangen, halten Sie die l-Taste ca. 1 Sekunde lang gedrückt. Wählen Sie durch Drücken der G- bzw. H-Taste den gewünschten Modus aus und bestätigen Sie durch Drücken der l-Taste. Durch Drücken der c- bzw. d-Taste verlassen Sie das Menü.
*optional
Modus: Wiedergabe
Wechseln Sie bitte in den Modus "WIEDERGABE".
Anzeige im Modus: Wiedergabe
1 |
Bitrate der Audiodatei |
8 |
Visualisierung / ID3-Tags |
|
|
|
|
2 |
Soundeffektanzeige |
9 |
Dateiname |
|
|
|
|
3 |
Lautstärke |
10 |
4/;/< |
|
|
|
|
4 |
Wiederholfunktion |
11 |
Fortschrittsanzeige |
|
|
|
|
5 |
A-BSegmentwiederholung |
12 |
Titellänge |
|
|
|
|
6 |
Tastensperre Symbol |
13 |
AktuelleTitelnummer |
|
|
|
|
7 |
Batterieanzeige |
14 |
Gesamtanzahl derTitel |
|
|
|
|
– 5 –

DE |
Funktionen im Modus: Wiedergabe |
1)Wiedergabe
Drücken Sie die A-Taste, um die Wiedergabe einer Audiodatei zu starten.
2)Pause
Drücken Sie kurz die A-Taste, um die Wiedergabe zu unterbrechen. Durch nochmaliges Drücken der A-Taste wird die Wiedergabe fortgesetzt.
3)Titel wechseln
Durch kurzes Drücken der G- bzw. H-Taste können Sie den aktuellenTitel wechseln. Wenn Sie die H-Taste drücken, wird der nächsteTitel ausgewählt. Wenn Sie die G-Taste innerhalb von 5 Sekunden nach Beginn des Wiedergabevorgangs drücken, wird zum vorhergehenden
Titel gewechselt. Nach Beginn des Wiedergabevorgangs und Ablauf von mindestens 5 Sekunden springt der i.Beat organix zum Anfang des aktuellenTitels zurück.
4)Vor- / Zurückspulen innerhalb einesTitels
Durch längeres Drücken der G- bzw. H-Taste können Sie innerhalb einesTitels spulen. Halten Sie die H- bzw G-Taste gedrückt, um vorbzw. zurückzuspulen.
Hinweis:JelängerdieG-bzw.H-Tastegedrücktbleibt,destoschnellerspultdasGerät.
5)Anzeigen der Uhrzeit
Die aktuelle Uhrzeit wird durch längeres Drücken der c-Taste angezeigt.
6)Lautstärke anheben / absenken
Sie können die Lautstärke bequem durch kurzes Drücken der c- bzw. d-Taste einstellen.
7)Abspielgeschwindigkeit
Durch längeres Drücken der d-Taste wird die Abspielgeschwindigkeit von Audio-Dateien angezeigt. Durch Drücken der G- bzw. H-Taste können Sie die Abspielgeschwindigkeit (von 50 % bis zu 150 %) ändern. Bestätigen Sie die Einstellung durch Drücken der l-Taste.
Hinweis:DieEinstellung"100%"entsprichtdernormalenAbspielgeschwindigkeit.
–6 –

Ordner-Navigation |
DE |
Die Ordner-Navigation erreichen Sie im Modus "WIEDERGABE" durch kurzes Drücken der l-Taste. |
|
Durch Drücken der G- bzw. H-Taste markieren Sie den vorhergehenden oder nächstenTitel |
|
bzw. Ordner. Um Ihre Auswahl zu bestätigen, drücken Sie bitte die l-Taste. Das übergeordnete |
|
Verzeichnis erreichen Sie durch Drücken der c-Taste. Um die Ordner-Navigation zu verlassen, |
|
drücken Sie die c-Taste, wenn Sie sich im Hauptverzeichnis befinden. |
|
Um den Inhalt nur eines bestimmten Ordners anzuzeigen und abzuspielen, markieren Sie diesen |
|
in der Ordner-Navigation durch kurzes Drücken der i-Taste. Die Meldung "ORDNER GEWÄHLT" |
|
erscheint. Starten Sie die Wiedergabe durch Drücken der A-Taste. Um die Auswahl wieder |
|
aufzuheben, wählen Sie im Hauptverzeichnis das Symbol für den übergeordneten Ordner aus und |
|
drücken kurz die i-Taste. Zur Bestätigung erscheint die Meldung"ALLES MARKIERT". |
|
Hinweis:HaltenSieca.1Sekundelangdie8-Tastegedrückt,umdieSprungweiteinderOrdner- |
|
Navigationeinzustellen(1bzw.8Titel/Ordnerüberspringen).DiesdientderschnellerenNavigation |
|
innerhalbderOrdner-Navigation. |
|
Löschen einer Datei über die Ordner-Navigation |
|
Wählen Sie die zu löschende Datei über die Ordner-Navigation aus und drücken Sie kurz die |
|
8-Taste. Um das Löschen der Datei zu bestätigen, wechseln Sie durch Drücken der G- |
|
bzw. H-Taste auf "JA" und drücken Sie anschließend die l-Taste. |
|
Playlist erstellen und abspielen |
|
Mit einer Playlist (Abspielliste) lässt sich die Reihenfolge der wiederzugebendenTitel festlegen. |
|
Um einenTitel in den Playlist-Ordner hinzuzufügen, markieren Sie diesen in der Ordner-Navigation |
|
durch kurzes Drücken der i-Taste. Dem Datei-Symbol wird dadurch ein kleines "P" hinzugefügt |
|
und automatisch eineVerknüpfung im Playlist-Ordner erstellt. Durch erneutes kurzes Drücken |
|
der i-Taste entfernen Sie die Playlist-Markierung für diesenTitel. Um die Playlist abzuspielen, |
|
markieren Sie den Ordner"PLAYLIST" in der Ordner-Navigation und drücken Sie kurz die i-Taste. |
|
Durch Drücken der A-Taste starten Sie die Wiedergabe Ihrer Playlist. |
|
– 7 –

DE |
Modus: FM-Radio (optional) |
|
Wechseln Sie bitte in den Modus "FM-RADIO". |
1)Automatische Speicherbelegung
Durch kurzes Drücken der 8-Taste wird der automatische Sendersuchlauf aktiviert.
Der i.Beat organix FM sucht nun automatisch empfangsstarke Radiosender und speichert diese auf den 15 Speicherplätzen ab.
2)Aufnahme starten
Wenn Sie die i-Taste 2 Sekunden drücken, beginnt die Aufnahme. Wenn Sie sich im FM-Radio-Modus befinden, erfolgt die Aufnahme vom Radio.
3)Aufnahme beenden
Durch kurzes Drücken der i-Taste beenden Sie die Aufnahme.
4)Wechsel zwischen manueller Senderwahl"SCAN" und Speicherplatz-Modus"PRESET"
Drücken Sie kurz die l-Taste, um zwischen der manuellen Senderwahl "SCAN" und dem Speicherplatz-Modus "PRESET" zu wechseln.
5)Wechsel zwischen eingespeicherten Sendern
Im Speicherplatz-Modus "PRESET": Durch kurzes Drücken der G- bzw. H-Taste können Sie zwischen den vorhandenen Speicherplätzen wechseln.
6)Manuelle Frequenzänderung / Manueller Suchlauf
Im manuellen Senderwahl-Modus "SCAN": Durch kurzes Drücken der G- bzw. H-Taste
können Sie die Empfangsfrequenz um jeweils 0,1 MHz ändern. Wenn Sie die G- bzw. H-Taste ausreichend lange drücken, sucht der i.Beat organix FM automatisch die unteren bzw. oberen Frequenzbereiche nach Sendern ab.
7)Speichern von individuellen Sendern
Im Speicherplatz-Modus "PRESET": Wählen Sie einen Speicherplatz, den Sie mit einer Frequenz belegen wollen. Wechseln Sie zur manuellen Senderwahl "SCAN". Stellen Sie die gewünschte Frequenz ein und drücken Sie kurz die 8-Taste. Der gewählte Speicherplatz ist nun mit dem gewünschten Sender belegt.
–8 –

Modus: Aufnahme |
DE |
Wechseln Sie bitte in den Modus "AUFNAHME". |
|
Wählen Sie den gewünschten Aufnahme-Modus mit der G- bzw. H-Taste aus und bestätigen |
|
Sie diesen mit der l-Taste. Die Line-In-Aufnahme bzw. Sprachaufnahme beginnt danach |
|
automatisch. Durch kurzes Drücken der i-Taste beenden Sie die Aufnahme und wechseln in |
|
den Wiedergabe-Modus. |
|
•Line-In-Aufnahme
Über den Line-In-Eingang können Sie ein externes Gerät (z. B. CD-Player) anschließen und direkte Aufnahmen davon durchführen.
•Sprachaufnahme
Über das integrierte Mikrofon können Sie Sprachaufnahmen durchführen.
•Radio (optional)
Hier können Sie zeitgesteuerte Radio-Aufnahmen vorprogrammieren. Stellen Sie dabei den gewünschten Aufnahmezeitpunkt, die Aufnahmedauer, die entsprechende Radio-Frequenz und den Aufnahmezyklus ein.
Hinweis:DiezeitgesteuerteRadio-Aufnahmewirdnurdanngestartet,wennderi.Beat organix FM ausgeschaltetist.
Modus:Text lesen
Wechseln Sie bitte in den Modus "TEXT LESEN".
Wählen Sie eineTextdatei (*.txt) aus und öffnen Sie diese durch kurzes Drücken der l-Taste. Durch Drücken der c- bzw. d-Taste können Sie imText nach oben bzw. unten scrollen. Durch erneutes kurzes Drücken der l-Taste schließen Sie dieTextdatei.
Modus: Zeit
Wechseln Sie bitte in den Modus "ZEIT".
Hier können Sie die Uhrzeit und den Wecker einstellen. Zusätzlich finden Sie auch hier eine integrierte Stoppuhr zum Zeitnehmen.
Modus: Spiele
Wechseln Sie bitte in den Modus "SPIELE".
Starten Sie das Spiel "SLOT MACHINE" durch Drücken der l-Taste.
– 9 –

DE |
Einstellungen im Hauptmenü |
|
Wechseln Sie zunächst in den Wiedergabe-Modus. Aktivieren Sie nun das Hauptmenü, in dem Sie |
|
die i-Taste kurz drücken. Im Hauptmenü können Sie die Konfiguration des Equalizers sowie für |
|
SRS WOW zur Klangbeeinflussung vornehmen. Weiterhin stehen Ihnen Menüs zur Konfiguration |
|
der Display-Einstellungen, Aufnahmeund Wiederhol-Funktionen, der automatischen Abschaltung, |
|
der USB-Einstellungen und zur Sprachauswahl zurVerfügung. |
USB- / Player-Modus
Sie können den i.Beat organix invollem Umfang nutzen, während er über den USB-Anschluss aufgeladen wird. Wählen Sie dazu die Funktion "PLAYER-MODUS" unter den USB-Einstellungen aus.
Hinweise:
•DieserMP3-PlayeristfürdenmitgeliefertenKopfhörer(Impedanzvon32Ohm)optimiert.DieVerwendungandererKopfhörermit geringererImpedanzkannu.U.zurBeschädigungdesMP3-PlayersoderauchdesKopfhörersführen;besondersbeiMP3-Playernmit 2Kopfhöreranschlüssen.
•Achtung:DiesesGerätkannhoheLautstärkenerzeugen.UmHörschädenzuvermeiden,solltenSienichtlängereZeitmithoher Lautstärkehören.NichtimStraßenverkehrbenutzen.
•VonderNutzungvonUSB-KabelnmitLeitungslängenvonmehrals3msollteabgesehenwerden.
Der Hersteller behält sich das Recht vor, das Produkt ständig weiter zu entwickeln. Diese Änderungen können ohne direkte Beschreibung in dieser Kurzanleitung vorgenommen werden. Informationen in dieser Kurzanleitung müssen somit nicht den Stand der technischen Ausführung widerspiegeln.
Der Hersteller garantiert nur die Eignung für die eigentliche Bestimmung dieses Produktes. Weiter ist der Hersteller nicht für Beschädigungen oderVerlust von Daten und deren Folgeschäden verantwortlich.
Copyright © 2006TrekStor GmbH & Co. KG. Alle Rechte vorbehalten. Bei weiteren erwähnten Produktoder Firmenbezeichnungen handelt es sich möglicherweise um Warenzeichen oder Markennamen der jeweiligen Inhaber.
– 10 –
 QUICK GUIDE
Please charge the i.Beat organix as described in this quick guide for at least 5 hours before initial use.
Note:Youcanfinddetailedinstructionsforusingthei.Beat organixontheaccompanying |
EN |
installationCD,orontheInternetsupportpageatwww.trekstor.de. |
|
Set the menu language for theTrekStor i.Beat organix |
|
The default language for the i.Beat organix is English.To switch the menu language to e.g. |
|
German, follow these steps: |
|
•HoldtheAbuttonforapproximately2secondstoturnthei.Beat organix on.
•Briefly press the ibutton to activate the main menu.
•Then press the Gbutton once, and confirm your selection ("LANGUAGE") by pressing the lbutton.
•Press the Gor Hbutton to select the desired language, and confirm by pressing the lbutton.
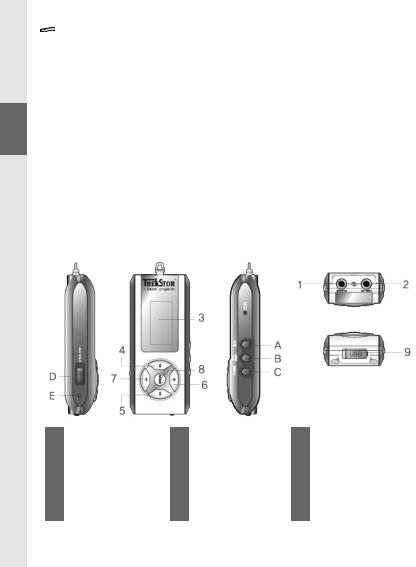
1) Controls for theTrekStor i.Beat organix
1 |
Headphone jack 1 |
6 |
c Volume button |
A |
A button |
|
|
|
|
|
|
2 |
Line-in jack / |
7 |
d Volume button |
B |
8 button |
|
headphone jack 2 |
|
|
|
|
3 |
OLED display |
8 |
l button |
C |
i button |
|
|
|
|
|
|
4 |
G Rewind button |
9 |
USB port |
D |
t button |
|
|
|
|
|
|
5 |
H Fast-forwardbutton |
|
|
E |
y button |
|
|
|
|
|
|
Note:Toreset,carefullypresstheybuttonwithapointedobject(suchasanunbentpaperclip).
Theresetbuttonisrecesseddeeplyinthehousing.
– 11 –

2) Connecting theTrekStor i.Beat organix to a PC
NoteforusersofWindows®98:FirstinstallthedriversontheaccompanyingCDbeforeconnectingthe i.Beat organix.
EN Use the supplied USB extension cable, and connect the i.Beat organix as follows:
USB connector
USB cable
3) Charging theTrekStor i.Beat organix
The i.Beat organix starts charging as soon as you connect it to a PC.The battery is charged after a maximum of 3 hours; charging automatically stops to prevent overcharging.
Note:Themaximumbatterylifeisonlyreachedafterapproximately10chargingcycles.
4) Exchanging data with theTrekStor i.Beat organix
Files that are not copy-protected
a)Select the desired files (such as MP3) with the mouse. Copy these files by clicking them with your right mouse button and then selecting "COPY".
b)Under "MY COMPUTER", select the device with removable storage, "TREKSTOR I.BEAT ORGANIX".
c)Click it with your right mouse button, and select "PASTE" to start copying. After copying is over, the data will be available on the i.Beat organix.
– 12 –

WMA-DRM9-protected files
To copy DRM9-protected files, you need to use the Windows Media® Player (reference version: Windows Media® Player 9).
a) Connect your MP3 player to your computer and start the Windows Media® Player. |
EN |
b)In the task bar, left click on "COPY TO CD OR DEVICE".
c)Drag the desired music files (WMA) to the list "ITEMS TO COPY" on the left.
d)In the pulldown menu at the top right, select the MP3 player under "ITEMS ON DEVICE".
e)Then click the "COPY" button at the top right.The selected music will then be automatically copied to your MP3 player.
5) Logging off theTrekStor i.Beat organix anddisconnectingfromthePC
Windows® 98 (SE) Look for i.Beat organix under "DEVICE MANAGER" (under "DRIVES"), and click
the device with the left mouse button. Select the menu item "REMOVE".You can now disconnect the i.Beat organix from the PC.
Windows® 2000/ME/XP At the bottom right on the task bar, click the symbol  "SAFELY REMOVE HARDWARE". Select "SAFELY REMOVE USB MASS STORAGE DEVICE – DRIVE", and click the "CLOSE" button.
Note:Pleasefollowtherecommendedlogoffproceduretopreventdamagetothedeviceordataloss.
6) Firmware update for theTrekStor i.Beat organix
You can find the current firmware version onTrekStor’s homepage www.trekstor.de.
Warning:Pleasereadalltheinstructionsandexactlyfollowtheproceduretokeepfromdamagingthe i.Beat organix.
a)Connect the i.Beat organix to the USB port of your PC.
b)Back up all the important files on your i.Beat organix onto your PC.
c)Start the "SETUP.EXE" file to install the software for the firmware update on your PC. Follow the installation instructions.
d)Select "START MENU" ‡"PROGRAMS" ‡"TREKSTOR I.BEAT ORGANIX", then start the "FIRMWARE UPDATE".
e)Click "START" to run the firmware update.
– 13 –

|
7) |
Formatting theTrekStor i.Beat organix |
|
|
a) |
Connect the i.Beat organix to the USB port of your PC. |
|
|
b) |
Back up all the important files on your i.Beat organix onto your PC. |
|
EN |
c) |
Open"MY COMPUTER", and click your right mouse button on"DEVICES WITH REMOVABLE STORAGE". |
|
d) |
Select "FORMAT…" from the context menu. |
||
|
|||
|
e) |
Click the "START" button to start the formatting. |
8) Using theTrekStor i.Beat organix
Turning the device on and off
Hold the Abutton for approximately 2 seconds to turn the i.Beat organix on.To turn off the i.Beat organix, hold the Abutton for approximately 2 seconds.
Note:Makesurethatthetswitchisinthecorrectposition,i.e.,thatthebuttonlockisturnedoff.
Ifthebuttonlockisactivated,thebuttonlocksymboloracorrespondingmessagewillappear.
Different modes
The i.Beat organix hasdifferentmodes:MusicPlayer,FMradio*,Recorder,TextView,Time Setting and Game.
To go to a mode, hold the lbutton for approximately 1 second. Press the Gor Hbutton to select the desired mode, and confirm by pressing the lbutton. Leave the menu by pressing the cor dbutton.
*optional
Mode: Playback
Switch to "MUSIC PLAYER" mode.
Mode display: Playback
1 |
Bit rate of the audio file |
8 |
Visualization / ID3 tags |
|
|
|
|
2 |
Sound-effect display |
9 |
File name |
|
|
|
|
3 |
Volume |
10 |
4/;/< |
|
|
|
|
4 |
Repeat function |
11 |
Progress display |
|
|
|
|
5 |
A-B repeat segment |
12 |
Song length |
|
|
|
|
6 |
Button-lock symbol |
13 |
Current song number |
|
|
|
|
7 |
Battery display |
14 |
Total number of songs |
|
|
|
|
– 14 –

Mode functions: Playback
EN
1)Playback
Briefly press the Abutton to start the playback of an audio file.
2)Pause
Briefly press the Abutton to stop playback. Repress the Abutton to continue playback.
3)Change song
You can change the current song by briefly pressing the Gor Hbutton. Press the Hbutton
to select the next song. If you press the Gbutton within 5 seconds after a song starts, you switch to the prior song. If you do this after 5 seconds of playback, the i.Beat organix returns to the beginning of the current song.
4)Rewind / fast-forward within a song
You can navigate within the current song by holding down the Gor Hbutton. The Hbutton fast-forwards, and the Gbutton rewinds.
Note: Thelongeryouholddownthe GorHbutton,thefasteryoufast-forwardorrewind.
5)Displaying the time
The current time is displayed by holding down the cbutton.
6)Increase / decrease volume
Briefly press the cor dbutton to adjust the volume.
7)Play speed
Hold down the dbutton to display the play speed of audio files.You can change the play speed (from 50% to 150%) by pressing the Gor Hbutton. Confirm the setting by pressing the lbutton.
Note:Thesetting"100%" correspondstothenormalplayspeed.
–15 –

Folder navigation
You get to folder navigation in "MUSIC PLAYER" mode by briefly pressing the lbutton. Press the Gor Hbutton to select the previous or next song or folder. Press the lbutton to confirm. Press the cbutton to get to the next-highest directory.To leave folder navigation when you are in the main directory, press the cbutton.
EN
To display and play back the contents of a specific folder, select it in folder navigation by pressing the ibutton.The message"FOLDER SELECTED" appears. Start playback by pressing the Abutton. To cancel the selection, select the symbol for the next-highest folder in the main menu, and briefly press the ibutton.The message "ALL SELECTED" appears as a confirmation.
Note:Holddownthe8buttonforapproximately1secondtosetthesizeoftheskipinfolder navigation(skip1to8songs/folder)Thisletsyounavigatefasterinfoldernavigation.
Deleting a file using folder navigation
Select the file you want to delete using folder navigation, and briefly press the 8button. To confirm that you want to delete the file, switch to "YES" by pressing Gor Hbutton, and then press the lbutton.
Create and play a playlist
Use the playlist to determine the sequence of the tracks to be played.To display and play back a song in the playlist folder, select it in folder navigation by briefly pressing the ibutton. A small "P" will be added to the file symbol, and a link will be automatically created in the playlist folder. Press the ibutton again to remove the playlist marking for this song.To play the playlist, just select the folder "PLAYLIST" in folder navigation, and briefly press the ibutton. Start playing the playlist by pressing the Abutton.
– 16 –

Mode: FM radio (optional)
Switch to "FM RADIO" mode.
EN
1)Automatic memory assignment
Brieflypressingthe8buttonactivatestheautomaticstationsearch.Thei.Beat organix FM then automatically searches for the radio stations with the strongest reception and saves them in 15 memory locations.
2)Start recording
Recording starts after the ibutton is held for more than 2 seconds.The radio broadcast is recorded when you are in FM radio mode.
3)Stop recording
Briefly press the ibutton to stop recording.
4)Switching between manual station selection"SCAN" and memory mode"PRESET"
Briefly press the lbutton to switch between manual station selection "SCAN" and memory mode "PRESET".
5)Switching between saved stations
In memory mode "PRESET":You can switch between available presets by briefly pressing the Gor Hbutton.
6)Manually change frequency / manual search
In manual station mode "SCAN": Briefly press the Gor Hbutton to change the reception frequency by 0,1 MHz. Hold down the Gor Hbutton for the i.Beat organix FM to automatically scan the upper and lower frequencies for stations.
7)Saving individual stations
In memory mode "PRESET": Select a memory that you want to assign a frequency to. Change to manualstationselection"SCAN".Selectthedesiredfrequency,andbrieflypressthe8button. The station is now assigned to the selected memory.
–17 –

|
Mode: Recorder |
|
|
Switch to "RECORDER" mode. |
|
|
Select the desire recording mode with the Gor Hbutton, and confirm it with the lbutton. |
|
|
Line-in recording or voice recording then starts automatically. Briefly press the ibutton to stop |
|
EN |
recording and switch to Playback mode. |
|
|
• Line-in recording |
|
|
|
You can connect an external device to the Line-In jack (such as a CD player) and directly record |
|
|
from it. |
|
• |
Voice recording |
|
|
You can record your voice using the integrated microphone. |
|
• |
Radio (optional) |
With this function, you can preprogram timed radio recordings. Select the desired recording start time, the length of recording, the desired radio frequency and the recording cycle.
Note:Timedradiorecordingonlystartswhenthei.Beat organix FM isturnedoff.
Mode: TextView
Switch to "TEXT VIEW" mode.
Select a text file (*.txt), and open it by briefly pressing the lbutton. Press the cor dbutton to scroll up or down in the text. Briefly press the lbutton to close the text file.
Mode:Time Setting
Switch to the "TIME SETTING" mode.
In this mode, you can set the time and alarm. In addition, this mode contains an integrated stopwatch for timing.
Mode: Game
Switch to the "GAME" mode.
Start the "SLOT MACHINE" game by pressing the lbutton.
– 18 –

Settings in the main menu
First switch to Playback mode. Briefly press the ibutton to activate the main menu. In the main menu, you can configure the equalizer and the SRS WOW to adjust sound.There are also menus for configuring the display settings, record and playback functions, automatic shutoff, USB settings, and language selection.
EN
USB / Player mode
You can use all the functions of the i.Beat organix while charging it via the USB port.To do this, select the "USE MUSIC PLAYER" function under the USB settings...
Note:
•ThisMP3playerisoptimizedfortheprovidedearphones(32Ohmimpedance).Usingotherearphoneswithalowerimpedance candamagetheMP3playerorearphone,especiallyMP3playerswith2earphonejacks.
•Note:Thisdevicecanproducehighvolumes.Topreventhearingloss,donotlistentohighvolumesforlongperiods.Donotusein streettraffic.
•DonotuseUSBcableslongerthan3meters.
The manufacturer retains the right to continuously improve the product.These changes may be made without being directly described in these quick guides. For this reason, the information provided in these quick guides may not reflect the current state of the art.
The manufacturer only guarantees suitability for the product"s intended purpose. In addition, the manufacturer is not responsible for damages or loss of data and subsequent consequences.
Copyright © 2006TrekStor GmbH & Co. KG. All rights retained. Other cited product or company names may be trademarks or brand names of the respective owner.
– 19 –
 GUIDE ABRÉGÉ
Veuillez charger le i.Beat organix au moins cinq heures avant la première utilisation, comme décrit dans ce guide abrégé de l’utilisateur.
Remarque:voustrouverezdeplusamplesinformationssurl’utilisationdui.Beat organixsoitsur leCDd’installation,soitsurlapaged’assistancetechniquefigurantsurInternetàl’adressewww.trekstor. de.
Régler la langue de menu duTrekStor i.Beat organix
FR Par défaut, la langue de menu du i.Beat organix est réglée en anglais. Pour par exemple régler la langue de menu en français, veuillez réaliser les étapes suivantes :
•MaintenezlatoucheAenfoncéependantenviron2secondespourallumerlei.Beat organix.
•Activez le menu principal en appuyant brièvement sur la touche i.
•Appuyez ensuite une fois sur la touche Get confirmez la sélection (« LANGUAGE ») en appuyant sur la touche l.
•En appuyant sur la touche Gou H, sélectionnez maintenant la langue souhaitée et confirmez celle-ci en appuyant sur la touche l.
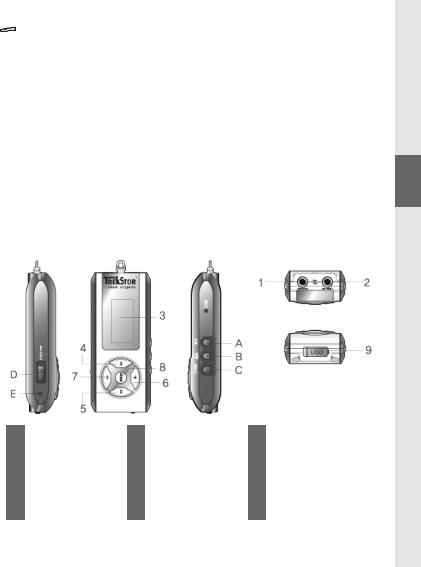
1)Eléments de commande duTrekStor i.Beat organix
1 |
Prise pour écouteurs 1 |
6 |
Touche de volume c |
A |
Touche A |
|
|
|
|
|
|
2 |
Prise Line-In / |
7 |
Touche de volume d |
B |
Touche 8 |
|
prise pour écouteurs 2 |
|
|
|
|
3 |
Affichage OLED |
8 |
Touche l |
C |
Touche i |
|
|
|
|
|
|
4 |
Touche de recul G |
9 |
Connecteur USB |
D |
Touche t |
|
|
|
|
|
|
5 |
Touched’avancerapideH |
|
|
E |
Bouton y |
|
|
|
|
|
|
Remarque:afinderéaliseruneremiseàzéro(Reset),appuyezprudemmentavecunobjetpointu(aveclapointe d’untrombonedépliéparex.)surleboutony.Ceboutonestinstalléenprofondeurdansl’appareil.
– 20 –
2) Connexion duTrekStor i.Beat organix à un PC
RemarquepourlesutilisateursdeWindows®98:installezenpremierlieulepilotesetrouvantsurleCD livréavantderaccorderlei.Beat organix!
Utilisez la rallonge USB fournie et branchez le i.Beat organix comme suit :
Prise USB
Câble USB |
FR |
|
3) Chargement duTrekStor i.Beat organix
Dès que vous connectez le i.Beat organix à un PC, il se charge automatiquement. Au bout de 3 heures maximum, la batterie est chargée et la procédure de chargement se termine alors automatiquement afin d’éviter une surcharge.
Anoter:lacapacitémaximaledelabatterien’estatteintequ’aprèsenviron10cyclesdecharge.
4) Echange de données avec leTrekStor i.Beat organix
Les fichiers reproductibles
a)Marquez les fichiers souhaités avec la souris (MP3 par ex.). Copiez ces derniers en appuyant sur le bouton droit de la souris (« COPIER »).
b)Sur le « BUREAU », sélectionnez le disque local «TREKSTOR I.BEAT ORGANIX ».
c)Appuyez sur le bouton droit de la souris et sélectionnez l’option « INSÉRER » afin de lancer la
procédure de copie. Après clôture de la procédure de copie, les données sont enregistrées sur le i.Beat organix.
– 21 –

Fichiers protégés par la fonction WMA-DRM9
Pour copier des fichiers protégés par DRM9, vous devez tout d’abord copier ces derniers par l’intermédiaire de Windows Media® Player (version de référence : Windows Media® Player 9).
a)Reliez le lecteur MP3 avec votre ordinateur et démarrez Windows Media® Player.
b)Dans la barre des tâches, cliquez à gauche sur « COPIER SUR CD OU PÉRIPHÉRIQUE ».
c)Déplacezlesfichiersmusicauxsouhaités(WMA)danslaliste«MUSIQUE À COPIER »surlecôtégauche.
d)Dans le menu déroulant apparaissant en haut à droite, sélectionnez le lecteur MP3 sous
FR |
« ELÉMENTS SUR LE PÉRIPHÉRIQUE ». |
e)Cliquez ensuite en haut à droite sur « COPIER ». La musique sélectionnée est ensuite automatiquement copiée sur le lecteur MP3.
5) Arrêt duTrekStor i.Beat organix et déconnexion du PC
Windows® 98 (SE) Cherchez le i.Beat organix dans le « GESTIONNAIRE DE PÉRIPHÉRIQUES » (sous
« DISQUES ») et cliquez sur le périphérique avec le bouton gauche de la souris. Cliquez sur le point de menu « SUPPRIMER ».Vous pouvez maintenant déconnecter le i.Beat organix du PC.
Windows® 2000/ME/XP Cliquez en bas à droite dans la « BARRE DES TÂCHES » sur l’icône 
« DÉCONNEXION OU ÉJECTION DE MATÉRIEL ». Sélectionnez maintenant « PÉRIPHÉRIQUE DE STOCKAGE DE MASSE USB
– SUPPRIMER DISQUE » et cliquez sur « ARRÊTER ».
Remarque:pouréviterdesdétériorationssurl’appareiletdespertesdedonnées,suivezscrupuleusement laprocédurededéconnexionrecommandée!
6) Mise à jour du progiciel duTrekStor i.Beat organix
Vous trouverez la version respectivement actuelle du progiciel sur la page d’accueil deTrekStor www.trekstor.de.
Avertissement:lisezleguideabrégédanssonintégralitéetrespectezavecexactitudelesprocéduresafin d’éviterdesdommagessurlei.Beat organix!
a)Raccordez le i.Beat organix au connecteur USB de votre PC.
b)Sauvegardez toutes les données importantes de votre i.Beat organix sur votre PC.
c)Faites démarrer le fichier « SETUP.EXE » pour installer le logiciel de la mise à jour du progiciel sur votre PC. Suivez les instructions d’installation.
d)Cliquez sur les rubriques de menu « DÉMARRER » ‡« PROGRAMMES » ‡«TREKSTOR I.BEAT ORGANIX »
pour démarrer la « MISE À JOUR DU PROGICIEL ».
e)Cliquez sur « DÉMARRER » pour lancer la mise à jour du progiciel.
– 22 –

7) Formatage duTrekStor i.Beat organix
a)Raccordez le i.Beat organix au connecteur USB de votre PC.
b)Sauvegardez toutes les données importantes de votre i.Beat organix sur votre PC.
c)Ouvrez le « BUREAU » et cliquez avec le bouton droit de la souris sur « DISQUE AMOVIBLE ».
d)Dans le menu contextuel affiché, sélectionnez le point « FORMATER… ».
e)Cliquez sur « DÉMARRER » pour lancer le formatage.
8) Utilisation duTrekStor i.Beat organix |
FR |
Allumer et éteindre
Gardez la touche Aenfoncée pendant environ 2 secondes pour allumer le i.Beat organix. Pour éteindre le i.Beat organix, maintenez la touche Aégalement enfoncée pendant environ 2 secondes.
Remarque:veillezàcequelecurseurtsetrouveàdroite,c’est-à-direquelaclédeverrouillage soitdésactivée.Silaclédeverrouillageestactivée,lesymboledelacléouunmessagecorrespondant apparaît.
Les différents modes
Le i.Beat organix dispose de plusieurs modes (Music Player, FM radio*, Recorder,TextView, Time Setting, Game).
Pour accéder à un mode, maintenez la touche lenfoncée pendant environ 1 seconde. En appuyant sur la touche Gou H, sélectionnez le mode souhaité et confirmez votre choix en appuyant sur la touche l. En appuyant sur la touche cou la touche d, vous quittez le menu.
*option
Mode : lecture
Passez dans le mode « MUSIC PLAYER ».
Affichage dans le mode : lecture
1 |
Débit binaire du fichier |
8 |
Visualisation / balises ID3 |
|
audio |
|
|
2 |
Affichage des effets |
9 |
Nom de fichier |
|
sonores |
|
|
3 |
Volume |
10 |
4/;/< |
|
|
|
|
4 |
Fonction de répétition |
11 |
Affichage de progression |
|
|
|
|
5 |
RépétitiondesegmentA-B |
12 |
Longueur de titre |
|
|
|
|
6 |
Symbole de clé de |
13 |
Numéro de titre actuel |
|
verrouillage |
|
|
7 |
Affichage de batterie |
14 |
Nombre total des titres |
|
|
|
|
– 23 –

Fonctions en mode : lecture
FR
1)Lecture
Appuyez sur la touche Apour démarrer la lecture d’un fichier audio.
2)Pause
Appuyez brièvement sur la touche Apour interrompre la lecture. En appuyant de nouveau sur la touche A, la lecture est poursuivie.
3)Changer de titre
En appuyant sur la touche Gou la touche H, vous pouvez changer le titre actuel. Si vous appuyez sur la touche H, le titre suivant sera sélectionné. Si vous appuyez sur la touche G
en l’espace de 5 secondes après la mise en route de la procédure de lecture, le titre précédent seraactivé.Aprèsledébutdelalectureetl’écoulementde5secondesminimum,lei.Beatorganix se replace au début du titre actuel.
4)Avancer / reculer dans un titre
En appuyant longuement sur la touche Gou la touche H, vous pouvez vous déplacer au sein d’un titre. La touche Hpermet à cette occasion d’avancer et la touche Gde reculer.
Remarque:plusl’utilisateurappuielonguementsurlatoucheGouH,plusl’appareileffectuera uneavance/unreculrapide.
5)Affichage de l’heure
L’heure actuelle est affichée en appuyant un peu plus longuement sur la touche c.
6)Monter / baisser le volume
Vous pouvez confortablement régler levolume en appuyant brièvement sur les touches cou d.
7)Vitesse de lecture
Appuyez plus longuement sur la touche dpour afficher la vitesse de lecture des fichiers audio. EnappuyantsurlatoucheGouH,vouspouvezmodifierlavitessedelecture(de50%à150%). Confirmez le réglage en appuyant sur la touche l.
Remarque:leréglage«100%»correspondàlavitessedelecturenormale.
–24 –

Navigation de dossiers
Vous accédez à la navigation de dossiers dans le mode « MUSIC PLAYER » en appuyant brièvement sur la touche l. Appuyez sur la touche Gou Hpour marquer le titre ou le dossier précédent ou suivant. Pour confirmer votre sélection, appuyez sur la touche l.Vous accédez au répertoire supérieur en appuyant sur la touche c. Afin de quitter la navigation de dossiers, appuyez sur la touche c, dès lors que vous vous trouvez dans le répertoire principal.
Pour afficher uniquement le contenu d’un dossier particulier et le lire, marquez celui-ci dans la navigation de dossiers en appuyant brièvement sur la touche i. Le message « FOLDER SELECTED » est alors affiché. Démarrez la lecture en appuyant sur la touche A. Pour annuler la sélection,
choisissez dans le répertoire principal le symbole pour le dossier supérieur et appuyez brièvement FR sur la touche i. Pour confirmation, le message « ALL SELECTED » est affiché.
Remarque:maintenezlatouche8enfoncéependantenvironunesecondepourréglerl’ampleur desautdanslanavigationdedossiers(sauterde1ou8titre(s)/dossier).Cecipermetunenavigationplus rapideauseindelanavigationdedossiers.
Effacer un fichier par l’intermédiaire de la navigation de dossiers
Sélectionnez le fichier à supprimer par l’intermédiaire de la navigation de dossiers et appuyez brièvement sur la touche 8. Afin de confirmer l’effacement du fichier, passez sur «YES » en appuyant sur la touche Gou H, puis appuyez ensuite sur la touche l.
Création et lecture d’une playlist
Avec une « PLAYLIST » (liste de diffusion), l’ordre des pistes à diffuser peut être déterminé. Afin d’introduire un titre supplémentaire dans un dossier de liste de diffusion, marquez celui-ci dans la navigation de dossiers en appuyant brièvement sur la touche i. Un petit « P » est alors ajouté au symbole de fichier et un raccourci automatiquement créé dans le dossier playlist. En appuyant de nouveau brièvement sur la touche i, vous effacez le marquage de playlist pour ce titre. Pour procéder à la lecture d’une playlist, marquez tout simplement le dossier « PLAYLIST » dans la navigation de dossiers et appuyez brièvement sur la touche i. En appuyant sur la touche A, vous démarrez la lecture de votre playlist.
– 25 –

Mode : radio FM (option)
Passez dans le mode « FM RADIO ».
FR
1)Occupation automatique de mémoire
En appuyant brièvement sur la touche 8, larechercheautomatiquedestationsestactivée. Le i.Beat organix FM cherche alors automatiquement les stations de radio dont la réception est assez claire et mémorise celles-ci sur les 15 emplacements de mémoire.
2)Démarrer l’enregistrement
Un enregistrement peut débuter, dès lors que vous appuyez pendant plus de 2 secondes sur la touche i. Si vous êtes en mode FM Radio, l’enregistrement s’opère alors à partir de la radio.
3)Terminer l’enregistrement
En appuyant brièvement sur la touche i, vous terminez l’enregistrement.
4)Alternance entre la recherche manuelle des stations « SCAN » et le mode d’emplacement de mémoire « PRESET »
Appuyez brièvement sur la touche lafin d’alterner entre la recherche manuelle de stations
«SCAN » et le mode d’emplacement de mémoire « PRESET ».
5)Alternance entre les stations mémorisées
En mode d’emplacement de mémoire « PRESET » : en appuyant brièvement sur la touche G ou H, vous pouvez alterner entre les emplacements de mémoire existants.
6)Changement manuel de fréquence / recherche manuelle
Enmodederecherchemanuelledesstations«SCAN»:enappuyantbrièvementsurlatoucheG
ou H, vous pouvez changer la fréquence de réception de respectivement 0,1 MHZ. Si vous appuyez suffisamment longtemps sur la touche Gou H, le i.Beat organix FM recherche automatiquement la gamme de fréquences inférieures ou supérieures de stations.
7)Mémorisation de stations individuelles
En mode d’emplacement de mémoire « PRESET » : choisissez un emplacement de mémoire que vousvoulez doter d’une fréquence. Passer au mode de recherche manuelle des stations « SCAN ». Recherchez la fréquence souhaitée et appuyez brièvement sur la touche 8. L’emplacement de mémoire sélectionné est maintenant occupé par la station souhaitée.
–26 –

Mode : enregistrement
Veuillez passez dans le mode « RECORDER ».
Sélectionnez le mode d’enregistrement souhaité avec la touche Gou Het confirmez celui-ci en appuyant sur la touche l. L’enregistrement Line-In ou vocal débute ensuite automatiquement. En appuyant brièvement la touche i, vous terminez l’enregistrement et passez en mode Lecture.
•Enregistrement Line-In
Par l’intermédiaire de l’entrée Line-In, vous pouvez brancher un appareil externe (un lecteur de
CD par ex.) et exécuter des enregistrements directs à partir de celui-ci. |
FR |
•Enregistrement vocal
Vous pouvez effectuer des enregistrements vocaux par l’intermédiaire du microphone intégré.
•Radio (option)
Vous pouvez ici pré-programmer des enregistrements radio synchronisés. Réglez à cette occasion la date / l’heure de l’enregistrement, la durée de l’enregistrement, la fréquence de radio correspondante et le cycle d’enregistrement.
Remarque:l’enregistrementradiosynchronisédébuteuniquementlorsquelei.Beat organix FM estéteint.
Mode : lecture texte
Passez dans le mode «TEXT VIEW ».
Sélectionnez un fichier texte (*.txt) et ouvrez celui-ci en appuyant brièvement sur la touche l. En appuyant sur la touche cou d, vous pouvez faire défiler le texte de haut en bas. En appuyant de nouveau brièvement sur la touche l, vous fermez le fichier texte.
Mode : horloge
Passez dans le mode «TIME SETTING ».
Dans ce mode, vous pouvez régler l’heure et le réveil. Ce mode vous offre également la fonction d’un chronomètre intégré pour l’enregistrement de temps.
Mode : jeux
Passez dans le mode « GAME ».
Démarrez le jeu « SLOT MACHINE » en appuyant sur la touche l.
– 27 –

Réglages dans le menu principal
Passez tout d’abord dans le mode Lecture. Activez maintenant le menu principal en appuyant brièvement sur la touche i. Dans le menu principal, vous pouvez procéder à la configuration de l’égaliseur ainsi que celle prévue pour SRS WOW pour le réglage de la sonorité. De plus, vous disposez de menus pour la configuration des paramètres de l’écran, de fonctions Enregistrement et Répétition, de la coupure automatique, des paramètres USB et du choix de langue.
Mode Player / USB
Vous pouvez pleinement exploiter les fonctions du i.Beat organix pendant qu’il sera en cours de chargement sur le connecteur USB. Sélectionnez à cet effet la fonction « USE MUSIC PLAYER »
FR dans la rubrique des réglages USB.
Remarques:
•CelecteurMP3estoptimisépourlesécouteurslivrésavecl’appareil(impédancede32ohms).EnparticuliersurdeslecteursMP3avec 2sortiesd’écouteurs,l’utilisationd’autresécouteursavecunefaibleimpédancepeutentraînerdanscertainscasladétériorationdu lecteurMP3ouégalementdesécouteurs.
•Attention:cetappareilpeutgénérerdesintensitéssonoresimportantes.Afind’éviterdestroublesauditifs,ilestdéconseilléd’écouter demanièreprolongéeavecdesintensitéssonoresélevées.Ilestinterditd’utiliserl’appareilpendantlacirculationroutière.
•L’utilisationdecâblesUSBd’unelongueursupérieureà3mestdéconseillée.
Le fabricant se réserve le droit de poursuivre le développement du produit en permanence. Ces modifications peuvent être réalisées sans description directe dans ce guide abrégé de l'utilisateur. Les informations contenues dans ce guide abrégé ne reflètent donc pas impérativement l'état d'exécution technique.
Le fabricant garantit uniquement la fonctionnalité pour la définition intrinsèque de ce produit. En outre, le fabricant n’endosse aucune responsabilité concernant les dommages ou pertes de données subis ainsi que les conséquences en résultant.
Copyright © 2006TrekStor GmbH & Co. KG.Tous droits réservés.Toutes les autres désignations de produits ou de firmes citées sont dans certains cas des marques déposées ou des noms de marques du propriétaire respectif.
– 28 –
 GUIDA RAPIDA
Prima di procedere al primo impiego, ricaricare i.Beat organix per almeno 5 ore come descritto nella presente guida rapida.
Nota:leistruzioniperl’usodettagliatedii.Beat organixsonodisponibiliall‘internodelCD d‘installazionefornitoinallegatoalprodottoonellapaginadisupportotecnicosuinternetall‘indirizzo www.trekstor.de.
Impostazione della lingua dei menu diTrekStor i.Beat organix
La lingua dei menu di i.Beat organix è impostata su inglese di default. Per impostare la lingua dei menu ad es. su tedesco, eseguire le seguenti operazioni:
•TenerepremutoilpulsanteAper2secondicircaperattivarei.Beat organix.
•Attivare il menu principale premendo rapidamente il pulsante i.
• Successivamente premere il pulsante Guna volta e confermare la selezione ("LANGUAGE") |
IT |
premendo il pulsante l. |
|
•A questo punto premendo i pulsanti Go H, selezionare la lingua desiderata e confermare la selezione premendo il pulsante l.
1) Comandi diTrekStor i.Beat organix
1 |
Connessione per cuffie 1 |
6 |
Intensità del volume |
A |
Pulsante A |
|
|
|
pulsante c |
|
|
2 |
Connessione line-in / |
7 |
Intensità del volume |
B |
Pulsante 8 |
|
connessione per cuffie 2 |
|
pulsante d |
|
|
3 |
Display OLED |
8 |
Pulsante l |
C |
Pulsante i |
|
|
|
|
|
|
4 |
Pulsante di |
9 |
Connessione USB |
D |
Pulsante t |
|
riavvolgimento G |
|
|
|
|
5 |
Pulsante di |
|
|
E |
Pulsante y |
|
avanzamento H |
|
|
|
|
Nota:pereseguireun’operazionedireset,premerefacendoattenzioneconunoggettoappuntito(ades. unaclipdaufficio)ilpulsanteychesitrovainseritoall‘internodeltelaio.
– 29 –
2) Collegamento diTrekStor i.Beat organix ad un PC
NotapergliutentiWindows®98:installareinnanzituttoildriverchesitrovanelCDfornitoindotazione primadicollegarei.Beat organix.
Utilizzare la prolunga USB e collegare i.Beat organix come indicato di seguito::
ConnessioneUSB
Cavo USB
IT
3) Caricamento diTrekStor i.Beat organix
Non appena si collega i.Beat organix al PC, la ricarica si avvia in modo automatico. Dopo al massimo 3 ore, la batteria è completamente ricaricata ed il processo di ricarica viene concluso in modo automatico per evitare un sovraccarico.
Attenzione:laduratamassimadellabatteriasiottienesolodopocirca10ciclidiricarica.
4) Scambio di dati conTrekStor i.Beat organix
File non protetti da copia
a)Evidenziare i file desiderati (ad. es. MP3) con il mouse. Copiarli premendo il pulsante destro del mouse ("COPIA").
b)Selezionare la periferica di archiviazione di massa "TREKSTOR I.BEAT ORGANIX" all’interno delle
"RISORSE DEL COMPUTER".
c)Premere il pulsante destro del mouse e selezionare l’opzione "INCOLLA" per avviare il processo di copia. Al termine del processo di copia, i dati saranno presenti su i.Beat organix.
– 30 –
 Loading...