

Page 1

Easy Smart Configuration Utility
REV1.2.0
1910011045
Page 2

CONTENTS
Chapter 1 About this Guide.................................................................................1
1.1 Intended Readers ......................................................................................................1
1.2 Conventions............................................................................................................... 1
1.3 Overview of This Guide .............................................................................................1
Chapter 2 Getting Started....................................................................................4
2.1 Introduction................................................................................................................ 4
2.2 Install the Easy Smart Configuration Utility ...............................................................4
2.3 Switch Discovery ....................................................................................................... 8
2.4 Switch Settings ..........................................................................................................8
2.5 Refresh ......................................................................................................................9
2.6 Utility Features Overview......................................................................................... 10
2.7 Uninstall the Utility ...................................................................................................12
Chapter 3 System...............................................................................................14
3.1 System Info.............................................................................................................. 14
3.2 IP Setting .................................................................................................................15
3.3 User Account ...........................................................................................................15
3.4 Backup and Restore ................................................................................................ 16
3.5 System Reboot ........................................................................................................ 17
3.6 System Reset .......................................................................................................... 17
3.7 Firmware Upgrade................................................................................................... 18
Chapter 4 Switching...........................................................................................19
4.1 Port Setting.............................................................................................................. 19
4.2 IGMP Snooping ....................................................................................................... 20
4.3 Port Trunk................................................................................................................ 21
Chapter 5 Monitoring .........................................................................................23
5.1 Port Statistics........................................................................................................... 23
5.2 Port Mirror................................................................................................................ 24
5.3 Cable Test ............................................................................................................... 25
5.4 Loop Prevention ......................................................................................................26
Chapter 6 VLAN..................................................................................................27
6.1 MTU VLAN ..............................................................................................................29
6.2 Port Based VLAN ....................................................................................................29
I
Page 3

6.3 802.1Q VLAN ..........................................................................................................31
6.4 802.1Q PVID Setting ............................................................................................... 32
Chapter 7 QoS ....................................................................................................34
7.1 QoS Basic................................................................................................................ 36
7.2 Bandwidth Control ................................................................................................... 37
7.3 Storm Control ..........................................................................................................38
Chapter 8 Help....................................................................................................40
8.1 Help ......................................................................................................................... 40
8.2 About ....................................................................................................................... 40
II
Page 4

Easy Smart Configuration Utility User Guide
Chapter 1 About this Guide
This User Guide contains information for setup and guidance of the Easy Smart Configuration
Utility. Please read this guide carefully before operation.
1.1 Intended Readers
This Guide is intended for network managers familiar with IT concepts and network terminologies.
1.2 Conventions
In this Guide the following conventions are used:
¾ Menu Name→Submenu Name indicates the menu structure. System→System
Info→System Summary means the System Summary page under the System Info menu
option located under the System menu.
¾ Bold font indicates a button, a toolbar icon, menu or menu item.
Symbols in this guide:
Symbol Description
Note:
Tips:
Ignoring this type of note might result in a malfunction or damage to the device.
This format indicates important information that helps you make better use of your
device.
1.3 Overview of This Guide
Chapter Introduction
Chapter 1 About This Guide Introduces the guide structure and conventions.
Chapter 2 Getting Started Introduces the installation and uninstallation of the utility, and
the overview of its interface.
1
Page 5

Easy Smart Configuration Utility User Guide
Chapter Introduction
Chapter 3 System This module is used to configure system properties of the
switch. Here mainly introduces:
z System Info: View device information and define the device
description.
z IP Setting: Get and modify the network parameters of the
switch.
z User Account: Modify the username and password for
users to login the Web management page.
z Backup and Restore: Save the current configuration file to
your computer or download a backup configuration file to
your switch.
z System Reboot: Reboot your switch.
z System Reset: Reset the switch to the default.
z Firmware Upgrade: Update the firmware of the switch.
Chapter 4 Switching
This module is used to configure the basic functions of the
switch.
z Port Setting: Configure and view the basic parameters of
each port, including the port status, speed, duplex mode
and flow control.
z IGMP Snooping: Enable IGMP snooping feature and view
the current IGMP Group information.
z Port Trunk: Configure and view the information of the trunk
group of the switch.
Chapter 5 Monitoring This module is used to monitor the traffic information of the
switch, and provide the convenient method to locate and solve
the network problem.
z Port Statistics: View the statistic information of each port.
z Port Mirror: Monitor and mirror network traffic by forwarding
copies of incoming and outgoing packets from one/multiple
ports (mirrored port) to a specific port (mirroring port).
z Cable Test: Diagnose the connection status of the cable
connected to the switch and the distance to the problem
location.
z Loop Prevention: Detect loops using loopback detection
packets, and then display an alert or further block the
corresponding port.
2
Page 6

Easy Smart Configuration Utility User Guide
Chapter Introduction
Chapter 6 VLAN This module is used to configure VLANs to control broadcast
in LANs. Here mainly introduces:
z MTU VLAN: Set the MTU VLAN mode.
z Port Based VLAN: Set the Port-Based VLAN mode
z 802.1Q VLAN: Set the 802.1Q Tag VLAN mode.
z 802.1Q PVID Setting: Configure 802.1Q PVID value.
Chapter 7 QoS This module is used to configure QoS function to provide
different quality of service for various network applications and
requirements. Here mainly introduces:
z QoS Basic: Configure and view the basic parameters of
QoS.
z Bandwidth Control: Configure and view the bandwidth
control function information.
z Storm Control: Configure and view the storm control
function information.
Chapter 8 Help Lists the help and version information of the utility.
Return to CONTENTS
3
Page 7
Easy Smart Configuration Utility User Guide
Chapter 2 Getting Started
2.1 Introduction
Easy Smart Configuration Utility is the management software for the TP-LINK Easy Smart
Switches. The utility allows operators to centrally manage entire networks of the Easy Smart
Switches, which include TL-SG105E/TL-SG108E/TL-SG1016DE/TL-SG1024DE. Among of them,
TL-SG105E and TL-SG108E can only be configured with Easy Smart Configuration Utility while
TL-SG1016DE and TL-SG1024DE can also be managed on their Web-Management page.
Throughout this guide, we will take TL-SG108E for example.
2.2 Install the Easy Smart Configuration Utility
If an earlier version of the utility is present on your computer, please install this version to replace
the older version.
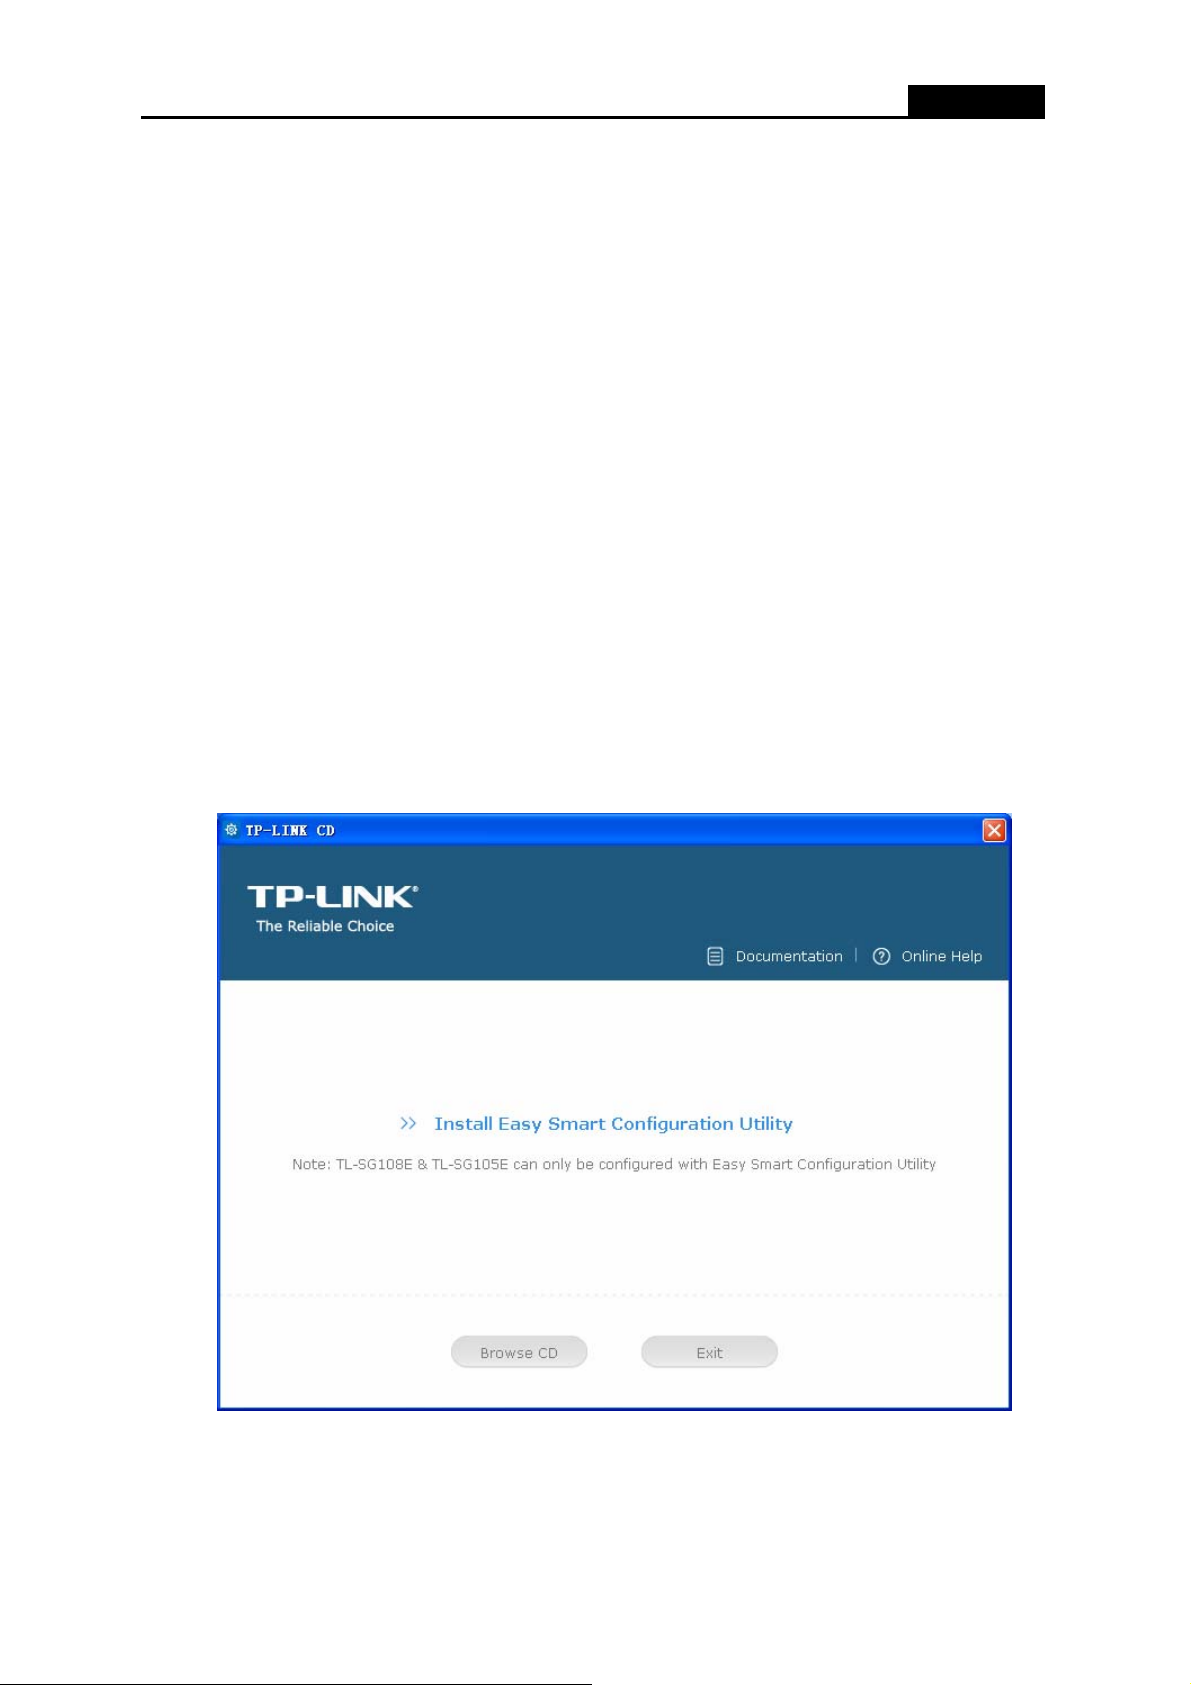
1. Insert the provided resource CD that came with your switch into your computer that you want
to use to manage your switches.
The resource CD home screen displays.
You can read the Easy Smart Configuration Utility User Guide by clicking Documentation in
the upper right corner of the above screen and view all the files on the resource CD by
clicking Browse CD.
4
Page 8

If the home screen does not display, browse the files on the CD and double-click
AutoRun.exe. You can also directly read the User Guide and double-click the icon
in the Utility folder to install the utility with the same steps from the following step 2 to
step 3.
AutoRun is not provided on the resource CD of TL-SG1016DE/TL-SG1024DE. Please
double-click the installation icon to install the utility.
2. Click the Install Easy Smart Configuration Utility link on the resource CD home screen.
a. The InstallShield Wizard prepares the setup shown as the following screen. Please wait
for a moment.
Easy Smart Configuration Utility User Guide
Figure 2-1 Preparing to Install
b. Then the following screen will appear. Click Next to continue. If you want to stop the
installation, click Cancel.
Figure 2-2 Welcome to the InstallShield Wizard
5
Page 9

c. Choose the destination location for the installation files and click Next to continue.
Figure 2-3 Choose Destination Location
Easy Smart Configuration Utility User Guide
By default, the installation files are saved in the Program Files folder of system disk. Click the
Change button to modify the destination location properly to your need.
d. Now the wizard is ready to begin the installation. Click Install to begin the installation on
the following screen.
Figure 2-4 Ready to Install the Program
6
Page 10

Easy Smart Configuration Utility User Guide
e. The InstallShield Wizard is installing Easy Smart Configuration Utility shown as the
following screen. Please wait for a while.
Figure 2-5 Setup Status
f. Click Finish to complete the installation on the following screen.
Figure 2-6 InstallShield Wizard Complete
3. The installation process creates a TP-LINK subdirectory under the \Program Files directory
on your computer, copies the utility program into the \Program Files\TP-LINK\Easy Smart
Configuration Utility directory, and places a utility icon
7
on the computer desktop.
Page 11

Easy Smart Configuration Utility User Guide
2.3 Switch Discovery
When the utility is launched, it immediately searches the network for TP-LINK Easy Smart
Switches.
The discovered switches are listed as below.
Figure 2-7 Main Page
Click Help in the left bottom to access the TP-LINK support website for more help.
Note:
The maximum number of the discovered switches is 30.
2.4 Switch Settings
You can select a switch and click to configure or display its status.
Figure 2-8 Discovered Switch
8
Page 12

The setting figure will be shown as below:
Easy Smart Configuration Utility User Guide
Figure 2-9 Switch Setting
You can configure the switch’s Device Description, DHCP Setting, IP Address, Subnet Mask and
Default Gateway on this page. The login User Name and Password are required to complete the
configuration. By default, they are both admin.
When the switch IP Address is not in the same subnet with host IP Address, it can be discovered
by the utility, but you cannot login the utility management page. Therefore, it needs to set the
switch IP Address in the same subnet with host IP Address, which allows you to login the utility
management page and configure the switch.
Clicking Apply can only make the new configurations effective before the switch is rebooted. If
you want to keep the configurations effective even the switch is rebooted, please select the
checkbox behind Save Config.
2.5 Refresh
Click Refresh in Figure 2-7 to restart the switch discovering process.
9
Page 13

Easy Smart Configuration Utility User Guide
2.6 Utility Features Overview
You can select a switch and click or double click its corresponding entry to log on to the
switch for further configuration. Please ensure that host IP address and switch IP address must be
in the same subnet.
Figure 2-10 Discovered Switch
Enter the User Name and Password to login the configuration interface. They are both admin by
default. You can select Remember Me to remember the User Name and Password.
Figure 2-11 Login
10
Page 14

The configuration figure is shown as blow:
Easy Smart Configuration Utility User Guide
Figure 2-12 Switch Configuration
Device description field shows the device model number of the switch that you are managing.
Click the icon to save the current configurations.
Click the icon
Note:
The switch you log on to should be in the same subnet with your computer.
to return to the discovering page.
11
Page 15

Easy Smart Configuration Utility User Guide
2.7 Uninstall the Utility
If you want to remove the Easy Smart Configuration Utility, please take the following steps:
1. On the Windows taskbar, click the Start button, point to All ProgramsÆTP-LINK Æ Easy
Smart Configuration Utility, and then click Uninstall Easy Smart Configuration Utility,
shown as the following figure.
Figure 2-13 Preparing Setup
2. Then the following screen will appear. If you want to stop the remove process, click Cancel.
Figure 2-14 Preparing Setup
12
Page 16

Easy Smart Configuration Utility User Guide
3. On the continued screen, click Yes to remove the utility from your PC.
Figure 2-15 Uninstall the Utility
4. Click Finish to complete.
Figure 2-16 Uninstall Complete
Return to CONTENTS
13
Page 17

Easy Smart Configuration Utility User Guide
Chapter 3 System
The System module is mainly for system configuration of the switch, including seven submenus:
System Info, IP Setting, User Account, Backup and Restore, System Reboot, System Reset
and Firmware Upgrade.
3.1 System Info
On this page you can view the system information and define the device description.
Choose the menu System→System Info to load the following page.
Figure 3-1 System Information
¾ System Info
Device Description: Displays the device model number.
MAC Address: Displays the MAC address of the switch.
IP Address: Displays the system IP address of the switch. The default system
IP is 192.168.0.1 and you can change it appropriate to your needs.
Subnet Mask: Displays the subnet mask of the switch.
Default Gateway: Displays the default gateway of the switch.
Firmware Version: Displays the installed software version number.
Hardware Version: Displays the installed device hardware version number.
Device Description: Give a description to the device for identification.
14
Page 18

Easy Smart Configuration Utility User Guide
3.2 IP Setting
Each device in the network possesses a unique IP address. You can login the IP Setting page to
operate the switch using this IP address. The switch supports the DHCP mode to obtain an IP
address from the DHCP server.
On this page you can get and modify the network parameters of the switch.
Choose the menu System→IP Setting to load the following page.
Figure 3-2 System IP Address Setting
The following entries are displayed on this screen:
¾ System IP Address Setting
DHCP Setting:
IP Address:
Subnet Mask:
Default Gateway:
Enable or disable the DHCP function. If DHCP setting is enabled, the
switch will obtain the IP address, subnet Mask and default gateway
from the DHCP Server automatically; otherwise, these three items
should be configured manually. By default, it is disabled.
Enter the system IP of the switch. The default system IP is
192.168.0.1 and you can change it appropriate to your needs.
Enter the subnet mask of the switch. By default, the switch uses
255.255.255.0 as the subnet mask.
Enter the default gateway of the switch.
3.3 User Account
On this page you can modify the administrator’s username and password in order to refuse illegal
users.
Choose the menu System→User Account to load the following page.
15
Page 19

Figure 3-3 System User Setting
The following entries are displayed on this screen:
¾ System User Setting
Easy Smart Configuration Utility User Guide
User Name:
Old Password:
Password:
Confirm Password:
Note:
1. The length of user name and password should not be more than 16 characters using digits,
letters and underlines only.
2. The default username/password is admin/admin.
Create a name for administrator’s login.
Type in the old password.
Type in a new password for administrator’s login.
Retype the new password.
3.4 Backup and Restore
On this page you can download the current configuration and save it as a file to your computer, or
upload a backup configuration file to restore your switch to this previous configuration.
Choose the menu System→Backup and Restore to load the following page.
Figure 3-4 System Config Backup
16
Page 20

The following entries are displayed on this screen:
¾ System Config Backup
Easy Smart Configuration Utility User Guide
Backup Config:
¾ System Config Restore
Restore Config:
Note:
1. It will take a few minutes to backup the configuration. Please wait without any operation.
2. It will take a few minutes to restore the configuration. Please wait without any operation.
3. To avoid any damage, please don’t power down the switch while being restored.
4. After being restored, the current settings of the switch will be lost. Wrong uploaded
configuration file may cause the switch unmanaged.
Click the Backup Config button to save the current configuration
as a file to your computer. You are suggested to take this
measure before upgrading.
Click the Choose File button to select the backup configuration
file, and then click the Restore Config button. It will take effect
after the switch automatically reboots.
3.5 System Reboot
On this page you can reboot the switch and return to the login page. Please save the current
configuration before rebooting to avoid losing the configuration unsaved.
Choose the menu System→System Reboot to load the following page.
Figure 3-5 System Reboot
Note:
To avoid damage, please don't turn off the device while rebooting.
3.6 System Reset
On this page you can reset the switch to the default. All the settings will be cleared after the switch
is reset.
17
Page 21

Choose the menu System→System Reset to load the following page.
Figure 3-6 System Reset
Note:
After the system is reset, the switch will be reset to the default and all the settings will be cleared.
Easy Smart Configuration Utility User Guide
3.7 Firmware Upgrade
The switch system can be upgraded via this management page. To upgrade the system is to get
more functions and better performance. Go to http://www.tp-link.com
firmware.
Choose the menu System→Firmware Upgrade to load the following page.
Figure 3-7 System Upgrade
Note:
1. Don’t interrupt the upgrade.
2. Please select the proper software version matching with your hardware to upgrade.
3. To avoid damage, please don't turn off the device while upgrading.
to download the updated
4. After upgrading, the device will reboot automatically.
5. You are suggested to backup the configuration before upgrading.
18
Return to CONTENTS
 Loading...