

BODY ELECTRICALHORN
HORN SYSTEM
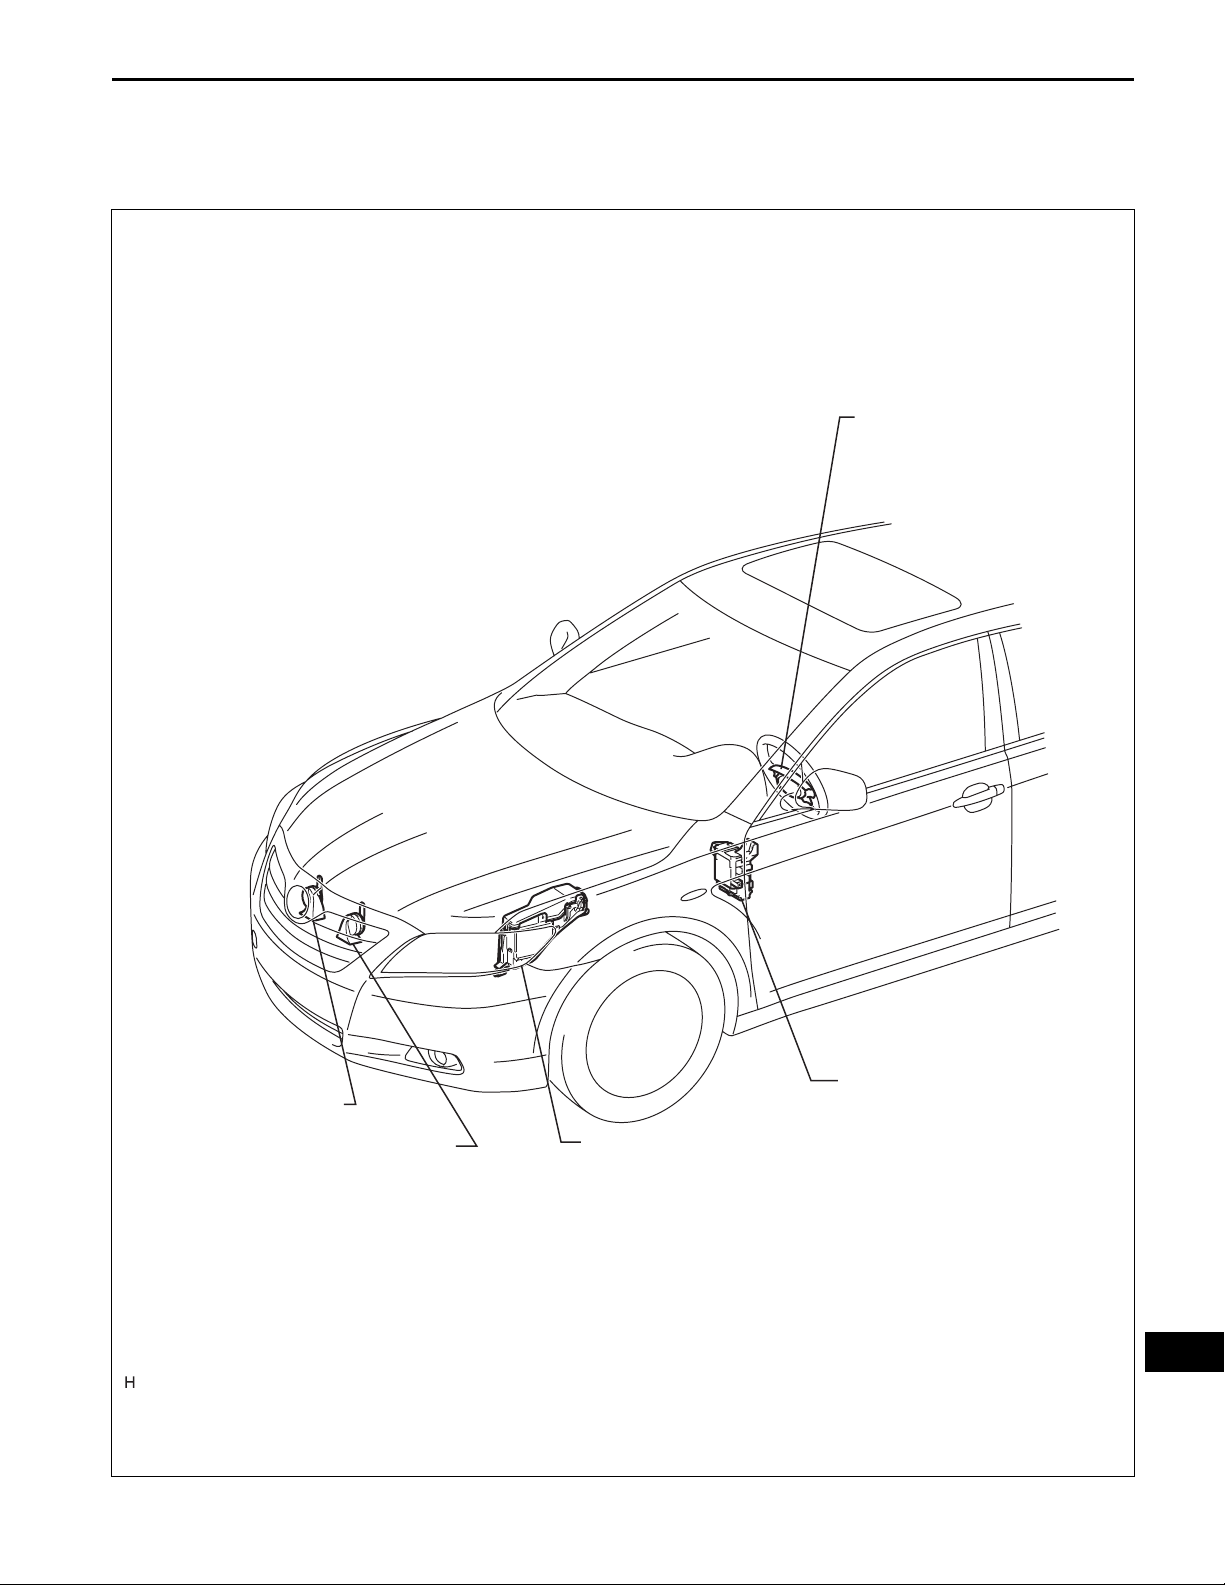
PARTS LOCATION
HORN – HORN SYSTEM
HO–1
STEERING PAD
(STEERING PAD SWITCH)
LOW PITCHED HORN
HIGH PITCHED HORN
MAIN BODY ECU
INSTRUMENT PANEL J/B
ENGINE ROOM R/B
ENGINE ROOM J/B
- HORN FUSE
- HORN RELAY
HO
B131106E01
HO–2
HORN
HORN – HORN SYSTEM
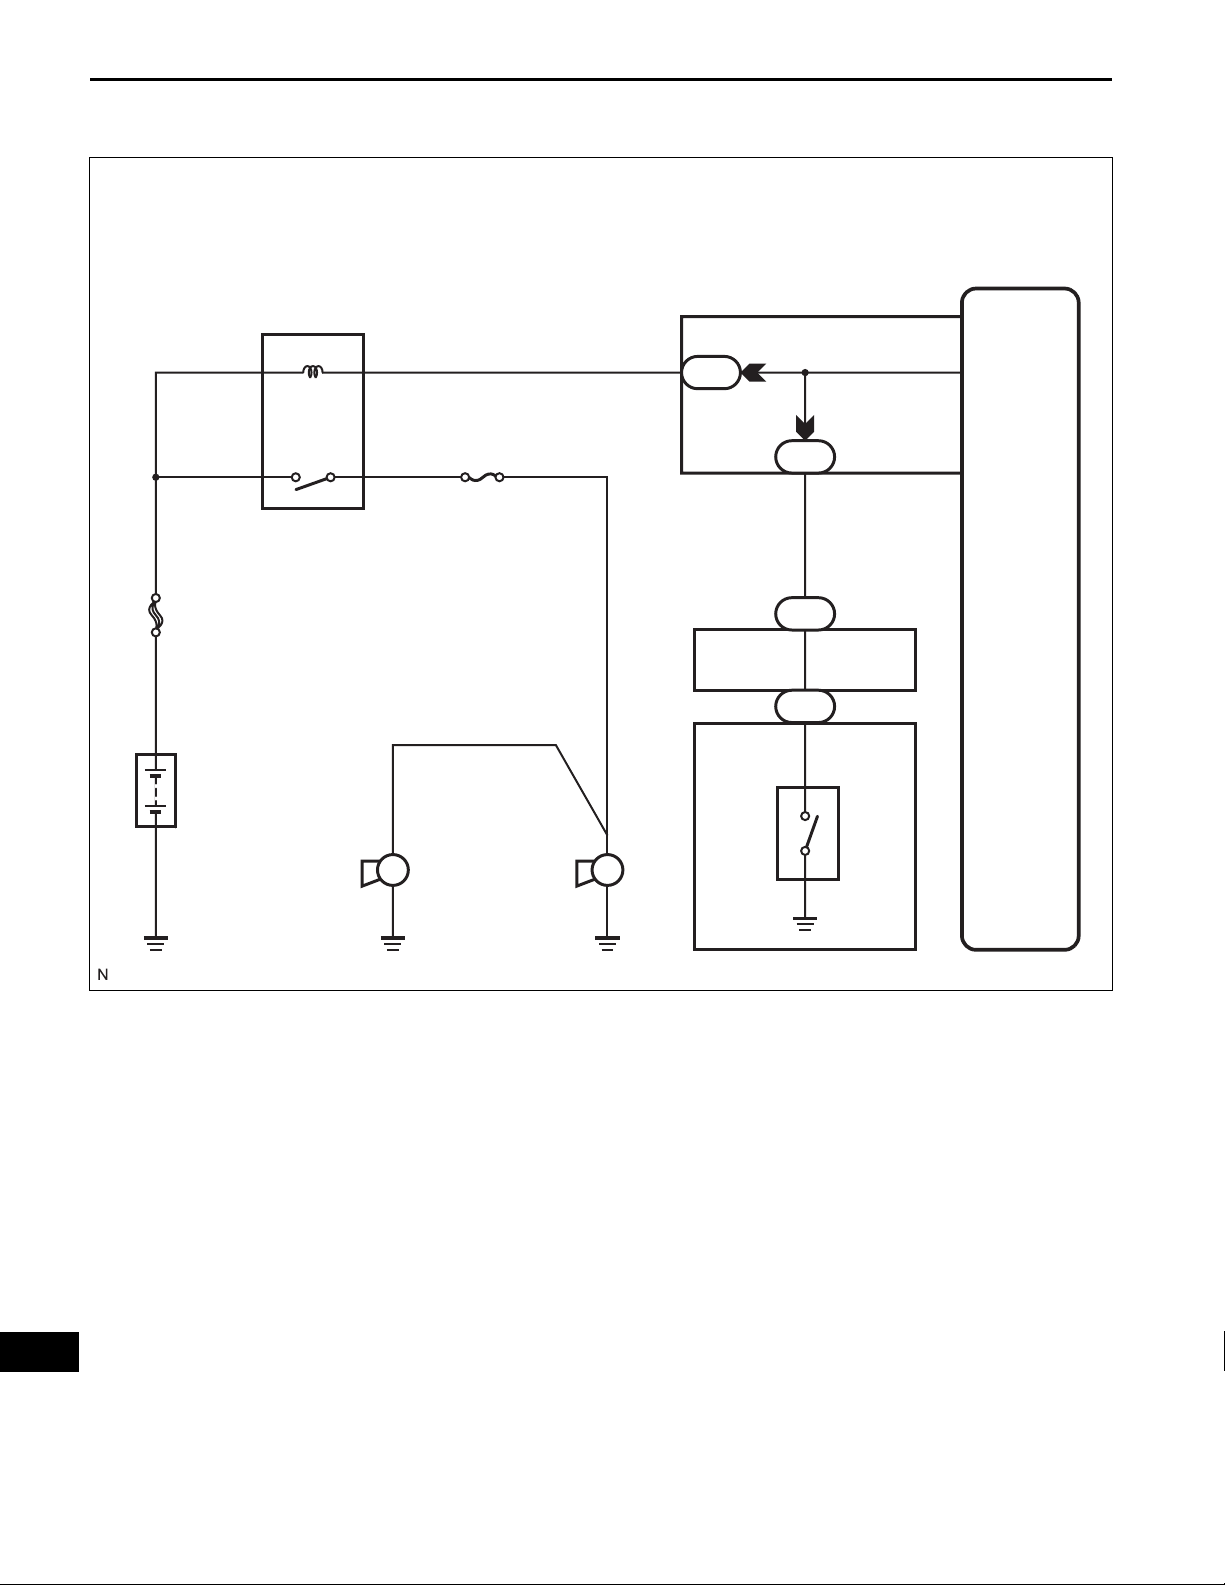
SYSTEM DIAGRAM
Instrument Panel J/B
11
ID
Main Body ECU
HORN
25
FL MAIN
HORN
8
Spiral
Cable
1
Steering
Pad
Switch
11
A4
Horn
(Low)
A3
Horn
(High)
II5
E18
HO
a1
L
Horn
Switch
B131104E01
HO
HORN SYSTEM
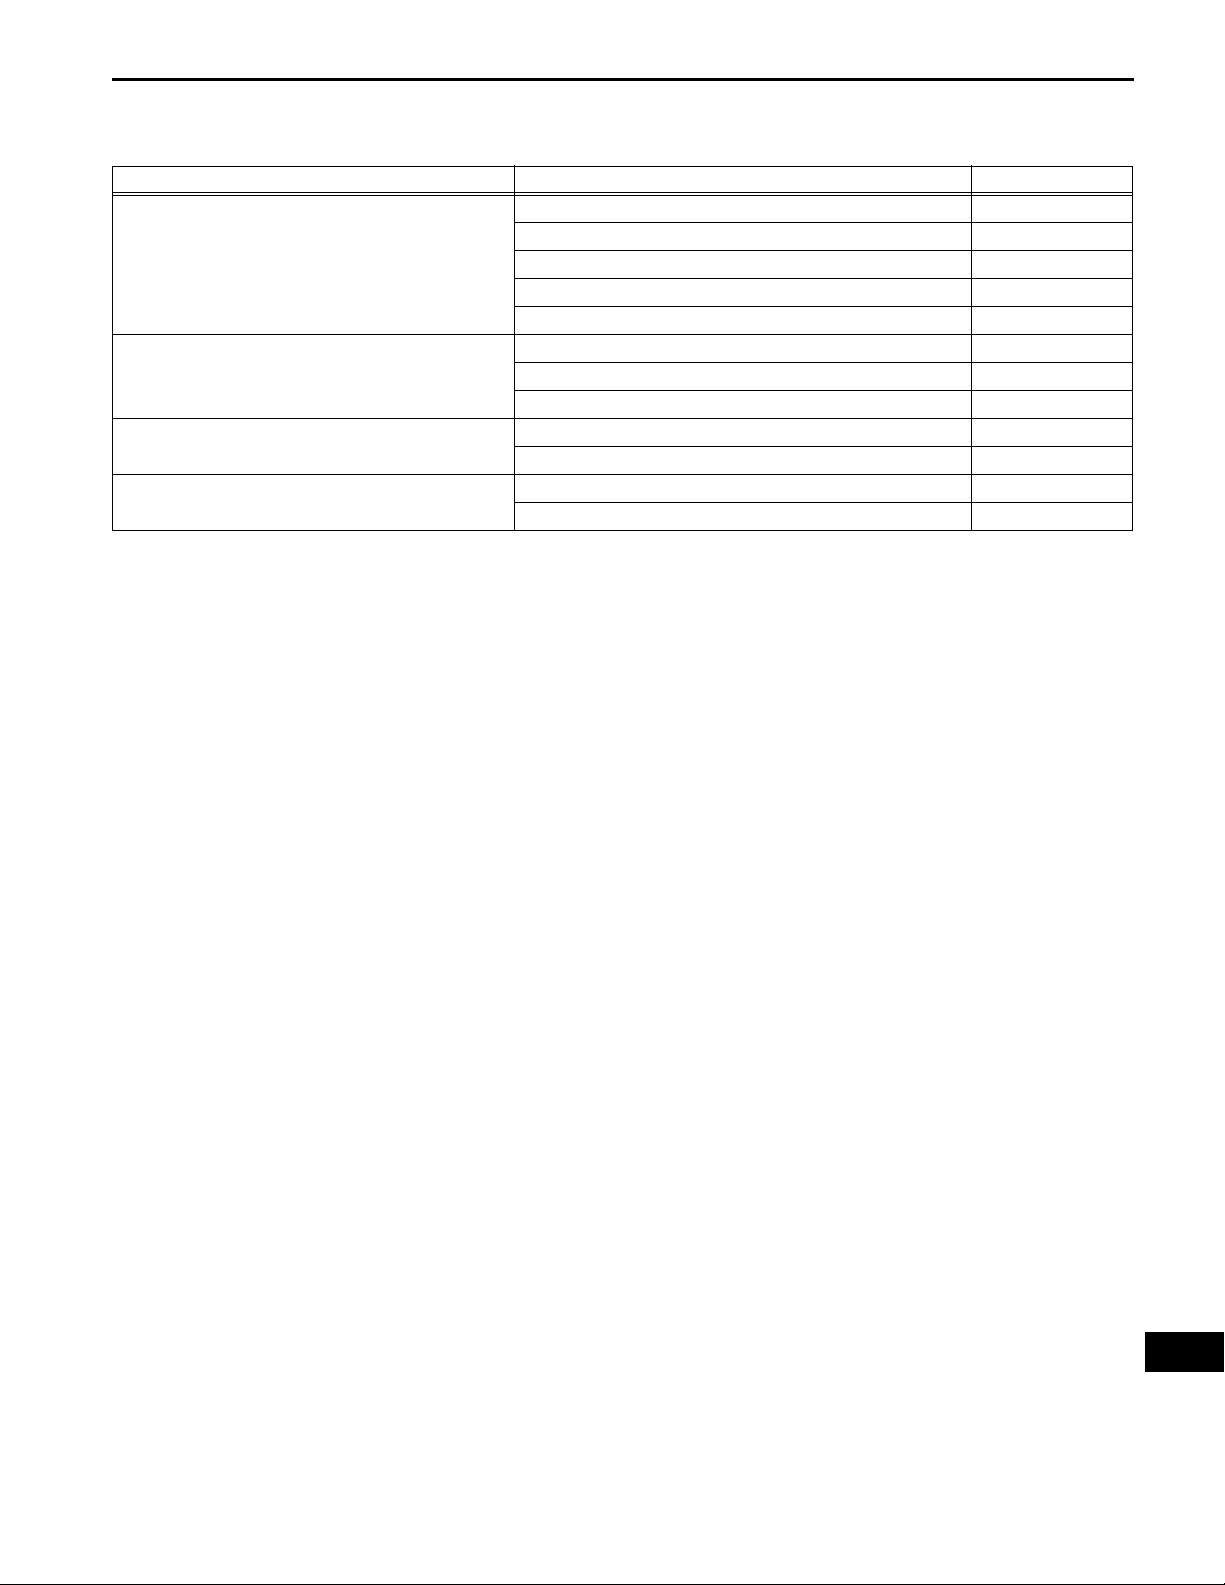
Symptom Suspected area See page
Horn does not sound
Horn blows all the time
Low pitched horn operates but high pitched horn does
not operate
High pitched horn operates but low pitched horn does
not operate
HORN – HORN SYSTEM
PROBLEM SYMPTOMS TABLE
1. HORN fuse HO-3
2. Horn relay HO-3
3. Steering pad switch RS-347
4. Spiral cable RS-364
5. Wire harness -
1. Horn relay HO-3
2. Steering pad switch RS-347
3. Wire harness -
1. High pitched horn HO-7
2. Wire harness -
1. Low pitched horn HO-5
2. Wire harness -
HO–3
HO

HORN – HORN RELAY
HORN RELAY
INSPECTION
1. INSPECT FUSE (HORN)
(a) Check the resistance of the HORN fuse.
Standard:
Below 1 Ω
2. INSPECT HORN RELAY
(a) Remove the engine room R/B and J/B (horn relay).
(b) Measure the resistance according to the value(s) in
the table below.
HO–3
1G
1B
654321
1D
16273
891011412513
B131164E01
Standard resistance
Tester Connection Condition Specified Condition
1G-1 - 1B-6 Always 10 kΩ or higher
When battery voltage is
1G-1 - 1B-6
applied to terminals 1G-
1 and 1D-10
Below 1 Ω
HO

HO–4
BODY ELECTRICALHORN
LOW PITCHED HORN
COMPONENTS
for 2GR-FE:
COOL AIR INTAKE DUCT SEAL
HORN – LOW PITCHED HORN
HO
20 (204, 15)
LOW PITCHED HORN ASSEMBLY
FRONT BUMPER ASSEMBLY
N*m (kgf*cm, ft.*lbf) : Specified torque
E127991E01

HORN – LOW PITCHED HORN
REMOVAL
1. REMOVE COOL AIR INTAKE DUCT SEAL (for 2GRFE) (See page ET-4)
2. REMOVE FRONT BUMPER ASSEMBLY (See page
ET-5)
3. REMOVE LOW PITCHED HORN ASSEMBLY
(a) Disconnect the connector.
(b) Remove the bolt and the low pitched horn assembly.
HO–5
E127994
B068846E01
INSPECTION
1. INSPECT LOW PITCHED HORN
(a) Apply battery voltage and check operation of the
horn, as shown in the table below.
Standard
Measurement Condition Specified Condition
Battery positive (+) → Terminal 1
Battery negative (-) → Body ground
Horn sounds
INSTALLATION
1. INSTALL LOW PITCHED HORN ASSEMBLY
(a) Install the low pitched horn assembly with the bolt.
Torque: 20 N*m (204 kgf*cm, 15 ft.*lbf)
(b) Connect the connector.
2. INSTALL FRONT BUMPER ASSEMBLY (See page ET-
13)
3. INSTALL COOL AIR INTAKE DUCT SEAL (for 2GRFE) (See page ET-14)
E127994
HO

HO–6
BODY ELECTRICALHORN
HIGH PITCHED HORN
COMPONENTS
for 2GR-FE:
COOL AIR INTAKE DUCT SEAL
HORN – HIGH PITCHED HORN
HO
20 (204, 15)
HIGH PITCHED HORN ASSEMBLY
FRONT BUMPER ASSEMBLY
N*m (kgf*cm, ft.*lbf)
: Specified torque
E127990E01

HORN – HIGH PITCHED HORN
REMOVAL
1. REMOVE COOL AIR INTAKE DUCT SEAL (for 2GRFE) (See page ET-4)
2. REMOVE FRONT BUMPER ASSEMBLY (See page
ET-5)
3. REMOVE HIGH PITCHED HORN ASSEMBLY
(a) Disconnect the connector.
(b) Remove the bolt and the high pitched horn
assembly.
HO–7
E127995
B068846E01
INSPECTION
1. INSPECT HIGH PITCHED HORN
(a) Apply battery voltage and check operation of the
horn, as shown in the table below.
Standard
Measurement Condition Specified Condition
Battery positive (+) → Terminal 1
Battery negative (-) → Body ground
Horn sounds
INSTALLATION
1. INSTALL HIGH PITCHED HORN ASSEMBLY
(a) Install the high pitched horn assembly with the bolt.
Torque: 20 N*m (204 kgf*cm, 15 ft.*lbf)
(b) Connect the connector.
2. INSTALL FRONT BUMPER ASSEMBLY (See page ET-
13)
3. INSTALL COOL AIR INTAKE DUCT SEAL (for 2GRFE) (See page ET-14)
E127995
HO
 Loading...