


 Loading...
 Synology NAS User's Guide

Based on DSM 6.2
Document ID Syno_UsersGuide_NAS_20180104

Table of Contents
Chapter 1: Introduction |
|
Chapter 2: Get Started with Synology DiskStation Manager |
|
Install Synology NAS and DSM............................................................................................................................................. |
8 |
Sign into DSM.......................................................................................................................................................................... |
8 |
DiskStation Manager Desktop............................................................................................................................................... |
8 |
Open Applications and Packages with Main Menu .......................................................................................................... |
11 |
Shutdown, Restart, Logout, or Manage Personal Settings ............................................................................................. |
12 |
Chapter 3: Modify System Settings |
|
Use Control Panel................................................................................................................................................................. |
14 |
Change Network Settings .................................................................................................................................................... |
15 |
Join Wireless Network.......................................................................................................................................................... |
16 |
Modify Regional Options...................................................................................................................................................... |
16 |
Use Energy Saving Features .............................................................................................................................................. |
17 |
Chapter 4: Perform Advanced Management Tasks |
|
Check System Information................................................................................................................................................... |
19 |
View System Logs ................................................................................................................................................................ |
20 |
Monitor System Resources.................................................................................................................................................. |
21 |
Analyze System Usage ........................................................................................................................................................ |
21 |
Scan System Settings .......................................................................................................................................................... |
22 |
Deploy High-Availability Solution ........................................................................................................................................ |
22 |
Automate Tasks .................................................................................................................................................................... |
23 |
Update DSM or Restore Defaults ....................................................................................................................................... |
23 |
Receive Event Notifications................................................................................................................................................. |
24 |
Access Applications with Independent Login.................................................................................................................... |
24 |
Index Multimedia Files for Applications.............................................................................................................................. |
24 |
Reset Admin Password........................................................................................................................................................ |
24 |
Reinstall Synology NAS ....................................................................................................................................................... |
25 |
Enable SNMP Service.......................................................................................................................................................... |
25 |
Enable Terminal Services.................................................................................................................................................... |
25 |
Chapter 5: Manage Storage Space |
|
Storage Pools and Volumes................................................................................................................................................ |
26 |
Repair Storage Pools ........................................................................................................................................................... |
28 |
Change RAID Type............................................................................................................................................................... |
28 |
Expand Volumes and Storage Pools.................................................................................................................................. |
29 |
RAID/File System Scrubbing............................................................................................................................................... |
30 |
SSD TRIM .............................................................................................................................................................................. |
30 |
Manage Hard Drives............................................................................................................................................................. |
30 |
SSD Cache ............................................................................................................................................................................ |
31 |
Hot Spare ............................................................................................................................................................................... |
31 |
2

Manage External Drives....................................................................................................................................................... |
31 |
Chapter 6: Manage iSCSI Service |
|
Manage iSCSI Targets......................................................................................................................................................... |
32 |
Manage iSCSI LUNs............................................................................................................................................................. |
33 |
Take iSCSI LUN Snapshots ................................................................................................................................................ |
33 |
Register iSCSI Targets with an iSNS Server .................................................................................................................... |
33 |
Set I/O Queue Depth ............................................................................................................................................................ |
33 |
Chapter 7: Access your Synology NAS from the Internet |
|
Use the EZ-Internet Wizard ................................................................................................................................................. |
34 |
Set Up Port Forwarding Rules for Router.......................................................................................................................... |
35 |
Register DDNS for the Synology NAS ............................................................................................................................... |
35 |
Access DSM Services via QuickConnect .......................................................................................................................... |
36 |
Set Up VPN Connection....................................................................................................................................................... |
37 |
Chapter 8: Enhance Internet Security |
|
Prevent Unauthorized Connection with Firewall............................................................................................................... |
38 |
Prevent Attacks over the Internet ....................................................................................................................................... |
38 |
Automatically Block Suspicious Login Attempts ............................................................................................................... |
39 |
Chapter 9: Set Up File Sharing |
|
Enable File Sharing Protocols for All Platforms................................................................................................................ |
40 |
Join Synology NAS to Domain/LDAP................................................................................................................................. |
41 |
Host LDAP Service with Directory Server ......................................................................................................................... |
42 |
Manage Users and Groups.................................................................................................................................................. |
43 |
Set Up Shared Folders......................................................................................................................................................... |
45 |
Define Windows ACL Privileges for Shared Folders........................................................................................................ |
48 |
Index Shared Folder Contents ............................................................................................................................................ |
48 |
Chapter 10: Access Files from Anywhere |
|
Access Files within the Local Network............................................................................................................................... |
49 |
Access Files via FTP ............................................................................................................................................................ |
51 |
Access Files via WebDAV ................................................................................................................................................... |
52 |
Access and Synchronize Files via Synology Drive........................................................................................................... |
52 |
Access Files via File Station................................................................................................................................................ |
53 |
Chapter 11: Back Up Data |
|
Back Up Computer Data ...................................................................................................................................................... |
56 |
Back Up Data or iSCSI LUN on Synology NAS................................................................................................................ |
57 |
Back Up and Restore System Configurations................................................................................................................... |
57 |
Sync Shared Folder Contents between Synology NAS................................................................................................... |
57 |
Back Up Data on USB Device or SD Card........................................................................................................................ |
57 |
Chapter 12: Host Websites and Print Server |
|
Use Web Station to Host Websites .................................................................................................................................... |
58 |
Set Synology NAS as Print Server ..................................................................................................................................... |
59 |
Chapter 13: Discover Various Applications with Package Center |
|
What Package Center Offers .............................................................................................................................................. |
60 |
3 Table of Contents

Install or Buy Packages........................................................................................................................................................ |
62 |
Chapter 14: Communicate with Mobile Devices |
|
Manage DSM Settings with DSM mobile........................................................................................................................... |
63 |
Use iOS, Android, and Windows Apps .............................................................................................................................. |
63 |
Use Other Mobile Devices ................................................................................................................................................... |
64 |
4 Table of Contents

Cha pter
Chapter 1: Introduction
Congratulations on your purchase of Synology NAS. Synology NAS is a multi-functional Network-Attached Storage server, serving as a file-sharing center within your Intranet. Moreover, it is specially designed for a variety of purposes, allowing you to perform the following tasks with the web-based Synology DiskStation Manager (DSM):
Store and Share Files over the Internet
Windows users, Mac users, and Linux users can easily share files within the Intranet or through the Internet. Unicode language support makes sharing files in different languages from Synology NAS simple.
Scan Settings with Security Advisor
Security Advisor is a security application that scans your DSM settings and Synology NAS. It will check your settings and recommend changes that help keep your Synology NAS safe.
Manage Files with Web-Based File Station
One of Synology DiskStation Manager’s applications, File Station, can make it possible for users to manage their files on Synology NAS easily through a web interface. You can also access the files stored on Synology NAS with a mobile device.
Transfer Files via FTP
Synology NAS provides FTP service with bandwidth restriction and anonymous login. To transfer data safely, FTP over SSL/TLS and uninvited IP auto-block are also available.
Sync Files with Cloud Station
Cloud Station is a file sharing service that allows you to synchronize files between a centralized Synology NAS and multiple client computers, mobile and Synology NAS devices.
Share Storage Capacity as iSCSI LUNs
You can designate portion of your Synology NAS volume space to be an iSCSI LUN, which will allow the iSCSI initiator to access the space like a local drive.
Back Up Files on Computer and Server
Synology NAS provides various backup solutions to back up computer data to Synology NAS, back up Synology NAS data or iSCSI LUN to an external hard drive, another Synology NAS, an rsync-compatible server, Amazon S3 server, HiDrive backup server, etc.
Enjoy Entertainment Content on the Server
Download Station allows you to download files from the Internet through BT, FTP, HTTP, eMule and NZB to Synology NAS. The Media Server and iTunes support allows computers or DMA devices within LAN to playback multimedia files on Synology NAS1.
With the USBCopy or SDCopy function, you can press the Copy button on your Synology NAS to instantly copy files from a camera or SD card to Synology NAS.2
---------
1For recommended peripheral models, including hard drive, USB printer, DMA, and UPS, please visit www.synology.com.
2USBCopy or SDCopy is supported on specific models only. Visit www.synology.com for more information.
5

Synology NAS User's Guide
Based on DSM 6.2
Organize Videos with Video Station
Video Station allows you to organize your collection of movies, TV shows, and home videos into a media platform on which you can watch and play video clips, live stream and record digital TV programs with a USB DTV dongle plugged into your Synology NAS, view and edit video metadata whose information is retrieved automatically from the Internet. You can also stream videos to your iPhone or iPad for playback.
Manage Personal Photos Smartly with Moments
Synology Moments allows you to gather all your photos and videos in one private place. This package opens a new era for photo storage, allowing random photos to be automatically sorted by an image-recognizing technique that can identify the people, subjects, and places in the photos.
Organize Professional Photos with Photo Station
Photo Station allows you to easily organize online albums with folders. Advanced privilege and sharing settings allow professional photographers to showcase their photos and collect feedback from their clients with ease.
Enjoy Music Anytime and Anywhere
Audio Station allows you to listen to music stored on the Synology NAS, from a connected iPod, or even stream Internet Radio stations. In addition, you can stream music from the Synology NAS with a web browser over the Internet.
Host Websites
The Virtual Host feature allows you to host up to 30 websites using Web Station, with PHP and MySQL supported.
Record Videos with IP Cameras
Surveillance Station allows you to manage, view, and record videos from multiple IP cameras over the network. By accessing the web-based management interface of Surveillance Station, you can watch the real-time image the camera is monitoring, and record videos continuously in motion-detection mode or in alarm-recording mode.
Manage Multiple Synology NAS Devices
Synology CMS (Central Management System) allows you to quickly and conveniently manage multiple Synology NAS servers. Once CMS is installed, you can designate your Synology NAS server as the CMS Host and designate other servers as managed servers. The CMS Host provides a single interface to monitor and maintain the managed servers.
Discover More Apps with Package Center
Package Center brings intuitiveness and convenience for users to easily install and update a variety of applications (which are packed into packages). Just browse all available applications and select the ones that best suit your needs. All can be done with just a few clicks.
Set up Print Server
USB or network printers connected to your Synology NAS can be shared by client computers over the local area network. AirPrint support allows you to print to the printer from an iOS device, while Google Cloud Print support allows you to print to the printer when you are using Google products and services.1
---------
1 For recommended peripheral models, including hard drive, USB printer, DMA, and UPS, please visit www.synology.com.
6 Chapter 1: Introduction

Synology NAS User's Guide
Based on DSM 6.2
Online Resources
If you cannot find what you need here, please see DSM Help or take a look at Synology's online resources below.
Knowledge Base: https://www.synology.com/knowledgebase Forum: https://forum.synology.com/
Download Center: https://www.synology.com/support/download
Technical Support: https://account.synology.com/support/support_form.php
7 Chapter 1: Introduction
Cha pter
Chapter 2: Get Started with Synology DiskStation Manager
This chapter explains how to sign into Synology DiskStation Manager (DSM), customize your desktop, use the taskbar and widgets, and open applications and packages with the Main Menu.
Install Synology NAS and DSM
For more information about setting up Synology NAS and installing DSM, see the Hardware Installation Guide for your Synology NAS model available at Synology’s Download Center.
Sign into DSM
After setting up and installing DSM on your Synology NAS, you can sign into DSM using a web browser on your computer.
To log in with Web Assistant:
1Make sure your computer is connected to the same network as the Synology NAS and can access the Internet.
2Open a web browser on your computer and go to find.synology.com.
3Web Assistant will find your Synology NAS within the local network. Click Connect to go to the login screen.
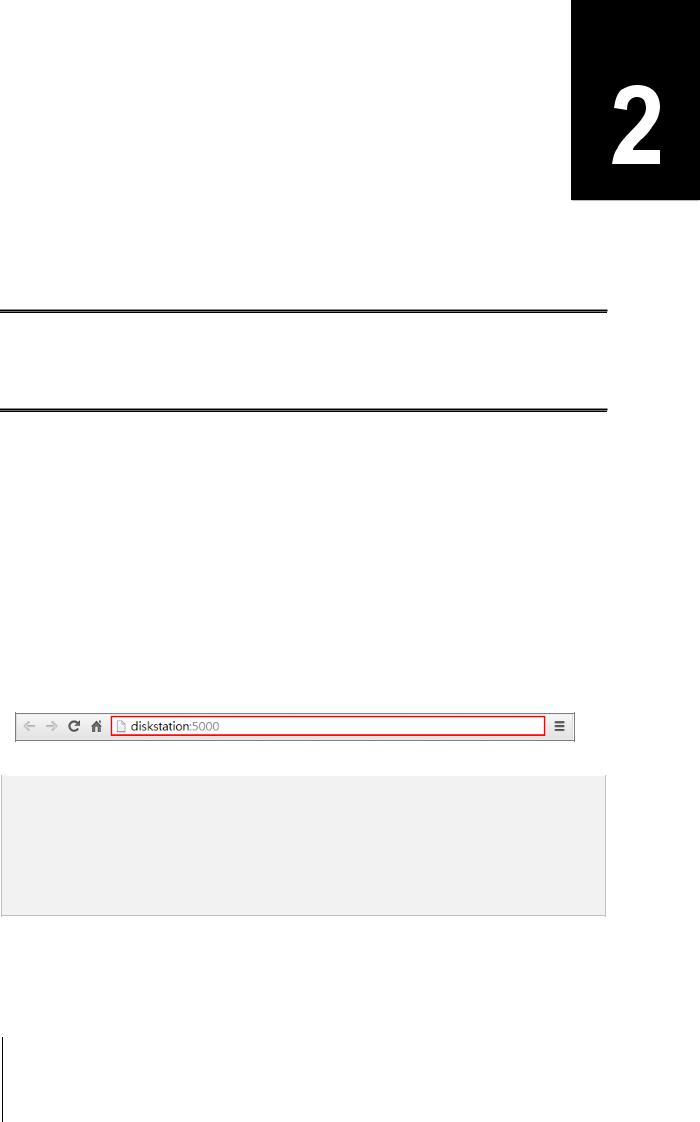
To log in with the server name or IP address:
1Make sure your computer is connected to the same network as your Synology NAS.
2Open a web browser on your computer, enter any of the following in the address field, and then press Enter on your keyboard:
http://Synology_Server_IP:5000
http://Synology_Server_Name:5000/ (or http://Synology_Server_Name.local:5000/ on a Mac)
Synology_Server_Name should be replaced with the name you set up for Synology NAS during the initial installation process.
3 Set up your username and password, and click Sign in.
Note: To ensure your connection to DSM runs smoothly, please use the following browsers.
Chrome
Firefox
Safari: 10 or later
Internet Explorer: 10 or later
Safari: iOS 10 or later
Chrome: Android 6 or later
8
Synology NAS User's Guide
Based on DSM 6.2
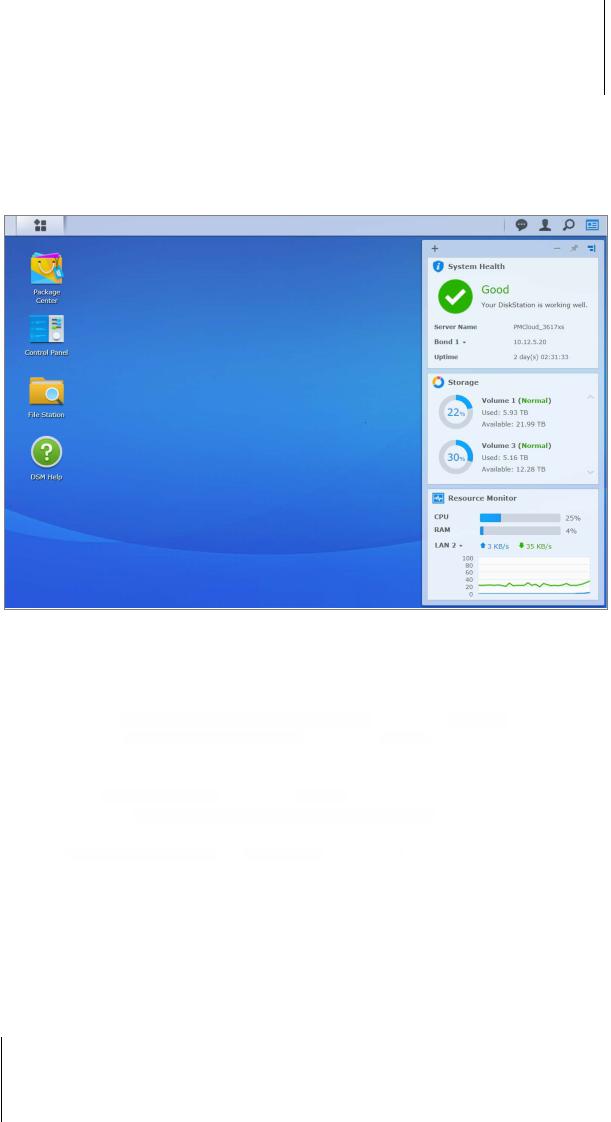
DiskStation Manager Desktop
When you sign into DSM, you will see the desktop. From here, you can start getting things done, like manage settings, use packages, or view notifications.
Desktop
The desktop is where your application and package windows are displayed. You can also create desktop shortcuts to frequently used applications.
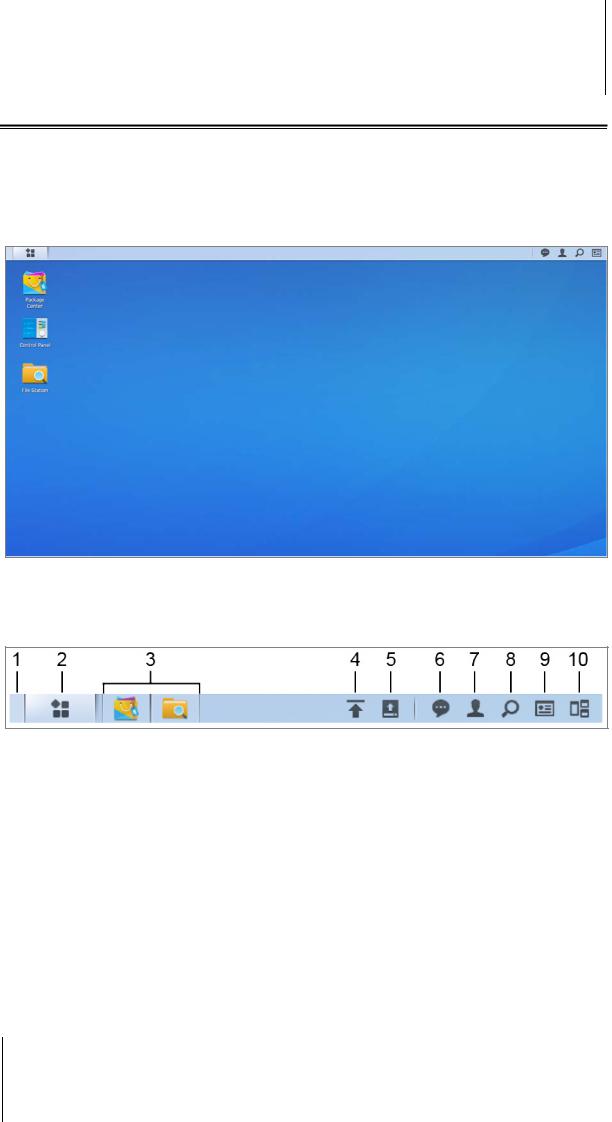
Taskbar
The taskbar at the top of the desktop includes the following items:
1Show Desktop: Minimize all open application and package windows.
2Main Menu: View and open applications and packages installed on your Synology NAS. You can also click and drag to create desktop shortcuts.
3Open applications:
Click the icon of an application to show or hide its window on the desktop.
Right-click the icon and choose from the shortcut menu to manage the application window (Maximize,
Minimize, Restore, Close) or its task bar icon (Pin to Taskbar, Unpin from Taskbar).
4Upload Queue: Appears when you start uploading files to the Synology NAS. Click to see more details, like progress and upload speed.
5External Devices: Appears when an external device (e.g. USB drive) is attached to your Synology NAS.
6Notifications: Displays notifications, like errors, status updates, and package installation notifications.
7Options: Shutdown, restart, logout, or modify personal account settings.
8Search: Quickly find specific applications, packages, or DSM Help articles here.
9 Chapter 2: Get Started with Synology DiskStation Manager
Synology NAS User's Guide
Based on DSM 6.2
9Widgets: Show or hide widgets.
10Pilot View: See a preview of all open application and package windows. Enable this button at Options >
Personal > Others.
Widgets
Widgets display various types of system information related to your Synology NAS.
To open/close the widget panel:
Click Widgets to show or hide the widgets panel.
Click the + to select which widgets to display. You can choose from the following:
Backup: View the status of your backup tasks.
Connected Users: See a list of users who are currently accessing Synology NAS resources.
File Change Log: View the file change log records of Synology NAS services.
No active logs: Appears when none of the logs (Samba, WebDAV, FTP, File Station) is enabled.
No logs available: Appears when any one of the logs (Samba, WebDAV, FTP, File Station) is enabled.
Recent Logs: View the log records of Synology NAS services.
Resource Monitor: Monitor the CPU usage, memory usage, and network flow.
Scheduled Tasks: View a list of upcoming tasks.
Storage: View the volume usage and drive status of your Synology NAS.
System Health: Obtain an overall status of your Synology NAS and all connected devices (if any). You will be advised to take corrective action when system error occurs.
10 Chapter 2: Get Started with Synology DiskStation Manager
Synology NAS User's Guide
Based on DSM 6.2
Open Applications and Packages with Main Menu
The Main Menu (the button at the top-left of the desktop) is where you can find all the applications and packages you have installed from Package Center on your Synology NAS.
To open applications or packages:
Open Main Menu and click the icon of the application or package that you want to open.
To reorder icons:
Open Main Menu and drag an icon to any position you want.
To create a desktop shortcut:
Open Main Menu and drag an icon to the side.
11 Chapter 2: Get Started with Synology DiskStation Manager

Synology NAS User's Guide
Based on DSM 6.2
Shutdown, Restart, Logout, or Manage Personal Settings
Click the Options menu (the person-shaped icon at the top right) to shutdown, restart, logout, or manage your personal account settings.
To manage personal settings:
Select Personal from the drop-down menu to manage personal account settings, like password, 2-step verification, desktop, etc.
12 Chapter 2: Get Started with Synology DiskStation Manager

Synology NAS User's Guide
Based on DSM 6.2
Account
Under Account, you can edit your account settings, enable 2-step verification, and view recent login activity of your DSM account.
Limitations:
The user description is case sensitive and can be 0 to 64 displayable Unicode characters.
The password is case sensitive and should be 0 to 127 displayable characters, including letters, numbers, signs, and space.
2-Step Verification
2-step verification provides improved security for your DSM account. If 2-step verification is enabled, you will need to enter a one-time verification code in addition to your password when logging in to DSM. Verification codes are obtained from authenticator apps installed on your mobile device. Therefore, if someone wants to access your account, he will not only need your username and password, but also your mobile device.
Requirements:
2-step verification requires a mobile device and an authenticator app which supports the Time-based One-Time Password (TOTP) protocol. Authenticator apps include Google Authenticator (Android/iPhone/BlackBerry) or Authenticator (Windows Phone).
Account Activity
Account Activity displays the login activity of your DSM account, including current connections, remembered devices, and login history.
Account Protection
Under Account Protection, you can perform actions related to account protection, such as managing trusted clients and canceling the protection. This tab is available only when users belonging to the administrators group enable the account protection feature at Control Panel > Security > Account > Account Protection.
Quota
Under Quota, you can view your quota on all Synology NAS volumes set by DSM administrators, as well as the amount of capacity you have used on each volume. On models with Btrfs support, you can also view the quota and capacity usage of each shared folder.
Desktop
Under Desktop, you can customize the appearance of your desktop by changing the main menu style, icon size, background and text color of the desktop, or uploading images to be used as the desktop wallpaper.
Photo Station
This tab is viewable only when users belonging to the administrators group enable Personal Photo Station service in Photo Station. Synology NAS provides the home/photo folder for you to store photos and videos that you want to share. The system will create index thumbnails of the photos and videos automatically, and then people can view photo albums via a web browser.
Email Account
You can add or edit email accounts to send files stored in File Station as attachments using the email addresses added here.
Others
Under Others, you can customize other personal settings. For more information about personal settings, please see DSM Help.
13 Chapter 2: Get Started with Synology DiskStation Manager

Cha pter
Chapter 3: Modify System Settings
After you have connected to Synology DiskStation Manager (DSM) and learned how to access its functions and customize its appearance, users belonging to the administrators group can begin to modify basic settings.
This chapter explains the basics of modifying network settings, display languages, time, and energy saving features. For more detailed instructions, please see DSM Help.
Use Control Panel
Choose Control Panel from the Main Menu to configure DSM settings.
The DSM settings on the Control Panel are grouped into the following categories:
File Sharing: Manage file sharing options to host your files and share with other people easily.
Connectivity: Make your Synology NAS accessible over the Internet, and protect it with security mechanisms such as firewall and auto block.
System: Manage system settings for your Synology NAS device.
Applications: Manage general settings related to Synology-designed applications.
Note: Control Panel is accessible only to users belonging to the administrators group. See "Create Groups" for more information.
14
Synology NAS User's Guide
Based on DSM 6.2
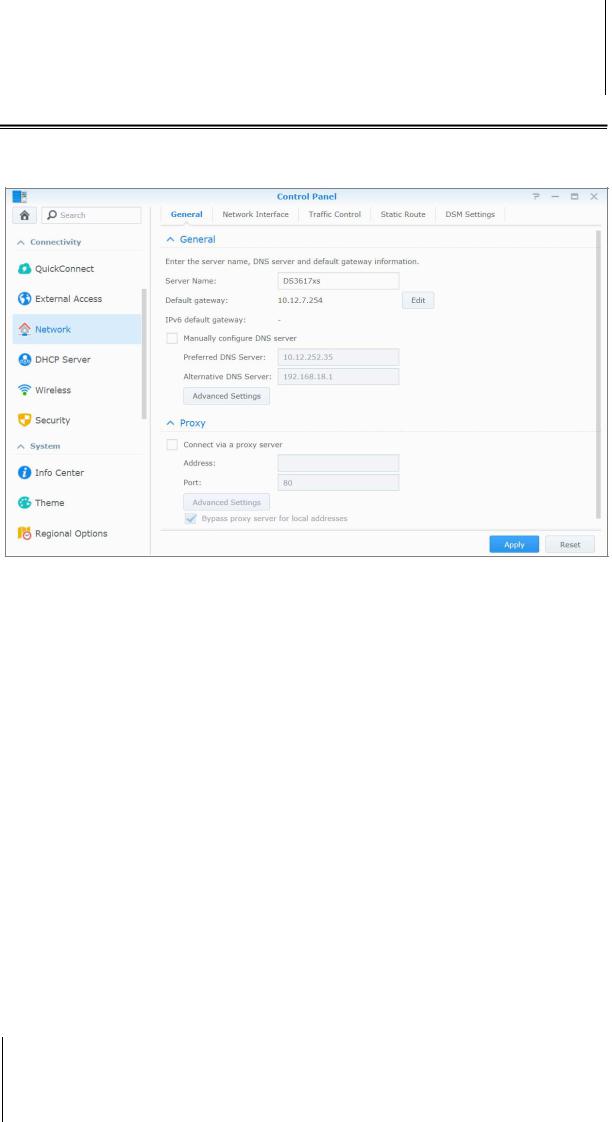
Change Network Settings
Go to Control Panel > Network to configure network settings and connect your Synology NAS device to the Internet. You can also manage traffic control rules to adjust the outgoing traffic allowed when clients access services on your Synology NAS. For more detailed instructions, please see DSM Help.
General
The General tab provides options to edit the name and default gateway of the Synology NAS, as well as configure domain name server, proxy server settings and IPv6 tunneling.
Network Interface
The Network Interface tab provides options to manage the network interfaces with which your Synology NAS connects to the network.
Traffic Control
Traffic control aims to control the outgoing traffic of services running on Synology NAS. Click Create to create traffic control rules.
Static Route
Static route controls the path that network information must follow to reach a specific host or network on Synology NAS. Click Create to create a static route. .
DSM Settings
Change the port number for accessing DSM or configure HTTPS settings. When the HTTPS connection function is enabled, any connection to Synology NAS via the HTTPS protocol will be encrypted with the SSL/TLS encrypting mechanism.
15 Chapter 3: Modify System Settings
Synology NAS User's Guide
Based on DSM 6.2
Join Wireless Network1
At Control Panel > Wireless, you can connect your Synology NAS device to a wireless network, or create a wireless hotspot to share its Internet connection with other devices wirelessly. Also, you can manage Bluetooth adapters and connect Bluetooth devices to your Synology NAS. For more detailed instructions, please see DSM Help.
Modify Regional Options
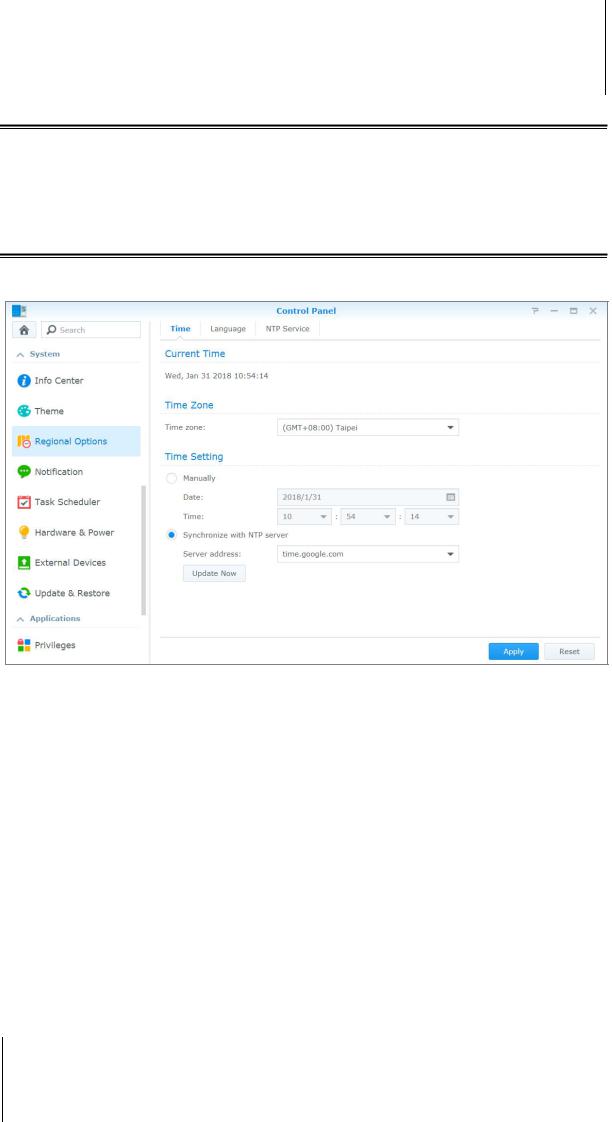
Go to Control Panel > Regional Options to configure the following regional options. For more detailed instructions, please see DSM Help.
Time
Click the Time tab to set up the system time settings of the Synology NAS. You can check the current time, manually set the server's date and time, or automatically set the time using a network time server.
Language
Click the Language tab to set the language for Synology DiskStation Manager, notifications, and specify the codepage for Unicode filename conversion.
Display Language: Choose your preferred display language, or have it the same as your default browser setting.
Notification Language: Set your preferred language for email and instant messaging notifications from Synology NAS.
Codepage: Synology NAS uses Unicode to avoid file inaccessibility from computers using different languages. But for the following devices or applications to use Synology NAS services without problem, you need to choose the appropriate codepage for them:
Computers without Unicode support
---------
1Supported on specific models only.
16 Chapter 3: Modify System Settings
Synology NAS User's Guide
Based on DSM 6.2
Applications that convert non-Unicode strings to Unicode, such as FTP service, UPnP support, music metadata indexing
NTP Service
Click the NTP Service tab to have your Synology NAS serve as a network time server to synchronize time between different network devices and the Synology NAS over network.
Note: The NTP service is required for Surveillance Station and Synology High Availability. Therefore, if you have Surveillance Station installed and run on your Synology NAS, the service cannot be disabled while the package is running.
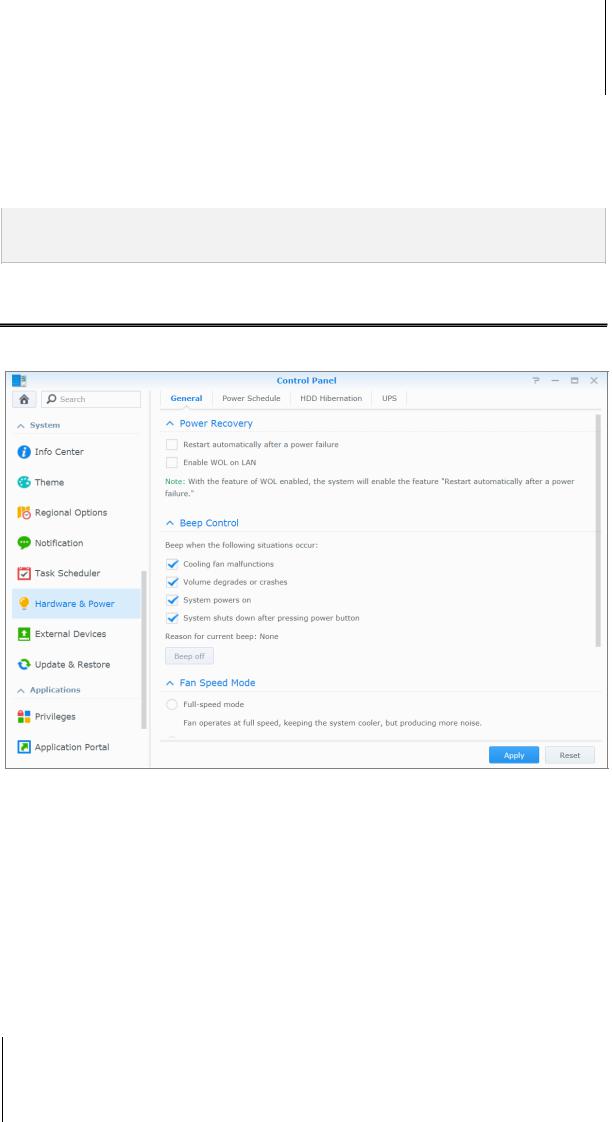
Use Energy Saving Features
Go to Control Panel > Hardware & Power to manage the following energy saving features provided by DSM. For more detailed instructions, please see DSM Help.
17 Chapter 3: Modify System Settings

Synology NAS User's Guide
Based on DSM 6.2
General
Click the General tab to enable power recovery, Wake on LAN (WOL)1 and Memory Compression. You can also modify beep control and fan speed mode here.
Power Schedule1
Click the Power Schedule tab to start up or shut down automatically at a specified time.
HDD Hibernation
Click the HDD Hibernation tab to manage drive hibernation for all internal or external drives on your Synology NAS.
When a drive enters HDD hibernation mode, it will stop spinning and become inactive, which not only saves energy but also extends the drive’s lifespan.
UPS
Under the UPS tab, you can modify UPS-related settings. UPS (Uninterruptible Power Supply) is a backup power device that allows the Synology NAS to continue operating for a short time if power failure occurs. This function helps prevent data loss by giving the Synology NAS enough time to save data and unmount volumes before losing power and shutting off. Synology NAS supports connecting to local or SNMP UPS devices.
---------
1 Supported on specific models only.
18 Chapter 3: Modify System Settings
Cha pter
Chapter 4: Perform Advanced Management Tasks
Synology DiskStation Manager comes with a variety of management functions, allowing you to check system information, monitor system resources, manage notification services, restore or upgrade DSM, access applications with independent login, index multimedia files for applications and more.
This chapter explains how to comprehend advanced management functions to make sure your Synology NAS is providing the best performance. For detailed instructions, please see DSM Help.
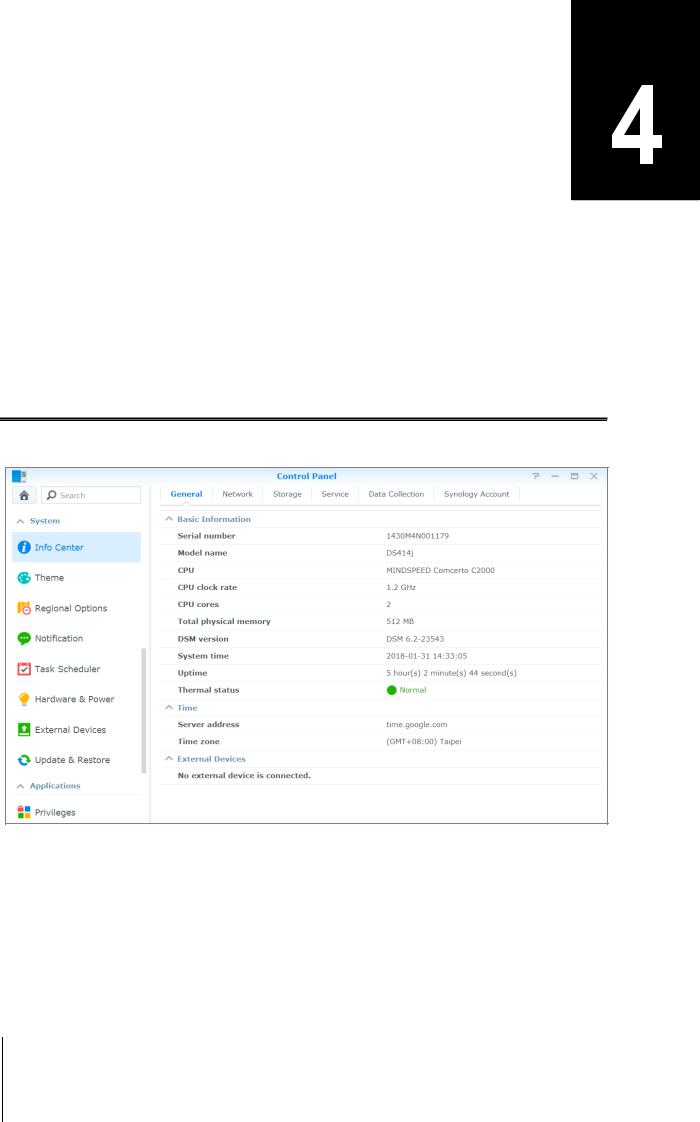
Check System Information
Info Center provides an overview of the status of the Synology NAS and other connected devices. Go to Control Panel > Info Center to check the below information. For more detailed instructions, please see DSM Help.
19
Synology NAS User's Guide
Based on DSM 6.2
General
Under the General tab, you can see the basic information about your Synology NAS, including serial number, model name, amount of physical memory, DSM version, time information, thermal status, and external devices.
Network
Under the Network tab, you can view the status of network configuration and network interfaces.
Storage
Under the Storage tab, you can check the free or used space of your Synology NAS volumes and check the status of the hard drives.
Service
Under the Service tab, you can see the list of DSM services, which can be enabled or disabled by clicking Enable or Disable under the Action column. The checkmarks under the Status column indicate whether the services are enabled.
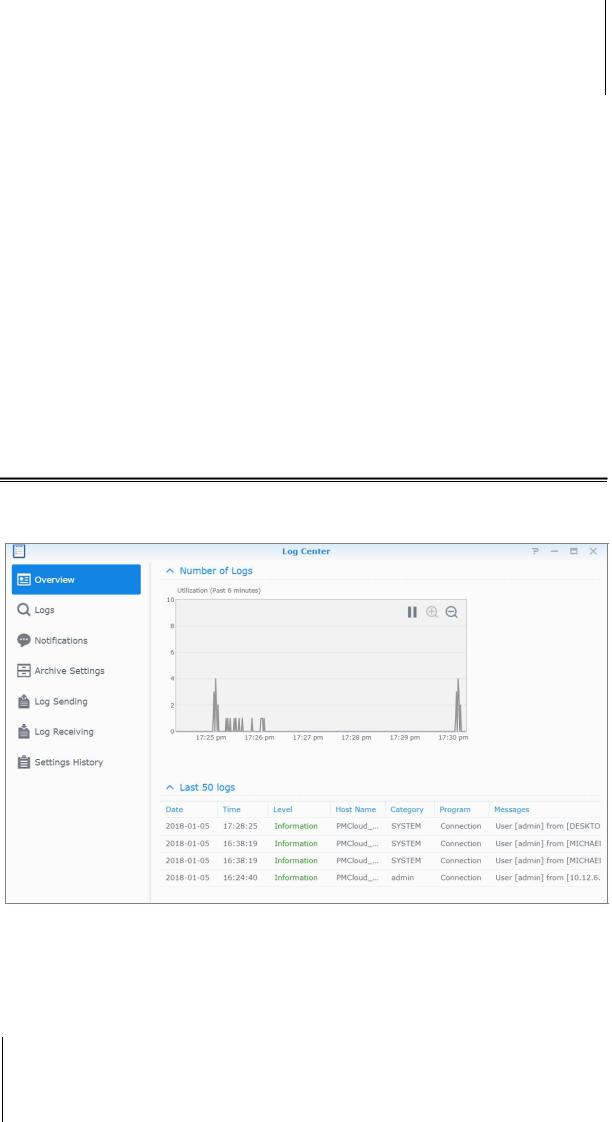
View System Logs
Log Center is a centralized log management application that allows you to view and manage log records of Synology NAS services easily and efficiently. To access the advanced functions, you have to go to Package Center and install the Log Center package. For detailed instructions, please see DSM Help.
20 Chapter 4: Perform Advanced Management Tasks
Loading...