


Synology Router User's Guide
Based on SRM 1.2

Table of Contents
Chapter 1: Set up Your Synology Router
Set up Synology Router Manager (SRM) |
4 |
Set up Desktop Wallpaper |
7 |
Reset Synology Router |
7 |
Chapter 2: Choose the Operation Mode
Wireless Router |
9 |
Wireless AP (Access Point) |
9 |
Wireless Client |
10 |
Wireless Repeater (WDS) |
10 |
Chapter 3: Set up Your Wi-Fi Connection
Enable Smart Connect |
11 |
Create Wi-Fi Networks (2.4GHz & 5GHz) |
11 |
Create Guest Wi-Fi Networks (2.4GHz & 5GHz) |
11 |
Create WPS Networks (2.4GHz & 5GHz) |
12 |
Chapter 4: Build a Wi-Fi system network
Add Wi-Fi Points |
13 |
Network Status |
13 |
Configure Wi-Fi Points |
13 |
Test Wi-Fi Performance |
13 |
Chapter 5: Manage Client Devices
Monitor Device Status |
14 |
Apply Traffic Control |
14 |
Apply Wake-On-LAN |
14 |
Chapter 6: Enhance Connection Security
Secure Your Connections |
15 |
Create Firewall Rules |
16 |
Enforce Auto Block |
16 |
Create Certificates |
16 |
Use More Security Measures |
16 |
Chapter 7: Update and Restore Your Synology Router
Update SRM and Packages |
17 |
Back up and Restore SRM |
17 |
Register Synology Account |
17 |
Chapter 8: Manage Internet Connection
Internet Connection Types |
18 |
ISP/VPN/IPv6 Settings |
18 |
2

Smart WAN |
18 |
QuickConnect & DDNS |
19 |
DMZ |
19 |
Port Forwarding |
19 |
Port Triggering |
19 |
Chapter 9: Manage Local Network Connection
Set up an IPv6 Router |
20 |
Set up DHCP Services |
20 |
Set up Static Routes |
20 |
Set up IPTV & VoIP |
20 |
Chapter 10: Manage External Devices and Privileges
Install & Manage USB/SD Storage |
21 |
Define User/Folder Privileges |
21 |
Install & Manage Network Printers |
21 |
Install & Manage 3G/4G Dongles |
21 |
Chapter 11: Discover SRM Packages
Safe Access |
22 |
VPN Plus Server |
22 |
Threat Prevention |
22 |
Download Station |
22 |
DNS Server |
22 |
Cloud Station Server |
23 |
Media Server |
23 |
RADIUS Server |
23 |
Chapter 12: Discover Synology Mobile Applications
DS router |
24 |
Other Synology Mobile Applications |
24 |
Chapter 13: Diagnosis Tools
Check Connection Status |
26 |
Check Notifications |
26 |
Ping |
26 |
Traceroute |
26 |
Contact Technical Support |
26 |
Chapter 14: FAQ
SRM Operation |
27 |
Network |
28 |
Wi-Fi |
30 |
Syno_UsersGuide_Router_20161220
3

Set up Your Synology Router
Set up Synology Router Manager (SRM)
1Use a computer or wireless device connected to the Synology Router's local network. If you use a wireless device, scan and join the Wi-Fi network (SSID: SynologyRouter; Password: synology).
2Open a web browser, and enter either URL into the address bar:
•http://router.synology.com
•http://192.168.1.1:8000
3Once connected, click Start to launch the SRM Setup Wizard.
4 Fill in the information to set up the administrator account. Click Next to continue.
Chapter
1
4 Chapter 1: Set up Your Synology Router
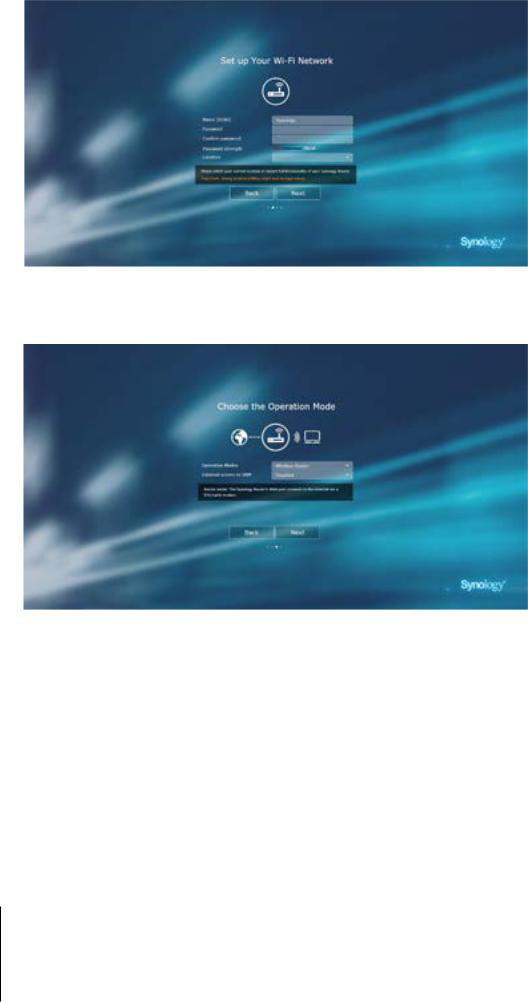
5 Fill in the information to set up the Wi-Fi network. Click Next to continue.
6Set up the operation mode. When choosing the Wireless Router mode, you can also enable External access to SRM so that only external access via the HTTP(S) port (e.g. 8000/8001) can reach SRM.
5 Chapter 1: Set up Your Synology Router
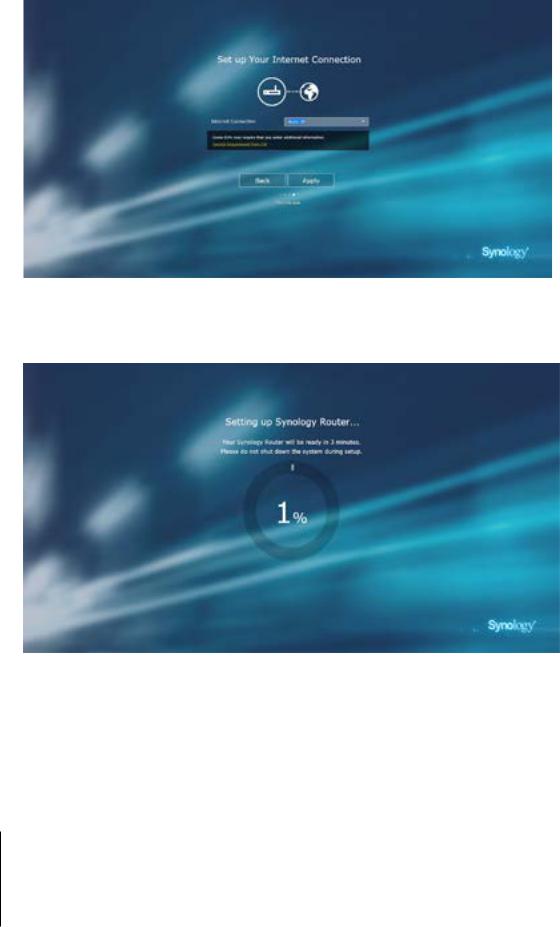
7Choose an Internet connection type:
•PPPoE: Choose this option if you have obtained PPPoE credentials from the ISP.
•Manual IP: Choose this option if you have obtained an available IP address for use.
•Auto IP: Choose this option if you rely on an ISP modem for automatic IP assignment.
•DS-Lite: Choose this option if you have obtained a DS-Lite service request from the ISP.
8The wizard will continue to set up your Synology Router, and it may take up to three minutes to complete the setup.
6 Chapter 1: Set up Your Synology Router
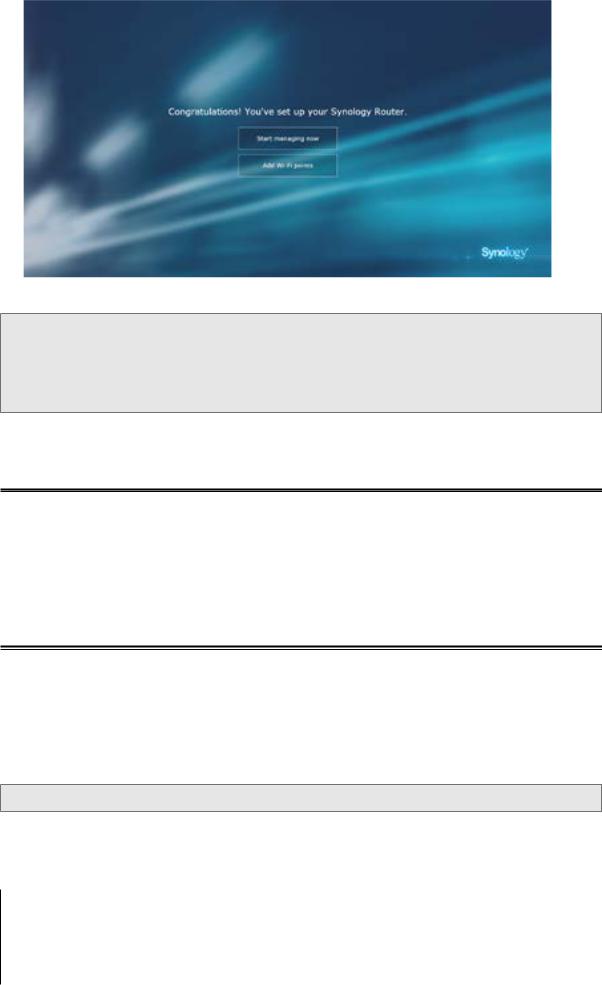
9After the setup is complete, click Start managing now to enjoy SRM and its various features, or add Wi-Fi points by clicking Add Wi-Fi points.
Note:
1.Above is a general demonstration of the SRM setup steps. The steps and available options may somewhat vary depending on your device type (e.g. PC or wireless device), access type (LAN, WAN, or Wireless LAN), and chosen operation mode (Wireless Router or Wireless AP).
2.If the setup is completed with a wireless device, remember to download DS router for anywhere management of your Synology Router. To know more about this mobile application, see "DS router".
Set up Desktop Wallpaper
SRM allows you to customize the desktop with default wallpapers or with your own images. You can also customize other desktop elements (e.g. text color and icon size).
Click Options (the person icon) on the top-right corner, and go to Options > Desktop:
•To change the desktop wallpaper: Select Customize wallpaper and click Select image. Click Default Wallpaper or My Images depending on the image source.
•To customize other desktop elements: Change relevant settings to suit your needs.
Reset Synology Router
If you forgot the administrator/Wi-Fi password or the Synology Router becomes unreachable, you can fix the situations by pressing the RESET button on the bottom shell.
1Use a pencil or ball pen to press and hold the RESET button.
2Press and hold the RESET button for four or ten seconds:
•For four seconds (Soft Reset): The system will reset passwords of the admin and the administrator with equal privileges but other users' credentials will remain unchanged. The system will also reset the following settings (firewall, DHCP services, Wi-Fi, and Traffic Control) and start the SRM Setup Wizard.
Note: On the MR2200ac model, only the admin password will be reset.
7 Chapter 1: Set up Your Synology Router

Note: During Soft Reset, the LED indicators behave as below:
1.The STATUS LED turns static orange on the RT1900ac model, blinking orange on the RT2600ac, and static blue on the MR2200ac model. The other LEDs become inactive for up to 30 seconds until the reset is complete.
2.The STATUS LED turns green (Soft Reset is complete) on the RT1900ac and RT2600ac model, blinking blue on the MR2200ac model, and the other LEDs become active and behave as stated in the respective Hardware Installation Guide.
•For ten seconds (Hard Reset): The system will be reset to the factory default. The data stored in the external storages will remain intact.
Note: During Hard Reset, the LED indicators behave as below:
1.The STATUS LED turns blinking orange on the RT1900ac model, static orange on the RT2600ac, and static blue on the MR2200ac model. The other LEDs become inactive for up to four minutes until the reset is complete.
2.The STATUS LED turns green (Hard Reset is complete), on the RT1900ac and RT2600ac model, blinking blue on the MR2200ac, and the other LEDs become active and behave as stated in the respective Hardware Installation Guide.
8 Chapter 1: Set up Your Synology Router

Choose the Operation Mode
This chapter introduces the wireless operation modes available to your Synology Router to suit your networking needs. To find the operation modes, please go to Network Center > Operation Modes.
Wireless Router
Under this mode, your Synology Router works as a regular router that transfers data between two networks (e.g. between a local network and the Internet) and finds the optimal path for data delivery. This mode also provides wireless connection to wireless devices for continuous access.
The Wireless Router mode is recommended in the scenarios below:
•When you need extra connection security (e.g. firewall, NAT, and DMZ)
•When the connected client devices need wireless connection
•When you need to create subnets within the local network
Below are the suggested usages:
If you have an ISP modem:
1Connect your Synology Router (at the WAN port) with a network cable to the ISP modem (at the LAN port).
2Configure basic network settings:
•Decide how your Synology Router obtains the IP address (at Network Center > Internet > Connection >
Primary Interface > Connection Type).
•Decide whether your Synology Router assigns IP addresses to its clients (at Network Center > Local Network > General > DHCP Server).
3Configure advanced network settings (at Network Center > Internet or Local Network). For setting details, refer to the SRM help.
If you do not have an ISP modem:
1Connect your Synology Router (at the WAN port) to the Internet (e.g. the Internet port on the wall/ground) with a network cable.
2Decide how your Synology Router obtains the IP address (at Network Center > Internet > Connection >
Primary Interface > Connection Type).
3Configure advanced network settings (at Network Center > Internet). For setting details, refer to the SRM help.
Wireless AP (Access Point)
Under this mode (also known as the Bridge mode), your Synology Router bridges all network interfaces (LAN, wireless LAN, and WAN) and therefore all LAN ports (including the WAN port) are available to wired clients.
As a wireless AP, the router cannot assign IP addresses to the clients (the DHCP Server is disabled) and works only as a wireless transmission device, sending/receiving data via Wi-Fi between wireless and wired networks.
The Wireless AP (Access Point) mode is recommended in the scenarios below:
•When your Synology Router (at LAN ports or WAN port) is already connected to an ISP modem (at the LAN port) for Internet access
•When the connected devices need wireless connection
Note: Under this mode, the Synology Router will not provide the following functions/settings under Network Center:
Port Forwarding, Local Network, and Traffic Control.
Chapter
2
9 Chapter 2: Choose the Operation Mode

Wireless Client
Under this mode, your Synology Router works as a Wi-Fi dongle (that is, a Wi-Fi client) and relies on the Wi-Fi signal from another router or access point for Internet access.
The Wireless Client mode is recommended in the scenario below:
•When you need Internet access, but a wired connection is hard to set up between your Synology Router and another router/ISP modem
Below is the suggested usage:
• Clients have to connect to the Synology Router (at the LAN port) with a network cable for Internet access.
Note:
1.This operation mode is available to the RT1900ac model.
2.Under this mode, your Synology Router must be within the range of the Wi-Fi source (e.g. a Wi-Fi router). If not, the received Wi-Fi signal may be weak and affect the connection quality.
3.Wireless client devices cannot connect to the Synology Router to access the Internet.
Wireless Repeater (WDS)
Under this mode (also known as the WDS mode), your Synology Router bridges all network interfaces (LAN, wireless LAN, and WAN) and therefore has five LAN ports (LAN 1-4 and WAN) available to wired clients.
As a wireless repeater, the router can neither assign IP addresses to the clients (the DHCP Server is disabled) nor send/receive data via Wi-Fi between wireless and wired networks.
Wireless AP (Access Point) is recommended in the scenarios below:
•When you wish to connect to an ISP modem but do not want to use wire connection for Internet access
•When the connected devices need wireless connection
Note:
1.This operation mode is available to the RT2600ac model.
2.Under this mode, your Synology Router must be within the range of the Wi-Fi source. A poor signal from the WiFi source may result in unstable or poor connection quality.
10 Chapter 2: Choose the Operation Mode
Set up Your Wi-Fi Connection
This chapter introduces how to create Wi-Fi networks hosted by your Synology Router. Three types of Wi-Fi networks can be created: 2.4GHz, 5GHz (5GHz-1 on Tri-band), and 5GHz-2.
•2.4GHz: A 2.4GHz Wi-Fi network is used by most wireless devices and tends to have broader signal coverage than a 5GHz Wi-Fi network. However, signal interference is likely to occur because most wireless devices rely on this wireless frequency for connection.
•5GHz (5GHz-1 on Tri-band): Many wireless devices do not rely on this wireless frequency, and signal interference is less likely to occur. Besides, a 5GHz Wi-Fi network has narrower signal coverage than a 2.4GHz Wi-Fi network, and its signal strength may weaken due to nearby obstacles.
•5GHz-2: Tri-band models will show this radio option.
Enable Smart Connect
Smart Connect allows you to connect your devices to the combined SSID with the shared Wi-Fi settings for both 2.4GHz and 5GHz bands. SRM will determine whether to switch between the two frequency bands (i.e. 2.4GHz and 5GHz) according to your specified policy and network conditions to ensure the best wireless connectivity for your devices. Smart Connect does not switch between channels (e.g. 1 and 10) within each band for your devices.
1Go to Wi-Fi Connect > Wireless > Wi-Fi.
2Turn on 2.4GHz/5GHz auto selection.
3Specify the settings for the Smart Connect Wi-Fi network. Click Advanced options to make more adjustments.
4Use your wireless device to scan and join the Wi-Fi network hosted by your Synology Router.
Create Wi-Fi Networks (2.4GHz & 5GHz)
You can create a 2.4GHz or 5GHz Wi-Fi network:
1Make sure your Synology Router is powered on and well-connected to the Internet.
2Make sure the Wi-Fi button is "ON" on your Synology Router.
3Go to Wi-Fi Connect > Wireless > Wi-Fi.
4Select Enable wireless radio under 5GHz/2.4GHz, and continue the setup. Click Advanced options to make more adjustments.
5Use your wireless device to scan and join the Wi-Fi network hosted by your Synology Router.
Create Guest Wi-Fi Networks (2.4GHz & 5GHz)
A guest Wi-Fi network is typically time-limited network (from one hour to one week) created by small and mediumsized businesses for visitors/non-regular users. The visitors can only access the guest network but not the host Wi-Fi network, to prevent unauthorized access to the host network.
To set up a guest Wi-Fi network, go to Wi-Fi Connect > Guest Network for the setup.
Chapter
3
11 Chapter 3: Set up Your Wi-Fi Connection

Create WPS Networks (2.4GHz & 5GHz)
WPS (Wi-Fi Protected Setup) is a standard promoted by the Wi-Fi Alliance to simplify Wi-Fi security settings for users. Though the setup is quick, the WPS network may not be secure. To keep the WPS network safe, you can use a push button or a PIN code.
Three ways are available to quickly set up a Wi-Fi network via WPS:
By push button:
1Go to Wi-Fi Connect > Wireless > WPS, and select Enable WPS. Alternatively, press the WPS button on your Synology Router.
2Enable the WPS function on your wireless device. Your wireless device and the Synology Router will be paired up.
By AP PIN code:
1Go to Wi-Fi Connect > Wireless > WPS > Device PIN > By AP PIN code, and click Enable to generate an AP PIN code.
2Enter the generated PIN code into your wireless device. Your wireless device and the Synology Router will be paired up.
By client PIN code:
1Enter the PIN code of your wireless device at Wi-Fi Connect > Wireless > WPS > Device PIN > By client PIN code.
2Click Register. Your wireless device and the Synology Router will be paired up.
Note: Client iOS devices cannot join a WPS network because iOS does not support WPS.
12 Chapter 3: Set up Your Wi-Fi Connection

Build a Wi-Fi system network
This chapter introduces various features to manage Wi-Fi points.
Add Wi-Fi Points
You can add new Wi-Fi Points to your Synology Wi-Fi Network to build a Wi-Fi system with complete coverage. To set up a Wi-Fi point:
1Place the Wi-Fi Point at a suitable location.
2Go to Wi-Fi Connect > Wi-Fi point, and click Add to connect your new Wi-Fi Point to your Synology WiFi system. SRM will detect all your new devices, apply settings, and upgrade the Wi-Fi Points to the latest version.
Note: Wi-Fi Points might fail to connect to the Primary Wi-Fi Point if the Primary Wi-Fi Point is reset to default. Please reset all Wi-Fi Points and follow the instruction of the Add Wizard to build your Wi-Fi system.
Network Status
To monitor the real-time status of all Wi-Fi Points in your Synology Wi-Fi System, go to Wi-Fi Connect > Status.
Configure Wi-Fi Points
At Wi-Fi Connect > Wi-Fi Point, you can find the status of your Wi-Fi system network by Topology. All your devices and their connection types are listed in this page — a solid line means the Wi-Fi Point is connected by an Ethernet cable, and a dotted line means it is connected via Wi-Fi. The devices can be configured to suit your needs:
•Detail: Name your Wi-Fi Points for easy recognition. You can find the general information, network status, and the connected list from the pop-up window.
•Manage: You can change the status of all Wi-Fi points.
•Turn off LED: Turn off the LED of this Wi-Fi Point.
•Blink to find: Find this Wi-Fi Point with the blinking LED.
•Restart now: Reboot this Wi-Fi Point.
•Delete & Reset: Remove this Wi-Fi Point from the Wi-Fi network and reset it to default for adding.
Test Wi-Fi Performance
The performance between Wi-Fi Points are crucial as the Wi-Fi Network is designed to keep the connection stable and with the best speeds. With the Wi-Fi Performance test, you can make sure your Wi-Fi Points are at the best location to provide the best network experience.
To use the Performance test service, go to Wi-Fi Connect > Wi-Fi Point, and click Wi-Fi point performance test.
Chapter
4
13 Chapter 4: Build a Wi-Fi system network
 Loading...