


VL800 C T 2009
Table of contents
 Loading...
VL800/C/ T
OWNER’S MANUAL
This owner’s manual contains
important safety information.
Please read it carefully.
California Proposition 65 Warning
WARNING
Engine exhaust, some of its constituents, and certain product components contain or emit chemicals known to the State of California
to cause cancer and birth defects or other reproductive harm.
This manual should be considered a permanent part of the
motorcycle and should remain with the motorcycle when resold
or otherwise transferred to a new owner or operator. The
manual contains important safety information and instructions
which should be read carefully before operating the motorcycle.
TABLE OF CONTENTS
THE SPORT OF MOTORCYCLING
FUEL, OIL AND COOLANT RECOMMENDATIONS
CONTROLS, EQUIPMENT AND ADJUSTMENTS
BREAK-IN AND INSPECTION BEFORE RIDING
RIDING TIPS
ACCESSORY USE AND MOTORCYCLE LOADING
INSPECTION AND MAINTENANCE
TROUBLESHOOTING
STORAGE PROCEDURE AND MOTORCYCLE CLEANING
1
2
3
4
5
6
7
8
9
CONSUMER INFORMATION
SPECIFICATIONS
INDEX
10

THE SPORT OF MOTORCYCLING
MOST ACCIDENTS CAN BE AVOIDED ............................................................. 1-2
IF YOU DON’T HAVE A HELMET - BUY A HELMET, AND
WEAR IT EVERY TIME YOU RIDE ..................................................................... 1-3
IF A COLLISION IS IMMINENT, DO SOMETHING! ........................................... 1-3
SPECIAL SITUATIONS REQUIRE SPECIAL CARE .......................................... 1-4
KNOW YOUR LIMITS .......................................................................................... 1-4
BE EXTRA SAFETY-CONSCIOUS ON BAD WEATHER DAYS ........................ 1-5
PRACTICE AWAY FROM TRAFFIC ................................................................... 1-5
INSPECTION BEFORE RIDING .......................................................................... 1-5
ACCESSORIES AND LOADING ......................................................................... 1-5
CARRYING A PASSENGER ............................................................................... 1-6
MOTORCYCLE SAFETY FOUNDATION’S
“RIDING TIPS AND PRACTICE GUIDE” HANDBOOK
(FOR OWNERS IN USA) ..................................................................................... 1-6
BE STREET SMART ........................................................................................... 1-6
CONCLUSION ..................................................................................................... 1-6
1
1-1

THE SPORT OF
MOTORCYCLING
Your motorcycle and this owner’s
manual have been designed by
people like you who enjoy motorcycling. People become motorcyclists for many reasons. For
starters, street riding is fun and
invigorating. But no matter why
you became a motorcyclist, or
how experienced you are, you will
eventually face some challenging
situations.
In preparing for these challenges,
you will be fine-tuning your coordination, concentration, and attitude. Learning the skills and
strategies associated with motorcycling is the basis for safely participating in this sport. Many
motorcyclists find that as they
become better riders, they also
get more enjoyment from the freedom unique to motorcycling.
MOST ACCIDENTS CAN BE
AVOI DED
The most common type of motorcycle accident in the U.S. occurs
when a car traveling toward a
motorcycle turns left in front of the
motorcycle. Is that because other
drivers are out to get motorcyclists? No. Other drivers simply
don’t always notice motorcyclists.
Ride defensively. Wise motorcyclists use a strategy of assuming
they are invisible to other drivers,
even in broad daylight. Pay careful attention to other motorists,
especially at intersections,
because they may not be paying
attention to you. Select a lane
position that gives you the best
view of others, and other motorists the best view of you. Wear
bright, reflective clothing. Put
reflective strips on your helmet.
Please remember:
1-2

IF YOU DON’T HAVE A
HELMET - BUY A HELMET, AND
WEAR IT EVERY TIME YOU RIDE
Most accidents occur within a few
miles of home, and almost half
occur at speeds of less than 30
mph. So even if you’re just going
on a quick errand, be preparedstrap on your helmet before you
take off.
Helmets do not reduce essential
vision or hearing. Generally, helmets do not cause or intensify
injury if you crash. Helmets simply
help your skull protect your intelligence, your memory, your personality, and your life.
IF A COLLISION IS IMMINENT,
DO SOMETHING!
Many riders fear locking up their
brakes or haven’t learned to
swerve to avoid an accident.
Many inexperienced riders (and
too many seasoned riders) use
only their rear brake in an emergency, resulting in unnecessary
impacts in some cases and
unnecessarily high impact speeds
in other cases. Your rear brake
can only provide about 30% of
your motorcycle’s potential stopping power. The front and rear
brakes can and should be used
together to maximize braking
effectiveness.
Your eyesight is equally valuable.
Wearing suitable eye protection
can help keep your vision
unblurred by the wind and save
your eyes from airborne hazards
like bugs, dirt, or pebbles kicked
up by tires.
Experienced motorcyclists learn
to “cover” the front brake lever by
lightly resting a couple of fingers
over the lever when riding in traffic
and near intersections to give
their reaction time a head start.
1-3

Emergency stopping and swerving are techniques that you
should practice and master before
you find yourself in an emergency
situation. The best place to practice such techniques is in a controlled environment such as the
Motorcycle Safety Foundation’s
(MSF) rider training courses. The
MSF’s Motorcycle Rider Courses
(fundamental techniques) and
Experienced Rider Courses
(advanced strategies) present
hands-on instruction of the basic
principles of motorcycling and a
variety of accident avoidance
maneuvers. Even a seasoned
motorcyclist can improve his or
her riding skills, and pick up a few
new skills, through these courses.
Some insurance companies even
offer discounts to course graduates.
SPECIAL SITUATIONS REQUIRE
SPECIAL CARE
Of course, there are some times
when full-force braking is not the
correct technique. When the road
surface is wet, loose, or rough,
you should brake with care. When
you’re leaned over in a corner,
avoid braking. Straighten up
before braking. Better yet, slow
down before entering a corner.
In these situations, the traction
available between your tires and
the road surface is limited. Overbraking when traction is limited
will cause your tires to skid, possibly resulting in loss of directional
control or causing you and your
motorcycle to fall over.
KNOW YOUR LIMITS
Always ride within the boundaries
of your own skills. Knowing these
limits and staying within them will
help you avoid accidents.
A major cause of accidents involving only a motorcycle (and no
cars) is going too fast through a
turn. Before entering a turn, select
an appropriately low cornering
speed.
Even on straight roads, ride at a
speed that is appropriate for the
traffic, visibility and road conditions, your motorcycle, and your
experience.
1-4

Riding a motorcycle safely
requires that your mental and
physical skills are fully part of the
experience. You should not
attempt to operate a motor vehicle, especially one with two
wheels, if you are tired or under
the influence of alcohol or other
drugs. Alcohol, illegal drugs, and
even some prescription and overthe-counter drugs can cause
drowsiness, loss of coordination,
loss of balance, and especially
the loss of good judgment. If you
are tired or under the influence of
alcohol or other drugs, PLEASE
DO NOT RIDE your motorcycle.
PRACTICE AWAY FROM
TRAFFIC
Your riding skill and your mechanical knowledge form the foundation for safe riding practices. We
suggest that you practice riding
your motorcycle in a nontraffic situation until you are thoroughly
familiar with your machine and its
controls. Again, consider taking
one of the MSF’s Rider Courses.
Even experts will be pleased with
the caliber of the information presented in these courses. As the
MSF says: “The more you know,
the better it gets!”
INSPECTION BEFORE RIDING
BE EXTRA SAFETY-CONSCIOUS
ON BAD WEATHER DAYS
Riding on bad weather days,
especially wet ones, requires
extra caution. Braking distances
increase on a rainy day. Stay off
the painted surface marks, manhole covers, and greasy appearing areas, as they can be
especially slippery. Use extra caution at railway crossings and on
metal gratings and bridges. When
it starts to rain, any oil or grease
on the road rises to the surface of
the water. Pull over and wait a few
minutes until this oil film is
washed away before riding.
Whenever in doubt about road
conditions, slow down!
Review the instructions in the
INSPECTION BEFORE RIDING
section of this manual. Perform an
entire pre-ride inspection before
you head out on the road. Spending a few minutes preparing your
machine for a ride can help prevent accidents due to mechanical
failure or costly, inconvenient
breakdowns far from home.
ACCESSORIES AND LOADING
The accessories you use with
your motorcycle and the manner
in which you load your gear onto
the bike might create hazards.
Aerodynamics, handling, balance,
and cornering clearance can suffer, and the suspension and tires
can be overloaded. Read the
ACCESSORY USE AND
MOTORCYCLE LOADING section.
1-5

CARRYING A PASSENGER
Carrying a passenger, when done
correctly, is a great way to share
the joy of motorcycling. You will
have to alter your riding style
somewhat since the extra weight
of a passenger will affect handling
and braking. You may also need
to adjust tire pressures and suspension; please refer to the Tire
Pressure and Loading section
and the Suspension section for
more details.
A passenger needs the same protection that you do, including a
helmet and proper clothing. The
passenger should not wear long
shoe laces or loose pants that
could get caught in the wheel or
the chain. Passengers must be
tall enough that their feet reach
the footrests.
MOTORCYCLE SAFETY
FOUNDATION’S “RIDING TIPS
AND PRACTICE GUIDE”
HANDBOOK (FOR OWNERS IN
USA)
This special handbook, supplied
with your owner’s manual, contains a variety of safety tips, helpful hints, and practice exercises.
This manual can increase your
riding enjoyment and safety. You
should read it thoroughly.
BE STREET SMART
Always heed speed limits, local
laws, and the basic rules of the
road. Set a good example for others by demonstrating a courteous
attitude and a responsible riding
style.
CONCLUSION
Traffic, road and weather conditions vary. Other motorist’s
actions are unpredictable. Your
motorcycle’s condition can
change. These factors can best
be dealt with by giving every ride
your full attention.
Circumstances beyond your control could lead to an accident. You
need to prepare for the unexpected by wearing a helmet and
other protective gear, and learning emergency braking and
swerving techniques to minimize
the damage to you and your
machine.
The best way to learn basic riding
skills and evasive maneuvers or
refresh your own riding skills is to
take one of the courses offered by
the Motorcycle Safety Foundation.
Your authorized Suzuki dealer
can help you locate the fundamental or advanced riding skills
course nearest you, or owners in
the USA can call toll-free 1-800446-9227.
Good riding on your new Suzuki!
1-6

FUEL, OIL AND COOLANT
RECOMMENDATIONS
FUEL .................................................................................................................... 2-2
ENGINE OIL ......................................................................................................... 2-3
GEAR OIL ............................................................................................................ 2-4
ENGINE COOLANT SOLUTION ......................................................................... 2-5
2
2-1

FUEL, OIL AND
COOLANT
RECOMMENDATIONS
FUEL
Your motorcycle requires regular
unleaded gasoline with a minimum pump octane rating of 87
((R+M)/2 method). In some areas,
the only fuels that are available
are oxygenated fuels.
Oxygenated fuels which meet the
minimum octane requirement and
the requirements described below
may be used in your motorcycle
without jeopardizing the New
Vehicle Limited Warranty or the
Emission Control System Warranty.
NOTE: Oxygenated fuels are
fuels which contain oxygen-carrying additives such as MTBE or
alcohol.
Gasoline containing MTBE
Unleaded gasoline containing
MTBE (Methyl Tertiary Butyl
Ether) may be used in your motorcycle if the MTBE content is not
greater than 15%. This oxygenated fuel does not contain alcohol.
Gasoline/Ethanol Blends
Blends of unleaded gasoline and
ethanol (grain alcohol), also
known as “GASOHOL”, may be
used in your vehicle if the ethanol
content is not greater than 10%.
Gasoline/Methanol Blends
Fuels containing 5% or less methanol (wood alcohol) may be suitable for use in your motorcycle if
they contain co-solvents and corrosion inhibitors.
DO NOT USE fuels containing
more than 5% methanol under
any circumstances. Fuel system
damage or motorcycle performance problems resulting from
the use of such fuels are not the
responsibility of Suzuki and may
not be covered under the New
Vehicle Limited Warranty or the
Emission Control System Warranty.
Fuel Pump Labeling
In some states, pumps that dispense oxygenated fuels are
required to be labeled for the type
and percentage of oxygenate, and
whether important additives are
present. Such labels may provide
enough information for you to
determine if a particular blend of
fuel meets the requirements listed
above. In other states, pumps
may not be clearly labeled as to
the content or type of oxygenate
and additives. If you are not sure
that the fuel you intend to use
meets these requirements, check
with the service station operator
or the fuel supplier.
2-2
NOTE:
• To help minimize air pollution,
Suzuki recommends that you
use oxygenated fuels.
• Be sure that any oxygenated
fuel you use has octane ratings of at least 87 pump
octane ((R+M)/2 method).
• If you are not satisfied with the
driveability of your motorcycle
when you are using an oxygenated fuel, or if engine pinging is experienced, substitute
another brand as there are differences between brands.
CAUTION
Spilled gasoline containing
alcohol can harm your motorcycle. Alcohol can damage
painted surfaces.
Be careful not to spill any fuel
when filling the fuel tank. Wipe
spilled gasoline up immediately.
ENGINE OIL
Oil quality is a major contributor to
your engine’s performance and
life. Always select good quality
engine oil. Suzuki recommends
the use of SUZUKI PERFORMANCE 4 MOTOR OIL or equivalent engine oil. Use oil with an API
(American Petroleum Institute)
classification of SF/SG or SH/SJ,
or with a JASO classification of
MA.
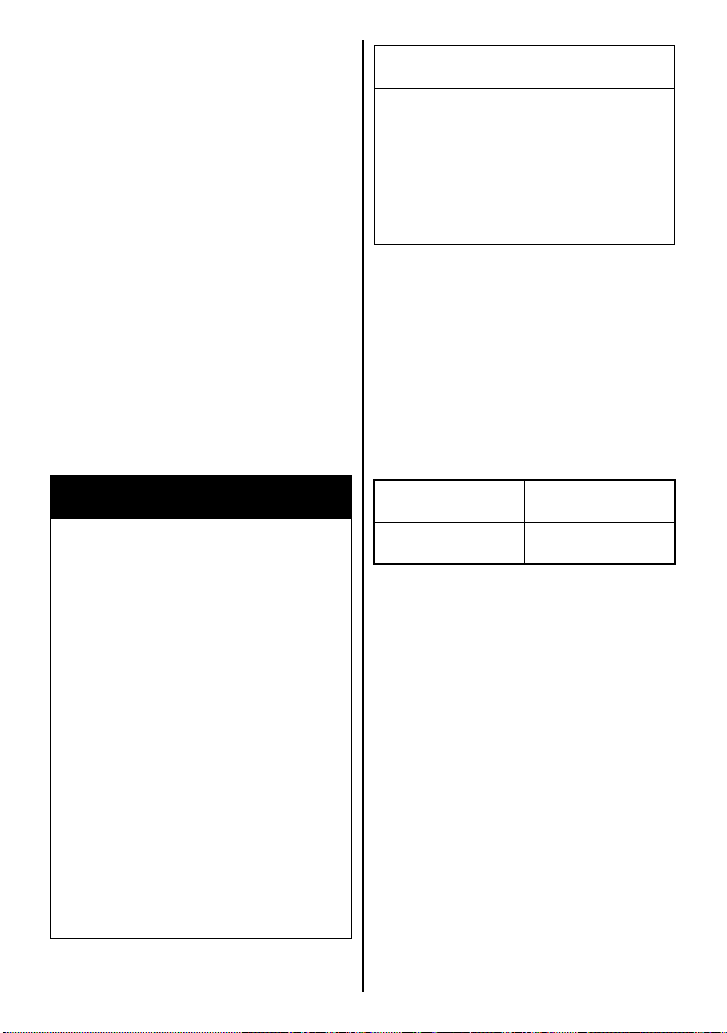
SAE API JASO
10W-40 SF or SG –
10W-40 SH or SJ MA
API: American Petroleum Institute
JASO: Japanese Automobile
Standards Organization
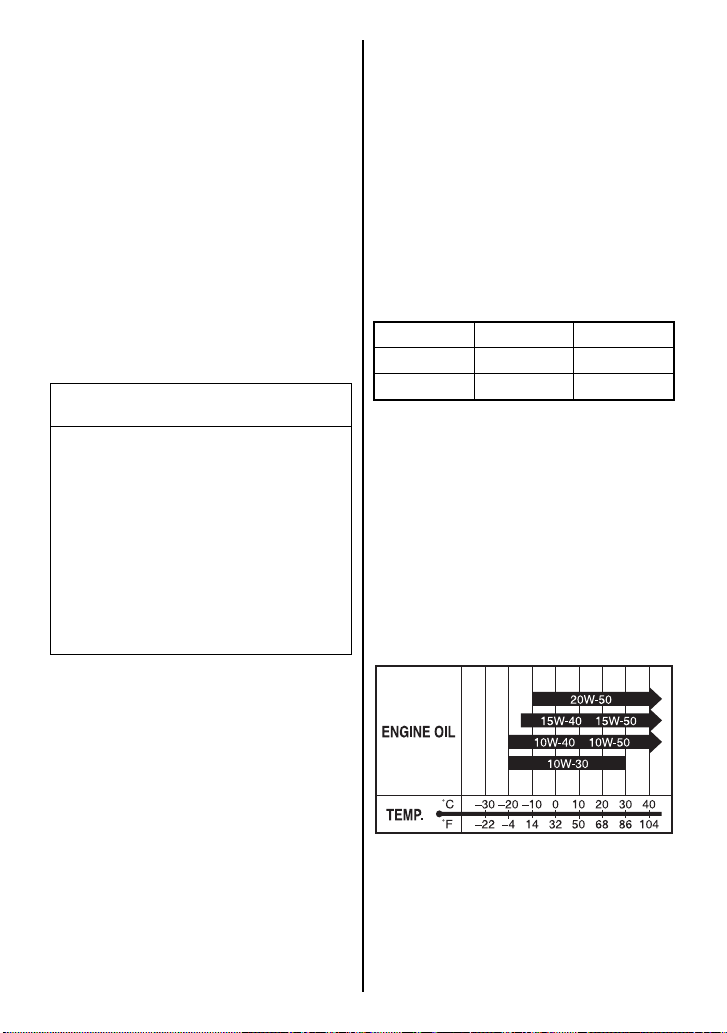
SAE Engine Oil Viscosity
Suzuki recommends the use of
SAE 10W-40 engine oil. If SAE
10W-40 engine oil is not available,
select an alternative according to
the following chart.
2-3
JASO T903
The JASO T903 standard is an
index to select engine oils for 4stroke motorcycle and ATV
engines. Motorcycle and ATV
engines lubricate clutch and
transmission gears with engine
oil. JASO T903 specifies performance requirements for motorcycle and ATV clutches and
transmissions.
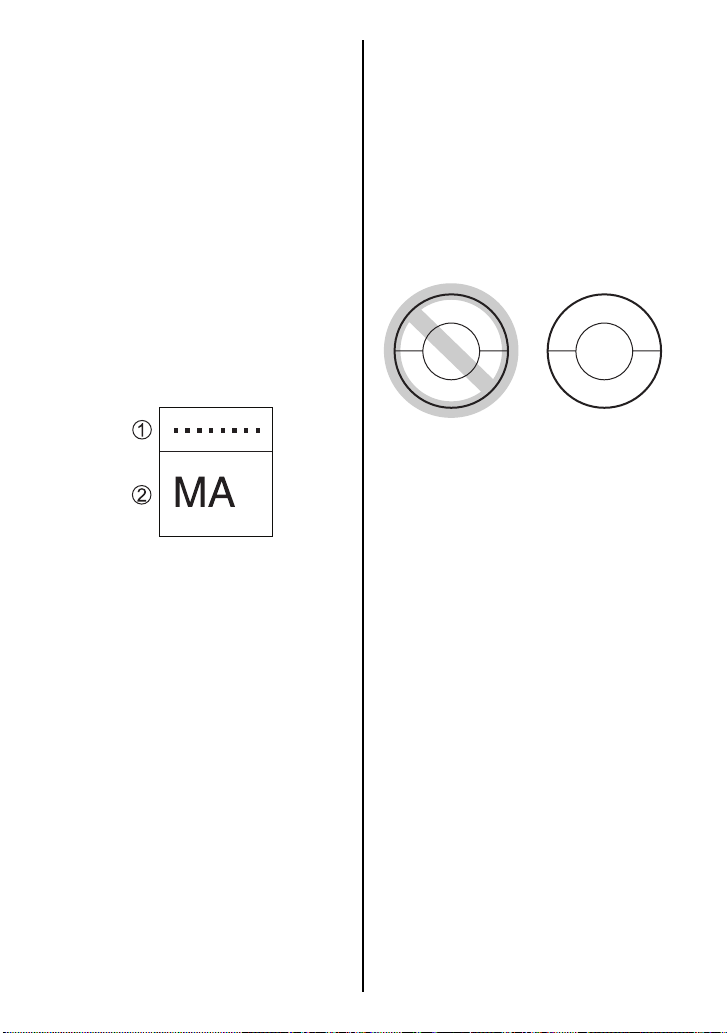
Energy Conserving
Suzuki does not recommend the
use of “ENERGY CONSERVING”
oils. Some engine oils which have
an API classification of SH or
higher have an “ENERGY CONSERVING” indication in the API
classification doughnut mark.
These oils can affect engine life
and clutch performance.
There are two classes, MA and
MB. The oil container shows the
classification as follows.
1 Code number of oil sales company
2 Oil classification
E
N
E
I
P
A
10W-40
R
G
Y
E
S
SAE
C
V
R
I
C
E
S
J
G
N
I
V
R
E
S
N
O
E
S
I
P
A
SAE
10W-40
V
R
I
C
E
S
J
Not recommended Recommended
GEAR OIL
Use an SAE90 hypoid gear oil
which is rated GL-5 under the API
classification system. If you operate the motorcycle where ambient
temperature is below 0°C (32°F),
use SAE80 hypoid gear oil.
2-4
ENGINE COOLANT SOLUTION
Use engine coolant that is compatible with an aluminum radiator,
mixed with distilled water at a
50:50 mixture ratio for engine
coolant solution. An engine coolant mixture other than 50:50 can
affect cooling efficiency or rust
inhibiting performance.
CAUTION
Spilled engine coolant can
damage painted surfaces.
Do not spill any fluid when filling the radiator. Wipe spilled
engine coolant up immediately.
Engine Coolant
Engine coolant should be used at
all times in your motorcycle’s radiator, even if the temperature in
your area does not go down to the
freezing point. Engine coolant
acts as a rust inhibitor and water
pump lubricant as well as an antifreeze solution.
WARNING
Engine coolant is harmful or
fatal if swallowed or inhaled.
Do not drink antifreeze or coolant solution. If swallowed, do
not induce vomiting. Immediately contact a poison control
center or a physician. Avoid
inhaling mist or hot vapors; if
inhaled, remove to fresh air. If
coolant gets in eyes, flush eyes
with water and seek medical
attention. Wash thoroughly
after handling. Solution can be
poisonous to animals. Keep
out of the reach of children and
animals.
Water for Mixing
Use distilled water only. Water
other than distilled water can corrode and clog the aluminum radiator.
Required amount of engine coolant/water solution capacity (total):
1500 ml (3.2 US pt)
Engine coolant
Wate r
750 ml
(1.6 US pt)
750 ml
(1.6 US pt)
2-5


CONTROLS, EQUIPMENT AND
ADJUSTMENTS
LOCATION OF PARTS ....................................................................................... 3-2
KEY ...................................................................................................................... 3-5
IGNITION SWITCH ..............................................................................................3-5
INSTRUMENT PANEL ......................................................................................... 3-7
LEFT HANDLEBAR ........................................................................................... 3-13
RIGHT HANDLEBAR ........................................................................................ 3-15
FUEL TANK CAP .............................................................................................. 3-17
GEARSHIFT LEVER .......................................................................................... 3-18
REAR BRAKE PEDAL ......................................................................................3-18
HELMET HOLDER ............................................................................................3-19
SIDE STAND ...................................................................................................... 3-19
SUSPENSION ADJUSTMENT ..........................................................................3-20
3
3-1
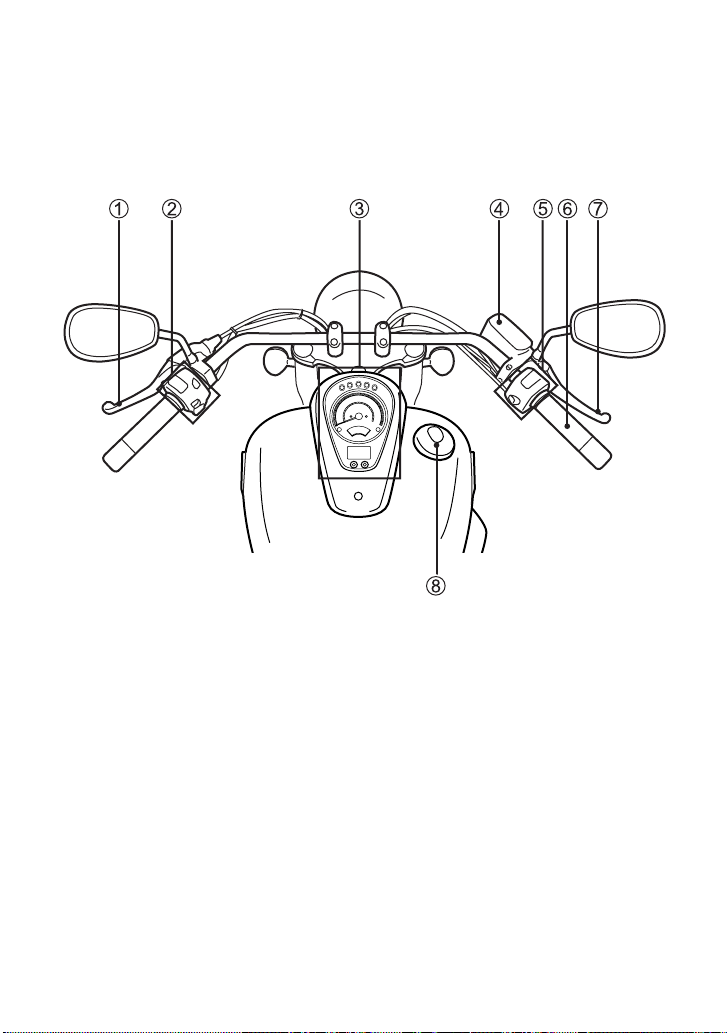
CONTROLS, EQUIPMENT AND ADJUSTMENTS
LOCATION OF PARTS
1 Clutch lever
2 Left handlebar switches
3 Instrument panel
4 Front brake fluid reservoir
5 Right handlebar switches
6 Throttle grip
7 Front brake lever
8 Fuel tank cap
3-2
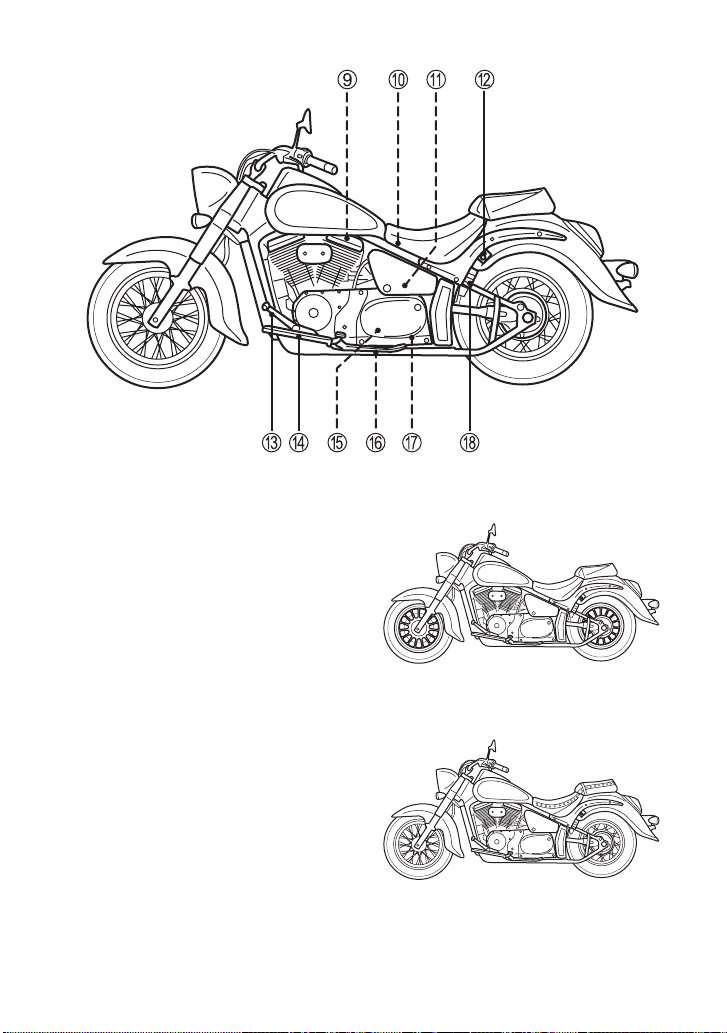
VL800
9 Spark plugs
0 Battery and main fuse
A To o l s
B Helmet holder
C Gearshift lever
D Footrests
E Engine coolant reservoir
F Side stand
G Fuses
H Passenger footrests
VL800C
VL800T
3-3
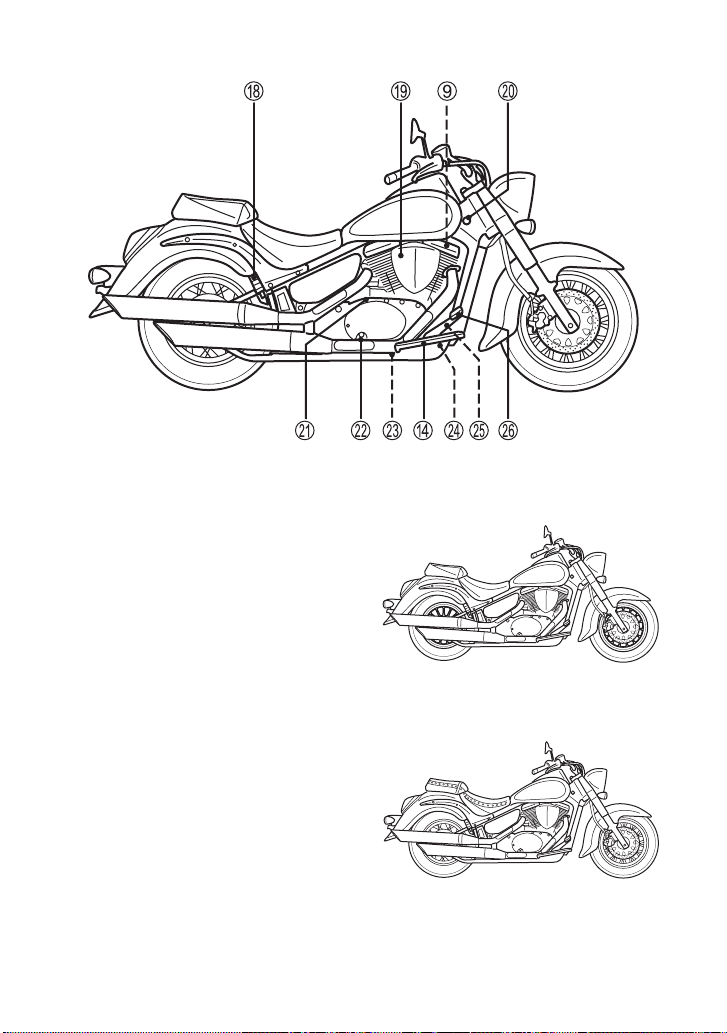
VL800
I Air cleaner
J Ignition switch
K Engine oil filler cap
L Engine oil inspection window
M Engine oil drain plug
N Engine oil filter
O Rear brake light switch
P Rear brake pedal
VL800C
VL800T
3-4

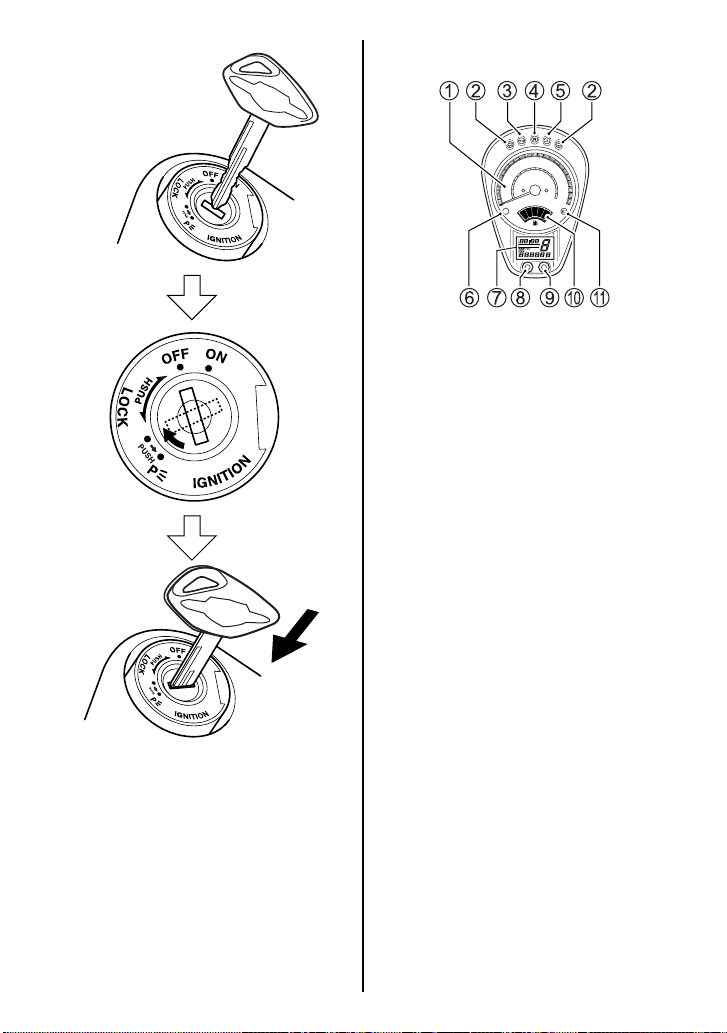
KEY
IGNITION SWITCH
Two keys come with this motorcycle. Keep the spare key in a safe
place. An identifying number is
stamped on the plate. Use this
number when making a replacement key.
Please write down your key number in the box provided for your
future reference.
Key number:
The ignition switch has 4 positions.
“OFF” position
All electrical circuits are cut off.
The engine will not start. The key
can be removed.
“ON” position
The ignition circuit is completed
and the engine can be started.
The headlight, front turn signal
light and taillight will automatically
turn on. The key cannot be
removed in this position.
NOTE: Start the engine promptly
after turning the key to the “ON”
position, or the battery will lose
power due to consumption by the
headlight and taillight.
“LOCK” position
All electrical circuits are off. The
key can be removed and the
steering will be locked. Turn the
steering all the way to the left and
push down the key and turn it to
the “LOCK” position.
3-5
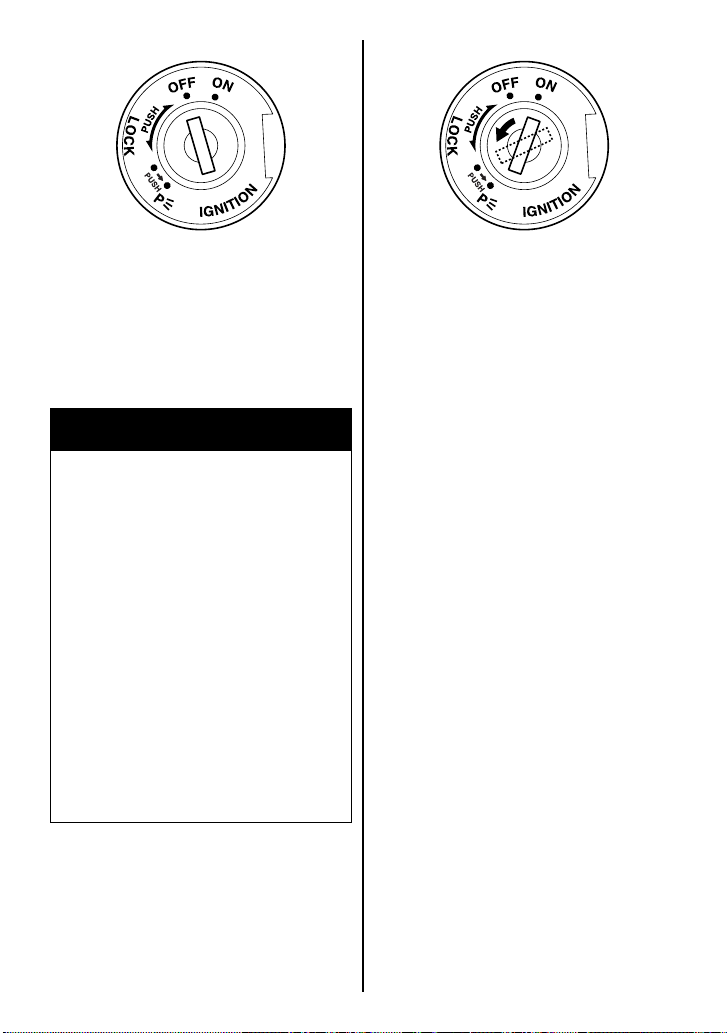
“P” (PARKING) position
The taillight will come on to
increase visibility for temporary
road side parking at night. The
key can be removed and the
steering will be locked.
WARNING
Turning the ignition switch to
the “P” (PARKING) or “LOCK”
position while the motorcycle
is moving can be hazardous.
Moving the motorcycle while
the steering is locked can be
hazardous. You could lose your
balance and fall, or you could
drop the motorcycle.
Stop the motorcycle and place
it on the side stand before locking the steering. Never attempt
to move the motorcycle when
the steering is locked.
The key hole can be covered by
turning the lid.
3-6
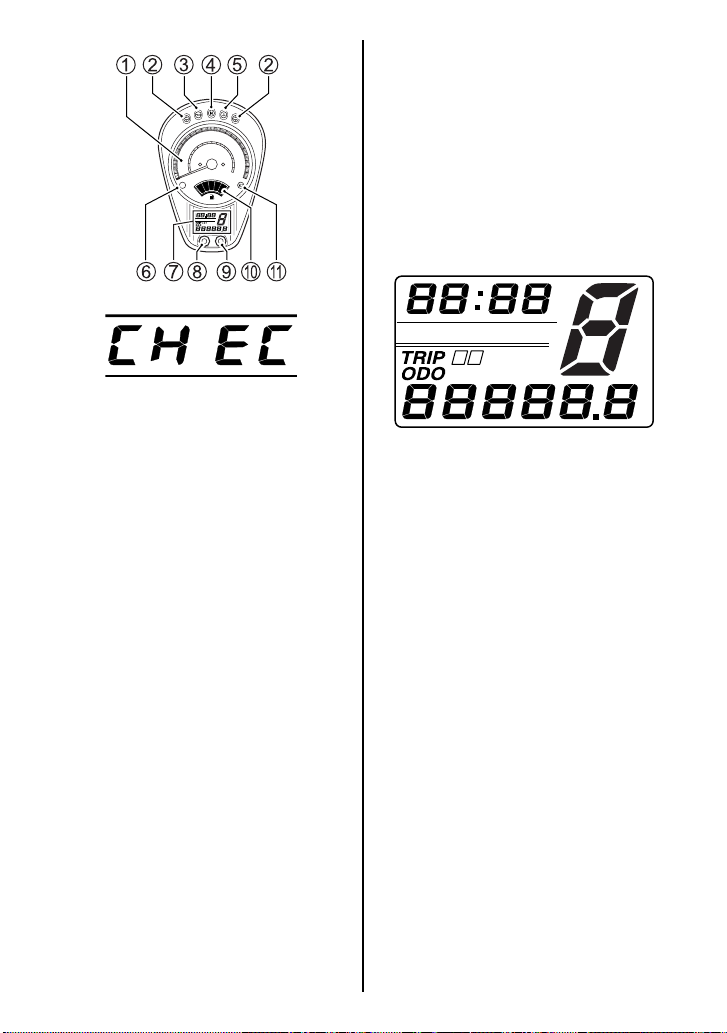
INSTRUMENT PANEL
FI
EF
GEAR
AB
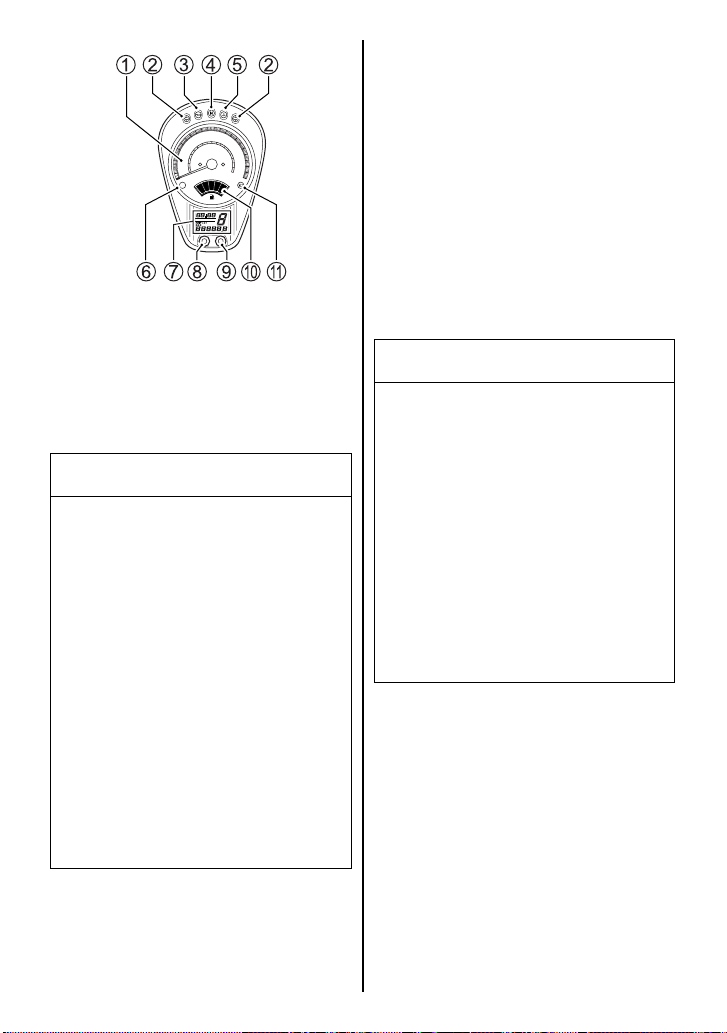
SPEEDOMETER 1
The speedometer indicates the
road speed in kilometers per hour
and miles per hour.
TURN SIGNAL INDICATOR
LIGHT “” 2
When the turn signals are being
operated either to the right or to
the left the indicator will flash at
the same time.
If a turn signal light is not operating properly due to bulb filament
or circuit failure, the indicator light
flickers more frequently than normal to notify the rider of the existence of a failure.
Align the lid hole position with the
key hole position when inserting
the key.
3-7
FI
EF
GEAR
AB
OIL PRESSURE INDICATOR
LIGHT “” 3
This indicator light comes on
when the engine oil pressure is
below the normal operating
range.
CAUTION
Riding the motorcycle with the
oil pressure indicator light lit
can damage the engine and
transmission.
Whenever the oil pressure indicator lights up, indicating low
oil pressure, stop the engine
immediately. Check the oil level
and determine if the proper
amount of oil is in the engine. If
the light still does not go out,
have your authorized SUZUKI
dealer or a qualified mechanic
troubleshoot your motorcycle.
NEUTRAL INDICATOR LIGHT
“N” 4
The green light will come on when
the transmission is in neutral. The
light will go out when you shift into
any gear other than neutral.
COOLANT TEMPERATURE
INDICATOR LIGHT “” 5
This indicator light comes on
when the coolant temperature
indicates more than 120°C
(248°F).
CAUTION
Running the engine with high
engine coolant temperature
can cause serious engine damage. If the engine coolant temperature indicates greater than
120°C (248°F) and the indicator
light comes on, stop the engine
to let it cool.
Do not run the engine until the
coolant temperature indicates
120°C (248°F) or below.
3-8
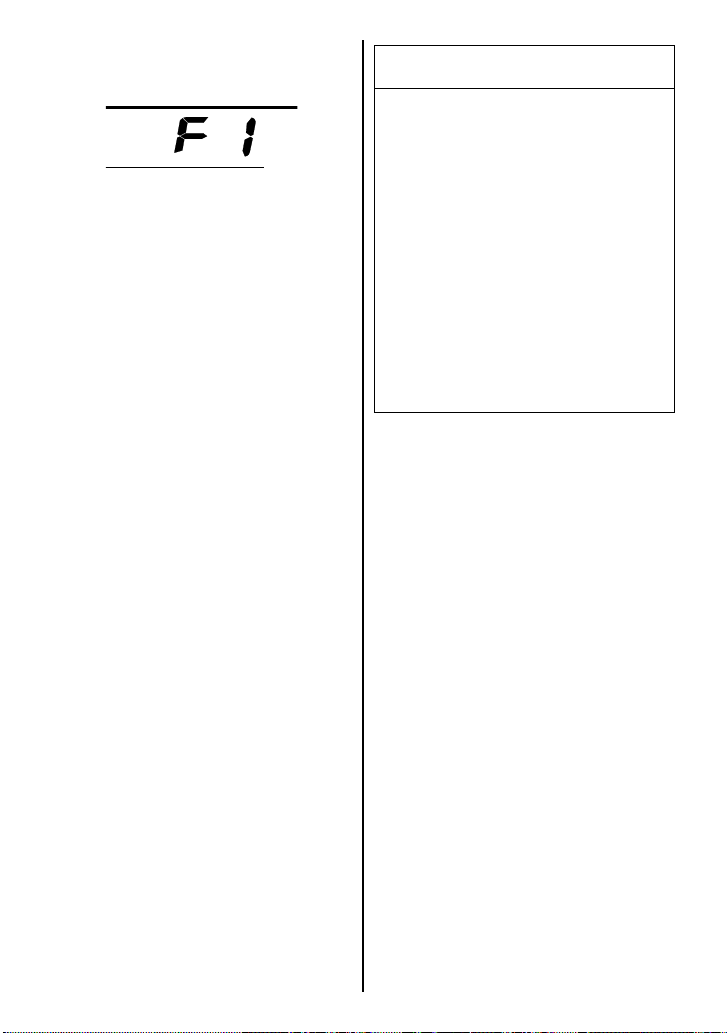
FUEL INJECTION SYSTEM
INDICATOR “FI” 6
If the fuel injection system fails,
the red indicator light 6 comes on
and the display indicates “FI” at
the clock display in the following
two modes;
A. The display 7 indicates “FI”
intermittently, and the red indicator light 6 comes on and
remains lit.
CAUTION
Riding the motorcycle with the
display indicating a problem
with the fuel injection system
and with the indicator light lit
can damage the engine.
Whenever the red indicator
light is lit and the display indicates “FI”, have your authorized Suzuki dealer or a
qualified mechanic inspect the
fuel injection system as soon
as possible.
B. The display 7 indicates “FI”
continuously and the red indicator light 6 blinks while
cranking the engine.
The engine may continue to run in
mode A, but the engine will not
run in mode B.
NOTE:
• If the display indicates “FI”
intermittently and the red indicator light comes on and
remains lit, keep the engine
running and bring your motorcycle to an authorized Suzuki
dealer. If the engine stalls, try
restarting the engine after
turning the ignition switch off
and on.
• If the display indicates “FI”
continuously and the red indicator light blinks, the engine
will not start.
3-9
FI
EF
GEAR
AB
When the display indicates
“CHEC”, check following items;
• Make sure that the engine stop
switch is in the “” position.
• Make sure that the transmission is in neutral or the side
stand is fully up.
If the display still indicates
“CHEC” after checking the above
items, inspect the ignition fuse
and the connection of the lead
wire couplers.
COMBINATION SYSTEM
DISPLAY 7
The display has five functions,
clock, odometer, two trip meters
and gear position. When the ignition switch is turned to the “ON”
position, the display indicates the
test pattern shown below for two
seconds.
GEAR
A B
3-10
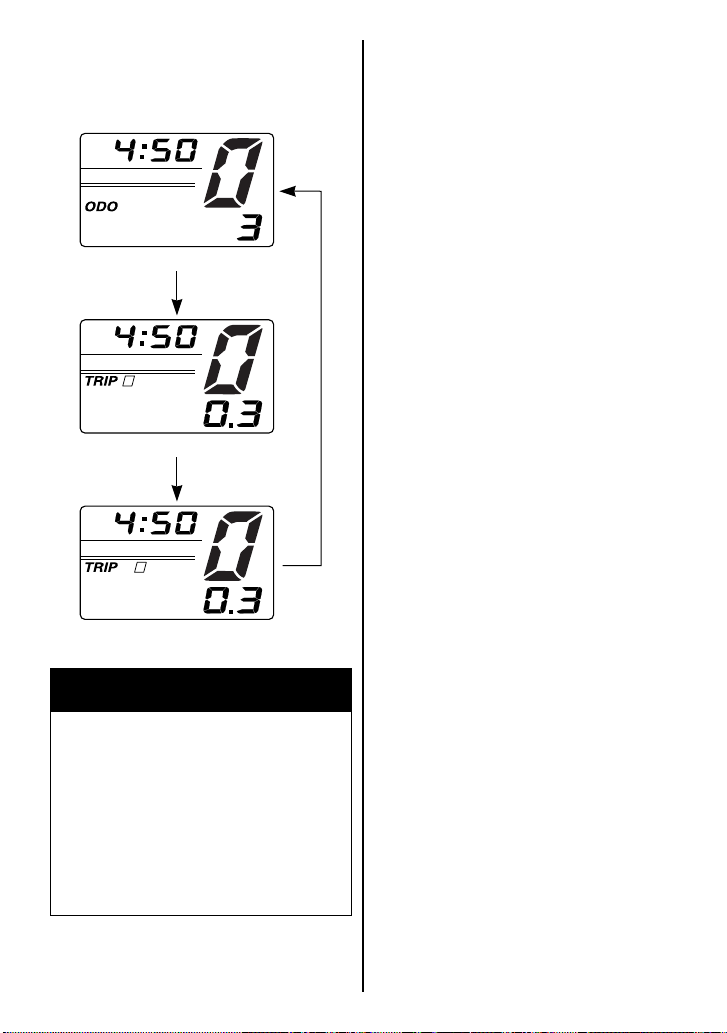
To change the display, push the
button 8. The display changes in
the order below.
Clock
The clock has a 12-hour display.
Follow the procedure below to
adjust the clock.
GEAR
Odometer
GEAR
A
Trip meter A
GEAR
B
Trip meter B
WARNING
Operating the display while
riding can be hazardous.
Removing a hand from the handlebars can reduce your ability
to control the motorcycle.
1. Push the buttons, 8 and 9,
simultaneously for 2 seconds
until the hour display blinks.
2. Adjust the hour display by
pushing the button 9.
NOTE: When the button 9 is held
in the display advances continuously.
3. Push the button 8 to highlight
the minute display.
4. Adjust the minute display by
pushing the button 9.
5. Push the button 8 to return to
the clock mode.
Odometer
The odometer registers the total
distance that the motorcycle has
been ridden. The odometer
ranges from 0 to 999999 miles.
Always keep both hands on the
handlebars during operation.
3-11
FI
EF
GEAR
AB
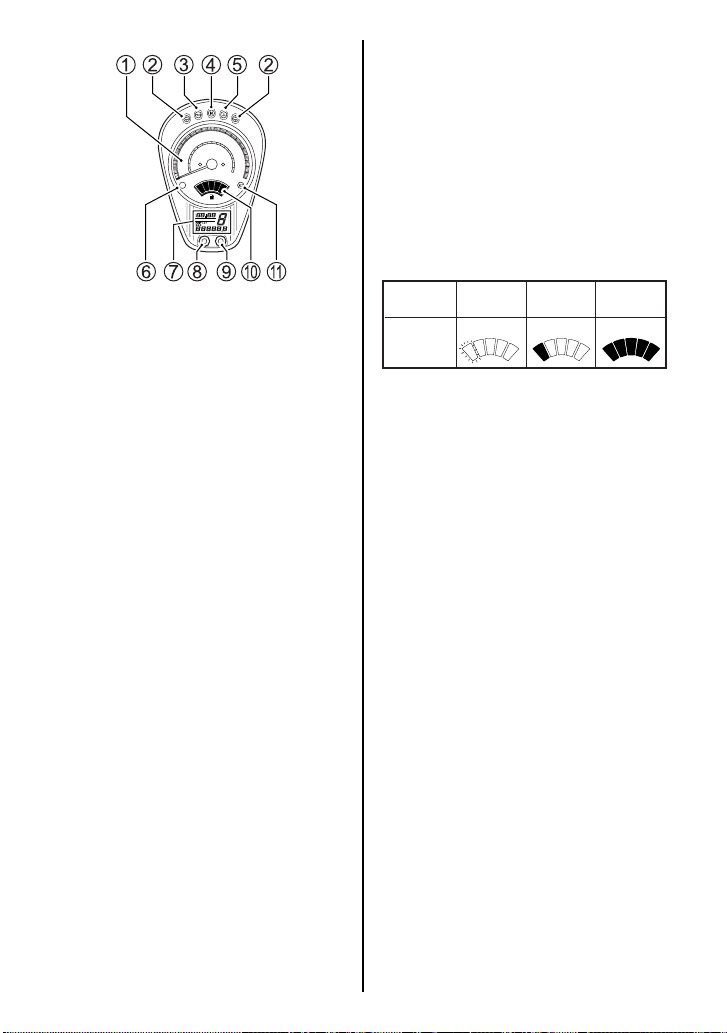
FUEL METER “” 0
The fuel meter indicates the
amount of fuel remaining in the
fuel tank. The fuel meter displays
all 5 segments when the fuel tank
is full. The segment comes on
when the fuel level drops below
3.5 L (3.7 US qt). The segment
flicker when the fuel drops below
1.5 L (1.6 US qt).
Trip Meters
The two trip meters are resettable
odometers. They can register two
kinds of distances at the same
time. For instance, trip meter A
can register the trip distance and
trip meter B can register the distance between fuel stops.
To reset a trip meter to zero, push
the button 9 for 2 seconds while
the display indicates the trip meter
A, or B, you want to reset.
NOTE: When the trip meter
exceeds 9999.9, the trip meter will
return to 0.0 and start counting
again.
Gear Position Indicator
The gear position indicator indicates gear position. This indicator displays “0” when the
transmission is in neutral.
NOTE: When the display indicates “CHEC”, the gear position
indicator does not indicate a number but indicates “–”.
Fuel tank
Fuel gauge
Approximately
Flicker
1.5 L
Approximately
3.5 L
Full
HIGH BEAM INDICATOR LIGHT
“” A
This blue indicator light will come
on when the headlight high beam
is turned on.
3-12

LEFT HANDLEBAR
Dimmer Switch 3
“” position
The headlight low beam and taillight turn on.
“” position
The headlight high beam and taillight turn on. The high beam indicator light also turns on.
Clutch Lever 1
The clutch lever is used for disengaging the drive to the rear wheel
when starting the engine or shifting transmission gears. Squeezing the lever disengages the
clutch.
Headlight Flasher Switch 2
Press the switch to flash the
headlight.
CAUTION
Holding the dimmer switch
between “
will light both “
” and “” position
” and “”
headlight beam. This operation
can damage the motorcycle.
Use the dimmer switch only at
“
” or “” position.
CAUTION
Sticking some tape or placing
objects in front of the headlight
can damage the headlight.
Do not stick any tapes to the
headlight. Do not place objects
in front of the headlight.
3-13

Turn Signal Switch “” 4
Moving the switch to the “”
position will flash the left turn signals. Moving the switch to the “”
position will flash the right turn
signals. The indicator light will
also flash intermittently. To cancel
turn signal operation, push the
switch in.
WARNING
Failure to use the turn signals,
and failure to turn off the turn
signals can be hazardous.
Other drivers may misjudge
your course and this may
result in an accident.
Horn Button “” 5
Press the button to sound the
horn.
Hazard Warning Switch “” 6
All four turn signal lights and indicators will flash simultaneously
when the switch is turned on with
the ignition switch in the “ON” or
“P” position. Use the hazard
warning lights to warn other traffic
during emergency parking or
when your vehicle could otherwise become a traffic hazard.
Always use the turn signals
when you intend to change
lanes or make a turn. Be sure
to turn off the turn signals after
completing the turn or lane
change.
3-14
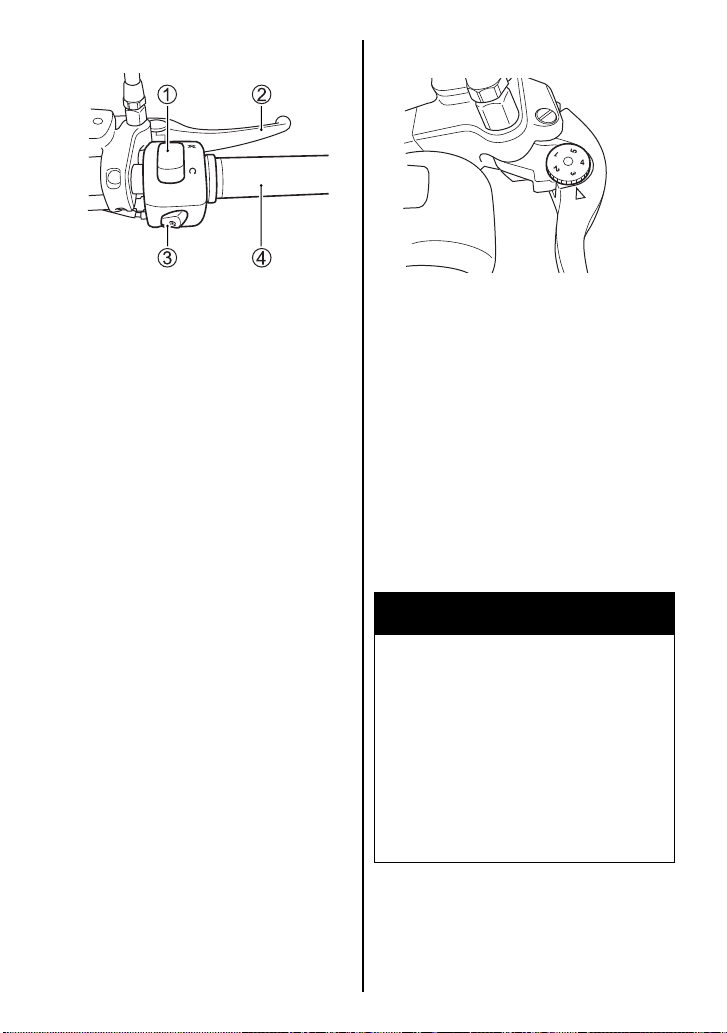
RIGHT HANDLEBAR
Front Brake Lever Adjustment
Engine Stop Switch 1
“” position
The ignition circuit is off. The
engine cannot start or run.
“” position
The ignition circuit is on and the
engine can run.
Front Brake Lever 2
Apply the front brake by squeezing the front brake lever toward
the grip. The brake light will come
on when the lever is squeezed.
The distance between the throttle
grip and the front brake lever is
adjustable to 5 positions. To
change the position, push the
brake lever forward and turn the
adjuster to the desired position.
Be sure the adjuster stops in the
proper position; a projection of the
brake lever holder should fit into
the depression of the adjuster.
This motorcycle is delivered from
the factory with its adjuster set on
position 3.
WARNING
Adjusting the front brake lever
position while riding can be
hazardous. Removing a hand
from the handlebars can
reduce your ability to control
the motorcycle.
Always keep both hands on the
handlebars while riding.
3-15
Loading...