

Page 1
Notice Originale
Original Instructions
Originalbetriebsanleitung
A LIRE ATTENTIVEMENT AVANT D’UTILISER LE BOÎTIER
PLEASE READ CAREFULLY BEFORE USING THE CONTROL BOX
VOR GEBRAUCH DES ELEKTRONIKGERÄTS SORGFÄLTIG LESEN
Réf: 400 325-01 - FR-GB-DE / SEM
Les Portes de Bretagne
P.A. de la Gaultière – 35220 CHATEAUBOURG France
Tél :(33)02-99-00-84-84 · Fax : (33)02-99-62-39-38
Site Internet : www.sulky-burel.com
E-Mail : info@sulky-burel.com
Adresse postale
SULKY-BUREL – CS 20005 – 35538 NOYAL SUR VILAINE CEDEX France
Page 2
Consignes de sécurité
Safety instructions
Sicherheitsvorschriften
• Respecter les instructions de cette notice et les instructions du manuel d’utilisation du Semoir ou du Distributeur
correspondant.
• Ne jamais quitter le poste de conduite lorsque le tracteur est en marche.
• Réaliser les réglages du (Semoir ou du Distributeur) et du boîtier U
• Assurez-vous qu’il n’y ait personne autour de la machine avant d’effectuer l’étalonnage de l' U
• Avant d’entreprendre des travaux sur l’installation électrique, interrompre le circuit de liaison batterie, il en est de
même pour les travaux de soudure sur le tracteur et la machine.
• L' U
LTRON est uniquement conçu afin d’être utilisé avec les semoirs à grains ou Distributeur. Toute autre utilisation
sera considérée comme non conforme à l’usage. La responsabilité du constructeur ne sauraît être engagée, si des
modifications ont été effectuées sur le boîtier sans accord express.
LTRON tracteur à l’arrêt.
LTRON.
R
F
Risque d’accident Risque d’endommager
• Ces symboles sont utilisés dans cette notice chaque fois que des recommandations concernent votre
sécurité, celle d’autrui ou le bon fonctionnement de la machine.
• Transmettez impérativement ces recommandations à tout utilisateur de la machine.
• Follow the instructions given in this guide and in the appropriate Seed Drill or Spreader user manual.
• Do not leave the driver’s seat when the tractor is running.
• Adjust the settings for the Seed Drill or Spreader and the U
• Make sure that nobody is near the machine when calibrating the ULTRON unit.
• Cut the power to the battery circuit before carrying out any work on the electrical system or before performing
welding work on the tractor and the machine.
• The U
LTRON unit has been designed solely for use on seed drills or fertilizer spreaders, and using it for any other
purpose shall be deemed improper use. The manufacturer declines all responsibility for alterations made to the unit
without his express approval.
Risk of accident Risk of damage
• These symbols are used in this guide whenever recommendations are made regarding your own or other
people’s safety or in order for the machine to operate smoothly.
• These recommendations must be passed on to other people using the machine.
la machine
to the machine
Faciliter le travail
LTRON unit when the tractor is switched off.
Operating tip
Ne pas jeter le
boîtier
Do not throw the
unit away
B
G
DE
• Anweisungen dieses Hinweisblattes und Bedienungsanleitung der Drillmaschine bzw. des Streuers befolgen.
• Fahrersitz niemals bei laufendem Schlepper verlassen.
• Einstellungen (an Drillmaschine oder Streuer) und am U
• Vor Eichung des ULTRON-Geräts sicherstellen, dass sich niemand im Maschinenbereich aufhält.
• Vor der Ausführung von Arbeiten an der elektrischen Anlage elektrische Verbindung zur Batterie unterbrechen. Das
Gleiche gilt für Schweißarbeiten an Schlepper oder Maschine.
• Das U
• Diese Symbole finden Sie in diesem Hinweisblatt, wenn Empfehlungen zu Ihrer eigenen Sicherheit bzw.
• Diese Empfehlungen sind unbedingt an alle Benutzer der Maschine weiterzugeben.
LTRON-Gerät ist ausschließlich für die Verwendung mit Drillmaschinen oder Düngerstreuern geeignet. Jede
andere Verwendung gilt als nicht bestimmungsgemäß. Der Hersteller haftet nicht für Änderungen, die ohne
ausdrückliche Zustimmung an dem U
Unfallgefahr Gefahr, die Maschine zu
der Sicherheit Dritter oder des richtigen Funktionierens der Maschine angesprochen werden.
LTRON-Gerät vorgenommen wurden.
beschädigen
LTRON-Gerät bei Schlepperstillstand ausführen.
Arbeitserleichterung
Elektronikgerät nicht im
Müll entsorgen
2
Page 3

Français
SSOOMMMMAAIIRREE
Pages
6-7
8-9
8-9
10-11
12-13
Pages
14-21
22-27
28-39
40-43
44-47
PRESENTATION / MISE EN FONCTIONNEMENT ULTRON SEMOIR
• A Schématisation du système
• B Connection au tracteur
• C Montage
• D Présentation du Boîtier
• E Mise en route rapide
UTILISATION ULTRON SEMOIR
• A Fonction vitesse d'avancement
• B Fonction compteur d'Ha
• C Fonction jalonnage
• D Fonction turbine
• E Fonction alarme
1
1
1
2
Pages
48-49
49
50
INFORMATIONS
• A Schématisation du circuit
• B Entretien
• C Remèdes aux problèmes
Lire attentivement la notice avant l’utilisation. Comprendre son boîtier
électronique, c’est mieux l’utiliser. En français suivre le symbole.
1
3
FR
3
Page 4
English
CONTENTS
Pages
6-7
8-9
8-9
10-11
12-13
Pages
14-21
22-27
28-39
40-43
44-47
PRESENTATION/OPERATING THE ULTRON FOR SEED DRILLS
• A A rundown of the system
• B Connecting to the tractor
• C Fiting
• D The console
• E Quick start
USING THE ULTRON FOR SEED DRILLS
• A The forward speed function
• B The hectaremeter function
• C The marking-out function
• D The turbine function
• E Alarm function
Pages
48-49
49
50
4
THE FUNCTIONS
• A System outline
• B Maintenance
• C Troubleshooting
Read the manual carefully before use. Understanding your electronic unit will
help you make better use of it. For English, look for the symbol
GB
Page 5

Deutsch
VVEERRZZEEIICCHHNNIISS
Seite
6-7
8-9
8-9
10-11
12-13
Seite
14-21
22-27
28-39
40-43
44-47
ULTRON DRILLMASCHINE: EINFÜHRUNG / INBETRIEBNAHME
• A Schematische Übersicht des Systems
• B Elektrischer Anschluss an den Schlepper
• C Montage
• D Elektronikgerät
• E Schnelle Inbetriebnahme
Benutzung Ultron Drillmaschine
• A Funktion Fahrgeschwindigkeit
• B Funktion Hektarzähler
• C Funktion Fahrgassenmarkierung
• D Turbinenfunktion
• E Alarmfunktion
1
1
1
2
Seite
48-49
49
50
INFORMATIONEN
• A Schaltplan
• B Wartung
• C Troubleshooting
Anweisung vor Benutzung sorgfältig durchlesen. Das Elektronikgerät
richtig zu verstehen, heißt, es besser (aus)nutzen zu können. Die
deutsche Fassung ist mit gekennzeichnet.
1
3
DE
5
Page 6
Présentation / Mise en fonctionnement Ultron Semoir
Presentation/Operating the Ultron for seed drills
Ultron Drillmaschine: Einführung / Inbetriebnahme
A
1
1
4
4
7
7
6
6
9
9
3
10
10
3
5
5
2
2
8
8
6
Page 7
Présentation / Mise en fonctionnement Ultron Semoir
Presentation/Operating the Ultron for seed drills
Ultron Drillmaschine: Einführung / Inbetriebnahme
R
F
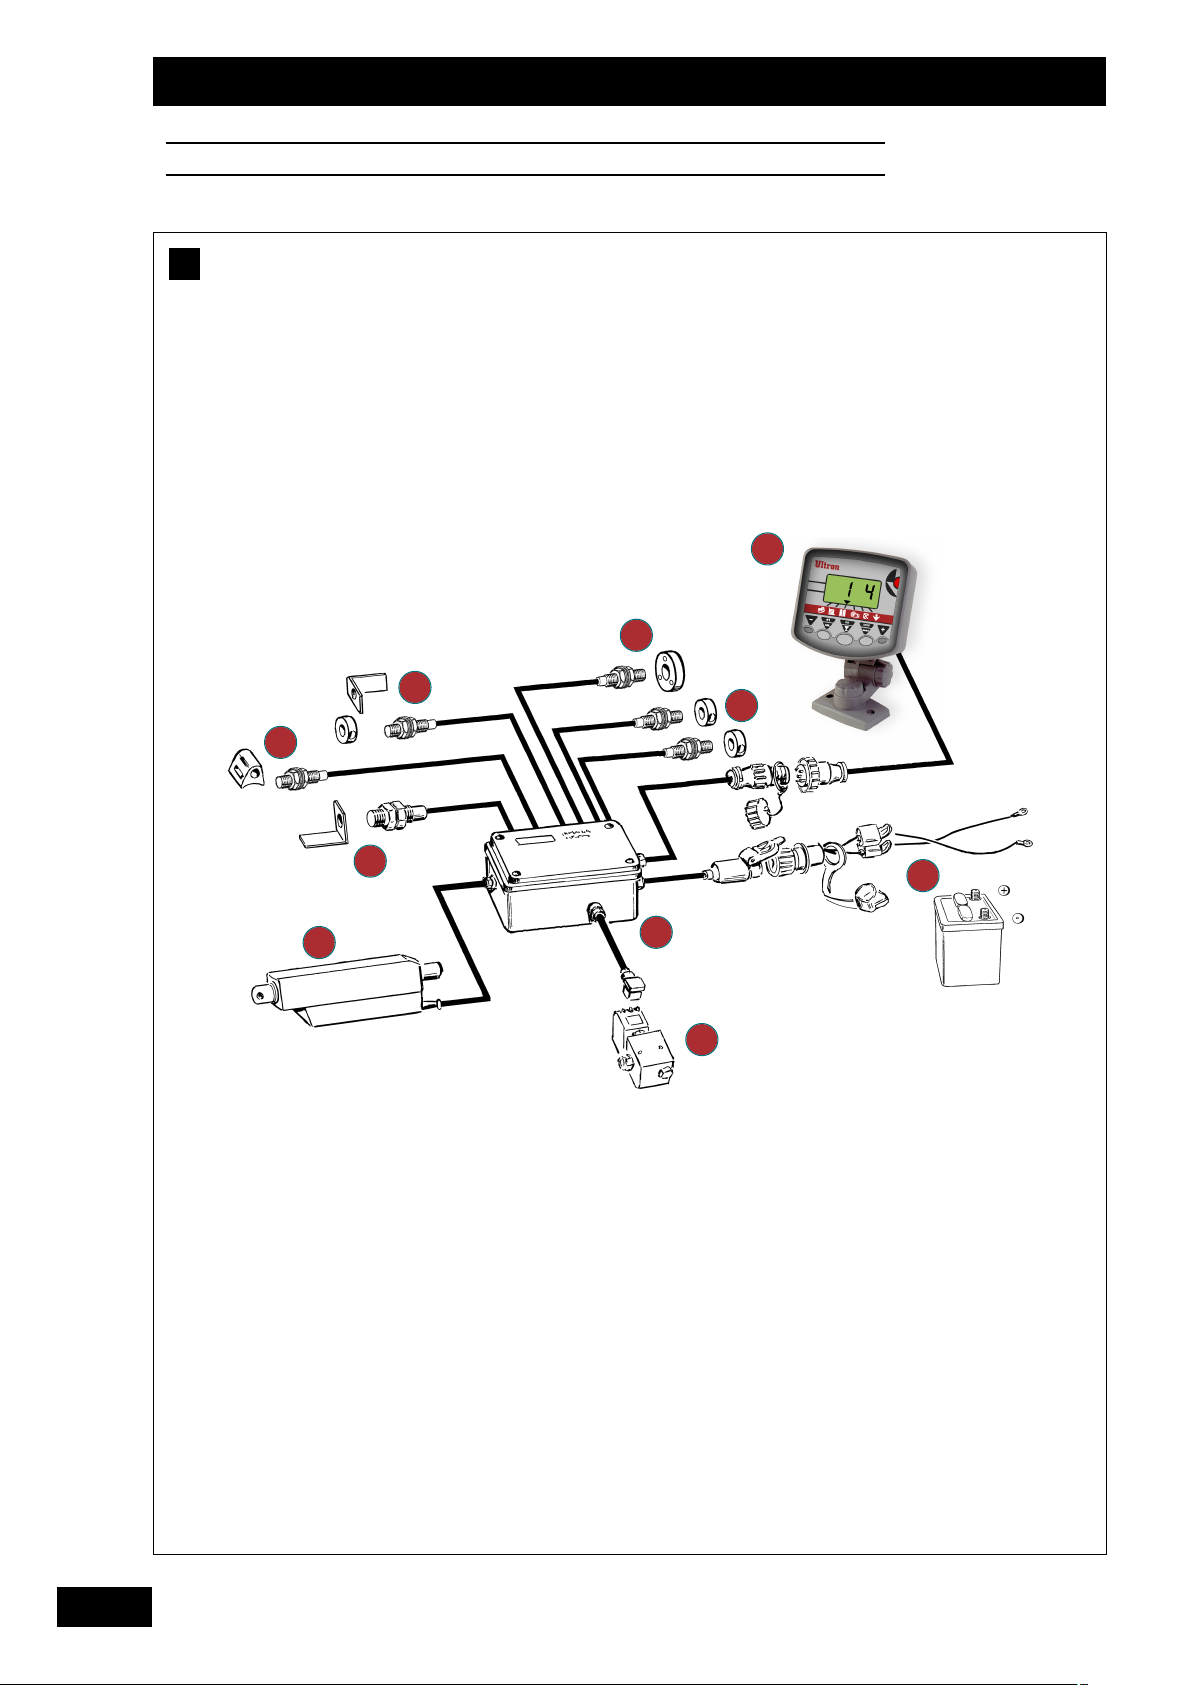
Schématisation du système
A
Le boîtier ULTRON est un instrument de réglage et de
contrôle.
Les informations de poids et de surface données par
'ULTRON ne peuvent pas être utilisées pour des
l
transactions commerciales.
A rundown of the system
A
The ULTRON unit is used for performing adjustments
and checks.
Weight and surface area information provided by the
ULTRON unit may not be used for business purposes.
Présentation
1
1
Boîtier ULTRON
2
2
Faisceau d’alimentation avec fusible 5 A (option)
3
3
Boîte de connection sur semoir
4
4
Capteur turbine.
5
5
Capteur de jalonnage (1 ou 2)
6
6
Capteur de vitesse / Surface
7
7
apteur de l’arbre de distribution
C
8
8
Electrovanne jalonnage de prélevée
9
9
Capteur de fin de trémie
10
10
alonnage de post levée
J
Presentation
1
1
ULTRON unit
2
2
Power bundle with 5 amp fuse (optional)
3
3
Seed-drill connector unit
4
4
Turbine sensor
5
5
Marking sensor (1 or 2)
6
6
Speed/area sensor
7
7
Metering device shaft sensor
8
8
Pre-emergence marking solenoid valve
9
9
Hopper-end sensor
10
10
Jalonnage de post levée
1
1
B
G
Schematische Übersicht des Systems
A
Das ULTRON-Gerät ist ein Steuer- und
Kontrollinstrument.
Die von angegebenen Daten zu Gewicht und Fläche
dürfen nicht zu Geschäftszwecken verwendet werden.
Präsentation
1
1
Elektronikgerät ULTRON
2
2
Versorgungskabel mit 5 A-Sicherung
(Sonderausrüstung)
3
3
Anschlussgerät an Drillmaschine
4
4
Turbinensensor
5
5
Markierungssensor (1 oder 2)
6
6
Sensor Geschwindigkeit/ Fläche
7
7
Sensor Verteilerwelle
8
8
Elektroventil für Vorauflaufmarkierung
9
9
Sensor Trichterfüllstand
10
10
Nachauflaufmarkierung
DE
7
Page 8
Présentation / Mise en fonctionnement Ultron Semoir
Presentation/Operating the Ultron for seed drills
Ultron Drillmaschine: Einführung / Inbetriebnahme
B
+
+
a)
-
-
12 V
C
110 mm
70 mm
45 mm
b)
c)
50 mm
1
1
100 mm
135 mm
Ø4 mm
2
2
3
3
8
Page 9
Présentation / Mise en fonctionnement Ultron Semoir
Presentation/Operating the Ultron for seed drills
Ultron Drillmaschine: Einführung / Inbetriebnahme
R
F
Connection au tracteur
B
a)
Branchement de l'ULTRON
•
Il est impératif de brancher l’alimentation
électrique du boîtier directement à la batterie 12
volts du tracteur.
Le boîtier ULTRON possède un accumulateur
permettant de garder en mémoire les données
programmées.
Le boîtier ULTRON est à protéger par des fusibles
5 A sur son alimentation.
Faisceau d’alimentation dispo en option.
R
EMARQUE
:
Si votre tracteur est pré-équipé avec une prise
identique (cobo), vérifier que le fusible est bien, un
5 ampères.
Connecting to the tractor
B
a)
Connecting the ULTRON
•
The unit’s electrical power supply must be
connected directly to the tractor’s 12-volt battery.
Montage
C
b)
Encombrement
Le boîtier électronique doit être monté de manière à
ce qu’il soit bien visible pour le conducteur.
c)
Fixation
Il est possible de fixer le boîtier dans diverses
1
positions grâce aux 3 molettes.
Fitting
C
b)
Volume
33221
The electronic unit must be fitted in clear view of the
driver.
1
1
B
G
The ULTRON unit includes an accumulator for
storing the programmed data.
The ULTRON unit is protected by 5-Amp fuses.
Optional power bundle available.
N
OTE:
If your tractor has been pre-fitted with an identical
socket (cobo), make sure that it includes a 5-Amp
fuse.
Elektrischer Anschluss an den Schlepper
B
a)
Anschluss des Geräts
•
Das elektrische Anschlusskabel des Geräts ist
unbedingt direkt an die 12-V-Batterie des
Schleppers anzuschließen.
Das Gerät besitzt einen Akkumulator, der die
programmierten Daten speichert.
Die Stromversorgung des ULTRON Elektronikgerät
durch 5 A-Sicherungen schützen.
Versorgungskabelbündel als Option lieferbar.
c)
Attaching
The unit can be attached in a number of positions
1
using the 3 adjusting screws.
Montage
C
b)
Gerätabmessungen
33221
Das Elektronikgerät muss im Sichtbereich des Fahrers
montiert werden.
c)
Befestigung
Aufgrund der drei Rädchen an dem Elektronikgerät ist
die Befestigung in verschiedenen Stellungen möglich.
1
33221
DE
A
NMERKUNG:
Wenn Ihr Schlepper bereits mit dem gleichen
Stecker (cobo) ausgestattet ist, prüfen, dass dieser
auch durch eine 5 A Sicherung geschützt ist.
9
Page 10

Présentation / Mise en fonctionnement Ultron Semoir
Presentation/Operating the Ultron for seed drills
Ultron Drillmaschine: Einführung / Inbetriebnahme
D
On/Off
A
B
C
D
E
F
1
1
2
2
3
3
4
4
5
5
10
Page 11

Présentation / Mise en fonctionnement Ultron Semoir
Presentation/Operating the Ultron for seed drills
Ultron Drillmaschine: Einführung / Inbetriebnahme
ARAMÉTRAGE
Présentation du boîtier
D
. Interrupteur On / Off
. Boîtier standard
. Ecran multifonction
FONCTIONS
A Vitesse d'avancement Km/h
B Surface
C Jalonnage
D Fin de trémie pour semoir
E Rotation de la distribution
F Contrôle turbine
P
1
1
Diminution des valeurs
2
2
Avancement des passages jalonnage
3
3
Déplacement curseur et validation
4
4
Arrêt jalonnage et remise à zéro ha
5
5
Augmentation des valeurs
R
F
1
1
The console
D
. On/Off switch
. Standard unit
. Multifunction screen
F
UNCTIONS
A Forward speed (in km/h)
B Area
C Marking
D Hopper end – seed drill
E Distributor rotation
F Turbine check
Elektronikgerät
D
. Schalter Ein / Aus
. Standardausstattung
. Multifunktionsbildschirm
F
UNKTIONEN
S
ETTINGS
1
1
Reduce setting value
2
2
Progress of tramlining passes
3
3
Cursor movement and validation
4
4
Stop tramlining and reset hectare counter to zero
5
5
Increase setting value
P
ARAMETRIERUNG
1
1
Wertangaben vermindern
2
2
Vorstellen der markierten Fahrgassen (Zähler)
3
3
Kursorbewegung und Bestätigung
4
4
Fahrgassenmarkierung beenden und Nullstellen
Ha-Zähler
5
5
Wertangaben erhöhen
B
G
DE
A Fahrgeschwindigkeit km/h
B Fläche
C Fahrgassenmarkierung
D Trichterfüllstand-Alarm Drillmaschine
E Rotation der Säwelle
F Kontrolle Turbine
11
Page 12
Présentation / Mise en fonctionnement Ultron Semoir
Presentation/Operating the Ultron for seed drills
Ultron Drillmaschine: Einführung / Inbetriebnahme
E
On/Off
A
2 6
C
B
o .1
B
2
2
3
3
4
4
12
Page 13
Présentation / Mise en fonctionnement Ultron Semoir
Presentation/Operating the Ultron for seed drills
Ultron Drillmaschine: Einführung / Inbetriebnahme
Mise en route rapide
E
B
-
Consulter les différentes fonctions avec la
touche .
A
3
3
alonnage
J
Compteur d’ha
-
Sélectionner le compteur d'ha
total.1
"
" et "
total.2
" avec la touche .
R
F
2
2
-
Vérifier le N° de passage et le mode de
jalonnage
" SY-AS "
-
Mettre la bonne valeur en début de parcelle
avec la touche .
2
2
Arrêt du comptage possible avec la touche .
Quick start
E
3
-
Press button to bring up the various
3
functions.
A
Marking
-
Check the pass number and " SY-AS "
tramlining mode
2
-
Use button to enter the correct value at the
2
beginning of the plot.
You can stop the count by pressing button .
Remise à zéro du compteur avec la touche
4
4
(après 5 secondes).
1
1
4
4
B
G
B
Hectare counter
2
-
Press button to select the hectaremeter
total.1
"
After 5 seconds press button to reset the
counter to zero.
4
4
2
" and "
total.2
" .
4
4
Schnelle Inbetriebnahme
E
-
Die verschiedenen Funktionen mit Taste
durchgehen
A
Fahrgassenmarkierung
-
Durchgangsnummer und Markierungsmodus
„SY-AS “ prüfen.
-
Richtigen Wert am Parzellenanfang mit Taste
eingeben.
Zählung beenden mit Taste möglich.
DE
3
3
B
Hektarzähler
-
Hektarzähler „
2
2
wählen.
Nullstellen des Zählers mit Taste (nach 5
total.1
" und „
total.2
4
4
" mit Taste
Sekunden).
2
2
4
4
13
Page 14
Utilisation Ultron Semoir
Using the Ultron for Seed Drills
Benutzung Ultron Drillmaschine
A
0
A
3
3
SS
EEMMOOIIRR
Tramline SE/SX/CE/CX 3.333
Xeos MD/HD 3m 7.843
Xeos MD/HD 3.5m 6.722
Xeos MD/HD 4m 5.882
//
DRILL / DRILLMASCHINE
CCOOEEFFFFIICCIIEENNTT
14
Easydrill 4m W 5.815
Easydrill 6m W 5.815
Page 15
Utilisation Ultron Semoir
Using the Ultron for Seed Drills
Benutzung Ultron Drillmaschine
Fonction vitesse d’avancement
A
a)
Utilisation :
R
F
3
-
Appuyer sur pour amener le curseur sur
3
Km/h.
Au travail la vitesse d’avancement s’affiche.
e boîtier ne fonctionne que pour une
L
vitesse d’avancement supérieure à 2 Km/h.
e boîtier est programmé avec un
L
coefficient de 3.333 pour les semoirs
mécaniques, ce qui permet une lecture
directe de la vitesse.
Pour les semoirs pneumatiques, le
coefficient varie en fonction de la largeur de
travail, voir tableau page de gauche.
Si vous observez que la vitesse indiquée
n’est pas correcte, vous pouvez :
The forward speed function
A
a)
Operation :
3
-
3
Press to move the cursor on to Km/h.
When working, the speed of advance is
displayed.
The unit only works for a speed of advance
greater than 2 Km/h.
The unit is programmed with a coefficient
of 3.333 for mechanical seed drills, which
enables the speed to be read directly.
For pneumatic seed drills, the coefficient
varies depending on the working width; see
table on left-hand page.
-
Vérifier que le coefficient est toujours en
émoire
m
-
Etalonner à nouveau le boîtier sur une distance
de 100m
R
EMARQUE :
On peut observer une différence de quelques
pourcentages de la valeur Km/h du boîtier par
rapport à celle donnée par le tracteur.
L’étalonnage du boîtier sur 100 m est la solution la
plus précise pour obtenir une vitesse d’avancement
la plus proche de la réalité.
-
Check that the coefficient is still stored in
memory
-
Recalibrate the unit over a distance of 100 m
OTE :
N
A difference of a few per cent may be observed
between the k.p.h. indication on the unit and on the
tractor.
Calibrating the unit over 100 m is the most accurate
method of obtaining a reading as close as possible
to the actual forward speed.
B
G
1
2
If you notice that the speed indicated is not
correct :
Funktion Fahrgeschwindigkeit
A
a)
Benutzung :
3
3
-
Auf drücken, um Cursor auf Km/h zu stellen.
Bei der Arbeit wird die Fahrgeschwindigkeit
angezeigt.
Das Gerät funktioniert nur bei einer
Fahrgeschwindigkeit von mehr als
2 Km/Stunde.
Das Gerät ist für mechanische Drillmaschinen
mit einem Koeffizienten von 3.333
programmiert und ermöglicht somit ein
direktes Ablesen der Geschwindigkeit.
Bei pneumatischen Drillmaschinen richtet sich
der Koeffizient nach der jeweiligen
Arbeitsbreite, siehe Tabelle auf der linken Seite.
Sollte die angezeigte Geschwindigkeit nicht
korrekt sein, können Sie :
-
Kontrollieren, ob der Koeffizient weiterhin
gespeichert ist
-
Das Gerät erneut auf eine Strecke von 100 m
eichen
ANMERKUNG :
Der vom Gehäuse angezeigte Wert km/h kann
manchmal von dem des Schleppers um einige
Prozente abweichen.
Mit der Eichung des Gehäuses auf 100 m kann in
diesem Fall eine der Realität entsprechende
Fahrgeschwindigkeit erzielt werden.
DE
15
Page 16

Utilisation Ultron Semoir
Using the Ultron for Seed Drills
Benutzung Ultron Drillmaschine
A
8
A
0.000
A
2
2
3
3
3.333
A
16
Page 17

Utilisation Ultron Semoir
Using the Ultron for Seed Drills
Benutzung Ultron Drillmaschine
A
b)
Contrôle du coefficient :
-
Sélectionner la fonction Km/h avec la
t
-
Appuyer sur et maintenir : Le coefficient
apparaît
3
3
ouche .
2
2
S’il est correct relâcher
S’il est faux maintenir appuyé pendant
toute la programmation
3
-
Appuyer sur avec l'autre main pour modifier
3
le chiffre qui clignote.
-
Relâcher lorsque le chiffre voulu apparaît.
-
Effectuer la même opération pour les autres
chiffres et l’emplacement du point.
Le coefficient théorique est de “3.333”
R
F
A
b)
Checking the coefficient :
-
Select the Km/h function, press .
2
-
2
Press and hold down : The coefficient is
displayed
if correct release
if incorrect keep pressed down
A
b)
Koeffizientenkontrolle :
-
Die funktion Km/h wählen .
2
2
-
Auf drücken und festhalten : Der
koeffizient erscheint
wenn korrekt loslassen
wenn falsch während der ganzen
3
3
throughout programming
3
3
program mierung
heruntergedrückt lassen
3
-
With your other hand, press to modify the
3
figure which is flashing
-
Release when the required figure appears.
-
Repeat this operation for the other figures and
for the location of the decimal point.
The coefficient should be “3.333”
3
-
Mit der anderen Hand, Drücken um die
3
blinkende Zahl zu ändern.
-
Loslassen wenn die gewünschte Zahl erscheint.
-
Gleicher Vorgang für die anderen Zahlen und die
Punktstellung.
Der Koeffizient muß “3.333” sein.
B
G
1
2
DE
17
Page 18

Utilisation Ultron Semoir
Using the Ultron for Seed Drills
Benutzung Ultron Drillmaschine
A
0
A
3.333
A
2
2
4
4
AUTo
A
18
Page 19

Utilisation Ultron Semoir
Using the Ultron for Seed Drills
Benutzung Ultron Drillmaschine
A
c)
Etalonnage sur 100 m :
-
Placer le semoir au premier jalon
. Sélectionner la fonction Km/h
1
100m
2
2 .
Appuyer sur et maintenir :
Le coefficient apparaît
3 .
Appuyer sur la touche avec l'autre main pour
2
4
4
mettre en place la programmation automatique
Le coefficient "AUTo" apparaît
-
Lâcher
R
F
A
c)
Calibration over 100 metres :
-
Position the seed drill at the first marking point
1 .
Select the Km/h function
A
c)
Eischung auf 100 m :
-
Drillmaschine auf erste Fahrgassenmarkierung
stellen
1 .
Die funktion Km/h wählen
100m
2
2 .
3 .
2
Press and hold down :
The coefficient is displayed
4
4
Press with your other hand to start automatic
programming
The "AUTo" coefficient will be displayed
-
Release
2
2 .
Drücken und festhalten :
3 .
Mit der anderen Hand : Auf drücken um
2
Der koeffizient erscheint
4
4
die automatische Programmierung auszulösen.
B
G
1
2
DE
100m
Der koeffizient "AUTo" erscheint
-
Loslassen
19
Page 20

Utilisation Ultron Semoir
Using the Ultron for Seed Drills
Benutzung Ultron Drillmaschine
A
0.064
A
3.332
4
4
A
20
Page 21

Utilisation Ultron Semoir
Using the Ultron for Seed Drills
Benutzung Ultron Drillmaschine
R
F
A
-
Parcourir la distance de 100 m
Le nombre d’impulsion défile.
100m
A
-
Travel the distance of 100 metres
The number of pulses is displayed.
-
Appuyer sur la touche à la fin des 100 m :
le nouveau coefficient apparaît.
Le boîtier garde ce coefficient en mémoire
t annule le précédent.
e
R
EMARQUE :
la différence entre le coefficient théorique et le
coefficient obtenu à l’essai est en général très
faible.
4
-
4
Press at the end of the 100 metres:
the coefficient is then displayed.
The unit stores this coefficient in memory
and cancels the previous value.
4
4
B
G
1
2
OTE :
N
100m
A
-
100 m fahren
Die Impulszahl läuft ab.
100m
the difference between the theoretical coefficient
and the coefficient obtained through testing is
generally very low.
4
-
Am Ende der 100 m, auf drücken:
der Koeffizient erscheint.
Das Gerät speichert diesen Koeffizienten
und annulliert den vorausgehenden.
Anmerkung:
die Differenz zwischen dem theoretischen und dem
bei der Abdrehprobe erhaltenen Koeffizienten ist
im allgemeinen sehr klein.
4
DE
21
Page 22

Utilisation Ultron Semoir
Using the Ultron for Seed Drills
Benutzung Ultron Drillmaschine
B
35
B
tot.1
B
2
2
3
3
tot.2
B
22
Page 23

Utilisation Ultron Semoir
Using the Ultron for Seed Drills
Benutzung Ultron Drillmaschine
Fonction compteur d'hectare
B
-
Déplacer le curseur par appui sur la touche .
-
Placer le curseur sur la position
B
C
HOIX DU COMPTEUR "TOTAL 1 OU 2":
-
Sélectionner le compteur avec un appui
impulsionnel sur la touche .
Le message "
total.1
apparaît au moment de l'appui sur .
La valeur de surface s'affiche après
relâchement de la touche .
2
2
" ou "
2
2
total.2
R
F
3
3
"
2
2
The hectaremeter function
B
3
-
Press button to move the cursor.
-
Move the cursor over
3
B
ELECTING THE "TOTAL 1 OR 2" METER:
S
2
-
Press button to select a meter.
"
total.1
2
" or "
when you press button .
The area reading will appear when you
release button .
Funktion Hektarzähler
B
-
Kursor durch Drücken auf Taste verschieben.
-
Kursor auf die Position platzieren
total.2
2
2
" will appear
2
2
3
3
B
G
1
2
DE
B
AHL DES ZÄHLERS „TOTAL 1 ODER 2“:
W
-
Zähler durch einen Impuls (einmaliges Drücken)
der Taste wählen.
2
2
Die Meldung „
total.1
" oder „
total.2
(Gesamtwert) erscheint beim Drücken auf
2
2
Taste .
Der Flächenwert erscheint nach Loslassen
der Taste .
2
2
"
23
Page 24

Utilisation Ultron Semoir
Using the Ultron for Seed Drills
Benutzung Ultron Drillmaschine
B
10.00
B
4.000
B
2
2
3
3
4.000
B
24
Page 25

Utilisation Ultron Semoir
Using the Ultron for Seed Drills
Benutzung Ultron Drillmaschine
B
CONTRÔLE DE LA LARGEUR DE TRAVAIL:
2
-
Appuyer sur et maintenir :
La largeur apparaît
Si elle est correcte relâcher.
Si elle est fausse maintenir appuyé.
-
Appuyer sur avec l'autre main pour modifier
le chiffre qui clignote.
-
Relâcher lorsque le chiffre voulu apparaît.
2
3
3
Semoir 3m “3.000”
Semoir 3,5m “3.500”
Semoir 4m “4.000”
Semoir 4,5m “4.500”
Semoir 4,8m “4.800”
Semoir 5m “5.000”
Semoir 6m “6.000”
R
F
B
CHECKING THE WORKING WIDTH:
2
-
2
Press and hold down:
The width appears
if it is correct release
if it is incorrect keep held down
3
-
3
Press with your other hand to modify the
figure which is flashing.
-
Release when the required figure appears
B
KONTROLLE DER PROGRAMMIERTEN ARBEITSBREITE:
2
2
-
Auf drücken und heruntergedrückt
halten: Die breite erscheint
wenn korrekt loslassen
wenn falsch heruntergedrückt
halten
-
Mit der anderen Hand, drücken um die
blinkende Zahl zu ändern.
B
G
1
3m seed drill “3.000”
3.5m seed drill “3.500”
4m seed drill “4.000”
4.5m seed drill “4.500”
4.8m seed drill “4.800”
5m seed drill “5.000”
6m seed drill “6.000”
DE
Drillmaschine 3m “3.000”
Drillmaschine 3,5m “3.500”
Drillmaschine 4m “4.000”
Drillmaschine 4,5m “4.500”
Drillmaschine 4,8m “4.800”
Drillmaschine 5m “5.000”
3
3
Drillmaschine 6m “6.000”
2
-
Loslassen wenn die gewünschte Zahl erscheint.
25
Page 26

Utilisation Ultron Semoir
Using the Ultron for Seed Drills
Benutzung Ultron Drillmaschine
B
20.00
B
tot.1
B
2
2
4
4
0.000
B
26
Page 27

Utilisation Ultron Semoir
Using the Ultron for Seed Drills
Benutzung Ultron Drillmaschine
B
REMISE À ZÉRO DU COMPTEUR:
-
Appuyer et sélectionner le total à remettre à
total.1
" ou "
zéro "
-
Relâcher lorsque le total obtenu s'affiche
-
Appuyer sur et jusqu'à la remise à zéro du
ompteur.
c
L’effacement de la surface est précédé de 5
bips sonores.
"
total.1
" ou "
d’avoir 2 niveaux de compteur ha (1 journalier
et 1 saisonnier par exemple)
total.2
4
4
total.2
" vous permettent
R
F
"
B
RESETTING THE METER TO ZERO:
-
Press and select which of the totals is to be
reset to zero "
-
Release when the total is displayed.
-
Press button until the meter is reset to zero.
The meter will beep 5 times when the area
reading is about to be deleted.
total.1
"
" or "
hectaremeter levels (e.g. 1 daily and 1
seasonal)
B
NULLSTELLEN DES ZÄHLER S:
-
Drücken und den Gesamtwert „
„
total.2
“ wählen, der auf null zurückgestellt
werden soll.
total.1
4
4
" or "
total.2
total.2
"
" give you two
total.1
“ oder
B
G
1
2
DE
-
Loslassen, wenn der erhaltene Gesamtwert
erscheint.
4
-
Auf Taste drücken bis der Zähler auf null steht.
4
Dem Löschen des Flächenwertes gehen 5
Tonsignale voraus.
Zwei getrennte Hektarzählungen („„
„
total.2
“) sind möglich, z. B. ein Tageswert und ein
Saisonwert.
total.1
“ oder
27
Page 28

Utilisation Ultron Semoir
Using the Ultron for Seed Drills
Benutzung Ultron Drillmaschine
C
2 6
C
a)
stop
C
3
3
4
4
b)
2 6
C
28
Page 29

Utilisation Ultron Semoir
Using the Ultron for Seed Drills
Benutzung Ultron Drillmaschine
Fonction Jalonnage
C
-
Déplacer le curseur avec la touche .
-
Placer le curseur sur la position
R
F
Pour non utilisation du jalonnage
4
-
Appuyer sur , une impulsion
3
3
Le message " " apparaît en clignotant
en alternance avec la valeur de jalonnage.
4
C
Chiffre de gauche : comptage
Chiffre de droite : chiffre programmé
Le comptage se fait par inversion des traceurs.
Le boîtier informe par un bip sonore le début de débrayage
des distributions.
RÊT DU COMPTAGE EN TRAVAIL
a)
AR
Pour inversion des traceurs en milieu de
parcelle
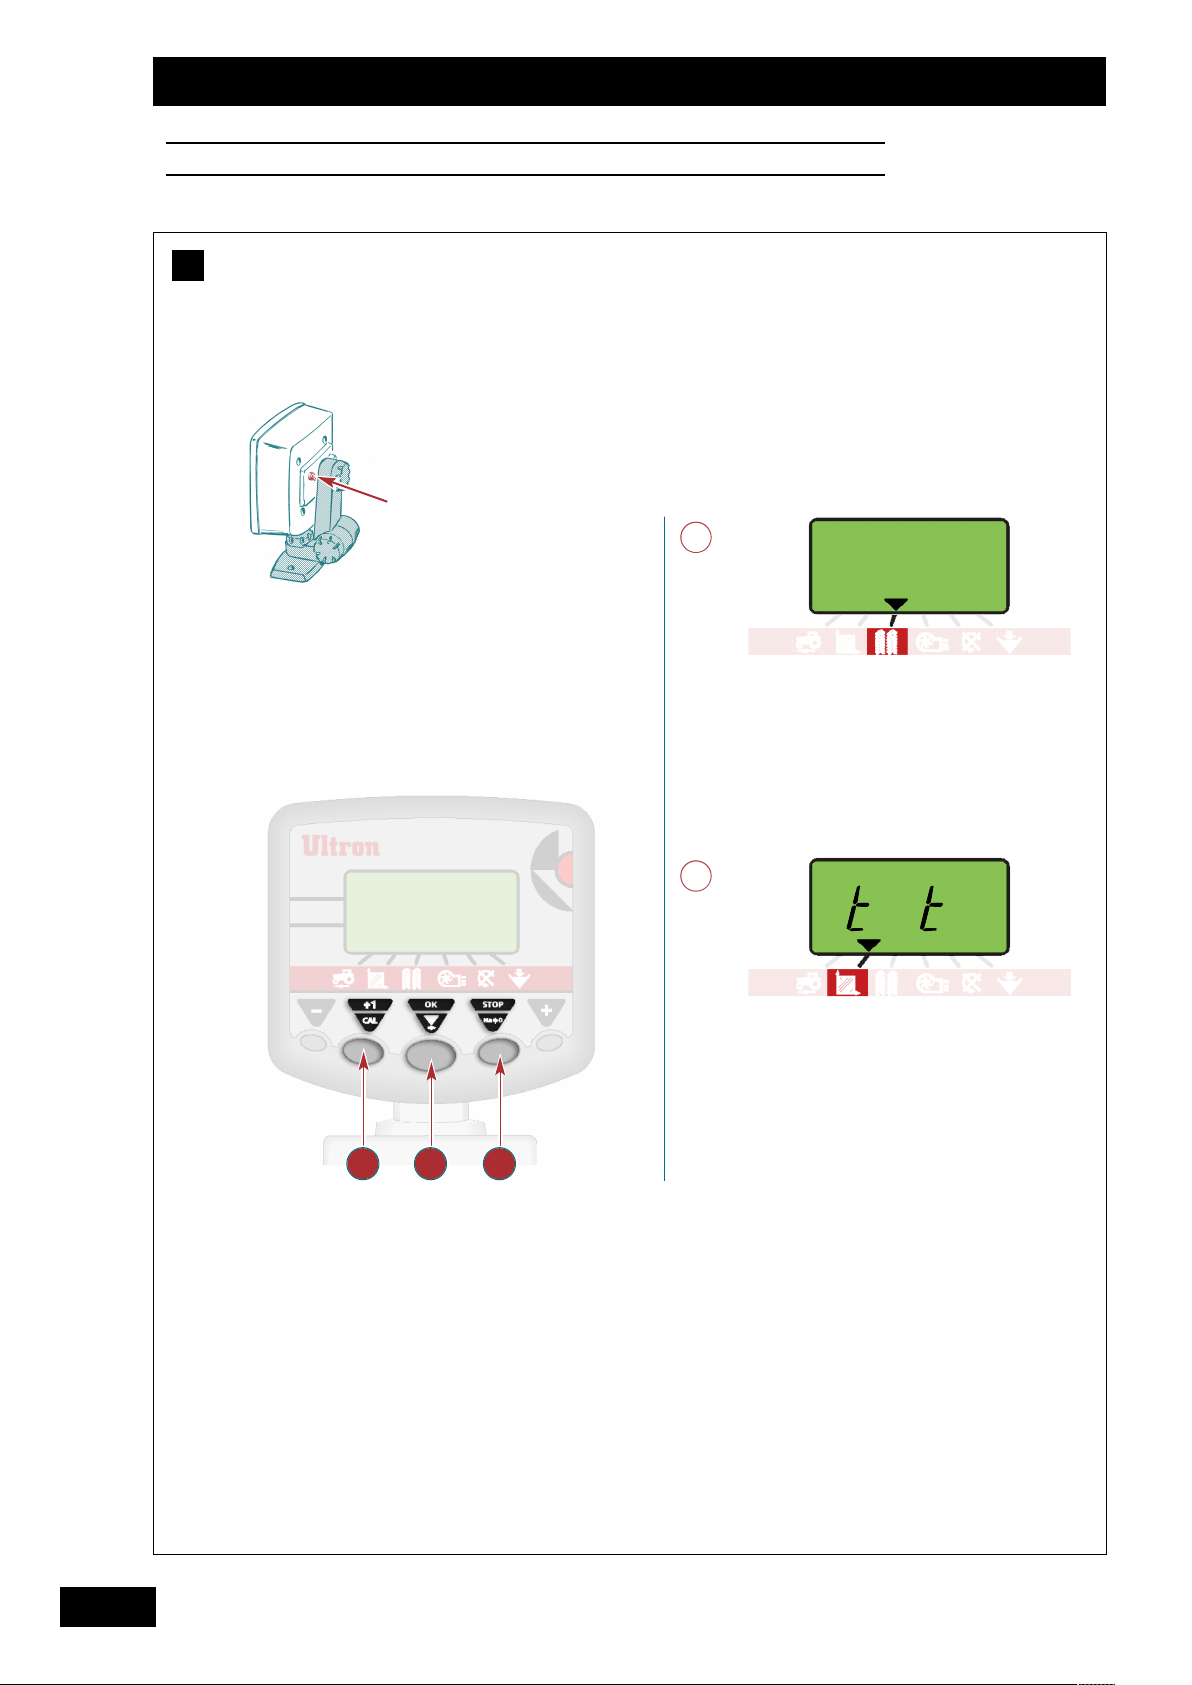
The marking-out function
C
3
-
Press button to move the cursor.
-
Move the cursor to
3
:
C
LH figure: count
RH figure: programmed figure
Counting is done by the markers being reversed.
The unit beeps when the metering devices begin
disengaging.
a)
STOPPING THE COUNT WHILE WORK IS IN PROGRESS
in order to reverse the markers in mid plot
Remarque :
Ne pas être sur le chiffre de programmation
(le Jalonnage fonctionnerait).
b)
REPRISE DU COMPTAGE EN TRAVAIL:
4
-
Appuyer sur , une impulsion
Le message " " disparaît et les 2
valeurs de tramlines s'affichent à nouveau.
because the tramline will not be used
-
Press button , once
the display will switch between a flashing
4
4
4
" " message and the tramline setting.
N
OTE :
Do not let the programme reach the pass number
that is stored in memory.
b)
RESTARTING THE COUNT WHILST WORK IS IN
PROGRESS
:
4
-
Press button , once
The " " message will disappear and the
4
two tramline settings will reappear.
B
G
1
2
Funktion Fahrgassenmarkierung
C
3
-
Kursor mit Hilfe von Taste verschieben.
-
Kursor auf die Position platzieren
3
C
Linke Zahl: Zählung
Rechte Zahl: Programmierte Zahl
Die Zählung erfolgt auf Basis der Umkehrung der
Spurreißer.
Das Gerät informiert durch ein Tonsignal über das
Auskoppeln der Saatgutstreuer.
a)
ZÄHLUNG WÄHREND DER ARBEIT BEENDEN:
Bei Umkehrung der Spurreißer innerhalb der
Parzelle
Bei Nicht-Verwendung der
Fahrgassenmarkierung
4
-
Einmal auf Taste drücken
Die Meldung „"erscheint blinkend im
Wechsel mit dem Markierungswe
4
rt
Anmerkung :
Der Kursor darf nicht auf der Programmzahl stehen
(dann läuft die Fahrgassenmarkierung).
b)
WIEDERAUFNAHME DER ZÄHLUNG WÄHREND DER
ARBEIT:
4
-
Einmal auf Taste drücken
Die Meldung „"verschwindet und die
4
2 Fahrgassenwerte erscheinen erneut.
DE
29
Page 30

Utilisation Ultron Semoir
Using the Ultron for Seed Drills
Benutzung Ultron Drillmaschine
C
c)
2 6
C
5Y.06
C
2
2
3
3
5Y.08
C
30
Page 31

Utilisation Ultron Semoir
Using the Ultron for Seed Drills
Benutzung Ultron Drillmaschine
C
c)
Programmation :
2
-
Appuyer sur et maintenir pendant toute la
programmation
Le chiffre de droite clignote
L’inscription de gauche correspond au mode
de jalonnage :
AAR
R
Jalonnage aller/retour du semoir
(asymétrique droit) Non utilisé
AAL
L
Jalonnage aller/retour du semoir
(asymétrique gauche)
SSY
Y
Jalonnage au centre du semoir
(symétrique)
-
Appuyer sur avec l'autre main pour modifier
le chiffre qui clignote.
2
3
3
Si le mode est AR, faire défiler les chiffres
jusqu’à 15 pour avoir ensuite le mode
uis jusqu’à 15 pour
p
SYe
t vice versa.
AL
R
F
,
C
c)
Programming :
-
Press button and keep pressed in throughout
AAR
R
AAL
L
SSY
Y
-
Press button with your other hand to alter
the flashing figure.
C
c)
Programmierung:
-
Auf drücken und während der gesamten
2
2
the programming operation
The figure on the RH side will flash
The caption that appears on the left indicates
the tramlining mode:
To-and-fro seed drill tramlining
(asymmetrical on the right) . Not used.
To-and-fro seed drill tramlining
(asymmetrical on the left)
Centre seed drill tramlining
(symmetrical)
3
3
2
2
Programmierung gedrückt halten
Die rechte Ziffer blinkt
Die Buchstabenfolge links entspricht dem
Markierungsmodus:
If the unit is in ARmode, scroll through the
figures until you reach number 15 to enter
mode, and then scroll to number 15 again to
SY
enter
Wenn der AR-Modus aktiv ist, die Ziffern bis
15 vorbeiziehen lassen, dann folgt der
Modus bis 15, dann
mode and vice versa.
SY
und umgekehrt.
AL
-
AL
B
G
1
2
DE
AAR
R
Markierung Hin- und Rückfahrten der
(asymmetrisch rechts) nicht aktiv
AAL
L
Markierung Hin- und Rückfahrten der
Drillmaschine (asymmetrisch links) aktiv
SSY
Y
Fahrgassenmarkierung zentral an der
Drillmaschine (symmetrisch)
-
Änderung der blinkenden Zahl durch Drücken
mit der anderen Hand auf .
3
3
31
Page 32

Utilisation Ultron Semoir
Using the Ultron for Seed Drills
Benutzung Ultron Drillmaschine
C
d)
2 6
C
2 6
2
2
3
3
C
32
Page 33

Utilisation Ultron Semoir
Using the Ultron for Seed Drills
Benutzung Ultron Drillmaschine
C
d)
Avance manuelle du comptage :
Pour le commencement de la parcelle:
ppuyer sur pour sélectionner le fonction
-
A
jalonnage.
Pour jalonner directement :
-
Appuyer sur pour mettre le chiffre
précédent le chiffre de programmation.
-
Agir sur l’hydraulique pour lever le traceur.
Le comptage passe directement au chiffre de
programmation et clignote.
-
Baisser l’autre traceur pour agir sur le système
hydraulique et électrique du débrayage du
semoir.
3
3
2
2
EMARQUE :
R
L’avance manuelle n’est possible que s’il y a
un des traceurs baissé.
Ne pas oublier d’agir sur l’hydraulique (retirer
la pression) après que les chiffres clignotent
pour actionner le système de débrayage du
semoir.
R
F
C
d)
Manual counting advance:
To begin the plot
3
-
3
Press to select the marking-out function.
To mark directly:
2
-
2
Press to display the number preceding the
programming number.
-
Raise the marker using the hydraulic control.
The counter changes directly to the
programming number and flashes.
-
Lower the other marker so that it acts on the
seed drill’s hydraulic and electrical clutch system.
C
d)
Manuelles Vorstellen der Fahrtenzählung:
Zum Anfang der Parzelle
-
Wahl der Fahrgassenmarkierung-Funktion durch
3
3
Drücken.
Zur Direktmarkierung
2
2
-
Auf drücken, um die der
Programmierungszahl vorausgehende Zahl
einzustellen.
B
G
Notes :
:
The manual advance function is only possible
1
if one of the markers is lowered.
Do not forget to release the hydraulic
pressure once the digits have started flashing
2
in order to activate the seed drill disengaging
system.
DE
Anmerkung :
:
Ein manuelles Vorstellen ist nur möglich, wenn
einer der Spuranreißer gesenkt ist.
Nicht vergessen, nach dem Blinken der Zahlen
auf das Hydrauliksystem einzuwirken (Druck
:
zurücknehmen), um das Abschaltsystem der
Drillmaschine zu betätigen.
-
Zum Heben des Spuranreißers auf das
Hydrauliksystem einwirken. Die Fahrtenzählung
geht direkt auf die Programmierungszahl über
und blinkt.
-
Anderen Spurreißer absenken, um das
hydraulische und elektrische Auskoppelsystem
der Drillmaschine zu 0beeinflussen.
33
Page 34

Utilisation Ultron Semoir
Using the Ultron for Seed Drills
Benutzung Ultron Drillmaschine
C
e1)
3
3
34512 34512
2
2
3 5
C
1
1
m
4
e2)
3
3
3456 123456123
4 m2 m
1
0 m
12 m
5 5
C
3 6
C
6 6
34
Page 35

Utilisation Ultron Semoir
Using the Ultron for Seed Drills
Benutzung Ultron Drillmaschine
C
e) Exemples de jalonnage
R
F
e1) Marquage au centre du semoir (symétrique)
ex : Rampe 20 m semoir 4 m
20 = 5 Nombre de passage impair
4
1
1
Programmer le boîtier sur
2
2
ettre le chiffre de comptage sur 3
M
3
3
Commencer la parcelle par un passage complet
SSYY--005
5
du semoir
A chaque demi-tour, le chiffre de comptage
doit avancer jusqu’au 5.
Agir sur l’inversion des traceurs hydrauliques
avant d’engager le 5ème passage.
Le chiffre doit ensuite revenir à 1 pour le
passage suivant.
C
e) Examples of tramlining
e1) Marking at the centre of the seed drill
(symmetrical)
e.g. 20 m boom, 4 m seed drill
20 = 5 - Odd number of passes
4
2) Marquage au centre du semoir
e
(symétrique)
ex: Rampe 24 m semoir 4 m
24 = 6 Nombre de passage pair
4
1
1
Programmer le boîtier sur
2
2
ettre le chiffre de comptage sur 3
M
3
3
Commencer la parcelle par un 1/2 semoir
SSYY--006
(voir manuel du semoir).
A chaque demi-tour, le chiffre de comptage
doit avancer jusqu’au 6.
Agir sur l’inversion des traceurs hydrauliques
avant d’engager le 6ème passage.
Le chiffre doit ensuite revenir à 1 pour le
passage suivant.
2) Marking at the centre of the seed drill
e
(symmetrical)
e.g. 24 m boom, 4 m seed drill
24 = 6 - Even number of passes
4
6
B
G
1
2
1
1
Programme the unit to
2
2
Set the count number to 3
3
3
Begin the plot with a full seed drill pass.
At each field end, the count number should
increase by 1, up to 5. Invert the hydraulic
markers before starting the 5th pass.
The number should return to 1 for the next
pass.
C
e) Markierungsbeispiele
e1) Markierung in Drillmaschinenmitte
(symmetrisch)
B.: Gestänge 20 m Drillmaschine 4 m
20 = 5 ungerade Fahrtenzahl
4
1
1
Gehäuse auf
2
2
Zahl der Fahrtenzählung auf 3 stellen.
3
3
Parzelle mit einer kompletten Fahrt der
SSYY--005
5
Drillmaschine beginnen. Bei jedem Wenden
muß die Zahl der Fahrtenzählung bis 5
vorrücken.
Vor Beginn der 5. Fahrt auf die Umkehrung der
hydraulischen Spuranreißer einwirken. Die Zahl
muß für die folgende Fahrt auf 1 zurückgehen.
SSYY--005
5
programmiern
1
1
Programme the unit to
2
2
Set the count number to 3.
3
3
Begin the plot with a half seed drill (see drill
SSYY--006
6
manual).
At each field end, the count number should
increase by 1, up to 6.
Invert the hydraulic markers before starting the
6th pass.
The number should return to 1 for the next
pass.
2) Markierung in Drillmaschinenmitte
e
(symmetrisch)
B.: Gestänge 24 m Drillmaschine 4 m
24 = 6 Gerade Fahrtenzahl
4
1
1
Gehäuse auf
2
2
Zahl der Fahrtenzählung auf 3 stellen
3
3
Parzelle mit 1/2 Drillmaschine beginnen (vgl.
SSYY--006
6
programmieren
Drillmaschinen-Handbuch). Bei jedem Wenden
muß die Zahl der Fahrtenzählung bis 6
vorrücken.
Vor Beginn der 6. Fahrt auf die Umkehrung der
hydraulischen Spuranreißer einwirken.
Die Zahl muß für die folgende Fahrt auf 1
zurückgehen.
DE
35
Page 36

Utilisation Ultron Semoir
Using the Ultron for Seed Drills
Benutzung Ultron Drillmaschine
C
2
e3)
2
4 6
C
456 123456 123
4 m
12 m
6 6
3
3
C
36
Page 37

Utilisation Ultron Semoir
Using the Ultron for Seed Drills
Benutzung Ultron Drillmaschine
C
e3) Marquage sur un Aller/Retour du semoir
(asymétrique)
ex: Rampe 24 m semoir 4 m
24
= 6 Nombre de passage pair
4
Attention au coté du semoir qui jalonne pour débuter la
parcelle
1
1
Programmer le boîtier sur
2
2
Mettre le chiffre de comptage sur 4. Commencer
la parcelle bordure coté droit.
3
3
A chaque demi-tour, le chiffre de comptage
doit avancer jusqu’au 6. Agir sur l’inversion des
traceurs hydrauliques avant d’engager le 6ème
passage. Le chiffre doit ensuite revenir à 1 et
de nouveau jalonner à ce passage.
AALL--006
6
R
F
C
e3) Marking over an Outward and Return pass
(asymmetrical)
e.g. 24 m boom, 4 m seed drill
= 6 Even number of passes
24
4
Pay attention to which side of the seed drill is marking
when starting the plot.
1
1
Programme the unit to
2
2
Set the count number to 4. Start the plot on the
AALL--006
6
right-hand edge.
3
3
At each field end, the count number should
increase by 1, up to 6. Invert the hydraulic
markers before starting the 6th pass. The
number should then return to 1 and mark again
on this pass.
C
e3) Markierung auf einer Hin- und Rückfahrt
(asymmetrisch)
B.: Rampe 24 m Drillmaschine 4 m
B
G
1
2
DE
= 6 Gerade Fahrtenzahl
24
4
Zum Anfang der Parzelle auf die markierende
Drillmaschinenseite achten.
1
1
Gehäuse auf
2
2
Zahl der Fahrtenzählung auf 4 stellen. Parzelle
AALL--006
6
programmieren
am Rand der rechten Seite beginnen.
3
3
Bei jedem Wenden muß die Zahl der
Fahrtenzählung bis 6 vorrücken. Vor Beginn der
6. Fahrt auf die Umkehrung der hydraulischen
Spuranreißer einwirken. Die Zahl muß
anschließend auf 1 zurückgehen und auf dieser
Fahrt erneut markieren.
37
Page 38

Utilisation Ultron Semoir
Using the Ultron for Seed Drills
Benutzung Ultron Drillmaschine
C
f)
5 3
m
39 3 2
3,5 21 . 66 34
4 12 32
m
SY AL
12 . 44 23
15 53
18 . 66 34
21 74
24 . 88 45
28 . 88 45
16 . 44 23
20 53
24 . 66 34
28 74
32 . 88 45
36 95
SY AL
SY AL
38
4,5 18 . 44 23
36 . 88 45
4,8 24 53
5 15 32
20 . 44 23
6 12 . 22 12
18 32
24 . 44 23
36 . 66 34
Page 39

Utilisation Ultron Semoir
Using the Ultron for Seed Drills
Benutzung Ultron Drillmaschine
C
f) Valeurs de programmation :
SSY
Y
Jalonnage au centre du semoir
AAL
L
Jalonnage sur un aller/retour du semoir
Remarque :
Dans le cas d’un jalonnage Asymétrique,
vérifier qu’il n’y ait vraiment qu’un coté de la
distribution qui se débraye.
Ne pas oublier de faire correspondre la
position des jalonneurs arrières avec les
distributions débrayables.
R
F
C
f) Programming values :
SSY
Y
Tramlining at the centre of the seed drill
AAL
L
Tramlining over an Outward & Return pass
Note :
In the case of Asymmetrical tramlining,
check that the metering devices are only
disengaged on one side.
Do not forget to match the position of the rear
markers with the disengaged metering devices.
C
f) Programmierwerte :
SSY
Y
Markieren in Drillmaschinenmitte
B
G
1
2
DE
AAL
L
Markieren auf einer Hin- und Rückfahrt der
Drillmaschine
Anmerkung
:
Bei asymmetrischem Markieren
kontrollieren, ob wirklich nur eine Seite der
Verteilung abgeschaltet ist.
Nicht vergessen, die Stellung der
Vorlaufmarkierer den
abgeschalteten Nockenrädern anzupassen.
39
Page 40

Utilisation Ultron Semoir
Using the Ultron for Seed Drills
Benutzung Ultron Drillmaschine
D
3500
F
2
2
3
3
4
4
XXEEOOSS
MMIINNII MMAAXXII
3m 2465 3335
3.5m 2635 3565
4m 2805 3795
EEAASSYYDDRRIILLLL -- MMAAXXIIDDRRIILLLL
MMIINNII MMAAXXII
4m 2890 3910
6m 3400 4600
40
Page 41

Utilisation Ultron Semoir
Using the Ultron for Seed Drills
Benutzung Ultron Drillmaschine
D
Fonction turbine
a)
Utilisation :
-
Sélectionner la fonction avec la touche .
-
Placer le curseur sur la position.
F
a valeur de la vitesse de rotation de la
L
turbine apparaît.. ex: 3500
-
Le réglage s'effectue avec maintenu appuyé
t l'action sur la touche .
e
-
SÉLECTIONNER LA VITESSE DE ROTATION DE LA
URBINE
T
(L
ECTURE
TR/MN)
3
3
R
F
3
3
Voir tableaux des alarmes ci-contre.
n cas de baisse de régime de la turbine, le curseur
E
se place automatiquement sur la fonction et est
suivi d’un bip sonore.
Le boîtier informe aussi en cas d’un surrégime.
2
2
The turbine function
D
a)
Use :
-
Select the function using button .
-
Move the cursor over
The turbine rpm setting will appear, e.g. 3,500
Use button to change the settings whilst
keeping button pressed.
-
SELECT THE TURBINE RPM (READ RPM)
Turbinenfunktion
D
a)
Benutzung :
-
Funktion mit der Taste wählen.
-
Kursor auf die Position platzieren
B
G
3
3
See table of alarms opposite.
1
If the turbine speed drops, the cursor will
automatically move over the function, followed by a
F
beep.
2
The unit will also warn if the turbine is over-revving.
3
3
2
2
DE
3
3
Siehe nebenstehende Tabellen mit
Alarmfunktionen.
F
Der Wert der Rotationsgeschwindigkeit der
Turbine erscheint, z. B.: 3500
Einstellung durch gedrückt halten der Taste
2
2
und Aktion mit Taste
-
ROTATIONSGESCHWINDIGKEIT DER TURBINE WÄHLEN
3
3
(IN U/MI N).
Vermindert sich die Rotationsgeschwindigkeit der
Turbine, platziert sich der Kursor automatisch auf die
Funktion, gefolgt von einem Tonzeichen.
Das Gerät informiert ebenfalls bei überhöhter
Rotationsgeschwindigkeit.
41
Page 42

Utilisation Ultron Semoir
Using the Ultron for Seed Drills
Benutzung Ultron Drillmaschine
D
0
F
2600
F
2
2
3
3
2600
F
42
Page 43

Utilisation Ultron Semoir
Using the Ultron for Seed Drills
Benutzung Ultron Drillmaschine
R
F
D
b)
Programmation :
nregistrement de la valeur minimum de rotation
E
pour l’alarme
2
-
Appuyer sur et maintenir:
2
La valeur apparaît
Si elle est correcte, relâcher
Si elle est fausse,maintenir appuyé
endant toute la programmation
p
3
-
Appuyer sur avec l'autre main pour modifier
3
le chiffre qui clignote.
-
Relâcher lorsque le chiffre voulu apparaît.
D
b)
Programming :
Setting the minimum rotation for the alarm.
2
-
2
Press and hold down:
the value is displayed
If it is correct release
-
Effectuer la même opération pour les autres
chiffres
Valeur : “2600 Tr/mn“
-
Repeat this operation for the other figures
Value : “2600 rpm”
B
G
1
2
If it is incorrect keep held down
throughout programming
3
-
With your other hand, press to change the
3
figure which is flashing.
-
Release when the required figure appears.
D
b)
Programmierung :
Aufzeichnung des Mindestdrehwerts für den Alarm
2
2
-
Auf drücken und heruntergedrückt halten:
Der Wert erscheint
wenn korrekt loslassen
wenn falsch während der ganzen
Programmierung herunterge
drückt lassen
3
-
Mit der anderen Hand, auf drücken um die
3
blinkende Zahl zu ändern.
-
Gleicher Vorgang bei den anderen Zahlen.
Wert “2600 Upm“
DE
-
Loslassen wenn die gewünschte Zahl erscheint.
43
Page 44

Utilisation Ultron Semoir
Using the Ultron for Seed Drills
Benutzung Ultron Drillmaschine
E
0001
E
3
3
44
Page 45

Utilisation Ultron Semoir
Using the Ultron for Seed Drills
Benutzung Ultron Drillmaschine
E
Fonction alarme
a)
Arbre de distribution
-
Sélectionner la fonction avec la touche .
-
Placer le curseur sur la position
E
Le chiffre indiqué est le nombre d’impulsion
lors de la rotation de l’arbre.
En cas de non rotation de l’arbre de distribution,
le curseur se place automatiquement sur la
fonction, et est suivi d’un bip sonore.
R
F
3
3
Alarm function
E
a)
Distribution shaft
-
Press button to select the function.
-
Move the cursor over
If the distribution shaft is not turning, the cursor
will move over the function automatically,
followed by a warning beep.
Alarmfunktion
E
a)
Verteilerwelle
-
Funktion mit der Taste wählen.
-
Kursor auf die Position platzieren
3
3
E
The figure given shows the number of pulses
when the shaft is turning.
3
3
B
G
1
2
DE
E
Die angezeigte Ziffer entspricht der Zahl der
Impulse bei der Geschwindigkeit der Welle.
Dreht sich die Verteilerwelle nicht, platziert sich
der Kursor automatisch auf die Funktion, gefolgt
von einem Tonzeichen.
45
Page 46

Utilisation Ultron Semoir
Using the Ultron for Seed Drills
Benutzung Ultron Drillmaschine
E
0001
D
alar
D
2
2
3
3
Prod
D
46
Page 47

Utilisation Ultron Semoir
Using the Ultron for Seed Drills
Benutzung Ultron Drillmaschine
E
b)
Fin de trémie
TILISATION :
U
ert à avertir avant la vidange complète de la
S
rémie.
t
égler la hauteur du capteur dans la trémie en
-
R
onction du type de semence.Dès qu'une alarme
f
se déclenche le curseur se place devant la
fonction concernée
ROGRAMMATION :
P
Il est possible de désactiver l’alarme.
Ex. Semis de colza.
-
Sélectionner la fonction avec la touche .
-
Placer le curseur sur la position
-
Appuyer sur , maintenir et avec régler
l'alarme fin de trémie.
2
2
R
F
= 1 pour alarme valide
= 0 pour alarme non valide
L'alarme est activée ou désactivée par
alternance à chaque pression.
c)
Déclenchement des alarmes
Dès qu'une alarme se déclenche le curseur se
place devant la fonction concernée.
D
aallaar
Le message "
r
" apparaît associé d'une
succession de bips + indications:
3
3
3
3
Distribution
Fin de trémie
RRootta
PPrrood
a
d
B
G
E
b)
Hopper end
PURPOSE:
Warns when the hopper is almost empty.
-
Adjust the height of the sensor in the hopper
according to the type of seed. When the alarm
sounds the cursor will move over the relevant
function.
P
ROGRAMMING:
The alarm can be disabled.
e.g. sowing rapeseed.
3
-
Use button to select a function.
-
Move the cursor over
-
Press button , and keep pressed in whilst
using button to set the hopper end alarm.
3
2
2
3
3
E
b)
Alarm Trichterfüllstand
ENUTZUNG:
B
Warnt vor vollständiger Entleerung des Trichters.
-
Sensorhöhe im Trichter nach Saatart einstellen.
Sobald eine Alarmfunktion ausgelöst wird,
platziert sich der Kursor vor die betroffene
Funktion.
= 1 to confirm alarm
= 0 to cancel alarm
The alarm is activated and disabled in turn
each time the button is pressed.
c)
When the alarm sounds
As soon as the alarm is triggered, the cursor will
move over the relevant function.
D
A series of warning beeps will sound and
aallaar
the "
r
" message will appear together
with the following indications:
RRootta
Distribution
Hopper end
= 1 Alarmfunktion aktiv
= 0 Alarmfunktion inaktiv
= Die Alarmfunktion wird bei jedem
PPrrood
a
d
Drücken wechselweise aktiviert bzw.
inaktiviert.
c)
Auslösung einer Alarmfunktion
Sobald eine Alarmfunktion ausgelöst wird,
platziert sich der Kursor vor die betroffene
Funktion.
1
2
DE
P
ROGRAMMIERUNG:
Die Alarmfunktion kann inaktiviert werden.
z. B.: Rapssaat.
3
-
Funktion mit der Taste wählen.
-
Kursor auf die Position platzieren
2
-
2
Taste gedrückt halten und mit Taste die
3
Alarmfunktion Trichterfüllstand einstellen
D
aallaar
Die Meldung „
r
" erscheint zusammen
mit einer Folge von Tonzeichen, +
Anweisungen:
3
3
Streugutverteilung
Alarm Trichterfüllstand
RRootta
PPrrood
a
d
47
Page 48

Informations
Z785-306 issue 07
PL2
PL1
PL3
1
5
10
16
151 610
1 6 11 16 22
0V IN
+V IN
FUSE
RL1
RL2
RL4
RL5
RL3
LK1
LK2
LK6
P585-100
ISSUE 02
G-SNR
ONLY
SEM
TRIB
B
G
BLEU
BLEU
BLEU
BLEU
BLEU
BLEU
BLEU
BLEU
BLEU
BLEU
ROUGE
ROUGE
N/C
N
/C
BLANC
MAUVE
JAUNE
GRIS
VERT
BLEU
BRUN
ROUGE/BLEU
TURQUOISE
ORANGE
VERT/ROUGE
JAUNE/ROUGE
BLANC/ROUGE
N/C
BRUN
BRUN
BRUN
BLANC
NOIR
BRUN
BRUN
BRUN
ROUGE
BRUN
BLEU
JAUNE/
VERT
JAUNE/
VERT
CO/TL1 CO/TL2 OP3 OP4 OP5
+V +V +V +V +V0V 0V 0V 0V 0V
COM
COM
COM
COM
COM
DT
BLOC.
H N1 N2 S
N1 SNR
ONLY
A
SULKY ULTRON JUNCTION BOX WIRING
Y D - SPB
“TL2”
VERIN
“EV”
“MS”
VERIN
“MS”
VERIN
“
TL1”
VERIN
LK3 LK4
LK5
G - SPB
“MS” VERIN
BLEU
BLEU
BRUN
BLEU
NOIR
BRUN
Information
Informationen
A
48
Page 49

Informations
Information
Informationen
R
F
A
Schématisation du circuit
G Traceur gauche
Traceur droit
D
T Turbine
H Surface
Distribution
S
TL1 Vérin jalonnage
System outline
A
G LH marker
D RH marker
T Turbine
H Surface
S Metering device
TL1 Tramlining actuator
B
Entretien
a)
Boîtier Electronique
Le boîtier ne nécessite pas d’entretien.
Il est impératif toutefois de le conserver dans un lieu
sec l’hiver.
b)
Capteurs
Les capteurs inductifs ne demandent aucun entretien
toutefois attention aux chocs qui pourraient provoquer
le déréglage de leurs positionnements.
-
Bien nettoyer le semoir aprés utilisation pour éviter
les dégats de rongeurs.
-
Ne pas diriger le jet du nettoyeur haute pression
vers les vérins électriques et électrovannes.
Maintenance
B
a)
Electronic control box
The control box does not require any maintenance.
It must nevertheless be kept in a dry place during winter.
b)
Sensors
The inductive sensors do not require maintenance.
However, care must be taken to avoid knocks as
these could throw their positional settings out of line.
B
G
Schaltplan
A
G Linker Spurreißer
D Rechter Spurreißer
T Turbine
H Fläche
S Streuung
TL1 Auslöser Fahrgassenmarkierung
-
The seed drill should be cleaned thoroughly after
use to prevent damage caused by rodents.
-
Do not aim the high-pressure cleaning spray at the
actuators or solenoid valves.
Wartung
B
a)
Elektronikgerät
Das Gerät ist wartungsfrei.
Es muss jedoch im Winter unbedingt an einem
trockenen Ort aufbewahrt werden.
b)
Sensoren
Die Induktionssensoren sind wartungsfrei. Sie sollten
jedoch vor Stößen geschützt werden, die eine
Verschiebung ihrer Position verursachen können.
-
Drillmaschine nach der Benutzung zum Schutz vor
Nagetieren gut reinigen.
-
Strahl des Hochdruckreinigers nicht auf die
elektrischen Auslöser und Ventile richten.
1
DE
3
49
Page 50

Informations
Information
Informationen
C
Remèdes aux problèmes
FR
PP
AANNNNEESS
Le boîtier ne s’allume pas
Le boîtier s’allume puis s’éteint
L’information vitesse est incorrecte
Le comptage des hectares est incorrect
Il n’y a plus de comptage automatique pour le
jalonnage (au comptage 2 fois au lieu de 1)
Contrôle d’un capteur inox
C
Troubleshooting
PP
RROOBBLLEEMMSS
The control box does not come on.
The control box comes on and then goes off.
The information reading is incorrect
RR
EEMMÈÈDDEESS
Vérifier le branchement 12 V continu
Vérifier le fusible 5 A
Vérifier la polarité + / -
érifier le coefficient de vitesse
V
Vérifier le positionnement du capteur sur l’arbre
Vérifier le coefficient de vitesse
Vérifier la largeur de travail dans le programme
Vérifier le positionnement du capteur sur l’arbre
Vérifier le positionnement du capteur au niveau du
mécanisme d’inversion des traceurs.
100Ω
SS
OOLLUUTTIIOONNSS
Check the 12 V DC connection.
Check the 5 amp fuse.
Check the + / - polarity.
Check the speed coefficient
Check the position of the sensor on the shaft
GB
The hectare count is incorrect
The automatic count function is not working when
tramlining (or is counting double)
Stainless steel sensor control
C
Störungsabhilfen
SS
TTÖÖRRUUNNGGEENN
Das MS-Gerät schaltet sich nicht ein.
Das MS-Gerät schaltet sich ein und sofort wieder aus
Geschwindigkeitsdaten nicht korrekt
Hektarzählung nicht korrekt
Automatische Zählung bei der Fahrgassenmarkierung
ausgefallen (zählt 2 anstatt 1)
Prüfung eines Edelstahl-Sensors
Check the speed coefficient
Check the working width in the programme
Check the position of the sensor on the shaft
Check the position of the sensor on the markers’
reversing mechanism.
100Ω
AA
BBHHIILLFFEE
12 V-Gleichstromanschluss überprüfen.
5 A-Sicherung überprüfen
+/- Polung überprüfen.
Geschwindigkeitskoeffizient prüfen
Positionierung des Sensors an der Verteilerwelle prüfen
Geschwindigkeitskoeffizient prüfen
Programmierte Arbeitsbreite prüfen
Positionierung des Sensors an der Verteilerwelle prüfen
Positionierung des Sensors am
Umkehrungsmechanismus der Spurreißer prüfen
100Ω
DE
50
 Loading...