

K
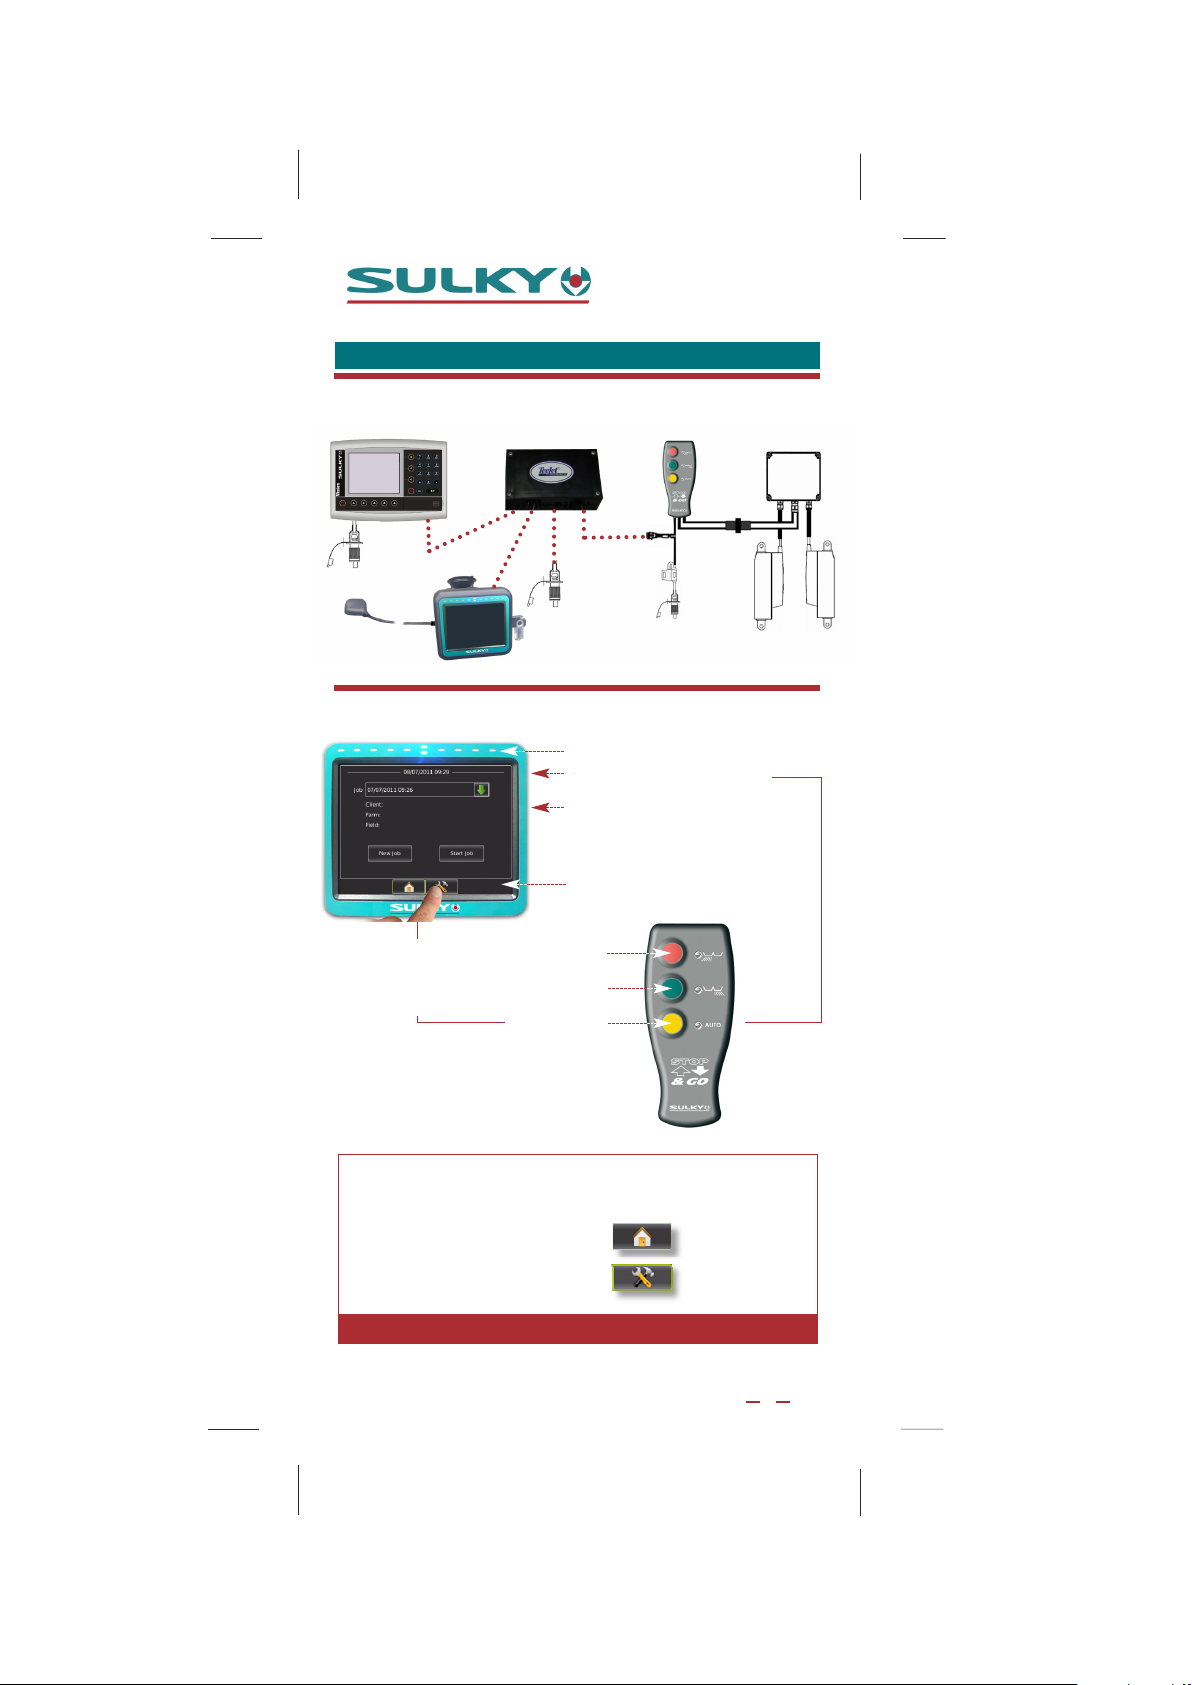
IT CONN ECTION
SULKY’SGUIDANCELIGHTBAR
STOP &GO
QUICK START INSTRUCTIONS
.
Integrated guidance bar
Power button
USB port with rubber cover
Backlit touch screen
Left shutter open/close
Right shutter open/close
Auto mode
The following instructions are provided to enable you to
quickly start using this equipment via the two main menus:
CCUEIL (HOME)
• A
• CONFIGURATION
A
LSO REFER TO THE MA NUFACTURER’S INSTRUCTION MANUAL
Ref: 400 515 - 00 - GB /DIS
.
1
N
N
S
S
Á
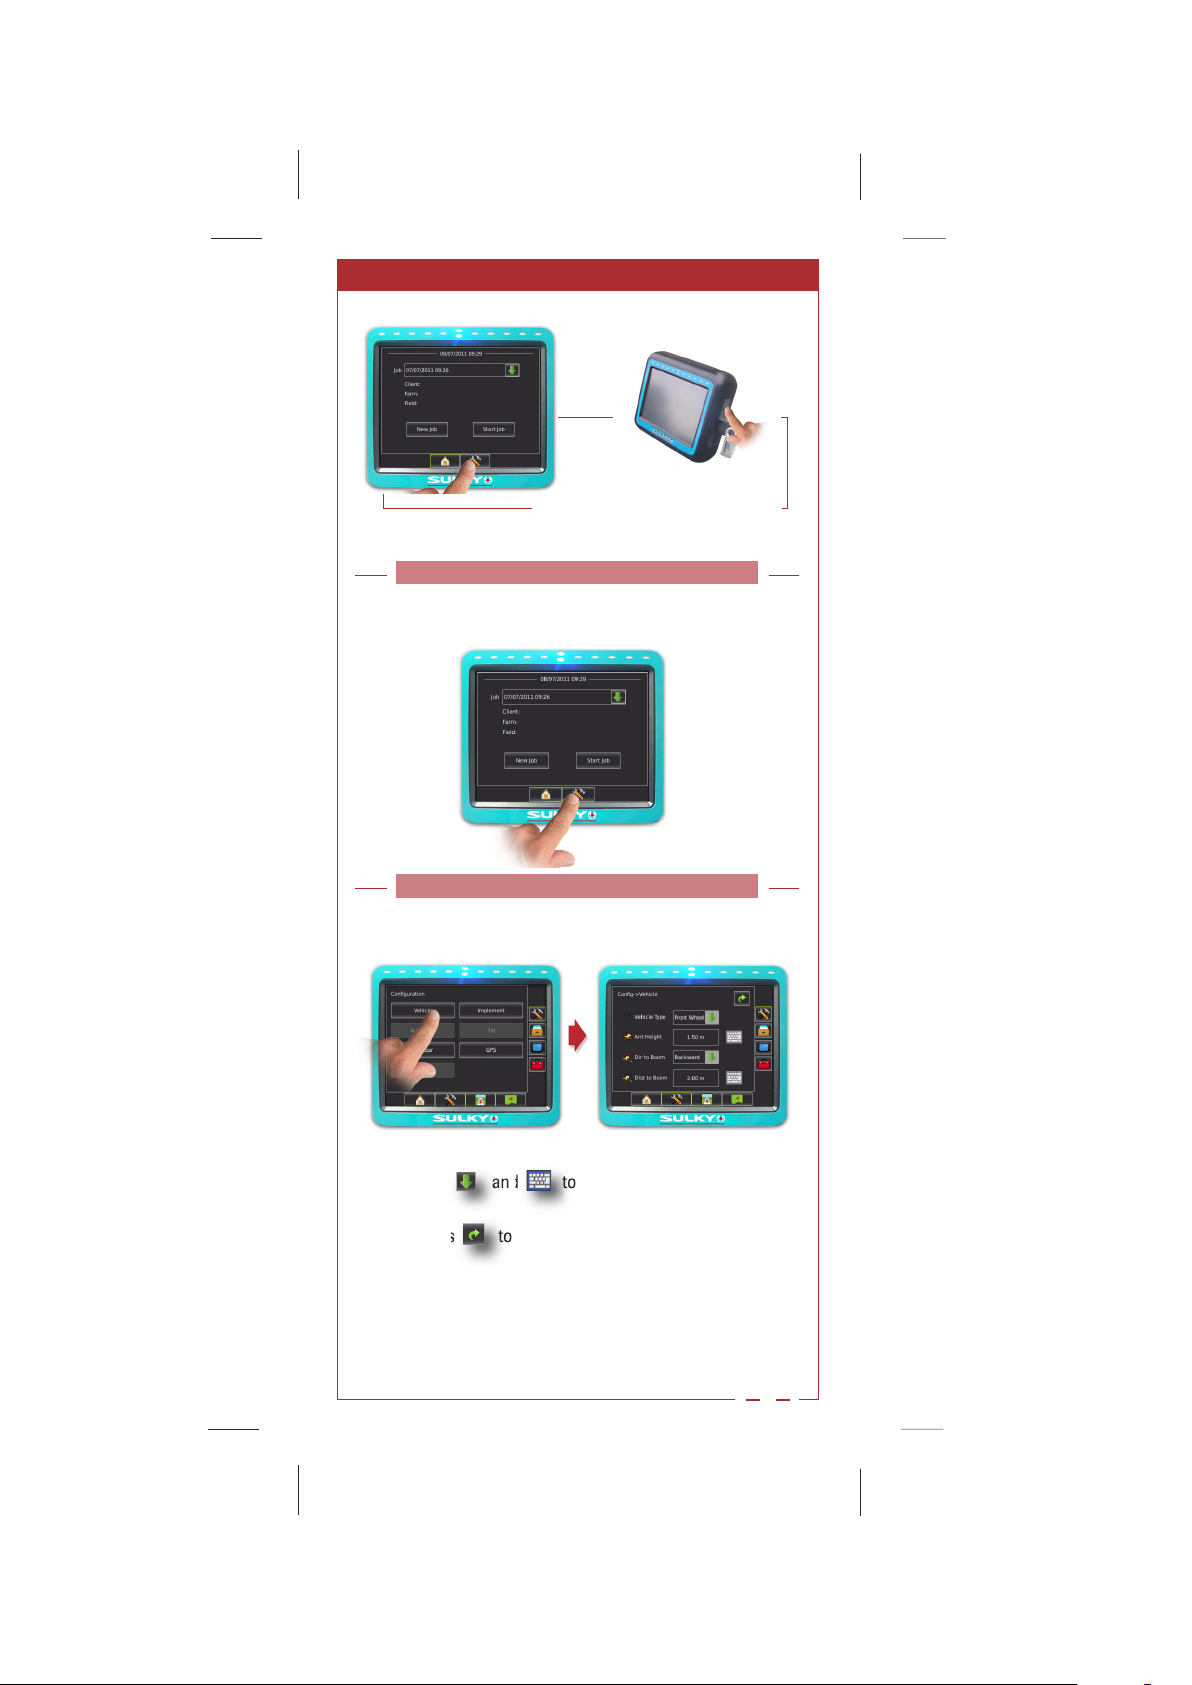
Switch on the console.
Á
Á
Á
Á
CCOONNFFIIGGUURRAATTIIOON
CCOONNFFIIGGUURRAATTIIOON
VVEEHHIICCLLEE SSEETTTTIINNGGS
VVEEHHIICCLLEE SSEETTTTIINNGGS
Use and to adjust the settings.
Á
Press to go back to the Configuration menu.
Á
For “
DIST. ÀLARAMPE
Á
consult the “M
on the final page.
” (
ANUFACTURER'SDATA
DIST. TO TH E BOOM
),
” table
2
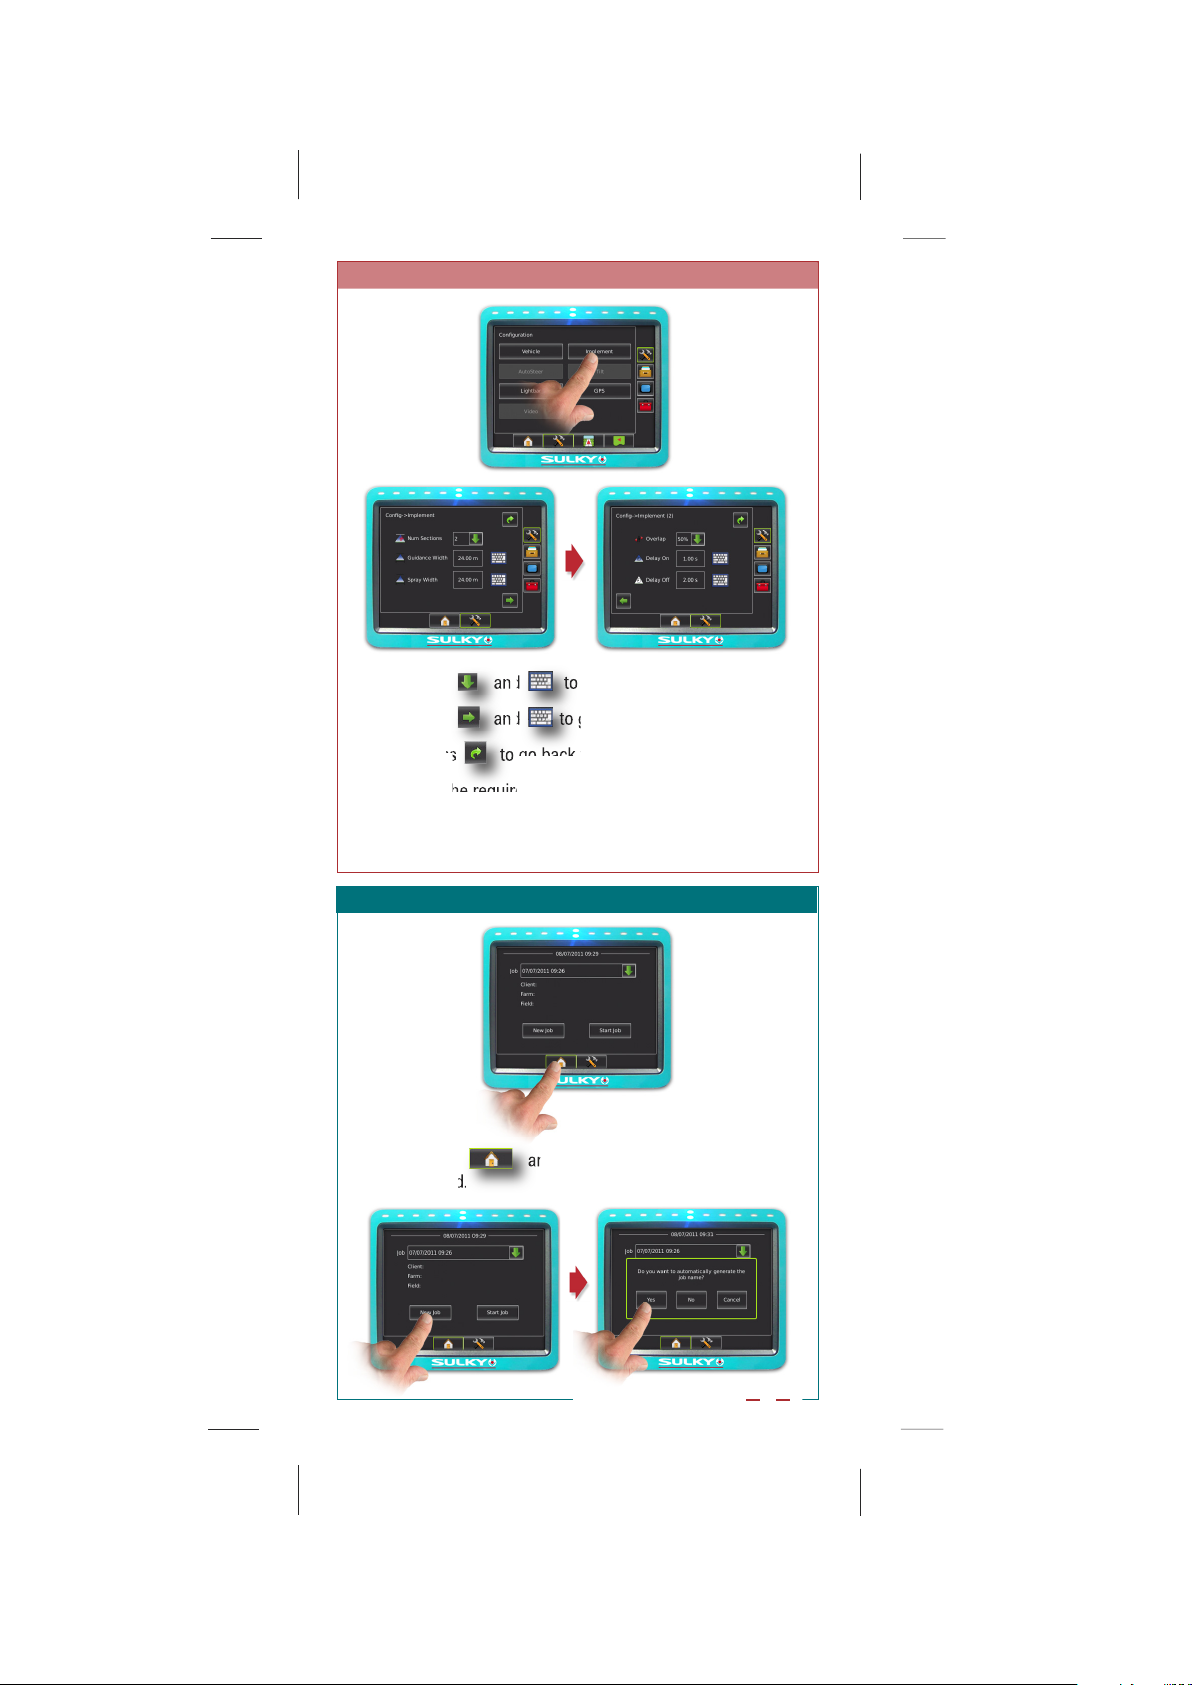
TOOL SETTINGS
Á
Á
Á
Á
Á
TOOL SETTINGS
Use and to adjust the settings.
Á
Use and to go to the next settings.
Á
Press to go back to the Configuration menu.
Á
For the required values, consult the “M
Á
TURER'SDATA
” table on the final page.
ANUFAC
-
ACCUEIL (HOME)
ACCUEIL (HOME)
Press and select the tasks in the order
Á
indicated.
3

S
SSPPRREEAADDIINNGG SSEETTTTIINNGGS
S
Á
Á
Á
Á
Á
Á
SSPPRREEAADDIINNGG SSEETTTTIINNGGS
Select the status bar
Á
Select the guidance mode
Á
Ideally, select the straight line guidance mode
Á
.
Press to go back to the status bar.
Á
Check the status of
Á
auto mode enabled.
auto mode disabled.
Switch between modes by pressing
Á
4

SSPPRREEAADDIINNGG
Á
Á
Á
Á
Á
Á
Á
Á
SSPPRREEAADDIINNGG
Enable auto mode on the controller
Á
Enable the field outline
Á
Start spreading around the
Á
edge of the field.
While spreading
Á
in a straight line, place
point
Point will remain disabled until you have travelled 40 m
Point is now enabled
Place point
Á
The guidance line appears
Á
Outline completed.
Á
Save the surface area to be treated.
Á
5

)
SSPPRREEAADDIINNGG ((CCOONNTTIINNUUEEDD)
)
Á
Á
Á
Á
SSPPRREEAADDIINNGG ((CCOONNTTIINNUUEEDD)
Continue spreading,
Á
following the LEDs
on the guidance bar.
Once you have finished spreading,
Á
press
Save your work
Retrieve your saved tasks
CONFIGURATION
in the
settings
Press
Á
“Job Data”.
To transfer your data onto a
Á
USB stick, select the job
then use the arrows to
move it onto the USB stick
then
6

Y1
M
A
N
U
F
A
C
T
U
R
E
R
'
S
D
A
T
A
M
A
N
U
F
A
C
T
U
R
E
R
'
S
D
A
T
A
X3
Y2
X2
Anticipate opening(s) T (s) O
Anticipate closing T (s) C
X2 (m)
X3 (m)
%
-3,25 -4,5 -5,25 -6 -7 -6 -7 -8 -9 -8 -9 -10 -11
2,5 2,5 2,5 3 3 3 3 3 3 3 3 3 3
1111 1 111 1 111 1
50 50 50 1
0
01
3,25 4,5 5,25 6 7 6 7 8 9 8 9 10 11
X1
Centre de l’épandeur
Centre of the spreader
Mittelpunkt des Schleppers
LG (m)
LR (m)
Y2 (m)
-
7,5 9 10,5 12 14 12 14 16 18 16 18 20 22
7,5 9 10,5 12 14 12 14 16 18 16 18 20 22
7,5 -9 -10 -12 -14 -12 -14 -15 -15 -16 -17 -16,5 -16,5
GPS
Guidance width
15 18 21 24 28 24 28 32 36 32 36 40 44
? 36
12
28
M
M
A
A
N
N
U
U
F
F
A
A
C
C
T
T
U
U
R
R
E
E
R
R
'
'
S
S
D
D
A
A
T
T
A
A
0
050501
0
01
0
0501
0
01
0
01
0
0
24
32
44
7
 Loading...