

Page 1
Sulky Burel
BP 92111 - rue Fabien Burel
35221 Châteaubourg Cedex- FRANCE
Tél: 02.99.00.84.84 - Fax: 02.99.62.39.38
Site Internet : www.sulky-burel.com
e-mail : info@sulky-burel.com
A LIRE ATTENTIVEMENT AVANT D’UTILISER LE BOÎTIER
PLEASE READ CAREFULLY BEFORE USING THE CONTROL BOX
VOR GEBRAUCH DES ELEKTRONIKGERÄTS SORGFÄLTIG LESEN
Réf: 400 221 - F-GB-D / GAM / A-01
OK
100%
+
%
-
%
3.57
Page 2
2
• Respecter les instructions de cette notice et les instructions du manuel d’utilisation du Semoir ou du Distributeur correspondant.
• Ne jamais quitter le poste de conduite lorsque le tracteur est en marche.
• Réaliser les réglages du (Semoir ou du Distributeur) et du boîtier MS tracteur à l’arrêt.
• Assurez-vous qu’il n’y ait personne autour de la machine avant d’effectuer l’étalonnage du MS.
•Avant d’entreprendre des travaux sur l’installation électrique, interrompre le circuit de liaison batterie, il en est de même pour les
travaux de soudure sur le tracteur et la machine.
•Le MS est uniquement conçu afin d’être utilisé avec les semoirs à grains ou les Distributeurs d'engrais. Toute autre utilisation sera
considérée comme non conforme à l’usage. La responsabilité du constructeur ne sauraît être engagée, si des modifications ont été
effectuées sur le boîtier sans accord express.
• Ces symboles sont utilisés dans cette notice chaque fois que des recommandations concernent votre sécurité, celle
d’autrui ou le bon fonctionnement de la machine.
• Transmettez impérativement ces recommandations à tout utilisateur de la machine.
Risque d’accident Risque d’endommager
la machine
Faciliter le travail
F
• Follow the instructions given in this guide and in the appropriate Seed Drill or Spreader user manual.
• Do not leave the driver’s seat when the tractor is running.
•Adjust the settings for the Seed Drill or Spreader and the MS unit when the tractor is switched off.
• Make sure that nobody is near the machine when calibrating the MS unit.
• Cut power to the battery link circuit before carrying out any work on the electrical system or before performing welding work on the
tractor and the machine.
•The MS unit has been designed solely for use on seed drills or fertilizer spreaders, and applying it to any other purpose shall be
deemed improper use. The manufacturer declines all responsibility for alterations made to the unit without his express approval.
GB
D
Consignes de sécurité
Safety instructions
Sicherheitsvorschriften
Risk of accident Risk of damage to
machinery
Making work easier
• These symbols are used in this guide whenever recommendations are made regarding your own or other people’s
safety or in order for the machine to operate smoothly.
• These recommendations must be passed on to other people using the machine.
• Anweisungen dieses Hinweisblattes und Bedienungsanleitung der Drillmaschine bzw. des Streuers befolgen.
• Fahrersitz niemals bei laufendem Schlepper verlassen.
• Einstellungen (an Drillmaschine oder Streuer) und am MEDION-Gerät bei Schlepperstillstand ausführen.
•Vor Eichung des Geräts sicherstellen, dass sich niemand im Maschinenbereich aufhält.
•Vor der Ausführung von Arbeiten an der elektrischen Anlage elektrische Verbindung zur Batterie unterbrechen. Das Gleiche gilt für
Schweißarbeiten an Schlepper oder Maschine.
• Das Gerät ist ausschließlich für die Verwendung mit Drillmaschinen oder Düngerstreuern geeignet. Jede andere Verwendung gilt als
nicht bestimmungsgemäß. Der Hersteller haftet nicht für Änderungen, die ohne ausdrückliche Zustimmung an dem MS-Gerät
vorgenommen wurden.
Unfallgefahr Gefahr der Beschädigung
der Maschine
Arbeitserleichterung
• Diese Symbole finden Sie in diesem Hinweisblatt, wenn Empfehlungen zu Ihrer eigenen Sicherheit bzw. der Sicherheit
Dritter oder des richtigen Funktionierens der Maschine angesprochen werden.
• Diese Empfehlungen sind unbedingt an alle Benutzer der Maschine weiterzugeben.
Page 3

3
1
2
3
Pages
PRESENTATION / MISE EN FONCTIONNEMENT
SOMMAIRE
Français
Lire attentivement la notice avant l’utilisation. Comprendre son boîtier
électronique, c’est mieux l’utiliser. En français suivre le symbole.
F
6-7
8-9
8-9
10-11
12-17
• A Schématisation du système
• B Connection au tracteur
• C Montage
• D Présentation du boîtier
• E Montage du MS sur les appareils
- E
XPERT - MAGNUM
- DPA XL
- SEMOIRS
Pages
UTILISATION
18-19
18-25
26-27
• A Choix de l'utilisation
• B Fonction débit
- Essai
- Accès direct au réglage
- Modification de la dose de référence
- Modulation
• C Fonction bordure pour distributeurs d'engrais
Pages
INFORMATIONS
28-29
29
30
• A Schématisation du circuit
• B Entretien
• C Remèdes aux problèmes
Page 4
4
Carefully read the manual before use. Understanding your electronic unit will
help you make better use of it. In English, follow .
Pages
PRESENTATION/STARTING UP
Pages
USE
Pages
INFORMATION
CONTENTS
English
GB
6-7
8-9
8-9
10-11
12-17
18-19
18-25
26-27
28-29
29
30
• A A rundown of the system
• B Connection au tracteur
• C Fitting
• D The console
• E Fitting the MS unit to the machinery
- E
XPERT - MAGNUM
- DPA XL
- SEED DRILLS
• A Choosing an application
• B Flow function
- Test
- Gaining direct access to the settings
- Changing the standard dose setting
- Adjustments
• C Border-spreading function for the fertilizer spreader
• A System outline
• B Maintenance
• C Troubleshooting
Page 5

5
Seiten
INBETRIEBNAHME
INHALTSVERZEICHNIS
Deutsch
Die Anweisung vor Benutzung aufmerksam durchlesen. Das
Elektronikgerät richtig zu verstehen, heißt, es besser (aus)nutzen zu
können. Die deutsche Fassung ist mit gekennzeichnet.
D
Seiten
BENUTZUNG
Seiten
INFORMATIONEN
1
2
3
6-7
8-9
8-9
10-11
12-17
28-29
29
30
18-19
18-25
26-27
• A Schematische Übersicht des Systems
• B Elektrischer Anschluss an den Schlepper
• C Montage
• D Elektronikgerät
• E Montage des Elektronikgeräts an die Maschinen
- E
XPERT - MAGNUM
- DPA XL
-
D
RILLMASCHINEN
• AWahl des Maschinentyps
• BFunktion Streumenge
- Abdrehprobe
- Direkter Zugang zur Einstellung nach Ausschalten des
MS-Geräts.
- Änderung der Vergleichsdosierung
- Dosierungsänderung
• CFunktion Parzellenrand für Düngerstreuer
• A Schaltplan
• B Wartung
• C Abhilfe bei Störungen
Page 6
6
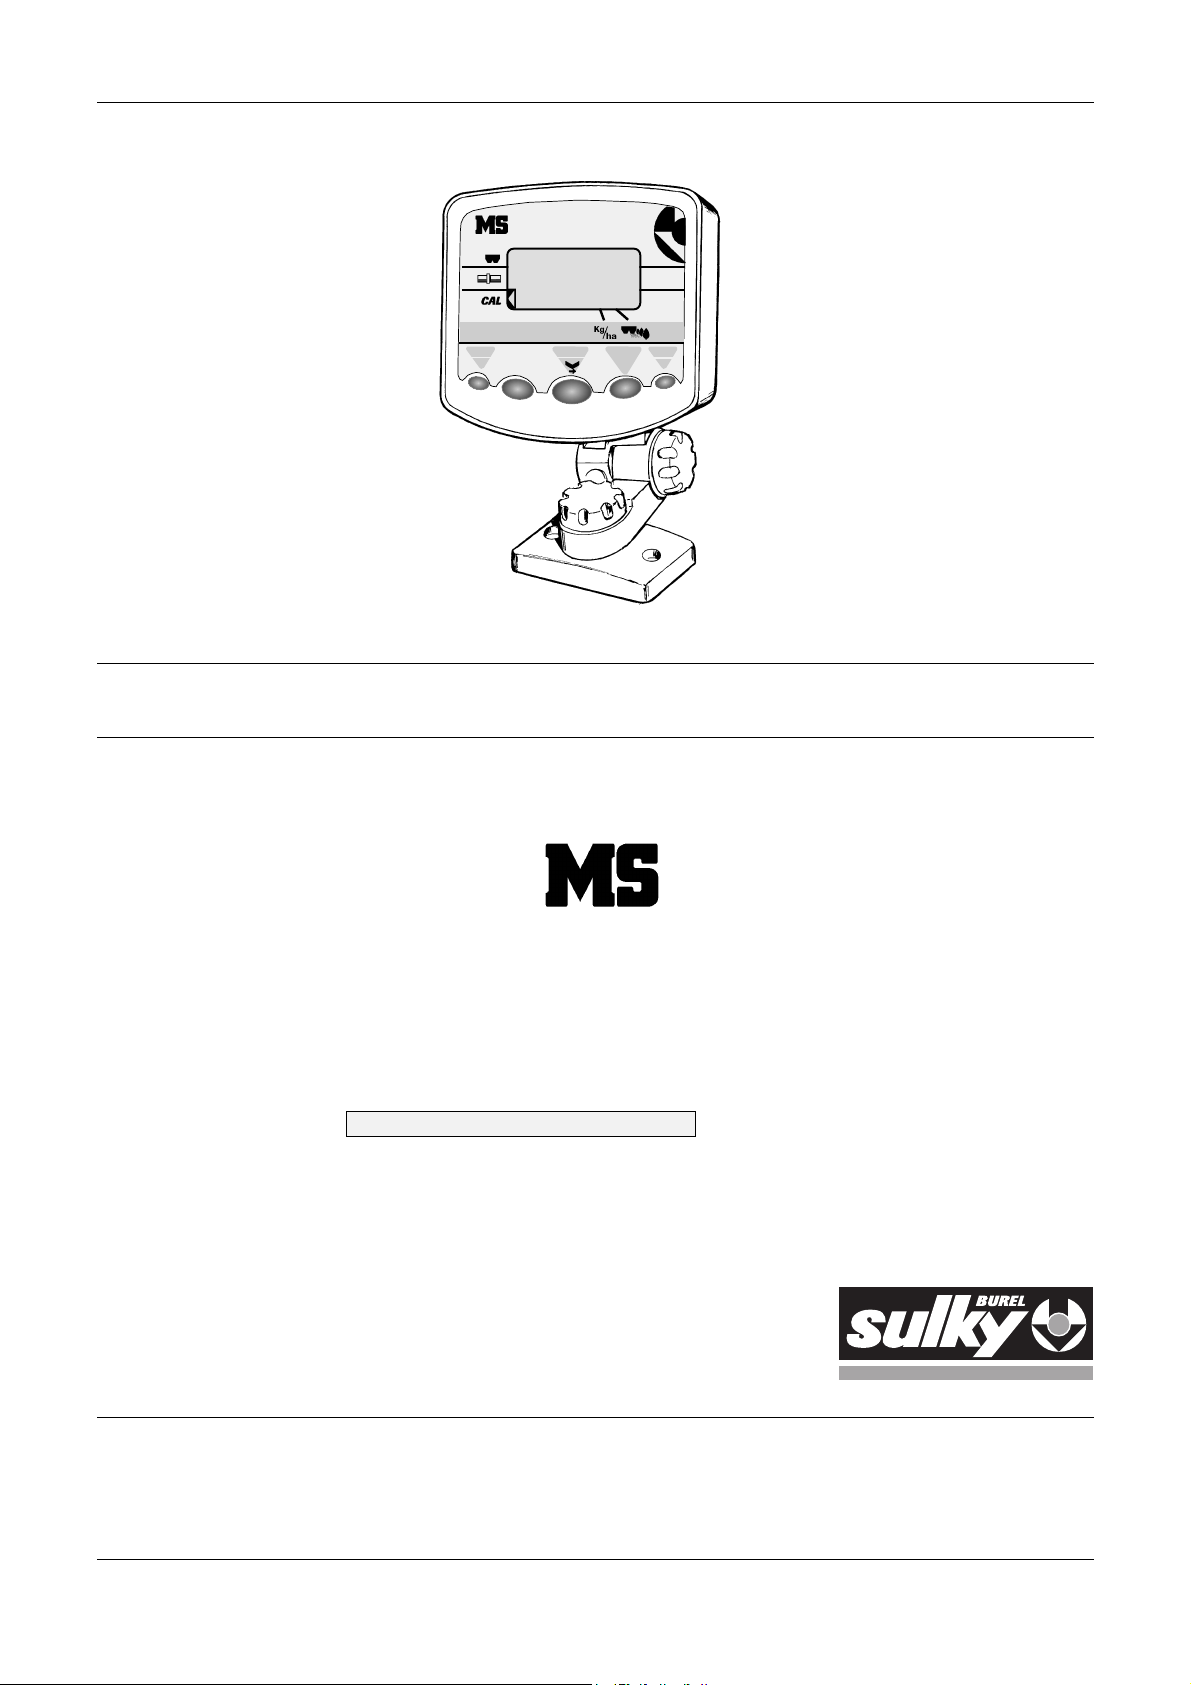
Présentation / Mise en fonctionnement
Presentation / Starting Up
Beschreibung / Inbetriebnahme
A
1
-
1
+
1
2
3
4
OK
100%
+
%
-
%
Page 7

7
Schématisation du système
•
Le boîtier MS est un instrument de réglage et de contrôle.
•Les informations de poids et de surface données par le
MS ne peuvent pas être utilisées pour des transactions
commerciales.
Présentation
Boîtier MS
Faisceau d’alimentation avec fusible 5 A
Faisceau vérins distributeur
Faisceau vérins semoir
GB
F
A
A
A
1
D
Présentation / Mise en fonctionnement
Presentation / Starting Up
Beschreibung / Inbetriebnahme
A rundown of the system
•
The MS unit is used for performing adjustments and
checks.
•Weight and surface area information provided by the MS
unit may not be used for business purposes.
Presentation
MS unit
Power bundle with 5 amp fuse (optional)
Spreader actuator pack
Seed drill actuator pack
Schematische Übersicht des Systems
•
Das MS-Gerät ist ein Steuer- und Kontrollinstrument.
• Die von MS angegebenen Daten zu Gewicht und Fläche
dürfen nicht zu Geschäftszwecken verwendet werden.
Einführung
MS-Gerät
Versorgungskabelbündel mit 5 A-Sicherung
(Sonderausrüstung)
Kabel für Streuerauslöser
Kabel für Drillmaschinen-Auslöser
Page 8

1
+
1
-
8
Présentation / Mise en fonctionnement
Presentation / Starting Up
Beschreibung / Inbetriebnahme
B
45 mm
100 mm
110 mm
b)
c)
50 mm
a)
C
1
3
2
70 mm
135 mm
Ø4 mm
OK
100%
+
%
-
%
12V
Page 9

9
GB
D
Présentation / Mise en fonctionnement
Presentation / Starting Up
Beschreibung / Inbetriebnahme
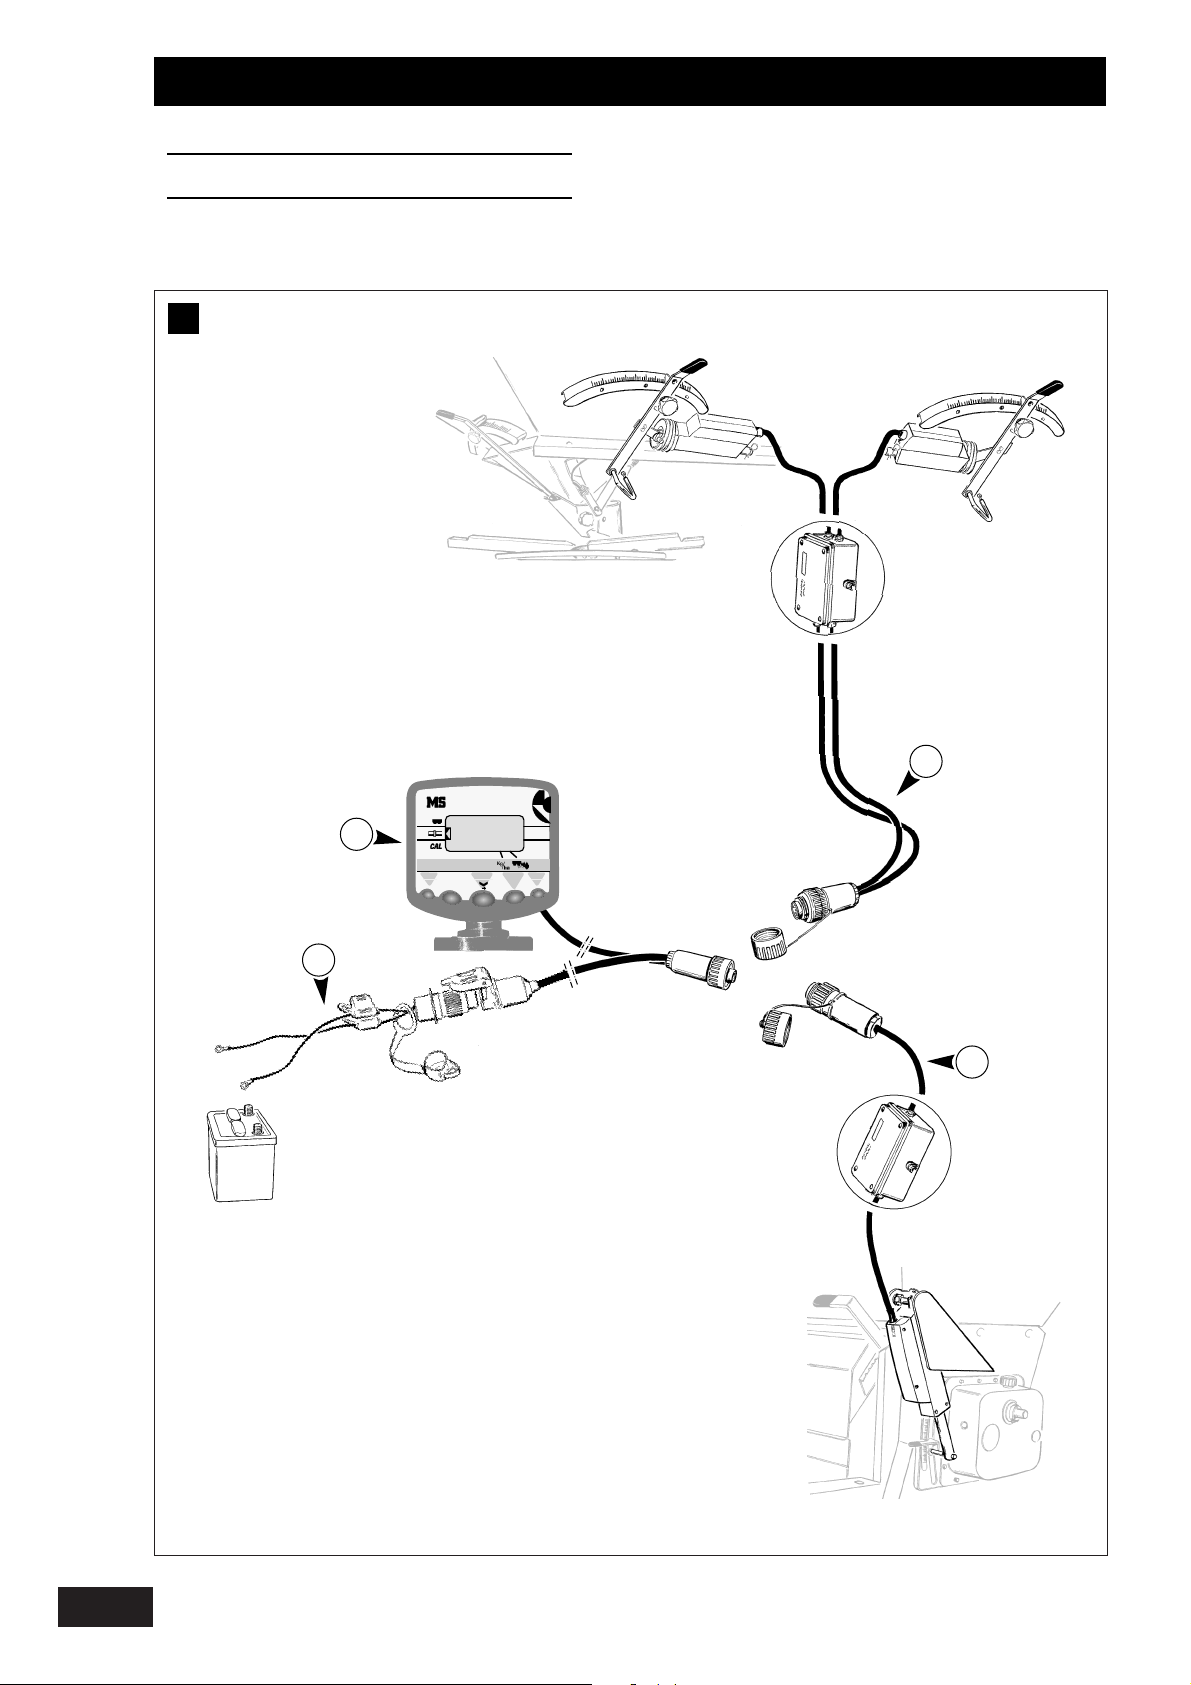
Connection au tracteur
a)
Branchement du MS
• Il est impératif de brancher l’alimentation
électrique du boîtier directement à la batterie 12 volts du
tracteur.
•Le boîtier MS possède un accumulateur permettant de
garder en mémoire les données programmées.
•Le boîtier MS est protégé par des fusibles 5 A
sur son alimentation.
Faisceau d’alimentation dispo en option.
Remarque:
Si votre tracteur est pré-équipé avec une prise identique
(cobo), vérifier que le fusible est bien de 5A.
Montage
b) Encombrement
-Le boîtier électronique doit être monté de manière à ce
qu’il soit bien visible pour le conducteur.
c) Fixation
- Il est possible de fixer le boîtier dans diverses positions
grâce aux 3 molettes.
F
B
C
Connecting to the tractor
a)
Connecting the MS
•The unit’s electrical power supply must be connected
directly to the tractor’s 12-volt battery.
•The MS unit includes an accumulator for storing the
programmed data.
•The MS unit is protected by 5 amp fuses.
Optional power bundle available.
Note:
If your tractor has been pre-fitted with an identical socket
(cobo), check that it has a 5 amp fuse.
B
Fitting
b) Volume
-The electronic unit must be fitted in clear view of the
driver.
c) Attaching
- The unit can be attached in a number of positions using
the 3 adjusting screws.
C
Elektrischer Anschluss an den Schlepper
a)
Anschluss des MS-Geräts
• Das elektrische Anschlusskabel des MS-Geräts ist
unbedingt direkt an die 12-V-Batterie des Schleppers
anzuschließen.
• Das MS-Gerät besitzt einen Akkumulator, der die
programmierten Daten speichert.
• Die elektrische Versorgung des MS-Geräts ist durch 5 ASicherungen geschützt.
Versorgungskabelbündel als Option lieferbar.
A
nmerkung:
Wenn Ihr Schlepper bereits mit dem gleichen Stecker
(cobo) ausgestattet ist, prüfen, dass dieser mit einer 5 ASicherung geschützt ist.
B
Montage
b) Gerätabmessungen
- Das Elektronikgerät muss im Sichtbereich des Fahrers
montiert werden.
c) Befestigung
- Aufgrund der drei Rädchen an dem Elektronikgerät ist die
Befestigung in verschiedenen Stellungen möglich.
C
Page 10

10
Présentation / Mise en fonctionnement
Presentation / Starting Up
Beschreibung / Inbetriebnahme
D
On/Off
OK
100%
+
%
-
%
A
B
C
D
E
1
2
3
4
Page 11

11
Présentation / Mise en fonctionnement
Presentation / Starting Up
Beschreibung / Inbetriebnahme
GB
F
D
D
Présentation du boîtier
. Interrupteur On / Off
. Boîtier standard
. Ecran multifonction
A Choix machine
- DPX - M
AGNUM
- DPA-XL
- S
EMOIR
B Repère de réglage
C Calibrage
FONCTIONS
D Dose
E Mode bordure pour distributeur d'engrais
P
ARAMÉTRAGE
1 Diminution des valeurs et du % de modulation
2 Déplacement curseur et validation
3 Retour à la dose
4 Augmentation des valeurs et du % de modulation
The console
. On/Off switch
. Standard unit
. Multifunction screen
A Choice of machine
- DPX - M
AGNUM
- DPA-XL
- S
EED DRILL
B Settings scale
C Calibration
FUNCTIONS
D Dose
E Border-spreading mode for fertilizer spreader
C
ONFIGURATION
1 Reduce setting and rate of adjustment (%).
2 Move cursor and confirm
3 Return to dose
4 Increase settings and rate of adjustment (%)
D
Elektronikgerät
. Schalter Ein / Aus
. Standardausstattung
. Multifunktionsbildschirm
A Wahl Maschine
- DPX - M
AGNUM
- DPA-XL
- D
RILLMASCHINE
B Einstellmarke
C Eichung
FUNKTIONEN
D Dosierung
E Modus Parzellenrand für Düngerstreuer
P
ARAMETRIERUNG
1 Verminderungder Werte und Mengenänderung in %
2 Kursorbewegung und Bestätigung
3 Zurück zur Dosierung
4 Erhöhung der Werte und Mengenänderung in %
D
Page 12

12
Présentation / Mise en fonctionnement
Presentation / Starting Up
Beschreibung / Inbetriebnahme
E
2
4
DPX EXPERT - MAGNUM
1
3
On/Off
DP
100%
-
%
OK
+
%
A
2
4
Page 13

13
Montage du MS sur les appareils
1)
DPX EXPERT - MAGNUM :
· Monter les fixations de vérins .
· Monter les vérins , (repérage D. G. sur le
faisceau) si besoin, pour vérifier, mettre en mode
bordure, c’est le vérin droit qui doit bouger.
· Mettre l'instrument sous tension
>
Le curseur latéral est placé devant le sigle
· Sélectionner la machine avec la touche 4.
>
L'afficheur doit indiquer "DP".
· Valider la sélection par l'appui sur la touche 2.
· Se positionner sur 35 à l’affichage MS.
· Déplacer la fixation du support de vérin pour
avoir le vernier à 35.
· Bloquer .
· Fixer les câbles avec les colliers.
· Passer les câbles au centre de la machine.
GB
F
D
Présentation / Mise en fonctionnement
Presentation / Starting Up
Beschreibung / Inbetriebnahme
E
E
E
A
Fitting the MS unit to the machinery
1)
DPX EXPERT - MAGNUM :
· Fit the actuator mounting units .
· Fit the actuators , (location D. G. on the pack)
if required. Check by switching to borderspreading mode: the right-hand actuator should
be the one that moves.
· Switch on the instrument
>
The side cursor is over
· Press button 4 to select a machine.
>
"DP" should be displayed.
· Press button 2 to confirm your choice.
· Move to 35 when MS is displayed.
· Move the actuator support mounting to set
the adjustment scale reading to 35.
· Lock .
· Secure the cables with the clamps.
· Pass the cables into the centre of the machine.
A
Montage des Elektronikgeräts an die
Maschinen
1)
D
PX EXPERT - MAGNUM :
· Auslöserbefestigungen anbringen .
· Auslöser anbringen (Markierung D. G. am
Versorgungskabelbündel). Bei Bedarf zur
Prüfung auf Parzellenrandmodus stellen: der
Auslöser muss sich bewegen.
· Gerät in Betrieb setzen
>
Der seitliche Kursor steht vor dem Zeichen
· Maschine mit der Taste 4 wählen.
>
Der Bildschirm muss „ DP" anzeigen.
· Wahl mit Taste 2 bestätigen..
· Kursor am MS-Bildschirm auf 35 stellen.
· Befestigung des Auslöserträgers verschieben, so
dass der Nonius auf 35 steht .
· Blockieren .
· Kabel mit den Schellen befestigen.
· Kabel an der Mitte der Maschine vorbeiführen.
A
Page 14

14
Présentation / Mise en fonctionnement
Presentation / Starting Up
Beschreibung / Inbetriebnahme
E
2
4
1
3
DPA-XL
On/Off
DPA
100%
-
%
OK
+
%
A
2
4
Page 15

15
2)
DPA-XL :
· Prévoir la trappe inox spécifique.
· Monter les fixations de vérins .
· Monter les vérins (repérage D. G. sur le
faisceau) sur la machine.
· Mettre en mode bordure si besoin pour vérifier,
c'est le vérin droit qui doit bouger.
· Mettre l'instrument sous tension
>
Le curseur latéral est placé devant le sigle
· Sélectionner la machine avec la touche 4.
>
L'afficheur doit indiquer "
DPA
".
· Valider la sélection par l'appui sur la touche 2.
· Se positionner sur 35 à l’affichage MS.
· Déplacer la fixation du support de vérin pour
avoir le vernier à 35.
· Bloquer .
· Fixer les câbles avec les colliers.
· Passer les câbles vers l'avant du chassis.
GB
F
D
Présentation / Mise en fonctionnement
Presentation / Starting Up
Beschreibung / Inbetriebnahme
A
2)
DPA-XL :
· Use the special stainless steel shutter.
· Fit the actuator mountings .
· Fit the actuators (location D. G. on the pack)
onto the machine.
· Check by switching to border-spreading mode if
necessary: the right-hand actuator should be
the one that moves.
· Switch on the instrument
>
The side cursor is over
· Press button 4 to select a machine.
>
"
DPA
" should be displayed.
· Press button 2 to confirm your choice.
· Move to 35 when MS is displayed.
· Move the actuator support mounting to set the
adjustment scale reading to 35.
· Lock .
· Secure the cables with the clamps.
· Pass the cables towards the front of the chassis.
A
2)
DPA-XL :
· Spezifische Edelstahl-Klappe vorsehen.
· Auslöserbefestigungen anbringen .
· Auslöser (Marke D. G. am
Versorgungskabelbündel) an der Maschine anbringen.
· Bei Bedarf zur Prüfung auf Parzellenrandmodus
stellen, der Auslöser muss sich bewegen.
· Gerät in Betrieb setzen
>
Der seitliche Kursor steht vor dem Zeichen
· Maschine mit der Taste 4 wählen.
>
Der Bildschirm muss „
DPA
" anzeigen.
· Wahl mit Taste 2 bestätigen.
· Kursor am MS-Bildschirm auf 35 stellen.
· Befestigung des Auslöserträgers verschieben,
so dass der Nonius auf 35 steht .
· blockieren.
· Kabel mit den Schellen befestigen.
· Kabel vorn am Fahrgestell vorbeiführen.
A
Page 16

16
Présentation / Mise en fonctionnement
Presentation / Starting Up
Beschreibung / Inbetriebnahme
E
3
1
2
4
On/Off
SE
100%
-
%
OK
+
%
A
2
4
Page 17

17
3)
SEMOIRS :
· Monter le support de vérin à l'angle supérieur
gauche du variateur.
· Monter la fixation de vérin
(Vis H10 + Ecrou + vis à oeil ), et le vérin .
· Monter le vérin sur la machine.
· Mettre l'instrument sous tension
>
Le curseur latéral est placé devant le sigle
· Sélectionner la machine avec la touche 4.
>
L'afficheur doit indiquer "SE".
· Valider la sélection par l'appui sur la touche 2.
· Se positionner sur le repère 35
à l’affichage MS.
· Déplacer la fixation du support vérin pour avoir le
vernier à 35 (réglage avec vis à oeil
).
· Bloquer la vis H10 et la vis à oeil .
· Fixer les câbles avec les colliers.
Remarque : Sans le support du vérin, vous avez de
disponible la molette permettant d'utiliser le variateur
manuel.
GB
F
D
Présentation / Mise en fonctionnement
Presentation / Starting Up
Beschreibung / Inbetriebnahme
A
3)
SEED DRILLS:
· Fit the actuator bracket in the upper left corner
of the variator.
· Fit the actuator mounting
(H10 bolt + Nut + eyelet screw ), and the
actuator .
· Fit the actuator onto the machine.
· Switch on the instrument
>
The side cursor is over
· Press button 4 to select a machine.
>
"SE" should be displayed.
· Press button 2 to confirm your choice.
· Move to 35 when MS is displayed.
· Move the actuator support mounting to set the
adjustment scale reading to 35 (adjust using the
eyelet screw ).
· Lock the H10 bolt and the eyelet screw into
position.
· Secure the cables with the clamps.
Note: without the actuator unit, a cursor wheel can be
provided to let you use the manual variator.
A
3)
DRILLMASCHINEN:
· Auslöserträger am oberen linken Winkel des Reglers
anbringen.
· Auslöserbefestigung und den Auslöser
anbringen (Schraube H10 + Mutter +
Ösenschraube )
· Auslöser an der Maschine anbringen
· Gerät in Betrieb setzen
>
Der seitliche Kursor steht vor dem Zeichen
· Maschine mit der Taste 4 wählen.
>
Der Bildschirm muss „SE" anzeigen.
· Wahl mit Taste 2 bestätigen.
· Kursor am MS-Bildschirm auf die Marke 35
positionieren.
· Befestigung des Auslöserträgers verschieben, so dass
der Nonius auf 35 steht (Einstellen mit Ösenschraube
).
· Schraube H10 und Ösenschraube feststellen.
· Kabel mit den Schellen befestigen.
Anmerkung : Ohne den Auslöserträger können Sie den
Regler mit dem Rädchen manuell betätigen.
A
Page 18

18
100%
OK
+
%
-
%
B
A
1
2
4
Utilisation
Use
Benutzung
B
A
SE
43
35
Page 19

19
Choix de l'utilisation
· Mettre l'instrument sous tension
>
Le curseur latéral est placé devant le sigle
· Sélectionner la machine avec la touche .
>
L'afficheur indique:
"SE" pour semoir.
"DP" pour distributeur d'engrais.
· Valider la sélection par l'appui sur la touche .
>
L'afficheur indique le dernier réglage mémorisé
des vérins.
Fonction débit
>
Appuyer sur la touche .
>
Le message " " apparaît et les vérins
s'initialisent.
>
Le curseur latéral se place devant le sigle
>
Les vérins se positionnent au repère 35 et le
message "
35
" apparaît.
>
L'afficheur indique " ".
Remarque : "
35
" est la valeur moyenne pour
réaliser l'essai de débit.
Pour les petites quantités/ha (ex: colza) mettre au
repère "15" par exemple à l'aide
des touches .
GB
F
D
Utilisation
Use
Benutzung
2
B
A
A
B
Choosing an application
· Switch on the instrument
>
The side cursor is over
· Press button to select a machine.
>
The display will read:
"SE" for a seed drill.
"DP" for a spreader.
· Press button to confirm your choice.
>
The display will show the most recently stored
actuator setting.
Flow function
>
Press button .
>
This message " " will appear and the
actuators will
be initiated.
>
The side cursor is over
>
The actuators will move to the 35 mark and
"35" will be displayed.
>
The display will read " ".
Note : "35" is the average setting for
performing a calibration test.
For low quantities per hectare (e.g. rape) set to
the "
15
" mark, for example, using .
A
B
A
B
Wahl des Maschinentyps
· Gerät in Betrieb setzen
>
Der seitliche Kursor steht vor dem Zeichen
· Mit Taste Maschine wählen.
>
Der Bildschirm zeigt an:
„SE" für Drillmaschine.
„DP" für Düngerstreuer.
· Wahl mit Taste bestätigen.
>
Der Bildschirm zeigt die zuletzt gespeicherte
Einstellung der Auslöser an.
Funktion Streumenge
>
Taste drücken.
>
Die Meldung „ " , die Auslöser werden
initialisiert.
>
Der seitliche Kursor stellt sich vor das Zeichen
>
Die Auslöser positionieren sich an der Marke 35
und die Meldung „
35
" erscheint.
>
Der Bildschirm zeigt „ " an.
Anmerkung: „35" ist der mittlere Wert für die
Durchführung der Abdrehprobe.
Bei kleinen Hektarausbringungsmengen (Raps)
zum Beispiel mit Hilfe der Tasten auf Marke
„
15
" einstellen.
A
B
A
B
Page 20

20
100%
D
OK
+
%
-
%
C
1
2
4
Utilisation
Use
Benutzung
B
a)
3.57
88
D
Kg/ha
Page 21

21
GB
F
D
Utilisation
Use
Benutzung
a) Essai de débit
· Appuyer sur la touche .
>
Le curseur latéral est placé devant le sigle
>
L'afficheur indique un poids théorique en Kg
>
Le boîtier est en attente.
· Faire l'essai de débit
(cf notice d'utilisation de la machine).
· Peser la quantité obtenue à l'essai.
· Entrer la valeur en Kg avec et .
Remarque :
Pour les petites valeurs, entrer 3 chiffres après la
virgule. (0,000 Kg)
· Appuyer sur la touche .
>
Le curseur se place sur la position
>
Le boîtier calcule et note une quantité en Kg/ha
théorique.
Deux choix possibles:
a) La dose inscrite est la dose voulue.
· Appuyer sur la touche .
>
Vous pouvez aller travailler.
b) La dose inscrite est différente de la dose voulue.
· Appuyer sur la touche ou pour mettre la
dose désirée.
· Appuyer sur la touche .
>
Vous pouvez aller travailler.
C
D
a) The calibration test
· Press button .
>
The side cursor is over
>
The display will show a hypothetical weight in kg
>
The unit is on standby.
· Carry out the calibration test
(refer to the machine’s instructions for use).
· Weigh the amount obtained from the test.
· Enter the weight in kg using and .
Note :
For low weights, enter a figure to 3 decimal places .
(0,000 Kg)
· Press button .
>
The cursor moves to
>
The unit will calculate and note a hypothetical
amount in kg/ha.
There are two possibilities:
a) If the registered dose is the correct dose:
· Press button .
>
You may now begin work.
b) If the registered dose is not the correct dose:
· Press button or to enter the required dose.
· Press button .
>
You may now begin work.
C
D
a) Abdrehprobe
· Taste drücken.
>
Der seitliche Kursor steht vor dem Zeichen
>
Der Bildschirm zeigt ein theoretisches Kilogewicht
an.
>
Das MS-Gerät ist in Bereitschaft.
· Abdrehprobe durchführen.
(Siehe Bedienungsanleitung der Maschine).
· Bei der Probe erhaltene Menge wiegen.
· Erhaltenen Kilowert mit und eingeben.
Anmerkung :
Bei kleinen Werten 3 Ziffern hinter dem Komma
angeben. (0,000 Kg)
· Ta ste drücken.
>
Der Kursor stellt sich auf die Position
>
Das MS-Gerät berechnet und notiert eine
theoretische Menge in kg/ha.
Zwei mögliche Fälle:
a) Die angegebene Dosierung entspricht der
gewünschten:
· Taste drücken.
>
Sie können mit der Arbeit beginnen.
b) Die angegebene Dosierung entspricht nicht der
gewünschten:
· Taste oder drücken und gewünschte
Dosierung einstellen.
· Taste drücken.
>
Sie können mit der Arbeit beginnen.
C
D
Page 22

22
+
%
-
%
D
OK
100%
C
2
3
Utilisation
Use
Benutzung
B
b)
D
135
D
88
D
Kg/ha
Kg/ha
Kg/ha
Page 23

23
b) Accès direct au réglage après arrêt du boîtier
· Appuyer sur la touche après la mise sous
tension.
· Appuyer sur la touche .
>
Le curseur latéral se positionne sur
et l'afficheur indique le dernier réglage
mémorisé des vérins.
· Appuyer sur la touche . pour initialiser la
même valeur.
>
L'écran indique
" "
le temps que le
vérin se positionne au repère programmé.
>
Vous pouvez aller travailler.
GB
F
D
Utilisation
Use
Benutzung
C
b) Gaining direct access to the settings when the unit
has been switched off
· Press button after power has been
switched on.
· Press button .
>
The side cursor will move to
and the display will bring up the most recently
stored actuator settings.
· Press button to initiate the same value.
>
The message
" "
will be displayed on
screen while the actuator is transferring to the
programmed mark.
>
You may now begin work.
C
b) Direkter Zugang zur Einstellung nach Ausschalten
des MS-Geräts.
· Nach in Betrieb setzen Taste drücken.
· Taste drücken.
>
Der seitliche Kursor stellt sich auf
und der Bildschirm zeigt die zuletzt gespeicherte
Einstellung der Auslöser an.
· Taste drücken um den gleichen Wert zu
initialisieren.
>
Der Bildschirm zeigt „
"
, bis der Auslöser
sich auf die
eingestellte Marke positioniert.
>
Sie können mit der Arbeit beginnen.
C
Page 24

24
D
OK
100%
+
%
-
%
1
2
3
4
Utilisation
Use
Benutzung
B
c)
135
D
125
D
135
D
115
D
d)
Kg/ha
Kg/ha
Kg/ha
Kg/ha
Page 25

25
c) Modification de la dose de référence
· Rester appuyé 3 secondes sur ou sur .
>
La valeur de la dose clignote seule
· Modifier la valeur avec les touches et .
>
La valeur clignote.
>
La valeur de la dose réglée s'affiche.
· Valider en appuyant sur la touche lorsque
la valeur est obtenue à l'affichage.
Remarque :
La modification de la dose de référence est à effectuer
uniquement avec la même semence. Sinon procéder à
un nouvel essai.
d) Modulation
· Appuyer sur la touche pour diminuer la dose
de 10%.
· Appuyer sur la touche pour augmenter la
dose de 10%.
· Appuyer sur la touche pour revenir à la dose
de référence.
>
La dose est modulée par palier de 10% à
chaque impulsion.
>
La valeur de modulation (%) s'affiche en
alternance avec la dose réglée.
Remarque :
Si la dose est trop fortement augmentée et que le semoir,
ou le distributeur ne peut la réaliser, la quantité inscrite
clignote.
GB
F
D
Utilisation
Use
Benutzung
c) Changing the standard dose setting
· Keep button or pressed in for 3 seconds.
>
The dose setting will start to flash
· Change the dose setting using buttons and .
>
The dose setting will start to flash.
>
The new dose setting will be displayed.
· Press button to confirm the new dose setting
displayed.
Note:
The standard dose setting should only be changed for
the same seed type. In other cases, a new test should
be performed.
d) Adjustments
· Press button to reduce the dose by 10%.
· Press button to increase the dose by 10%.
· Press button to revert to the standard dose.
>
The dose is adjusted up or down by 10% each
time the buttons are pressed.
>
The display switches back and forth between the
rate of adjustment (%) and the new dose.
Note:
If there is a sharp increase in the dose setting that the
seed drill or spreader cannot handle, the registered
amount will flash.
c) Änderung der Vergleichsdosierung
· 3 Sekunden ununterbrochen auf oder
drücken.
>
Nur der Dosierungswert blinkt
· Wert mit den Tasten und ändern .
>
Dosierungswert blinkt.
>
Eingestellter Dosierungswert wird angezeigt.
· Bestätigen mit Taste wenn der Wert am
Bildschirm erscheint.
Anmerkung :
Die Änderung der Vergleichsdosierung gilt nur für das
gleiche Saatgut. Anderenfalls neue Probe durchführen.
d) Dosierungsänderung
· Einmaliges Drücken auf Taste vermindert die
Dosierung um 10%.
· Einmaliges Drücken auf Taste erhöht die
Dosierung um 10%.
· Taste führt zurück zur Vergleichsdosierung.
>
Bei jedem Impuls verändert sich die Dosierung
um eine 10%-Stufe
>
Der Änderungswert (%) wird im Wechsel mit der
eingestellten Dosierung angezeigt.
Anmerkung :
Wird die Dosierung so weit nach oben verstellt, dass die
Drillmaschine bzw. der Düngerstreuer diese nicht
realisieren kann, blinkt die angegebene Menge.
Page 26

26
+
%
-
%
E
OK
100%
2
3
Utilisation
Use
Benutzung
C
E
bord
E
135
Page 27

27
Fonction bordure pour distributeur d'engrais
· Sélectionner la fonction avec la touche .
>
Le message "
b o r d
" s'affiche à l'écran.
>
Après 3 secondes, il s'affiche en alternance avec la
valeur de la dose par ha.
>
Le débit est automatiquement réduit de 20% côté
droit.
· Appuyer sur la touche pour quitter le mode
bordure.
>
La valeur en Kg/ha s'affiche.
GB
F
D
Utilisation
Use
Benutzung
C
E
E
Border-spreading function for the fertilizer spreader
· Press button to select the function.
>
"
b o r d er
" will appear on the screen.
>
After 3 seconds, "
b o r d er
" and the dose
setting/ha will be displayed alternately on the screen.
>
The application rate is automatically reduced by 20%
on the right-hand side.
· Press button to exit border-spreading mode.
>
The kg/ha setting will be displayed.
C
Funktion Parzellenrand für Düngerstreuer
· Funktion mit der Taste wählen.
>
Die Meldung „
b o r d
" erscheint am Bildschirm.
>
Nach 3 Sekunden erscheint sie im Wechsel mit dem
Wert der Hektardosierung.
>
Die Streumenge reduziert sich automatisch rechts
um 20%.
· Durch Drücken auf Taste verlassen Sie den
Parzellenrandmodus.
>
Der Dosierungswert in kg/ha wird angezeigt.
C
Page 28

28
Informations
Information
Informationen
A
Page 29

29
Informations
Information
Informationen
Schématisation du circuit Entretien
a)
Boîtier Electronique
• Le boîtier ne nécessite pas d’entretien.
• Il est impératif toutefois de le conserver dans un lieu sec l’hiver.
b) Capteurs
•Les capteurs inductifs ne demandent aucun entretien toutefois
attention aux chocs qui pourraient provoquer le déréglage de
leurs positionnements.
• Bien nettoyer le semoir aprés utilisation pour éviter les dégats
de rongeurs.
B
GB
F
D
3
A
System outline Maintenance
a)
Electronic control box
• The control box does not require any maintenance.
• It must nevertheless be kept in a dry place during winter.
b) Sensors
•The inductive sensors do not require maintenance. However,
care must be taken to avoid knocks as these could throw their
positional settings out of line.
•The seed drill should be cleaned thoroughly after use to prevent
damage caused by rodents.
A
B
Schaltplan Wartung
a)
Elektronikgerät
• Das MS-Gerät ist wartungsfrei.
•MS-Gerät im Winter unbedingt trocken aufbewahren.
b) Sensoren
•Die Induktionssensoren sind wartungsfrei. Vorsicht vor
Erschütterungen, die die Einstellungen verschieben könnten.
• Drillmaschine nach der Benutzung zum Schutz vor Nagetieren
gut reinigen.
A
B
Page 30

30
Informations
Information
Informationen
GB
F
D
Remèdes aux problèmes
C
Pannes
Le boîtier ne s’allume pas.
Le boîtier s’allume puis s’éteint.
Le / les vérin(s) ne bouge(nt) plus.
Remèdes
Vérifier le branchement 12 V continu.
Vérifier le fusible 7,5 A.
Vérifier la polarité + / -.
Vérifier le fusible 5 A.
Troubleshooting
C
Faults
The control box does not come on.
The control box comes on and then goes off.
No response from the actuator(s).
Solutions
Check the 12 V DC connection.
Check the 7.5 amp fuse.
Check the + / - polarity.
Check the 5 amp fuse.
Abhilfe bei Störungen
C
Störungen
Das MS-Gerät schaltet sich nicht ein.
Das MS-Gerät schaltet sich ein und sofort wieder aus.
Der/ die Auslöser bewegen sich nicht mehr.
Abhilfe
12 V-Gleichstromanschluss überprüfen.
7,5 A-Sicherung überprüfen
+/- Polung überprüfen.
5 A-Sicherung überprüfen.
 Loading...