

Notice Originale
Original Instructions
Originalbetriebsanleitung
A LIRE ATTENTIVEMENT AVANT D’UTILISER LE BOîTIER
PLEASE READ CAREFULLY BEFORE USING THE CONTROL BOX
VOR GEBRAUCH DES ELEKTRONIKGERÄTS SORGFÄLTIG LESEN
Réf: 400 116-03 - FR-GB-DE / CD
Les Portes de Bretagne
P.A. de la Gaultière – 35220 CHATEAUBOURG France
Tél :(33)02-99-00-84-84 · Fax : (33)02-99-62-39-38
Site Internet : www.sulky-burel.com
E-Mail : info@sulky-burel.com
Adresse postale
SULKY-BUREL – CS 20005 – 35538 NOYAL SUR VILAINE CEDEX France
Consignes de sécurité
Safety instructions
Sicherheitsvorschriften
• Respecter les instructions de cette notice.
• Respecter les instructions du manuel d’utilisation du X correspondant.
• Ne jamais quitter le poste de conduite lorsque le tracteur est en marche.
• Réaliser les réglages du X44 HI-TECH tracteur à l’arrêt.
• Assurez-vous qu’il n’y ait personne autour de la machine avant d’effectuer l’étalonnage du X44 HI-TECH.
FR
Risque d’accident Risque d’endommager
la machine
• Ces symboles sont utilisés dans cette notice chaque fois que des recommandations concernent votre sécurité, celle d’autrui ou le bon fonctionnement de la machine.
• Transmettez impérativement ces recommandations à tout utilisateur de la machine.
• Follow the instructions contained in this manual.
• Follow the X User Manual recommendations.
• Never leave the driver’s position whilst the tractor is running.
• Carry out X44 HI-TECH adjustments with the tractor stopped.
• Make sure no one is near the machine before calibrating the X44 HI-TECH unit.
Risk of accident Risk of damage
to the machine
• These symbols are used in these instructions every time recommendations are provided concerning your
safety, the safety of others or the correct operation of the machine.
• These recommendations must be given to all users of the machine.
Faciliter le travail
Operating tip
Ne pas jeter le boîtier
Do not discard the unit
GB
• Die Anweisungen dieser Anleitung einhalten.
• Die Anweisungen des Benutzerhandbuchs des entsprechenden X einhalten.
• Den Führerstand niemals bei laufendem Schleppermotor verlassen.
• Einstellungen des X44 HI-TECH bei ausgestelltem Schlepper vornehmen.
• Darauf achten, dass sich beim Kalibrieren des X44 HI-TECH niemand im Maschinenbereich aufhält.
Unfallgefahr Gefahr, die Maschine zu
beschädigen
• Diese Symbole werden in dieser Anleitung jedes Mal dann benutzt, wenn Empfehlungen für Ihre und anderer Personen Sicherheit oder den einwandfreien Betrieb der Maschine gegeben werden.
• Es ist unerlässlich, diese Empfehlungen an alle Benutzer der Maschine weiterzugeben.
Arbeitserleichterung
Elektronikgerät nicht im
Müll entsorgen
2
DE
SOMMAIRE
Français
Pages
6-7 • A Présentation du système X44 HI-TECH
Pages
8-15 • A Réglage
PRESENTATION
RECOMMANDATION
1
1
1
2
Pages
16-17
18-21
22-23
Pages ENTRETIEN
24-25 • A Entretien
UTILISATION
• A Réglage largeur
• B Fonctions justax
• c Contrôle largeur
1
3
1
4
Lire attentivement la notice avant l’utilisation. Comprendre son
boîtier électronique c’est mieux l’utiliser. En français suivre le symbole.
FR
3

English
CONTENTS
Pages
6-7 • A Description of the X44 HI-TECH system
PRESENTATION
Pages RECOMMENDATIONS
8-15
• A Settings
Pages
16-17
18-21
22-23
USE
• A Setting the width
• B Justax functions
• C Checking the width
Pages MAINTENANCE
24-25 • A Maintenance
Read the operator's manual carefully before use. Understanding your electronic unit
will help you make better use of it. English instructions: follow this
4
symbol.
GB
INHALTSVERZEICHNIS
Deutsch
Seite
6-7 • A Beschreibung des Systems X44 HI-TECH
Seite
8-15
BESCHREIBUNG
EMPFEHLUNG
• A Einstellung
1
1
1
2
Seite
16-17
18-21
22-23
Seite
24-25
BENUTZUNG
• A Breiteneinstellung
• B Justax-Funktion
• C Arbeitsbreite uberprufung
WARTUNG
• A Instandhaltung
1
3
1
4
Anleitung vor Benutzung sorgfältig durchlesen. Das Elektronikgerät richtig zu verstehen, heißt, es besser (aus)nutzen zu können. Die deutsche Fassung ist
mit gekennzeichnet.
DE
55
Présentation / Presentation / Beschreibung
A
2
1
4
4
5
3
6
6
Présentation / Presentation / Beschreibung
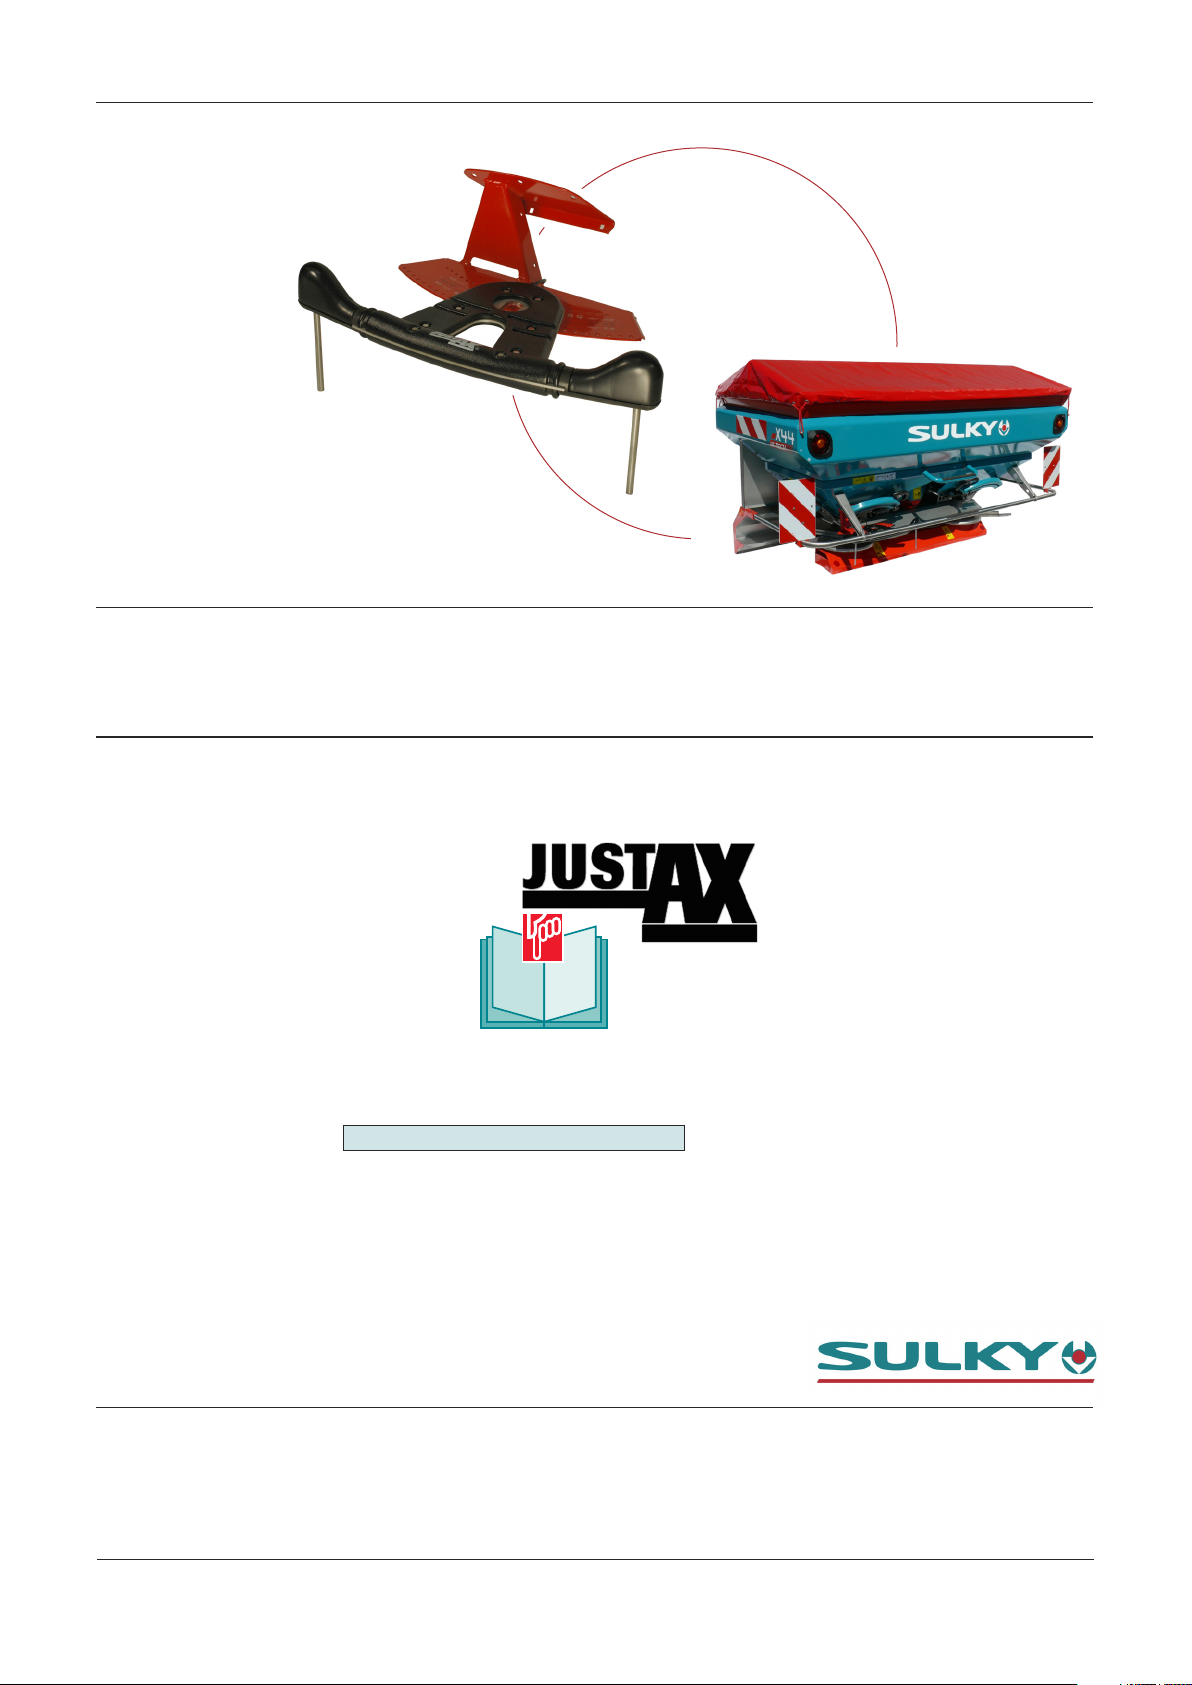
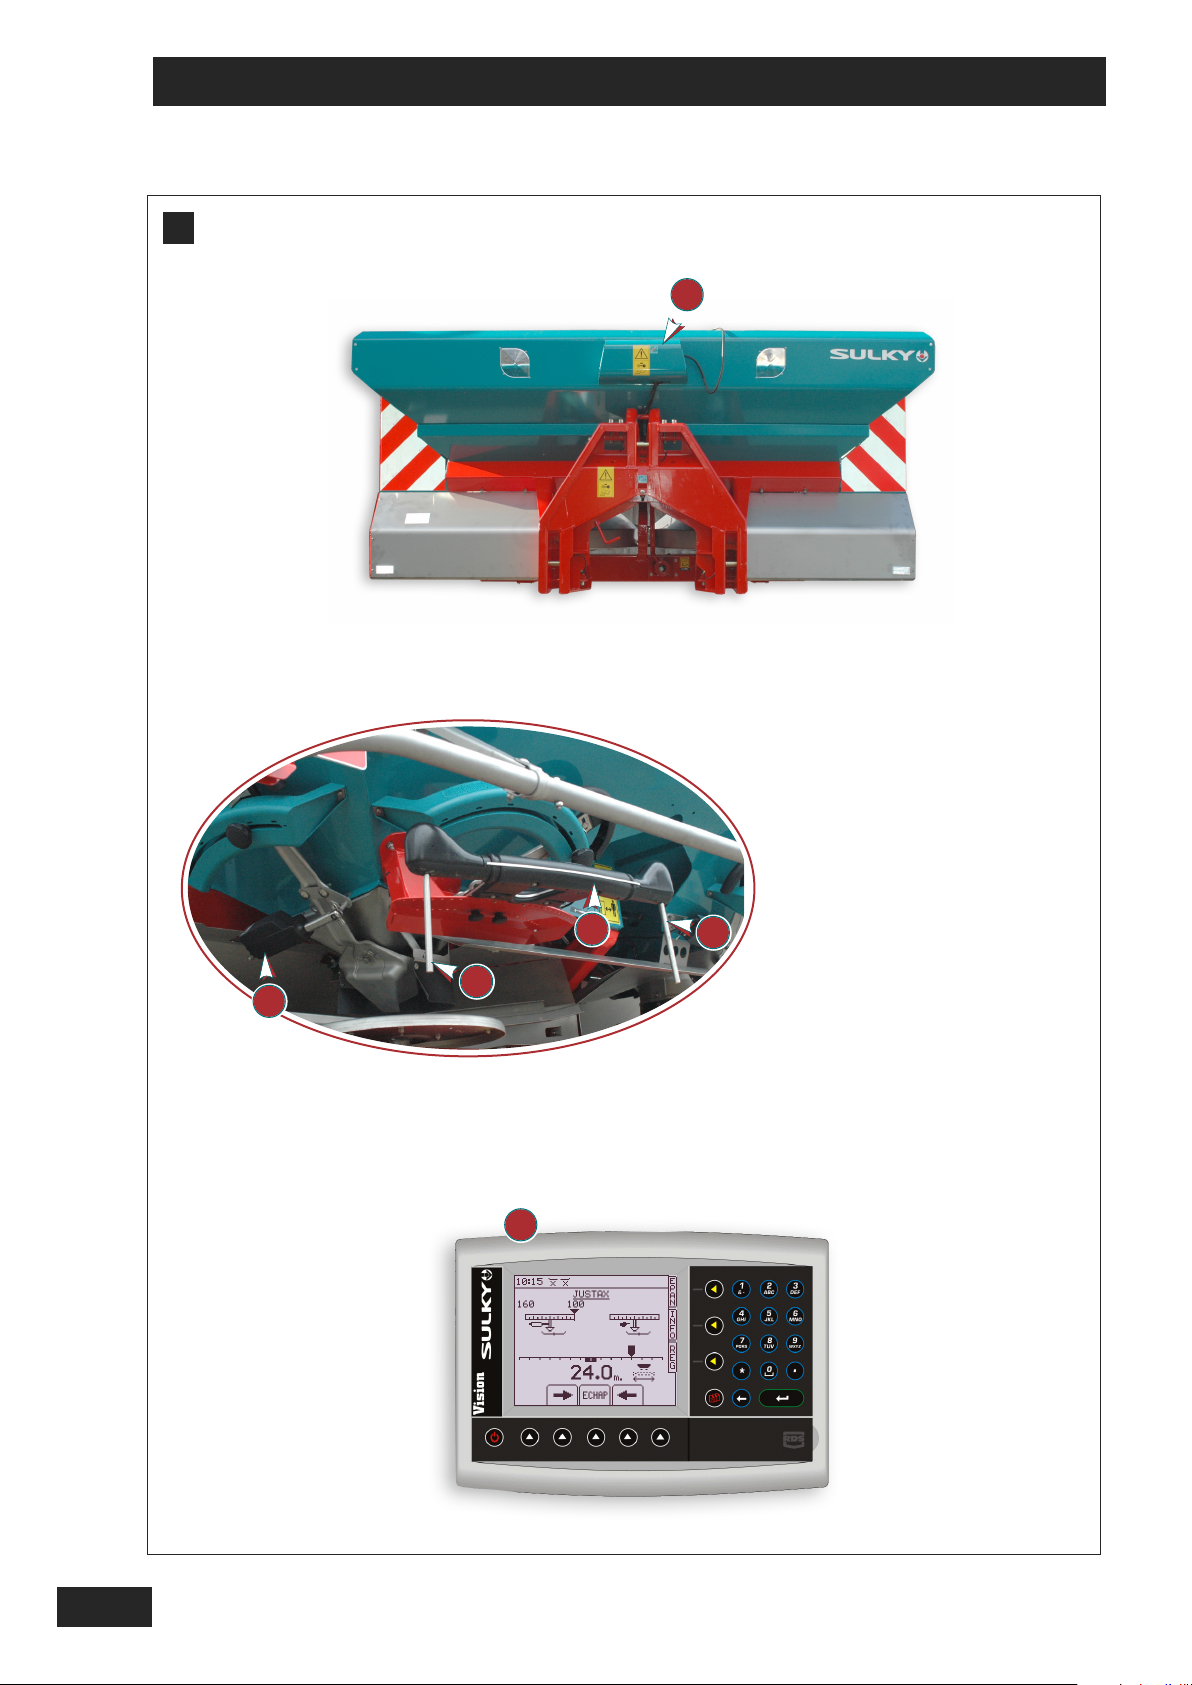
Présentation du système X44 HI-TECH
A
FR
Le justax est uniquement conçu pour être utilisé
1
avec le distributeur d’engrais.
Toute autre utilisation sera considéré comme non
conforme.
La responsabilité du constructeur ne saura être
engagée si des modifications ont été effectuées sur le
système.
Le Justax est un outil d’assistance permettant d’optimi
ser la position de la nappe d’épandage pour une largeur
demandée.
Description of the X44 HI-TECH system
A
The Justax is only designed to be used with fertilizer
1
spreaders.
Any other form of use shall be considered to be noncompliant.
The manufacturer cannot be held liable for defects if
modifications have been made to the system.
Il se compose de :
- une boîte de connexion
- une commande qui est intégrée dans la console
2
3
vision WPB.
- Du justax qui est positionné côté gauche, et
comprend 2 capteurs .
- Un vérin électrique pour piloter la goulotte de
1
4
5
largeur côté gauche.
It is composed of:
- a connection box
- a control panel that is integrated into the WPB
2
3
vision console.
- the Justax which is located on the left hand side,
and includes 2 sensors .
An electric cylinder for controlling the spreading
1
4
5
chute on the left.
1
1
GB
The Justax is a tool that helps the user to optimise the
position of the fertilizer distribution area for a required
width.
Beschreibung des Systems X44 HI-TECH
A
Der Justax ist nur zur Benutzung mit dem Düngers-
1
treuer gedacht.
Jede andere Benutzung gilt als nicht bestimmungsgemäß.
Der Hersteller kann nicht zur Verantwortung gezogen
werden, wenn Änderungen am System vorgenommen
wurden.
Der Justax ist ein Hilfegerät zur Optimierung der Position der Streubahn für eine gegebene Breite.
Zusammensetzung:
- eine Anschlußbox
- eine Bedienungsoberfläche die in der VISION
2
3
WPB-Konsole integriert ist.
- Der Justax , der links positioniert ist und mit 2 Sensoren ausgestattet ist.
Ein elektrischer Arbeitszylinder , um die Breitenrinne
1
4
5
links zu steuern.
DE
7
7
Recommandation / Recommendations / Empfehlung
A
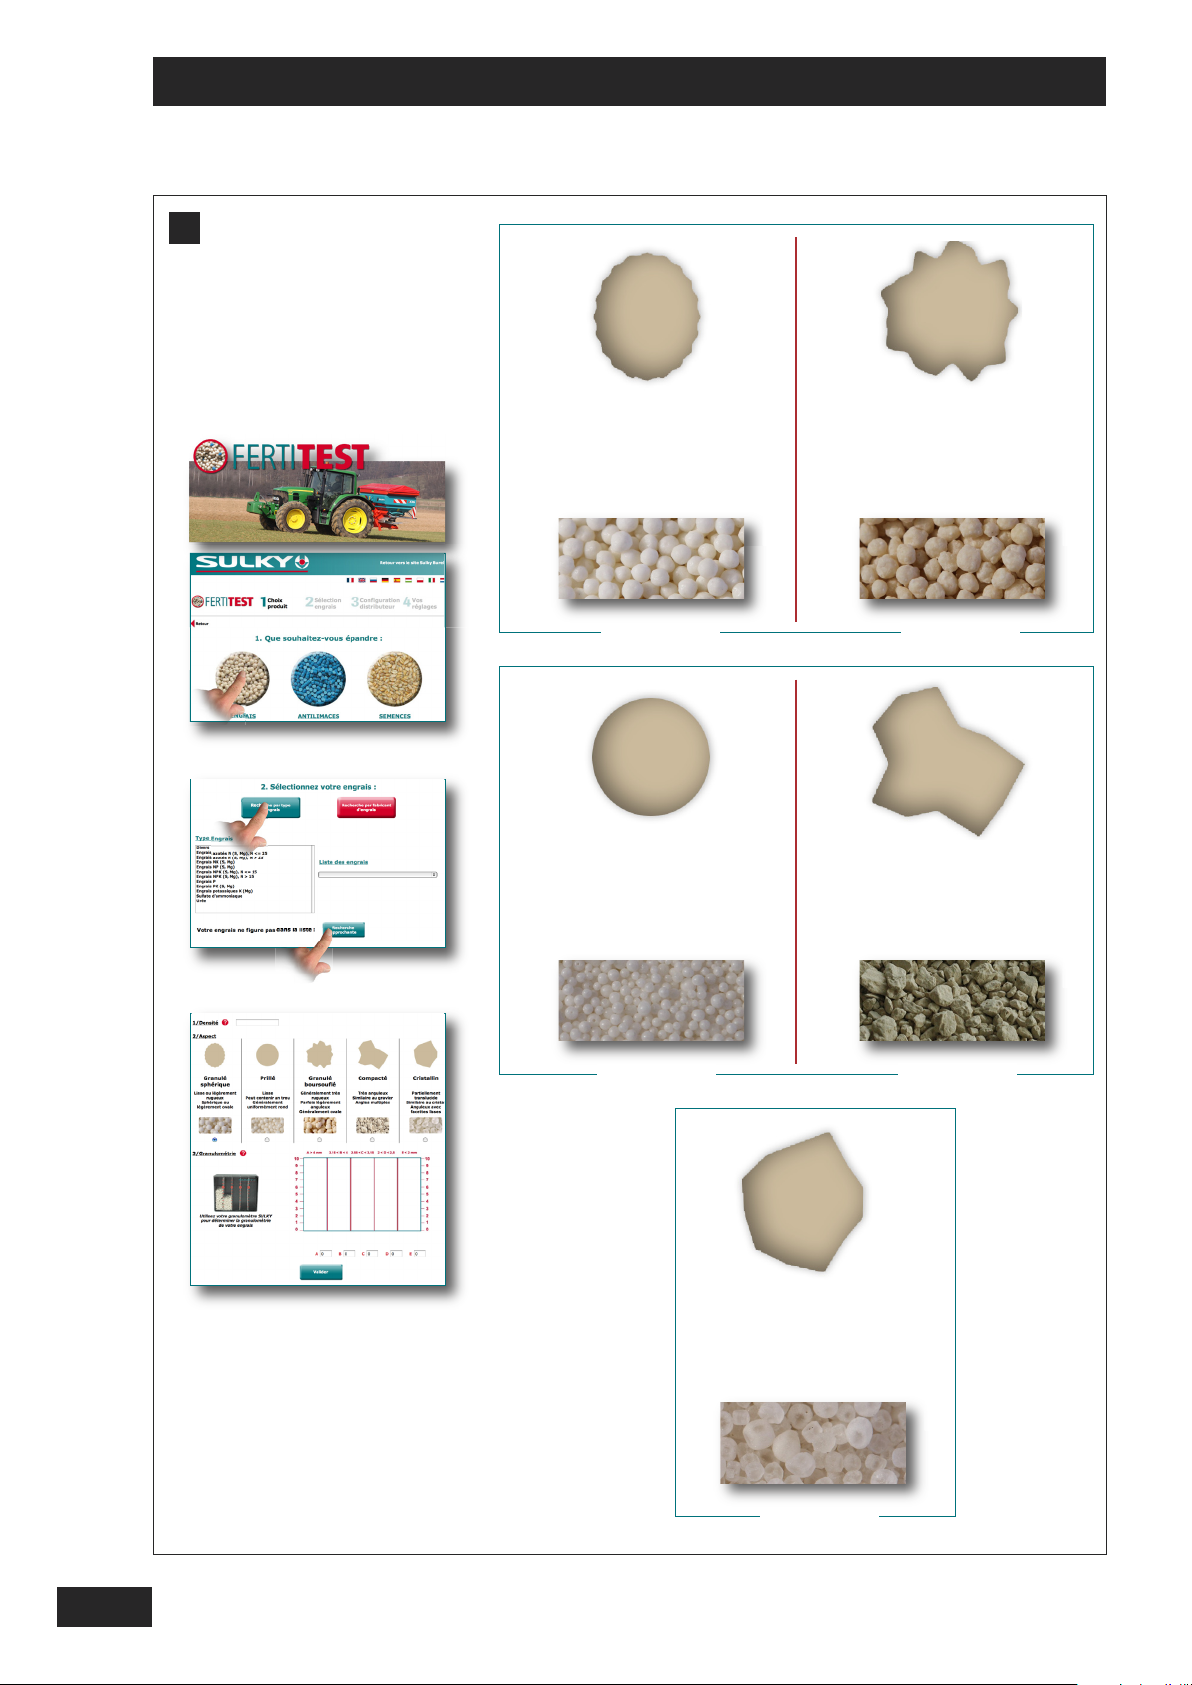
GRANULÉ SPHÉRIQUE
Lisse ou légèrement rugueux.
Sphérique ou légèrement ovale.
PHOTO - 1 -
GRANULÉ PRILLÉ
Lisse.
Peut contenir un trou.
Généralement uniformément rond.
GRANULÉ BOURSOUFLÉ
Généralement très rugueux.
Parfois légèrement anguleux.
Généralement ovale.
PHOTO - 2 -
GRANULÉ COMPACTÉ
Très anguleux.
Similaire au gravier.
Angles multiples.
PHOTO - 3 -
GRANULÉ CRISTALLIN
Partiellement translucide.
Similaire au cristal.
Anguleux avec facettes lisse.
PHOTO - 5 -
PHOTO - 4 -
8

Recommandation / Recommendations / Empfehlung
Réglage
A
Caractéristiques des engrais, pour obtenir une
grande largeur de travail, la densité, la forme et la
structure de l'engrais sont importantes et il est préférable de choisir le produit le mieux adapté.
SPECT SUR FERTITEST
A
- A l’aide des schémas et photos sur
Valider si :
“ http://fertitest.sulky-burel.com”
FR
Avant d’utiliser le justax il faut valider l’aptitude physique pour chaque engrais utilisé . Pour le faire il
faut contrôler et réunir les trois conditions présentées ci-dessous :
1ère Condition
-
Mesurer la densité ( = le poids d’un litre) de l’engrais utilisé.
LECTURE DU RÉSULTAT
- Pour atteindre les performances maximales
du distributeur (exemple 34m avec jeu de
pales 32 -44m): La densité doit être supérieure ou égale à 0,95 .
2 ème Condition
-
Valider à partir de la forme des granulés l’aptitude
à atteindre la largeur souhaitée.
Settings
A
Fertilizer characteristics, the density, shape and structure
of the fertilizer are important factors in obtaining a large
spreading width, and so the most suitable product
should be selected.
Before using the Justax you must validate the physical
ability for each fertilizer used. To do so, you must check
that the three conditions presented below are met:
1st condition
- Measure the density ( = the weight of one litre) of the
fertilizer used.
R
EADING THE RESULTS
- To achieve maximum performance with your
spreader (34m with a 32 -44m set of vanes for
example): The density must be greater than or
equal to 0.95.
2nd condition
- From the fertilizer granules, validate the ability to
achieve the required width.
. GRANULÉ SPHÉRIQUE ET GRANULÉ BOURSOUFLÉ
“PHOTOS N°1 ET N°2”
La largeur maxi possible est égale au maximum à
ce qui est noté sur les pales.
Pales 24-36 Largeur maxi 36m
Pales 32-44 Largeur maxi 44m
. GRANULÉ PRILLÉ ET GRANULÉ COMPACTÉ
“PHOTOS N°3 ET N°4”
La largeur maxi possible est égale à:
Avec le jeu de pale 24-36 32m maxi
Avec le jeu de pale 32-44 36m maxi
. GRANULÉ CRISTALLIN “PHOTO N°5”
La largeur maxi possible est égale à:
Avec le jeu de pale 24-36 28m maxi
Avec le jeu de pale 32-44 36m maxi
SPECT ON FERTITEST
A
- Using the diagrams and photos on
“http://fertitest.sulky-burel.com”
Validate if:
. SPHERICAL GRANULES AND LUMPY GRANULES
“PHOTOS NO. 1 AND NO. 2”
The max possible width is equal to the maximum marked on the vanes.
24-36 vanes Max width 36m
32-44 vanes Max width 44m
. PRILLED GRANULES AND COMPACTED GRANULES
“PHOTOS NO. 3 AND NO. 4”
The max possible width is equal to:
With 24-36 set of vanes 32m max
With 32-44 set of vanes 36m max
. CRYSTALLINE GRANULES “PHOTO NO. 5”
The max possible width is equal to:
With 24-36 set of vanes 28m max
With 32-44 set of vanes 36m max
GB
DE
1
2
Einstellung
A
Merkmale der Düngemittel: Um eine große Arbeitsbreite zu erreichen, sind Dichte, Struktur und Form des
Düngers von Bedeutung, und es ist vorzuziehen, das am
besten geeignete Produkt zu wählen.
Vor Betrieb des Justax die Eignung jedes Düngertyps
testen. Dazu ist sicherzustellen, dass die drei folgenden
Bedingungen gleichzeitig gelten:
Erste Bedingung
- Messung der Dichte (= Gewicht eines Liters) des benutzten Düngers.
A
BLESEN DES ERGEBNISSES
- Für optimale Leistungen des Düngerstreuers (34m
mit Streuschaufelsatz 32-44m zum Beispiel) sollte
die Dichte mindestens 0,95 betragen.
Zweite Bedingung
- Anhand der Form des Düngergranulats prüfen, ob dieser die gewünschte Arbeitsbreite erreichen kann.
A
USSEHEN MIT FERTITEST
- Anhand der Schemata und Fotos unter
“http://fertitest.sulky-burel.com”
Prüfen ob:
. FEIN UND GROB GEKÖRNTES GRANULAT
« FOTO S NR. 1 UND NR. 2 »
Die mögliche Höchstbreite entspricht dem auf den
Wurfschaufeln genannten Höchstwert.
Wurfschaufeln 24-36 Höchstbreite 36m
Wurfschaufeln 32-44 Höchstbreite 44m
. GEPRILLTES UND GEBROCHENES GRANULAT
« FOTO S NR. 3 UND NR. 4 »
Die mögliche Höchstbreite entspricht:
Mit dem Wurfschaufelsatz 24-36 höchstens 32m
Mit dem Wurfschaufelsatz 32-44 höchstens 36m
. KRISTALLISCHES GRANULAT, FOTO NR. 5
Die mögliche Höchstbreite entspricht:
Mit dem Wurfschaufelsatz 24-36 höchstens 28m
Mit dem Wurfschaufelsatz 32-44 höchstens 36m
9

Recommandation / Recommendations / Empfehlung
A
C
E
D
4
3,15
B
2,5
A
2
1
10cm
D
E
E
C
B
A
2
3
10
D
E
C
B
A

Recommandation / Recommendations / Empfehlung
A
FR
3 ème Condition
Avant d’utiliser le justax il faut :
- Mesurer à l’aide du granulomètre SULKY l’aptitude
physique de l’engrais utilisé pour atteindre la largeur souhaitée.
A
3rdcondition
Before using the Justax you must:
-
Measure the physical ability of the fertilizer used
to achieve the desired width using the SULKY
granulometer
Description de l’ utilisation du granulomètre
1
Positionner le couvercle ouvert. Remplir d'en-
grais le compartiment gauche du granulomètre puis refermer le couvercle.
2
Agiter le granulomètre pendant au minimum
10 secondes.
3
L'appareil reposé, lire directement l'histo-
gramme formé par les cinq colonnes graduées
de produits séparés par les tamis calibrés.
Description of the use of the granulometer
1
Open the cover. Fill the left-hand
compartment of the granulometer with
fertilizer then close the cover.
2
Shake the granulometer for a minimum of
10 seconds.
GB
1
2
A
Dritte Bedingung
Vor Benutzung des Justax muss:
Anhand des SULKY Korngrößenmessers die
physikalische Eignung des Düngergranulats
messen, um die gewünschte Breite zu erreichen.
3
After allowing the device to settle, read the
“bar chart” formed by the five graduated
columns of product separated by the calibrated grills.
Beschreibung
1
Deckel öffnen. Linke Unterteilung des Korn-
des Korngrößenmessers
größenmessers füllen, Deckel wieder schließen.
2
➩ Den Kornverteiler mindestens 10 Sekunde
lang schütteln.
3
➩ Bei abgelegtem Gerät direkt das Streifen-
diagramm ablesen, welches durch die fünf
skalierte Produktsäulen gebildet ist, die
durch kalibrierte Siebe getrennt sind.
DE
11

Recommandation / Recommendations / Empfehlung
A
+
1
E
DC
BA
+
12
12

Recommandation / Recommendations / Empfehlung
FR
A
LES
COMPARTIMENTS SÉPARÉS PAR LES TAMIS CALIBRÉS
SONT LES SUIVANTS
A :- de 2mm
B : de 2,5 à 2mm
C : de 3,15 à 2,5mm
D : de 4 à 3,15mm
E : + de 4mm
Lecture du résultat
-
Pour atteindre les performances maximales du
distributeur
(32m avec jeu de pales 32-44m par exemple):
80% de l'engrais doit avoir une granulométrie
supérieure à 2,5mm avec une densité supérieure
ou égale à 0,9.
C'est à dire avec le granulomètre
C + D + E ≥ 8cm.
R
EMARQUE
Pour l'urée, le chlorure de potasse et tous les
compactés en général :
:
1
:
A
THE COMPARTMENTS SEPARATED BY THE CALIBRATED GRILLS ARE
AS FOLLOWS:
A = < 2mm
B = 2,5 to 2mm
C = 3.15 to 2.5mm
D = 4 to 3.15mm
E = > 4mm
Reading the result
-
To achieve maximum performance with your
spreader
(32 m with a 32-44m set of vanes, for example):
80% of the fertilizer granules must be
larger than 2.5 mm and a density at least equal
to 0.9; i.e.
Pale 24-36m Largeur maxi 32m
Pale 32-44m Largeur maxi 36m
Voir notice réglage largeur pour valider l’aptitude.
Si le distributeur n'est pas utilisé au maximum de
ces capacités.
(24m avec jeu de pale 24-36m par exemple)
le pourcentage d'engrais supérieur à 2,5mm peut
être moins important.
1
2
GB
24-36 m vanes max. width of 32 m
32-44 m vanes max. width of 36 m
See the instructions for setting the width to verify
the fertilizer’s ability to achieve the desired result.
If the spreader is not used to its full capacity
(24 m with a 24-36m set of vanes, for example),
the percentage of fertilizer over 2.5 mm may be
reduced.
With the granulometer
1
C+D+E ≥ 8 cm
Note
:
With urea, potassium chloride and all compact fertilizers in general:
A
DIE VON DEN KALIBRIERTEN SIEBEN GETRENNTEN BEREICHEN
SIND NACHSTEHEND ERWÄHNT:
A :- als 2 mm
B : von 2,5 bis 2 mm
C: von 3,15 bis 2,5 mm
D : von 4 bis 3,15 mm
E : + als 4 mm
Ablesung des Resultats
-
Zum Erzielen maximaler Leistungen des Streuers
(z. B. 32 m mit Schaufel- Spiel 32-44m): 80%
des Düngers müssen eine Korngröße von
mehr als 2,5 mm mit einer Dichte von mehr oder
gleich 0,9 aufweisen.
Bzw. mit dem Korngrößenmesser
1
C+D+E ≥ 8 cm
Anmerkung. Für Harnstoff, Kaliumchlorid und allgemein alle verdichteten Produkte:
DE
Schaufel -24-36 m maxi. Breite 32 m
Schaufel -32-44 m maxi. Breite 36 m
S. Breiteneinstellungsnotiz zur Bestätigung der Fähigkeit
Wird die Kapazität des Streuers nicht maximal
genutzt
(z.B. 24 m mit Schaufelspiel 24-36 m), kann der
Anteil von mehr als 2,5 mm großem Dünger geringer sein.
13

Recommandation / Recommendations / Empfehlung
5
A
540tr/mn
70cm
a
14
b
a
b
c
c
1

Recommandation / Recommendations / Empfehlung
FR
A
VALIDER LES RÉGLAGES DE BASE SUR L’ÉPANDEUR
’ENGRAIS
D
-
Vitesse de la prise de force.
-H
auteur des plateaux d’épandage.
-
Hauteur de la chape d’attelage inférieur.
-R
églage de l’aplomb.
C
ONSULTER LA NOTICE D’UTILISATION DU
X44 HI-TECH
VALIDER L’ADÉQUATION ENTRE LE JEUX DE PALES
PRÉSENT SUR LA MACHINE ET LA LARGEUR SOUHAITÉE
A
CHECK THE BASIC SETTINGS ON THE FERTILIZER SPREADER
- PTO speed.
- Height of the spreading discs.
- Height of the lower linkage point.
- Angle setting of the machine.
ONSULT THE OPERATING INSTRUCTIONS FOR
C
X44 HI-TECH
THE
-
Il est important de vérifier la correspondance entre
le jeu de pale qui est sur la machine et la largeur
souhaitée.
Exemple:
Pales 32-44:
largeur de travail possible de 32 à 44 m si et seulement si les caractéristiques de l’engrais, la densité,
la forme et la structure de l'engrais sont réunies
pour atteindre la largeur souhaitée.
Se reporter à la notice d’utilisation et la notice tableaux
de réglage (largeur et débit )
- It is important to check that the set of vanes that is on
the machine and the desired width correspond to one
another.
Example
:
32-44 vanes:
32 to 44 m working width possible if and only if the
fertilizer's characteristics, the density, the form and
the structure of the fertilizer are met to achieve the
required width.
1
1
GB
C
HECK THE SUITABILITY OF THE SET OF VANES ON THE MA-
CHINE FOR THE DESIRED WIDTH.
A
DIE GRUNDEINSTELLUNGEN AM DÜNGERSTREUER BESTÄTI-
GEN
- Geschwindigkeit der Zapfwelle.
- Höhe der Streupritschen
- Höhe des unteren Zugmauls.
- Loteinstellung.
NDERBEDIENUNGSANLEITUNG DES X44 HI-TECH NACH-
I
SCHAUEN
DIE ANPASSUNG DES AUF DEM GERÄT MONTIERTEN BLATT-
SETS MIT DER GEWÜNSCHTEN BREITE BESTÄTIGEN
Refer to the operating instructions and the settings
charts (width and flow rate)
DE
- Es ist wichtig, die Übereinstimmung des Blattsets auf
dem Gerät mit der gewünschten Breite zu überprüfen
Beispiel:
Wurfschaufeln 32-44:
Arbeitsbreite von 32 bis 44 m möglich, aber nur,
wenn die Merkmale des Düngergranulats, dessen
Dichte, Form und Struktur optimal sind, um die gewünschte Breite erreichen zu können.
Es wird auf die Bedienungsanleitung und auf die Tabellennotiz verwiesen (Breite und Abdrehen)
15

Utilisation / Use / Benutzung
A
1
3
5°
80 cm
Pour un bon épandage, il
est indispensable de
maintenir les plateaux et
les pales d’éjection en
bon état.
2
For correct spreading, the
discs and the ejector
blades need to be kept in
good condition.
++ 15%
Streuscheiben und Wurf schaufeln müssen für ein
gutes Streuergebnis in
gutem Zustand sein.
16

Utilisation / Use / Benutzung
Réglage largeur
A
Il faut faire un pré-réglage de la goulotte droite
En consultant les tableaux ou le site internet SULKY
“http://fertitest.sulky-burel.com/FertiKli/” , rechercher
l’engrais qui se rapproche le plus du produit que vous
avez à épandre suivant ses principales caractéristiques,
à savoir : sa grosseur, sa densité D, sa forme.
Ex: FERTIVA (BASF) ASS 26N +13S
Pour 36m repère 115
FR
-
Mettre la goulotte au repère lu et serrer la
poignée.
-
Vérifier que la molette de serrage de la goulotte
gauche ne soit pas bloquée.
Setting the width
A
The right-hand chute must be pre-set.
By consulting the tables or the SULKY website
“http://fertitest.sulky-burel.com/FertiKli/”, find the fertili-
zer that is closest to the product that you wish to spread
following the main characteristics, i.e.: its size, density D
and shape.
e.g.
: FERTIVA (BASF) ASS 26N +13S
For 36m mark 115
- Set the chute to the position suggested and
tighten the thumbscrew.
- Check that the left chute’s thumbscrew is not
tightened.
1
GB
1
1
3
Breiteneinstellung
A
Die rechte Rinne muss voreingestellt werden
In den Tabellen oder auf der Internetseite von Sulky
“http://fertitest.sulky-burel.com/FertiKli/” durch Beach-
ten der folgenden Eigenschaften den Dünger auswählen, der Ihrem Düngerprodukt am nächsten kommt:
Korngröße, Dichte D, Form.
Bsp.: FERTIVA (BASF) ASS 26N +13S
Für 36m Marke 115
- Zufuhrorgan auf die abgelesene Marke stellen und Hebel anziehen
- Stellen Sie sicher, dass das Spannrändelrad der
linken Rinne nicht blockiert ist.
DE
1
17

Utilisation / Use / Benutzung
B
1
2
1
18
a)
3
b)

Utilisation / Use / Benutzung
Fonctions Justax
B
Le justax est un outil d’assistance permettant de
faciliter le réglage de la largeur.
Pour son utilisation:
Sur la machine
FR
- I
l faut positionner le justax sur l’index correspon-
1
dant à la largeur souhaitée pour le
jeu de pales
-
Il faut verrouiller les 2 capteurs en position verticale .
Justax functions
B
2
. “ 24- 36 “ ou “ 32 – 44 “
The Justax is a tool that makes it easier for the user to
set the width.
To use it:
On the machine
- The Justax must be positioned on index corres-
1
ponding to the required width for the set of vanes .
“ 24- 36 “ or “ 32 – 44 “
- The two sensors must be fixed in the vertical position
3
.
3
GB
1
2
3
Justax-Funktion
B
Der Justax ist ein Hilfegerät, welches Ihnen die Breiteneinstellung erleichtern soll.
Zu seiner Benutzung:
- Den Justax auf den Index positionieren, der der ge-
1
wünschten Arbeitsbreite für den Wurfschaufelsatz
entspricht: “24- 36“ oder “32 – 44“
- Die 2 Sensoren müssen senkrecht verriegelt wer-
3
den.
DE
2
19

Utilisation / Use / Benutzung
B
3
3
4
4
2
2
1
1
20

Utilisation / Use / Benutzung
B
Sur la console
-
Pendant l’épandage, il faut prendre le temps pour
bien visualiser la position du curseur .
2
FR
- Sélectionner le menu REG
- Sélectionner le pictogramme
Maintenant vous allez épandre, le réglage doit se faire
sur une longueur minimum de 100 mètre, de
préférence à plat et en plein champ .
La prise de force doit être enclenchée, les réglages de
base sur la machine correctement effectués
(Voir chapitre recommandation )
L’indication vous confirme la largeur qui est
1
programmée sur la console.
Le curseur permet de visualiser le centrage de la
2
nappe d’épandage, la position idéale est centrée.
-
Pour centrer la nappe il faut agir sur les touches
3
par impulsion:
La gauche pour diminuer la largeur
la droite pour augmenter la largeur
On the console
B
- Select the REG (Settings) menu
- Select the icon
The machine is now ready to spread fertilizer; the settings should be checked over a minimum distance of 100
metres, preferably in a flat location away from the edge
of the field.
The PTO should be engaged, and the machine set to the
correct basic settings
(See Recommendations section)
The information on the screen confirms the width that
1
is programmed in the console.
The cursor enables you to see the alignment of the
2
fertilizer distribution area; the ideal position is in the centre.
- To centre the fertilizer distribution area, you must move
the cursor incrementally by pressing the keys :
the left-hand key to reduce the width and the righthand key to increase it
Il doit être sensiblement stabilisé au centre
(il est normal qu’il oscille autour du centre )
Quand le centrage de la nappe est optimisé,
Il est automatiquement mémorisé, pour l’engrais
préalablement sélectionné dans le menu REG.
« choix de l’engrais ».
APRÈS AVOIR STOPPÉ LE TRACTEUR, ARRÊTÉ LA
PRISE DE FORCE ET ARRÊTÉ LE MOTEUR DU
TEUR.
TRAC-
IL FAUT EFFECTUER LE RÉGLAGE MANUELLEMENT SUR LA
GOULOTTE DE DROITE
GOULOTTE GAUCHE AVEC LE JUSTAX
4
, AU MÊME REPÈRE OBTENU SUR LA
.
IMPORTANT, QUAND L’UTILISATION DU JUSTAX EST TERMINÉE,
IL FAUT IMPÉRATIVEMENT RELEVER LES 2 CAPTEURS EN
POSITION HORIZONTALE
CAPTEURS EN CONTINU DANS LE JET D
, IL NE FAUT JAMAIS LAISSER LES
’ENGRAIS.
LE CHANGEMENT DE POSITION DES CAPTEURS DOIT ÊTRE
EFFECTUÉ AVEC LE MOTEUR DU TRACTEUR ARRÊTÉ
.
GB
- When spreading, it is important to take the time to look
at the position of the cursor .
2
It should be more or less stable in the centre (it is normal
for it to oscillate around the centre point)
When the alignment of the fertilizer distribution area has
been optimised, it is automatically memorised for the fertilizer selected beforehand in the REG menu. “choice of
fertilizer”.
1
AFTER HAVING HALTED THE TRACTOR AND STOPPED
THE
PTO AND THE TRACTOR ENGINE:
THE RIGHT-HAND CHUTE SHOULD BE SET MANUALLY TO
THE SAME MARK OBTAINED ON THE LEFT HAND CHUTE WITH
THE
JUSTAX.
HEN YOU HAVE FINISHED USING THE JUSTAX, IT IS IMPOR-
W
TANT THAT THE 2 SENSORS ARE PLACED IN THE HORIZONTAL
3
POSITION
NUOUSLYINTHESTREAMOFFERTILIZER. THE SENSOR POSI-
TION MUST BE CHANGED WITH THE TRACTOR ENGINE
STOPPED
. THE TWO SENSORS MUST NEVER BE LEFT CONTI-
.
4
DE
3
An der Konsole
B
- Wählen Sie das REG-Menü
- Wählen Sie das -Piktogramm
Sie werden jetzt streuen. Die Einstellung muss auf eine
Mindestlänge von 100 Metern erfolgen, und zwar vorzugsweise auf flachem und freiem Feld.
Die Zapfwelle muss eingeschaltet und die Grundeinsteillungen am Gerät korrekt sein
(s. Kapitel Empfehlungen)
Die Anzeige bestätigt Ihnen die an der Konsole pro-
1
grammierte Breite.
Der Cursor erlaubt es Ihnen, die Zentrierung der
2
Streubahn zu visualisieren. Die ideale Position ist zentriert.
- Betätigen Sie die Tasten impulsweise um die Bahn
3
zu zentrieren.
Die linke Taste wird die Breite verringern, die rechte sie
erhöhen.
- Nehmen Sie sich während des Streuens Zeit, die Position des Cursors zu visualisieren.
2
Er muss ziemlich stabilisiert in der Mitte liegen (es ist
normal, dass er um die Mitte schwingt).
Wenn das Zentrieren der Bahn optimiert ist, wird es automatisch für den vorher im REG-Menü ausgewählten Dün-
ger gespeichert. „Düngerauswahl“.
ACH DEM ANHALTEN DER ZUGMASCHINE, DEM AB-
N
SCHALTEN DER ZAPFWELLE UND DES MOT OR S DE R
ZUGMASCHINE.
IE EINSTELLUNG AN DER RECHTEN RINNE MUSS VON
D
4
HAND ERFOLGEN, UND ZWAR AN DER GLEICHEN MARKE, DIE
SIE AUF DER LINKEN RINNE ÜBER DEN JUSTAX ERHALTEN
HABEN
.
W
ICHTIG: NACH BEENDEN DER ARBEIT MIT DEM JUSTAX
UNBEDINGT DIE
2 SENSOREN WIEDER IN WAAGERECHTE
STELLUNG BRINGEN. DIE SENSOREN NIEMALS STÄNDIG IM
DÜNGERSTRAHL LASSEN. ZUR ÄNDERUNG DER POSITION
DER
SENSOREN SCHLEPPERMOTOR STETS ABSTELLEN.
21

Utilisation / Use / Benutzung
C
L
120m
1/2
2
50m
30m
30m
1
50m
22
3

Utilisation / Use / Benutzung
Contrôle largeur
C
IMPORTANT :
Seul le kit de recroisement permet de valider le
réglage de la largeur de travail.
Réglage de confirmation avec essais de recroisement
La zone critique d’épandage correspond au
recouvrement entre un aller-retour du distributeur.
Le kit permet de contrôler cette zone vous permettant
ainsi d’ajuster le réglage.
Veuillez vous reporter à la notice d’utilisation du X44
chapitre « contrôle largeur»
FR
GB
Checking the width
C
IMPORTANT:
Only the overlap kit should be used to check the working width setting.
Setting with overlap check list
The critical spreading zone corresponds to the
overlap area between an outward and return pass.
The kit enables this zone to be checked to enable you
to adjust the setting.
Please refer to the section on “checking the width” in
the operating instructions for the X44.
Arbeitsbreite uberprufung
C
WICHTIG:
Nur der Wiederkreuzungsset ermöglicht es Ihnen, die
Einstellung der Arbeitsbreite zu bestätigen.
1
3
DE
Einstellung mit Überlappungsprobe
Die kritische Streuzone entspricht der Überlappung
zwischen einer Hin- und Rückfahrt des Streuers.
Die Ausrüstung erlaubt die Kontrolle dieser Zone und
damit die Feineinstellung.
In diesem Zusammenhang verweisen wir Sie auf die Gebrauchsanleitung des X44, Kapitel „Breitenüberprüfung“.
23

Entretien / Maintenance / Wartung
A
24

Entretien / Maintenance / Wartung
Entretien
A
Après épandage :
-
Laver les support et les capteurs à l’eau sans
pression et laisser sécher.
-
Les capteurs doivent etre verrouilles en position
horizontale .
- Utiliser un produit d’entretien adapté pour
l’hivernage.
-
Ne jamais démonter les capteurs en cas de
panne, l’ensemble est à changer sans
déparier les 2 capteurs.
-
Attention à ne pas endommager les fils.
FR
GB
Maintenance
A
After spreading:
- Wash the bracket and the sensors with water
(must not be under pressure) and leave to dry.
- The sensors must be locked in horizontal position.
- Use a cleaning product that is suitable for overwintering.
- Never remove the sensors in the event of a
breakdown; the whole unit must be changed without separating the 2 sensors.
- Ensure that you do not damage the cables.
Instandhaltung
A
Nach dem Streuen:
- Waschen Sie die Halter und die Sensoren unter
laufendem Wasser und lassen Sie diese trocknen.
DE
1
4
- Die Sensoren sind in waagerechter Position zu
verriegeln.
- Benutzen Sie ein geeignetes Pflegemittel für die
Überwinterung.
- Demontieren Sie im Falle einer Panne nie die
Sensoren. Das ganze Teil muss ausgewechselt
werden, ohne die 2 Sensoren voneinander zu
trennen.
- Achten Sie darauf, dass die Kabeln nicht beschädigt werden.
25
 Loading...