

3000 - 4000
Notice Originale
Original Instructions
Originalbetriebsanleitung
A LIRE ATTENTIVEMENT AVANT D’UTILISER LA MACHINE
PLEASE READ CAREFULLY BEFORE USING THE MACHINE
VOR INBETRIEBNAHME SORGFÄLTIG LESEN!
Réf: 400 413 - 02 - FR-GB-DE / DF
Sulky Burel
BP 92111 - rue Fabien Burel
35221 Châteaubourg Cedex- FRANCE
Tél: 02.99.00.84.84 - Fax: 02.99.62.39.38
Site Internet : www.sulky-burel.com
e-mail : info@sulky-burel.com

Cher Utilisateur
le bon de
Garantie dûment rempli
J. BUREL
Dear Customer
Geehrter Kunde
Cher Client,
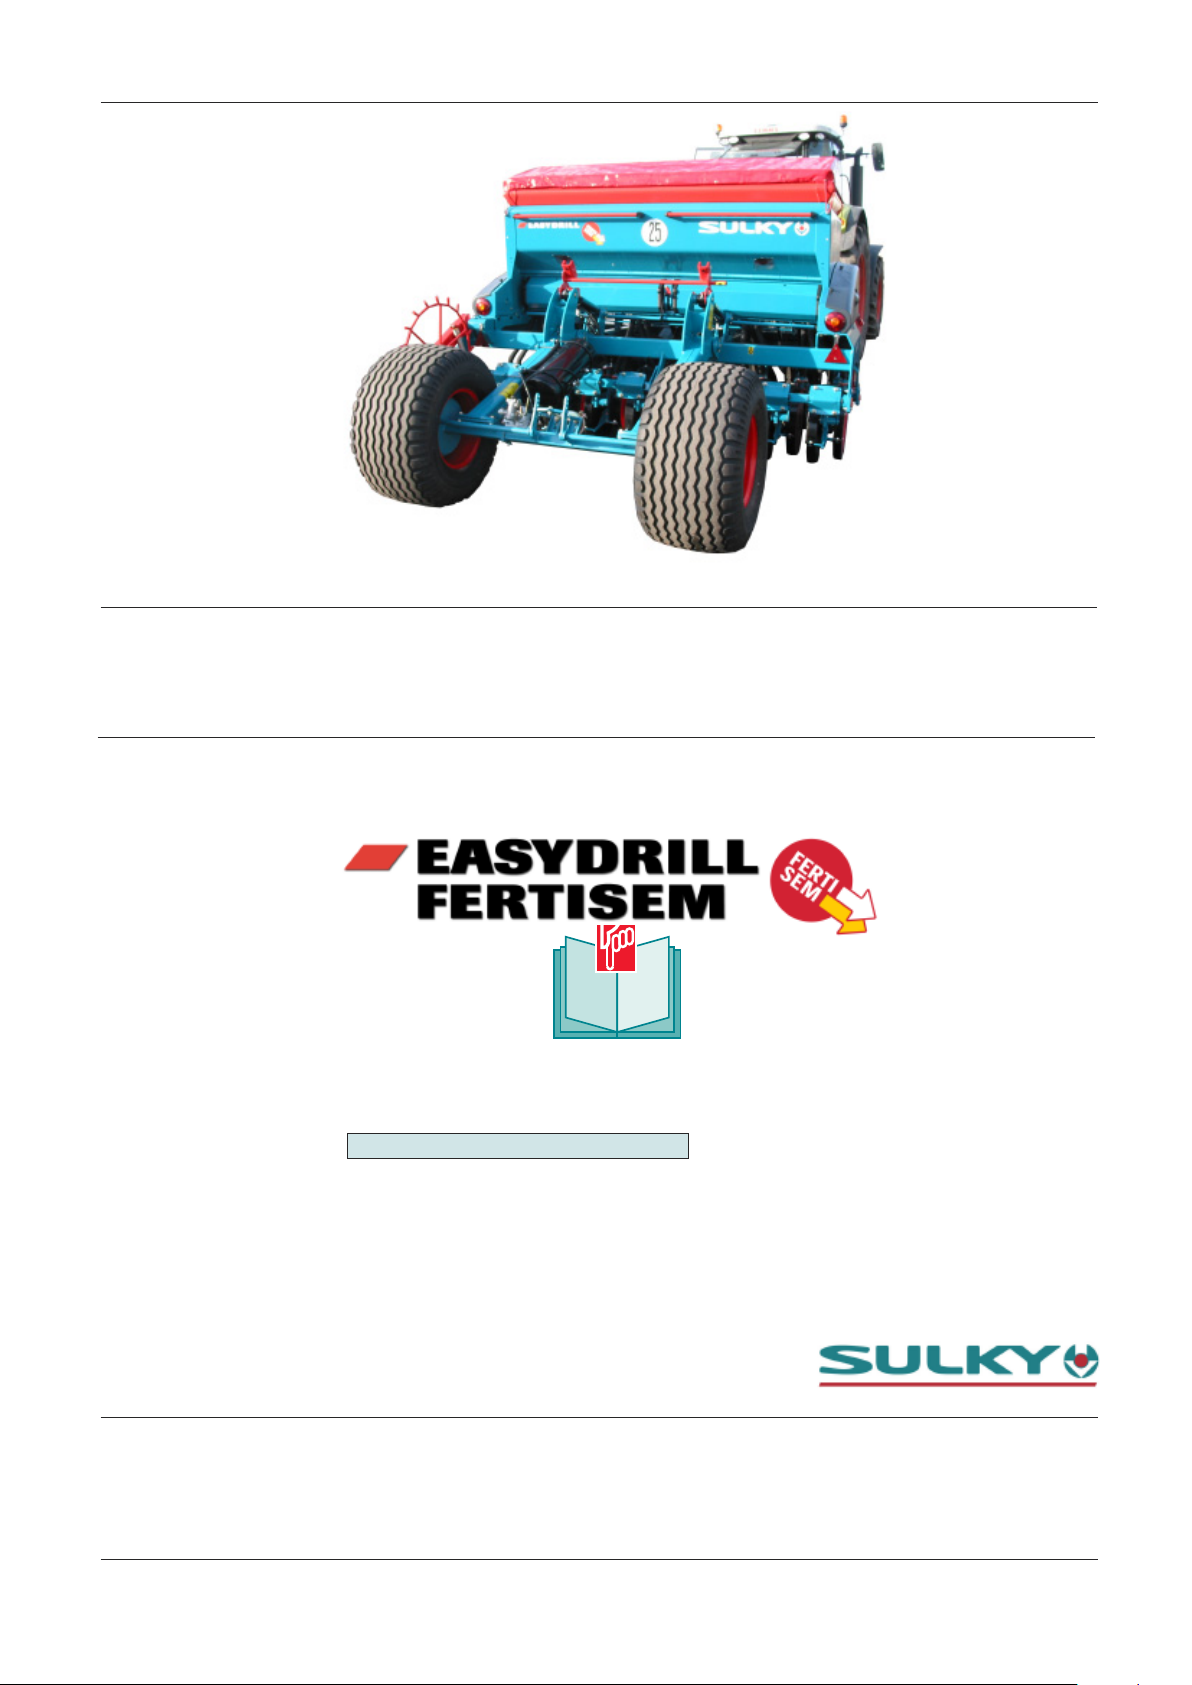
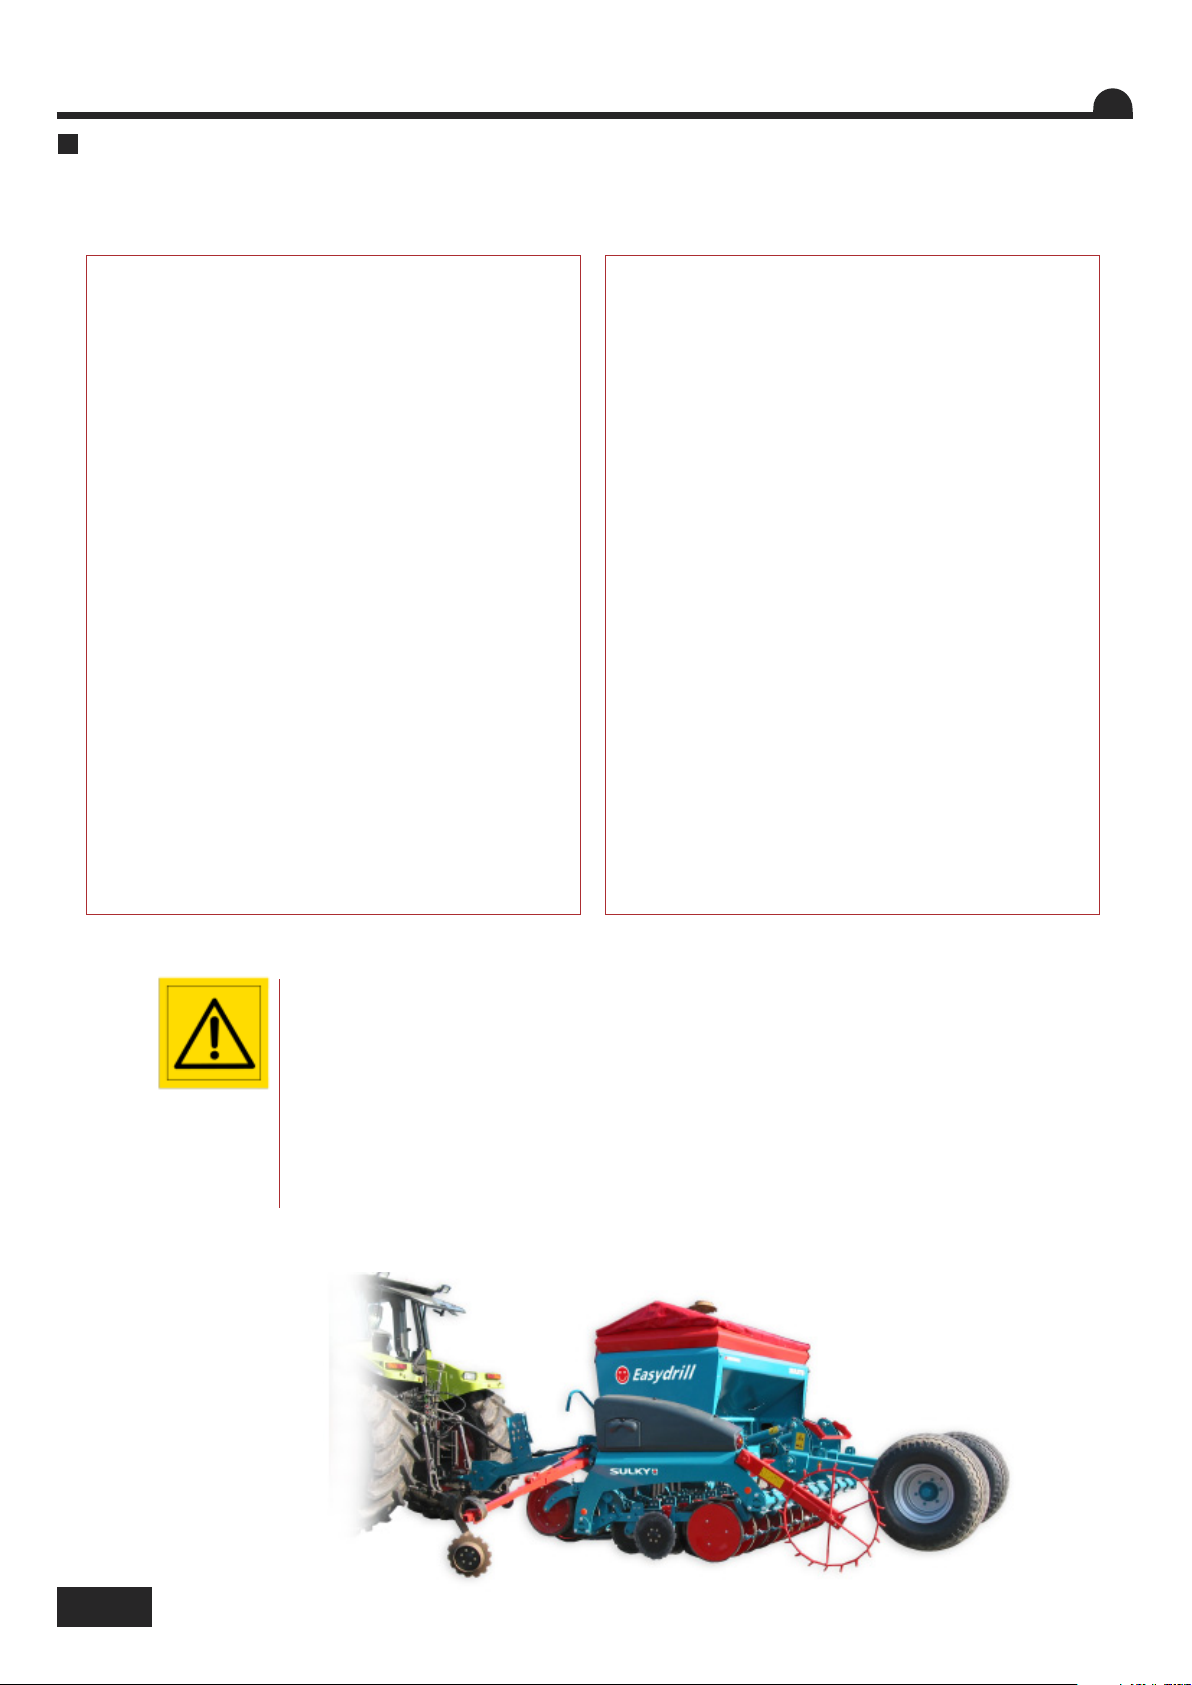
Vous avez choisi le SEMOIR à grains EASYDRILL
FERTISEM, et nous vous remercions de votre confiance
pour notre matériel.
Pour une bonne utilisation, et pour tirer profit de toutes
les capacités de votre semoir, nous vous recommandons
de lire attentivement cette notice.
De par votre expérience, n’hésitez pas à nous faire part
de vos observations et suggestions, toujours utiles pour
l’amélioration de nos produits.
Nous vous saurions gré de nous retourner
.
En vous souhaitant bon usage de votre semoir,
Veuillez agréer, Cher Client, l’assurance de nos meilleurs
sentiments.
Président
GB
Dear Customer,
thank you for trusting our equipment and
choosing the EASYDRILL FERTISEM seed
drill.
To ensure correct operation, and to make
full use of your seed drill’s possibilities, we
recommend that you read this operator's
manual carefully.
DE
Geehrter Kunde,
Sie haben einen EASYDRILL-Drillmaschine
gewählt, und wir danken Ihnen für das in
unsere Geräte gesetzte Vertrauen.
Bitte lesen Sie die Anleitung sorgfältig
durch, damit Sie ihre Drillmaschine richtig
benutzen und alle ihre Möglichkeiten voll
nutzen können.
Please do not hesitate to make
suggestions or comments based on your
experience; they will always be of use to
us, and will help us improve our products.
Please return the duly completed
guarantee form to us.
We wish you great success with your
seed drill.
Yours sincerely,
J. BUREL
Chairman
Zögern Sie nicht, uns Ihre eigenen
Beobachtungen und Erfahrungen
mitzuteilen, die für die Verbesserung
unserer Produkte immer nützlich sein
können.
Garantieschein bitte ausgefüllt an uns
zurückschicken.
Wir wünschen Ihnen viel Erfolg mit Ihrem
Drillmaschine und verbleiben
mit freundlichen Grüßen
J. BUREL
Geschäftsführer
1

Selon annexe 2, partie 1, point A de la directive « MACHINES » 2006/42/CE.
In accordance with Appendix 2, Section 1, Point A of the European Machinery Directive 2006/42/EC.
Gemäß Anhang II, Teil 1, Abschnitt A der Maschinenrichtlinie 2006/42/EG.
Déclaration de Conformité
Declaration of Conformity
Konformitätserklärung
NOM DU FABRICANT ET ADRESSE :
MANUFACTURER’S NAME AND ADDRESS:
NAME UND ADRESSE DES HERSTELLERS:
OM DE LA PERSONNE AUTORISÉE A
N
CONSTITUER LE DOSSIER TECHNIQUE ET
NAME AND ADDRESS OF THE PERSON AUTHORISED
TO COMPILE THE TECHNICAL SPECIFICATIONS:
NAME UND ADRESSE DES FÜR DIE ZUSAMMENSTELLUNG
DER TECHNISCHEN UNTERLAGEN BEVOLLMÄCHTIGTEN:
DESCRIPTION DE LA MACHINE :
M
ACHINE DESCRIPTION :
BESCHREIBUNG DER MASCHINE:
TYPE :
TYPE:
YP:
T
NUMÉRO DE SÉRIE :
SERIAL NUMBER:
ERIENNUMMER:
S
ADRESSE :
SULKY-BUREL
BP 92111
35221 C
ACQUES
J
J
ACQUES
HÂTEAUBOURG CEDEX - FRANCE
BUREL
BUREL
BP 92111
35221 C
SEMOIR À GRAINS
SEMOIR À GRAINS
SEED DRILL
SEED DRILL
DRILLMASCHINE
DRILLMASCHINE
HÂTEAUBOURG CEDEX - FRANCE
EASYDRILL FERTISEM
ACCESSOIRES :
ACCESSORIES:
ZUSATZAUSRÜSTUNGEN:
FR
LA MACHINE EST CONFORME AUX
DISPOSITIONS PERTINENTES DE LA
DIRECTIVE
A MACHINE EST CONFORME AUX
L
DISPOSITIONS DES AUTRES DIRECTIVES
SUIVANTES
D
IRECTIVE CEM 2004 / 108 / CE
Fait à Châteaubourg : Décembre 2009
Châteaubourg: December 2009
Ausgestellt in Châteaubourg: Dezember 2009
2
« MACHINES » 2006-42 CE
:
T
HE MACHINE CONFORMS TO THE
RELEVANT TERMS OF THE
EUROPEAN
MACHINERY DIRECTIVE 2006/42/EC.
HE MACHINE ALSO CONFORMS TO THE
T
TERMS OF THE FOLLOWING DIRECTIVES
D
IRECTIVE CEM 2004/108/EC
GB
D
IE MASCHINE ENTSPRICHT ALLEN
EINSCHLÄGIGEN
BESTIMMUNGEN DER
MASCHINENRICHTLINIE 2006/42/EG
IE MASCHINE ENTSPRICHT
D
:
BESTIMMUNGEN
DEN
DER NACHFOLGENDEN
EMV-R
ICHTLINIE 2004/108/EG
Signé :
Signed:
Unterzeichnet:
J. BUREL
Président
Chairman
Geschäftsführer
DE
RICHTLINIEN:

PRESCRIPTIONS GÉNÉRALES DE SÉCURITÉ
GÉNÉRALITÉS
UTILISATION CONFORME DE LA MACHINE
ATTELAGE
Prescriptions de sécurité
FR
Risque d’accident
Ces symboles sont utilisés dans cette notice chaque fois que des recommandations concernent votre sécurité, celle d’autrui ou le bon
fonctionnement de la machine.
Transmettez impérativement ces recommandations à tout utilisateur de la machine.
Avant chaque utilisation et mise en service de
l’ensemble tracteur-machine, s’assurer de sa
conformité avec la réglementation en matière de
sécurité du travail et avec les dispositions du Code
de la Route.
1 - Respecter, en plus des instructions contenues
dans cette notice, la législation relative aux
prescriptions de sécurité et de prévention des
accidents.
2 - Les avertissements apposés sur la machine
fournissent des indications sur les mesures de
sécurité à observer et contribuent à éviter les
accidents.
3 - Lors de la circulation sur la voie publique,
respecter les prescriptions du Code de la Route.
4 - Avant de commencer le travail, l’utilisateur
devra se familiariser obligatoirement avec les
organes de commande et de manœuvre de la
machine et leurs fonctions respectives. En cours
de travail, il sera trop tard pour le faire.
5 - L’utilisateur doit éviter de porter des vêtements
flottants qui risqueraient d’être happés par des
éléments en mouvement.
6 - Il est recommandé d’utiliser un tracteur équipé
d’une cabine ou d’un arceau de sécurité, aux
normes en vigueur.
7 - Avant la mise en route de la machine et le
démarrage des travaux, contrôler les abords
immédiats (enfant !).
Veiller à avoir une visibilité suffisante ! Eloigner
toute personne ou animal de la zone de danger de
la machine (projections !).
8 - Le transport de personnes ou d’animaux sur la
machine lors du travail ou lors des déplacements
est strictement interdit.
9 - L’accouplement de la machine au tracteur ne
doit se faire que sur les points d’attelage prévus à
cet effet conformément aux normes de sécurité
en vigueur.
10 - La prudence est de rigueur lors de l’attelage
de la machine au tracteur et lors de son
désaccouplement !
11 - Avant d’atteler la machine, il conviendra de
s’assurer que le lestage de l’essieu avant du
tracteur est suffisant. La mise en place des masses
de lestage doit se faire sur les supports prévus à
cet effet conformément aux prescriptions du
constructeur du tracteur.
12 - Respecter la charge à l’essieu maximum et le
poids total roulant autorisé en charge.
13 - Respecter le gabarit maximum sur la voie
publique.
14 - Avant de s’engager sur la voie publique,
veiller à la mise en place et au bon
Risque d’endommager la machine
fonctionnement des protecteurs et dispositifs de
signalisation (lumineux, réfléchissants…) exigés
par la loi.
15 - Toutes les commandes à distance (corde,
câble, tringle, flexible…) doivent être positionnées
de telle sorte qu’elles ne puissent déclencher
accidentellement une manœuvre génératrice de
risque d’accident ou de dégâts.
16 - Avant de s’engager sur la voie publique,
placer la machine en position de transport,
conformément aux indications du constructeur.
17 - Ne jamais quitter le poste de conduite
lorsque le tracteur est en marche.
18 - La vitesse et le mode de conduite doivent
toujours être adaptés aux terrains, routes et
chemins. En toute circonstance, éviter les
brusques changements de direction.
19 - La précision de la direction, l’adhérence du
tracteur, la tenue de route et l’efficacité des
dispositifs de freinage sont influencées par des
facteurs tels que : poids et nature de la machine
attelée, lestage de l’essieu avant, état du terrain ou
de la chaussée. Il est donc impératif de veiller au
respect des règles de prudence dictées par
chaque situation.
20 - Redoubler de prudence dans les virages en
tenant compte du porte-à-faux, de la longueur, de
la hauteur et du poids de la machine ou de la
remorque attelée.
21 - Avant toute utilisation de la machine,
s’assurer que tous les dispositifs de protection
sont en place et en bon état. Les protecteurs
endommagés doivent être immédiatement
remplacés.
22 - Avant chaque utilisation de la machine,
contrôler le serrage des vis et des écrous, en
particulier de ceux qui fixent les outils (disques,
palettes, déflecteurs…). Resserrer si nécessaire.
23 - Ne pas stationner dans la zone de manœuvre
de la machine.
24 - Attention ! Des zones d’écrasement et de
cisaillement peuvent exister sur les organes
commandés à distance, notamment ceux asservis
hydrauliquement.
25 - Avant de descendre du tracteur, ou
préalablement à toute intervention sur la machine,
couper le moteur, retirer la clé de contact et
attendre l’arrêt complet de toutes les pièces en
mouvement.
26 - Ne pas stationner entre le tracteur et la
machine sans avoir préalablement serré le frein de
parcage et/ou avoir placé des cales sous les
roues.
27 - Avant toute intervention sur la machine,
s’assurer que celle-ci ne puisse être mise en route
accidentellement.
28 - Ne pas utiliser l’anneau de levage pour lever
la machine lorsqu’elle est remplie.
Le Semoir ne doit être utilisé que pour les travaux
pour lesquels il a été conçu.
En cas de dommage lié à l’utilisation de la
machine hors du cadre des applications spécifiées
par le constructeur, la responsabilité de celui-ci
sera entièrement dégagée.
Toute extrapolation de la destination d’origine de la
machine se fera aux risques et périls de
l’utilisateur.
L’utilisation conforme de la machine implique
également :
- le respect des prescriptions d’utilisation,
d’entretien et de maintenance édictées par le
constructeur,
- l’utilisation exclusive de pièces de rechange,
d’équipements et d’accessoires d’origine ou
préconisés par le constructeur.
Le Semoir ne doit être utilisé, entretenu et réparé
que par des personnes compétentes, familiarisées
avec les caractéristiques et modes d’utilisation de
la machine. Ces personnes doivent aussi être
informées des dangers auxquels elles pourraient
être exposées.
L’utilisateur est tenu au respect scrupuleux de la
réglementation en vigueur en matière de :
- prévention contre les accidents,
- sécurité du travail (Code du Travail),
- circulation sur la voie publique (Code de la
Route).
- Il lui est fait obligation d’observer strictement les
avertissements apposés sur la machine.
- Toute modification de la machine effectuée par
l’utilisateur lui-même ou toute autre personne,
sans l’accord écrit préalable du constructeur
engagera la responsabilité du propriétaire du
matériel modifié.
1 - Lors de l’attelage de la machine au tracteur ou
de sa dépose, placer le levier de commande du
relevage hydraulique dans une position telle que
toute entrée en action du relevage ne puisse
intervenir de façon inopinée.
2 - Lors de l’attelage de la machine au relevage 3
points du tracteur, veiller à ce que les diamètres
des broches ou tourillons correspondent bien aux
diamètres des rotules du tracteur.
3 - Attention ! Dans la zone de relevage 3 points,
il existe des risques d’écrasement et de
cisaillement!
4 - Ne pas se tenir entre le tracteur et la machine
lors de la manœuvre du levier de commande
extérieur du relevage.
5 - Au transport la machine doit être stabilisée par
les tirants de rigidification du relevage pour éviter
tout flottement et débattement latéral.
Conseil d’utilisation
pour Faciliter le travail
3

FR
6 - Lors du transport de la machine en position
relevée, verrouiller le levier de commande du
relevage.
7 - Ne jamais dételer la machine lorsque la trémie
est remplie.
ORGANES D’ANIMATION
(Prises de force et arbres de transmission à
cardans)
1 - N’utiliser que les arbres de transmission à
cardans fournis avec la machine ou préconisés par
le constructeur.
2 - Les protecteurs des prises de force et des
arbres de transmission à cardans doivent toujours
être en place et en bon état.
3 - Veiller au recouvrement correct des tubes des
arbres de transmission à cardans, aussi bien en
position de travail qu’en position de transport.
4 - Avant de connecter ou de déconnecter un
arbre de transmission à cardans, débrayer la prise
de force, couper le moteur et retirer la clé de
contact.
5 - Si l’arbre de transmission à cardans primaire
est équipé d’un limiteur de couple ou d’une roue
libre, ceux-ci doivent impérativement être montés
sur la prise de force de la machine.
6 - Veiller toujours au montage et au verrouillage
corrects des arbres de transmission à cardans.
7 - Veiller toujours à ce que les protecteurs des
arbres de transmission à cardans soient
immobilisés en rotation à l’aide des chaînettes
prévues à cet effet.
8 - Avant d’embrayer la prise de force, s’assurer
que le régime choisi et le sens de rotation de la
prise de force sont conformes aux prescriptions du
constructeur.
9 - Avant d’embrayer la prise de force, s’assurer
qu’aucune personne ou animal ne se trouve à
proximité de la machine.
10 - Débrayer la prise de force lorsque les limites
de l’angle de l’arbre de transmission à cardans
prescrites par le constructeur risquent d’être
dépassées.
11 - Attention ! Après le débrayage de la prise de
force, les éléments en mouvement peuvent
continuer à tourner quelques instants encore. Ne
pas s’en approcher avant immobilisation totale.
12 - Lors de la dépose de la machine, faire
reposer les arbres de transmission à cardans sur
les supports prévus à cet effet.
13 - Après avoir déconnecté l’arbre de
transmission à cardans de la prise de force du
tracteur, celle-ci doit être recouverte de son
capuchon protecteur.
14 - Les protecteurs de prise de force et d’arbres
de transmission à cardans endommagés doivent
être remplacés immédiatement.
CIRCUIT HYDRAULIQUE
1 - Attention ! Le circuit hydraulique est sous
pression.
2 - Lors du montage de vérins ou de moteurs
hydrauliques, veiller attentivement au branchement
correct des circuits, conformément aux directives
du constructeur.
3 - Avant de brancher un flexible au circuit
hydraulique du tracteur, s’assurer que les circuits
côté tracteur et côté machine ne sont pas sous
pression.
4 - Il est vivement recommandé à l’utilisateur de la
machine de suivre les repères d’identification sur
les raccords hydrauliques entre le tracteur et la
machine afin d’éviter des erreurs de branchement.
Attention ! Il y a risque d’interversion des fonctions
(par exemple : relever/abaisser).
5 - Contrôler une fois par an les flexibles
hydrauliques :
. Blessure de la couche extérieure
. Porosité de la couche extérieure
. Déformation sans pression et sous pression
. Etat des raccords et des joints
La durée d’utilisation maximum des flexibles est de
6 ans. Lors de leur remplacement, veiller à
n’utiliser que des flexibles de caractéristiques et
de qualité prescrits par le constructeur de la
machine.
6 - Lors de la localisation d’une fuite, il conviendra
de prendre toute précaution visant à éviter les
accidents.
7 - Tout liquide sous pression, notamment l’huile
du circuit hydraulique, peut perforer la peau et
occasionner de graves blessures ! En cas de
blessure, consulter de suite un médecin ! Il y a
danger d’infection !
8 - Avant toute intervention sur le circuit
hydraulique, abaisser la machine, mettre le circuit
hors pression, couper le moteur et retirer la clé de
contact.
ENTRETIEN
1 - Avant tous travaux de maintenance, d’entretien
ou de réparation, ainsi que lors de la recherche de
l’origine d’une panne ou d’un incident de
fonctionnement, il faut impérativement que la prise
de force soit débrayée, que le moteur soit coupé
et la clé de contact retirée.
2 - Contrôler régulièrement le serrage des vis et
des écrous. Resserrer si nécessaire !
3 - Avant de procéder à des travaux d’entretien
sur une machine en position relevée, étayer celleci à l’aide d’un moyen approprié.
4 - Lors du remplacement d’une pièce travaillante,
(pale pour les distributeurs ou socs pour les
semoirs), mettre des gants de protection et
n’utiliser qu’un outillage approprié.
5 - Pour la protection de l’environnement, il est
interdit de jeter ou de déverser les huiles, graisses
et filtres en tout genre. Les confier à des
entreprises spécialisées dans leur récupération.
6 - Avant toute intervention sur le circuit
électrique, déconnecter la source d’énergie.
7 - Les dispositifs de protection susceptibles
d’être exposés à une usure doivent être contrôlés
régulièrement. Les remplacer immédiatement s’ils
sont endommagés.
8 - Les pièces de rechange doivent répondre aux
normes et caractéristiques définies par le
constructeur. N’utiliser que des pièces de
rechange Sulky !
9 - Les réparations affectant les organes sous
tension ou pression (ressorts, accumulateurs de
pression, etc,) impliquent une qualification
suffisante et font appel à un outillage spécifique ;
aussi ne doivent-elles être effectuées que par un
personnel qualifié.
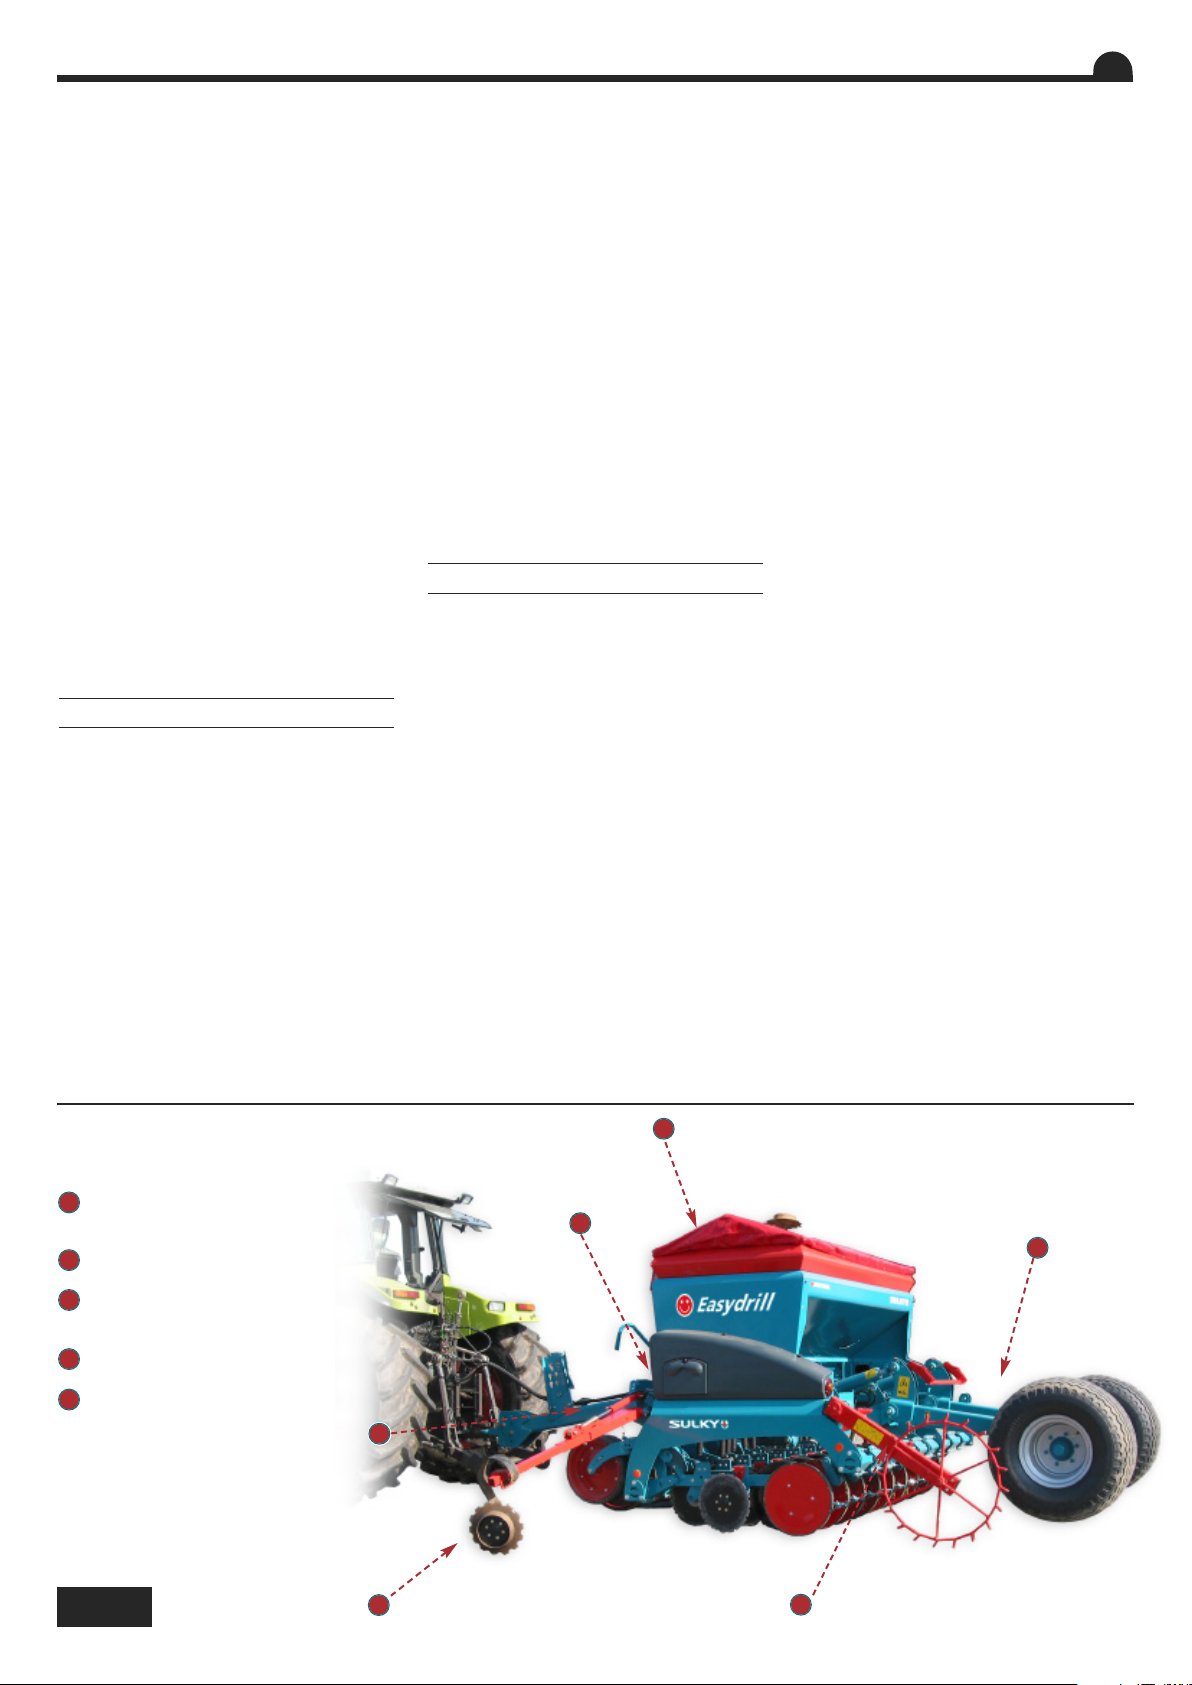
DANGER
1
Zone de fonctionnement des traceurs
1
(le cas échéant)
Pièces en mouvement
2
2
Ne pas stationner sur la passerelle
3
3
pendant le travail
Arbre d’agitateur en rotation
4
4
5
Risque d'écrasement
5
4
4
4
3
3
5
5
5
5
1
1
2
2

GENERAL SAFETY REGULATIONS
GENERAL
PROPER USE OF THE MACHINE
HITCHING
DRIVE EQUIPMENT
Safety regulations
GB
Risk of accident
These symbols are used in these instructions every time recommendations are provided concerning your safety, the safety of others or the
correct operation of the machine.
These recommendations must be given to all users of the machine.
Every time the tractor/machine assembly is to be
started up and used, you should ensure
beforehand that it complies with current legislation
on safety at work and road traffic regulations.
1 - In addition to the instructions contained in this
manual, legislation relating to safety instructions
and accident prevention should be complied with.
2 - Warnings affixed to the machine give
indications regarding safety measures to be
observed and help to avoid accidents.
3 - When travelling on public roads, abide by the
provisions of the Highway Code.
4 - Before starting work, it is essential that the
user familiarizes himself with the control and
operating elements of the machine and their
respective functions. When the machine is
running, it may be too late.
5 - The user should avoid wearing loose clothing
which may be caught up in the moving parts.
6 - We recommend using a tractor with a safety
cab or roll bar conforming to standards in force.
7 - Before starting up the machine and beginning
work, check the immediate surroundings,
particularly for children. Make sure that visibility is
adequate. Clear any persons or animals out of the
danger zone.
8 - It is strictly forbidden to transport any persons
or animals on board the machine whether it is in
operation or not.
9 - The machine should only be coupled up to the
tractor at the specially provided linkage points and
in accordance with applicable safety standards.
10 - Extreme care must be taken when coupling
or uncoupling the machine from the tractor.
11 - Before hitching up the machine, ensure that
the front axle of the tractor is sufficiently
weighted. Ballast weights should be fitted to the
special supports in accordance with the
instructions of the tractor manufacturer.
12 - Do not exceed the maximum axle weight or
the gross vehicle weight rating.
13 - Do not exceed the maximum authorized
dimensions for using public roads.
14 - Before entering a public road, ensure that the
protective and signalling devices (lights, reflectors,
etc.) required by law are fitted and working
properly.
15 - All remote controls (cords, cables, rods,
hoses, etc.) must be positioned so that they
cannot accidentally set off any manoeuvre which
may cause an accident or damage.
16 - Before entering a public road, place the
machine in the transport position, in accordance
Risk of damage to the machine
with the manufacturer’s instructions.
17 - Never leave the driver’s position whilst the
tractor is running.
18 - The speed and the method of operation must
always be adapted to the land, roads and tracks.
Avoid sudden changes of direction under all
circumstances.
19 - Precision of the steering, tractor adhesion,
road holding and effectiveness of the braking
mechanism are influenced by factors such as the
weight and nature of the machine being towed,
the front axle ballast and the state of the land or
path. It is essential, therefore, that the appropriate
care is taken for each situation.
20 - Take extra care when cornering, taking
account of the overhang, length, height and
weight of the machine or trailer being towed.
21 - Before using the machine, ensure that all
protective devices are fitted and in good condition.
Damaged protectors should be replaced
immediately.
22 - Before using the machine, check that nuts
and screws are tight, particularly those for
attaching tools (discs, guards, deflectors, etc.).
Tighten if necessary.
23 - Do not stand in the operating area of the
machine.
24 - Caution! Be aware of any crushing and
shearing zones on remote-controlled and
particularly hydraulically-controlled parts.
25 - Before climbing down from the tractor, or
before any operation on the machine, turn off the
engine, remove the key from the ignition and wait
until all moving parts have come to a standstill.
26 - Do not stand between the tractor and the
machine until the handbrake has been applied
and/or the wheels have been wedged.
27 - Before any operation on the machine, ensure
that it cannot be started up accidentally.
28 - Do not use the lifting ring to lift the machine
when it is loaded.
The Seed drill must only be used for tasks for
which it has been designed.
The manufacturer will not be liable for any damage
caused by using the machine for applications
other than those specified by the manufacturer.
Using the machine for purposes other than those
originally intended will be done entirely at the
user’s risk.
Proper use of the machine also implies:
- complying with instructions on use, care and
maintenance provided by the manufacturer;
- using only original or manufacturer
recommended spare parts, equipment and
accessories.
The Seed drill must only be operated, maintained
and repaired by competent persons, familiar with
the specifications and methods of operation of the
machine. These persons must also be informed of
the dangers to which they may be exposed.
The user must strictly abide by current legislation
regarding:
- accident prevention;
- safety at work (Health and Safety Regulations);
- transport on public roads (road traffic
regulations).
Strict compliance with warnings affixed to the
machine is obligatory.
The owner of the equipment shall become liable
for any damage resulting from alterations made to
the machine by the user or any other person,
without the prior written consent of the
manufacturer.
1 - When hitching or unhitching the machine from
the tractor, place the control lever of the hydraulic
lift in such a position that the lifting mechanism
cannot be activated accidentally.
2 - When hitching the machine to the three-point
lifting mechanism of the tractor, ensure that the
diameters of the pins or gudgeons correspond to
the diameter of the tractor ball joints.
3 - Caution! In the three-point lifting zone, there
may be a danger of crushing and shearing.
4 - Do not stand between the tractor and the
machine whilst operating the external lift control
lever.
5 - When in transport, lifting mechanism stabilizer
bars must be fitted to the machine to avoid
floating and side movement.
6 - When transporting the machine in the raised
position, lock the lift control lever.
7 - Never unhitch the machine when the hopper is
full.
(Power take-off and universal drive shafts)
1 - Only use universal drive shafts supplied with
the machine or recommended by the
manufacturer.
2 - Power take-off and universal drive shaft
guards must always be fitted and in good
condition.
3 - Ensure that the tubes of the universal drive
shafts are properly guarded, both in the working
position and in the transport position.
4 - Before connecting or disconnecting a universal
drive shaft, disengage the power take-off, turn off
the engine and re-move the key from the ignition.
Usage tip
5
HYDRAULIC CIRCUIT
MAINTENANCE
GB
5 - If the primary universal drive shaft is fitted with
a torque limiter or a free wheel, these must be
mounted on the machine power take-off.
6 - Always ensure that universal drive shafts are
fitted and locked correctly.
7 - Always ensure that universal drive shaft guards
are immobilized in rotation using the specially
provided chains.
8 - Before engaging power take-off, ensure that
the speed selected and the direction of rotation of
the power take-off comply with the
manufacturer’s instructions.
9 - Before engaging power take-off, ensure that
no persons or animals are close to the machine.
10 - Disengage power take-off when the universal
drive shaft angle limits laid down by the
manufacturer are in danger of being exceeded.
11 - Caution! When power take-off has been
disengaged, moving parts may continue to rotate
for a few moments. Do not approach until they
have reached a complete standstill.
12 - On removal from the machine, rest the
universal drive shafts on the specially provided
supports.
13 - After disconnecting the universal drive shafts
from the power take-off, the protective cap should
be fitted to the power take-off.
14 - Damaged power take-off and universal drive
shaft guards must be replaced immediately.
1 - Caution! The hydraulic circuit is pressurized.
2 - When fitting hydraulic motors or cylinders,
ensure that the circuits are connected correctly in
accordance with the manufacturer’s guidelines.
3 - Before fitting a hose to the tractor’s hydraulic
circuit, ensure that the tractor-side and machineside circuits are not pressurized.
4 - The user of the machine is strongly
recommended to identify the hydraulic couplings
between the tractor and the machine in order to
avoid wrong connection. Caution! There is a
danger of reversing the functions (for example:
raise/lower).
5 - Check hydraulic hoses once a year:
. Damage to the outer surface
. Porosity of the outer surface
. Deformation with and without pressure
. State of the fittings and seals
The maximum working life for hoses is 6 years.
When replacing them, ensure that only hoses with
the specifications and grade recommended by the
machine manufacturer are used.
6 - When a leak is found, all necessary
precautions should be taken to avoid accidents.
7 - Pressurized liquid, particularly hydraulic circuit
oil, may cause serious injury if it comes into
contact with the skin. If the case of injury, consult
a doctor immediately. There is a risk of infection.
8 - Before any operation on the hydraulic circuit,
lower the machine, release the pressure from the
circuit, turn off the engine and remove the key
from the ignition.
1 - Before commencing any maintenance,
servicing or repair work, or before attempting to
locate the source of a breakdown or fault, it is
essential that the power take-off is disengaged,
the engine turned off and the key removed from
the ignition.
2 - Check regularly that nuts and screws are not
loose. Tighten if necessary.
3 - Before carrying out maintenance work on a
raised machine, prop it up using appropriate
means of support.
4 - When replacing a working part (fertilizer
spreader blade or seed drill coulter), wear
protective gloves and only use appropriate tools.
5 - To protect the environment, it is forbidden to
throw away oil, grease or filters of any kind. Give
them to specialist recycling firms.
6 - Before carrying out any work on the electric
circuit, disconnect the power source.
7 - Protective devices likely to be exposed to wear
and tear should be checked regularly. Replace
them immediately if they are damaged.
8 - Spare parts should comply with the standards
and specifications laid down by the manufacturer.
Only use Sulky spare parts.
9 - Repairs affecting parts under stress or
pressure (springs, pressure accumulators, etc.)
should be carried out by suitably qualified
engineers with special tools.
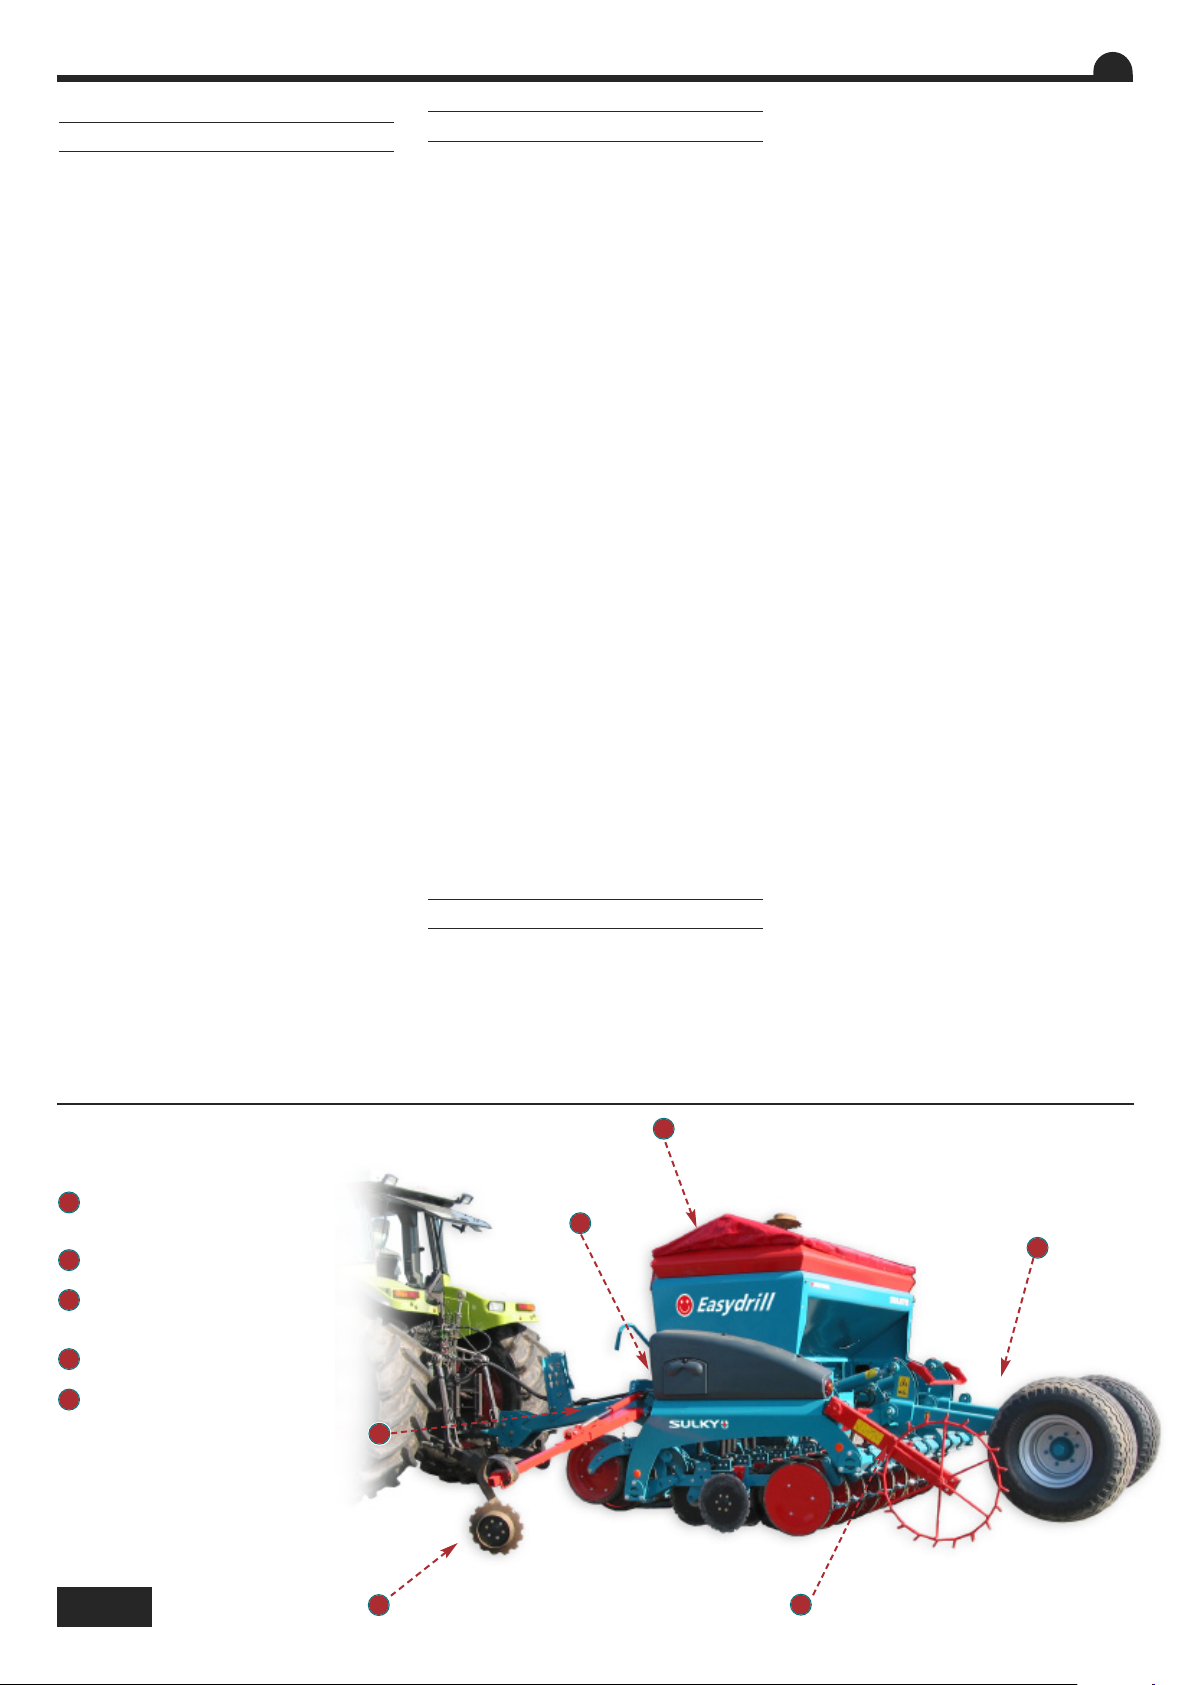
DANGER
Marker operating area
1
1
(if markers in use)
2
Moving parts
2
3
Do not stand on the platform during
3
operation
4
4
Rotating agitator shaft
5
5
Risk of crushing
6
4
4
3
3
5
5
5
5
1
1
2
2

ALLGEMEINE SICHERHEITSVORSCHRIFTEN
ALLGEMEINES
BESTIMMUNGSGEMÄSSE VERWENDUNG
DER MASCHINE
ANHÄNGUNG
Sicherheitsvorschriften
DE
Verletzungsgefahr
In der Anweisung werden diese Zeichen in Verbindung mit Empfehlungen für Ihre Sicherheit und der anderer sowie die gute Funktion der
Maschine verwendet.
Jeder Benutzer dieser Maschine muß diese Vorschriften genau kennen.
Vor jeder Benutzung und Inbetriebsetzung der
Schlepper-Maschine-Einheit kontrollieren, ob sie
den Sicherheitsvorschriften und den Vorschriften
der Straßenverkehrsordnung entsprechen.
1 - Zusätzlich zu den in diesem Handbuch
enthaltenen Anweisungen die Gesetzgebung
bezüglich der Sicherheits- und
Unfallverhütungvorschriften einhalten.
2 - Die auf der Maschine angebrachten
Warnungen informieren über die einzuhaltenden
Sicherheitsmaßnahmen und tragen zur
Unfallverhütung bei.
3 - Im Straßenverkehr die
Straßenverkehrsordnung einhalten.
4 - Vor Arbeitsbeginn muß sich der Benutzer
unbedingt mit den Antriebs- und
Bedienungsorganen der Maschine und ihren
jeweiligen Funktionen vertraut machen. Während
der Arbeit ist es dafür zu spät.
5 - Weite Kleidungsstücke, die in sich bewegende
Teile geraten könnten, vermeiden.
6 - Es empfiehlt sich, gemäß den gültigen Normen
einen Schlepper mit Kabine oder
Sicherheitsverstärkung zu verwenden.
7 - Vor Inbetriebsetzung und Arbeitsbeginn die
direkte Umgebung kontrollieren (Kind!). Für
ausreichende Sicht sorgen! Personen oder Tiere
aus dem Maschinengefahrenbereich entfernen
(Schutzvorrichtungen!).
8 - Der Transport von Personen oder Tieren auf
der Maschine ist während der Arbeit oder beim
Fahren streng verboten.
9 - Die Maschine darf gemäß den geltenden
Sicherheitsnormen nur an den dafür vorgesehenen
Kupplungspunkten angehängt werden.
10 - Besondere Vorsicht ist beim An- und Abbau
der Maschine am Schlepper geboten.
11 - Vor Anhängen der Maschine kontrollieren, ob
der Ballast des Schleppers genügt. Die
Ballastelemente müssen gemäß den Vorschriften
des Schlepperherstellers auf den dafür
vorgesehenen Haltern angebracht werden.
12 - Die maximale Achslast und das zulässige
Gesamtgewicht einhalten.
13 - Das für den Straßenverkehr maximal
zulässige Außenmaß einhalten.
14 - Vor Straßenbenutzung die
Schutzvorrichtungen und Signalisierungs vorrichtungen (Licht- und Rückstrahlelemente)
anbringen und ihre Funktion prüfen.
Gefahr der Beschädigung der Maschine
15 - Alle Fernsteuerungen (Seil, Kabel, Stange,
Schlauch) müssen so positioniert sein, daß sie
nicht ungewollt betätigt werden und dadurch
Unfälle oder Schäden hervorrufen können.
16 - Vor Benutzung der Straße die Maschine
gemäß Herstelleranweisungen in Transportstellung
bringen.
17 -. Fahrersitz nie bei laufender Maschine
verlassen.
18 - Fahrgeschwindigkeit und -weise müssen
immer dem Gelände, den Straßen und Wegen
angepaßt sein. Auf alle Fälle plötzliche
Richtungsänderungen vermeiden.
19 - Die Präzision der Lenkung, die Bodenhaftung
des Schleppers, die Straßenlage und die
Wirksamkeit der Bremsvorrichtungen werden
beeinflußt von Faktoren wie: Gewicht und Art der
angebauten Maschine, Belastung der Vorderachse,
Zustand des Geländes oder der Fahrbahn. Die den
Bedingungen entsprechenden
Vorsichtsmaßnahmen einhalten.
20 - Besondere Vorsicht ist in Kurven geboten.
Schwerpunktlage, Länge, Höhe und Gewicht der
Maschine oder des Anhängers berücksichtigen.
21 - Vor jeder Benutzung der Maschine
kontrollieren, ob alle Schutzvorrichtungen
angebracht und in gutem Zustand sind. Bei
Beschädigung sofort austauschen.
22 - Vor jeder Benutzung kontrollieren, ob alle
Schrauben und Muttern fest angezogen sind,
insbesondere die, mit denen die Geräte befestigt
sind (Scheiben, Paletten, Schirme...). Notfalls
anziehen.
23 - Sich nicht im Manövrierbereich der Maschine
aufhalten.
24 - Vorsicht! Auf den Fernsteuerungsorganen,
insbesondere auf denen mit hydraulischem
Regelkreis, kann es Stauch- und Abscherzonen
geben.
25 - Vor Verlassen des Schleppers oder vor jedem
Eingriff auf der Maschine Motor abschalten,
Zündschlüssel abziehen und völligen Stillstand aller
bewegten Teile abwarten.
26 - Sich nicht zwischen Schlepper und Maschine
aufhalten, ohne zuvor die Parkbremse angezogen
und/oder Keile unter die Räder gelegt zu haben.
27 - Vor jedem Eingriff an der Maschine
kontrollieren, ob diese nicht ungewollt in Betrieb
gesetzt werden kann.
28 - Die Aufhängöse nicht zum Heben der
gefüllten Maschine benutzen.
Die Drillmaschine darf nur für die Arbeiten
eingesetzt werden, für die er geplant ist.
Hinweise zur Arbeitserleichterung
Bei Beschädigung der Maschine infolge einer nicht
vom Hersteller spezifizierten Benutzung ist dieser
nicht haftbar.
Jede nicht der ursprünglichen Bestimmung der
Maschine entsprechende Benutzung erfolgt auf
Rechnung und Gefahr des Benutzers.
Die bestimmungsgemäße Verwendung der
Maschine setzt ebenfalls voraus:
- die Einhaltung der vom Hersteller verordneten
Benutzungs-, Wartungs- und
Instandsetzungsvorschriften,
- die ausschließliche Verwendung von
Originalersatzteilen, Originalausrüstungen und
Originalzubehör oder von Teilen, die vom Hersteller
empfohlen sind.
Die Drillmaschine darf nur von kompetenten, mit
den technischen Daten und
Benutzungsanweisungen der Maschine vertrauten
Personen benutzt, gewartet und repariert werden,
die über die Risiken informiert sind, denen sie
ausgesetzt sein könnten.
Streng die gültige Reglementierung einhalten
bezüglich:
- der Unfallverhütung,
- der Arbeitssicherheit (Arbeitsgesetzbuch)
- des Straßenverkehrs (Straßenverkehrsordnung).
Die auf der Maschine angebrachten Warnungen
berücksichtigen.
Der Hersteller haftet nicht für Schäden, die durch
Abänderungen entstehen, die vom Benutzer selbst
oder von Dritten ohne schriftliche Genehmigung
an der Maschine vorgenommen wurden.
1 - Beim An- und Abkuppeln der Maschine am
Schlepper, den Steuerhebel des
Hydraulikkrafthebers so stellen, daß der Hubvorgang nicht unerwartet ausgelöst werden kann.
2 - Beim Anhängen der Maschine am
Dreipunktkraftheber des Schleppers darauf
achten, daß die Spindel- oder Zapfendurchmesser
dem Durchmesser der Schlepperkugelgelenke
entsprechen.
3 - Vorsicht! Im Dreipunkt-Hubbereich bestehen
Stauch- und Abscherrisiken!
4 - Sich bei Betätigung des äußeren KraftheberSteuerhebels nicht zwischen Schlepper und
Maschine aufhalten.
5 - Beim Transport muß die Maschine durch die
Versteifungsstreben des Krafthebers zur
Vermeidung von Unwucht und seitlicher
Pendelung stabilisiert werden.
6 - Beim Transport der Maschine in angehobener
Stellung den Kraftheber-Steuerhebel blockieren.
7 - Die Maschine erst abhängen wenn der Tank
leer ist.
7
ANTRIEBSORGANE
HYDRAULIKLEITUNG
WARTUNG
DE
(Zapfwelle und Gelenkwellen-Antrieb)
1 - Nur die mit der Maschine gelieferte oder vom
Konstrukteur empfohlene Gelenkwelle verwenden.
2 - Die Schutzvorrichtungen der Zapfwellen und
Gelenkwellen müssen immer angebracht und in
gutem Zustand sein.
3 - Auf die richtige Überlappung der
Gelenkwellenrohre sowohl in Arbeits- als auch in
Transportstellung achten.
4 - Vor Anschließen oder Abziehen einer
Gelenkwelle die Zapfwelle auskuppeln, den Motor
abschalten und den Zündschlüssel abziehen.
5 - Ist die Primärkardanwelle mit einem
Drehmomentbegrenzer oder einer
Freilaufkupplung ausgestattet, müssen diese
unbedingt auf der Zapfwelle der Maschine
montiert sein.
6 - Immer auf die korrekte Montage und
Verriegelung der Kardanantriebe achten.
7 - Immer darauf achten, daß die
Schutzvorrichtungen der Gelenkwellen mit den
dafür vorgesehenen Ketten gegen Verdrehen
gesichert sind.
8 - Vor Kuppeln der Zapfwelle prüfen, ob die
gewählte Drehzahl und die Drehrichtung der
Zapfwelle den Vorschriften des Herstellers
entsprechen.
9 - Vor Kuppeln der Zapfwelle kontrollieren, ob
sich keine Personen oder Tiere in Nähe der
Maschine befinden.
10 - Die Zapfwelle auskuppeln, wenn Gefahr
besteht, daß die vom Hersteller vorgeschriebenen
Grenzen des Gelenkwellenwinkels überschritten
werden.
11 - Vorsicht! Nach Auskuppeln der Zapfwelle
können Teile der Maschine noch einige Zeit
nachlaufen. Sich ihnen nie vor völligem Stillstand
nähern.
12 - Bei Abbau der Maschine die Gelenkwellen
auf den dafür vorgesehenen Haltern ablegen.
13 - Nach Abziehen der Gelenkwelle von der
Schlepperzapfwelle muß diese mit ihrer
Schutzkappe bedeckt werden.
14 - Schadhafte Schutzvorrichtungen der
Zapfwelle und der Gelenkwellemüssen sofort
ausgewechselt werden.
1 - Vorsicht! Die Hydraulikleitung steht unter
Druck.
2 - Bei Montage von Zylindern oder
Hydraulikmotoren auf den korrekten Anschluß
gemäß Anweisungen des Herstellers achten.
3 - Vor Anschluß eines Schlauches an der
Hydraulikleitung des Schleppers dafür sorgen, daß
die schlepper- und maschinenseitigen Leitungen
nicht unter Druck stehen.
4 - Dem Benutzer der Maschine wird zur
Vermeidung falscher Anschlüsse dringend geraten,
die Kennzeichnungen auf den
Hydraulikanschlüssen zwischen Schlepper und
Maschine zu beachten, da sonst die Gefahr einer
Funktionsumkehrung besteht. (z.B.:
Heben/Senken).
5 - Einmal im Jahr die Hydraulikschläuche
kontrollieren auf:
. Beschädigung der Außenschicht
. Porosität der Außenschicht
. Verformung ohne Druck und unter Druck
. Zustand der Verbindungen und Dichtungen.
Die maximale Benutzungsdauer der Schläuche ist
6 Jahre. Beim Auswechseln darauf achten, daß
nur Schläuche verwendet werden, deren
Eigenschaften und Qualität den Vorschriften des
Maschinenkonstrukteurs entsprechen.
6 - Bei Feststellung einer undichten Stelle alle
Vorsichtsmaßnahmen zur Unfallverhütung treffen.
7 - Eine unter Druck stehende Flüssigkeit,
insbesondere das Öl der Hydraulikleitung, kann die
Haut durchdringen und schwere Verletzungen
verursachen! Bei Verletzungen sofort Arzt
Konsultieren; Infektionsgefahr!
8 - Vor jedem Eingriff in die Hydraulikanlage
Maschine ablassen, Anlage drucklos schalten,
Motor abstellen und Zündschlüssel abziehen.
1 - Vor Instandsetzungs-, Wartungs- oder
Reparaturarbeiten sowie bei Ermitteln einer
Pannen- oder Betriebsstörungsquelle muß die
Zapfwelle ausgekuppelt, der Motor abgeschaltet
und der Zündschlüssel abgezogen sein.
2 - Regelmäßig kontrollieren, ob Schrauben und
Muttern fest angezogen sind. Notfalls anziehen.
3 - Vor Wartung einer Maschine in angehobener
Stellung diese mit einem geeigneten Mittel
abstützen.
4 - Beim Austausch eines Funktionsteiles
(Schaufel bei Streuern oder Schare bei
Drillmaschinen) Schutzhandschuhe tragen und nur geeignete Werkzeuge
benutzen.
5 - Zum Schutz der Umwelt ist es verboten, Öl,
Fett und Filter jeder Art wegzuwerfen oder
auszugießen. Sie sind von darauf spezialisierten
Unternehmen zu entsorgen.
6 - Vor Eingriff an der elektrischen Leitung die
Stromzufuhr unterbrechen.
7 - Verschleiß ausgesetzte Schutzvorrichtungen
müssen regelmäßig kontrolliert werden. Sie sofort
austauschen, wenn schadhaft.
8 - Ersatzteile müssen den vom Konstrukteur
festgelegten Normen und Kennwerten
entsprechen. Nur Sulky-Ersatzteile verwenden!
9 - Reparaturen an Organen, die unter Spannung
oder Druck stehen (Federn, Druckspeicher, usw...)
setzen eine ausreichende Qualifikation voraus und
erfordern Werkzeuge; sie dürfen daher nur von
qualifiziertem Personal durchgeführt werden.
GEFAHR
Betriebsbereich der Spurreißer
1
1
(gegebenenfalls)
2
Umlaufende Teile
2
3
Bei der Arbeit nicht auf dem Ladesteg
3
stehen
4
4
Rührwerkwelle dreht sich
5
5
Stauchgefahr
8
4
4
3
3
5
5
5
5
1
1
2
2
SOMMAIRE
Français
S
Pages
12 • A Préconisation d’utilisation
Pages
14-15
16-17
18-19
20-21
22-23
Pages
24-33
34-35
36-39
40-41
42-43
Pages
AVANT LA MISE EN ROUTE
A
LIRE
ABSOLUMENT
A
LIRE
ABSOLUMENT
MISE EN ROUTE
• A Préparation de la machine
• B Montage
• C Attelage
• D Transport
• E Remplissage de la trémie
REGLAGES EASYDRILL
• A Réglage du débit
• B Réglage de profondeur
• C Réglage du report de
charge
• D Réglage des rasettes
• E Herse de recouvrement
REGLAGES FERTISEM
42-43
44-45
46-47
48-49
48-49
• F Décrottoirs
• G Traceurs latéraux
• H Dispositif de marquage
• I Débrayage demi-semoir
• J Vidange de la trémie
1
1
1
2
1
3
1
50-51
52-53
54-55
Pages
56-57
56-57
58-59
60-61
Pages
66-67
68-69
Pages
70-71
76
77-92
94
95-97
• A Mise en place Fertisem
• B Réglage du débit
• C Réglage des tubes de descente
ENTRETIEN
• A Nettoyage
• B Graissage
• C Vérifications
• D Distribution
EQUIPEMENTS
• A Ultron MS
• B Agitateur souple
TABLEAUX DE REGLAGE
• A Fiches pratiques
• B Rappel pré-réglages distribution semences avant
• C Tableaux de débit distribution semences avant
• D Rappel pré-réglages distribution ferti arrière
• E Tableaux de débit distribution ferti arrière
62-63
62-63
64-65
• E Remisage
• F Caractéristiques
techniques
• G Positions Autocollants
4
1
5
1
6
1
7
Lire attentivement la notice avant l’utilisation. Comprendre son semoir
FR
c’est mieux l’utiliser. En français suivre le symbole.
F
9

English
CONTENTS
Pages
13 • A Recommendations for use
Pages
14-15
16-17
18-19
20-21
22-23
Pages
24-33
34-35
36-39
40-41
42-43
Pages
BEFORE START-UP
REQUIRED
REQUIRED
START-UP
• A Preparing the machine
• B Assembly
• C Hitching up the machine
• D Transport
• E Filling the hopper
EASYDRILL SETTINGS
• A Setting the flow rate
• B Adjusting the depth
• C Adjusting the load transfer
• D Adjusting the coulters
• E Covering harrow
FERTISEM SETTINGS
READING
READING
42-43
44-45
46-47
48-49
48-49
• F Scrapers
• G Side markers
• H Tramlining system
• I Disengaging half the seed drill
• J Emptying the hopper
50-51
52-53
54-55
Pages
56-57
56-57
58-59
60-61
Pages
66-67
68-69
Pages
72-73
76
77-92
94
95-97
• A Setting up the Fertisem
• B Setting the flow rate
• C Adjusting the delivery tubes
MAINTENANCE
• A Cleaning
• B Greasing
• C Checks
• D Distribution
OPTIONAL EQUIPMENT
• A Ultron MS
• B Rubber agitator
SETTINGS CHARTS
• A Practical recommendations
• B Pre-setting reminder - Seed metering device (front)
• C Seeding rate charts - Seed metering device (front)
• D Pre-setting reminder - Fertilizer metering device (rear)
• E Seeding rate charts - Fertilizer metering device (rear)
62-63
62-63
64-65
• E Storage
• F Technical specifications
• G Sticker positions
10
10
Read the operator’s manual carefully before use. Understanding your seed drill
means better and safer drilling. For English instructions, follow this symbol.
GB

VERZEICHNIS
Deutsch
V
Seite
13 • A Bedienungsempfehlungen
Seite
14-15
16-17
18-19
20-21
22-23
Seite
24-33
34-35
36-39
40-41
42-43
Seite
VORBEMERKUNGEN
SORGFÄLTIG
SORGFÄLTIG
INBETRIEBSETZUNG
• A Vorbereitung der Maschine
• B Montage
• C Ankopplung
• D Straßentransport
• E Füllen des Tanks
EINSTELLUNGEN EASYDRILL
• A Streumengeneinstellung
• B Einstellung der Ablagetiefe
• C Einstellung der
Gewichtsverlagerung
• D Einstellung der Säscharen
• E Saatstriegel
EINSTELLUNGEN FERTISEM
LESEN
LESEN
42-43
44-45
46-47
48-49
48-49
• F Schmutzabstreifer
• G Seitliche Spurreißer
• H Fahrgassen-System
• I Auskoppeln der Streuanlage
auf halber Breite
• J Leeren des Tanks
1
1
1
2
1
3
1
50-51
52-53
54-55
Seite
56-57
56-57
58-59
60-61
Seite
66-67
68-69
Seite
74-75
76
77-92
94
95-97
• A Inbetriebnahme Fertisem
• B Streumengeneinstellung
• C Einstellung der Auslaufrohre
WARTUNG
• A Reinigung
• B Schmierung
• C Prüfungen
• D Verteilung
AUSRÜSTUNGEN
• A Ultron MS
• B Elastische Rührwelle
EINSTELLTABELLEN
• A Praktische Hinweise
• B Zur Erinnerung: Voreinstellungen Saatstreumengen vorne
• C Tabellen Saatstreumengen vorne
• D Zur Erinnerung: Voreinstellungen Ferti Streumengen hinten
• E Tabellen Düngerstreumengen Ferti hinten
62-63
62-63
64-65
• E Abstellen
• F Technische Daten
• G Sicherheitsaufkleber
4
1
5
1
6
1
7
Anweisung vor Benutzung sorgfältig durchlesen. Die Drillmaschine
verstehen, heißt sie besser benutzen. Die deutsche Fassung ist mit
gekennzeichnet.
DE
11
Avant la mise en route
Préconisation d’utilisation
A
FR
Le semoir EASYDRILL est conçu et construit pour
semer toutes les semences courantes dans des
situations très différentes.
Toutefois, il est indispensable de respecter les
recommandations du constructeur et de travailler
avec prudence et bon sens.
Il doit être utilisé exclusivement par du personnel
qualifié et formé.
Lors de son utilisation, il est possible de rencontrer
des situations où les sols sont trop humides ou au
contraire trop secs pour pouvoir faire fonctionner
correctement votre semoir.
Certaines de ces situations difficiles peuvent
conduire à des dommages pour votre semoir ainsi
qu’à votre sol.
Sulky ne peut pas être tenu pour responsable des
dommages occasionnés lors d’une utilisation
inappropriée.
Toute modification de la machine opérée sans
l’accord de Sulky annule automatiquement toute
garantie du constructeur.
Les semis sur préparations simplifiées doivent être
pratiqués sur un sol nivelé et fermement rappuyé
avec des résidus de récolte correctement répartis
au préalable.
La présence de cailloux, rochers, souches ou autres
obstacles doit absolument être prise en compte.
La conduite du semoir doit être adaptée.
La vitesse d’utilisation ne doit pas excéder 12 km/h
en semis sur préparation simplifiée.
La vitesse d’utilisation ne doit pas excéder 8km/h
en semis direct et sous couvert végétal.
Des variations dans les résultats des semis et leurs
levées ne peuvent être totalement exclues malgré
le soin apporté par Sulky dans la conception et la
fabrication de ce semoir, même lors d’une
utilisation conforme.
Les facteurs pouvant intervenir dans le succès des
semis directs et simplifiés sont très variés :
- Qualité des semences (enrobages, traitements,
densité, vigueur, taux de germinabilité etc.)
- Problème de structure ou d’hétérogénéité des
sols, présence de ravageurs (limaces, mulots).
La pratique des semis simplifiés requiert un haut
niveau de connaissances agronomiques.
Lors des semis, il est absolument nécessaire de relever la
machine pour faire un demi-tour dans le champ.
Il n’est pas souhaitable de décrire des courbes trop
prononcées en semant.
la responsabilité de Sulky est totalement dégagée en cas
d’accident survenant lors d’une utilisation de la machine
non-conforme aux prescriptions.
12
Before start-up
Recommendations for use
A
GB
The EASYDRILL seed drill has been designed and
constructed for drilling all kinds of commonly used
seeds in a variety of different situations.
Nevertheless, it is essential to follow the
manufacturer’s recommendations and to work
carefully and sensibly.
It must be used only by skilled and trained
operators.
It is possible that there will be occasions where the
ground is either too wet or too dry to use the drill
properly.
In some of these difficult conditions, using your drill
may result in damage to the machinery or to the soil.
Sulky cannot be held responsible for damage
caused by improper use of the machine.
Any modification to the machine carried out
without Sulky’s approval will automatically
invalidate the manufacturer’s guarantee.
Minimum tillage drilling must be carried out on
level, firmly consolidated ground where the harvest
residues have been properly incorporated
beforehand.
When drilling, it is absolutely essential to lift the machine up when turning in the field.
It is not advisable to turn too tightly when drilling.
The presence of stones, rocks, stumps or other
obstacles must be taken into account.
The drill must be driven appropriately.
The operating speed for minimum tillage drilling
must not exceed 12 km/h. The operating speed
when drilling directly and in plots where there is
vegetative cover must not exceed 8 km/h.
Variations in the results of drilling and plant
emergence cannot be completely excluded in spite
of the care taken by Sulky in the design and
manufacture of this seed drill, even when it is used
in full compliance with the instructions.
The factors that may have an impact on the
success of direct and minimum tillage drilling are
very varied, and include:
- Seed quality (coatings, treatments, density,
vigour, germination rate, etc.)
- Problems with the structure or heterogeneity of
the soil, presence of pests (slugs, field mice).
Minimum tillage drilling requires a high level of
agronomic knowledge.
1
1
Sulky cannot be held liable in any way in the event of an accident arising due to the use of the
machine that does not comply with the instructions.
Vorbemerkungen
Bedienungsempfehlungen
A
Die EASYDRILL Drillmaschine ist darauf ausgelegt,
alle gängigen Saatarten unter sehr verschiedenen
Voraussetzungen säen zu können.
Dazu ist es jedoch erforderlich, die
Herstellerempfehlungen zu beachten und mit
Vorsicht und Vernunft vorzugehen.
Die Drillmaschine darf nur von qualifiziertem
Personal bedient werden.
Beim Säen können zu feuchte bzw. zu trockene
Bodenverhältnisse auftreten, unter denen die
Drillmaschine nicht korrekt funktionieren kann.
Einige dieser heiklen Situationen können zu
Beschädigungen an der Drillmaschine oder am
Boden führen.
Sulky kann nicht haftbar gemacht werden für
Schäden, die aufgrund unsachgemäßer Bedienung
oder Handhabung entstehen.
Werden an der Maschine ohne Zustimmung von
Sulky Änderungen vorgenommen, ist die
Herstellergewährleistung ungültig.
Die Aussaat bei vereinfachter Bodenvorbereitung
muss auf planiertem und gut angedrücktem Boden
erfolgen, wobei die verbleibenden Pflanzenreste
vorher gut verteilt werden müssen.
DE
Steine, Felsen, Baumstümpfen oder andere
Hindernisse sind unbedingt zu berücksichtigen.
Die Führung der Drillmaschine ist an diese
Hindernisse anzupassen.
Bei Einsaat mit vereinfachter Bodenvorbereitung darf
die Fahrgeschwindigkeit 12 km/h nicht
überschreiten.
Bei Direkteinsaat und Bodenbedeckung darf die
Fahrgeschwindigkeit 8km/h nicht überschreiten.
Abweichende Ergebnisse bei der Aussaat und beim
Saataufgang können trotz der Sorgfalt bei der
Entwicklung dieser Drillmaschine durch Sulky, auch
bei sachgemäßer Bedienung und Handhabung, nicht
völlig ausgeschlossen werden.
Die für die Aussaatqualität bei Direkteinsaat und bei
vereinfachter Bodenvorbereitung verantwortlichen
Faktoren sind sehr unterschiedlich:
- Saatqualität (Pillieren, Behandlung, Dichte,
Lebenskraft, Keimfähigkeit in Prozent usw.)
- Problem der Bodenstruktur oder der heterogenen
Beschaffenheit des Bodens, Vorliegen von
Schädlingen (Schnecken, Feldmäuse).
Beim vereinfachten Aussaatverfahren ist ein hohes
Niveau an landwirtschaftlichem Fachwissen gefragt.
Beim Aussäen muss die Maschine beim Wenden im Feld unbedingt angehoben werden.
Es ist nicht zu empfehlen, beim Säen zu enge Kurven zu fahren.
Die Haftung von Sulky ist ausgeschlossen bei Unfällen, die beim Betrieb der Maschinen
unter Nichtbeachtung dieser Betriebsanleitung entstehen.
13

Mise en route / Start-up / Inbetriebsetzung
A
1
1
2
2
2
2
Assurez-vous qu'il n'y ait
personne autour de la
machine lors de la
manipulation
Ensure that all personnel
are a safe distance from
the machine when
manoeuvring
Sicherstellen, dass sich
beim
Ankopplungsmanöver
niemand im
Maschinengefahrenbereic
h befindet
14
Mise en route / Start-up / Inbetriebsetzung
A
Préparation de la machine
FR
Au moment de la livraison, vérifier que le semoir est
complet
-
Assurez-vous que rien n’a été oublié dans la
trémie.
-
Vérifier que la machine n'a subi aucun dommage
en cours de transport et qu'il ne manque aucune
pièce.
Seules les réclamations formulées à réception de
la machine pourront être prises en considération.
-
Faire constater d'éventuels dégâts par le
transporteur.
-
En cas de doute ou de litige, adressez-vous à
votre revendeur.
A
Preparing the machine
As soon as the drill has been delivered check that it is
complete.
-
Ensure that nothing has been left in the hopper.
-
Check that the machine has not suffered any
damage during transport and that no parts are
missing.
Only claims made upon receipt of the machinery
will be considered.
Dans le cas où votre machine vous est livrée repliée
1
1
(2.50 m x 3), la flèche peut être utilisée en
2
2
guise de palonnier pour le déchargement au palan.
1
If your machine is delivered folded up (2.50 m x 3),
2
the draw bar can be used as a lifting beam for
2
1
unloading using a hoist.
1
2
GB
-
Make a note of any possible damage caused
during transport.
-
If there is any doubt or dispute, please contact
your dealer.
A
Vorbereitung der Maschine
Bei Lieferung prüfen, ob die Drillmaschine komplett
geliefert wurde.
-
Sicherstellen, dass nichts im Tank zurückgelassen
wurde.
-
Prüfen, ob die Maschine nicht beim Transport
beschädigt wurde und kein Teil fehlt.
Nur bei Abnahme formulierte Reklamationen
können berücksichtigt werden.
-
Eventuelle Schäden vom Spediteur feststellen
lassen.
-
Im Zweifelsfall oder Schadenfall Ihren
Fachhändler informieren.
Wenn die Maschine Ihnen zusammengefaltet
1
ausgeliefert wird (2.50 m x 3), kann der Ausleger
1
beim Abladen zum Aufhängen des Flaschenzugs
benutzt werden.
DE
2
2
15
Mise en route / Start-up / Inbetriebsetzung
B
D
C
B
B
C
C
B
D
A
1
1
D
A
A
3
3
16
2
2
4
4
Assurez-vous qu'il n'y ait
personne autour de la
machine lors de la
manipulation
4
4
Ensure that all personnel
are a safe distance from
the machine when
manoeuvring
3
3
Sicherstellen, dass sich
beim
Ankopplungsmanöver
niemand im
Maschinengefahrenbereic
h befindet
Mise en route / Start-up / Inbetriebsetzung
B
Montage
FR
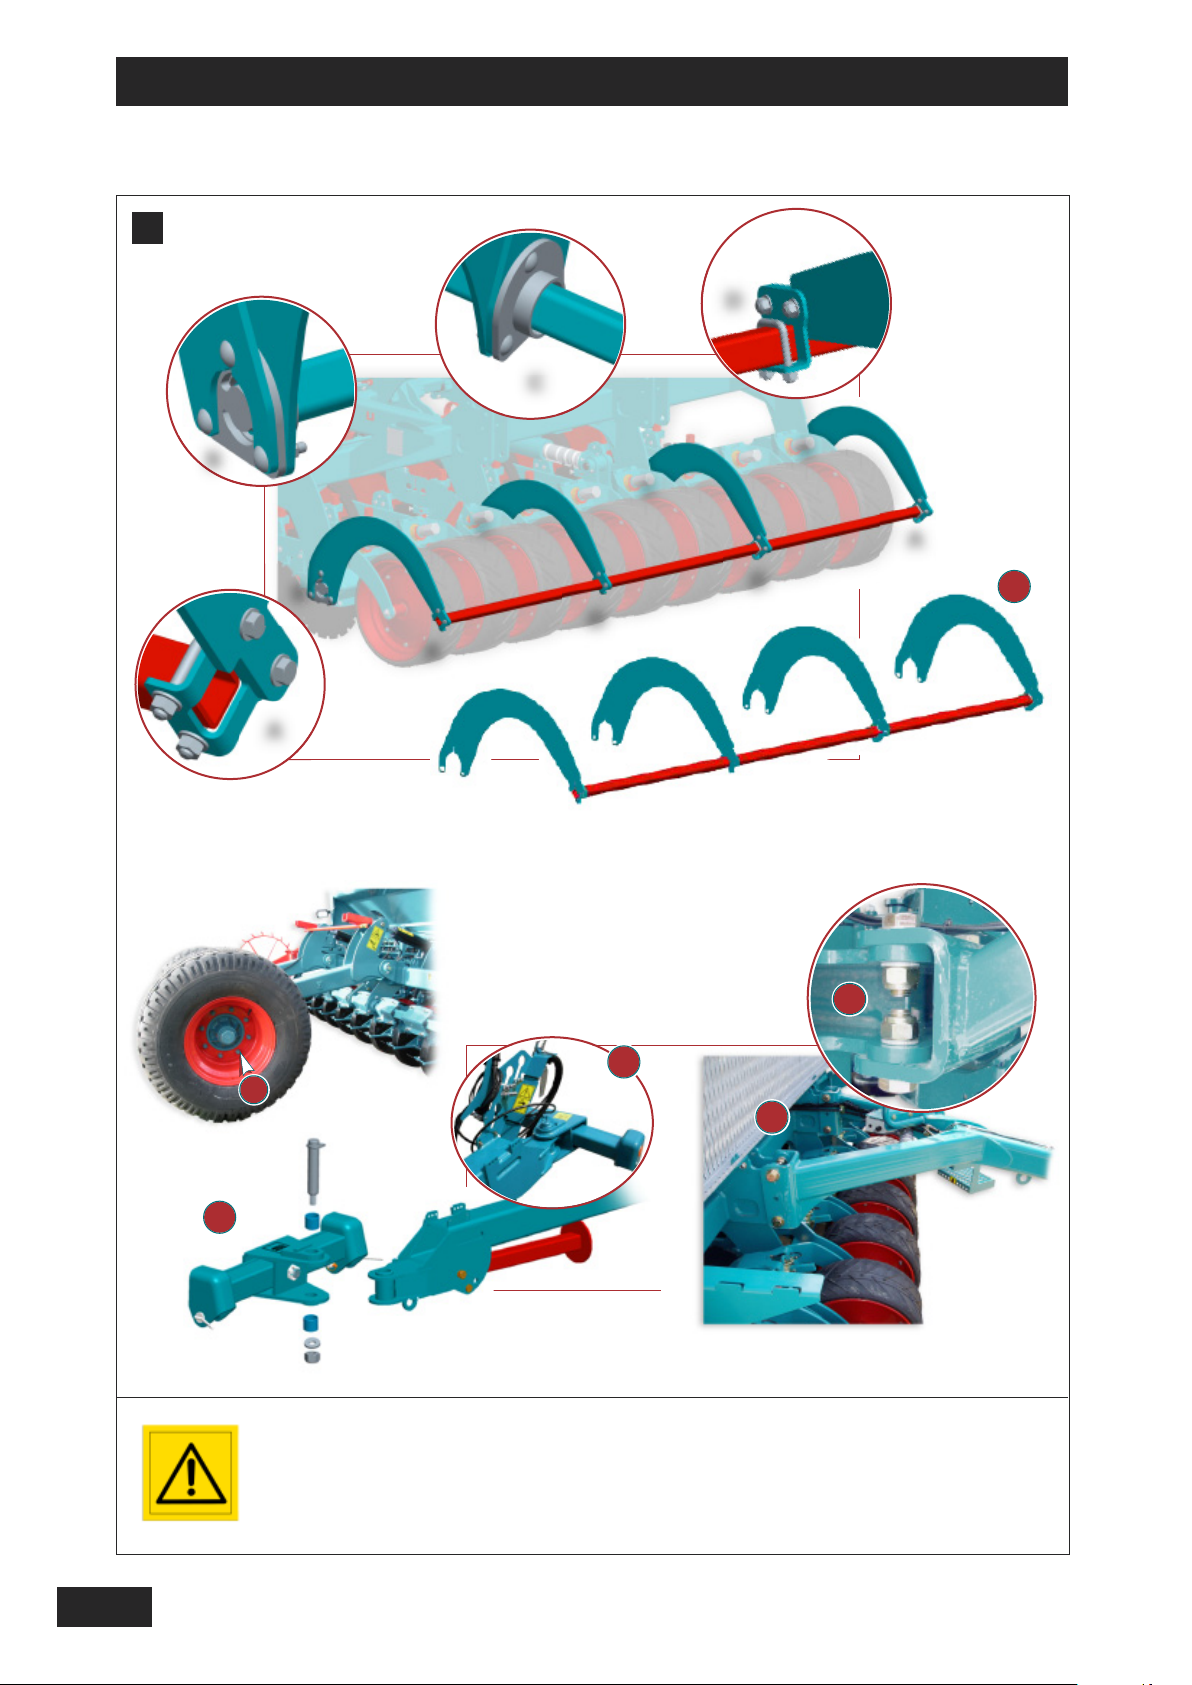
-
Monter la barre déflecteur de tiges de
tournesol . (
Les écrous des roues doivent être serrés à 210 Nm
1
1
OPTION)
2
2
et vérifiés régulièrement pendant les premières heures
de fonctionnement.
Montage de la flèche:
3
Les platines d’assemblage doivent être jointes, le
3
couple de serrage est de 600 Nm (une personne de
60 kg pesant sur une rallonge d’un mètre).
Les boulonnages de la flèche doivent être serrés
jusqu’à ce que les chapes du châssis viennent en
contact avec la flèche.
-
Assembler la barre d’attelage sur le pivot de
la flèche.
Serrage de l’écrou M 30 (clef 46) 120 DaN/m.
B
Assembly
1
- Fit the sunflower stem deflector bar . (OPTIONAL)
2
The wheel nuts must be tightened to 210 Nm and
2
1
checked regularly during the first few hours of
operation.
Le logement conique de la rondelle est fait
pour épouser l’extrémité conique de l’axe.
-
Bien graisser avant la première utilisation.
1
2
4
4
GB
The tapered housing of the washer is designed
to hug the tapered end of the axis.
- Lubricate well before the first use.
Fitting the draw bar:
3
The assembly brackets must be attached, the
3
tightening torque is 600 Nm (equivalent to a person
weighing 60 kg pushing down on a bar of one metre).
The draw bar’s bolts should be tightened until the
chassis’ clevis come into contact with the draw bar.
- Assemble the linkage bar on the pivot of the draw
4
4
bar.
Tighten the nut M 30 (spanner 46) 120 DaN/m.
B
Montage
- Prallbügel für Sonnenblumenstängel anbauen .
(OPTION)
2
Die Radmuttern müssen auf 210 Nm Drehmoment
2
angezogen werden und während der ersten
Betriebsstunden regelmäßig überprüft werden.
Auslegeranbau:
3
Die Halteplatten müssen zusammengebaut werden,
3
das Anziehdrehmoment liegt bei 600 Nm (entspricht
einer 60 kg wiegenden Person, die an einem ein
Meter langen Hebel hängt).
DE
1
1
Die kegelförmige Aufnahme der Scheibe dient
dazu, das kegelförmige Achsende zu
umschließen.
- Vor der ersten Benutzung gut schmieren.
Die Schrauben des Auslegers müssen festgezogen
werden, bis sich die Gabelgelenke des Fahrgestells in
Kontakt mit dem Ausleger befinden.
- Deichsel an der Schwenkachse des Auslegers
4
4
anbauen.
Anziehen der Mutter M 30 (Schlüssel 46) 120
DaN/m.
17
Mise en route / Start-up / Inbetriebsetzung
C
1
1
3
3
A
B
600 mm
A A ≈≈600 mm
(travail au champ)
(travail au champ)
1130 mm
B B ≈≈1130 mm
(position route)
(position route)
2
2
18
Assurez-vous qu'il n'y ait
personne autour de la
machine lors de la
manipulation
4
4
Ensure that all personnel
are a safe distance from
the machine when
manoeuvring
5
5
Sicherstellen, dass sich
beim
Ankopplungsmanöver
niemand im
Maschinengefahrenberei
ch befindet

Mise en route / Start-up / Inbetriebsetzung
FR
C
Attelage
Le semoir s’attelle au bras inférieur du relevage
hydraulique catégorie 3-2.
Après attelage, tendre légèrement les stabilisateurs
l
atéraux de bras de relevage pour limiter le
mouvement de la flèche lors des manoeuvres et
opération de transport.
UR LA ROUTE:
S
- Respecter le code de la route.
- Respecter le PTAC et la vitesse maximum autorisée
de la machine.
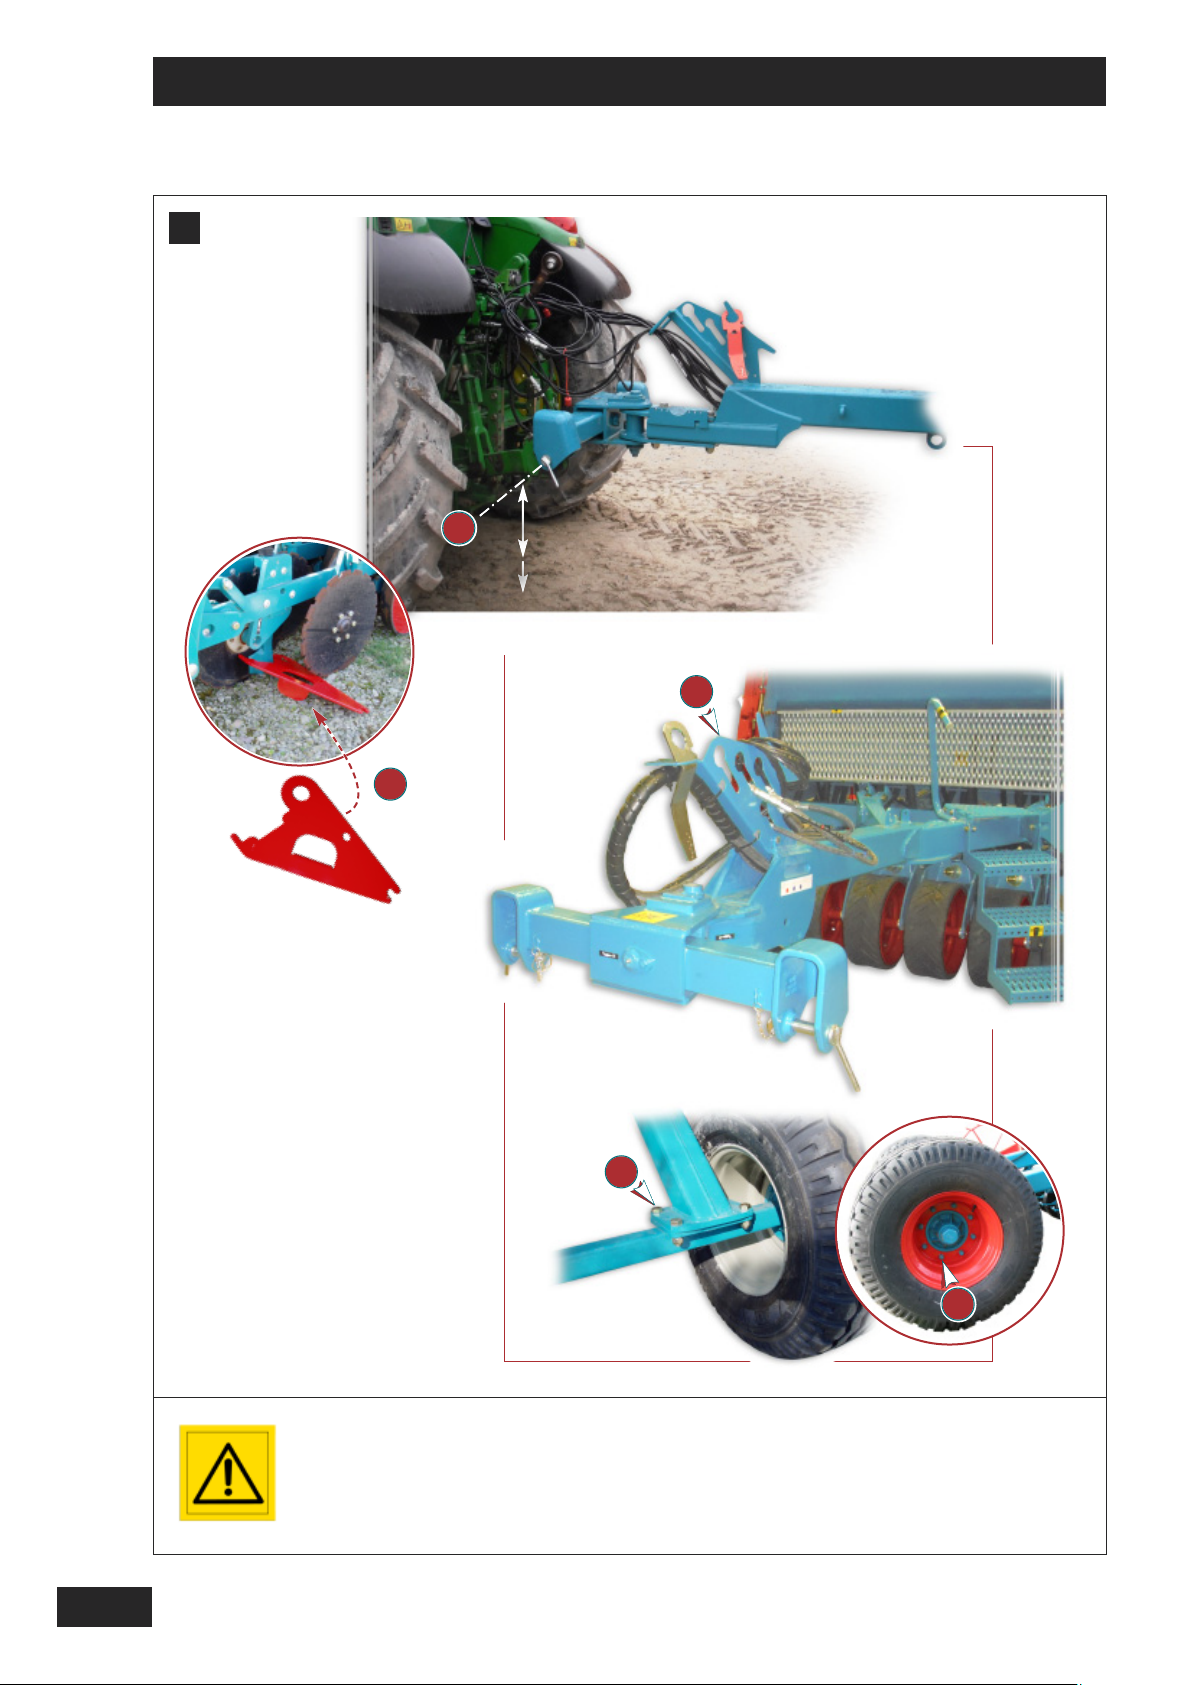
- Respecter la hauteur d’attelage
1
1
B
, 1130 mm
du sol pour le transport.
- Brancher la prise pneumatique / hydraulique de
freinage.
U TRAVAIL:
A
- La hauteur d’attelage est importante, respecter la
A
distance
(rotule / sol de 600mm )
1
1
Au remisage les flexibles hydrauliques sont rangés
2
sur le support .
C
Hitching up the machine
2
The drill hitches to the lower arm of the category 3-2
hydraulic lifting mechanism.
After hitching up, tighten the lifting arm side stabilizers
to limit the movement of the draw bar during
manoeuvres and transport operations.
N THE ROAD:
O
- Follow the traffic code.
- Observe the GVWR and the maximum speed allowed
for the machine.
1
1
B
- Observe the linkage height
, 1130 mm from the
ground for transport.
- Connect the pneumatic / hydraulic brake connection.
Toujours dételer la machine sur un plan
horizontal.
Dans le cas contraire il est impératif de caler la
machine au niveau des disques pour assurer la
sécurité.
-
Placer une cale devant les disques.
Utiliser pour cela les cales fournies avec la
3
3
machine
Lors du montage de la flèche assurez vous de passer
les flexibles et câbles dans la flèche pour les
protéger des pneus du tracteur
Montage de l’essieu:
4
Serrage des platines à 350Nm
Serrage des écrous de roues à 260Nm
4
5
5
Penser à resserrer les écrous de roues après les
premières heures de fonctionnement
Always unhitch the machine on level ground.
If the ground is not level, it is imperative that
the machine is wedged in front of the disks to
ensure that it is secure.
- Place a wedge in front of the disks. To do this use
3
the wedges supplied with the machine.
3
When fitting the draw bar, ensure that you thread
the hoses and cables inside it to protect them from
the tractor’s tyres.
Assembling the axle:
4
Tighten the brackets to 350 Nm
4
1
2
GB
N USE:
I
- The linkage height is important, observe the
distance
A
1
1
(ball joint / ground of 600mm)
Whilst the drill is in storage, the hydraulic hoses can be
2
placed on the support .
C
Ankopplung
2
Die Drillmaschine wird am unteren Arm des
Hydraulikkrafthebers Klasse 3-2 angebaut.
Nach dem Anbauen die seitlichen Stabilisatoren des
Hublenkers leicht spannen, um die Bewegung des
Auslegers beim Manövrieren und beim Transport zu
begrenzen.
IM STRASSENVERKEHR:
- Straßenverkehrsordnung beachten.
- Zulässiges Gesamtgewicht und erlaubte
Höchstgeschwindigkeit der Maschine beachten.
1
- Anbauhöhe beachten
1
B
, 1130 mm Bodenhöhe
beim Transport.
- Druckluft- bzw. Hydraulikstecker der Bremsleitung
anschließen.
B
EI DER FELDARBEIT:
- Die Anbauhöhe ist wichtig, Abstand Azwischen
1
1
Kupplungskopf und Boden = 600 mm beachten.
Bei der Einwinterung werden die
2
Hydraulikschläuche am Halter befestigt.
2
5
Tighten the wheel nuts to 260 Nm
5
Remember to retighten the wheel nuts after the first
few hours of operation
Maschine stets auf einer ebenen Fläche
abkoppeln. Ist dies nicht möglich, muss die
Maschine aus Sicherheitsgründen an den
Rädern mit einem Keil versehen werden.
- Einen Keil vor die Räder setzen.Verwenden Sie
dazu die mit der Maschine mitgelieferten Keile .
Versichern Sie sich bei der Montage des Auslegers,
die Schläuche und Kabel im Ausleger verlaufen zu
lassen, um sie vor den Schlepperreifen zu schützen.
Montage der Achse:
4
Anziehen der Halteplatten auf 350 Nm
Anziehen der Radmuttern auf 260 Nm
4
5
5
Denken Sie daran, die Radmuttern nach den ersten
Arbeitsstunden neu anzuziehen.
DE
3
3
19
Mise en route / Start-up / Inbetriebsetzung
D
1
1
1
1
1
1
2
2
2
L'utilisateur est tenu au
respect scrupuleux de la
réglementation en
matière de circulation sur
la voie publique
(code de la route).
Ne circuler que trémie
vide.
2
2
2
The user must comply
with road traffic
regulations.
The hopper should be
empty when driving on
the road.
Der Benutzer hat sich
genau an die Straßenverkehrsvorschriften
zu halten.
Nur mit leerem
Saatkasten fahren.
20
Mise en route / Start-up / Inbetriebsetzung
D
Transport
FR
-
Se mettre en conformité avec le code de la
route.
- Sur la route, brancher la prise électrique
d’éclairage pour utiliser les feux de gabarit.
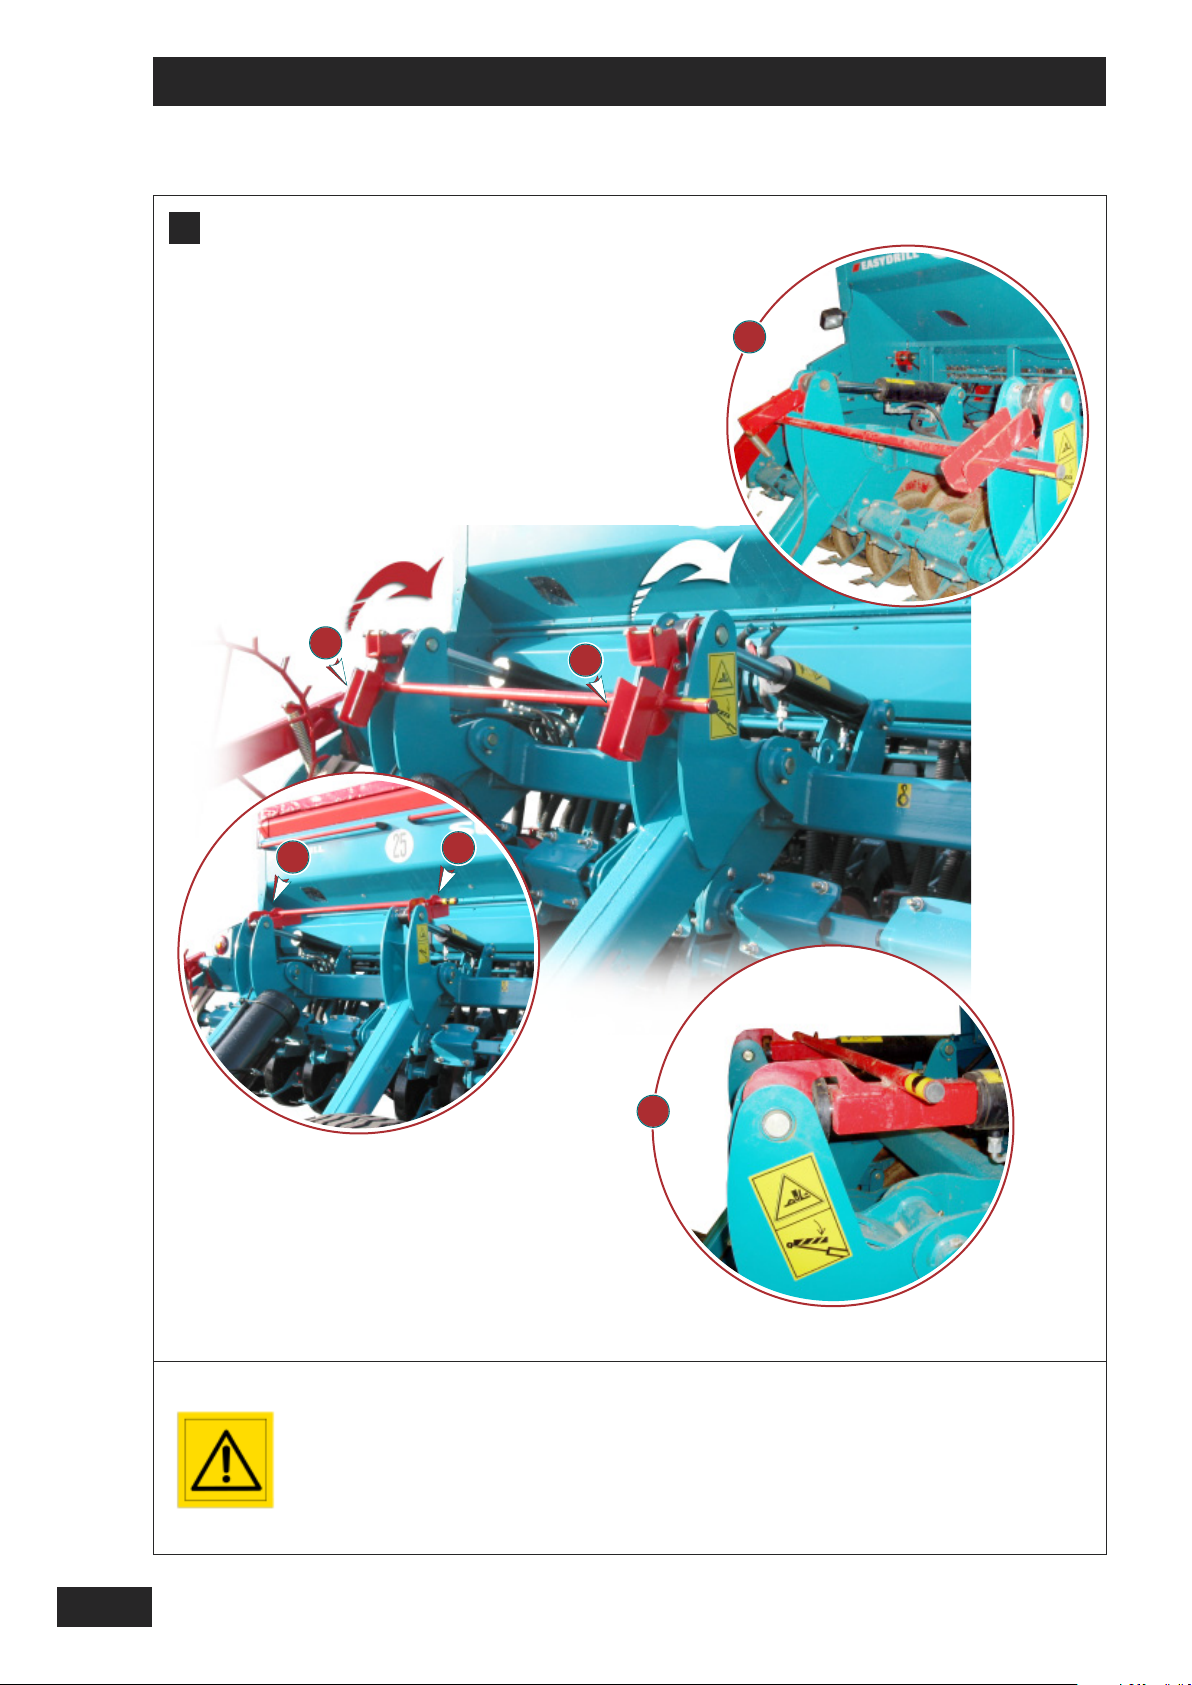
•
Mise en place des sécurités de blocage en
position transport.
-
Lever le semoir.
1
-
Faire pivoter les sécurités contre le fût du
1
vérin.
-
Laisser reposer la machine sur les sécurités
afin de détendre la pression dans les vérins
pendant le transport.
Transport
D
- Ensure that the machine complies with the
Highway Code.
- When on the road, connect the electric lighting
plug in order to use the side lights.
Il est impératif de positionner la sécurité de
transport, lors des déplacements routiers
1
1
1
2
2
2
GB
It is essential to put the transport safety
devices in place when moving the machine by
road.
1
• To put the ram locking arms in the transport
1
position:
- Raise the seed drill.
1
- Rotate the ram locking arms so that they rest
1
on the ram piston.
- Release the oil pressure in the rams during
transport to allow the machine to rest on the
2
locking arms .
Straßentransport
D
2
- Beim Transport auf der Straße ist die
Straßenverkehrsordnung einzuhalten.
- Auf der Straße den elektrischen Stecker für die
Beleuchtung der Außenmaße anschließen.
1
• Montage der Feststellsicherheiten in
1
Transportposition.
- Drillmaschine anheben.
1
- Feststellsicherheiten gegen den
1
Zylinderkolben drehen.
DE
Beim Straßentransport ist es unbedingt
erforderlich, die Elemente der
Transportsicherheit zu positionieren.
- Lassen Sie die Maschine auf den
2
Feststellsicherheiten ruhen, um beim
2
Straßentransport den Druck in den Auslösern
zu entlasten.
21
Mise en route / Start-up / Inbetriebsetzung
E
6
6
3
3
2
2
5
5
5
5
Attention à la rotation de
l'arbre d'agitateur.
Vérifier qu'aucun corps
étranger ne se trouve
dans la trémie.
Il est conseillé de ne pas
laisser de graines à
l'intérieur de la trémie
afin d'éviter d'éventuels
dégats causés par les
rongeurs.
Il est formellement
interdit de monter sur le
semoir pendant le travail.
1
1
Beware of the rotating
agitator shaft.
Check that there are no
foreign objects in the
hopper.
You are advised not to
leave seed in the hopper
to avoid possible damage
by rodents.
It is strictly forbidden to
stand on the drill when
operating.
4
4
Prüfen, ob sich keine
Fremdkörper im
Saatkasten befindet.
Keine Körner im
Saatkasten lassen, um
eventuelle
Beschädigungen durch
Nagetiere zu vermeiden.
Während der Arbeit nicht
in den Saatkasten
greifen," rotierende
Rührwelle".
Es ist strengstens
untersagt während des
Betriebs auf die
Drillmaschine zu steigen.
22
Mise en route / Start-up / Inbetriebsetzung
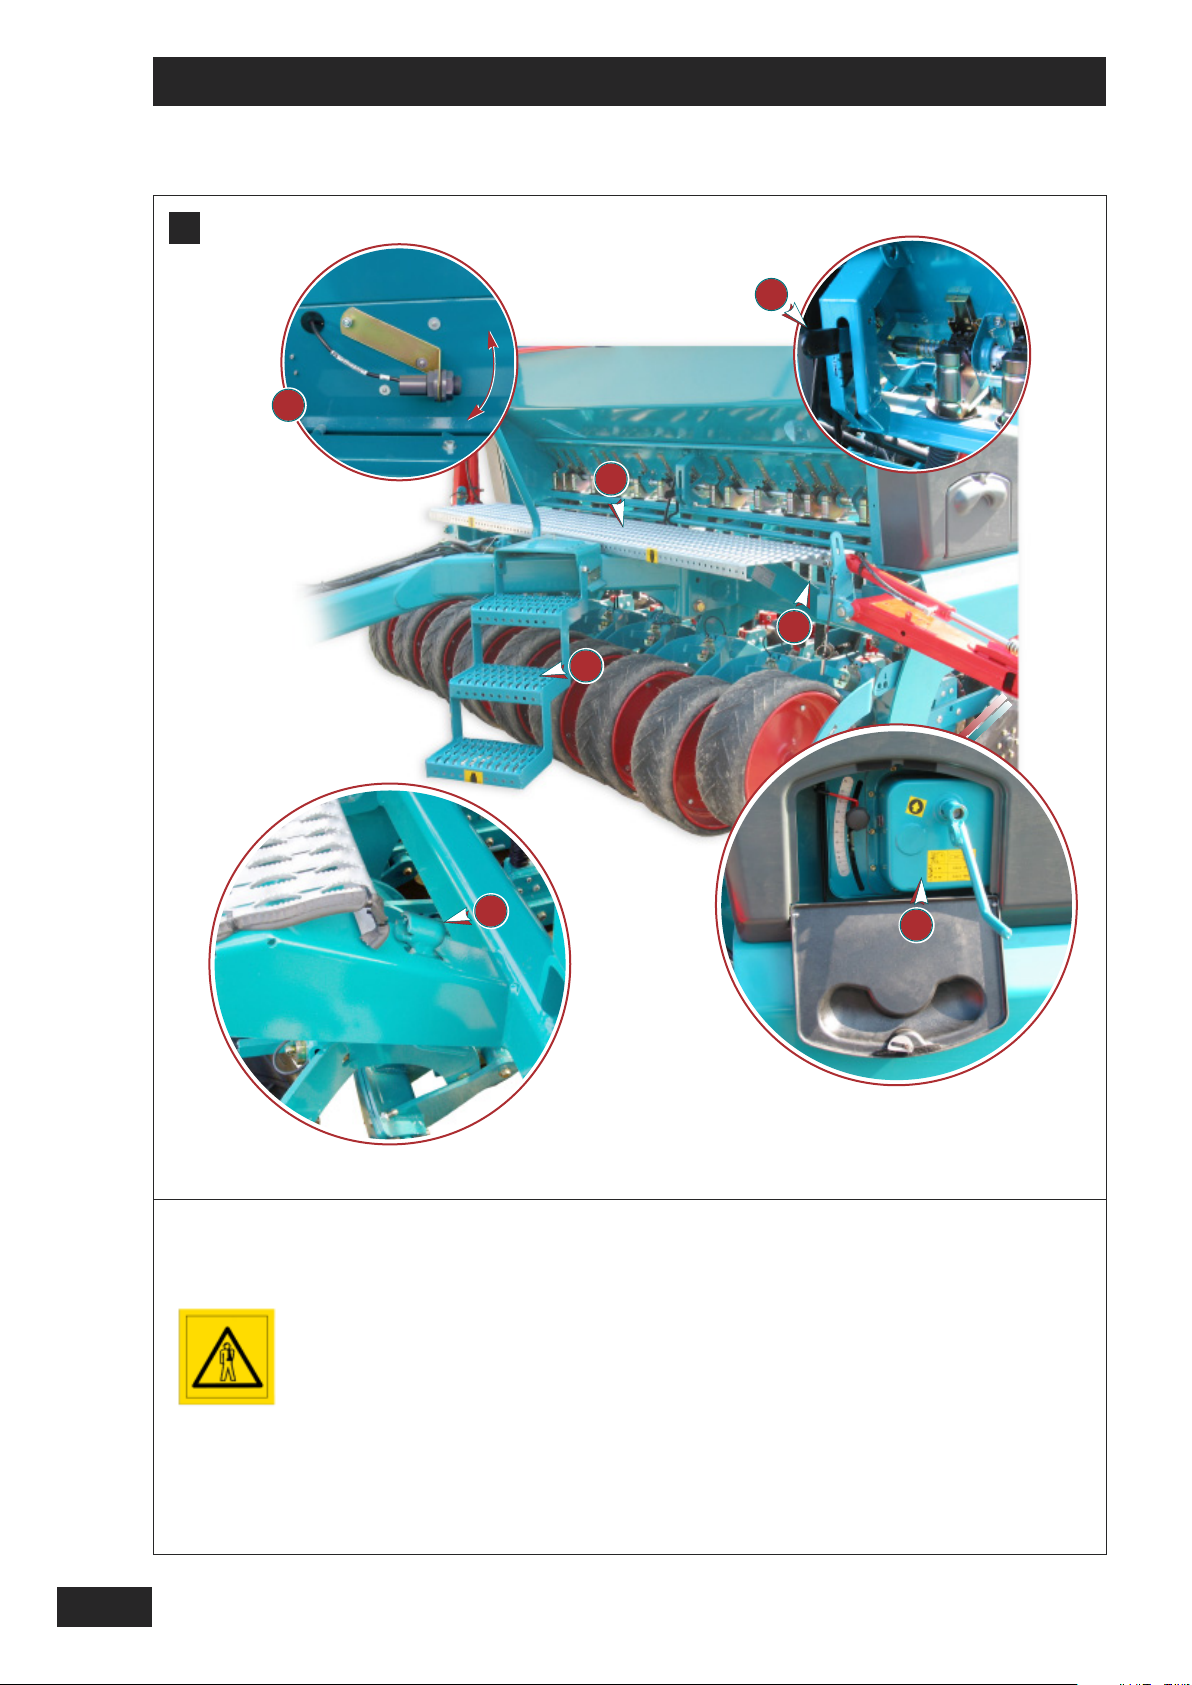
E
Remplissage de la trémie
R
-
Poser le semoir au sol.
1
-
Utiliser les marches et la passerelle
1
2
2
amovible.
-
Vérifier que rien n’a été oublié dans la trémie.
-
Vérifier que les clapets de fond sont fermés
(pos. 1 à 5).
Avec l'option SULKY ULTRON un capteur de fin de
6
6
3
3
trémie réglable est placé dans la trémie.
(position basse pour petite graine, position haute pour
grosse graine)
EMARQUE
Lors du chargement éviter le contact avec la semence
traitée et porter des gants et un masque antipoussières.
•
Le variateur de réglage de débit de semence se
trouve dans le carter gauche.
•
La manivelle d’essais de débit est remisée
derrière la passerelle sur la gauche de la machine .
:
FR
4
4
1
5
5
2
GB
Filling the hopper
E
- Lower the seed drill to the ground.
1
- Use the steps and the removable platform .
1
- Ensure that nothing has been left in the hopper
- Check that the flaps are closed
6
(positions 1 to 5).
6
With the optional SULKY ULTRON unit, an
3
adjustable low seed level sensor is placed inside
3
the hopper (low position for small seed, high
position for large seed).
Füllen des Tanks
E
-
Die Drillmaschine auf dem Boden abstellen.
1
-
1
Stufen und abnehmbaren Ladesteg
benutzen.
NB:
When filling the hopper, avoid contact with treated
2
2
seed and wear gloves and a dust mask.
4
• The seed flow rate regulator is located in the left-
4
hand housing.
5
• The calibration test crank handle is stored behind
5
the platform on the left-hand side of the machine.
DE
A
NMERKUNG:
beim Füllen des Tanks den Kontakt mit dem
2
2
behandelten Saatgut meiden und
Schutzhandschuhe und Staubschutzmaske tragen.
-
Sicherstellen, dass nichts im Tank zurückgelassen
wurde.
-
Sicherstellen, dass die Bodenklappen
geschlossen sind (Pos. 1 bis 5).
6
6
Mit der Sonderausrüstung SULKY ULTRON ist ein
3
Fühler "Leerer Saatkasten" im Kasten angebracht.
3
(untere Stellung für kleines Korn, obere Stellung für
dickes Korn).
4
• Der Streumengenregler befindet sich im linken
4
Schutzgehäuse.
5
• Die Kurbel für die Abdrehprobe wird hinter
5
dem Ladesteg links von der Maschine verstaut.
23
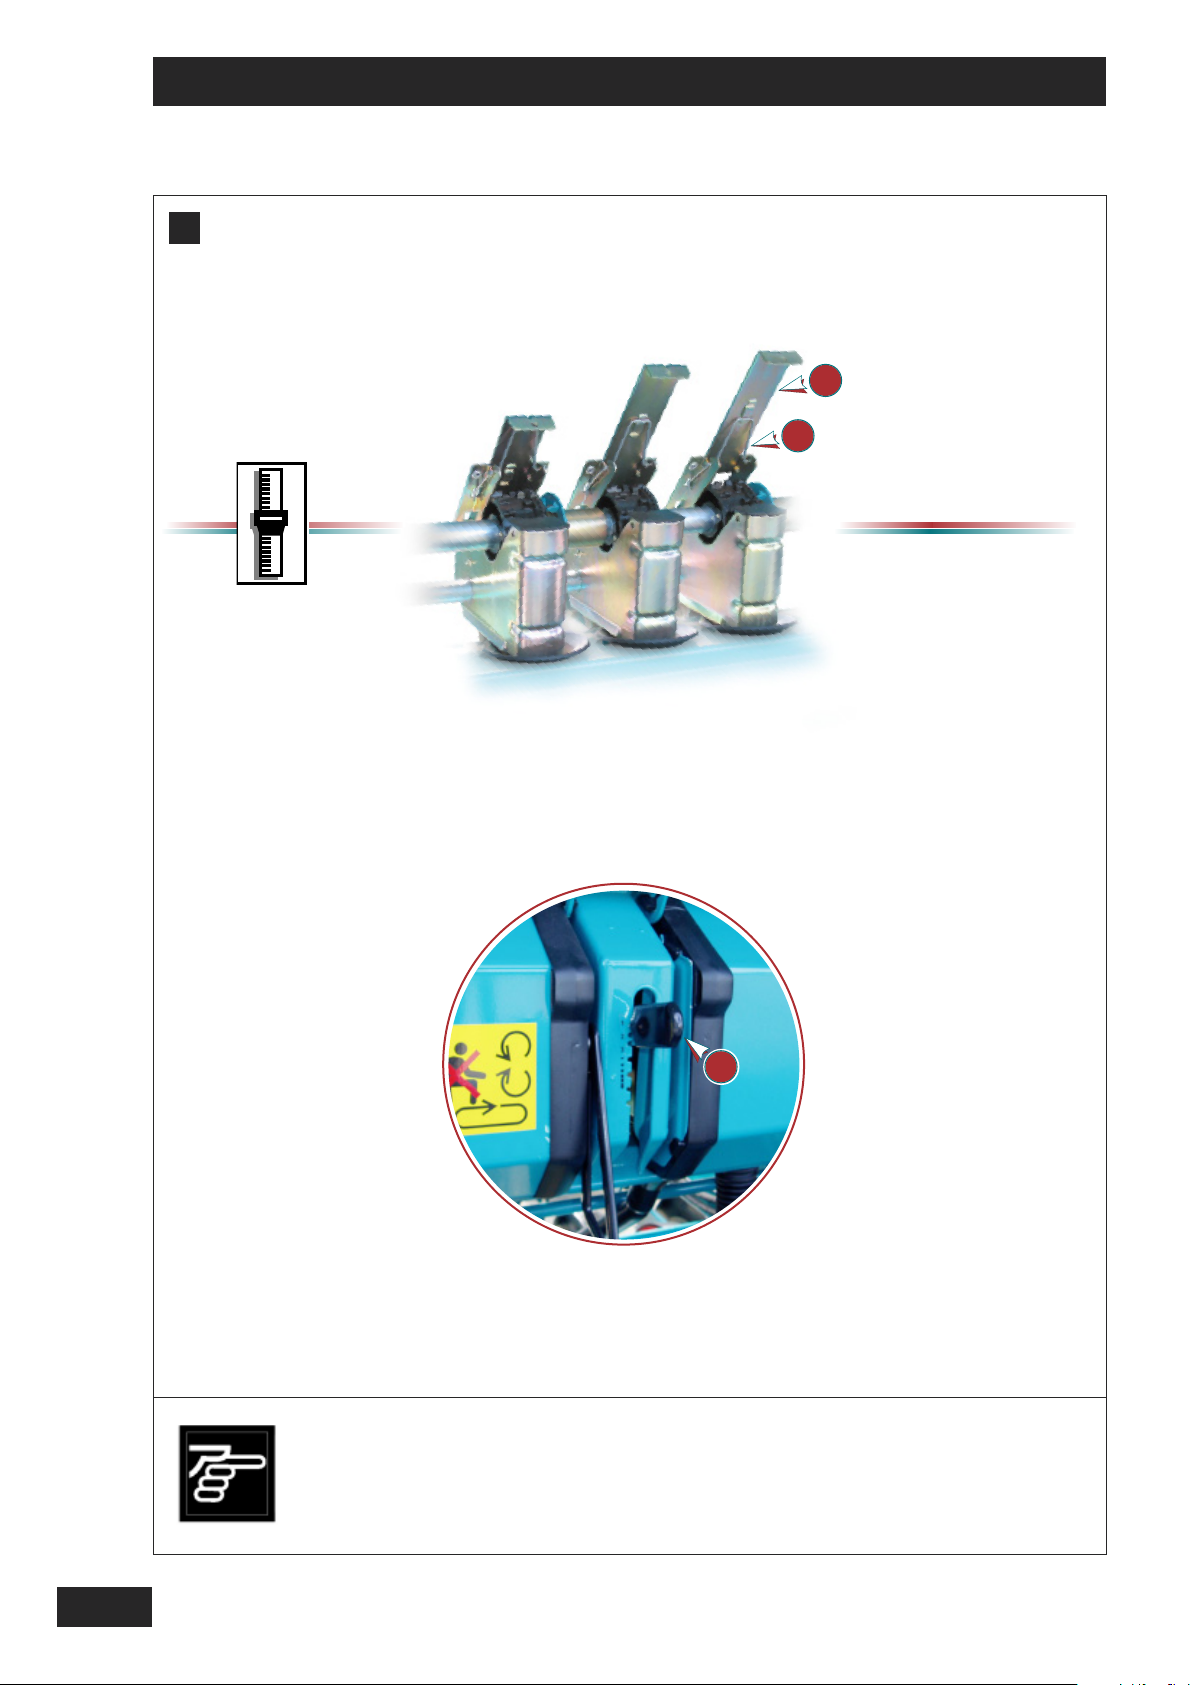
Réglages Easydrill / Easydrill Settings / Einstellungen Easydrill
A
1)
0
0
1
1
2
2
a
a
b
b
2)
Suivre les indications
de réglage.
1
1
Follow the setting
instructions.
Die Hinweise zur
Einstellung befolgen.
24
Réglages Easydrill / Easydrill Settings / Einstellungen Easydrill
2) -
A
Réglage du débit
a) R
églage de la distribution
(voir chapitre pour les valeurs de réglage)
1) -
Trappe de distribution
-
Lever ou baisser la trappe en fonction des
recommandations. Encliqueter le ressort dans
l’encoche correspondante.
La trappe dispose de 3 positions
7
a
b
Clapet de fond
1
-
Déplacer légèrement le levier sur la droite et
mettre au cran correspondant.
R
EPÈRE
1 Céréales
1
2
2
3
3
4 Pois de conserve
4
5 Pois
5
6 Féverole
6
Maxi Position basse, Vidange
Maxi
1
FR
REPÈRE
Setting the flow rate
A
a) Setting the seed metering device
1) – Seed metering shutter
- Raise or lower the shutter according to the
M
0 Fermé (semis 1 rang sur 2 par exemple)
0
1 Petites graines
1
2 Grosses graines (céréales)
2
(see chapter for settings)
recommendations. Clip the spring in the
corresponding recess. The shutter has three set
positions
ARKER
7
a
b
0 Closed (when sowing one row in two,
0
for example)
1 Small seeds
1
2 Large seeds (cereals)
2
Il faut rechercher à accompagner la graine avec l'ergot
en resserrant le plus possible le clapet de fond
(ex: repère 1 pour blé, orge).
-T
outefois, si vous observez des projections ou des
casses de graines de la distribution en permanence,
placer le levier au cran supérieur par rapport à la
préconisation
(ex: repère 2 pour blé, orge).
2) – Flap
1
- Move the lever slightly to the right and
position at the appropriate marker.
ARKER
M
The aim is to have the seeds metered out by the
peg wheel with the flap open as little as possible
(e.g.: marker 1 for wheat or barley).
- Nevertheless, if you notice seeds being constantly
thrown from or crushed by the metering wheel,
position the lever one marker above the
recommended setting.
(e.g.: marker 2 for wheat or barley).
1
1
1
2
2
3
3
4 Peas for canning
4
5 Peas
5
6
6
Maxi . Lower position, emptying
Maxi
Cereals
Beans
GB
DE
1
3
Streumengeneinstellung
A
a)
Einstellung der Verteilung
(siehe Kapitel , Einstellwerte)
1) -
Verteilungsschieber
-
Den Schieber je nach Empfehlung heben
oder senken. Die Feder in der
entsprechenden Kerbe einrasten lassen.
Der Schieber kann in drei Positionen gebracht
werden
M
ARKIERUNG:
7
a
b
0 geschlossen
0
1
1
2 Größere Körner (Getreide)
2
(z. B. Aussaat alle
zwei Reihen)
Feines Saatgut
2) -
Bodenklappe
1
-
Den Hebel leicht nach rechts bewegen und in
die entsprechende Einkerbung legen.
ARKIERUNG:
M
Höchststellung Niedrige Position, Entleerung
Das Korn soll so weit wie möglich vom Nockenrad
begleitet werden, wobei die Bodenklappe möglichst stark
angezogen ist (Beispiel : Markierung 1 für Weizen,
Gerste).
-
Wenn Sie bei der Saatgutverteilung ständig Spritzer
oder gebrochene Körner beobachten, stellen Sie
den Hebel entgegen der generellen Empfehlung
(Bsp.: Marke 2 für Weizen, Gerste) eine Kerbe
weiter nach oben.
1
1 Getreide
1
2
2
3
3
4 Erbsen für Konserven
4
Erbsen
5
5
6 Ackerbohnen
6
25
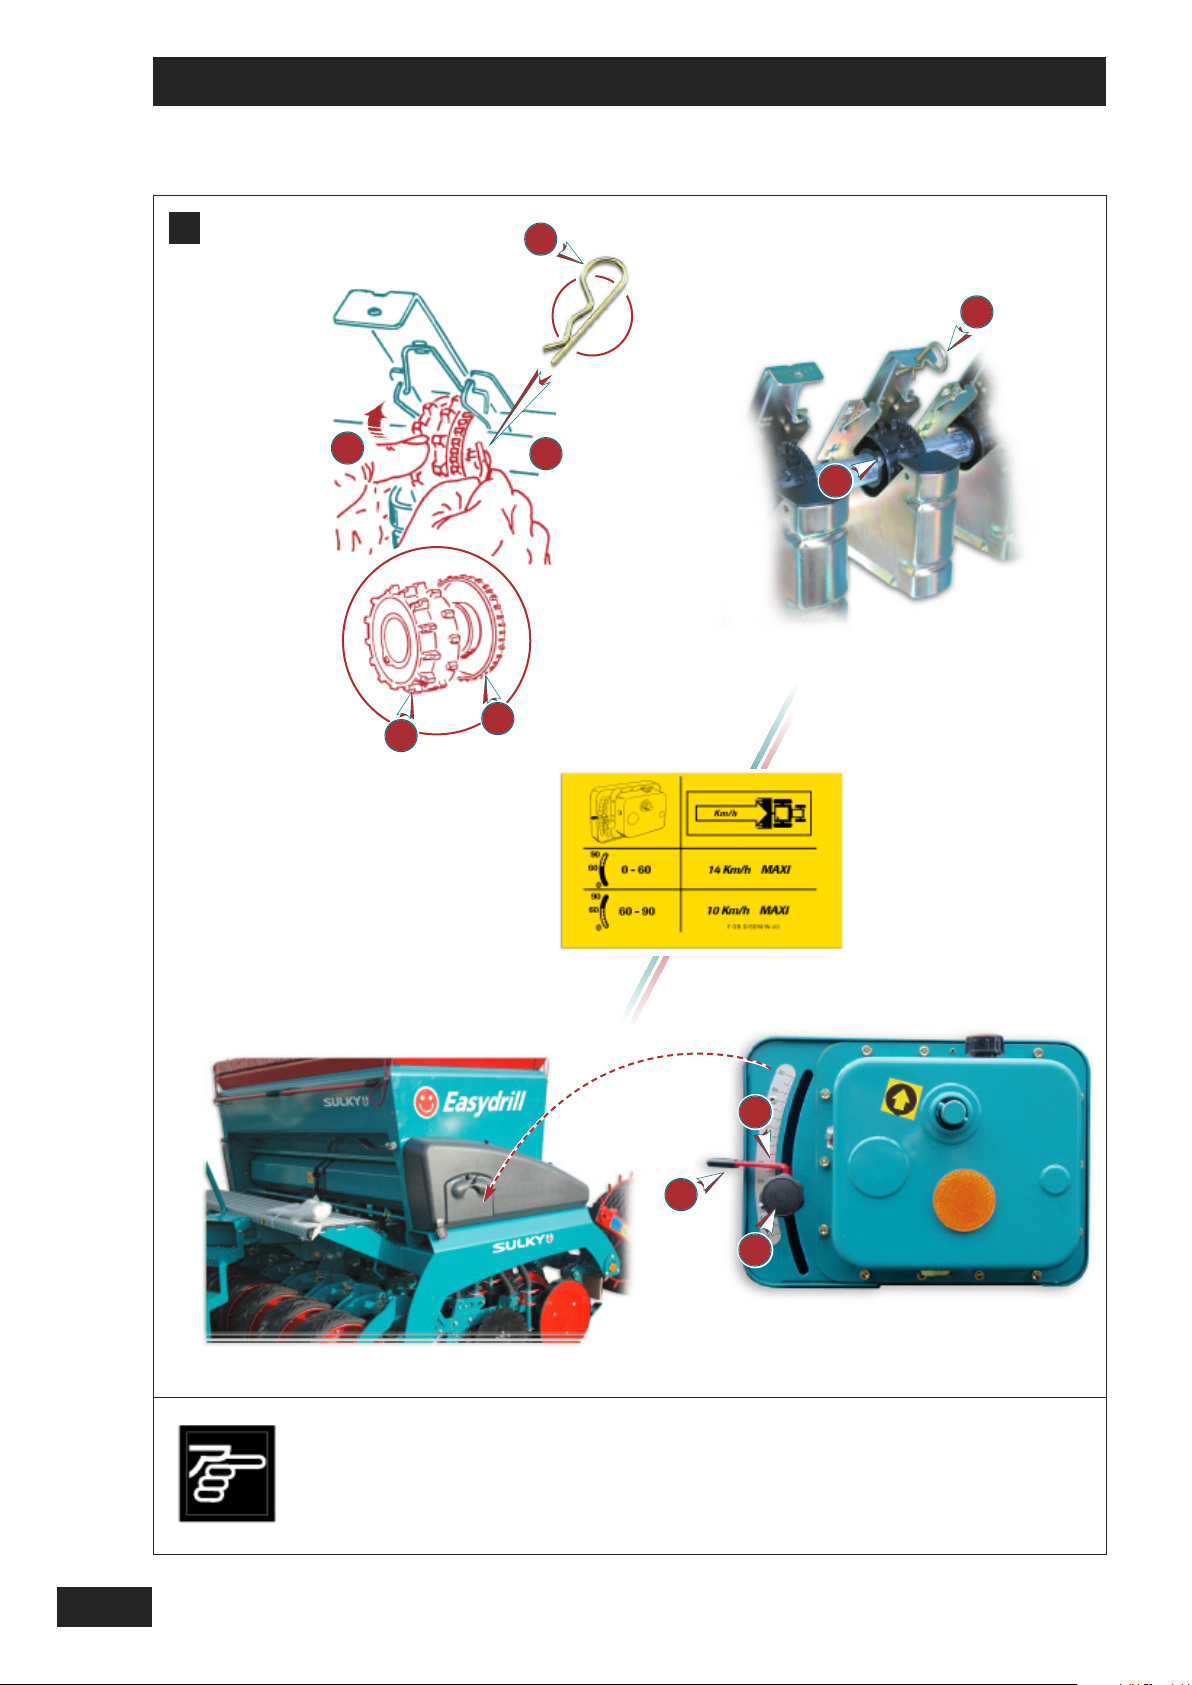
Réglages Easydrill / Easydrill Settings / Einstellungen Easydrill
A
3)
3
3
3
3
b
b
1
1
a
a
4
4
2
2
4)
Suivre les indications
de réglage.
6
6
Follow the setting
instructions.
7
7
5
5
Variateur Semence
Seed Variator
Streumengenregler
Die Hinweise zur
Einstellung befolgen.
26
Réglages Easydrill / Easydrill Settings / Einstellungen Easydrill
A
3) -
Sélection de l'ergot
1
1
Roue standard pour céréales et grosses
graines.
2
2
Roue fine pour petites graines.
La roue fine est toujours solidaire de l’arbre
de distribution .
La roue standard est connectée à la roue fine
par l’intermédiaire d’un verrouillage en laiton
3
3
Prendre la goupille sur la trappe du 1er
boîtier à droite.
-
Pour sélectionner la roue de distribution:
a
Appuyer latéralement
Tourner pour ré-enclencher, effectuer
b
l’opération inverse: repositionner
4
4
4) -
Variateur
-
Mettre le repère déterminé à l’essai de débit à
5
l’aide de la molette , et du levier .
5
6
6
La lecture se fait au dessus de la partie plane .
Chaque changement de repère doit être suivi d’un
contrôle de débit.
Pour information, 3 graduations de vernier
correspondent à un
écart
d’environ 10 Kg/ha avec des
céréales.
Repère de 0 à 90.
FR
7
7
1
GB
3
A
3) - Selecting the peg wheel
1
1
Standard wheel for cereals and large seeds.
2
2
Fine wheel for small seeds.
The fine wheel is always secured to the metering
shaft.
The standard wheel is connected to the fine wheel by
4
means of a brass interlock .
3
3
Take the pin located on the shutter of the 1st
4
unit on the right.
- To select the distribution wheel:
a
Push sideways
Turn to re-engage, carry out the same
b
operation in reverse to reposition
3) -
Wahl des Nockenrades
1
1
Normalrad für Getreide und größere Körner.
2
2
Feines Rad für feinkörniges Saatgut. Das
feine Rad ist immer fest mit der Verteilerwelle
verbunden. Das Normalrad ist mit dem feinen
Rad über eine Messing-Verriegelung
verbunden.
3
3
Den Splint auf dem Schieber des ersten
Gehäuses rechts nehmen.
-
Zur Wahl des Särades:
a
Seitlich drücken
Drehen zum Wiederauslösen,
b
entgegengesetzten Arbeitsschritt
durchführen: repositionieren
4) - Variator
5
- Using the knob and the lever , position the
5
6
6
marker according to the results of the calibration
test.
7
Read the setting above the flat part .
7
Each time the marker is changed it must be followed
by a calibration test.
For information, 3 graduations on the adjustment scale
correspond to a difference of approximately 10 kg /
ha for cereals.
Scale range from 0 to 90.
DE
4) -
Getriebe
-
Den bei der Abdrehprobe ermittelten Wert mit
5
Hilfe des Rädchens , und des Hebels
5
6
6
einstellen.
Das Ablesen der Werte erfolgt oberhalb des
7
4
4
abgeflachten Teils .
7
Nach jedem Einstellwechsel muß eine
Streumengenkontrolle vorgenommen werden.
Zu Ihrer Information : 3 Nonius-Gradeinteilungen
entsprechen bei Getreide ungefähr einer
Abweichung von 10 kg/ha.
Markierung von 0 bis 90.
27

Réglages Easydrill / Easydrill Settings / Einstellungen Easydrill
A
2
2
1
1
1
1
3
3
4
4
5
5
28
Pour un semis très précis,
il est nécessaire de
réaliser un essai de débit.
Attention à la précision
de votre balance.
Very precise sowing
requires a calibration
test. Make sure your
scales are accurate.
Für eine exakte Saatgut dosierung muß eine Ab dreh probe vorgenommen
werden. Überprüfen Sie
die Genauigkeit der
benutzten Waage.

Réglages Easydrill / Easydrill Settings / Einstellungen Easydrill
A
b)
Mise en place de l’essai de débit
FR
-
Procurez-vous une balance précise et un
récipient.
ÉMARCHE:
D
1
1
Retirer les augets.
2
2
Déverrouiller la barre à godet.
3
3
baisser la barre à godet
4
4
Mettre les augets sous les distributions.
5
5
Prendre la manivelle et l'engager sur l'arbre
du variateur.
A
b) Setting up the calibration test
- Use an accurate set of scales and a container.
ROCEDURE:
P
1
1
Remove the trays.
2
2
Unscrew the trough bar.
Vérifier que les distributions utilisées
soient toutes enclenchées.
(attention au jalonnage).
-
Effectuer votre essai de débit suivant les
recommandations des pages suivantes.
-
Pour vider plus facilement la semence de l'auget,
utiliser la trappe.
-
Une fois les essais terminés remettre les augets
en position carter.
1
1
Check that all the metering devices used
are engaged.
(NB tramlining).
- Carry out the calibration test in accordance with
the recommendations contained in the following
pages.
GB
1
3
3
3
Lower the trough bar.
4
4
Place the trays under the distribution system.
5
5
Take the crank and engage it on the variator
shaft.
A
b)
Einrichten des Abdrehproben-Sets
-
Besorgen Sie sich eine Präzisionswaage und
einen Behälter.
ORGANGSWEISE:
V
1
1
Kippwannen abnehmen.
2
2
Kübelstange entriegeln.
3
3
Kübelstange absenken.
4
4
Kippwannen unter die Saatgutverteiler
platzieren.
- Use the shutter to empty the seed tray more
easily.
- Once the tests are complete, return the trays to
1
the guard position.
1
Sicherstellen, dass die genutzten Verteiler
alle geöffnet sind.
(Achtung Fahrgassen).
-
Die Abdrehprobe gemäß den Empfehlungen
auf den folgenden Seiten durchführen.
-
Mit Hilfe des Schiebers lässt sich das Saatgut
leichter aus der Kippwanne entleeren.
-
Wenn die Abdrehproben beendet sind, die
Kippwannen zurück in die abgeschirmte
1
Position bringen.
1
DE
5
5
Kurbel auf die Getriebewelle stecken.
29

Réglages Easydrill / Easydrill Settings / Einstellungen Easydrill
A
A
B
B
1
5
1 tr / s
m 2,503,003,504,004,504,805,006,006,66
tr 60 50 43 37,5 33,3 31,25 30 25 22,5
7
6
5
5
ou - or - oder
x 40 = Kg / ha
2
8
Mini 5 Kg
Mini 150 Kg
3
B
V
V
S
T
T
B
B
ARIÉTÉ
ARIETY
ORTE
RAITEMENT
REATMENT
EHANDLUNG
HIVER
LÉLÉHIVER
:
: O
:
60
70
80
90
100
110
120
130
140
150
160
170
180
190
200
210
220
230
240
250
260
270
280
290
300
//
INTER
WHEAT
INTERWEIZEN
W
/ W
//
W
INTER
WHEAT
/ W
INTERWEIZEN
RVANTIS
:
: A
USTRAL
:
16,6
16,6
120
26
26
140
31
31
160
35
35
80
1
39
39
200
44
44
220
48
48
240
52
52
260
56
56
280
59
59
300
63
63
66
66
69
69
72
72
75
75
78
78
80
80
83
83
4
9
ha = 0
10
Mini 100 tr
30
Mini 25 tr
5 6 7
+
+

Réglages Easydrill / Easydrill Settings / Einstellungen Easydrill
c) Réalisation de l’essai de débit
A
1) Essai en poste fixe
FR
Procéder au réglage de la distribution comme
1
l’indique la notice (clapet de fond, trappes
etc...).
Mettre la graine dans la trémie le jour
2
même du semis (5 Kg en colza / 150 Kg en
céréales) et réaliser l’essai à suivre.
Régler le variateur suivant le repère indicatif
3
du tableau (voir chapitre 5).
Amorcer la distribution : 25 tours de
4
manivelle minimum (l’auget peut être
rempli), sauf pour le colza 100 tours.
Faire l’essai en effectuant le nombre de
5
tours en fonction de la largeur du semoir.
Nota : tourner régulièrement
à 1 tour/seconde.
c) Carrying out the calibration test
A
1) Fixed unit test
Set the distribution as indicated in the manual
1
(flap, shutters, etc.).
Put the grain in the hopper on the day of
2
sowing (5 kg of rape, 150 kg of cereal) and
carry out the following test.
Set the variator to the mark indicated in the
3
table (see section 5).
Start distribution: a minimum of 25 turns
4
of the crank (the trough may be filled), or
100 turns for rape.
Carry out the test by completing the
5
appropriate number of turns for the width of
the seed drill.
N.B. Turn steadily at 1 turn per second.
Peser la quantité recueillie dans les augets avec
6
une balance précise.
Multiplier par 40 pour obtenir la quantité par ha
7
ou utiliser la réglette (voir page suivante).
Corriger le réglage du variateur (baisser
8
complètement le levier pour le ramener ensuite à la
valeur souhaitée).
Ramener le compteur d’hectares à zéro, après
9
l’essai de débit.
L’essai en condition réelle est le plus
10
représentatif.
Après un hectare de semis, refaire un essai de
vérification (procéder comme ci-dessus à partir
de ).
5
Weigh the quantity collected in the trays with an
6
accurate set of scales.
Multiply by 40 to obtain the quantity per hectare
7
or use the calculator (see next page).
Correct the variator setting (lower the lever
8
completely then bring it back up to the required
value).
Reset the area meter to zero after the calibration
9
test.
The most representative test is one carried out
10
under real working conditions.
After sowing a hectare, carry out a further
check (proceed as above from step ).
1
GB
3
5
c) Durchführung der Abdrehprobe
A
1) Probe im Stillstand
Einstellung der Verteilung gemäß Anweisung
1
vornehmen (Bodenklappe, Schieber, usw..).
Das Korn am Tag der Aussaat in den
2
Saatkasten geben (5 kg bei Raps/ 150 kg
bei Getreide) und die notwendige Probe
durchführen.
Das Getriebe gemäß der in der Tabelle
3
angegebenen Markierung einstellen (vgl.
Kapitel 5).
Die Verteilung in Gang bringen:
4
mindestens 25 Kurbelumdrehungen (die
Mulde kann gefüllt werden), aber 100
Umdrehungen für Raps.
Probe vornehmen, indem eine der
5
Drillmaschinenbreite entsprechende Anzahl
von Umdrehungen vorgenommen wird.
Anmerkung: regelmäßig eine Umdrehung/
Sekunde vornehmen.
In den Mulden aufgefangene Menge mit einer
6
Präzisionswaage wiegen.
Mit 40 multiplizieren, um die Menge pro ha zu
7
erhalten oder Einstellscheibe benutzen (s.
nächste Seite).
Die Getriebe-Einstellung korrigieren (den Hebel
8
völlig senken und dann wieder auf den gewünschten
Wert stellen).
Den Hektarzähler nach der Abdrehprobe wieder
9
auf Null stellen.
Eine Probe unter reellen Bedingungen ist die
10
beste. Nach einem Hektar Aussaat eine Probe
zur Kontrolle durchführen
(wie o.a. ab Punkt ).
5
DE
31

Réglages Easydrill / Easydrill Settings / Einstellungen Easydrill
A
4
4
3
3
1
1
2
2
32

Réglages Easydrill / Easydrill Settings / Einstellungen Easydrill
A
2) Essai avec la réglette
4
Cette réglette vous permet de déterminer le
nouveau repère de variateur après votre 1er essai
de débit.
-
Lire sur la ligne le nouveau repère de
variateur correspondant à votre semence suivant
vos conditions.
4
FR
-
Effectuer les réglages de la distribution et un
essai suivant les recommandations données dans
les pages précédentes.
Utilisation:
1
-
Faire coïncider la ligne du repère du variateur
1
qui a servi à votre 1er essai de débit avec la ligne
2
2
qui correspond à la quantité recueillie à cet
essai dans l’auget en Kg.
-
Sans bouger les disques de la réglette, repérer
sur la ligne votre débit souhaité sur la ligne
3
3
Kg/ha.
A
2) Testing with the calculator
This calculator enables you to determine the new
variator setting after your first calibration test.
-
Set the distribution and carry out a test in line
with the recommendations given on the previous
pages.
Use:
1
- Match line , the variator setting used for
1
your first calibration test, up to line which
corresponds to the quantity collected in the
trough in kg during this test.
Après un hectare de semis, refaire un essai de
vérification
-
Si vous désirez changer le débit/ha avec la
même semence sur une autre parcelle, vous
pouvez réutiliser la réglette pour déterminer le
nouveau repère du variateur en gardant la valeur
de pesée du 1er essai de débit.
1
3
4
-
On line , read off the new variator setting
4
GB
corresponding to your seed and conditions.
After sowing a hectare, carry out a further check.
-
If you wish to change the seeding rate per
hectare with the same seed on another plot, you
can use the calculator again to determine the
new variator setting by keeping the weighed
quantity obtained in the first calibration test.
2
2
- Without moving the discs on the calculator,
identify your required seeding rate in kg/ha
3
on line .
3
2) Probe mit der Einstellscheibe
Diese Einstellscheibe erlaubt Ihnen, die neue
Getriebe-Markierung nach der 1. Abdrehprobe zu
bestimmen.
-
Die Einstellungen der Verteilung und eine Probe
gemäß den Empfehlungen auf den vorherigen
Seiten durch führen.
Benutzung:
1
- Die Linie der Getriebe-Markierung, die
1
für die 1. Abdrehprobe gedient hat, mit der
2
2
Linie in Übereinstimmung bringen, die
der bei dieser Probe in der Mulde
aufgefangenen Menge in kg entspricht.
- Ohne Verschiebung der Einstellscheibe auf
3
der Linie Ihre gewünschte Streumenge
3
auf der Linie kg/ha suchen.
4
-
Auf der Linie die neue Getriebe-Markierung
4
ablesen, die Ihrem Saatgut gemäß Ihren
Bedingungen entspricht.
Nach einem Hektar Aussaat eine neue Probe zur
Kontrolle durchführen.
-
Wollen Sie die Streumenge/ha mit dem gleichen
Saatgut auf einer anderen Parzelle ändern,
können Sie erneut die Einstellscheibe verwenden,
um die neue Getriebe-Markierung unter
Beibehaltung des gewogenen Wertes der 1.
Abdrehprobe zu ermitteln.
DE
33

Réglages Easydrill / Easydrill Settings / Einstellungen Easydrill
B
m
c
1
1
a
2
2
2
2
a
3
3
5
5
2
2
4
4
6
6
4
4
34

Réglages Easydrill / Easydrill Settings / Einstellungen Easydrill
FR
Réglage de profondeur
B
1
1
Profondeur de semis.
Elle s’établit grâce à la différence de niveau
entre la pointe de la rasette semeuse et les
roues de jauge “
- Desserrer (1/2 tour) le blocage à l’aide de l’outil
- Soulever légèrement la roue
-
2
2
fourni .
Tout en soulevant la roue, soulever les cales
a“.
Farmflex .
pour pouvoir ajuster la profondeur.
4
- Serrer le blocage .
5
- Bloquer à l’aide de l’outil .
5
4
2
2
- Chaque cale joue sur 1cm de profondeur.
Veiller à ne verrouiller qu’une seule cale à la
6
6
fois sous peine d’endommager le système.
R
EMARQUE
:
Il est possible d’établir un réglage de profondeur
différent sur les éléments semeurs situés derrière les
roues du tracteur pour tenir compte du tassement.
Adjusting the depth
B
1
1
Drilling depth.
This is set using the difference in level
between the tip of the drilling coulter and the
a
depth wheels "
".
- Loosen (1/2 turn) the locking using the tool
2
provided .
- Lift the Farmflex wheel slightly.
- While lifting the wheel, lift the shims in order
2
3
3
4
4
to adjust the depth.
4
- Tighten the locking .
5
- Secure using the tool .
5
4
2
2
- Each shim adjusts the depth by 1cm.
Make sure that you only fasten one shim in place
6
at once otherwise you may damage the
6
system.
NB:
It is possible to set the drilling units to different depths
to take the compaction caused by the tractor wheels
into account.
B
Einstellung der Ablagetiefe
1
1
Saatablagetiefe.
Diese ergibt sich aus dem Höhenunterschied
zwischen Säscharenspitze und den Maßrädern
„
a
“.
- Feststellschraube mithilfe des mitgelieferten
2
Werkzeugs um 1/2 Drehung aufschrauben.
- Farmflex-Rad leicht anheben.
- Beim Anheben des Rades die Keile anheben,
2
3
3
4
4
um die Tiefe einstellen zu können.
4
- Sperre anziehen.
- mithilfe von Werkzeug festziehen.
4
2
5
5
2
- Jeder Keil macht 1 cm Unterschied in der
Ablagetiefe aus.
6
Achten Sie darauf, nur einen Keil gleichzeitig
6
zu verriegeln, um das System nicht zu
beschädigen.
A
NMERKUNG
:
Die Ablagetiefe der sich hinter den Schlepperrädern
befindlichen Säorgane kann unterschiedlich eingestellt
werden, um die Bodenverdichtung zu berücksichtigen.
Pour atteindre plus commodément certaines
profondeurs, (6 - 7 cales), il est préférable d’utiliser le
vérin de report de charge pour abaisser les roues
Farmflex.
Le semoir Easydrill est conçu pour semer sur des sols
très différents (déchaumé, direct, sous couvert).
Les 3 premières cales correspondent à des travaux
superficiels sur des sols déchaumés, on peut semer:
3
3
4
4
Du colza sur sol déchaumé avec 1 ou 2 cales
Du colza en direct sur sol meuble avec 3 cales.
Le semis de blé sur déchaumage s’effectue avec 2
ou 3 cales
Le semis de blé en direct s’effectue le plus
souvent avec 4 cales.
Toujours vérifier sur le terrain que les graines
sont placées à une profondeur satisfaisante.
2
2
L’outil de réglage de la machine est gradué
1
en cm afin de vous aider à contrôler votre
profondeur de de semis.
GB
3
To obtain certain depths more easily, (6-7 shims), it is
preferable to use the load transferring ram to lower
the Farmflex wheels.
The Easydrill seed drill is designed for drilling in to very
different types of soil (tilled ground, direct or into
vegetative cover).
The first three shims are suitable for superficial
working depths in tilled ground, and it is possible to
drill:
Rape seed on tilled ground with 1 or 2 shims
Rape seed directly into soft ground with 3 shims.
Wheat can be drilled in tilled ground using 2 or 3
shims
Direct drilling of wheat generally requires 4 shims.
Always check in the field that the seeds are
positioned at a satisfactory depth.
2
The adjustment tool for the machine is
2
graduated in cm in order to assist you in
checking your drilling depth.
DE
Um bestimmte Ablagetiefen leichter zu erreichen (6-7
Keile) ist es vorzuziehen, den Hydraulikheber zu
verwenden, um die Farmflex-Räder zu senken.
Der Easydrill ist darauf ausgelegt, unter sehr
unterschiedlichen Bodenverhältnissen säen zu können
(umgepflügtes Stoppelfeld, Direkteinsaat, mit
Bodenbedeckung).Die 3 ersten Keile sind für
oberflächliche Säarbeiten auf umgepflügten
Stoppelfeldern, mit dieser Einstellung kann man säen:
Raps auf umgepflügtem Stoppelfeld mit 1 oder 2 Keilen
Rapsdirekteinsaat auf lockerem Boden mit 3 Keilen.
Weizenaussaat auf umgepflügtem Stoppelfeld mit 2
oder 3 Keilen
Die Weizendirekteinsaat wird meist mit 4 Keilen
durchgeführt.
Anschließend bei der Feldarbeit sicherstellen,
dass die Saat auch in der richtigen Tiefe
abgelegt wird.
2
Die Skala des Einstellwerkzeugs für die
Maschine ist in cm, um Ihnen zu helfen, die
2
35
Ablagetiefe zu steuern.

Réglages Easydrill / Easydrill Settings / Einstellungen Easydrill
C
3
3
1
1
36
Vérifier qu’il n’y ait
personne autour de la
machine avant d’agir sur
l’hydraulique.
2
2
Make sure that nobody is
in the immediate vicinity
of the machine before
operating the hydraulic
system.
Sichergehen, dass sich
niemand im
Maschinenbereich
befindet, bevor Sie an der
Hydraulik arbeiten.

Réglages Easydrill / Easydrill Settings / Einstellungen Easydrill
R
Réglage du report de charge
C
EMARQUES:
FR
-
Après avoir réglé votre profondeur de travail,
régler la position du vérin central de report de
charge.
E
N CONDITION SÈCHE OU EN SEMIS SUR COUVERT:
- Allonger le vérin et mettre plusieurs cales de
manière à mettre de la charge sur les rouleaux
arrières. (meilleure fermeture du sillon).
Il faut toutefois appliquer suffisamment d’effort
sur les disques lorsque le sol est dur.
E
N CONDITION OU LE SOL EST “HUMIDE”.
- Raccourcir le vérin et mettre moins de cales
de manière à mettre de la charge sur les
“Farmflex” avant.
Adjusting the load transfer
C
- After setting your working depth, set the position
of the central load transferring ram .
IN DRY CONDITIONS OR WHEN DRILLING IN VEGETATIVE
COVER:
- Extend the ram and add several shims so that
the load is transferred to the rear press rollers
(this provides better furrow closure).
Le réglage du report de charge se fait dans la parcelle
1
1
en tenant compte des conditions réelles de semis.
Après réglage du report de charge il peut être
nécessaire de modifier le réglage de la profondeur.
3
2
2
L’indicateur permet de visualiser le règlage
3
1
GB
3
NB:
1
1
The load transfer should be set in the field under real
drilling conditions.
After adjusting the load transfer, it may be necessary
2
2
to modify the depth setting.
3
The indicator enables you to see the setting.
3
Sufficient pressure must be applied to the discs
when the ground is hard.
I
N “WET” GROUND CONDITIONS:
- Retract the ram and reduce the number of shims
used so that the load is transferred to the front
“Farmflex” wheels.
Einstellung der Gewichtsverlagerung
C
-
Nach Einstellung der Arbeitstiefe die Position des
zentralen Zylinders für die
1
1
Gewichtsverlagerung einstellen.
B
EI TROCKENEN BODENVERHÄLTNISSEN ODER BEIM
EINSÄEN AUF EINE VEGETATIONSDECKE:
-
Zylinder länger einstellen und mehrere Keile
so anbringen, dass das Gewicht auf die hinteren
Walzen verlagert wird. (besseres Schließen der
Saatfurche)
Bei hartem Boden muss jedoch genügend Kraft
auf die Scheiben ausgeübt werden.
B
EI STARK „FEUCHTEN“ BODENBEDINGUNGEN:
-
Zylinder kürzer einstellen und weniger Keile
benutzen, damit mehr Gewicht auf die vorderen
„Farmflex“ verlagert wird.
DE
A
NMERKUNGEN:
Die Einstellung der Gewichtsverlagerung erst vor Ort
nach Inspektion der realen Säbedingungen
durchführen.
Nach der Einstellung der Gewichtsverlagerung kann es
erforderlich sein, die Saatablagetiefe nachzustellen.
3
2
2
Der Anzeiger zeigt die Einstellung.
3
37

Réglages Easydrill / Easydrill Settings / Einstellungen Easydrill
C
1
1
2
2
Vérifier qu’il n’y ait
personne autour de la
machine avant d’agir sur
l’hydraulique.
3
3
4
4
Make sure that nobody is
in the immediate vicinity
of the machine before
operating the hydraulic
system.
Sichergehen, dass sich
niemand im
Maschinenbereich
befindet, bevor Sie an der
Hydraulik arbeiten.
38

Réglages Easydrill / Easydrill Settings / Einstellungen Easydrill
FR
C
Le réglage de report de charge permet de parfaire
le réglage de profondeur.
Il permet également d’adapter la machine aux
conditions de semis en déplaçant une partie du
poids de la machine, soit vers les rouleaux Farmflex
pour plomber plus légèrement le semis, soit vers les
rouleaux plombeurs métalliques pour plomber le
semis plus énergiquement.
1
1
Vérin de report rentré au maximum, poids sur
l’avant de la machine.
Roue Farmflex basse (faible profondeur)
Plombage minimum.
2
2
Vérin de report rentré au maximum, poids sur
l’avant de la machine.
C
Setting the load transfer enables the depth setting to
be perfected.
It also enables the user to adapt the machine to the
drilling conditions by shifting part of its weight either
towards the Farmflex rollers to consolidate the drilling
less, or towards the metal press rollers to consolidate
the drilling more strongly.
1
1
Load transferring ram fully retracted, weight
on the front of the machine.
Farmflex wheel set low (low depth)
Roue Farmflex relevée (profondeur
importante)
Poids au maximum sur les disques.
3
3
Vérin légèrement rentré ( cale de 2 pouces
ou cale de 2 pouces + cale d’1 pouce)
Poids réparti sur l’ensemble de la machine.
4
4
Vérin de report sorti au maximum, poids sur
l’arrière de la machine.
Toutes les cales sur le vérin.
Plombage maximum.
Les positions intermédiaires se règlent en plaçant
les cales aluminium sur le vérin.
4
N
OTA: La position plombage maxi n’est utilisée que
4
très occasionnellement.
Farmflex wheel raised (greater depth)
Maximum weight on the discs.
3
3
Ram slightly retracted (2 inch shim or 2 inch
shim + 1 inch shim)
Weight evenly distributed over the entire
machine.
4
4
Load transferring ram fully extended, weight
on the rear of the machine.
All shims on the ram.
GB
1
3
Minimum consolidation.
2
2
Load transferring ram fully retracted, weight
on the front of the machine.
C
Die Einstellung der Gewichtsverlagerung kann die
Tiefeneinstellung ergänzen.
Diese Einstellung kann ebenfalls die Maschine an
die Säverhältnisse anpassen, indem ein Teil des
Maschinengewichts verlagert wird, entweder auf die
Farmflex-Räder, um das Saatgut weniger
anzudrücken oder auf die Metalldruckräder, um das
Saatgut stärker anzudrücken.
1
1
Verlagerungszylinder ganz geschlossen,
Last vorne auf der Maschine.
Farmflex-Rad abgesenkt (geringe
Ablagetiefe)
Kleinster Saatandruck.
2
2
Verlagerungszylinder ganz geschlossen,
Last vorne auf der Maschine.
Maximum consolidation.
The intermediate positions can be adjusted by placing
the aluminium shims on the ram.
4
: The maximum consolidation position is only
NB
4
used very occasionally.
Höchstes Gewicht auf den Rädern.
3
3
Zylinder leicht eingezogen (Keil 2 Zoll bzw.
Keil 2 Zoll + Keil 1 Zoll)
Gewicht auf die gesamte Maschine verteilt.
4
4
Verlagerungszylinder im Höchsttand
geöffnet, Last hinten auf der Maschine.
Alle Keile auf dem Zylinder.
Höchster Saatandruck.
Zwischenpositionen lassen sich durch Einsetzen der
Aluminiumkeile am Zylinder erreichen.
NMERKUNG
A
: Die Position höchster Saatandruck
wird nur äußerst selten verwendet.
DE
4
4
Farmflex-Rad angehoben (große
Ablagetiefe)
39

Réglages Easydrill / Easydrill Settings / Einstellungen Easydrill
D
b
0 à 2mm
1
1
a
c
2
2
40
8mm
Faire le réglage des
rasettes, machine au sol.
0mm
Set the coulters with
the machine resting
on the ground.
Die Einstellungen der
Säschare vornehmen,
Maschine am Boden

Réglages Easydrill / Easydrill Settings / Einstellungen Easydrill
FR
D
Réglage des rasettes
a) Réglage en hauteur:
Le réglage le plus courrant consiste à positionner le
pointe de la rasette au ras de l’ouverture du
créneau du disque
1
1
.
Cette distance minimum doit impérativement être
respectée afin de protéger la rasette des chocs.
-
Il est possible d'ajuster cette cote, machine posée
sur une surface plane.
-
Desserrer la vis puis régler toutes les
a
rasettes à la même hauteur. (poser sur le sol sous
la rasette une cale dont l’épaisseur est adaptée).
-
Dans le cas d'une utilisation sur un sol très
meuble ou fortement encombré de débris
végétaux, il est conseillé de remonter la rasette à
environ 20mm de la pointe du disque afin de
favoriser la motricité de ce dernier.
Un moyen rapide de vérifier le réglage en hauteur
de la rasette semeuse est de vérifier sa position
par rapport au créneau du disque.
Adjusting the coulters
D
a) Adjusting the height:
The most common setting consists in positioning
the tip of the coulter at the edge of the opening of
the disk's notches.
1
1
This minimum distance must be adhered to in order to
protect the coulter from impacts.
- This measurement can be adjusted; to do so, the
machine must be standing on a flat surface.
- Loosen the screw then adjust all the coulters
a
to the same height. (position a shim of which the
thickness is adapted on the ground under the
coulter).
- If using the drill on very soft ground, or soil with a lot
of trash, you are advised to raise the coulter to
around 20 mm above the edge of the disk to make
sure the disk is able to rotate.
A quick way of checking the drill coulter's height
b) Réglage en inclinaison:
Le bord d'attaque de la rasette doit être:
Parallèle au disque
Le plus proche possible du disque sans pour
cela freiner sa rotation et ce, afin d’éviter que
des débris ne viennent se loger entre le disque
et le tranchant de la rasette.
Si des disques viennent à se bloquer, il convient de
procéder au réglage des rasettes.
En agissant sur les vis et , on va approcher
cb
ou éloigner la rasette du disque.
Il est nécessaire que le bord de fuite de la rasette
soit décollé de 8mm du disque afin d’éviter les
bouchages.
EMARQUE:
R
La profondeur de semis est équivalente à la
profondeur de travail de la rasette.
1
1
Rasette basse sol ferme.
2
2
Rasette haute sol meuble, débris végétaux
très abondants.
setting is to check its position in relation to the disk’s
notches
b) Adjusting the angle:
The coulter’s leading edge must be:
Parallel with the disk
As close as possible to the disk without
preventing it from rotating, and in order to
prevent debris becoming lodged between the
disk and the coulter’s leading edge.
If the disks become stuck, it is advisable to adjust the
coulters.
The coulter can be moved closer to or further away
from the disk by turning the screws and .
cb
The coulter’s trailing edge must be separated from the
disk by 8 mm in order to prevent clogging.
NB:
The drilling depth is equal to the coulter’s working
depth.
1
1
Coulter set low for firm ground.
2
2
Coulter set high for soft ground or very heavy
trash.
GB
DE
1
3
Einstellung der Säscharen
D
a) Höheneinstellung:
Die gängigste Einstellung ist, die Spitze der
Säschare genau an der Öffnung der Radscharte zu
positionieren.
1
1
Diesen Mindestabstand unbedingt einhalten, um die
Säschare vor Stößen zu schützen.
- Dieses Maß kann feiner eingestellt werden, dazu
die Maschine auf einer ebenen Fläche abstellen.
- Schraube lockern und alle Säscharen auf die
a
gleiche Höhe einstellen. (Auf den Boden unter der
Säschare einen Keil geeigneter Dicke platzieren).
- Bei Verwendung auf sehr lockerem Boden oder
bei sehr vielen Pflanzenresten ist es
empfehlenswert, die Säschare bis auf etwa 20 mm
vom Radrand anzuheben, um die Drehfähigkeit
desselben zu fördern.
Ein schnelles Mittel, um die Höheneinstellung der
Säschare zu prüfen, ist ihre Position gegenüber der
Radscharte zu prüfen.
b) Einstellung des Schrägstands:
Der Angriffswinkel der Säschare muss
folgendermaßen sein:
Parallel zum Rad
So nah wie möglich am Rad, ohne dessen
Drehvermögen zu beeinträchtigen und zwar, um
zu verhindern, dass Pflanzenreste sich zwischen
dem Rad und der scharfen Kante der Säschare
festsetzen.
Wenn die Räder blockiert werden, müssen die
Säscharen neu eingestellt werden.
Durch Drehen an den Schrauben und kann
b c
die Säschare vom Rad entfernt oder dem Rad
angenähert werden.
Die Austrittskante der Säschare muss sich um 8
mm vom Rad abheben, um Verstopfung zu
vermeiden.
NMERKUNG
A
:
Die Saatablagetiefe entspricht der Arbeitstiefe der
Säschare.
1
1
Säschare tief bei festem Boden.
2
2
Säschare hoch bei lockerem Boden und bei
großen Mengen Pflanzenresten.
41

Réglages Easydrill / Easydrill Settings / Einstellungen Easydrill
E
3
3
1
1
2
2
F
5
5
4
4
42
Changer les dents
niveleuses lorsque le
coude inférieur présente
une usure importante.
Change the levelling tines
if their lower curve shows
widespread signs of
wear.
Die Planierzinken
auswechseln, sobald die
untere Biegung eine
starke Abnutzung
aufweist

Réglages Easydrill / Easydrill Settings / Einstellungen Easydrill
E
Herse de recouvrement
Décrottoirs
F
FR
La herse se règle en positionnant les goupilles sur les
bras de herse comme suit :
1
1
Position des goupilles lorsque la herse est
inutile et pour plus de sécurité en transport
sur route.
2
2
Position des goupilles lorsque vous souhaitez
appliquer une pression légère sur la herse.
3
3
Position des goupilles pour une pression plus
importante sur la herse (certains cas de semis
direct).
Covering harrow
E
The harrow is adjusted by positioning the pins on the
harrow arms as follows:
1
1
Position of the pins when the harrow is not
being used and for greater safety during
transportation by road.
2
2
Position of the pins if you wish to apply slight
pressure to the harrow.
Il existe 2 types de décrottoirs:
4
4
Modèle de série décrottoir horizontal.
5
5
Décrottoir type « sud Ouest » vertical.
-
Vérifier régulièrement et compenser l’usure
par rapport au rouleau.
Scrapers
F
There are 2 types of scraper:
4
4
Standard horizontal scraper model.
5
5
“South West” type vertical scraper.
- Check regularly and compensate for wear relative
to the roller.
GB
1
3
3
3
Position of the pins for stronger pressure on
the harrow (certain cases of direct drilling).
Saatstriegel
E
Die Egge wird eingestellt, indem die Stifte an den
Eggenarmen wie folgt positioniert werden:
1
1
Position der Stifte, wenn die Egge nicht
benutzt wird und zur größeren Sicherheit
beim Straßentransport.
2
2
Position der Stifte, wenn Sie einen leichten
Druck auf die Egge ausüben wollen.
3
3
Position der Stifte, wenn Sie einen größeren
Druck auf die Egge (bei bestimmten Fällen
der Direkteinsaat) ausüben wollen.
Schmutzabstreifer
F
Es existieren 2 Arten Schmutzabstreifer:
4
4
Serienausführung horizontaler
Schmutzabstreifer.
5
5
Vertikaler Schmutzabstreifer Typ
« Südwest ».
- Prüfen Sie regelmäßig den Verschleiß
gegenüber der Walze und gleichen Sie
diesen aus.
DE
43

Réglages Easydrill / Easydrill Settings / Einstellungen Easydrill
G
1
1
44
4
4
Bloquer les traceurs en
transport.
Retirer la pression d'huile
avant dételage du semoir.
Ne pas stationner à côté
des traceurs.
Secure the side markers
for transport.
Release the oil pressure
before unhitching the
seed drill.
Do not stand next to the
side markers.
3
3
Die Spurreißer beim
Transport blockieren.
Den Öldruck vor dem
Abkuppeln der Drillmaschine wegnehmen.
Nicht neben den
Spurreißern parken.
2
2

Réglages Easydrill / Easydrill Settings / Einstellungen Easydrill
FR
G
Traceurs latéraux
Les traceurs sont conçus pour un marquage au centre
du tracteur, ils sont préréglés à l’usine.
-
Toutefois si vous désirez ajuster ce réglage,
déplacer le support du disque sur le tube.
3
3
La distance de la dernière ligne de semis au disque
de traceur est égale à une 1/2 largeur de travail
plus un 1/2 écartement.
-
Vérifier que le vérin hydraulique est bien en
pression.
1
-
Retirer la goupille à droite et à gauche.
-
Avant d’agir sur l’hydraulique, vérifier qu’il n’y ait
1
personne à côté des traceurs.
-
Pendant l’utilisation, le distributeur qui commande
les traceurs doit être en position flottante.
Side markers
G
The markers are designed to mark a line along the
tractor’s centre line; they are preset in the factory.
- However if you wish to adjust this setting, move the
3
disc support on the tube.
3
The distance of the last seed row to the marker disk
is equal to half of the working width plus half a row
width.
- Make sure that the hydraulic ram is under pressure.
Il est possible de régler l’angle d’attaque du disque
2
Desserrer les 2 vis et faire une légère rotation à
2
l’axe du disque.
Un méplat sur l’axe du disque, vous permet de
l’orienter à l’aide d’une clef.
-
Resserrer les vis.
4
Un boulon de sécurité placé sur l’articulation du
4
traceur permet son dégagement en cas de rencontre
avec un obstacle.
It is possible to adjust the disk’s angle of attack.
2
Unscrew the 2 screws and slightly rotate the disk
2
pin.
A flat edge on the disc pin enables it to be positioned
using a spanner.
- Tighten the screws up again.
4
A shear pin on the marker’s hinge enables it to be
4
released if it hits an obstacle.
GB
1
3
1
- Remove the right and left-hand pins .
1
- Before operating the hydraulics, check that no-one
is standing next to the markers.
- During use, the spool valve that controls the markers
must be in the “float” position.
Seitliche Spurreißer
G
Die Spurreißer sollen die Mitte des Schleppers
markieren.
-
Wenn Sie diese Einstellung jedoch verändern wollen,
verstellen Sie den Radhalter an dem Rohr.
3
3
Der Abstand der letzten Saatlinie zum Spurreißerrad
ist gleich1/2 Arbeitsbreite plus 1/2 Reihenabstand.
-
Sicherstellen, dass der Hydraulikzylinder unter Druck
steht.
1
-
Riegel rechts und links abnehmen.
-
Bevor Sie an der Hydraulik arbeiten, sicherstellen,
1
dass sich niemand im neben den Spurreißern
befindet.
Der Angriffswinkel der Scheibe kann eingestellt
werden. Die 2 Schrauben lockern und Radachse
2
2
leicht drehen.
Über die Abflachung an der Radachse kann diese
mit Hilfe eines Schlüssels ausgerichtet werden.
- Schrauben anziehen.
4
Ein Sicherheitsbolzen am Spurreißergelenk sorgt
4
beim Auftreten eines Hindernisses dafür, dass
diesem ausgewichen werden kann.
DE
- Während der Arbeit muss der Hydraulikverteiler,
der die Spurreißer steuert, in loser Stellung sein.
45

Réglages Easydrill / Easydrill Settings / Einstellungen Easydrill
H
46
Pour le bon
fonctionnement du
jalonnage assurez-vous
que le branchement
électrique est
correctement réalisé.
For correct operation of
the tramlining system,
make sure all electrical
connections have been
made correctly.
Damit die Fahrgassenschaltung gut
funktioniert, sollte
überprüft werden,
ob die elektrischen
Anschlüsse richtig
angebracht wurden

Réglages Easydrill / Easydrill Settings / Einstellungen Easydrill
H
Dispositif de marquage (option)
FR
a) Principe
Le jalonnage consiste à ménager des passages en vue
de traitements ultérieurs avec des outils de largeur
multiple de la largeur de travail du semoir.
COMMANDE ÉLECTRONIQUE
Le principe d'automatisme est basé sur la
manoeuvre de l’essieu AR.
Tramlining system (optional)
H
a) Principle
The aim of tramlining is to prepare runs for later crop
treatments with equipment whose widths are in
multiples of the working width of the drill.
ELECTRONIC CONTROL
The principle of automated control is based on the
operation of the rear axle.
b) Fonctionnement
JALONNAGE POST LEVÉE
Débrayage à distance de 2 à 4 distributions
correspondant à la voie de l'outil d'épandage ou de
traitement.
- commande électronique
Pour le réglage du boîtier électronique, se référer à la
notice correspondante (notice MEDION, ULTRON ou
ULTRON MS selon l'équipement de votre semoir)
b) Operation
OST-EMERGENCE TRAMLINING
P
It is possible to disengage between two and four
metering devices corresponding to the tracks of the
spreader or crop sprayer.
- electronic control
For the electronic unit settings, please refer to the
relevant instruction manual (MEDION, ULTRON or
ULTRON MS depending on the equipment fitted to
your seed drill).
GB
1
3
Fahrgassen-System (Option)
H
a) Prinzip
Die Fahrgassenmarkierung besteht darin, Rücksicht
zu nehmen auf spätere Durchgänge mit Maschinen,
die ein Vielfaches der Arbeitsbreite der
Drillmaschine haben.
ELEKTRONISCHE BEDIENUNG
Das Prinzip der Automatisierung basiert auf
Bewegung der der Hinterachse.
b) Funktionsweise
ACHAUFLAUFMARKIERUNG
N
Fernabschaltung von 2 bis 4 Nockenrädern je nach
Spur des Streu- oder Bodenbearbeitungsgerätes.
- elektronische Bedienung
Zur Einstellung des Elektronikgeräts die
entsprechende Bedienungsanleitung konsultieren
(Bedienungsanleitung MEDION, ULTRON oder
ULTRON MS je nach Ausstattung ihrer
Drillmaschine).
DE
47

Réglages Easydrill / Easydrill Settings / Einstellungen Easydrill
I
1
1
a
b
3
J
2
2
2
2
3
3
3
2
2
48
Il est impératif de vider la
trémie après le travail,
pour éviter les dégâts
causés par les rongeurs.
It is essential to empty
the hopper after sowing
to avoid any damage
caused by rodents.
Den Saatkasten wegen
möglicher Schäden durch
Nagetiere nach getaner
Arbeit leeren!

Réglages Easydrill / Easydrill Settings / Einstellungen Easydrill
FR
Débrayage demi-semoir
I J
1
Le désaccouplement de la noix centrale entre les
1
1/2 arbres de distribution est possible pour permettre
de semer avec 1/2 semoir afin de correspondre au
passage de jalonnage.
Seul le côté droit est débrayable.
-
Pour débrayer
a
Déplacer la noix vers la droite
b
Tourner
I J
Disengaging half the seed drill
1
The central coupling between the metering device’s
1
½ shafts can be uncoupled to facilitate drilling with
only half the drill in order to match the tramline
settings.
Vidange de la trémie
2
La vidange de la trémie se fait dans l'auget .
-
Positionner les augets sous la distribution et
abaisser le levier à fond vers le bas.
-
Pour stopper l'écoulement de la graine alors que
3
3
2
la trémie n'est que partiellement vide, lever
légèrement le levier sans chercher à le mettre en
position haute.
Emptying the hopper
2
The hopper should be emptied into the tray .
- Position the trays under the metering device and
3
push the bottom lever down fully.
3
2
GB
1
3
Only the right hand side of the machine can be
disengaged.
- To disengage:
a
Move the coupling to the right
b
Turn
Auskoppeln der Streuanlage
I
auf halber Breite
1
Die Zentralnuss zwischen den halben
Verteilerwellen kann entkoppelt werden, um auf
halber Breite säen zu können, wenn der
Fahrgassenmarkierung entsprochen werden soll.
Nur die linke Seite kann ausgekuppelt werden.
-
Zum Auskuppeln
a
b
1
Nuss nach rechts schieben
Drehen
- To stop the seed flow when the hopper is only
partly empty, lift the lever very slightly without
raising it to its upper position.
Leeren des Tanks
J
2
Der Saatkasten wird in die Mulde entleert.
-
Die Mulden unter der Verteilung anbringen und
den Hebel ganz nach unten drücken.
-
Zum Stoppen des Kornflusses bei nur teilweise
3
3
2
entleertem Kasten den Hebel leicht anheben,
ohne zu versuchen, ihn ganz nach oben zu
stellen.
DE
49

Réglages Fertisem / Fertisem Settings / Einstellungen Fertisem
A
a)
50
b)

Réglages Fertisem / Fertisem Settings / Einstellungen Fertisem
FR
A
Mise en place FERTISEM
a)
Mise en place de la trémie en position double
distribution
-
Positionner les cloisons amovibles vers l’avant
et les verrouiler
b)
Positionner les tamis
2
2
La distribution FERTISEM a été concue pour doser
des engrais de types variés: microgranulés starter,
18-46, azote et même certains engrais organiques
en bouchons.
Toutefois, devant la grande variété des produits
fertilisants ainsi que de leurs caractéristiques,
SULKY vous recommande d’essayer tout nouveau
produit en utilisant de faibles quantités.
Setting up the FERTISEM
A
a) Set up the hopper in the double distribution
position
- Position the detachable partitions towards the
1
1
front and fasten them in place
2
2
b) Position the screens
La distribution F
ERTISEM, peut également distribuer
des granulés antilimaces.
La distribution FERTISEM, permet de distribuer des
semences.
1
1
Il faut toutefois prendre garde au risque de voutage,
cette distribution n’étant pas munie d’agitateur
La trémie et la distribution SEMENCE
(ergots) « EASYDRILL » ne peut en aucun
cas être utilisée pour distribuer des
produits autres que des semences.
GB
The F
ERTISEM metering device is also able to
distribute slug pellets.
The FERTISEM metering device enables seeds to be
distributed.
1
However, you should take precautions against the
risk of bridging, as this system does not have an
4
agitator.
ERTISEM metering device has been designed
The F
to meter a variety of types of fertilizer: starter
microgranules, 18-46, nitrogen and even certain
pelletized organic fertilizers.
Nevertheless, given the large range of fertilizer
products available and their varied characteristics,
SULKY recommends that you test out every new
product first using only small quantities.
Inbetriebnahme Fertisem
A
a) Installation des Tanks in Position doppelte
Verteilung
- Bewegliche Trennwände nach vorne positionieren
1
1
und verriegeln
2
2
b) Siebe positionieren
Die Fertisem Streuvorrichtung wurde konzipiert, um
unterschiedliche Dünger zu dosieren:
Granulatperlen Starter, 18-46, Stickstoff und sogar
bestimmte organische Dünger in Pelletsform.
The hopper and the “E
ASYDRILL” seed
metering device (peg wheels) should
under no circumstances be used to
distribute any product other than seeds.
Die F
ERTISEM Streuvorrichtung kann ebenfalls
Schneckenkorn streuen.
Mit der FERTISEM Streuvorrichtung kann auch
Saatgut gestreut werden.
Es ist dann allerdings auf die Gefahr der Wölbung
zu achten, da das System nicht mit einem
Rührwerk ausgestattet ist.
Der Tank und der „E
ASYDRILL“ Saatstreuer
(Vorsprünge) können auf keinen Fall zu
anderen Zwecken als zur Saatstreuung
eingesetzt werden.
DE
Vor der großen Auswahl an Düngerarten und ihren
Eigenschaften empfiehlt Ihnen SULKY, jedes neue
Produkt zunächst in geringen Mengen
auszuprobieren.
51

Réglages Fertisem / Fertisem Settings / Einstellungen Fertisem
B
a)
b)
1
1
Variateur Ferti
Fertilizer Variator
Ferti Streumengenregler
C)
52

Réglages Fertisem / Fertisem Settings / Einstellungen Fertisem
b)
B
Réglage du débit
Vérifier que le variateur de la distribution
«semences» (gauche) est bien en position 0
avant de faire l’essai de débit « F
ERTISEM »
(noter la position de réglage le cas échéant)
Avant de remplir la trémie, vérifier que les tamis
anti-mottes sont bien en place, la présence de
mottes d’engrais peut perturber la distribution du
produit.
a)
Réglage des clapets de fond
L’ ouverture des clapets de fond doit être adapté au
produit a distribuer.
Un repère amovible rouge présélectionne
l’ouverture des clapets pour les engrais comme
l’amonitrate ou le 18.46.
Pour des semences de très petites taille le repère
peut être dépassé afin de resserrer les clapets de
fond.
Pour des produits de grosses tailles; (pois , féveroles)
on peut ouvrir les clapets de fond.
Réglage du variateur « FERTISEM » (droit)
-
Mettre le repère déterminé pour l’essai de
débit à l’aide de la molette et du levier.
La lecture se fait au dessus de la partie plate
1
repères de 0 à 90
c)
Essai de débit
1
Les tableaux de débit de la distribution
semence ne peuvent pas être utilisés pour
la distribution FERTISEM.
-
Amorcer 25 tours.
- Vider les augets.
- Faire 50 tours de manivelle pour un 3m, 37½
pour un 4m.
- Récupérer la semence dans les augets.
- Peser la quantité recueillie.
- Multiplier le résultat de la pesée par 40 pour
trouver la quantité par ha.
- Réenclencher les barres à godets.
- Repositionner les augets en position carter
FR
GB
Setting the flow rate
B
Check that the “seed” metering variator (left)
is positioned at 0 before carrying out the
“F
ERTISEM” calibration test (make a note of
the setting position if need be).
Before filling the hopper, check that the anti-clod
screens are in place, as the presence of clods of
fertilizer may disrupt the distribution of the product.
a) Adjusting the flaps
The flap openings should be adjusted to suit the
product being distributed.
A moveable red marker preselects the flap
openings for fertilizer such as ammonium nitrate or
18-46.
For very small seeds, the setting may be
exceeded in order to close the flaps.
For larger sized products (peas, beans) the flaps
may be opened.
Streumengeneinstellung
B
Sicherstellen, dass der "Saat"Streumengenregler (links) vor der
„F
ERTISEM“ Abdrehprobe auf Position 0 steht
(ggf die Einstellposition notieren).
Vor dem Füllen des Tanks sicherstellen, dass die
Klumpenschutzroste montiert sind, bei
Düngerklumpen kann die Streuung gestört werden.
a) Einstellung der Bodenklappen
Die Öffnung der Bodenklappen muss an das zu
streuende Produkt angepasst sein.
Eine bewegliche rote Marke stellt die Öffnung der
Bodenklappen für Düngerarten wie
Ammoniumnitrat oder 18.46 vor.
Für sehr kleine Saatarten muss die Einstellmarke so
klein wie möglich eingestellt werden, um die
Bodenklappen auf die kleinste Öffnung einzustellen.
Bei großen Saatarten (Erbsen, Ackerbohne usw.)
können die Klappen ganz geöffnet werden.
b) Adjusting the “Fertisem” variator (right)
- Using the knob and the lever, set to the marker
determined for the calibration test.
Read the setting above the flat part – scale range
1
from 0 to 90
1
c) Calibration test
The seeding rate charts cannot be used for
the F
ERTISEM metering device.
- Make 25 turns.
- Empty the trays.
- Turn the crank handle 50 times for a 3m, 37½ for
a 4m.
- Collect the seed in the trays.
- Weigh the quantity collected.
- Multiply the result by 40 to determine the
quantity per hectare.
- Reengage the trough bars.
- Return the trays to the guard position.
b) Einstellung des „Fertisem“-Reglers (rechts)
- Stellen Sie mit dem Rädchen und dem Hebel die
für die Abrehprobe ermittelte Marke ein.
Menge oberhalb des flachen Stücks - Marken 0
1
1
bis 90 - ablesen.
c) Abdrehprobe
Die Mengentabellen für die Saatstreuung
können nicht für die F
ERTISEM-Streuung
verwendet werden.
- 25 Drehungen durchführen.
- Kippwannen entleeren.
- Handkurbel 50 mal drehen für 3 m; 37,5 mal für
4m.
- Saat in den Kippwannen auffangen.
- Aufgefangene Menge wiegen.
- Gewogene Menge mit 40 multiplizieren, um die
Menge pro Ha zu ermitteln.
- Kübelstangen wieder einschalten.
- Kippwannen zurück in Sicherungsposition
bringen.
1
4
DE
53

Réglages Fertisem / Fertisem Settings / Einstellungen Fertisem
C
1
1
2
2
54

Réglages Fertisem / Fertisem Settings / Einstellungen Fertisem
FR
C
Réglage des tubes de descente
Les tubes de descente de la distribution Fertisem
peuvent être inclinés de l’avant vers l’arrière en 3
positions
Plus le tube est positionné vers l’avant position
plus le produit est positionné proche de la graine
déposée par la rasette semeuse
Plus le tube est positionné vers l’arrière
plus le produit est positionné en surface.
Il peut être recouvert par le rouleau plombeur ou
par la herse de recouvrement le cas échéant si les
conditions le permettent
Utiliser la manivelle d’essai de débit pour effectuer
le réglage des tubes de descente.
Adjusting the delivery tubes
C
The Fertisem metering device’s delivery tubes have
three different angle settings from front to back.
1
The further forward the tube , the closer the
1
product is positioned to the seed placed by the
coulter.
Déplacer d’abords la manivelle latéralement pour
débloquer le tube, puis le faire pivoter.
Il est également possible d’effectuer une rotation de 45°
avec les tubes afin de déposer le produit entre les rangs.
(exemple: luzerne, trèfle)
1
1
2
2
GB
First of all push the crank handle sideways to release
the tube, then pivot it.
It is also possible to rotate the tubes by 45º in order to
place the product between the rows. (e.g.: alfalfa,
1
clover)
4
2
The further back the tube , the closer the
2
product is positioned to the surface.
It may be covered by the press roller or by the
covering harrow as the case may be, if the
conditions allow.
Use the calibration test crank handle to adjust the
delivery tubes.
Einstellung der Auslaufrohre
C
Die Auslaufrohre der Fertisem Streuvorrichtung
können in 3 Positionen von vorne nach hinten
geneigt werden.
Je weiter das Rohr nach vorne geneigt ist ,
je näher das Produkt an dem durch die Säschar
platzierten Saatkorn positioniert wird.
Je weiter das Rohr nach hinten geneigt ist ,
je näher wird das Produkt an der Oberfläche
positioniert.
Es kann ggf. durch die Andruckwalze oder durch
den Saatstriegel überdeckt werden, wenn die
Verhältnisse es zulassen
DE
Kurbel zunächst seitlich verstellen, um das Rohr frei
zu legen, dieses dann drehen.
Es ist ebenfalls möglich, die Rohre um 45° zu
drehen, um das Produkt zwischen die Reihen zu
streuen. (Beispiel: Luzerne, Klee)
1
1
2
2
Die Abdrehproben-Kurbel benutzen, um die
Auslaufrohre einzustellen.
55

Entretien / Maintenance / Wartung
A
d
1
1
112
3
3
2
2
3
3
4
4
5
5
2
4
4
f
a
c
i
Stocker le semoir à l’abri.
Il est nécessaire de
vidanger le variateur tous
les 500 ha ou tous les 2
ans si la surface n'est pas
effectuée.
e
b
h
Store the drill in a
sheltered place.
Change the oil every 500
ha or every 2 years at the
most.
Never grease the
metering devices or the
coulter tubes.
e
g
Die Drillmaschine
geschützt abstellen.
Der Ölwechsel des
Getriebes muß alle 500
ha oder alle zwei Jahre
vorgenommen werden,
wenn diese Fläche nicht
bearbeitet wurde.
56

Entretien / Maintenance / Wartung
Nettoyage
A
-
Nettoyer l'intérieur de la trémie et de la
distribution.
-
Laver le semoir.
Les nettoyeurs haute pression endommagent les
circuits électriques et les roulements !
Pour le nettoyage et entretien, porter
lunette de protection et gants pour éviter
toute blessures.
Si il reste de la semence, porter un
masque anti-poussière pour éviter toute
inhalation.
Graissage
B
i
l’articulation de la flèche ainsi que
l’articulation de l’essieu et le vérin de chassis
h
toutes les 20 heures
-
Huiler les ressorts de débrayage pour repérage,
f
g
(il est préférable de pulvériser du dégrippant).
-
Huiler les chaînes de distribution et .
-
Graisser les paliers de roue DPA et .
-
Vérifier le niveau d'huile du variateur
ba
d
c
(semoir horizontal), ajuster le niveau au point
rouge avec de l'huile de boîte de vitesses
automatique. ATF - DEXTRON II D
-
Effectuer la vidange tous les 500 ha ou tous les
2 ans si la surface n'est pas effectuée.
FR
Procéder régulièrement à un graissage de la
machine en début et fin de campagne:
e
A
Cleaning
-
Graisser les traceurs (le cas échéant),
-
Clean the inside of the hopper and metering
system.
-
Clean the seed drill.
High-pressure cleaners are liable to cause damage
to bearings and electrical circuits!
For cleaning and maintenance, wear
protective glasses and gloves to prevent
injury.
If there are seeds remaining in the machine,
wear a dust-mask to prevent inhalation.
B
Greasing
Grease the machine regularly at the beginning
and end of the season:
- Lubricate the markers (if need be) and the
e
4
3
4
Disques , rouleaux , roue
-
draw bar joint as well as the axle joints
3
Un coup de pompe tous les 200 ha.
i
and the chassis cylinders about every 20
2
1
2
1
h
5
5
hours.
-
Lubricate the tramlining clutch springs
(preferably by spraying with penetrating oil).
-
Lubricate the drive chains and .
ba
- Lubricate the DPA wheel bearings
-
Check the oil level in the variator (with the seed
drill horizontal), and top up to the red dot with
ATF - DEXTRON II D automatic gearbox oil.
-
Change the oil every 500 ha or every 2 years at
the most.
3
Discs , rollers , wheel
443
1
221
5
5
- One pump every 200 hectares.
gf
dc
and .
GB
1
4
DE
Reinigung
A
-
Das Innere des Saatkastens und die Verteilung
reinigen.
-
Die Drillmaschine waschen.
Hochdruckreinigungsgeräte beschädigen den
Stromkreislauf und die Lager!
Zur Vermeidung von Verletzungen beim
Reinigen und bei der Instandhaltung
Schutzbrille und Handschuhe tragen.
Sind Saatgutrückstande vorhanden, eine
Staubschutzmaske tragen.
Schmierung
B
Maschine regelmäßig zu Beginn und nach
Abschluß der Kampagne schmieren:
- Spurreißer (gegebenenfalls), das Gelenk des
Auslegers sowie das Gelenk der Achse
e
f
i
und den Zylinder am Chassis etwa alle 20
h
Betriebsstunden schmieren.
-
Die Auskupplungsfedern zur Markierung ölen
(am besten Lockerungsöl aufsprühen).
-
Die Antriebsketten ölen. et .
- Lager des DPA-Rades schmieren und .
-
Den Ölstand des Getriebes (bei waagrechter
ba
dc
Drillmaschine) überprüfen und bis zum roten
Punkt mit Öl für Automatikgetriebe (ATF DEXTRON II D) auffüllen.
- Einen Ölwechsel alle 500 ha oder alle zwei Jahre
vornehmen, wenn diese Fläche nicht bearbeitet
wurde.
Lager des DPA-Rades schmieren und
3
g
Räder , Walzen , Rad
443
- Aufpumpen alle 200 ha.
1
5
5
221
57

Entretien / Maintenance / Wartung
C
1
1
2
2
58
3
3
Il convient de renouveler
ces vérifications
régulièrement, en
particulier si l’appareil
évolue sur des sols durs
ou caillouteux.
Carry out these checks
regularly, particularly
when using the seed drill
on hard or rocky soil.
Diese Kontrollen sind
regelmäßig zu
wiederholen, vor allem,
wenn die Maschine auf
harten
oder steinigen Böden
eingesetzt wird.

Entretien / Maintenance / Wartung
Vérifications
C
1
- C
ONTRÔLER L’USURE
réglage.
des rasettes et leur
1
-
VÉRIFIER PÉRIODIQUEMENT LE SERRAGE DES
JANTES ET LA PRESSION DES PNEUS:
FR
C’est la pièce essentielle du système de mise en
terre, elle doit impérativement conserver une
forme progressive.
- C
ONTRÔLER LE SERRAGE
APRÈS 10 HEURES D’UTILISATION:
-
Vérifier le serrage des vis du système de mise
en terre :
2
Vis de fixation des disques.
A
PRÈS 20 HEURES D’UTILISATION:
-
Vérifier le serrage des principaux écrous.
2
.
Checks
C
1
- Check the wear on the coulters and their
1
settings.
As they are an essential part of the drilling system,
it is very important that they retain a progressive
shape.
- C
HECK TIGHTNESS
AFTER 10 HOURS OF USE:
- Check the tightness of the drilling system’s bolts:
2
Disk attachment bolts .
2
AFTER 20 HOURS OF USE:
- Check the tightness of the main nuts.
Pneus
500 - 50 x 17
3294 Kg à 30 Km/h - 2,5 bars
520 - 50 x 17
3940 Kg à 50 Km/h - 3,6 bars
-
VÉRIFIER L’ÉTAT DES FREINS
-
Ajuster si nécessaire .
-
Verifier la tension de la chaine secondaire et
3
3
ajuster si nécessaire.
-N
e jamais changer la position du vérin sur le
levier conformément au règlage prescrit dans le
document d’homologation de la machine.
- P
ERIODICALLY CHECK THE TIGHTNESS OF THE WHEELS
AND THE PRESSURE OF THE TYRES:
Tyres
500 - 50 x 17
3294 kg at 30 km/h – 2.5 bar
520 - 50 x 17
3940 kg at 50 km/h – 3.6 bar
- C
HECK THE CONDITION OF THE BRAKES
- Adjust if necessary.
- Check the tension of the secondary chain and
adjust if necessary.
- Never change the position of the cylinder on
the lever in accordance with the setting laid
down in the approval document for the
machine.
GB
3
3
1
5
Prüfungen
C
- P
RÜFUNG DES VERSCHLEISSES
an den Säscharen
und deren Einstellung.
Die Säscharen sind der grundlegende Teil des
Saatablagesystems und müssen unbedingt eine spitz
zulaufende Form behalten.
- P
RÜFEN, OB DIE SCHRAUBEN GUT FESTGEZOGEN SIND
N
ACH
10 B
ETRIEBSSTUNDEN
:
- Prüfen, ob die Schrauben des Saatablagesystems
gut angezogen sind:
2
Einstellschraube der Streuscheiben.
N
ACH
20 B
ETRIEBSSTUNDEN
2
:
- Anziehdrehmoment der Hauptmuttern prüfen.
DE
- P
1
1
ERIODISCH PRÜFEN, OB DIE FELGEN GUT
FESTGEZOGEN SIND UND DEN REIFENDRUCK PRÜFEN
Reifen
500 - 50 x 17
:
3294 Kg bei 30 Km/h - 2,5 Bar
520 - 50 x 17
3940 Kg bei 50 Km/h - 3,6 Bar
- B
REMSENZUSTAND PRÜFEN
- Bei Bedarf nachstellen
3
- Spannung der sekundären Kette prüfen
3
und bei Bedarf nachstellen.
- Zylinderposition am Hebel niemals ändern,
übereinstimmend mit der Einstellung, die im
Zulassungsdokument der Maschine beschrieben
ist.
59

6 mm
Entretien / Maintenance / Wartung
D
1
1
6
3
3
2
2
4
4
60
Entretien / Maintenance / Wartung
Distribution
D
Ne jamais laisser de la semence dans la trémie
pendant une longue période.
-
Vérifier visuellement dans un premier temps la
distance entre le clapet et la roue à ergot.
FR
1
-
Ouvrir les trappes et les clapets de fond
1
pendant la période de remisage.
Ne jamais graisser les distributions et les tubes de
descente.
C
ONTRÔLE
Un réglage défectueux des clapets de fond peut
2
2
provoquer un surdosage en cours de semis.
Il est conseillé de contrôler et de régler si nécessaire
après chaque période de semis.
-
Positionner le levier des clapets de fond au
repère 1.
Distribution
D
Never leave seed in the hopper for any length of time.
1
-
Open the distribution shutters and the bottom
2
2
flaps during storage.
1
Never lubricate delivery tubes and pipes.
HECK
C
Faulty adjustment of the flaps may induce
2
2
oversowing.
2
2
-
Si nécessaire, mettre une cale de 6mm entre
3
3
le clapet et la roue à ergot grosse graine (entre
les ergots).
4
-
Ajuster la distance à l’aide de la vis .
-
Visually check the clearance between the flap
4
GB
and the peg wheel.
3
-
If necessary, put a 6 mm shim between the
3
flap and the large seed peg wheel (between
studs).
4
-
Adjust clearance with the screw .
4
It is recommended to check and adjust if necessary
after each sowing campaign.
-
Set the bottom flap lever to marker 1.
D
Verteilung
Das Saatgut nicht über längere Zeit im Saatkasten
lassen.
1
-
Die Schieber und die Bodenklappen
1
während der Abstellzeit öffnen.
Die Verteilungen und die Saatrohre nicht schmieren.
K
ONTROLLE
Eine schlechte Einstellung der Bodenklappen kann
beim Säen zu einer Überdosierung führen.
Es ist empfehlenswert, diese Einstellung nach jeder
Saatperiode zu überprüfen und gegebenenfalls neu
einzustellen.
1
5
DE
-
Dann den Abstand zwischen Klappe und
Nockenrad begutachten.
3
-
2
2
Wenn nötig, einen 6 mm-Keil zwischen
Klappe und das Nockenrad für größere Körner
schieben (zwischen die Nocken).
-
Den Abstand mithilfe der Schraube justieren.
2
2
3
4
4
-
Die Hebel der Bodenklappen auf Markierung 1
einstellen.
61

Entretien / Maintenance / Wartung
E
1
1
2
2
F
62

Entretien / Maintenance / Wartung
FR
E
Remisage
Pour le remisage de votre machine vous
disposez d’une béquille sous la flèche
b) Caractéristiques
1
SULKY EASYDRILL FERTISEM EASYDRILL 3m EASYDRILL 4m
LARGEUR (m) 3 4
NOMBRE DE RANGS 18 24
ECARTEMENT (cm) 16,6 16,6
LARGEUR TRANSPORT (m) 3 4
CONTENANCE TRÉMIE ( l ) FERTI / SEMENCE 2000 3100
POIDS VIDE (kg) SUIVANT ÉQUIPEMENT 3400 4100
PTAC 5500 5500
UISSANCE MINIMUM RECOMMANDÉE (ch) 90 120
P
Storage
E
For storing your machine, there is a stand under the
draw bar .
b) Specifications
1
221
SULKY EASYDRILL FERTISEM EASYDRILL 3m EASYDRILL 4m
WIDTH (m) 3 4
NUMBER OF ROWS 18 24
SPACING (cm) 16.6 16.6
TRANSPORT WIDTH (m) 3 4
HOPPER CAPACITY ( l ) 2000 3100
UNLADEN WEIGHT (KG) ACCORDING TO EQUIPMENT 3400 4100
GVWR 5500 5500
INIMUM RECOMMENDED POWER (hp) 90 120
M
F
Caractéristiques techniques
a) Identification
221
• Lors de la prise en charge de votre machine, notez en
page 2 les informations suivantes : NUMERO DE
SERIE DE LA MACHINE / TYPE DE MACHINE /
ACCESSOIRES
GB
F
Technical specifications
a) Identification
• Note the following information on receipt of your
machine : MACHINE NUMBER / MACHINE TYPE /
ACCESSORIES
1
5
Abstellen
E
Zum Abstellen der Maschine dient die Parkstütze
unter dem Ausleger .
b) Technische Daten
1
221
SULKY EASYDRILL FERTISEM EASYDRILL 3m EASYDRILL 4m
BREITE (m) 3 4
REIHENZAHL 18 24
ABSTAND (cm) 16.6 16.6
TRANSPORTBREITE (m) 3 4
TANKINHALT ( L ) FERTI / STREUGUT 2000 3100
LEERGEWICHT (KG) NACH AUSSTATTUNG 3400 4100
ZULÄSSIGES GESAMTGEWICHT 5500 5500
MPFOHLENE MINDESTLEISTUNG (ps) 90 120
E
Technische Daten
F
a) Identifizierung
• Bei Abnahme Ihrer Maschine folgende
Informationen vermerken : MASCHINENNUMMER
/ MASCHINENTYP / ZUBEHÖRTEILE
DE
63

Entretien / Maintenance / Wartung
G
64

Entretien / Maintenance / Wartung
G
Positions Autocollants
Des étiquettes adhésives relatives à la sécurité ont
été placées sur votre machine.
Leur but est de contribuer à votre sécurité et à
celle d'autrui.
Lisez leur contenu et contrôlez leur
emplacement.
Revoyez les étiquettes ainsi que les instructions
contenues dans la notice d'instructions avec
l'opérateur de la machine.
Gardez les étiquettes propres et lisibles.
Remplacez-les lorsqu'elles sont détériorées.
FR
GB
Sticker positions
G
Warning notices relating to safety are affixed to your
machine.
Their aim is to contribute to your safety and to
the safety of others.
Know their contents and check their location.
Review the safety notices as well as the
instructions contained in this operating manual.
If any safety notices become illegible or lost they
should be replaced.
Sicherheitsaufkleber
G
Sicherheitsaufkleber sind auf Ihrer Maschine
angebracht.
1
5
DE
Sie sollen zu Ihrer Sicherheit und der anderer
Personen beitragen.
Sie sorgfältig lesen und ihre Anbringung
kontrollieren.
Sicherheitsaufkleber und Bedienungsanweisung
mit dem Benutzer der Maschine durchgehen.
Schilder sauber und lesbar halten. Beschädigte
Aufkleber auswechseln.
65

Equipements / Optional equipment / Ausrüstungen
A
-
-
+
+
66
Suivre les instructions de
montage.
Attention : pression
hydraulique !
Follow the mounting
instructions.
Warning: hydraulic
pressure!
Die Montieranweisungen
befolgen.
Achtung: Hydraulikdruck!

Equipements / Optional equipment / Ausrüstungen
A
ULTRON MS
voir notice jointe.
FR
GB
ULTRON MS
A
see enclosed instructions.
ULTRON MS
A
s. beiliegendes Handbuch
DE
1
6
67

Equipements / Optional equipment / Ausrüstungen
B
68
Après avoir mis le
compteur à zéro, tourner
la molette en sens
inverse jusqu'à
l'encliquetage.
After resetting the meter
to zero, turn the knob the
other way until a click is
heard.
Nach Nullstellung des
Zählers das Rädchen bis
zum Einrasten in
entgegen gesetzte
Richtung drehen.

Equipements / Optional equipment / Ausrüstungen
B
Agitateur souple
Utiliser l'agitateur souple dans le cas ou la semence a
un très mauvais écoulement.
Exemple : Ray Grass de ferme
• Montage :
- Prendre la bavette caoutchouc et l'enrouler autour
du doigt d'agitateur suivant le schéma.
- Attention au sens de rotation.
FR
GB
B
Rubber agitator
Use the rubber agitator in cases where the seed flows
poorly (e.g. farm rye-grass).
• Fitting:
- Take the rubber flap and wind it round the
agitator finger as shown.
- Beware of the direction of rotation.
Elastische Rührwelle
B
Elastische Rührwelle verwenden, wenn das Saatgut
schlecht ausläuft (z. B. Landraygras)
DE
1
6
• Montage :
- Gummischutz gemäß Plan um Rührfinger wickeln.
- Auf Drehrichtung achten.
69

Tableaux de réglage
A
Fiches pratiques
COMMENT PRÉVENIR LA COMPACTION ?
Généraliser les pneumatiques basse pression sur tous les engins évoluant dans les champs pour limiter lacompaction
superficielle
Il ne suffit pas de monter des pneumatiques larges ou des roues jumelées mais il faut régler la pression.
Viser 0,6 bar, en accord avec le fournisseur de pneu. Semoir traîné, l’EASYDRILL ne pèse pas sur les roues arrière du tracteur et
n’exige pas d’installer des contrepoids à l’avant !
Réduire les charges par essieu pour limiter la compaction en profondeur.
Viser 6 tonnes par essieu : en cas de remorques plus lourdes, les laisser sur le chemin. Préférer des tracteurs légers : peu tirant,
l’EASYDRILL se contente de tracteurs de puissance modérée et donc moins lourds.
Travailler sur sol ressuyé.
Etre patient et attendre le bon moment avant d’intervenir. Selon les scientifiques, dès le changement de couleur de la surface d’un
sol qui sèche, le terrain résiste mieux à la compaction. Au bout de 4 à 5 ans de T.C.S. le sol draine l’eau plus vite et devient plus
portant, ce qui réduit le temps d’attente.
Apporter calcium et magnésium pour compenser une acidification du milieu.
Viser à maintenir le pH entre 6,5 et 7 pour assurer une bonne stabilité du complexe argilo-humique.
FR
Enrichir le sol en matières organiques pour le protéger de la compaction et améliorer la résistance au tassement.
Restituer pailles et résidus de récolte, apporter du fumier, implanter des cultures fourragères, éviter de labourer…
COMMENT ENFOUIR LA PAILLE ?
Choisir une variété adaptée.
Selon la variété, la quantité de paille produite varie, sa résistance aux chocs également. Une variété résistante aux maladies, qui
n’exige pas systématiquement une protection fongicide de fin de cycle, sera également plus facilement attaquée par les organismes
décomposeurs.
Equiper et régler la moissonneuse-batteuse.
Serrer au batteur et tourner plus vite brise davantage la paille. Bien sèches, les pailles sont plus brisantes : récolter dans ces
conditions les parcelles à semer en premier. Equiper absolument la moissonneuse d’un répartiteur de menues pailles. Broyer la paille
en brins de 5 à 6 centimètres (affûter les couteaux du broyeur, tendre les courroies…) et bien la répartir.
Broyer la paille et le chaume derrière la moissonneuse.
En particulier, lorsque l’interculture est courte, la hauteur de coupe élevée, la paille mal répartie, lorsque l’on veut travailler le sol
avec un outil à dents…
Bien mélanger la paille au sol et rappuyer.
Ne pas dépasser 5 à 6 centimètres de profondeur pour faciliter la décomposition et pour ne pas diluer les résidus. Rappuyer avec un
rouleau lourd favorise le contact terre/paille et l’attaque par les organismes décomposeurs.
COMMENT SE PROTÉGER DES LIMACES ?
Déchaumer tôt pour diminuer les sources de nourriture des limaces.
70
Travailler en surface le sol assez fin et rappuyer pour déranger et gêner les limaces
Maintenir le sol propre par destruction mécanique et chimique réalisée assez tôt le semis.
Repérer la présence de limaces dès les premières pluies, installer des pièges.
Semer un peu plus profond et dans des conditions favorables pour une levée rapide.
Bien refermer le sillon de semis, rouler éventuellement après le semis. En situation de risque, traiter avec un produit
approprié.
Bien surveiller la culture après le semis, surtout si les conditions sont humides.

Tableaux de réglage
Fiches pratiques
A
COMMENT LUTTER CONTRE LES MAUVAISES HERBES ?
Mettre en place les T.C.S. uniquement dans des parcelles propres.
En particulier, les mauvaises herbes vivaces doivent être maîtrisées au cours de la culture précédente.
Organiser la lutte contre les mauvaises herbes dans le cadre de la rotation.
Alterner céréales et cultures de plantes dicotylédones (pois, colza, betteraves…) ainsi que cultures d’hiver et cultures de printemps.
Profiter de la culture de dicotylédones pour agir efficacement sur les graminées ; inversement, profiter de la culture de céréales pour
détruire les dicotylédones.
Réaliser des faux-semis pendant l’interculture pour se débarrasser des mauvaises herbes annuelles et des repousses.
Préparer dès le passage de la moissonneuse-batteuse un véritable lit de semence homogène, avec de la terre fine, superficiel et
rappuyé pour obtenir une levée des graines de mauvaises herbes régulière et aussi complète que possible. Une semaine avant le semis,
détruire les plantes levées par un travail mécanique ou bien à l’aide d’un herbicide total non rémanent, comme le glyphosate, le
sulfosate… Viser zéro adventice au moment du semis.
FR
Eviter de semer trop tôt pour améliorer l’efficacité du faux-semis.
Plus l’interculture est longue, plus le désherbage est efficace. Semer en dernier les parcelles les plus sales. Faire confiance à la rapidité
d’intervention de l’EASYDRILL et à la qualité de ses levées pour semer sans risque aux dates habituelles.
Mettre en place dès le semis une culture propre et vigoureuse.
Utiliser des semences propres et sans graines de mauvaises herbes, des semences d’un haut pouvoir germinatif. Placer les semences
de façon à obtenir une levée rapide et groupée, une culture compétitive des mauvaises herbes.
Utiliser un semoir qui remue peu le sol comme l’EASYDRILL.
L’EASYDRILL travaille seulement la ligne de semis, ce qui réduit les chances de faire lever les graines qui ont échappé au faux-semis.
Préférer les écartements entre rangs larges comme ceux de l’EASYDRILL (16,6 cm). Réserver l’emploi de la herse arrière du semoir
aux cas utiles.
Bien observer en culture l’évolution de la flore.
Avec les T.C.S. les mauvaises herbes habituelles n’apparaissent plus en même quantité et aux mêmes dates; de plus, d’autres espèces
peuvent apparaître. Se préparer à cette évolution en améliorant ses connaissances botaniques. Faire chaque semaine en conditions
poussantes un tour de plaine, avancer dans les parcelles en dessinant une suite de W, identifier les plantes et leur développement,
noter les observations et tenir un historique pour chaque parcelle.
Faire varier d’une année sur l’autre les familles chimiques des herbicides.
Nettoyer bordures, jachères et cultures avant la montée à graine.
Faucher, broyer talus, bordures, fossés, jachères plutôt que traiter avec un herbicide total : celui-ci pourrait sélectionner des vivaces
qui seraient ensuite difficiles à éliminer. Pour les bordures, certains préfèrent cultiver du ray-grass : il étouffe les mauvaises herbes et
se contrôle facilement avec une faucheuse. En culture, détruire les taches résiduelles de mauvaises herbes par traitements localisés,
au pulvérisateur habituel ou à main.
Eviter de disséminer les graines de mauvaises herbes à la moisson.
Commencer par récolter les parcelles les plus propres. Dans les parcelles infestées, récolter les parties les plus propres en premier.
Nettoyer la moissonneuse-batteuse après chaque passage dans une parcelle sale.
Labourer en dernier recours lorsque les techniques ci-dessus ne sont pas assez efficaces pour se débarrasser des
graminées ou des dicotylédones annuelles.
1
7
71

Settings Charts
A
Practical recommendations
PREVENTING SOIL COMPACTION
Whenever possible, use low-pressure tyres on all machines operated in fields in order to reduce superficial
compaction.
Mounting wide tyres or twin wheels is not enough; the tyre pressure must be adjusted accordingly.
Aim for 0.6 bar, according to the tyre manufacturer's recommendations. As the EASYDRILL is a towed seed drill, it exerts no weight
on the rear tractor wheels and does not require counterweights to be mounted at the front!
Reduce the load per axle to avoid in-depth soil compaction.
Avoid loads over 6 tons per axle: if heavier trailers must be used, park them at the field entrance. Prefer lightweight tractors: as
the EASYDRILL requires little traction power, moderately powerful - and therefore lightweight - tractors are sufficient.
Till on dried-out ground.
Be patient, and wait for the right time of year before starting tilling. According to scientists, as soon as drying soil changes colour, it
acquires greater resistance to compaction. After 4 to 5 years of conservation tillage, the ground drains water faster and becomes
more resilient, which reduces the necessary waiting time.
Provide calcium and magnesium to compensate for the ground’s acidity where necessary.
Aim to maintain a pH of 6.5 - 7 to ensure optimal stability of the clay-humus compound.
GB
Enrich the soil with organic matter to preserve it from compaction and to increase its resilience.
Leave straw and crop residues on the ground, spread manure, grow fodder plants, and avoid ploughing.
BURYING THE STRAW
Select a suitable variety.
According to the selected variety, the quantity of produced straw can vary, as well as its shock resistance. A variety that is resistant
to disease and which it is not essential to treat with a fungicide at the end of the season will also be more easily decomposed by
the fauna in the soil.
Prepare and adjust settings on the combine harvester
Tighten the thresher and increase the rotation speed to break straw better. Dry straw breaks more easily: under these conditions,
harvest the fields that you wish to sow first. The combine harvester must be equipped with a chaff spreader. Shred the straw into
chaff of 5-6 cm (sharpen the shredder blades, tighten all belts) and spread it evenly.
Shred the chaff and stubble behind the combine harvester.
In particular, if the catch-crop period is short, the cutting level is high, the chaff is poorly spread out and you wish to till the soil with
tools fitted with tines.
Thoroughly mix the straw on the ground and roll.
Do not bury the straw deeper than 5 to 6 centimetres below the surface in order to facilitate decomposition and avoid mixing trash in.
Rolling with a heavy roller improves the contact between soil and straw and facilitates decomposition by the fauna in the soil.
PROTECTING CROPS AGAINST SLUGS
Disc early to deprive slugs of food.
72
Till the surface to make the soil fairly fine, and roll to disturb slugs.
A long time before sowing, keep the soil clean by means of mechanical and chemical destruction.
Watch for the arrival of slugs with the first rains and set up traps if necessary.
To ensure quick emergence, sow a little deeper, and in favourable conditions.
Close the seed furrow well, and possibly roll after sowing. In a situation where the risk of damage from slugs is high,
treat with the appropriate product.
Watch over the crop well after sowing, especially in damp weather and soil conditions.

Settings Charts
Practical recommendations
A
DEALING WITH WEEDS
Conservation tillage must exclusively be kept to clean fields.
Perennial weeds, in particular, must be kept under control during the previous seasons.
Weeds must be dealt with within the framework of crop rotation.
Alternate cereal and dicotyledonous plant crops (peas, rape, beetroot etc.) as well as winter and spring crops. Dicotyledonous crops
give an opportunity to efficiently get rid of graminae; on the other hand, cereal crops allow efficient action to be taken against
dicotyledonous plants.
Sow stale seed beds during catch-crop periods to get rid of yearly weeds and regrowths.
As soon as the combine harvester has harvested the crop, a homogeneous, superficial and rolled "bed" of seeds must be prepared,
using fine soil, so that the weed seeds emerge as regularly and completely as possible. One week before sowing, destroy the
emerged plants by means of mechanical tillage or total non carry-over herbicide, such as glyphosate or sulfosate. Aim to have no
weeds at all at the time of sowing.
GB
Avoid sowing too early in order to improve the stale seed bed's efficiency.
The longer the catch-crop period, the more efficient weeding will be. Sow trashy fields last. Trust the quick efficiency and the
emergence quality of the EASYDRILL to enable you to sow at the usual dates, without any risks.
As soon as the sowing is finished, keep clean and strong crops growing.
Use clean seeds that are free of weeds and have good viability. The seeds must be placed to obtain a fast and grouped growth, to
create a crop that will be able to compete with weeds.
Use a seed drill that causes little disturbance of the soil, such as the EASYDRILL.
The EASYDRILL works exclusively in the sowing line, which avoids seeds that escaped the stale seed bed emerging. Prefer wide
spacing between rows, such as that of the Easydrill (16.6 cm). Use the seed drill’s rear harrow only when necessary.
Monitor the growth of plant life in the crop during the growing period.
With conservation tillage, the usual weeds do not appear in the same quantities or at the same dates; additionally, new species may
appear. Prepare for this evolution by improving your botanical knowledge. Every week while the crops are growing, walk through the
fields, moving into plots of land in a continuous series of "Ws", identifying plants and their respective development; write any
observations down and trace the history of each plot of land.
Use herbicides of new chemical categories every year.
Clean borders, fallows and crops before the heading.
Cut or shred weeds on embankments, in ditches and in fallows rather than treating them with total herbicide: some perennial plants
might not react to the product, and may then become difficult to get rid of. Some find it preferable to grow rye-grass on borders: it
chokes weeds and can easily be kept under control using a mower. During the season, destroy the remaining localised weed growth
spots using localised treatments, your usual sprayer, or by hand.
Avoid scattering weed seeds when harvesting.
Start harvesting the cleanest plots of land. In weed-infested plots, harvest the cleanest parts first. Clean the combine harvester well
after harvesting weed-infested land.
Ploughing is a last resort if the techniques above are not efficient enough to get rid of annual grass or dicotyledones.
1
7
73

Einstelltabellen
A
Praktische Hinweise
WIE KANN MAN VERDICHTUNG VORBEUGEN?
Zur Begrenzung der Oberflächenverdichtung generell Reifen mit niedrigem Druck auf den Fahrzeugen einsetzen, die
auf den Feldern arbeiten.
Es reicht nicht aus, breite oder Zwillingsreifen zu benutzen - der Reifendruck muß angepaßt sein !
Dabei sind 0,6 bar - in Übereinstimmung mit dem Reifenlieferant - anzustreben. Als gezogene Drillmaschine belastet der EASYDRILL
die Hinterradreifen des Schleppers nicht und macht so vorne auch nicht den Anbau eines Gegengewichtes erforderlich.
Zur Beschränkung der Verdichtung in Tiefenschichten sind die Lasten pro Achse zu verringern.
6 Tonnen pro Achse sind anzustreben. Schwerere Anhänger auf dem Weg stehenlassen. Leichtere Schlepper sind empfehlenswert:
Der EASYDRILL als eine Drillmaschine, die weniger Schlepperkraft erfordert, begnügt sich mit Schleppern geringerer Leistung, die
damit auch leichter sind.
Arbeiten auf ausgetrocknetem Boden.
Seien Sie geduldig und warten Sie auf einen guten Moment, bevor sie eingreifen. Den Wissenschaftlern zufolge ist es der Boden,
der gerade trocknet und dessen Oberfläche die Farbe wechselt, der sich am wenigsten verdichtet. Nach 4 bis 5 Jahren pflugloser
Bestelltechnik entwässert der Boden schneller und wird tragfähiger, wodurch sich die Wartezeit verringert.
Kalzium und Magnesium-Zugaben gleichen die Säuerung des Milieus aus.
Streben Sie es an, den pH-Wert zwischen 6,5 und 7 zu halten, damit der Klei-Humus-Komplex stabil bleibt.
DE
Die Anreicherung des Bodens mit organischen Stoffen schützt ihn vor Verdichtung und verbessert seine
Widerstandsfähigkeit gegen das Absenken.
Stroh und Ernterückstände auf dem Feld lassen, Mist ausfahren, Viehfutter-Kulturen anpflanzen, das Pflügen vermeiden.
WIE PFLÜGT MAN STROH UNTER?
Eine geeignete Varietät wählen.
Je nach Varietät fällt die Menge des erzeugten Strohs unterschiedlich aus und es ändert sich seine Stoßfestigkeit. Eine Varietät, die
Krankheiten gegenüber nicht anfällig ist und die nicht systematisch ein Pilzschutzmittel am Ende des Wachstumszyklus erfordert,
wird andererseits auch leichter von Zersetzungsorganismen angegriffen.
Den Mähdrescher ausrüsten und einstellen.
Das Annähern und das schnellere Drehen mit der Dreschtrommel läßt das Stroh schneller brechen. Je trockener das Stroh ist, desto
leichter bricht es auch. Unter diesen Umständen zuerst auf den neu zu besäenden Teilflächen ernten. Die Mähmaschine unbedingt
mit einem Verteiler für kleinere Strohhalme ausrüsten. Das Stroh in Stückchen von 5 bis 6 cm fein brechen (die Messer der
Zerkleinerungsmaschine schleifen und die Riemen anspannen) und es gut verteilen.
Das Stroh und die Stoppel hinter der Mähmaschine zerkleinern.
Dies gilt vor allem, wenn die Zwischenkultur kurz, die Schnitthöhe hoch, das Stroh schlecht verteilt ist oder wenn der Boden mit
einem Hakenwerkzeug bearbeitet werden soll.
Das Stroh gut auf dem Boden mischen und festdrücken.
Zur besseren Zersetzung und damit die Rückstände nicht verdünnt werden, nicht tiefer als 5 bis 6 Zentimeter gehen. Das Andrücken mit
einer schweren Ackerwalze verbessert den Kontakt Erde/ Stroh und Beschleunigt somit das Zersetzen durch Mikroorganismen.
WIE KANN MAN SICH VOR SCHNECKEN SCHÜTZEN?
Frühzeitig entstoppeln, damit die Schnecken weniger Nahrungsquellen vorfinden.
74
Den Boden an der Oberfläche recht fein bearbeiten und festdrücken, um die Schnecken zu stören.
Den Boden durch mechanische und chemische Zerstörung, die früh genug vor der Aussaat durchgeführt wird,
von Unkräutern frei halten.
Bei den ersten Regenfällen das Vorhandensein von Schnecken überprüfen und gegebenenfalls Fallen aufstellen.
Etwas tiefer und am besten bei Bedingungen, durch die der Saataufgang beschleunigt wird, säen.
Die Saatfurchen gut schließen, eventuell nach der Saat walzen. Bei zu viel Schädigungsgefahr mit einem
angemessenen Produkt behandeln.
Den Pflanzenstand nach dem Säen gut überwachen, vor allem, wenn es sehr feucht ist.

Einstelltabellen
Praktische Hinweise
A
WIE KANN MAN UNKRAUT BEKÄMPFEN?
Die pfluglose Bestelltechnik ausschließlich auf sauberen, unkrautfreien Teilflächen einsetzen.
Insbesondere die mehrjährigen Unkräuter müssen während der vorhergehenden Kultur unter Kontrolle gebracht werden.
Die Unkrautbekämpfung im Rahmen des Fruchtwechsels mitorganisieren.
Getreide- und Dikotyledonen-Kultur (Erbsen, Raps, Zuckerrüben) wie auch Winter- und Frühlingskulturen abwechseln. Profitieren
sie vom Anbau der zweikeimblättrigen Pflanzen zur Bekämpfung der Gräser und umgekehrt, bekämpfen Sie die Dikotyledonen beim
Anbau von Getreide.
Im Zeitraum zwischen zwei Kulturen kann durch Oberflächenbearbeitung das einjährige Unkraut und der
Pflanzennachwuchs ausgerottet werden.
Sobald der Mähdrescher seine Arbeit getan hat, können Sie ein gleichmäßiges Saatgutbett, an der Oberfläche, aus feiner Erde und
gewalzt, vorbereiten, damit das Unkraut gleichmäßig und möglichst vollständig keimt. Eine Woche vor der richtigen Ausaat werden
die gekeimten Pflanzen auf mechanische Weise oder auch mit Hilfe eines totalen, nicht zurückbleibenden Unkrautvertilgungsmittels
wie Glyphosat oder Sulfosat vernichtet. Im Moment des Säens ist Null Wildwuchs anzustreben.
DE
Vermeiden Sie ein allzu frühzeitiges Säen, um die Wirksamkeit der Obees Keimen stattfindet und die Kultur sich
gegen Unkraut durchsetzt.
Je länger der Zeitraum zwischen zwei Kulturen, je effizienter die Unkrautbekämpfung. Die am schwersten befallenen Parzellen
zuletzt einsäen. Vertrauen Sie auf die einwandfreie Arbeitsqualität des Easydrill und den guten Saataufgang und säen Sie
bedenkenlos zum gewohnten Zeitpunkt.
Fördern Sie bereits bei der Aussaat eine reine und widerstandsfähige Kultur.
Verwenden Sie reines Saatgut, frei von Unkrautsamen, mit gutem Keimvermögen. Säen Sie unter geeigneten Bedingungen aus, um
ein schnelles und gleichzeitiges Aufgehen des Saatgutes zu erreichen, so dass die Kulturpflanze dem Unkraut zuvor kommt.
Benutzen Sie eine Drillmaschine, die den Boden wenig aufrührt wie den EASYDRILL.
Der EASYDRILL bearbeitet ausschließlich die Saatreihe, wodurch das Unkraut, welches nicht durch die Oberflächenbearbeitung auf
der Strecke geblieben ist, nicht zum Keimen gebracht wird. Der Reihenabstand sollte besser groß sein wie derjenige des EASYDRILL
(16,6 cm). Der hintere Saatstriegel der Drillmaschine bleibt den seinen besonderen Anwendungzwecken vorbehalten.
Behalten Sie die Entwicklung der Pflanzen in Ihrem Anbau gut im Auge.
Mit der Bestelltechnik ohne Pflugfurche wächst das normale Unkraut nicht in der gleichen Menge und nicht mehr zu den selben
Zeiten nach; außerdem können neue Arten auftreten. Bereiten Sie sich auf diese Entwicklung vor, indem Sie Ihre Botanikkentnisse
vergrößern. Machen Sie einmal wöchentlich bei guten Saataufgang-Bedingungen eine Runde im Anbaugebiet, begehen Sie die
Teilflächen, indem Sie einen Zick-Zackweg durch die Pflanzen einschlagen, bestimmen Sie die Pflanzen und ihre Entwicklung und
schreiben Sie ihre Beobachtungen auf, so daß zu jeder Teilfläche eine Beschreibung entsteht.
Von Jahr zu Jahr sollte die chemische Klasse der Unkrautvernichtungsmittel gewechselt werden.
Vor der Körnerbildung die Feldränder, die Brachacker und Kulturen von Unkraut befreien.
Dazu die Böschungen, Feldränder, Gräben und Brachlandstücke eher mähen und die Pflanzen zerkleinern als ein totales
Unkrautvernichtungsmittel einzusetzen : dies könnte nicht auf alle widerstandsfähigen Unkräuter einwirken, die anschließend schwer
zu bekämpfen wären. Für die Feldränder ist die Pflanzung von Ray-Gras empfehlenswert: es erstickt das Unkraut und sein Wuchs
läßt sich leicht mit einem Sichelmäher in den Griff bekommen. Im Anbau sollten die Flecken, an denen es noch Unkrautrückstände
gibt, durch örtliche Behandlungen gesäubert werden, entweder mit einem normalen Zerstäuber oder mit einem Handspritzgerät.
1
5
Vermeiden Sie es, bei der Ernte Unkrautsamen zu verstreuen.
Beginnen Sie das Ernten auf den unkrautfreien Teilflächen. Auf den stark befallenen Parzellen sind die unkrautfreien Flächen zuerst
zu ernten. Der Mähdrescher sollte nach jedem Arbeitsdurchgang auf einer Teilfläche mit viel Unkraut gesäubert werden.
Wenn die genannten Vorgehensweisen nichts mehr nützen, um die Gräser oder die einjährigen Dikotyledonen zu
vertilgen, beackern Sie die Parzelle.
75

Tableaux de réglage / Settings charts / Einstelltabellen
DE
GBFR
Rappel pré-réglages
B
1
1
Trappes (3 positions)
2
2
Ergots (2 positions)
3
3
Clapet de fond (6 positions)
4
4
Variateur (Repères 0 à 90)
1
1
Pre-setting reminder
Zur Erinnerung: Voreinstellungen
Saatstreumengen vorne
1
1
Shutters (3 positions)
2
2
Rollers (2 positions)
3
3
Flap (6 positions)
4
4
Variator (Scale from 0 to 90)
1
1
Schieber (3 Stellungen)
2
2
Nockenräder (2 Stellungen)
3
3
Bodenklappe (6 Stellungen)
4
4
Ölbadgetriebe
(Markierungen 0 bis 90)
Distribution Semences (Avant)
Seed metering device (Front)
Saatgutstreuer (Vorne)
2
2
76
3
3
4
4
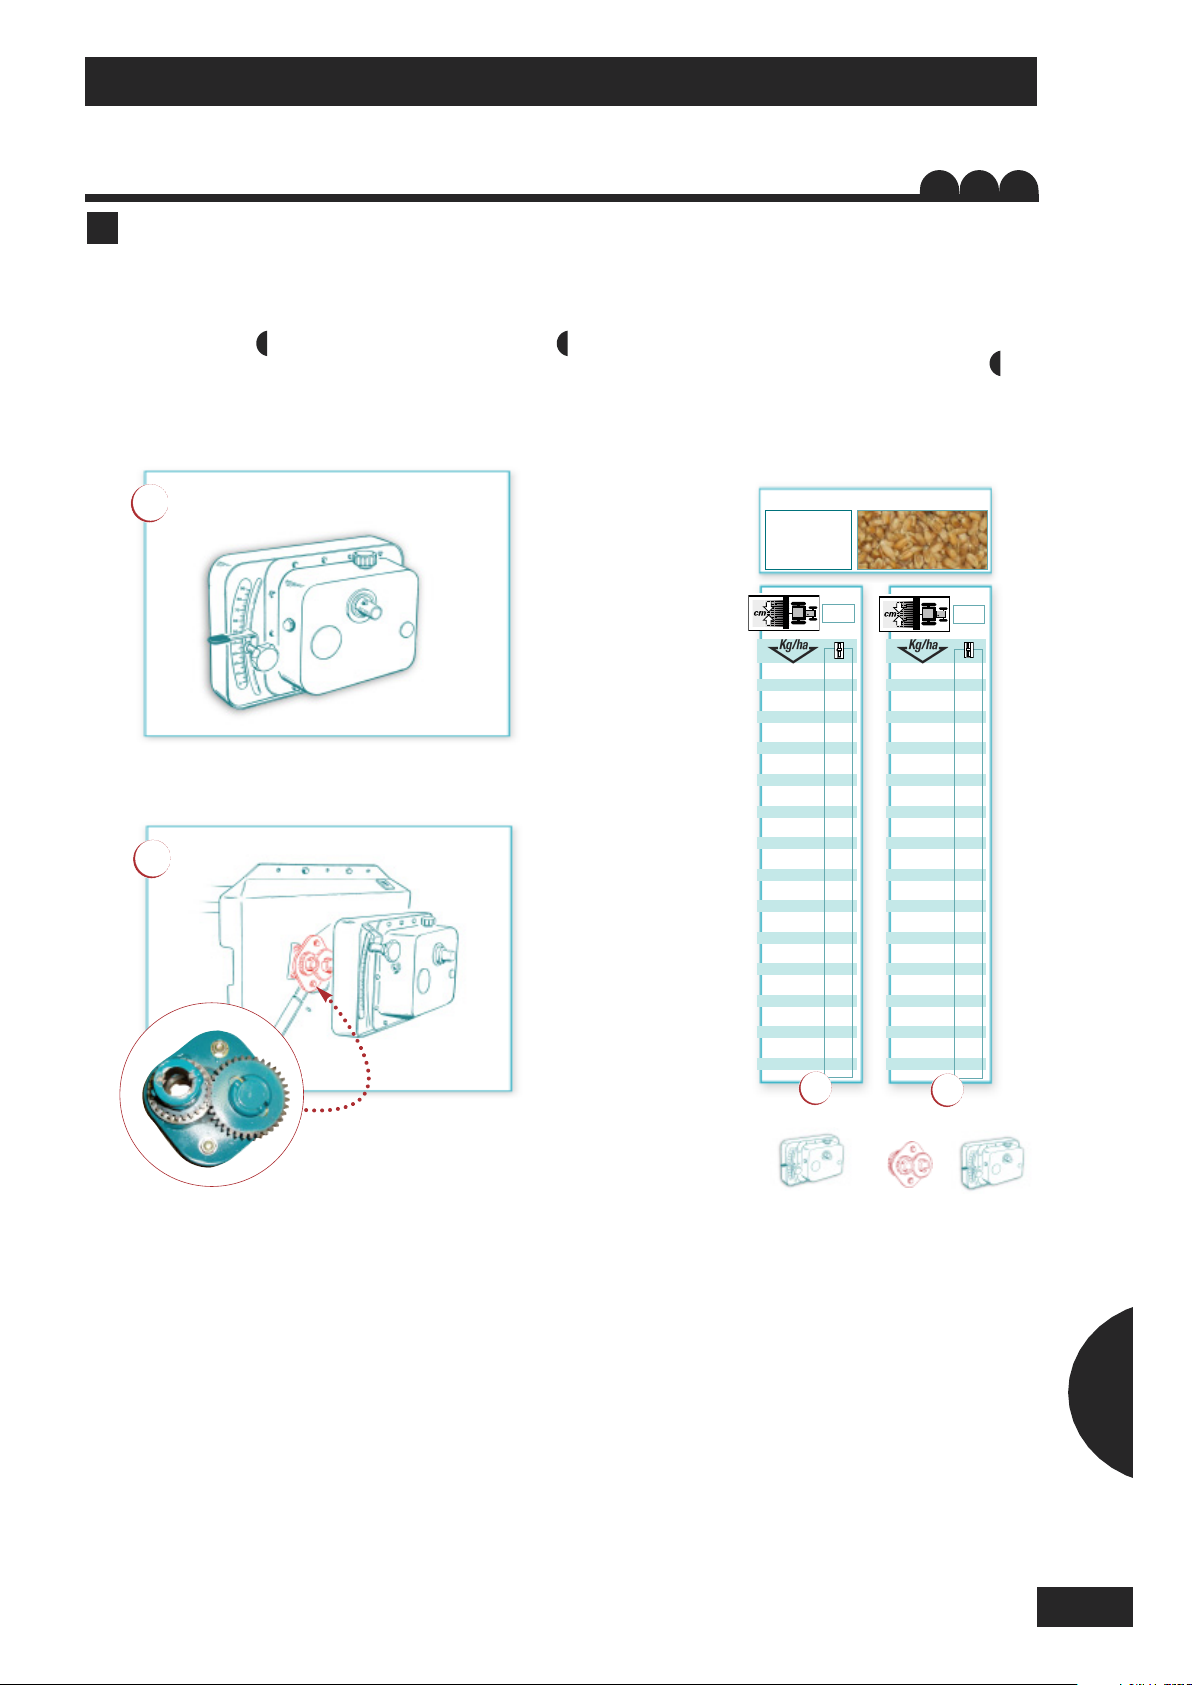
Tableaux de réglage / Settings charts / Einstelltabellen
+
DE
GBFR
Tableaux de débit
C
Les réglages des tableaux ne
sont donnés qu'à titre indicatif.
Vérifier votre débit hectare,
pour plus de précision
(voir chapitre ).
A
B
Seeding rate charts
The chart settings are provided
as an indication only.
Check your seeding rate per
hectare for greater accuracy
(see section ).
33
Tabellen Saatstreumengen
vorne
Die Einstellungen der Tabellen
geben nur Richtwerte an.
Zur größeren Genauigkeit ist
die Streumenge pro Hektar zu
überprüfen (siehe Kapitel ).
//
HIVER
LÉLÉHIVER
ARIÉTÉ
:
ARIETY
: O
ORTE
:
RAITEMENT
:
REATMENT
: A
EHANDLUNG
:
60
70
80
90
100
110
120
130
140
150
160
170
180
190
200
210
220
230
240
250
260
270
280
290
300
RVANTIS
USTRAL
W
//
W
16,6
26
31
35
39
44
48
52
56
59
63
66
69
72
75
78
80
83
INTER
INTER
WHEAT
WHEAT
/ W
INTERWEIZEN
/ W
INTERWEIZEN
120
140
160
180
200
220
240
260
280
300
B
B
V
V
S
T
T
B
16,6
26
31
35
39
44
48
52
56
59
63
2
Kg / ha X 2
.........................
• Avoine 78
• Blé 78-79
• Colza 79-80
• Fétuque 80-81
• Féverole 81-82
• Lin 82
• Lotier
cornicule 83
• Lupin 83
• Luzerne 84
• Maïs 84
• Moutarde
blanche 85
• Oat • Hafer
.........................
• Wheat • Weizen
.........................
• Rape • Raps
.........................
• Fescue • Schwingel
.........................
• Field beans • Ackerbohnen
.........................
• Flax • Leinsaat
.........................
• Bird's-foot • Flügelginsterweide
.........................
trefoil
• Lupin • Lupine
.........................
• Lucern • Luzern
.........................
• Maize • Mais
.
• White • Weißer
.........................
mustard Senf
A
}
• Navette 86
• Oeillette 86
• Orge 87
• Phacélia 88
• Pois 88
• Radis 89
• Ray grass 89-90
• Sorgho 90-91
• Trèfle 91
• Triticale 92
• Vesce 92
• Rape • Rübsen
............................
• Oil poppy • Schlafmohn
............................
• Barley • Gerste
............................
• Phacelia • Phazelia
............................
• Peas • Erbsen
............................
• Radish • Radieschen
............................
• Rye-grass • Ray-Gras
..............
• Sorghum • Sorghum
..........................
• Clover • Klee
..........................
• Triticale • Triticale
..........................
• Vetch • Wicke
B
+
}
1
7
77

Tableaux de réglage / Settings charts / Einstelltabellen
+
+
A
VOINE
A
VOINE
V
ARIÉTÉ
ARIETY
: E
V
S
ORTE
:
T
RAITEMENT
REATMENT
T
B
EHANDLUNG
50
60
70
80
90
100
110
120
130
140
150
160
170
180
190
200
210
220
230
240
250
260
270
280
290
:
:
: G
:
HIVER
HIVER
VORA
AUCHO
16,6
35
43
50
56
63
68
74
79
83
//
//
W
W
INTER
INTER
OAT
OAT
/ W
INTERHAFER
/ W
INTERHAFER
100
120
140
160
180
200
220
240
260
280
300
//
B
HIVER
B
LÉLÉHIVER
V
ARIÉTÉ
:
ARIET Y
: O
V
S
ORTE
:
T
RAITEMENT
:
REATMENT
: A
T
B
EHANDLUNG
W
//
W
RVANTIS
USTRAL
:
16,6 16,6
26
31
35
39
44
48
52
56
59
63
66
69
72
75
78
80
83
+
35
43
50
56
63
68
74
79
83
60
70
80
90
100
110
120
130
140
150
160
170
180
190
200
210
220
230
240
250
260
270
280
290
300
INTER
INTER
WHEAT
WHEAT
/ W
INTERWEIZEN
/ W
INTERWEIZEN
120
140
160
180
200
220
240
260
280
300
16,6
26
31
35
39
44
48
52
56
59
63
+
78
2
1
0
1
2
3
RÉF: /
2
1
1
T
RAMLINE
2
1
0
1
2
3
RÉF: /
2
1
1
T
RAMLINE

Tableaux de réglage / Settings charts / Einstelltabellen
/
+
+
B
HIVER
B
LÉLÉHIVER
V
ARIÉTÉ
:
ARIETY
: O
V
S
ORTE
:
T
RAITEMENT
:
REATMENT
: J
T
EHANDLU NG
:
B
60
70
80
90
100
110
120
130
140
150
160
170
180
190
200
210
220
230
240
250
260
270
280
290
300
//
//
RVANTIS
OCK FLEXI
16,6
W
W
30
35
40
45
50
54
58
62
66
70
73
76
80
83
T2
INTER
INTER
WHEAT
WHEAT
/ W
INTERWEIZEN
/ W
INTERWEIZEN
120
140
160
180
200
220
240
260
280
300
C
OLZADD
C
OLZA
V
ARIÉTÉ
ARIETY
V
S
ORTE
T
RAITEMENT
REATMENT
T
B
EHANDLU NG
:
: F
:
:
: T
:
’
HIVER
’
HIVER
RÉDÉRIC
HIRAM
16,6 16,6
+
30
35
40
45
50
54
58
62
66
70
1,5
2
2,5
3
3,5
4
4,5
5
5,5
6
6,5
7
7,5
8
8,5
10
13
15
17
19
22
24
27
29
31
34
36
//
/
W
W
INTER
INTER
RAPE
RAPE
/ W
INTERRAPS
/ W
INTERRAPS
16,6
3
+
8
10
13
15
17
19
8
4
5
6
7
8
9
2
1
0
1
2
3
RÉF: /
2
1
1
T
RAMLINE
2
1
0
1
2
3
RÉF: /
2
1
T
RAMLINE
1
7
79

Tableaux de réglage / Settings charts / Einstelltabellen
/
/
+
+
//
ULCIA
//
T
T
ALL
ALL
FESCUE
FESCUE
C
OLZADD
C
OLZA
V
ARIÉTÉ
ARIETY
: P
V
S
ORTE
:
T
RAITEMENT
REATMENT
T
B
EHANDLUNG
:
:
: T
:
’
HIVER
’
HIVER
OLEN
HIRAM
W
W
INTER
INTER
RAPE
RAPE
/ W
INTERRAPS
/ W
INTERRAPS
F
ÉTUQUE
F
ÉTUQUE
V
ARIÉTÉ
:
ARIETY
: D
V
S
ORTE
:
T
RAITEMENT
:
REATMENT
: -
T
EHANDLU NG
:
B
ÉLEVÉE
ÉLEVÉE
/ H
/ H
OHER
OHER
S
CHWINGEL
S
CHWINGEL
1,5
2
2,5
3
3,5
4
4,5
5
5,5
6
6,5
7
7,5
8
8,5
16,6
9
12
14
16
19
21
23
26
28
30
32
34
36
16,6 16,6
3
+
9
12
14
16
19
21
4
5
6
7
8
9
6
7
8
9
10
11
12
14
16
18
20
22
24
26
28
30
32
34
36
38
40
42
44
12
13
14
17
20
22
25
28
31
33
36
39
42
44
47
49
52
54
57
12
14
16
18
20
22
24
28
32
36
40
44
48
16,6
12
13
14
17
20
22
25
28
31
+
46
48
80
80
2
1
0
1
2
3
RÉF: /
2
1
T
RAMLINE
2
1
0
1
2
3
RÉF: /
1
1
T
RAMLINE
2

Tableaux de réglage / Settings charts / Einstelltabellen
/
/
+
+
//
F
ÉTUQUE
F
ÉTUQUE
V
ARIÉTÉ
:
ARIETY
: M
V
S
ORTE
:
T
RAITEMENT
:
REATMENT
: -
T
EHANDLUNG
:
B
ÉLEVÉE
ÉLEVÉE
YLÉNA
T
ALL
T
ALL
FESCUE
FESCUE
/ H
OHER
/ H
OHER
S
CHWINGEL
S
CHWINGEL
V
ARIÉTÉ
ARIETY
V
S
ORTE
:
T
RAITEMENT
REATMENT
T
B
EHANDLUNG
F
F
: I
ÉVEROLE
ÉVEROLE
:
:
: Q
:
F
//
F
RENA
UINOLATE PRO FL
IELD
IELD
BEANS
BEANS
/ A
/ A
CKERBOHNEN
CKERBOHNEN
6
7
8
9
10
11
12
14
16
18
20
22
24
26
28
30
32
34
36
38
40
42
44
46
48
16,6
13
14
15
17
20
22
25
27
30
33
36
38
41
44
47
50
52
55
58
61
12
14
16
18
20
22
24
28
32
36
40
44
48
16,6 16,6
25
27
29
32
34
37
39
41
44
46
48
50
52
54
56
58
60
62
64
66
67
69
71
73
+
13
14
15
17
20
22
25
27
30
33
130
140
150
160
170
180
190
200
210
220
230
240
250
260
270
280
290
300
310
320
330
340
350
360
380
400
260
280
300
320
340
360
380
400
16,6
25
27
29
32
34
37
39
41
+
2
1
0
1
2
3
RÉF: /
2
1
1
T
RAMLINE
2
1
0
6
1
2
3
RÉF: /
2
1
1
T
RAMLINE
1
7
81

Tableaux de réglage / Settings charts / Einstelltabellen
+
+
V
ARIÉTÉ
ARIETY
V
S
ORTE
:
T
RAITEMENT
REATMENT
T
B
EHANDLUNG
120
130
140
150
160
170
180
190
200
210
220
230
240
250
260
270
280
290
300
310
320
330
340
350
360
380
: C
F
ÉVEROLE
F
ÉVEROLE
:
ASTEL
:
: Q
UINOLATE PRO
:
16,6
//
//
26
29
32
34
37
40
42
45
47
50
53
55
58
60
63
65
68
70
72
75
77
79
81
83
85
F
F
IELD
IELD
BEANS
BEANS
/ A
CKERBOHNEN
/ A
CKERBOHNEN
240
260
280
300
320
340
360
380
400
L
OLÉAGINEUX
L
ININOLÉAGINEUX
V
ARIÉTÉ
:
ARIETY
V
S
ORTE
T
RAITEMENT
REATMENT
T
B
EHANDLUNG
: M
:
:
: P
:
IKAEL
ROCHLORAZE
16,6 16,6
+
26
29
32
34
37
40
42
45
47
40
50
60
70
80
90
100
110
120
130
140
150
160
170
180
28
34
39
44
49
54
59
64
68
72
//
C
OMMON
//
C
OMMON
FLAX
FLAX
80
100
120
140
160
180
/ L
EINSAMEN
/ L
EINSAMEN
16,6
28
34
39
44
49
+
82
2
1
0
6
1
2
3
RÉF: /
2
1
1
T
RAMLINE
2
1
0
1
2
3
RÉF: /
1
1
T
RAMLINE
2

Tableaux de réglage / Settings charts / Einstelltabellen
+
+
//
OTIER
CORNICULE
L
L
OTIER
CORNICULE
V
ARIÉTÉ
:
ARIETY
: L
V
S
ORTE
:
T
RAITEMENT
REATMENT
: -
T
EHANDLUNG
B
:
: -
:
MIGA
L
L
//
IRD
S
FOOT
’
’
S
-
-
FOOT
TREFOIL
TREFOIL
B
//
B
IRD
ÉO
:
:
LÜGELGINSTERWEIDE
/ F
/ F
LÜGELGINSTERWEIDE
V
ARIÉTÉ
ARIETY
V
S
ORTE
:
T
RAITEMENT
REATMENT
T
EHANDLUNG
B
:
: A
UPIN
UPIN
//
L
L
UPIN
UPIN
/ L
/ L
UPINE
UPINE
5
6
7
8
9
10
11
12
14
16
18
20
22
24
26
28
30
32
34
36
38
40
42
44
46
16,6
36
43
50
56
62
68
73
10
12
14
16
18
20
22
24
28
32
36
40
44
48
16,6 16,6
+
36
43
50
56
62
68
73
60
70
80
90
100
110
120
130
140
150
160
170
180
190
200
210
220
230
240
250
260
270
280
290
300
22
25
29
32
36
40
43
47
50
53
56
59
61
64
66
69
71
73
75
77
80
82
120
140
160
180
200
220
240
260
280
300
290
300
16,6
22
25
29
32
36
40
43
47
50
53
56
+
2
1
0
1
2
3
RÉF: /
2
1
1
T
RAMLINE
2
1
0
1
2
3
RÉF: /
2
1
1
T
RAMLINE
1
7
83

Tableaux de réglage / Settings charts / Einstelltabellen
+
+
//
V
ARIÉTÉ
ARIET Y
V
S
ORTE
T
RAITEMENT
REATMENT
T
EHANDLUNG
B
:
: C
:
:
: -
:
UZERNE
L
L
UZERNE
ANNELLE
//
//
UCERN
L
L
UCERN
/ L
/ L
UZERN
UZERN
V
ARIÉTÉ
ARIET Y
V
S
ORTE
:
T
RAITEMENT
REATMENT
T
EHANDLUNG
B
M
M
:
:
F
UXXOL
:
:
:
AÏS
AÏS
M
/ M
AIZE
//
M
AIZE
/ M
AIS
AIS
20
22
24
26
28
32
34
38
40
45
50
16,6
9
10
11
12
13
14
15
17
18
20
23
40
44
48
52
16,6 16,6
+
9
10
11
12
6
7
8
9
10
11
12
14
16
18
20
22
24
26
28
30
32
34
36
38
40
42
44
46
48
50
16,6
12
14
16
18
20
3
22
24
28
5
32
36
6
40
44
48
52
+
3
5
6
84
2
1
0
1
2
3
RÉF: /
2
1
1
T
RAMLINE
2
1
0
1
2
3
RÉF: /
1
1
T
RAMLINE
2
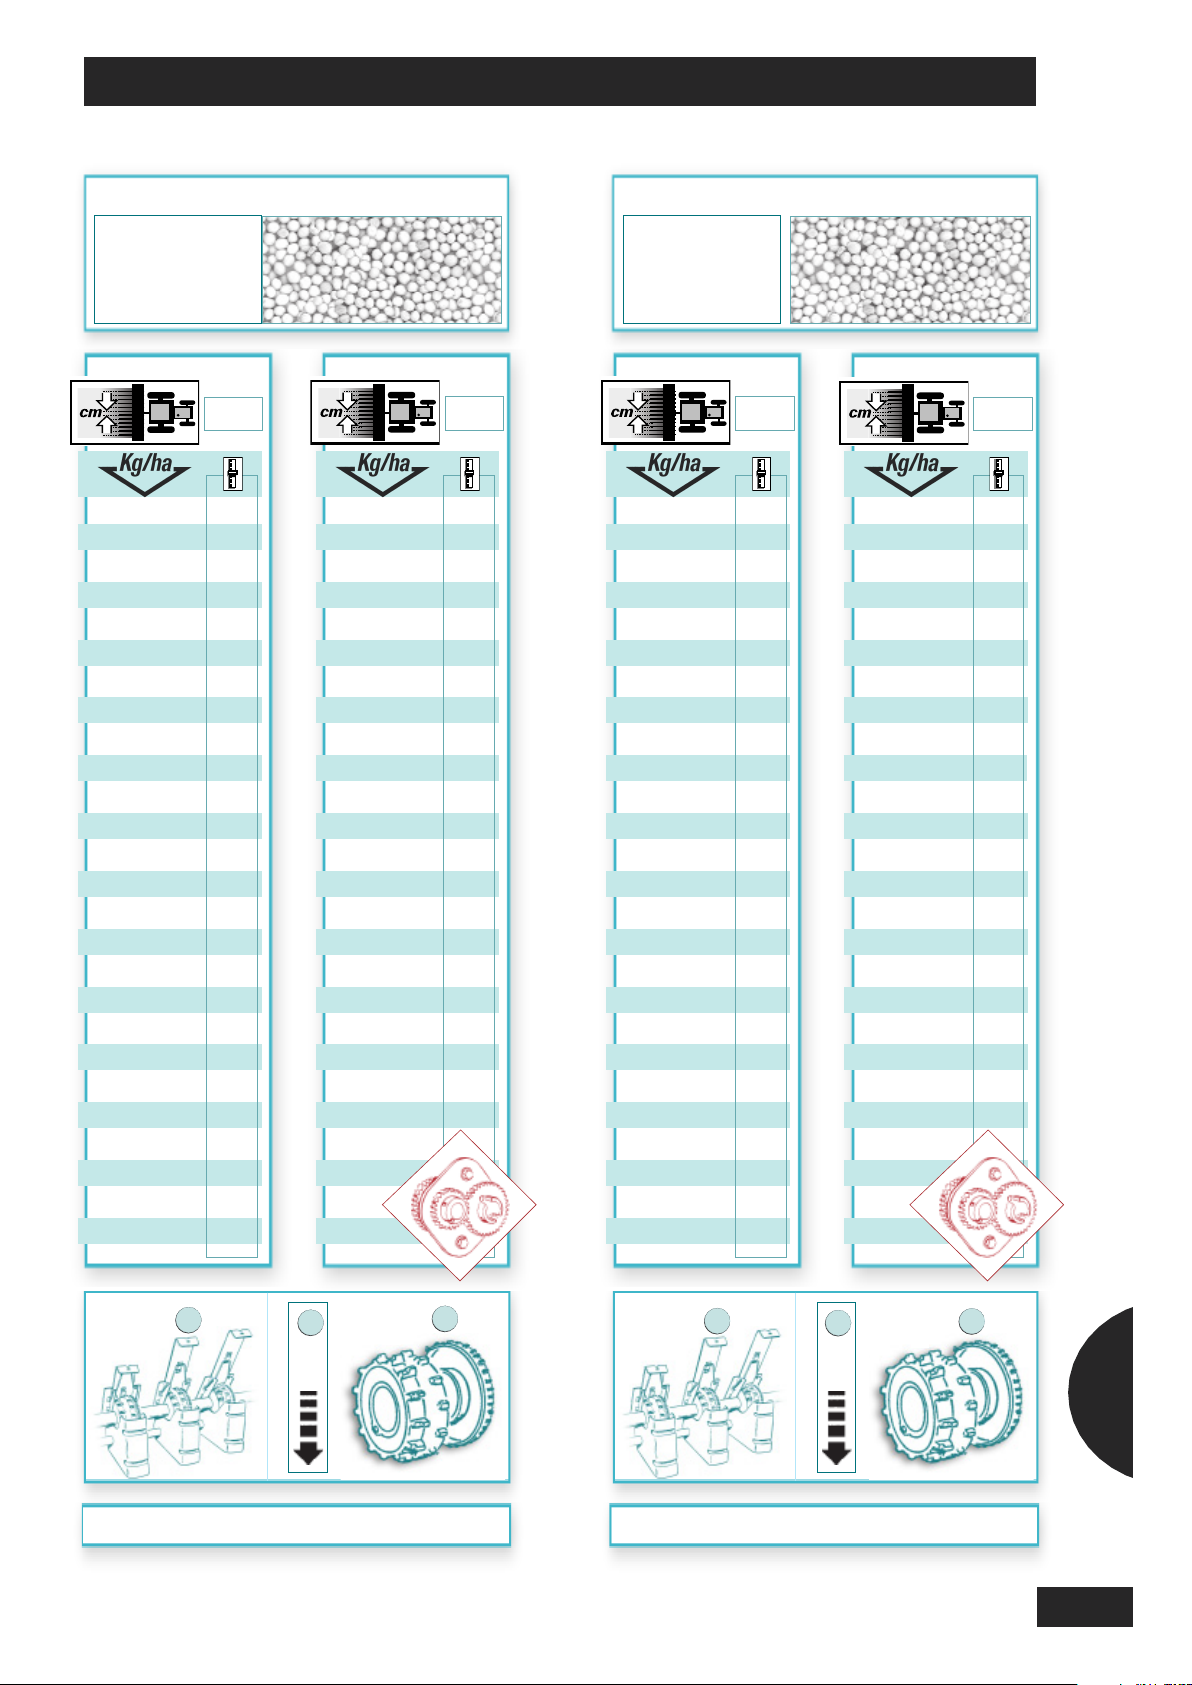
Tableaux de réglage / Settings charts / Einstelltabellen
+
+
//
OUTARDE
M
M
OUTARDE
V
ARIÉTÉ
:
ARIETY
: C
V
S
ORTE
:
T
RAITEMENT
REATMENT
: -
T
EHANDLUNG
B
:
:
BLANCHE
BLANCHE
APRI
HITE
MUSTARD
W
//
W
HITE
MUSTARD
EISSER
/ W
/ W
EISSER
SENF
SENF
OUTARDE
M
M
OUTARDE
V
ARIÉTÉ
:
ARIETY
:
V
S
ORTE
:
T
RAITEMENT
REATMENT
: -
T
EHANDLUNG
B
A
:
:
//
BLANCHE
BLANCHE
STA
//
W
W
HITE
HITE
MUSTARD
MUSTARD
EISSER
/ W
/ W
EISSER
SENF
SENF
5
6
7
8
9
10
11
12
14
16
18
20
22
24
26
28
30
32
34
36
38
40
42
44
46
16,6
20
25
29
34
38
43
48
52
61
68
74
10
12
14
16
18
20
22
24
28
32
36
40
44
48
16,6 16,6
+
20
25
29
34
38
43
48
52
61
68
74
5
6
7
8
9
10
11
12
14
16
18
20
22
24
26
28
30
32
34
36
38
40
42
44
46
23
27
31
36
40
44
48
52
60
67
74
10
12
14
16
18
20
22
24
28
32
36
40
44
48
16,6
23
27
31
36
40
44
48
52
60
67
74
+
2
1
0
1
2
3
RÉF: /
2
1
T
RAMLINE
2
1
0
1
2
3
RÉF: /
2
1
T
RAMLINE
1
7
85

Tableaux de réglage / Settings charts / Einstelltabellen
+
+
//
POPPY
O
//
O
-
ILILPOPPY
/ S
/ S
V
ARIÉTÉ
ARIET Y
V
S
ORTE
T
RAITEMENT
REATMENT
T
EHANDLUNG
B
:
: J
:
:
: -
:
UPITER
AVETTE
N
N
AVETTE
EILLETTE
:
:
:
: -
O
O
EILLETTE
:
:
//
APE
ÜBSEN
R
/ R
//
R
APE
/ R
ÜBSEN
V
ARIÉTÉ
ARIET Y
V
S
ORTE
T
RAITEMENT
REATMENT
T
EHANDLUNG
B
CHLAFMOHN
CHLAFMOHN
5
6
7
8
9
10
11
12
14
16
18
20
22
24
26
28
30
32
34
36
38
40
42
44
46
16,6
23
28
33
37
42
47
52
56
64
10
12
14
16
18
20
22
24
28
32
36
16,6 16,6
+
23
28
33
37
42
47
52
56
64
1
1,5
2
2,5
3
3,5
4
4,5
5
5,5
6
6,5
6
9
12
15
18
21
24
27
30
33
36
16,6
+
6
9
12
15
18
21
2
3
4
5
6
7
86
2
1
0
1
2
3
RÉF: /
2
1
T
RAMLINE
2
1
0
1
2
3
RÉF: /
2
1
T
RAMLINE

Tableaux de réglage / Settings charts / Einstelltabellen
+
+
//
HIVER
//
HIVER
ROSTAR
AUCHO
W
W
INTER
INTER
BARLEY
BARLEY
INTERGERSTE
/ W
/ W
INTERGERSTE
V
ARIÉTÉ
ARIETY
V
S
ORTE
:
T
RAITEMENT
REATMENT
T
B
EHANDLUNG
O
O
:
:
:
: G
:
RGE
RGE
V
//
HIVER
//
HIVER
ANESSA
AUCHO
W
W
INTER
INTER
BARLEY
BARLEY
V
ARIÉTÉ
ARIETY
V
S
ORTE
:
T
RAITEMENT
REATMENT
T
B
EHANDLUNG
RGE
O
O
RGE
:
: O
:
: G
:
INTERGERSTE
/ W
/ W
INTERGERSTE
60
70
80
90
100
110
120
130
140
150
160
170
180
190
200
210
220
230
240
250
260
270
280
290
300
16,6
38
43
48
53
58
62
66
70
73
77
80
120
140
160
180
200
220
240
260
280
300
16,6 16,6
27
32
37
41
46
50
55
59
62
66
70
73
76
79
83
+
38
43
48
53
58
62
66
70
73
60
70
80
90
100
110
120
130
140
150
160
170
180
190
200
210
220
230
240
250
260
270
280
290
300
120
140
160
180
200
220
240
260
280
300
290
300
16,6
27
32
37
41
46
50
55
59
62
66
70
73
+
2
1
0
1
2
3
RÉF: /
2
1
1
T
RAMLINE
2
1
0
1
2
3
RÉF: /
2
1
1
T
RAMLINE
1
7
87

Tableaux de réglage / Settings charts / Einstelltabellen
+
+
//
HACELIA
P
//
P
HACELIA
HAZELIA
/ P
/ P
HAZELIA
V
ARIÉTÉ
ARIET Y
V
S
ORTE
:
T
RAITEMENT
T
REATMENT
B
EHANDLUNG
:
:
: N
OIS
FOURRAGER
P
P
OIS
FOURRAGER
A
SSAS
: N
ON TRAITÉ
ONE
: U
NBEHANDEL T
//
IELD
PEA
F
//
F
IELD
PEA
V
ARIÉTÉ
ARIET Y
V
S
ORTE
T
RAITEMENT
REATMENT
T
EHANDLUNG
B
:
: A
:
:
:
:
HACÉLIA
P
P
HACÉLIA
MÉRIGO
UTTERERBSE
/ F
/ F
UTTERERBSE
10
11
12
14
16
18
20
22
24
26
28
30
32
34
36
38
40
42
44
46
48
50
16,6
6
7
8
9
10
11
12
13
15
16
17
18
20
21
22
24
25
26
28
29
30
32
20
22
24
28
32
36
40
44
48
52
16,6 16,6
21
23
25
27
29
31
33
35
37
39
41
43
45
47
49
51
53
55
56
58
60
61
63
64
66
69
71
+
10
11
12
13
15
16
6
7
8
9
120
130
140
150
160
170
180
190
200
210
220
230
240
250
260
270
280
290
300
310
320
330
340
350
360
380
400
240
260
280
300
320
340
360
380
400
16,6
21
23
25
27
29
31
33
35
37
+
88
2
1
0
1
2
3
RÉF: /
2
1
1
T
RAMLINE
2
1
0
5
1
2
3
RÉF: /
2
1
1
T
RAMLINE

Tableaux de réglage / Settings charts / Einstelltabellen
+
+
//
ADIS
V
ARIÉTÉ
ARIETY
V
S
ORTE
:
T
RAITEMENT
REATMENT
T
EHANDLUNG
B
:
: A
:
: -
:
DIOS
R
R
ADIS
//
R
R
ADISH
ADISH
ADIESCHEN
/ R
/ R
ADIESCHEN
V
ARIÉTÉ
ARIETY
V
S
ORTE
:
T
RAITEMENT
REATMENT
T
EHANDLUNG
B
:
:
:
: -
R
R
AYAYGRASS
B
OXER
:
//
GRASS
//
R
R
YE
YE
GRASS
-
-
GRASS
AY
/ R
/ R
AY
GRAS
-
-
GRAS
9
10
11
12
14
16
18
20
22
24
26
28
30
32
34
36
38
40
16,6
5
6
7
9
10
12
13
14
16
17
19
20
22
23
25
27
28
18
20
22
24
28
32
36
40
16,6 16,6
+
5
6
7
9
10
12
13
14
5
6
7
8
9
10
11
12
14
16
18
20
22
24
26
28
30
32
34
36
38
40
42
44
46
12
13
15
16
19
22
24
27
30
32
35
38
40
43
46
48
51
53
56
58
10
12
14
16
18
20
22
24
28
32
36
40
44
48
52
16,6
+
12
13
15
16
19
22
24
27
30
32
35
2
1
0
1
2
3
RÉF: /
2
1
1
T
RAMLINE
2
1
0
1
2
3
RÉF: /
2
1
1
T
RAMLINE
1
7
89
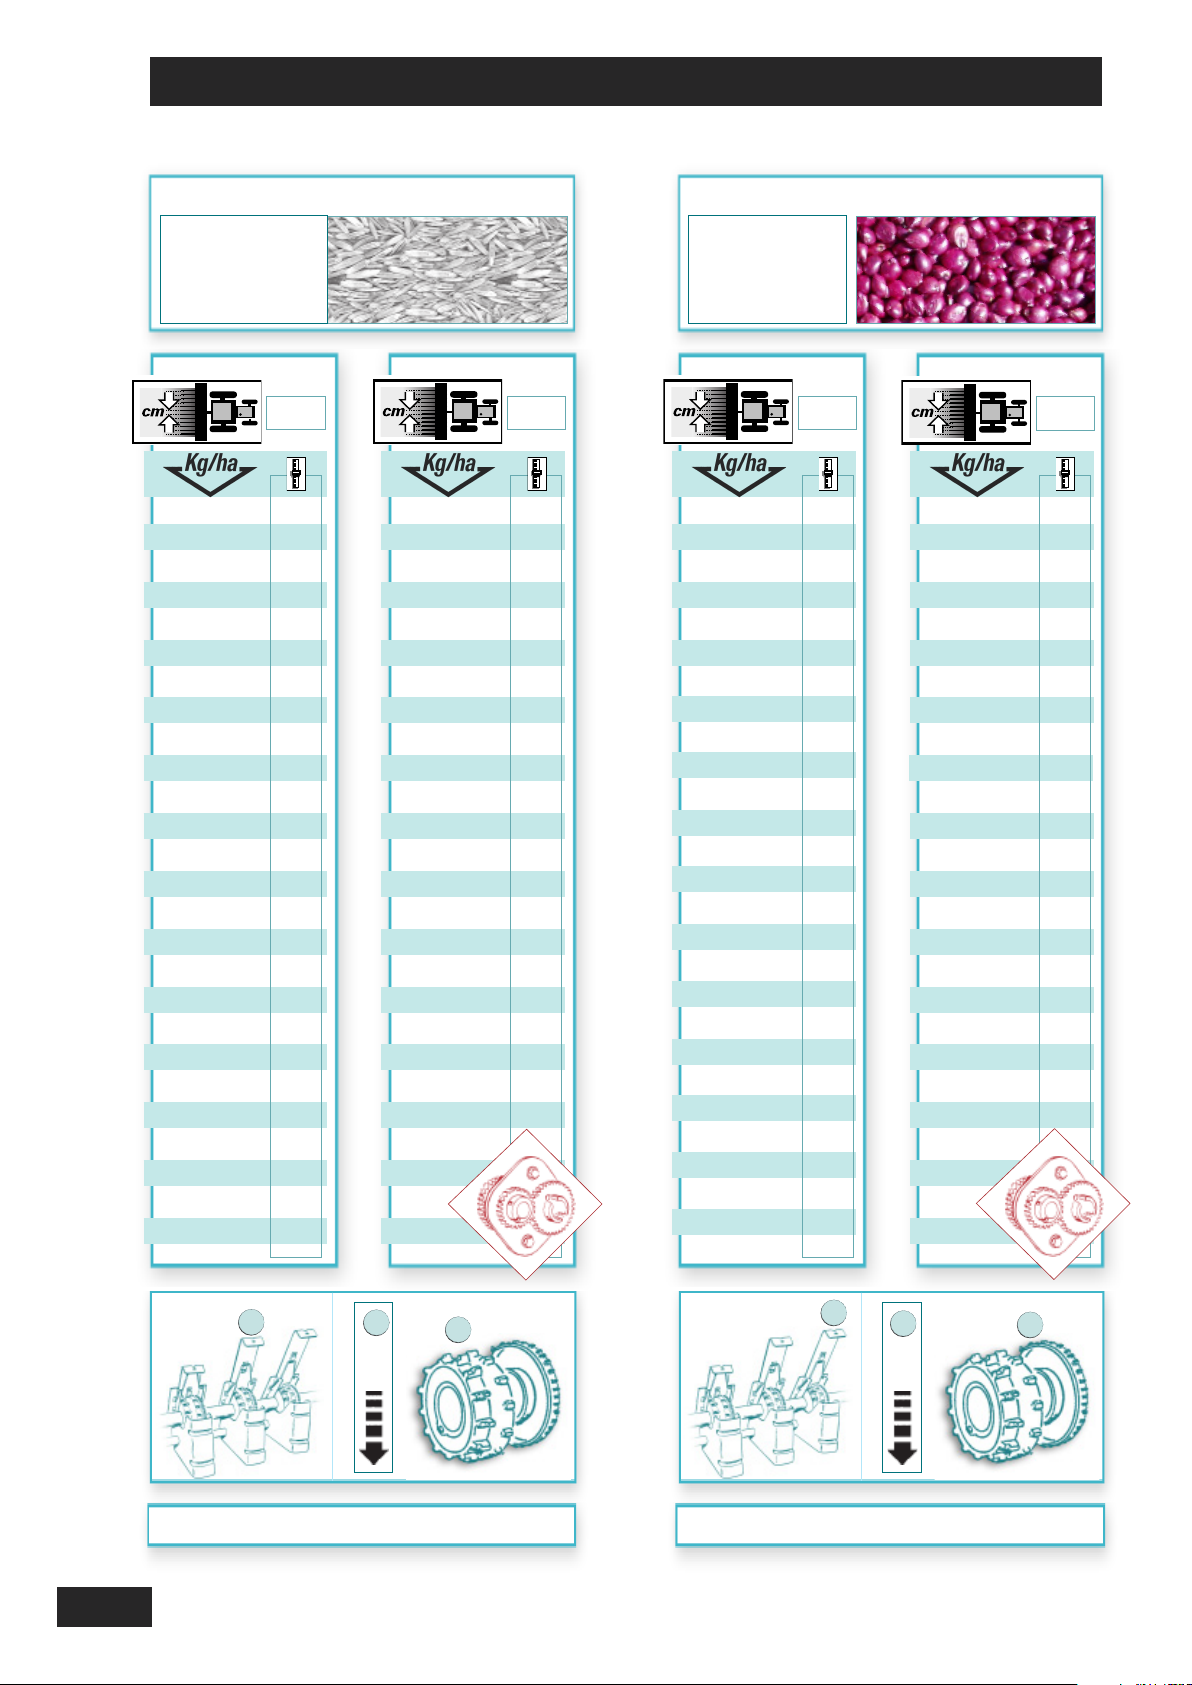
Tableaux de réglage / Settings charts / Einstelltabellen
+
+
//
R
R
AYAYGRASS
V
ARIÉTÉ
ARIET Y
: D
V
S
ORTE
:
T
RAITEMENT
REATMENT
T
EHANDLUNG
B
GRASSDD
:
:
: -
:
ANERGO
TALIE
’I
’I
TALIE
I
//
I
TALIAN
TALIAN
RYE
RYE
GRASS
-
-
GRASS
EIDELGRAS
/ W
/ W
EIDELGRAS
V
ARIÉTÉ
:
ARIET Y
:
V
S
ORTE
:
OUFFRAY-DRILLAUD
J
ORGHO
S
S
ORGHO
A
RDITO
//
ORGHUM
S
//
S
ORGHUM
/ S
/ S
ORGHUM
ORGHUM
5
6
7
8
9
10
11
12
14
16
18
20
22
24
26
28
30
32
34
36
38
40
42
44
46
16,6
7
8
9
10
12
13
15
17
19
22
24
26
28
30
33
35
37
39
41
43
45
47
10
12
14
16
18
20
22
24
28
32
36
40
44
48
16,6 16,6
19
23
27
31
35
39
50
60
71
+
7
8
9
10
12
13
15
17
19
22
24
26
5
6
7
8
9
10
13
16
20
16,6
+
90
2
1
0
1
2
3
RÉF: /
2
1
1
T
RAMLINE
2
1
0
1
2
3
RÉF: /
2
1
1
T
RAMLINE

Tableaux de réglage / Settings charts / Einstelltabellen
+
+
//
V
ARIÉTÉ
:
ARIETY
: A
V
S
ORTE
S
EMENCES DEPROVENCE
RLYS
:
ORGHO
S
S
ORGHO
, A
RAKAN
ORGHUM
S
//
S
ORGHUM
ORGHUM
/ S
/ S
ORGHUM
V
ARIÉTÉ
ARIETY
V
S
ORTE
:
T
RAITEMENT
REATMENT
T
EHANDLUNG
B
//
RÈFLE
T
T
RÈFLE
:
:
S
ALINO
:
:
:
VIOLET
//
VIOLET
CLOVER
R
R
EDEDCLOVER
/ R
/ R
OTK LEE
OTK LEE
6
9
12
15
20
25
30
16,6
2
3
4
5
7
8
10
16,6 16,6
10
11
12
14
16
18
20
22
24
26
28
30
32
34
36
38
40
42
5
6
7
8
9
10
11
12
13
14
15
16
17
18
19
20
20
22
24
28
32
36
40
44
16,6
5
6
7
8
9
10
11
2
1
0
1
2
3
RÉF: /
+
2
1
1
T
RAMLINE
2
1
0
1
2
3
RÉF: /
+
2
1
1
T
RAMLINE
1
7
91

Tableaux de réglage / Settings charts / Einstelltabellen
+
+
//
RITICALE
T
//
T
RITICALE
RITICALE
/ T
/ T
RITICALE
V
ARIÉTÉ
ARIET Y
V
S
ORTE
:
T
RAITEMENT
REATMENT
T
EHANDLUNG
B
ESCE
V
V
ESCE
:
:
:
:
:
//
COMMUNE
COMMUNE
O
PALE
C
//
C
OMMON
OMMON
VETCH
VETCH
V
ARIÉTÉ
ARIET Y
V
S
ORTE
T
RAITEMENT
REATMENT
T
EHANDLUNG
B
:
: C
:
:
: T2
:
RITICALE
T
T
RITICALE
ARNAC
UTTERWICKE
/ F
/ F
UTTERWICKE
40
50
60
70
80
90
100
110
120
130
140
150
160
170
180
190
200
210
220
230
240
250
260
16,6
24
29
34
39
44
48
53
57
61
66
70
73
77
80
83
80
100
120
140
160
180
200
220
240
260
16,6 16,6
20
+
24
29
34
39
44
48
53
57
61
22
24
26
28
30
32
34
36
38
40
42
44
46
48
50
5
6
7
8
9
10
11
12
13
14
15
16
17
40
44
48
52
16,6
5
6
+
92
2
1
0
1
2
3
RÉF: /
2
1
1
T
RAMLINE
2
1
0
1
2
3
RÉF: /
2
1
1
T
RAMLINE

Notes / Notes / Notizen
1
7
93

Tableaux de réglage / Settings charts / Einstelltabellen
DE
GBFR
Rappel pré-réglages
D
1
1
Trappes
2
2
Clapet de fond
3
3
Variateur (Repères 0 à 90)
1
1
Pre-setting reminder
Zur Erinnerung: Voreinstellungen
Ferti Streumengen hinten
1
1
Shutters
2
2
Flap
3
3
Variator
(scale range from 0 to 90)
1
1
Schieber
2
2
Bodenklappe
3
3
Ölbadgetriebe
(Markierungen 0 bis 90)
Distribution Ferti (Arrière)
Fertilizer metering device (Rear)
Ferti Streuvorrichtung (Hinten)
2
2
94
3
3

Tableaux de réglage / Settings charts / Einstelltabellen
DE
GBFR
Tableaux de débit
E
Les réglages des tableaux ne
sont donnés qu'à titre indicatif.
Vérifier votre débit hectare,
pour plus de précision
(voir chapitre ).
16,6
4
Seeding rate charts
The chart settings are provided
as an indication only.
Check your seeding rate per
hectare for greater accuracy
(see section ).
33
Tabellen
Düngerstreumengen Ferti
hinten
Die Einstellungen der Tabellen
geben nur Richtwerte an.
Zur größeren Genauigkeit ist
die Streumenge pro Hektar zu
überprüfen (siehe Kapitel ).
2
0
9
16
29
43
53
65
96
115
133
153
Engrais Fertilizer Dünger
• Urée • Urea • Harnstoff
• NP 18-46-00
• Physiostart
0
4
6
10
14
18
22
32
38
44
50
• NP 18-46-00 • NP 18-46-00
• Physiostart • Physiostart
....................
....................
....................
96
96
96
1
7
Petites graines Small seeds Kleine Saatkörner
• Moutarde • Mustard • Senf
• Trèfle blanc Tivoli
• Avoine Evora
• Tivoli white clover • Weißklee Tivoli
• Evora oats • Hafer Evora
....................
....................
....................
97
97
97
95
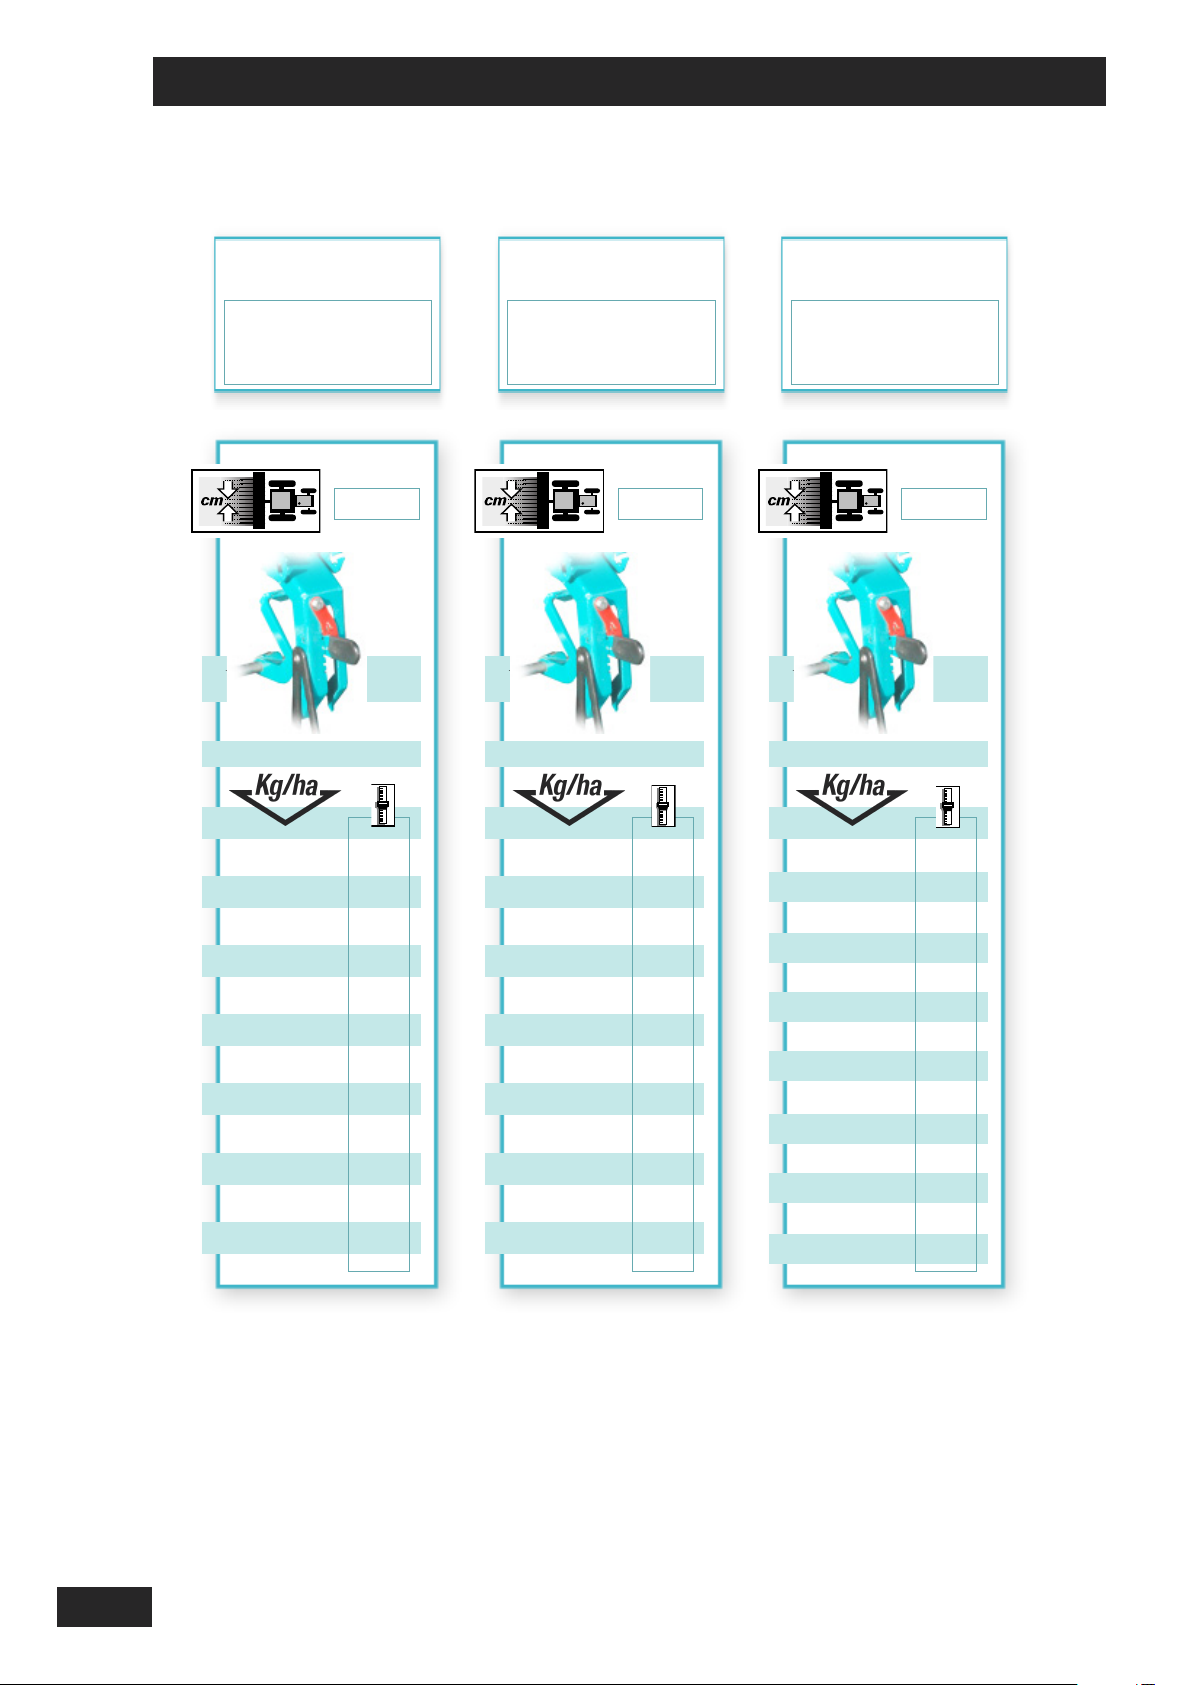
Tableaux de réglage / Settings charts / Einstelltabellen
Engrais Fertilizer Dünger
HYSIOSTART
P
P
HYSIOSTART
P
P
HYSIOSTART
HYSIOSTART
HYSIOSTART
/ P
/ P
HYSIOSTART
U
U
REA
REA
RÉE
U
U
RÉE
/ H
/ H
ARNSTOFF
ARNSTOFF
NP 18-46-00
NP 18-46-00
NP 18-46-00 / NP 18-46-00
NP 18-46-00 / NP 18-46-00
0
9
16
29
43
53
65
96
115
133
153
16,6
4
0
4
6
10
14
18
22
32
38
44
50
0
13
40
64
88
114
140
163
16,6
4
0
4
10
16
22
28
34
40
2,5
5
7,5
10
15
20
25
30
35
40
50
60
75
100
16,6
0
2
3
3
4
5
6
7
9
10
11
13
16
19
25
96

Tableaux de réglage / Settings charts / Einstelltabellen
Petites graines Small seeds Kleine Saatkörner
RÉFLE
OUTARDE
M
M
OUTARDE
USTARD
M
M
USTARD
/ S
/ S
ENF
ENF
T
T
RÉFLE
T
T
IVOLI
IVOLI
EISSKLEE
W
W
EISSKLEE
BLANC
BLANC
WHITE
WHITE
IVOLI
T
T
IVOLI
CLOVER
CLOVER
IVOLI
T
T
IVOLI
VORA
E
E
VORA
VOINE
A
A
VOINE
OATS
OATS
A
A
/ H
/ H
VORA
VORA
AFER
E
AFER
E
VORA
VORA
VORA
E
E
VORA
A
A
OATS
OATS
VOINE
VOINE
/ H
/ H
VORA
A
A
VORA
AFER
AFER
VORA
E
E
VORA
0
4
7
9,5
12
14
16,6
1
0
3
4
5
6
7
0
5
9
11
15
16,6
1
0
3
4
5
6
0
39
43
47
51
56
61
70
16,6
1
0
20
22
24
26
28
30
34
0
42
52
61
70
74
16,6
2
0
20
24
28
32
34
1
7
97
 Loading...