


 Loading...
STIH)
STIHL FW 20
|
|
Gebrauchsanleitung |
||
Kasutusjuhend |
|
Instruction Manual |
||
|
||||
Eksploatavimo |
|
Notice d’emploi |
||
instrukcija |
|
Instrucciones de servicio |
||
Инструкция за употреба |
|
Naputak za korišcenje |
||
Navodilih za uporabo |
|
Skötselanvisning |
||
|
|
Käyttöohje |
||
|
|
Istruzioni d’uso |
||
|
|
Betjeningsvejledning |
||
|
|
Bruksanvisning |
||
|
|
Návod k použití |
||
|
|
Használati utasítás |
||
|
|
Instruções de serviço |
||
|
|
Návod na obsluhu |
||
|
|
Handleiding |
||
|
|
Инструкция по эксплуатации |
||
|
|
Lietoðanas instrukcija |
||
|
|
²нструкц³я з експлуатац³¿ |
||
|
пдзгЯет чсЮузт |
|||
|
|
|
|
|
|
|
|
|
|
Instrukcja u¿ytkowania
Contents
02.fm |
|
Guide to Using this Manual |
.............. 9 |
|
Safety Precautions ......................... |
10 |
|
002 01 |
|
Assembling the unit ........................ |
12 |
|
Operating elements ........................ |
14 |
|
174_ |
|
Special accessories ........................ |
15 |
|
Maintenance and Repairs |
16 |
|
SE_ |
|
||
|
|
|
|
BA_ |
|
|
|
on chlorine-free paper. inks contain vegetable oils; paper can be recycled. |
|
|
|
Printed |
Printing |
|
|
KG, 2004 |
Printed in Germany |
|
|
& Co. |
L4. T. |
|
|
© ANDREAS STIHL AG |
0458 379 9921 A. M2,5. |
STIHl |
|
English
Guide to Using this Manual
Pictograms
All the pictograms attached to the machine are shown and explained in this manual.
The operating and handling instructions are supported by illustrations.
Symbols in text
The individual steps or procedures described in the manual may be marked in different ways:
:A bullet marks a step or procedure without direct reference to an illustration.
A description of a step or procedure that refers directly to an illustration may contain item numbers that appear in the illustration.
Example:
Loosen the screw (1) Lever (2) ...
FW 20 |
9 |
English
In addition to the operating instructions, this manual may contain paragraphs that require your special attention. Such paragraphs are marked with the symbols described below:
Warning where there is a risk of an accident or personal injury or
serious damage to property.
 Caution where there is a risk of damaging the machine or its individual components.


 Note or hint which is not essential for using the machine, but may improve the operator’s understanding of the situation and result in better use of the machine.

 Note or hint on correct procedure in
  order to avoid damage to the environment.
Safety Precautions
Equipment and features
This instruction manual may refer to several models with different features. Components that are not installed on all models and related applications are marked with an asterisk (*). Such components may be available as special accessories from your STIHL dealer.
Engineering improvements
STIHL’s philosophy is to continually improve all of its products. As a result, engineering changes and improvements are made from time to time. If the operating characteristics or the appearance of your machine differ from those described in this manual, please contact your STIHL dealer for assistance.
Therefore some changes, modifications and improvements may not be covered in this manual.
Special precautionsmust be taken when working with the combined cut-off
machine and cart.
It is important that you read, fully understand and observe the following safety precautions and warnings. Read the owner's manuals and
safety instructions of your TS 700 cut-off machine and cart periodically. Careless or improper use of any power tool may cause serious or fatal injury.
Do not lend or rent your cut-off machine and cart without the Owner's Manual. Be sure that anyone using your cut-off machine and cart understands the information contained in these manuals.
Have your STIHL dealer show you how to operate your cut-off machine with cart. Observe all applicable local safety regulations, standards and ordinances.
10 |
FW 20 |
English
!Warning !
Minors should never be allowed to use a cut-off machine and cart. Bystanders, especially children, and animals should not be allowed in the area where a cutoff machine is in use. Never let the cutoff machine run unattended.
The cart
For parts of the cart, illustrations and definitions of the parts see "Parts and control".
!Warning !
Never modify a cut-off machine or cart in any way. Only attachments supplied by STIHL or expressly approved by STIHL for use with the specific STIHL cut-off machine model and cart are authorized. Although certain unauthorized attachments are usable with a STIHL powerhead and cart, their use may, in fact, be extremely dangerous.
Mounting the cut-off machine
!Warning !
To reduce the risk of injury from loss of control and subsequent wheel shatter the cart has been approved by STIHL only for use with the STIHL TS 700 cutoff machine model. Other cut-off machines must not be mounted on the cart.
For assembly, follow the procedure described at the appropriate sections of your owner's manuals.
Before operation of your cut-off machine and cart, be sure that the cart and cut-off machine are in good working order.
Check correct functioning of the operating elements (e.g. throttle control, cutting depth adjustment and follow the appropriate chapters in the Owner's Manuals).
Fueling
The cart must be parked so that it cannot tip over or roll away when refueling the cut-off machine mounted on the cart.
!Warning !
Gasoline is an extremely flammable fuel. If spilled or ignited by a spark or other ignition source, it can cause fire and serious burn injury or property damage. Use extreme caution when handling gasoline or fuel mix. Do not smoke or bring any fire or flame near the fuel. For fueling instructions see chapter "Fuel" of the owner's manual of your cut-off machine.
FW 20 |
11 |
English
During work
Sweep debris from the path of the wheel as debris may cause flexing of the abrasive wheel. This could result in high frictional forces and thus greatly reduce the engine power available for the actual cutting work. Always use the cart to cut in a straight line.
!Warning !
If the cart is pushed over objects, the abrasive wheel may become wedged in the cut and shatter! Always clear a path for the cart and never work on uneven surfaces.
!Warning !
To reduce the risk of injury from a cart and cut-off machine tipping over and subsequently causing wheel damage do not work on uneven surfaces.
Assembling the unit
!Warning !
Use of this product can generate dust, mists and fumes containing chemicals known to cause serious or fatal injury or illness. Control dust, mists and fumes at the source where possible. A water attachment kit is available for your cart and cut-off machine and should be used for dust suppression when wet cutting is feasible. When the inhalation of dust, mists and fumes cannot be eliminated, the operator and any bystanders should always wear a respirator approved by NIOSH / MSHA for the material being cut. See also the safety precautions on dust, mists and fumes in the Owner's Manual of the cut-off machine.
For information on transporting, maintenance, repair and storage of your cutoff machine, see specific sections of your cut-off machine manual.
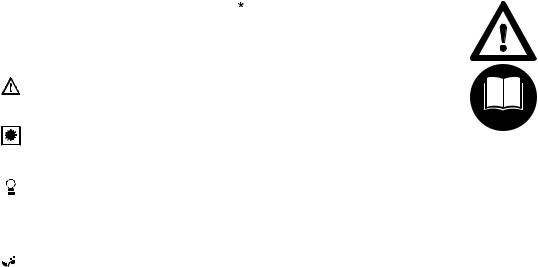
Move cart into working position
:Turn star handle (1) anticlockwise and move guide tube (2) to working position A.
:Tighten star handle down in clockwise direction.
:Steady the guide tube.
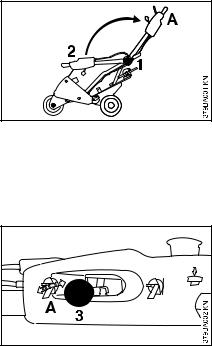
:Move the lever (3) for cutting depth adjustment to position A –
the cutting depth adjustment is released.
12 |
FW 20 |

English
Mount the cut-off machine
:Press the guide tube down in the direction of the arrow until the wheel (4) hovers above the ground with the swivel arm.
:Hold the cart in this position.
:Move the lever (3) for cutting depth adjustment to position B –
the cutting depth adjustment is engaged.
:Relieve the guide tube – the wheel of the swivel arm rests on the ground.
:Position the cut-off machine so that the pins (5) protrude into the holes in the support (6).
:The handle (7) must rest in the bracket (8) and the handle (9) presses down into the holder (10).
:Turn the locking lever (11) over the hand guard and engage it.
:The locking pawl (12) advances and holds the handle in position.
Mounting the throttle control
:Push the throttle control (13) sideways onto the handle (9) and engage it.
FW 20 |
13 |
Loading...