


{
STIHL MS 210, 230, 250
Instruction Manual
Manual de instrucciones
Warning!
To reduce the risk of kickback injury use STIHL reduced kickback bar and STIHL PMC3, PD3 (3/8" Picco) or RMC3 (0.325“) chain depending on sprocket pitch or other available low kickback components.
Advertencia!
Para reducir el riesgo de lesionarse como resultado de un culatazo, utilice la barra de contragolpe reducido y la cadena PMC3, PD3 (Picco de 3/8 pulg) o RMC3 (0,325 pulg) de STIHL, dependiendo de la rueda dentada usada y de otros componentes reductores de contragolpe.
Read and follow all safety precautions in Instruction Manual – improper use can cause serious or fatal injury.
Lea y siga todas las precauciones de seguridad dadas en el manual de instrucciones – el uso incorrecto puede causar lesiones graves o mortales.
Instruction Manual 1 - 67
Manual de instrucciones 69 - 142

Contents
Original Instruction Manual |
|
on chlorine-free paper inks contain vegetable oils, paper can be recycled. |
|
Printed |
Printing |
© ANDREAS STIHL AG & Co. KG, 2011 0458-208-8621-A. M55.F11.CP. 0000001880_006_GB
Guide to Using this Manual
Safety Precautions and Working Techniques
Cutting Attachment
Mounting the Bar and Chain (side chain tensioner)
Mounting the Bar and Chain (front chain tensioner)
Mounting the Bar and Chain (quick chain tensioner)
Tensioning the Saw Chain (side chain tensioner)
Tensioning the Saw Chain (front chain tensioner)
Tensioning the Saw Chain (quick chain tensioner)
Checking Chain Tension Fuel
Fueling
Chain Lubricant Filling Chain Oil Tank
Checking Chain Lubrication Chain Brake
Winter Operation
Starting / Stopping the Engine Operating Instructions Taking Care of the Guide Bar Air Filter System
Cleaning the Air Filter
Engine Management Adjusting the Carburetor Spark Plug
{
2Engine Running Behavior Replacing the Starter Rope and
3Rewind Spring
24 Storing the Machine
Checking and Replacing the Chain
24Sprocket
Maintaining and Sharpening the
25Saw Chain
Inspections and Maintenance by
26Dealer
Maintenance and Care
28 |
Main Parts |
|
Specifications |
28 |
Special Accessories |
|
29Ordering Spare Parts Maintenance and Repairs
29 |
Allocation of STIHL Incorporated |
|
29 |
||
Warranty Declarations |
||
30 |
||
STIHL Incorporated Federal |
||
32 |
||
Emission Control Warranty |
32Statement
33STIHL Incorporated California
33 |
Exhaust and Evaporative |
|
34 |
Emissions Control Warranty |
|
Statement |
||
|
35 |
Trademarks |
|
39 |
||
|
||
40 |
|
|
41 |
|
|
41 |
|
|
42 |
|
|
42 |
|
|
44 |
|
English
45Allow only persons who fully understand this manual to operate your chain saw.
45 |
To receive maximum performance and |
49 |
satisfaction from your STIHL chain saw, |
|
it is important that you read, understand |
49and follow the safety precautions and the operating and maintenance instructions in chapter "Safety
50Precautions and Working Techniques"
54 |
before using your chain saw. For further |
information you can go to |
|
55 |
www.stihlusa.com. |
57 |
Contact your STIHL dealer or the STIHL |
59 |
distributor for your area if you do not |
61 |
understand any of the instructions in this |
61 |
manual. |
|
|
62 |
Warning! |
|
62Because a chain saw is a high-speed wood-cutting tool, some special safety
precautions must be observed as with
62any other power saw to reduce the risk of personal injury. Careless or improper use may cause serious or even fatal injury.
64
66
MS 210, MS 210 C, MS 230, MS 230 C, MS 250, MS 250 C |
1 |
English
Guide to Using this Manual
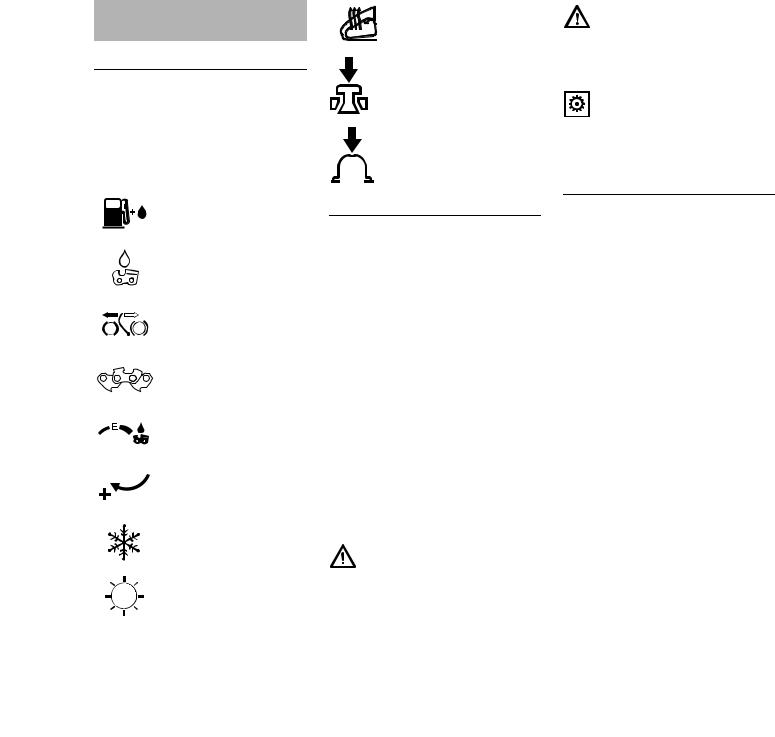
Pictograms
The meanings of the pictograms attached to or embossed on the machine are explained in this manual.
Depending on the model concerned, the following pictograms may be on your machine.
Fuel tank; fuel mixture of gasoline and engine oil
Chain oil tank; chain oil
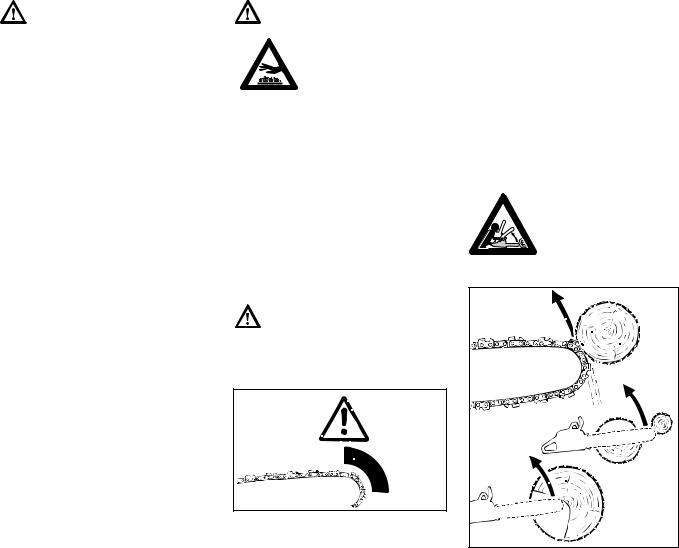
Engaging and disengaging the STIHL Quickstop chain brake
Direction of chain rotation
Ematic; chain oil quantity control
Tension the chain
Intake air preheating for winter operation
Intake air for summer operation
Handle heating
Operate decompression valve
Operate manual fuel pump
Symbols in Text
Many operating and safety instructions are supported by illustrations.
The individual steps or procedures described in the manual may be marked in different ways:
N A bullet marks a step or procedure.
A description of a step or procedure that refers directly to an illustration may contain item numbers that appear in the illustration. Example:
N Loosen the screw (1). N Lever (2) ...
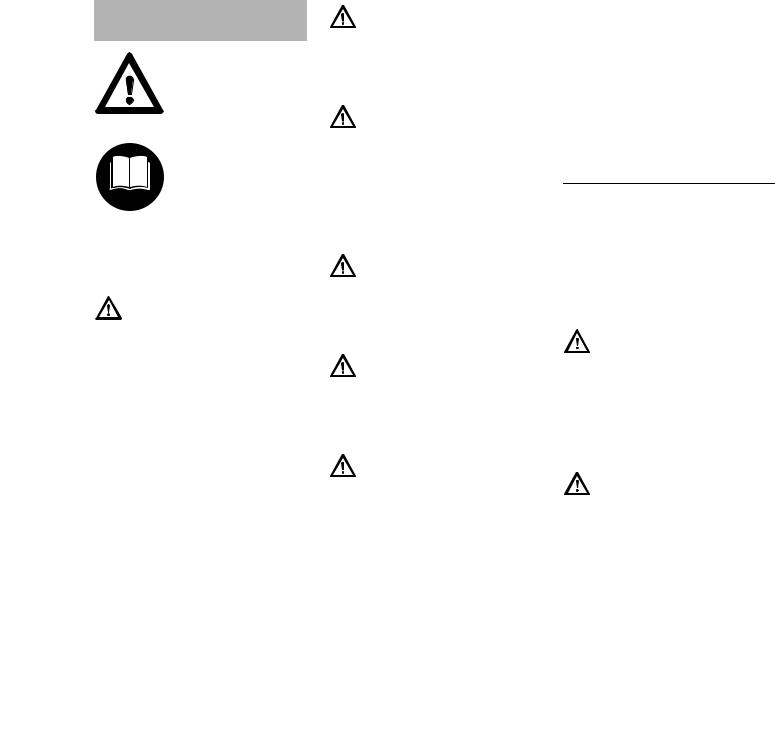
In addition to the operating instructions, this manual may contain paragraphs that require your special attention. Such paragraphs are marked with the symbols and signal words described below:
Danger!
Indicates an imminent risk of severe or fatal injury.
Warning!
Indicates a hazardous situation which, if not avoided, could result in severe or fatal injury.
Caution!
Indicates a risk of property damage, including damage to the machine or its individual components.
Engineering Improvements
STIHL’s philosophy is to continually improve all of its products. As a result, engineering changes and improvements are made from time to time. Therefore, some changes, modifications and improvements may not be covered in this manual. If the operating characteristics or the appearance of your machine differs from those described in this manual, please contact your STIHL dealer for assistance.
2 |
|
MS 210, MS 210 C, MS 230, MS 230 C, MS 250, MS 250 C |
Safety Precautions and
Working Techniques
Because a chain saw is a high-speed, fast-cutting power tool, special safety precautions must be observed to reduce the risk of personal injury.
It is important that you read, fully understand and observe the following safety precautions and warnings. Read the instruction manual and the safety instructions periodically. Careless or improper use may cause serious or fatal injury.
Warning!
Reactive forces, including kickback, can be dangerous. Pay special attention to the section on reactive forces.
Have your STIHL dealer show you how to operate your power tool. All safety precautions that are generally observed when working with an ax or a hand saw also apply to the operation of chain saws. Observe all applicable federal, state and local safety regulations, standards and ordinances. When using a chain saw for logging purposes, for instance, refer to the OSHA regulations for "logging operations" at 29 Code of Federal Regulations 1910.266.
Warning!
Do not lend or rent your power tool without the instruction manual. Be sure that anyone using it understands the information contained in this manual.
Warning!
The use of this machine may be hazardous.The saw chain has many sharp cutters. If the cutters contact your flesh, they will cut you, even if the chain is not moving.
Use your chain saw only for cutting wooden objects.
Warning!
Do not use it for other purposes, since misuse may result in personal injury or property damage, including damage to the machine
Warning!
Minors should never be allowed to use this power tool. Bystanders, especially children, and animals should not be allowed in the area where it is in use.
Warning!
To reduce the risk of injury to bystanders and damage to property, never let your power tool run unattended. When it is not in use (e.g. during a work break), shut it off and make sure that unauthorized persons do not use it.
Most of these safety precautions and warnings apply to the use of all STIHL chain saws. Different models may have
English
different parts and controls. See the appropriate section of your instruction manual for a description of the controls and the function of the parts of your model.
Safe use of a chain saw involves
1the operator
2the power tool
3the use of the power tool.
THE OPERATOR
Physical Condition
You must be in good physical condition and mental health and not under the influence of any substance (drugs, alcohol, etc.) which might impair vision, dexterity or judgment. Do not operate this machine when you are fatigued.
Warning!
Be alert – if you get tired, take a break. Tiredness may result in loss of control. Working with any power tool can be strenuous. If you have any condition that might be aggravated by strenuous work, check with your doctor before operating this machine.
Warning!
Prolonged use of a power tool (or other machines) exposing the operator to vibrations may produce whitefinger disease (Raynaud's phenomenon) or carpal tunnel syndrome.
MS 210, MS 210 C, MS 230, MS 230 C, MS 250, MS 250 C |
3 |
English
These conditions reduce the hand's ability to feel and regulate temperature, produce numbness and burning sensations and may cause nerve and circulation damage and tissue necrosis.
All factors which contribute to whitefinger disease are not known, but cold weather, smoking and diseases or physical conditions that affect blood vessels and blood transport, as well as high vibration levels and long periods of exposure to vibration are mentioned as factors in the development of whitefinger disease. In order to reduce the risk of whitefinger disease and carpal tunnel syndrome, please note the following:
–Most STIHL power tools are available with an anti-vibration ("AV") system designed to reduce the transmission of vibrations created by the machine to the operator's hands. An AV system is recommended for those persons using power tools on a regular or sustained basis.
–Wear gloves and keep your hands warm. Heated handles, which are available on some STIHL powerheads, are recommended for cold weather use.
–Keep the AV system well maintained. A power tool with loose components or with damaged or worn AV elements will tend to have higher vibration levels. Keep the
saw chain sharp. A dull chain will increase cutting time, and pressing a dull chain through wood will increase the vibrations transmitted to your hands.
–Maintain a firm grip at all times, but do not squeeze the handles with constant, excessive pressure. Take frequent breaks.
All the above-mentioned precautions do not guarantee that you will not sustain whitefinger disease or carpal tunnel syndrome. Therefore, continual and regular users should closely monitor the condition of their hands and fingers. If any of the above symptoms appear, seek medical advice immediately.
Warning!
The ignition system of the STIHL unit produces an electromagnetic field of a very low intensity. This field may interfere with some pacemakers. To reduce the risk of serious or fatal injury, persons with a pacemaker should consult their physician and the pacemaker manufacturer before operating this tool.
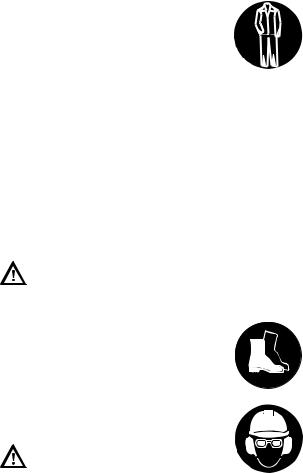
Proper Clothing
Warning!
To reduce the risk of injury, the operator should wear proper protective apparel.
Clothing must be sturdy and snug-fitting, but allow complete freedom of movement. Wear long pants made of heavy material to help protect your legs from contact with branches or brush. To reduce the risk of cut injuries, wear pants or chaps that contain pads of cut retardant material. Avoid loose-fitting jackets, scarfs, neckties, jewelry, flared or cuffed pants, unconfined long hair or anything that could become caught on branches, brush or the moving parts of the unit. Secure hair so it is above shoulder level.
Good footing is very important. Wear sturdy boots with nonslip soles. Steel-toed safety boots are recommended.
Wear an approved safety hard hat to reduce the risk of injury to your head. Chain saw noise may damage your hearing. Wear sound barriers (ear plugs or ear mufflers) to help protect your hearing. Continual and regular users should have their hearing checked regularly.
4 |
MS 210, MS 210 C, MS 230, MS 230 C, MS 250, MS 250 C |
Be particularly alert and cautious when wearing hearing protection because your ability to hear warnings (shouts, alarms, etc.) is restricted.
Never operate your power tool unless wearing goggles or properly fitted protective glasses with adequate top and side protection complying with ANSI Z 87.1 (or your applicable national standard). To reduce the risk of injury to your face STIHL recommends that you also wear a face shield or face screen over your goggles or protective glasses.
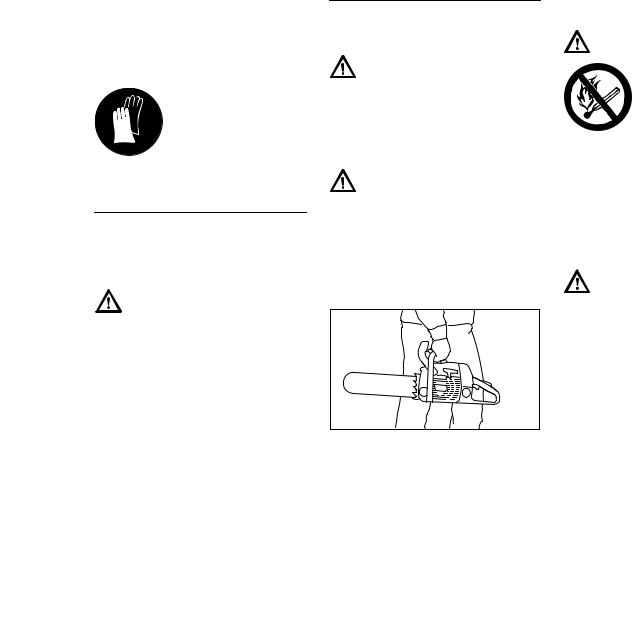
Always wear gloves when handling the machine and the cutting tool. Heavy-duty, nonslip gloves improve your grip and help to protect your hands.
THE POWER TOOL
For illustrations and definitions of the power tool parts see the chapter on "Main Parts."
Warning!
Never modify this power tool in any way. Only attachments supplied by STIHL or expressly approved by STIHL for use with the specific STIHL model are authorized. Although certain unauthorized attachments are useable with STIHL power tools, their use may, in fact, be extremely dangerous.
If this tool is subjected to unusually high loads for which it was not designed (e.g. heavy impact or a fall), always check that it is in good condition before continuing work. Check in particular that
the fuel system is tight (no leaks) and that the controls and safety devices are working properly. Do not continue operating this machine if it is damaged. In case of doubt, have it checked by your STIHL servicing dealer.
THE USE OF THE POWER TOOL
Transporting the Power Tool
Warning!
To reduce the risk of injury from saw chain contact, never carry or transport your power tool with the saw chain moving. Always engage the chain brake when taking more than a few steps.
Warning!
Always switch off the engine, and fit the chain guard (scabbard) over the chain and guide bar before transporting the power tool over longer distances. When transporting it in a vehicle, properly secure it to prevent turnover, fuel spillage and damage to the unit.
001BA115 KN
It may be carried only in a horizontal position. Grip the front handle in a manner that the machine is balanced
MS 210, MS 210 C, MS 230, MS 230 C, MS 250, MS 250 C
English
horizontally. Keep the hot muffler away from your body and the cutting attachment behind you.
Fuel
Your STIHL power tool uses an oilgasoline mixture for fuel (see the chapter on "Fuel" of your instruction manual).
Warning!
Gasoline is an extremely flammable fuel. If spilled and ignited by a spark or
other ignition source, it can cause fire and serious burn injury or
property damage. Use extreme caution when handling gasoline or fuel mix. Do not smoke or bring any fire or flame near the fuel or the power tool. Note that combustible fuel vapor may escape from the fuel system.
Fueling Instructions
Warning!
Fuel your power tool in well-ventilated areas, outdoors. Always shut off the engine and allow it to cool before refueling. Gasoline vapor pressure may build up inside the fuel tank depending on the fuel used, the weather conditions and the tank venting system.
In order to reduce the risk of burns and other personal injury from escaping gas vapor and fumes, remove the fuel filler cap on your power tool carefully so as to allow any pressure build-up in the tank to release slowly. Never remove the fuel filler cap while the engine is running.
5
English
Select bare ground for fueling and move at least 10 feet (3 m) from the fueling spot before starting the engine. Wipe off any spilled fuel before starting your machine.
Warning!
Check for fuel leakage while refueling and dur-
ing operation. If fuel leakage is found, do not start or run the engine until the leak is fixed and
any spilled fuel has been wiped away. Take care not to get fuel on your clothing. If this happens, change your clothing immediately.
Different models may be equipped with different fuel caps.
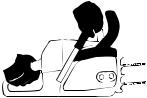
Toolless cap with grip
Warning!
In order to reduce the risk of fuel spillage and fire from an improperly tightened fuel cap, correctly position and tighten the fuel cap in the fuel tank opening.
001BA220 KN
To do this with this STIHL cap, raise the grip on the top of the cap until it is upright at a 90° angle. Insert the cap in the fuel tank opening with the raised positioning
6
marks on the grip of the cap and on the fuel tank opening lining up. Using the grip, press the cap down firmly while turning it clockwise as far as it will go (approx. 1/4 turn).
Fold the grip flush with the top of the cap. Grip
the cap and check for tightness. If the grip does not lie completely flush with the cap and the detent on the grip does not fit in the corresponding recess in the filler opening, or if the cap is loose in the filler opening, the cap is not properly seated and tightened and you must repeat the above steps.
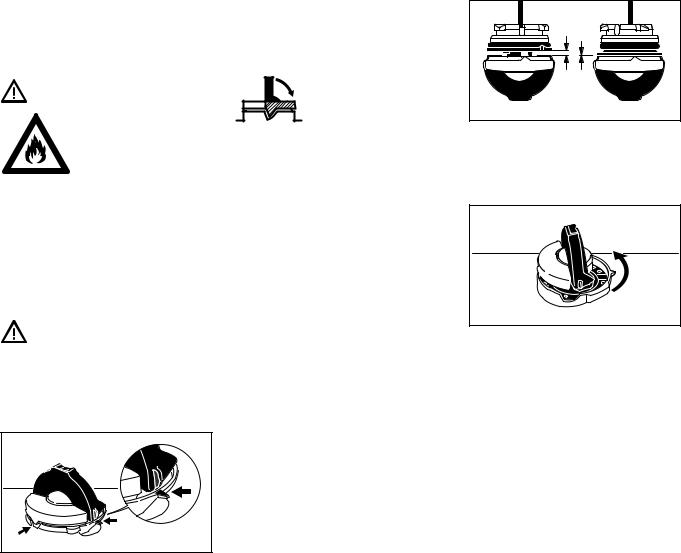
Misaligned, damaged or broken cap
NIf the cap does not drop fully into the opening when the positioning marks line up and/or if the cap does not tighten properly when twisted, the base of the cap may be prematurely rotated (in relation to the top) to the closed position. Such misalignment can result from handling, cleaning or an improper attempt at tightening.
001BA227 KN |
Left: |
Base of cap in closed posi- |
|
tion (with open space) |
Right: |
Base of cap correctly posi- |
|
tioned for installation |
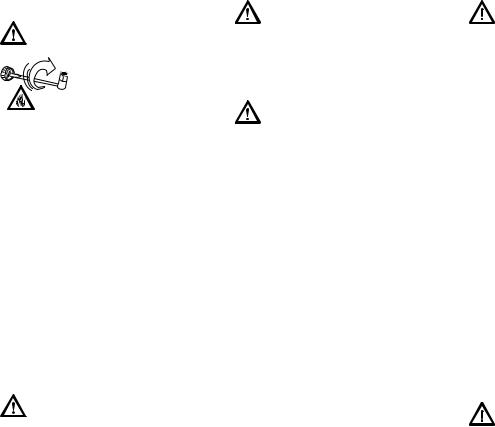
001BA226 KN |
NTo return the cap to the open position for installation, turn the cap (with the grip up) until it drops fully into the tank opening. Next, twist the cap counterclockwise as far as it will go (approx. 1/4 turn) – this will twist the base of the cap into the correct position. Then, twist the cap clockwise, closing it normally.
NIf your cap still does not tighten properly, it may be damaged or broken; immediately stop use of the unit and take it to your authorized STIHL dealer for repair.
MS 210, MS 210 C, MS 230, MS 230 C, MS 250, MS 250 C
Screw Cap
Warning!
Unit vibrations can cause an improperly
tightened fuel filler cap to
loosen or come off and spill quantities of fuel. In order to reduce the risk
of fuel spillage and fire, tighten the fuel filler cap by hand as securely as possible.
The screwdriver end of the STIHL combination wrench or other similar tool can be used as an aid in tightening slotted fuel filler caps.
See also the "Fueling" chapter in your Instruction Manual for additional information.
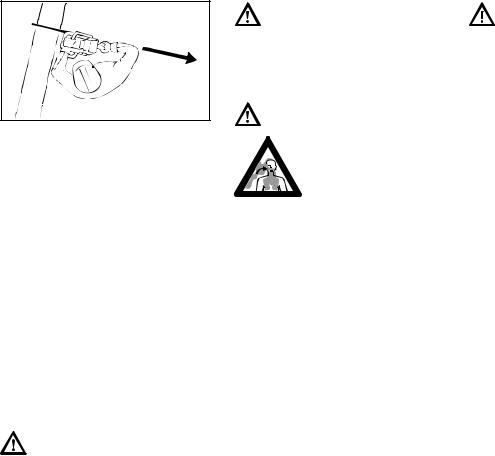
Before Starting
Take off the chain guard (scabbard) and inspect the saw for proper condition and operation. (See the maintenance chart near the end of the instruction manual.)
Warning!
Always check your power tool for proper condition and operation before starting, particularly the throttle trigger, throttle trigger lockout, stop switch and cutting tool. The throttle trigger must move freely and always spring back to the idle position. Never attempt to modify the controls or safety devices.
Warning!
Never operate your power tool if it is damaged, improperly adjusted or maintained, or not completely or securely assembled.
Warning!
Check that the spark plug boot is securely mounted on the spark plug – a loose boot may cause arcing that could ignite combustible fumes and cause a fire.
For proper assembly of the bar and chain follow the procedure described in the chapter "Mounting the Bar and Chain" of your instruction manual. STIHL Oilomatic chain, guide bar and sprocket must match each other in gauge and pitch. Before replacing any bar and chain, see the chapter entitled "Specifications" in the instruction manual and the section "Kickback" and the "ANSI B 175.1-2000 chain saw chain saw kickback standard" below.
English
Warning!
Proper tension of the chain is extremely important. In order to avoid improper setting, the tensioning procedure must be followed as described in your manual. Always make sure the hexagonal nut(s) for the sprocket cover is (are) tightened securely after tensioning the chain in order to secure the bar. Never start the saw with the sprocket cover loose. Check chain tension once more after having tightened the nut(s) and thereafter at regular intervals (whenever the saw is shut off). If the chain becomes loose while cutting, shut off the engine and then tighten. Never try to adjust the chain while the engine is running!
Keep the handles clean and dry at all times; it is particularly important to keep them free of moisture, pitch, oil, fuel mix, grease or resin in order for you to maintain a firm grip and properly control your power tool.
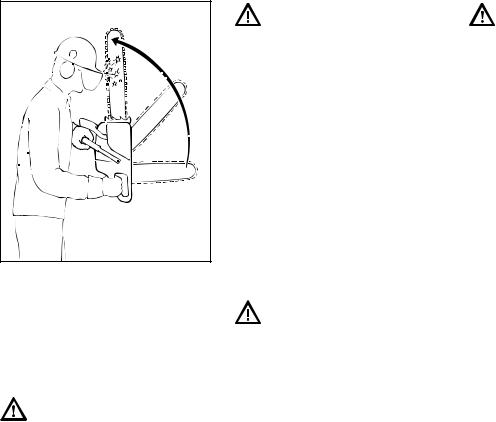
Starting
Warning!
To reduce the risk of fire and burn injuries, start the engine at least 10 feet (3 m) from the fueling spot, outdoors only.
Start and operate your saw without assistance. For specific starting instructions, see the appropriate section of the instruction manual. Proper starting methods reduce the risk of injury.
MS 210, MS 210 C, MS 230, MS 230 C, MS 250, MS 250 C |
7 |

English
Warning!
To reduce the risk of injury from chain contact and / or reactive forces, the chain brake must be engaged when starting the saw.
Warning!
Do not drop start. This method is very dangerous because you may lose control of the saw.
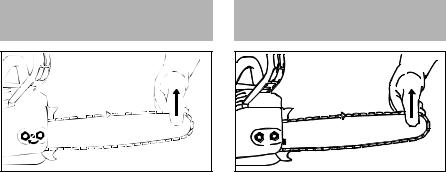
There are two recommended methods for starting your chain saw.


 001BA113 KN
With the first recommended method, the chain saw is started on the ground. Make sure the chain brake is engaged (see "Chain Brake" chapter in your instruction manual) and place the chain saw on firm ground or other solid surface in an open area. Maintain good balance and secure footing.
Grip the front handlebar of the saw firmly with your left hand and press down. For saws with a rear handle level with the ground, put the toe of your right foot into the rear handle and press down. With your right hand pull out the starter grip slowly until you feel a definite resistance and then give it a brisk, strong pull.


 001BA114 KN
The second recommended method for starting your chain saw allows you to start the saw without placing it on the ground. Make sure the chain brake is engaged, grip the front handle of the chain saw firmly with your left hand. Keep your arm on the front handle in a locked (straight) position. Hold the rear handle of the saw tightly between your legs just above the knees. Maintain good balance and secure footing. Pull the starting grip slowly with your right hand until you feel a definite resistance and then give it a brisk, strong pull.
Warning!
Be sure that the guide bar and chain are clear of you and all other obstructions and objects, including the ground. When the engine is started, the engine speed with the starting throttle lock engaged will be fast enough for the clutch to engage the sprocket and, if the chain brake is not activated, turn the chain. If the upper quadrant of the tip of the bar touches any object, it may cause kickback to occur (see section on reactive forces). To reduce this risk, always engage the chain brake before starting. Never attempt to start the chain saw when the guide bar is in a cut or kerf.
As soon as the engine is running, immediately blip the throttle trigger, which will disengage the starting throttle lock and allow the engine to settle down to idle.
Warning!
When you pull the starter grip, do not wrap the starter rope around your hand. Do not let the grip snap back, but guide the starter rope to rewind it properly. Failure to follow this procedure may result in injury to your hand or fingers and may damage the starter mechanism.
Important Adjustments
Warning!
To reduce the risk of personal injury from loss of control and / or contact with the running cutting tool, do not use your unit with incorrect idle adjustment. At correct idle speed, the cutting tool should not move. For directions on how to adjust idle speed, see the appropriate section of your instruction manual.
If you cannot set the correct idle speed, have your STIHL dealer check your power tool and make proper adjustments and repairs.
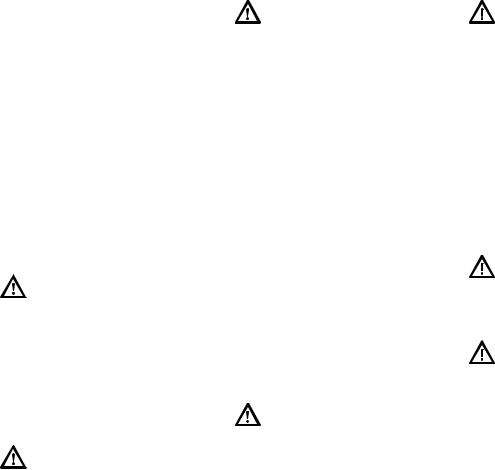
During Operation
Holding and Controlling the Power Tool
Always hold the unit firmly with both hands on the handles while you are working. Wrap your fingers and thumbs around the handles.
8 |
MS 210, MS 210 C, MS 230, MS 230 C, MS 250, MS 250 C |

 001BA087 LÄ
Your right hand should grip the rear handle. This also applies to left-handers. With your hands in this position, you can best oppose and absorb the push, pull and kickback forces of your saw without losing control (see section on reactive forces).
Warning!
To reduce the risk of serious or fatal injury to the oper-


 ator or bystanders from loss of control, never use the saw with one hand. It
is more difficult for you to control reactive forces and to prevent the bar and chain from skating or bouncing along the limb or log. Even for those compact saws designed for use in confined spaces, one-handed operation is dangerous because the operator may lose control.
Warning!
To reduce the risk of cut injuries, keep hands and feet away from the cutting tool. Never touch a moving cutting tool with your hand or any other part of your body.
Warning!
Keep proper footing and balance at all times. Special care must be taken in slippery conditions (wet ground, snow) and in difficult, overgrown terrain. Watch for hidden obstacles such as tree stumps, roots, rocks, holes and ditches to avoid stumbling. There is increased danger of slipping on freshly debarked logs. For better footing, clear away fallen branches, scrub and cuttings. Be extremely cautious when working on slopes or uneven ground.
Warning!
Take extreme care in wet and freezing weather (rain, snow, ice). Put off the work when the weather is windy, stormy or rainfall is heavy.
English
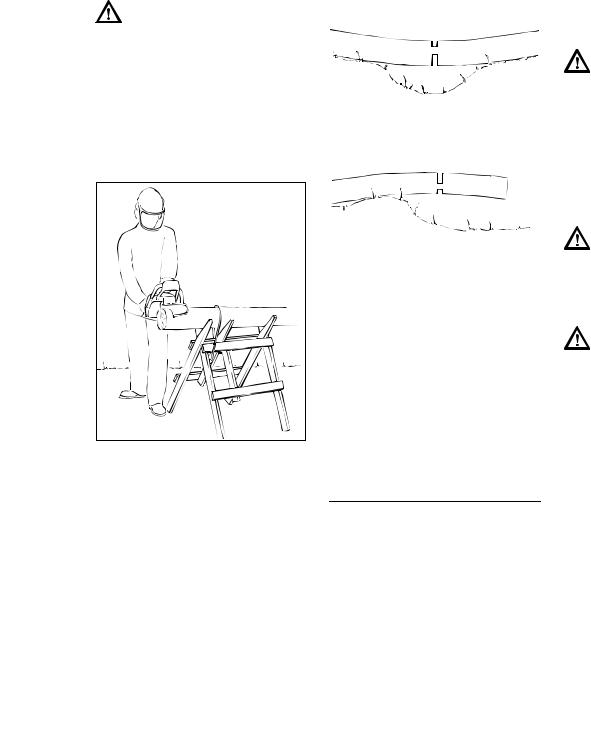
001BA031 KN
Warning!
To reduce the risk of injury from loss of control, never work on a ladder or any other insecure support. Never hold the machine above shoulder height. Do not overreach.
Warning!
Never work in a tree unless you have received specific, professional training for such work, are properly secured (such as tackle and harness system or a lift bucket), have both hands free for operating the chain saw in a cramped environment and have taken proper precautions to avoid injury from falling limbs or branches.
MS 210, MS 210 C, MS 230, MS 230 C, MS 250, MS 250 C |
9 |
English
001BA082 KN
Position the chain saw in such a way that your body is clear of the cutting attachment whenever the engine is running. Stand to the left of cut while bucking.
Never put pressure on the saw when reaching the end of a cut. The pressure may cause the bar and rotating chain to pop out of the cut or kerf, go out of control and strike the operator or some other object. If the rotating chain strikes some other object, a reactive force may cause the moving chain to strike the operator.
Working Conditions
Operate and start your power tool only outdoors in a well ventilated area. Operate it under good visibility and daylight conditions only. Work carefully.
Warning!
Your chain saw is a one-person machine. Do not allow other persons in the general work area, even when starting. Stop the engine immediately if you are approached.
Warning!
Even though bystanders should be kept away from the running saw, never work alone. Keep within calling distance of others in case help is needed.
Warning!
As soon as the engine is running, this product generates toxic exhaust fumes containing chemicals, such as unburned hydrocarbons (including
benzene) and carbon monoxide, that are known to cause respiratory problems, cancer, birth defects, or other reproductive harm. Some of the gases (e.g. carbon monoxide) may be colorless and odorless. To reduce the risk of serious or fatal injury / illness from inhaling toxic fumes, never run the machine indoors or in poorly ventilated locations. If exhaust fumes become concentrated due to insufficient ventilation, clear obstructions from work area to permit proper ventilation before proceeding and / or take frequent breaks to allow fumes to dissipate before they become concentrated.
Warning!
Inhalation of certain dusts, especially organic dusts such as mold or pollen, can cause susceptible persons to have an allergic or asthmatic reaction. Substantial or repeated inhalation of dust and other airborne contaminants, in particular those with a smaller particle size, may cause respiratory or other illnesses. This includes wood dust, especially from hardwoods, but also from some softwoods such as Western Red Cedar. Control dust at the source where possible. Use good work practices, such as always cutting with a properly sharpened chain (which produces wood chips rather than fine dust) and operating the unit so that the wind or operating process directs any dust raised by the power tool away from the operator. Follow the recommendations of EPA / OSHA / NIOSH and occupational and trade associations with respect to dust ("particulate matter"). When the inhalation of dust cannot be substantially controlled, i.e., kept at or near the ambient (background) level, the operator and any bystanders should wear a respirator approved by NIOSH / MSHA for the type of dust encountered.
10 |
MS 210, MS 210 C, MS 230, MS 230 C, MS 250, MS 250 C |

Warning!
Breathing asbestos dust is dangerous and can cause severe or fatal injury, respiratory illness or cancer. The use and disposal of asbestos-containing products have been strictly regulated by OSHA and the Environmental Protection Agency. If you have any reason to believe that you might be cutting asbestos, immediately contact your employer or a local OSHA representative.
Operating Instructions
Warning!
Do not operate your power tool using the starting throttle lock, as you do not have control of the engine speed.
In the event of an emergency, switch off the engine immediately – move the slide control / stop switch to 0 or STOP.
Warning!
Always stop the engine before putting a chain saw down.
Warning!
The saw chain continues to move for a short period after the throttle trigger is released (flywheel effect).
Accelerating the engine while the saw chain is blocked increases the load and will cause the clutch to slip continuously. This may occur if the throttle is depressed for more than a few seconds when the chain is pinched in the cut or the chain brake is engaged. It can result in overheating and damage to important components (e.g. clutch, polymer
housing components) – which can then increase the risk of injury, e.g., from the saw chain moving while the engine is idling.
Warning!
Your chain saw is equipped with a chain catcher. It is designed to reduce the risk of personal injury in the event of a thrown or broken chain. From time to time, the catcher may be damaged or removed. To reduce the risk of personal injury, do not operate a chain saw with a damaged or missing chain catcher.
Warning!
Inspect antivibration elements periodically. Replace damaged, broken or excessively worn antivibration elements immediately, since they may result in loss of control of the saw. A "sponginess" in the feel of the saw, increased vibration or increased "bottoming" during normal operation may indicate damage, breakage or excessive wear. Antivibration elements should always be replaced in sets. If you have any questions as to whether the antivibration elements should be replaced, consult your STIHL servicing dealer.
Warning!
Your saw is not designed for prying or shoveling away limbs, roots or other objects. Such use could damage the cutting attachment or AV system.
MS 210, MS 210 C, MS 230, MS 230 C, MS 250, MS 250 C
English
Warning!
When sawing, make sure that the saw chain does not touch any foreign materials such as rocks, fences, nails and the like. Such objects may be flung off, damage the saw chain or cause the saw to kickback.
Warning!
Never modify your muffler. Any modification could cause an increase in heat radiation, sparks or sound level, thereby increasing the risk of fire, burn injury or hearing loss. You may also permanently damage the engine. Have your muffler serviced and repaired by your STIHL servicing dealer only.
Warning!
The muffler and other parts of the engine (e.g. fins of the cylinder, spark plug) become hot during operation and remain hot for a while after stopping the engine. To reduce risk of burns, do not touch the muffler and other parts while they are hot. Keep the area around the muffler clean. Remove excess lubricant and all debris such as pine needles, branches or leaves. Let the engine cool down sitting on concrete, metal, bare ground or solid wood (e.g. the trunk of a felled tree) away from any combustible substances.
11
English
Warning!
An improperly mounted or damaged cylinder housing or a damaged/deformed muffler shell may interfere with the cooling process of the muffler. To reduce the risk of fire or burn injury, do not continue work with a damaged or improperly mounted cylinder housing or a damaged/deformed muffler shell.
Your muffler is furnished with a spark arresting screen designed to reduce the risk of fire from the emission of hot particles. Never operate your unit with a missing or damaged spark arresting screen. If your gas/oil mix ratio is correct (i.e., not too rich), this screen will normally stay clean as a result of the heat from the muffler and need no service or maintenance. If you experience loss of performance and you suspect a clogged screen, have your muffler maintained by a STIHL servicing dealer. Some state or federal laws or regulations may require a properly maintained spark arrestor for certain uses. See the "Maintenance, Repair and Storing" section of these Safety Precautions. Remember that the risk of a brush or forest fire is greater in hot or dry conditions.
12
Warning!
Some STIHL power tools are equipped with a catalytic converter, which is
designed to reduce the exhaust emissions of the engine by a chemical
process in the muffler. Due to this process, the muffler does not cool down as rapidly as conventional mufflers when the engine returns to idle or is shut off. To reduce the risk of fire and burn injuries when using a catalytic converter, always set your power tool down in the upright position and never locate it where the muffler is near dry brush, grass, wood chips or other combustible materials while it is still hot.
Reactive Forces including Kickback
Warning!
Reactive forces may occur any time the chain is rotating. Reactive forces can cause serious personal injury.
001BA093 LÄ
The powerful force used to cut wood can be reversed and work against the operator. If the rotating chain is suddenly stopped by contact with any solid object such as a log or branch or is pinched, the reactive forces may occur instantly. These reactive forces may result in loss
of control, which, in turn, may cause serious or fatal injury. An understanding of the causes of these reactive forces may help you avoid the element of surprise and loss of control. Sudden surprise contributes to accidents.
The most common reactive forces are:
–kickback,
–pushback,
–pull-in.
Kickback:
Kickback may occur when the moving saw chain near the upper quadrant of the bar nose contacts a solid object or is pinched.
001BA035 KN
The reaction of the cutting force of the chain causes a rotational force on the chain saw in the direction opposite to the chain movement. This may fling the bar
MS 210, MS 210 C, MS 230, MS 230 C, MS 250, MS 250 C

up and back in a lightning fast reaction in an uncontrolled arc mainly in the plane of the bar. Under some cutting circumstances the bar moves towards the operator, who may suffer severe or fatal injury.
Kickback may occur, for example, when the chain near the upper quadrant of the bar nose contacts the wood or is pinched during limbing or when it is incorrectly used to begin a plunge or boring cut.
The greater the force of the kickback reaction, the more difficult it becomes for the operator to control the saw. Many factors influence the occurrence and force of the kickback reaction. These include chain speed, the speed at which the bar and chain contact the object, the angle of contact, the condition of the chain and other factors.
The type of bar and saw chain you use is an important factor in the occurrence and force of the kickback reaction. Some STIHL bar and chain types are designed to reduce kickback forces. STIHL recommends the use of reduced kickback bars and low kickback chains.
ANSI B 175.1-2000 chain saw kickback standard
§ 5.11 of ANSI standard B 175.1-2000, sets certain performance and design criteria related to chain saw kickback.
To comply with § 5.11 of ANSI B 175.1-2000:
a)Saws with a displacement of less than 3.8 cubic inches (62 cm³)
–must, in their original condition, meet a 45° computer derived kickback angle when equipped with certain cutting attachments,
–and must be equipped with at least two devices to reduce the risk of kickback injury, such as a chain brake, low kickback chain, reduced kickback bar, etc.
b)Saws with a displacement of 3.8 cubic inches (62 cm³) and above
–must be equipped with at least one device designed to reduce the risk of kickback injury, such as a chain brake, low kickback chain, reduced kickback bar, etc.
The computer derived angles for saws below 3.8 cubic inches (62 cm³) displacement are measured by applying a computer program to test results from a kickback test machine.
Warning!
The computer derived angles of § 5.11 of ANSI B 175.1-2000 may bear no relationship to actual kickback bar rotation angles that may occur in real life cutting situations.
In addition, features designed to reduce kickback injuries may lose some of their effectiveness when they are no longer in their original condition, especially if they have been improperly maintained.
Compliance with § 5.11 of ANSI
B 175.1-2000 does not automatically mean that in a real life kickback the bar and chain will rotate at most 45°.
English
Warning!
In order for powerheads below 3.8 cubic inches (62 cm³) displacement to comply with the computed kickback angle requirements of § 5.11 of ANSI
B 175.1-2000 use only the following cutting attachments:
–bar and chain combinations listed as complying in the "Specifications" section of the instruction manual or
–other replacement bar and chain combinations marked in accordance with the standard for use on the powerhead or
–replacement chain designated "low kickback saw chain."
See the section on "Low kickback saw chain and reduced kickback bars."
Devices for Reducing the Risk of Kickback Injury
STIHL recommends the use of the STIHL Quickstop chain brake on your powerhead with green labeled reduced kickback bars and low kickback chains.
Warning!
To reduce the risk of injury, never use a saw if the chain brake does not function properly. Take the saw to your local STIHL servicing dealer. Do not use the saw until the problem has been rectified.
STIHL Quickstop Chain Brake
STIHL has developed a chain stopping system designed to reduce the risk of injury in certain kickback situations. It is called a Quickstop chain brake.
MS 210, MS 210 C, MS 230, MS 230 C, MS 250, MS 250 C |
13 |
English
001BA174 KN
All STIHL chain saws are equipped with a Quickstop chain brake which can be activated by inertia. If the forces of an occurring kickback are sufficiently high, the hand guard is accelerated towards the bar nose even without hand contact. See the chapter entitled "Chain Brake" of your instruction manual.
Warning!
Never operate your chain saw without a front hand guard. In a kickback situation this guard helps protect your left hand and other parts of your body. In addition, removal of the hand guard on a saw equipped with a Quickstop chain brake will deactivate the chain brake.
Warning!
No Quickstop or other chain brake device prevents kickback. These devices are designed to reduce the risk of kickback injury, if activated, in certain kickback situations. In order for the Quickstop to reduce the risk of kickback injury, it must be properly maintained and in good working order. See the chapter of your instruction manual entitled "Chain Brake" and the section "Maintenance, Repair and Storing" at the end of these Safety Precautions. In addition, there must be enough distance between the bar and the operator to ensure that the Quickstop has sufficient time to activate and stop the chain before potential contact with the operator.
Warning!
An improperly maintained chain brake may increase the time needed to stop the chain after activation, or may not activate at all.
Warning!
Never run the chain saw above idle speed for more than 3 seconds when the chain brake is engaged or when the chain is pinched or otherwise caught in the cut. Clutch slippage can cause excessive heat, leading to severe damage of the motor housing, clutch and oiler component and may interfere with the operation of the chain brake. If clutch slippage in excess of 3 seconds has occurred, allow the motor housing to cool before proceeding and check the operation of your chain brake as described in the chapter entitled "Chain Brake" of your instruction manual. Also make sure that the chain is not turning at idle speed (see above at "Important Adjustments").
Low Kickback Saw Chain and Reduced Kickback Bars
STIHL offers a variety of bars and chains. STIHL reduced kickback bars and low kickback chains are designed to reduce the risk of kickback injury. Other chains are designed to obtain higher cutting efficiency or sharpening ease but may result in higher kickback tendency.
STIHL has developed a color code system to help you identify the STIHL reduced kickback bars and low kickback chains. Cutting attachments with green warning decals or green labels on the packaging are designed to reduce the risk of kickback injury. The matching of green decaled powerheads under
3.8 cubic inches (62 cm³) displacement with green labeled bars and green labeled chains gives compliance with the computed kickback angle requirements of ANSI B 175.1-2000
14 |
MS 210, MS 210 C, MS 230, MS 230 C, MS 250, MS 250 C |
when the products are in their original condition. Products with yellow decals or labels are for users with extraordinary cutting needs and experience and specialized training for dealing with kickback.
STIHL recommends the use of its green labeled reduced kickback bars, green labeled low kickback chains and a STIHL Quickstop chain brake for both experienced and inexperienced chain saw users.
Please ask your STIHL dealer to properly match your powerhead with the appropriate bar / chain combination to reduce the risk of kickback injury. Green labeled bars and chains are recommended for all powerheads.
Warning!
Use of other, non-listed bar / chain combinations may increase kickback forces and the risk of kickback injury. New bar / chain combinations may be developed after publication of this literature, which will, in combination with certain powerheads, comply with § 5.11 of ANSI
B 175.1-2000. Check with your STIHL dealer for such combinations.
Warning!
Reduced kickback bars and low kickback chains do not prevent kickback, but they are designed to reduce the risk of kickback injury. They are available from your STIHL dealer.
Warning!
Even if your saw is equipped with a Quickstop, a reduced kickback bar and / or low kickback chain, this does not eliminate the risk of injury by kickback. Therefore, always observe all safety precautions to avoid kickback situations.
Low Kickback Chain
Some types of saw chain have specially designed components to reduce the force of nose contact kickback. STIHL has developed low kickback chain for your powerhead.
"Low kickback saw chain" is a chain which has met the kickback performance requirements of § 5.11.2.4 of ANSI B 175.1-2000 (GasolinePowered Chain Saws–Safety Requirements) when tested in its original condition on a selected representative sample of chain saws below 3.8 cubic inches (62 cm³) displacement specified in ANSI
B 175.1-2000.
Warning!
There are potential powerhead and bar combinations with which low kickback saw chains can be used which have not been specifically certified to comply with the 45° computer derived kickback angle of § 5.11 of ANSI B 175.1-2000. Some low kickback chains have not been tested with all powerhead and bar combinations.
English
Warning!
A dull or improperly sharpened chain may reduce or negate the effects of the design features intended to reduce kickback energy. Improper lowering or sharpening of the depth gauges or shaping of the cutters may increase the chance and the potential energy of a kickback. Always cut with a properly sharpened chain.
Reduced Kickback Bars
STIHL green labeled reduced kickback bars are designed to reduce the risk of kickback injury when used with STIHL green labeled low kickback chains.
Warning!
When used with other, more aggressive chains, these bars may be less effective in reducing kickback.
Warning!
For a properly balanced saw and in order to comply with § 5.12.1 of ANSI B 175.1-2000, use only bar lengths listed in the specifications chapter of the instruction manual for your chain saw powerhead.
MS 210, MS 210 C, MS 230, MS 230 C, MS 250, MS 250 C |
15 |
English
Bow Guides
Warning!
Do not mount a bow guide on any STIHL chain saw. Any chain saw equipped with a bow guide is potentially very dangerous. The risk of kickback is increased with a bow guide because of the increased kickback contact area. Low kickback chain will not significantly reduce the risk of kickback injury when used on a bow guide.
To avoid Kickback
The best protection from personal injury that may result from kickback is to avoid kickback situations:
1.Hold the chain saw firmly with both hands and maintain a secure grip. Don’t let go.
2.Be aware of the location of the guide bar nose at all times.
3.Never let the nose of the guide bar contact any object. Do not cut limbs with the nose of the guide bar. Be especially careful near wire fences and when cutting small, tough limbs, small size brush and saplings which may easily catch the chain.
4.Don't overreach.
5.Don't cut above shoulder height.
6.Begin cutting and continue at full throttle.
7.Cut only one log at a time.
8.Use extreme caution when reentering a previous cut.
9.Do not attempt to plunge cut if you are not experienced with these cutting techniques.
16
10.Be alert for shifting of the log or other forces that may cause the cut to close and pinch the chain.
11.Maintain saw chain properly. Cut with a correctly sharpened, properly tensioned chain at all times.
12.Stand to the side of the cutting path of the chain saw.
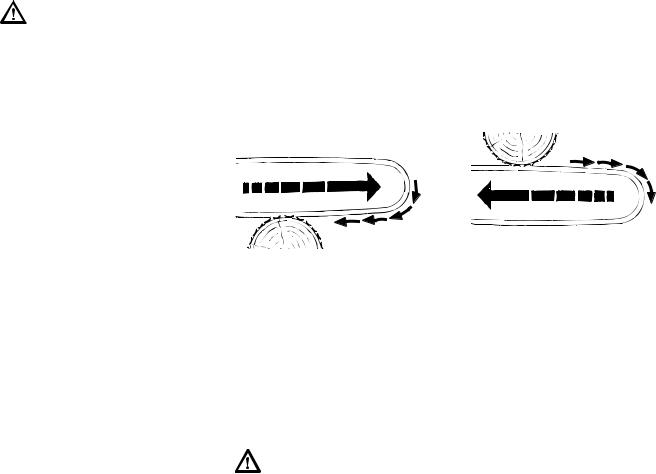
A = Pull-in
A |
001BA037 KN |
|
|
Pull-in occurs when the chain on the bottom of the bar is suddenly stopped when it is pinched, caught or encounters a foreign object in the wood. The reaction of the chain pulls the saw forward and may cause the operator to lose control.
Pull-in frequently occurs when the bumper spike of the saw is not held securely against the tree or limb and when the chain is not rotating at full speed before it contacts the wood.
Warning!
Use extreme caution when cutting small size brush and saplings which may easily catch the chain, be whipped towards you or pull you off balance.
To avoid Pull-in
1.Always start a cut with the chain rotating at full speed and the bumper spike in contact with the wood.
2.The risk of pull-in may also be reduced by using wedges to open the kerf or cut.
B = Pushback
B |
001BA038 KN |
|
|
Pushback occurs when the chain on the top of the bar is suddenly stopped when it is pinched, caught or encounters a foreign object in the wood. The reaction of the chain may drive the saw rapidly straight back toward the operator and may cause loss of saw control. Pushback frequently occurs when the top of the bar is used for cutting.
To avoid Pushback
1.Be alert to forces or situations that may cause material to pinch the top of the chain.
2.Do not cut more than one log at a time.
3.Do not twist the saw when withdrawing the bar from a plunge cut or underbuck cut because the chain can pinch.
MS 210, MS 210 C, MS 230, MS 230 C, MS 250, MS 250 C
Cutting Techniques Felling
Felling is cutting down a tree.
Before felling a tree, consider carefully all conditions which may affect the direction of fall.
Warning!
There are a number of factors that may affect and change the intended direction of fall, e.g. wind direction and speed, lean of tree, surrounding trees and obstacles, sloping ground, one-sided limb structure, wood structure, decay, snow load, etc. To reduce the risk of severe or fatal injury to yourself or others, look for these conditions prior to beginning the cut, and be alert for a change in direction while the tree is falling.
Warning!
Always observe the general condition of the tree. Inexperienced users should never attempt to cut trees that are decayed or rotted inside or that are leaning or otherwise under tension. There is an increased risk that such trees could snap or split while being cut and cause serious or fatal injury to the operator or bystanders. Also look for broken or dead branches which could vibrate loose and fall on the operator. When felling on a slope, the operator should stand on the uphill side if possible.
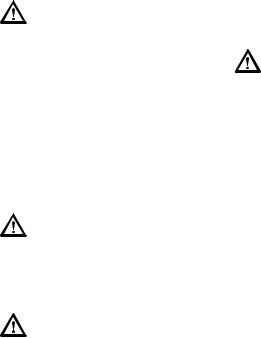
Felling Instructions
|
|
|
|
|
|
|
|
|
|
|
|
|
|
|
|
|
|
|
|
|
|
|
|
|
|
|
|
|
|
LÄ |
|
|
|
|
1 |
|
|
|
1/2 |
|
|
1 |
|
|
|
001BA088 |
|
|
|
|
|
|
|
|
|
|
|
|
|
||||
|
|
|
|
|
|
|
21/2 |
|
|
|
|
|
|
|
|
|
|
|
|
|
|
|
|
|
|
|
|
|
|
|
|
|
|
|
|
|
|
|
|
|
|
|
|
|
|
|
|
|
|
|
|
|
|
|
|
|
|
|
|
|
|
|
|
When felling, maintain a distance of at least 2 1/2 tree lengths from the nearest person.
When felling in the vicinity of roads, railways and power lines, etc., take extra precautions. Inform the police, utility company or railway authority before beginning to cut.
Warning!
The noise of your engine may drown any warning call.
English
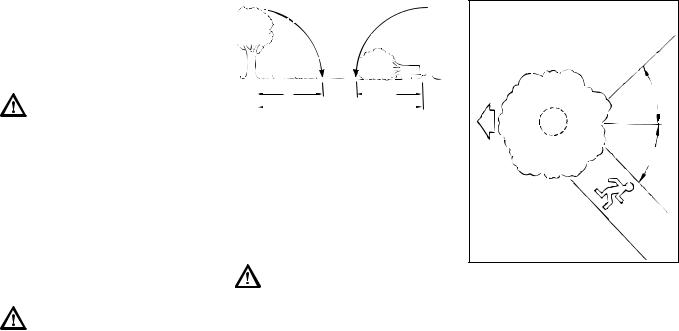
Escape Path
 B
B
45°
001BA040 KN
First clear the tree base and work area from interfering limbs and brush and clean its lower portion with an ax.
Then, establish two paths of escape (B) and remove all obstacles. These paths should be generally opposite to the planned direction of the fall of the tree
(A) and about at a 45° angle. Place all tools and equipment a safe distance away from the tree, but not on the escape paths.
MS 210, MS 210 C, MS 230, MS 230 C, MS 250, MS 250 C |
17 |
English
Buttress Roots


 001BA146 KN
If the tree has large buttress roots, cut into the largest buttress vertically first (horizontally next) and remove the resulting piece.
Gunning Sight
001BA153 KN
When making the felling notch, use the gunning sight on the shroud and housing to check the desired direction of fall:
Position the saw so that the gunning sight points exactly in the direction you want the tree to fall.
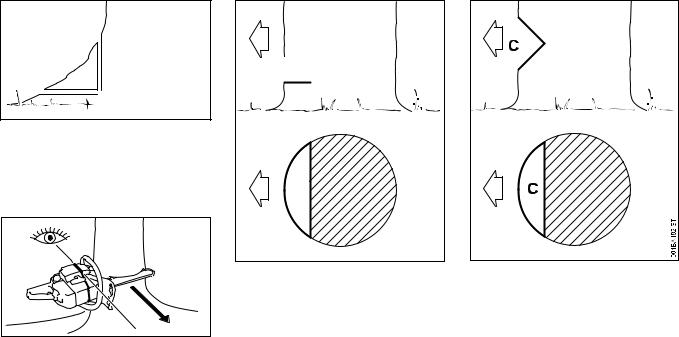
Conventional Cut
C
C
001BA143 KN
Felling notch (C) – determines the direction of the fall
For a conventional cut:
NProperly place felling notch perpendicular to the line of fall, close to the ground.
NCut down at approx. 45° angle to a depth of about 1/5 to 1/4 of the trunk diameter.
N Make second cut horizontal. N Remove resulting 45° piece.
Open-face Technique
Felling notch (C) – determines the direction of the fall
For an open-face cut:
NProperly place felling notch perpendicular to the line of fall, close to the ground.
NCut down at approx. 50° angle to a depth of approx.1/5 to 1/4 of the trunk diameter.
NMake second cut from below at approx. 40 degree angle.
N Remove resulting 90° piece.
18 |
MS 210, MS 210 C, MS 230, MS 230 C, MS 250, MS 250 C |
English
Making Sapwood Cuts |
D =Felling Cut |
E = Hinge |
001BA150 KN
NFor medium sized or larger trees make cuts at both sides of the trunk, at same height as subsequent felling cut.
NCut to no more than width of guide bar.
This is especially important in softwood in summer – it helps prevent sapwood splintering when the tree falls.
D
D
001BA144 KN
Conventional and open-face technique:
NBegin 1 to 2 inches (2,5 to 5 cm) higher than center of felling notch.
NCut horizontally towards the felling notch.
NLeave approx.1/10 of diameter uncut. This is the hinge.
NDo not cut through the hinge – you could lose control of the direction of the fall.
Drive wedges into the felling cut where necessary to control the fall.
Warning!
If the tip of the bar contacts a wedge, it may cause kickback. Wedges should be of wood or plastic – never steel, which can damage the chain.
E
E
001BA145 KN
N Helps control the falling tree.
NDo not cut through the hinge – you could lose control of the direction of the fall.
MS 210, MS 210 C, MS 230, MS 230 C, MS 250, MS 250 C |
19 |
English
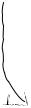
Felling Cut for Small Diameter Trees: Simple Fan Cut
001BA147 KN
Engage the bumper spikes of the chain saw directly behind the location of the intended hinge and pivot the saw around this point only as far as the hinge. The bumper spike rolls against the trunk.
Felling Cut for Large Diameter Trees
001BA148 KN
Warning!
Felling a tree that has a diameter greater than the length of the guide bar requires use of either the sectioning felling cut or plunge-cut method. These methods are extremely dangerous because they involve the use of the nose of the guide bar and can result in kickback. Only properly trained professionals should attempt these techniques.
Sectioning Method
For the sectioning method make the first part of the felling cut with the guide bar fanning in toward the hinge. Then, using the bumper spike as a pivot, reposition the saw for the next cut.
Avoid repositioning the saw more than necessary. When repositioning for the next cut, keep the guide bar fully engaged in the kerf to keep the felling cut straight. If the saw begins to pinch, insert a wedge to open the cut. On the last cut, do not cut the hinge.
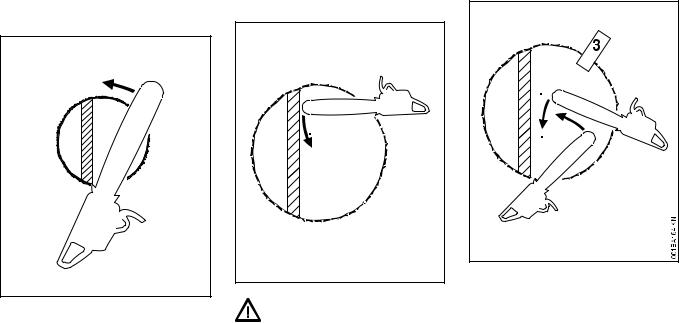
Plunge-cut Method
Timber having a diameter more than twice the length of the guide bar requires the use of the plunge-cut method before making the felling cut.
First, cut a large, wide felling notch. Make a plunge cut in the center of the notch.
20 |
MS 210, MS 210 C, MS 230, MS 230 C, MS 250, MS 250 C |

The plunge cut is made with the guide bar nose. Begin the plunge cut by applying the lower portion of the guide bar nose to the tree at an angle. Cut until the depth of the kerf is about the same as the width of the guide bar. Next, align the saw in the direction in which the recess is to be cut.
With the saw at full throttle, insert the guide bar in the trunk.
Enlarge the plunge cut as shown in the illustration.
Warning!
There is an extreme danger of kickback at this point. Extra caution must be taken to maintain control of the saw. To make the felling cut, follow the sectioning method described previously.
If you are inexperienced with a chain saw, plunge-cutting should not be attempted. Seek the help of a professional.
Warning!
In order to reduce the risk of personal injury, never stand directly behind the tree when it is about to fall, since part of the trunk may split and come back towards the operator (barber-chairing), or the tree may jump backwards off the stump. Always keep to the side of the falling tree. When the tree starts to fall, withdraw the bar, shut off the engine and walk away on the preplanned escape path. Watch out for falling limbs.
Warning!
Be extremely careful with partially fallen trees which are poorly supported. When the tree hangs or for some other reason does not fall completely, set the saw aside and pull the tree down with a cable winch, block and tackle or tractor. If you try to cut it down with your saw, you may be injured.
Limbing
Limbing is removing the branches from a fallen tree.
Warning!
There is an extreme danger of kickback during the limbing operation. Do not work with the nose of the bar. Be extremely cautious and avoid contacting the log or other limbs with the nose of the guide bar.
English
Do not stand on a log while limbing it – you may slip or the log may roll.
Start limbing by leaving the lower limbs to support the log off the ground. When underbucking freely hanging limbs, a pinch may result or the limb may fall, causing loss of control. If a pinch occurs, stop the engine and remove the saw by lifting the limb.
Warning!
Be extremely cautious when cutting limbs or logs under tension (spring poles). The limbs or logs could spring back toward the operator and cause loss of control of the saw and severe or fatal injury to the operator.
Bucking
 001BA033 KN
Bucking is cutting a log into sections.
MS 210, MS 210 C, MS 230, MS 230 C, MS 250, MS 250 C |
21 |
English
Warning!
When bucking, do not stand on the log. Make sure the log will not roll downhill. If on a slope, stand on the uphill side of the log. Watch out for rolling logs.
Cut only one log at a time.
Shattered wood should be cut very carefully. Sharp slivers of wood may be caught and flung in the direction of the operator of the saw.
001BA051 LÄ
When cutting small logs, place log through "V"-shaped supports on top of a sawhorse. Never permit another person to hold the log. Never hold the log with your leg or foot.
22
|
2 |
KN |
|
|
001BA151 |
|
|
|
|
|
|
|
2 |
|
|
1 |
KN |
|
|
001BA152 |
|
|
|
Logs under strain:
Risk of pinching! Always start relieving cut (1) at compression side.Then make bucking cut (2) at tension side. If the saw pinches, stop the engine and remove it from the log.
Only properly trained professionals should work in an area where the logs, limbs and roots are tangled. Working in "blow down" areas is extremely hazardous. Drag the logs into a clear area before cutting. Pull out exposed and cleared logs first.
MAINTENANCE, REPAIR AND STORING
Maintenance, replacement, or repair of the emission control devices and systems may be performed by any nonroad engine repair establishment or individual. However, if you make a warranty claim for a component which has not been serviced or
maintained properly or if nonapproved replacement parts were used, STIHL may deny coverage.
Warning!
Use only identical STIHL replacement parts for maintenance and repair. Use of non-STIHL parts may cause serious or fatal injury.
Strictly follow the maintenance and repair instructions in the appropriate section of your instruction manual.
Please refer to the maintenance chart in this manual.
Warning!
Always stop the engine and make sure that the cutting tool is stopped before doing any maintenance or repair work or cleaning the power tool.
Warning!
Do not attempt any maintenance or repair work not described in your instruction manual. Have such work performed by your STIHL servicing dealer only. For example, if improper tools are used to remove the flywheel or if an improper tool is used to hold the flywheel in order to remove the clutch, structural damage to the flywheel could occur and could subsequently cause the flywheel to burst.
Wear gloves when handling or performing maintenance on saw chains.
MS 210, MS 210 C, MS 230, MS 230 C, MS 250, MS 250 C
Warning!
Use the specified spark plug and make sure it and the ignition lead are always clean and in good condition. Always press spark plug boot snugly onto spark plug terminal of the proper size. (Note: If terminal has detachable SAE adapter nut, it must be securely attached.) A loose connection between spark plug terminal and the ignition wire connector in the boot may create arcing that could ignite combustible fumes and cause a fire.
Warning!
Never test the ignition system with the spark plug boot removed from the spark plug or with a removed spark plug, since uncontained sparking may cause a fire.
Warning!
Do not operate your chain saw if the muffler is damaged, missing or modified. An improperly maintained muffler will increase the risk of fire and hearing loss.
If your muffler was equipped with a spark-arresting screen to reduce the risk of fire, never operate your saw if the screen is missing or damaged. Remember that the risk of forest fires is greater in hot or dry weather.
Keep the chain, bar and sprocket clean; replace worn sprockets or chains. Keep the chain sharp. You can spot a dull chain when easy-to-cut wood becomes hard to cut and burn marks appear on the wood. Keep the chain at proper tension.
Tighten all nuts, bolts and screws except the carburetor adjustment screws after each use.
Warning!
In order for the chain brake on your STIHL chain saw to properly perform its function of reducing the risk of kickback and other injuries, it must be properly maintained. Like an automobile brake, a chain saw chain brake incurs wear each time it is engaged.
The amount of wear will vary depending upon usage, conditions under which the saw is used and other factors. Excessive wear will reduce the effectiveness of the chain brake and can render it inoperable.
For the proper and effective operation of the chain brake, the brake band and clutch drum must be kept free of dirt, grease and other foreign matter which may reduce friction of the band on the drum.
For these reasons, each STIHL chain saw should be returned to trained personnel such as your STIHL servicing dealer for periodic inspection and servicing of the brake system according to the following schedule:
Heavy usage – every three months, Moderate usage – twice a year, Occasional usage – annually.
The chain saw should also be returned immediately for maintenance whenever the brake system cannot be thoroughly cleaned or there is a change in its operating characteristics.
English
For any maintenance of the emission control system please refer to the maintenance chart and to the limited warranty statement near the end of the instruction manual.
Do not clean your machine with a pressure washer. The solid jet of water may damage parts of the machine.
Store chain saw in a dry place and away from children. Before storing for longer than a few days, always empty the fuel tank (see chapter "Storing the Machine" in the instruction manual).
MS 210, MS 210 C, MS 230, MS 230 C, MS 250, MS 250 C |
23 |
English
Cutting Attachment
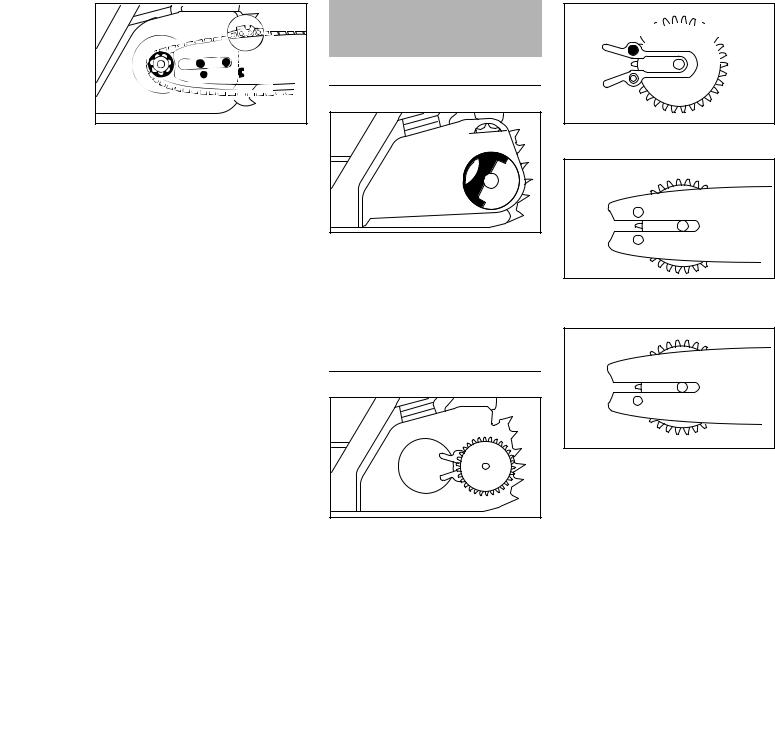
STIHL is the only manufacturer in the industry to produce its own chain saws, guide bars, saw chains and chain sprockets.
A cutting attachment consists of the saw chain, guide bar and chain sprocket.
The cutting attachment that comes standard is designed to exactly match the chain saw.
1 |
2 |
|
|
|
|
|
3 |
KN |
a |
001BA191 |
|
t = a : 2 |
|
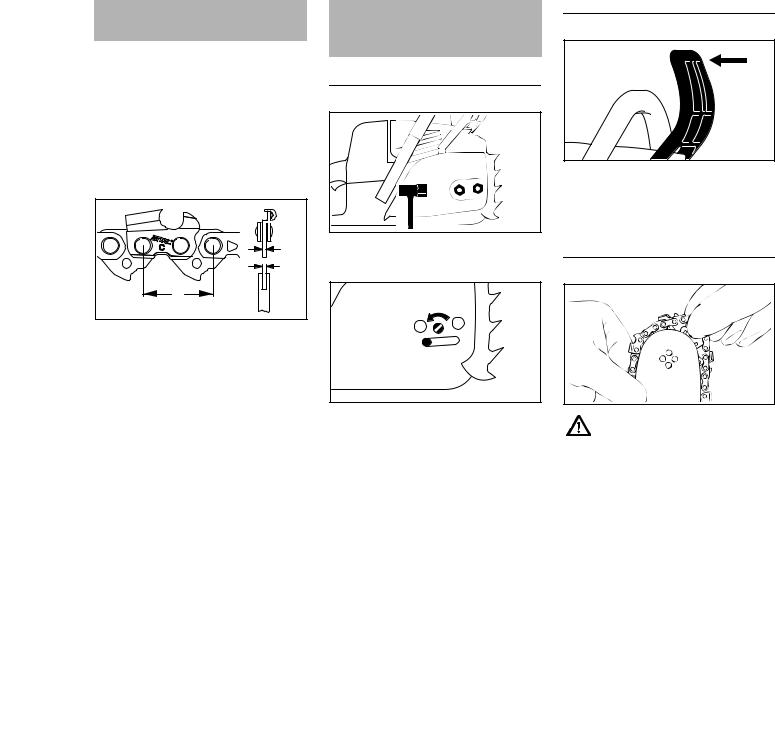
–The pitch (t) of the saw chain (1), chain sprocket and the nose sprocket of the Rollomatic guide bar must match.
–The drive link gauge (2) of the saw chain (1) must match the groove width of the guide bar (3).
If non-matching components are used, the cutting attachment may be damaged beyond repair after a short period of operation.
Mounting the Bar and Chain (side chain tensioner)
Removing the chain sprocket cover
143BA034 KN |
NUnscrew the nuts and take off the chain sprocket cover.
|
1 |
2 |
KN |
|
001BA185 |
NTurn the screw (1) counterclockwise until the tensioner slide (2) butts against the left end of the housing slot.
Disengaging the chain brake.
001BA186 KN
NPull the hand guarad towards the front handle until there is an audible click – the chain brake is disengaged.
Fitting the chain
143BA003 KN
Wear work gloves to protect your hands from the sharp cutters.
N Fit the chain – start at the bar nose.
24 |
MS 210, MS 210 C, MS 230, MS 230 C, MS 250, MS 250 C |
001BA187 KN |
NFit the guide bar over the studs (1) – the cutting edges on the top of the bar must point to the right.
NEngage the peg of the tensioner slide in the locating hole (2) –- place the chain over sprocket (3) at the same time.
NTurn the tensioning
screw (4)clockwise until there is very little chain sag on the underside of the bar – and the drive link tangs are engaged in the bar groove.
NRefit the sprocket cover and screw on the nuts only fingertight.
NGo to chapter on "Tensioning the Saw Chain"
Mounting the Bar and Chain (front chain tensioner)
Removing the chain sprocket cover
143BA034 KN |
NUnscrew the nut and remove the chain sprocket cover.
|
KN |
2 |
207BA009 |
|
NTurn the screw (1) counterclockwise until the tensioning nut (2) butts against the left end of the housing slot.
English
Disengage the chain brake.
001BA186 KN
NPull the hand guard towards the front handle until there is an audible click – the chain brake is disengaged.
Fitting the chain
143BA003 KN
Wear work gloves to protect your hands from the sharp cutters.
N Fit the chain – start at the bar nose.
MS 210, MS 210 C, MS 230, MS 230 C, MS 250, MS 250 C |
25 |
English |
4 |
207BA010KN |
NFit the guide bar over the studs (1) – the cutting edges on the top of the bar must point to the right.
NEngage the peg of the tensioner slide in the locating hole (2) –- place the chain over the sprocket (3) at the same time.
NTurn the tensioning screw (4) clockwise until there is very little chain sag on the underside of the bar – and the drive link tangs are engaged in the bar groove.
NRefit the sprocket cover and screw on the nut only fingertight.
NGo to chapter on "Tensioning the Saw Chain"
Mounting the Bar and Chain (quick chain tensioner)
Removing the chain sprocket cover
3 |
1 |
|
2 |
KN |
|
|
2310BA013 |
|
|
|
NSwing grip (1) into position (until it engages)
NTurn the wing nut (2) to the left until it hangs loosely in the chain sprocket cover (3)
N Remove chain sprocket cover (3)
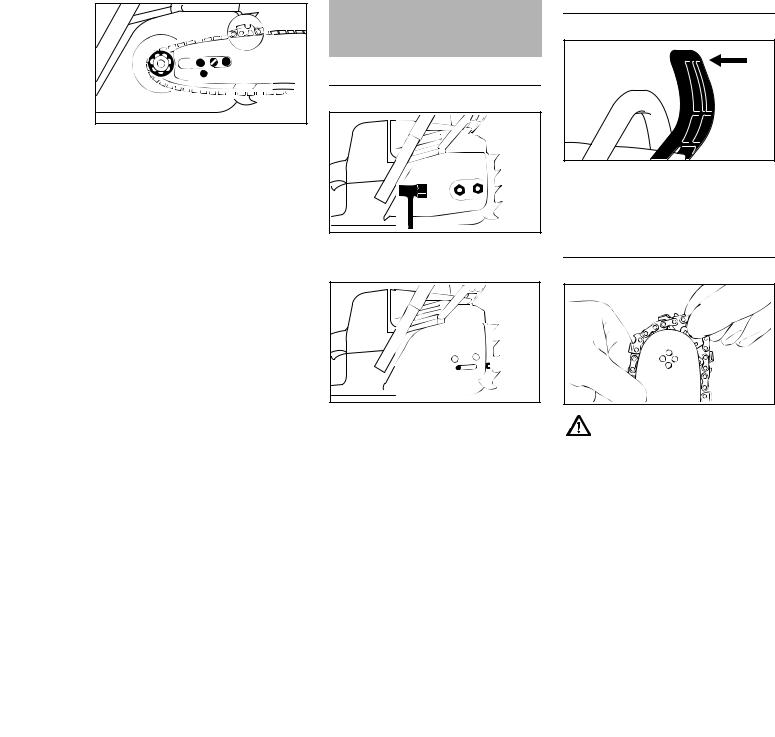
Mounting the tensioning gear
1 |
2310BA014 KN |
NRemove and reverse tensioning gear (1)
2


2310BA015 KN
N Remove screw (2)
1
3 KN2310BA016
NPosition tensioning gear (1) and guide bar (3) relative to one another
 2
2
2310BA017 KN
N Insert and tighten screw (2)
26 |
MS 210, MS 210 C, MS 230, MS 230 C, MS 250, MS 250 C |

Releasing the chain brake
001BA186 KN
NPull hand guard towards the front handle until it engages audibly – chain brake is released
Fitting the saw chain
1 |
KN |
|
181BA012 |
||
|
Put on protective gloves – risk of injury by the sharp cutters.
NFit the saw chain – starting at the nose of the guide bar – pay attention to the position of the tensioning gear and the cutting edges
NTurn tensioning gear (1) to the right as far as possible
NTurn the guide bar so that the tensioning gear faces the user


 3 2
3 2 

181BA013 KN
NPlace the saw chain on the chain sprocket (2)
NSlide the guide bar over the collar screw (3); the head of the rear collar screw must protrude into the oblong hole
English |
135BA011 KN |
NGuide the drive link into the bar groove (see arrow) and turn the tensioning gear to the left as far as possible
NFit chain sprocket cover, sliding the guide lugs into the engine housing openings
4 |
5 |
2310BA018 KN |
When fitting the chain sprocket cover, the teeth of the adjusting wheel and the tensioning gear must mesh; if necessary,
MS 210, MS 210 C, MS 230, MS 230 C, MS 250, MS 250 C |
27 |
English
Nturn the adjusting wheel (4) a little until the chain sprocket cover can be slid completely against the engine housing
NSwing grip (5) into position (until it engages)
N Fit wing nut and tighten lightly
NNext step: see "Tensioning the Saw Chain"
Tensioning the Saw Chain (side chain tensioner)
133BA024 KN |
Retensioning during cutting work: N Shut off the engine.
N Loosen the nuts.
N Hold the bar nose up.
NUse a screwdriver to turn the tensioning screw (1) clockwise until the chain fits snugly against the underside of the bar.
NWhile still holding the bar nose up, tighten down the nuts firmly.
N Go to "Checking Chain Tension".
A new chain has to be retensioned more often than one that has been in use for some time.
NCheck chain tension frequently – see chapter on "Operating Instructions".
Tensioning the Saw Chain (front chain tensioner)
143BA045 KN |
Retensioning during cutting work: N Switch off the engine.
N Loosen the nuts.
N Hold the bar nose up.
NUse a screwdriver to turn the tensioning screw (1) clockwise until the chain fits snugly against the underside of the bar.
NWhile still holding the bar nose up, tighten down the nuts firmly.
N Go to "Checking Chain Tension".
A new chain has to be retensioned more often than one that has been in use for some time.
NCheck chain tension frequently – see chapter on "Operating Instructions".
28 |
MS 210, MS 210 C, MS 230, MS 230 C, MS 250, MS 250 C |
 Loading...