


{
STIHL AR 900
Instruction Manual
Manual de instrucciones
 WARNING
Read and follow all safety precautions in Instruction Manual – improper use can cause serious or fatal injury.
 ADVERTENCIA
Lea y siga todas las precauciones de seguridad dadas en el manual de instrucciones – el uso incorrecto puede causar lesiones graves o mortales.
Instruction Manual 1 - 23
Manual de instrucciones 24 - 48
Printing inks contain vegetable oils, paper can be recycled.
Printed on chlorine-free paper Original Instruction Manual
© ANDREAS STIHL AG & Co. KG, 2013 0458-420-8621-A. VA1.C13. 0000006357_002_GB
Contents
Guide to Using this Manual |
2 |
Safety Precautions and Working |
|
Techniques |
2 |
Assembling the Battery |
6 |
Fitting the Harness |
7 |
Acoustic Signal |
9 |
Charging the Battery |
9 |
Light Emitting Diodes (LED) on |
|
Battery |
10 |
Light Emitting Diodes (LED) on |
|
Charger |
12 |
Connecting Battery to Power Tool |
13 |
Disconnecting Battery from Power |
|
Tool |
13 |
Maintenance and Care |
14 |
Main Parts |
15 |
Specifications |
16 |
Special Accessories |
17 |
Troubleshooting |
18 |
Maintenance and Repairs |
21 |
Battery Recycling |
21 |
Disposal |
21 |
Trademarks |
22 |
Addresses |
23 |
English
Allow only persons who fully understand this manual to operate your backpack battery.
It is important that you read, understand and follow the safety precautions and the operating and maintenance instructions in the chapter "Safety Precautions and Working Techniques" before using your battery. For further information you can go to www.stihlusa.com.
Contact your STIHL dealer orthe STIHL distributor for your area if you do not understandany oftheinstructionsin this manual.
 WARNING
Some special safety precautions must be observed to reduce the risk of personal injury. Careless or improper use may cause serious or even fatal injury.
{This instruction manual is protected by copyright. All rights reserved, especially the rights to reproduce, translate and process with electronic systems.
AR 900 |
1 |
English
Guide to Using this Manual
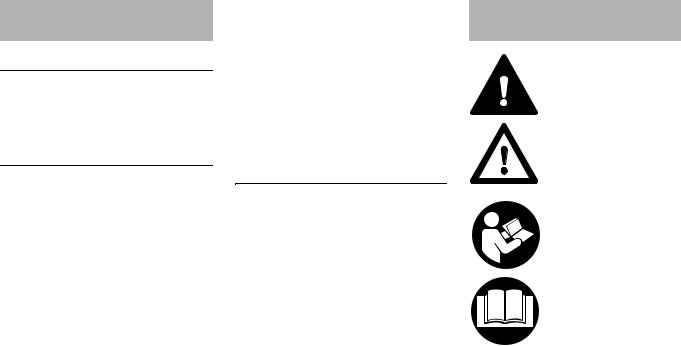
Pictograms
All the pictograms attached to or embossed on the machine are shown and explained in this manual.
Symbols in Text
Many operating and safety instructions are supported by illustrations.
The individual steps or procedures described in the manualmay be marked in different ways:
N A bullet marks a step or procedure.
A description of a step or procedure that refers directly to an illustration may contain item numbers that appear in the illustration. Example:
N Loosen the screw (1). N Lever (2) ...
In addition to the operating instructions, this manual may contain paragraphs that require your special attention. Such paragraphs are marked with the symbols and signal words described below:
 DANGER
Indicates an imminent risk of severe or fatal injury.
 WARNING
Indicates a hazardous situation which, if not avoided, could result in severe or fatal injury.
NOTICE
Indicates a risk of property damage, including damage to the machine or its individual components.
Engineering Improvements
STIHL’s philosophy is to continually improve all of its products. As a result, engineeringchanges andimprovements are made from time to time. Therefore, some changes, modifications and improvements may not be covered in this manual. If the operating characteristics or the appearance of your machine differs from those describedin this manual, please contact your STIHL dealer for assistance.
Safety Precautions and Working Techniques
It is important that you observe the following information and warnings.
It is important you read, fully understand and observe the following safety precautions and warnings. Read the instruction manual and safety precautions peri- odically. Careless or improper use may cause serious or fatal injury. Always read and observe the instruction manual of the STIHL tool powered by this battery.
 WARNING
Use the STIHL battery only with STIHL power tools and recharge it only with STIHL chargers. Do not use the battery for any other purpose since it may result in accidents and injuries.
The battery is recommended for use withthefollowingSTIHL powertoolsand STIHL chargers:
STIHL MSA 160 C, MSA 200 C, HSA 65, HSA 85, HSA 66, HSA 86, HLA 65, BGA 85, FSA 65, FSA 85, SPA 65
2 |
AR 900 |
STIHL AL 300
 WARNING
Have your STIHL dealer show you how to operate your backpack battery. Observe all apllicable local safety regulations, standards and ordinances.
 WARNING
Do not lend or rent your battery without the instruction manual. Be sure that anyone using it understands the information contained in this manual.
 WARNING
Do not use it for other purposes, since misuse may result in personal injury or property damage, including damage to the battery.
 WARNING
Minors should never be allowed to use this backpack battery. Bystanders, especially children, and animals should not be allowed in the area where it is in use.
Safe use of a battery involves
1.the battery
2.the use of the battery.
THE BATTERY
For illustrations and definitions of the battery see the chapter on "Main Parts".
 WARNING
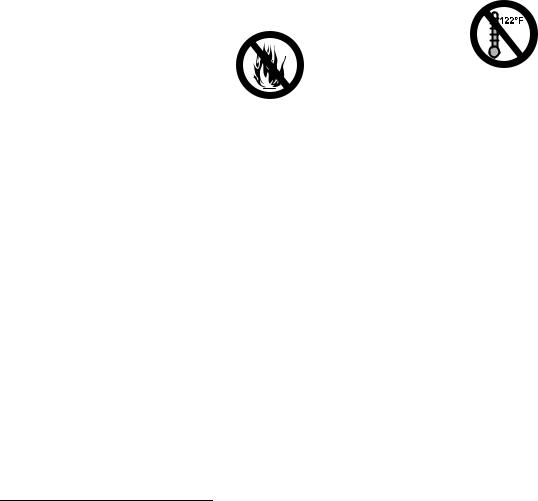
Risk of fire, explosion and / or burns, including chemical burns. Do not disassemble, crush, heat above 212 °F (100 °C), expose to fire or inciner- ate. Never expose the battery to microwaves or high pressures.
Do not place the battery on or nearfires, stoves or in other high-temperature locations. Do not place the battery in direct sunlightwhen not in use or store it inside a vehiclein hot weather.Doing so may cause the battery to generate heat, ruptureorignite.Using thebatteryin this manner may also result in a loss of performance and a shortened life expectancy.
In case of fire: Stay clear of any vapors or gases generated, taking wind directioninto account.Ifpossiblewithout danger, remove battery from the vicinity of the fire. In principle, cooling the battery or extinguishing the fire with water is possible. It is preferable to extinguish the fire with a multipurpose dry chemicalfireextinguisher.Asforany fire, evacuate the area and fight the fire from a safe distance. Once the fire has been extinguished, the area should be monitored (fire watch) in case of a flareup, until the battery has cooled sufficiently. Contact the proper authorities immediately for appropriate handling and safe disposal. Restrict access to the area until completion of clean-up. Do not touch the burnt battery or any spilled liquids. Use inert absorbent to absorb spilled liquids.
English
Use and store the bat- tery only within a
temperature range from 14 °F (-10 °C) and no more than 122 °F
(+ 50 °C).
Protect the battery from direct sunlight when it is not in use.
Immediately discontinue use of the battery if, while using, charging or storing, it emits smoke, an unusual smell, feels hot or appears abnormal in any other way.
Charge the battery before use.
Iffourlightemittingdiodesonthebattery flash red (see "Light Emitting Diodes (LEDs) on Battery") and a rapid sucession of short beeps sound for severalseconds(see"AcousticSignal"), the battery is not functioning properly – disconnect the battery from the power tool, take it off your back, check its condition and contact your STIHL servicing dealer immediately.
 WARNING
If the battery emits smoke, heats up, smells, makes noises or shows signs of deformation, disconnect it from the power tool, take it off your back, put it down and immediately move a safe distance away. Keep children and animals away from the work area. Keep battery away from combustible materials.
Use the battery only with the harness supplied – it must not be combined with any other carrying straps (e.g. shoulder strap, full harness, etc.).
AR 900 |
3 |

English
Do not place or hang the battery in an elevated position (e.g. branches) – it may fall down.
Never sit or stand on the battery. Never place objects on the battery – do not stack several batteries on top of one another.
Protect from rain – do not immerse in fluids.
 WARNING
Do not charge or use a defective, damaged or deformed battery. Do not open, drop, hit or damage battery. The battery contains safety features and devices, which, if, damaged, may cause the battery to generate heat, rupture or ignite.
Never insert objects into the cooling slots of the adapter that connects the battery to the power tool.
Inspect the adapter, the adapter's contacts and the cable for damage at regularintervals.Ifanydamageisfound, contact your STIHL servicing dealer. Do not continue using or charging a malfunctioning, damaged, cracked or deformed battery, cable or adapter.
Never bridgetheadapter's contacts with metallic objects (short circuit). The battery may be damaged by a short circuit. Keep a battery that is not in use away from metal objects (e.g. nails, coins, jewelry). Do not use metal containers for transporting batteries.
 WARNING
Fluid may leak from the battery if it is damaged or is not used properly – avoid contact with the skin! Leaking battery fluid can cause skin irritation and chemical burns. In the event of accidental contact, wash affected areas of skin with plenty of water and soap. If batteryfluidgetsinthe eye(s),donotrub your eye(s) and rinse with plenty of water for 15 minutes at least. Also seek medical assistance.
Accessories and Spare Parts
Only use parts and accessories that are explicity approved for this battery by STIHL. If you have any questions in this respect, consult your STIHL servicing dealer.
STIHL recommends the use of genuine STIHL replacement parts and accessories. They are specifically designed to matchtheproduct and meet your performance requirements.
THE USE OF THE BATTERY
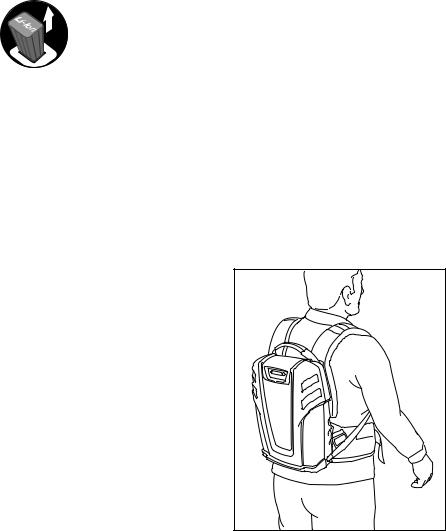
Transporting the Battery
Disconnect the battery from the power tool – even when carrying it for short distances. This avoids the risk of accidental startup.
4865BA002 KN
Carry the battery by the handle or on your back.
In vehicles: Properly secure the battery to prevent turnover and damage.
 WARNING
Specialprecautions mustbe takenwhen transporting a damaged or malfunctioning battery. To reduce the risk of accidents, always contact your STIHL servicing dealer before transporting such a battery.
Cleaning the Battery
Always cleandustand dirtoff thebattery
– do not use any grease solvents forthis purpose.
Clean plastic surfaces with a cloth. Do not use aggressive detergents. They may damage the plastic.
Do not spray the battery with water.
Do not use a pressure washer to clean your battery. The solid jet of water may damage parts of the battery and cause malfunctions.
Storing the Battery
Disconnect the battery from the power tool or charger.
4 |
AR 900 |
When the battery is not in use, put it in a safe place itso thatitdoesnotendanger others. Secure it against unauthorized use.
Store the battery out of the reach of children.
Store indoors in a dry and safe location. Protect it from dirt and damage.
To ensure maximum battery life: Store with a charge of about 30%.
Do not store spare batteries unused – use in rotation.
Notes on Cable
Check the adapter and its cable and plug for signs of damage. Never use a damaged adapter, cable or plug.
Make sure the insulation of the cable and plug is in good condition.
Straighten a twisted cable before use.
Position the cable so that it cannot be reached or damaged by the cutting or working attachment of the power tool being used.
Do not chafe, squash, jerk or damage the cable. Protect it from heat, oil and sharp edges.
Do not use the cable for any other purpose, e.g. for carrying or hanging up the battery or power tool. Do not tug the cable.
Position the cable so that it does not endanger others – risk of tripping or stumbling.
AR 900
Notes on Operation
Disconnect battery from the power tool:
–when carrying out tests and adjustments or cleaning
–before working on the power tool's cutting or working attachment
–before leaving the machine unattended
–when transporting
–storing the machine
–before performing repairs and maintenance work
–in the eventofa malfunctionorinan emergency
This avoids the riskofaccidentalstartup. Before Starting Work
Check that the battery is in good condition – refer to appropriate chapters in the instruction manual.
–Check condition of housing parts.
–Check condition of straps.
–Make sure cable, plug and adapter are not damaged.
–Depress push button to activate the LED display – see chapter "Light Emitting Diodes (LED) on Battery".
–Acoustic signal should beep when push button is released.
Do not continue usingthe batteryif parts of housing or straps are worn, cracked or broken – contact STIHL servicing dealer.
English
To reducethe riskofpersonalinjury,use the battery only if it is in good working order.
Do not use the battery if any of its components are damaged.
For emergencies: Practice quickly opening the fastener on the waist belt, loosening the shoulder straps and setting down the battery. To avoid damage, do not throw the battery to the ground when practicing.
During Operation
 WARNING
Thebatteryis equippedwith avisualand acoustic signal. Your ability to hear the acoustic signal may be reduced when wearing hearing protection.
4865BA001 KN
The battery is carried as a backpack.
5
English
The battery is designed to be operated by one person only. Do not allow other persons in the work area.
Make sure you always have good balance and secure footing.
Never work with the battery in trees, on roofs or on a ladder or other insecure support.
Make sure the cable cannot become entangled or snag on objects – position and secure the cable carefully before starting work.
If the battery is subjected to unusually high loads for which it was not designed (e.g. heavy impact or a fall), always check that it is in good condition before continuing work – see also "Before Starting Work". Do not continue operating the battery if it is damaged. In case of doubt, contact your STIHL servicing dealer.
After Finishing Work
Clean the battery – see "Cleaning the Battery".
Assembling the Battery
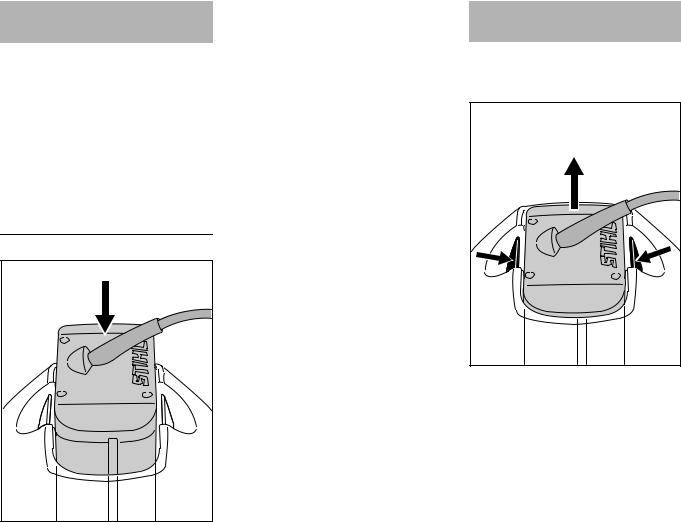
Connecting the Adapter
4865BA003 KN
NRemove the cover (1) – press the tabs (arrows) inwards and push the cover upwards.


 3
3

4865BA004 KN
NInserttheplug (2) in thesocket (3)– line up the lugs on the plug with the slots in the socket.
5 |
6 |
KN |
|
|
4865BA021 |
NPush the plug into the socket as far as stop, then turn it clockwise until the plug's latch (4) engages audibly.
NFit cable (5) in the cable duct (6) in the housing – see also "Positioning the Cable".
4865BA023 KN
NPush the cover (1) into place, making sure the cable is properly seated in the duct and not pinched.
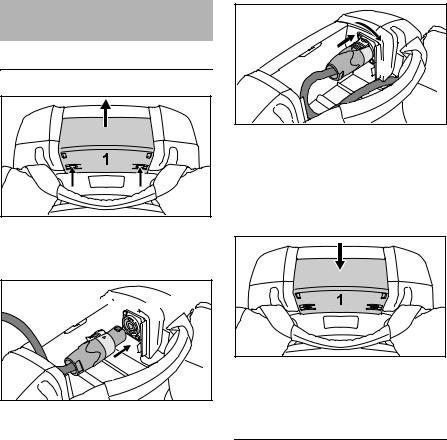
Positioning the Cable
The cable can be fitted in different cable ducts.
If the power tool being used with this battery is:
6 |
AR 900 |


 1
1


2 |
2 |


 4865BA005 KN
Nnext to or behind your body – fit the cable (1) in one of the lateral cable ducts (2) and push it into place
 WARNING
To reduce the risk of accidents, never lay the cable diagonally– itmay snag on objects.
4865BA006 KN
NIf the cable is too long, attach it to the retainer on the bag.
|
KN |
2 |
4865BA022 |
|
Nin front of your body – fit the cable (1) in one of the upper cable ducts (2) and push it into place
Always use the cable outlets at the side on which the power tool is held and controlled.
English
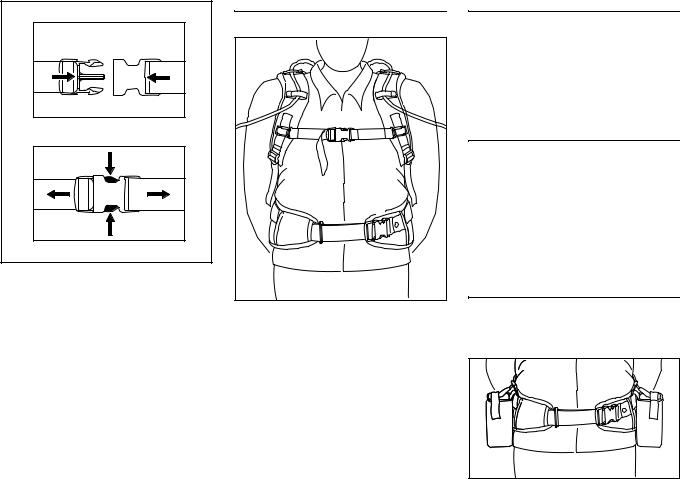
Fitting the Harness
Adjusting the Harness Straps
A |
B |
|
4865BA007 KN |
APull the ends of the straps downward to tighten the harness.
BLift the tabs of the adjusters to loosen the straps.
AR 900 |
7 |
English
C |
D |
4865BA027 KN |
CClose and lock the quick-release fastener by pushing it together.
DSqueeze the hooks to open the quick-release fastener.
Put on the shoulder strap.
5 |
5 |
5 |
5 |
|
4 |
3 |
3 |
|
1 |
|
2 |
4865BA009 KN
NFasten and adjust the waist belt (1) so that it rests comfortably on your hips – thread the end of the belt through the loop (2) – do not let in hang down.
NAdjust the harness straps (3) to the correct length.
NAdjust chest strap (4) to correct length and fasten it.
NIf you use the upper cable ducts – see"Positioning the Cable"– thread the cable through the hook and eye fasteners (5).
The back padding must fit firmly and securely against your back.
Removing Harness
NOpen the quick-release fasteners on the waist belt and chest strap.
NLoosen the harness straps by lifting the sliding adjusters and then take off the battery.
Throwing off the machine
 WARNING
The batterymustbequickly thrown offin the event ofimminentdanger. The waist belt and chest strap must be opened before throwing the battery to the ground.
Pouch
Accommodates adapter during work breaks and after finishing work.
1 |
KN |
|
4865BA010 |
Secure the pouch (1) to the waist belt only in the positions shown.
8 |
AR 900 |

 2
2


 3
3

4865BA011 KN
N Attach pouch to waist belt. N Insert the adapter (2).
NClosethehookand eye fastener (3)
– the adapter is held in the pouch.
 WARNING
Never transport metallic, pointed or sharp objects in the pouch. They may bridge the contacts in the adapter and cause a short circuit.
English
Acoustic Signal |
Charging the Battery |
|
|
The battery emits acoustic signals as well as optical signals – see "Light Emitting Diodes (LEDs) on Battery".
A
B
|
|
|
|
|
|
|
|
|
|
|
|
|
|
|
|
|
|
|
|
|
|
|
|
|
|
|
|
|
|
|
|
|
|
|
|
|
|
|
|
|
KN |
C |
|
|
|
|
|
|
|
|
|
|
|
|
|
|
|
|
|
|
|
|
|
|
|
|
|
|
|
|
|
|
|
|
|
|
|
|
|
|
|
....... |
4865BA024 |
|
|
|
|
|
|
|
|
|
|
|
|
|
|
|
|
|
|
|
|
|
|
|
|
|
|
|
|
|
|
|
|
|
|
|
|
|
|
|
|
AA short beep
This signal is activated by pressing and releasing the button on the bat- tery – see "Main Parts".
Meaning:Acoustic signalworks asit should.
BFour long beeps
One LED on battery flashes green.
Meaning:Battery'sstate ofchargeis low – recharge the battery.
CRapid succession of short beeps 1) Four LEDs on battery flash red.
Meaning: Malfunction in battery – see "Troubleshooting".
1)Signal stops automatically after a few seconds.
A factory-new battery is not fully charged.
Recommendation: Fully charge the battery before using it with your power tool for the first time.
NConnect the charger to the power supply – mains voltage and operating voltage of the charger must be the same – see "Connecting Charger to Power Supply".
Operate the charger indoors only in dry locations at an ambient temperature between 41 °F (5 °C) and 104 °F
(40 °C).
2 |
4865BA012 KN |
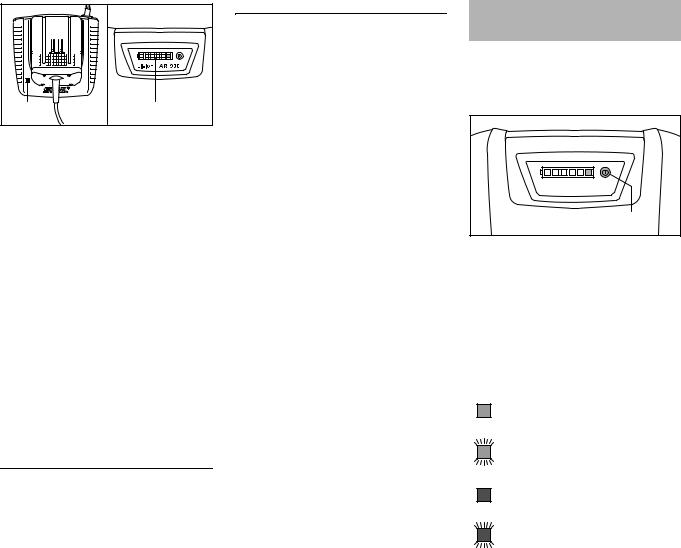
NPush the adapter (1) into the charger (2) until you feel noticeable resistance – then push it as far as stop.
AR 900 |
9 |
English
3 |
4 |
4865BA013 KN |
The light emitting diode (3) on the charger comes on when the adapter is inserted – see "Light Emitting Diode (LED) on Charger".
Charging begins as soon as the light emitting diodes (4) on the battery light up green – see "Light Emitting Diodes (LEDs) on Battery".
The charge time is dependent on a number of factors, including battery condition, ambient temperature, etc., and may therefore vary from the charge time in the "Specifications".
The battery warms up during operation. If a warm battery is inserted in the charger, it may be necessary to cool it down before charging. The charging processbeginsonlyafterthebattery has cooled down. The time required for cooling may prolong the charge time.
AL 300 charger
The charger is equipped with a fan which is audible when it is running.
End of Charge
The charger switches itself off automatically when the battery is fully charged:
–Light emitting diodes on the battery go off
–The light emitting diode on the charger goes off
–The charger's fan is switched off. Remove the adapter from the charger.
Light Emitting Diodes (LED) on Battery
The light emitting diodes show the battery's state of charge and any problems with the battery or the power tool being used.
AR 900 Lithium-Ion |
|
KN |
|
|
|
|
1 |
4865BA025 |
|
|
NPress button (1) to activate the light emitting diodes – the display goes off automatically after 5 seconds.
–The acoustic signal must sound briefly when the button is released (to confirm function) – see also "Acoustic Signal".
The light emitting diodes can glow or flash green or red.
Light emitting diode glows con- tinuously green.
Light emitting diode flashes green.
Light emitting diode glows con- tinuously red.
Light emitting diode flashes red.
10 |
AR 900 |
During Charging Process
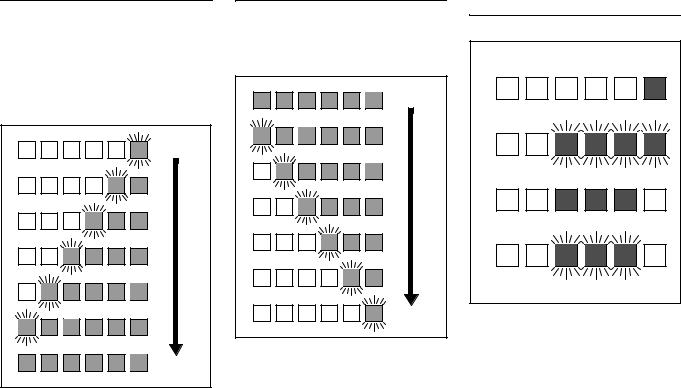
The light emitting diodes glow continuously or flash to indicate the progress of charge.
A green flashing light emitting diode indicates the capacity that is currently being charged.
0 %
|
|
|
|
KN |
|
|
|
|
|
|
|
|
|
|
|
|
|
|
|
|
|
|
|
|
|
|
|
|
|
|
|
|
|
|
|
|
|
|
|
|
|
|
|
|
|
|
|
|
|
|
|
|
|
|
|
|
|
|
|
|
|
|
|
|
|
|
|
|
|
|
|
|
|
|
|
|
|
|
|
|
|
|
|
|
|
|
|
|
|
|
|
|
|
|
|
|
|
|
|
|
|
|
|
|
100 % |
4865BA015 |
|||
|
||||
The light emitting diodes on the battery go off automatically when the charge process is completed.
If the light emitting diodes on the battery flash or glow red – see "If the red light emitting diodes glow continuously / flash".
During Operation
The green light emitting diodes glow continuouslyorflashtoindicatethe state of charge.
100 %
|
|
|
KN |
|
|
|
|
|
|
|
|
|
|
|
|
|
|
|
|
|
|
|
|
|
|
|
|
|
|
|
|
|
|
|
|
|
|
|
|
|
|
|
|
|
|
|
|
|
|
|
|
|
|
|
|
|
|
|
|
|
|
|
|
|
|
|
|
|
|
|
|
|
|
|
|
|
|
|
|
|
|
|
|
0 % |
4865BA016 |
||
|
|||
If the battery is almost completely discharged and the last LED begins to flash, four long signals sound – see "Acoustic Signal".
If the light emitting diodes on the battery flash or glow red – see "If the red light emitting diodes glow continuously / flash".
English
If the red light emitting diodes glow continuously / flash
A |
|
B |
|
C |
|
D |
KN |
|
4865BA025 |
A |
1 light emitting |
Battery is too |
|
diode glows |
hot1) 2)/cold1) |
|
continuously |
|
|
red: |
|
|
|
|
B |
4 light emitting |
Malfunction in |
|
diodes flash red |
battery 3) |
C |
3 light emitting |
Powertoolis too |
|
diodes glow |
hot – allow it to |
|
continuously |
cool down. |
|
red: |
|
|
|
|
D |
3 light emitting |
Malfunction in |
|
diodes flash red |
power tool 4) |
1)When charging: Charge process starts automatically after the battery has cooled down / warmed up.
AR 900 |
11 |
English
2)During operation: Power tool switches itself off – allow battery to cool down for a while.
3)Electromagnetic problem or malfunction. Acoustic signal can be heard as a rapid series of sounds lasting several seconds – see also "Acoustic Signal". Disconnect battery from power tool, take it off your back, observe battery and contact your STIHL servicing dealer immediately – see also "Troubleshooting".
4)Electromagnetic problem or malfunction. Take the adapter out of the power tool and refit it. Switch on the power tool – if the light emitting diodes still flash, the power tool has a malfunction and must be checked by a STIHL servicing dealer.
Light Emitting Diodes (LED) on Charger
1 |
KN |
|
3901BA019 |
The light emitting diode (1) on charger glows continuously green or flashes red.
Green continuous light ...
... indicates the following: The battery
–is being charged
–is too hot and must cool down before charging
See also "Light Emitting Diodes (LEDs) on Battery".
The green light emitting diode on the charger goes off as soon as the battery is fully charged.
Red flashing light ...
... indicates the following:
–No electrical contact between battery and charger – remove and refit the adapter
–Malfunction in battery – see also "Light Emitting Diodes (LEDs) on Battery".
–Malfunction in charger – have charger checked by dealer – STIHL recommends an authorized STIHL servicing dealer.
12 |
AR 900 |
Connecting Battery to Power Tool
A factory-new battery is not fully charged.
Recommendation: Fully charge the battery before using it for the first time.
NIfnecessary,remove the coverfrom the power tool's battery compartment before fitting the adapter, i.e. depress both locking levers to unlock and remove the cover.
Insert adapter
The battery and power tool are now connected together.
For further information on switching on and operating the power tool: see the instruction manual of the power tool being operated with this battery.
4865BA018 KN
NInsert the adapter (1) in the power tool – the adapter slides into the compartment – press it down carefully untilitsnapsinto position – the adapter must be flush with the top of the housing.
AR 900
English
Disconnecting Battery from Power Tool
NSwitch off the power tool – see also instruction manual of the power tool being used.
2 |
4865BA019 KN |
NDepress both locking levers (1) at thesame timeto unlock the adapter.
NTake the adapter (2) out of the power tool.
The battery and power tool are now disconnected.
13

English
Maintenance and Care
The following intervals apply to normal operating conditions only. If your daily work- |
|
daily |
|
|
|
|
|
|
||
ing time is longer or operating conditions are difficult (very dusty work area, etc.), |
|
|
|
|
|
|
|
|||
shorten the specified intervals accordingly. |
|
|
|
|
|
|
|
|
||
|
before starting work |
after finishing work or |
|
|
|
|
|
|
||
Alwaysdisconnectthe batteryfromthepowertool beforeperformingany work onthe |
|
|
every 12 months |
|
|
|
||||
battery. |
|
|
|
|
|
|
||||
|
|
|
weekly |
monthly |
if problem |
if damaged |
if required |
|||
|
|
|
|
|
|
|
|
|
|
|
Battery |
|
Visual inspection |
X |
|
|
|
|
X |
X |
X |
|
|
|
|
|
|
|
|
|
|
|
|
Clean |
|
X |
|
|
|
|
|
|
|
|
|
|
|
|
|
|
|
|
||
|
|
|
|
|
|
|
|
|
|
|
Light emitting diodes (LEDs) |
|
Check operation – LED display must be |
X |
|
|
|
|
|
|
X |
|
activated when button is pressed |
|
|
|
|
|
|
|||
|
|
|
|
|
|
|
|
|
|
|
|
|
|
|
|
|
|
|
|
|
|
Acoustic signal |
|
Check operation – brief signal must |
X |
|
|
|
|
|
|
X |
|
sound when button is released |
|
|
|
|
|
|
|||
|
|
|
|
|
|
|
|
|
|
|
|
|
|
|
|
|
|
|
|
|
|
Adapter and cable |
|
Visual inspection |
X |
|
|
|
|
X |
X |
|
|
|
|
|
|
|
|
|
|
|
|
Safety labels |
|
Replace |
|
|
|
|
|
|
X |
|
|
|
|
|
|
|
|
|
|
|
|
14 |
AR 900 |
 Loading...