


 Loading...
®
DSM Sport System with Integrated Telemetry

Table of Contents |
|
Introduction............................................................................................................................................. |
3 |
Contents.................................................................................................................................................. |
3 |
ModelMatch/Binding............................................................................................................................... |
3 |
System Features...................................................................................................................................... |
3 |
Identifying Buttons, Switches and Controls............................................................................................. |
4 |
Switching Rubber Grips........................................................................................................................... |
5 |
Installing the Batteries............................................................................................................................. |
5 |
Charging.................................................................................................................................................. |
5 |
Steering Rate........................................................................................................................................... |
6 |
Receiver Compatibility............................................................................................................................. |
6 |
Receiver Connection and Installation....................................................................................................... |
7 |
Using the Rolling Selector....................................................................................................................... |
7 |
Main Screen............................................................................................................................................ |
8 |
Telemetry Screen..................................................................................................................................... |
9 |
List........................................................................................................................................................ |
10 |
Model Select.......................................................................................................................................... |
10 |
Model Name.......................................................................................................................................... |
11 |
Model Reset........................................................................................................................................... |
11 |
Travel..................................................................................................................................................... |
12 |
Exponential............................................................................................................................................ |
13 |
Reverse.................................................................................................................................................. |
14 |
Sub Trim................................................................................................................................................ |
14 |
Timer..................................................................................................................................................... |
15 |
Bind....................................................................................................................................................... |
16 |
ModelMatch.......................................................................................................................................... |
16 |
Binding a Receiver................................................................................................................................. |
16 |
Failsafe.................................................................................................................................................. |
17 |
Throttle Punch....................................................................................................................................... |
17 |
AUX Setting........................................................................................................................................... |
18 |
Telemetry Settings................................................................................................................................. |
19 |
System................................................................................................................................................... |
22 |
Installing the Telemetry Sensors in Your Vehicle................................................................................... |
23 |
General Notes........................................................................................................................................ |
25 |
2 |
SPEKTRUM DX3S USER GUIDE |
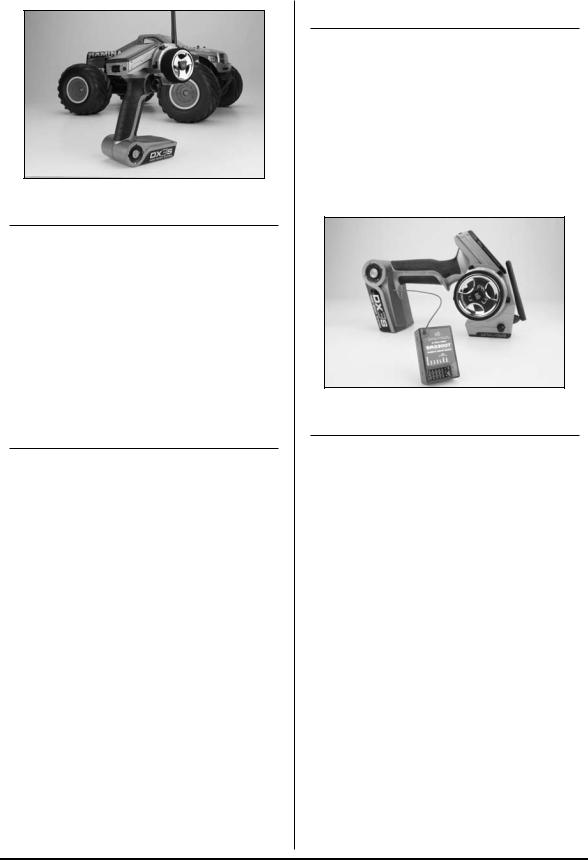
Introduction
Spektrum’s DX3S features an integrated telemetry system providing accurate speed/rpm, temperature and voltage readings. Featuring DSM 2.4GHz technology, the DX3S offers sophisticated software combined with an easy-to- use one-touch Rolling Selector making programming quick and easy. Spektrum technology offers a bulletproof radio link that’s immune to internal (noisy motors/ ESCs, etc.) and external interfering sources. No longer will you have to wait for a frequency or worry about someone else being on the same channel. With Spektrum when you’re ready to race there’s nothing stopping you!
Contents
The DX3S radio system is supplied with the following:
•DX3S transmitter
•SR3300T receiver (SPMSR3300T)
•SR300 receiver (SPMSR300)
•Bind plug (SPM6802)
•4 AA Alkaline batteries
•Receiver AA battery holder
•Switch harness
•Grip Set (SPM9006)
•Head Temperature Sensor (SPM1450)
•Battery/Motor Temperature Sensor (SPM1451)
•RPM Sensor (SPM1452)
•Sensor Mount Hardware .21-.26 (SPM1501)
•Sensor Mount Hardware .12-.15 (SPM1502)
•Sensor Mount Hardware Electrics (SPM1503)
•Telemetry RPM Sticker (SPM1512)
ModelMatch/Binding
The DX3S features ModelMatch (patent pending). ModelMatch prevents a model from being operated when the wrong model memory is selected. If the wrong model memory is selected the receiver simply won’t respond to the transmitter.
It’s necessary to program the receiver to a specific model memory (called binding) so that the receiver will only recognize and respond to that specific model
memory. See Page 16 for specific details on Binding and ModelMatch.
System Features
•Integrated Telemetry
•One-touch easy-to-use programming
•Internal and programmable Up or Down timers
•128x64 high resolution dot-matrix screen
•10-model memory
•Travel adjust
•Exponential
•Throttle punch
•Steering mix
•Expert and standard modes
Dodge and HEMI are trademarks of Chrysler LLC. Dodge Ram and its trade dress are used under license by Horizon Hobby, Inc. ©Chrysler LLC 2008.
SPEKTRUM DX3S USER GUIDE |
3 |
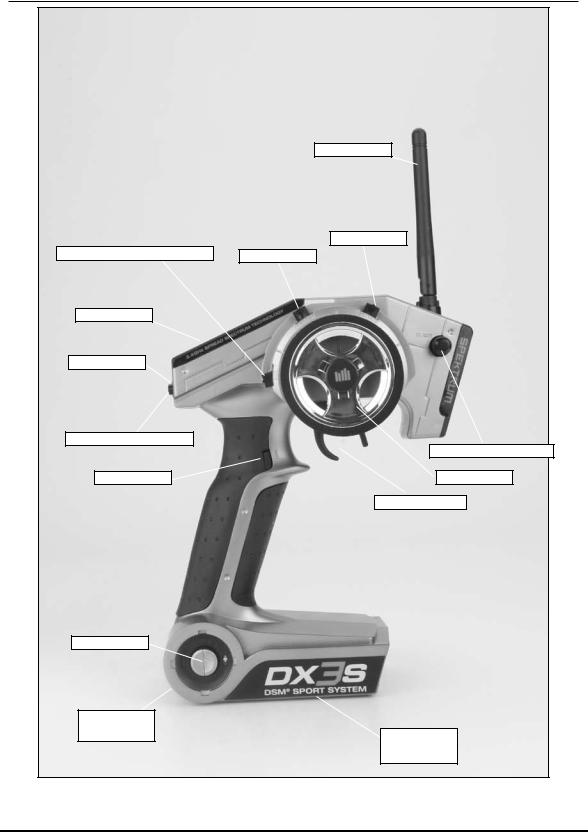
Identifying Buttons, Switches and Controls
|
Antenna |
|
Steering Trim |
Switch - Aux. Ch. 2-Position |
Throttle Trim |
LCD Screen |
|
Rolling Selector |
|
Remote Start Button |
Steering Rate Knob |
|
|
Timer Button |
Steering Wheel |
|
Throttle Trigger |
On/Off Switch |
|
Charge Jack |
|
(on back) |
Battery Door |
|
|
|
(on bottom) |
4 |
SPEKTRUM DX3S USER GUIDE |

Switching Rubber Grips
The DX3S is supplied with 3 different sized rubber grips with the medium size installed on the transmitter. Each grip’s size is identified with an “S” (small), “M” (medium), or “L” (large) on the inside of the grip for easy identification. To remove, simply lift the edge of the grip and continue around the grip until it is completely
removed. To replace, align the tabs of the grip to the slots in the handle and press the grip in place.
Installing the Batteries
The DX3S radio system is supplied with 4 AA alkaline batteries required for operation that provide over 16 hours of run time. Many drivers prefer alkaline batteries over rechargeable batteries finding it more convenient to simply replace the batteries when depleted rather than taking the time to recharge.
Optional NiMH 1.2-volt AA rechargeable batteries (SPM9525) can also be used. A charge jack located opposite of the on/off switch is provided for convenient recharging.
Remove the battery door and install 4 AA batteries observing the polarity marked on the battery holder. Replace the battery door.
Charging |
|
Charger Pigtail for Transmitter |
|
|
BLACK TO POSITIVE |
BLACK W/WHITE STRIPE TO NEGATIVE |
|
Spektrum Transmitter Charge Jack Polarity |
|
- |
+ |
A charging jack is located on the opposite side of the on/ off switch. If rechargeable batteries are used they can be conveniently charged without removing them from the transmitter using the charge jack.
IMPORTANT: All Spektrum charge jacks are center-pin negative. This is opposite of many chargers. Before using a charger, make sure the connector is center-pin negative. This can be done using a voltmeter. Also, unlike conventional radio systems that use 8 cells to power the transmitter, the DX3S uses 4 cells. This is due to the electronics being more efficient. When charging, be sure to use a
charger designed for 4 cells (a 4.8-volt battery pack) when charging the transmitter. Many drivers simply make a harness and use the same charger used to charge their car packs but turn the current rate down to 1 to 2 amps.
SPEKTRUM DX3S USER GUIDE |
5 |

Steering Rate
Steering
Rate
Steering rate, (also known as dual rate) allows on-the-fly steering travel adjustments to be made using the steering rate knob. Steering rate limits the amount of travel of the steering servo. The steering rate cannot be greater than 100% and will never exceed the amount of steering travel set in the travel screen.
Receiver Compatibility
The DX3S features DSM technology and is also compatible with most DSM Spektrum surface receivers.
Compatible Spektrum Receivers
The DX3S is compatible with the following DSM receivers. It is not compatible with the SR3100 DSM2 receiver.
SR300 - 3-channel - SPMSR300
SR3000 - 3-channel standard - SPM1200
SR3001 - 3-channel Pro - SPM1205
SR3500 - 3-channel Micro Race - SPM1210
Note: The SR3000HRS (SPM1202) receiver is designed to be used with Spektrum’s Futaba HRS compatible module system only and is not compatible with the DX3S.
6 |
SPEKTRUM DX3S USER GUIDE |
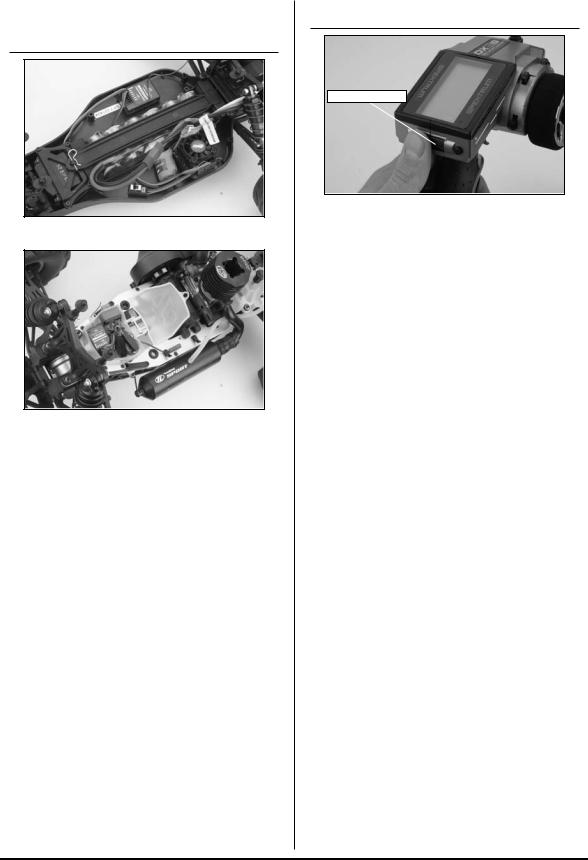
Receiver Connection and
Installation
Typical Electric Installation
Typical Gas Installation
Using the Rolling Selector
Rolling Selector
The Rolling Selector is pressed to access functions and rolled to select specific features or to change settings or values. Pressing and holding the Rolling Selector for more than 3 seconds returns the display to the main screen.
The DX3S features one-touch programming utilizing a Rolling Selector. The Rolling Selector has three functions:
1.Pressing the Rolling Selector - enters the selected function.
2.Rolling the Rolling Selector - highlights function or changes settings and values when selected.
3.Pressing and holding the Rolling Selector for more than 3 seconds from any screen - returns the display to the Main Screen.
Programming is very intuitive and always starts with a press on the selector, then a roll, then a press, then a roll and so on. Most find that within a few minutes they are able to easily program their car without reading the instructions; however, to realize the full benefit of the programming it is recommend that the manual be read.
Most racers find it is most convenient to use their thumb when making programming changes as this allows for one-handed programming, even allowing the car to be run in one hand while making programming adjustments with the other.
Futaba is a registered trademark of Futaba Denshi
Kogyo Kabushiki Kaisha Corporation of Japan
SPEKTRUM DX3S USER GUIDE |
7 |

Main Screen
Model Number and Name
Down Timer
Internal Timer
Transmitter Voltage
Steering Rate
Brake Trim
Steering Trim
Throttle Trim
Auxiliary Trim
The main screen displays pertinent information about the selected model like trim and steering rate positions, timers, the model selected, battery voltage, etc.
To access the main screen
From the List screen, the first function at the top of the List screen is MAIN. Using the Rolling Selector highlight the Main function and press the Rolling Selector to access the Main screen.
From any screen, pressing and holding the Rolling Selector for more than three seconds will return the display to the main screen.
Note: When the battery voltage drops below the preset value in the System function, an alarm will sound.
8 |
SPEKTRUM DX3S USER GUIDE |
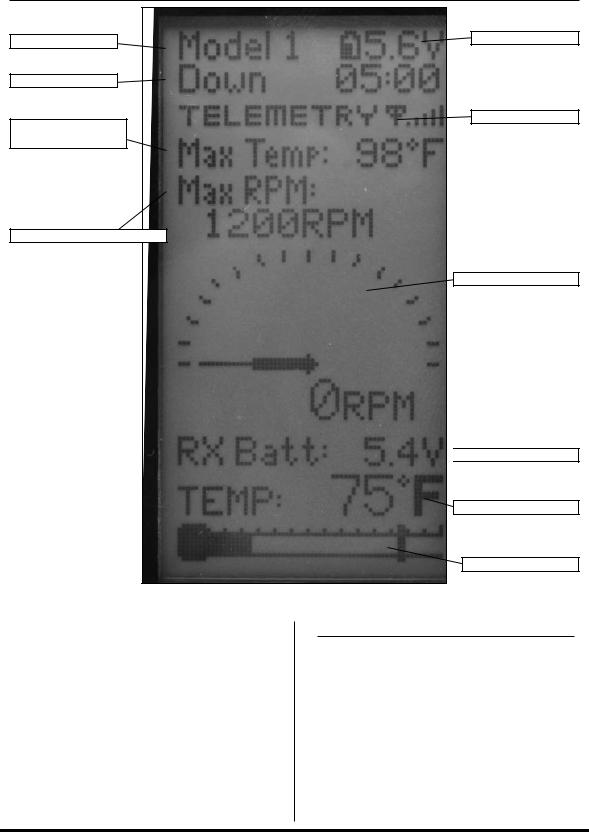
Telemetry Screen |
|
Model Number |
Transmitter Voltage |
|
|
Down/Up Timer |
|
Maximum Recorded |
Signal Strength |
|
|
Temperature |
|
Maximum Recorded rpm/Speed |
|
|
Real-Time rpm/Speed |
 Receiver Battery Voltage
Temperature
Alert Temperature
The Telemetry screen displays information received from the on-board telemetry built into the SR3300T receiver.
Note: The signal strength display is for the Telemetry link only. Typical telemetry range is 100–200 feet and will vary depending on the operating environment.
To access the Telemetry screen
From any screen, pressing and holding the Rolling Selector for more than three seconds will first return the display to the Main screen. Three seconds later the Telemetry screen will be displayed.
SPEKTRUM DX3S USER GUIDE |
9 |
Loading...