

User guide
HBH-PV715 and
HBH-PV720
1
Microphone
Micrófono
Volume keys
Teclas de volumen
Call handling keys
Tecla de
gestión de
llamadas
Call handling key
Tecla de gestión de
llamadas
Volume keys
Teclas de volumen
2
Indicator light
Indicador luminoso
English
Español
Français
Deutsch
On/off key
Tecla de activación/
desactivación
Earspeaker
Auricular
3
CST-60/CST-70
CDS-60
CLA-61
6
English
The Bluetooth™ headsets HBH-PV715 and HBH-PV720
can be connected to any device with Bluetooth wireless
technology that supports the handsfree or headset profile.
This User guide focuses on use with a
mobile phone.
Sony Ericsson
To switch between two calls
• Press and hold down the call handling key until you
hear a beep.
To turn off the microphone (mute)
• Press both volume keys simultaneously. Mute
is indicated with a beeping sound. Repeat to turn
on the microphone again.
Español
Los auriculares Bluetooth™ HBH-PV715 y HBH-PV720
pueden conectarse a cualquier dispositivo que disponga
de tecnología inalámbrica Bluetooth y que admita perfiles
de manos libres o de auricular. Esta guía del usuario se
centra en la utilización del dispositivo con un teléfono
móvil de Sony
Ericsson.
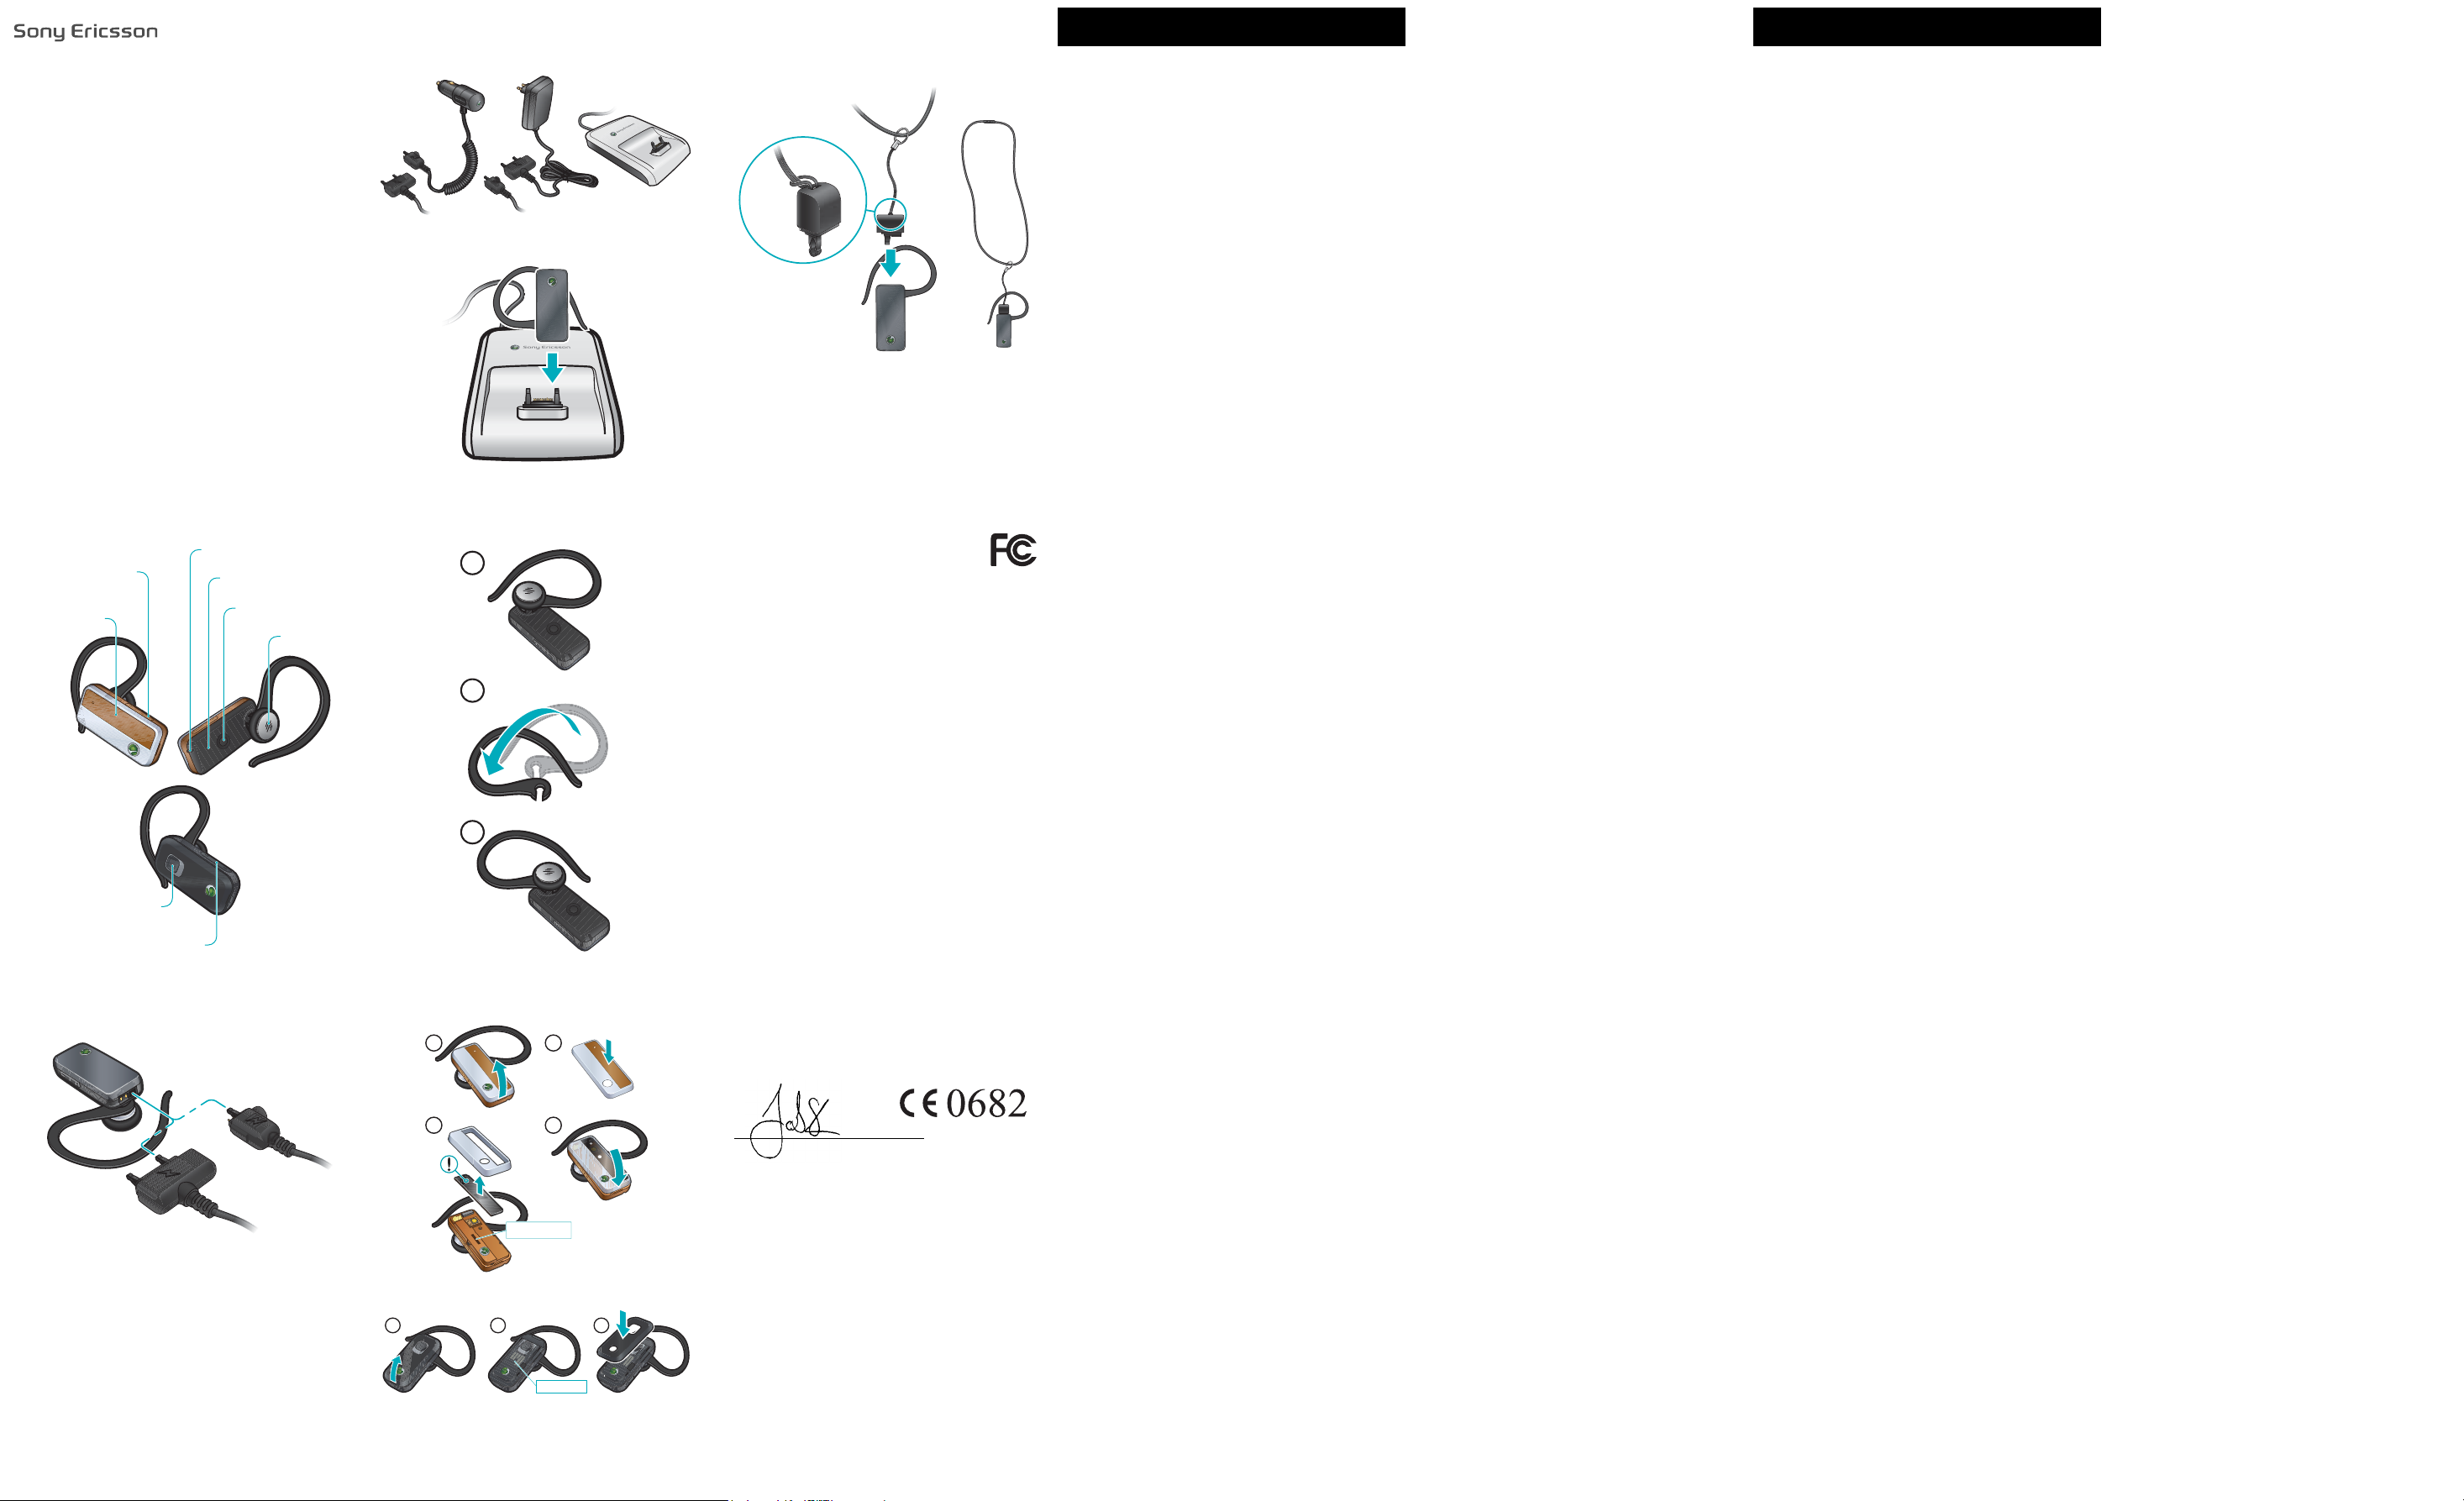
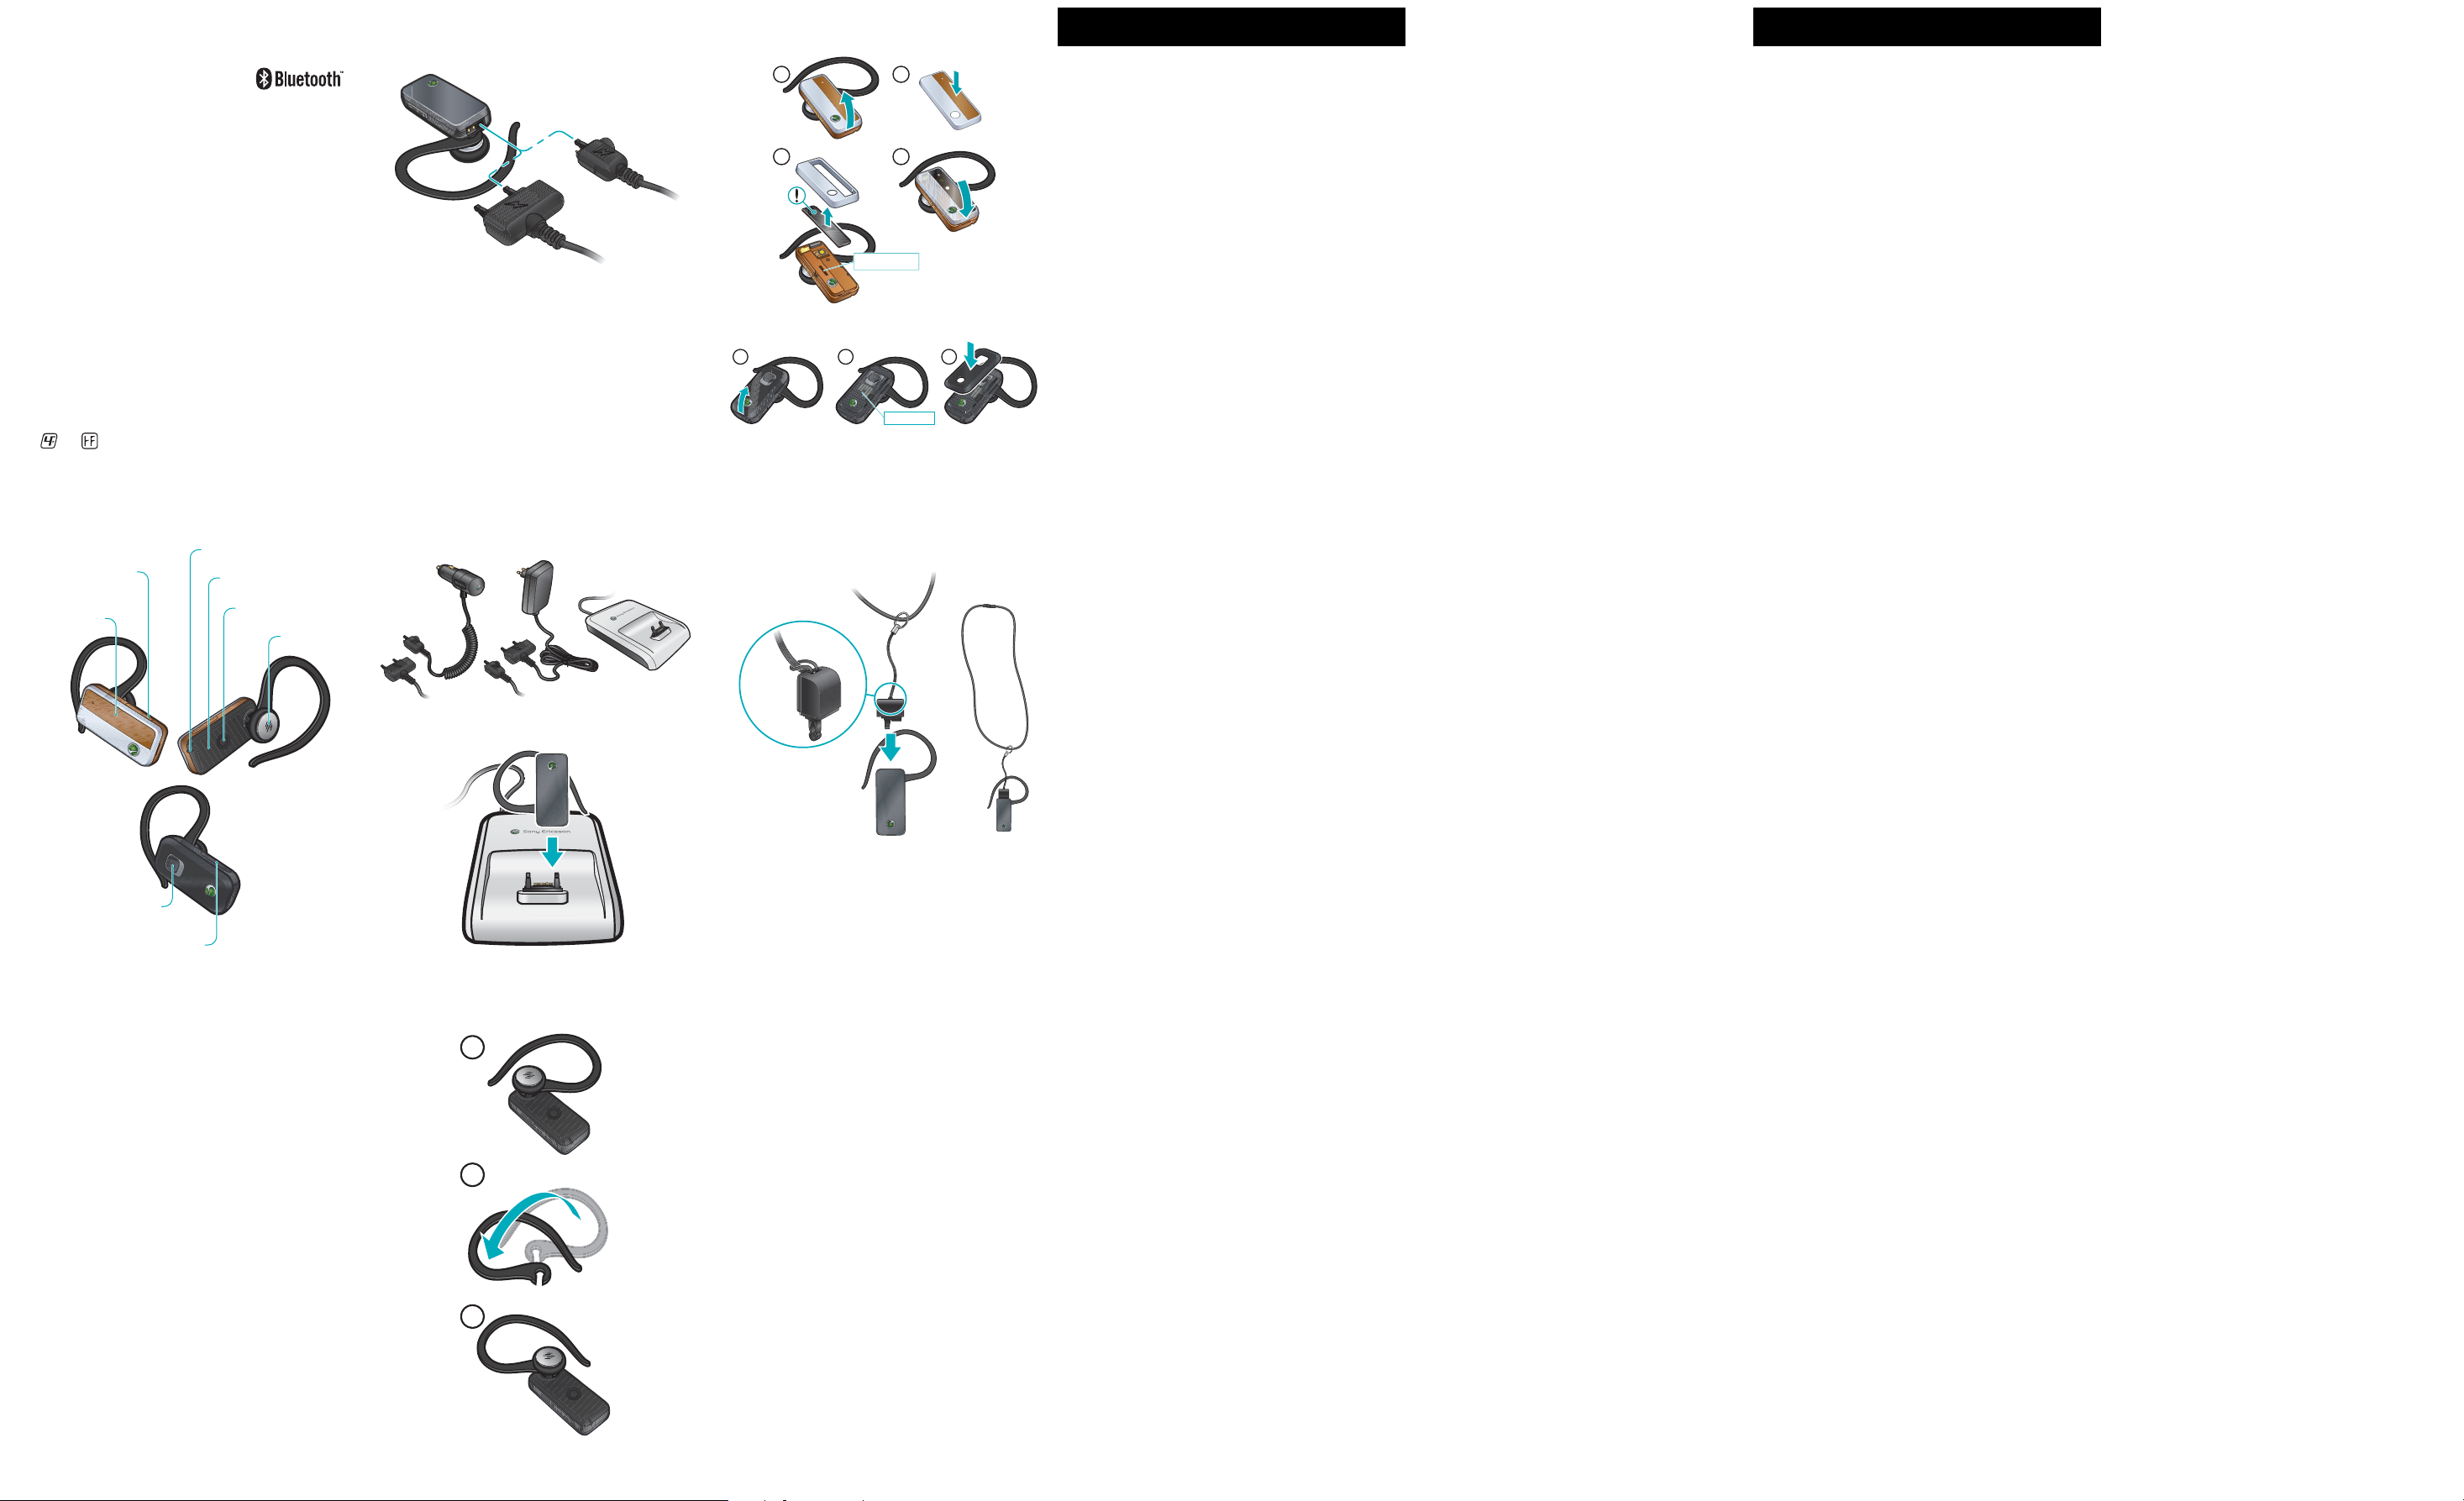
Charging the headset
Before using the HBH-PV715 or the HBH-PV720 for
CST-61/CST-18
the first time, you must charge it with, for example, the
supplied charger or your phone charger, see figure
For compatible chargers, see figure 3.
Turning on and off the headset
2.
To turn on the headset
• Press and hold down the on/off key until the indicator
light shows a steady green light (if the light is red, the
headset needs charging). After 3 seconds, the light
turns off and the headset stays on.
To turn off the headset
• Press and hold down the on/off key until the
indicator light shows a steady green light (if the
is red, the headset needs charging). After
light
seconds, the light fades and the headset turns off.
2
Pairing the headset
Before you can use the headset it has to be paired
once with your phone. After a successful pairing, the
headset connects automatically to the phone when
is turned on and within range.
it
4
FCC Statement
This device complies with Part 15 of the FCC rules.
1
2
3
5
1
3
2
4
Operation is subject to the following two conditions:
(1) This device may not cause harmful interference,
and (2) This device must accept any interference
received, including interference that may cause undesired operation.
Any change or modification not expressly approved by Sony Ericsson
may void the user's authority to operate the equipment.
This equipment has been tested and found to comply with the limits
for a Class B digital device, pursuant to Part 15 of the FCC Rules.
These limits are designed to provide reasonable protection against
harmful interference in a residential installation. This equipment
generates, uses and can radiate radio frequency energy and, if not
installed and used in accordance with the instructions, may cause
harmful interference to radio communications. However, there is no
guarantee that interference will not occur in a particular installation.
If this equipment does cause harmful interference to radio or television
reception, which can be determined by turning the equipment off and
on, the user is encouraged to tr y to correct the interference by one or
more of the following measures:
• Reorient or relocate the receiving antenna.
• Increase the separation between the equipment and receiver.
• Connect the equipment into an outlet on a circuit different from
that to which the receiver is connected.
• Consult the dealer or an experienced radio/TV technician for help.
Industry Canada Statement
This device complies with RSS-210 of Industry Canada.
Operation is subject to the following two conditions: (1) this device
may not cause interference, and (2) this device must accept any
interference, including interference that may cause undesired
operation of the device.
This Class B digital apparatus complies with Canadian ICES-003.
Cet appareil numérique de la classe B est conforme à la norme
NMB-003 du Canada.
Declaration of conformity for HBH-PV715 and HBH-PV720
We, Sony Ericsson Mobile Communications AB of
Nya Vattentornet
SE-221 88 Lund, Sweden
declare under our sole responsibility that our product
Sony Ericsson type DDA-0002018
and in combination with our accessories, to which this declaration
relates is in conformity with the appropriate standards EN 300
328:V1.7.1, EN 301 489-7:V1.3.1, EN 301 489-17:V1.2.1 and
EN 60950-1:2006 following the provisions of Radio Equipment and
Telecommunication Equipment directive 1999/5/EC.
Lund, May 2008
Note: When you put the headset in pairing mode, do not
press the call handling key together with the on/off key.
To pair the headset with your phone
1. Turn on the Bluetooth function in the phone.
instructions, see the phone User guide.
For
2. Place the phone within 20 cm (8 inches) of the
headset.
3. Turn on the headset. The first time you do so,
the
headset enters pairing mode automatically
tries to pair with your phone (auto pairing).
and
Note: If auto pairing is not supported by your phone,
not successful, follow the two first steps above
or
and
turn on the headset. Then add the headset to
phone as described in your phone User guide.
your
passcode is 0000.
The
To pair the headset with another phone
1. Turn on the Bluetooth function in the phone.
instructions, see the phone User guide.
For
2. Place the phone within 20 cm (8 inches) of the
headset.
3. Turn off the headset if it is turned on. Press and hold
down the on/off key until the indicator light flashes
red and green alternately.
4. Press Yes when Add device? appears in the phone.
If required, the passcode is
beeps and flashes green when paired successfully.
0000. The headset
Putting on the headset
Slide the ear hook behind your ear and point the
microphone towards your mouth. For left ear use, change
the position of the ear hook as instructed in figure
4
.
Calling
When you have paired the headset with your phone,
you can make and receive calls as long as the headset
is turned on.
Solid objects, walls and a greater distance than
5 metres (16.5 feet) can affect the sound quality
negatively. For best performance, you should wear the
headset and the phone on the same side of your body.
Adjusting volume
To adjust the ring volume
• When you are not making a call, or when the phone
is ringing, press a volume key.
To adjust the speaker volume
• During a call, press a volume key.
Calling using voice commands
Voice commands can be useful when you are using
the
headset and the phone is not close to you. For
more information on voice commands, see your phone
User guide.
To make a call using voice commands
• Press the call handling key briefly, wait for a beep
and say your command.
Note: Make sure voice commands are enabled and
recorded in your phone before you use them.
Transferring sound
To transfer sound from the phone to the headset
• During a call, press the call handling key briefly.
The sound is transferred to the headset.
To transfer sound from the headset to the phone
• See the phone User guide.
Battery
A new, or infrequently used, battery could have reduced
capacity. It may need to be recharged a few times to
reach full capacity.
When the battery needs charging, the indicator
light flashes red and you hear a low beep. If you do
not charge the headset, it turns off automatically.
To check the battery status
• Press the on/off key briefly:
• steady green light plus one green flash –
the battery needs charging soon
• steady green light plus two green flashes –
the battery is half full
• steady green light plus three green flashes –
the battery is fully charged
Resetting the headset
To reset the headset
1. Turn off the headset.
2. Press and hold down the on/off key until the
indicator light flashes red and green alternately.
3. Press and hold down the on/off key and the call
handling key simultaneously until the headset
off.
turns
4. Pair the headset with the phone in the same way
you paired it the first time.
as
To make a call
• Use the phone keys to dial the number as normal.
The call is activated automatically in the headset.
To end a call
• Press the call handling key briefly.
xxx xxx xx
Jacob Sten, Head of Product Business Unit Accessories
We fulfil the R&TTE Directive
Cumplimos con la directiva R&TTE
Nous respectons la Directive R&TTE
Die Richtlinie für Funk- und Fernmeldegeräte wird erfüllt
To answer a call
• Press the call handling key briefly.
To reject a call
• Press and hold down the call handling key until you
1
2
3
hear a short beep (after 2 seconds).
To redial the last number
• Double-click the call handling key.
xxx xxx xx
To answer a second call
• Press the call handling key. The ongoing call is put
on hold.
Carga del auricular
Antes de utilizar el auricular HBH-PV715 o el
HBH-PV720 por primera vez, debe cargarlo, por
ejemplo, con el cargador suministrado o con el de
teléfono (consulte la figura 2). Para cargadores
su
compatibles, consulte la figura 3.
Encendido y apagado del auricular
Para encender el auricular
• Mantenga pulsada la tecla de activación/
desactivación hasta que el indicador luminoso
muestre una luz verde fija (si es roja significa que
hay que cargar el auricular). Al cabo de 3 segundos,
la luz se apaga y el auricular se queda encendido.
Para apagar el auricular
• Mantenga pulsada la tecla de activación/
desactivación hasta que el indicador luminoso
muestre una luz verde fija (si es roja significa que
que cargar el auricular). Al cabo de 2 segundos,
hay
la luz y el auricular se apagan.
Asociación del auricular
Antes de utilizar el auricular, debe asociarlo una vez
con su teléfono. Después de asociarlo correctamente,
el auricular se conecta al teléfono de forma automática
en cuanto se enciende y tiene cobertura.
Nota: Cuando ponga el auricular en modo asociación,
no pulse la tecla de gestión de llamadas al mismo
tiempo que la tecla de activación/desactivación.
Para asociar el auricular con el teléfono
1. Active la función Bluetooth en el teléfono. Consulte
las instrucciones pertinentes en la Guía del usuario
del teléfono.
2. Coloque el teléfono a 20 cm (8 pulgadas) del auricular.
3. Encienda el auricular. La primera vez que lo haga,
entrará automáticamente en el modo asociación
e
intentará asociarse con el teléfono (acoplamiento
automático).
Nota: Si su teléfono no admite el acoplamiento
automático o no consigue asociarlo correctamente,
siga
los dos primeros pasos indicados anteriormente
encienda el auricular. A continuación, añada el auricular
y
al teléfono siguiendo las instrucciones de la Guía del
usuario del teléfono. El código de acceso es el
0000.
Para asociar el auricular con otro teléfono
1. Active la función Bluetooth en el teléfono. Consulte
las instrucciones pertinentes en la Guía del usuario
del teléfono.
2. Coloque el teléfono a 20 cm (8 pulgadas) del auricular.
3.
Si el auricular está encendido, apáguelo. Mantenga
pulsada la tecla de activación/desactivación hasta que
el indicador parpadee en rojo y verde, alternativamente.
4. Cuando en el teléfono aparezca la pregunta
¿Añadir dispositivo?, pulse Sí. Puede que necesite
introducir el código de acceso, que es el
El
auricular emite un pitido y parpadea en color
verde cuando se asocia correctamente.
0000.
Colocación del auricular
Colóquese el enganche para la oreja detrás de ésta
oriente el micrófono hacia su boca. Para colocarlo
y
en la oreja izquierda, cambie la posición del enganche
tal y como se ilustra en la figura 4.
Llamadas
Después de asociar el auricular con el teléfono, podrá
realizar y recibir llamadas mientras el auricular esté
encendido.
Los objetos sólidos, las paredes y las distancias
superiores a 5 metros (16,5 pies) pueden deteriorar
la calidad del sonido. Para optimizar el rendimiento,
debería llevar el auricular y el teléfono en el mismo
lado del cuerpo.
Para realizar una llamada
• Utilice las teclas del teléfono para marcar el número
normalmente. La llamada se activará automáticamente
en el auricular.
Para finalizar una llamada
• Pulse brevemente la tecla de gestión de llamadas.
Para responder a una llamada
• Pulse brevemente la tecla de gestión de llamadas.
Para rechazar una llamada
•
Mantenga pulsada la tecla de gestión de llamadas
hasta que oiga un breve pitido (al cabo de 2 segundos).
Para volver marcar el último número
• Haga doble clic en la tecla de gestión de llamadas.
Para responder a una segunda llamada
• Pulse la tecla de gestión de llamadas. La llamada en
curso quedará en espera.
Para cambiar entre las dos llamadas
• Mantenga pulsada la tecla de gestión de llamadas
hasta que oiga un pitido.
Para apagar el micrófono (silencio)
• Pulse simultáneamente las dos teclas de volumen.
Un pitido indica que el micrófono se ha silenciado.
Repítalo para volver a encender el micrófono.
Ajuste del volumen
Para ajustar el volumen del timbre de llamada
• Cuando no esté hablando por teléfono, o cuando
éste esté sonando, pulse la tecla de volumen.
Para ajustar el volumen del altavoz
• Mientras habla por teléfono, pulse la tecla de volumen.
Llamadas mediante comandos de voz
Los comandos de voz pueden resultar muy útiles
cuando utiliza un auricular y no tiene el teléfono cerca.
Si desea obtener más información sobre los comandos
de voz, consulte la Guía del usuario del teléfono.
Para realizar llamadas mediante comandos de voz
• Pulse brevemente la tecla de gestión de llamadas,
espere a que suene un pitido y diga el comando.
Nota: Compruebe que los comandos de voz estén
activados y que se hayan grabado en el teléfono antes
de utilizarlos.
Transferencia de sonido
Para transferir el sonido del teléfono al auricular
• Mientras habla por teléfono, pulse brevemente la
tecla de gestión de llamadas. El sonido se transfiere
al auricular.
Para transferir el sonido del auricular al teléfono
• Consulte la Guía del usuario del teléfono.
Batería
Una batería nueva o que no se ha utilizado con
frecuencia puede tener la capacidad reducida.
posible que deba recargarla varias veces
Es
alcanzar su capacidad total.
para
Cuando sea necesario cargar la batería, el
indicador luminoso parpadeará en rojo y se oirá un
leve pitido. Si no carga el auricular, se apagará
automáticamente.
Para comprobar el estado de la batería
• Pulse brevemente la tecla de activación/desactivación:
• luz verde fija más un parpadeo verde:
es necesario cargar pronto la batería
• luz verde fija más dos parpadeos verdes:
la batería está medio cargada
• luz verde fija más tres parpadeos verdes:
la batería está totalmente cargada
Reinicio del auricular
Para reiniciar el auricular
1. Apague el auricular.
2. Mantenga pulsada la tecla de activación/
desactivación hasta que el indicador parpadee
en rojo y verde, alternativamente.
3. Mantenga pulsadas simultáneamente la tecla de
encendido y apagado y la de gestión de llamadas
hasta que el auricular se apague.
4. Asocie el auricular con el teléfono siguiendo el mismo
proceso que cuando lo asoció por primera vez.
This is the Internet version of the User guide. © Print only for private use.
Bluetooth™ Headsets HBH-PV715 and
HBH-PV720
User guide
Guía del usuario
Guide de l’utilisateur
Bedienungsanleitung
Sony Ericsson HBH-PV715 and HBH-PV720
This User guide is published by Sony Ericsson Mobile Communications
AB, without any warranty. Improvements and changes to this User
guide necessitated by typographical errors, inaccuracies of current
information, or improvements to programs and/or equipment, may be
made by Sony Ericsson Mobile Communications AB at any tim e and
without notice. Such changes will, however, be incorporated into new
editions of this User guide. All rights reserved.
©Sony Ericsson Mobile Communications AB, 2008
Publication number: 1211-9294.2
Some of the services in this User guide are not supported by all
networks. This also applies to the GSM International Emergency
Number 112. Contact your network operator or service provider
if you are in doubt whether you can use a particular service.
The Bluetooth word mark and logos are owned by the Bluetooth SIG,
Inc. and any use of such marks by Sony Ericsson is under license.
Sony and WALKMAN are trademarks or registered trademarks of
Sony Corporation.
Ericsson is a trademark or registered trademark of
Telefonaktiebolaget LM Ericsson.
This product is leadfree and halogenfree.
1
Touches de réglage
du volume
Lautstärketasten
Touche de gestion
des appels
Anruftaste
Touche de gestion
des appels
Anruftaste
Touches de volume
Lautstärketasten
Sony Ericsson Mobile Communications AB
SE-221 88 Lund, Sweden
1211-9294.2
Printed in XXXXX
Micro
Mikrofon
Témoin
Anzeigeleuchte
Touche marche/arrêt
Ein/Aus-Taste
Ecouteur
Hörmuschel
2
5
1
3
2
4
xxx xxx xx
Français
Les oreillettes Bluetooth™ HBH-PV715 et HBH-PV720
peuvent être connectées à n’importe quel périphérique
doté de la technologie sans fil Bluetooth prenant en
charge le profil mains libres ou oreillette. Le présent
Guide de l’utilisateur cible l’utilisation avec un téléphone
mobile Sony
Ericsson.
Chargement de l’oreillette
Avant d’utiliser l’oreillette HBH-PV715 ou HBH-PV720
pour la première fois, vous devez la charger, par
exemple à l’aide du chargeur fourni ou du chargeur
votre téléphone. Reportez-vous à la figure 2. Pour
de
connaître les chargeurs compatibles, reportez-vous
la figure 3.
à
Mise sous et hors tension de l’oreillette
Pour mettre l’oreillette sous tension
• Maintenez enfoncée la touche marche/arrêt
jusqu’à ce que le témoin brille en vert de manière
continue (si le témoin est rouge, l’oreillette doit être
1
2
3
rechargée). 3 secondes plus tard, le témoin s’éteint
et l’oreillette reste sous tension.
Pour mettre l’oreillette hors tension
xxx xxx xx
• Maintenez enfoncée la touche marche/arrêt
jusqu’à
ce que le témoin brille en vert de manière
continue (si le témoin est rouge, l’oreillette doit être
rechargée). 2 secondes plus tard, le témoin
s’estompe et l’oreillette se met hors tension.
Jumelage de l’oreillette
3
CST-60/CST-70
CDS-60
CLA-61
CST-61/CST-18
6
4
1
Avant de pouvoir utiliser l’oreillette, elle doit
jumelée à une reprise à votre téléphone.
être
le jumelage a réussi, l’oreillette se connecte
Quand
automatiquement au téléphone dès qu’elle est mise
sous tension et qu’elle est à la portée de celui-ci.
Remarque : Lorsque vous mettez l’oreillette en mode de
jumelage, n’appuyez pas simultanément sur la touche
de gestion des appels et sur la touche marche/arrêt.
Pour jumeler l’oreillette avec votre téléphone
1. Activez la fonction Bluetooth sur le téléphone.
Pour
plus d'informations, reportez-vous au
de l’utilisateur du téléphone.
Guide
2. Placez le téléphone à moins de 20 cm (8 pouces)
de
l’oreillette.
3. Mettez l’oreillette sous tension. La première fois,
l’oreillette passe automatiquement en mode de
jumelage et essaie de se jumeler avec votre
téléphone (jumelage automatique).
Remarque : Si le jumelage automatique n’est pas pris
en charge par votre téléphone ou si le jumelage échoue,
recommencez les deux premières étapes ci-dessus
mettez l’oreillette sous tension. Ajoutez ensuite
et
l’oreillette à votre téléphone comme décrit dans le
Guide de l’utilisateur de votre téléphone. Le code
d’accès est
0000.
Pour jumeler l’oreillette avec un autre téléphone
1. Activez la fonction Bluetooth sur le téléphone.
plus d'informations, reportez-vous au
Pour
de l’utilisateur du téléphone.
Guide
2. Placez le téléphone à moins de 20 cm (8 pouces)
l’oreillette.
de
3. Si l’oreillette est sous tension, mettez-la hors
tension. Maintenez enfoncée la touche marche/arrêt
jusqu’à ce que le témoin clignote alternativement en
rouge et vert.
4. Appuyez sur Oui lorsque Ajouter un périphérique ?
apparaît sur le téléphone. Le cas échéant, le code
d’accès est
et clignote en vert quand le jumelage a réussi.
0000. L’oreillette émet un signal sonore
Mise sous tension de l’oreillette
Faites glisser le contour d’oreille derrière l’oreille et
2
dirigez le micro vers la bouche. Pour les gauchers,
modifiez la position du contour d’oreille comme
expliqué à la figure
4.
Appel
Lorsque vous avez jumelé l’oreillette avec votre
téléphone, vous pouvez émettre et recevoir des appels
aussi longtemps que l’oreillette est sous tension.
La présence d’objets solides, de murs et une
distance supérieure à 5 mètres (16,5 pieds) peuvent
3
avoir un impact négatif sur la qualité du son. Pour des
performances optimales, vous devez porter l’oreillette
et le téléphone du même côté du corps.
Pour émettre un appel
• Utilisez les touches du téléphone pour numéroter
normalement. L’appel est automatiquement activé
sur l’oreillette.
Pour terminer un appel
• Appuyez brièvement sur la touche de gestion des
appels.
Pour répondre à un appel
• Appuyez brièvement sur la touche de gestion des
appels.
Pour rejeter un appel
• Maintenez enfoncée la touche de gestion des appels
jusqu’à ce que vous entendiez un bref signal sonore
(après 2 secondes).
Pour renuméroter le dernier numéro
• Double-cliquez sur la touche de gestion des appels.
Pour répondre à un deuxième appel
• Appuyez sur la touche de gestion des appels.
L’appel en cours est mis en attente.
Pour permuter deux appels
• Maintenez enfoncée la touche de gestion des appels
jusqu’à ce que vous entendiez un signal sonore.
Pour couper le micro (silencieux)
• Appuyez simultanément sur les deux touches
de volume. Un signal sonore indique que le son est
coupé. Répétez la procédure pour réactiver le micro.
Réglage du volume
Pour régler le volume de la sonnerie
• Lorsque vous n’appelez pas ou que le téléphone
sonne, appuyez sur une touche de volume.
Pour régler le volume de l’écouteur
• Durant un appel, appuyez sur une touche de volume.
Appel à l’aide des commandes vocales
Les commandes vocales peuvent être utiles si vous
utilisez l’oreillette alors que le téléphone n’est pas près
de vous. Pour plus d’informations sur les commandes
vocales, reportez-vous au Guide de l’utilisateur de
votre téléphone.
Pour émettre un appel à l’aide des commandes
vocales
• Appuyez brièvement sur la touche de gestion des
appels jusqu’à ce que vous entendiez un signal
sonore et prononcez la commande.
Remarque : Assurez-vous que les commandes vocales
sont activées et enregistrées sur votre téléphone, avant
de les utiliser.
Transfert du son
Pour transférer le son du téléphone à l’oreillette
• Pendant un appel, appuyez brièvement sur la touche
de gestion des appels. Le son est transféré vers
l’oreillette.
Pour transférer le son de l’oreillette au téléphone
• Reportez-vous au Guide de l’utilisateur du téléphone.
Batterie
Une batterie neuve ou qui n’est pas régulièrement
utilisée peut voir sa capacité se réduire. Il est possible
que vous deviez la recharger plusieurs fois avant
qu’elle atteigne sa pleine capacité.
Lorsque la batterie doit être chargée, le témoin
clignote en rouge et un signal sonore faible retentit.
Si vous ne rechargez pas l’oreillette, elle se met
automatiquement hors tension.
Pour vérifier l’état de la batterie
• Appuyez brièvement sur la touche marche/arrêt :
• témoin vert continu plus un clignotement vert :
la batterie doit être rechargée sans tarder
• témoin vert continu plus deux clignotements
verts : la batterie est à moitié chargée
• témoin vert continu plus trois clignotements
verts : la batterie est complètement chargée
Réinitialisation de l’oreillette
Pour réinitialiser l’oreillette
1. Mettez l’oreillette hors tension.
2. Maintenez enfoncée la touche marche/arrêt jusqu’à
ce que le témoin clignote alternativement en rouge
et vert.
3. Maintenez simultanément enfoncées la touche
marche/arrêt et la touche de gestion des appels
jusqu’à ce que l’oreillette se mette hors tension.
4. Jumelez l’oreillette avec le téléphone, comme vous
l’avez fait la première fois.
Deutsch
Die Bluetooth™-Headsets HBH-PV715 und HBH-PV720
können mit jedem Bluetooth-Gerät verbunden werden,
sofern es das Profil „Handsfree“ bzw. „Headset“
unterstützt. Diese Bedienungsanleitung befasst sich
primär mit der Benutzung mit Mobiltelefonen von
Ericsson.
Sony
Laden des Headsets
Bevor Sie das HBH-PV715 bzw. das HBH-PV720
erstmals benutzen, müssen Sie es z. B. mit dem
mitgelieferten Ladegerät oder dem Telefonladegerät
aufladen (siehe Abbildung
kompatible Ladegeräte.
2). Abbildung 3 zeigt
Ein- und Ausschalten des Headsets
So schalten Sie das Headset ein:
• Drücken und halten Sie die Ein/Aus-Taste,
bis die Anzeigeleuchte dauerhaft grün leuchtet
(ist die Anzeigeleuchte rot, muss das Headset
geladen werden). Nach 3 Sekunden erlischt die
Leuchte und das Headset bleibt eingeschaltet.
So schalten Sie das Headset aus:
• Drücken und halten Sie die Ein/Aus-Taste, bis
Anzeigeleuchte dauerhaft grün leuchtet (ist die
die
Anzeigeleuchte rot, muss das Headset geladen
werden). Nach 2 Sekunden erlischt die Leuchte
langsam und das Headset wird ausgeschaltet.
Koppeln des Headsets
Bevor Sie das Headset benutzen können, müssen Sie
es mit dem Telefon koppeln. Nachdem es gekoppelt
wurde, stellt das Headset die Verbindung zum Telefon
automatisch her, sofern es eingeschaltet ist und in
Reichweite gelangt.
Hinweis: Drücken Sie die Anruftaste nicht zusammen
mit der Ein/Aus-Taste, wenn Sie den Kopplungsmodus
des Headsets aktivieren.
So koppeln Sie das Headset mit dem Telefon:
1. Schalten Sie die Bluetooth-Funktion des Telefons
ein. Entsprechende Anweisungen enthält die
Bedienungsanleitung des Telefons.
2. Bringen Sie das Telefon in eine Entfernung von
maximal 20 cm (8 Zoll) zum Headset.
3. Schalten Sie das Headset ein. Beim ersten
Einschalten des Headsets wird automatisch der
Kopplungsmodus aktiviert, damit es mit dem Telefon
gekoppelt werden kann (automatisches Koppeln).
Hinweis: Wenn das Telefon das automatische Koppeln
nicht unterstützt oder das automatische Koppeln nicht
funktioniert hat, führen Sie die oben beschriebenen
ersten beiden Schritte durch. Schalten Sie das Headset
dann ein. Koppeln Sie das Headset nun wie in der
Telefon-Bedienungsanleitung beschrieben mit dem
Telefon. Die Kennung lautet
0000.
So koppeln Sie das Headset mit einem anderen
Telefon:
1. Schalten Sie die Bluetooth-Funktion des Telefons
ein. Entsprechende Anweisungen enthält die
Bedienungsanleitung des Telefons.
2. Bringen Sie das Telefon in eine Entfernung von
maximal 20 cm (8 Zoll) zum Headset.
3. Das Headset muss ggf. ausgeschaltet werden.
Drücken und halten Sie die Ein/Aus-Taste, bis die
Anzeigeleuchte abwechselnd rot und grün blinkt.
4. Drücken Sie Ja, sobald Gerät hinzu? auf dem
Telefonbildschirm angezeigt wird. Die ggf. benötigte
Kennung lautet
erfolgreicher Kopplung Tonsignale aus und blinkt grün.
0000. Das Headset gibt nach
Aufsetzen des Headsets
Schieben Sie den Ohrbügel hinter Ihr Ohr und richten
Sie das Mikrofon auf Ihren Mund. Die Position des
Ohrbügels kann geändert werden, wenn das Headset
am linken Ohr getragen werden soll (Abbildung
4).
Anrufen
Nachdem Sie das Headset mit dem Telefon gekoppelt
haben, können Sie Anrufe tätigen und annehmen,
sobald das Headset eingeschaltet ist.
Massive Objekte, Wände und Abstände von mehr als
5 m (16,5 Fuß) können die Tonqualität beeinträchtigen.
Optimale Leistung erzielen Sie, wenn Sie Headset und
Telefon auf derselben Körperseite tragen.
So tätigen Sie einen Anruf:
• Wählen Sie die Nummer wie gewohnt mit den Tasten
des Telefons. Der Anruf wird automatisch zum
Headset übertragen.
So beenden Sie einen Anruf:
• Drücken Sie kurz die Anruftaste.
So nehmen Sie einen Anruf an:
• Drücken Sie kurz die Anruftaste.
So weisen Sie einen Anruf ab:
• Drücken und halten Sie die Anruftaste, bis Sie ein
kurzes Tonsignal hören (nach 2 Sekunden).
So wählen Sie die letzte Nummer erneut:
• Drücken Sie die Anruftaste zweimal in schneller Folge.
So nehmen Sie einen zweiten Anruf an:
• Drücken Sie die Anruftaste. Der aktive Anruf wird auf
Halteposition gesetzt.
So wechseln Sie zwischen zwei Anrufen:
• Drücken und halten Sie die Anruftaste, bis Sie ein
Tonsignal hören.
So schalten Sie das Mikrofon aus:
• Drücken Sie beide Lautstärketasten gleichzeitig.
Die Stummschaltung wird durch ein Tonsignal
bestätigt. Wiederholen Sie diesen Schritt, um
das Mikrofon wieder einzuschalten.
Einstellen der Lautstärke
So stellen Sie die Ruftonlautstärke ein:
• Drücken Sie eine Lautstärketaste, während Sie nicht
telefonieren bzw. während das Telefon läutet.
So stellen Sie die Hörlautstärke ein:
•
Drücken Sie während eines Anrufs eine Lautstärketaste.
Telefonieren mit Sprachbefehlen
Sprachbefehle sind besonders nützlich, wenn
Sie
das Headset benutzen und sich das Telefon
in unmittelbarer Reichweite befindet.
nicht
Informationen zu Sprachbefehlen
Weitere
enthält
die Telefon-Bedienungsanleitung.
So tätigen Sie einen Anruf per Sprachbefehl:
• Drücken Sie die Anruftaste kurz, bis Sie ein
Tonsignal hören. Sagen Sie dann den Befehl.
Hinweis: Die Sprachbefehlfunktion muss aktiviert sein.
Außerdem müssen aufgenommene Sprachbefehle im
Telefon gespeichert sein.
Übertragen des Tons
So übertragen Sie den Ton vom Telefon zum
Headset:
• Drücken Sie beim Telefonieren kurz die Anruftaste.
Der Ton wird zum Headset übertragen.
So übertragen Sie den Ton vom Headset zum
Telefon:
• Beachten Sie die Bedienungsanleitung des Telefons.
Akku
Ein neuer oder nur selten benutzter Akku kann eine
reduzierte Kapazität aufweisen. Er muss dann einige Male
geladen werden, bis die volle Kapazität erreicht wird.
Wenn der Akku geladen werden muss,
blinkt die Anzeigeleuchte rot. Außerdem wird ein
tiefes Tonsignal ausgegeben. Das Headset wird
automatisch ausgeschaltet, wenn Sie es nicht laden.
So prüfen Sie den Akkustatus:
• Drücken Sie kurz die Ein/Aus-Taste:
• Anzeigeleuchte leuchtet grün und blinkt einmal
grün – Akku muss in Kürze geladen werden
• Anzeigeleuchte blinkt zweimal grün – Akku ist
halb voll
• Anzeigeleuchte leuchtet grün und blinkt dreimal
grün – Akku ist geladen
Zurücksetzen des Headsets
So setzen Sie das Headset zurück:
1. Schalten Sie das Headset aus.
2. Drücken und halten Sie die Ein/Aus-Taste, bis die
Anzeigeleuchte abwechselnd rot und grün blinkt.
3. Drücken und halten Sie die Ein/Aus-Taste und die
Anruftaste des Headsets gleichzeitig, bis das
Headset ausgeschaltet wird.
4. Koppeln Sie das Headset dann wie beim ersten
Koppeln mit dem Telefon.
This is the Internet version of the User guide. © Print only for private use.
 Loading...