


4-205-025-11(1)
R
FD Trinitron
Colour Television
Instruction Manual |
GB |
|
Bedienungsanleitung |
DE |
|
|
Manuale d’Istruzioni |
IT |
|
|
|
|
Mode d’emploi |
FR |
|
KV-29FX201D
©1999 by Sony Corporation Printed in Spain

Instruction Manual GB
Thank you for choosing this Sony TV.
Before operating the TV, please read this manual thoroughly and retain it for future reference.
Keys to read this Instruction Manual:
•Use Getting Started if you wish to install the TV set and to get familiar with the basic functions.
•Use Advanced Operation if you wish to know more about the additional features of the TV set.
•Symbols used in the manual:
• |
|
|
Informs you of possible hazards |
• |
|
|
Important information |
• |
|
|
Information on a feature |
• 1, 2 ... Sequence of instructions |
|||
• |
K |
MENU |
Shaded buttons on the remote control show the buttons you have to |
|
|
|
press to follow the sequence of instructions. |
• |
|
|
Informs you of the result of the instructions. |
• |
|
|
The process continues on the next page to get final result. |
3

For Your Safety
WARNING
 Safety Information
All TVs operate on extremely high voltages. To prevent fire or electric shock, please follow the safety procedures indicated below.
 For General Safety
•Do not expose the TV set to rain or moisture.
•Do not remove the rear cover.
•For your protection, refer all servicing to qualified personnel only.
 For Safe Installation
•Do not install the TV in hot, humid or excessively dusty places.
•Do not block or cover the ventilation openings. For ventilation, leave a space of at least 10 cm all around the set.
•Do not install the TV where it may be exposed to mechanical vibrations.
•Place the TV set only on a stable stand designed for the weight and dimensions of the TV.
 For Safe Operation
•Do not operate the TV set on anything other than a 220-240V AC, 50Hz supply.
•Do not operate the TV if any liquid or solid objects fall in through the ventilation slots. Have it checked immediately.
•For environmental and safety reasons, it is recommended that the TV set is not left in standby mode when not in use. Switch off at the mains.
•Do not disconnect the TV by pulling on the power cable. Disconnect by removing the mains plug.
•In case of a thunderstorm, disconnect the TV set from the main supply and the aerial. Otherwise the set may be damaged by a stroke of lightning.
 For Maintenance
•Clean the TV screen with a soft dampened cloth. Do not use any abrasive cleaners.
•Dust and nicotine deposits may cause heat accumulation inside the TV set. In the long term this could be a safety risk and may shorten the lifetime of your TV set. Therefore have your set serviced about every five years.
4 For Your Safety

Table of Contents
Table of Contents
Keys to read this Instruction Manual .................................................................................................. |
3 |
For your Safety ........................................................................................................................................ |
4 |
Getting Started |
|
Overview |
|
Checking the Accessories Supplied ......................................................................................... |
6 |
Overview of TV Buttons ........................................................................................................... |
6 |
Overview of Remote Control Buttons ..................................................................................... |
7 |
First Time Operation |
|
Step 1 - Installation |
|
Inserting Batteries into the Remote Control ........................................................................... |
8 |
Connecting the Aerial ................................................................................................................ |
8 |
Switching on the TV .................................................................................................................. |
8 |
Step 2 - Basic Presetting |
|
|
GB |
Selecting Language .................................................................................................................... |
9 |
Automatically Tuning the TV using the Remote Control .................................................. |
10 |
Changing the Programme Order of the TV channels ......................................................... |
11 |
Advanced Operation |
|
Advanced Presetting |
|
Automatically Tuning the TV using the TV buttons........................................................... |
12 |
Manually Tuning the TV ......................................................................................................... |
13 |
Fine Tuning Channels .............................................................................................................. |
14 |
Adjusting the Picture Rotation ............................................................................................... |
15 |
Skipping Programme positions ............................................................................................. |
16 |
Advanced TV Operation |
|
Adjusting the Picture ............................................................................................................... |
17 |
Adjusting the Sound ................................................................................................................ |
18 |
Using the Sleep Timer ............................................................................................................. |
19 |
Teletext |
|
Viewing Teletext ....................................................................................................................... |
20 |
Optional Connections |
|
Using Optional equipment ..................................................................................................... |
21 |
Smartlink ................................................................................................................................... |
22 |
Additional Information |
|
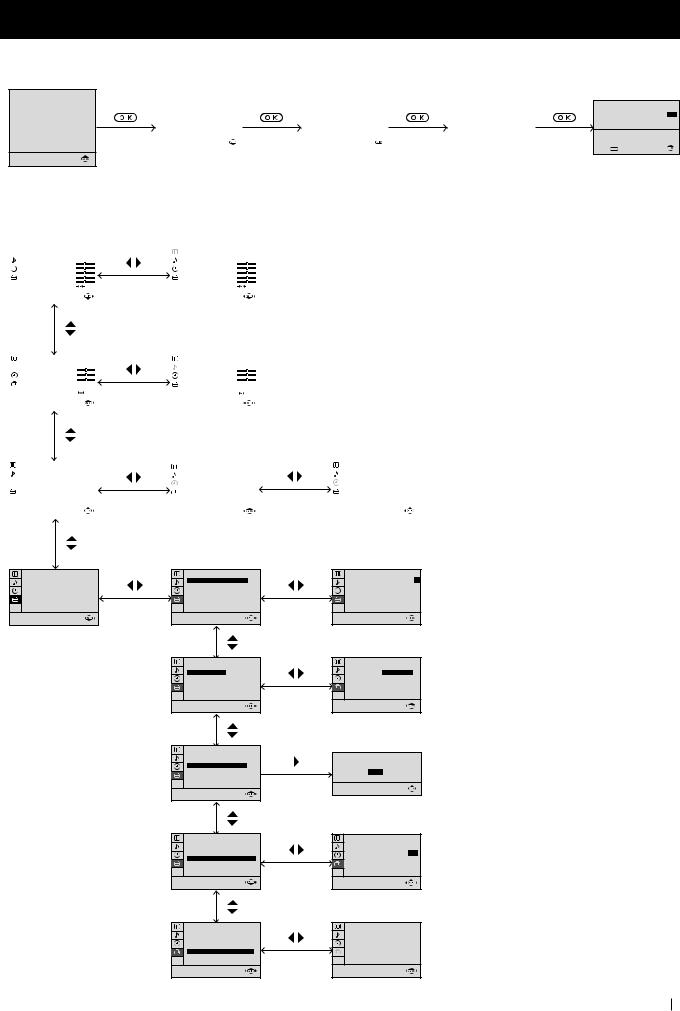
Menu Guide .............................................................................................................................. |
23 |
Troubleshooting ........................................................................................................................ |
24 |
Specifications ............................................................................................................................ |
25 |
Table of Contents 5
Getting Started - Overview
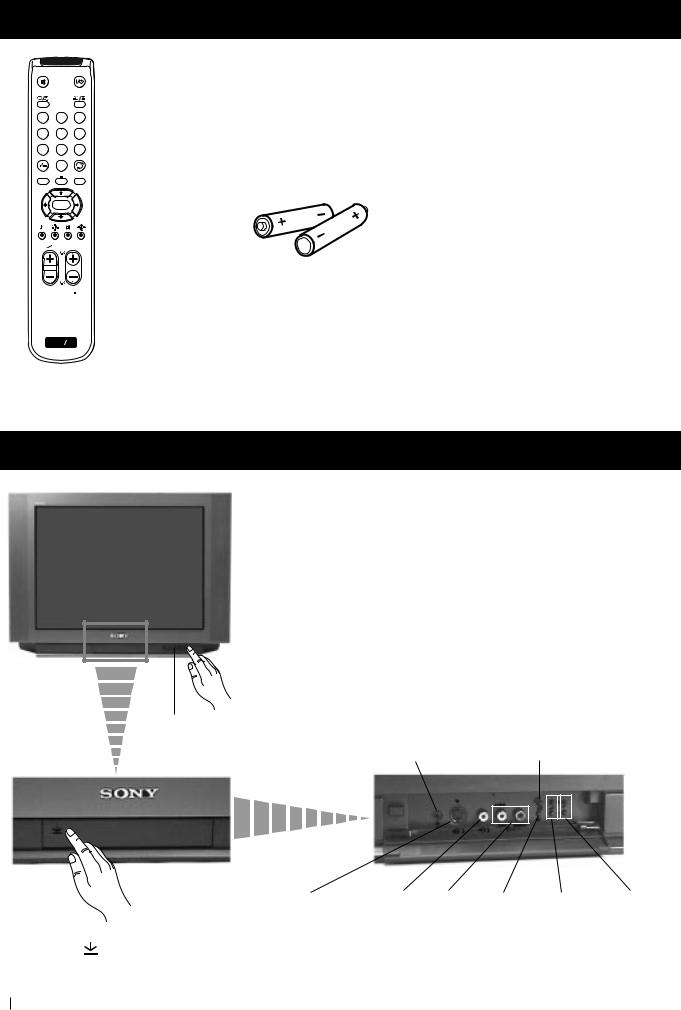
Checking the Accessories Supplied
1 2 3
4 5 6
7 8 9
0
MENU
 K
K
PROGR
Two batteries (R6 type)
 RM 887
S
One Remote Control
(RM-887)
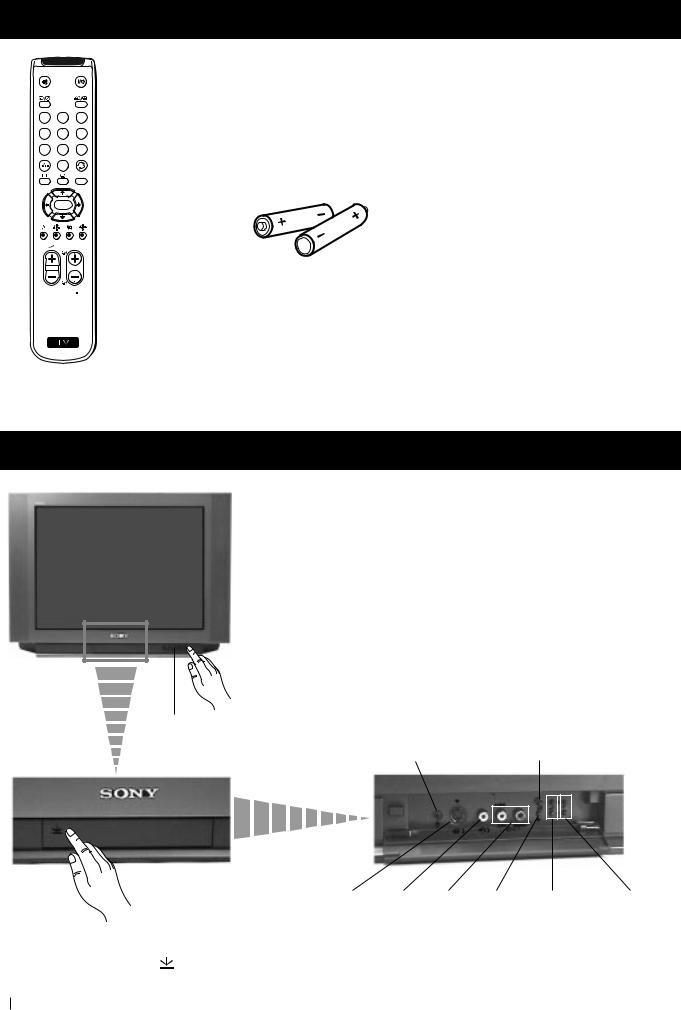
Overview of TV Buttons
On/Off Switch
Standby indicator
Headphone jack |
Auto Tune button |
|
S Video |
Phono |
Audio |
Selecting |
Volume |
Programme Up or |
|
Input |
Video |
Inputs |
Input |
control |
Down buttons |
Press the flap on the front of the TV |
jack |
Input |
jacks |
source |
buttons |
(Selects TV channels) |
to reveal the front control panel |
|
jack |
|
|
|
|
(press on the mark ) |
|
|
|
|
|
|
6 Getting Started - Overview
Getting Started - Overview
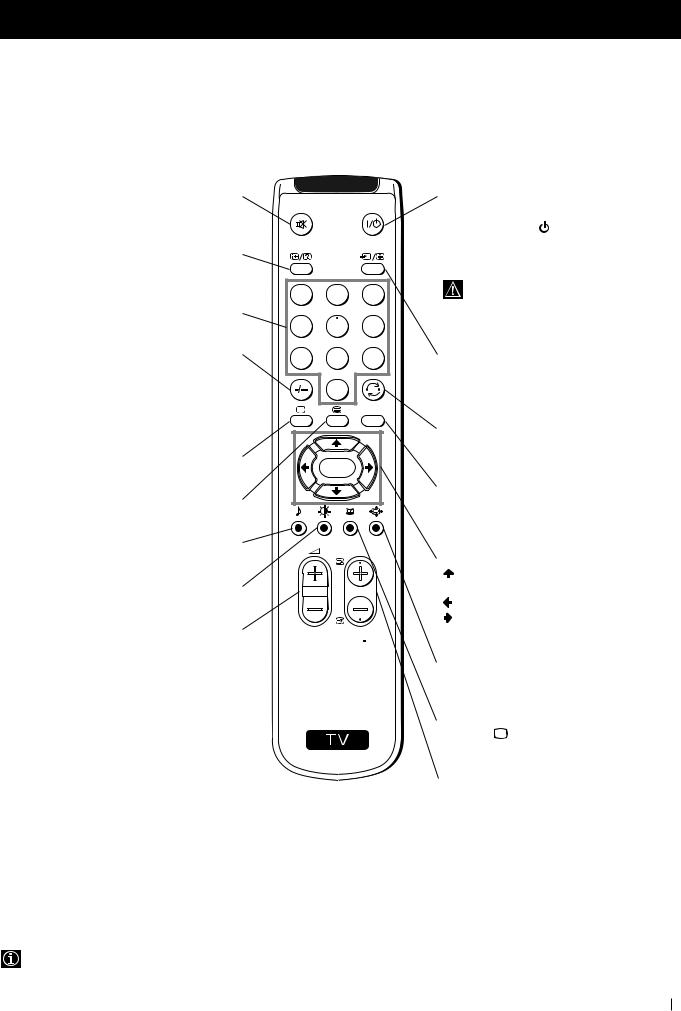
Overview of Remote Control Buttons
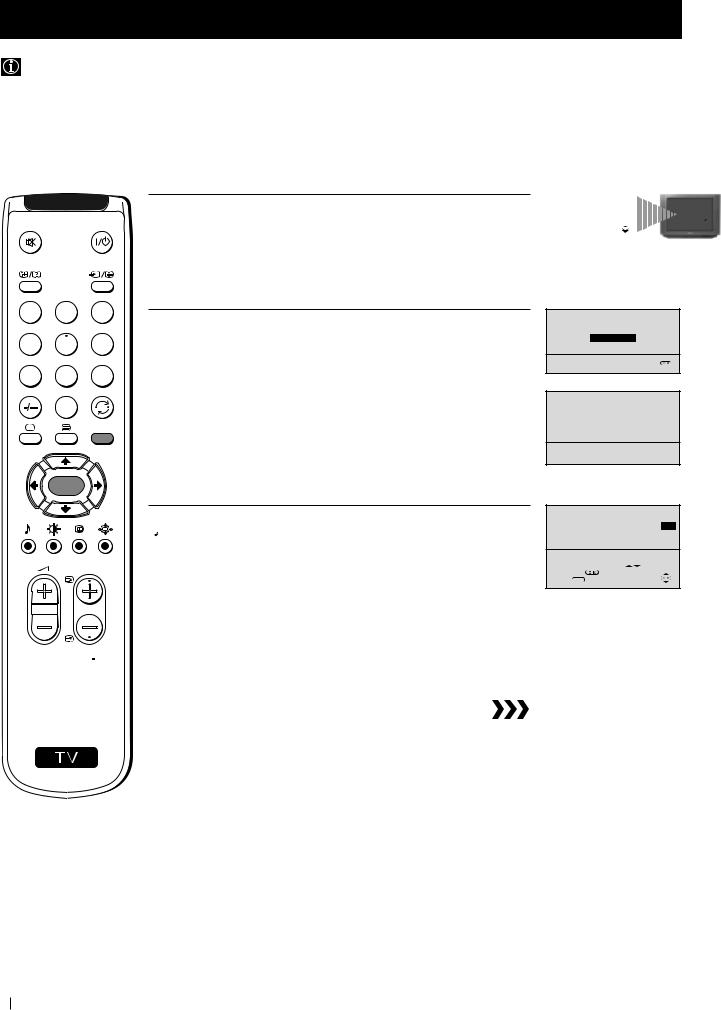
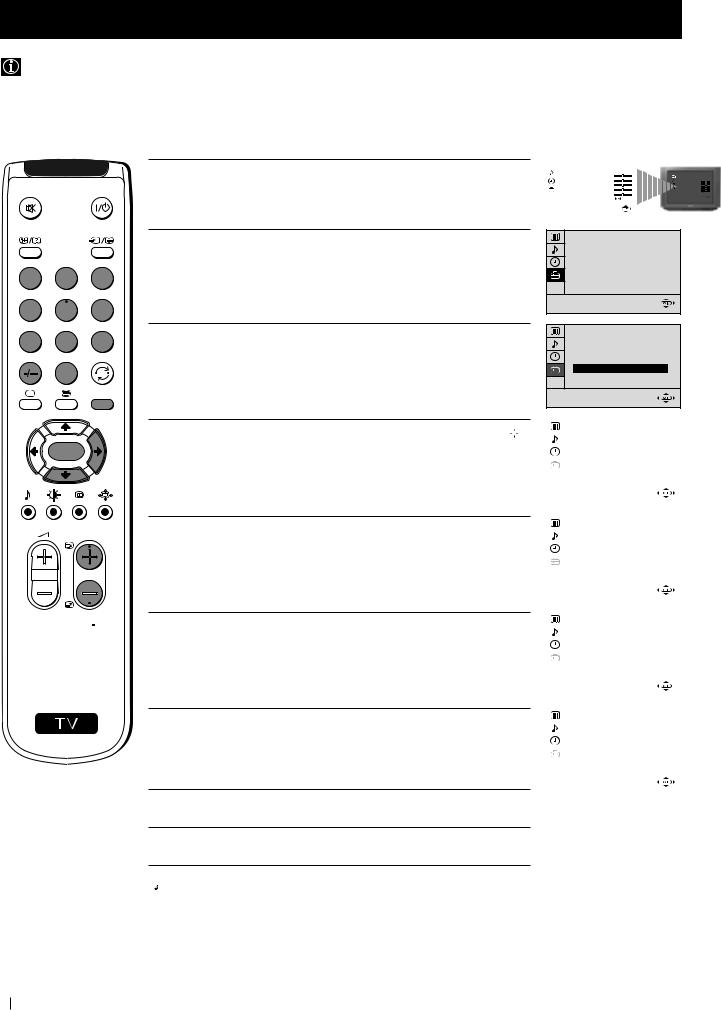
Muting the Sound
Press to mute TV sound.
Press again to restore the sound.
Displaying On Screen Information
Press to display all on-screen indications. Press again to cancel.
Selecting channels
Press to select channels.
For double-digit programme numbers, e.g. 23, press -/-- first, then the buttons 2 and 3.
If you enter an incorrect first digit, this should be corrected by entering another digit (0-9) and then selecting -/-- button again to enter the programme number of your choice.
Selecting TV mode
Press to switch off Teletext or video input.
Selecting Teletext
Press to switch on Teletext.
Selecting Sound mode
Press to change the sound mode.
Selecting Picture mode
Press to change the picture mode.
Adjusting TV Volume
Press to adjust the volume of the TV.
1 2 3
4 5 6
7 8 9
0
MENU
 K
K
PROGR
 RM 887
S
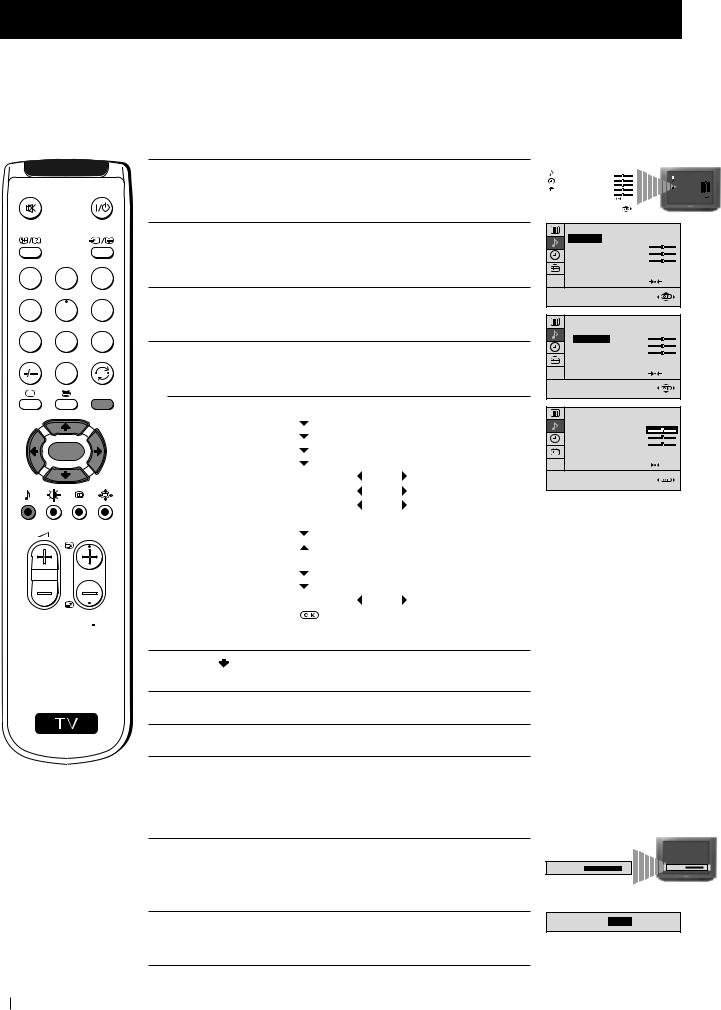
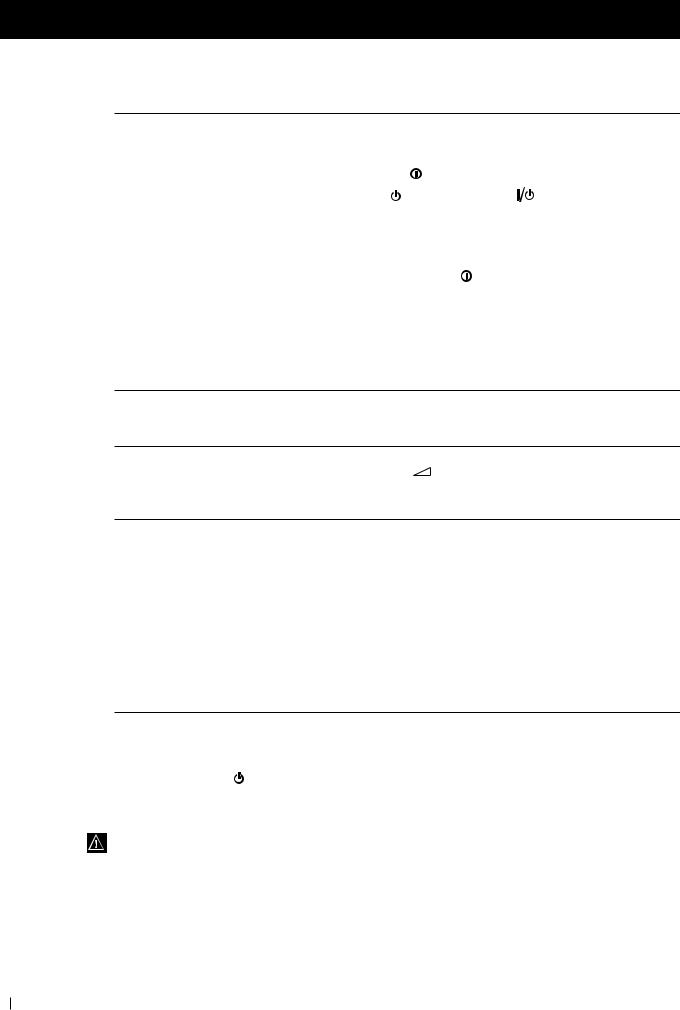
To Temporarily Switch Off TV
Press to temporarily switch off TV (the standby indicator on TV lights up). Press again to switch on TV from standby mode.
To save energy we recommend switching off completely when TV is not in use.
After 15-30 minutes without a TV signal and without any button being pressed, the TV switches automatically into standby mode.
Selecting Input source
Press repeatedly until the desired input symbol of the source appears on the TV screen.
Back to the channel last watched
Press to watch the last channel selected (watched for at least 5 seconds).
Displaying the menu system
Press to display the menu on the TV screen. Press again to remove the menu display from the TV screen.
Menu selection
Scroll Up
 Scroll Down
Previous menu or selection
Next menu or selection
OK Confirms your selection
Selecting Screen format
Press to view programmes in 16:9 mode. Press again to return to 4:3 mode.
This button only works in Teletext mode. Function  associated to this button does not work with this TV.
Selecting channels
Press to select the next or previous channel.
Besides TV functions, all coloured buttons as well as green symbols are also used for Teletext operation. For more details, please refer to the "Teletext" section of this instruction manual.
Getting Started - Overview 7
First Time Operation - Installation
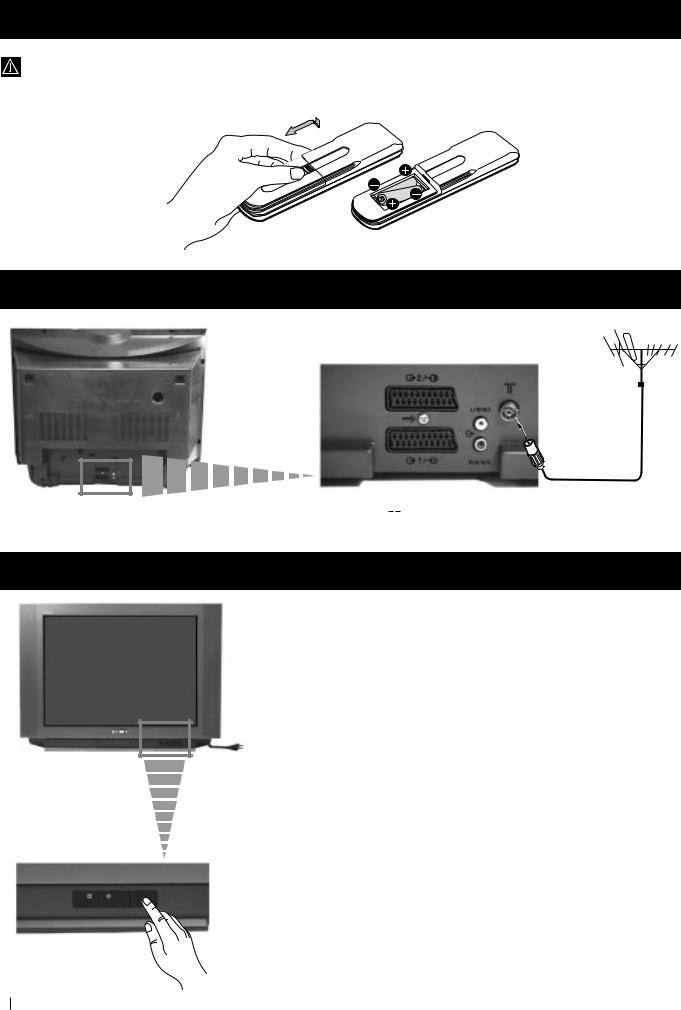
Inserting Batteries into the Remote Control
Make sure to insert the batteries using the correct polarities.
Always remember to dispose of used batteries in an environmental friendly way.
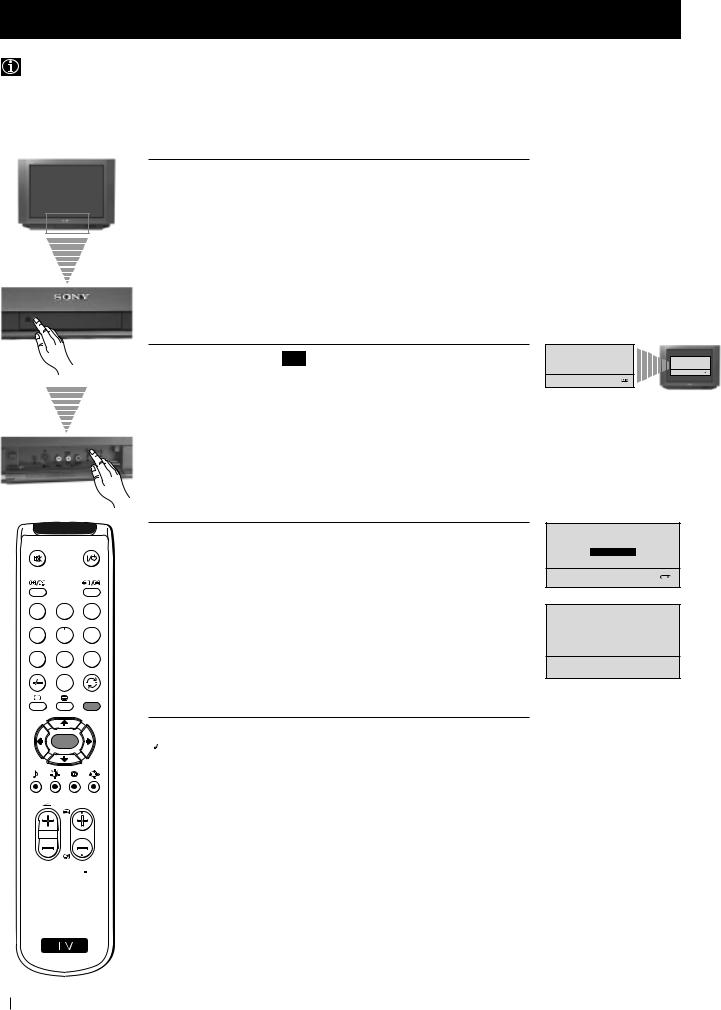
Connecting the Aerial
Connect a conventional aerial to the socket marked 
 on the rear of the TV.
Switching on the TV
Connect the TV plug to the mains socket (220-240V AC, 50Hz).
Push in the On/Off switch on the front of the TV.
8 First Time Operation - Installation
First Time Operation - Basic Presetting
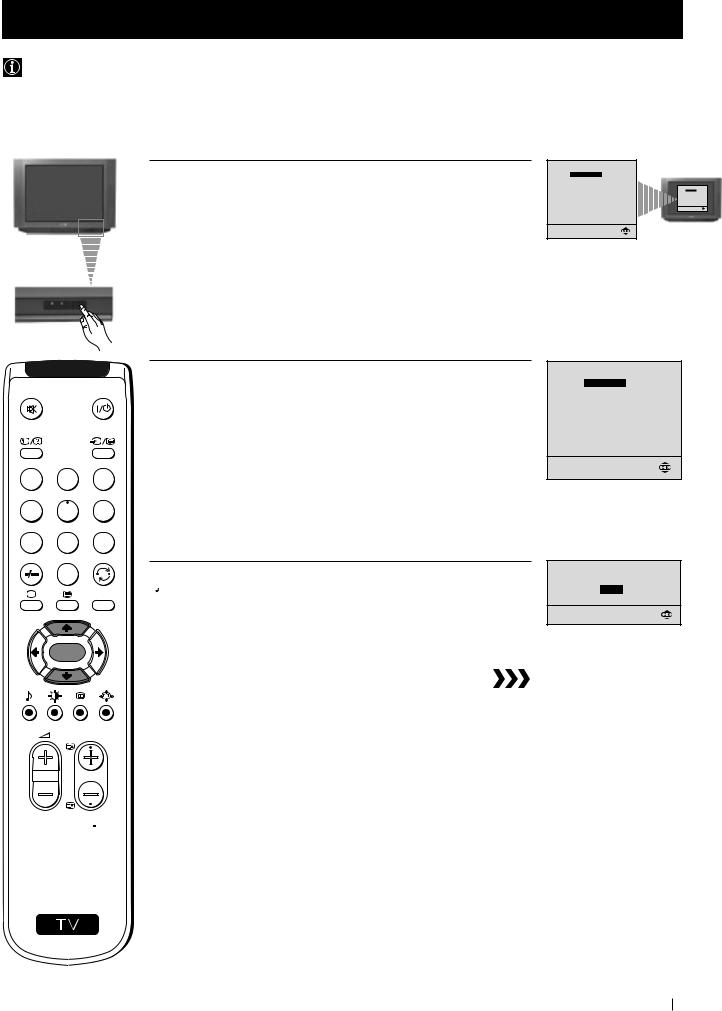
Selecting Language
Use this function to change the language of the menu screens.
The first time that you switch on your TV, the Language menu appears automatically.
However, if you need to change the language menu afterwards, select the menu LANGUAGE in the  (SET UP) menu and proceed in the same way as described below.
1 Press the on/off button on your TV set to switch on your TV. The first time you press the on/off button on your TV set, the language menu displays automatically on the TV screen.
LANGUAGE
ENGLISH
DEUTSCH
FRANÇAIS
ITALIANO
ESPAÑOL NEDERLANDS E§§HNIKA POLSKI ČESKI MAGYAR TÜRKÇE
Select language:
LANGUAGE
ENGLISH
DEUTSCH
FRANÇAIS
ITALIANO
ESPAÑOL NEDERLANDS E§§HNIKA POLSKI ČESKI MAGYAR TÜRKÇE
Select language:
1 2 3
4 5 6
7 8 9
0
MENU
 K
K
PROGR
 RM 887
S
2 Press the or
or button on the remote control to select the language, then press the OK button to confirm your selection.
 The Auto Tuning menu appears on the TV screen in the selected language.
LANGUAGE
ENGLISH
DEUTSCH
FRANÇAIS
ITALIANO
ESPAÑOL NEDERLANDS E§§HNIKA POLSKI ČESKI MAGYAR TÜRKÇE
Select language:
Do you want to start automatic tuning?
YES
NO
First Time Operation - Basic Presetting 9
First Time Operation - Basic Presetting
Automatically Tuning the TV using the Remote Control
You need to tune the TV to receive channels (TV Broadcast). By following the instructions below, this TV automatically searches and stores all available channels for you.
After having selected the language, a new menu appears automatically on the TV screen asking you to automatically tune the TV. However, if you need to change or repeat the tuning afterwards (e.g. when you move house), select the menu AUTO PROGRAMME in the  (SET UP) menu and proceed in the same way as described below in step 1 or, please refer to the section "Automatically Tuning the TV using the TV buttons" of this instruction manual.
1 2 3
4 5 6
7 8 9
0
MENU
 K
K
PROGR
 RM 887
1 Press the OK button on the remote control to select YES.
A new menu appears automatically on the screen asking you to check that the antenna is connected.
2 Confirm that the antenna is connected and then press the OK button.
The automatic tuning starts and the message "Searching..." flashes on the screen.
 This procedure could take some minutes.
 When the automatic tuning is finished, the Programme Sorting menu appears on the TV screen.
Notes: • To stop the automatic tuning, press the MENU button.
•If you stop the automatic tuning by pressing the MENU button, the Programme Sorting menu does not appear automatically on the TV screen.
Do you want to start |
|
|
|
|
||
automatic tuning? |
|
|
|
|
||
|
|
|
|
Do you want to start |
||
|
YES |
|
|
automatic tuning? |
||
|
|
|
|
YES |
|
|
|
NO |
|
|
|
NO |
|
|
|
|
|
|
||
|
|
|
|
|
|
|
Please confirm that antenna is connected
CONFIRM
AUTO PROGRAMME |
|
PROGRAMME: |
01 |
SYSTEM: |
B/G |
CHANNEL: |
C 21 |
Searching... |
|
PROGRAMME SORTING
PROGRAMME: 01 03
03
CONFIRM
Select Channel: PROGR
Select new position:
Confirm:
Exit: MENU
S
10 First Time Operation - Basic Presetting
First Time Operation - Basic Presetting
Changing the Programme Order of the TV channels
After all available channels (TV Broadcast) are captioned and stored, a new menu appears automatically on the screen to change the order in which the channels appear on the screen.
However, if you wish to rearrange the order of the channels afterwards, select the menu PROGRAMME SORTING in the  (SET UP) menu and proceed in the same way as described in the b) section of this chapter.
1 2 3
4 5 6
7 8 9
0
MENU
 K
K
PROGR
a) If you do not wish to change the channel order:
1 Press the MENU button to exit and return to the normal TV screen. |
PROGRAMME SORTING |
|
CONFIRM |
|
|
|
PROGRAMME: 01 |
03 |
Select Channel: PROGR
Select new position:
Confirm:
Exit: MENU
 Your TV is now ready for use.
PROGRAMME SORTING
PROGRAMME: 01 03 CONFIRM
Select Channel: PROGR Select new position:
  Confirm:
Exit:
b) If you wish to change the channel order:
1 Press the PROGR or
or button until the channel (TV Broadcast) you wish to rearrange appears on the screen.
2 Press the or
or button to select the new programme number position for your selected channel (TV Broadcast), then press the OK button.
The word CONFIRM is highlighted for a few seconds to confirm that the new programme position is stored.
3 Repeat steps 1 and 2 if you wish to change the order of the other channels on your TV.
PROGRAMME SORTING |
|
|
|
|
|
|
PROGRAMME: |
01 |
|
|
|
|
|
03 |
|
|
|
|
||
|
|
|
|
|||
CONFIRM |
|
|
|
PROGRAMME SORTING |
||
|
|
|
PROGRAMME: 01 |
03 |
|
|
|
|
|
|
CONFIRM |
||
Select Channel: PROGR Select new position:
Select Channel: PROGR Confirm: 
Exit:
Select new position: Confirm: 
Exit: MENU
PROGRAMME SORTING
PROGRAMME: 02 04
04
CONFIRM
Select Channel: PROGR
Select new position:
Confirm:
Exit: MENU
 RM 887
4 Press the MENU button to exit and return to the normal TV screen.
S
 Your TV is now ready for use.
First Time Operation - Basic Presetting 11
Advanced Operation - Advanced Presetting
Automatically Tuning the TV using the TV buttons
Besides the explanation in the section “Automatically Tuning the TV using the Remote Control“, by following the instructions below, this TV also searches and stores automatically all available channels using just one button of the TV set.
1 Press the flap on the front of the TV by pressing on the mark to reveal the front control panel.
1 2 3
4 5 6
7 8 9
0
MENU
 K
K
PROGR
2 Press and hold in the  button on the TV set for some seconds, until a menu appears automatically on the screen asking you to check that antenna is connected.
3 Confirm that the antenna is connected and then press the OK button.
The automatic tuning starts and the message "Searching..." flashes on the screen.
 This procedure could take some minutes.
 When the automatic tuning procedure is complete, the menu disappears from the TV screen and your TV is now ready for use.
Note: To stop the automatic tuning, press the MENU button on the remote control.
Please confirm that antenna is connected
|
Please confirm that |
||
CONFIRM |
antenna is connected |
||
|
|
|
|
|
CONFIRM |
||
Please confirm that antenna is connected
CONFIRM
AUTO PROGRAMME |
|
PROGRAMME: |
01 |
SYSTEM: |
B/G |
CHANNEL: |
C 21 |
Searching... |
|
 RM 887
S
12 Advanced Operation - Advanced Presetting

Advanced Operation - Advanced Presetting
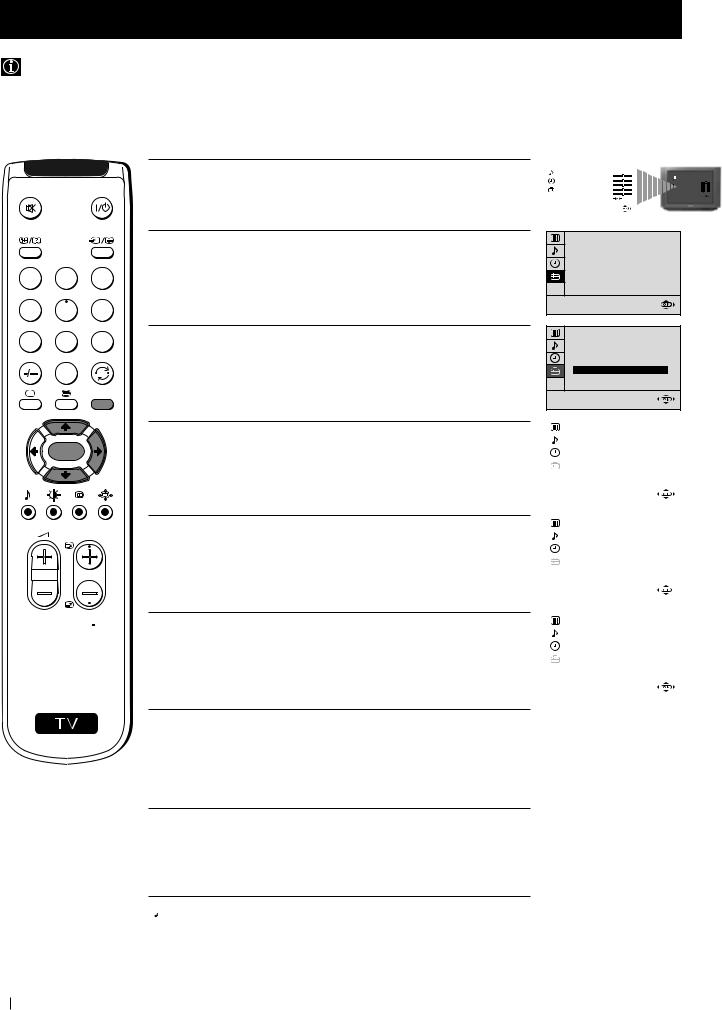
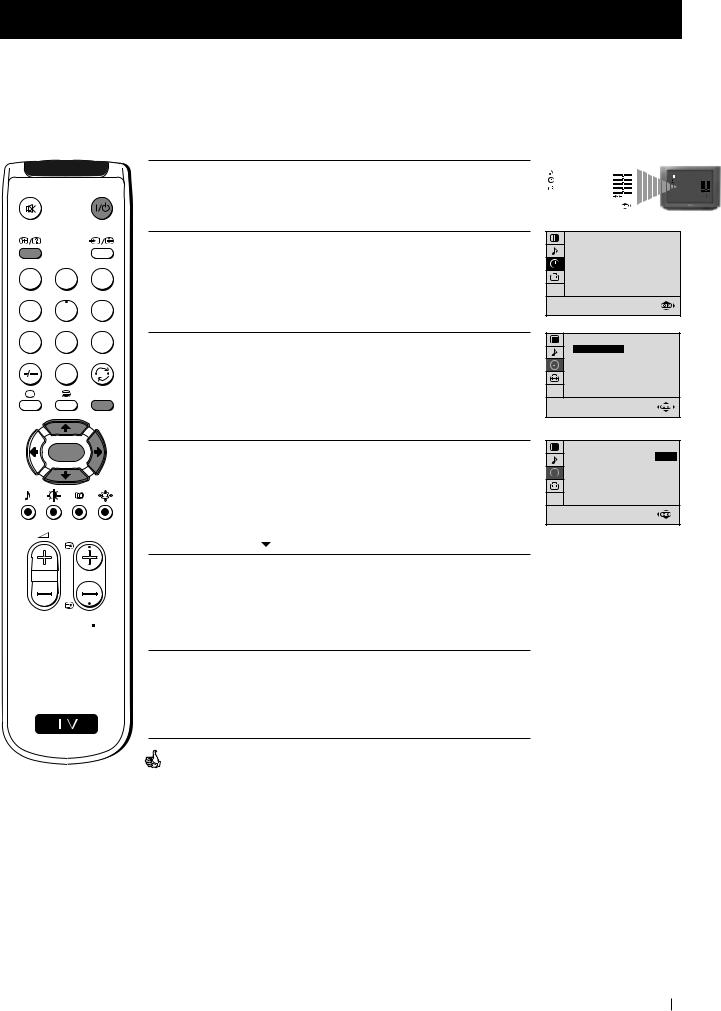
Manually Tuning the TV
 Use this function to preset channels or a video input source one by one to the programme order of your choice.
1 Press the MENU button on the remote control to display the menu on the TV screen.
2 Press the button to select the
 symbol, then press the
  button to enter to the SET UP menu.
1 2 3
4 5 6
7 8 9
0
MENU
 K
K
PROGR
 RM 887
3 Press the button to select MANUAL PROGRAMME, then press the
  button.
4 With the cursor highlighting PROGRAMME, press the  button and then, press the
  or
or button to select on which programme number you want to preset a channel. Press the
  button.
5 Press the button to select CHANNEL, then press the
 button. Press
 or
or button to select the channel tuning, "C" for terrestrial channels or "S" for cable channels. Press the
  button.
6 Press the number buttons to enter the channel number of the TV Broadcast or press the or
or button to search for the next available channel.
If you do not wish to store this channel, press the or
or button to continue searching for the desired channel.
S7 If this is the desired channel you wish to store, press the OK
button and then, with the cursor highlighting CONFIRM, press the OK button again.
8 Repeat steps 4 to 7 if you wish to store more channels.
9 Press the MENU button to exit and return to the normal TV screen.
 Your TV is now ready for use.
|
PICTURE CONTROL |
|
|
|
MODE: PERSONAL |
|
|
|
CONTRAST |
|
|
|
|
PICTURE CONTROL |
|
|
BRIGHTNESS |
|
CONTRAST |
|
COLOUR |
|
MODE: PERSONAL |
|
|
COLOUR |
|
|
SHARPNESS |
|
BRIGHTNESS |
|
|
HUE |
|
|
|
|
SHARPNESS |
|
HUE |
|
RESET |
|
RESET |
|
|
|
|
|
|
SET UP
PICTURE ROTATION: 0
LANGUAGE: ENGLISH
AUTO PROGRAMME
PROGRAMME SORTING
MANUAL PROGRAMME
SET UP
PICTURE ROTATION: 0
LANGUAGE: ENGLISH
AUTO PROGRAMME
PROGRAMME SORTING
MANUAL PROGRAMME
|
SET UP: |
|
||||
|
|
MANUAL PROGRAMME |
01 |
|||
|
||||||
|
|
PROGRAMME: |
|
|||
|
|
SYSTEM: |
|
B/G |
||
|
|
CHANNEL: |
C 21 |
|||
|
|
AFT: |
ON |
|||
|
|
SKIP: |
NO |
|||
|
|
DECODER: |
OFF |
|||
|
|
CONFIRM |
|
|||
|
|
|
|
|
|
|
|
|
|
|
|
|
|
|
SET UP: |
|
||||
|
|
MANUAL PROGRAMME |
01 |
|||
|
|
PROGRAMME: |
||||
|
|
SYSTEM: |
B/G |
|||
|
|
CHANNEL: |
|
C 21 |
||
|
|
AFT: |
|
ON |
||
|
|
SKIP: |
NO |
|||
|
|
DECODER: |
OFF |
|||
|
|
CONFIRM |
|
|||
|
|
|
|
|
|
|
|
|
|
|
|
||
|
SET UP: |
|
||||
|
|
MANUAL PROGRAMME |
01 |
|||
|
|
PROGRAMME: |
||||
|
|
SYSTEM: |
B/G |
|||
|
|
CHANNEL: |
C 21 |
|||
|
|
AFT: |
ON |
|||
|
|
SKIP: |
NO |
|||
|
|
DECODER: |
OFF |
|||
|
|
CONFIRM |
|
|||
|
|
|
|
|
|
|
|
|
|
|
|
||
|
SET UP: |
|
||||
|
|
MANUAL PROGRAMME |
01 |
|||
|
|
PROGRAMME: |
||||
|
|
SYSTEM: |
B/G |
|||
|
|
CHANNEL: |
C 21 |
|||
|
|
AFT: |
ON |
|||
|
|
SKIP: |
NO |
|||
|
|
DECODER: |
OFF |
|||
|
|
CONFIRM |
|
|
||
|
|
|
|
|
|
|
Advanced Operation - Advanced Presetting 13
Advanced Operation - Advanced Presetting
Fine Tuning Channels
Normally, the automatic fine tuning (AFT) function is operating. If the picture is distorted, however, you can manually fine tune the TV to obtain a better picture reception.
1 2 3
4 5 6
7 8 9
0
MENU
 K
K
PROGR
 RM 887
S
1 Select the channel (TV Broadcast) you wish to fine tune, then press the MENU button on the remote control to display the menu on the TV screen.
2 Press the button to select the
 symbol, then press the
  button to enter to the SET UP menu.
3 Press the button to select MANUAL PROGRAMME, then press the
  button.
4 Press the button to select AFT, then press the
  button.
5 Press the or
or button to adjust the fine tuning (-15 to +15), then press the OK button.
6 With the cursor highlighting CONFIRM, press the OK button to store.
7 Press the MENU button to exit and return to the normal TV screen.
|
PICTURE CONTROL |
|
|
|
MODE: PERSONAL |
|
|
|
CONTRAST |
|
|
|
|
PICTURE CONTROL |
|
|
BRIGHTNESS |
|
CONTRAST |
|
COLOUR |
|
MODE: PERSONAL |
|
|
COLOUR |
|
|
|
|
BRIGHTNESS |
|
SHARPNESS |
|
SHARPNESS |
|
|
HUE |
|
|
HUE |
|
RESET |
|
RESET |
|
|
|
|
|
|
SET UP
PICTURE ROTATION: 0
LANGUAGE: ENGLISH
AUTO PROGRAMME
PROGRAMME SORTING
MANUAL PROGRAMME
SET UP
PICTURE ROTATION: 0
LANGUAGE: ENGLISH
AUTO PROGRAMME
PROGRAMME SORTING
MANUAL PROGRAMME
|
SET UP: |
|
|
|||
|
|
MANUAL PROGRAMME |
01 |
|
||
|
|
PROGRAMME: |
|
|||
|
|
SYSTEM: |
B/G |
|||
|
|
CHANNEL: |
C 21 |
|||
|
|
AFT: |
|
ON |
||
|
|
SKIP: |
|
NO |
||
|
|
DECODER: |
OFF |
|||
|
|
CONFIRM |
|
|
||
|
|
|
|
|
|
|
|
|
|
|
|
|
|
|
SET UP: |
|
|
|||
|
|
MANUAL PROGRAMME |
01 |
|
||
|
|
PROGRAMME: |
|
|||
|
|
SYSTEM: |
B/G |
|||
|
|
CHANNEL: |
C 21 |
|||
|
|
AFT: |
+2 |
|
||
|
|
SKIP: |
NO |
|
||
|
|
DECODER: |
OFF |
|||
|
|
CONFIRM |
|
|
||
|
|
|
|
|
|
|
|
|
|
|
|
|
|
|
SET UP: |
|
|
|||
|
|
MANUAL PROGRAMME |
01 |
|
||
|
|
PROGRAMME: |
|
|||
|
|
SYSTEM: |
B/G |
|||
|
|
CHANNEL: |
C 21 |
|||
|
|
AFT: |
+2 |
|
||
|
|
SKIP: |
NO |
|||
|
|
DECODER: |
OFF |
|||
|
|
CONFIRM |
|
|
|
|
|
|
|
|
|
|
|
8 Repeat steps 1 to 7 to fine tune other channels.
 Your TV is now ready for use.
14 Advanced Operation - Advanced Presetting
Advanced Operation - Advanced Presetting
Adjusting the Picture Rotation
 Because of the earth's magnetism, the picture might slant. In this case, you can correct the picture slanting.
1 Press the MENU button on the remote control to display the menu |
|
|
PICTURE CONTROL |
|
|
|
MODE: PERSONAL |
|
|
||
|
BRIGHTNESS |
|
|
||
|
|
|
CONTRAST |
|
|
on the TV screen. |
|
COLOUR |
|
|
|
|
HUE |
|
|
||
|
|
|
SHARPNESS |
|
|
|
|
|
RESET |
|
|
|
|
|
|
|
|
PICTURE CONTROL MODE: PERSONAL
CONTRAST BRIGHTNESS COLOUR SHARPNESS HUE RESET
1 2 3
4 5 6
7 8 9
0
MENU
 K
K
PROGR
 RM 887
2 Press the button to select the
 symbol, then press the
  button to enter to the SET UP menu.
3 With the cursor highlighting PICTURE ROTATION, press the  button.
4 Press the or
or button to adjust the picture rotation (adjusting range is -5 to +5), then press the OK button.
5 Press the MENU button to exit and return to the normal TV screen.
S
SET UP
PICTURE ROTATION: 0 LANGUAGE: ENGLISH AUTO PROGRAMME PROGRAMME SORTING MANUAL PROGRAMME
SET UP
PICTURE ROTATION: 0
LANGUAGE: ENGLISH AUTO PROGRAMME PROGRAMME SORTING MANUAL PROGRAMME
SET UP
PICTURE ROTATION: +2 LANGUAGE: ENGLISH AUTO PROGRAMME PROGRAMME SORTING MANUAL PROGRAMME
 Your TV is now ready for use.
Advanced Operation - Advanced Presetting 15
Advanced Operation - Advanced Presetting
Skipping Programme positions
You can programme this TV to skip any unwanted programme numbers when they are selected with the PROGR +/- buttons. To cancel this function afterwards, proceed in the same way as described below by selecting NO instead of YES in step 6.
1 2 3
4 5 6
7 8 9
0
MENU
 K
K
PROGR
 RM 887
S
1 Press the MENU button on the remote control to display the menu on the TV screen.
2 Press the button to select the
 symbol, then press the
  button to enter to the SET UP menu.
3 Press the button to select MANUAL PROGRAMME, then press the
  button.
4 With the cursor highlighting PROGRAMME, press the PROGR or
or button until the programme you want to skip appears on the screen.
5 Press the button to select SKIP, then press the
  button.
6 Press the button to select YES, then press the OK button.
7 With the cursor highlighting CONFIRM, press the OK button.
|
PICTURE CONTROL |
|
|
|
MODE: PERSONAL |
|
|
|
CONTRAST |
|
|
|
|
PICTURE CONTROL |
|
|
BRIGHTNESS |
|
MODE: PERSONAL |
|
|
CONTRAST |
|
|
COLOUR |
|
BRIGHTNESS |
|
|
COLOUR |
|
|
SHARPNESS |
|
SHARPNESS |
|
|
RESET |
|
|
HUE |
|
HUE |
|
RESET |
|
|
|
|
|
|
SET UP
PICTURE ROTATION: 0
LANGUAGE: ENGLISH
AUTO PROGRAMME
PROGRAMME SORTING
MANUAL PROGRAMME
SET UP
PICTURE ROTATION: 0
LANGUAGE: ENGLISH
AUTO PROGRAMME
PROGRAMME SORTING
MANUAL PROGRAMME
|
SET UP: |
|
||||
|
|
MANUAL PROGRAMME |
01 |
|||
|
||||||
|
|
PROGRAMME: |
|
|||
|
|
SYSTEM: |
|
B/G |
||
|
|
CHANNEL: |
C 21 |
|||
|
|
AFT: |
ON |
|||
|
|
SKIP: |
NO |
|||
|
|
DECODER: |
OFF |
|||
|
|
CONFIRM |
|
|||
|
|
|
|
|
|
|
|
|
|
|
|
|
|
|
SET UP: |
|
||||
|
|
MANUAL PROGRAMME |
05 |
|||
|
|
PROGRAMME: |
||||
|
|
SYSTEM: |
B/G |
|||
|
|
CHANNEL: |
C 21 |
|||
|
|
AFT: |
ON |
|||
|
|
SKIP: |
|
|
NO |
|
|
|
DECODER: |
OFF |
|||
|
|
CONFIRM |
|
|||
|
|
|
|
|
|
|
|
|
|
|
|
||
|
SET UP: |
|
||||
|
|
MANUAL PROGRAMME |
05 |
|||
|
|
PROGRAMME: |
||||
|
|
SYSTEM: |
B/G |
|||
|
|
CHANNEL: |
C 21 |
|||
|
|
AFT: |
ON |
|||
|
|
SKIP: |
YES |
|||
|
|
DECODER: |
OFF |
|||
|
|
CONFIRM |
|
|||
|
|
|
|
|
|
|
|
|
|
|
|
||
|
SET UP: |
|
||||
|
|
MANUAL PROGRAMME |
05 |
|||
|
|
PROGRAMME: |
||||
|
|
SYSTEM: |
B/G |
|||
|
|
CHANNEL: |
C 21 |
|||
|
|
AFT: |
ON |
|||
|
|
SKIP: |
YES |
|||
|
|
DECODER: |
OFF |
|||
|
|
CONFIRM |
|
|
||
|
|
|
|
|
|
|
8 Repeat steps 4 to 7 to skip other unused programme positions.
9 Press the MENU button to exit and return to the normal TV screen.
 When changing channels (TV Broadcasts) with the PROGR +/- buttons, the skipped programme positions do not appear. You can, however, still select them using the number buttons.
16 Advanced Operation - Advanced Presetting

Advanced Operation - Advanced TV Operation
Adjusting the Picture
 Although the picture is adjusted at the factory, you can modify it to suit your own taste.
1 Press the MENU button on the remote control to display the menu on the TV screen.
2 Press the button to enter to the PICTURE CONTROL menu.
1 2 3
4 5 6
7 8 9
0
MENU
 K
K
PROGR
 RM 887
3 Press the or
or button to select the item you wish to change.
4 With the cursor highlighting the item you wish to change, press the
 button.
(Refer to the table below for the effect of each control).
PICTURE CONTROL |
OPERATION / EFFECT |
|
MODE |
PERSONAL (for individual settings) |
|
|
LIVE (for live broadcast programmes) |
|
|
MOVIE (for films) |
|
CONTRAST |
Less |
More |
BRIGHTNESS* |
Darker |
Brighter |
COLOUR* |
Less |
More |
SHARPNESS* |
Softer |
Sharper |
HUE** |
Greenish |
Reddish |
RESET |
Resets picture to the factory preset levels. |
|
*Can be only altered if PERSONAL MODE is selected.
**Only avalaible for NTSC colour signal (e.g: US video tapes).
5 Press the / or
or  /
/ button to alter the selected item, then press
Sthe OK button to store the new adjustment.
6 Repeat steps 3 to 5 to alter the other items.
7 Press the MENU button to exit and return to the normal TV screen.
PICTURE CONTROL
MODE: PERSONAL
CONTRAST
BRIGHTNESS
COLOUR
SHARPNESS
HUE
RESET
PICTURE CONTROL
MODE: PERSONAL
CONTRAST
BRIGHTNESS
COLOUR
SHARPNESS
HUE
RESET
PICTURE CONTROL
MODE: PERSONAL
CONTRAST
BRIGHTNESS
COLOUR
SHARPNESS
HUE
RESET
PICTURE CONTROL
MODE: PERSONAL
CONTRAST
BRIGHTNESS
COLOUR
SHARPNESS
HUE
RESET
PICTURE CONTROL MODE: PERSONAL
CONTRAST BRIGHTNESS COLOUR SHARPNESS HUE RESET
Changing Picture Mode Quickly
1 Press the 
 button on the remote control to directly access the
PICTURE MODE.
2 Press the button to select your desired picture mode (PERSONAL, LIVE or MOVIE).
PICTURE MODE: PERSONAL |
PICTURE MODE: PERSONAL |
PICTURE MODE: LIVE
Advanced Operation - Advanced TV Operation 17
Advanced Operation - Advanced TV Operation
Adjusting the Sound
 Although the sound is adjusted at the factory, you can modify it to suit your own taste.
1 Press the MENU button on the remote control to display the menu on the TV screen.
2 Press the button to select the
  symbol, then press the
  button to enter to the SOUND CONTROL menu.
1 2 3
4 5 6
7 8 9
0
MENU
 K
K
PROGR
 RM 887
S
3 Press the or
or button to select the item you wish to change.
4 With the cursor highlighting the item you wish to change, press the
 button.
(Refer to the table below for the effect of each control).
SOUND CONTROL |
OPERATION / EFFECT |
|
MODE |
PERSONAL (for individual settings) |
|
|
JAZZ |
|
|
POP |
|
TREBLE* |
ROCK |
|
Less |
More |
|
BASS* |
Less |
More |
BALANCE |
Left |
Right |
DUAL SOUND |
• For a stereo broadcast: |
|
|
MONO |
|
|
STEREO |
|
|
• For a bilingual broadcast: |
|
|
A (for channel 1) |
|
|
B (for channel 2) |
|
DSP (Digital sound Processor) |
ON |
OFF |
RESET |
Resets sound to the factory preset levels. |
|
|
|
|
* Can be only altered if PERSONAL MODE is selected.
5 Press the / or
or  /
/ button to alter the selected item, then press the OK button to store the new adjustment.
6 Repeat steps 3 to 5 to alter the other items.
7 Press the MENU button to exit and return to the normal TV screen.
Changing Sound Mode Quickly
1 Press the button on the remote control to access directly to the
SOUND MODE.
2 Press the button to select your desired sound mode (PERSONAL, JAZZ, POP or ROCK).
|
PICTURE CONTROL |
|
|
|
MODE: PERSONAL |
|
|
|
CONTRAST |
|
|
|
|
PICTURE CONTROL |
|
|
BRIGHTNESS |
|
CONTRAST |
|
COLOUR |
|
MODE: PERSONAL |
|
|
COLOUR |
|
|
|
|
BRIGHTNESS |
|
SHARPNESS |
|
SHARPNESS |
|
|
HUE |
|
|
HUE |
|
RESET |
|
RESET |
|
|
|
|
|
|
SOUND CONTROL
MODE: PERSONAL
TREBLE
BASS
BALANCE
DUAL SOUND: STEREO
DSP: ON
RESET
SOUND CONTROL
MODE: PERSONAL
TREBLE
BASS
BALANCE
DUAL SOUND: STEREO
DSP: ON
RESET
SOUND CONTROL
MODE: PERSONAL
TREBLE
BASS
BALANCE
DUAL SOUND: STEREO
DSP: ON
RESET
SOUND MODE: PERSONAL |
SOUND MODE: PERSONAL |
SOUND MODE: POP
18 Advanced Operation - Advanced TV Operation
Advanced Operation - Advanced TV Operation
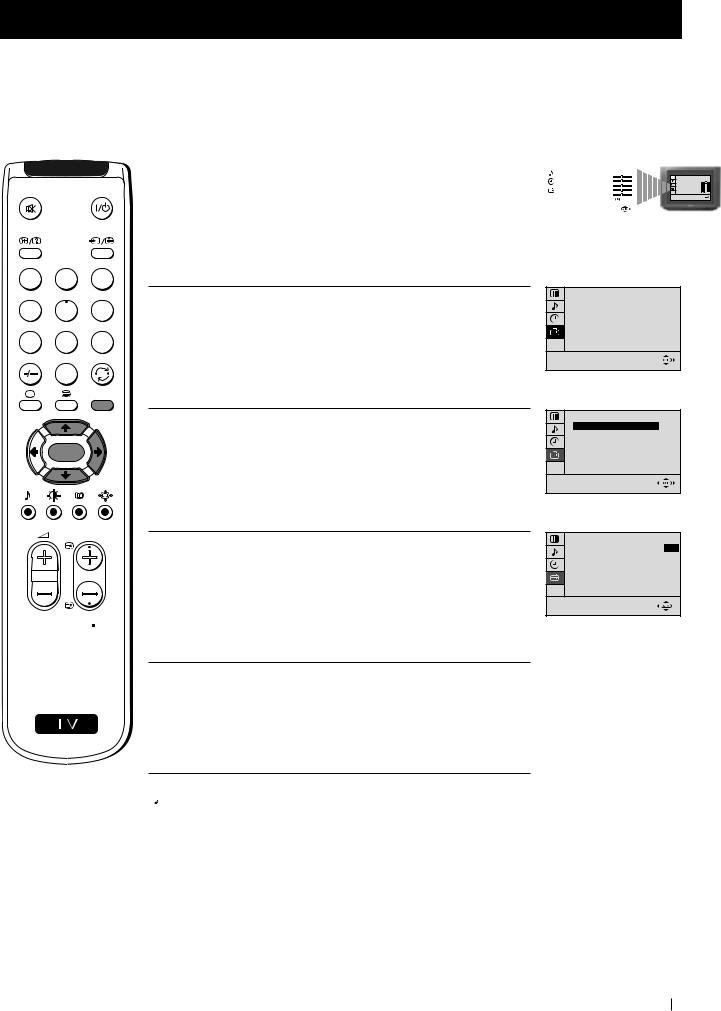
Using the Sleep Timer
 You can select a time period for the TV to switch itself automatically into the standby mode.
1 Press the MENU button on the remote control to display the menu on the TV screen.
2 Press the button to select the
 symbol, then press the
 button to enter to the TIMER menu.
1 2 3
4 5 6
7 8 9
0
MENU
 K
K
PROGR
 RM 887
S
3 With the cursor highlighting OFF TIMER, press the button.
4 Press the or
or button to set the time period delay
 OFF 0:15 min. 0:30 min.
...
...
4:00 hours
5 Press the OK button.
6 Press the MENU button to exit and return to the normal TV screen.
One minute before the TV switches into standby mode, the time remaining is displayed on the TV screen automatically.
Notes: • When watching the TV, press the  button to display the time remaining.
•To return to normal operation from standby mode, press the button.
|
PICTURE CONTROL |
|
|
|
|
MODE: PERSONAL |
|
|
|
|
CONTRAST |
|
|
PICTURE CONTROL |
|
BRIGHTNESS |
|
|
CONTRAST |
|
COLOUR |
|
|
MODE: PERSONAL |
|
|
|
COLOUR |
|
|
SHARPNESS |
|
|
BRIGHTNESS |
|
|
|
HUE |
|
|
|
|
|
SHARPNESS |
|
HUE |
|
|
RESET |
|
RESET |
|
|
|
|
|
|
|
|
TIMER |
OFF |
OFF TIMER: |
TIMER |
OFF |
OFF TIMER: |
TIMER |
0:15 |
OFF TIMER: |
Advanced Operation - Advanced TV Operation 19
Teletext
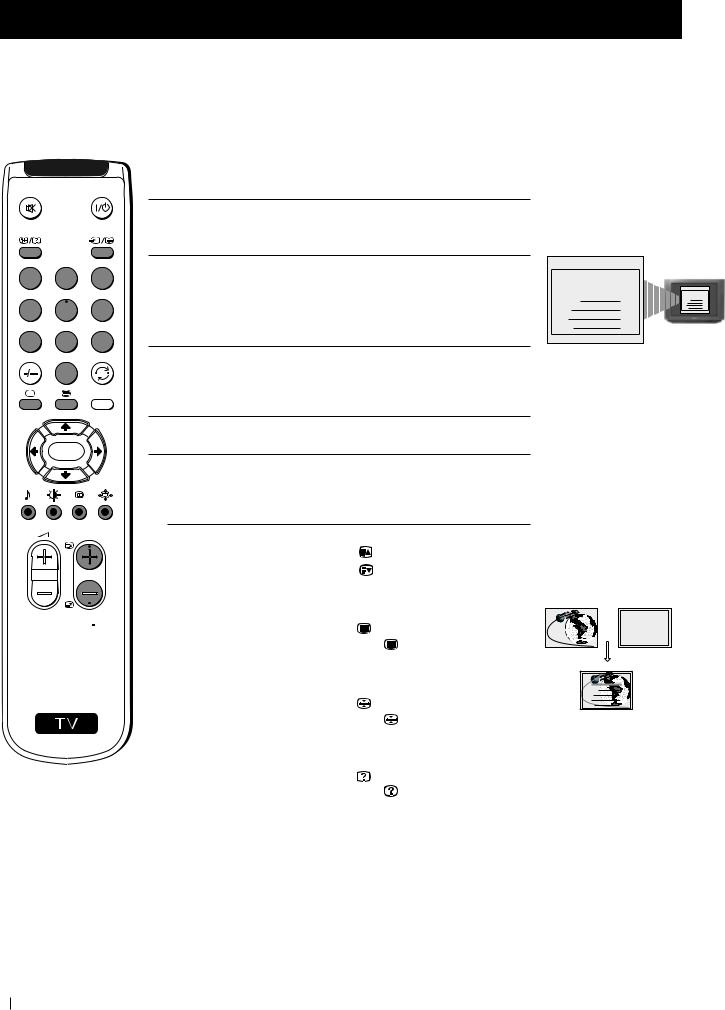
Viewing Teletext
 Teletext is an information service transmitted by most TV stations.
 Make sure to use a TV channel with a strong signal, otherwise teletext errors may occur.
1 2 3
4 5 6
7 8 9
0
MENU
 K
K
Selecting Teletext
1 Select the TV channel which carries the teletext service you wish to view.
2 Press the  button on the remote control to switch on the teletext.
3 Input three digits for the page number, using the numbered buttons on the remote control. (if you have made a mistake, type in any three digits and then, re-enter the correct page number).
4 Press the button to switch off teletext.
TELETEXT
Index |
|
|
Programme |
25 |
|
News |
153 |
|
Sport |
101 |
|
Weather |
98 |
|
PROGR
 RM 887
S
Using other Teletext functions
TO |
PRESS THE BUTTON |
|
Access the next or preceding page |
for next page or |
|
|
for the preceding page |
|
Superimpose teletext on to the TV |
|
|
|
Press |
again to cancel teletext |
|
mode. |
|
Freeze a teletext page |
|
|
|
Press |
again to cancel the |
|
freeze. |
|
Reveal concealed information |
|
|
(e.g: answer to a quiz) |
Press |
again to cancel. |
Using Fastext
 Fastext lets you access pages with one button stroke.
When Fastext is broadcast, a colour coded menu appears at the bottom of the teletext page. Press the colour button (red, green, yellow or blue) on the remote control to access the corresponding page.
TELETEXT
Index |
|
|
|
|
|
|
Programme |
|
|
25 |
|||
News |
|
|
|
153 |
||
Sport |
|
|
|
|
101 |
|
Weather |
|
|
98 |
|||
TELETEXT |
|
Index |
|
Programme |
25 |
News |
153 |
Sport |
101 |
Weather |
98 |
TELETEXT
Index |
|
|
Programme |
25 |
|
News |
153 |
|
Sport |
101 |
|
Weather |
98 |
|
20 Teletext
Optional Connections
Using Optional Equipment
You can connect optional audio or video equipment to your TV, such as a VCR, a camcorder or a video game as shown below.
Select and View the Input Signal |
|
Front of TV |
|
||||
|
|
|
|
|
|||
1 |
Connect your equipment to the designated TV socket. |
|
|
|
|
|
|
2 |
Press the |
button repeatedly on your remote control until the correct |
|
|
|
|
|
|
input symbol appears on the TV screen. |
|
|
|
|
|
|
|
Symbol |
Input signals |
|
|
|
|
|
|
k |
• Audio/video input signal through the Euro AV |
|
|
|
|
|
|
|
connector |
A |
B |
C |
D |
|
|
|
• RGB input signal through the Euro AV |
|
||||
|
|
|
|
|
|
8mm/Hi8 |
|
|
|
connector |
|
|
|
|
|
|
|
|
|
|
|
camcorder |
|
|
K |
• Audio/video input signal through the Euro AV |
|
|
|
|
|
|
|
connector |
|
|
|
MONO |
+ |
|
q2 |
|
|
|
_ P |
||
|
• S video input signal through the Euro AV |
|
|
3 |
L/G/S/I R/D/D/D |
|
|
|
|
|
|
s 3 |
|
||
|
|
connector |
|
|
|
3 |
|
|
|
|
|
|
|
|
|
|
K3 |
• Video input signal through the phono socket |
and |
|
|
|
|
3
4
|
Audio input signal through |
q3 |
• S video input signal through the socket and |
Audio input signal through  .
.
 S-VHS/Hi8
camcorder
Switch on the connected equipment.
To return to normal TV picture, press the  button on the remote control.
Rear of TV
Note: To avoid picture distortion, do not connect equipment to the  and
and  connectors at the same time.
Additional Information
Connecting a VCR
Plug in VCR to the socket  on the rear of the TV set.
We recommend you tune in the VCR signal to TV programme number ‘0’ using the section “Manually Tuning the TV“ of this instruction manual.
Connecting Headphones
Plug in your headphones to the socket  on the front of the TV set.
Connecting Decoders
Plug in decoders to the socket  on the rear of the TV.
Connecting to External Audio Equipment
Plug in your Hi-Fi equipment to the  sockets on the rear of the TV if you wish to amplify the audio output from the TV.
|
F |
G |
2 / |
s |
|
|
|
L/G/S/I |
1/ |
|
R/D/D/D |
1 |
2 |
|
“PlayStation”* |
||
Hi-Fi
VCR
*“PlayStation” is a product of Sony Computer Entertainment, Inc.
*“PlayStation” is a trademark of Sony Computer Entertainment, Inc.
Decoder
Optional Connections 21
Optional Connections
Smartlink
 Smartlink is a direct link between your TV set and a VCR.
For Smartlink you need:
•A VCR which supports Smartlink, NextView Link, Easy Link or Megalogic.
Megalogic is a trademark of Grundig Corporation.
EasyLink is a trademark of Philips Corporation.
•A fully-wired 21 pin SCART cable to connect your VCR to Scart :1/

 connector.
The features of Smartlink are:
•Tuning information such as the channel overview are downloaded from the TV set to the VCR.
•Direct TV recording: While watching TV you need to press just one button on the VCR to record this programme.
•TV in standby mode: Press the "Play z" button on your VCR to switch the TV automatically on.
If you have connected a decoder to a VCR which supports Smartlink feature, select the menu MANUAL PROGRAMME in the  (SET UP) menu and select DECODER ON to each codified channel.
For more information on Smartlink, please refer to the Instruction
Manual of your VCR.
22 Optional Connections
Additional Information
Menu Guide
Set Up Menus (for first time operation)
LANGUAGE
ENGLISH |
|
|
|
|
|
|
|
|
|
|
|
DEUTSCH |
|
|
|
|
|
|
|
|
|
AUTO PROGRAMME |
|
FRANÇAIS |
Do you want to start |
|
Please confirm that |
|
|
||||||
|
|
|
|
||||||||
ITALIANO |
automatic tuning? |
|
antenna is connected |
|
PROGRAMME: |
01 |
|||||
ESPAÑOL |
|
|
|
|
|
|
|
|
|||
NEDERLANDS |
|
YES |
|
|
|
CONFIRM |
|
|
SYSTEM: |
B/G |
|
E§§HNIKA |
|
NO |
|
|
|
|
|
|
CHANNEL: |
C 21 |
|
POLSKI |
|
|
|
|
|
|
|
|
|
|
|
ČESKI |
|
|
|
|
|
|
|
|
Searching... |
|
|
MAGYAR |
|
|
|
|
|
|
|
|
|
||
TÜRKÇE |
|
|
|
|
|
|
|
|
|
|
|
Select language:
(For more details, please refer to the chapter "Selecting Language")
PROGRAMME SORTING
PROGRAMME: 01 03 CONFIRM
Select Channel: PROGR Select new position:
  Confirm:
Exit: MENU
On Screen display Menus Guide
|
PICTURE CONTROL |
|
|
PICTURE CONTROL |
|
|
MODE: PERSONAL |
|
|
MODE: |
PERSONAL |
|
CONTRAST |
|
|
CONTRAST |
|
|
BRIGHTNESS |
|
|
BRIGHTNESS |
|
|
COLOUR |
|
|
COLOUR |
|
|
SHARPNESS |
|
|
SHARPNESS |
|
|
HUE |
|
|
HUE |
|
|
RESET |
|
|
RESET |
|
|
|
|
|
|
|
|
SOUND CONTROL |
|
|
|
SOUND CONTROL |
|
|
|
MODE: PERSONAL |
|
|
|
MODE: |
PERSONAL |
|
|
TREBLE |
|
|
|
TREBLE |
|
|
|
|
|
|||||
|
BASS |
|
|
|
BASS |
|
|
|
BALANCE |
|
|
|
BALANCE |
|
|
|
DUAL SOUND: |
STEREO |
|
|
DUAL SOUND: |
STEREO |
|
|
DSP: |
ON |
|
|
DSP: |
ON |
|
|
RESET |
|
|
|
RESET |
|
|
|
|
|
|
|
|
|
|
|
TIMER |
|
|
|
TIMER |
|
|
|
TIMER |
|
|
|
OFF TIMER: |
OFF |
|
|
|
OFF TIMER: |
OFF |
|
|
OFF TIMER: |
OFF |
|
|
|
|
|
|
|
|
|
|
|
|
|
|
|
|
|
|
|
|
|
|
|
|
|
|
|
|
|
|
|
|
|
|
|
|
|
|
|
|
|
|
|
|
|
|
|
|
(For different adjustments, please refer to the section "Adjusting the Picture")
(For different adjustments, please refer to the section "Adjusting the Sound" )
(For more details,
please refer to the section "Using the Sleep Timer")
SET UP
PICTURE ROTATION: 0 LANGUAGE: ENGLISH AUTO PROGRAMME PROGRAMME SORTING MANUAL PROGRAMME
SET UP |
0 |
PICTURE ROTATION: |
|
LANGUAGE: ENGLISH |
|
AUTO PROGRAMME |
|
PROGRAMME SORTING |
|
MANUAL PROGRAMME |
|
SET UP
PICTURE ROTATION: 0 LANGUAGE: ENGLISH AUTO PROGRAMME PROGRAMME SORTING MANUAL PROGRAMME
SET UP
PICTURE ROTATION: 0 LANGUAGE: ENGLISH AUTO PROGRAMME PROGRAMME SORTING MANUAL PROGRAMME
SET UP
PICTURE ROTATION: 0 LANGUAGE: ENGLISH AUTO PROGRAMME PROGRAMME SORTING MANUAL PROGRAMME
(For more details,
please refer to the section "Picture Rotation")
(For more details,
please refer to the section "Selecting Language")
SET UP |
0 |
PICTURE ROTATION: |
|
LANGUAGE: ENGLISH |
|
AUTO PROGRAMME |
|
PROGRAMME SORTING |
|
MANUAL PROGRAMME |
|
SET UP |
0 |
PICTURE ROTATION: |
|
LANGUAGE: ENGLISH |
|
AUTO PROGRAMME |
|
PROGRAMME SORTING |
|
MANUAL PROGRAMME |
|
SET UP |
0 |
PICTURE ROTATION: |
|
LANGUAGE: ENGLISH |
|
AUTO PROGRAMME |
|
PROGRAMME SORTING |
|
MANUAL PROGRAMME |
|
Do you want to start automatic tuning?
YES
NO
SET UP:
PROGRAMME SORTING
PROGRAMME: 01 03
03
CONFIRM
Select channel: PROGR Select new position:
SET UP:
MANUAL PROGRAMME
|
|
PROGRAMME: |
01 |
|
|
SYSTEM: |
B/G |
|
|
CHANNEL: |
C 21 |
|
|
AFT: |
ON |
|
|
SKIP: |
NO |
|
|
DECODER: |
OFF |
|
CONFIRM |
|
|
(For more details, please refer to the section "Automatically Tuning the TV using the Remote Control")
(For more details, please refer to the section "Changing the Programme Order of the TV channels")
(For more details,
please refer to the section "Manually Tuning the TV")
Additional Information 23
Additional Information
Troubleshooting
 Here are some simple solutions to the problems which may affect the picture and sound.
Problem |
Solution |
|
|
No picture (screen is dark), no sound |
• |
Plug the TV in. |
|
|
• |
Press the button on the front of TV. |
|
|
• |
If the indicator is on, press |
button or a |
|
programme number button on the remote control. |
• Check the aerial connection. |
|
• |
Check that the selected video source is on. |
• |
Turn the TV off for 3 or 4 seconds and then turn it |
|
on again using the button on the front of the TV. |
|
|
Poor or no picture (screen is dark), but good sound
•Using the MENU system, select the Picture Adjustment display.
Adjust the brightness, picture and colour balance levels.
•From the Picture Adjustment display select RESET to return to the factory settings.
Poor picture quality when watching a RGB video source.
•Press the  button repeatedly on the remote control until the RGB symbol

 is displayed on the screen.
Good picture, no sound |
• Press the |
+/– button on the remote control. |
•If  is displayed on the screen, press the
  button on the remote control.
No colour on colour programmes |
• Using the MENU system, select the Picture Adjustment |
|
display. Adjust the colour balance. |
|
• From the Picture Adjustment display select RESET to return |
|
to the factory settings. |
|
|
Distorted picture when changing |
• Turn off any equipment connected to the 21 pin Euro |
programmes or selecting teletext |
connector on the rear of the TV. |
|
|
Noisy picture when viewing TV channel
• Adjust Fine Tuning to obtain better picture reception.
Remote control does not function |
• |
Replace the batteries. |
|
|
|
The standby indicator on the TV |
• |
Contact to your nearest Sony service centre. |
flashes. |
|
|
|
|
|
•If you continue to have these problems, have your TV serviced by qualified personnel.
•NEVER open the casing yourself.
24 Additional Information

Additional Information
Specifications
TV system
B/G/H
Colour system
PAL, SECAM
NTSC 3.58, 4.43 (only Video In)
Channel coverage
VHF: E2-E12
UHF: E21-E69
CATV: S1-S20
HYPER: S21-S41
Picture tube
Flat Display Trinitron
Approx. 72 cm (29 inches) (Approx. 68 cm picture measured diagonally), 104° deflection
Rear Terminals |
|
||||||
:1/ |
|
|
21-pin Euro connector (CENELEC |
||||
|
|
||||||
|
|
|
|
|
|
|
standard) including audio/video input, |
|
|
|
|
|
|
|
RGB input, TV audio/video output |
:2/ |
|
s |
21-pin Euro connector (CENELEC |
||||
|
|||||||
|
|
|
|
|
|
|
standard) including audio/video input, |
|
|
|
|
|
|
|
S-video input, monitor audio/video |
|
|
|
|
|
|
|
output |
|
|
|
|
|
|
|
Audio outputs - phono jacks |
Front Terminals |
|||||||
|
|
|
23 |
|
video input - phono jack |
||
|
|
||||||
|
23 |
|
audio inputs - phono jacks |
||||
|
|
|
s |
3 |
|
S video input - 4 pin DIN |
|
|
|
|
|
||||
|
|
|
|
|
|
Headphones jack - minijack stereo |
|
Design and specifications are subject to change without notice.
Ecological Paper - Totally Chlorine Free 

Sound output
2x7 W + 1x15 W (RMS)
Power consumption
120 W
Standby Power consumption
0.5 W
Dimensions (w x h x d)
Approx. 746 x 569 x 516 mm
Weight
Approx. 47.5 kg
Accessories supplied
1 Remote Control (RM-887)
2 Batteries (IEC designated)
Other features
TELETEXT, Fastext, TOPtext Sleep Timer
Smartlink
Additional Information 25
FD Trinitron
Farbfernseher
Bedienungsanleitung DE
Wir gratulieren Ihnen zum Kauf Ihres Sony Fernsehgerätes.
Lesen Sie bitte vor der Inbetriebnahme des Gerätes diese Anleitung sorgfältig durch und bewahren Sie sie gut auf.
Über diese Bedienungsanleitung
•Verwenden Sie den Teil Inbetriebnahme beim Aufstellen und um sich mit den Grundfunktionen des Gerätes vertraut zu machen.
•Verwenden Sie den Teil Zusatzfunktionen, falls Sie die Sonderund Zusatzfunktionen des Gerätes interessieren.
•In der Anleitung verwendete Symbole:
• |
|
|
Mögliche Gefahren |
• |
|
|
Wichtiger Hinweis |
• |
|
|
Information zu einer Funktion |
• 1, 2 ... Eine Aufzählung von Bedienschritten |
|||
• |
K |
MENU |
Farblich hervorgehobene Tasten auf der Fernbedienung beziehen sich |
|
|
|
auf die zu drückenden Tasten, um eine Bedienfolge auszuführen. |
• |
|
|
Resultat einer Bedienung. |
• |
|
|
Text geht auf der nächsten Seite weiter. |
27

Zu Ihrer Sicherheit
Zu Ihrer Sicherheit
 Sicherheitshinweis
Fernsehgeräte arbeiten mit sehr hohen Spannungen. Um ein Feuer oder einen elektrischen Schlag zu vermeiden, sollten Sie unbedingt die folgenden Sicherheitshinweise beachten.
 Allgemeine Hinweise
•Dieses Fernsehgerät ist zum Empfang und der Wiedergabe von Audiound Videosignalen bestimmt. Jegliche andere Verwendung des Gerätes ist nicht erlaubt.
•Setzen Sie das Gerät keinesfalls Regen oder sonstiger Feuchtigkeit aus.
•Öffnen Sie nie selbst die Rückwand des Gerätes.
•Lassen Sie Reparaturen ausschließlich von Fachpersonal ausführen!
 Zur sicheren Installation
•Stellen Sie das Gerät nicht an einem heißen, feuchten oder übermäßig staubigen Platz auf.
•Decken Sie die Lüftungsschlitze des Gerätes nicht ab. Lassen Sie zur Belüftung mindestens 10 cm um das Gerät frei (z.B. in einer Regalwand).
•Setzen Sie das Gerät keinen starken Erschütterungen aus.
•Stellen Sie das Gerät nur auf einen stabilen TV-Stand, der für das Gewicht und die Abmessungen des Gerätes ausgelegt ist.
 Zum sicheren Betrieb
•Betreiben Sie das Gerät nur an 220 - 240 V AC, 50 Hz.
•Ziehen Sie sofort den Netzstecker, falls Flüssigkeiten oder Gegenstände in das Gehäuse gelangen. Lassen Sie das Gerät auf jeden Fall überprüfen!
•Schalten Sie das Gerät normalerweise mit dem Netzschalter ganz aus. Lassen Sie es nicht unnötig im Bereitschaftsbetrieb. Ziehen Sie den Netzstecker, falls Sie das Gerät längere Zeit nicht verwenden.
•Ziehen Sie beim Ausstecken immer am Stecker selbst, nicht am Kabel. Sie könnten ansonsten das Netzkabel beschädigen.
•Ziehen Sie bei einem Gewitter Netzund Antennenkabel. Ansonsten kann das Gerät bei einem Einschlag beschädigt werden.
 Zur Wartung
•Reinigen Sie den Bildschirm mit einem weichen, feuchten Tuch. Verwenden Sie keine scharfen Reiniger.
•Langfristig können Staubund Nikotinablagerungen zu einem Wärmestau im Gerät führen. Dies kann ein Sicherheitsrisiko sein und die Lebensdauer Ihres Fernsehgerätes verkürzen. Wie empfehlen deshalb, das Gerät alle 5 Jahre warten zu lassen.
28 Zu Ihrer Sicherheit

Inhaltsverzeichnis
Inhaltsverzeichnis
Über diese Bedienungsanleitung ....................................................................................................... |
27 |
Zu Ihrer Sicherheit ................................................................................................................................ |
28 |
Als erstes |
|
Auf einen Blick |
|
Überprüfen des mitgelieferten Zubehörs ............................................................................. |
30 |
Auf einen Blick - Tasten am Gerät ......................................................................................... |
30 |
Auf einen Blick - Fernbedienung ........................................................................................... |
31 |
Erstmalige Inbetriebnahme |
|
Schritt 1- Installation |
|
Einlegen der Batterien in die Fernbedienung ...................................................................... |
32 |
Anschluß der Antenne ............................................................................................................ |
32 |
Einschalten des Fernsehgerätes ............................................................................................. |
32 |
Schritt 2 - Abspeicherung - Grundfunktionen |
|
Menüsprache wählen .............................................................................................................. |
33 |
Automatisches Abspeichern von Sendern mit der Fernbedienung ................................. |
34 |
Ordnen der Programmspeicherplätze .................................................................................. |
35 |
DE
Weitere Funktionen |
|
Abspeicherung - Zusatzfunktionen |
|
Automatisches Abspeichern von Sendern mit den Tasten am Gerät ............................... |
36 |
Manuelles Abspeichern von Sendern ................................................................................... |
37 |
Feinabstimmen eines Senders ................................................................................................ |
38 |
Einstellen der Bildrotation ...................................................................................................... |
39 |
Überspringen von Programmspeicherplätzen .................................................................... |
40 |
Bedienung des Fernsehgerätes - Zusatzfunktionen |
|
Einstellen des Bildes ................................................................................................................ |
41 |
Einstellen des Tons ................................................................................................................... |
42 |
Die automatische Abschaltfunktion ...................................................................................... |
43 |
Videotext |
|
Verwenden von Videotext ...................................................................................................... |
44 |
Anschlußmöglichkeiten |
|
Anschluß von anderen Geräten ............................................................................................. |
45 |
“Smartlink” ............................................................................................................................... |
46 |
Weitere Informationen |
|
Das Menüsystem ...................................................................................................................... |
47 |
Fehlersuche ............................................................................................................................... |
48 |
Technische Daten ..................................................................................................................... |
49 |
Inhaltsverzeichnis 29
Als erstes - Auf einen Blick
Überprüfen des mitgelieferten Zubehörs
1 2 3
4 5 6
7 8 9
0
MENU
 K
K
PROGR
Zwei Batterien (R6)
 RM 887
S
Eine Fernbedienung
(RM-887)
Auf einen Blick - Tasten am Gerät
Netzschalter (Ein/Aus)
Bereitschaftsanzeige
Taste zur automatischen
Kopfhörer-Buchse Abspeicherung von Sendern
|
S-Video- |
Cinchbuchse, |
Cinch- |
Taste zur |
LautstärkeProgrammwahl |
|
Eingangsbuchse Videoeingang |
buchsen, |
Wahl des |
regelung |
|
Tasten am Gerät: Zum Öffnen |
|
Audio- |
Video- |
|
|
Markierung |
auf Abdeckung vorne |
|
eingang |
eingangs |
|
am Gerät drücken. |
|
|
|
|
|
30 Als erstes - Auf einen Blick
 Loading...