


 Loading...
4-748-703-11(1)
Television
Reference Guide
KD-77A9G / 65A9G / 55A9G
To attach the Table-Top
Stand, refer to the Setup
Guide.
Table of Contents
Safety Information . . . . . . . . . . . . . . . . . . . . . 2
Protecting the TV Screen (OLED TV) . . . . . . .4
Parts and Controls . . . . . . . . . . . . . . . . . . . 5
Controls and Indicators . . . . . . . . . . . . . . . . . 5
Using Remote Control . . . . . . . . . . . . . . . . 6
Remote Control Parts Description. . . . . . . . .6
Connection Diagram . . . . . . . . . . . . . . . . . 8 Installing the TV to the Wall . . . . . . . . . . 10
Using the optional Wall-Mount Bracket (SU-WL850 or SU-WL450) . . . . . . . . . . . . . . 10
Troubleshooting . . . . . . . . . . . . . . . . . . . . 12
Troubles and Solutions. . . . . . . . . . . . . . . . . 12
Specifications . . . . . . . . . . . . . . . . . . . . . . 13
Introduction
Thank you for choosing this Sony product.
Before operating the TV, please read this manual thoroughly and retain it for future reference.
Note
•Before operating the TV, please read the “Safety Information” (page 2).
•Read the supplied Safety Information for additional safety information.
•Instructions about “Installing the TV to the Wall” are included within this TV’s instruction manual.
•Images and illustrations used in the Setup Guide and this manual are for reference only and may differ from the actual product.
Help
Find more troubleshooting and other useful information directly from your TV. Press HELP on the remote control to display a list of topics, or to search by keyword.
Help Guide (Manual)
For more detailed information, select [Help Guide] from the Help menu on your TV. You can also check the Help Guide from your PC or smartphone (information provided on the back cover of this manual).
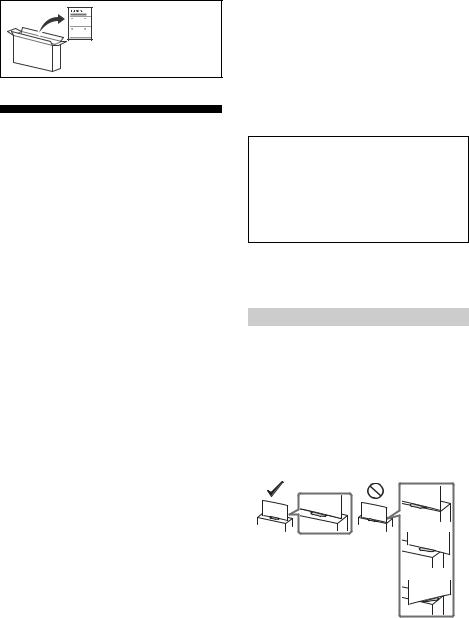
Location of the identification label
Labels for the TV Model No. and Power Supply rating are located on the rear of the TV. They can be found by removing the stand cover 
 .
.
Safety Information
Installation/Set-up
Install and use the TV set in accordance with the instructions below in order to avoid any risk of fire, electric shock or damage and/or injuries.
Installation
•The TV set should be installed near an easily accessible AC power outlet (mains socket).
•Place the TV set on a stable, level surface to prevent it from falling over and causing personal injury or property damage.
•Install the TV where it cannot be pulled, pushed, or knocked over.
•Install the TV so that the TV’s Table-Top Stand does not protrude out from the TV stand (not supplied). If the TV’s Table-Top Stand protrudes out from the TV stand, it may cause TV set to topple over, fall down, and cause personal injury or damage to the TV.
2GB
•For safety reasons, be sure to attach the centre covers to the rear of the TV when TV in Table-Top condition.
•Only qualified service personnel should carry out wall-mount installations.
•For safety reasons, it is strongly recommended that you use Sony accessories, including:
Wall-Mount Bracket SU-WL850
Wall-Mount Bracket SU-WL450
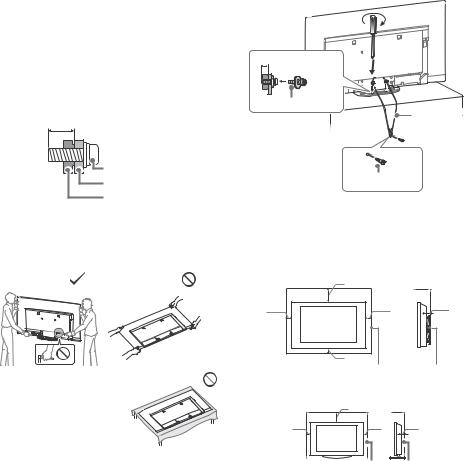
•Be sure to use the screws supplied with the Wall-Mount Bracket when attaching the Wall-Mount Bracket to the TV set. The supplied screws are designed as indicated by illustration when measured from the attaching surface of the Wall-Mount Bracket. The diameter and length of the screws differ depending on the Wall-Mount Bracket model.
Use of screws other than those supplied may result in internal damage to the TV set or cause it to fall, etc.
9 mm - 13 mm
Screw (M6)
Wall-Mount Bracket
TV’s rear cover
Transporting
•Before transporting the TV set, disconnect all cables.
•Two or three people are needed to transport a large TV set.
•When transporting the TV set by hand, hold it as shown below. Do not put stress on the panel and the frame around the screen.
•When handling or mounting the TV set, do not lay down the TV.
•When transporting the TV set, do
not subject it to jolts or excessive vibration.
•When transporting the TV set for repairs or when moving, pack it using the original carton and packing material.
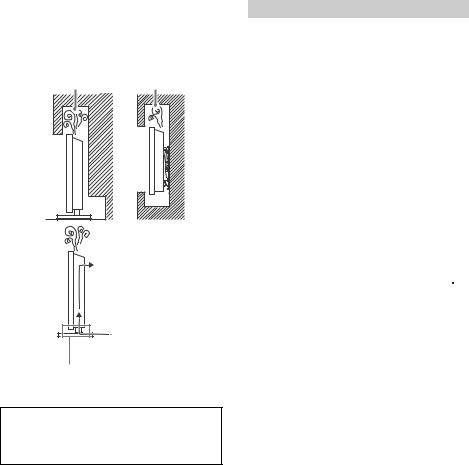
Topple prevention
(Except models with supplied support belt kit)
1.5 N·m
{15 kgf·cm}
6 mm - 7 mm
M4 screw (not supplied)
Cord (not
supplied)
Screw (not supplied)
Ventilation
•Never cover the ventilation holes or insert anything into the cabinet.
•Leave space around the TV set as shown below.
•It is strongly recommended that you use a Sony Wall-Mount Bracket in order to provide adequate air circulation.
Installed on the wall
|
30 cm |
|
10 cm |
10 cm |
1 cm |
|
10 cm |
|
|
Leave at least this space around the set. |
|
Installed with stand |
|
|
|
30 cm |
|
10 cm |
10 cm |
6 cm |
|
||
Leave at least this space around the set.
3GB
•To ensure proper ventilation and prevent the collection of dirt or dust:
Do not lay the TV set flat, install upside down, backwards, or sideways.
Do not place the TV set on a shelf, rug, bed or in a closet.
Do not cover the TV set with a cloth, such as curtains, or items such as newspapers, etc.
Do not install the TV set as shown below.
Air circulation is blocked.
Wall |
Wall |
 Air circulation
Do not block the air circulation area.
Notice for customer in UAE
TRA
REGISTERED No: ER63944/18
DEALER No: |
DA0065531/11 |
Protecting the TV Screen (OLED TV)
Precautions to Protect the Screen from Damage
Image retention
OLED TV‘s are susceptible to image retention (burn-in) due to the characteristics of the materials used. Image retention may occur if images are displayed in the same location on the screen repeatedly or over extended periods of time. This is not a malfunction of the TV. Avoid displaying images that may cause image retention.
The following are examples of images that may cause image retention:
•Content with black bars either on the top and bottom and/or the left and right sides of the screen. (for example, Letterboxed, 4:3 screen, Standard definition)
•Static images such as photos.
•Video games that might have static content in some part of the screen.
•On-screen menus, programme guides, channel logos etc.
•Static content from applications.
•On-screen tickers, such as those used for news and headlines.
To reduce the risk of image retention:
•Sony recommends that you turn off the TV normally by pressing the power button on the remote control or the TV.
•Fill the screen by changing [Wide mode] to eliminate the black bars. Select [Wide mode] other than [Normal].
•Turn off the OSD (On Screen Display) by pressing the  /
/ button, and turn off the menus from connected equipment. For details, refer to the instruction manuals for the connected equipment.
•Avoid displaying static images with bright colours (including white), clocks or logos on any portion of the screen.
•Set the picture settings based on the ambient conditions. The Standard Picture is recommended for home use and when viewing content that often displays the station logos, etc.
The TV has following features to help reduce/prevent image retention.
Panel refresh
Panel refresh will automatically run to adjust the uniformity of the TV screen after it has been in use for long periods of time. Panel refresh can also be performed manually and should only be used if image retention is very noticeable or you see the following message: [Panel refresh did not finish…]
Caution:
•The Panel refresh function may affect the panel. As a reference, perform the Panel refresh only once a year, do not perform it more than once a year as it may affect the usable life of the panel.
•Panel refresh takes about one hour to complete.
•A white line may be displayed on the screen during the Panel refresh, this is not a malfunction of the TV.
•Panel refresh will only work when the room temperature is between 10 ºC and 40 ºC.
Pixel shift
Automatically moves the image on the screen to prevent image retention.
Other feature
The screen brightness is automatically reduced when displaying still images, clocks, bright colours or logos etc.
4GB

Parts and Controls
Controls and Indicators
ȩ |
|
|
Ȫ ȫ Ȭ |
(Power) / + / –
When the TV is off,
Press to power on.
When the TV is on,
Press and hold to power off.
Press repeatedly to change the function, then press + or – button to:
•Adjust the volume.
•Select the channel.
•Select the input source of TV.
Remote Control sensor*1 /
Light sensor*1 / Illumination LED
The illumination LED lights up or blinks according to the status of the TV.
For more information, refer to the Help Guide.
Built-in MIC*2*3
Use the hands-free built-in microphone for voice search. To enable the built-in MIC,
follow the on-screen instructions when you press the  button.
Built-in MIC LED
The built-in MIC LED lights up in amber
when the built-in MIC is enabled. The builtin MIC LED can be disabled.*3
*1 Do not place anything near the sensor.
*2 The voice search requires an Internet connection. The voice search with the built-in MIC is available only on limited region/country/language.
Standby power consumption will increase because the built-in MIC is always listening when the voice search with the built-in MIC is enabled.
*3 For more information, see the Online Help Guide (page 2).
5GB
Loading...