


LCD TV
4-437-334-12(1)
|
|
Operating Instructions |
GB |
|
|
|
|
|
|
|
|
|
|
|
|
|
Mode d’emploi |
FR |
|
|
|
|
|
|
|
|
|
|
|
|
|
Manual de instrucciones |
ES |
|
|
|
|
|
|
|
|
|
|
|
|
|
Gebruiksaanwijzing |
NL |
|
|
|
|
|
|
|
|
|
|
|
|
|
Bedienungsanleitung |
DE |
|
|
|
|
|
|
|
|
|
|
|
|
|
Manual de Instruções |
PT |
|
|
|
|
|
|
|
|
|
|
|
|
|
Istruzioni per l’uso |
IT |
|
|
|
|
|
|
|
|
|
|
|
|
|
Bruksanvisning |
SE |
|
|
|
|
|
|
|
|
|
|
|
|
|
Betjeningsvejledning |
DK |
|
|
|
|
|
|
|
|
|
|
|
|
|
Käyttöohje |
FI |
|
|
|
|
|
|
|
|
|
|
|
|
|
Bruksanvisning |
NO |
|
|
|
|
|
|
|
|
|
|
|
|
|
Instrukcja obsługi |
PL |
|
|
|
|
|
|
|
|
|
|
|
|
|
Návod k použití |
CZ |
|
|
|
|
|
|
|
|
|
|
|
|
|
Návod na obsluhu |
SK |
|
|
|
|
|
|
|
|
|
|
|
|
|
Kezelési utasítás |
HU |
|
|
|
|
|
|
|
|
|
|
|
|
|
Instrucţiuni de utilizare |
RO |
|
|
|
|
|
|
|
|
|
|
|
|
|
Ръководство за употреба |
BG |
|
|
|
|
|
|
|
|
|
|
|
|
|
δηγίες ρήσης |
GR |
|
|
|
|
|
|
|
|
|
|
|
|
|
Kullanım Kılavuzu |
TR |
|
|
|
|
|
|
|
|
|
|
|
|
|
Инструкция по эксплуатации |
RU |
|
|
|
|
|
|
|
|
|
|
|
|
|
Інструкції з експлуатації |
UA |
|
|
|
|
|
|
KD-84X9005
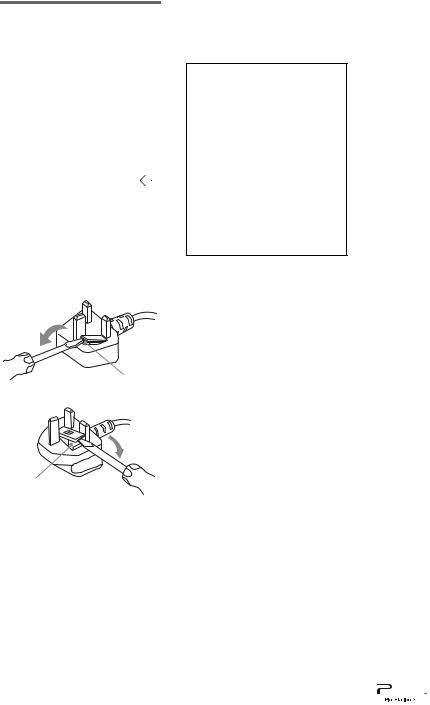
NOTICE FOR CUSTOMERS IN THE UNITED KINGDOM
A moulded plug complying with BS1363 is fitted to this equipment for your safety and convenience.
Should the fuse in the plug supplied need to be replaced with the same rating of fuse approved by ASTA or BSI to BS 1362 (i.e., marked with  or
or  ) must be used.
If the plug supplied with this equipment has a detachable fuse cover, be sure to attach the fuse cover after you change the fuse. Never use the plug without the fuse cover. If you should lose the fuse cover, please contact your nearest Sony service station.
FUSE
FUSE
How to replace the fuse
Open the fuse compartment with a blade screwdriver, and replace the fuse.
Please refer to the illustration that actually equipped with the product.
Introduction
Thank you for choosing this Sony product. Before operating the TV, please read this manual thoroughly and retain it for future reference.
This product has been manufactured by or on behalf of Sony Corporation, 1-7-1 Konan Minato-ku Tokyo, 108-0075 Japan. Inquiries related to product compliance based on European Union legislation shall be addressed to the authorized representative, Sony Deutschland GmbH, Hedelfinger Strasse 61, 70327 Stuttgart, Germany. For any service or guarantee matters, please refer to the addresses provided in the separate service or guarantee documents.
Notes on Digital TV function
•Any functions related to Digital TV
( ) will only work in countries or areas where DVB-T/DVB-T2 (MPEG-2 and H.264/MPEG-4 AVC) digital terrestrial signals are broadcast or where you have access to a compatible DVB-C/ DVB-C2 (MPEG-2 and H.264/ MPEG-4 AVC) cable service. Please confirm with your local dealer if you can receive a DVB-T/DVB-T2 signal where you live or ask your cable provider if their DVB-C/DVB-C2 cable service is suitable for integrated operation with this TV.
•Your cable provider may charge a fee for their services, or require you to agree to its terms and conditions of business.
•This TV set complies with DVB-T/ DVB-T2 and DVB-C/DVB-C2 specifications, but compatibility with future DVB-T/DVB-T2 digital terrestrial and DVB-C/DVB-C2 digital cable broadcasts are not guaranteed.
•Some Digital TV functions may not be available in some countries/areas and DVB-C/DVB-C2 cable may not operate correctly with some providers.
~
•Instructions about “Installing Wall Mount Bracket” are included within this TV’s instructions manual.
•The illustrations of the remote used in this manual are of the RM-ED051 unless otherwise stated.
•Before operating the TV, please read page 33 (Safety Information). Retain this manual for future reference.
Trademark information
 is a registered trademark of the DVB Project.
The terms HDMI and HDMI HighDefinition Multimedia Interface, and the HDMI Logo are trademarks or registered trademarks of HDMI Licensing LLC in the United States and other countries.
DLNA®, the DLNA Logo and DLNA CERTIFIED® are trademarks, service marks, or certification marks of the Digital Living Network Alliance.
Manufactured under license from Dolby Laboratories. Dolby and the double-D symbol are trademarks of Dolby Laboratories.
“BRAVIA” and 

 are trademarks of Sony Corporation.
TrackID is a trademark or registered trademark of Sony Mobile Communications AB.
Music and video recognition technology and related data are provided by Gracenote®. Gracenote is the industry standard in music recognition technology and related content delivery. For more information, please visit www.gracenote.com. CD, DVD, Blu-ray Disc, and music and video-related data from Gracenote, Inc., copyright © 2000-present Gracenote. Gracenote Software, copyright © 2000-present Gracenote. One or more patents owned by Gracenote apply to this product and service. See the Gracenote website for a nonexhaustive list of applicable Gracenote patents. Gracenote, CDDB, MusicID, MediaVOCS, the Gracenote logo and logotype, and the “Powered by Gracenote” logo are either registered trademarks or trademarks of Gracenote in the United States and/or other countries.
Opera® Browser from Opera Software ASA. Copyright 1995-2012 Opera Software ASA. All rights reserved.
Wi-Fi Direct is a mark of the Wi-Fi Alliance.
“Blu-ray Disc”, “Blu-ray” and “Blu-ray Disc” logo are trademarks of Blu-ray Disc Association.
“Sony Entertainment Network logo” and “Sony Entertainment Network” are trademarks of Sony Corporation.
“ ” and “SimulView” are
trademarks of Sony Computer Entertainment Inc.
DiSEqC™ is a trademark of EUTELSAT.
This TV supports DiSEqC 1.0. This TV is not intended for controlling motorized antennas.
Java and all Java-based trademarks and logos are trademarks or registered trademarks of Oracle and/ or its affiliates. Other names may be trademarks of their respective owners.
2 GB

Notice for Wireless
Signal
Hereby, Sony Corporation declares that this unit is in compliance with the essential requirements and other relevant provisions of Directive 1999/5/EC.
For details, please access the following URL:
http://www.compliance.sony.de/
GB
Location of the identification label
Labels for Model No., Production Date (month/year) and Power Supply rating (in accordance with applicable safety regulation) are located on the rear of the TV or package.
3 GB
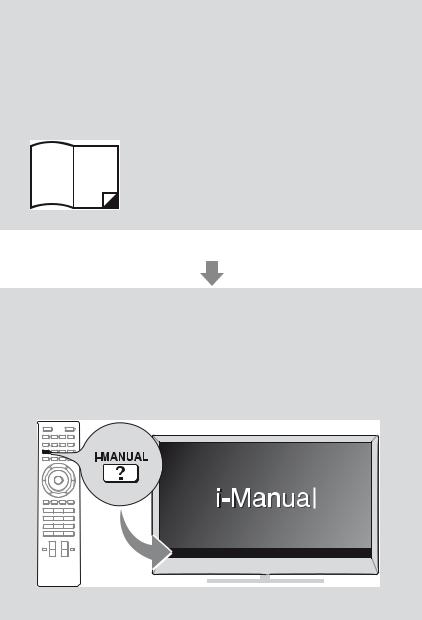
About this manual
(Operating Instructions)
This manual explains how to set up your TV. For more information on how to use BRAVIA TV, refer to the “Electronic manual”.
Operating Instructions
Explains how to set up your TV such as connections, initial set-up, and basic operations.
For more information, press the i-MANUAL button
Electronic manual
(i-Manual)
Explains how to use all the features. See page 25 on how to use the i-Manual.
Images and illustrations used in this manual may differ from the actual screen.
4 GB

Table of Contents
Getting Started
Checking the accessories |
6 |
|
GB |
||
........................................................Inserting batteries into the remote |
6 |
|
1: Assembling the Table-Top Stand..................................................... |
7 |
|
2: Adjusting the Speakers angle ........................................................ |
11 |
|
3: Connections ................................................................................... |
12 |
|
4: Preventing the TV from toppling over............................................. |
13 |
|
5: Connecting the AC power cord (mains lead)................................. |
14 |
|
6: Bundling the cables ....................................................................... |
14 |
|
7: Connecting the TV to the Internet................................................... |
15 |
|
8: Performing the initial set-up............................................................ |
16 |
|
Using Your BRAVIA TV |
|
|
Watching TV B ............................. |
w; |
|
Selecting various functions and settings (Home Menu)..................... |
22 |
|
Watching Internet Video ..................................................................... |
|
24 |
Looking for Instructions |
|
|
Looking for instructions in the |
|
|
electronic manual |
|
|
(i-Manual) B.................................. |
wg |
|
Additional Information |
|
|
Troubleshooting.................................................................................. |
|
27 |
Specifications ..................................................................................... |
|
28 |
Installing the Accessories (Wall-Mount Bracket)................................ |
30 |
|
Safety Information............................................................................... |
|
33 |
Precautions......................................................................................... |
|
35 |
5 GB

Checking the |
Inserting |
accessories |
batteries into the |
|
remote |
AC power cord (mains lead) (3) |
|
Cable holder (5) |
|
Remote (1) |
|
Size AAA batteries (R03 type) (2) |
|
Short Neck (2) |
|
Short Neck Cover (2) |
|
3D Glasses (2) |
|
Pouch for 3D Glasses (2) |
|
Operating Instructions (this manual) and |
|
other documents |
1 Remove the protection sheet. |
|
|
|
2 Push and slide the cover to open. |
6 GB
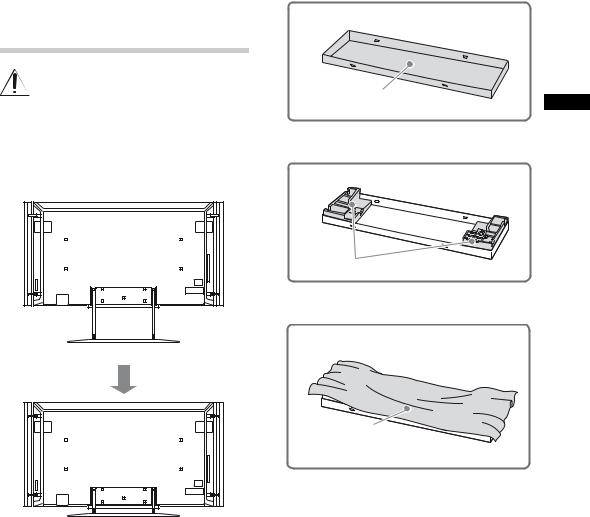
1:Assembling the Table-Top Stand
Read and follow the instructions below when assembling the Table-Top Stand in order to avoid any risk of damaging the TV set.
Refer to the instructions below on how to change the Floor Stand to Table-Top Stand.
TV with Floor Stand
TV with Table-Top Stand
~
•If using an electric screwdriver, set the torque at approximately 1.5 N·m {15 kgf·cm}.
Before detaching the Floor Stand, perform the following steps.
Place the carton lid on the floor.
1
Carton lid |
GB |
|
Place both lower corner cushions onto the carton lid.
2
Lower corner cushions
Place the TV protection bag on top of the cushions.
3
TV protection bag
(Continued) |
7 GB |
Detaching the Floor
Stand from the TV
~
•Do not remove the Floor Stand for any reason other than to attach the Table-Top Stand or to install corresponding accessories on the TV.
1 Slide the Neck Covers upward to remove them from the Floor Stand.
Neck Covers
2 Remove the screws that attach the Floor Stand to the TV.
Screw (M5 × 20)
~
•Be sure to store the removed screws in a safe place. Reuse the screws when attaching the Table-Top Stand.
3 Detach the TV set from the Floor Stand, and place it in the carton lid. Support the TV set when changing the Necks to prevent it from toppling over.
Floor Stand
8 GB

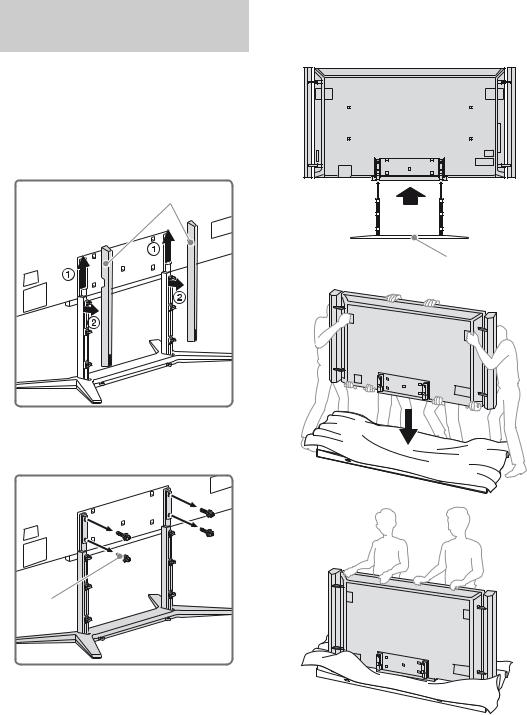
Attaching the Table-Top
Stand
1 Remove the screws from the bottom of the Floor Stand and detach the Long Necks from the Base.
Long Necks
Base
Bottom view
Bottom view
Screw (M6 × 20) (8)
Screw (M6 × 20) (4)
Long Necks
GB
Base
2 Attach the Short Necks to the Base using the screws removed in step 1 of “Attaching the Table-Top Stand” (page 9).
Short Necks
Base
Bottom view
Bottom view
Screw (M6 × 20) (8)
Screw (M6 × 20) (4)
(Continued) |
9 GB |

3 Place the TV set on the Table-Top Stand.
IR Sensor
Table-Top Stand
4 Attach the Table-Top Stand using the screws previously removed in step 2 of “Detaching the Floor Stand from the TV” (page 8).
Screw (M5 × 20)
5 Attach the Short Neck Covers to the TableTop Stand.
Short Neck Covers
~
•Ensure that there are no objects in front of the TV.
10 GB
2:Adjusting the Speakers angle
To access the terminals on the rear of the TV when it is mounted to a wall, adjust the Speakers angle by loosening the screw as indicated in the illustration.
*
Detaching the Speakers from the TV
The Speakers can be detached from the TV if you wish to use a separate audio system (e.g. Home Theatre System). Refer to the instructions below on how to detach the Speakers.
GB
 2
2
1
 3
3
4
1 Disconnect the Speaker cable.
2 Remove the screw from the lower Speaker Joint.
3 Remove the screw from the upper Speaker Joint.
4 Pull the Speaker out horizontally to detach the Speaker.
Repeat steps 1 to 4 to remove the other
* Make sure the screw is tightened back after adjust Speaker. the Speakers to the original angle.
11 GB

3: Connections
~
•Use an antenna cable connector no greater than 14 mm in thickness.
•Use an HDMI cable connector within 12 mm (thickness) × 21 mm (width).
•Use Sony HDMI cable with “High Speed” indication for HDMI connection.
~
•Right Angle Type Universal SCART Lead is recommended for this connection.
•Screw the satellite connector softly with hand, do not use any tool.
•TV must be switched off when connecting satellite antenna (aerial).
xTo connect a Set Top Box/recorder (e.g. DVD recorder) with HDMI
Connecting an antenna (aerial)/Set Top Box/ recorder (e.g. DVD recorder)
x To connect a Set Top Box/recorder |
* |
||||||||||||||||||||||||||||||||||||||||||||||
|
|
|
|
|
|
|
|
|
|
||||||||||||||||||||||||||||||||||||||
(e.g. DVD recorder) with SCART |
|
|
|
|
|
|
|
|
|
|
|
|
|
|
|
|
|
|
|||||||||||||||||||||||||||||
|
|
|
|
|
|
|
|
ARC |
|
|
|
|
|
|
|
||||||||||||||||||||||||||||||||
|
|
|
|
|
|
|
|
|
|
|
|
||||||||||||||||||||||||||||||||||||
|
|
|
|
|
|
|
|
|
|
|
|
|
|
|
|
|
|
|
|
|
|
4 |
|
|
|
|
|
|
|||||||||||||||||||
|
|
|
|
|
|
|
|
|
1 |
|
|
|
|
|
|
|
|
|
|||||||||||||||||||||||||||||
|
|
|
|
|
|
|
|
|
|
|
|
|
|
|
|
|
|
|
|
|
|
|
|
|
|
|
|
|
|
|
|
|
|
|
|
|
|
|
|
|
|
|
|
|
|
|
|
|
|
|
|
|
|
|
|
|
|
|
|
|
|
|
|
|
|
|
|
|
|
|
|
|
|
|
|
|
|
|
|
|
|
|
|
|
|
|
|
|
|
|
|
|
|
|
|
|
|
|
|
|
|
|
|
|
|
|
|
|
|
|
|
|
|
|
|
|
|
|
|
|
|
|
|
|
|
|
|
|
|
|
|
|
|
|
|
|
|
|
|
|
|
|
|
|
|
|
|
|
|
|
|
|
|
|
|
|
|
|
|
|
|
|
|
|
|
|
|
|
|
|
|
|
|
|
|
|
|
|
|
|
|
|
|
|
|
|
|
|
|
|
|
|
|
|
|
|
|
|
|
|
|
|
|
|
|
|
|
|
|
|
|
|
|
|
|
|
|
|
|
|
|
|
|
|
|
|
|
|
|
|
|
|
|
|
|
|
|
|
|
|
|
|
|
|
|
|
|
|
|
|
|
|
|
|
|
|
|
|
|
|
|
|
|
|
|
|
|
|
|
|
|
|
|
|
|
|
|
|
|
|
|
|
|
|
|
|
|
|
|
|
|
|
|
|
|
|
|
|
|
|
|
|
|
|
|
|
|
|
|
|
|
|
|
|
|
|
|
|
|
|
|
|
|
|
|
|
|
|
|
|
|
|
|
|
|
|
|
|
|
|
|
|
|
|
|
|
|
|
|
|
|
|
|
|
|
|
|
|
|
|
|
|
|
|
|
|
|
|
|
|
|
|
|
|
|
|
|
|
|
|
|
|
|
|
|
|
|
|
|
|
|
|
|
|
|
|
|
|
|
|
|
|
|
|
|
|
|
|
|
|
|
|
|
|
|
|
|
|
|
|
|
|
|
|
|
|
|
|
|
|
|
|
|
|
|
|
|
|
|
|
|
|
|
|
|
|
|
|
|
|
|
|
|
|
|
|
|
|
|
|
|
|
|
|
|
|
|
|
|
|
|
|
|
|
|
|
|
|
|
|
|
|
|
|
|
|
|
|
|
|
|
|
|
|
|
|
|
|
|
|
|
|
|
|
|
|
|
|
|
|
|
|
|
|
|
|
|
|
|
|
|
|
|
|
|
|
|
|
|
|
|
|
|
|
|
|
|
|
|
|
|
|
|
|
|
|
|
|
|
|
|
|
|
|
|
|
|
|
|
|
|
|
|
|
|
|
|
|
|
|
|
|
|
|
|
|
|
|
|
|
|
|
|
|
|
|
|
|
|
|
|
|
|
|
|
|
|
|
|
|
|
|
|
|
|
|
|
|
|
|
|
|
|
|
|
|
|
|
|
|
|
|
|
|
|
|
|
|
|
|
|
|
|
|
|
|
|
|
|
|
|
|
|
|
|
|
|
|
|
|
|
|
|
|
|
|
|
|
|
|
|
|
|
|
|
|
|
|
|
|
|
|
|
|
|
|
|
|
|
|
|
|
|
|
|
|
|
|
|
|
|
|
|
|
|
|
|
|
|
|
|
|
|
|
|
|
|
|
|
|
|
|
|
|
|
|
|
|
|
|
|
|
|
|
|
|
|
|
|
|
|
|
|
|
|
|
|
|
|
|
|
|
|
|
|
|
|
|
|
|
|
|
|
|
|
|
|
|
|
|
|
|
|
|
|
|
|
|
|
|
|
|
|
|
|
|
|
|
|
|
|
|
|
|
|
|
|
|
|
|
|
|
|
|
|
|
|
|
|
|
|
|
|
|
|
|
|
|
|
|
|
|
|
|
|
|
|
|
|
|
|
|
|
|
|
|
|
|
|
|
|
|
|
|
|
|
|
|
|
|
|
|
|
|
|
|
|
|
|
|
|
|
|
|
|
|
|
|
|
|
|
|
|
|
|
|
|
|
|
|
|
|
|
|
|
|
|
|
|
|
|
|
|
|
|
|
|
|
|
|
|
|
|
|
|
|
|
|
|
|
|
|
|
|
|
|
|
|
|
|
|
|
|
|
|
|
|
|
|
|
|
|
|
|
|
|
|
|
|
|
|
|
|
|
|
|
|
|
|
|
|
|
|
|
|
|
|
|
|
|
|
|
|
|
|
|
|
|
|
|
|
|
|
|
|
|
|
|
|
|
|
|
|
|
|
|
|
|
|
|
|
|
|
|
|
|
|
|
|
|
|
|
|
|
|
|
|
|
|
|
|
|
|
|
|
|
|
|
|
|
|
|
|
|
|
|
|
|
|
|
|
|
|
|
|
|
|
|
|
|
|
|
|
|
|
|
|
|
|
|
|
|
|
|
|
|
|
|
|
|
|
|
|
|
|
|
|
|
|
|
|
|
|
|
|
|
|
|
|
|
|
|
|
|
|
|
|
|
|
|
|
|
|
|
|
|
|
|
|
|
|
|
|
|
|
|
|
|
|
|
|
|
|
|
|
|
|
|
|
|
|
|
|
|
|
|
|
|
|
|
|
|
|
|
|
|
|
|
|
|
|
|
|
|
|
|
|
|
|
|
|
|
|
|
|
|
|
|
|
|
|
|
|
|
|
|
|
|
|
|
|
|
|
|
|
|
|
|
|
|
|
|
|
|
|
|
|
|
|
|
|
|
|
|
|
|
|
|
|
|
|
|
|
|
|
|
|
|
|
|
|
|
|
|
|
|
|
|
|
|
|
|
|
|
|
|
|
|
|
|
|
|
|
|
|
|
|
|
|
|
|
|
|
|
|
|
|
|
|
|
|
|
|
|
|
|
|
|
|
|
|
|
|
|
|
|
|
|
|
|
|
|
|
|
|
|
|
|
|
|
|
|
|
|
|
|
|
|
|
|
|
|
|
|
|
|
|
|
|
|
|
|
|
|
|
|
|
|
|
|
|
|
|
|
|
|
|
|
|
|
|
|
|
|
|
|
|
|
|
|
|
|
|
|
|
|
|
|
|
|
|
|
|
|
|
|
|
|
|
|
|
|
|
|
|
|
|
|
|
|
|
|
|
|
|
|
|
|
|
|
|
|
|
|
|
|
|
|
|
|
|
|
|
|
|
|
|
|
|
|
|
|
|
|
|
|
|
|
|
|
|
|
|
|
|
|
|
|
|
|
|
|
|
|
|
|
|
|
|
|
|
|
|
|
|
|
|
|
|
|
|
|
|
|
|
|
|
|
|
|
|
|
|
|
|
|
|
|
|
Set Top Box/recorder (e.g. DVD recorder)
* Only HDMI 2 and HDMI 3 support 4k resolution (located at the side of the TV).
Set Top Box/recorder (e.g. DVD recorder)
12 GB
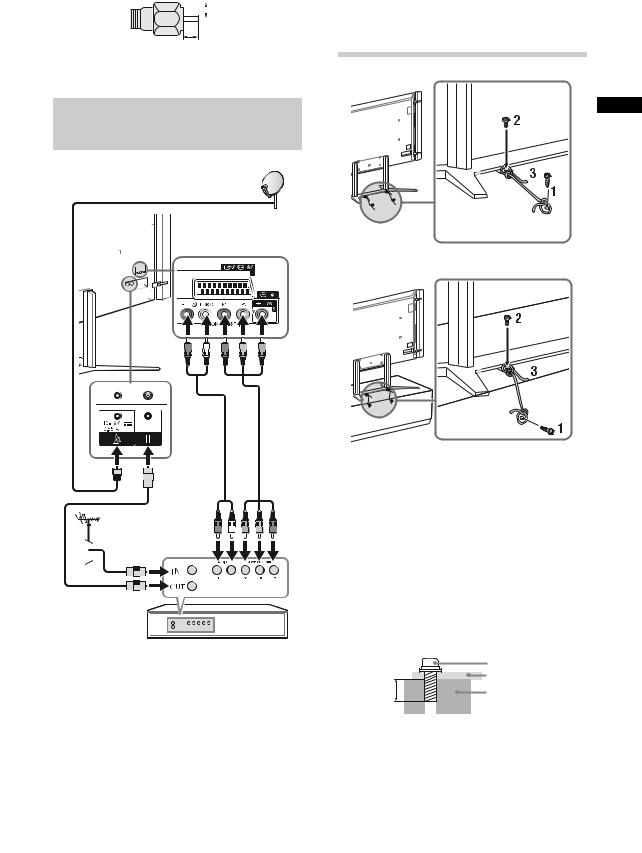
Recommendation of the F type plug
Projection of the inner wire from the connection part must be less than 1.5 mm.
 7 mm max.
1.5 mm max.
(Reference drawing of the F type plug)
Connecting audio/video devices
Audio/video device
4:Preventing the TV from toppling over
GB
OR
1 Install a wood screw (3.8 mm in diameter, not supplied) to the floor or TV stand.
2 Install a machine screw (M4, not supplied) into the screw hole of the Base.
3 Tie the wood screw and the machine screw with a strong cord (not supplied).
The length of the M4 machine screw differs depending on the cord diameter. Please see below illustration.
|
Screw M4 |
|
Cord |
10 mm |
TV’s Floor |
|
Stand |
13 GB

5:Connecting the AC power cord (mains lead)
AC IN (power supply input) terminal
AC power cord (mains lead)
~
•Make sure that the AC power cord is fully inserted into the AC IN terminal.
6:Bundling the cables
~
•Do not bundle the AC power cord (mains lead) together with other cables.
Floor Stand
1 * |
2 |
3 |
4 |
14 GB

Table-Top Stand
Use 1, 2, 3, 4, 5*
2
1
5
4
3
*When installing on the wall, attach the cable holder under the terminals.
7:Connecting the TV to the Internet
When you connect this TV to the Internet, you |
|
can enjoy multiple functions. For details on the |
|
functions, refer to the i-Manual. |
GB |
|
~
•You will need to contract with an Internet service provider to connect to the Internet.
Preparing a wired network
TV
Internet
Modem with router functions
or


 Router

 Modem
Modem
Internet
~
•For LAN connections, use a Category 7 cable (not supplied).
(Continued) 15 GB
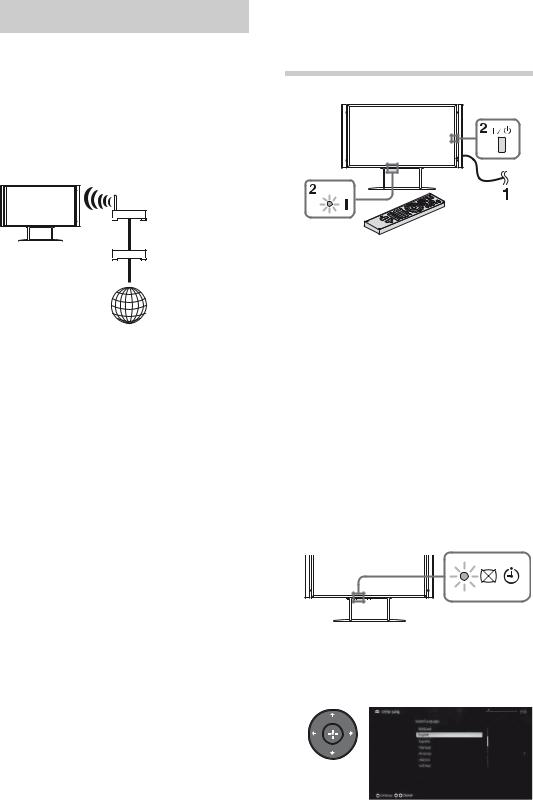
Preparing a wireless LAN
The built-in wireless LAN device allows you to access the Internet and your home network. With this feature, you can connect to a wireless LAN and enjoy the benefits of networking in a cable-free environment. Before setting up the wireless LAN function of the TV, be sure to set up a wireless LAN router.
TV
Wireless router
Modem
Internet
8:Performing the initial set-up
1 Connect the TV to your AC power outlet (mains socket).
2 Press "/1 on the TV. The = (power) indicator will light up in green.
When you switch on the TV for the first time, the Language menu appears on the screen.
~
•When you turn on the TV for the first time, the TV requires some internal processing for optimisation before you can perform the initial setup. There will be no picture and sound, and the timer indicator on the front of the TV blinks orange for about 40 seconds. Do not turn off the TV during this process.
This process has been completed at the factory for some TVs.
3 Press F/f/G/g to select an item, then press
 .
.
Follow the instructions on the screen.
16 GB

Satellite Auto Tuning:
“Satellite Auto Tuning” automatically tunes in available satellite channels. Digital Satellite Equipment Control (DiSEqC) 1.0 management allows setting of up to four different satellites. The following settings are independent for each connection. To set-up DiSEqC input in the “DiSEqC Control”, use “LNB Configuration”. Single Cable Distribution enables the delivery of satellite broadcasting using a single coaxial cable to multiple receivers eliminating the numerous cables required.
1“Antenna Configuration”:
1Please select “Fixed Antenna or DiSEqC” or “Single Cable Distribution”.
2For “Single Cable Distribution” you can select the range for “Band” between 1-8 and set your desired “Band Frequency”.
~
•“Single Cable Distribution” may not be available depending on your country/area.
The following procedure may be required depending on the area:
1Please select “Preferred Satellite” or “General Satellite”.
2For “Preferred Satellite”, select your preferred operator.
2“Advanced Settings”:
Allows you to set tuning settings in more detail to better find the type of services you would prefer to tune.
“Scan Type”: If no channel is found using “Network Scan”, try “Full Scan”.
“Full Scan”: Performs a complete frequency scan and guarantees tuning to all possible programmes for the currently set LNB configuration. Previously – tuned programmes will be lost.
“Network Scan”: Performs a scan in the transponders of a network (aka NIT scan). Since “Network Scan” is faster than “Full Scan”, it is recommended when tuning to a known network (normally associated with the satellite). A transponder must be specified, from which network information (other transponders) will be retrieved. Previously – tuned programmes will be lost.
“Manual Scan”: Performs a scan manually.
3 “LNB Configuration”:
For “Fixed Antenna or DiSEqC”:
In the case of a non-standard LNB (low noise block), manual setting is available.
–In the case of a single satellite, you can leave it on the initial setting.
–For two satellites, you can set “Toneburst A” (1st satellite) and “Toneburst B” (2nd satellite) in the “DiSEqC Control” setting.
–Or you can use DiSEqC command A (1st
satellite) and B (2nd satellite), if your LNB
or multi switch can handle these GB commands.
–For four satellites, DiSEqC control A, B, C, and D is required.
“LNB Low Band Frequency” and “LNB High Band Frequency”:
–Specifies LNB frequency bands. Be sure to check your LNB documentation to set frequencies (normally appears as “L.O. frequency”).
–The default values are for Universal LNB.
–If your LNB can handle both bands (low and high), you can specify both. If it handles only one, specify low band.
“22 kHz Tone”: If your LNB is dual band (low and high bands) or Universal LNB, set to “Auto”. The TV will take care of everything automatically; otherwise, set to “Off”.
“LNB Voltage”: Specifies the set voltage for a dual polarization LNB.
–13/18V: default.
–14/19V: if LNB cable is over 60m long.
–Off: if an external power supply can be used. (It should not be off typically).
For “Single Cable Distribution”:
–To control the satellites, you can set “A” (1st group of satellites) or “B” (2nd group of satellites) in the “Single Cable Control” setting.
“LNB Low Band Frequency” and “LNB High Band Frequency”:
–Specifies LNB frequency bands. Be sure to check your LNB documentation to set frequencies (normally appears as “L.O. frequency”).
–The default values are for Universal LNB.
–If your LNB can handle both bands (low and high), you can specify both. If it handles only one, specify low band.
(Continued) 17 GB
4 “Transponder”
There is no need to set the transponder when you select “Full Scan”.
“Scan for new services”:
–Tunes to a single transponder.
–This is an incremental scan, and it should be used in cases when a new transponder is added to a satellite.
–Previously – tuned programmes are kept and found ones are added to the program list of the satellite connection you are editing.
1Press HOME, then select  > “Digital Set-up” > “Satellite Auto Tuning”.
2Follow the instruction on the Satellite Auto Tuning.
~
•“Scan for new services” is unavailable while performing the initial set-up.
•When you scan for the new services, please check if the satellite signal is available.
Digital Auto Tuning:
“Antenna” or “Cable”:
Select “Antenna” to receive terrestrial TV broadcasting by an external antenna. Select “Cable” if you are a Cable TV subscriber not using an external Set-Top Box. When you select “Cable”, we recommend that you select “Quick Scan” for quick tuning. Set “Frequency” and “Network ID” according to the information supplied from your cable provider. If no channel is found using “Quick Scan”, try “Full Scan” (though it may take some time).
~
•In some countries, you may select “Antenna” instead of “Cable” to receive Cable TV programmes.
•“Full Scan” may not be available depending on your region/country.
Programme Sorting: Changes the order of analogue channels stored in the TV.
1Press F/f to select the channel you want to move to a new position, then press  .
.
2Press F/f to select the new position for the channel, then press  .
.
~
•For satellite channels, select “Satellite Programme Sorting” in “Digital Set-up” of “Settings” to change the order of satellite channels in the same procedure above after initial set-up completed.
•You can also tune channels manually.
Network Set-up: Sets up the Internet settings. Select “Auto” to connect to the network automatically. Select “Custom” to connect manually.
If you do not access the Internet, or to set up later, select “Skip”.
~
•If you use WEP security, select “Custom” t “Wireless Set-up” t “Scan”. Then, select the network name (SSID) you want to connect. If you cannot find the required network name, select “[Manual Entry]” and press  to enter network name.
•Use the optional USB Wireless LAN Adapter to connect with your wireless router (or access point) at 5GHz. Insert USB Wireless LAN Adapter and set “Standby for Wi-Fi Direct” to “Off”. Press HOME, then select “Settings” t “Network” t “Standby for Wi-Fi Direct” t “Off”.
•To set “Network Set-up” later, press HOME, then select “Settings” t “Network” t “Network Set-up”.
18 GB
19 GB

Watching TV
1
1
3
2
3
1 Turn on the TV.
Press "/1 on the TV or remote to turn on the TV.
2 Select a mode.
3 Select a TV channel or select an input.
or |
or |
x To select digital channels
Use 0-9. For channel numbers 10 and above, press the next digit quickly.
20 GB
Watching 3D contents
This feature lets you experience powerful 3D entertainment, such as stereoscopic 3D games and 3D Blu-ray Disc. Refer to the i-Manual on how to set the 3D settings or watch the 3D contents.
GB
Frequently used buttons
1

 3
3


 2
2

 4
4


 5
5
1 GUIDE
GUIDE
Displays the digital programme guide.
2Colour buttons
When the colour buttons are available, an operation guide appears on the screen.
3 /
/ Info/Text reveal
Displays channel number, details of programmes, and the clock.
4 Subtitle setting
You can turn subtitles on/off while watching digital broadcasting.
5AUDIO
You can select the sub sound or secondary language while watching multiplex broadcasts (digital broadcasts only).
21 GB
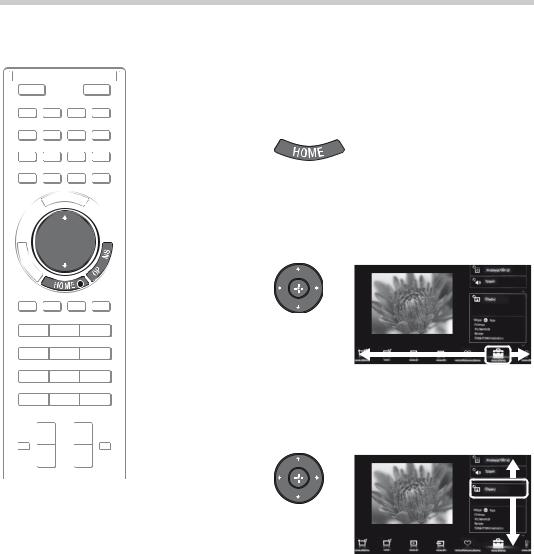
Selecting various functions and settings (Home Menu)
You can select the features of your TV from the Home menu.
Here is an example on how to select an item and modify the TV settings.
1
2


 2, 3
2, 3

 OPTIONS
 1
1
Press HOME.
Press G/g to select  (Settings) category.
The contents of “Settings” are displayed on the right.
See page 23 (Category list) for all categories.
3 Press F/f to select “Display”, then press  .
.
4 Modify the settings.
xTo exit the Home menu
Press HOME.
xTo select using the OPTIONS button
Press OPTIONS.
A list of convenient functions and menu shortcuts are displayed. The menu items vary based on the current input and/or content.
22 GB
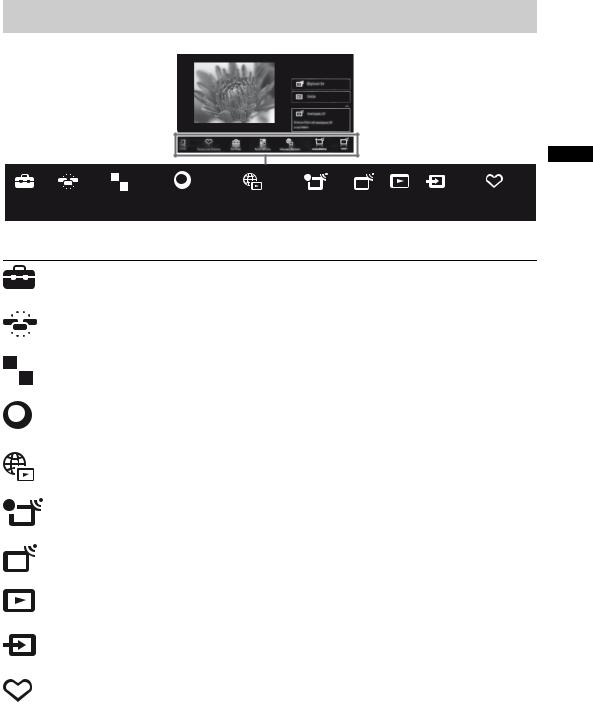
Category list
GB
|
|
|
|
|
|
|
Sony |
Internet Content |
Recordings |
TV |
Media |
Inputs |
Favourites/History |
|
|
|
|
|
|
|
|||||||
|
|
|
|
|
|
|
|||||||
Settings |
Widgets |
Applications |
|||||||||||
|
|
|
|
|
|
|
Entertainment |
|
|
|
|
|
|
|
|
|
|
|
|
|
Network |
|
|
|
|
|
|
The categories are available depending on your region and country.
|
|
|
Settings |
Provides settings (e.g. picture settings, sound settings, key |
|
|
|
|
tone setting) that allow you to customise your TV. |
|
|
|
|
|
|
|
|
Widgets |
Enables access to Widgets. |
|
|
|
|
|
|
|
|
Applications |
Launches applications that require an Internet connection. |
|
|
|
||
|
|
|
|
|
|
|
|
|
|
|
|
|
|
|
|
|
|
Sony |
Enables selection of content from the online service “SEN” |
|
|
|
Entertainment |
(Sony Entertainment Network). |
|
|
|
Network |
|
|
|
|
|
|
|
|
|
Internet Content |
Enables access to Internet services for TV. |
|
|
|
|
|
|
|
|
Recordings |
Enables timer recordings to a connected USB HDD device, |
|
|
|
|
and selection of recorded content to play. |
|
|
|
|
|
|
|
|
TV |
Allows you to select a list of TV channels, or a programme |
|
|
|
|
guide. |
|
|
|
|
|
|
|
|
Media |
Enables selection of media files (photo, music, video) to play |
|
|
|
|
in a connected USB storage device or your home network. |
|
|
|
|
|
|
|
|
Inputs |
Enables selection of devices connected to the TV. |
|
|
|
|
|
|
|
|
Favourites/History |
Displays items in Favourites and recently viewed items. |
|
|
|
|
|
23 GB
Watching Internet Video
This feature serves as a gateway to Internet content, delivering a variety of on-demand entertainment straight to your TV. You can enjoy video content, including movies and cartoons. You will need to make a broadband Internet connection. For details, see page 15 (7: Connecting the TV to the Internet).
1 Press HOME.
2 Press G/g to select  (Internet
Content) category.
3 Press F/f to select “Internet
Video”, then press  .
.


 2, 3, 4
1
4 Press F/f/G/g to highlight the desired content, then press  .
.
~
•If you experience difficulties with this feature, check that the Internet connection is set up properly.
•The interface to Internet content depends on the Internet content providers.
•Services block video content based on the “Parental Lock” setting of the TV. Some service providers do not support this function.
•To update Internet Video content services, press HOME, then select “Settings” t “Network” t “Refresh Internet Content”.
24 GB
Looking for instructions in the electronic manual (i-Manual)
Operating instructions are built into your BRAVIA TV and can be displayed on the screen. To learn more about your TV features, access your i-Manual with the touch of a button.
1
1 2
2
Press i-MANUAL. |
GB |
Select an item.
1 Press G/g to select an item.
 RETURN
2 Press F/f/G/g to select an item, then press
 .
.
Scroll bar*
* If a scroll bar appears, press f repeatedly to display more items.
The page of the selected item appears.
~
•You can step through pages using G/g.
Press RETURN to return to the previous page.
(Continued) 25 GB
Saving frequently viewed pages (Bookmark)
You can save frequently viewed pages for easy access anytime.
x To save a page
In the page to bookmark, press the yellow button on the remote.
x To access the bookmarked page
When displaying the i-Manual, press the green button on the remote to display the bookmark list. Press F/f to select the desired item, then press  .
.
~
• To return to the previous page, press G.
x To remove a bookmark
When the bookmarked page is displayed, press the yellow button on the remote.
Displaying the page again while operating the TV
You can switch between the i-Manual screen and the TV screen. This feature allows you to refer to the instructions in the i-Manual while using your BRAVIA TV. Press i-MANUAL to switch between the i-Manual screen previously displayed and the TV screen.
i-Manual screen previously displayed
BRAVIA TV screen
~
•To jump to the top page of i-Manual, press the red button on the remote. You can also press HOME, then select “Settings” t “i-Manual” to jump to the top page of i-Manual.
•Once you turn off the TV or the TV goes to standby mode, the i-Manual will be displayed from the top page when you select “i-Manual”.
26 GB

Troubleshooting |
|
|
When the 1 (standby) indicator is flashing, count how many times it flashes (interval |
|
|
time is three seconds). |
|
|
Press "/1 on the TV to turn it off, disconnect the AC power cord (mains lead), and inform your |
|
|
dealer or Sony service centre of how the indicator flashes (number of flashes). |
|
|
When the 1 (standby) indicator is not flashing, check the items in the tables as |
|
|
follows. |
GB |
|
Also refer to “Troubleshooting” in the i-Manual. If the problem persists, have your TV serviced by |
||
|
||
qualified service personnel. |
|
Condition Explanation/Solution
There is no picture (screen is dark) and no sound.
•Check the antenna (aerial)/cable connection.
•Connect the TV to the AC power (mains), and press "/1 on the TV.
•If the 1 (standby) indicator lights up in red, press "/1 on the remote.
Tiny black points and/or |
• The screen is composed of pixels. Tiny black points and/or |
bright points appear on the |
bright points (pixels) on the screen do not indicate a |
screen. |
malfunction. |
|
|
|
|
Some programmes cannot |
• Check the antenna (aerial) or dish. |
be tuned. |
• The satellite cable might be short-circuited or there might |
|
be connection problems of the cable. Check the cable |
|
connection and then turn the TV off with the Mains power |
|
On/Off switch, and turn it on again. |
|
• The frequency that you entered is out of range. Consult the |
|
received satellite broadcasting company. |
|
|
There is no Cable TV |
• Check the cable connection or tuning configuration. |
services (programmes) |
• Attempt the “Digital Auto Tuning” by selecting “Antenna” |
found. |
instead of “Cable”. |
|
|
|
|
The TV turns off |
• Check if the “Sleep Timer” is activated, or confirm the |
automatically (the TV enters “Duration” setting of “On Timer”. |
|
standby mode). |
• Check if the “Idle TV Standby” is activated. |
|
|
The remote does not |
• Replace the batteries. |
function. |
• Your TV may be in SYNC mode. |
|
Press SYNC MENU, select “TV Control” and then select |
|
“Home (Menu)” or “Options” to control the TV. |
|
|
The “Parental Lock” |
• Enter 9999 for the PIN code. (PIN code 9999 is always |
password has been |
accepted.) |
forgotten. |
|
|
|
The TV surrounds become |
• When the TV is used for an extended period, the TV |
warm. |
surrounds become warm. |
|
You may feel hot when touching there by the hand. |
|
|
~
When viewing photo files in 4K resolution:
•The menu screen, operation guide or messages may not appear when displaying photos.
•To finish playback of photos, press RETURN, or switch the input by pressing  .
.
27 GB

Specifications
System
|
Panel system |
LCD (Liquid Crystal Display) Panel |
|||||||||||||
|
|
|
|
|
|
|
|
|
|
|
|
|
|
|
|
|
TV system |
Analogue: Depending on your country/area selection: B/G/H, D/K, L, I, M |
|||||||||||||
|
|
|
|
|
|
|
|
|
|
|
|
|
|
|
Digital: DVB-T2/DVB-C2, DVB-C2 is activated only when “Deutschland” is selected. |
|
|
|
|
|
|
|
|
|
|
|
|
|
|
|
DVB-T/DVB-C |
|
|
|
|
|
|
|
|
|
|
|
|
|
|
|
Satellite: DVB-S/DVB-S2 |
|
|
|
|
|
|
|
|
|
|
|
|
|
|
|
|
|
Colour/video system |
Analogue: PAL, SECAM, NTSC3.58, NTSC4.43 |
|||||||||||||
|
|
|
|
|
|
|
|
|
|
|
|
|
|
|
Digital: MPEG-2 MP@HL/H14L/ML, AVC BP@L3/MP@L4/HP@L4 (30Mbps max, limited tool), |
|
|
|
|
|
|
|
|
|
|
|
|
|
|
|
MPEG-4 Visual SP@L6/ASP@L5/ACEP@L4 |
|
|
|
|
|
|
|
|
|
|
|
|
|
|
|
|
|
Channel coverage |
Analogue: UHF/VHF/Cable, Depending on your country/area selection |
|||||||||||||
|
|
|
|
|
|
|
|
|
|
|
|
|
|
|
Digital: UHF/VHF/Cable, Depending on your country/area selection |
|
|
|
|
|
|
|
|
|
|
|
|
|
|
|
Satellite: IF Frequency 950-2150 MHz |
|
|
|
|
|
|
|
|
|
|
|
|
|
|
|
|
|
Sound output |
12.5 W +12.5 W +12.5 W +12.5 W |
|||||||||||||
|
|
|
|
|
|
|
|
|
|
|
|
|
|
|
|
|
Input/Output jacks |
|
|||||||||||||
|
Antenna (aerial) cable |
75 ohm external terminal for VHF/UHF |
|||||||||||||
|
|
|
|
|
|
|
|
|
|
|
|
|
|
|
|
|
Satellite antenna (aerial) |
Female F-Type Connector IEC169-24, 75 ohm. |
|||||||||||||
|
|
|
|
|
|
|
|
|
|
|
|
|
|
|
DiSEqC 1.0, LNB 13 V/18 V & 22 KHz tone, Single Cable Distribution EN50494 |
|
|
|
|
|
|
|
|
|
|
|
|
|
|
|
|
/ |
|
|
AV1 |
21-pin scart connector (CENELEC standard) including audio/video input, RGB input and TV |
|||||||||||
|
|
||||||||||||||
|
|
|
|
|
|
|
|
|
|
|
|
|
|
|
audio/video output. |
|
|
|
|
|
|
|
|
|
|
|
|
|
|
|
|
|
|
|
|
|
/ |
|
COMPONENT IN |
YPBPR (Component Video):1080p (50, 60 Hz), 1080i (50, 60 Hz), 720p (50, 60 Hz), 576p, 576i, |
|||||||
|
|
|
|
||||||||||||
|
|
|
|
|
|
|
|
|
|
|
|
|
|
|
480p, 480i |
|
tAV2 |
|
|
Audio input (phono jacks) |
|||||||||||
|
|
|
Video input (common phono pin with Y input) |
||||||||||||
|
|
|
|
|
|
|
|
|
|
|
|
|
|
|
|
|
HDMI IN 1, 2, 3, 4 |
Video (2D): |
|||||||||||||
|
(Only HDMI 2 and HDMI 3 |
HDMI 1, 4: 1080p (30, 50, 60 Hz), 1080/24p, 1080i (50, 60 Hz), 720p (30, 50, 60 Hz), 720/24p, |
|||||||||||||
|
support 4k resolution) |
576p, 576i, 480p, 480i, PC Formats |
|||||||||||||
|
|
|
|
|
|
|
|
|
|
|
|
|
|
|
HDMI 2, 3: 3840 x 2160p (24, 25, 30 Hz), 4096 x 2160p (24 Hz), 1080p (30, 50, 60 Hz), 1080/ |
|
|
|
|
|
|
|
|
|
|
|
|
|
|
|
24p, 1080i (50, 60 Hz), 720p (30, 50, 60 Hz), 720/24p, 576p, 576i, 480p, 480i, PC |
|
|
|
|
|
|
|
|
|
|
|
|
|
|
|
Formats |
|
|
|
|
|
|
|
|
|
|
|
|
|
|
|
Video (3D): |
|
|
|
|
|
|
|
|
|
|
|
|
|
|
|
Frame Packing 1080p (30 Hz), 1080/24p, 1080i (50, 60 Hz), 720p (30, 50, 60 Hz), 720/24p |
|
|
|
|
|
|
|
|
|
|
|
|
|
|
|
Side-by-Side 1080p (50, 60 Hz), 1080/24p, 1080i (50, 60 Hz), 720p (50, 60 Hz) |
|
|
|
|
|
|
|
|
|
|
|
|
|
|
|
Over-Under 1080p (30, 50, 60 Hz), 1080/24p, 1080i (50, 60 Hz), 720p (50, 60 Hz) |
|
|
|
|
|
|
|
|
|
|
|
|
|
|
|
Audio: Two channel linear PCM: 32, 44.1 and 48 kHz, 16, 20 and 24 bits, Dolby Digital |
|
|
|
|
|
|
|
|
|
|
|
|
|
|
|
Analogue audio input (stereo minijack) (HDMI IN 3 only, common with PC IN) |
|
|
|
|
|
|
|
|
|
|
|
|
|
|
|
ARC (Audio Return Channel) (HDMI IN 1 only) |
|
|
|
|
|
|
|
|
|
|
|
|
|
|
|
|
|
|
|
|
|
|
|
|
|
|
DIGITAL AUDIO OUT |
Digital optical jack (Two channel linear PCM, Dolby Digital) |
||||
|
|
|
|
|
|
|
|
|
|||||||
|
(OPTICAL) |
|
|||||||||||||
|
|
|
|
|
|
|
|
|
|
|
|
|
|
|
|
|
|
|
|
|
|
|
|
|
|
AUDIO OUT / i |
Audio output (stereo minijack) |
||||
|
|
|
|
|
|
|
|
|
|||||||
|
|
|
|
|
|
|
|
|
|
|
|
|
|
|
Headphones jack |
|
|
|
|
|
|
|
|
|
|
|
|
|
|
|
|
|
|
|
|
|
|
|
|
|
|
|
PC IN |
Analog RGB (Mini D-sub 15-pin) |
|||
|
|
|
|
|
|
|
|
|
|
|
|||||
|
|
|
|
|
|
|
|
|
|
PC / HDMI 3 AUDIO IN |
Audio input (stereo minijack) (common with HDMI IN 3) |
||||
|
|
|
|
|
|
|
|
|
|
|
|
|
|
|
|
|
|
|
|
|
|
1, 2 (HDD REC) |
USB port, USB HDD device port ( 2 only) |
||||||||
|
|
|
|
|
|
|
|
|
|
|
|
|
|
|
|
|
|
|
|
|
|
|
|
|
|
|
|
|
|
|
CAM (Conditional Access Module) slot |
|
|
|
|
|
|
|
|
|
|
|
|
|
|
|
|
|
|
|
|
|
|
|
|
|
|
LAN |
|
|
10BASE-T/100BASE-TX connector (Depending on the operating environment of the network, |
||
|
|
|
|
|
|
|
|
|
|
|
|
||||
|
|
|
|
|
|
|
|
|
|
|
|
|
|
|
connection speed may differ. 10BASE-T/100BASE-TX communication rate and communication |
|
|
|
|
|
|
|
|
|
|
|
|
|
|
|
quality are not guaranteed for this TV.) |
|
|
|
|
|
|
|
|
|
|
|
|
|
|
|
|
|
|
|
|
|
|
|
|
|
|
|
|
|
|
|
|
|
Model name KD- |
84X9005 |
|||||||||||||
|
Power and others |
|
|||||||||||||
|
Power requirements |
220 V - 240 V AC, 50 Hz |
|||||||||||||
|
|
|
|
|
|
|
|
|
|
|
|
|
|
||
|
Energy Efficiency Class |
B |
|||||||||||||
|
|
|
|
|
|
|
|
|
|
|
|
|
|
||
|
Screen size (measured |
Approx. 213.5 cm/84 inches |
|||||||||||||
|
diagonally) |
|
|||||||||||||
|
|
|
|
|
|
|
|
|
|
|
|
|
|
|
|
|
Power |
|
in “Home” / |
360 W |
|||||||||||
|
consumption |
“Standard” |
|
||||||||||||
|
|
|
|
|
|
|
|
|
|
|
|
|
|
mode |
|
|
|
|
|
|
|
|
|
|
|
|
|
|
|
|
|
|
|
|
|
|
|
|
|
|
|
|
|
|
|
in “Shop” / |
580 W |
|
|
|
|
|
|
|
|
|
|
|
|
|
|
Vivid mode |
|
|
|
|
|
|
|
|
|
|
|
|
|
|
|
|
|
28 GB
Model name KD- |
84X9005 |
|
|
Average annual energy |
499 kWh |
|
|
consumption*1 |
|
|
|
Standby power |
0.30 W (15 W in software / EPG update mode) |
|
|
consumption*2 |
|
|
|
Display resolution |
3,840 dots (horizontal) × 2,160 lines (vertical) |
|
|
|
|
|
|
Dimensions (Approx.) (w × h × d) |
|
|
|
TV with Floor Stand |
213.7 × 151.1 × 56.7 cm |
|
|
|
|
|
|
TV with Table-Top Stand |
213.7 × 120.9 × 56.7 cm |
|
|
|
|
|
|
TV without Floor Stand/ |
213.7 × 113.6 × 9.0 cm |
|
|
Table-Top Stand |
|
|
|
|
|
GB |
|
Monitor with Floor Stand |
192.6 × 151.1 × 56.7 cm |
|
|
|
|
|
|
Monitor with Table-Top |
192.6 × 120.9 × 56.7 cm |
|
|
Stand |
|
|
|
|
|
|
|
Monitor without Floor |
192.6 × 113.6 × 7.9 cm |
|
|
Stand/Table-Top Stand |
|
|
|
|
|
|
|
Mass (Approx.) |
|
|
|
TV with Floor Stand |
97.9 kg |
|
|
|
|
|
|
TV with Table-Top Stand |
95.2 kg |
|
|
|
|
|
|
TV without Floor Stand/ |
80.0 kg |
|
|
Table-Top Stand |
|
|
|
|
|
|
|
Monitor with Floor Stand |
90.5 kg |
|
|
|
|
|
|
Monitor with Table-Top |
87.8 kg |
|
|
Stand |
|
|
|
|
|
|
|
Monitor without Floor |
72.7 kg |
|
|
Stand/Table-Top Stand |
|
|
|
|
|
|
|
Supplied accessories |
See page 6 (Checking the accessories). |
|
|
|
|
|
|
Optional accessories |
Wall-Mount Bracket: SU-WL500 |
|
|
|
Camera and Microphone Unit: CMU-BR100 |
|
|
|
USB Wireless LAN Adapter: UWA-BR100 |
|
|
|
|
|
|
Operating temperature |
0 °C - 40 °C |
|
|
|
|
|
|
Operating humidity |
10% - 80% RH (non-condensing) |
|
|
|
|
|
|
*1 Energy consumption per year, based on the power consumption of the television operating 4 hours per day for 365 days. The actual energy consumption will depend on how the television is used.
*2 Specified standby power is reached after the TV finishes necessary internal processes.
Optional accessories availability depends on countries/region/TV model/stock.
Design and specifications are subject to change without notice.
29 GB
Installing the Accessories (Wall-
Mount Bracket)
x To Customers:
For product protection and safety reasons, Sony strongly recommends that installing of your TV be performed by Sony dealers or licensed contractors. Do not attempt to install it yourself.
x To Sony Dealers and Contractors:
Provide full attention to safety during the installation, periodic maintenance and examination of this product.
Your TV can be installed using the SU-WL500 (page 31) Wall-Mount Bracket (sold separately).
•Refer to the Instructions supplied with the Wall-Mount Bracket to properly carry out the installation.
•See page 8 (Detaching the Floor Stand from the TV).
Sufficient expertise is required for installing this product, especially to determine the strength of the wall for withstanding the TV’s weight. Be sure to entrust the attachment of this product to the wall to Sony dealers or licensed contractors and pay adequate attention to safety during the installation. Sony is not liable for any damage or injury caused by mishandling or improper installation.
SU-WL500
When installing the TV on the wall, remove the screws from the rear of the TV. (They are fastened in the screw holes for wall mounting.) Be sure to store the removed screws in a safe place, keeping them away from children.
 × 4
× 4
30 GB
 Loading...