

Page 1

lйЙк~нбеЦ=fелнкмЕнбзел
NMKOMNR
pfoli~ëÉê=_äìÉ
kÉï=~ë=çÑW==
bеЦдблЬ
=
bеЦдблЬ
Operating Instructions
Page 2

Page 3

65 40 863 D3648
D3648.201.01.02.02 10.2015
3
Sirona Dental Systems GmbH Table of contents
Operating Instructions SIROLaser Blue
bеЦдблЬ
Table of contents
1
General information.................................................................................................. 6
1.1 Dear Customer.............................................................................................. 6
1.2 Contact data.................................................................................................. 6
1.3 General information on the Operating Instructions ....................................... 7
1.4 Intended use ................................................................................................. 7
1.5 Formats and symbols used ........................................................................... 8
2
Safety information .................................................................................................... 9
2.1 Identification of danger levels........................................................................ 9
2.2 Standards and regulations ............................................................................ 9
2.3 Operating personnel...................................................................................... 9
2.4 Physical working principle ............................................................................. 10
2.5 Laser radiation hazards................................................................................. 10
2.6 Nominal ocular hazard distance.................................................................... 11
2.7 Laser protective goggles ............................................................................... 11
2.8 EasyTips and MultiTips ................................................................................. 12
2.9 Contamination ............................................................................................... 12
2.10 Installation ..................................................................................................... 13
2.11 Modifications ................................................................................................. 14
2.12 Cellular phones ............................................................................................. 14
2.13 Transfering data with usb stick...................................................................... 14
3
System description ................................................................................................... 15
3.1 System overview ........................................................................................... 15
3.2 Laser operation modes ................................................................................. 17
3.3 Symbols and abbreviations ........................................................................... 18
3.3.1 Symbols ........................................................................................... 18
3.3.2 Abbreviations ................................................................................... 20
3.4 Technical Data .............................................................................................. 21
4
Installation ................................................................................................................ 25
4.1 Scope of supply............................................................................................. 25
4.2 Spare parts.................................................................................................... 26
4.3 Labels............................................................................................................ 26
Page 4

65 40 863 D3648
4 D3648.201.01.02.02 10.2015
Table of contents Sirona Dental Systems GmbH
Operating Instructions SIROLaser Blue
4.4 Initial start-up – procedure for proper assembly............................................ 27
4.4.1 Install power supply.......................................................................... 27
4.4.2 Handpiece and assembly of single-use fiber tips and therapy rods. 28
4.4.2.1 Handpiece ......................................................................... 28
4.4.2.2 Assembly of sterile single-use optical fiber tips................. 28
4.4.2.3 Assembly of therapy light guides....................................... 32
4.4.3 Install wireless foot control – optional............................................... 34
4.4.4 Install remote interlock – optional..................................................... 35
5
Operation.................................................................................................................. 36
5.1 Start the device for the first time ................................................................... 36
5.2 Switch on/off power....................................................................................... 38
5.3 Enter pin code ............................................................................................... 39
5.4 Sleep Mode ................................................................................................... 39
5.5 Main home screen......................................................................................... 39
5.5.1 Self Test ........................................................................................... 40
5.5.2 Favorites .......................................................................................... 42
5.5.3 Submenu: All applications................................................................ 42
5.5.3.1 My Applications ................................................................. 46
5.5.3.2 Settings ............................................................................. 46
5.5.4 Error messages, warnings and instructions ..................................... 53
5.5.4.1 Error messages and warnings........................................... 53
5.5.4.2 Instructions ........................................................................ 55
5.5.4.3 Information messages ....................................................... 56
6
Indications, contraindications and medical precautions ........................................... 57
6.1 Indications ..................................................................................................... 57
6.2 List of preset indications................................................................................ 57
6.3 Further non-preset indications ...................................................................... 59
6.4 Examples of treatment risk............................................................................ 60
6.5 Contraindications .......................................................................................... 60
7
Cleaning, disinfection and sterilization ..................................................................... 61
7.1 Cleaning ........................................................................................................ 61
7.2 Disinfection.................................................................................................... 62
7.3 Sterilization.................................................................................................... 62
7.4 Cleaning the control unit ............................................................................... 63
8
Maintenance and service ......................................................................................... 64
8.1 Safety checks................................................................................................ 64
8.2 Maintenance.................................................................................................. 64
Page 5

65 40 863 D3648
D3648.201.01.02.02 10.2015
5
Sirona Dental Systems GmbH Table of contents
Operating Instructions SIROLaser Blue
bеЦдблЬ
8.3 Troubleshooting of simple defects................................................................ 65
8.4 Technical support, repair and testing ........................................................... 66
8.5 Replacing the rechargeable battery of the control unit................................. 67
8.6 Replacing the batteries of the wireless foot control...................................... 68
8.7 Replacement of parts subject to wear and tear............................................ 69
9
Electromagnetic compatibility.................................................................................. 70
9.1 Electromagnetic emission ............................................................................ 70
9.2 Interference immunity................................................................................... 71
9.3 Working clearances...................................................................................... 73
10
Disposal................................................................................................................... 74
10.1 Batteries ....................................................................................................... 75
10.2 Accessories .................................................................................................. 75
11
Appendix.................................................................................................................. 76
11.1 Appendix A – Certification ............................................................................ 76
11.2 Appendix B -Label positions......................................................................... 76
11.2.1 Control unit ...................................................................................... 76
11.2.2 Wireless foot control – optional ....................................................... 77
11.3 Appendix C – Safety circuit (interlock).......................................................... 78
Page 6

65 40 863 D3648
6 D3648.201.01.02.02 10.2015
1General information Sirona Dental Systems GmbH
1.1Dear Customer Operating Instructions SIROLaser Blue
1
General information
1.1
Dear Customer
We are pleased that you have equipped your practice with the SIROLaser
Blue.
Performance, presets, foot control
You now possess a therapy device that features diode laser technology.
This device is characterized by a wide range of applications. It can be
used as rather pain-free therapy or as an extension to the conventional
treatment. A high number of therapies are already preset. According to
your approach you can change settings or put on also own treatment
programs. The laser can alternatively be activated by the finger switch at
the handpiece or by the optional wireless foot switch.
These Operating Instructions are designed to assist you prior to initial use
and whenever you require information later on. It is important to observe
all safety information to prevent personal injury and material damage.
Please perform maintenance and cleaning based on the corresponding
instructions.
We wish you much success and pleasure with the SIROLaser Blue.
Your SIROLaser Blue Team
1.2
Contact data
Worldwide customer service
Customer service center In the event of technical queries, please use our online contact form at
www.sirona.com. In the navigation bar, go to the menu commands
"CONTACT"
/
"Customer Service Center"
and then click the
"CONTACT
FORM FOR TECHNICAL QUESTIONS"
button.
Manufacturer's address (w orl dw i de )
Manufacturer's address Sirona Dental Systems GmbH
Fabrikstrasse 31
64625 Bensheim
Germany
Trademark
Phone: +49 (0) 6251/16-0
Fax: +49 (0) 6251/16-2591
e-mail: contact@sirona.com
www.sirona.com
Page 7

65 40 863 D3648
D3648.201.01.02.02 10.2015
7
Sirona Dental Systems GmbH 1General information
Operating Instructions SIROLaser Blue 1.3General information on the Operating Instructions
bеЦдблЬ
1.3
General information on the Operating Instructions
Observe the Operating Instructions Please familiarize yourself with the SIROLaser Blue by reading through
these Operating Instructions before putting it into operation. It is essential
that you comply with the specified warning and safety information.
Warning different behaviour
Keep documents safe Always keep the Operating Instructions handy in case you or another
user require(s) information at a later point of time. To this product belong
even more documentations.
In case you sell the unit, make sure that the Operating Instructions and all
other technical documents are attached to it so that its new owner can
familiarize himself with its functioning and the specified warning and
safety information. The technical documents are a component of the
product.
Help If you reach an impasse despite having thoroughly studied the Operating
Instructions, please contact your dental dealer.
1.4
Intended use
The SIROLaser Blue is developed as a table top laser device for:
● Soft-tissue surgery with simultaneous coagulation
● Germ reduction in endodontics
● Germ reduction in periodontology and implantology
● Low level laser therapy for the following: dentine-hypersensitivity and
wound healing
● Treatment of aphthous ulcers and herpes
● Desensitization
All patients coming to a dental office or clinic and needing a treatment that
can be done or supported by the use of a diode laser can be treated with
the SIROLaser Blue. For indications for use refer to chapter "Indications,
contraindications and medical precautions [ → 57]".
The use of the SIROLaser Blue is not appropriate in an operating theater.
WARNING
Do not use the device in the case when it shows a behaviour different to
the operating instructions.
Page 8

65 40 863 D3648
8 D3648.201.01.02.02 10.2015
1General information Sirona Dental Systems GmbH
1.5Formats and symbols used Operating Instructions SIROLaser Blue
1.5
Formats and symbols used
The symbols and character formats used in the present manual have the
following meaning:
Instructions for action
References
Lists
Designations
✔ Prerequisite
1. First action step
2. Second action step
or
➢ Alternative action
Result, reaction of SIROLaser
Blue
Prompts you to do something.
See "General information [ → 6]" Identifies a reference to another
text passage.
[ → 8] Indicates the page being referred
to.
● List Designates a list.
'Designation' Denotes key and button
Page 9

65 40 863 D3648
D3648.201.01.02.02 10.2015
9
Sirona Dental Systems GmbH 2Safety information
Operating Instructions SIROLaser Blue 2.1Identification of danger levels
bеЦдблЬ
2
Safety information
2.1
Identification of danger levels
Lead text
To prevent personal injury and material damage, please observe the
warning and safety information provided in this document. Such
information is highlighted as follows:
Warning, Caution, Note
2.2
Standards and regulations
Requirements address, Si rona
For the installation and operation of the SIROLaser Blue, Sirona Dental
Systems GmbH requires:
Requirements SIROLaser Blue
● compliance with IEC 60825-1 and its amendments,
● observance of any supplemental national laws and regulations.
Public legal requirements may include special safety regulations
concerning protection against laser radiation. These requirements must
be fulfilled.
The SIROLaser Blue is manufactured in compliance with the provisions
of Council Directive 93/42/EEC (MDD) concerning medical devices.
National directives regarding electrical installations must be observed.
2.3
Operating personnel
Qualification/education The SIROLaser Blue may only be operated by educated and qualified
personnel (dentist, assistent, dental hygienist). The applicable
occupational safety regulations and accident prevention measures, the
current operating instructions and national requirements concerning
education must be complied with.
Know-how Know-how and expertise about laser therapy as well as the skilled use of
the laser and the applied indications are required. Please refer to
applicable country-specific requirements.
Experience, Sirona
Experience Sirona recommends to gain practical experience in laser dentistry before
first use of the SIROLaser Blue by attending an appropriate training.
WARNING
Warning of bodily injury
For an possible danger that could result in light to serious bodily injury
or death.
CAUTION
Caution against damage
For a possibly harmful situation which could lead to damage of the
product or an object in its environment.
NOTICE
Information to make work easier
For application information and other useful information.
Page 10

65 40 863 D3648
10 D3648.201.01.02.02 10.2015
2Safety information Sirona Dental Systems GmbH
2.4Physical working principle Operating Instructions SIROLaser Blue
Amongst others Sirona offers trainings. Please see the Sirona homepage
(www.sirona.com).
Obligation of the user Users are obliged to use only faultless materials, to ensure correct
application and to protect themselves, the patient and other persons
against hazards.
Unauthorized access In order to prevent false or improper use, the SIROLaser Blue must not
be used by unauthorized persons. Therefore the SIROLaser Blue
equipment must be protected against unauthorized access when not in
use. This can be achieved, for example, by switching the SIROLaser Blue
off after usage so that the electronic access key (pin code) must be
entered before using it again.
2.4
Physical working principle
SIROLaser Blue
The 445 nm, 970 nm and 660 nm laser radiation of the SIROLaser Blue
is generated via different laser diodes inside the control unit and guided
to the treatment region via quartz fibers. The laser radiation is absorbed
by the tissue and converted to heat used for cutting, coagulation, germ
reduction and desensitization.
2.5
Laser radiation hazards
Never direct the laser or aiming beam toward a person's eye! All persons
present in the room e.g. patient, dentist and assistant must always wear
the laser protective goggles.
Observe all labels on the SIROLaser Blue.
With battery
Master switch of the practice Note that after switching off the master switch of the practice the
SIROLaser Blue will still remain switched on. It is then energized by the
rechargeable battery.
Emergency stop In case of an emergency press the "Laser Stop" button below the touch
screen on the front side of the SIROLaser Blue control unit.
Settings Failure to use the settings specified in this manual or perform the actions
described here may lead to a dangerous exposure to radiation.
Improper use, Sirona
Sirona Dental Systems GmbH cannot be held liable for any damage
caused by improper use or non-compliance with the instructions and
information provided in this manual.
Flammable materials Never direct the laser beam towards any flammable material, e.g. paper
or plastics. They could catch fire due to the high temperatures produced
by the laser beam.
The unit is not suitable for use in the presence of anesthetics that are
flammable when in contact with air, oxygen or nitrogen monoxide.
Oxygen-saturated materials such as cotton wool can catch fire owing to
the high temperature that the unit reaches during operation. Label
removers and flammable solutions used for cleaning and disinfecting the
SIROLaser Blue should be allowed to evaporate before using the device.
Observe fire hazards caused by flammable gases.
WARNING
The SIROLaser Blue may only be used and maintained by thoroughly
trained personnel.
Page 11

65 40 863 D3648
D3648.201.01.02.02 10.2015
11
Sirona Dental Systems GmbH 2Safety information
Operating Instructions SIROLaser Blue 2.6Nominal ocular hazard distance
bеЦдблЬ
Reducing the risk of burns If any tissue is unintentionally irradiate, this may lead to burns. This risk
can be reduced by surrounding the target area with moistened sterile
drapes or gauze doused in salt. These covering materials must meet the
requirements of laser surgery.
2.6
Nominal ocular hazard distance
The nominal ocular hazard distance (NOHD) from the distal end of the
optical fiber is 1.5 m.
2.7
Laser protective goggles
Laser protective goggle s SIROLaser Blue
All persons present in the room e.g. patient, dentist, assistent must
always wear the appropriate laser protective goggles delivered along with
the SIROLaser Blue.
Check before use Before using the laser protective goggles, please read and observe the
instructions for use provided by the manufacturer and attached to the
goggles in the case. Make sure that the laser protective goggles:
● are not damaged
● conform to standard EN 207 with the following protection levels:
– user goggles: LB5 (445 ± 5 nm / 970 -10/+15 nm)
and LB1 (660 ± 5 nm)
– patient goggles: LB5 (445 ± 5 nm / 970 -10/+15 nm)
and LB3 (660 ± 5 nm)
● are suitable for the correct wavelengths (labeled on the goggles)
These instructions apply particularly when using goggles supplied from
an outside source that are not included in the scope of delivery of the
SIROLaser Blue.
Optical instruments Never use optical instruments such as microscopes, eye loupes or
magnifiers together with the original protective goggles. Otherwise
sufficient eye protection can no longer be ensured.
Page 12
65 40 863 D3648
12 D3648.201.01.02.02 10.2015
2Safety information Sirona Dental Systems GmbH
2.8EasyTips and MultiTips Operating Instructions SIROLaser Blue
2.8
EasyTips and MultiTips
Optical fiber tips and connection socket Make sure that no dust, dirt and foreign particles can enter the optical
fiber socket or the optical system. Never place your finger or any other
objects in the optical connectors. Otherwise the unit may be permanently
damaged.
When disconnecting the EasyTip or MultiTip from the SIROLaser Blue,
always cover the connection socket at the handpiece with the special
protection cap supplied. Make sure that the optical system is clean before
connecting the EasyTip or MultiTip.
The optical fiber must not be twisted inside the tube of the single-use fiber
tip (EasyTip). There is a risk of breakage.
Stop the laser activation of the SIROLaser Blue immediately if the
EasyTip or MultiTip is broken. Otherwise the tips may become hot.
EasyTips and MultTips must be checked for sure seating prior to each
use.
2.9
Contamination
Accessories Danger of (cross) contamination. Pay attention not to hurt or stick yourself
or any other person with the laser fiber tip. This applies also, if the
handpiece is placed in the holder.
Prior to each use, the handpiece sleeve and the optical light guide
(MultiTip) must be sterilized. The single-use fiber tips are delivered sterile
and must be used only once.
Tissue particles By cutting and coagulation of tissue, tissue particles could get into the air.
Always wear a face mask, because a risk of infection exists.
A extractor or a filter should be used. The operating personnel should be
aware that biologically active material could get into the enviroment. It
may contain particles of viable tissue.
WARNING
Single-use fiber tips (EasyTip) must not be sterilized again after usage.
They are disposable products.
WARNING
Single-use fiber tips (EasyTip) must not be sterilized again after usage.
They are disposable products.
Page 13

65 40 863 D3648
D3648.201.01.02.02 10.2015
13
Sirona Dental Systems GmbH 2Safety information
Operating Instructions SIROLaser Blue 2.10Installation
bеЦдблЬ
2.10
Installation
Location The SIROLaser Blue is to be protected against the intrusion of liquids.
The SIROLaser Blue must not be used in areas, in which the appearance
of liquids is probable.
Verify that the line voltage corresponds to the voltage indicated on the
rating plate of the power supply or in the technical specifications.
Do not place the unit near heat sources. Do not cover the convection
openings for air cooling on the sides of the unit.
Make sure that the electrical system is equipped with the required devices
for protection against direct and indirect contact (thermomagnetic
switches, residual current circuit breakers) and has been set up by a
qualified electrician in compliance with the applicable standards.
Avoid interference between the laser emission and any optical sensors of
devices operated in the vicinity of the SIROLaser Blue.
National directives regarding electrical installations must be observed.
Set up Set up the SIROLaser Blue unit properly and completely before putting it
into operation, see chapter "Installation [ → 25]".
Functional Check The system owner is obliged to use only technically faultless products.
Please check the unit for proper functioning before putting it into
operation. In case of unusual noises, check both the unit and the
handpiece. If the unit has fallen down, have it checked by qualified
technical personnel.
To prevent the unit being accidently pulled from the table, the handpiece
hose should never be under tension. Please always ensure that ca.
40 cm of the handpiece hose hangs.
With battery
If there is any doubt about the correct function of the switching power
supply or the correct electric power supply (wall outlet) the unit may only
be used with internal electric power supply (battery).
Do not use the SIROLaser Blue if a visual inspection shows that it has
been damaged.
Page 14

65 40 863 D3648
14 D3648.201.01.02.02 10.2015
2Safety information Sirona Dental Systems GmbH
2.11Modifications Operating Instructions SIROLaser Blue
2.11
Modifications
Product safety, Sirona
General product safety As manufacturers of dental medical equipment and in the interest of the
operational safety of your system, we stress the importance of having
maintenance and repair of this product performed only by Sirona Dental
Systems GmbH or by agencies expressly authorized by us. Furthermore
components must always be replaced with original Sirona spare parts
upon failure. When having such work done, we suggest that you request
a certificate stating the type and extent of work performed, including
information about any modifications of the rated parameters or of the
operating ranges (if applicable), as well as the date, name of organization
and signature. Please use a fault circuit interrupter to connect this system
to the electrical line power supply. Modifications to this system which
might affect the safety of the system owner, patients or other persons are
prohibited by law! For reasons of product safety, this product may be
operated only with original Sirona accessories or third-party accessories
expressly approved by Sirona. The user is responsible for any damage
resulting from the use of non-approved accessories.
It is not permitted to modify the design or construction of the unit.
Maintenance The unit must be checked and maintained at regular intervals, as
described in chapter "Maintenance and service [ → 64]".
Damages If you accidentally spill any liquid on the unit, immediately stop treatment,
disconnect the power cable and contact your local dental dealer or your
authorized service center for assistance.
Never under any circumstances try to disassemble the SIROLaser Blue.
This is limited exclusively to trained and authorized personnel.
2.12
Cellular phones
Portable and mobile RF communications equipment may interfere with
medical electrical equipment. Therefore, the use of mobile wireless
phones in medical office or hospital environments must be prohibited.
2.13
Transfering data with usb stick
To guarantee the correct datatransfer for software update or storage of
the history file use always an USB-Stick with the following specification:
● USB class 2.0 or above
● Minimum capacity of 512 MB
● Filesystem FAT32 or NTFS
Always perform the datatransfer according to the instructions of the
manual. Never disconnect the USB-stick during data transfer while you
perform a software update or the storage of the history file.
The connection of the SIROLaser to other USB-devices could result in
previously unidentified risks for your patients, yourself or others.
Page 15
65 40 863 D3648
D3648.201.01.02.02 10.2015
15
Sirona Dental Systems GmbH 3System description
Operating Instructions SIROLaser Blue 3.1System overview
bеЦдблЬ
3
System description
3.1
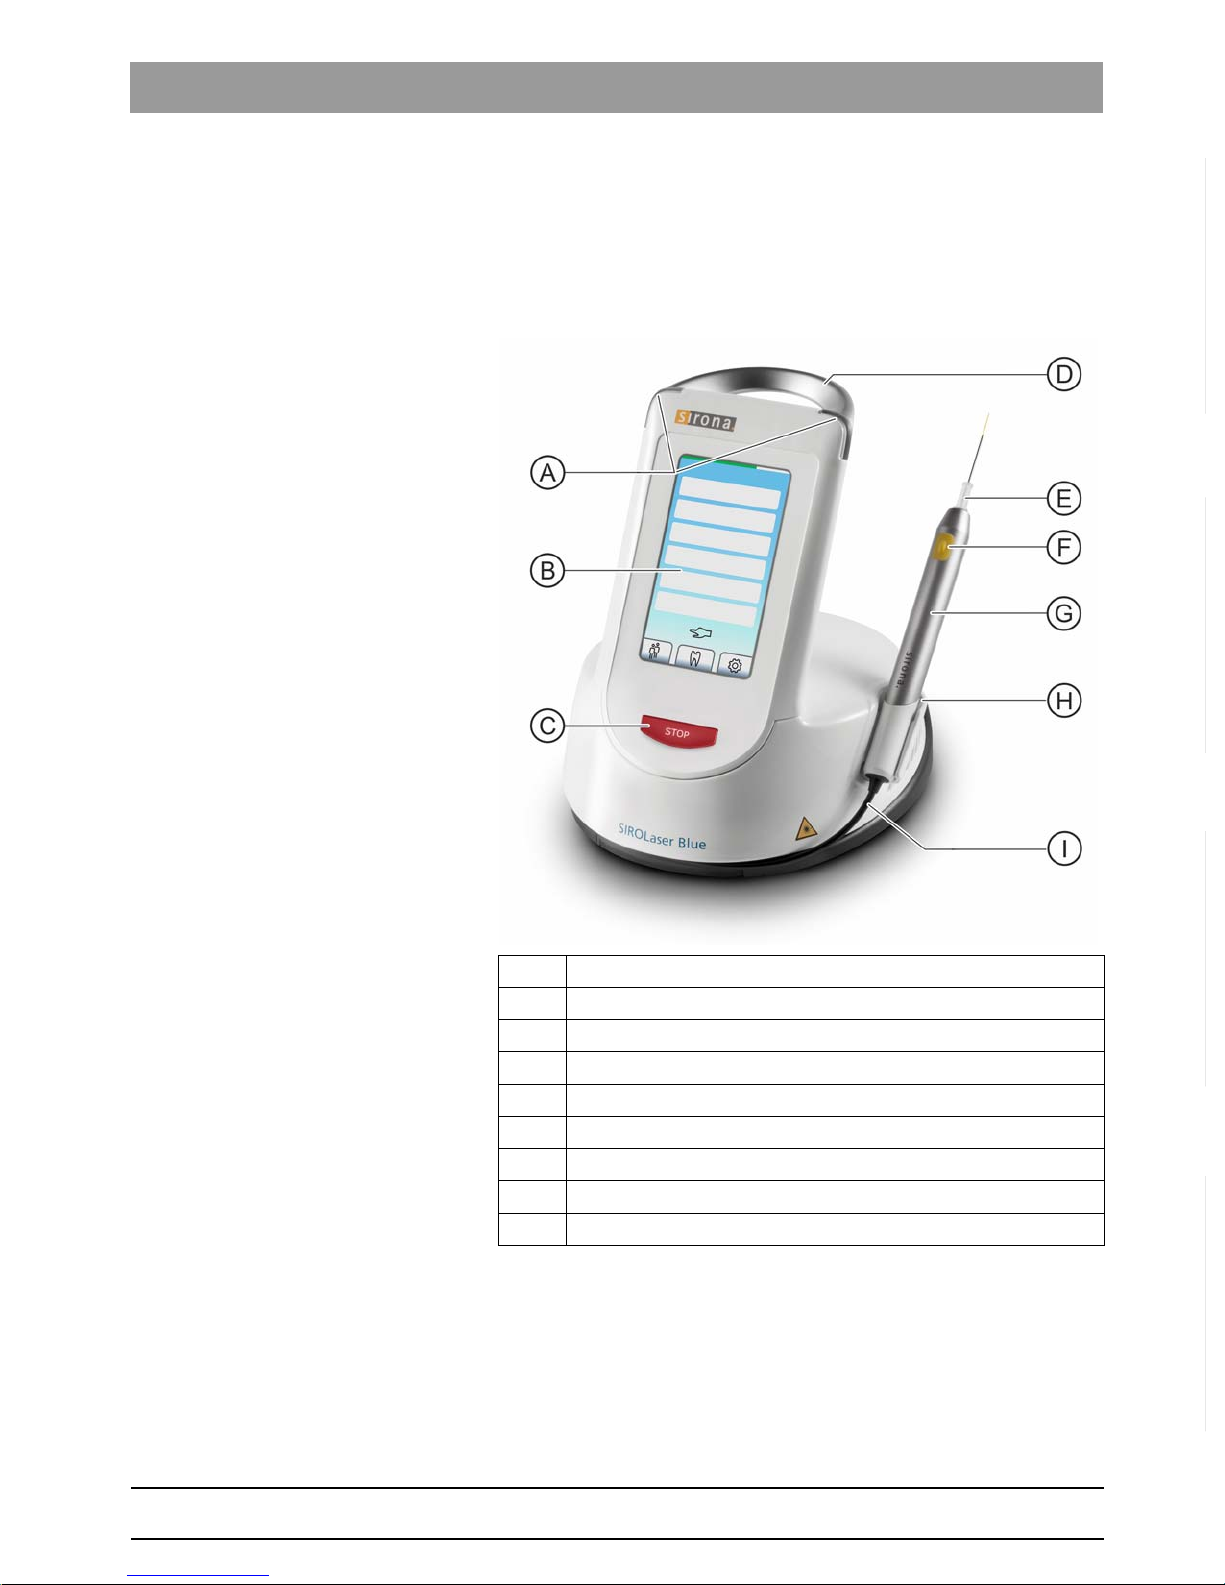
System overview
SIROLaser Blue (Control unit)
A LED lights
B Touch screen
C Laser Stop key
D Carry handle
E Single-use fiber tips (EasyTip)
F Finger switch with exchangeable keypad
G Metal handpiece sleeve
H Snap tab
I Cable for optical fiber and wires
Page 16

65 40 863 D3648
16 D3648.201.01.02.02 10.2015
3System description Sirona Dental Systems GmbH
3.1System overview Operating Instructions SIROLaser Blue
Wireless foot control
Wireless foot control – optional
A ON/OFF switch
B Power supply socket
C Interlock connector including interlock connector bridge
DUSB port
A Foot switch
B Registration key
C Safety and positioning bar
C
B
A
Page 17

65 40 863 D3648
D3648.201.01.02.02 10.2015
17
Sirona Dental Systems GmbH 3System description
Operating Instructions SIROLaser Blue 3.2Laser operation modes
bеЦдблЬ
3.2
Laser operation modes
Continuous wave mode (CW)
CW implies a continuous, uninterrupted laser beam as long as the laser
is activated (and determined by a time set). This means a very good
power control since the maximum power equals the average power.
In adjacent example the laser is in CW mode with a power of 3 W.
Chopped mode
in literature sometimes also called "pulse mode"
The laser beam is interrupted at regular intervals (e.g. 50% ON and 50%
OFF) which can be adjusted via the duty cycle. The average power is the
product of power and duty cycle.
The result is a better thermal control due to the fact that the OFF periods
are used for thermal relaxation of the tissue.
In adjacent example the laser is in chopped mode with a power of 3 W
and a duty cycle of 20%. The average power is 0.6 W.
Page 18

65 40 863 D3648
18 D3648.201.01.02.02 10.2015
3System description Sirona Dental Systems GmbH
3.3Symbols and abbreviations Operating Instructions SIROLaser Blue
3.3
Symbols and abbreviations
3.3.1 Symbols
Type B applied part according to IEC 60601-1
CE mark in accordance with Council Directive 93/42/EEC, stating the
manufacturer's Notified Body. Verifies the compliance of the SIROLaser
Blue
FDA label nanoLOC
This label stands for device compliance of the wireless foot pedal
Date of manufacture: yyyy-mm-dd
Best before date – Do not use after: year-month
Batch number
Single-use fiber tip is sterile, sterilized with gas (ethylene oxide)
Single-use fiber tip is not sterile
Steripoint
®
as evidence of sterilization process
Filled with green dot: EO processed
Serial Number
Reference number
Please refer to manual first (IEC 60601-1 3rd ed.)
Please observe the user manual of the laser unit
Do not use when packaging is damaged
Temperature limitations, transport and storage
Protect against moisture, keep dry
0123
XXXX/XX/XX
LOT
STERILE EO
NON
STERILE
SN
Page 19

65 40 863 D3648
D3648.201.01.02.02 10.2015
19
Sirona Dental Systems GmbH 3System description
Operating Instructions SIROLaser Blue 3.3Symbols and abbreviations
bеЦдблЬ
Fragile, Handle with care
refer to manuals 3rd edit ion SIROLaser Blue
Please refer to manual first (IEC 60601-1 3rd ed.)
Power switch (on the backside of the control unit)
Power supply MPU100-106
Connection socket for DC input from Sinpro MPU101-106 power supply
Connection socket for interlock
Connection socket for USB
Interference is possible in the vicinity of the device
The disassembled handpiece sleeves may be sterilized only in
autoclaves with saturated water vapor at minimum sterilization values of
135°C (275°F), 3 min. holding time and 2.04 bar (29,59 psi) overpressure.
Single-use only for sterile delivered fiber tips, no reuse
Refers to directive 2002/96/EC and EN 50419
Do not dispose with domestic waste
Laser radiation warning
Label Laser specification 3W SIROLaser Blue
Specification of laser output power and wavelength of blue, IR and red/
aiming beam, see also chapter "Technical Data [ → 21]".
Warns of potential laser radiation hazards when opening the laser unit.
Warns of Class 4 laser radiation hazards when using the unit.
Warns of laser radiation emission at the distal tip of the handpiece.
CAUTION
CLASS 4 VISIBLE AND INVISIBLE LASER
RADIATION WHEN OPEN. AVOID EYE
OR SKIN EXPOSURE TO DIRECT
OR SCATTERED RADIATION
CAUTION
VISIBLE AND INVISIBLE LASER RADIATION.
AVOID EYE OR SKIN EXPOSURE TO
DIRECT OR SCATTERED RADIATION
CLASS 4 LASER PRODUCT
Page 20
65 40 863 D3648
20 D3648.201.01.02.02 10.2015
3System description Sirona Dental Systems GmbH
3.3Symbols and abbreviations Operating Instructions SIROLaser Blue
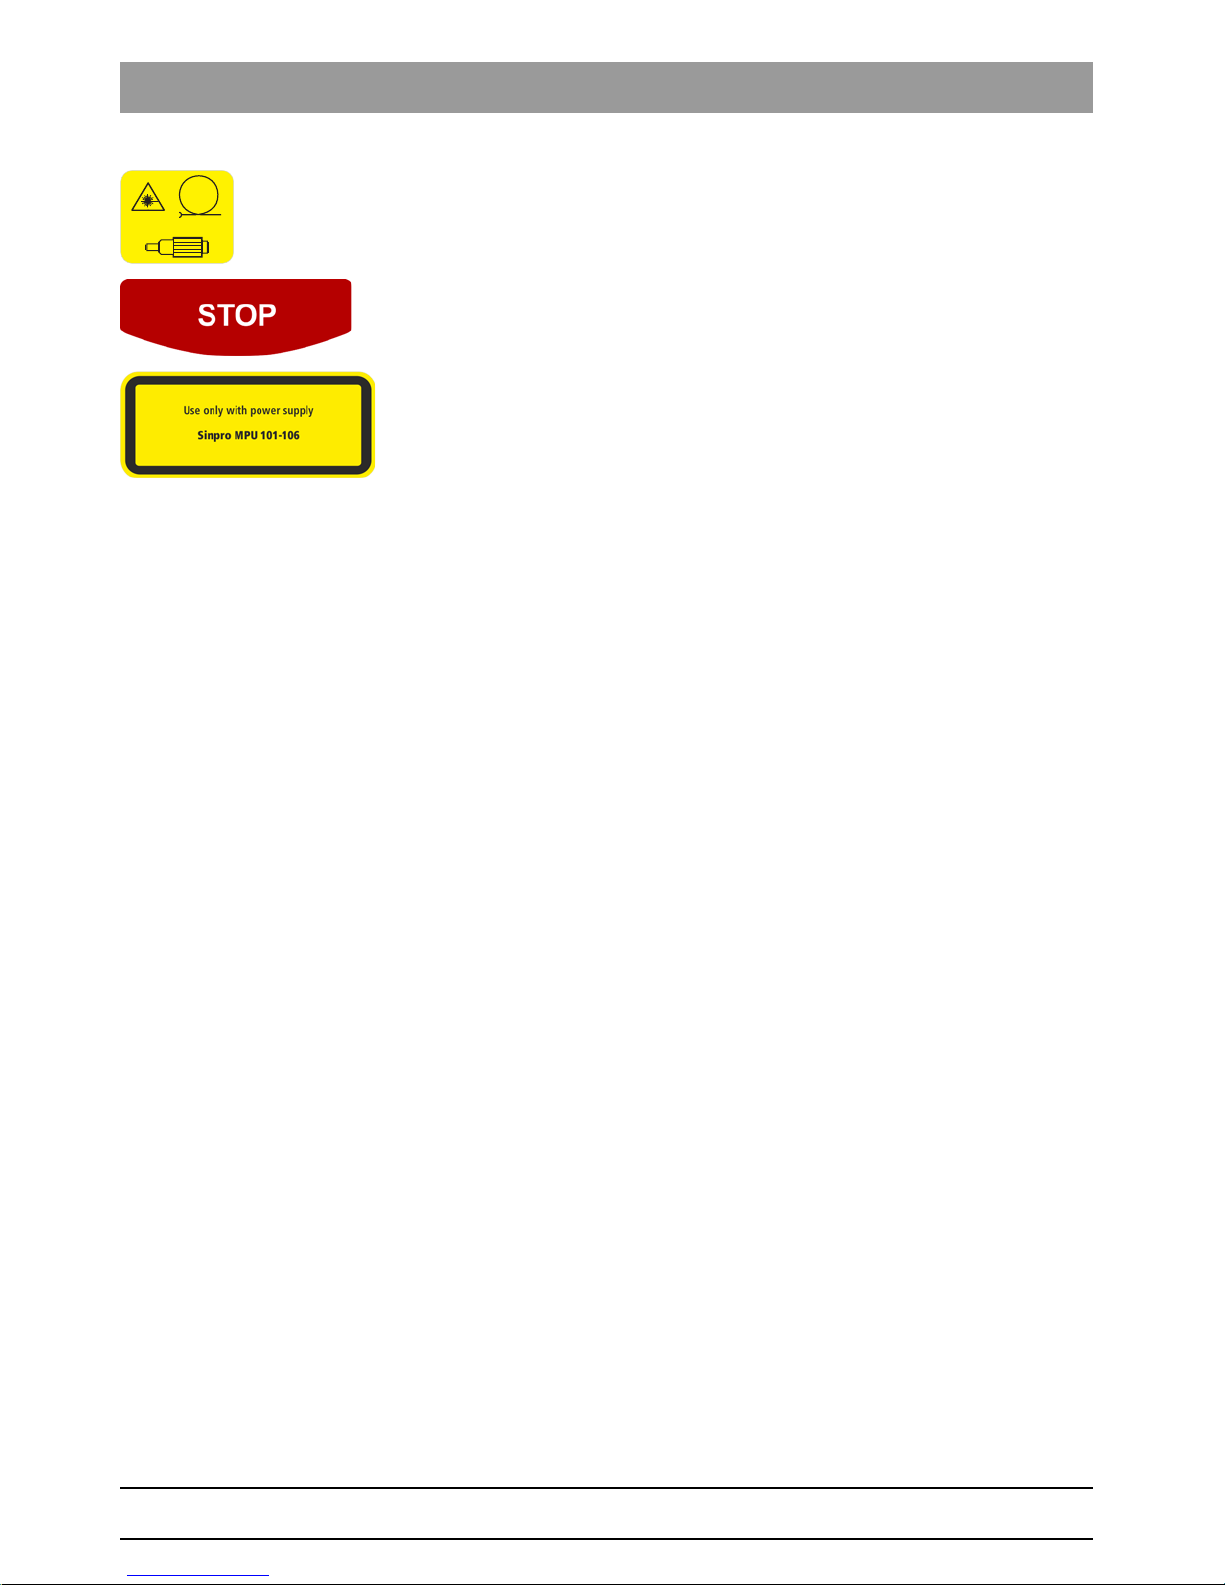
Warns of laser radiation hazards when the fiber connector is unscrewed.
"Laser Stop" key: press this button in case of an emergency
Operate the unit exclusively with the Sinpro MPU101-106 power supply
3.3.2 Abbreviations
FINGER SWITCH
NOHD Nominal ocular
hazard distance
VA Volt-ampere
CW Continuous Wave V
eff
Effective voltage
PF Pulsed Frequency or
Chopped Mode
V
th
Threshold voltage
cont. continuous V/m Volt per meter
approx. approximately mA Milliampere
IR Infrared diode A/m Ampere per meter
g Gram mW Milliwatt
kg Kilogram W Watt
µs Microseconds P Power
ms Milliseconds P
max
Maximum power
s Seconds J Joule
µm Micrometer RF Radiofrequency
nm Nanometer Hz Hertz
mm Millimeter kHz Kilohertz
cm Centimeter MHz Megahertz
m Meter GHz Gigahertz
WxLxH Width x length x
height
kPa Kilopascal
DC Direct current voltage kpsi Kilo-pound-force per
square inch
AC Alternating current
voltage
db/km Decibels per kilometer
mV Millivolt °C Degree Celsius
V Volt °F Degree Fahrenheit
kV Kilovolt
Page 21

65 40 863 D3648
D3648.201.01.02.02 10.2015
21
Sirona Dental Systems GmbH 3System description
Operating Instructions SIROLaser Blue 3.4Technical Data
bеЦдблЬ
3.4
Technical Data
Technical Data SIROLaser Advance Blue
General
SIROLaser Blue specification
Beam guide: Flexible quartz glass fiber
Display: Full color, graphical LCD touch screen
Cooling: Internal air cooling controlled by output
Temperature switch: Software temperature switch at 48° C
Door contact connection: Potential-free contact 5 VDC/20 mA (TTL)
Dimensions (W x L x H): ~ 182 x 197 x 189 mm
Weight: ~ 1300 g (incl. handpiece and rechargeable
battery)
Laser type: Diode laser
Wavelengths & optical
power:
445 ± 5 nm / approx. 0.2 - 3.0 W (CW)
970 -10/+15 nm / approx. 0.2 - 2.0 W (CW)
660 ± 5 nm / approx. 0.5 - 100 mW (CW)
Laser system: 445 & 970 nm: Class IV
660 nm: Class I
(according to IEC 60825-1)
Device classification: Class IIb (according to Council Directive 93/
42/EEC)
Emission modes: CW (continuous wave),
chopped 1 Hz to 10 kHz
Pulse: Repeated pulse
Pulse duration: Chopped mode: 10 µs - 0.99 sec.
IP degree of protection: Laser unit: IP20; wireless foot control: IPX5
(according to EN IEC 60601-1)
Aiming beam: 660 ± 5 nm, max. 1 mW
NOHD: From the distal end of the optical fiber: 1.5 m
Optical fiber thickness: 200 and 320 µm (single-use fiber tips)
4 and 8 mm (glas rods)
Operation: Electrical wireless foot control or finger
switch, with electronic access key
Nominal power input: 15 V DC 6.66 A max. 100 VA MPU101-106
Insulation class: Class I, type B (according to IEC 60601-1)
Warning: To avoid the risk of electric shock,
this equipment must only be connected to a
supply mains with protective earth.
Type of protection against
electric shock:
SIROLaser handpiece applied part type B
Page 22

65 40 863 D3648
22 D3648.201.01.02.02 10.2015
3System description Sirona Dental Systems GmbH
3.4Technical Data Operating Instructions SIROLaser Blue
Technical Data optical fiber, standard
Optical fibers specification
Technical Data wireless foot control
Wireless foot control
Power supply: The SIROLaser Blue may only be operated
with the Sinpro MPU101-106 power supply.
Input voltage: 100 - 240 VAC
Input current: 1.25 - 0.5 A
Input frequence: 47 - 63 Hz
Separation of mains: The seperation of the mains of SIROLaser
Blue is conducted by unplugging the plug of
the power supply on the backside of the
unit's housing.
Optical fiber diameters: 200 µm fiber 320 µm fiber
Core diameter: 200 µm 320 µm
Cladding diameter: 240 µm 385 µm
Coating diameter: 270 µm 408 µm
All diameters ± 20%
Optical fiber length: 200 μm fiber: 13 ± 1 mm (end of tube to end
of fiber)
200 μm fiber Endo: 27 ± 1 mm (end of tube
to end of fiber)
320 μm fiber: 13 ± 1 mm (end of tube to end
of fiber)
Tube length: 200 μm fiber: ~ 25 mm
200 μm fiber Endo: ~ 25 mm
320 μm fiber: ~ 25 mm
Minimum transmission
efficiency at related
wavelength:
The optical fiber material has an attenuation
of around 1 dB/km @970 nm
Maximum transmission
power:
100 kW/mm² (Nd:YAG, cw at 1060 nm)
Numerical aperture: ≥ 0.22
Tensile strength: 70 kpsi
Frequency: 2.4 GHz - 2.4835 GHz (ISM band)
Transmitting power: < 2 mW (short-range device)
Modulation type: Multi-dimensional Multi Access (MDMA)
Battery: Type AAA, 1.5 V
Page 23

65 40 863 D3648
D3648.201.01.02.02 10.2015
23
Sirona Dental Systems GmbH 3System description
Operating Instructions SIROLaser Blue 3.4Technical Data
bеЦдблЬ
Transport and storage
The SIROLaser Blue comes in a cardboard box that ensures proper and
easy transport.
Appropriate storage, Sirona
To ensure appropriate storage, the device must always be kept in the box
supplied by Sirona Dental Systems.
Thus stored, the SIROLaser Blue can withstand the following ambient
conditions:
● Temperatures from -40° C to +70° C
● Relative humidity from 10 % to 95 %
● Atmospheric pressure from 50 kPa to 106 kPa
Battery must be charg ed
In its original transport packaging, the SIROLaser Blue can withstand the
following ambient transport conditions:
● Temperatures from -40° C to +70° C
● Relative humidity from 10 % to 95 %
● Atmospheric pressure from 50 kPa to 106 kPa
Operating conditions
The SIROLaser Blue may be operated in the following environmental
conditions:
● Temperatures from +10° C to +33° C
● Relative humidity from 10 % to 95 %
● Atmospheric pressure from 80 kPa to 106 kPa
CAUTION
Do not leave the SIROLaser Blue in a vehicle parked in the sun. The
inside temperature of the car could thus heat up to a point where
individual components may be damaged.
NOTICE
The rechargeable battery must be fully charged regularly. After six
months of no charging (storage) the rechargeable battery might lose its
loading capacity and might not be rechargeable anymore.
CAUTION
Following transport and storage, let the SIROLaser Blue adapt to room
temperature for about one hour prior to operation to reduce the risk of
malfunctions caused by condensation.
Page 24

65 40 863 D3648
24 D3648.201.01.02.02 10.2015
3System description Sirona Dental Systems GmbH
3.4Technical Data Operating Instructions SIROLaser Blue
Sterile delivered single-use fiber tips
Labeling Each tip is sterilized with gas (ethylene oxide). A label on the outer
packing of each set of 25 single-use fiber tips indicates the sterilization
procedure (see 3.3.1 symbols).
A green dot on the label of the outer packing serves as a process indicator
for a correct sterilization process (see 3.3.1 symbols).
Storage To ensure the proper storage and therefore the sterility of the tips, the
following environmental factors have to be considered in terms of
storage:
● Protection from moisture
● Pollution
● Mechanical stress
● Direct solar or UV radiation
● Influence of temperature
● In a closed storage system (e.g. cupboard, drawer), or
● in shelves or rooms of the room class II according to DIN 1946-4:
2008 -12
● From 15°C to 25°C (room temperature)
● Under relative humidity from 40% to 60% (dry conditions)
Only store the single-use fiber tips in the outer packaging, which serves
as the safety packaging (carton).
Use firstly the oldest tips according to their best-before month. It is
labeled on each packaging tube of the tips and on the outer packaging of
the tip set. The remaining quantity remains in the closed outer packaging
(carton).
Do not refill an outer packaging (carton) of the single-use fiber tip sets
with new tips.
WARNING
Do not use the single-use fiber tips if there is no green dot on the label
of the outer packaging.
Page 25

65 40 863 D3648
D3648.201.01.02.02 10.2015
25
Sirona Dental Systems GmbH 4Installation
Operating Instructions SIROLaser Blue 4.1Scope of supply
bеЦдблЬ
4
Installation
Any national or local regulations stipulating that the SIROLaser Blue may
be installed only by trained personnel must be strictly observed.
4.1
Scope of supply
The following components are included in the scope of supply of the
SIROLaser Blue:
Components of SIROLaser A dvance, Blue
Order-No for SIROLaser Blue
SIROLaser Blue Order-No for the following countries:
Order-No
SIROLaser Blue see below
1 x SIROLaser Blue control unit including handpiece
with integrated finger switch
1 x Additional handpiece sleeve for alternating
operation
1 x Demo set of single-use fiber tips (non-sterile
demo fibers): 6 x EasyTip 320 μm
1 x Fiber cutter
1 x Bending tool
1 x Rechargeable battery (already mounted)
2 x Laser protective goggles for operator and
assistant
1 x Laser protective goggle for patients
1 x Switching power supply
1 x Transport packaging
Language-specific documentation set, e.g. User Manual
Country-specific power cable see
"Spare
parts [ → 26]
"
Option: Wireless foot control 62 56 841
Order-No
Germany, Austria 65 40 491
Switzerland 65 40 632
Netherlands, Belgium 65 40 509
France 65 40 640
England 65 40 624
Denmark 65 40 616
Finland, Norway, Sweden 65 40 590
Italy 65 40 657
Page 26

65 40 863 D3648
26 D3648.201.01.02.02 10.2015
4Installation Sirona Dental Systems GmbH
4.2Spare parts Operating Instructions SIROLaser Blue
Further countries on request.
4.2
Spare parts
SIROLaser Advance
4.3
Labels
Attach the appropriate language-specific labels (1 and 2) to your laser
unit. For more information on the labels and their position, refer to
"Appendix B -Label positions [ → 76]".
Spain 65 40 608
Portugal 65 40 665
Order-No
Handpiece sleeve with keypad 62 56 767
Keypad finger switch 64 87 800
EasyTip 320 µm (25 pieces) 64 98 062
EasyTip 200 µm Endo (25 pieces) 65 35 905
MultiTip 8 mm, therapy light guide 65 41 465
MultiTip 4 mm, therapy light guide 65 41 499
Optic protection cap for handpiece 65 52 108
EasyBend - Bending tool 65 44 097
Fibercutter 60 91 669
Laser protective goggles 65 41 515
Laser protective goggles for spectacle wearers 65 46 407
Laser protective goggles for patients 65 41 523
Battery Pack 62 56 833
Switching power supply 65 59 418
Power cord EU 62 58 581
Power cord IT 62 58 607
Power cord GB 62 58 599
Power cord US 62 58 615
Power cord AUS 62 58 565
Power cord DK 62 58 573
Power cord CH 62 69 554
Page 27
65 40 863 D3648
D3648.201.01.02.02 10.2015
27
Sirona Dental Systems GmbH 4Installation
Operating Instructions SIROLaser Blue 4.4Initial start-up – procedure for proper assembly
bеЦдблЬ
4.4
Initial start-up – procedure for proper assembly
With foot control
1. Install power supply
2. Handpiece and assembly of single-use fiber tips and therapy rods
3. Install wireless foot control – optional
4. Install remote interlock – optional
5. Start SIROLaser Blue for the first time
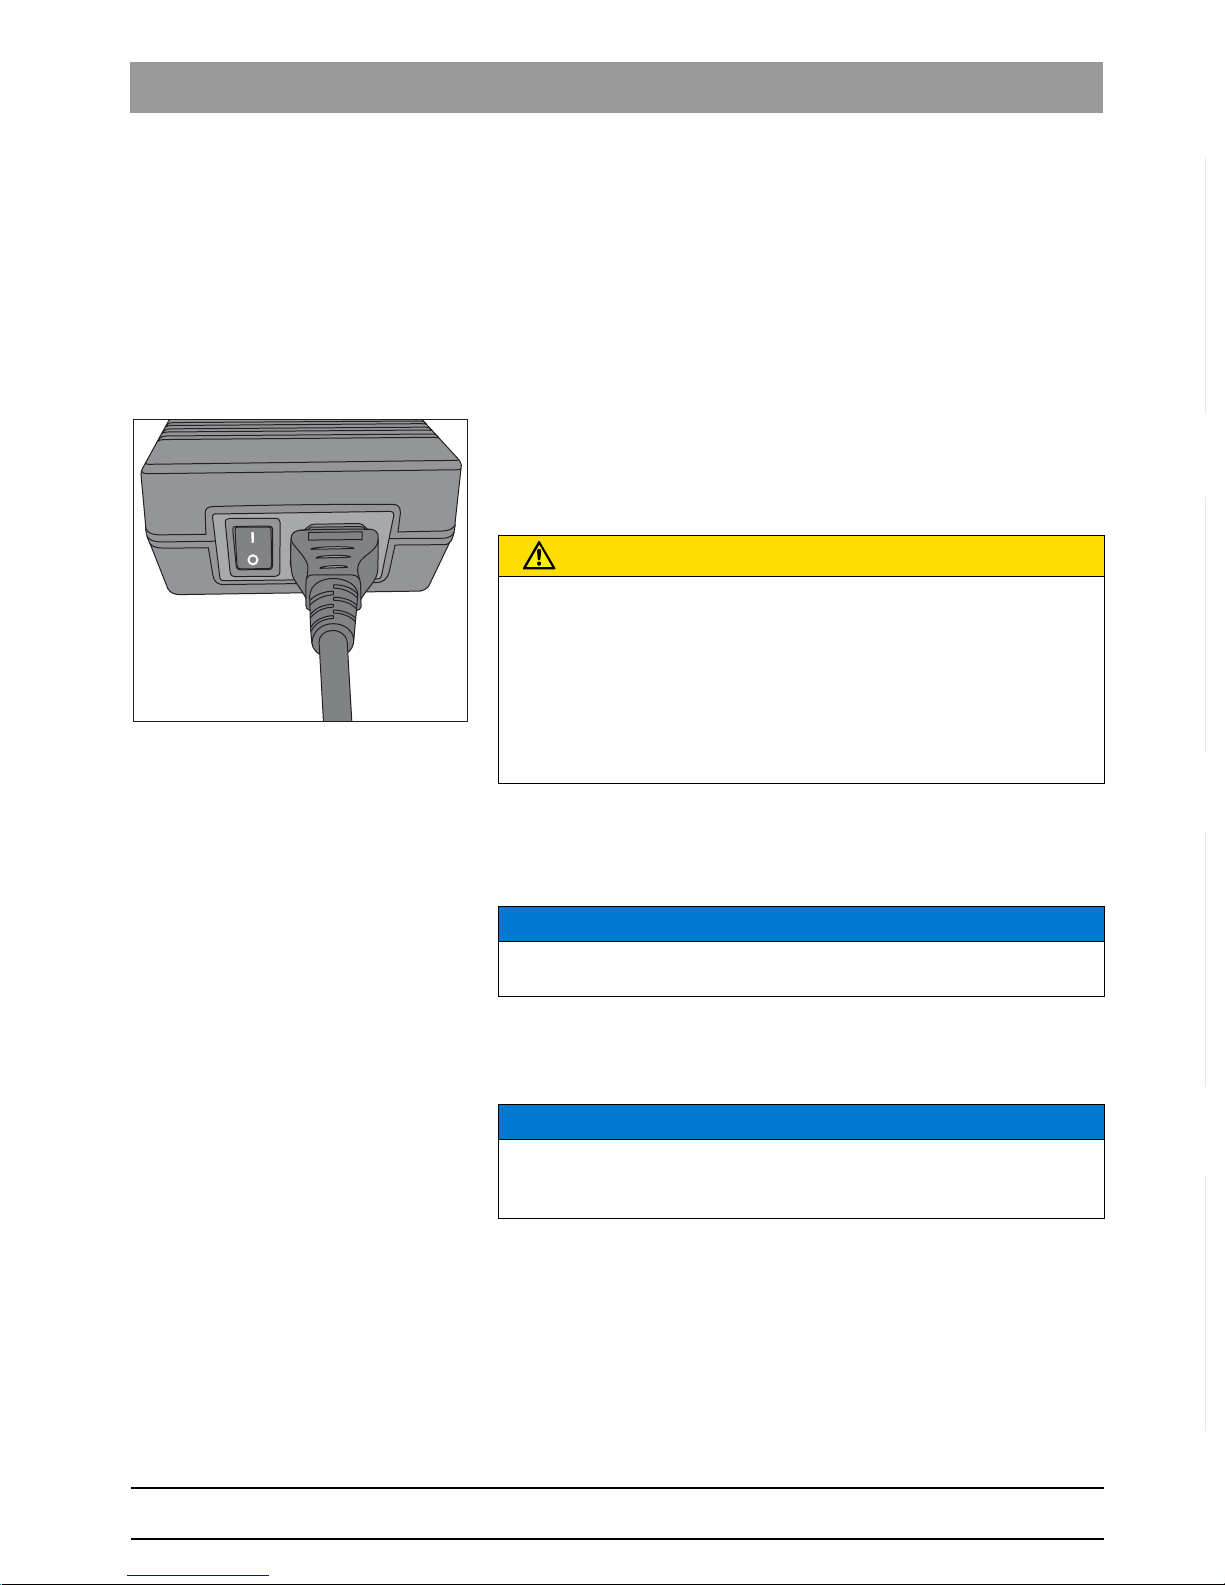
4.4.1 Install power supply
1. Connect the power cable to the DC IN socket at the back of the
SIROLaser Blue.
2. Please make sure to switch on the switching power supply.
The green LED on the power supply lights up.
Power supply MPU101-106
With battery
The SIROLaser Blue is supplied with a rechargeable battery and
therefore can be used without connected power cable. The status of the
rechargeable battery and whether the power cable is actually connected
will be always displayed on the touch screen.
The SIROLaser Blue is fully functional and can be run while charging the
battery.
➢ Charge the battery completely.
CAUTION
The SIROLaser Blue may only be operated with the Sinpro MPU101106 power supply. Operation with other power supplies may result in
failure or destruction of the laser unit. If any power supply other than the
one recommended is used, the approval of the entire unit automatically
becomes void and the warranty granted by Sirona Dental Systems
GmbH expires.
The use of any power supplies other than the one recommended may
cause overheating and failure of the laser unit or damage of batteries.
NOTICE
There will be a warning if the rechargeable battery will reach a low level
of capacity.
NOTICE
The rechargeable battery must be fully charged regularly. After six
months of non-charging the rechargeable battery might reduce its
loading capacity.
Page 28

65 40 863 D3648
28 D3648.201.01.02.02 10.2015
4Installation Sirona Dental Systems GmbH
4.4Initial start-up – procedure for proper assembly Operating Instructions SIROLaser Blue
4.4.2 Handpiece and assembly of single-use fiber tips and
therapy rods
4.4.2.1
Handpiece
4.4.2.2
Assembly of sterile single-use optical fiber tips
4.4.2.2.1 Area of application
The SIROLaser Blue is provided with three types of sterile single-use
optical fiber tips of different diameter so that it can be used for a variety
of different dental procedures and indications:
● Single-use optical fiber tip, EasyTips 320 µm (sterile)
● Single-use optical fiber tip, EasyTip Endo 200 µm (sterile)
SIROLaser Blue
EasyTips are delivered sterile in a special packaging tube, which also
assists the mounting of the fiber tips.The optical single-use fiber tips can
be used only with the SIROLaser Blue in the spectral range of 445 nm ±
5 nm and 970 nm -10/+15 nm.
A
B
D
A C
A Handpiece body with tube
B Snap tab
C Stainless steel handpiece sleeve
D Keypad for finger switch
WARNING
If optical fiber tips from other manufacturers are used, physical
properties such as load carrying capacity and transmission behavior
may vary.Sirona Dental Systems GmbH therefore assumes no liability
in such cases.Therefore, use only Sirona single-use optical fiber tips.
WARNING
The fiber tips from the demo set of single-use fiber tips in the scope of
supply serve only as test fibers for first familarisation with the unit. They
are not sterile, as shown on their label. Do not use them for clinical
treatments at patients.
WARNING
Do not sterilize the single-use fiber tips (EasyTips) again after usage.
Sterilization effects strongly the characteristics of the single-use fiber
tips (laser power output, form, accuracy,…).
Page 29

65 40 863 D3648
D3648.201.01.02.02 10.2015
29
Sirona Dental Systems GmbH 4Installation
Operating Instructions SIROLaser Blue 4.4Initial start-up – procedure for proper assembly
bеЦдблЬ
4.4.2.2.2 Preparation for clinical application
1. The EasyTips are delivered sterile. The metal handpiece sleeve can
be cleaned in the autoclave (high-pressure sterilizer), see chapter
"Cleaning, disinfection and sterilization [ → 61]".
2. Select the required sterile EasyTip (320 µm or 200 µm Endo), see
chapter "List of preset indications [ → 57]".
Mounting of the EasyTip:
Do not use the EasyTip if its packaging tube is damaged or the bestbefore date has expired. The best-before date is printed on the product
label of the packaging tube.
1. Remove the protective cap from the connection socket at the
handpiece
2. Open the sterile transport packaging tube of the EasyTip by tearing
off the seal label from the top of the packaging.
WARNING
Use of the laser unit when the aiming beam is not functioning properly
may cause injuries to operating personnel, assistants or patients. If you
cannot see the red aiming beam after switching the laser on or during
treatment refer to chapter "Troubleshooting of simple defects [ → 65]".
The optical fiber of the EasyTip may be damaged if it is seriously bent.
This may constitute a health hazard for patients, dentists and dental
assistants.
Remove the protection cap for treatment only. Never touch the proximal
end of the ferrule and protect them against damage and dirt.
Never use the laser without optical fiber, check for correct fixation. Never
bend, fold or jam the EasyTips, as this might cause it to break. The
EasyTip must never be bent without the bending tool.
Never pull on the optical fiber of the EasyTip.
WARNING
If the EasyTip is used after the best-before date, the required sterile
conditions of the EasyTip in the packaging tube are only covered until
the best-before date. Moreover, some of its physical properties, e.g. its
load carrying capacity and transmission behavior, may change, thus
posing a hazard to the health of the patient, the dentist and the dental
assistant.
After removal of a tip, immediately lose the outer packaging.
Page 30

65 40 863 D3648
30 D3648.201.01.02.02 10.2015
4Installation Sirona Dental Systems GmbH
4.4Initial start-up – procedure for proper assembly Operating Instructions SIROLaser Blue
3. Position the packaging tube with the EasyTip on the connection
socket by placing the funnel-shaped end of the packaging on the
handpiece
4. Press the packaging tube with the EasyTip with light pressure against
the handpiece, until the EasyTip perceptibly clicks into place and is
firmly seated
5. Subtract the packaging tube from the handpiece and the connected
EasyTip
6. Please check whether the EasyTip is firmly seated on the handpiece
and perform a visual check to make sure that it has not been
damaged during shipment.
7. Put the laser into operation by choosing any preset treatment. A
corresponding description is provided in chapter "Operation [ → 36]".
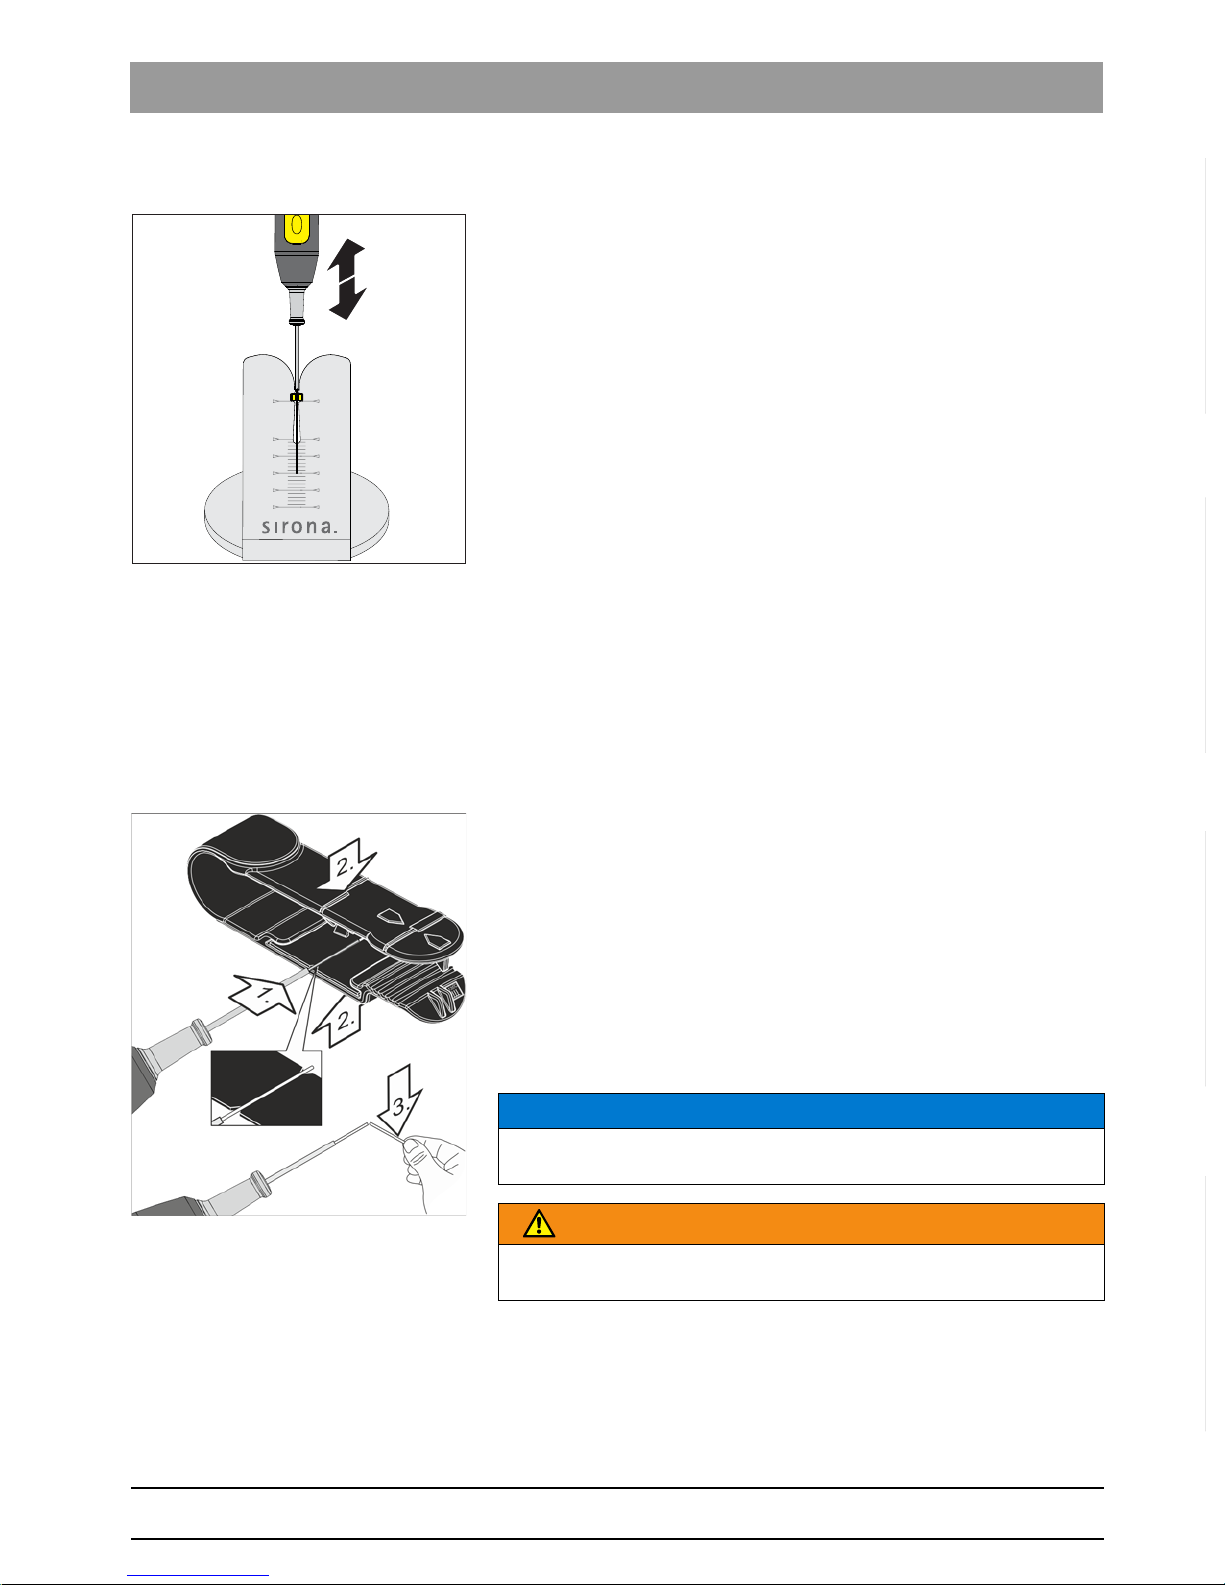
8. As soon as the SIROLaser Blue is ready you can check to make sure
that the aiming beam illuminates evenly, i.e. projects a circular light
pattern (see adjacent picture).To do this, aim the EasyTip vertically at
a white background. If the beam shows no pattern or the beam
pattern is not illuminated evenly, the EasyTip may be damaged or
defective. In this case, return the EasyTip to your dental dealer so
that it can be replaced under warranty. Do not use any defective
EasyTips.
Bending of the EasyTip
1. Please sterilize the bending tool prior to each use to keep the sterile
conditions of the EasyTip, see chapter "Cleaning, disinfection and
sterilization [ → 61]"
2. Now you can insert the EasyTip into the bending tool and bend the
EasyTip to the angle that you need for best handling.
WARNING
The aiming beam must not be aimed toward a person‘s eye. It
comprises an intensive light source even when set to a low power level.
Always wear protective goggles.
Page 31
65 40 863 D3648
D3648.201.01.02.02 10.2015
31
Sirona Dental Systems GmbH 4Installation
Operating Instructions SIROLaser Blue 4.4Initial start-up – procedure for proper assembly
bеЦдблЬ
Adjusting the position of the endo stopper
The single-use fiber tip for endodontic applications (EasyTip Endo) is
provided with an already mounted endo stopper, which serves as a stop
collar for the length of the root canal. The endo stopper can be moved on
the optical fiber.
1. To guarantee the sterile conditions of the fiber tip, please use the
sterilized bending tool to adjust the position of the endo stopper.
2. Place the EasyTip in the bending tool so that the endo stopper
positions itself in the notch for the stopper at the bending tool.
3. Adjust the position of the endo stopper by moving the handpiece up
and down so that the end of the fiber tip has the needed distance to
the stopper (indicated by the mm scale on the bending tool).
Adjusting the fiber length with the fiber cutter
Generally, all types of sterile delivered single-use fiber tips have the
proper fiber length in order to start working immediately without the need
of adjusting the length prior to application. However, in some cases it will
be necessary to adjust the length of the fiber.
Please sterilize the fiber cutter prior to each use to keep the sterile
conditions of the EasyTip, see chapter "Cleaning, disinfection and
sterilization [ → 61]".
1. Place the optical fiber of the EasyTip in the fiber cutter at the notched
mark.
2. Press the fiber cutter together and release it again.
3. Bend the optical fiber at the notched location.
The optical fiber breaks at the notched location with a smooth,
perpendicular fracture surface.
Check to see if the light of the aiming beam projects a uniform circular
pattern. To do this, aim the optical fiber vertically at a white background.
If the probe projects no pattern at all or only an uneven pattern, cut off
another one to two millimeters.
10
15
25
20
0
30
0
10
15
25
20
30
NOTICE
Press firmly but do not squeeze the optical fiber. You just need a little
notch to receive a perfect result when breaking the fiber at the notch.
WARNING
If the optical fiber of the EasyTip does not protrude at least 5 mm out of
its metal tube, there is a risk that the tube will heat up.
Page 32

65 40 863 D3648
32 D3648.201.01.02.02 10.2015
4Installation Sirona Dental Systems GmbH
4.4Initial start-up – procedure for proper assembly Operating Instructions SIROLaser Blue
After treatment
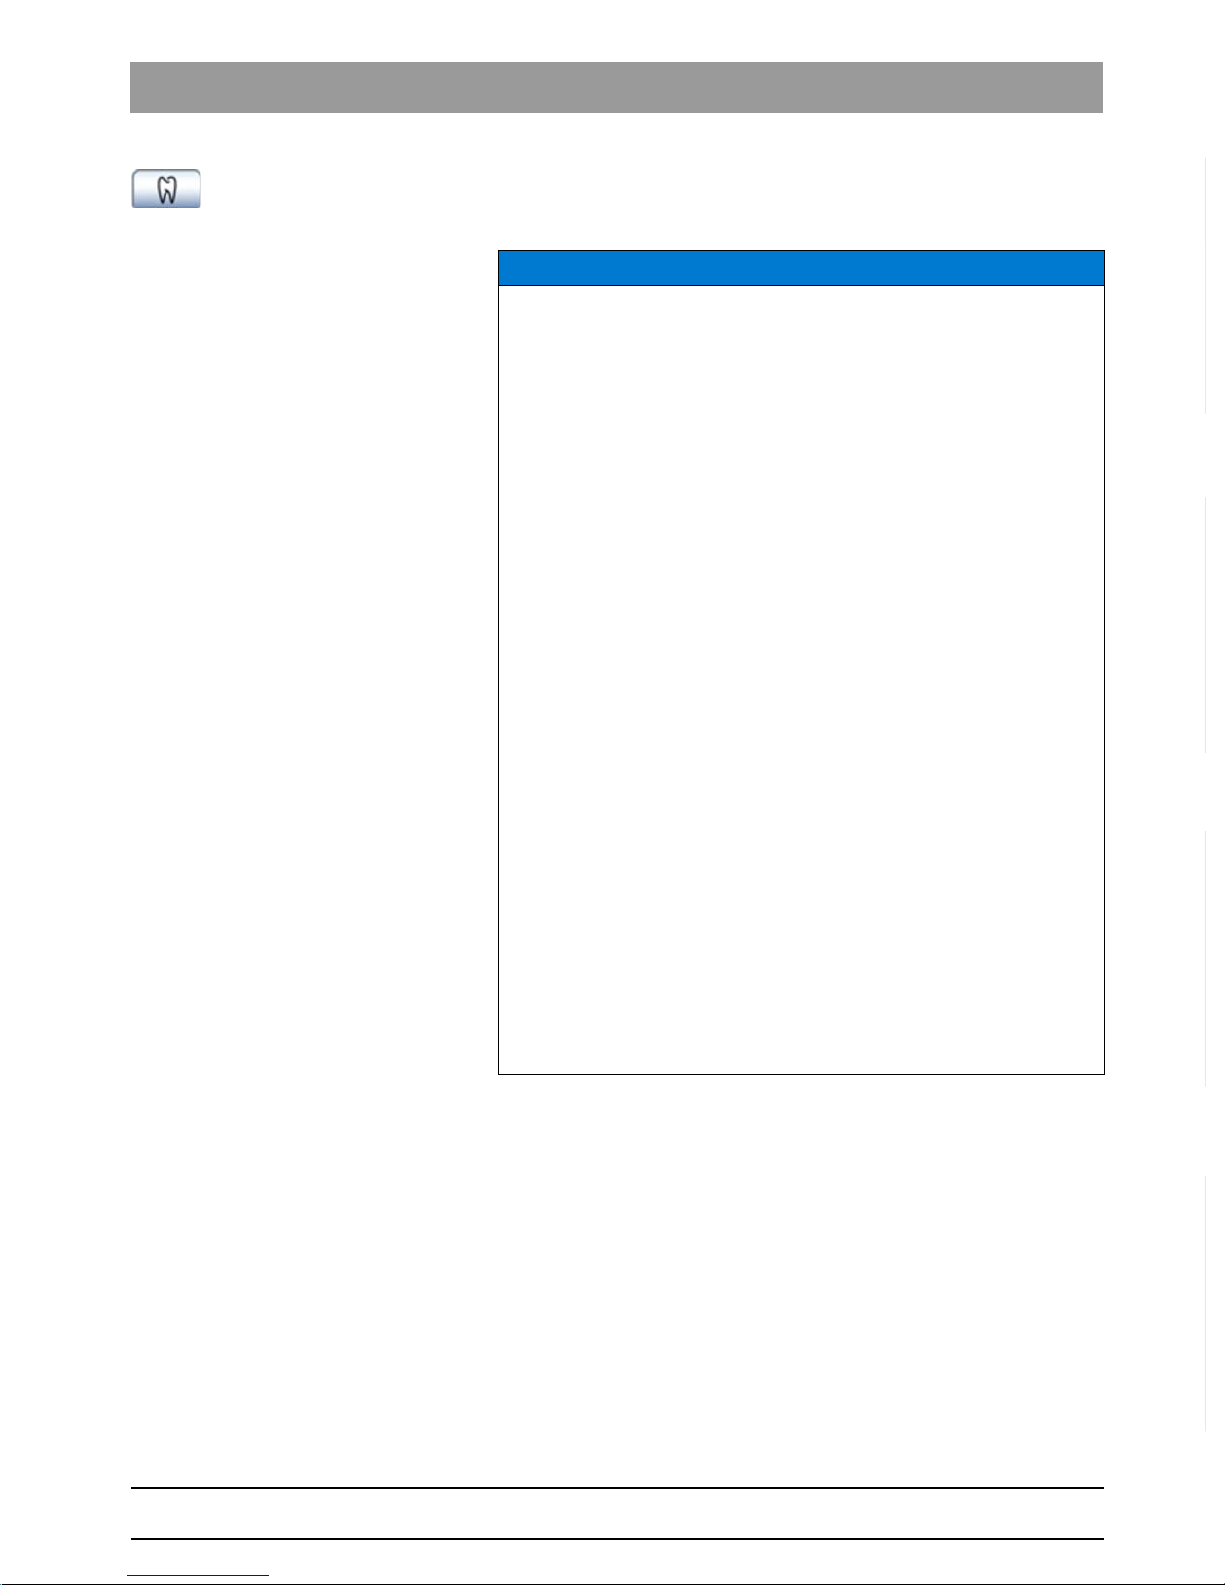
The easiest and safest way to dismount the EasyTip from the handpiece
after treatment is to use a disposable container.
1. Open the lid of the disposable container and connect the plastic grip
of the tip to the suitable recess inside the container.
2. Remove the EasyTip from the handpiece by pulling the container
away from the handpiece.
3. The EasyTip falls into the disposable container.
4. Close the disposal container.
4.4.2.3
Assembly of therapy light guides
4.4.2.3.1 Area of application
The SIROLaser Blue can be used for additional dental procedures with
two types of reusable therapy light guides of different diameters:
● Light guide (MultiTip 8 mm), diameter: 8 mm
● Light guide (MultiTip 4 mm), diameter: 4 mm
The light guides are delivered non-sterile.
SIROLaser Blue
The MultiTips can be used only with the SIROLaser Blue in the spectral
range of 445 nm ± 5 nm, 660 nm ± 5 nm and 970 nm -10/+15 nm.
If light guide rods from other manufacturers are used, physical properties
such as load carrying capacity and transmission behavior may vary.
Sirona Dental Systems GmbH therefore assumes no liability in such
cases.Therefore, use only Sirona light guide rods.
CAUTION
As soon as you disassemble the EasyTip after treatment make sure to
protect the optical fiber socket with the protective cap provided for this
purpose. Make sure that no dust or dirt can enter the optical system.
Otherwise the unit may be permanently damaged.
WARNING
After 2,000 sterilization cycles or 2 years which marks the end of the
service period, the MultiTips will have reached their wear limit. Please
check the usage period based on the LOT number (definition of LOT =
week year e.g. 0215 for calendar week 2, 2015). Please replace the light
guide accordingly. The optical output can be reduced.
Page 33

65 40 863 D3648
D3648.201.01.02.02 10.2015
33
Sirona Dental Systems GmbH 4Installation
Operating Instructions SIROLaser Blue 4.4Initial start-up – procedure for proper assembly
bеЦдблЬ
4.4.2.3.2 Preparation for clinical application
1. The MultiTips are delivered non-sterile. Make sure that the rod is
clean and sterile. The metal handpiece sleeve can be cleaned in the
autoclave (high-pressure sterilizer), see chapter "Cleaning,
disinfection and sterilization [ → 61]".
2. Select the required MultiTip light guide (diameter 8 mm or 4 mm), see
chapter „List of preset indications”.
3. Please perform a visual check to make sure that the MultiTip is not
damaged or has not reached its wear limit.
4. Put the optical connection of the MultiTip on the optical socket of the
handpiece. Press the MultiTip with light pressure against the
handpiece, until the MultiTip perceptibly clicks into place and is firmly
seated.
5. Put the laser into operation by choosing any preset treatment
destined for the light guide. A corresponding description is provided
in chapter "Operation [ → 36]".
After treatment
Dismount the MultiTip from the handpiece by deducting it carefully from
the optical socket of the handpiece.
For cleaning, disinfecting and sterilizing the MultiTip please refer to
chapter "Cleaning, disinfection and sterilization [ → 61]" [ ➙ xx].
WARNING
For safety reason it is necessary to use the 4 mm or the 8 mm light guide
(MultiTip) if wavelength of 660 nm is chosen
WARNING
Use of the laser unit when the aiming beam is not functioning properly
may cause injuries to operating personnel, assistants or patients. If you
cannot see the red aiming beam after switching the laser on or during
treatment refer to chapter "Troubleshooting of simple defects [ → 65]".
Only use the MultiTips for treatments destined for them. EasyTips and
MultiTips have completely different optical characteristics.
Remove the protection cap of the handpiece optic for treatment only.
Never touch the proximal end of the ferrule and protect them against
damage and dirt.
Never use the laser without optical fiber, check for correct fixation.
CAUTION
As soon as you disassemble the MultiTip after treatment make sure to
protect the optical fiber socket with the protective cap provided for this
purpose. Make sure that no dust or dirt can enter the optical system.
Otherwise the unit may be permanently damaged.
Page 34

65 40 863 D3648
34 D3648.201.01.02.02 10.2015
4Installation Sirona Dental Systems GmbH
4.4Initial start-up – procedure for proper assembly Operating Instructions SIROLaser Blue
4.4.3 Install wireless foot control – optional
The SIROLaser Blue can be operated using the finger switch (which is
integrated in the handpiece) as well as by using the optional wireless foot
control.
Technical data of the wireless foot control, see chapter Technical Data,
"Wireless foot control".
The wireless foot control must be assigned to the SIROLaser Blue via a
registration. This prevents malfunctions caused by neighboring wireless
controls.
✔ The SIROLaser Blue control unit and the wireless foot control are
ready for operation.
1. Choose in main home screen the item "Settings".
2. Choose there the item "Activation device".
3. Choose the "Wireless registration".
4. Follow the instructions on the screen and press first the foot switch
for three seconds.
5. After this press the registration key on the top of the wireless foot
control radio box for three seconds.
After this the device shows a mac address of the pedal and ask
to confirm the pairing within 20 sec.
Confirmation via 'OK'.
6. To use the wireless foot control, choose in submenu "Settings" in
"Activation device" the wireless foot control.
NOTICE
The foot switch has an IPX5 degree of protection. Therefore this foot
switch must not be used in hospital operating rooms.
NOTICE
The finger switch is pre-set.
Page 35

65 40 863 D3648
D3648.201.01.02.02 10.2015
35
Sirona Dental Systems GmbH 4Installation
Operating Instructions SIROLaser Blue 4.4Initial start-up – procedure for proper assembly
bеЦдблЬ
4.4.4 Install remote interlock – optional
Explanation
The interlock is a safety device that stops laser radiation whenever the
door of the treatment room is opened. The interlock circuit must be
connected to a switch that is located near the door of the treatment room
in order to ensure automatic interruption of the laser emission.
Installation of an interlock with door switch
1. Prepare the interlock plug by connecting the interlock cable with the
interlock plug and by opening the bridge. Please find the technical
data sheet with circuit diagram for the installation of the interlock
circuit in "Appendix C – Safety circuit (interlock) [ → 78]".
2. Mount the prepared interlock plug into the interlock socket on the
backside of the SIROLaser Blue.
NOTICE
The installation must be performed by a qualified electrician who is also
responsible for the installation and maintenance of the electrical system
to which the SIROLaser Blue is connected.
NOTICE
Additional or different safety precautions required by the applicable
national or local regulations for the protection of dentists, assistant
personnel, or patients must also be observed.
Page 36

65 40 863 D3648
36 D3648.201.01.02.02 10.2015
5Operation Sirona Dental Systems GmbH
5.1Start the device for the first time Operating Instructions SIROLaser Blue
5
Operation
5.1
Start the device for the first time
Battery included
Battery state
Information concerning the remaining battery power
Connected/charging battery
Battery is connected to power supply and charging
Activate Laser
Laser is being activated
Back
User goes back one screen
Home
User goes directly back to home screen
OK
User agrees to settings, confirms and activates action
Save
Settings of application will be saved in My Applications
Delete
Settings of application will be deleted from My Applications. Defined
users will be deleted from the user list.
Continuous wave
Laser is being set for continuous wave mode
C (clear button)
User clears letters or digits (going backwards)
Help menu
Help
User wants to open additional help information to this application
'Plus' and 'Minus'
User is able to count up and down respectively can move cursor to the
right or left side
'Forward' and 'Backward'
User is able to scroll forward and backwards (if there is more than one
page of this screen)
User Change
Change the user by entering the password dialog
Settings
User is able to do all the necessary settings, e.g. language settings
NOTICE
Touch screen functionality: When the touch screen is touched by the
finger the touch field is highlighted. As soon as the finger leaves the
touch screen the action will be started.
Page 37
65 40 863 D3648
D3648.201.01.02.02 10.2015
37
Sirona Dental Systems GmbH 5Operation
Operating Instructions SIROLaser Blue 5.1Start the device for the first time
bеЦдблЬ
All applications
User is able to select an application from all applications or to define an
own application
Up to 10kHz Blue
NOTICE
Alphabetic and numeric letters, limitation to data input:
• Numbers are displayed with English decimals '.' for all languages/
regions.
• The power for 445 nm and 970 nm is displayed with one decimal place.
Unit is watt (W).
• The power for 660 nm is displayed with no decimal place. Unit is
milliwatt (mW).
• The time can be set-up as continuous or 1 to 9999 seconds. If
continuous is selected it counts up to maximum 9999 seconds after
activating application. If time is fixed it counts down. Unit is seconds (s).
If 9999 is exceeded treatment will stop and display jumps back to
treatment screen.
• The duty cycle is displayed in 1% steps, from 1% to 100% without unit.
100% is displayed as CW.
• The frequency can be entered by typing in the numbers or by moving
higher or lower by using 'plus' or 'minus'. If using 'plus' or 'minus' the
frequency will be set from 1 Hz -10 Hz in increments of 1 Hz, from 10 Hz
-100 Hz in increments of 10 Hz, from 100 Hz -1 kHz in increments of
100 Hz and from 1 kHz -10 kHz in increments of 1 kHz. If 0 Hz is set,
CW is displayed. Unit is hertz (Hz).
• Between 1 kHz -10 kHz the duty cycle cannot be below 10% and
above 90% due to physical limits. So, at 1 kHz -10 kHz any input below
10% will automatically be displayed and used as 10% for the treatment
as well as any input above 90% will automatically turn into 90%.
• The average power will automatically be calculated and displayed with
one decimal place for 445 nm and 970 nm, with no decimal place for
660 nm. Unit is watt (W) for 445 nm and 970 nm, milliwatt (mW) for
660 nm.
Clear screen before entering new parameters or data. Existing entries
will not be overwritten.
Newly generated applications or changed parameters of preset
applications will appear in red.
Page 38

65 40 863 D3648
38 D3648.201.01.02.02 10.2015
5Operation Sirona Dental Systems GmbH
5.2Switch on/off power Operating Instructions SIROLaser Blue
5.2
Switch on/off power
Switch on the laser device
After starting the SIROLaser Blue by switching on the on/off button on the
backside of the control unit the LEDs will blink.
While the SIROLaser Blue is booting information about the software
version and the set language as well as the advice to read the user
manual will be displayed.
Language, date & time Blue
When starting the SIROLaser Blue for the very first time you will
automatically be asked to set-up the unit. Please proceed as requested:
1. Language
Choose your language and press 'OK '. See also chapter
"Language [ → 52]".
2. Date & time
Please enter the appropriate date & time and press 'OK'. See also
chapter "Date & time [ → 47]".
Switch off the laser device
To switch off the laser device press the on/off button on the backside of
the control unit. The unit will ask you then to confirm switching off by
pressing the “OK“ button on the screen.
In any unpredicted case, the laser device can be also switched off by
pressing the on/off button on the backside of the control unit longer than
5 seconds.
Laser stop In case of emergency press the laser stop button. Note, that the laser is
interrupted and deactivated, but not switched off. If you want to continue,
enter the pin code
IMPORTANT
In some cases when the laser has been switched off for a longer time, it
may be necessary to press the on/off button two times to start the unit.
NOTICE
After switching off the laser device, it is not possible to immediately
restart the unit due to the shutdown off the unit. Please wait a few
seconds until the shutdown is completed.
WARNING
The laser main switch does not disconnect the battery loading circuit,i.e.
the batteries are loaded even if the laser is switched off.
Page 39

65 40 863 D3648
D3648.201.01.02.02 10.2015
39
Sirona Dental Systems GmbH 5Operation
Operating Instructions SIROLaser Blue 5.3Enter pin code
bеЦдблЬ
5.3
Enter pin code
The SIROLaser Blue may be operated only by authorized personnel and
has an electronic key for security purposes.
Codes changeable
➢ Enter the key user pin code 2974.
The unit automatically jumps into the home screen, if the correct pin
code has been entered.
This pin code is changeable in the settings menu.
5.4
Sleep Mode
After 10 minutes, the unit falls into the sleep mode. During the sleep
mode, the LEDs are blinking blue. After touching the display, the unit will
immediately wake up and jumps into the password screen.
5.5
Main home screen
Favorites included
The following section describes the main home screen. The main home
screen includes the following options and information:
● Favorites
Use, define or change six favorite applications directly on the home
screen.
● All applications
After opening the submenu, you will be able to select among different
indications with preset treatment parameters out of the areas:
Surgery, Periodontology, Endodontics, Soft Laser Therapy,
Miscellaneous, and My Applications. All submenus are structured the
same way.
● Settings
Within this submenu you will be able to configure the SIROLaser Blue
to your needs as well as you will find all necessary settings and
service programs.
● User Change
By pressing the 'user change button' you will jump back to the screen
'enter pin code'.
● Self Test
After booting the SIROLaser Blue will automatically perform a self
test. The information will be shown in the main home screen.
WARNING
Do not give the access code to unauthorized third parties. Risk of
misuse of the laser by unauthorized persons!
NOTICE
In case the key user forgets his/her pin code please enter the super pin
code 2877. The super pin code is never changeable.
Page 40

65 40 863 D3648
40 D3648.201.01.02.02 10.2015
5Operation Sirona Dental Systems GmbH
5.5Main home screen Operating Instructions SIROLaser Blue
5.5.1 Self Test
After booting the SIROLaser Blue will automatically perform a self test
including a status check of the following matters:
Self Test screen with foot control
● Wireless foot control vs. finger switch
● USB port
In addition, you will be informed when the next calibration check or when
the next servicing is due.
The statuses are displayed on the home screen.
Self Test of the foot control
Foot control
If the wireless foot control is selected in the settings the self test may
result in:
The wireless foot control is selected and the appropriate symbol for foot
control will be displayed on the home screen confirming selected.
If the wireless foot control is not selected the appropriate symbol for foot
control will not be displayed on the home screen.
Finger switch
With Foot control
If the finger switch is selected in settings the self test may result into:
The finger switch is connected and the appropriate symbol for finger
switch will be displayed on the home screen confirming checked and
selected.
If the finger switch is not selected the appropriate symbol for finger switch
will not be displayed on the home screen.
NOTICE
If the wireless foot control is selected but not detected, please perform
the registry of the wireless foot control and/or check the battery, see
chapter "Install wireless foot control – optional [ → 34]".
If the wireless foot control remains not selectable please contact your
local dental dealer or an authorized Customer Service Department for
technical support.
NOTICE
If the finger switch is defective/missing the unit shows an error message
after booting. In this case please check the cable connection to the
SIROLaser Blue control unit, see chapter "Troubleshooting of simple
defects". If the finger switch remains defective/missing, please contact
your local dental dealer or an authorized Customer Service Department
for technical support.
In general: If any switch is defective laser will be blocked.
Page 41
65 40 863 D3648
D3648.201.01.02.02 10.2015
41
Sirona Dental Systems GmbH 5Operation
Operating Instructions SIROLaser Blue 5.5Main home screen
bеЦдблЬ
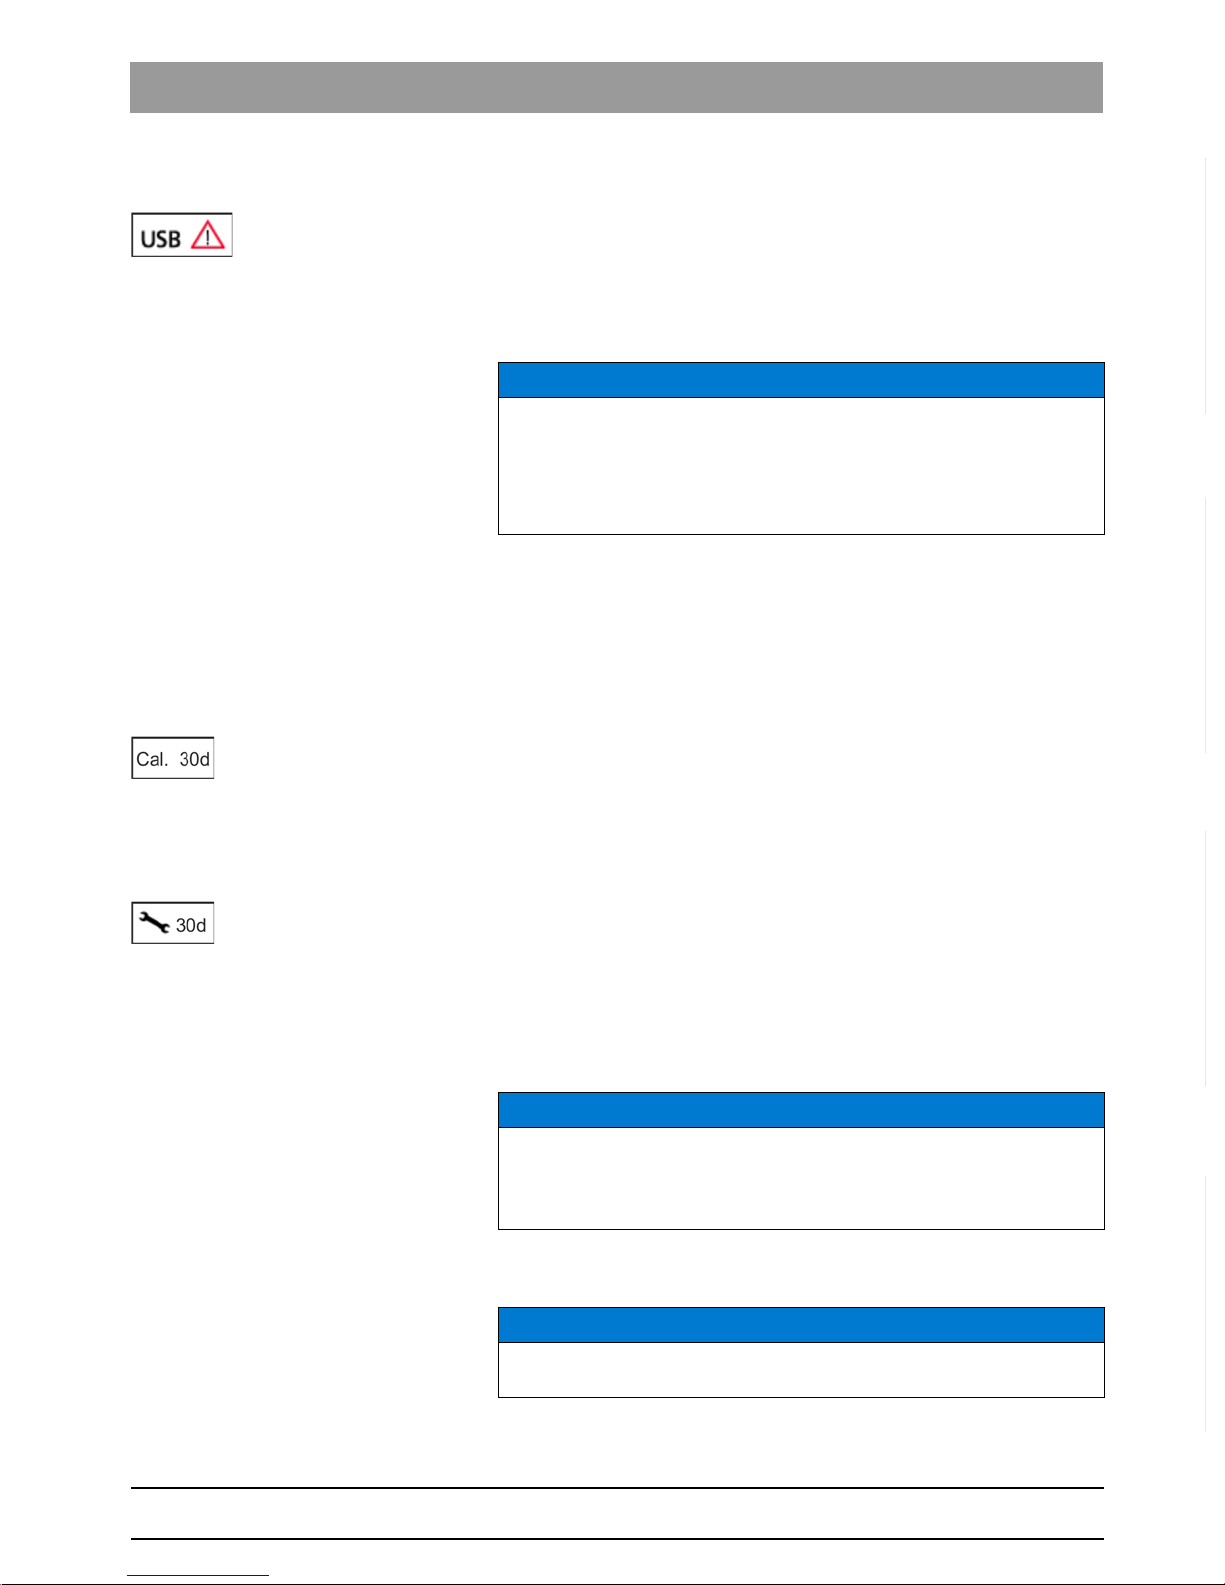
USB port
To make sure that the USB port is available it is checked within the self
test.
If the appropriate symbol for USB port error is not displayed on the home
screen, the USB port works properly.
If the symbol is displayed on the home screen, the USB port is defective.
With history file
Calibration check
Powermeter, Sirona
Sirona Dental Systems recommends a calibration check with external
powermeter to be performed every twelve months, see chapter
"Calibration check using an external power meter [ → 51]".
The information for 'next calibration check' is only displayed on the home
screen for the first time after restart or log-in (in month).
For the last 30 days it is displayed continuously on the home screen. After
excess of the service interval the days are displayed with a minus [-] and
red coloured.
The laser remains fully functional.
Time to service
The safety test is a mandatory test for all medical devices. The
SIROLaser Blue needs to be tested once every two years.
The information for 'time to service' is only displayed on the home screen
for the first time after restart or log-in (in month).
For the last 30 days it is displayed continuously on the home screen. After
excess of the service interval the days are displayed with a minus [-] and
red coloured. The laser remains fully functional.
If internal or external calibration check failed after last calibration a
warning screen pops up after self test. The laser remains fully functional.
NOTICE
If the USB port error is displayed on the home screen for defective
please contact your local dental dealer or an authorized Customer
Service Department for technical support.
The SIROLaser Blue will remain functional but the download of the
history file / software updates are not possible.
NOTICE
Legal regulations require a regular safety test of the performance of a
laser device. The SIROLaser Blue needs to be tested once every two
years. Please contact your local dental dealer or an authorized
Customer Service Department for technical support.
NOTICE
Please contact your local dental dealer or an authorized Customer
Service Department for technical support.
Page 42

65 40 863 D3648
42 D3648.201.01.02.02 10.2015
5Operation Sirona Dental Systems GmbH
5.5Main home screen Operating Instructions SIROLaser Blue
5.5.2 Favorites
Six applications from pre-set applications within the preset submenus
Surgery, Periodontology, Endodontics, Miscellaneous and Soft Laser
Therapy or self-defined applications from My Applications can be defined
as favorite applications directly accessible from the home screen. Four
favorites are already pre-selected at delivery but can be changed.
New favorite SiroLaser Blue
➢ To assign an application as favorite to a not yet assigned favorite
button, please press the particular favorite button until the screen
automatically jumps into the screen “All Applications“.
➢ If a favorite button is already assigned to an application, please press
the favorite button until the screen automatically jumps into the
screen “All Applications“.
You will be now able to select one application from the different
submenus as the new favorite: Surgery, Periodontology,
Endodontics, Miscellaneous, Soft Laser Therapy and My
Applications.
5.5.3 Submenu: All applications
The submenus of the surgery, periodontology, endodontics, soft laser
therapy and miscellaneous areas as well as the area of own applications
are arranged in the same way. After opening the submenus, you can
select among different indications with preset treatment parameters.
Surgery
● Abscess
● Epulis
● Fibroma
● Frenectomy
● Gingivectomy
● Gingivoplastic
● Implant Uncovery
● Incisions/Excisions
● Operculectomy
● Gingival Troughing
Periodontology
● Periimplantitis (Germ Reduction)
● Perio. Germ Reduction
Endodontics
● Endo. Germ Reduction
● Pulpotomy
● Gangrene Germ Reduction
Page 43

65 40 863 D3648
D3648.201.01.02.02 10.2015
43
Sirona Dental Systems GmbH 5Operation
Operating Instructions SIROLaser Blue 5.5Main home screen
bеЦдблЬ
Soft Laser Therapy
● Burning mouth-syndrome
● Dentin hypersensitivity
● Wound healing
Miscellaneous
● Haemostasis
● Aphthous Ulcers
● Desensitization
● Herpes
My applications
● for 24 own applications
Settings in submenus
Putting the laser in ready mode
1. Select the desired indication.
The pre-set parameters will be displayed.
2. Now you can activate the laser: Press the 'Activate Laser' button.
You will be advised to wear the correct protective goggles before
the aiming beam is activated.
3. Acknowledging the advice.
The green LEDs start flashing. After a delay of 2 seconds, the
aiming beam is switched on.
The laser is now ready for operation.
WARNING
Check the set parameters before activating the treatment.
NOTICE
Please do not press the finger switch or foot switch during the 2 seconds
of laser activation before being in ready mode to avoid an error
message.
WARNING
All persons present in the room (operator, assistants and patient) must
wear the proper laser protective goggles as soon as it is advised to wear
laser protective goggles and whenever the green LEDs are lit.
Any actuation of the finger or wireless foot control activates the laser
unit.
Wrong settings may result in severe damage of the patient's soft or hard
tissue or may result in no treatment efficacy. So any user is supposed to
have sufficient knowledge and training in laser therapy.
The treatment room must be protected by suitable measures (in
compliance with IEC 60825-1), e.g. by closing the doors.
Page 44
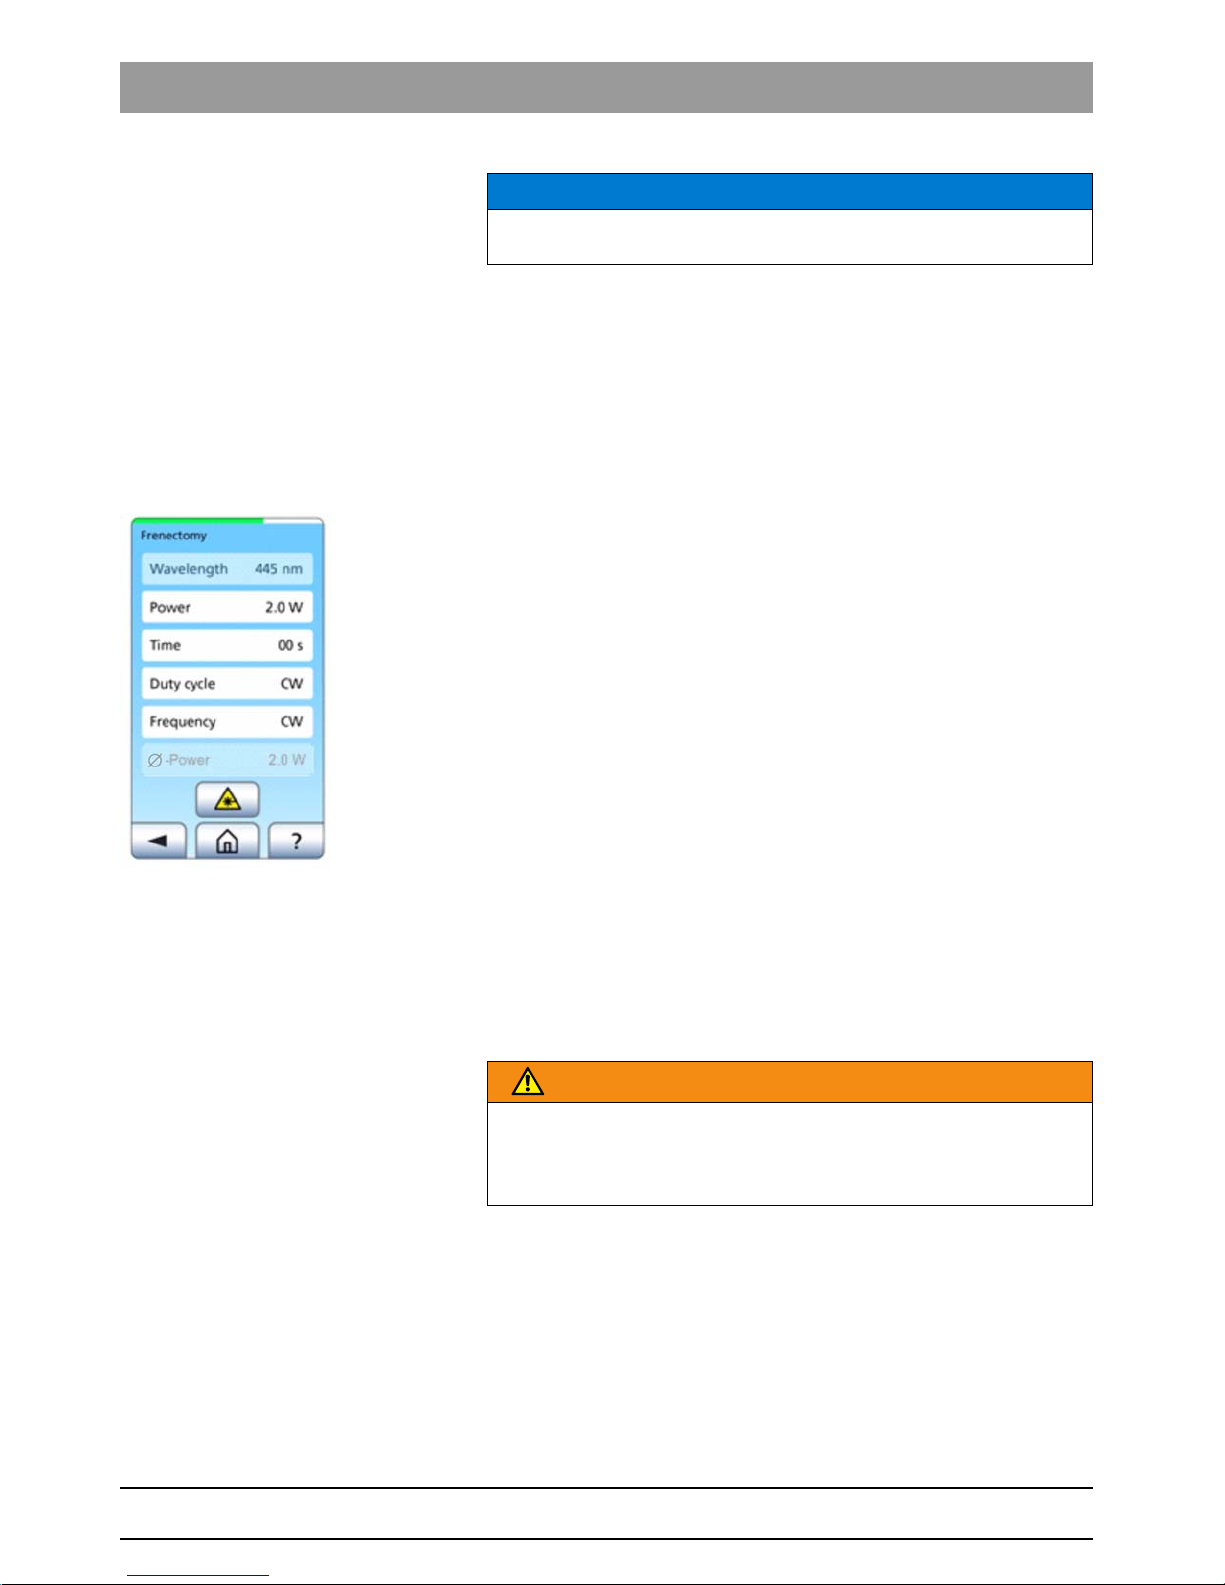
65 40 863 D3648
44 D3648.201.01.02.02 10.2015
5Operation Sirona Dental Systems GmbH
5.5Main home screen Operating Instructions SIROLaser Blue
When you activate the finger or wireless foot control, the laser begins
emitting. At the same time, two yellow LEDs at the upper right and left end
of the SIROLaser Blue control unit light up as well as the laser active bar
on the touch screen and the audible alarm sounds. When you release the
finger or wireless foot control to interrupt treatment, the laser is
deactivated, but remains ready for operation.
The following is a typical example of a treatment submenu.
1. Selected program
in this example Frenectomy
2. Laser power
2.0 W Blue
in our example, 2.0 W power. By pushing on the power touch field you will
be transferred to another screen where you will be able to adjust the
emitted power between 0.2 W and 3.0 W in 0.1 W increments either by
typing in the numbers or by moving higher or lower by using 'plus' or
'minus'.
3. Time
in our example, continuous. The laser will be activated as long as the
finger or wireless foot control is pressed. By pushing on the time touch
field you will be transferred to another screen where you will be able to
adjust the time between continuous or 1 to 9999 seconds either by typing
in the numbers or by moving higher or lower by using 'plus' or 'minus'.
NOTICE
Before starting a laser treatment in battery operation please reconfirm
the battery status.
WARNING
The preset power levels are considered to be safe for patients.
Increasing the power levels entails the risk of overheating the patient's
soft or hard tissue. Setting the power to excessively low levels may
result in reduced treatment efficacy.
Page 45

65 40 863 D3648
D3648.201.01.02.02 10.2015
45
Sirona Dental Systems GmbH 5Operation
Operating Instructions SIROLaser Blue 5.5Main home screen
bеЦдблЬ
4. Duty cycle
in our example, CW (continuous wave mode). The duty cycle is defined
as the ratio between the pulse duration (when the laser beam is actually
activated) and the total period of time (which is the time from the
beginning of a pulse to the beginning of the next pulse). By pushing on
the duty cycle touch field you will be transferred to another screen where
you will be able to adjust the duty cycle between 10% and 90% by typing
in the numbers or by moving higher or lower by using 'plus' or 'minus'.
5. Frequency
in our example, CW (continuous wave mode). This is the modulation
frequency of the laser unit. By pushing frequency touch screen you will be
transferred to another screen where you will be able to enter the laser
operation mode. For more informations about the operation modes, see
chapter "Laser operation modes [ → 17]".
Continuous wave
When pushing the ’CW’ button the continuous wave mode is set and in
the control field appears "CW". Via ’OK’ you will be proceeded back to the
treatment submenu in which you can further adjust the power and time.
6. Average power
2W Blue
in our example, 2 W (watt). The system calculates the average power (in
W) from the power values and the selected duty cycle.
Further more the example here shows:
7. Home button
By pushing the home button you will jump directly to the home screen.
8. Back button
By pushing the back button you will jump back one screen.
9. Help button
By pushing the 'help' button the help menu will be opened and you can
read additional information about this treatment.
10. Laser button
By pushing the 'Activate Laser' button the laser will be made ready for
operation.
NOTICE
If the frequency is set CW the duty cycle will not be changeable.
Page 46

65 40 863 D3648
46 D3648.201.01.02.02 10.2015
5Operation Sirona Dental Systems GmbH
5.5Main home screen Operating Instructions SIROLaser Blue
5.5.3.1
My Applications
24 applications
Up to 24 applications can be generated and saved to My Applications.
With presets
1. If you press on the My Applications screen the 'plus' button a blank
input mask is opened.
2. Name the new application by touching the field ‘name‘.
A keyboard field is shown.
3. Confirm your text input with 'OK'.
The keyboard field is hidden.
4. Enter your desired parameters.
5. The new input will be confirmed by pressing the 'OK' button.
Selected application can be deleted from My Applications by pressing the
'delete' button.
5.5.3.2
Settings
After pressing the ‚settings‘ button on the home screen, the screen jumps
into the settings menu
5.5.3.2.1 Activation device
In case you have purchased your SIROLaser Blue with the optional
wireless foot control you have the choice to use either the finger switch or
the wireless foot control. Select one and confirm by pressing 'OK'.
NOTICE
If My Applications are full and you try to add another application a
warning screen will signal to remove another application from My
Applications else the chosen application cannot be saved to My
Applications.
WARNING
Wrong settings may result in severe damage of the patient's soft or hard
tissue or may result in no treatment efficacy. So any user is supposed to
have sufficient knowledge and training of laser therapy.
NOTICE
The finger switch is pre-set.
To be able to use the wireless foot control please see chapter "Install
wireless foot control – optional [ → 34]" for further instructions.
Page 47

65 40 863 D3648
D3648.201.01.02.02 10.2015
47
Sirona Dental Systems GmbH 5Operation
Operating Instructions SIROLaser Blue 5.5Main home screen
bеЦдблЬ
It is also possible to check the functionality of the finger switch and the
foot control (only if it is registered) in this menu:
➢ Press the finger switch or the foot control.
If the pressed activation device works properly, the unit indicates it by
beeping of the warning sound. No laser beam is activated during this
functionality check.
5.5.3.2.2 Date & time
Format for date: dd/mm/yyyy
Format for time (24hours notation): hh/mm
➢ Enter date & time and save by pressing 'OK'.
5.5.3.2.3 Sound volume and display settings
Sound volume
1. Select volume level of warning sound and push button sound by
using 'plus' or 'minus'.
Level of warning and push button sound will immediately be
applied.
2. Save with 'OK'.
Display settings
1. Select level of display brightness by using 'plus' or 'minus'.
Level of display brightness will immediately be applied.
2. Save with 'OK'.
5.5.3.2.4 User management
When entering the user parameters menu, the key user is already
configured, similar to a computer administrator. This administrator has
the possibility to enter five additional users (via 'plus' button).
If key user presses the 'new' button on user parameters screen a blank
file is opened.
➢ To enter the name, pin code and other settings of the new user press
the appropriate buttons.
NOTICE
The set-up of the key user is fixed and not changeable, but it is possible
to give him a user name (e.g. SMITH instead key user) and to change
the pin code 2974.
The key user is the administrator of the SIROLaser Blue and has all
rights to create and configurate five new users as well as to remove
them from the list of users.
The additional users will have access only to limited parts of the settings:
Language, display setting, sound volume, history file, finger or foot
switch, battery calibration.
The configuration for the selection finger or foot switch, and the screen
and volume settings are not stored individually.
Page 48
65 40 863 D3648
48 D3648.201.01.02.02 10.2015
5Operation Sirona Dental Systems GmbH
5.5Main home screen Operating Instructions SIROLaser Blue
The key user decides if this user will be allowed to change preset
applications.
The key user decides if this user will have a power limit for treatments. If
yes is entered the key user also enters the power limit in watt.
The key user is able to select the applications this user is allowed to use.
5.5.3.2.5 Software update
If a software update of the SIROLaser Blue is needed please proceed as
follows:
1. Choose in main menu the item "Settings".
2. Choose there the item "Software update".
3. Follow the instructions in the note message and insert the USB stick.
The message "updating software..." and an hour glass appears
which indicates that the software update is in progress.
After this, the unit automatically reboots with the 2 LEDs lighting
orange and a white screen.
NOTICE
If 'no' is entered there will be no My Applications screen for this user.
NOTICE
The power limit directly influences the number of applications that can
be used by this user.
For example, when you choose a power limit of 2 W the user can not
choose preset indication with more than 2 W. If the power limit 0.5 W
(default) so the user has no access to preset indications.
NOTICE
The non-usable applications due to the direct selection or the power limit
appear shaded and are disabled.
CAUTION
Use a USB class 2.0 (or above) memory stick.
To perform the software download use a USB stick with a minimum
capacity of 512 MB.
Specify the USB configuration that is FAT32 and NTFS.
NOTICE
Please bear in mind that the system requires approx. 5 seconds to
detect the USB stick.
CAUTION
Leave the USB stick and the power cable plugged in until the completion
of software update.
The Software update may take up to five minutes.
Page 49

65 40 863 D3648
D3648.201.01.02.02 10.2015
49
Sirona Dental Systems GmbH 5Operation
Operating Instructions SIROLaser Blue 5.5Main home screen
bеЦдблЬ
4. Enter the pin code.
The software update was successfully performed. The USB stick
can be removed.
5.5.3.2.6 History file
After having finished a treatment all parameters will be saved and
documented in the history file - i.e. user name, application, date & time as
well as power, laser activation time, energy, and average power of this
treatment.
➢ To download the history file please insert an USB mass storage and
press the 'save' button.
Proceed as instructed on the screen.
5.5.3.2.7 Battery calibration
For perfect battery performance a battery calibration must be proceeded
in any case of having removed and again mounted or completely
replaced the battery pack, see chapter "Replacing the rechargeable
battery of the control unit [ → 67]".
1. Switch on the laser without having connected the power supply.
2. Choose "Battery calibration" in the settings menu.
The following message will appear. "Battery calibration may take
several hours."
3. Press 'OK'.
The battery will now be discharged automatically until the device
switches off due to lack of power.
4. When the device has been switched off automatically plug in the
power supply and charge the battery for at least 2 hours (best over
night).
Now the battery is calibrated.
NOTICE
A maximum of 50 treatments is possible to be stored. If the maximum is
reached the 51st treatment will replace the 1st treatment.
When downloading the history file the data of this user will be deleted
from the control unit.
CAUTION
Use only USB Class 2.0 memory sticks.
To perform the download of the history files use a USB stick with a
minimum capacity of 512 MB.
Page 50

65 40 863 D3648
50 D3648.201.01.02.02 10.2015
5Operation Sirona Dental Systems GmbH
5.5Main home screen Operating Instructions SIROLaser Blue
5.5.3.2.8 Laser calibration check
The following section describes the procedure to check the calibration of
the SIROLaser Blue.
We recommend performing this check at least once a week.
Up to 7 W
In order to enable exact inspection of the performance and flawless
functioning of your SIROLaser Blue, we recommend performing
calibration check at the following different stages:
●1W (445nm)
●1W (970nm)
● 100 mW (660 nm)
The SIROLaser Blue performs a self-calibration. During this procedure,
the system checks that the laser emission parameters are correct. We
recommend that you check these values using a suitable external
measuring instrument at least every twelve months. If the measurement
readings indicate the following values, the calibration is correct:
● wavelength: 445 ±5 nm
power: 1 W
resolution: 5 % or higher
● wavelength: 970 -10/+15 nm
power: 1 W
resolution: 5 % or higher
● wavelength: 660 ±5 nm
power: 100 mW
resolution: 5 % or higher
Select one of two test procedures to check the calibration:
5.5.3.2.8.1 Calibration check without an external power meter
➢ Select w/o power meter.
Please read the operating instructions and wear protection goggles
before proceeding the calibration check.
Now the calibration check starts! Direct the correctly mounted handpiece
with correctly installed fiber to a beam dump, i.e. a non flammable object
which does not reflect the laser beam.
WARNING
You must wear the supplied laser protective goggles during the entire
calibration check.
WARNING
The calibration check takes place with laser power. Danger for skin and
eyes!
Do not direct the laser beam to flammable objects or use the laser with
flammable substances or gases around.
Do not direct the laser to reflective (metallic) surfaces. Danger for skin
and eyes!
Page 51
65 40 863 D3648
D3648.201.01.02.02 10.2015
51
Sirona Dental Systems GmbH 5Operation
Operating Instructions SIROLaser Blue 5.5Main home screen
bеЦдблЬ
The menu asks you to press the finger switch for 3 seconds.
Up to 7W
1. Press the finger switch for at least 3 seconds, the laser will stop
emission automatically.
2. Press 'OK'.
3. Repeat the procedure for all wavelengths.
For each value the device compares the delivered current with the
calibration value. If the value is inside the tolerance, the test is passed. If
the tolerance is out of the tolerance, the test is stopped.
If the calibration check is passed successfully, the message "Calibration
Test passed" will appear.
➢ Acknowledge with 'OK'.
If the laser shows an error message, please contact your local service.
5.5.3.2.8.2 Calibration check using an external power meter
Required power meter: Calibrated power meter capable of measuring a
power level of at least 1 watt at a wavelength of 445 nm and 970 nm and
100 mW at a wavelength of 660 nm with an accuracy of better than 10%.
➢ Select with external power meter.
Please read the operating instructions and wear protection goggles
before proceeding the calibration check.
Now the calibration check starts! Direct the correctly mounted handpiece
with correctly installed fiber to the head of your power meter.
The menu asks you to press the finger switch for 3 seconds.
Up to 7W
1. For each value the device asks to perform a measure and indicate if
the visualized value is inside the tolerance (value -20% / value
+20%).
2. Press the finger switch for at least 3 seconds, while directing the laser
to the head of the power meter.
3. Readout the measured power from the display of your power meter.
4. The unit will ask you whether the measured value is inside the
tolerance of ±20%. Press 'Yes' on the screen if the measured value
is inside the tolerance of ±20% Press `No` if it is outside the
tolerance.
5. Repeat the procedure for all wavelengths.
WARNING
The calibration check takes place with laser power. Danger for skin and
eyes!
Do not direct the laser beam to flammable objects or use the laser with
flammable substances or gases around.
Do not direct the laser to reflective (metallic) surfaces. Danger for skin
and eyes!
Page 52

65 40 863 D3648
52 D3648.201.01.02.02 10.2015
5Operation Sirona Dental Systems GmbH
5.5Main home screen Operating Instructions SIROLaser Blue
If the calibration check is passed successfully, the message "Calibration
Test passed" will appear.
➢ Acknowledge with 'OK'.
If the laser shows an error message, please contact your local service.
5.5.3.2.9 Language
➢ You have the choice of different languages. The currently set
language is greyed out. Select one and confirm by pressing 'OK'.
Language will be applied after confirmation.
5.5.3.2.10 Service Menu
NOTICE
The language will be changed for all users.
NOTICE
Only authorized persons are allowed to enter the service menu. To
avoid misuse it is necessary to enter the eight-digit pin code.
Page 53

65 40 863 D3648
D3648.201.01.02.02 10.2015
53
Sirona Dental Systems GmbH 5Operation
Operating Instructions SIROLaser Blue 5.5Main home screen
bеЦдблЬ
5.5.4 Error messages, warnings and instructions
5.5.4.1
Error messages and warnings
SIROLaser Blue
Pin not correct
Confirmation via ‘OK’ to
insert the pin code again.
The screen is displayed in
case of anomaly. It avoids
hazardous situation
resulting from failure of the
it-network: downgrade not
allowed or corrupted
package.
Confirmation via ‘OK’.
Before battery calibration
this screen is displayed.
‘OK’ for confirmation,
‘arrow’ to go back to the
current screen. No action
occurs.
A message warns the user
about the missing USB.
Please plug a suitable USB
device (Version 2.0) into the
slot.
Confirmation via ‘OK’.
Visualization of "Laser not
calibrated" if the calibration
test was not successful.
Confirmation via ‘OK’.
Displayed in case when
temperature sensor of the
laser module is
defective.Please contact
Sirona Dental Systems
GmbH, your local dental
dealer or your authorized
service center.
Confirmation via ‘OK’.
Displayed in case when the
laser stop button has been
pressed.
Confirmation via ‘OK’.
Displayed in case of an
error of the foot switch.
Please contact Sirona
Dental Systems GmbH,
your local dental dealer or
your authorized service
center.
Confirmation via ‘OK’.
Page 54

65 40 863 D3648
54 D3648.201.01.02.02 10.2015
5Operation Sirona Dental Systems GmbH
5.5Main home screen Operating Instructions SIROLaser Blue
Displayed in case of an
error of the finger switch.
Please contact Sirona
Dental Systems GmbH,
your local dental dealer or
your authorized service
center.
Confirmation via ‘OK’.
Displayed in case when an
error of the fan occurs (for
example: the fan is
blocked).
To avoid damage please
switch of the SIROLaser
Blue and let it cool down for
a while. See chapter
"Troubleshooting of simple
defects [ → 65]".
Confirmation via ‘OK’.
Displayed in case when the
interlock contact is open.
See chapter
"Troubleshooting of simple
defects [ → 65]".
Displayed in case when the
currents of the diode differ
more than the 20 percent
tolerance compared to the
calibrated currents.
Please contact Sirona
Dental Systems GmbH,
your local dental dealer or
your authorized service
center.
Confirmation via ‘OK’.
Displayed in case when
there is no fiber connection.
See chapter
"Troubleshooting of simple
defects [ → 65]".
Confirmation via ‘OK’.
The battery level is low and
needs to be connected to
the power supply.
Confirmation via ‘OK’.
Device error occurred.
Please contact Sirona
Dental Systems GmbH,
your local dental dealer or
your authorized service
center.
Confirmation via ‘OK’.
An error occurred during
calibration check (with or
without power meter) which
could not be handled.
Please contact Sirona
Dental Systems GmbH,
your local dental dealer or
your authorized service
center.
Confirmation via 'OK'.
Page 55

65 40 863 D3648
D3648.201.01.02.02 10.2015
55
Sirona Dental Systems GmbH 5Operation
Operating Instructions SIROLaser Blue 5.5Main home screen
bеЦдблЬ
5.5.4.2
Instructions
SIROLaser Blue
The screen describes how
to perform the pairing
process of the wireless foot
switch.
The device asks to remove
the power supply before
starting battery calibration.
Confirmation via ‘OK’
The device asks to insert
the USB device for
downloading the history file
(USB 2.0, min. 512MB
storage capacity).
‘OK’ for confirmation,
‘arrow’ to go back to the
current screen. No action
occurs.
The device asks to use the
protective goggles.
‘OK’ for confirmation,
‘arrow’ to come back to the
current screen. No action
occurs.
Displayed in case of
overheating of the laser
block. It is requested to wait
for cooling.
Confirmation via ‘OK’
Release the used activation
device: footswitch or finger
switch
Displayed when footswitch
or finger switch is pressed
before the laser is in ‘ready
mode‘ (complete green
bar).
Confirmation via ‘OK’.
The MultiTip must be used.
Confirmation via ‘OK’ to
insert the pin code again.
To perform any calibration
check it is advised to read
the user manual carefully.
Confirmation via 'OK',
‘arrow’ to go back to the
current screen. No action
occurs.
Page 56

65 40 863 D3648
56 D3648.201.01.02.02 10.2015
5Operation Sirona Dental Systems GmbH
5.5Main home screen Operating Instructions SIROLaser Blue
5.5.4.3
Information messages
SIROLaser Blue
The unit asks to press finger
switch for three seconds.
This screen is displayed
during laser calibration for
the calibration process
(without power meter)
Confirmation via ‘OK’
The unit asks to direct the
laser beam to the power
meter and to press the
finger switch for three
seconds. This screen is
displayed during laser
calibration for the
calibration process (with
power meter).
The operator presses ‘Yes’
or ‘No’ if the measured
value in inside the stated
value or not.
The screen occurs when
the battery level is low and
the external power supply is
not connected.
The device displays the
information that the battery
charge is sufficient only for
180sec of treatment (with
max power) and
recommend to connect the
power supply.
The calibration check was
successfully performed.
Confirmation via 'OK'.
Page 57

65 40 863 D3648
D3648.201.01.02.02 10.2015
57
Sirona Dental Systems GmbH 6Indications, contraindications and medical precautions
Operating Instructions SIROLaser Blue 6.1Indications
bеЦдблЬ
6
Indications, contraindications and medical
precautions
6.1
Indications
Compared to conventional dental surgery, treatment with the SIROLaser
Blue offers the following advantages: less invasive, minimum cell
destruction, less bleeding, better coagulation, and negligible postoperative edema. Treatment with the laser is low-pain and not pain-free.
We recommend using anesthetics if necessary. The SIROLaser Blue
may be operated only by trained and qualified personnel.
6.2
List of preset indications
Application Used
wavel
ength
[nm]
Power Mo-
dus
Duty
Cycle
[%]
Frequenz
y
[Hz]
Time
[s]
Fiber Help Menu
Surgery
Abscess 445 2,0W CW 320µm Point directly with fiber towards the tissue
where the drainage canal is planned. Start
laser and perform the drainage.
Caution: Avoid bone contact during
treatment!
Epulis 445 2,0W CW 320µm Stretch the tissue and use laser tip like an
scalpel to excise the tissue.
Fibroma 445 2,0W CW 320µm Stretch the tissue and use laser tip like an
scalpel to excise the tissue. Depending on the
size of the fibroma energy can be adjusted
until desired cutting is achieved.
Frenectomy 445 2,0W CW 320µm Stretch the frenulum and stay in contact with
the fiber. Use brush stroke at the base to cut
through fibrous attachment.
Caution: For the tongue, protect the salivary
glands! Avoid bone contact during treatment!
Gingivectomy 445 2,0W CW 320µm Gently remove the gingival tissue in contact
with the fiber.
Caution: Work in parallel to the tooth surface!
Gingivoplastic 445 2,0W CW 320µm Gently shape the gingival tissue in contact
with the fiber.
Caution: Work parallel to the tooth surface!
Implant
Uncovery
445 2,0W CW 320µm Stretch the tissue and use laser tip like an
scalpel to excise the tissue.
Caution: Avoid contact to implant and bone!
Incisions/
Excisions
445 2,0W CW 320µm Stretch the tissue and use laser tip like an
scalpel to incise/excise the tissue.
Operculectomy 445 2,0W CW 320µm Stretch the tissue and use laser tip like an
scalpel to excise the tissue.
Page 58
65 40 863 D3648
58 D3648.201.01.02.02 10.2015
6Indications, contraindications and medical precautions Sirona Dental Systems GmbH
6.2List of preset indications Operating Instructions SIROLaser Blue
Gingival
Troughing
445 2,0W CW 320µm Gently shape the gingival tissue in contact
with the fiber.
Caution: Work parallel to the tooth surface!
Periodontology
Periimplantitis
(Germ
Reduction)
970 1,5W PF 50 12 320µm Move the fiber tip around the implant gently
up and down with a sinuous movement,
covering the wall of the tissue.
Caution: Keep the laser tip always in motion!
Perio. Germ
Reduction
970 1,5W PF 50 10 320µm Irradiate the whole pocket starting from the
deepest position using a meandering course
to cover all contaminated regions. Reduce
power, if pain sensations appear.
Endodontics
Endo. Germ
Reduction
970 1,5W PF 50 15 200µm
Endo
Carefully insert the fiber into the root canal,
ca. 1 mm from the apex, start laser and
retract fiber slowly in circular motion from the
canal (1-2 mm/s). Repeat procedure 4 times
in 5-seconds-intervals.
Caution: Do not stay at the apex after laser
activation!
Pulpotomy 970 2,0W PF 65 5 200µm
Endo
After conventional pulp removal, residual
pulp tissue can be removed with the laser.
Gangrene
Germ
Reduction
970 2,0W PF 65 20 200µm
Endo
Carefully insert the fiber into the root canal,
directly to the apex, start laser and after
maximum 2 seconds at the apex, retract fiber
slowly in circular motion from the canal (12 mm/s). Repeat procedure 4 times in 5seconds-intervals.
Caution: Stay maximum 2 seconds at the
apex after laser activation!
Soft Laser Therapy
Burning mouthsyndrome
660 50mW CW 10 8mm
(rod)
Move the light guide back and forth over the
area being treated so that the entire affected
region is covered. Use the power settings
provided for this application.
Dentin
hypersensitivity
660 25mW CW 160 8mm
(rod)
Move the light guide back and forth over the
whole dentine surface so that the entire
affected region is covered. Use the power
settings provided for this application.
Wound healing 660 25mW CW 120 8mm
(rod)
Move the light guide back and forth over the
area being treated so that the entire affected
region is covered. Use the power settings
provided for this application.
Application Used
wavel
ength
[nm]
Power Mo-
dus
Duty
Cycle
[%]
Frequenz
y
[Hz]
Time
[s]
Fiber Help Menu
Page 59

65 40 863 D3648
D3648.201.01.02.02 10.2015
59
Sirona Dental Systems GmbH 6Indications, contraindications and medical precautions
Operating Instructions SIROLaser Blue 6.3Further non-preset indications
bеЦдблЬ
6.3
Further non-preset indications
Further non-preset applic ations
Further non-preset applications which you may define individually and
medicate according to scientific publications in My Applications:
● Frenotomy
● Biopsy
● Laser assisted flap surgery
● Incisions and draining of abscesses
● Papillectomy
● Vestibuloplasty
● Excision of lesions
● Excision of hyperplasias
● Leukoplakia
● Crown lengthening
● Set hidden teeth free
Miscellaneous
Haemostasis 445 2,0W CW 320µm Stop the blood flow by moving the tip of the
laser over the affected tissue surface with
opened blood vessels. Avoid bone contact
during treatment!
Aphthous
Ulcers
970 2,0W PF 50 10 320µm Anesthetics not needed! Apply laser 1-3 mm
away from lesion for a few seconds semicontact, wave the laser fiber over the
entire lesion. Interrupt treatment briefly, if
pain sensations occurs.
Desensitization 970 1,0W CW 320µm Apply tin fluoride solution as described in
scientific diode-laser studies on the sensitive
tooth areas, apply laser 2-4 mm away from
these regions - semicontact, total time per
area: 60 seconds.
Caution: Avoid contact to dentine, keep laser
tip always in motion!
Herpes 970 2,0W PF 50 10 320µm Anesthetics not needed! Apply laser 1-3 mm
away from lesion for a few seconds semicontact, wave the laser fiber over the
entire lesion. Interrupt treatment briefly, if
pain sensations occurs.
Application Used
wavel
ength
[nm]
Power Mo-
dus
Duty
Cycle
[%]
Frequenz
y
[Hz]
Time
[s]
Fiber Help Menu
Page 60

65 40 863 D3648
60 D3648.201.01.02.02 10.2015
6Indications, contraindications and medical precautions Sirona Dental Systems GmbH
6.4Examples of treatment risk Operating Instructions SIROLaser Blue
6.4
Examples of treatment risk
Surgery area
Risk: Soft and hard tissue necrosis or overheating of the tooth.
Countermeasure: Use the laser beam like a scalpel, holding it
perpendicular to the surface under treatment, and never aim it at a single
point for a longer period of time. Do not select excessively high power
levels for the laser.
Endodontics area
Root canal germ reduction
Risk: Contractions in the apical region, small fusions and microfractures.
Countermeasure: Measure the depth and stop 1 mm above the root apex.
Never aim the optical fiber at a single point in the root apex for a longer
period of time. The optical fiber must be moved constantly during
treatment. Start in the apical region and work your way up to the crown.
Gangrenous canals
Risk: Contraction, fusion and bone necrosis.
Countermeasure: Measure the depth and stop 1 mm above the root apex.
Never aim the optical fiber at a single point in the root apex for a longer
period of time. The optical fiber must be moved constantly during
treatment. Start in the apical region and work your way up to the crown.
Periodontics area
Risk: Minor necrosis or scarring of the radicular area.
Countermeasure: When working in periodontal pockets, always aim the
laser parallel to, i.e. never perpendicular to, the roots. Run the distal end
of the optical fiber over the entire inner surface of the periodontal pocket.
6.5
Contraindications
All clinical procedures performed with the SIROLaser Blue must be
subjected to the same clinical judgment and care as with traditional
techniques. Patient risk must always be considered and fully understood
before clinical treatment. The clinician must completely understand the
patient’s medical history prior to treatment. Exercise caution for general
medical conditions that might contraindicate a local procedure. Such
conditions may include allergy to local or topical anesthetics, cancer,
pregnancy, heart disease, lung disease, bleeding disorders, sleep apnea,
and immune system deficiency, or any medical conditions or medications
that may contraindicate use of certain light/laser type sources associated
with this device. Medical clearance from patient’s physician is advisable
when doubt exists regarding treatment.
Moreover, patients suffering from photodermatoses must not be treated
as well as photosensitized patients (Photoallergy).
WARNING
Never treat perpendicular to any bone surface.
Page 61

65 40 863 D3648
D3648.201.01.02.02 10.2015
61
Sirona Dental Systems GmbH 7Cleaning, disinfection and sterilization
Operating Instructions SIROLaser Blue 7.1Cleaning
bеЦдблЬ
7
Cleaning, disinfection and sterilization
Following treatment, switch off the SIROLaser Blue and disconnect the
power cable from the power supply.
With foot control
Control unit, handpiece body, handpiece tube and foot control are
supposed to be cleaned and wipe-disinfected.
Dispose the single use fiber tips.
The removable stainless steal handpiece sleeve, therapy light guides,
fibercutter and bending tool are supposed to be cleaned and sterilized.
For the number of sterilization cycles, see chapter "Replacement of parts
subject to wear and tear [ → 69]".
7.1
Cleaning
Cleaning notice blue
Handpiece sleeve
1. Remove the handpiece sleeve from the handpiece body by pressing
the snap tab after disposing the single-use fiber tip or the therapy light
guide.
2. Clean the handpiece sleeve with a suitable brush under running
water.
Therapy light guide (MultiTip)
➢ Clean the therapy light guide under running water (< 38 °C, water
must be at least drinking water quality).
NOTICE
When following these instructions wear gloves.
CAUTION
Do not clean and disinfect the parts using a washer-disinfector! The
parts may be seriously damaged.
NOTICE
Manual cleaning must always be combined with disinfection.
CAUTION
Danger of damage to the optical system
Reattach the protective cap to the optical system of the handpiece
immediately after dismounting the EasyTip or MultiTip. Do this before
taking any hygienic measures.
NOTICE
Never clean in an ultrasonic bath!
Page 62
65 40 863 D3648
62 D3648.201.01.02.02 10.2015
7Cleaning, disinfection and sterilization Sirona Dental Systems GmbH
7.2Disinfection Operating Instructions SIROLaser Blue
Fibercutter
➢ Clean the fiber cutter in the ultrasonic bath or with a suitable brush
under running water (< 38 °C, water must be at least drinking water
quality).
Laser protective goggles
➢ Before cleaning the laser protective goggles, please read and
observe the instructions for use provided by the manufacturer and
attached to the goggles in the case.
7.2
Disinfection
Disinfect the upper mentioned parts by wipe disinfection:
SIROLaser Blue (wipe disinfection only)
Disinfectants, Sirona
7.3
Sterilization
NOTICE
Use only disinfectants that comply with the requirements of your
national authorities and whose bactericidal, fungicidal and virucidal
properties have been tested and properly certified.
Sirona recommends the use of MinuteWipes from Alpro. In the USA:
Caviwipes
™
.
Observe the instructions provided by the manufacturers of these
disinfectants.
WARNING
Therapy light guide (MultiTip), handpiece sleeve, fibercutter and
bending tool must be sterilized prior to initial use and before each
subsequent use.
WARNING
Single-use fiber tips (EasyTip) must not be sterilized again after usage.
They are disposable products.
NOTICE
Remove any possible water residues.
The parts must be sterilized only in an autoclave with saturated water
vapor at minimum sterilization values of 135 °C (275 °F), 3 min. holding
time and 2.04 bar (29,59 psi) overpressure.
Steam sterilizers are approved for sterilization that fulfill the
requirements of EN 13060 class B or validated steam sterilizer (EN
13060 class S) which are employing three, separate initial vacuum airpurges being suitable for the sterilization of dental handpieces. For
example SIRONA DAC PROFESSIONAL or DAC PREMIUM.
Page 63

65 40 863 D3648
D3648.201.01.02.02 10.2015
63
Sirona Dental Systems GmbH 7Cleaning, disinfection and sterilization
Operating Instructions SIROLaser Blue 7.4Cleaning the control unit
bеЦдблЬ
7.4
Cleaning the control unit
Use a dry, soft cloth to remove dust from the SIROLaser Blue. More
stubborn spots can be removed with a damp cloth.
You can wipe-disinfect the SIROLaser Blue using any of the products that
are commonly used to disinfect medical electrical equipment, e.g.
MinuteWipes, Caviwipes.
Observe the instructions provided by the manufacturers of these
disinfectants.
MinuteWipes Fa. Alpro.
In USA: Caviwipes
™
.
NOTICE
Sterilize the therapy light guides in a packing material suitable for
sterilization and storage to prevent scratching or chipping the light
guides inthe autoclave. Do not exceed a temperature of 140 °C (284 °F)
during the drying cycle. Do not abort the drying cycle before it has
ended. Do not try to accelerate the cool-down process by placing the
MultiTips in cold water. This could cause the therapy light guide to crack.
CAUTION
Store all components so that they are protected against
contamination.Sterilize again once the storage period has elapsed.
NOTICE
Please proceed carefully not to scratch and damage the foil on the touch
screen.
CAUTION
Spray disinfection may allow liquids to penetrate into the SIROLaser
Blue!
The SIROLaser Blue may be disinfected only by wiping it. Do never
spraydisinfect the SIROLaser Blue.
Page 64

65 40 863 D3648
64 D3648.201.01.02.02 10.2015
8Maintenance and service Sirona Dental Systems GmbH
8.1Safety checks Operating Instructions SIROLaser Blue
8
Maintenance and service
8.1
Safety checks
The following safety checks must be performed every 24 months by a
qualified service engineer:
Up to 3W
● Visual inspection of the unit and its accessories for mechanical
damage that might impair operation
● General function check
● Check of the visual and audible indicators
● NC and SFC earth leakage current acc. to IEC 60601
● NC and SFC housing leakage current acc. to IEC 60601
● NC and SFC patient leakage current acc. to IEC 60601
● Laser power measurement with a calibrated measuring instrument in
the range between 0.2 W and 3 W
8.2
Maintenance
Maintenance table, Sirona
The SIROLaser Blue does not require special maintenance. In case of
malfunctioning, see chapter Technical support, repair and testing.
However, Sirona Dental Systems GmbH recommends taking the
following actions at regular intervals:
Action Frequency Conducting personnel
Check of the single-use
fiber tips or therapy light
guides, see "Assembly of
sterile single-use optical
fiber tips [ → 28]" and
"Assembly of therapy light
guides [ → 32]"
Before each
treatment session
System owner
Calibration check of the
laser, see "Laser
calibration check [ → 50]"
Weekly System owner
Recommended check of
the optical power at the end
of the single-use fiber tip
with an external power
meter, see "Laser
calibration check [ → 50]"
Every twelve
months
System owner
Safety checks (required by
law in some European
countries)
Every 2 years Sirona Dental
Systems GmbH, local
Dental Sales or
qualified service
engineer.
Page 65

65 40 863 D3648
D3648.201.01.02.02 10.2015
65
Sirona Dental Systems GmbH 8Maintenance and service
Operating Instructions SIROLaser Blue 8.3Troubleshooting of simple defects
bеЦдблЬ
The manufacturer accepts responsibility for the safety of the laser unit
only if the following requirements are fulfilled:
● Modifications of the laser unit or repair work may be performed only
by authorized personnel.
● The electrical installations in the rooms where the SIROLaser Blue is
used must fulfill the applicable legal requirements.
● The unit must be used in compliance with the instructions provided in
the present manual.
8.3
Troubleshooting of simple defects
In case of malfunctioning, proceed as follows:
General First general directions in case of malfunctioning:
With foot control
● Check if power supply is connected properly and/or rechargeable
battery is loaded.
● Check if EasyTip or MultiTip is installed correctly.
● Be sure that all operational steps have been carried out correctly.
● Check the functioning of the finger switch and/or wireless foot control
by pressing several times.
The touch screen of the SIROLaser Blue remains dark after switching it
on.
With battery
● Check the connection of the power cable and/or check the
rechargeable battery.
● Make sure that the switch on the switching power supply is switched
on.
● Check the connection of the interlock device.
Finger switch The finger switch is claimed to be broken.
With foot control
● Check if the finger switch is chosen in the settings submenu.
● Check if the plug of the cable is properly connected to the control unit.
With foot control
Foot control The foot control is not working or claimed to be missing.
● Check if the foot control is chosen in the settings submenu.
● Check the battery of the wireless foot control.
● Register the wireless foot control again.
Single-use fiber tip or therapy light guide The single-use fiber tip or therapy light guide is claimed to be missing.
● Make a visual check of the single-use fiber tip or therapy light guide
and its connector. If you see any damage (e.g. scratches) replace the
single-use fiber tip or therapy light guide with a new one.
● Check the connection of the single-use fiber tip or therapy light guide.
● Check the proper assembly of the handpiece sleeve.
NOTICE
If national or local legal regulations require additional safety checks for
your laser unit, these regulations must be complied with and the
corresponding checks must be performed.
Page 66

65 40 863 D3648
66 D3648.201.01.02.02 10.2015
8Maintenance and service Sirona Dental Systems GmbH
8.4Technical support, repair and testing Operating Instructions SIROLaser Blue
● Be sure that all operational steps have been carried out correctly.
Aiming beam There is no aiming beam.
● Check to see if the single-use fiber tip or therapy light guide or its
connector is damaged. If the single-use fiber tip or therapy light guide
is damaged, replace it with a new one.
● Check the connection of the single-use fiber tip or therapy light guide.
● Check the proper assembly of the handpiece sleeve.
● Be sure that all operational steps have been carried out correctly.
The light of the aiming beam does not project a uniform circular pattern.
● Trim the end of the single-use fiber tip with the fiber cutter. Always
make the notch perpendicular to the optical fiber.
Interlock The interlock is claimed to be open.
Interlock is used:
● Check the connection of the interlock.
● Check if the door is open.
Interlock is not being used:
● Check if the interlock bridge is connected properly.
Overheating The laser source is claimed to overheat.
● Check if all convection openings for air cooling on the sides of the unit
are uncovered.
● Check if unit is placed near heat sources. If so, place the unit
somewhere else and let it cool down.
Accustic signal There is no accustic signal for activating the laser and/or pushing the
buttons.
● Check the settings for the accustic signals in the settings submenu.
Cannot solve the malfunctioni ng, Sirona
If you cannot solve the malfunctioning, switch off the laser and contact
Sirona Dental Systems GmbH, your local dental dealer or your authorized
service center.
8.4
Technical support, repair and testing
Sirona
Sirona provides technical information on the repair of individual
components only to authorized dealers and only after conducting an
advanced training course for their technical personnel. Please contact
your local dental dealer or an authorized Customer Service Department
for technical support.
The SIROLaser Blue may be sent in for repair or for safety inspection only
in its original packaging, including all accessories. Disinfect the
SIROLaser Blue and sterilize the accessories according to the relevant
instructions for use before shipping them.
Page 67

65 40 863 D3648
D3648.201.01.02.02 10.2015
67
Sirona Dental Systems GmbH 8Maintenance and service
Operating Instructions SIROLaser Blue 8.5Replacing the rechargeable battery of the control unit
bеЦдблЬ
8.5
Replacing the rechargeable battery of the control
unit
If the rechargeable battery does not load more than 30% even by
charging it overnight, the battery should be replaced.
1. Disconnect the power supply.
2. Take the handpiece out of the holder and unwind the tube completely.
3. Remove the battery cover.
4. Pull out the battery with the strips applied to the battery.
5. Mount the new battery.
6. Closing the battery cover. Make sure that the small metal cylinder of
the cable is properly placed in the anti-pull protection! Otherwise, the
handpiece is damaged.
7. Switch on the laser (use power supply if necessary).
8. Choose "Battery calibration" in the settings menu.
The following message will appear: "Unplug the laser and press
OK for battery calibration. For further steps refer to user manual."
9. Unplug laser and press 'OK'.
The battery will now discharged automatically until the device
switches off due to lack of power.
10. Plug in the power supply, switch on the laser device and charge the
battery for at least 2 h (best over night).
For perfect battery performance a battery calibration must be proceeded
in any case of having removed and again mounted or completely
replaced the battery pack, see chapter "Battery calibration [ → 49]".
Page 68

65 40 863 D3648
68 D3648.201.01.02.02 10.2015
8Maintenance and service Sirona Dental Systems GmbH
8.6Replacing the batteries of the wireless foot control Operating Instructions SIROLaser Blue
8.6
Replacing the batteries of the wireless foot
control
The wireless foot control is powered by two (2) AAA batteries
(commercially available).
When the battery is empty, select the finger switch in the settings
submenu "Activation device [ → 46]" for further operation of the
SIROLaser Blue.
The batteries can be changed by the user.
The housing of the wireless foot control must be opened to change the
battery. Touch a grounded metal part before opening the housing to
prevent damage to the PC board due to electrostatic discharge.
Removing and replacing the batteries
1. Remove the screws from the bottom of the foot control.
2. Remove the cover and open the battery compartment.
3. Pull the battery holder out of the battery compartment and replace the
batteries with new ones. Be careful to insert them with the correct
polarity (minus pole facing spring).
Assembling the foot control
1. Place the battery holder back again in the battery compartment.
2. Close the battery compartment with the cover.
3. Screw tight the screws at the bottom of the foot control.
CAUTION
Make sure that the small metal cylinder of the cable is properly placed
in the anti-pull protection. Fiber in cable may break if not correctly
mounted resulting in high repair costs.
Only use the Sirona Dental Systems battery pack, see "Spare
parts [ → 26]".
CAUTION
Prior to changing the batteries, switch the SIROLaser Blue off at the
main switch. This prevents accidental triggering.
+
–
+
–
NOTICE
After changing the batteries, start the SIROLaser Blue and check the
complete functionality of the foot control. In case the finger switch was
selected as preliminary activation device it is necessary to re-select the
wireless foot control. It is not necessary to reregister the foot control
again at the SIROLaser Blue after changing batteries.
Page 69

65 40 863 D3648
D3648.201.01.02.02 10.2015
69
Sirona Dental Systems GmbH 8Maintenance and service
Operating Instructions SIROLaser Blue 8.7Replacement of parts subject to wear and tear
bеЦдблЬ
8.7
Replacement of parts subject to wear and tear
Check the following parts subject to wear and tear and replace where
applicable:
With foot control and battery
● Therapy light guides (change after 2,000 sterilization cycles or every
two years)
● Silicone key pad of the handpiece (change after 400 treatments/
sterilizations)
● Fiber cutter (change after 400 treatments/sterilizations or every two
years)
● Rechargeable battery (change after 1000 charging cycles or every
two years)
● Batteries in wireless foot control (change after 1 year)
For further informations, see chapter "Cleaning, disinfection and
sterilization [ → 61]".
Only original spare parts, Sirona
CAUTION
Only use parts from Sirona Dental Systems, see "Spare parts [ → 26]".
Page 70

65 40 863 D3648
70 D3648.201.01.02.02 10.2015
9Electromagnetic compatibility Sirona Dental Systems GmbH
9.1Electromagnetic emission Operating Instructions SIROLaser Blue
9
Electromagnetic compatibility
Definitions:
Emission (electromagnetic)
When electromagnetic energy is emitted by a source.
Interference immunity
The ability of a device or system to work without errors even if there is
electromagnetic interference.
Immunity level
The maximum level of a certain electromagnetic interference that affects
a particular device or system, where the device or system remains
operative with a certain level of performance.
9.1
Electromagnetic emission
The UNIT is intended for operation in the electromagnetic environment
specified below.
The customer or user of the UNIT should make sure that it is used in such
an environment.
NOTICE
The SIROLaser Blue complies with all requirements for electromagnetic
compatibility according to IEC 60601-1-2: 2007
Emission measurement Conformity Electromagnetic environment - guidelines
RF emissions according to CISPR 11 Group 1 The UNIT uses RF energy only for its internal
function. Therefore, its RF emissions are very low
and are not likely to cause any interference in
nearby electronic equipment.
RF emissions according to CISPR 11 Class B The UNIT is intended for use in all facilities,
including residential areas and in any facilities
connected directly to a public power supply
providing electricity to buildings used for residential
purposes.
Harmonics
according to IEC 61000-3-2
Class A
Voltage fluctuations / flicker according
to IEC 61000-3-3
coincides
Page 71

65 40 863 D3648
D3648.201.01.02.02 10.2015
71
Sirona Dental Systems GmbH 9Electromagnetic compatibility
Operating Instructions SIROLaser Blue 9.2Interference immunity
bеЦдблЬ
9.2
Interference immunity
The UNIT is intended for operation in the electromagnetic environment
specified below.
The customer or user of the UNIT should make sure that it is used in such
an environment.
Interference
immunity tests
IEC 60601-1-2 test level Compliance level Electromagnetic environment –
guidance
Electrostatic
discharge (ESD)
according to IEC
61000-4-2
± 6 KV contact discharge
± 8 KV air discharge
± 6 KV contact
discharge
± 8 KV air discharge
Floors should be wood, concrete, or
ceramic tile. If floors are covered with
synthetic material, the relative
humidity should be at least 30 %.
Electrical fast
transient/burst
according to
IEC 61000-4-4
± 1kV for input and output
lines
± 2 kV for power supply
lines
± 1kV for input and
output lines
± 2 kV for power supply
lines
The quality of the line power supply
should be that of a typical commercial
or hospital environment.
Surge voltages
according to IEC
61000-4-5
± 1 kV differential mode
± 2 kV common mode
voltage
± 1 kV differential mode
± 2 kV common mode
voltage
The quality of the line power supply
should be that of a typical commercial
or hospital environment.
Voltage dips, short
interruptions and
variations of the
power supply
according to IEC
61000-4-11
<5% U
T
for ½ period
(>95% dip of U
T
)
40% U
T
for 5 periods (60%
dip of U
T
)
70 % U
T
for 25 periods
(30% dip of U
T
)
<5% U
T
for 5sec. (>95%
dip of U
T
<5% UT for ½ period
(>95% dip of U
T
)
40% U
T
for 5 periods
(60% dip of U
T
)
70 % U
T
for 25 periods
(30% dip of U
T
)
<5% U
T
for 5sec. (>95%
dip of U
T
The quality of the line power supply
should be that of a typical commercial
or hospital environment.
If the user of the UNIT requires it to
continue functioning following
interruptions of the power supply, it is
recommended to have the UNIT
powered by an uninterruptible power
supply or a battery.
Magnetic field of
power frequencies
(50/60 Hz) according
to IEC 61000-4-8
3 A/m 3 A/m Power frequency magnetic fields
should be at levels characteristic of a
typical location in a typical commercial
or hospital environment.
Remarks: U
T
is the AC supply voltage prior to application of the test level.
Portable and mobile radio equipment
must not be used within the
recommended working clearance
from the UNIT and its cables, which is
calculated based on the equation
suitable for the relevant transmission
frequency.
Recommended working clearance:
Page 72
65 40 863 D3648
72 D3648.201.01.02.02 10.2015
9Electromagnetic compatibility Sirona Dental Systems GmbH
9.2Interference immunity Operating Instructions SIROLaser Blue
1. The higher frequency range applies at 80 MHz and 800 MHz.
2. Field strengths from fixed transmitters, such as base stations for radio
(cellular/cordless) telephones and land mobile radios, amateur radio,
AM and FM radio broadcast and TV broadcast, cannot be predicted
theoretically with accuracy. An investigation of the location is
recommended to determine the electromagnetic environment
resulting from stationary HF transmitters. If the measured field
strength in the location in which the UNIT is used exceeds the
applicable RF compliance level above, the UNIT should be observed
to verify normal operation. If unusual performance characteristics are
observed, it may be necessary to take additional measures such as
reorientation or repositioning of the UNIT.
3. Over the frequency range 150kHz to 80MHz, field strengths should
be less than 3V/m.
Conducted RF
interference
IEC 61000-4-6
3 V
eff
150 kHz to 80 MHz
1
3 V
eff
d= [1.2] √P
Radiated RF
interference
IEC 61000-4-3
3 V/m
80 MHz to 800 MHz
1
3 V/m
800 MHz to 2.5 GHz
1
3 V
eff
3 V
eff
d= [1.2] √P
at 80 MHz to 800 MHz
d= [2.3] √P
at 800 MHz to 2.5 GHz
where P is the nominal transmitter
output in watts (W) specified by the
transmitter manufacturer and d is the
recommended working clearance in
meters (m).
Field strengths from fixed RF
transmitters, as determined by an
electromagnetic site survey
2
should
be less than the compliance level
3
in
each frequency range.
Interference is possible in the vicinity
of equipment bearing the following
graphic symbol.
Interference
immunity tests
IEC 60601-1-2 test level Compliance level Electromagnetic environment –
guidance
Page 73

65 40 863 D3648
D3648.201.01.02.02 10.2015
73
Sirona Dental Systems GmbH 9Electromagnetic compatibility
Operating Instructions SIROLaser Blue 9.3Working clearances
bеЦдблЬ
9.3
Working clearances
Recommended working clearances
between portable and mobile HF
communication devices and the UNIT
The UNIT is intended for operation in an electromagnetic environment,
where radiated RF interference is checked. The customer or the user of
the UNIT can help prevent electromagnetic interference by maintaining a
minimum distance between portable and mobile RF communications
equipment (transmitters) and the UNIT - depending on the maximum
output power of the communication device, as shown below.
The recommended safety distance d in meters (m) can be determined for
transmitters, whose maximum power rating is not specified in the above
table, using the equation that belongs to the corresponding column,
wherein P is the maximum power rating of the transmitter in watts (W)
according to the transmitter manufacturer.
Note 1
The higher frequency range applies at 80 MHz and 800 MHz.
Note 2
These guidelines may not apply in all cases. The propagation of
electromagnetic waves is influenced by their absorption and reflection by
buildings, objects and persons.
Power rating of the transmitter
[W]
Working clearance according to transmission frequency [m]
150 kHz - 80 MHz 80 MHz - 800 MHz 800 MHz - 2.5 GHz
d= [1,2] √P d= [1,2] √P d= [2,3] √P
0.01 0.12 0.12 0.23
0.1 0.38 0.38 0.73
1 1.2 1.2 2.3
10 3.8 3.8 7.3
100 12 12 23
Page 74
65 40 863 D3648
74 D3648.201.01.02.02 10.2015
10Disposal Sirona Dental Systems GmbH
Operating Instructions SIROLaser Blue
10
Disposal
Based on Directive 2012/19/EU and country-specific disposal directives
for waste electrical and electronic equipment, we would like to point out
that these must be disposed of in a special way within the European
Union (EU). These regulations require environmentally compliant
recycling/disposal of waste electrical and electronic equipment. They
must not be disposed of as domestic waste. This is shown with the
symbol of the crossed out dust bin, which has been in use since March
24, 2006.
Disposal procedure
We feel responsible for our products from the initial idea to their disposal.
That is why we give you the option of taking back our waste electrical and
electronic equipment.
If disposal is required, please proceed as follows:
In Germany
In order to arrange return of the electrical equipment, please send a
disposal request to "enretec GmbH." The following options are available
for this purpose:
● On the homepage of enretec GmbH, click on the "Return of electronic
equipment" button under the "eom" menu item.
● Alternatively, you may also contact the company directly.
enretec GmbH
Kanalstraße 17
16727 Velten
Tel: +49 3304 3919-500
Email: eom@enretec.de
As manufacturers, we assume the costs for disposal of waste from
electrical and electronic equipment in accordance with the countryspecific disposal regulations (ElektroG). All disassembly, transport and
packaging costs are to be borne by the owner/operator.
Proper preparation (cleaning/disinfection/sterilization) of the equipment
must be carried out prior to disassembly/disposal.
Any nonpermanently installed equipment will be picked up at its
installation site in the practice. Permanently installed equipment will be
picked up curbside at your address by appointment.
Other countries
The dental dealers would be glad to provide you with country-specific
information.
Page 75

65 40 863 D3648
D3648.201.01.02.02 10.2015
75
Sirona Dental Systems GmbH 10Disposal
Operating Instructions SIROLaser Blue 10.1Batteries
bеЦдблЬ
10.1
Batteries
Please dispose the batteries according to the disposal regulations and
legal requirements applicable in your country.
With foot control
Prior to disposal, remove the following batteries:
● Batteries in the wireless foot control
● Lithium battery in the SIROLaser Blue
10.2
Accessories
MultiTips, handpiece sleeve incl. keypad for finger switch, bending tool for
EasyTips and fiber cutter may be disposed in the domestic refuse. Please
disinfect or sterilize the parts prior to disposal.
Please dispose the single-use fiber tips (EasyTips) in a biohazard
medical waste/ sharps container.
Page 76

65 40 863 D3648
76 D3648.201.01.02.02 10.2015
11Appendix Sirona Dental Systems GmbH
11.1Appendix A – Certification Operating Instructions SIROLaser Blue
11
Appendix
11.1
Appendix A – Certification
The unit is manufactured in compliance with the provisions of Council
Directive 93/42/EEC concerning medical devices.
11.2
Appendix B -Label positions
11.2.1 Control unit
Label positions contr ol unit
The following figures show the positions of the labels on the SIROLaser
Blue:
Front side
Front side SIROLaser Blue
Rear side
Rear side SIROLaser Bl ue
Page 77
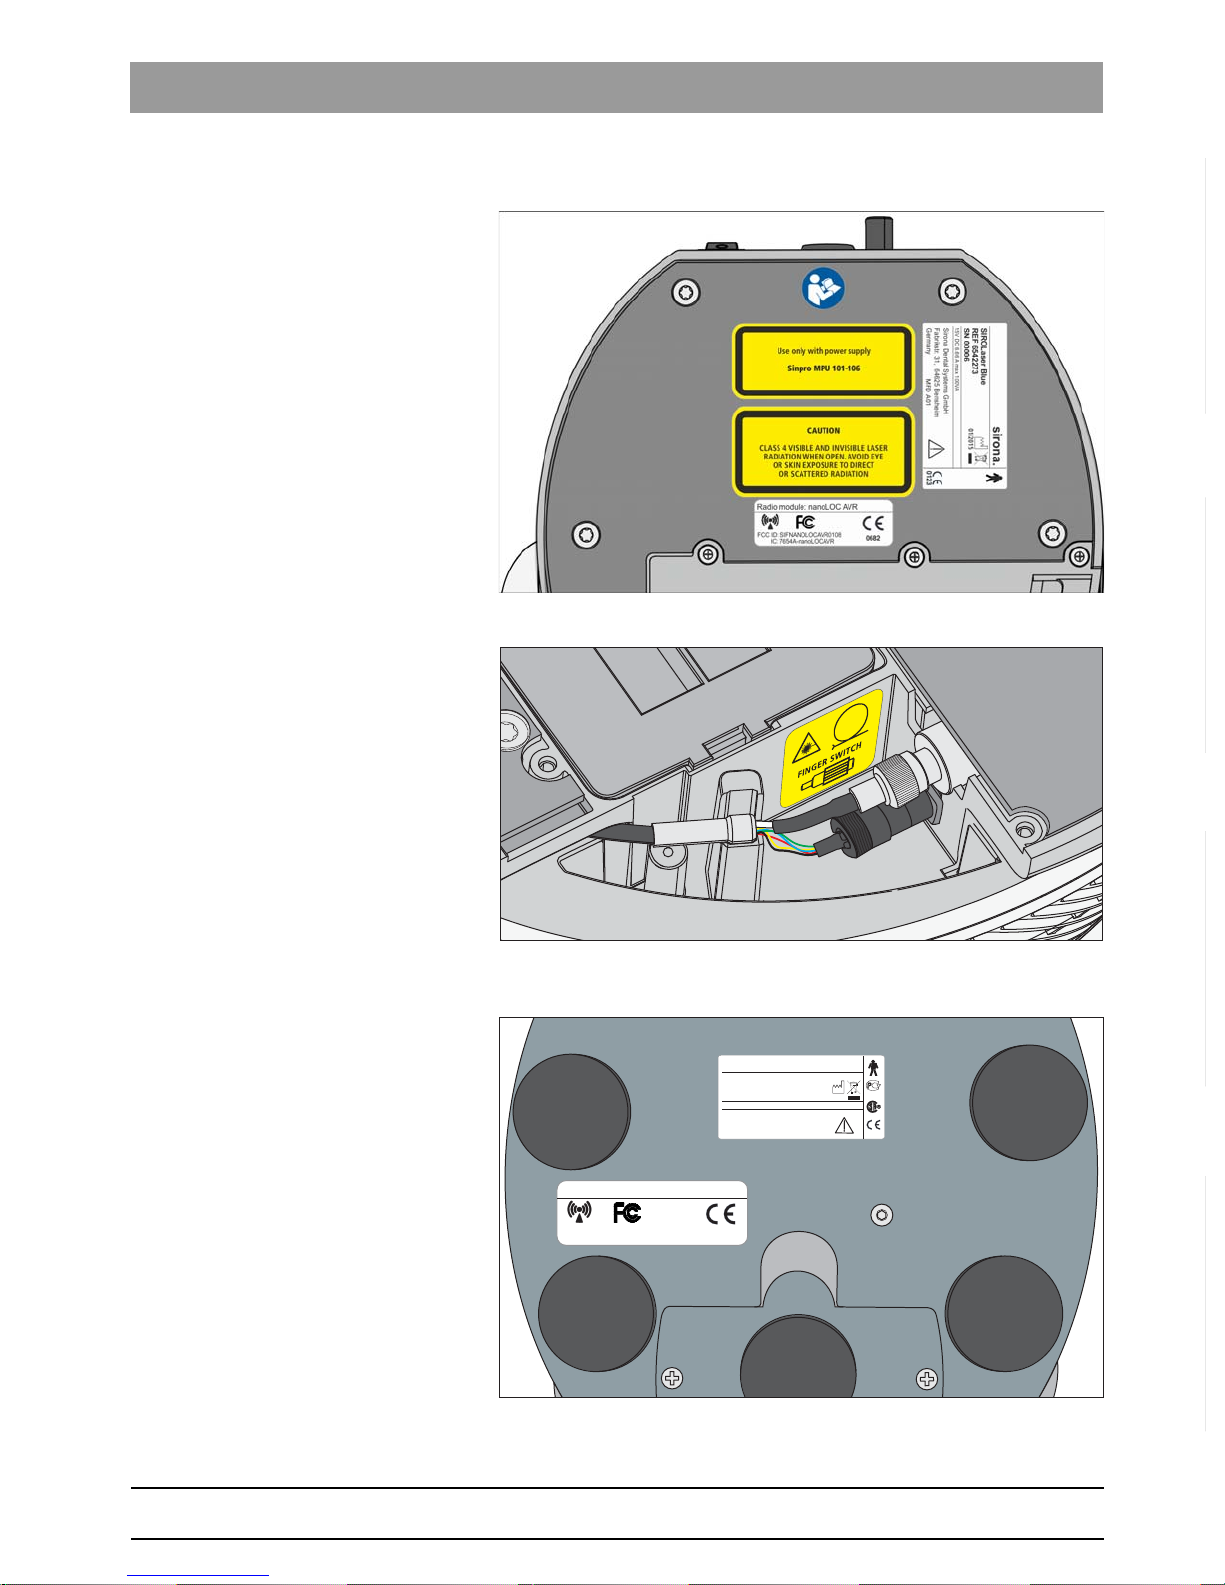
65 40 863 D3648
D3648.201.01.02.02 10.2015
77
Sirona Dental Systems GmbH 11Appendix
Operating Instructions SIROLaser Blue 11.2Appendix B -Label positions
bеЦдблЬ
Rear side SIROLaser Advance+
Bottom side
Bottom side SIROLaser Blue
With battery
Under the battery cover
11.2.2 Wireless foot control – optional
Radio module: nanoLOC AVR
FCC ID: SIFNANOLOCAVR0108
IC: 7654A-nanoLOCAVR
0682
Wireless Footswitch ADVANCE
REF 6256841
SN 00006
Sirona Dental Systems GmbH
Fabrikstr. 31, 64625 Bensheim
Germany
MFD A01
04-2009
0123
15VDC6,66Amax100VA
AE68
CUS
sirona.
Page 78

65 40 863 D3648
78 D3648.201.01.02.02 10.2015
11Appendix Sirona Dental Systems GmbH
11.3Appendix C – Safety circuit (interlock) Operating Instructions SIROLaser Blue
11.3
Appendix C – Safety circuit (interlock)
Units designed for this purpose are already available from various
companies, however, are also unreasonably expensive in some cases.
We recommend having the installation performed by a qualified
electrician who is also responsible for the electrical system.
JP1 Interlock connection supplied with the SIROLaser Blue
(Insulate the jumper between pins 1 and 2; connect both
of these pins to relay K1 with a two-core cable).
K1 Low-level relay (AC)
Door switch S1Must close the interlock circuit when the treatment room
door is closed.
Lp1 Optional low-level lamp used as an optical warning while
the laser is in operation.
T1 Power transformer
S2 Main switch for power supply
J1 Possible power supply for the SIROLaser Blue
CAUTION
It is recommended to keep the distance between connector JP1 and
relay K1 as short as possible.
Page 79

Page 80

tЙ=кЙлЙкоЙ=нЬЙ=кбЦЬн=нз=г~вЙ=~еу=~днЙк~нбзел=пЬбЕЬ=г~у=ДЙ=кЙимбкЙЗ=ЗмЙ=нз=нЙЕЬебЕ~д=бгйкзоЙгЙенлK
«=pбкзе~=aЙен~д=pулнЙгл=dгДe=OMNR pйк~ЕЬЙW ЙеЦдблЕЬ mкбенЙЗ=бе=dЙкг~еу
aPSQUKOMNKMNKMOKMO NMKOMNR ûKJkêKW= NON=OQT
pбкзе~=aЙен~д=pулнЙгл=d гДe
áå=íÜÉ=rp^W
c~Дкбвлнк~≈Й=PN
aJSQSOR=_ЙелЬЙбг=
dÉêã~åó
пппKлбкзе~KЕзг
pбкзе~=aЙен~д=pулнЙгл=ii`
QUPR=pбкзе~=aкбоЙI=pмбнЙ=NMM
`Ь~кдзннЙI=k`=OUOTP
rp^
lêÇÉê=kç
SR=QM=USP=aPSQU
 Loading...