


WSL2000
Table of contents
 Loading...
WHITE
SUPERLOCK
OWNERS WORKBOOK
2000 ATS
Copyright 1995
Education Department
White Sewing Machine Company
11760 Berea Road
Cieveland OH 44111

TABLE OF CONTENTS
INTRODUCTION
SECTION I - Know Your Machine - Model 2000 ATS
Accessories
Superlock Set Up and Maintenance
Foot Control
Power/Light Switch
Opening Front Cover
Closing Front Cover
Opening Swing-Away Side Cover
Handwheel
Presser Foot Lift
Changing Presser Foot
Adjustment of the Presser Foot Pressure
Disengaging Upper Cutter
Exclusive Built-in Thread Cutter
Adjustable Fabric Guide
Waste Tray
Oiling
Cleaning
Storage
Hints for Successful Stitching
Needle Replacement
Needles, Thread & Fabric Chart
3
4
5
5
5
5
5
5
6
6
6
6
7
7
7
7
8
8
8
9
10
11
SECTION II - Threading & Tension
Preparation for Threading
Spool Holders
Spool Caps
Spool Nets
Threading Upper Looper
Threading Lower Looper
Threading Needles
Needle Threader
Helpful Hints - Changing Thread
Testing Stitch
Thread Tensions
Adjusting Thread Tension
SECTION III - Basic Sewing Techniques
Superlock Seams & Seam Finishing
Adjusting Stitch Length
Adjusting Cutting Width & Balance of Stitch
Adjusting Cutting Width
Securing Beginning & End of Seam
Outside Corners
Inside Corners
Corded Overlook
Ribbing
Casing or Hem Fold
12
12
12
12
12
14
15
16
17
18
19
20
21
22
23
24
25
26
27
28
29
30
31
32

SECTION IV - Differential Feed
Positive Differential Feed
Minimal Differential Feed
Normal Differential Feed
Serging Lightweight Fabrics
Serging Stretch or Bulky Knits
Gathering
33
34
34
34
35
36
37
SECTION V - 3-Thread Sewing Techniques
3-Thread Seam or Edge Finish
Rolled Edge
Picot Edge
Spaghetti Straps
Slit or Placket
Rolled Edge - "Pokies"
Narrow Edge
Safelock
Decorative Edges
Decorative Braids
Flatlock/Ladder Stitching & Seams
Flatlock Technique - Lace Application
Flatlock Technique - Lingerie Elastic Application
Flatlock Technique - Fringe
Rolled Edge - Novelty Threads
Rollled Edge - Fishline Ruffles or Wire Edges
Narrow or Shell Edge
SECTION VI - 2-Thread Sewing Techniques
Threading for 2-thread Sewing
Two Thread Overcast
Two Thread Flatlock
Two Thread Wrapped Edge
Two Thread Rolled Edge
38
39
40
41
42
43
44
45
46
47
48
49
50
51
52
53
54
55
56
56
57
58
59
60
SECTION VII - Optional Accessory Feet
Blind Hem Foot
Piping/Cording Foot
Elastic Foot
Shirring Foot
SECTION vm - Special Hints
Puckery Fabric
Skipped Stitches
Stitiches Show Through on the Right Side of Seam
Thread Continues to Break
Cannot Get a Tight Stitch at the Cut Edge of the Fabric
Adjusting Tensions
Machine is Jamming
INDEX
61
61
62
63
64
65
65
65
65
65
66
66
66
67-69
II

tNTRODUCTtON
Welcome to the world of easy, speed sewing. The White Superlock was designed with
the home sewer in mind. It is simple to thread, simple to change from regular sewing to specialty
sewing, such as flatlock and rolled edge. The automatic thread tension release will help you
in easy removal of your projects and creative sewing. This workbook is compiled in a method
so you will thoroughly understand the machine and its potential. After following these
instructions, you will marvel at how easy your new White Superlock is to operate.
SECTION I
KNOW YOUR MACHINE - MODEL 2000 ATS
Top of the line Superlock model 20CXÌ ATS is a 2/3/4 thread serger with adjustable
cutting width, built in rolled edge and differential feed. It is capable of two, three or four
thread sewing plus many decorative and specialty applications. A section of this workbook
outlines many different techniques, specialty feet, and simple quick projects for you to try
on your new Superlock.
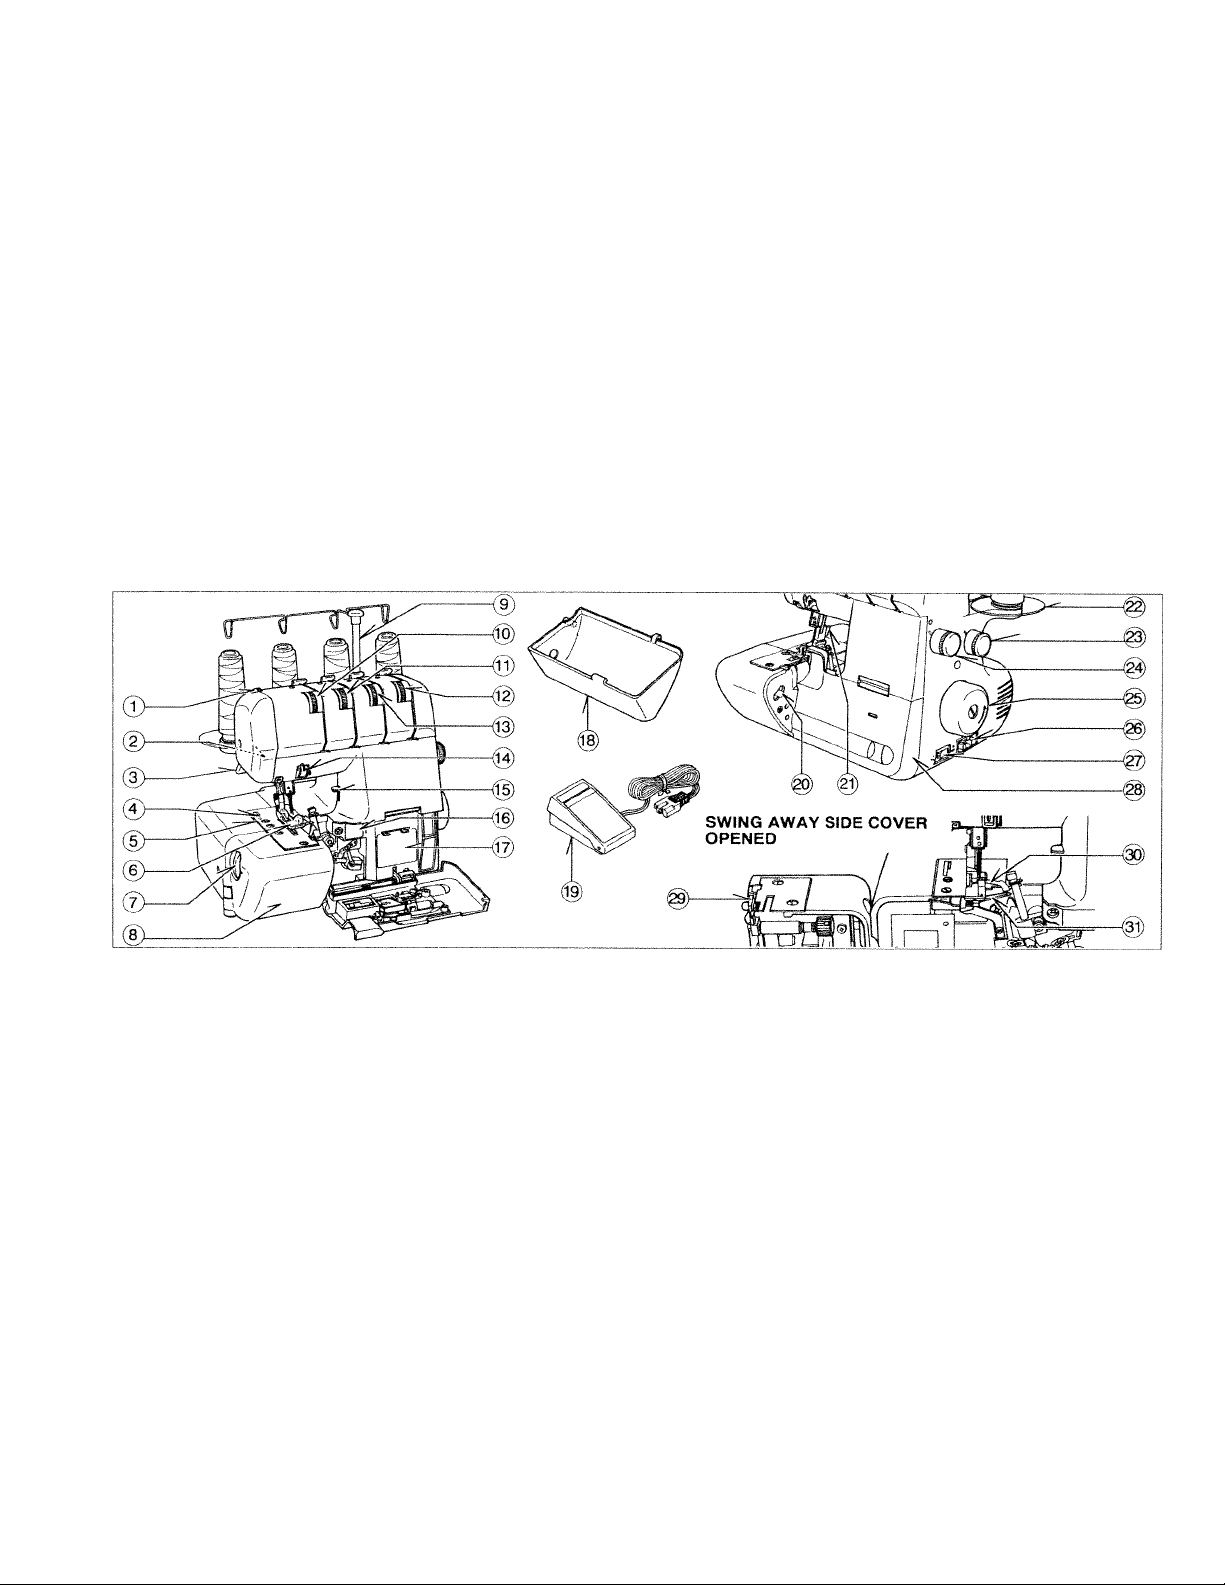
1. KNOWING YOUR MACHINE
IDENTIFICATION CHART
1. Foot pressure regulator
2. Sewing light
3. Presser foot lift lever
4. Thread cutter (Model 2000 only)
5. Needle plate
6. Presser foot
7. Overedge cutting width dial
8. Swing away side cover
9. Thread guide pole
10. Left needle thread tension dial
11. Right needle thread tension dial
12. Lower looper thread tension dial
13. Upper looper thread tension dial
14. Needle thread guides
15. Thread cutter lever (Model 2000 only)
16. Two thread convertor Instruction
17. Threading chart
18. Waste tray (Model 2000 only)
19. Foot control
20. Release lever side cover
21. Foot release lever
22. Thread extension plate
23. Differential feed control dial
24. Stitch length dial
25. Hand wheel
26. Plug connector socket
27. Light and power switch
28. Front cover
29. Moving cutter
30. Upper looper
31. Lower looper
(Model 2000 only)

ACCESSORIES
All parts listed may be obtained from your nearest dealer.
(D (D
^
P
I I
*
1. Two-thread convertor
(Model 2000 only)
2. Needle set
3. Brush
4. Screwdriver (small)
5. Needle threader
6. Machine cover
7. Screwdriver (large)
8. Oiler
*Only Model 2000 has storage of accessories at the back of front cover.
9. Moving cutter
10. Spanner
11. Thread net
12. Tweezers
13. Thread extension plate
14. Cone holder
15. Cord guide
16. Accessory bag
SUPERLOCK SET UP & MAINTENANCE
1. Set your Superlock on a sturdy, flat surface.
2. Your Superlock has been thoroughly oiled at the
factory so be sure to wipe the needle and bed
plate areas carefully before sewing a garment.
Practice on a scrap of fabric so any surplus oil
is absorbed.
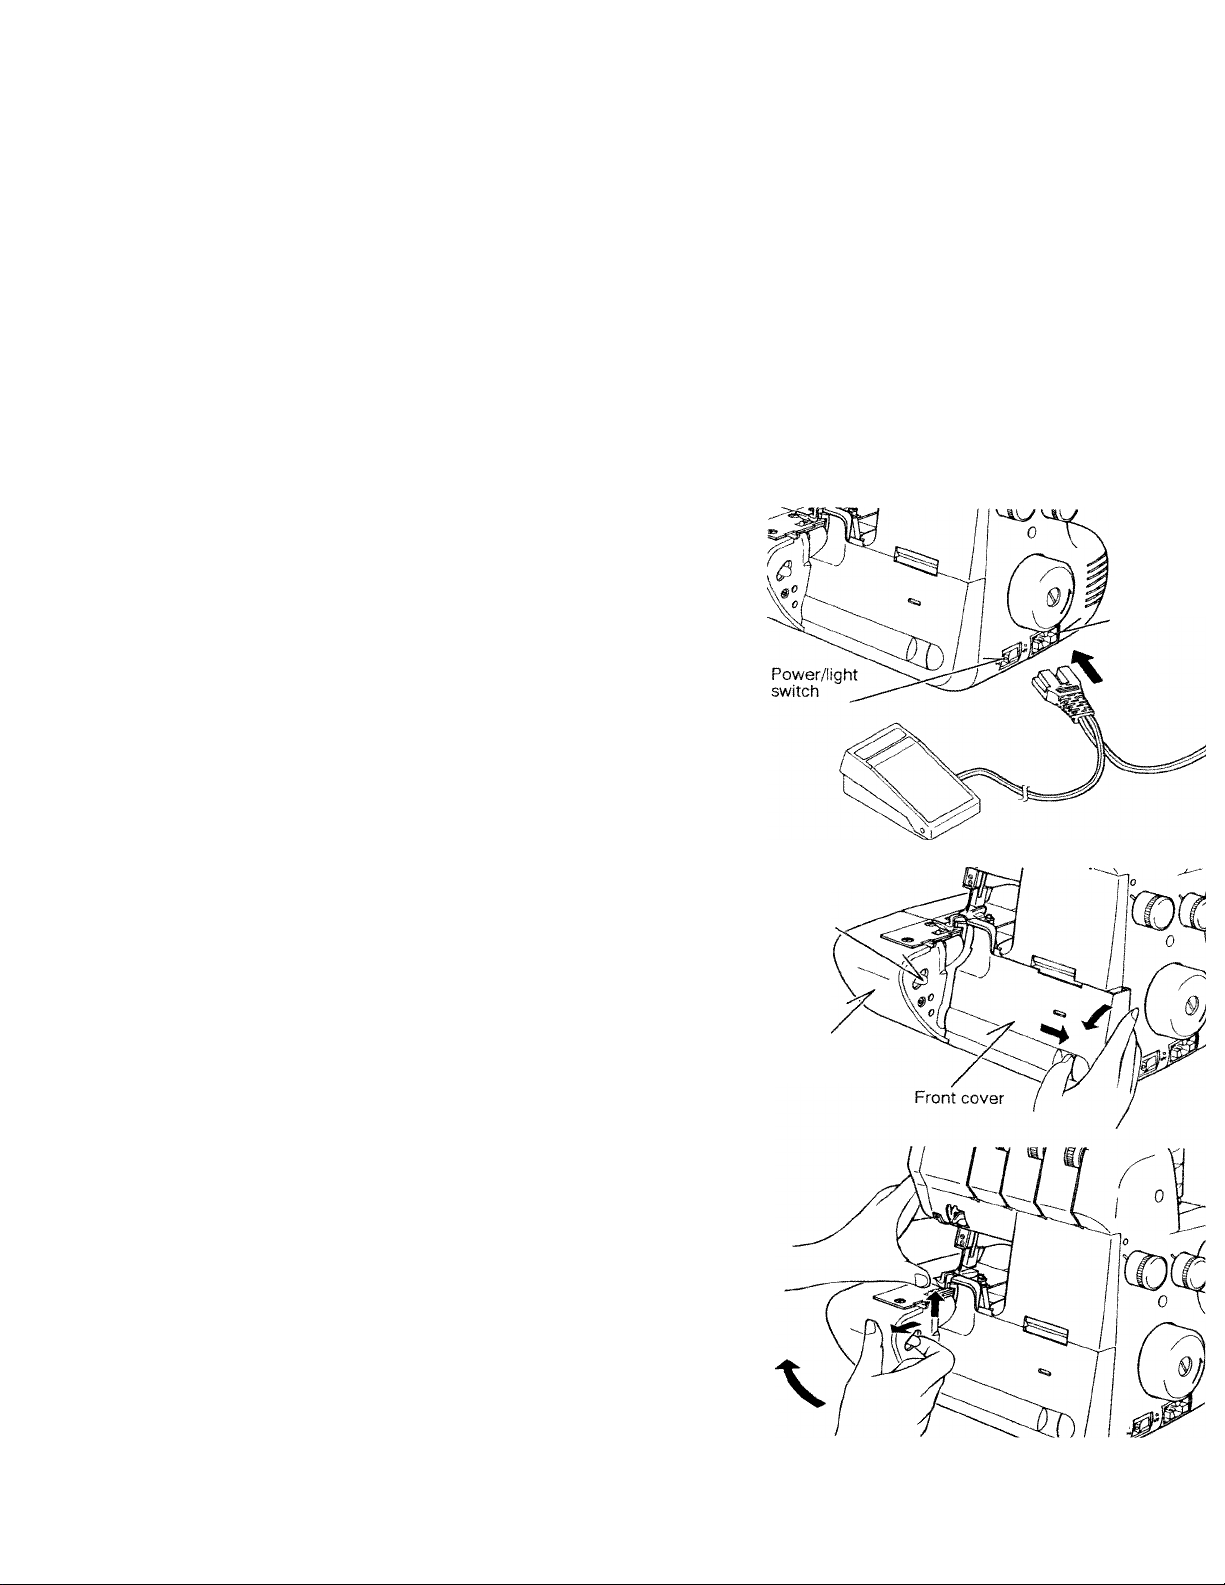
3. FOOT CONTROL
Push foot control plug into the connector socket
at the bottom right side of your Superlock.
4. POWER/LIGHT SWITCH
To operate your machine, turn the power switch
on. It is located at the bottom right hand side.
The same switch controls both power and light.
If leaving your Superlock unattended, turn
switch off.
Connector
socket
5. OPENING FRONT COVER
To open front cover, push part B of cutter cover
to right and pull the cover down toward you.
To open the side cover, press down on the
silver knob located to the inside of the side cover,
and swing the lower left portion of the Superlock
to the left.
6. CLOSING FRONT COVER
Push part B and lower left cover toward the
center of the front to close it.
Note: Always close front cover when sewing.
7. OPENING SWING-AWAY SIDE COVER
To open side cover, pull the release lever toward
you with your right hand and swing out to left.
NOTE: Always close side cover when sewing.
Release lever
Swing away
side cover
8. HANDWHEEL
Always turn handwheel toward you.
9. PRESSER FOOT LIFT
Raise the presser foot lift to lift up the
presser foot.
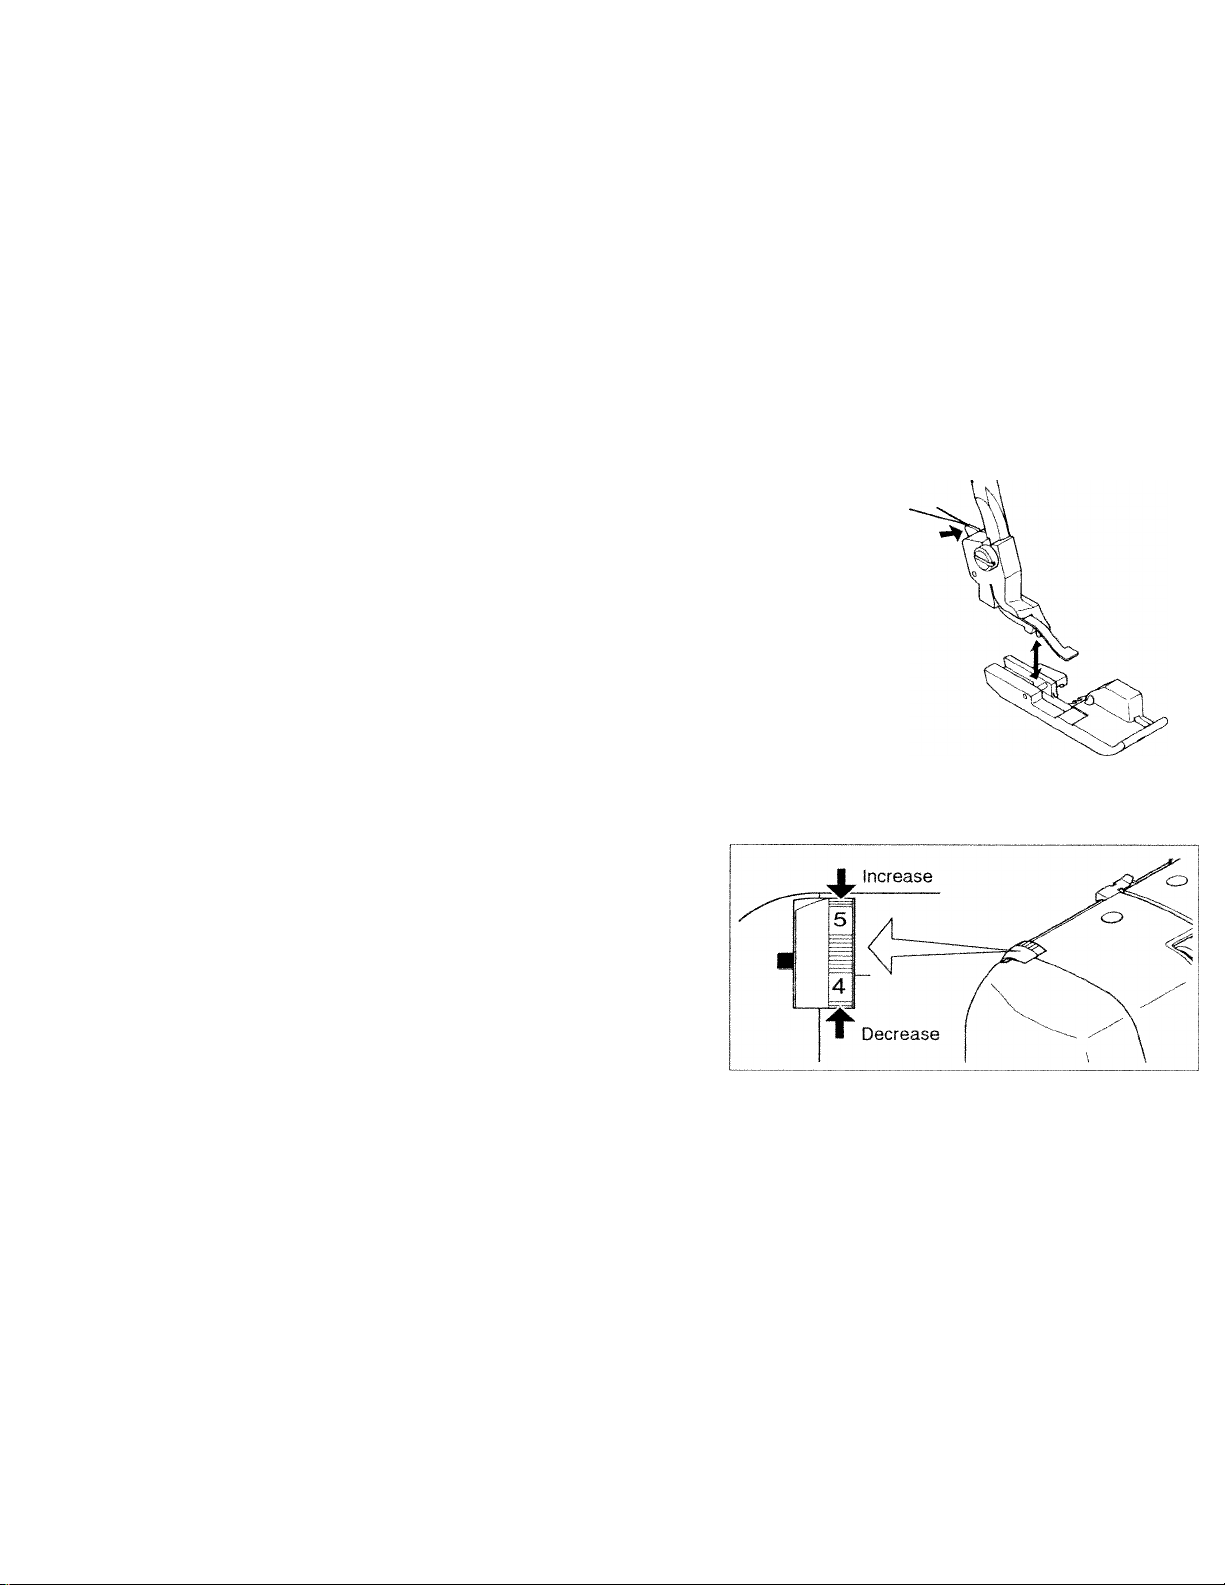
10. CHANGING PRESSER FOOT
Switch off your Superlock.
Raise presser foot.
Raise needles to their highest position by
turning handwheel toward you.
Push lever A and foot will come off.
Position the new foot with pin right under
the groove of the ankle. Lower presser foot
lift so that holder catches the presser foot.
11. ADJUSTMENT OF THE PRESSER
FOOT PRESSURE
The presser foot pressure is pre-adjusted
for materials of medium thickness.
Adjustment is necessary only when
you work on very thin or very thick
materials. Accordingly, sew thinner
materials with less pressure (2 - 3)
and thicker materials with more pressure
(4 - 5). Increase the pressure of the presser
foot by turning the dial to the desired number.
Foot release lever
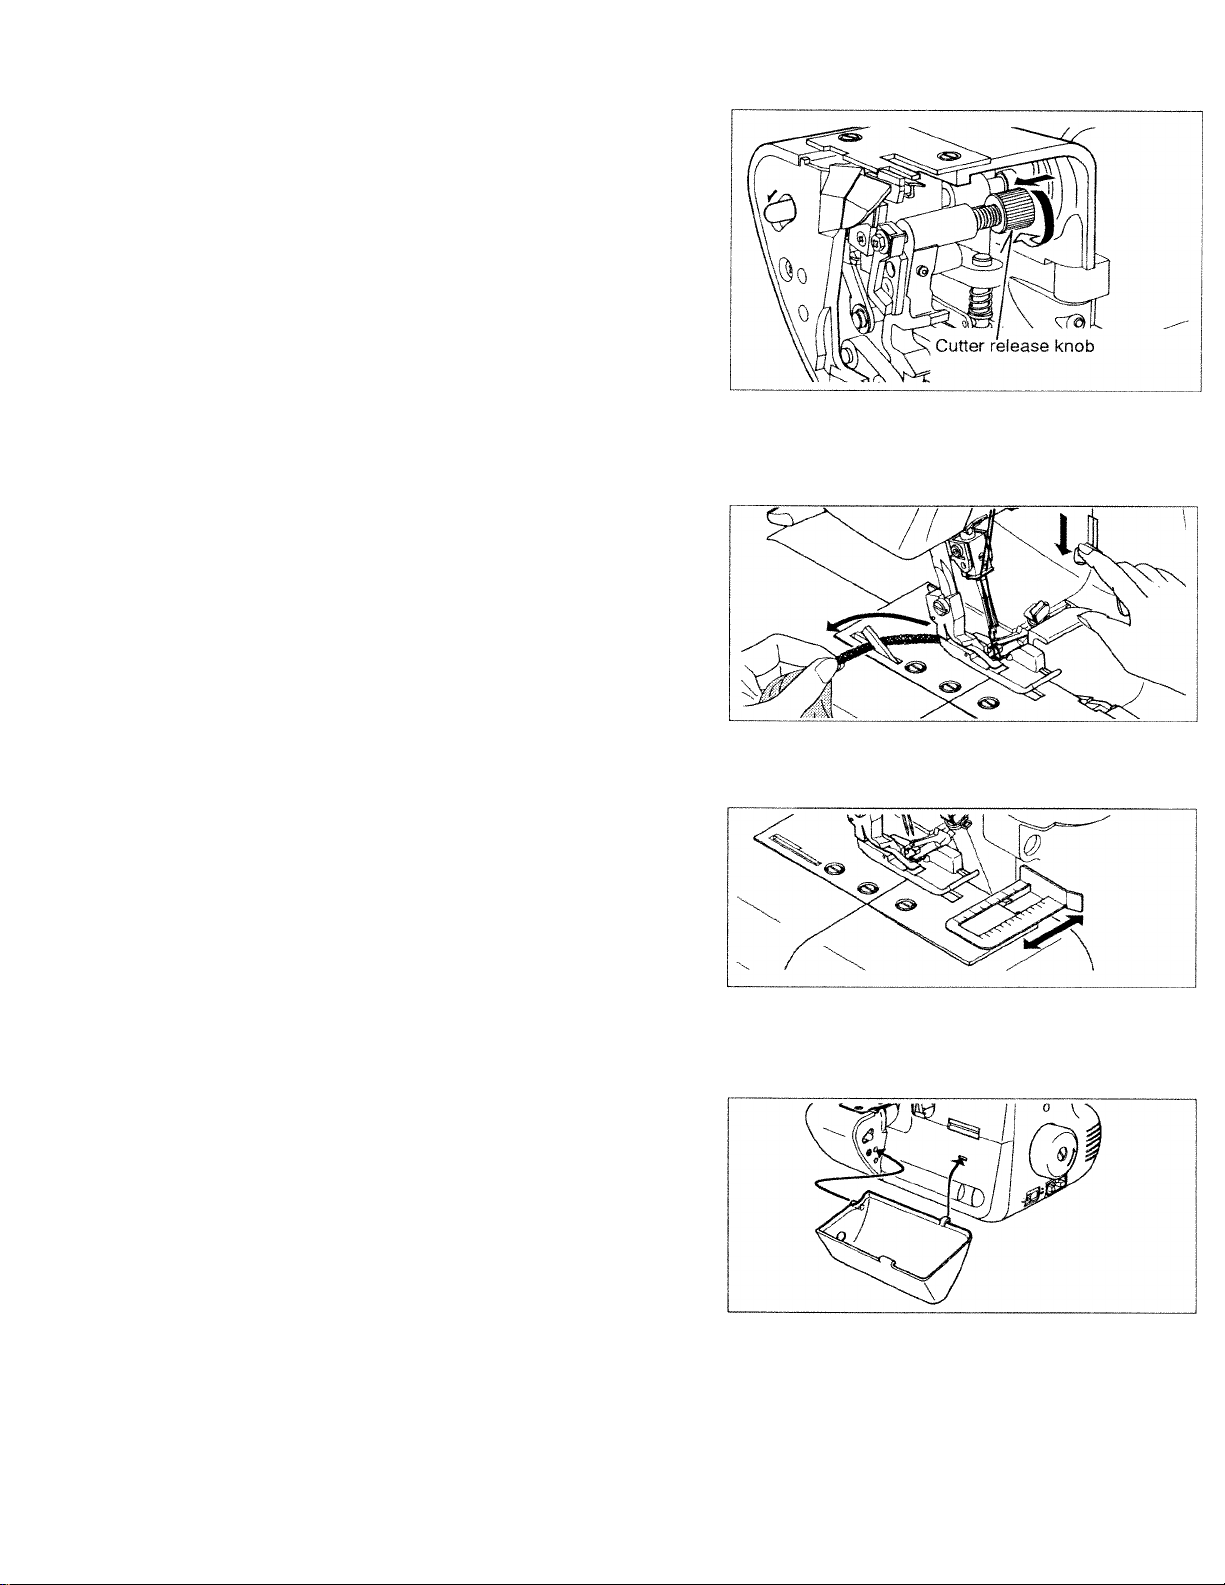
12. DISENGAGING UPPER CUTTER
To lower the upper cutter, open the left
front cover and turn the cutter knob toward
you until the cutter is all the way in the
down position. BE SURE TO PUT CUTTER
BACK UP BEFORE SEWING.
13. EXCLUSIVE BUILT-IN THREAD CUTTER
The built-in scissor conveniently cuts your
thread tail simply by pressing down on the
lever as illustrated, then releasing to cut.
14. ADJUSTABLE FABRIC GUIDE
The adjustable seam guide can slide to the
left or right as needed to keep fabric straight
while serging seams.
15. WASTE TRAY
Place the large waste tray on the front of
your Superlock by hooking over the slot on
the right front cover and inserting the peg
on the left into the hole on the side cover,
as illustrated.

16. OILING
Lubrication is not required often for
this machine since the important parts are all
made of a special oil impregnated sintered
metal. You will want to occasionally put one
or two drops of oil on moving metal parts will
increase durability.
17. CLEANING
First disconnect machine from power supply
by removing plug from the electric outlet.
Open front cover and side cover (see pg. 3).
Using the brush provided, remove all the dust
and lint that has accumulated. Remember to
also clean between the cutters often.
18. STORAGE
When the machine is not in use, disconnect
it from the power supply by removing plug
from the electric outlet.
Using the vinyl cover provided, cover
your machine when not in use.
8
)
HINTS FOR SUCCESSFUL STITCHING
An understanding of the following variables will make your Superlock run smoothly and
your work will look professional. Before sewing, always test the compatibility of your fabric,
thread, pressure, stitch length, and tension.
Thread Selection
When selecting the proper thread, choose one that is compatible with the fashion and
the fabric. Polyester threads (or polyester based) are most commonly used for general
sewing purposes. Threads of different fibers (cotton, rayon, silk, etc.) are available for
special sewing.
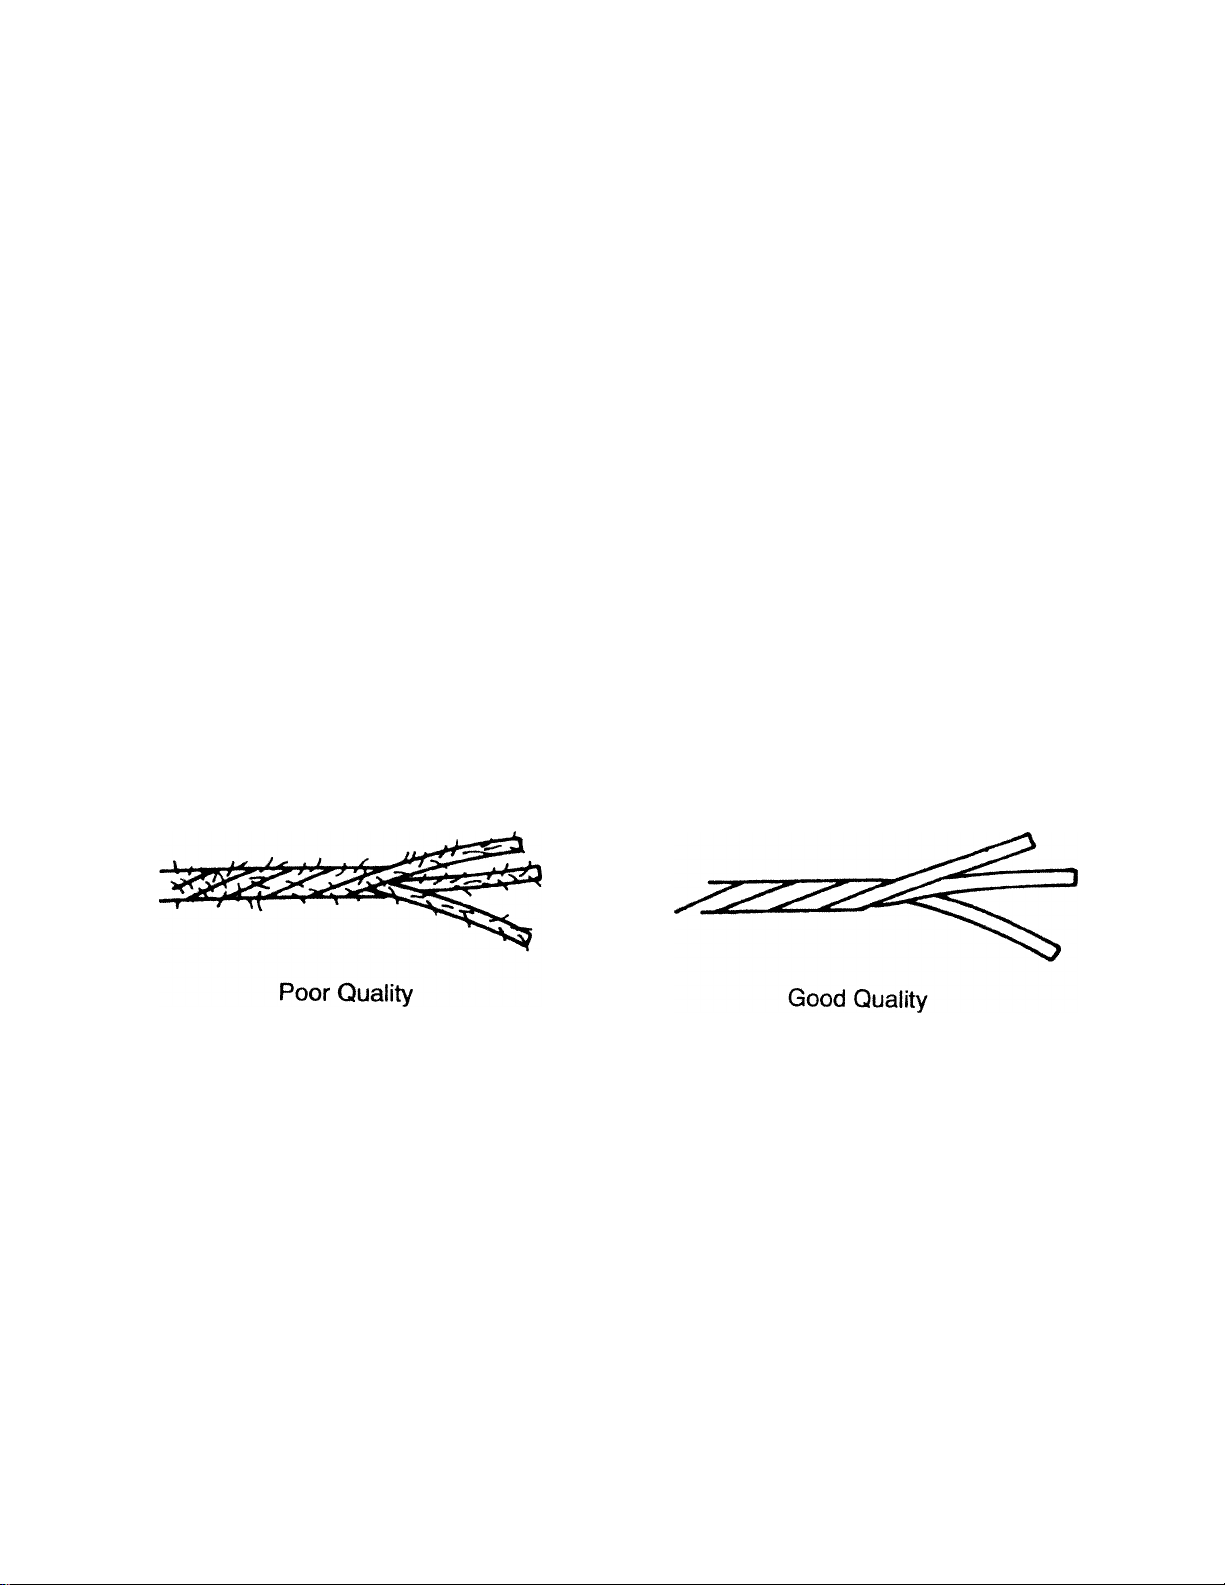
Quality is a very important consideration when selecting a thread. A thread of poor
quality will result in operating and stitching problems on any type of sewing machine. Syn
thetic threads are made by twisting filaments together. Lower quality synthetic threads are
made by twisting short, leftover filaments of polyester together. The result is a "hairy*
appearance and a weaker thread. Better quality threads are made by twisting long continu
ous filaments together. This thread is stronger and smoother, thus fewer operating prob
lems will occur. Brand name and price do not necessarily represent quality in a thread.
The only true test of thread quality is close examination.
A variety of threads are available for overlooks. They may be of cotton, cottonwrapped polyester, polyester or nylon (Wooly Nylon®). These are most often put up on
cones or tubes. Threads for the overlock are generally finer and lighter in weight than
standard sewing machine thread. This is because of the large amount of thread that builds
up in an overlook seam. Finer thread makes for a less bulky seam. Your Superlock will
handle thread on cones or spools. Many decorative threads will be discussed later in this
workbook.
Loading...