Singer S18 Instruction Manual
INSTRUCTION MANUAL
S18
SINGER and STUDIO are trademarks of The SINGER Company Limited S.à.r.l. or its Affiliates. ©2014 The SINGER Company Limited S.à.r.l. or its Affiliates. All rights reserved.

IMPORTANT SAFETY INSTRUCTIONS
When using an electrical appliance, basic safety precautions should always be followed, including the following:
This sewing machine is designed and manufactured for household use only. Read all instructions before using this sewing machine.
DANGER— To reduce the risk of electric shock:
1.An appliance should never be left unattended when plugged in. Always unplug this sewing machine from the electric outlet immediately after using and before cleaning.
WARNING— To reduce the risk of burns, fire, electric shock, or injury to persons:
1.Do not allow to be used as a toy. Close attention is necessary when this sewing machine is used by or near children.
2.Use this appliance only for its intended use as described in this owner’s manual.
Use only attachments recommended by the manufacturer as contained in this owner’s manual.
3.Never operate this sewing machine if it has a damaged cord or plug, if it is not working properly, if it has been dropped or damaged, or dropped into water.
Return this sewing machine to the nearest authorized dealer or service center for examination, repair, electrical or mechanical adjustment.
4.Never operate the appliance with any air opening blocked. Keep ventilation openings of this sewing machine and foot controller free from accumulation of lint, dust and loose cloth.
5.Never drop or insert any object into any opening.
6.Do not use outdoors.
7.Do not operate where aerosol (spray) products are being used or where oxygen is being administered.
8.To disconnect, turn all controls to the off (“O”) position, then remove plug from outlet.
9.Do not unplug by pulling on cord. To unplug, grasp the plug, not the cord.
10.Keep fingers away from all moving parts. Special care is required around the sewing machine needle and/or cutting blade.
11.Always use the proper needle plate. The wrong plate can cause the needle to break.
12.Do not use bent needles.
13.Do not pull or push fabric while stitching. It may deflect the needle causing it to break.
14.Switch this sewing machine off (“O”) when making any adjustment in the needle area, such as threading the needle, changing the needle, threading the bobbin or changing the presser foot, and the like.
15.Always unplug this sewing machine from the electrical outlet when removing covers, lubricating, or when making any other adjustments mentioned in this owner’s manual.
SAVE THESE INSTRUCTIONS
For Europe only:
This appliance can be used by children aged from 8 years and above and persons with reduced physical, sensory or mental capabilities or lack of experience and knowledge if they have been given supervision or instruction concerning use of the appliance in a safe way and understand the hazards involved. Children shall not play with the appliance. Cleaning and user maintenance shall not be made by children without supervision.
For outside Europe (except U.S.A and Canada):
This appliance is not intended for use by persons (including children) with reduced physical, sensory or mental capabilities, or lack of experience and knowledge, unless they have been given supervision or instruction concerning use of the appliance by a person responsible for their safety.
Children should be supervised to ensure that they do not play with the appliance.
Please note that on disposal, this product must be safely recycled in accordance with relevant National legislation relating to electrical/electronic products. If in doubt please contact your retailer for guidance. (European Union only)
2
TABLE OF CONTENTS
MACHINE IDENTIFICATION.............................. |
5 |
Name of Parts............................................................ |
5 |
Standard Accessories................................................ |
6 |
GETTING READY TO SEW................................ |
7 |
Connecting the Power Supply................................... |
7 |
Controlling Sewing Speed......................................... |
7 |
Speed control lever........................................................ |
7 |
Foot control.................................................................... |
7 |
Functions of Buttons.................................................. |
8 |
Pattern selection buttons.............................................. |
10 |
Raising and Lowering the Presser Foot................... |
11 |
Attaching the Knee Lifter......................................... |
11 |
Changing the Presser Foot...................................... |
12 |
Removing and Attaching the Presser Foot Holder.. 12 |
|
Variety of Presser Feet and Their Uses................... |
13 |
Winding the Bobbin................................................. |
14 |
Removing the bobbin................................................... |
14 |
Preparing thread spool for sewing............................... |
14 |
Winding the bobbin...................................................... |
15 |
Inserting the bobbin..................................................... |
16 |
Threading the Machine....................................... |
17-18 |
Automatic Needle Threader..................................... |
19 |
Drawing Up the Bobbin Thread................................ |
20 |
Changing Needles................................................... |
21 |
Thread and Needle Chart........................................ |
21 |
Balancing Thread Tension....................................... |
22 |
Adjusting the tension................................................... |
22 |
Adjusting the Presser Foot Pressure....................... |
23 |
Dropping the Feed Dog........................................... |
23 |
Selecting the Sewing Mode..................................... |
24 |
Help Button.............................................................. |
25 |
Selecting the Stitch Pattern..................................... |
25 |
Customizing Machine Settings................................ |
26 |
Resumption setting...................................................... |
26 |
Sound setting............................................................... |
26 |
Language selection...................................................... |
26 |
BASIC STITCHES (Mode 1)............................ |
27 |
Straight Stitch 01...................................................... |
27 |
How to sew with the straight stitch.............................. |
27 |
How to start stitching on the edge of thick fabrics....... |
27 |
Securing seams.......................................................... |
27 |
Pivoting a corner......................................................... |
28 |
Using the cloth guide.................................................. |
28 |
Using the seam guide lines......................................... |
28 |
Adjusting the needle position...................................... |
29 |
Adjusting the stitch length........................................... |
29 |
Various Stitch Patterns for Seaming........................... |
30 |
Basting Stitch pattern 07.......................................... |
31 |
Zigzag Stitch pattern 08........................................... |
32 |
Adjusting the stitch width............................................ |
32 |
Adjusting the stitch length........................................... |
32 |
Seam and Overcasting Stitch Patterns |
|
(Modes 1 and 3)....................................................... |
33 |
Overcasting with zigzag stitch pattern 08................... |
33 |
Seam and overcast stitch pattern 10........................... |
33 |
Multiple zigzag stitch pattern 09.................................. |
33 |
Knit stitch pattern 01................................................... |
34 |
Double overedge stitch pattern 02.............................. |
34 |
Overlock stitch pattern 03........................................... |
34 |
Zipper Sewing..................................................... |
35-37 |
How to attach zipper foot............................................ |
35 |
How to insert a lapped zipper................................ |
35-37 |
Narrow Hemming with Narrow Hemmer Foot.......... |
38 |
PIECING AND QUILTING (Mode 2)................. |
39 |
Piecing with Quarter Inch Seams............................. |
39 |
Angle scale on the needle plate.................................. |
39 |
Locked quarter inch seams......................................... |
39 |
Decorative stitch patterns for quilting.......................... |
39 |
Even Feed / Walking Foot........................................ |
40 |
How to attach the even / feed walking foot.................. |
40 |
How to stitch in the ditch............................................. |
40 |
How to channel quilt with quilting bar.......................... |
40 |
Quilting Options........................................................ |
41 |
Edge guide / quilting bar............................................. |
41. |
Free-motion quilting.................................................... |
41 |
Clasp stitch quilting..................................................... |
42 |
Appliqué...................................................................... |
42 |
3
UTILITY STITCH PATTERNS |
|
|
(Mode 3).......................................................... |
|
43 |
Buttonholes....................................................... |
43-50 |
|
Sewing sensor buttonholes.................................... |
44-46 |
|
Corded buttonhole...................................................... |
|
47 |
Changing buttonhole width......................................... |
|
48 |
Changing buttonhole stitch density............................. |
|
48 |
Automatic buttonhole............................................. |
49-50 |
|
Button Sewing......................................................... |
|
51 |
Darning................................................................... |
|
52 |
Adjusting for a shorter darning area........................... |
|
53 |
Uneven darning stitches............................................. |
|
53 |
Tacking.................................................................... |
|
54 |
How to sew a shorter tack........................................... |
|
54 |
Eyelet...................................................................... |
|
55 |
Adjusting the shape of an eyelet................................. |
|
55 |
Blind Hem.......................................................... |
56-57 |
|
Shell Tucking........................................................... |
|
58 |
Scallop Stitch.......................................................... |
|
58 |
Cording.................................................................... |
|
58 |
Twin Needle Sewing.......................................... |
59-60 |
|
PROGRAMMING STITCH PATTERNS AND |
|
|
BUTTON FUNCTIONS IN MODE 2 AND 3....... |
|
61 |
Programming Stitch Patterns & Button Functions |
...61 |
|
Programming a single stitch pattern with auto-lock.... |
61 |
|
How to program auto thread cutting............................ |
|
61 |
Programming two stitch patterns................................ |
|
62 |
Programming two stitch patterns and |
|
|
auto thread cutting...................................................... |
|
62 |
Elongating satin stitch patterns................................... |
|
63 |
Programming stitch pattern combinations with |
|
|
mirror image .............................................................. |
|
63 |
Starting programmed stitch patterns at the beginning.. 64 |
||
Returning to beginning of incomplete stitch pattern... |
64 |
|
Making a copy and mirror image of programmed |
|
|
stitch patterns............................................................. |
|
64 |
Editing Programmed Stitch Patterns....................... |
|
65 |
Uniform stitch adjustment (Modes 2 and 3 only)........ |
|
65 |
Customizing individual stitch patterns |
|
|
(Mode 2 and 3 only).................................................... |
|
66 |
Storing and recalling the stitch pattern combinations. 66 |
||
MONOGRAMMING (Mode 4)........................ |
67 |
Selecting a Letter Style......................................... |
67 |
Programming Lettering.......................................... |
68 |
Editing Lettering.................................................... |
69 |
Inserting a letter (character)..................................... |
69 |
Deleting a letter (character)...................................... |
69 |
Correcting Distorted Stitch Patterns...................... |
70 |
CARE AND MAINTENANCE......................... |
71 |
Cleaning the Bobbin Case and Feed Dog Area.... 71 |
|
Replacing the Light Bulb....................................... |
72 |
Problems and Warning Signals........................ |
73-74 |
Troubleshooting..................................................... |
75 |
4
MACHINE IDENTIFICATION
|
3 |
|
6 |
1 |
|
|
|
|
|
7 |
|
2 |
|
4 |
|
|
5 |
||
|
|
|
8
9
25
24
23 


22 |
|
|
|
|
|
21 |
|
|
13 |
|
|
20 |
14 |
|
|
|
|
15 |
|
|
|
|
|
|
28 |
|
|
|
|
|
30 |
|
|
16 |
|
29 |
|
|
17 |
27 |
26 |
|
|
18 |
|
|
|
|
19 |
|
|
39 |
|
31 |
|
|
|
|
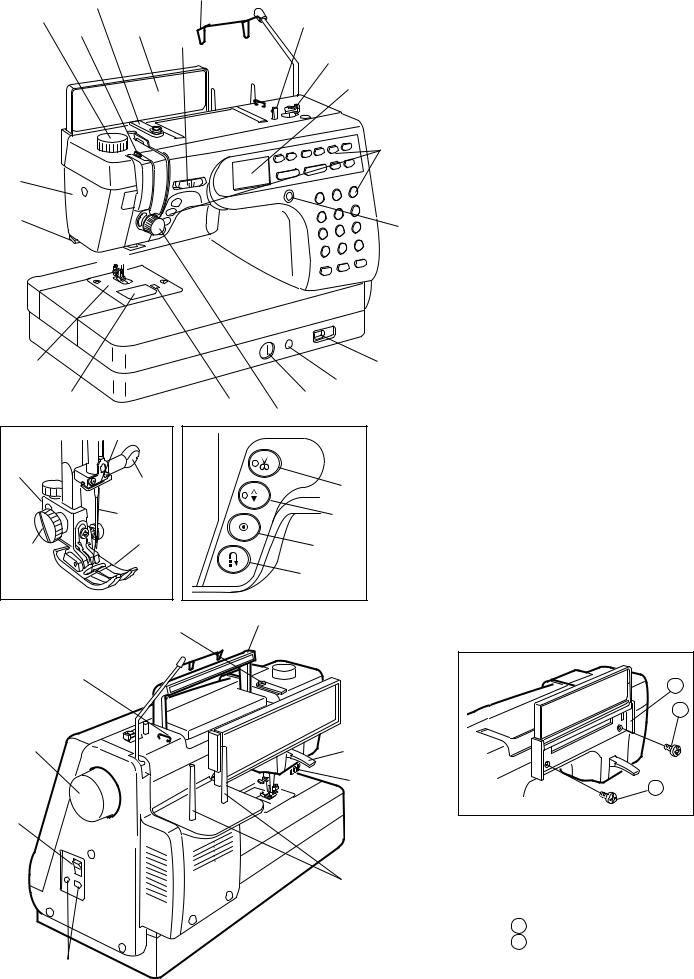
Name of parts
1.Presser foot pressure dial
2.Thread take-up lever
3.Thread guide plate
4.Quick reference board
5.Speed control lever
6.Retractable thread guide
7.Bobbin winder spindle
8.Bobbin winder stopper
109. LCD screen
10.Function buttons
11.LCD contrast adjusting dial
12.Feed dog lever
13.Knee lifter socket
14.Stitch balance adjusting dial
1115. Thread tension dial
16.Thread cutter button
17.Needle up/down button
18.Auto-lock button
19.Reverse button
20.Bobbin case cover release button
21.Bobbin case cover
22.Needle plate
1223. Needle threader
24.Thread cutter on face plate
25.Face plate
26.General purpose foot A
27.Thumb screw
28.Presser foot holder
29.Needle
30.Needle clamp screw
31.Carrying handle
32.Presser foot lifter
33.Buttonhole lever
34.Spool pins
35.Machine sockets
36.Power switch
37.Handwheel
38.Thread guide
39.Pre-tension guide for bobbin
|
38 |
2 |
|
|
|
|
|
1 |
37 |
32 |
|
|
33 |
1 |
36 |
|
Attaching the quick reference board |
|
|
|
|
|
The quick reference board and setscrews are |
|
|
included in the standard accessories. |
|
34 |
Fix the quick reference board on the backside of |
|
the machine with the two setscrews. |
|
|
|
|
|
|
Tighten the screws firmly with a screwdriver. |
1 Setscrews
2 Quick Reference Board
35
5
1 |
2 |
3 |
4 |
5 |
6 |
7 |
8 |
9 |
10 |
11 |
12 |
13 |
14 |
15 |
16 |
17 |
18
19 |
20 |
21 |
22 |
|
23 |
||
|
24 |
25 |
26
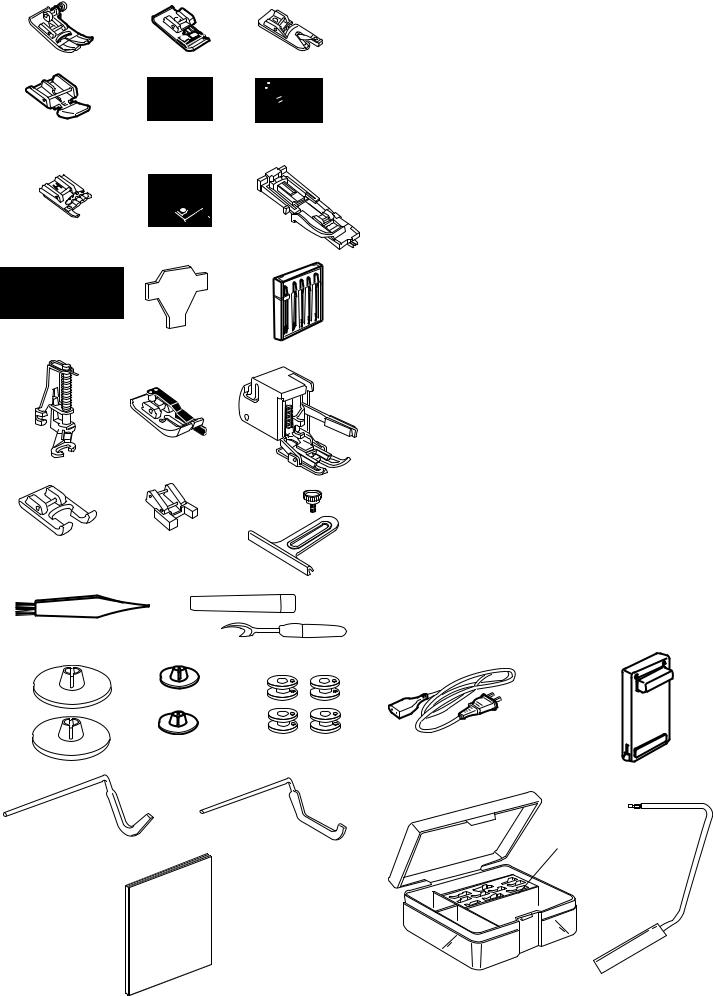
Standard Accessories
1.General purpose foot A (comes attached to the machine)
2.Overedge foot C
3.Narrow hemmer foot D
4.Zipper foot E
5.Satin stitch foot F
6.Blind hem foot G
7.Cording foot H
8.Overcasting foot M
9.Automatic buttonhole foot R
10.Screwdriver
11.Screwdriver for needle plate
12.Set of needles
13.Darning/Embroidery foot P-2
14.Quarter inch foot with guide O
15.Even feed/Walking foot
16.Open toe foot F-2
17.Button sewing foot T
18.Cloth guide with screw
19.Lint brush
20.Seam ripper
21.Spool pin caps (Large)
22.Spool pin caps (Small)
23.Class 15 bobbins
24.Edge/quilting guide
25.Quilting bar for even feed/walking foot
26.Instruction book
27.Power supply cord
28.Foot control
29.Accessory box
30.Foot storage compartment (marked with letters corresponding to the presser feet)
31.Knee lifter for presser foot
28
27
31
29
30
6
1
3
|
4 |
3 |
6 |
|
|
|
2 |
5
GETTING READY TO SEW
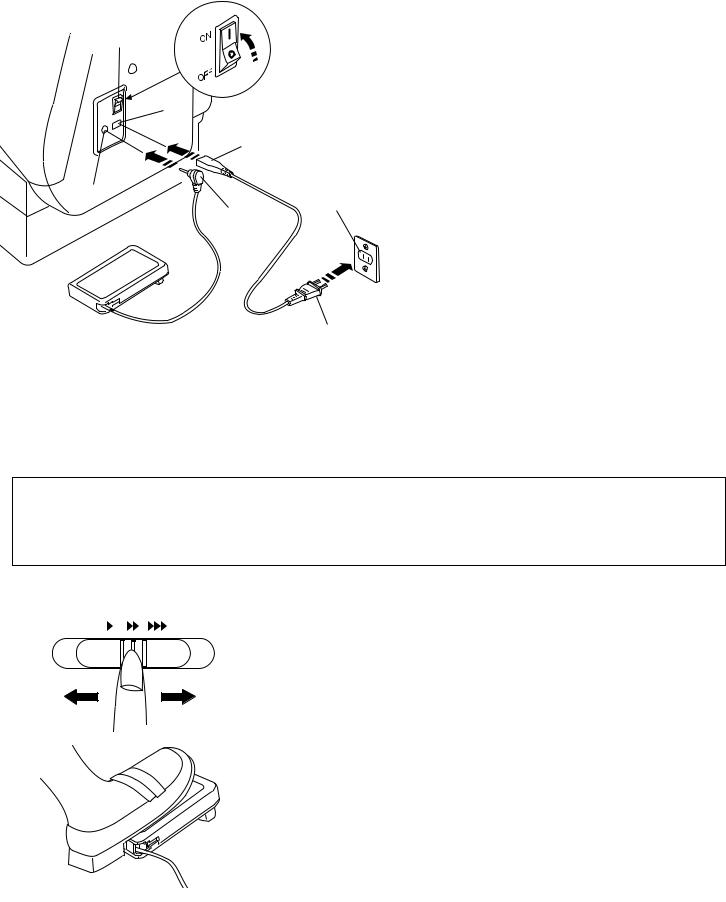
Connecting the Power Supply
Check that power switch is in the off position. Insert the foot control plug into the machine socket. Insert the machine plug into the machine socket. Insert the power supply plug into the wall outlet. Turn on the power switch.
1Power switch
2Foot control plug
3Machine socket
4Machine plug
5Power supply plug
6Wall outlet
NOTE
If you turn off the power switch, wait for 15 seconds before turning it on again.
For Your Safety:
While in operation, always keep your eyes on the sewing area. Keep your hands free from any moving parts such as the thread take-up lever, handwheel or needle. Always turn off the power switch and unplug from the power supply:
-when leaving the machine unattended.
-when attaching or removing parts.
-when cleaning the machine.
Do not place anything on the foot control when not in use.
Operating Instructions:
The symbol “O” of a switch indicates the “off” position of a switch.
For appliances with a polarized plug (one blade wider than the other). To reduce the risk of electric shock, this plug is intended to fit in a polarized outlet only one way. If it does not fit fully in the outlet, reverse the plug. If it still does not fit, contact a qualified electrician to install the proper outlet. Do not modify the plug in any way.
Controlling Sewing Speed
Speed control lever
You can limit the maximum sewing speed by the speed control lever according to your sewing needs.
To increase sewing speed, slide the lever to the right. To decrease sewing speed, slide the lever to the left.
Foot control
Sewing speed is varied by the foot control and the speed control lever. The heavier the foot presses down on the controller the faster the machine runs. The machine runs at the maximum speed set by the speed control slider when the foot control is being fully depressed.
7
1
5
2
6
3
4
Functions of Buttons
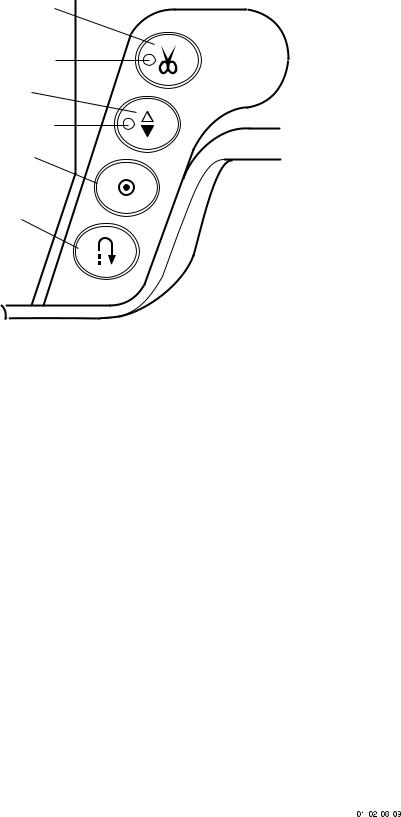
1 Thread cutter button
Press this button after finishing sewing and the machine will trim the threads.
The LED signal blinks while cutting thread of the needle and bobbin.
5 Thread cutter signal
NOTE
The auto thread cutter can be used for threads #30 or finer.
Use the thread cutter on the face plate of the machine to cut specialty thread or threads heavier than #30 weight.
The auto thread cutter can not be used with a hemstitching needle (wing needle) or with a twin needle.
The thread cutter works best in conjunction with the needle up/down button in the down position. The cutting action may cause the spools to become tangled if the needle is not set in a down position.
Clean the auto thread cutter mechanism regularly to avoid malfunction due to built up lint. (See page 71.) Use only SINGER® class 15 bobbins in your machine. Using improperly sized bobbins or prewound bobbins may cause stitching problems. Improper bobbins can damage your bobbin case and machine.
2 Needle up/down button
Press this button to select the needle to stop up or down when done stitching.
If you select the needle down position the LED signal on the button will come on and stay on till changed to needle up. The light will remain on after using the auto thread cutter. The auto thread cutter will make the needle stop up. The needle down function is recommended when ever using the automatic thread cutter.
6 LED signal light
3 Auto-Lock button
Press the auto-lock button at the end of a seam to sew locking stitches to secure the end of the seam. The machine will stop automatically after these locking stitches with foot control pressed down. The auto-lock can be used with all stitch patterns on the machine.
4 Reverse button
When sewing with stitch pattern 01, 02, 08 or 09

 and selecting reverse, the stitch pattern will sew in reverse.
For all other stitch patterns, when reverse is selected, the machine will stop sewing where the needle is and sew locking stitches in place.
8
1
2
3
4
5
6
7
8
9
10
11
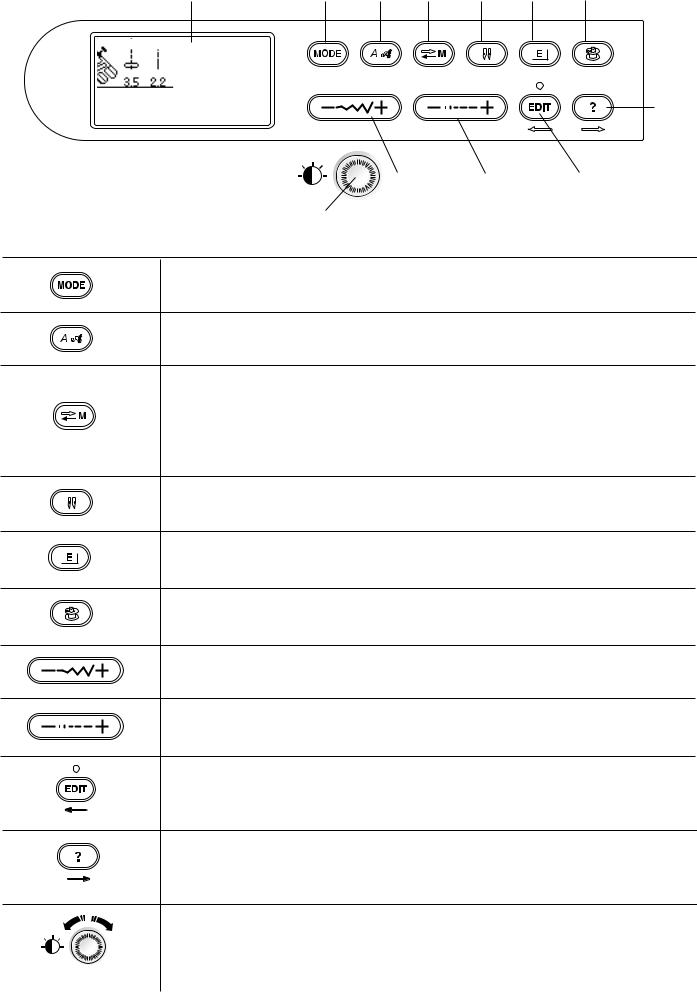
LCD Screen |
1 |
2 |
3 |
4 |
5 |
6 |
10
7 |
8 |
9 |
11
Mode button:
Press this button to select the desired mode.
Letter style button:
Press this button to change the letter style of monogram.
Memory/Recall button:
Press this button to register or recall programmed stitch pattern combinations.
The previous stitch pattern combination will be replaced by the new combination when pressing this button after programming. The memorized stitch pattern combination will be recalled when pressing this button on the initial screen of the selected mode.
Twin needle button:
Press this button when sewing with a twin needle. The machine will limit width to protect a 2.0 width double needle from breakage.
Elongation button:
Press this button to elongate satin stitch patterns in Mode 3.
Note: Not all stitch patterns can be elongated.
Bobbin winding button:
Press this button to wind the bobbin.
Stitch width adjusting button:
Press this button to alter the stitch width.
Stitch length adjusting button:
Press this button to alter the stitch length.
Editing button:
Press this button to edit the programmed stitch patterns.
In the editing mode this button is used to shift the cursor to the left.
Help button:
Press this button to view alternative applications of certain stitches and correct choice of sewing foot. In the editing mode this button is used to shift the cursor to the right.
LCD contrast adjusting dial:
Turn this dial to adjust contrast of the LCD Screen.
9
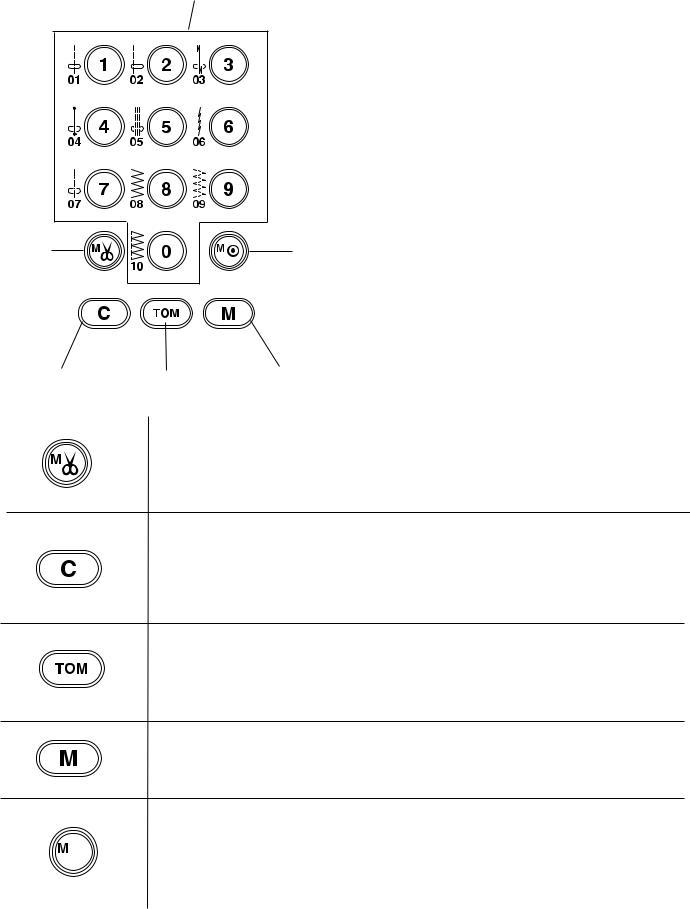
12 Pattern Selection Buttons
12 Pattern selection buttons
In Mode 1 (Direct Selection) you can press your desired stitch pattern directly from the pattern selection buttons. For example, selecting 08 will give you the zigzag stitch.
When Mode 2 (Quilting), Mode 3 (Utility), and Mode 4 (Lettering) are selected the pattern selection buttons are used to recall stitch patterns in those modes.
For example select Mode 3 and select 12, and you will see the automatic buttonhole on the LCD screen.
13
14
13
17
15 16
Auto thread cutter button:
Press this button after the last memorized stitch pattern and the machine will automatically trim the threads when sewing is finished.
14
15
16
Clear button:
When the clear button is pressed it will recall the stitch patterns that are programmed in the MODE that is on screen. The clear button can also delete a sequence of stitch
patterns that have been programmed. Hold the clear button in for a few seconds and the programmed stitch patterns will clear.
Turnover memory button:
The turnover memory button can be used in Mode 2 and Mode 3. Pressing the button after selecting a stitch program will mirror image the stitch pattern. In Mode 4, pressing this button will reduce the letters to 2/3 of their original size.
Memory button:
Press this button to memorize the desired stitch pattern on screen. Up to 50 stitch patterns can be stored in each of these modes: Mode 2, Mode 3 and Mode 4.
Locking stitch button:
Press this button after programming the last stitch pattern. The machine will sew 17  the stitch pattern combination programmed and auto-lock the last stitch pattern. The
machine will then automatically stop at the end of the sequence.
10
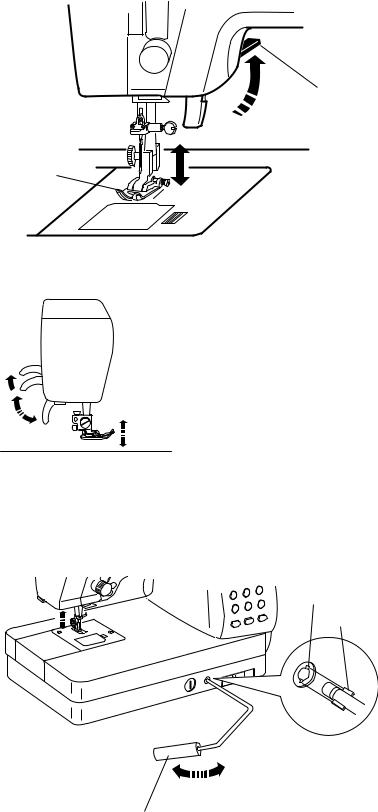
Raising and Lowering the Presser Foot
The presser foot lifter raises and lowers the presser foot.
You can raise the presser foot about 1/4” (0.7 cm) higher than the locked up position. The lifter will not stay locked at this higher setting. The extra area helps
1 when putting different presser feet on and putting bulky fabrics under the presser foot.
|
1 |
Presser foot lifter |
|
2 |
Presser foot |
2 |
3 |
Up position |
4 |
Extra lift |
NOTE
If you start to sew with the presser foot up, the machine will beep and the LCD screen will advise you to lower the presser foot.
4
3
|
|
|
Attaching the Knee Lifter |
|
|
|
The knee lifter is very helpful when quilting, sewing |
|
|
|
appliques, or when working with larger projects |
|
|
|
because it allows you to keep both hands on the fabric |
|
3 |
|
while your knee controls the presser foot. |
|
|
|
|
|
|
2 |
Match the ribs on the knee lifter with the notches in the |
|
|
machine socket and insert the knee lifter. |
|
|
|
|
|
|
|
|
1 Knee lifter |
|
|
|
2 Ribs |
|
|
|
3 Machine socket notches |
|
|
|
Push the knee lifter with your knee to raise and lower |
|
|
|
the presser foot. |
|
|
|
NOTE |
|
|
|
Keep leg away from lifter while sewing. Pressing on |
1 |
|
|
knee lift while sewing will effect feeding of fabric and |
|
|
the thread tension. |
11

2
3
1
6
5
4
2
1
 3
3
 2
2
1
Changing the Presser Foot
Many of the various presser feet can be changed easily with a push of the finger.
To snap off foot:
Raise the needle and presser foot to the up position. Press the button on the back of the presser foot holder and the foot will drop.
1Button
2Foot holder
3Presser foot
To snap on:
Align the presser foot so the pin on the foot lies just under the groove of the presser foot holder.
Lower the presser foot holder to lock the foot in place. Each foot is marked with a letter for identification.
4Groove
5Pin
6Identification letter
CAUTION
When selecting the proper foot for the stitch pattern selected, refer to the information in the LCD window. Also the help button can help you chose the right foot for the right sewing technique. See page 25 in the manual for further information.
Remember that not all stitches can be sewn with all of the feet. Be careful because the incorrect foot can cause needle damage and harm to your machine.
Removing and Attaching the Presser Foot
Holder
WARNING
Turn OFF the power switch before detaching or attaching the presser foot holder.
To detach:
Raise the presser foot holder up. With large screwdriver turn the thumbscrew counterclockwise to remove the presser foot holder from the needle bar.
1Thumbscrew
2Presser foot holder
To attach:
Align the hole in the presser foot holder with the threaded hole in the presser bar and insert the thumbscrew through the hole.
Tighten the thumbscrew by turning it clockwise. 3 Presser bar
12

1
2
3
4
5
6
7
8
9
10
11
12
13
14
Variety of Presser Feet and Their Uses
1 General purpose foot A:
The general purpose foot will be used for the majority of your sewing needs. The foot is designed to achieve good stitch quality when straight stitching.
2 Overedge foot C:
This foot is exclusively for overedging. The brush on the foot effectively prevents skipped stitches on the raw edge of fabrics. The brush also keeps lint build up off the needle when working with fabrics that have a nap or pile.
3 Narrow hemmer foot D:
This special foot is for sewing a narrow hem. The curl of the foot helps to form a hem at a constant width.
4 Zipper foot E:
This foot is for sewing zippers and also for creating and inserting piping.
5 Satin stitch foot F:
This clear plastic foot is ideal for satin stitching and decorative stitch patterns. The center groove on the bottom of the foot ensures smooth feeding of dense stitches.
6 Open toe foot F-2:
The open toe satin stitch foot for decorative stitching and appliqué.
7 Blind hem foot G:
This foot is specially designed for blind hemming. The guide on the foot helps feed the fabric and sew a straight and nearly invisible blind-hem.
8 Cording foot:
This foot is specially designed to hold one or three strands of cording to create braiding.
9 Overcasting foot M:
This foot is specially designed to simulate professional style overlocking. The wires on the foot effectively prevent the fabric edge from puckering or rolling.
10 Quarter inch foot with guide O:
This foot is useful for patchwork piecing. The guide on the foot helps to maintain an exact 1/4” (0.7 cm) seam allowance.
11 Button sewing foot T:
This foot is exclusively used for attaching a button. The grips on the foot hold the button securely in place while stitching.
12 Darning/Embroidery foot P-2:
This foot can be used with the basting stitch #07 in Mode 1. This foot can also be used for free-motion embroidery or stipple quilting.
13 Automatic buttonhole foot R:
This foot is for buttonholes and for darning. Place a button in the button holder on the rear of the foot. This automatically sets the buttonhole size. The buttonhole foot holds fabrics securely when sewing darning stitches.
14 Even feed / Walking foot:
This is a special attachment for fabrics that tend to shift when sewing. This foot helps prevent two fabrics from shifting and puckering when stitching. Use this foot for quilting multiple layers and matching plaids.
13
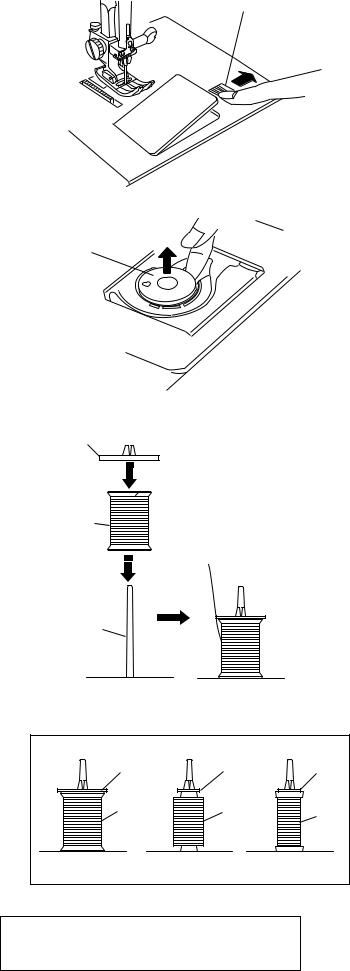
Winding the Bobbin
1
Removing the bobbin
Slide the bobbin case cover plate release button to the right and remove the bobbin case cover plate.
 2
2
3
3
1
2
3 |
5 |
5 |
1 |
4 |
4 |
Go to www.singerco.com for information on where to buy needles and bobbins.
Lift out the bobbin from the bobbin case.
1Bobbin case cover plate release button
2Bobbin case cover plate
3Bobbin
NOTE
Use only SINGER® Class 15 bobbins in your machine. Using improper sized bobbins and pre-wound bobbins may cause stitching problems. Improper bobbins can damage your bobbin case and machine.
Preparing the Thread Spool for Winding
Place the spool of thread on the spool pin with the thread coming off the spool as shown. Attach the spool cap and press it snug against the spool of thread.
1Spool of thread
2Spool pin
3Spool holder
A spool cap is used to prevent the spool moving as the thread feeds off. The cap also prevents thread catching on rough edges at the top of the spool. The automatic thread cutter works best when threads are held stationary with spool caps.
Use the large spool cap for large spools and the small spool cap for small spools.
4Small spool
5Small spool cap
NOTE
When sewing with decorative threads wound on paper spool spools the automatic thread cutter should not be used. The spool caps may not hold the spool from moving when the cutter activates. The movement can cause the threads to drop down from the spool. The pooling at the bottom of the spool will cause the thread to not feed off correctly.
14
|
1 |
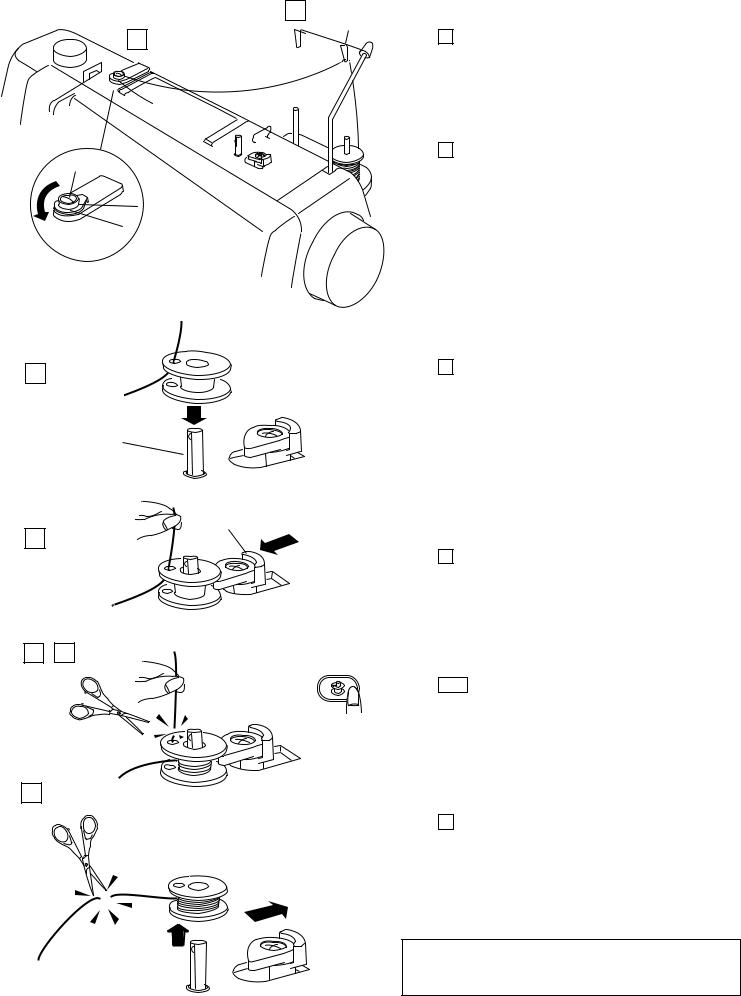
Winding the Bobbin |
|
1 |
|
2 |
|
|
|
Step 1 |
Pass the thread through the thread guide on the thread guide post from behind.
1 Thread guide bar
2
Step 2
Pass the thread under the bobbin winding tension disk.
2 Bobbin winding tension disk
3 |
Step 3 |
|
Thread through the hole in the bobbin from the |
|
inside to the outside. |
|
3 Bobbin winder spindle |
3
4
4
Step 4
Put the bobbin on the bobbin winder spindle. Push the bobbin winder stopper to the left.
4 Bobbin winder stopper
5 |
6 |
5 |
|
|
7
Step 5  6
6
Hold the free end of the thread in your hand and press the bobbin winding button.
Press the bobbin winding button again to stop the bobbin when it has made several turns, and cut the thread close to the hole in the bobbin.
5 Bobbin winding button
Step 7
Press the bobbin winding button again. When the bobbin is fully wound, the machine will stop automatically.
Return the bobbin winder stopper to its original position and cut the thread.
The SINGER® Studio™ S18 sewing machine has an independent motor for bobbin winding. Bobbins can be wound while sewing.
15
1 |
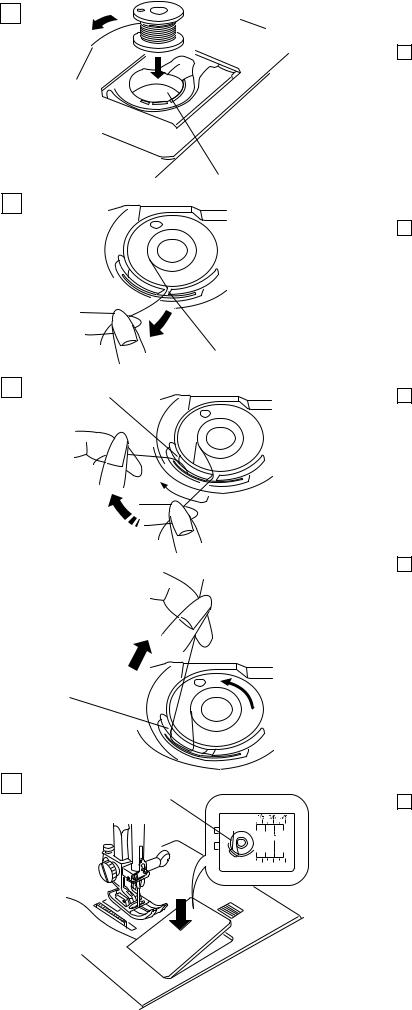
Inserting the Bobbin |
|
|
Step 1 |
|
|
Place the bobbin in the bobbin case with the |
|
1 |
thread coming off counter clockwise. |
|
|
1 |
Thread |
|
2 |
Bobbin case |
2
2
Step 2
Guide the thread into notch (A) on the front of the bobbin case.
|
|
(A) |
3 |
(B) |
Step 3 |
|
|
|
|
|
Draw the thread to the left, sliding it between the |
|
|
tension spring blades. |
|
Step 4 |
4 |
|
|
Continue to draw the thread lightly until the |
|
|
|
thread slips into side notch (B). The bobbin |
|
should turn counter clockwise when pulling the |
|
bobbin thread. |
(B)
5 |
3 |
|
Step 5
Pull out about 4” (10 cm) of thread to the rear. Refer to the threading chart shown on the bobbin case cover plate.
Reattach the bobbin case cover plate. 3 Threading diagram
16
|
|
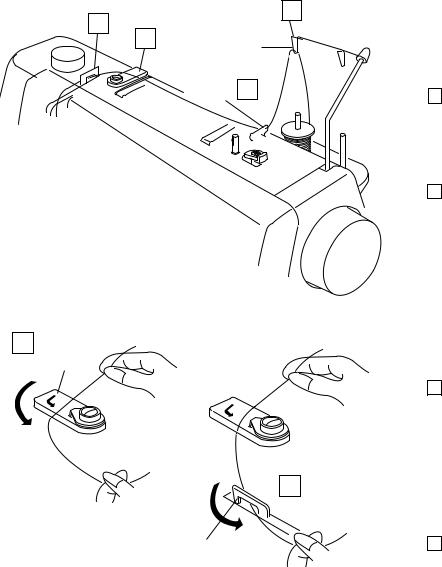
Threading the Machine |
|
4 |
|
1 |
|
|
Raise the presser foot lifter. Press the needle up/down |
||
3 |
1 |
||
button twice to raise the needle to its highest position. |
|||
|
|||
2 |
2 |
Step 1 |
|
|
|
||
|
|
Pass the thread up through the guide on the thread |
|
|
|
guide bar from behind. |
|
|
|
1 Thread guide bar |
|
|
|
Step 2 |
|
|
|
Pass the thread through the machine thread guide. |
|
|
|
2 Machine thread guide |
3
3
|
Step 3 |
|
Hold the upper thread with both hands as shown |
|
and slip it under the thread guide plate. |
|
3 Thread guide plate |
|
4 |
4 |
Step 4 |
Draw the thread toward you and pass it into the left thread guide. Draw the thread along the right channel.
4 Left thread guide
NOTE
This is a good time to make sure that the thread is feeding smoothly off the spools and the thread caps are secure.
17
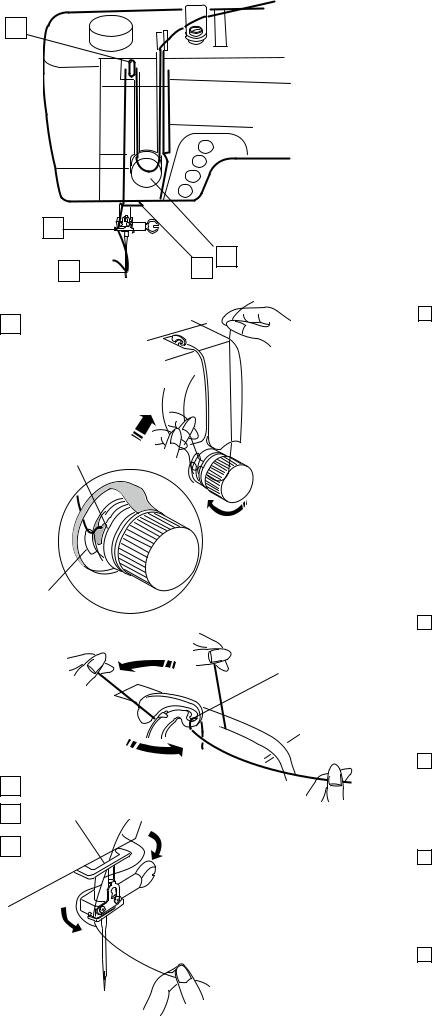
Threading the Machine (continued)
6
8 |
|
|
9 |
7 |
5 |
|
||
5 |
|
Step 5 |
|
Draw the thread down and around the tension |
|
|
|
|
|
|
dial from the right to the left. Pull the thread up |
|
|
to insert it between the tension disks and under |
|
|
the loop of the check spring. |
|
|
Be sure that the thread is coming out from |
|
|
notch of the disk. |
|
|
5 Check spring |
|
|
6 Notch |
6
5
|
|
Step 6 |
|
|
|
Firmly draw the thread up to the take-up lever |
|
6 |
|
||
|
|
and down into its eye from the right to the left. |
|
7 |
|||
7 Eye of the thread take-up lever |
|||
|
|
Step 7 |
7 |
|
Draw the thread down through the lower thread |
|
guide from the right. |
|
|
|
|
8 |
8 |
8 Lower thread guide |
9
Step 8
Slip the thread behind the needle bar thread guide on the left.
9 Needle bar thread guide
 9
9
Step 9
Thread the needle from front to back by hand or use the automatic needle threader.
18
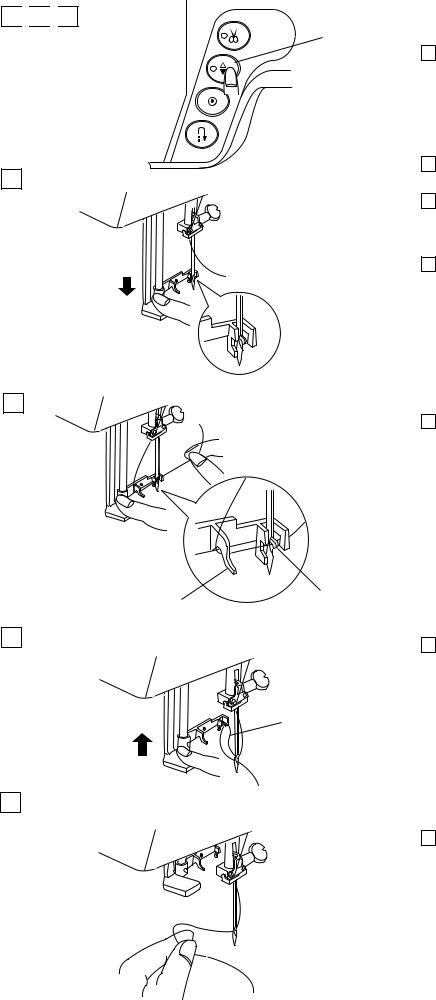
1 
 2
2 
 3
3
1
4
2 
 3
3
5
4 |
3 |
|
6
5
7
Automatic Needle Threader
Step 1
Raise the needle to its highest position by pressing the needle up/down button twice. Check that the needle in is a center position. A stitch width of 3.5 is centered.
1 Needle up/down button
Step 2
Turn the power switch off.
Step 3
Lower the presser foot.
Step 4
Depress the needle threader lever as far as it will go. The hook enters the needle eye from behind.
2Needle threader lever
3Hook
Step 5
Draw the thread down around the threader guide and under the hook.
4 Threader guide
Step 6
Release the threader lever slowly while holding the thread end with your hand lightly. A loop of the thread is pulled up through the needle eye.
5 Loop of thread
Step 7
Remove the loop from the threader and pull out the thread end from the needle eye.
NOTE
The automatic needle threader cannot be used for threading a twin needle or a hemstitching (wing) needle.
If the needle hook is missing the needle hole check that the needle is in a center needle position. (3.5)
19
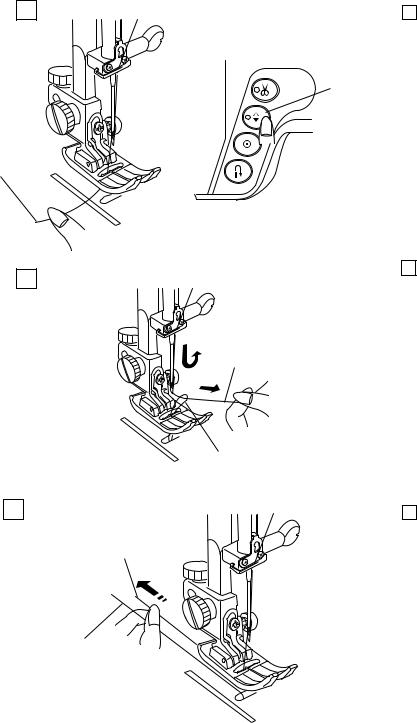
1
1
2
2
1
Drawing Up the Bobbin Thread
Step 1
Raise the presser foot lifter.
Hold the needle thread with your finger and press the needle up/down button twice to bring up the bobbin thread.
1Needle thread
2Needle up/down button
Step 2
Lift up the needle thread to bring up a loop of bobbin thread.
3 Bobbin thread
3
3 |
Step 3 |
|
Slide 4” (10 cm) of both threads to the back under |
1 |
the presser foot. You can also pull the threads up to |
|
the thread cutter on the machines cover plate. |
|
See page 5 of manual for machine identification. |
3
20
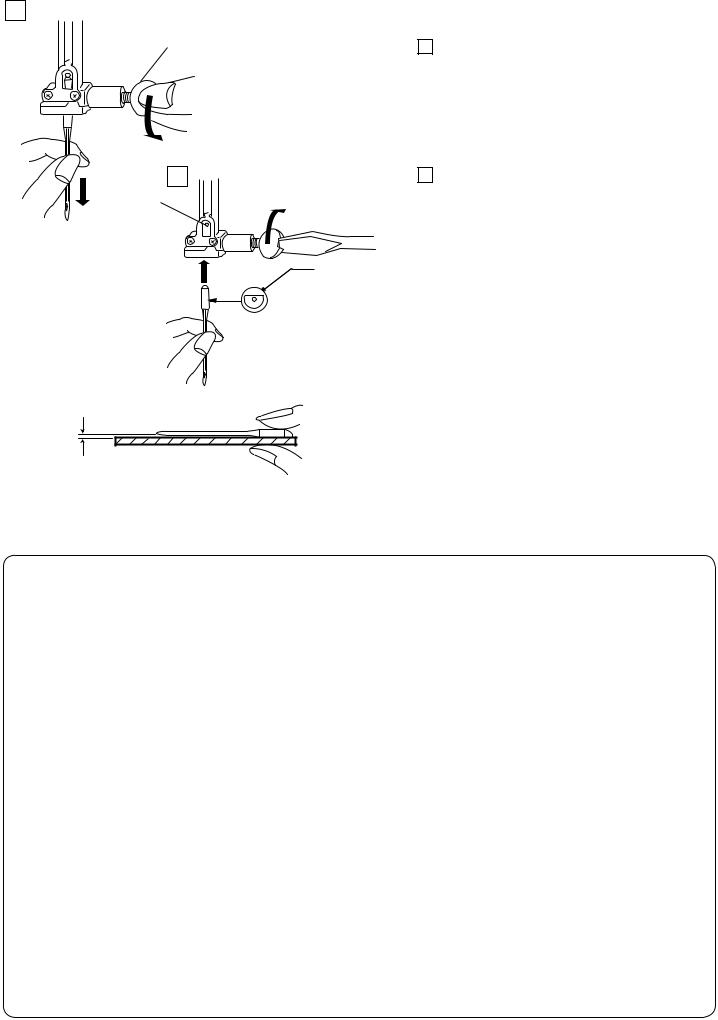
1 |
|
Changing Needles |
|
1 |
|
Step 1 |
|
|
|
|
|
|
|
Raise the needle by pressing the up/down needle |
|
|
|
button and lower the presser foot. |
|
|
|
Turn off the power switch. Loosen the needle clamp |
|
|
|
screw by turning it counterclockwise. |
|
|
|
Remove the needle from the clamp. |
|
|
|
1 Needle clamp screw |
|
2 |
|
Step 2 |
|
2 |
|
Insert a new needle into the needle clamp with the |
|
|
flat side of the needle to the rear. |
||
|
|
||
|
|
When inserting the needle into the needle clamp, |
|
|
|
push it up against the stopper pin and tighten the |
|
|
3 |
needle clamp screw firmly. |
|
|
2 |
Stopper pin |
|
|
|
||
|
|
3 |
Flat side |
|
|
To check needle straightness, place the flat side of the |
|
|
|
needle onto something flat (a needle plate, glass etc.) |
|
|
|
The gap between the needle and the flat surface should |
|
|
|
be consistent. |
|
|
|
4 Gap |
|
4 |
|
CAUTION |
|
|
|
||
|
|
Always make sure to turn the power switch off and |
|
|
|
disconnect the machine from power supply before |
|
|
|
changing the needle. Remove and discard damaged |
|
|
|
needles. Blunt, burred or bent needles can harm your |
|
|
|
machine and fabric. |
|
Thread and Needle Chart
Included with this machine is a package of 5 needles: A twin needle, a ballpoint needle, 2 regular point needles size 11, and a regular point needle size 14. When purchasing additional needles, refer to chart for recommended needle type and size.
Weight |
Fabric |
Type of needle |
|
Needle size |
||
Very Light |
Fine Lace, Net, Tulle |
SINGER® 2001 |
Chromium ballpoint needle |
11 |
||
|
|
SINGER® 2045 |
Ballpoint needle |
9 |
||
Light |
Batiste, Organdy, Voile, Lawn, Silk, Crepe, |
SINGER® 2000 |
Chromium regular point needle |
11 |
||
|
Chambray, Lightweight Linen, Gingham, |
SINGER® 2020 |
Regular point needle |
11 |
||
|
Challis, Wool Crepe, Taffeta, Satin, Organza |
|
|
|
|
|
|
|
|
|
|
||
|
Single Knits, Jersey, Swim Wear, Tricot |
SINGER® 2001 |
Chromium ballpoint needle |
11 |
||
|
|
SINGER® 2045 |
Ballpoint needle |
11 |
||
|
Leather, Suede, Oilcloth |
SINGER® 2032 |
Leather needle |
14 |
||
|
Flannel, Velvet, Muslin, Velveteen, Poplin, |
SINGER® 2000 |
Chromium regular point needle |
14 |
||
|
Corduroy, Broadcloth, Linen, Chintz, |
SINGER® 2020 |
Regular point needle |
14 |
||
Medium |
Gabardine, Terrycloth, Quilted Fabric |
|
|
|
|
|
|
|
|
|
|
|
|
|
Double Knits, Velour, Stretch Terry, |
SINGER® 2001 |
Chromium ballpoint needle |
14 |
||
|
Sweater Knits |
SINGER® 2045 |
Ballpoint needle |
14 |
||
|
|
|
|
|
||
|
Leather, Vinyl, Suede |
SINGER® 2032 |
Leather needle |
14 |
||
|
|
|
|
|
||
|
Denim, Sailcloth, Ticking, Twill |
SINGER® 2026 |
Denim needle |
16 |
||
Heavy |
|
|
|
|
|
|
Double Faced Wool, Heavy Coating, |
SINGER |
® |
2000 |
Chromium regular point needle |
16 |
|
|
|
|||||
|
Faux Fur, Burlap, Drapery Fabric |
SINGER® 2020 |
Regular point needle |
16 |
||
|
|
|
|
|
||
|
Leather, Suede |
SINGER® 2032 |
Leather Needle |
16 |
||
|
|
|
|
|
||
Very Heavy |
Canvas, Duck, Upholstery Fabrics |
SINGER® 2000 |
Chromium regular point needle |
16 |
||
|
|
SINGER® 2020 |
Regular point needle |
18 |
||
|
|
|
|
|
|
|
21
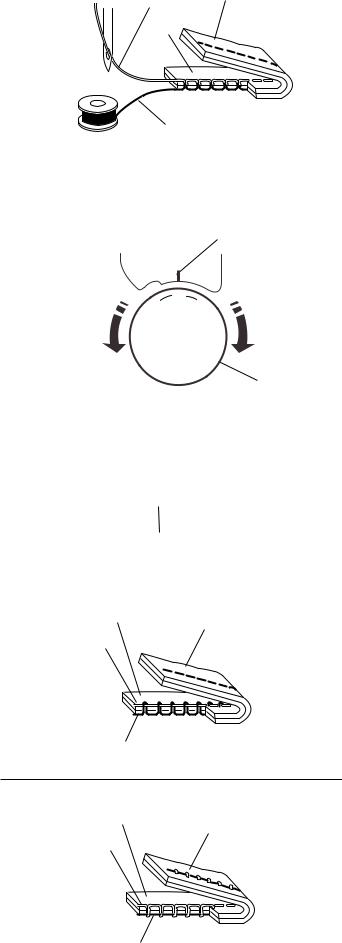
1 3
2
4
5
5 |
4 |
3 |
|
6 |
|
2 |
|
7 |
|
1 |
|
8 |
9 |
0 |
6 |
|
|||
|
|
||
|
|
|
7
2 3
1
4
2 3
1
4
Balancing Thread Tension
Correct tension:
The ideal straight stitch has threads locked evenly between two layers of fabric.
For an ideal zigzag stitch, the bobbin thread does not show on the right side of the fabric, and the needle thread shows slightly on the wrong side of the fabric.
1Needle thread
2Right side of the fabric
3Wrong side of the fabric
4Bobbin thread
Different threads and fabric types may require slight adjustments in the tension. Before making adjustments determine first that the machine is threaded correctly and the proper needle is being used.
Adjusting the tension
Thread tension may need adjusted for many reasons: Thread weight, fabric type, layers of fabric, needle type and stitch pattern selected.
Before adjusting the tension consult information on the LCD screen for the recommended tension setting for selected stitch pattern.
5Setting mark
6Tension control dial
7Recommended tension setting
If needle thread tension is too tight:
The bobbin thread will appear on the right side of the fabric. Loosen the needle thread tension by moving the dial to a lower number.
If needle thread tension is too loose:
The needle thread will appear on the wrong side of the fabric. Tighten the needle thread tension by moving the dial to a higher number.
22

|
|
Adjusting the Presser Foot Pressure |
|
1 |
|
The presser foot pressure dial should be set at “3” for |
|
|
|
regular sewing. |
|
|
|
Reduce the pressure for appliqué, sewing on fine |
|
|
|
synthetics and elastic fabrics. |
|
|
|
Set the dial at “1” when sewing on extra fine fabrics. |
|
|
|
1 |
Foot pressure dial |
|
2 |
2 |
Setting mark |
|
3 |
Recommended setting |
|
|
|
||
|
|
NOTE |
|
|
|
Do not reduce the foot pressure lower than “0”. |
|
3
|
|
|
|
|
|
Dropping the Feed Dogs |
|
1 |
|||||
|
|
|
|
|
|
The feed dogs can be lowered by the drop feed dog |
|
|
|
|
|
|
control lever. |
2 |
|
|
|
|
|
Move the drop feed control lever to the right to lower |
|
|
|
|
|
the feed dogs. |
|
|
|
|
|
|
|
|
|
|
|
|
|
|
Move the drop feed control lever. The feed dogs will |
|
|
|
|
|
|
not physically come up until the handwheel is rotated |
|
|
|
|
|
|
toward you one full revolution, or until you start to sew. |
1 Feed dog lever
2 Feed dog down
3 Feed dog up
3
4
Whenever the feed dogs are lowered a message will come up on the LCD screen when foot control is depressed.
An alarm will beep when starting to sew with the feed dogs down, also. The machine will not sew unless the following stitch patterns are selected.
MODE 1: 01, 02, 08 and 09
MODE 2: 25, 28, 53, 54, 55, 56, 57, and 60.
When these stitch patterns are selected you must press the foot control down again after you hear the alarm and see the message on screen. The machine will not sew with the feed dogs lowered when all other stitch patterns are selected.
4 Message on the LCD screen
23
 Loading...