

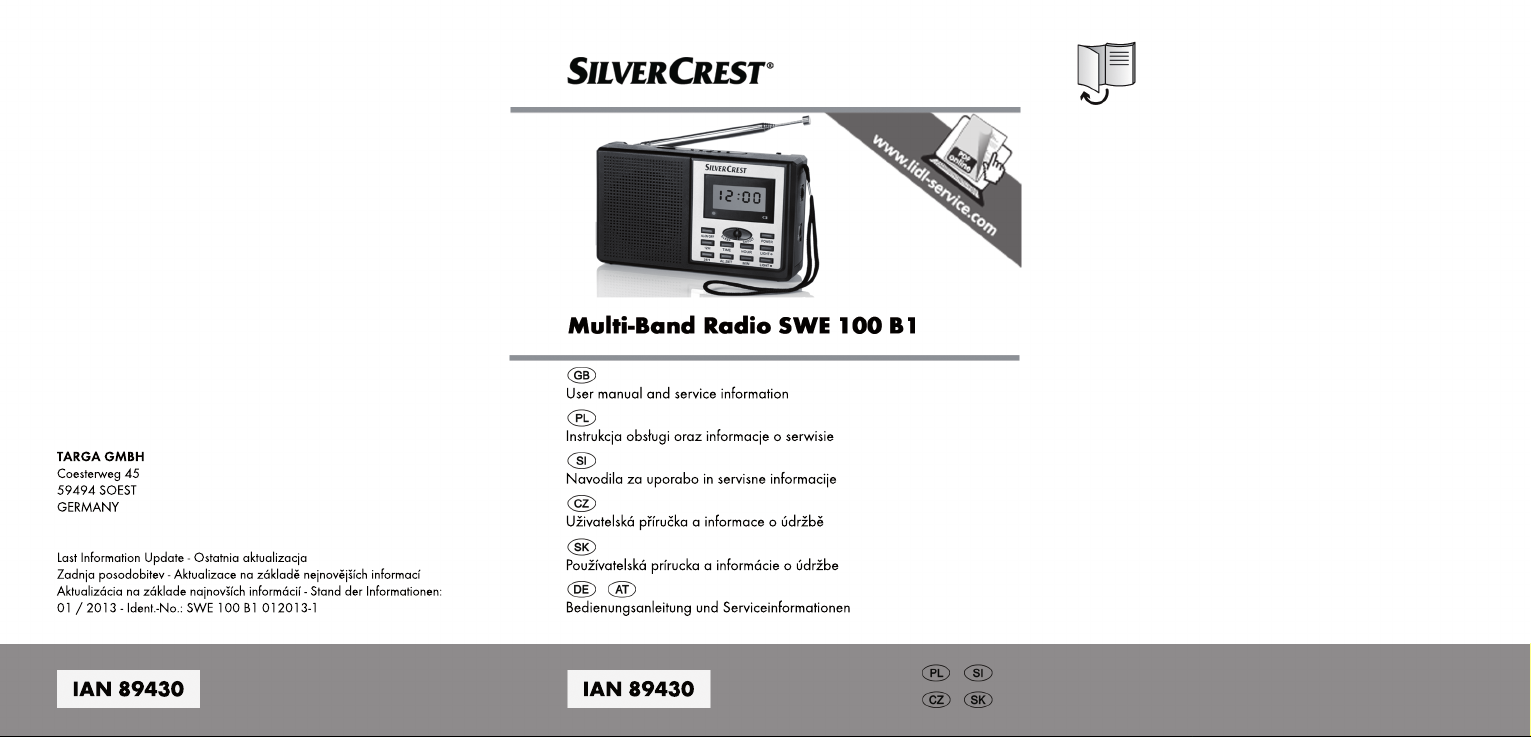
Page 1
Page 2
Page 3

English ................................................................................. 2
Polski ................................................................................ 30
Slovenščina ....................................................................... 58
Česky ................................................................................ 87
Slovensky ....................................................................... 115
Deutsch ........................................................................... 143
V 1.51
Page 4

Multi-Band Tuner SWE 100 B1
Table of Contents
Introduction ......................................................................... 3
Intended Use ....................................................................... 4
Package Contents ................................................................ 5
Technical Specifications ........................................................ 6
Safety instructions ............................................................... 7
Danger Through Noise Disturbance .......................................................... 7
Copyright ...................................................................................................... 8
Operating Environment ............................................................................... 8
Batteries ...................................................................................................... 10
Children ...................................................................................................... 10
Maintenance / Cleaning .......................................................................... 11
Overview .......................................................................... 12
Display ........................................................................................................ 14
Stand ........................................................................................................... 15
Before Getting Started ....................................................... 16
Inserting the Batteries................................................................................. 17
Connecting a Plug-Type Power Adapter .................................................. 18
Getting Started .................................................................. 18
Powering the Device On/Off ................................................................... 18
Setting the Time .......................................................................................... 19
Tuning a Station ......................................................................................... 20
Setting the Alarm Clock ............................................................................. 21
Enabling the Alarm .................................................................................... 22
The Sleep Timer .......................................................................................... 23
Connecting the Headphones .................................................................... 24
Backlight ..................................................................................................... 24
2 - English
Page 5
Multi-Band Tuner SWE 100 B1
Setting the Sensitivity ................................................................................. 25
Selecting the Time Format ......................................................................... 25
Troubleshooting ................................................................ 26
Environmental Considerations and Recycling .................... 27
Disposal of packaging .............................................................................. 27
Disposal of Batteries .................................................................................. 27
Conformity ........................................................................ 28
Warranty Information ....................................................... 28
Introduction
Thank you for choosing a SilverCrest product.
The multi-band tuner SilverCrest SWE 100 B1 is capable of tuning up to 6
different short-wave bands, the FM (VHF) band and the AM (medium
wave) band. Furthermore the device features a digital clock with alarm
clock function.
Please read the following pages for instructions on how to use your
product.
This icon denotes important information for the safe
operation of the product and for the user’s safety.
This symbol denotes further information on the topic.
English - 3
Page 6

Multi-Band Tuner SWE 100 B1
Intended Use
This device is a consumer electronics device. It has been designed to
receive and playback radio broadcasting stations. Furthermore, the device
may be used as an alarm clock. It may only be used for private use, not
industrial or commercial purposes. Furthermore, the device may not be
used in tropical climates. The manufacturer is not liable for any damage or
interference caused by unauthorized modifications. Only use the
accessories recommended by the manufacturer. Please observe the
regulations and laws in the country of use.
Please note that country-specific regulations may exist regarding the
frequency bands that can be received. Any information received from
frequency bands located outside those that are explicitly free for public
use may not be used, nor may its contents be forwarded to any third
parties.
4 - English
Page 7
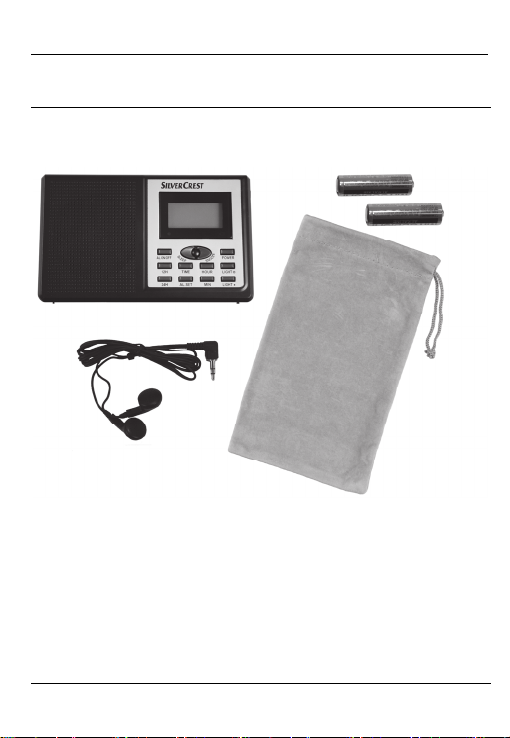
Package Contents
Multi-band tuner SWE 100 B1
2 AA-sized batteries, 1.5 V
Pouch
Earphones SWE 100 B1
Multi-Band Tuner SWE 100 B1
English - 5
Page 8
Multi-Band Tuner SWE 100 B1
y
l
Technical Specifications
This information describes the technical characteristics of
our device. Different national regulations may apply in
different countries regarding the frequency bands that are
free for public use. Please note that receiving any
information from bands outside these frequency bands wil
be illegal and may be subject to law enforcement.
Operating voltage 3 V
Power adapter plug polarity
Max. current consumption 100 mA
Battery Type 2x AA 1.5 V (LR6)
Output power 100 mW
Frequency bands
Please note that the given tuning
bands may slightly vary upwards or
downwards because of product
tolerances.
Dimensions 129 x 79 x 33 mm (W x H x D)
Weight 160 g (without batteries)
Headphones SWE 100 B1
Impedance 32 Ohms
6 - English
FM 87,5 - 108 MHz
MW 520 - 1620 kHz
SW1 5,9 - 6,2 MHz
SW2 9,4 - 9,9 MHz
SW3 11,6 - 12,1 MHz
SW4 13,57 - 13,87 MHz
SW5 15,1 - 15,8 MHz
SW6 17,48 - 17,9 MHz
Page 9
Multi-Band Tuner SWE 100 B1
Wide Band Characteristic
Voltage approx. 180 mV
Max. sound pressure level with
supplied headphones approx. 90 dB(A)
Max. output voltage on
headphones jack approx. 80 mV
Operating temperature 5 °C to 35 °C
Storage temperature -10 °C bis 50 °C
Operating humidity 85 % rel. humidity
The technical data and design may be changed without notification.
Safety instructions
Before you use this device for the first time, please read the following notes
in this manual and heed all warnings, even if you are familiar with
handling electronic devices. Keep this manual safe for future reference. If
you sell the device or pass it on, it is essential you hand over this manual
also.
Danger Through Noise Disturbance
Caution when using headphones. Listening at high volume
can harm the user’s auditory system.
English - 7
Page 10
Multi-Band Tuner SWE 100 B1
Copyright
The entire content of this User’s Manual is copyrighted and is provided to
the reader for information purposes only.
Copying data and information without prior written and explicit
authorization from the author is strictly forbidden. This also applies to any
commercial use of the contents and information.
All texts and figures are up-to-date as per the date of print release.
Operating Environment
The device is not for use in environments with high temperatures or
humidity (e.g. bathrooms), and must be kept free of dust. Operating
temperature and operating humidity: 5°C to 35°C, max. 85 % RH.
Always make sure that:
there is free circulation of air (do not place the device on shelves, on a
carpet, on a bed, or anywhere that obstructs the ventilation slots, and
leave at least 10 cm clearance on all sides;
no direct heat sources (e.g. heating) can affect the device;
no direct sunlight or bright artificial light reaches the device;
contact with sprayed and dripping water and abrasive liquids must be
avoided and the device should never be operated near water. It must
8 - English
Page 11

Multi-Band Tuner SWE 100 B1
especially never be immersed (do not place any recipients containing
liquids such as beverages, vases, etc. onto or next to the device);
the device is never placed in the immediate vicinity of magnetic fields
(e.g. loudspeakers);
no fire sources (e.g. burning candles) are placed on or near the
device;
no foreign bodies are introduced into the device;
the device is not subject to any great temperature changes as this may
cause moisture through condensation and short-circuit;
the device is not subject to excessive shocks and vibrations;
the device or an optional mains power adapter is not used during
thunder and lightning storms and unplug the mains power adapter
from the mains;
English - 9
Page 12
Multi-Band Tuner SWE 100 B1
Batteries
Insert the batteries with the correct polarity. Refer to the polarity markings
beside the battery compartment. Do not try to recharge the batteries and
do not throw batteries into fire. Do not mix batteries (old and new or
carbon and alkaline, etc.). Remove batteries when the device is not to be
used for a long time. Non-intended use may cause explosion and danger
to life.
Children
Electrical appliances do not belong in the hands of children! Do not allow
children to use electrical devices when not under supervision. Children
may not comprehend the presence of potential risks. Small parts can
represent choking hazards. If a battery is swallowed, seek medical help
immediately. Keep the packaging away from children too as there is
danger of suffocation.
10 - English
Page 13

Multi-Band Tuner SWE 100 B1
Maintenance / Cleaning
Repairs are required when this device has been damaged in any way, for
example, when the power adapter or device housing is damaged, when
liquids or objects have entered the device or when the product has been
exposed to rain or moisture. Repairs are also necessary when the product
does not perform normally or if it has been dropped. If smoke, unusual
noises or smells are noticed, power off the device immediately. In these
cases the device should not be used further and should be inspected by
authorized service personnel. Please contact qualified personnel when
servicing is needed. Never open the housing of the device. Only use a
clean, dry cloth for cleaning. Never use any corrosive liquids. Do not
attempt to open the housing of the device otherwise you will void your
warranty.
English - 11
Page 14
Multi-Band Tuner SWE 100 B1
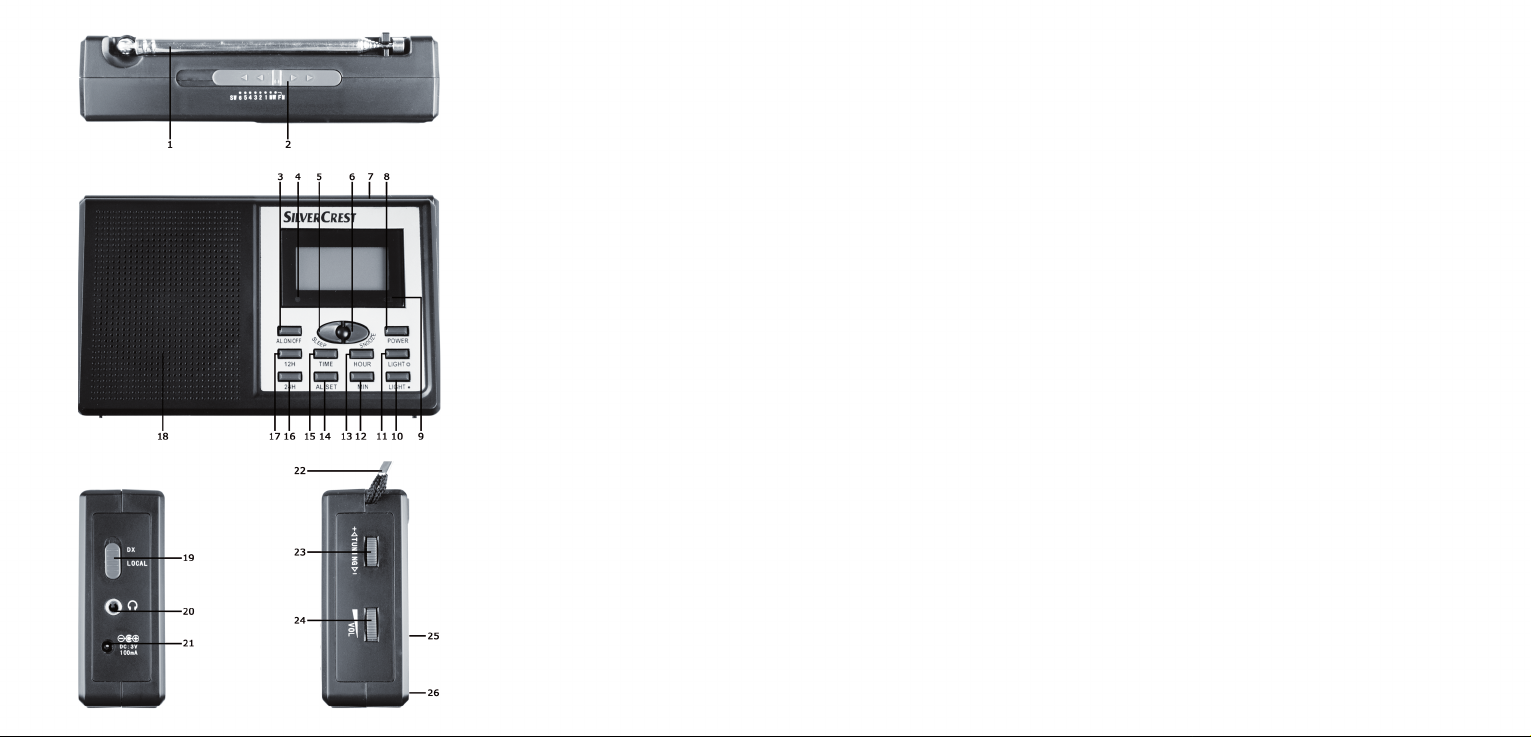
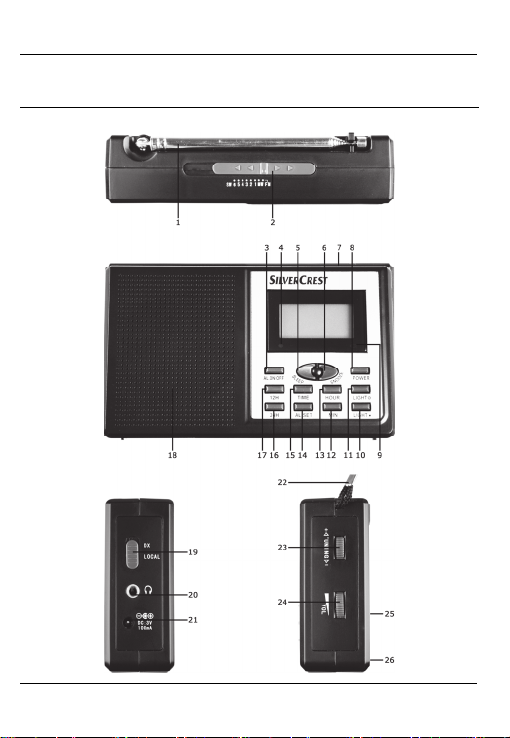
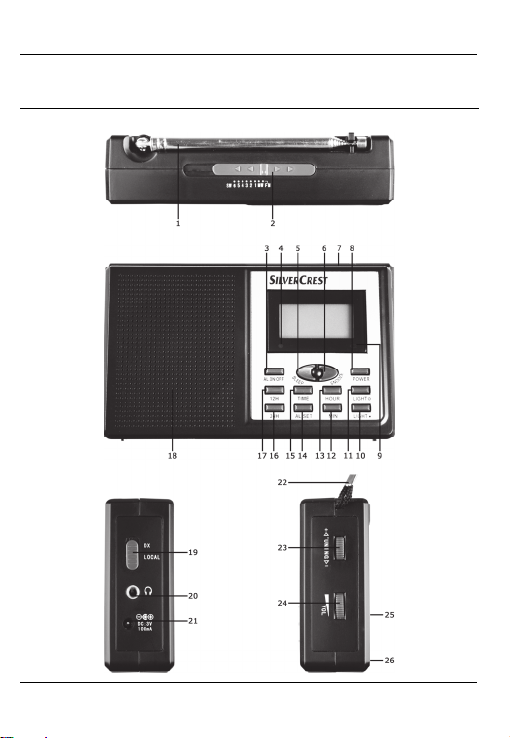
Overview
12 - English
Page 15

Multi-Band Tuner SWE 100 B1
1 Telescopic antenna
2 Band selector
3 Alarm on/off
4 POWER LED
5 Sleep Timer
6 Repeat alarm / Snooze
7 Display
8 On/Off button
9 Battery level indicator
10 Backlight off
11 Backlight on
12 Select minutes
13 Select hours
14 Set alarm clock time
15 Set time
16 24-hours display
17 12-hours display
18 Speaker
19 DX/Local switch
20 Headphones connector jack
21 Connection for plug-type power adapter (optional, Polarity
)
22 Strap
23 Frequency dial knob
24 Volume control
25 Stand (on the back)
26 Battery compartment (on the back)
English - 13
Page 16
Multi-Band Tuner SWE 100 B1
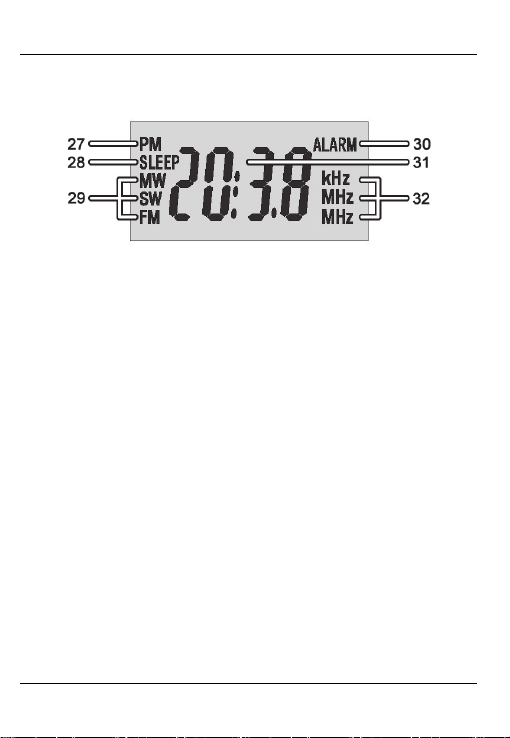
Display
27 Afternoon indicator (PM)
28 Sleep Timer
29 Frequency band
30 Alarm indicator
31 Clock/frequency display
32 Frequency unit
14 - English
Page 17

Multi-Band Tuner SWE 100 B1
Stand
On the back panel of the device you’ll find a stand [25] that allows to
install the multi-band tuner in an almost vertical position. To do this, fold-out
the retractile stand [25].
English - 15
Page 18
Multi-Band Tuner SWE 100 B1
d
Before Getting Started
You can power the device on either by using the supplied AA-sized
batteries or by using an optional plug-type power adapter (not supplied).
The power adapter must feature a compatible power plug and output a
voltage of 3V.
Do not use both means of power supply at the same
time. Remove batteries when the device is to be operate
using the power adapter.
16 - English
Page 19

Multi-Band Tuner SWE 100 B1
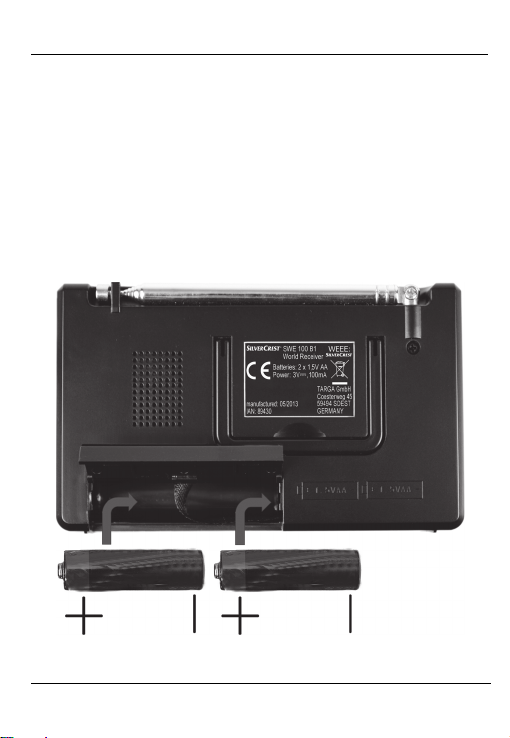
Inserting the Batteries
Unplug the power adapter cable if there is one connected to the product.
Open the battery compartment cover [26] on the back panel of the device
by sliding it in the direction of the printed arrow and folding it out. Insert
the batteries with the correct polarity (+ and -), as shown in the following
figure. The correct polarity is labelled on the batteries and beside the
battery compartment. Close the battery compartment cover and slide it in
the opposite direction of the arrow.
English - 17
Page 20
Multi-Band Tuner SWE 100 B1
W
The device features a battery level indicator [9]. If it lights yellow, the
batteries are empty. When this happens, replace the batteries with new
batteries of the same type.
Remove batteries when the device is not to be used for a
long time.
Connecting a Plug-Type Power Adapter
Remove the batteries from the battery compartment [26] located on the
back panel of the device if any are inserted. Plug the power adapter plug
into the receptacle [21] of the multi-band tuner. Plug the power adapter
into an easily accessible wall outlet.
hen laying the cable, make sure it cannot cause a trip
hazard.
Getting Started
Powering the Device On/Off
To power the device on, press the On/Off button [8] once. When
powered on, the POWER LED [4] will light green and the device will
display the currently tuned-in frequency and the frequency band (FM,
MW, SW).
18 - English
Page 21
Multi-Band Tuner SWE 100 B1
To power the device off, press the On/Off button [8] again. When
powered off, the current time will be shown on the display [7].
Setting the Time
The time can only be set while the device is powered off. If it is still
powered on, press the On/Off button [8] to power the device off.
Use the 12H button [17] and 24H button [16] to change
between the 12- and 24-hour time display.
Press and hold the TIME button [15].
Then press the HOUR button [13] repeatedly to set the hour. You can
also keep the HOUR button [13] pressed down to accelerate the digit
adjustment. To distinguish ante meridian (morning) and post meridian
(afternoon) time for the 12-hour display, "PM" [27] will display for post
meridian clock hours.
Keep the TIME button [15] pressed. Then press the MIN button [12]
repeatedly to set the minutes. You can also keep the MIN button [12]
pressed down to accelerate the digit adjustment.
Release the TIME button [15] after the clock has been set correctly.
Please note that you should adjust the clock when you
move into a different time zone.
English - 19
Page 22

Multi-Band Tuner SWE 100 B1
Tuning a Station
You can only pivot the telescopic antenna and not retract
it into the device housing, otherwise you risk seriously
damaging your device.
Power the device on.
Use the volume adjustment button [24] to set the desired sound
volume.
First select the desired frequency band. To do this, use the band
selector [2]. The currently tuned frequency band will show on the
display [7].
Fully extract the telescopic antenna [1].
Rotate the frequency dial knob [23] to tune the desired frequency. The
frequency displays in MHz (for FM and SW) and in kHz (for MW). If
required, move the telescopic antenna into a different position or move
the device to optimise reception of the current station.
20 - English
Page 23

Multi-Band Tuner SWE 100 B1
Setting the Alarm Clock
Make sure that the clock has been set correctly (see the page 19 - Setting
the Time). The alarm time can only be set while the device is powered off.
If it is still powered on, press the On/Off button [8] to power the device
off.
Press and hold the AL.SET button [14]. The indication “ALARM” [30]
starts blinking on the display.
Then press the HOUR button [13] repeatedly to set the hours of the
alarm time. You can also keep the HOUR button [13] pressed down to
accelerate the digit adjustment. To distinguish ante meridian (morning)
and post meridian (afternoon) time for the 12-hour display, "PM" [27]
will display for post meridian clock hours.
Keep the AL.SET button [14] pressed. Then press the MIN button [12]
repeatedly to set the minutes of the alarm time. You can also keep the
MIN button [12] pressed down to accelerate the digit adjustment.
Release the AL.SET button [14] after the alarm clock has been set
correctly.
English - 21
Page 24
Multi-Band Tuner SWE 100 B1
d
Enabling the Alarm
After the desired alarm time has been set, you can enable the alarm as
follows:
Press the AL.ON/OFF button [3]. The indication “ALARM” [30]
appears on the display.
To disable the alarm, press the AL.ON/OFF button [3] again. The
indication “ALARM” [30] disappears.
The device will power on at the set alarm time and will receive the last
tuned-in frequency and frequency band.
Press the AL.ON/OFF button [3] to switch the device off. To disable
the alarm, press the AL.ON/OFF button [3] again.
or
Press the SNOOZE button [6] to delay the alarm for approx. 5
minutes. After this delay, the device will power on again.
Even when the alarm function is enabled, you can use
the device as usual. However, remember that the device
always powers on with the last tuned-in frequency an
frequency band as well as the last volume setting.
The alarm function will work only if the device has been
powered off previously.
22 - English
Page 25

Multi-Band Tuner SWE 100 B1
p
The Sleep Timer
The sleep timer allows you to have the device power off automatically
after a set delay time has elapsed.
While the device is powered on or off, press the SLEEP button [5]. The
number “60” will appear on the display showing that the device will
power off automatically after 60 minutes.
Press the SLEEP button [5] multiple times to decrease the countdown
time shown. Each press of the button will reduce the delay time 10
minutes.
If you have reached the delay time “0”, the sleep timer will be
disabled, thus the device will stay on. You can press the SLEEP button
[5] again to select the delay time from the beginning.
While the sleep timer countdown is running, you can
ower the device off at any time by pressing the On/Off
button.
English - 23
Page 26
Multi-Band Tuner SWE 100 B1
Connecting the Headphones
Set the volume to the lowest level before connecting the
headphones in order to avoid damaging your hearing.
You can then set the volume to the level you want.
Do not use any headphones other than the supplied
SWE 100 B1. Different headphones can produce
harmful sound pressure levels.
Caution when using headphones. Listening at high
volume can harm the user’s auditory system.
You can connect the supplied headphones SWE 100 B1 to the
headphones connector [20]. While the headphones are plugged in, the
speaker [18] is muted automatically.
Backlight
While the device is powered on or off, press the LIGHT ☼ button [11] to
turn the backlight on for approx. 5 seconds.
While the backlight is on you can press the LIGHT button [10] to turn it
off.
24 - English
Page 27

Multi-Band Tuner SWE 100 B1
Setting the Sensitivity
Slide the DX/LOCAL switch [19] to the “DX” position to use the device in
normal mode.
Slide the DX/LOCAL switch [19] to the “LOCAL” position to receive strong
broadcasting station signals only. This is recommended whenever a
weaker local station is receiving interference from a stronger non-local
station.
Selecting the Time Format
Use the 12H button [17] and 24H button [16] to change between the 12and 24-hour time display.
Press the 12H button [17] for 12-hour time display or the 24H button [16]
for 24-hour time display. To distinguish post meridian (afternoon) time for
the 12-hour display, the "PM" icon [27] will display for post meridian clock
hours.
English - 25
Page 28

Multi-Band Tuner SWE 100 B1
Troubleshooting
The device does not switch on
The batteries may be empty, fit new batteries.
Test that the batteries are fitted with the correct polarity. Check the
diagram next to the battery compartment and on the batteries. See
also the description on page 17.
No radio reception, poor radio reception
Pull the telescopic FM antenna [1] all the way out and make sure it is
aligned correctly.
Tune to the station you want using the band switch [2] and the
frequency dial knob [23].
Check whether the DX/LOCAL switch [19] is in the correct position.
See also the chapter on "Setting the Sensitivity" on page 25.
Device switched on but no sound
Check the volume setting.
26 - English
Page 29
Multi-Band Tuner SWE 100 B1
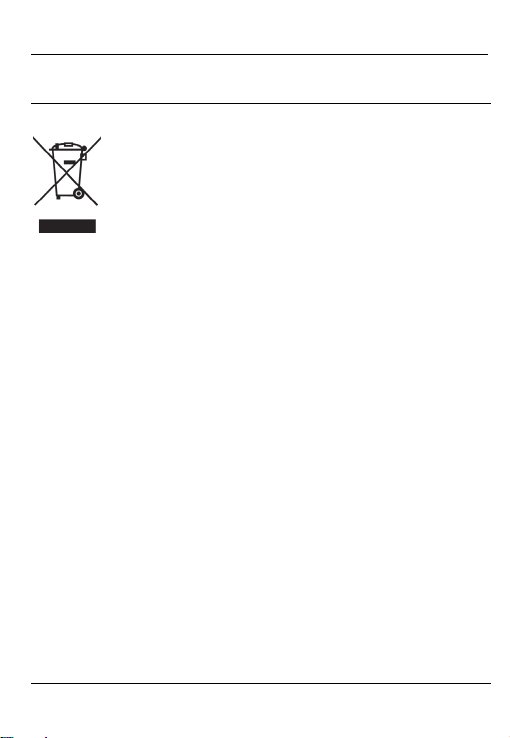
Environmental Considerations and Recycling
If the product is labelled with a struck-out waste bin, it is
subject to the European Guideline 2002/96/EC. All electric
and electronic devices must be disposed of separately from
household waste at established bodies. With the proper
disposal of old or defective devices you avoid damage to
the environment and your personal health. For further information about
proper disposal, contact your local government, disposal bodies or the
shop where you bought the device.
Disposal of packaging
Also recycle the packaging material properly. Cardboard packaging can
be taken to paper recycling containers or public collection points for
recycling. Any films or plastic contained in the packaging should be taken
to your public collection points.
Disposal of Batteries
Respect the environment. Old batteries do not belong in with domestic
waste. They must be handed in to a collection point for old batteries.
Please note that batteries must be disposed of fully discharged at
appropriate collection points for old batteries. If disposing of batteries
which are not fully discharged, take precautions to prevent short circuits.
English - 27
Page 30

Multi-Band Tuner SWE 100 B1
Conformity
This device complies with the basic and other relevant
requirements of EMC Directive 2004/108/EC and the
RoHS II Directive 2011/65/EU.
Warranty Information
Warranty of TARGA GmbH
This device is sold with three years warranty from the date of purchase.
Please keep the original receipt in a safe place as proof of purchase.
Before using your product for the first time, please read the enclosed
documentation or online help. Should any problems arise which cannot be
solved in this way, please call our hotline. Please have the article number
and, if available, the serial number to hand for all enquiries. If it is not
possible to solve the problem on the phone, our hotline support staff will
initiate further servicing procedures depending on the fault. Within the
warranty period the product will be repaired or replaced free of charge as
we deem appropriate. No new warranty period commences if the product
is repaired or replaced. Consumables such as batteries, rechargeable
batteries and lamps are not covered by the warranty.
Your statutory rights towards the seller are not affected or restricted by this
warranty.
28 - English
Page 31

Multi-Band Tuner SWE 100 B1
Service
E-Mail: service.GB@targa-online.com
E-Mail: service.IE@targa-online.com
E-Mail: service.MT@targa-online.com
E-Mail: service.CY@targa-online.com
TARGA GmbH
IAN: 89430
Manufacturer
Coesterweg 45
59494 SOEST
GERMANY
Phone: 0207 – 36 50 744
Phone: 01 – 242 15 83
Phone: 800 – 62 175
Phone: 800 – 92 496
English - 29
Page 32

Radio wielopasmowe SWE 100 B1
Spis treści
Wprowadzenie ................................................................. 31
Przeznaczenie ................................................................... 32
Zawartość opakowania .................................................... 33
Dane techniczne................................................................. 34
Ważne instrukcje związane z bezpieczeństwem ............... 35
Niebezpieczeństwo spowodowane głośnym dźwiękiem ...................... 35
Prawa autorskie ......................................................................................... 36
Środowisko pracy ...................................................................................... 36
Baterie ......................................................................................................... 38
Dzieci .......................................................................................................... 38
Konserwacja i czyszczenie ....................................................................... 39
Charakterystyka ............................................................... 40
Wyświetlacz ............................................................................................... 42
Podpórka .................................................................................................... 43
Zanim zaczniesz ................................................................ 44
Wkładanie baterii ...................................................................................... 45
Podłączanie zasilacza zintegrowanego z wtyczką ............................... 46
Rozpoczynamy .................................................................. 46
Włączanie/wyłączanie urządzenia ........................................................ 46
Ustawienie godziny ................................................................................... 47
Wybieranie stacji ....................................................................................... 48
Ustawianie budzika ................................................................................... 49
Włączanie budzika ................................................................................... 50
Programator wyłączania ........................................................................... 51
Podłączanie słuchawek ............................................................................. 52
Podświetlenie.............................................................................................. 52
30 - Polski
Page 33

Radio wielopasmowe SWE 100 B1
Ustawianie czułości ................................................................................... 53
Wybieranie formatu czasu ....................................................................... 53
Rozwiązywanie problemów ............................................. 54
Ochrona środowiska i recykling ....................................... 55
Utylizacja opakowania ............................................................................. 55
Utylizacja baterii ........................................................................................ 55
Zgodność .......................................................................... 56
Gwarancja ........................................................................ 56
Wprowadzenie
Dziękujemy za zakup produktu SilverCrest.
Wielopasmowe radio SilverCrest SWE 100 B1 obsługuje 6 różnych pasm
fal krótkich, pasmo fal ultrakrótkich FM (VHF) oraz pasmo fal średnich
AM. Ponadto wyposażone jest w zegar cyfrowy z budzikiem.
Niniejsza instrukcja zawiera informacje o tym, jak korzystać z tego
produktu.
Ten symbol oznacza ważne informacje dotyczące
bezpiecznej obsługi produktu i bezpieczeństwa
użytkownika.
Ten symbol oznacza dodatkową informację związaną z
omawianym tematem.
Polski - 31
Page 34

Radio wielopasmowe SWE 100 B1
Przeznaczenie
Opisywane urządzenie jest urządzeniem elektronicznym klasy
konsumenckiej. Zaprojektowano je z myślą o odbiorze i odtwarzaniu
stacji radiowych. Ponadto urządzenie może służyć jako budzik. Może być
użytkowane wyłącznie w warunkach domowych, a nie w zastosowaniach
przemysłowych czy komercyjnych. Z urządzenia nie można korzystać w
klimacie tropikalnym. Producent nie ponosi odpowiedzialności za
jakiekolwiek szkody lub zakłócenia spowodowanie nieautoryzowanymi
modyfikacjami. Używać wyłącznie akcesoriów zalecanych przez
producenta. Prosimy postępować zgodnie z przepisami i regulacjami
obowiązującymi w kraju użytkowania produktu.
Zwraca się uwagę, że mogą istnieć przepisy krajowe dotyczące
odbieranych częstotliwości. Wszelkie informacje pochodzące z pasm
częstotliwościowych spoza tych dopuszczonych do odbioru publicznego
nie powinny być odbierane, a pozyskanych w ten sposób materiałów nie
wolno przekazywać innym.
32 - Polski
Page 35

Zawartość opakowania
Radio wielopasmowe SWE 100 B1
2 baterie AA 1,5 V
Etui
Słuchawki SWE 100 B1
Radio wielopasmowe SWE 100 B1
Polski - 33
Page 36

Radio wielopasmowe SWE 100 B1
W
ć
Dane techniczne
Niniejsze informacje stanowią charakterystykę
techniczną urządzenia.
zastosowanie różne przepisy krajowe w zakresie pasm
częstotliwości dostępnych do użytku publicznego.
Odbieranie informacji na falach spoza tych
dozwolonych częstotliwości jest nielegalne i może by
ścigane z mocy prawa.
Napięcie 3 V
Biegunowość wtyku zasilacza
Maks. pobór prądu 100 mA
Typ baterii 2 baterie AA 1,5 V (LR6)
Moc wyjściowa 100 mW
Pasma częstotliwości
Informujemy, że podane pasma
strojenia mogą się nieco różnić w
górę lub w dół ze względu na
tolerancje produkcyjne.
Wymiary 129 x 79 x 33 mm (szer. x wys. x
Waga 160 g (bez baterii)
Słuchawki SWE 100 B1
Impedancja 32 omy
34 - Polski
różnych krajach mogą mieć
FM 87,5 MHz - 108 MHz
AM 520 - 1620 kHz
SW1 5,9 - 6,2 MHz
SW2 9,4 - 9,9 MHz
SW3 11,6 - 12,1 MHz
SW4 13,57 - 13,87 MHz
SW5 15,1 - 15,8 MHz
SW6 17,48 - 17,9 MHz
głęb.)
Page 37

Radio wielopasmowe SWE 100 B1
Napięcie w łączu
szerokopasmowym ok. 180 mV
Maks. ciśnienie akustyczne
przy zastosowaniu
dołączonych do zestawu
słuchawek ok. 90 dB(A)
Maks. napięcie wyjściowe na
złączu słuchawek ok. 80 mV
Temperatura pracy 5 °C do 35 °C
Temperatura przechowywania -10°C do 50°C
Dopuszczalna wilgotność
podczas pracy Wilgotność względna 85%
Zastrzegamy możliwość zmian danych technicznych i konstrukcyjnych bez
wcześniejszego uprzedzenia.
Ważne instrukcje związane z bezpieczeństwem
Przed pierwszym włączeniem urządzenia należy przeczytać odpowiednie
instrukcje zawarte w niniejszym podręczniku i zastosować się do
ostrzeżeń. Dotyczy to również osób, które mają duże doświadczenie w
korzystaniu z urządzeń elektronicznych. Niniejszy podręcznik należy
zachować na przyszłość. W razie sprzedaży lub odstąpienia urządzenia
należy także przekazać niniejszy podręcznik.
Niebezpieczeństwo spowodowane głośnym
dźwiękiem
Zachować ostrożność podczas korzystania ze słuchawek.
Słuchanie głośnego dźwięku może doprowadzić do
uszkodzenia słuchu.
Polski - 35
Page 38

Radio wielopasmowe SWE 100 B1
Prawa autorskie
Wszelkie materiały zawarte w instrukcji obsługi są objęte prawem
autorskim i dostarczone czytelnikom wyłącznie w celach informacyjnych.
Kopiowanie danych lub informacji bez uprzedniej pisemnej zgody i
jawnego zezwolenia autora jest bezwzględnie zabronione. Dotyczy to
również komercyjnego wykorzystania materiałów i informacji.
Wszelki tekst i liczby są aktualne na dzień przekazania do druku.
Środowisko pracy
Urządzenia nie należy użytkować w warunkach wysokiej temperatury lub
wilgotności (np. w łazienkach). Urządzenie nie powinno mieć kontaktu z
kurzem. Zakres temperatury i wilgotności roboczej: 5°C do 35°C, maks.
wilgotność względna 85 %.
Pamiętaj, aby:
urządzenie miało zapewniony swobodny obieg powietrza (nie
stawiać urządzenia na półce, dywanie, łóżku lub w dowolnym innym
miejscu, w którym szczeliny wentylacyjne mogłyby zostać zasłonięte;
pozostawić przynajmniej 10 cm odstępu z każdej strony);
urządzenie pozostawało poza wpływem bezpośrednich źródeł ciepła
(np. grzejników);
36 - Polski
Page 39

Radio wielopasmowe SWE 100 B1
na urządzenie nie padały bezpośrednio promienie światła
słonecznego lub z bliskiej odległości światła sztucznego;
nie dochodziło do kontaktu urządzenia z rozpyloną lub skroploną
wodą ani z płynami o właściwościach ściernych; urządzenia nie
wolno obsługiwać w pobliżu wody; nie zanurzać urządzenia ani nie
stawiać żadnych pojemników z wodą (np. wazonów, kubków itp.) na
lub obok urządzenia;
urządzenie nie stało w bezpośrednim działaniu pól magnetycznych
(np. w pobliżu głośników);
na ani w pobliżu urządzenia nie stawiać źródeł otwartego ognia (np.
świec);
nie dopuszczać, aby do urządzenia przedostały się ciała obce;
urządzenie nie było wystawiane na duże zmiany temperatury,
ponieważ takie skoki temperatury mogą doprowadzić do kondensacji
wilgoci i zwarcia;
nie narażać urządzenia na nadmierne wstrząsy i wibracje.
nie używać urządzenia ani opcjonalnego zasilacza sieciowego
podczas wyładowań atmosferycznych oraz wyjąć wtyczkę zasilacza
z gniazda sieciowego;
Polski - 37
Page 40

Radio wielopasmowe SWE 100 B1
Baterie
Włożyć baterie do urządzenia, zwracając uwagę na zachowanie
prawidłowej biegunowości. Oznaczenia polaryzacji pokazano obok
zasobnika baterii. Nie próbować ładować baterii, ani nie wrzucać baterii
do ognia. Nie łączyć różnych typów baterii (starych i nowych, węglowych
i alkalicznych itp.). Jeśli urządzenie ma pozostawać nieużywane przez
dłuższy czas, wyjąć baterie. Nieprawidłowe lub niezamierzone użycie
może spowodować wybuch i zagrożenie dla życia.
Dzieci
Dzieciom nie wolno bawić się urządzeniami elektrycznymi! Nie wolno
pozwalać dzieciom na korzystanie z urządzeń elektrycznych bez
nadzoru. Dzieci mogą nie zdawać sobie sprawy z potencjalnych
zagrożeń. Dziecko może udławić się małymi elementami. W razie
połknięcia baterii natychmiast skontaktować się z lekarzem. Opakowanie
przechowywać w miejscu niedostępnym dla dzieci; dziecko może udusić
się opakowaniem.
38 - Polski
Page 41

Radio wielopasmowe SWE 100 B1
Konserwacja i czyszczenie
W przypadku jakiegokolwiek uszkodzenia tego urządzenia należy je
oddać do naprawy. Dotyczy to m.in. uszkodzenia zasilacza lub obudowy
urządzenia, przedostania się płynów lub obiektów do wnętrza obudowy
lub wystawienia produktu na działanie deszczu lub wilgoci. Naprawy są
wymagane także wtedy, gdy produkt nie działa w normalny sposób, albo
gdy został upuszczony. Jeśli z urządzenia wydostaje się dym, dziwne
zapachy lub dźwięki, należy je natychmiast wyłączyć. Z takiego
urządzenia nie należy dalej korzystać, lecz zanieść do autoryzowanego
punktu serwisowego. W razie konieczności dokonania serwisowania
kontaktować się z wykwalifikowanymi pracownikami. Nie otwierać
obudowy urządzenia. Do czyszczenia należy stosować wyłącznie suchą
ściereczkę; Nie stosować płynów o właściwościach żrących. Nie
próbować otwierać obudowy urządzenia; spowodowałoby to
unieważnienie gwarancji.
Polski - 39
Page 42

Radio wielopasmowe SWE 100 B1
Charakterystyka
40 - Polski
Page 43

Radio wielopasmowe SWE 100 B1
1 Antena teleskopowa
2 Wybieranie pasma
3 Włączanie/Wyłączanie budzika
4 DIODA ZASILANIA
5 Aut. wyłącz.
6 Przycisk drzemki
7 Wyświetlacz
8 Przycisk zasilania
9 Wskaźnik naładowania baterii
10 Podświetlenie wyłączone
11 Podświetlenie włączone
12 Wybieranie minut
13 Wybieranie godzin
14 Ustawianie budzika
15 Ustawianie czasu
16 Format 24-godzinny
17 Format 12-godzinny
18 Głośnik
19 Przełącznik DX/Local
20 Gniazdo słuchawek
Złącze zasilacza wtykowego (zasilacz jest opcjonalny,
21
biegunowość
22 Pasek
23 Pokrętło częstotliwości
24 Regulacja głośności
25 Podpórka (na tylnej ściance)
26 Zasobnik baterii (tył)
)
Polski - 41
Page 44

Radio wielopasmowe SWE 100 B1
Wyświetlacz
27 Wskaźnik czasu popołudniowego (PM)
28 Aut. wyłącz.
29 Pasmo częstotliwości
30 Wskaźnik budzika
31 Wyświetlanie zegara/częstotliwości
32 Jednostka częstotliwości
42 - Polski
Page 45

Radio wielopasmowe SWE 100 B1
Podpórka
Na tylnej ściance znajduje się podpórka [25], umożliwiająca ustawienie
wielopasmowego tunera radiowego w prawie pionowej pozycji. W tym
celu należy rozłożyć chowaną podpórkę [25].
Polski - 43
Page 46

Radio wielopasmowe SWE 100 B1
yjąć
Zanim zaczniesz
Urządzenie jest zasilane z baterii lub opcjonalnego zasilacza
zintegrowanego z wtyczką do gniazda zasilania (nie wchodzi w skład
zestawu). Zasilacz musi mieć zgodną tym urządzeniem wtyczkę i
podawać prąd o napięciu 3 V.
Nie stosować jednocześnie obu metod zasilania. Kiedy
urządzenie ma być zasilane z zasilacza, najpierw w
baterie.
44 - Polski
Page 47
Radio wielopasmowe SWE 100 B1
Wkładanie baterii
Odłączyć przewód zasilania (jeśli taki jest podłączony). Otworzyć osłonę
zasobnika baterii [26] na ściance tylnej, przesuwając ją w kierunku
wskazanym strzałką i rozkładając. Włożyć baterie, zwracając uwagę na
prawidłową biegunowość (+ i –), tak jak pokazano na poniższej ilustracji.
Prawidłowa biegunowość jest oznaczona na bateriach i obok zasobnika
baterii. Zamknąć osłonę zasobnika baterii i wsunąć w kierunku
odwrotnym do wskazywanego strzałką.
Polski - 45
Page 48
Radio wielopasmowe SWE 100 B1
J
Urządzenie jest wyposażone we wskaźnik naładowania baterii [9]. Żółte
światło wskaźnika świadczy o rozładowaniu baterii. W takim przypadku
należy wymienić rozładowane baterie na nowe tego samego typu.
eśli urządzenie ma pozostawać nieużywane przez
dłuższy czas, wyjąć baterie.
Podłączanie zasilacza zintegrowanego z
wtyczką
Wyjąć baterie z zasobnika [26] znajdującego się na tylnej ściance
urządzenia (o ile są włożone). Podłączyć zasilacz do gniazda [21] radia
wielopasmowego. Zasilacz podłączyć do łatwo dostępnego gniazda
ściennego.
Przewód zasilający należy umieścić w sposób
uniemożliwiający przypadkowe potknięcie się.
Rozpoczynamy
Włączanie/wyłączanie urządzenia
Aby włączyć urządzenie, jednokrotnie naciśnij przycisk zasilania [8]. Po
włączeniu urządzenia zapala się zielona DIODA ZASILANIA [4] i
wyświetlana jest częstotliwość dostrojenia tunera, a także symbol pasma
częstotliwości (FM — fale ultrakrótkie; MW — fale średnie; SW — fale
długie).
46 - Polski
Page 49

Radio wielopasmowe SWE 100 B1
Aby wyłączyć urządzenie, ponownie naciśnij przycisk zasilania [8]. Po
wyłączeniu na wyświetlaczu pokazywany jest aktualny czas [7].
Ustawienie godziny
Czas można ustawiać tylko wtedy, gdy urządzenie jest wyłączone. Jeśli
urządzenie jest włączone, najpierw wyłącz je przyciskiem [8].
Do przełączania między 12- i 24-godzinnym formatem
wyświetlania czasu służą przyciski 12H [17] i 24H [16].
Naciśnij i przytrzymaj przycisk TIME [15].
Naciskając raz po raz przycisk HOUR [13], ustaw godzinę. Aby
przyspieszyć przeskakiwanie godzin, przycisk HOUR [13] można
przytrzymać. Godziny popołudniowe są oznaczone zapisem PM
(post meridian) dla odróżnienia od przedpołudniowych (ante
meridian) [27].
Nadal trzymaj przycisk TIME [15] naciśnięty. Naciskając raz po raz
przycisk MIN [12], ustaw minuty. Aby przyspieszyć przeskakiwanie
minut, przycisk MIN [12] można przytrzymać.
Po ustawieniu godziny zwolnij przycisk TIME [15].
Po podróży do innej strefy czasowej konieczna jest
zmiana ustawienia zegara.
Polski - 47
Page 50

Radio wielopasmowe SWE 100 B1
Wybieranie stacji
Antenę teleskopową można tylko wychylać; nie można
jej schować do wnętrza urządzenia — próba wsunięcia
do wnętrza może spowodować poważne uszkodzenie
urządzenia.
Włącz urządzenie.
Za pomocą pokrętła regulacji głośności [24] ustaw żądaną głośność.
Najpierw wybierz pasmo częstotliwości. Służy do tego element
wybierania pasma [2]. Aktualna częstotliwość jest pokazana na
wyświetlaczu [7].
Wyciągnij do końca antenę teleskopową [1].
Za pomocą pokrętła częstotliwości [23] dostrój radio do żądanej
częstotliwości. Częstotliwość jest wyświetlana w MHz dla pasm FM i
SW oraz w kHz dla pasma MW. W razie konieczności zmień
ustawienie anteny teleskopowej lub przenieś urządzenie w inne
miejsce, tak aby odbiór był jak najlepszy.
48 - Polski
Page 51

Radio wielopasmowe SWE 100 B1
Ustawianie budzika
Upewnij się, że zegar jest ustawiony prawidłowo (patrz strona 47,
Ustawiane godziny). Budzik można ustawiać tylko wtedy, gdy urządzenie
jest wyłączone. Jeśli urządzenie jest włączone, najpierw wyłącz je
przyciskiem [8].
Naciśnij i przytrzymaj przycisk AL.SET [14]. Wskaźnik ALARM [30] na
wyświetlaczu zaczyna migać.
Naciskając raz po raz przycisk HOUR [13], ustaw godzinę budzika.
Aby przyspieszyć przeskakiwanie godzin, przycisk HOUR [13] można
przytrzymać. Godziny popołudniowe są oznaczone zapisem PM
(post meridian) dla odróżnienia od przedpołudniowych (ante
meridian) [27].
Nadal trzymaj przycisk AL.SET [14] naciśnięty. Naciskając raz po raz
przycisk MIN [12], ustaw minuty budzika. Aby przyspieszyć
przeskakiwanie minut, przycisk MIN [12] można przytrzymać.
Po ustawieniu budzika zwolnij przycisk AL.SET [14].
Polski - 49
Page 52

Radio wielopasmowe SWE 100 B1
Włączanie budzika
Po ustawieniu czasu budzika sam budzik należy jeszcze włączyć:
Naciśnij przycisk AL.ON/OFF [3]. Na wyświetlaczu pojawia się
wskaźnik ALARM [30].
Aby wyłączyć budzik, ponownie naciśnij przycisk AL.ON/OFF [3].
Wskaźnik ALARM [30] gaśnie.
Urządzenie włącza się o ustawionej godzinie i rozpoczyna
odbieranie ostatnio ustawionego pasma i częstotliwości.
Aby wyłączyć urządzenie, naciśnij przycisk AL.ON/OFF [3]. Aby
wyłączyć budzik, ponownie naciśnij przycisk AL.ON/OFF [3].
lub
Aby opóźnić alarm o ok. 5 minut, naciśnij przycisk SNOOZE [6]. Po
upłynięciu tego czasu urządzenie włącza się ponownie.
Kiedy budzik jest nastawiony i włączony, z urządzenia
można nadal korzystać. Należy jednak pamiętać, że
urządzenie zawsze włącza się na ostatnio nastawioną
częstotliwość i pasmo oraz z ostatnio nastawioną
głośnością.
Budzik działa tylko wtedy, jeśli urządzenie wcześniej
zostało wyłączone.
50 - Polski
Page 53

Radio wielopasmowe SWE 100 B1
Programator wyłączania
Programator wyłączania służy do automatycznego wyłączania
urządzenia po upłynięciu zdefiniowanego czasu.
Przy urządzeniu włączonym lub wyłączonym naciśnij przycisk SLEEP
[5]. Na wyświetlaczu pokazywana jest liczba „60”, co oznacza, że
urządzenie wyłączy się automatycznie po 60 minutach.
Kolejne naciśnięcia przycisku SLEEP [5] powodują stopniowe
skracanie czasu odliczania. Każde naciśnięcie przycisku skraca czas
do wyłączenia o 10 minut.
Dojście do wartości „0” powoduje wyłączenie programatora
wyłączania — przy tym ustawieniu urządzenie nie wyłączy się
automatycznie. Kolejne naciśnięcie przycisku SLEEP [5] powoduje
powrócenie do początku cyklu określania czasu opóźnienia.
Podczas gdy programator czasowy jest aktywny,
urządzenie można także wyłączyć ręcznie, naciskając
przycisk zasilania.
Polski - 51
Page 54

Radio wielopasmowe SWE 100 B1
Podłączanie słuchawek
Przed podłączeniem słuchawek należy ustawić głośność
na najniższym poziomie, aby zapobiec uszkodzeniu
słuchu. Po podłączeniu słuchawek można ustawić
żądany poziom głośności.
Nie należy stosować słuchawek innych niż dołączone
do zestawu SWE 100 B1. Użycie innych słuchawek
spowoduje, że poziom ciśnienia akustycznego będzie
szkodliwy dla słuchającego.
Zachować ostrożność podczas korzystania ze
słuchawek. Słuchanie głośnego dźwięku może
doprowadzić do uszkodzenia słuchu.
Do złącza słuchawek [20] można podłączyć dostarczone w zestawie
słuchawki SWE 100 B1. Po podłączeniu słuchawek głośnik [18] jest
automatycznie wyciszany.
Podświetlenie
Naciśnięcie przycisku LIGHT ☼ [11] przy włączonym lub wyłączonym
zasilaniu urządzenia powoduje włączenie podświetlenia na ok. 5 sekund.
Przy włączonym podświetleniu można nacisnąć przycisk LIGHT [10],
aby wyłączyć podświetlenie.
52 - Polski
Page 55

Radio wielopasmowe SWE 100 B1
Ustawianie czułości
Ustawienie przycisku DX/LOCAL [19] w pozycji DX powoduje, że
urządzenie działa w zwykłym trybie.
Ustawienie przycisku DX/LOCAL [19] w pozycji LOCAL powoduje, że
urządzenie odbiera tylko silny sygnał rozgłośni lokalnych. To ustawienie
zaleca się wtedy, gdy słabsze rozgłośnie lokalne są zakłócane przez
silniejsze stacje nielokalne.
Wybieranie formatu czasu
Do przełączania między 12- i 24-godzinnym formatem wyświetlania
czasu służą przyciski 12H [17] i 24H [16].
W celu wyświetlania czasu w formacie 12-godzinnym należy nacisnąć
przycisk 12H [17], zaś w celu wyświetlania czasu w formacie 24godzinnym należy nacisnąć przycisk 24H [16]. Godziny popołudniowe
są oznaczone zapisem PM (post meridian) [27].
Polski - 53
Page 56

Radio wielopasmowe SWE 100 B1
Rozwiązywanie problemów
Urządzenie nie włącza się
Baterie mogły ulec rozładowaniu, włóż nowe baterie.
Sprawdź, czy baterie zostały włożone z zachowaniem prawidłowej
biegunowości. Skorzystaj z oznaczeń biegunowości umieszczonych
obok zasobnika baterii oraz na bateriach. Patrz również opis na
stronie 45.
Brak lub słaby odbiór sygnału radiowego
Wyciągnij całkowicie teleskopową antenę FM [1] i ustaw ją we
właściwym położeniu.
Dostrój się do żądanej stacji przy użyciu przełącznika zakresów [2] i
pokrętła częstotliwości [23].
Sprawdź, czy przełącznik DX.LOCAL [19] znajduje się we
właściwym położeniu. Patrz również rozdział zatytułowany
„Ustawianie czułości” na stronie 53.
Urządzenie jest włączone, ale nie słychać dźwięku
Sprawdź ustawienie głośności.
54 - Polski
Page 57

Radio wielopasmowe SWE 100 B1
Ochrona środowiska i recykling
Produkty oznaczone symbolem przekreślonego pojemnika
na śmieci podlegają zapisom dyrektywy Unii Europejskiej
2002/96/EC. Urządzeń elektrycznych i elektronicznych nie
wolno wyrzucać ze zwykłymi śmieciami; należy je
składować w specjalnie przeznaczonych do tego celu
miejscach. Prawidłowo pozbywając się starych lub uszkodzonych
urządzeń, pomagamy chronić środowisko i nasze własne zdrowie.
Dodatkowe informacje o prawidłowym pozbywaniu się urządzeń tego
typu można uzyskać w lokalnych urzędach, instytucjach
odpowiedzialnych za gospodarkę odpadami oraz w sklepie, w którym
urządzenie zostało zakupione.
Utylizacja opakowania
Prosimy o prawidłowe poddanie materiału pakunkowego utylizacji.
Pudełka kartonowe można wrzucić do zbiorników na papier do wtórnego
przerobu lub pozostawić w publicznych punktach zbiórki. Folie i plastik z
opakowania można zwrócić do odpowiednich publicznych punktów
zbiórki.
Utylizacja baterii
Dbaj o środowisko. Zużytych baterii nie wolno wyrzucać wraz ze
zwykłymi odpadami domowymi. Należy oddawać je do miejsc zbiórki
Polski - 55
Page 58

Radio wielopasmowe SWE 100 B1
odpadów tego typu. Należy pamiętać, że całkowicie rozładowane
baterie należy przekazywać do odpowiednich punktów zbiórki zużytych
baterii. W przypadku pozbywania się niecałkowicie rozładowanych
baterii należy podjąć środki ostrożności w celu zapobieżenia zwarciom.
Zgodność
Niniejsze urządzenie spełnia podstawowe i inne odnośne
wymagania dyrektywy kompatybilności elektromagnetycznej 2004/108/EC oraz dyrektywy RoHs II
2011/65/EU.
Gwarancja
Gwarancja firmy TARGA GmbH
Niniejszy produkt jest objęty trzyletnią gwarancją od daty zakupu.
Należy zachować oryginalny kwit kasowy jako dowód zakupu. Przed
uruchomieniem produktu prosimy dokładnie zapoznać się z załączoną
dokumentacją lub pomocą online. W razie wystąpienia problemu, którego
nie można rozwiązać w ten sposób, prosimy skontaktować się z naszą
infolinią pomocy technicznej. Przy każdym kontakcie z infolinią pomocy
technicznej należy mieć pod ręką numer artykułu lub numer seryjny, jeśli
jest dostępny. W przypadku, gdy rozwiązanie problemu przez telefon nie
będzie możliwe, w zależności od przyczyny usterki nasza infolinia
pomocy technicznej zorganizuje inną formę serwisowania. W razie
56 - Polski
Page 59

Radio wielopasmowe SWE 100 B1
stwierdzenia was materiałowych lub produkcyjnych produktu, zostanie on
bezpłatnie naprawiony lub wymieniony na nowy, wedle naszego
swobodnego uznania. Naprawa lub wymiana produktu nie powoduje
rozpoczęcia nowego okresu gwarancyjnego. Gwarancja nie obejmuje
części zużywających się, jak baterie, akumulatory czy elementy
oświetlenia.
Gwarancja ta w niczym nie ogranicza ustawowych praw nabywcy w
stosunku do sprzedawcy, które pozostają nienaruszone.
Serwis
E-Mail: service.PL@targa-online.com
TARGA GmbH
IAN: 89430
Producent
Coesterweg 45
59494 SOEST
GERMANY
Telefon: 00800 – 44 11 481
Polski - 57
Page 60

Širokopasovni sprejemnik SWE 100 B1
Vsebina
Uvod ................................................................................. 59
Namenska uporaba .......................................................... 60
Vsebina paketa ................................................................. 61
Tehnični podatki ................................................................ 62
Varnostna navodila ........................................................... 63
Nevarnosti, povezane z visokimi nivoji hrupa ......................................... 63
Avtorske pravice ........................................................................................ 64
Delovno okolje ........................................................................................... 64
Baterije ........................................................................................................ 66
Otroci .......................................................................................................... 66
Vzdrževanje/čiščenje ................................................................................ 67
Pregled .............................................................................. 68
Zaslon ......................................................................................................... 70
Stojalo ......................................................................................................... 71
Pred začetkom uporabe .................................................... 72
Vstavljanje baterij ....................................................................................... 73
Priključitev vtičnega napajalnika ............................................................... 74
Začetek uporabe ............................................................... 74
Vklop/izklop naprave ............................................................................... 74
Nastavitev časa ......................................................................................... 75
Uglaševanje postaje .................................................................................. 76
Nastavitev alarma ..................................................................................... 77
Omogočanje alarma ................................................................................. 78
Časovnik za samodejni izklop .................................................................. 79
Priključitev slušalk ....................................................................................... 80
Osvetlitev ozadja ....................................................................................... 80
58 - Slovenščina
Page 61
Širokopasovni sprejemnik SWE 100 B1
Nastavitev občutljivosti .............................................................................. 81
Izbira formata prikaza časa ..................................................................... 81
Odpravljanje težav ........................................................... 82
Okoljski predpisi in informacije glede odstranjevanja ...... 83
Odstranjevanje embalaže ........................................................................ 83
Odstranjevanje baterij ............................................................................... 83
Izjava o skladnosti ............................................................ 84
Garancija in servisne informacije ...................................... 84
Uvod
Zahvaljujemo se vam za nakup izdelka podjetja SilverCrest.
Širokopasovni sprejemnik SilverCrest SWE 100 B1 lahko sprejema signale
na do 6 različnih kratkovalovnih pasovih, FM (VHF) območju in AM
(srednjevalovnem) območju. Naprava ima poleg tega tudi digitalno uro s
funkcijo alarma.
Na naslednjih straneh so zapisana navodila za način uporabe izdelka.
Ta ikona označuje pomembne informacije za varno
delovanje izdelka in za varnost uporabnika.
Ta ikona označuje dodatne informacije o zadevi.
Slovenščina - 59
Page 62

Širokopasovni sprejemnik SWE 100 B1
Namenska uporaba
Naprava spada med običajno potrošniško blago. Načrtovana je za
sprejem in predvajanje radijskih oddaj. Naprava se poleg tega lahko
uporablja kot ura z alarmom. Namenjene so samo za osebno uporabo in
ne za industrijsko ali komercialno uporabo. Naprava se ne sme
uporabljati v tropskih razmerah. Proizvajalec ni odgovoren za morebitne
poškodbe ali težave, do katerih pride zaradi nepooblaščenih sprememb.
Uporabljajte samo opremo, ki jo priporoča proizvajalec. Upoštevajte
predpise in zakone, ki veljajo v državi uporabe.
Upoštevajte morebitne specifične državne predpise glede frekvenčnih
pasov, ki jih lahko sprejemate. Uporaba morebitnih informacij, ki jih
sprejmete izven frekvenčnih pasov, ki so izrecno določeni za prosto javno
uporabo, ni dovoljena; morebitno sprejeto vsebino pa ni dovoljeno
posredovati tretjim osebam.
60 - Slovenščina
Page 63

Širokopasovni sprejemnik SWE 100 B1
Vsebina paketa
Širokopasovni sprejemnik SWE 100 B1
2 bateriji velikosti AA, 1,5 V
Torbica
Slušalke SWE 100 B1
Slovenščina - 61
Page 64

Širokopasovni sprejemnik SWE 100 B1
V
v
Tehnični podatki
Te informacije opisujejo tehnične značilnosti vaše
naprave.
državni predpisi glede frekvenčnih pasov, ki so na
za prosto javno uporabo. Upoštevajte, da je sprejemanje
morebitnih informacij izven teh frekvenčnih pasov
nelegalno in je lahko podvrženo kazenskemu pregonu.
Delovna napetost 3 V
Polariteta vtiča napajalnika
Največja poraba toka 100 mA
Tip baterije 2 x AA 1,5 V (LR6)
Izhodna moč 100 mW
Frekvenčni pasovi
Upoštevajte, da podani frekvenčni
pasovi lahko zaradi odstopanj
izdelka rahlo odstopajo navzgor ali
navzdol.
Dimenzije 129 x 79 x 33 mm (Š x V x G)
Masa 160 g (brez baterij)
Slušalke SWE 100 B1
različnih državah so lahko v veljavi različni
FM 87,5 MHz - 108 MHz
AM 520 - 1620 kHz
KV1 5,9 – 6,2 MHz
KV2 9,4 – 9,9 MHz
KV3 11,6 – 12,1 MHz
KV4 13,57 – 13,87 MHz
KV5 15,1 – 15,8 MHz
KV6 17,48 – 17,9 MHz
oljo
62 - Slovenščina
Page 65
Širokopasovni sprejemnik SWE 100 B1
Impedanca 32 ohmov
Karakteristična širokopasovna
napetost približno 180 mV
Največja jakost zvoka s
priloženimi slušalkami približno 90 dB(A)
Največja izhodna napetost na
vtičnici za slušalke približno 80 mV
Temperatura delovanja 5 ºC do 35 ºC
Temperatura shranjevanja -10 °C do 50 °C
Vlažnost pri delovanju 85 % rel. vlažnost
Tehnični podatki ali izvedba se lahko spremenijo brez predhodne najave.
Varnostna navodila
Pred prvo uporabo naprave preberite naslednje opombe v tem priročniku
ter upoštevajte vsa opozorila, tudi če ste dobro seznanjeni z upravljanjem
elektronskih naprav. Priročnik shranite na varnem mestu za kasnejšo
uporabo. V primeru, ko napravo prodate ali izročite drugi osebi, obvezno
priložite tudi ta priročnik.
Nevarnosti, povezane z visokimi nivoji hrupa
Previdnost pri uporabi slušalk. Poslušanje z visoko jakostjo
zvoka lahko poškoduje vaš sluh.
Slovenščina - 63
Page 66

Širokopasovni sprejemnik SWE 100 B1
Avtorske pravice
Celotna vsebina teh navodil za uporabo je avtorsko zaščitena in se
zagotavlja uporabniku samo v informativne namene.
Kopiranje podatkov in informacij brez predhodne izrecne pisne odobritve
avtorja je strogo prepovedano. To velja tudi za morebitno komercialno
uporabo vsebine in informacij.
Celotno besedilo in sheme predstavljajo aktualno stanje na dan tiskanja.
Delovno okolje
Naprava ni namenjena uporabi v okolju z visoko temperaturo ali vlago
(npr. v kopalnicah), biti mora čista in brez prahu. Delovna temperatura in
vlaga: 5 °C do 35 °C, maks. 85 % RV.
Vedno se prepričajte, da:
je zagotovljeno prosto kroženje zraka (naprave ne postavljajte na
police, preprogo, posteljo ali mesto, kjer bi bile ovirane prezračevalne
odprtine, ter na vseh straneh pustite najmanj 10 cm praznega
prostora);
na napravo ne vplivajo direktni toplotni viri (npr. radiatorji);
naprava ni izpostavljena neposredni sončni svetlobi ali umetni
razsvetljavi;
64 - Slovenščina
Page 67

Širokopasovni sprejemnik SWE 100 B1
preprečite stik z brizgajočo in tekočo vodo ter abrazivnimi tekočinami,
naprava nikoli ne sme delovati v bližini vode; naprava ne sme biti
nikdar potopljena (na napravo ali v njeno bližino ne postavljajte
predmetov, ki vsebujejo tekočino, npr. pijače, vaze itd.);
naprave nikoli ne postavite v neposredno bližino magnetnih polj (npr.
zvočnikov);
na ali v bližino naprave ne postavite predmetov, ki predstavljajo
nevarnost požara (npr. gorečih sveč);
v napravo ne zaidejo tujki;
naprava ni izpostavljena velikim temperaturnim spremembam, ker le-te
lahko povzročijo nastanek vlage zaradi kondenzacije in posledično
kratke stike;
naprava ni izpostavljena prevelikim udarcem ali vibracijam;
se naprava ali opcijski napajalnik ne uporabljata med nevihtami z
grmenjem in bliskanjem ter odklopite napajalnik iz omrežne vtiènice;
Slovenščina - 65
Page 68

Širokopasovni sprejemnik SWE 100 B1
Baterije
Vstavite bateriji in pazite na pravilno polariteto. Upoštevajte oznako
polaritete ob strani predala za baterije. Baterij ne poskušajte napolniti ter
jih ne odvrzite v ogenj. Ne mešajte različnih tipov baterij (starih in novih ali
ogljikovih in alkalnih itd.). Ko naprave dalj časa ne nameravate
uporabljati, odstranite baterije. V primeru nepravilne uporabe lahko pride
do eksplozije in iztekanja.
Otroci
Električne naprave niso primerne za otroke! Otrokom nikoli ne dovolite
uporabljati električnih naprav brez nadzora. Otroci morda ne razumejo,
da so lahko nevarne. Majhni deli lahko predstavljajo nevarnost zadušitve.
V primeru, ko pride do pogoltnjenja baterije, takoj poiščite zdravniško
pomoč. Embalažni material shranite izven dosega otrok. Obstaja
nevarnost zadušitve!
66 - Slovenščina
Page 69
Širokopasovni sprejemnik SWE 100 B1
Vzdrževanje/čiščenje
Popravila so potrebna v primeru kakršnekoli poškodbe naprave: npr. v
primeru poškodbe napajalnika ali ohišja naprave; ko v napravo zaide
tekočina ali predmeti; ko je bila naprava izpostavljena dežju ali vlagi.
Popravila so potrebna tudi, ko naprava ne deluje normalno oz. v primeru
padca naprave. Če opazite dim, nenavaden zvok ali nepričakovane
vonjave, napravo takoj izklopite. V tem primeru naprave ne uporabljajte
več. Pregleda naj jo strokovno usposobljena oseba. Vsa popravila morajo
izvesti strokovno usposobljeni serviserji. Nikoli ne odpirajte ohišja naprave.
Za čiščenje uporabljajte samo čisto, suho krpo. Nikoli ne uporabljajte
jedkih tekočin. Ne poskušajte odpirati ohišja naprave. V nasprotnem
primeru izgubite pravico do garancije.
Slovenščina - 67
Page 70
Širokopasovni sprejemnik SWE 100 B1
Pregled
68 - Slovenščina
Page 71

Širokopasovni sprejemnik SWE 100 B1
Teleskopska antena
1
Stikalo za izbiro frekvenčnega pasu
2
Vklop/izklop alarma
3
LED za prikaz napajanja
4
Časovnik za samodejni izklop
5
Ponavljanje alarma / dremež
6
Zaslon
7
Tipka za vklop/izklop
8
Indikator baterij
9
Izključena osvetlitev ozadja
10
Vključena osvetlitev ozadja
11
Izbira minut
12
Izbira ur
13
Nastavitev časa alarma
14
Nastavitev časa
15
24-urni prikaz časa
16
12-urni prikaz časa
17
Zvočnik
18
Stikalo DX/LOCAL
19
Vtičnica za slušalke
20
Priključek za vtični napajalnik (opcija, polariteta
21
Trak
22
Gumb za izbiro frekvence
23
Nastavitev glasnosti
24
Stojalo (na zadnji strani)
25
Predal za baterije (na zadnji strani)
26
)
Slovenščina - 69
Page 72

Širokopasovni sprejemnik SWE 100 B1
Zaslon
27 Indikator popoldanskega časa (PM)
28 Časovnik za samodejni izklop
29 Frekvenčni pas
30 Indikator alarma
31 Prikaz časa/frekvence
32 Enota za frekvenco
70 - Slovenščina
Page 73

Širokopasovni sprejemnik SWE 100 B1
Stojalo
Na zadnji strani naprave je stojalo [25], ki omogoča namestitev
širokopasovnega sprejemnika v skoraj povsem navpičen položaj. V ta
namen razprite sklopno stojalo [25].
Slovenščina - 71
Page 74

Širokopasovni sprejemnik SWE 100 B1
Pred začetkom uporabe
Za napajanje naprave lahko uporabite priloženi bateriji tipa AA ali
dodatni vtični napajalnik (ni priložen). Napajalnik mora imeti ustrezen
izhodni priključek za enosmerno napetost (DC) in zagotavljati delovno
napetost 3 V.
Istočasno ne uporabljajte obeh tipov napajanja. Ko za
napajanje naprave uporabljate napajalnik, odstranite
bateriji.
72 - Slovenščina
Page 75

Širokopasovni sprejemnik SWE 100 B1
Vstavljanje baterij
Če je na napravo priključen kabel napajalnika, ga odklopite. Odprite
pokrov predala za baterije [26] na zadnji strani naprave - potisnite ga v
smeri natisnjene puščice in ga dvignite navzven. Vstavite baterije in pazite
na pravilno polariteto (+ in -), kot je prikazano na naslednji sliki. Pravilna
polariteta je označena na baterijah in ob strani predala za baterije.
Zaprite pokrov predala za baterije in ga potisnite v nasprotni smeri
puščice.
Slovenščina - 73
Page 76
Širokopasovni sprejemnik SWE 100 B1
Naprava ima vgrajen indikator baterij [9]. Če sveti rumeno, so baterije
prazne. V tem primeru zamenjajte baterije z novimi baterijami istega tipa.
Ko naprave dalj časa ne nameravate uporabljati,
odstranite baterije.
Priključitev vtičnega napajalnika
Če sta vstavljeni bateriji, ju odstranite iz predala za baterije [26] na zadnji
strani naprave. Vtič napajalnika priključite v vtičnico [21] na
širokopasovnem sprejemniku. Napajalnik priključite v lahko dostopno
omrežno vtičnico.
Pri napeljevanju kabla zagotovite, da kabel ne
predstavlja nevarnosti spotikanja.
Začetek uporabe
Vklop/izklop naprave
Napravo vklopite z enkratnim pritiskom na tipko za vklop/izklop [8]. Ko je
naprava vključena, LED za prikaz napajanja [4] sveti zeleno in na zaslonu
sta prikazana trenutno nastavljena frekvenca in frekvenčni pas (FM, SV,
KV).
74 - Slovenščina
Page 77

Širokopasovni sprejemnik SWE 100 B1
Napravo izklopite s ponovnim pritiskom na tipko za vklop/izklop [8]. Ko
je naprava izključena, se na zaslonu [7] prikazuje trenutni čas.
Nastavitev časa
Čas lahko nastavite samo, ko je naprava izklopljena. Če je še vedno
vklopljena, jo izklopite s pritiskom na tipko za vklop/izklop [8].
S tipkama 12H [17] in 24H [16] lahko preklopite med
12 in 24-urnim prikazom časa.
Pritisnite in zadržite tipko TIME [15].
Zatem nastavite uro z večkratnim pritiskom na tipko HOUR [13]. Za
pospešitev postopka nastavitve lahko tipko HOUR [13] zadržite
pritisnjeno. Za razlikovanje med dopoldanskim in popoldanskim (post
meridian) 12-urnim prikazom časa se za popoldanski čas prikaže
"PM" [27].
Tipko TIME [15] zadržite pritisnjeno. Zatem z večkratnim pritiskom na
tipko MIN [12] nastavite še minute. Za pospešitev postopka nastavitve
lahko tipko MIN [12] zadržite pritisnjeno.
Po nastavitvi pravilnega časa spustite tipko TIME [15].
Upoštevajte, da je ob prehodu v drug časovni pas
potrebno uro ponovno nastaviti.
Slovenščina - 75
Page 78

Širokopasovni sprejemnik SWE 100 B1
Uglaševanje postaje
Teleskopsko anteno lahko samo vrtite, ne morete pa je
potisniti v ohišje naprave, kajti v tem primeru lahko pride
do resne poškodbe naprave.
Vklopite napravo.
S tipko za nastavitev glasnosti [24] nastavite želeno jakost zvoka.
Najprej izberite želen frekvenčni pas. Izberete ga s stikalom za izbiro
frekvenčnega pasu [2]. Trenutno nastavljen frekvenčni pas se prikaže
na zaslonu [7].
Do konca izvlecite teleskopsko anteno [1].
Z vrtenjem gumba za izbiro frekvence [23] nastavite želeno frekvenco.
Prikaže se vrednost frekvence v MHz (za FM in KV) ter v kHz (za SV).
Za optimalen sprejem trenutne postaje po potrebi premaknite
teleskopsko anteno v drug položaj oz. premaknite napravo.
76 - Slovenščina
Page 79

Širokopasovni sprejemnik SWE 100 B1
Nastavitev alarma
Čas mora biti pravilno nastavljen (glejte stran 75 – Nastavitev časa). Čas
alarma lahko nastavite samo, ko je naprava izklopljena. Če je še vedno
vklopljena, jo izklopite s pritiskom na tipko za vklop/izklop [8].
Pritisnite in zadržite tipko AL.SET [14]. Na zaslonu začne utripati
prikaz “ALARM” [30].
Zatem z večkratnim pritiskom na tipko HOUR [13] nastavite ure za čas
alarma. Za pospešitev postopka nastavitve lahko tipko HOUR [13]
zadržite pritisnjeno. Za razlikovanje med dopoldanskim in
popoldanskim (post meridian) 12-urnim prikazom časa se za
popoldanski čas prikaže "PM" [27].
Tipko AL.SET [14] zadržite pritisnjeno. Zatem z večkratnim pritiskom
na tipko MIN [12] nastavite minute za čas alarma. Za pospešitev
postopka nastavitve lahko tipko MIN [12] zadržite pritisnjeno.
Po nastavitvi pravilnega časa alarma spustite tipko AL.SET [14].
Slovenščina - 77
Page 80

Širokopasovni sprejemnik SWE 100 B1
v
Omogočanje alarma
Ko nastavite želen čas alarma, lahko omogočite alarm po naslednjem
postopku:
Pritisnite tipko AL.ON/OFF [3]. Na zaslonu se pojavi prikaz
“ALARM” [30].
Za izklop alarma ponovno pritisnite tipko AL.ON/OFF [3]. Prikaz
“ALARM” [30] se izklopi.
Naprava se vklopi ob nastavljenem času alarma ter sprejema zadnjo
nastavljeno frekvenco in frekvenčni pas.
Pritisnite tipko AL.ON/OFF [3] za zaustavitev alarma. Ponovno
pritisnite tipko AL.ON/OFF [3] za izklop alarma.
ali
Pritisnite tipko SNOOZE [6] za ponoven vklop alarma čez približno 5
minut. Naprava se bo po tem času ponovno vklopila.
Napravo lahko tudi pri vključeni funkciji alarma
normalno uporabljate. Zapomnite pa si, da se naprava
edno vklopi z zadnjo nastavljeno frekvenco in
frekvenčnim pasom ter zadnjo nastavljeno glasnostjo.
Funkcija alarma deluje samo, če je bila naprava
predhodno izključena.
78 - Slovenščina
Page 81

Širokopasovni sprejemnik SWE 100 B1
Časovnik za samodejni izklop
Časovnik za samodejni izklop samodejno izklopi napravo po vnaprej
nastavljenem času.
Ko je naprava vklopljena ali izklopljena, pritisnite tipko SLEEP [5]. Na
zaslonu se prikaže številka “60”, ki označuje, da se bo naprava
samodejno izklopila čez 60 minut.
Z večkratnim pritiskom na tipko SLEEP (5) lahko zmanjšate prikazan
čas odštevalne ure. Z vsakim pritiskom na tipko se čas zakasnitve
skrajša za 10 minut.
Ko čas zakasnitve doseže vrednost “0”, je časovnik za samodejni
izklop izključen in naprava ostane vklopljena. S ponovnim pritiskom na
tipko SLEEP [5] lahko izberete čas zakasnitve od začetka.
Med odštevanjem časa časovnika za samodejni izklop
lahko s pritiskom na tipko za vklop/izklop kadarkoli
izklopite napravo.
Slovenščina - 79
Page 82

Širokopasovni sprejemnik SWE 100 B1
Priključitev slušalk
Pred prikljuèitvijo slušalk nastavite glasnost na najnižji
nivo, da ne pride do poškodbe vašega sluha. Glasnost
lahko nastavite na poljuben nivo.
Uporabljajte samo priložene slušalke SWE 100 B1.
Druge slušalke lahko povzročijo škodljivo jakost zvoka.
Previdnost pri uporabi slušalk. Poslušanje z visoko
jakostjo zvoka lahko poškoduje vaš sluh.
Priložene slušalke SWE 100 B1 lahko priključite v vtičnico za slušalke
[20]. Ko so slušalke priključene, se samodejno izklopi zvok zvočnika [18].
Osvetlitev ozadja
Ko je naprava vklopljena ali izklopljena lahko s pritiskom na tipko
LIGHT ☼ [11] za približno 5 sekund vklopite osvetlitev ozadja.
Ko je osvetlitev ozadja vklopljena, jo lahko izklopite s pritiskom na tipko
LIGHT [10].
80 - Slovenščina
Page 83

Širokopasovni sprejemnik SWE 100 B1
Nastavitev občutljivosti
Ko potisnete stikalo DX/LOCAL [19] v položaj “DX”, uporabljate napravo
v normalnem načinu.
Ko potisnete stikalo DX/LOCAL [19] v položaj “LOCAL”, lahko
sprejemate samo močne oddajne postaje. Ta nastavitev se priporoča, ko
na šibkejšo lokalno postajo vplivajo motnje iz močnejše oddaljene postaje.
Izbira formata prikaza časa
S tipkama 12H [17] in 24H [16] lahko preklopite med 12 in 24-urnim
prikazom časa.
Za 12-urni prikaz časa pritisnite tipko 12H [17], za 24-urni prikaz časa
pa tipko 24H [16]. Za razlikovanje popoldanskega časa z 12-urnim
prikazom se za popoldanski (post meridian) čas prikaže ikona "PM" [27].
Slovenščina - 81
Page 84

Širokopasovni sprejemnik SWE 100 B1
Odpravljanje težav
Naprava se ne vklopi
Morda so baterije prazne - vstavite nove baterije.
Preverite, èe so baterije vstavljene s pravilno polariteto. Primerjajte
sliko poleg predala za baterije in oznake na baterijah. Glejte tudi
opis na strani 73.
Ni radijskega sprejema, radijski sprejem je slab
Teleskopsko FM anteno [1] izvlecite do konca ven in preverite, èe je
pravilno usmerjena.
S stikalom za izbiro frekvenènega pasu [2] in gumbom za izbiro
frekvence [23] poišèite želeno postajo.
Preverite, èe je stikalo DX/LOCAL [19] v pravilnem položaju. Glejte
tudi poglavje "Nastavitev občutljivosti" na strani 81.
Naprava je vkljuèena, vendar ni zvoka
Preverite nastavitev glasnosti.
82 - Slovenščina
Page 85

Širokopasovni sprejemnik SWE 100 B1
Okoljski predpisi in informacije glede
odstranjevanja
Simbol s prekrižanim znakom smetnjaka na izdelku pomeni,
da za ta izdelek velja evropska direktiva 2002/96/EC. Vse
električne in elektronske naprave je potrebno odstraniti
ločeno od gospodinjskih odpadkov na uradnih odlagališčih.
Z ustreznim odlaganjem rabljenih ali okvarjenih izdelkov
preprečite škodo v okolju in ogrožanje lastnega zdravja. Za dodatne
informacije glede pravilnega odstranjevanja se pozanimajte na ustreznem
občinskem uradu, pri komunalni službi ali v trgovini, kjer ste izdelek kupili.
Odstranjevanje embalaže
Poskrbite tudi za pravilno recikliranje embalažnega materiala. Embalažni
karton lahko odnesete v zbiralnike starega papirja oz. ga odpeljite na
javna zbirališča za recikliranje. Če je v embalaži vključena folija ali
plastika, jo odpeljite na javna zbirališča za recikliranje.
Odstranjevanje baterij
Spoštujte in varujte okolje. Stare baterije ne spadajo med običajne
gospodinjske odpadke. Odnesite jih na zbirališče starih baterij.
Upoštevajte, da je potrebno do konca izpraznjene baterije odstraniti na
ustreznih zbirališčih rabljenih baterij. Če odstranjujete baterije, ki niso do
konca izpraznjene, izvedite ustrezne ukrepe za preprečitev kratkega stika.
Slovenščina - 83
Page 86

Širokopasovni sprejemnik SWE 100 B1
Izjava o skladnosti
Naprava v celoti izpolnjuje osnovne in druge ustrezne
zahteve direktive za elektromagnetno združljivost
2004/108/EC in direktive RoHS II 2011/65/EU.
Garancija in servisne informacije
36 mesecev garancije od dneva nakupa
1. S tem garancijskim listom jamčimo TARGA GmbH, da bo izdelek v
garancijskem roku ob normalni in pravilni uporabi brezhibno deloval
in se zavezujemo, da bomo ob izpolnjenih spodaj navedenih pogojih
odpravili morebitne pomanjkljivosti in okvare zaradi napak v
materialu ali izdelavi oz. po svoji presoji izdelek zamenjali ali vrnili
kupnino.
2. Garancija je veljavna na ozemlju Republike Slovenije.
3. Garancijski rok za proizvod je 36 mesecev od dneva izročitve balga.
Dan izročitve blaga je enak dnevom prodaje, ki je razviden iz
računa.
4. Kupec je dolžan okvaro javiti pooblaščenemu servisu oz. se
informirati o nadaljnih postopkih na zgoraj navedeni telefonski
številki. Svetujemo vam, da pred tem natančno preberete navodila o
sestavi in uporabi izdelka.
5. Kupec je dolžan pooblaščenemu servisu predložiti garancijski list in
račun, kot potrdilo in dokazilo o nakupu.
6. V primeru, da proizvod popravlja nepooblaščeni servis ali oseba,
kupec ne more uveljavljati zahtevkov iz te garancije.
84 - Slovenščina
Page 87

Širokopasovni sprejemnik SWE 100 B1
7. Vzroki za okvaro oz. nedelovanje izdelka morajo biti lastnosti stvari
same, in ne vzroki, ki so zunaj proizvajalčeve oz. prodajalčeve sfere.
Kupec ne more uveljavljati zahtevkov iz te garancije, če se ni držal
priloženih navodil za sestavo in uporabo izdelka ali, če je izdelek
kakorkoli spremenjen ali nepravilno vzdrževan.
8. Jamčimo servisiranje in rezervne dele za minimalno dobo, ki je
zahtevana s strani zakonodaje.
9. Obrabni deli oz. potrošni material so izvzeti iz garancije.
10. Vsi potrebni podatki za uveljaljanje garancije se nahajajo na dveh
ločenih dokumentih (garancijski list, račun).
11. Ta garancija proizvajalca ne izključuje pravic potrošnika, ki izhajajo
iz odgovornosti prodajalca za napake na blagu.
Ta garancija velja za Slovenijo.
Poleg te garancije lahko brez omejitve naše garancije uveljavljate tudi
pravice iz garancije zoper prodajalca.
Slovenščina - 85
Page 88

Širokopasovni sprejemnik SWE 100 B1
T
Service
E-pošto: service.SI@targa-online.com
Prodajalec:
Lidl d.o.o.k.d., Pod lipami 1, SI-1218 Komenda
IAN: 89430
Proizvajalec
ARGA GmbH
Coesterweg 45
59494 SOEST
GERMANY
Telefon: 0800 – 80 88 7
86 - Slovenščina
Page 89

Vícepásmový přijímač SWE 100 B1
Obsah
Úvod ................................................................................. 88
Určené použití ................................................................... 89
Obsah balení ..................................................................... 90
Technické údaje ................................................................. 91
Důležité bezpečnostní pokyny .......................................... 92
Nebezpečí plynoucí z rušení hlukem ....................................................... 92
Copyright.................................................................................................... 93
Provozní podmínky .................................................................................... 93
Baterie ........................................................................................................ 95
Děti .............................................................................................................. 95
Údržba / Čištění ........................................................................................ 96
Přehled ............................................................................. 97
Displej ......................................................................................................... 99
Stojánek ................................................................................................... 100
Příprava k použití ........................................................... 101
Vložení baterií ......................................................................................... 102
Připojení k napájecímu adaptéru .......................................................... 103
Použití ............................................................................. 103
Zapnutí a vypnutí přístroje ..................................................................... 103
Nastavení času ....................................................................................... 104
Naladění stanice .................................................................................... 105
Nastavení budíku .................................................................................... 106
Aktivace buzení ...................................................................................... 107
Časovač vypnutí ..................................................................................... 108
Připojení sluchátek .................................................................................. 109
Podsvícení ................................................................................................ 109
Česky - 87
Page 90

Vícepásmový přijímač SWE 100 B1
Nastavení citlivosti .................................................................................. 110
Výběr formátu času ................................................................................. 110
Řešení problémů .............................................................. 111
Ohled na životní prostředí a recyklace ............................ 112
Likvidace obalu ....................................................................................... 112
Likvidace baterií ...................................................................................... 112
Soulad ............................................................................. 113
Informace o záruce .......................................................... 113
Úvod
Děkujeme vám, že jste si zvolili výrobek společnosti SilverCrest.
Vícepásmový přijímač SilverCrest SWE 100 B1 umožňuje ladění až 6
různých krátkovlnných pásem, pásma FM (VHF) a pásma AM (střední
vlny). Navíc jsou v přístroji digitální hodiny s vestavěným budíkem.
Pokyny k použití přístroje jsou uvedeny na následujících stránkách.
Tato ikona označuje důležité informace pro bezpečné
používání výrobku a bezpečnost uživatele.
88 - Česky
Tento symbol označuje další informace o tématu.
Page 91

Vícepásmový přijímač SWE 100 B1
Určené použití
Jedná se o spotřební elektronické zařízení. Je zkonstruováno pro příjem a
přehrávání rozhlasového vysílání. Zařízení lze také používat jako budík. Je
určeno pouze k soukromému použití, nikoli k průmyslovým či komerčním
účelům. Zařízení se nesmí používat v tropickém podnebí. Výrobce nenese
odpovědnost za škody nebo rušení způsobené neoprávněnými změnami.
Používejte pouze příslušenství doporučené výrobcem. Dodržujte, prosím,
předpisy a zákony platné v zemi použití.
Mějte prosím na paměti, že pro kmitočtová pásma, která lze přijímat,
mohou v jednotlivých zemích platit určitá pravidla. Jakékoli informace
přijaté z kmitočtových pásem ležících mimo pásma, která jsou uvolněna
výhradně pro veřejné využití, se nesmějí využívat ani být předávány třetím
stranám.
Česky - 89
Page 92
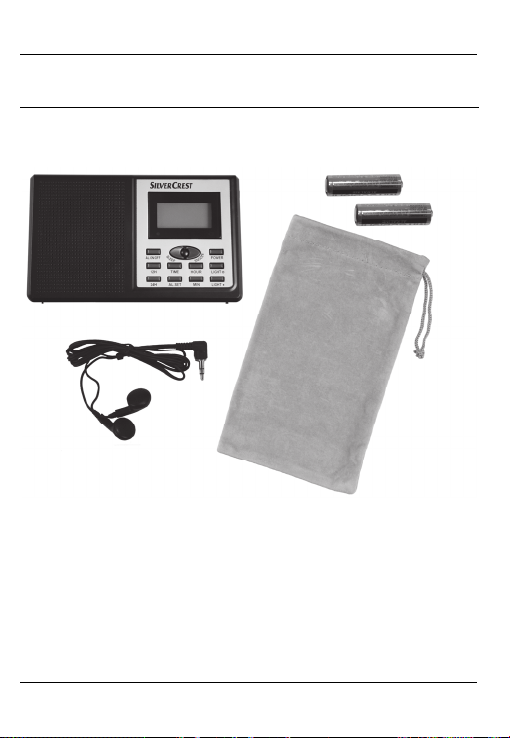
Vícepásmový přijímač SWE 100 B1
Obsah balení
Vícepásmový přijímač SWE 100 B1
2 baterie typu AA, 1,5 V
Pouzdro
Sluchátka SWE 100 B1
90 - Česky
Page 93

Vícepásmový přijímač SWE 100 B1
v
v
p
Technické údaje
Tyto informace popisují technické vlastnosti vašeho
přístroje. V různých zemích mohou platit různá pravidla
týkající se kmitočtových pásem uvolněných pro
yužití. Mějte prosím na paměti, že příjem jakýchkoli
informací z
je nezákonný, a může být stíhán soudními orgány.
Provozní napětí 3 V
Polarita konektoru napájecího
adaptéru
Max. odběr proudu 100 mA
Typ baterie 2x AA, 1,5 V (LR6)
Výstupní výkon 100 mW
Kmitočtová pásma
Dané kmitočtové rozsahy se mohou
mírně lišit v obou směrech kvůli
tolerancím výrobku.
Rozměry 129 x 79 x 33 mm (Š x V x H)
Hmotnost 160 g (bez baterií)
Sluchátka SWE 100 B1
Impedance 32 ohmů
ásem, která se nacházejí mimo tato pásma,
FM 87,5 - 108 MHz
MW 520 - 1620 kHz
SW1 5,9 - 6,2 MHz
SW2 9,4 - 9,9 MHz
SW3 11,6 - 12,1 MHz
SW4 13,57 - 13,87 MHz
SW5 15,1 - 15,8 MHz
SW6 17,48 - 17,9 MHz
eřejné
Česky - 91
Page 94

Vícepásmový přijímač SWE 100 B1
Napětí širokopásmové
charakteristiky přibližně 180 mV
Max. úroveň tlaku zvuku
s dodanými sluchátky přibližně 90 dB(A)
Max. výstupní napětí v
konektoru sluchátek přibližně 80 mV
Provozní teplota 5 °C až 35 °C
Skladovací teplota -10 °C až 50 °C
Provozní vlhkost 85 % rel. vlhkosti.
Změny v technických údajích a designu jsou vyhrazeny bez předchozího
upozornění.
Důležité bezpečnostní pokyny
Před prvním použitím zařízení si přečtěte pokyny v této příručce
a dodržujte veškerá upozornění, i když jste obeznámeni s obsluhou
elektronických zařízení. Příručku uschovejte, abyste se k ní mohli
v budoucnu vracet. V případě prodeje nebo předání zařízení jiné osobě
předejte rovněž tuto příručku.
Nebezpečí plynoucí z rušení hlukem
Upozornění týkající se používání sluchátek Poslech při
vysoké hlasitosti může poškodit váš sluch.
92 - Česky
Page 95

Vícepásmový přijímač SWE 100 B1
Copyright
Celý obsah této uživatelské příručky je chráněn autorským právem a je
poskytnut čtenáři pouze k informačním účelům.
Je přísně zakázáno kopírovat data a informace bez předchozího
písemného a výslovného souhlasu autora. To se týká i komerčního využití
tohoto obsahu a informací.
Veškerý text a obrázky jsou aktuální k datu vytištění.
Provozní podmínky
Zařízení není určeno k provozu v prostředí s vysokou teplotou nebo
vlhkostí (např. koupelnách) a je třeba jej chránit před prachem. Provozní
teplota a vlhkost: 5 °C až 35 °C, max. 85 % relativní vlhkosti.
Vždy se ujistěte, že jsou dodrženy tyto podmínky:
v okolí zařízení je dostatek prostoru pro proudění vzduchu (zařízení
neumisťuje na police, na koberec, na postel nebo na jakékoli místo,
kde by došlo k zakrytí ventilačních otvorů a na všech stranách zařízení
ponechte 10 cm volného prostoru;
na zařízení nepůsobí žádné přímé zdroje tepla (např. topení);
zařízení není vystaveno přímému slunečnímu ani jasnému umělému
světlu;
Česky - 93
Page 96

Vícepásmový přijímač SWE 100 B1
na zařízení nestříká ani nekape voda, k jeho čištění se nepoužívají
abrazivní tekutiny a nepoužívá se v blízkosti vody; zařízení nesmí být
nikdy ponořeno do vody (do blízkosti zařízení neumísťujte předměty
naplněné vodou, například nápoje, vázy apod.);
zařízení není umístěno v těsné blízkosti silných magnetických polí
(např. reproduktorů);
na zařízení nebo v jeho blízkosti nejsou umístěny žádné zdroje
otevřeného ohně (např. zapálené svíčky);
do zařízení nejsou vloženy žádné cizí předměty;
zařízení není vystaveno větším změnám teploty, které by mohly
způsobit vznik vlhkosti z kondenzace a následný zkrat;
zařízení není vystaveno prudkým nárazům a vibracím;
přístroj nebo volitelný síťový adaptér se nepoužívá během bouřky s
blesky bouří a síťový adaptér je odpojen od sítě;
94 - Česky
Page 97

Vícepásmový přijímač SWE 100 B1
Baterie
Vložte baterie se správnou polaritou. Řiďte se označením polarity vedle
přihrádky pro baterie. Baterie nezkoušejte nabíjet ani vhazovat do ohně.
Nepoužívejte současně různé baterie (staré a nové nebo uhlíkové a
alkalické a podobně). Pokud nebudete zařízení delší dobu používat,
baterie vyjměte. Jiné než určené použití může vést k výbuchu a ohrožení
života.
Děti
Elektrická zařízení nepatří do rukou dětem! Nedovolte dětem, aby
používaly elektrická zařízení bez dozoru. Děti nemusejí předvídat možná
rizika. Malé součásti by děti mohly spolknout. V případě spolknutí baterie
okamžitě vyhledejte lékařskou pomoc. Mimo dosah dětí uchovávejte také
obaly. Hrozí riziko udušení.
Česky - 95
Page 98

Vícepásmový přijímač SWE 100 B1
Údržba / Čištění
V případě jakéhokoli poškození zařízení je nutná oprava - např. když
dojde k poškození napájecího adaptéru nebo krytu, vniknutí tekutiny nebo
předmětů do zařízení nebo pokud bylo zařízení vystaveno dešti či vlhkosti.
Oprava je nutná také v případě, kdy zařízení nefunguje normálním
způsobem nebo pokud došlo k jeho upuštění. Všimnete-li si dýmu,
neobvyklých zvuků nebo zápachu, okamžitě zařízení vypněte. Zařízení
v takovém případě dále nepoužívejte a zajistěte jeho kontrolu
pracovníkem autorizovaného servisu. V případě potřeby opravy zařízení
se obraťte na kvalifikovaného servisního technika. Kryt zařízení nikdy
neotvírejte. K čištění používejte pouze čistý suchý hadřík. Nepoužívejte
korozní kapaliny. Nepokoušejte se otevřít kryt zařízení, jinak porušíte
záruku.
96 - Česky
Page 99
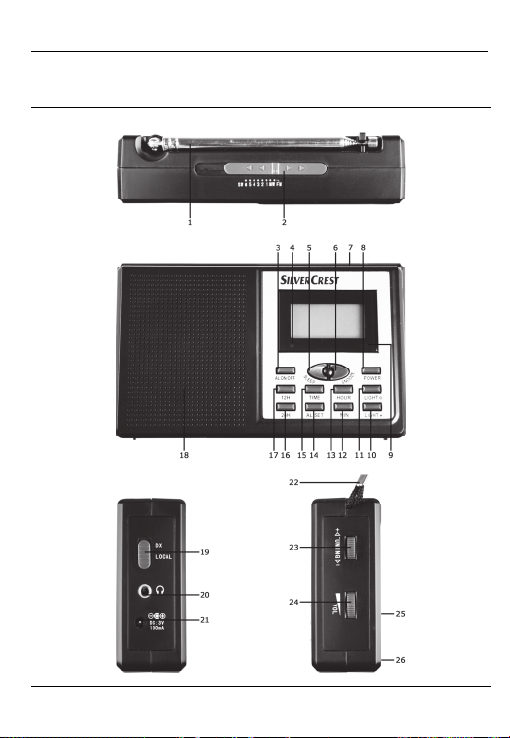
Přehled
Vícepásmový přijímač SWE 100 B1
Česky - 97
Page 100

Vícepásmový přijímač SWE 100 B1
1 Teleskopická anténa
2 Přepínač pásem
3 Zapnutí/vypnutí budíku
4 INDIKÁTOR NAPÁJENÍ
5 Časovač vypnutí
6 Opakované buzení/odložení buzení
7 Displej
8 Vypínač
9 Indikátor stavu baterií
10 Podsvícení vypnuto
11 Podsvícení zapnuto
12 Volba minut
13 Volba hodin
14 Nastavení času buzení
15 Nastavení času
16 24hodinový formát
17 12hodinový formát
18 Reproduktor
19 Přepínač DX/lokální
20 Konektor pro sluchátka
Připojení k napájecímu adaptéru (volitelný doplněk, Polarita
21
)
22 Poutko
23 Ovladač ladění
24 Ovládání hlasitosti
25 Stojánek (na zadní straně)
26 Přihrádka na baterie (na zadní straně)
98 - Česky
 Loading...