


English ...................................................................................................... 2
Suomi ..................................................................................................... 31
Svenska ................................................................................................. 60
Français .................................................................................................. 89
Nederlands .......................................................................................... 120
Deutsch ................................................................................................. 150
V 1.49

SilverCrest SPMR 8000 B1
Contents
Introduction ................................................................................................................ 4
Intended use ............................................................................................................... 4
Package contents ....................................................................................................... 5
Technical specifications ............................................................................................... 6
Safety instructions ...................................................................................................... 8
Copyright ................................................................................................................. 11
Overview ................................................................................................................. 12
Handheld transceiver ................................................................................................................................... 12
Display items ................................................................................................................................................. 13
Charger cradle ............................................................................................................................................. 13
Before you start ....................................................................................................... 14
Inserting the rechargeable/conventional batteries .................................................................................... 14
Charging the batteries ................................................................................................................................. 14
Preparing the charging cradle ................................................................................................................ 14
Charging the batteries ............................................................................................................................. 15
Installing/removing the belt clip .................................................................................................................. 16
Installing the belt clip ............................................................................................................................... 16
Removing the belt clip ............................................................................................................................. 16
Connecting the earphones ........................................................................................................................... 16
Getting started ......................................................................................................... 17
Powering the handheld transceivers on/off ............................................................................................... 17
Powering the handheld transceiver on ................................................................................................... 17
Powering the handheld transceiver off ................................................................................................... 17
Adjusting the volume .................................................................................................................................... 17
Setting a different channel ........................................................................................................................... 18
Reception ...................................................................................................................................................... 18
Transmission .................................................................................................................................................. 18
2 - English

SilverCrest SPMR 8000 B1
Battery status indicator ................................................................................................................................. 19
Advanced operation ................................................................................................. 19
CTCSS (Continuous Tone Coded Squelch System)/DCS (Digital Coded Squelch) code ...................... 19
Setting the CTCSS code .......................................................................................................................... 20
Setting the DCS code .............................................................................................................................. 20
Disabling the CTCSS/DCS code ............................................................................................................ 20
Channel monitoring ...................................................................................................................................... 20
Voice-controlled send function (VOX) ......................................................................................................... 21
Channel scan ................................................................................................................................................ 21
Searching for an active channel ............................................................................................................. 21
Searching for a CTCSS code ................................................................................................................. 22
Searching for a DCS code ...................................................................................................................... 22
Dual scan ...................................................................................................................................................... 23
Call tones ...................................................................................................................................................... 23
Selecting the call tone ............................................................................................................................. 23
Sending the call tone ............................................................................................................................... 23
Setting the roger beep on/off ..................................................................................................................... 24
Setting the button sound on/off................................................................................................................... 24
RM (Room Monitor) ..................................................................................................................................... 24
Button lock .................................................................................................................................................... 25
Chronometer ................................................................................................................................................. 25
Display backlight .......................................................................................................................................... 25
Troubleshooting ....................................................................................................... 26
Maintenance/cleaning .............................................................................................. 27
Maintenance ................................................................................................................................................. 27
Cleaning ........................................................................................................................................................ 27
Environmental regulations and disposal information ............................................... 28
Conformity notes ...................................................................................................... 28
Warranty and Service Information ........................................................................... 29
English - 3

SilverCrest SPMR 8000 B1
Introduction
Thank you for choosing a SilverCrest product.
Your SilverCrest SPMR 8000 B1 consists of two portable handheld radio transceivers with a maximum
range of 8 km. Using this PMR set is free of charge, so there is no need to pay any licence fees, etc. You
can choose from eight channels for communicating between the two stations. The handheld transceivers
are protected against light rain.
You can use your PMR set anywhere you need to communicate with other people. For instance, you can
keep in touch with your children while they are playing in the garden. Once you have found an
interference-free channel, communication will be limited only by obstacles and the maximum range.
Intended use
This handheld radio transceiver set is a consumer electronics device. The SilverCrest SPMR 8000 B1
handheld radio transceiver set has been designed for communicating with other people. The handheld
radio transceiver set may be used only for private purposes, and not for industrial or commercial
purposes. It may not be used in tropical climates. Only cables and external devices that comply with
safety standards and the electromagnetic compatibility and shielding quality of this device may be used.
This handheld radio transceiver set fulfils all relevant norms and standards associated with CE Conformity.
Any modifications to the handheld radio transceiver set may mean that these norms cease to be met. The
manufacturer shall not be liable for any damage or malfunctions resulting from such modifications. Only
use accessories recommended by the manufacturer. Any use other than that mentioned above does not
correspond to the intended use.
Observe the regulations and laws in the country of use.
4 - English
Power your PMR off when on an aircraft and the cabin attendants instruct you to do so. You
must follow the airline flight and cabin crew instructions when using the product.
Power the product off wherever you encounter any signs indicating you must do so. Hospitals
and medical facilities may use devices that are sensitive to RF fields.
In some countries it is forbidden to use your PMR while driving a vehicle, in which case stop
your vehicle beside the road before using it.
Do not touch the antenna while transmitting, as this may result in decreased range.

SilverCrest SPMR 8000 B1
Package contents
Take all supplied devices and accessories out of the packaging and inspect them for any damaged or
missing items:
2 SPMR 8000 B1 handheld radio transceivers
2 belt clips
1 charger cradle
1 power adapter
6 rechargeable AAA-sized Ni-MH batteries
Operating instructions with safety instructions
If you find any items missing or damaged, please phone our hotline. You will find the phone number in the
last chapter, “Warranty and Service Information”.
Remove the protective film from the displays (1) of both transceivers.
English - 5

SilverCrest SPMR 8000 B1
Technical specifications
Brand SilverCrest
Model name SPMR 8000 B1
Channels 8
Subcode CTCSS 38/DCS 83
Frequency 446.00625 – 446.09375 MHz
Range Up to 8 km (in open field)
Per handheld transceiver:
Conventional/rechargeable batteries
Transmission power ≤ 500 mW ERP
Modulation type FM – F3E
Channel separation 12.5 kHz
Power adapter for dual charging cradle
Dimensions
Weight
(without batteries/rechargeable batteries)
Environment
IP standard IPX2 protection against water drops
3 x AAA-sized batteries or
3 x rechargeable AAA-sized NiMH batteries
(1.2V/600
Manufacturer: O Real
Type: TGE050P055
Input: 100 ---- 240 V AC, 50/60 Hz
Output: 5 V / 550 mA
Power: max. 2.75 W
Handheld transceiver: 55 x 103 x 36 mm
Charger cradle: 102 x 60 x 35 mm
Handheld transceiver: 90 g
Charger cradle: 60 g
Power adapter: 55 g
Operation:
0 to 30 ºC, max. 85% relative humidity
Storage:
-20 to 55 ºC, max. 90% relative humidity
mAh
)
6 - English

SilverCrest SPMR 8000 B1
Frequency chart CTCSS code
Channel
1 446.00625 0 Disabled 10 94.8 20 131.8 30 186.2
2 446.01875 1 67.0 11 97.4 21 136.5 31 192.8
3 446.03125 2 71.9 12 100.0 22 141.3 32 203.5
4 446.04375 3 74.4 13 103.5 23 146.2 33 210.7
5 446.05625 4 77.0 14 107.2 24 151.4 34 218.1
6 446.06875 5 79.7 15 110.9 25 156.7 35 225.7
7 446.08125 6 82.5 16 114.8 26 162.2 36 233.6
8 446.09375 7 85.4 17 118.8 27 167.9 37 241.8
DCS codes
No. DCS code No. DCS code No. DCS code No. DCS code No. DCS code
1 23 18 125 35 245 52 412 69 624
2 25 19 131 36 251 53 413 70 627
3 26 20 132 37 261 54 423 71 631
4 31 21 134 38 263 55 431 72 632
5 32 22 143 39 265 56 432 73 654
6 43 23 152 40 271 57 445 74 662
7 47 24 155 41 306 58 464 75 664
8 51 25 156 42 311 59 465 76 703
9 54 26 162 43 315 60 466 77 712
10 65 27 165 44 331 61 503 78 723
11 71 28 172 45 343 62 506 79 731
12 72 29 174 46 346 63 516 80 732
13 73 30 205 47 351 64 532 81 734
14 74 31 223 48 364 65 546 82 743
15 114 32 226 49 365 66 565 83 754
16 115 33 243 50 371 67 606
17 116 34 244 51 411 68 612
Frequency
(MHz)
Frequency
Code
(Hz)
8 88.5 18 123.0 28 173.8 38 250.3
9 91.5 19 127.3 29 179.9
Code
Frequency
(Hz)
Code
Frequency
(Hz)
Code
Frequency
(Hz)
English - 7

SilverCrest SPMR 8000 B1
Safety instructions
Before using this device for the first time, read the following User Manual and heed all warnings, even if
you are familiar with handling electronic devices. Keep these operating instructions in a safe place for
future reference. If you sell the device or pass it on, it is essential that you also hand over this manual.
This symbol denotes important information for the safe operation
of the product and user safety.
This symbol denotes further information on the topic.
This icon warns you about possible damage to the user’s hearing.
Please only use the supplied power adapter (manufacturer: O Real / model number:
TGE050P055) for the charging cradle.
General safety instructions
Electrical devices should not be operated by children or people with mental or physical disabilities. Do
not allow these people to use electrical devices when not under supervision. They may fail to
understand that they can be dangerous.
Small parts can represent choking hazards. Please also note that there is a risk of suffocation if airways
are blocked by the packaging films.
If you notice smoke or unusual noises or smells, disconnect all cables immediately. If this occurs the
handheld radio transceiver set should no longer be used and should be inspected by authorised service
personnel. Never inhale smoke from a possible device fire. If you do inadvertently inhale smoke, seek
medical attention. Smoke inhalation can be damaging to your health.
8 - English

Operating environment/environmental conditions
Position the handheld radio transceiver set on a stable, flat surface and do not place any heavy objects
on the components.
Keep the handheld radio transceiver set away from moisture. Do not place any receptacles containing
liquids (beverages, vases, etc.) next to or on the components. Avoid vibrations, heat and direct sunlight
so that the handheld radio transceiver set is not damaged.
The handheld radio transceiver set is not designed for use in environments with high temperatures or
humidity (e.g. bathrooms) or above-average levels of dust. Operating temperature and operating
humidity: 0 to 30 , max. 85% relative humidity.
If the handheld radio transceiver set is exposed to wide temperature fluctuations, condensation can form
and create moisture, which can in turn cause a short circuit. If this occurs, use the handheld radio
transceiver set only after it has reached the ambient temperature.
Make sure that no fire hazards (e.g. burning candles) are placed on or near the handheld radio
transceiver set.
Cables
Unplug all cables by holding the plugs and never pull on the cables themselves. Never place pieces of
furniture or other heavy objects on the cables and take care that they do not become damaged,
especially at the plugs and sockets. Never tie knots in a cable and do not tie them to other cables. All
cables must be laid so that nobody can trip over them or be obstructed by them.
A damaged power cord can cause fire or an electric shock. Check the power cord from time to time.
Never use adapter plugs or extension cables that do not comply with the current safety regulations in your
country, and do not modify the power adapter or power cable yourself.
SilverCrest SPMR 8000 B1
English - 9
SilverCrest SPMR 8000 B1
Conventional and rechargeable batteries
Insert the batteries/rechargeable batteries with the correct polarity. Refer to the diagram inside the
battery compartment.
Do not attempt to recharge the batteries and do not dispose of the batteries in a fire.
Use only batteries/rechargeable batteries of the same type.
Remove the batteries/rechargeable batteries when the device is not going to be used for a long time.
Batteries/rechargeable batteries must be disposed of at specific collection points. For more information
about battery/rechargeable battery disposal, please see the "Environmental regulations and disposal
information" chapter.
Caution – danger of explosion
Never replace any batteries/rechargeable batteries in an explosion-sensitive environment. While
inserting or removing the batteries (or rechargeable batteries), a spark may be produced causing an
explosion.
Power your PMR off when in a potentially explosive environment. Sparks in such an environment may
cause explosion or fire. In addition, injury or even death may occur.
Explosion-sensitive areas are normally (but not always) labelled. These include fuel storage areas such
as below deck on a boat, fuel line or tank areas, environments where the air contains inflammable
substances (e.g. cereals, metal dust or powder) and any areas where you should normally switch off
your car engine.
Do not throw any batteries or rechargeable batteries into a fire, as they may explode.
Don't try to charge conventional (non-rechargeable) batteries. Only use batteries/rechargeable
batteries of the same type. Always use two batteries/rechargeable batteries of the same type and
capacity. You will find this information in the "Technical specifications" chapter.
10 - English
Caution – risk of burns
SilverCrest SPMR 8000 B1
Never touch the antenna if you find that the antenna insulation is damaged. When the antenna comes
in contact with the skin, minor burns may occur while transmitting.
Batteries and rechargeable batteries may cause material damage and burns if any conductors such as
jewellery, keys or chains touch the battery terminals. The conductive material may close an electrical
circuit causing a short circuit and become very hot. Handle any batteries and rechargeable batteries
carefully, especially when storing them in a pocket, purse or other receptacle containing metal objects.
Caution – risk of injury
Do not place the product within the action radius of your vehicle’s airbag. Airbags inflate very quickly. If
a PMR is placed within the airbag deployment radius, the PMR may be hurled across the vehicle and
cause injury to the occupants.
Keep the radio transceivers at least 15 cm (6 inches) away from any pacemakers.
Power your PMR off if you observe any interference caused to medical equipment.
Risks associated with high noise levels
Caution when using earphones (not supplied). Listening at a high volume can damage your
hearing.
Copyright
All the contents of this user manual are protected by copyright and provided to the reader for information
only.
Copying data and information without the prior explicit written consent of the author is strictly forbidden.
This also applies to any commercial use of the contents and information.
All texts and diagrams are up-to-date as of the date of printing. Subject to change without notice.
English - 11

SilverCrest SPMR 8000 B1
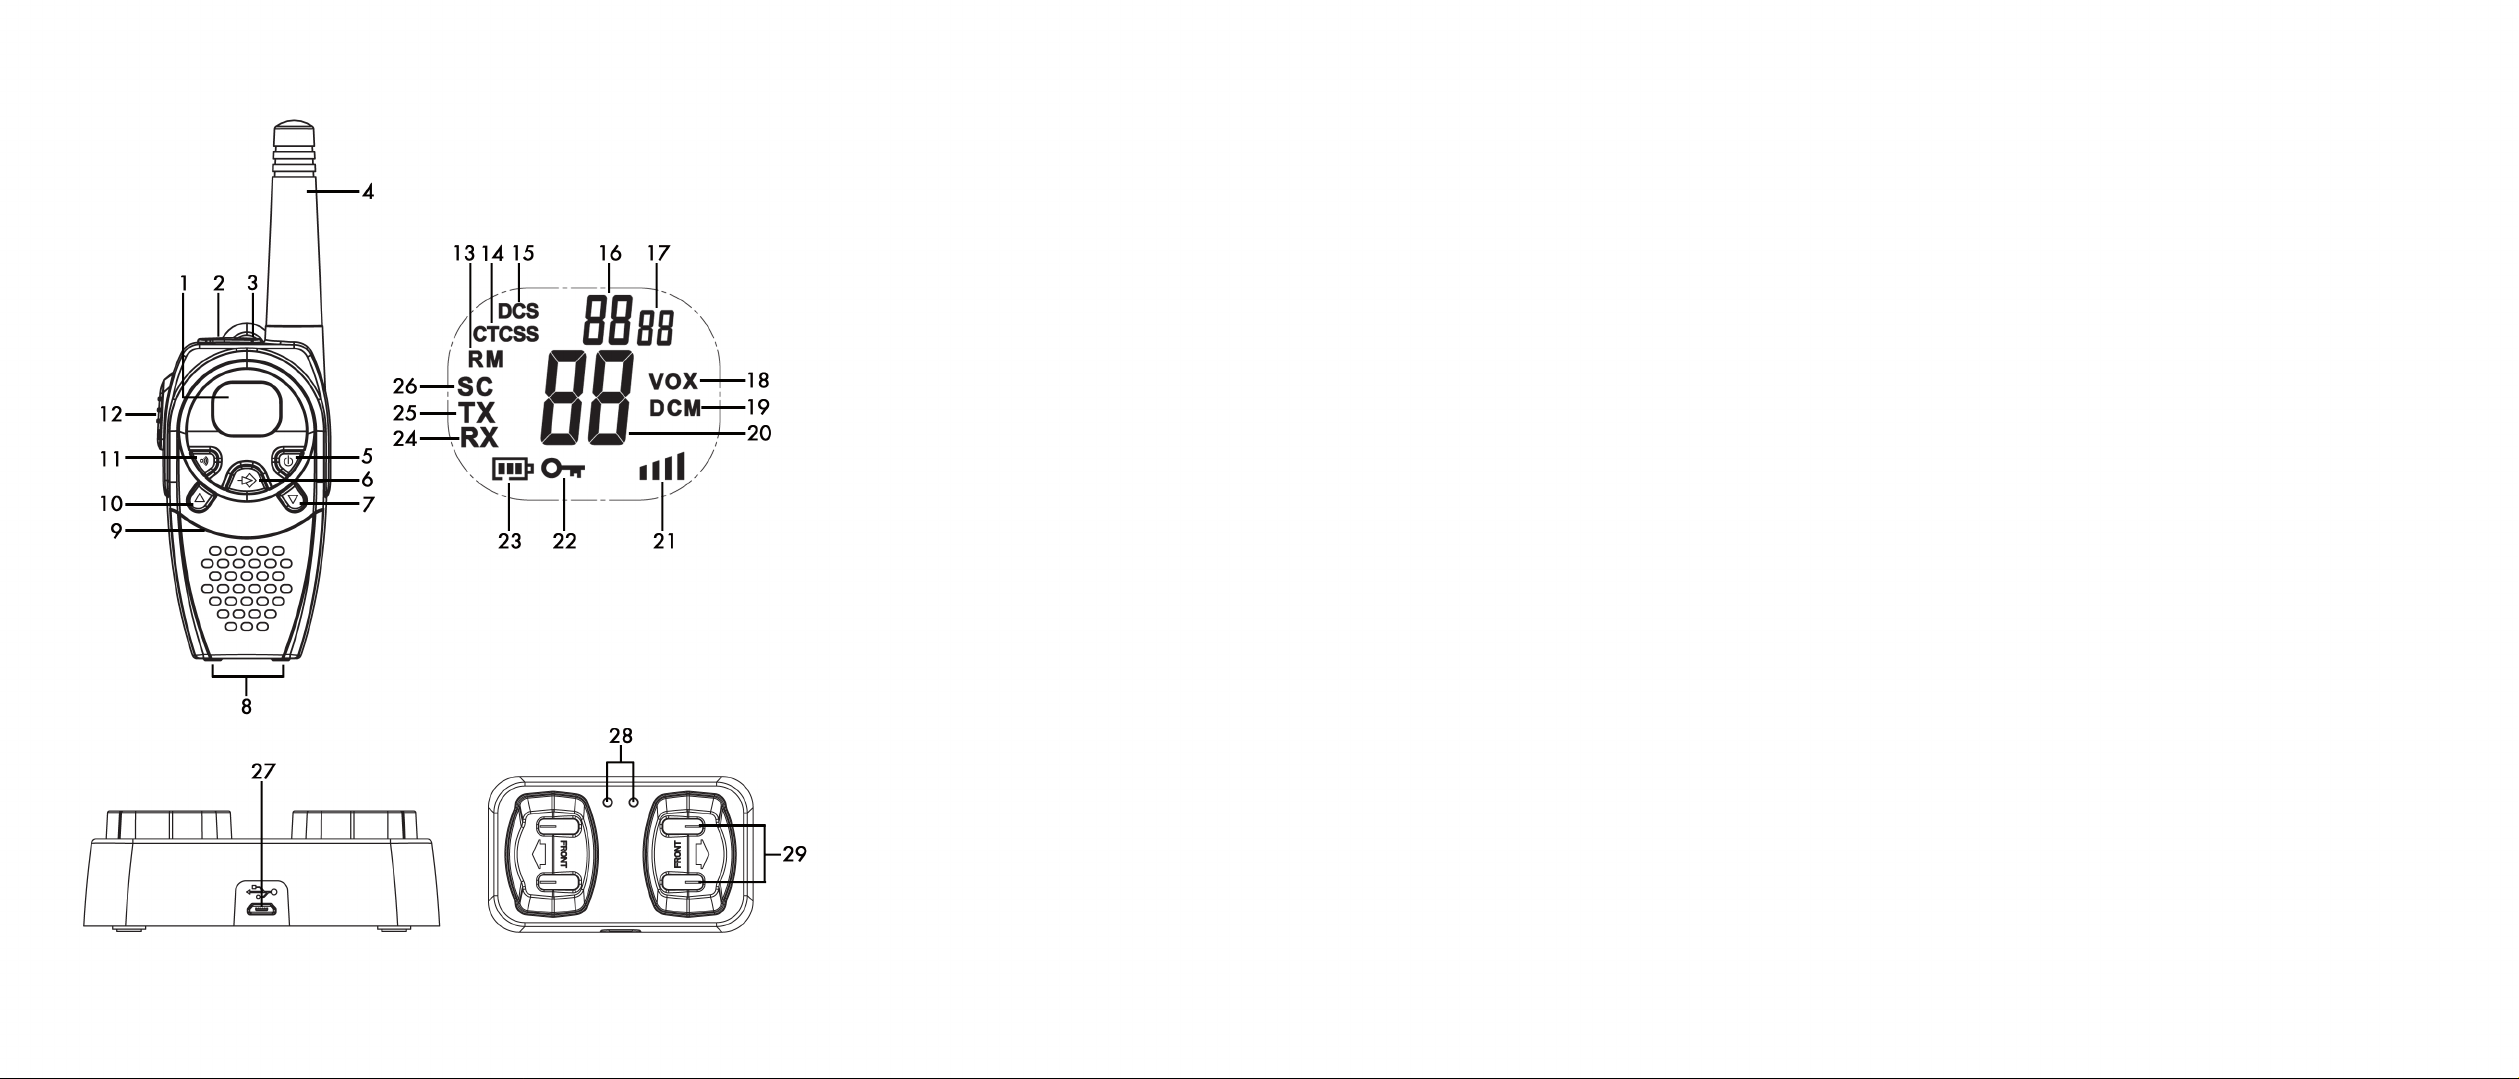
Overview
These operating instructions have a fold-out cover. On the inside of the cover the various components are
shown with numbers indicated. The meanings of the numbers are as follows:
Handheld transceiver
1 Display
2 Power adapter socket (with rubber cover)
3 Earphones connector (with rubber cover)
4 Antenna
5
On/Off button
6 Menu button
- To open the menu settings
7 Down button
- To reduce the speaker volume
- To select the previous menu item
8 Charging contacts
9 Microphone
Up button
10
- To increase the speaker volume
- To select the next menu item
11 Call button
12 PTT button
12 - English

Display items
13 RM indicator
14 CTCSS indicator
15 DCS indicator
16 CTCSS/DCS code/chronometer seconds/menu item value
17 Chronometer 1/100 second
18 VOX icon
19 DCM icon
20 Channel/menu item indication
21 Speaker volume
22 Button lock icon
23 Battery level indicator
24 Reception icon (RX)
25 Transmission icon (TX)
26 Scan icon
Charger cradle
27 Power adapter socket
28 Battery level indicator
29 Charging contacts
SilverCrest SPMR 8000 B1
English - 13
SilverCrest SPMR 8000 B1
Before you start
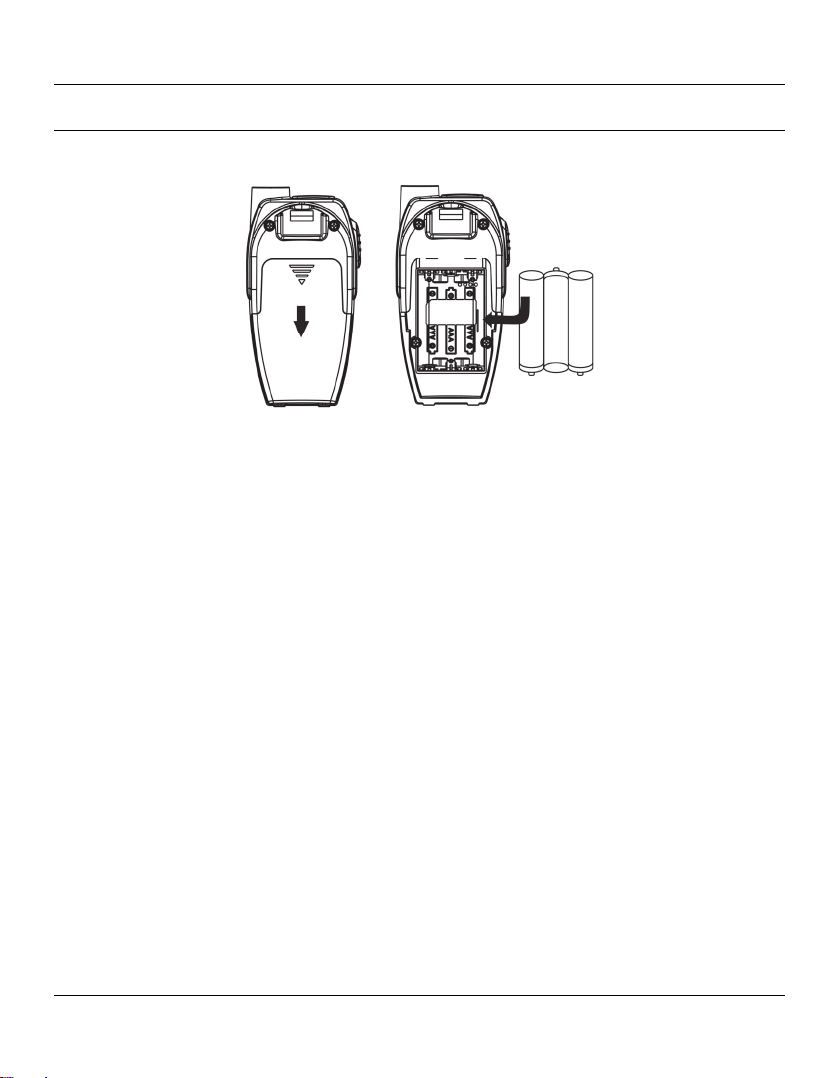
Inserting the rechargeable/conventional batteries
(The figure is representational)
If necessary, remove the belt clip (see the chapter “Removing the Belt Clip”).
Press the ribbed area of the battery compartment cover and slide it downwards. Then lift the battery
compartment cover upwards.
Insert two AAA-sized batteries/rechargeable batteries into the battery compartment by respecting the
correct polarity. Note the + and – icons on the batteries and inside the battery compartment.
Close the battery compartment. Insert the battery compartment cover into the corresponding notch on
the radio transceiver housing and then slide the battery compartment cover upwards until it clicks into
place.
Replace the belt clip (see “Installing the belt clip”).
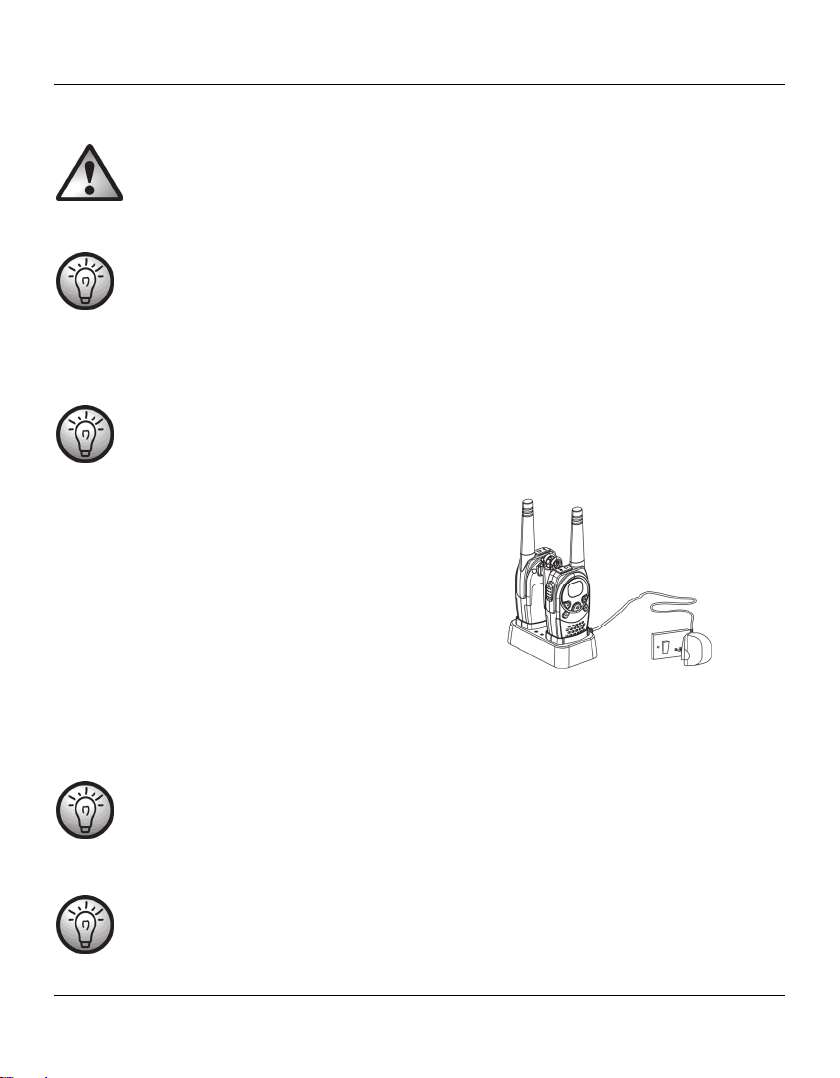
Charging the batteries
If you use rechargeable batteries to power your SilverCrest SPMR 8000 B1 handheld radio transceiver
set, read this chapter carefully.
Preparing the charging cradle
Place the charging cradle on a stable, flat surface.
Plug the power adapter plug into the power receptacle [27] of the charging cradle.
Plug the power adapter into a wall outlet.
14 - English
:
WARNING
Make sure that the wall outlet is nearby and easily accessible so that you can
unplug the power adapter quickly in case of an emergency. Otherwise a short
circuit or fire can occur.
The charging cradle’s power adapter consumes power even if there is no
handheld radio transceiver placed onto it. It is therefore recommended that you
unplug the power adapter from the wall outlet to completely separate it from the
mains and avoid any unnecessary power consumption.
Charging the batteries
Charge the battery packs of both handheld radio transceivers completely before
using them for the first time. Charging takes approx. 8 to 10 hours.
Place the handheld transceivers onto the charging cradle as
shown.
The charging indicator [28] located on top of the charging
cradle illuminates when a transceiver has been inserted
properly and its battery is being charged. Charging takes
approx. 8 to 10 hours. The charging indicator [28] is still
illuminated when the batteries are fully charged.
You can also charge a handheld transceiver without the cradle. To do so, insert
the power adapter plug into the power adapter socket [2] of the handheld
transceiver. To do this, open the rubber cover that protects the power adapter
socket [2].
SilverCrest SPMR 8000 B1
(The figure is
representational)
The handheld transceivers cannot be used while they are charging.
English - 15

SilverCrest SPMR 8000 B1
Installing/removing the belt clip
Installing the belt clip
Insert the belt clip into the guide located at the handheld transceiver
back panel. The belt clip must click into place.
Removing the belt clip
To remove the belt clip from the handheld transceiver, use your
finger to release the belt clip lock (see the arrow). Once unlocked,
slide the belt clip upwards out of the guide.
(The figure is representational)
Connecting the earphones
You can use your handheld transceivers with suitable earphones (not supplied). The earphones receptacle
[3] is located behind a protective cover.
WARNING:
Before connecting the earphones, you must reduce the sound volume (see page 17),
1. To connect the earphones, open the rubber cover that protects the earphones receptacle [3].
2. Insert a 2.5 mm jack-type earphones plug into the earphones receptacle [3].
otherwise you risk damaging your hearing due to the high earphones level.
When using the earphones, the IPX2 protection against vertically falling drops of
water with tilted enclosure is not guaranteed.
16 - English

SilverCrest SPMR 8000 B1
Getting started
In order to be able to communicate using two PMR units, they must be set to the same channel and the
same CTCSS or DCS code. Furthermore, they must be located within range (max. 8 km in open field).
RF communications take place on a free (unscrambled) channel, i.e. other people who have a PMR or
receiver for the set channel will be able to listen to your messages. You can choose from eight different
channels.
This User Manual’s display illustrations show only the information relevant to the functions
or settings being described.
Powering the handheld transceivers on/off
Powering the handheld transceiver on
Press and hold the On/Off button [5] for at least three seconds. An acoustic
signal can be heard and the currently set channel will appear on the display [1].
The handheld transceiver will be in receive mode as long as it is powered on
and not transmitting (idle mode).
Powering the handheld transceiver off
Press and hold the On/Off button [5] for at least three seconds. An acoustic signal can be heard and
the display [1] will turn blank.
Adjusting the volume
Press the Up button [10] to raise the audio volume. The speaker volume will
be indicated by the number of bars [21] (one bar = low volume, four bars =
high volume).
Press the Down button [7] to reduce the audio volume.
English - 17
SilverCrest SPMR 8000 B1
Setting a different channel
When setting a different channel, this needs to be done on both PMR sets for you to be able to
communicate with the remote station.
Press the Menu
the display.
Press the Up [10] or Down [7] button to set a different channel.
Press the PTT button [12] to confirm the setting.
button [6] once. The current channel number will flash on
If no button is pressed for five seconds while changing a setting, the handheld transceiver
will return to idle mode and use the previously adjusted setting.
Reception
The handheld transceiver will be in receive mode as long as it is powered on and not transmitting (idle
mode).
Transmission
Keep the PTT button [12] pressed. The TX icon will appear on the display [1].
Speak into the microphone [9]. Hold the handheld transceiver vertically and
approx. 10 cm (4 inches) from your mouth.
Release the PTT button [12] when you are done with your message.
18 - English
SilverCrest SPMR 8000 B1
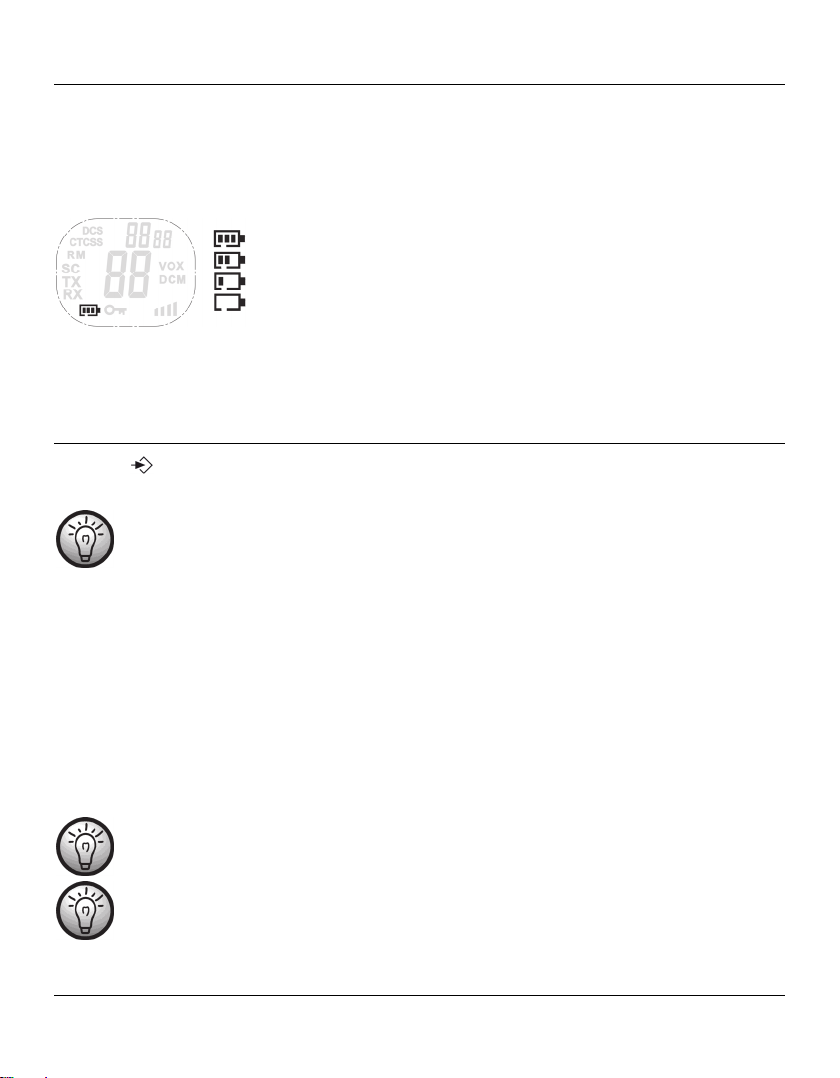
Battery status indicator
When the transceiver is powered on, the number of bars on the battery status indicator [23] will appear
on the display [1] to show the level of the rechargeable or inserted batteries.
Rechargeable batteries/batteries fully charged
Rechargeable batteries/batteries two-thirds charged
Rechargeable batteries/batteries one-third charged
When the rechargeable or inserted batteries are exhausted, an acoustic signal will be heard, in which
case replace the batteries or recharge them if using rechargeable batteries.
Rechargeable batteries/batteries empty
Advanced operation
The Menu button [6] allows you to customise your PMR. For more information about the functions, see
the following pages.
If no button is pressed for five seconds while changing a setting, the handheld transceiver
will return to idle mode and use the previously adjusted setting.
CTCSS (Continuous Tone Coded Squelch System)/DCS (Digital Coded
Squelch) code
If many handheld transceivers are being used in your vicinity, it is likely that other people will be using the
same channel. To avoid receiving the signals of other parties, CTCSS or DCS codes can be used.
The three-digit CTCSS or DCS code is a tone frequency that the PMR will transmit. Two stations that have
been set to the same channel and the same CTCSS or DCS code can listen to each other. No other
stations will be heard on the same channel, unless these stations use the same CTCSS or DCS code. Your
SilverCrest SPMR 8000 B1 supports 38 analogue CTCSS (1 to 38) and 83 digital DCS (1 to 83) codes.
Any receiver tuned to the same channel and using the same CTCSS or DCS code can listen
to your conversation.
Using a CTCSS or DCS code does not prevent your conversations from being intercepted by
other parties: any radio transceiver or receiver tuned into the same channel that is not using
a CTCSS or DCS code will be able to listen to all transmissions on this channel.
English - 19

SilverCrest SPMR 8000 B1
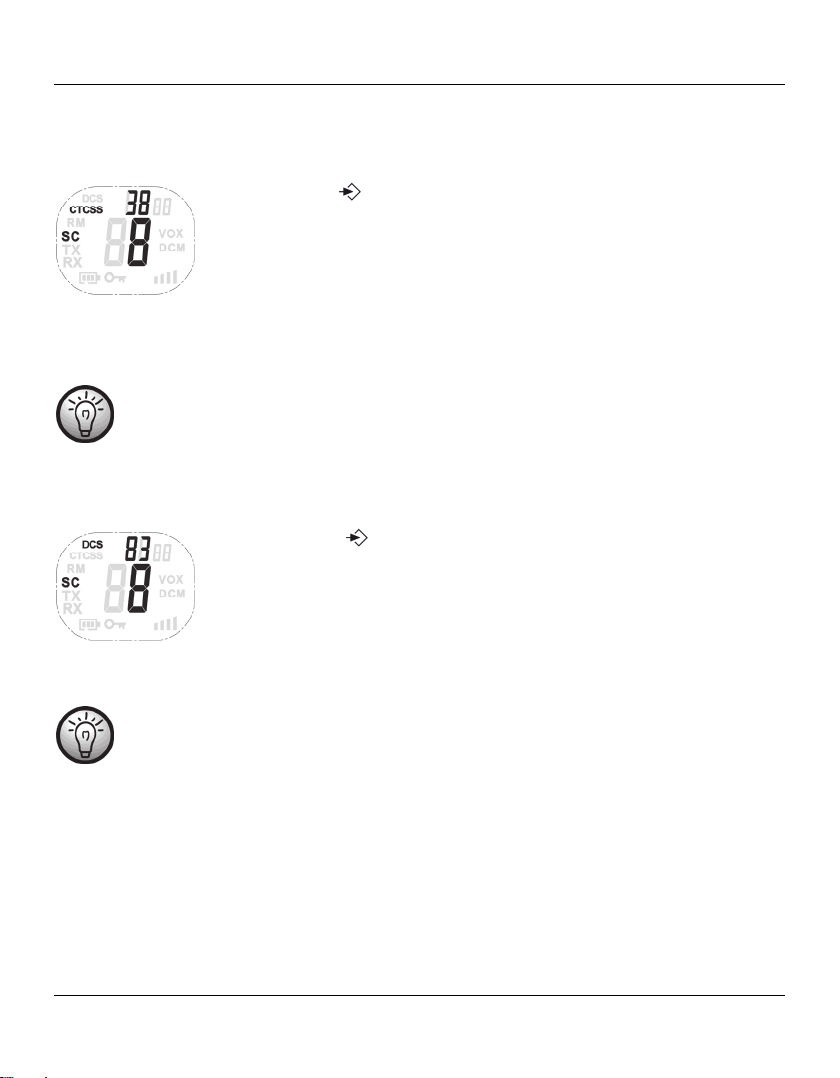
Setting the CTCSS code
Press the Menu
CTCSS code will flash on the display.
Press the Up [10] or Down [7] button to set a different CTCSS code.
Press the PTT button [12] to confirm the setting.
button [6] twice. The indication “CTCSS” and the current
Setting the DCS code
Press the Menu
current DCS code will flash on the display.
Press the Up [10] or Down [7] button to set a different DCS code.
Press the PTT button [12] to confirm the setting.
button [6] three times. The indication “DCS” and the
Disabling the CTCSS/DCS code
To disable the CTCSS or DCS code, select the code “00”. “OF” will appear on the menu.
Channel monitoring
You can use this function to search the current channel for any weak signals.
Press and hold the Menu
monitoring.
Press the Menu
button [6] to stop channel monitoring.
During channel monitoring you can listen to any communications over the current
channel, independently of the set CTCSS or DCS code.
button [6] and the Down button [7] simultaneously to enable channel
20 - English

SilverCrest SPMR 8000 B1
Voice-controlled send function (VOX)
This function is similar to the hands-free feature of your mobile phone. The PMR will start transmitting as
soon as it detects your voice (or any other noise). This allows you to send a message without pressing the
PTT button [12]. Using this function is not recommended when you are located in a noisy or windy
environment.
Press the Menu
VOX setting will flash on the display.
Press the Up button [10] to enable the VOX function or to raise the VOX
sensitivity.
Press the Down button [7] to reduce the VOX sensitivity or to disable the
VOX function (“OF”).
Press the PTT button [12] to confirm the setting.
button [6] four times. The indication “VOX” and the current
Channel scan
Channel scan will search all available channels (1 to 8) for any active stations in a loop.
If an active channel is found, you can search for the CTCSS or DCS code that a station is using on the
channel.
Searching for an active channel
Press the Menu
channel number will flash on the display.
Press the Up [10] or Down [7] button to launch the channel search.
The scan will stop automatically once an active channel has been found. Then you can listen to the
transmissions. Once the transmission on the active channel is terminated, the channel search continues.
Pressing the PTT button [12] while listening to a found channel, the handheld transceiver
will use that channel and return to idle mode.
button [6] five times. The indication “SC” and the current
English - 21
SilverCrest SPMR 8000 B1
Searching for a CTCSS code
If an active channel is found, press the PTT button [12] to use the found channel. Next you can search for
the CTCSS or DCS code being used.
Press the Menu
will flash on the display. The current channel number will also be displayed.
Press the Up [10] or Down [7] button to scan the selected channel.
Once a transmission is detected on the selected channel, its CTCSS code (if any) is detected and
displayed.
Pressing the PTT button [12] will cause the handheld transceiver to use that code and
return to idle mode.
button [6] six times. The indications “SC” and “CTCSS 00”
Searching for a DCS code
Press the Menu button [6] seven times. The indications “SC” and “DCS
00” will flash on the display. The current channel number will also be
displayed.
Press the Up [10] or Down [7] button to scan the selected channel.
Once a transmission is detected on the selected channel, its DCS code (if any) is detected and displayed.
Pressing the PTT button [12] will cause the handheld transceiver to use that code and
return to idle mode.
22 - English
SilverCrest SPMR 8000 B1
Dual scan
Your PMR will normally receive one channel only (with or without CTCSS or DCS code). The dual scan
function allows the monitoring of a second channel with CTCSS or DCS code.
While dual scan is enabled, your PMR will toggle between the two channels.
Press the Menu
flash on the display.
Press the Up [10] or Down [7] button to switch to a different channel.
Press the Menu
CTCSS selection. Press the Menu
Press the Up [10] or Down [7] button to set a different CTCSS or DCS
code.
Press the PTT button [12] to confirm the setting and return to idle mode.
button [6] eleven times. The indication “DCM OF” will
button [6] to confirm the selected channel and continue to
button [6] again to go to DCS selection.
To disable this function, select ”OF” when choosing the DCM channel.
Call tones
The call tone is an audible signal that alerts other stations that you want to transmit a message. The
SilverCrest SPMR 8000 B1 supports 15 call tones.
Selecting the call tone
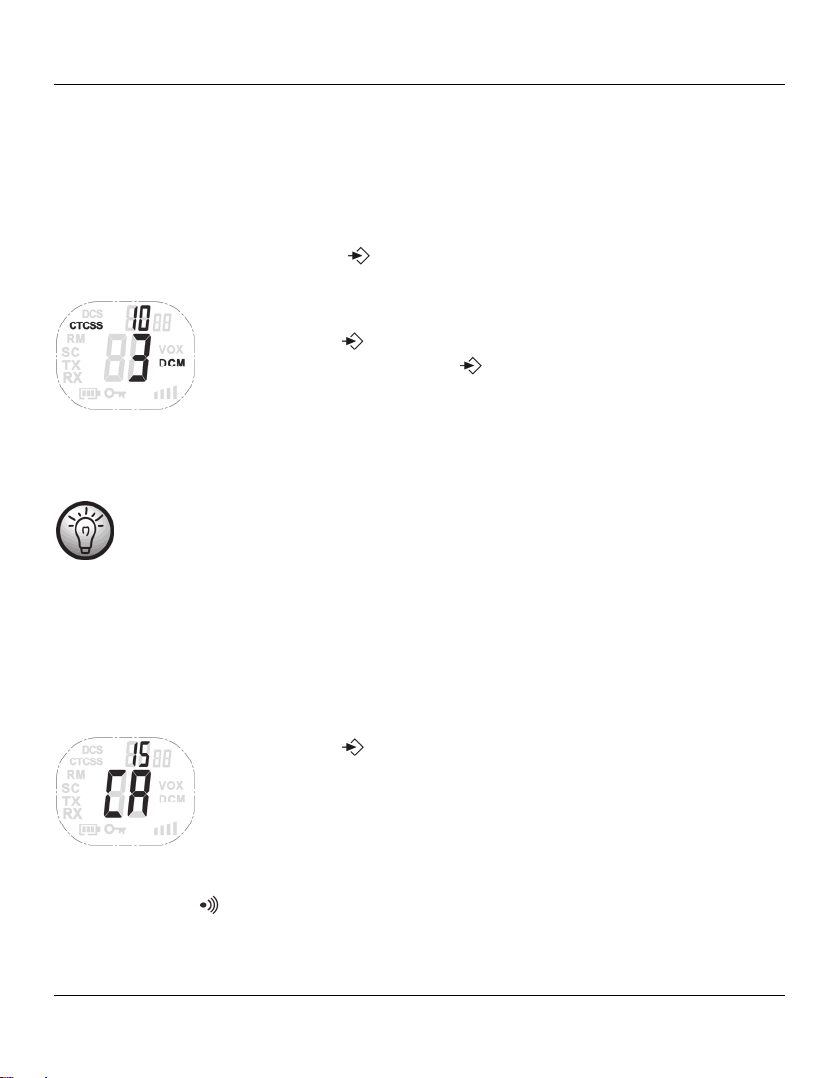
Press the Menu button [6] eight times. The indication “CA” will appear on
the display, the number of the current call tone will flash and the call tone can
be heard.
Press the Up [10] or Down [7] button to set a different call tone.
Sending the call tone
Briefly press the Call button [11] to send the call tone over the current channel.
English - 23
SilverCrest SPMR 8000 B1
Setting the roger beep on/off
If you release the PTT button [12] after transmitting your message, the unit will send a roger beep to
indicate the end of the transmission. If necessary, you can disable this roger beep.
Press the Menu
and the current status will flash on the display.
Press the Up button [10] to enable (ON) or the Down button [7] to
disable (OF) the roger beep.
Press the PTT button [12] to confirm the setting and return to idle mode.
button [6] nine times. The indication “rO” will be shown
Setting the button sound on/off
An acoustic signal can normally be heard each time you press a button. This feature does not apply to the
On/Off button
[5] or the PTT button [12]. If necessary, you can disable the button sound.
Press the Menu
the current status will flash on the display.
Press the Up button [10] to enable (ON) or the Down button [7] to
disable (OF) the button sound.
Press the PTT button [12] to confirm the setting and return to idle mode.
button [6] ten times. The indication “tO” will be shown and
RM (Room Monitor)
You can use this function to monitor a room. While this function is enabled, the handheld transceiver will
transmit as long as voices or other noises are detected and without having to press the PTT button [12].
This lets you hear these voices or noises on the second handheld transceiver.
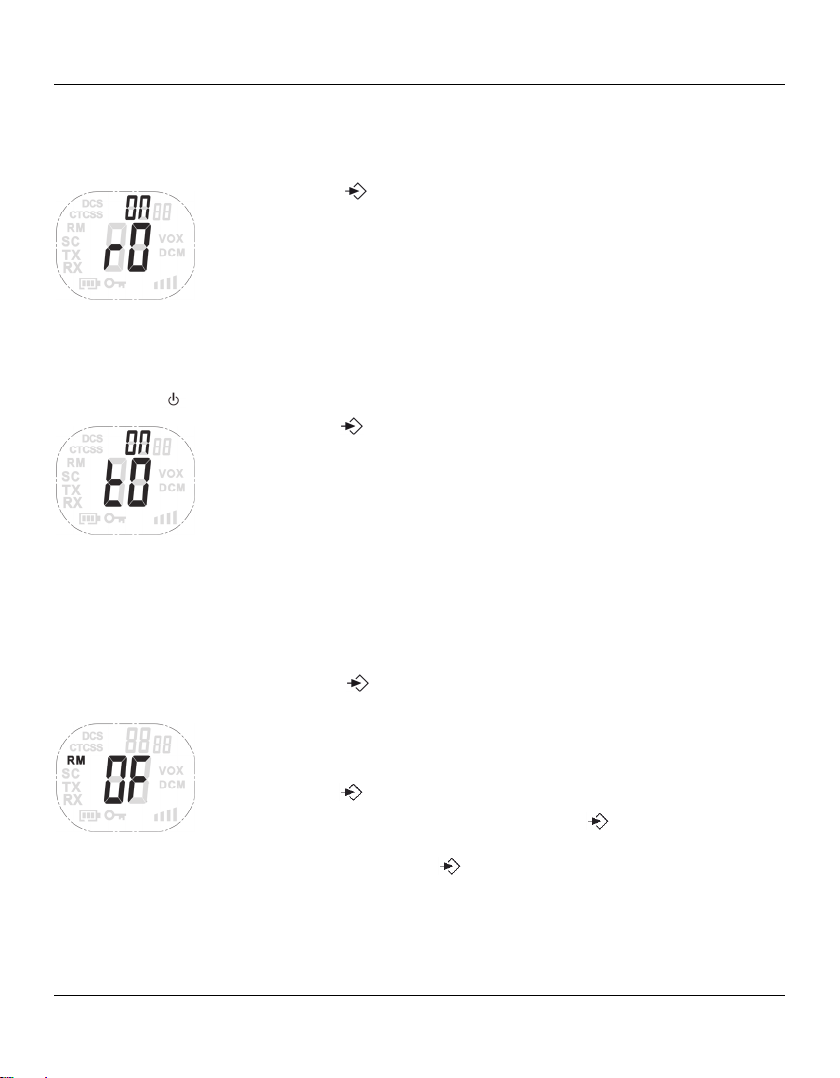
Press the Menu
shown and the current status will flash on the display.
Press the Up button [10] to enable the Room Monitor.
Press the Down button [7] to disable the function (“RM OF”).
Press the Menu
To exit the Room Monitor function, press the Menu button [6] eleven times
and then press the Down button [7] as many times as necessary until "RM
OF" is shown. Press the Menu
button [6] twelve times. The indication “RM OF” will be
button [6] to confirm the setting.
button [6] to confirm.
24 - English

Button lock
SilverCrest SPMR 8000 B1
Press and hold the Menu
lock. The button lock icon is displayed on the screen.
To disable the button lock, press and hold the Menu button [6] again for
three seconds. The button lock icon will go off.
The following buttons will still work while the button lock is enabled:
PTT button [12], Call button [11] and On/Off button [5].
button [6] for three seconds to activate the button
Chronometer
The SilverCrest SPMR 8000 B1 includes a chronometer function for time measurement. The chronometer
can count to 59’59’’99.
Press and hold the Call
chronometer. The chronometer appears on the display.
Press the Up button [10] to start time measurement.
Press the Up button [10] to stop time measurement.
Press the Down button [7] to reset time measurement.
Press and hold the Call
chronometer.
button [11] for three seconds to activate the
button [11] for three seconds to exit the
The chronometer is not available while channel monitoring is enabled.
Display backlight
The PMR display [1] has a backlight to facilitate operating the device in darkness. The backlight will
switch on automatically when pressing any button except the PTT button [12] and the Call
The On/Off
The backlight will switch off automatically after six seconds.
button [5] activates the backlight only when powering the unit on.
button [11].
English - 25

SilverCrest SPMR 8000 B1
Troubleshooting
You can solve most common problems yourself using the table below. If the problem persists after
checking the suggested solutions, contact our Service Hotline. You will find the phone number in the last
chapter, “Warranty and Service Information”. Do not attempt to repair the product yourself.
Problem Solution
Unable to power the PMR
on
No transmission Set both radio transceivers to the same channel and if applicable the
Short range,
communications interference
Reception interference Move away from any electromagnetic sources (high-voltage power
Press and hold the On/Off button [5] for at least three seconds.
Charge the batteries of your PMR or insert new batteries.
same CTCSS or DCS code.
Press and hold the PTT button [12] fully down while speaking.
If there is interference in the transmission, switch to a different channel.
The range depends on the environment. Steel constructions, concrete
buildings or use of the unit in a vehicle may reduce the range. If
possible, try moving to a place where you have free sight to the
receiving station.
lines, machines with electric motors, etc.).
The sending and receiving units are placed too close together. Keep at
least 1.5 m between the two units.
Try to see if the communication quality is better on a different channel.
26 - English

SilverCrest SPMR 8000 B1
Maintenance/cleaning
Maintenance
Repairs are required when the PMR set has been damaged in any way, such as when liquid has
entered the product, the product has been exposed to rain or moisture, the product does not work
normally or the product has been dropped.
If you notice smoke or unusual noises or smells, unplug the charger cradle immediately or remove the
rechargeable battery or conventional batteries from the radio transceivers. In these cases the product
should not be used further and should be inspected by authorised service personnel.
All servicing work must be carried out by qualified specialist personnel.
Never open the housing of the handheld transceiver, as you may damage it.
Do not attempt to repair the product yourself.
If the power cord is damaged you run the risk of an electric shock.
Cleaning
Disconnect the PMR set from the mains before cleaning it.
Use a soft, lint-free cloth for cleaning.
Do not use any cleaners, detergents or solvents, as these may enter the housing and cause permanent
damage to the product.
For more stubborn dirt, use a slightly damp cloth.
Clean the battery terminals from time to time with a dry, lint-free cloth.
If a handheld transceiver gets wet, power it off immediately and remove the rechargeable or
conventional batteries. Dry the battery compartment with a soft cloth. Leave the battery compartment
open until the humidity has completely evaporated. Do not use the product until it is completely dry.
English - 27
SilverCrest SPMR 8000 B1
Environmental regulations and disposal information
If the product is labelled with a crossed-out waste bin, it is subject to European Directive
2012/19/EU. All electrical and electronic devices must be disposed of separately
from household waste at official disposal centres. Proper disposal of old devices
prevents damage to the environment or your health. For further information about
proper disposal, contact your local council, recycling centre or the shop where you
bought the device.
Respect the environment. Old batteries/rechargeable batteries do not go in the
domestic waste. They must be handed in at a collection point for waste batteries. Note that
batteries/rechargeable batteries must be disposed of fully discharged at appropriate collection points for
old batteries. If disposing of batteries which are not fully discharged, take precautions to prevent short
circuits.
Dispose of all packaging in an environmentally-friendly manner. Cardboard packaging can be taken to
paper recycling centres or public collection points for recycling. Any film or plastic contained in the
packaging should be taken to your public collection points for disposal.
Conformity notes
This device has been tested for compliance with the relevant requirements of RTT&E
Directive 1999/5/EC. The Declaration of Conformity can also be found at the end
of this User Manual. The CE sign can be found in the battery compartment of the
handheld radio transceivers and on the bottom of the charger cradle. The product
also fulfils Ecological Design Directive 2009/125/EC with implementing order
278/2009 as well as the RoHS Directive 2011/65/EU.
28 - English

SilverCrest SPMR 8000 B1
Warranty and Service Information
Warranty of TARGA GmbH
Dear Customer,
This device is sold with three years warranty from the date of purchase. In the event of product defects,
you have legal rights towards the seller. These statutory rights are not restricted by our warranty as
described below.
Warranty conditions
The warranty period commences upon the date of purchase. Please keep the original receipt in a safe
place as it is required as proof of purchase. If any material or manufacturing faults occur within three
years of purchase of this product, we will repair or replace the product free of charge as we deem
appropriate.
Warranty period and legal warranty rights
The warranty period is not extended in the event of a warranty claim. This also applies to replaced and
repaired parts. Any damage or defects discovered upon purchase must be reported immediately when the
product has been unpacked. Any repairs required after the warranty period will be subject to charge.
Scope of warranty
The device was carefully manufactured in compliance with stringent quality guidelines and subjected to
thorough testing before it left the works. The warranty applies to material and manufacturing faults. This
warranty does not cover product components which are subject to normal wear and which can therefore
be regarded as wearing parts, or damage to fragile components such as switches, rechargeable batteries
or components made of glass. This warranty is void if the product is damaged, incorrectly used or
serviced. To ensure correct use of the product, always comply fully with all instructions contained in the
user manual. The warnings and recommendations in the user manual regarding correct and incorrect use
and handling of the product must always be observed and complied with. The product is solely designed
for private use and is not suitable for commercial applications. The warranty is rendered void in the event
of incorrect handling and misuse, if it is subjected to force, and also if any person other than our
authorised service technicians interfere with the device. No new warranty period commences if the
product is repaired or replaced.
Submitting warranty claims
To ensure speedy handling of your complaint, please note the following:
- Before using your product for the first time, please read the enclosed documentation carefully.
Should any problems arise which cannot be solved in this way, please call our hotline.
English - 29

SilverCrest SPMR 8000 B1
- Always have your receipt, the product article number as well as the serial number (if available)
to hand as proof of purchase.
- If it is not possible to solve the problem on the phone, our hotline support staff will initiate further
servicing procedures depending on the fault.
Service
E-Mail: service.GB@targa-online.com
E-Mail: service.IE@targa-online.com
E-Mail: service.MT@targa-online.com
E-Mail: service.CY@targa-online.com
IAN: 270811
Phone: 020 – 70 49 04 03
Phone: 01 - 4370121
Phone: 027 78 11 03
Phone: 02 – 20 09 025
Manufacturer
Please note that the following address is not a service address. First contact the service point stated above.
TARGA GmbH
Coesterweg 45
59494 SOEST
GERMANY
30 - English

SilverCrest SPMR 8000 B1
Sisällys
Johdanto .................................................................................................................. 33
Käyttötarkoitus ........................................................................................................ 33
Pakkauksen sisältö .................................................................................................. 34
Tekniset tiedot .......................................................................................................... 35
Turvaohjeet .............................................................................................................. 37
Tekijänoikeudet ....................................................................................................... 40
Yleistä ...................................................................................................................... 41
Radiopuhelin ................................................................................................................................................. 41
Näyttökohteet ............................................................................................................................................... 42
Latausteline ................................................................................................................................................... 42
Alkuvalmistelut ........................................................................................................ 43
Ladattavan akun / tavallisen pariston asentaminen .................................................................................. 43
Akun lataaminen .......................................................................................................................................... 43
Lataustelineen käyttövalmistelut .............................................................................................................. 43
Akun lataaminen ...................................................................................................................................... 44
Vyöpidikkeen asentaminen/irrottaminen .................................................................................................... 45
Vyöpidikkeen asentaminen ..................................................................................................................... 45
Vyöpidikkeen irrottaminen ...................................................................................................................... 45
Kuulokkeiden kytkeminen............................................................................................................................. 45
Alkuvalmistelut ........................................................................................................ 46
Radiopuhelimien virran kytkeminen päälle/pois ........................................................................................ 46
Radiopuhelimen kytkeminen päälle ....................................................................................................... 46
Radiopuhelimen kytkeminen pois päältä ............................................................................................... 46
Äänenvoimakkuuden säätäminen ............................................................................................................... 46
Siirtyminen toiselle kanavalle ....................................................................................................................... 47
Vastaanotto ................................................................................................................................................... 47
Siirto .............................................................................................................................................................. 47
Suomi - 31

SilverCrest SPMR 8000 B1
Akun jännitetason ilmaisin ........................................................................................................................... 48
Lisätoiminnot ............................................................................................................ 48
CTCSS-koodi (Continuous Tone Coded Squelch System)/DCS-koodi (Digital Coded Squelch) ........... 48
CTCSS-koodin asettaminen ..................................................................................................................... 49
DCS-koodin asettaminen ......................................................................................................................... 49
CTCSS/DCS-koodin käytöstä poistaminen ............................................................................................ 49
Kanavaseuranta ........................................................................................................................................... 49
Ääniohjattu lähetystoiminto (VOX) .............................................................................................................. 49
Kanavahaku .................................................................................................................................................. 50
Aktiivisen kanavan etsiminen .................................................................................................................. 50
CTCSS-koodin etsiminen ......................................................................................................................... 50
DCS-koodin etsiminen ............................................................................................................................. 51
Kaksoishaku .................................................................................................................................................. 52
Kutsuäänet .................................................................................................................................................... 52
Kutsuäänen valitseminen ......................................................................................................................... 52
Kutsuäänen lähettäminen ........................................................................................................................ 52
Kuittausäänen asettaminen päälle/pois ..................................................................................................... 53
Painikeäänen asettaminen käyttöön/pois .................................................................................................. 53
Huoneen valvonta (RM) .............................................................................................................................. 53
Painikelukko .................................................................................................................................................. 54
Kronometri .................................................................................................................................................... 54
Näytön taustavalo ........................................................................................................................................ 54
Vianetsintä ............................................................................................................... 55
Kunnossapito ja puhdistaminen ............................................................................... 56
Kunnossapito ................................................................................................................................................ 56
Puhdistaminen ............................................................................................................................................... 56
Käytöstä poistetun laitteen hävittäminen ja ympäristöstä huolehtiminen ................ 57
Vaatimustenmukaisuusilmoitus ................................................................................ 57
Takuu- ja huoltotiedot .............................................................................................. 58
32 - Suomi

SilverCrest SPMR 8000 B1
Johdanto
Kiitämme SilverCrest-tuotteen valinnasta.
SilverCrest SPMR 8000 B1 koostuu kahdesta kannettavasta radiolähetin-vastaanottimesta, joiden
kantama on enimmillään 8 km. PMR-laitteiston käyttö ei maksa mitään, sillä siihen ei vaadita maksullisia
lupia. Kahden laitteen väliseen yhteydenpitoon on valittavissa kahdeksan kanavaa. Radiopuhelimen
kotelointi suojaa laitetta kevyeltä sateelta.
PRM-radiopuhelin soveltuu kaikkialla, missä henkilöiden välinen yhteydenpito on välttämätöntä. Voit olla
esimerkiksi yhteydessä lastesi kanssa, kun he leikkivät puutarhassa. Kun löydät häiriöttömän kanavan,
yhteydenpito toimii. Ainoat rajoitteet ovat signaalin kulkuesteet ja enimmäiskantama.
Käyttötarkoitus
Tämä radiopuhelin on kotikäyttöön tarkoitettu sähkölaite. SilverCrest SPMR 8000 B1 radiopuhelin on
tarkoitettu yhteydenpitoon muiden ihmisten kanssa. Radiopuhelinta voi käyttää vain yksityistarkoituksiin, ei
teollisiin tai kaupallisiin tarkoituksiin. Laite ei sovellu trooppiseen ilmastoon. Laitteessa saa käyttää
ainoastaan turvastandardit ja sähkömagneettisen yhteensopivuuden sekä suojausvaatimukset täyttäviä
johtoja ja lisälaitteita.
Radiopuhelin täyttää kaikki CE-vaatimukset ja sen olennaiset määräykset ja standardit. Kaikki
radiopuhelimeen tehdyt muutokset saattavat aiheuttaa sen, ettei näitä normeja täytetä. Valmistaja ei ole
vastuussa mistään sellaisesta aiheutuneista vahingoista tai toimintahäiriöistä. Käytä vain valmistajan
suosittelemia lisälaitteita. Muu kuin edellä mainittu käyttö ei vastaa käyttötarkoitusta.
Noudata käyttömaassa voimassa olevia määräyksiä.
Katkaise radiopuhelimen virta lentokoneessa, kun matkustamohenkilökunta pyytää
sulkemaan elektroniset laitteet. Laitteen käytössä tulee noudattaa lento- ja
matkustamohenkilökunnan ohjeita.
Katkaise laitteen virta, kun ilmoituksin tai merkinnöin pyydetään tekemään niin. Sairaaloiden
ja terveyskeskusten laitteet ovat herkkiä radiotaajuussignaaleille.
Joissain maissa radiopuhelimen käyttö on kiellettyä ajoneuvoa kuljetettaessa. Pysähdy silloin
tienlaitaan ennen laitteen käyttämistä.
Antennin koskettaminen lähetyksen aikana voi lyhentää radiopuhelimen kantamaa.
Suomi - 33

SilverCrest SPMR 8000 B1
Pakkauksen sisältö
Pura pakkauksen sisältö ja tarkista, että laite tarvikkeineen on moitteettomassa kunnossa ja että pakkaus
sisältää seuraavat osat:
2 kannettavaa SPMR 8000 B1 radiopuhelinta
2 vyökiinnikettä
1 latausteline
1 verkkolaite
6 ladattavaa AAA-kokoista Ni-MH-akkua
Käyttöohjeet ja turvallisuusohjeet
Jos havaitset puutteita tai laitevaurioita, soita asiakaspalveluumme. Yhteystiedot ovat käyttöoppaan
lopussa kohdassa Takuu- ja huoltotiedot.
Poista molemmista radiopuhelimista näyttöä (1) suojaava kalvo.
34 - Suomi

SilverCrest SPMR 8000 B1
Tekniset tiedot
Merkki SilverCrest
Mallin nimi SPMR 8000 B1
Kanavat 8
Alikoodi CTCSS 38/DCS 83
Taajuus 446,00625 – 446,09375 MHz
Alue enintään 8 km (avoin maasto)
Radiopuhelinta kohti
Tavalliset/ladattavat paristot
Lähetysteho ≤ 500 mW ERP
Modulointityyppi FM – F3E
Kanavaerottelu 12,5 kHz
Kaksoislataustelineen verkkolaite
Ulkomitat:
Paino (ilman paristoja / ladattavilla
paristoilla)
Ympäristö
IP-luokka IPX2 suojaus vesipisaroilta
3 x AAA-kokoista paristo tai 3 x ladattavaa AAA-
mAh
kokoista NiMH-akkua (1,2 V / 600
Valmistaja: O Real
Tyyppi: TGE050P055
Tulo: 100 - 240 V AC, 50/60 Hz
Lähtö: 5 V/550 mA
Teho: enintään 2,75 W
Radiopuhelin: 55 x 103 x 36 mm
Latausteline: 102 x 60 x 35 mm
Radiopuhelin: 90 g
Latausteline: 60 g
Verkkolaite: 55 g
Käyttö:
0 – 30 ºC, maks. 85% suhteellinen kosteus
Varastointi:
-20 – 55 ºC, maks. 90% suhteellinen kosteus
)
Suomi - 35

SilverCrest SPMR 8000 B1
Taajuuskaavio CTCSS-koodi
Kana-
Taajuus
va
(MHz)
1 446,00625 0
2 446,01875 1 67,0 11 97,4 21 136,5 31 192,8
3 446,03125 2 71,9 12 100,0 22 141,3 32 203,5
4 446,04375 3 74,4 13 103,5 23 146,2 33 210,7
5 446,05625 4 77,0 14 107,2 24 151,4 34 218,1
6 446,06875 5 79,7 15 110,9 25 156,7 35 225,7
7 446,08125 6 82,5 16 114,8 26 162,2 36 233,6
8 446,09375 7 85,4 17 118,8 27 167,9 37 241,8
DCS-koodit
DCS-
N:o
koodi
1 23 18 125 35 245 52 412 69 624
2 25 19 131 36 251 53 413 70 627
3 26 20 132 37 261 54 423 71 631
4 31 21 134 38 263 55 431 72 632
5 32 22 143 39 265 56 432 73 654
6 43 23 152 40 271 57 445 74 662
7 47 24 155 41 306 58 464 75 664
8 51 25 156 42 311 59 465 76 703
9 54 26 162 43 315 60 466 77 712
10 65 27 165 44 331 61 503 78 723
11 71 28 172 45 343 62 506 79 731
12 72 29 174 46 346 63 516 80 732
13 73 30 205 47 351 64 532 81 734
14 74 31 223 48 364 65 546 82 743
15 114 32 226 49 365 66 565 83 754
16 115 33 243 50 371 67 606
17 116 34 244 51 411 68 612
Koodi
8 88,5 18 123,0 28 173,8 38 250,3
9 91,5 19 127,3 29 179,9
N:o
DCSkoodi
Taajuus
(Hz)
Ei
käytössä
Taajuus
Koodi
(Hz)
10 94,8 20 131,8 30 186,2
DCS-
N:o
koodi
Koodi
N:o
Taajuus
(Hz)
DCSkoodi
Koodi
N:o
Taajuus
(Hz)
DCSkoodi
36 - Suomi

SilverCrest SPMR 8000 B1
Turvaohjeet
Ennen kuin käytät laitetta ensimmäistä kertaa, lue käyttöohje ja noudata kaikkia varoituksia, vaikka
olisitkin tottunut käyttämään sähkölaitteita. Säilytä tämä käyttöohje tulevaa tarvetta varten paikassa, josta
se on helposti saatavissa käsille. Jos myyt laitteen tai luovutat sen eteenpäin, on tärkeää, että annat
mukana myös tämän käyttöoppaan.
Tämä kuvake tarkoittaa tärkeitä virtalaturin turvallista käyttöä ja käyttäjän turvallisuutta
koskevia tietoja.
Tämä kuvake tarkoittaa lisätietoja aiheesta.
Tämä kuvake varoittaa kuulovaurioiden mahdollisuudesta.
Käytä vain mukana toimitettua verkkolaitetta (valmistaja: O Real / mallinumero:
TGE050P055) latausteline.
Yleisiä turvaohjeita
Lapset tai henkilöt, joiden henkiset tai fyysiset kyvyt ovat vajavaiset, eivät saa käyttää sähkölaitteita. Älä
anna näiden henkilöiden käyttää sähkölaitteita ilman valvontaa. He eivät ehkä ymmärrä, että ne voivat
olla vaarallisia.
Pienet osat saattavat aiheuttaa tukehtumisvaaran. Huomaa, että on aina tukehtumisvaara, jos
hengitystiet estetään pakkauskalvolla.
Jos laturista tulee savua tai outoa ääntä tai hajua, irrota sen kaikki johdot välittömästi. Näissä
tapauksissa radiopuhelinta ei saa käyttää, ennen kuin valtuutettu huolto on tarkastanut sen. Älä koskaan
hengitä laitepalosta tulevaa savua. Jos olet tahattomasti hengittänyt savua, ota yhteyttä lääkäriin.
Laitepalon savun hengittäminen voi vaarantaa terveytesi.
Suomi - 37

SilverCrest SPMR 8000 B1
Käyttöympäristö ja käyttöpaikan olosuhteet
Sijoita radiopuhelinsetti tasaiselle, tukevalle alustalle. Älä aseta painavia esineitä sen päälle.
Pidä radiopuhelinsetti erossa kosteudelta. Älä aseta nesteitä sisältäviä astioita (kuten juomia, maljakoita
jne.) laitteen osien päälle tai sen läheisyyteen. Vältä tärinöitä, kuumuutta ja suoraa auringonvaloa, jotta
radiopuhelinsetti ei vahingoitu.
Laitetta ei ole tarkoitettu käytettäväksi ympäristössä, jossa on korkea lämpötila tai kosteaa (esim.
kylpyhuone) tai kosteissa tiloissa. Käyttölämpötila ja -ilmankosteus: 0 – 30 ºC, maks. 85% suhteellinen
kosteus.
Jos radiopuhelinsetti altistetaan suurille lämpötilavaihteluille, vettä voi tiivistyä laitteen sisälle ja
muodostaa kosteutta, joka saattaa aiheuttaa oikosulun. Jos tämä tapahtuu, käytä radiopuhelinsettiä
vasta, kun se on saavuttanut ympäristön lämpötilan.
Varmista, ettei laitetta sijoiteta avotulen (esim. palavan kynttilän) päälle tai lähelle.
Johdot
Irrota johdot aina vetämällä pistokkeesta. Älä koskaan vedä itse johdosta. Älä aseta huonekaluja tai
painavia esineitä johdon päälle ja huolehdi, ettei johto tai pistoke jää puristuksiin tai vahingoitu. Älä tee
johtoon solmuja, äläkä sido yhteen muiden johtojen kanssa. Kaikki johdot tulee sijoittaa niin, ettei niihin voi
kompastua eivätkä ne ole kenenkään tiellä.
Vahingoittunut virtajohto voi aiheuttaa tulipalon tai sähköiskun. Tarkista virtajohto ajoittain. Älä käytä
sellaisia sovittimia tai jatkojohtoja, jotka eivät täytä voimassa olevia turvamääräyksiä. Älä tee mitään
muutoksia verkkolaitteeseen tai johtoihin.
38 - Suomi

Tavalliset ja ladattavat paristot
Aseta paristo tai akku paikalleen navat oikein päin. Katso napojen suuntamerkinnät paristokotelon
sisällä.
Älä yritä ladata paristoja tai heitä niitä tuleen.
Käytä vain samantyyppisiä paristoja tai ladattavia akkuja.
Poista paristot tai ladattavat akut, jos laitetta ei käytetä pitkään aikaan.
Paristot / ladattavat paristot on vietävä hävitettäviksi erityisiin keräyspisteisiin. Lisätietoja paristojen /
ladattavien paristojen hävittämisestä on luvussa "Käytöstä poistetun laitteen hävittäminen ja ympäristöstä
huolehtiminen".
SilverCrest SPMR 8000 B1
Huomio – räjähdysvaara
Älä vaihda paristoja tai ladattavia akkuja räjähdysherkässä ympäristössä. Akkujen tai paristojen
irrottaminen voi synnyttää kipinän, joka puolestaan voi aiheuttaa räjähdyksen.
Katkaise radiopuhelimen virta räjähdysalttiissa ympäristössä. Kipinöinti sellaisessa ympäristössä voi
aiheuttaa räjähdyksen tai tulipalon. Seurauksena voi olla vammautuminen tai jopa kuolema.
Räjähdysherkät alueet ovat yleensä (mutta ei aina) merkitty asianmukaisesti. Tällaisia ympäristöjä ovat
polttoainetta sisältävät alueet, kuten veneiden moottoritilat, polttoaineiden varastoalueet tai rakennukset,
joiden ilmassa on syttyviä aineita (esim. metalli- tai turvepölyä) ja kaikki sellaiset tilat, joissa normaalisti
auton moottori sammutetaan.
Älä hävitä ladattavia akkuja tai paristoja polttamalla, sillä ne voivat räjähtää.
Älä yritä ladata tavanomaisia (ei ladattavia) paristoja. Käytä vain samantyyppisiä paristoja tai
ladattavia paristoja. Käytä aina kahta samantyyppistä ja saman kapasiteetin paristoa tai ladattavaa
paristoa. Löydät nämä tiedot luvusta "Tekniset tiedot".
Suomi - 39

SilverCrest SPMR 8000 B1
Huomio – palovammojen vaara
Älä kosketa antenniin, jos antennin eriste on rikkoutunut. Jos antenni koskettaa ihoa radiopuhelimen
lähetyksen aikana, ihoon voi muodostua vähäinen palovamma.
Akut ja paristot voivat aiheuttaa vaurioita tai palovammoja, jos jokin sähköä johtavasta materiaalista
tehty esine, kuten koru, avain tai ketju koskettaa akun tai pariston napoja. Sähköä johtava materiaali voi
sulkea virtapiirin aiheuttaen oikosulun ja samalla kuumentua. Käsittele ladattavia akkuja ja paristoja
huolellisesti erityisesti silloin, jos pidät niitä esimerkiksi taskussa tai laukussa, jossa ne voivat koskettaa
metalliesineitä.
Huomio – loukkaantumisvaara
Älä sijoita laitetta autossa turvatyynyjen toimintasäteelle. Turvatyynyt täyttyvät erittäin nopeasti. Täyttyvä
turvatyyny voi radiopuhelimeen osuessaan lennättää sen voimalla päin auton matkustajaa ja aiheuttaa
vammoja.
Sijoita radiopuhelin vähintään 15 cm:n etäisyydelle sydäntahdistimesta.
Katkaise radiopuhelimen virta, jos se aiheuttaa häiriötä lääkinnälliselle laitteelle.
Korkeisiin melutasoihin liittyviä vaaroja
Ole varovainen käyttäessäsi kuulokkeita (ei mukana). Liiallinen äänenvoimakkuus voi
vahingoittaa kuuloa.
Tekijänoikeudet
Kaikki tämän käyttöoppaan tiedot ovat tekijänsuojan alaisia ja ne on annettu lukijalle vain tiedoksi.
Tietojen kopioiminen on ehdottomasti kiellettyä ilman tekijän etukäteen myöntämää kirjallista lupaa. Tämä
koskee myös kaikkea sisällön ja tietojen kaupallista käyttöä.
Kaikki tekstit ja kuvitukset ovat ajan tasalla painatuspäivänä. Teknisiä tietoja voidaan muuttaa ilman
ilmoitusta.
40 - Suomi

Yleistä
SilverCrest SPMR 8000 B1
Tässä käyttöoppaassa on ulostaittuva kansilehti. Kannen sisäsivulla on kuva eri osista viitenumeroineen.
Numerot ja niitä vastaavat osat:
Radiopuhelin
1 Näyttö
2 Virtaliitäntä (ja kumisuojus)
3 Kuulokeliitäntä (ja kumisuojus)
4 Antenni
5
Virtapainike
6 Valikkopainike
- Avaa valikkoasetukset
7 Alas-painike
- Vähentää kaiuttimen äänenvoimakkuutta.
- Palaa edelliseen valikkokohtaan.
8 Latauskontaktit
9 Mikrofoni
Ylös-painike
10
- Lisää kaiuttimen äänenvoimakkuutta.
- Siirtyminen seuraavaan valikkokohtaan.
11 Kutsupainike
12 PTT-painike
Suomi - 41

SilverCrest SPMR 8000 B1
Näyttökohteet
13 RM-merkkivalo
14 CTCSS-merkkivalo
15 DCS-merkkivalo
16 CTCSS/DCS-koodi / kronometrin sekunnit / valikkokohteen arvo
17 Kronometri 1/100 sekuntia
18 VOX-kuvake
19 DCM-kuvake
20 Kanavan/valikkokohteen merkkivalo
21 Kaiuttimen äänenvoimakkuus
22 Painikelukon kuvake
23 Pariston jännitetason ilmaisin
24 Vastaanoton kuvake (RX)
25 Lähetyksen kuvake (TX)
26 Hakukuvake
Latausteline
27 Sähköpistorasia
28 Pariston jännitetason ilmaisin
29 Latauskontaktit
42 - Suomi

SilverCrest SPMR 8000 B1
Alkuvalmistelut
Ladattavan akun / tavallisen pariston asentaminen
(kuva on viitteellinen)
Irrota tarvittaessa vyöpidike (katso luku ”Vyöpidikkeen irrottaminen”).
Paina paristolokeron kannen uritettua aluetta ja siirrä alaspäin. Nosta paristolokeron kantta sitten
ylöspäin.
Aseta kaksi AAA-kokoista paristoa / ladattavaa akkua akkulokeroon noudattaen napaisuusmerkintöjä.
Huomioi plus (+) ja miinus (-) paristoissa ja paristokotelossa.
Sulje paristokotelon kansi. Työnnä paristolokeron kansi radiopuhelimen kotelon vastaavaan
syvennykseen ja siirrä sitten paristolokeron kantta ylöspäin, kunnes se napsahtaa paikalleen.
Kiinnitä vyöpidike takaisin paikalleen (katso kappale ”Vyöpidikkeen asentaminen”).
Akun lataaminen
Jos käytät SilverCrest SPMR 8000 B1 radiopuhelinsetin tehonlähteenä ladattavia akkuja, lue tämä luku
huolellisesti.
Lataustelineen käyttövalmistelut
Aseta latausteline tukevalle, tasaiselle alustalle.
Kytke verkkolaitteen pistoke lataustelineen virtaliitäntään [27].
Kytke verkkolaite pistorasiaan.
Suomi - 43

SilverCrest SPMR 8000 B1
:
VAROITUS
Käytä lähellä ja hyvin näkyvissä olevaa verkkovirran pistorasiaa, josta
verkkolaitteen voi hätätilanteessa irrottaa nopeasti. Muutoin seurauksena voi olla
oikosulku tai tulipalo.
Lataustelineen verkkolaite kuluttaa virtaa silloinkin, kun siihen ei ole asetettu
radiopuhelinta. Siksi on suositeltavaa irrottaa verkkolaite pistorasiasta ja
kokonaan virransyötöstä, jotta vältetään tarpeeton virrankulutus.
Akun lataaminen
Lataa kummankin radiopuhelimen akku aivan täyteen ennen niiden ensimmäistä
käyttökertaa. Lataaminen kestää noin 8–10 tuntia.
Aseta radiopuhelimet lataustelineeseen kuten kuvassa.
Lataustelineen päällä oleva latauksen merkkivalo [28] palaa,
kun radiopuhelin on kunnolla paikallaan ja sen akku latautuu.
Lataaminen kestää noin 8–10 tuntia. Latauksen merkkivalo
palaa [28] edelleen, kun akut on ladattu täyteen.
Voit ladata kannettavan radiopuhelimen ilman lataustelinettä. Se tapahtuu
liittämällä virtapistoke kannettavan radiopuhelimen virtaliitäntään [2]. Voit tehdä
sen avaamalla virtaliitäntää [2] suojaavan kumisuojuksen.
(kuva on viitteellinen)
44 - Suomi
Radiopuhelimia ei voi käyttää, kun ne ovat latauksessa.

SilverCrest SPMR 8000 B1
Vyöpidikkeen asentaminen/irrottaminen
Vyöpidikkeen asentaminen
Asenna vyöpidike radiopuhelimen takapaneelin ohjainpaikkaan.
Vyöpidikkeen tulee napsahtaa paikalleen.
Vyöpidikkeen irrottaminen
Irrota vyöpidike kannettavasta radiopuhelimesta vapauttamalla
vyöpidikkeen lukko sormella (katso nuoli). Kun vyöpidike on avattu,
siirrä sitä ylöspäin ulos ohjaimesta.
(kuva on viitteellinen)
Kuulokkeiden kytkeminen
Käytä kannettavaa radiopuhelinta sopivien kuulokkeiden kanssa (ei mukana). Kuulokeliitäntä [3] on
suojuksen alla.
1. Aloita kuulokkeiden kiinnitys avaamalla kuulokeliitännän [3] kumisuojus.
2. Työnnä 2,5 mm:n kuulokepistoke radiopuhelimen kuulokeliitäntään [3].
VAROITUS:
Ennen kuulokkeiden kiinnittämistä äänenvoimakkuutta on syytä vähentää (katso sivu 46),
sillä liiallinen äänenvoimakkuus kuulokkeita käytettäessä altistaa kuulovaurioille.
Kuulokkeita käytettäessä IPX2-suojaa kallistetulle laitteelle pystysuoraan tippuvia
vesipisaroita vastaan ei ole taattu.
Suomi - 45

SilverCrest SPMR 8000 B1
Alkuvalmistelut
Jotta kaksi PMR-radiopuhelinta voi olla yhteydessä toisiinsa, niihin täytyy asettaa sama kanava ja sama
CTCSS- tai DCS-koodi. Lisäksi puhelinten täytyy olla kantaman sisällä (enintään 8 km avoimessa
maastossa).
Radiotaajuudella toimiva yhteys käyttää vapaata (suojaamatonta) kanavaa. Se tarkoittaa, että muutkin
samalle kanavalle säädetyn radiopuhelimen tai vastaanottimen käyttäjät voivat kuulla puheesi.
Valittavissasi on kahdeksan kanavaa.
Tämä käyttöoppaan kuvissa näytetään vain toimintoja tai asetuksia koskevat tiedot.
Radiopuhelimien virran kytkeminen päälle/pois
Radiopuhelimen kytkeminen päälle
Paina virtapainiketta [5] vähintään kolmen sekunnin ajan. Radiopuhelin
antaa äänimerkin ja käytössä olevan kanavan numero ilmestyy näyttöön [1].
Radiopuhelin on vastaanottotilassa niin kauan kuin virta on kytkettynä eikä sillä
lähetetä (käyttämätön).
Radiopuhelimen kytkeminen pois päältä
Paina virtapainiketta [5] vähintään kolmen sekunnin ajan. Radiopuhelin antaa äänimerkin ja näyttö
[1] tyhjenee.
Äänenvoimakkuuden säätäminen
Äänenvoimakkuutta lisätään vastaanottotilassa painamalla -ylöspainiketta
[10]. Kaiuttimen äänenvoimakkuus ilmaistaan palkkien määrällä [21] (yksi
palkki = matala äänenvoimakkuus, neljä palkkia = korkea äänenvoimakkuus).
Laske äänenvoimakkuutta painamalla -alaspainiketta [7].
46 - Suomi

SilverCrest SPMR 8000 B1
Siirtyminen toiselle kanavalle
Jos halutaan ottaa käyttöön eri kanava, radiopuhelinparin molemmat laitteet on viritettävä tuolle
kanavalle, jotta laitteiden välinen yhteys toimisi.
Paina kerran
vilkkuu näytöllä.
Valitse haluamasi kanava [10] ylös- tai [7] -alaspainikkeella.
Vahvista asetus painamalla PTT-painiketta [12].
-valikkopainiketta [6]. Käytössä olevan kanavan numero
Jos mitään painiketta ei paineta viiden sekunnin aikana asetuksia valittaessa, radiopuhelin
palaa vastaanottotilaan, ja käyttää aiempia asetuksia.
Vastaanotto
Radiopuhelin on vastaanottotilassa niin kauan kuin virta on kytkettynä eikä sillä lähetetä (käyttämätön).
Siirto
Pidä PTT-painiketta [12] painettuna. TX-kuvake tulee näyttöön [1].
Puhu mikrofoniin [9]. Pidä radiopuhelinta pystyasennossa ja noin 10 cm
päässä suustasi.
Vapauta PTT-painike [12], kun olet sanonut sanottavasi.
Suomi - 47

SilverCrest SPMR 8000 B1
Akun jännitetason ilmaisin
Kun virta on kytketty radiopuhelimeen, sen näytöllä [1] näkyy laitteessa olevan ladattavan akun/pariston
jännitetason merkkipalkit [23].
Ladattavat akut / paristot täyteen ladattu
Ladattavien akkujen / paristojen lataus kaksi kolmasosaa
Ladattavien akkujen / paristojen lataus yksi kolmasosa
Kun ladattavat akut tai tavalliset paristot ovat tyhjentyneet, kuuluu äänimerkki. Vaihda silloin paristot tai
lataa ne uudelleen, jos käytät ladattavia akkuja.
Ladattavien akkujen / paristojen lataus purkautunut
Lisätoiminnot
Valikkopainikkeella [6] radiopuhelimen toimintoja voi muokata vastaamaan käyttäjän tarpeita.
Lisätietoja eri toiminnoista on seuraavilla sivuilla.
Jos mitään painiketta ei paineta viiden sekunnin aikana asetuksia valittaessa, radiopuhelin
palaa vastaanottotilaan, ja käyttää aiempia asetuksia.
CTCSS-koodi (Continuous Tone Coded Squelch System)/DCS-koodi
(Digital Coded Squelch)
Jos useita radiopuhelimia käytetään läheisyydessäsi, on luultavaa, että muut ihmiset käyttävät samaa
kanavaa. Jotta vältetään vastaanottamasta signaaleja muilta, voidaan käyttää CTCSS- tai DCS-koodeja.
Kolminumeroinen CTCSS- tai DCS-koodi on äänitaajuus, jota PMR-radiopuhelin lähettää. Kaksi samalle
kanavalle ja samalle CTCSS- tai DCS-koodille viritettyä asemaa voi kuunnella toinen toisiaan. Muut
asemat eivät kuulu tällä kanavalla, elleivät ne käytä samaa CTCSS- tai DCS-koodia. SilverCrest SPMR
8000 B1 tukee 38 analogista CTCSS-koodia (1 – 38) ja 83 digitaalista DCS-koodia (1 – 83).
Kaikki muut samalle kanavalle ja samalle CTCSS- tai DCS-koodille viritetyt asemat voivat
kuunnella puhettasi.
CTCSS- tai DCS-koodin käyttö ei suojaa yhteyttä ulkopuolisen tahon sieppaukselta: Kaikki
samalle kanavalle viritetyt radiopuhelimet tai vastaanottimet, jotka eivät käytä lainkaan
CTCSS- tai CDCSS-koodia, voivat kuunnella kaikkia tämän kanavan lähetyksiä.
48 - Suomi

SilverCrest SPMR 8000 B1
CTCSS-koodin asettaminen
Paina kahdesti
koodi vilkkuvat näytöllä.
Aseta toinen CTCSS-koodi [10] ylös- tai [7] -alaspainikkeella.
Vahvista asetus painamalla PTT-painiketta [12].
-valikkopainiketta [6]. Viesti ”CTCSS” ja nykyinen CTCSS-
DCS-koodin asettaminen
Paina
vilkkuvat näytöllä.
Aseta toinen DCS-koodi [10] ylös- tai [7] -alaspainikkeella.
Vahvista asetus painamalla PTT-painiketta [12].
-valikkopainiketta [6] kolmesti. Viesti ”DCS” ja nykyinen DCS-koodi
CTCSS/DCS-koodin käytöstä poistaminen
CTCSS- tai DCS-toiminto poistetaan käytöstä valitsemalla koodiksi 00. ”OF” ilmestyy valikkonäytölle.
Kanavaseuranta
Voit etsiä tällä toiminnolla käytössä olevalta kanavalta mahdollisia heikkoja signaaleja.
Pidä painettuna
kanavan valvonta.
Kanavaseuranta lopetetaan painamalla
-valikkopainiketta [6] ja -alaspainiketta [7] samanaikaisesti ja ota käyttöön
-valikkopainiketta [6].
Kanavaseurannan aikana voit kuunnella kaikkea nykyisen kanavan liikennettä
riippumatta asetetusta CTCSS- tai DCS-koodista.
Ääniohjattu lähetystoiminto (VOX)
Tämä toiminto vastaa matkapuhelimen hands-free-toimintoa. Radiopuhelin aloittaa lähetyksen heti, kun se
tunnistaa käyttäjän puheen (tai muun äänen). Tämä toiminto mahdollistaa lähetyksen, vaikka PTTpainiketta [12] ei paineta. Tätä toiminnon käyttöä ei suositella meluisassa tai tuulisessa ympäristössä.
Suomi - 49

SilverCrest SPMR 8000 B1
Paina
vilkkuvat näytöllä.
VOX-toiminto otetaan käyttöön ja VOX-herkkyyttä nostetaan painamalla -
ylöspainiketta [10].
VOX-herkkyyttä lasketaan ja VOX-toiminto poistetaan käytöstä (”OF”)
painamalla -alaspainiketta [7].
Vahvista asetus painamalla PTT-painiketta [12].
-valikkopainiketta [6] neljästi. Viesti ”VOX” ja nykyinen VOX-asetus
Kanavahaku
Kanavahaku käy jatkuvasti läpi kaikkia kanavia (1–8) etsien aktiivisia asemia.
Jos aktiivinen kanava löytyy, voit etsiä CTCSS- tai DCS-koodia, jota asema käyttää kanavalla.
Aktiivisen kanavan etsiminen
Paina
vilkkuvat näytöllä.
Käynnistä kanavahaku [10] ylös- tai [7] -alaspainikkeella.
Haku pysähtyy automaattisesti, kun aktiivinen kanava on löytynyt. Sen jälkeen voit kuunnella lähetyksiä.
Kun aktiivisen kanavan haku lähetys päättyy, kanavahaku jatkuu.
Painamalla PTT-painiketta [12] kuunnellen samalla löydettyä kanavaa, radiopuhelin
käyttää sitä kanavaa ja palaa käyttämättömään tilaan.
-valikkopainiketta [6] viidesti. Viesti ”SC” ja nykyinen kanavanumero
CTCSS-koodin etsiminen
Jos aktiivinen kanava löytyy, käytä löydettyä kanavaa painamalla PTT-painiketta [12]. Seuraavaksi voit
etsiä käytettävää CTCSS- tai DCS-koodia.
Paina -valikkopainiketta [6] kuudesti. Viesti ”SC” ja ”CTCSS 00” vilkkuvat
näytöllä. Nykyinen kanavan numero näkyy myös näytöllä.
Tee haku valitulla kanavalla painamalla [10] ylös- tai [7] -alaspainiketta.
50 - Suomi

SilverCrest SPMR 8000 B1
Kun lähetys havaitaan valitulla kanavalla, sen CTCSS-koodi (jos sellainen on) havaitaan ja näytetään.
Painamalla PTT-painiketta [12] radiopuhelin käyttää sitä koodia ja palaa
käyttämättömään tilaan.
DCS-koodin etsiminen
Paina
näytöllä. Nykyinen kanavan numero näkyy myös näytöllä.
Tee haku valitulla kanavalla painamalla [10] ylös- tai [7] -alaspainiketta.
Kun lähetys havaitaan valitulla kanavalla, sen DCS-koodi (jos sellainen on) havaitaan ja näytetään.
Painamalla PTT-painiketta [12] radiopuhelin käyttää sitä koodia ja palaa
käyttämättömään tilaan.
-valikkopainiketta [6] seitsemästi. Viesti ”SC” ja ”DCS 00” vilkkuvat
Suomi - 51

SilverCrest SPMR 8000 B1
Kaksoishaku
Normaalisti radiopuhelin vastaanottaa vain yhtä kanavaa (CTCSS- tai DCS-koodista riippumatta).
Kaksoishaku antaa mahdollisuuden seurata toisenkin kanavan asemia, jotka käyttävät CTCSS- tai DCSkoodia.
Kun kaksoishaku on käytössä, radiopuhelin vaihtelee kahden kanavan välillä.
Paina
näytöllä.
Vaihda toinen kanava [10] ylös- tai [7] -alaspainikkeella.
Paina
CTCSS-koodin valintaan. Siirry DCS-valintaan painamalla uudelleen valikkopainiketta [6].
Aseta toinen CTCSS- tai DCS-koodi [10] ylös- tai [7] -alaspainikkeella.
Vahvista asetus painamalla PTT-painiketta [12] ja palaa käyttämättömään
tilaan.
Poista toiminto käytöstä valitsemalla ”OF” valitessasi DCM-kanavaa.
-valikkopainiketta [6] yksitoista kertaa. Viesti ”DCM OF” vilkkuu
-valikkopainiketta [6] vahvistaaksesi kanavan valinnan ja jatkaaksesi
Kutsuäänet
Kutsuääni on merkkiääni, joka ilmoittaa etäasemalle, että haluat ottaa yhteyttä. SilverCrest SPMR 8000
B1 -radiopuhelimessa on 15 erilaista kutsuääntä.
Kutsuäänen valitseminen
Paina -valikkopainiketta [6] kahdeksan kertaa. Viesti ”CA” tulee näyttöön,
nykyisen kutsuäänen numero vilkkuu ja kutsu ääni toistetaan.
Aseta toinen kutsuääni [10] ylös- tai [7] -alaspainikkeella.
Kutsuäänen lähettäminen
Paina hetken -kutsupainiketta [11] lähettääksesi kutsuäänen nykyisellä kanavalla.
52 - Suomi

SilverCrest SPMR 8000 B1
Kuittausäänen asettaminen päälle/pois
Kun PTT-painike [12] vapautetaan viestin lähetyksen jälkeen, radiopuhelin lähettää kuittausäänen
lähetyksen loppumerkiksi. Tarvittaessa kuittausäänen voi poistaa käytöstä.
Paina
vilkkuvat näytöllä.
Kuittausääni otetaan käyttöön (ON) painamalla -ylöspainiketta [10] tai
pois käytöstä (OF) painamalla [7] -alaspainiketta.
Vahvista asetus painamalla PTT-painiketta [12] ja palaa käyttämättömään
tilaan.
-valikkopainiketta [6] yhdeksän kertaa. Viesti ”rO” ja nykyinen tila
Painikeäänen asettaminen käyttöön/pois
Normaalisti jokaisesta painikkeen painalluksesta kuuluu merkkiääni. Tämä ominaisuus ei koske
virtapainiketta
[5] tai PTT-painiketta [12]. Tarvittaessa painikeäänen voi poistaa käytöstä.
Paina
vilkkuvat näytöllä.
Painikeääni otetaan käyttöön (ON) painamalla -ylöspainiketta [10] tai pois
käytöstä (OF) painamalla [7] -alaspainiketta.
Vahvista asetus painamalla PTT-painiketta [12] ja palaa käyttämättömään
tilaan.
-valikkopainiketta [6] kymmenen kertaa. Viesti ”tO” ja nykyinen tila
Huoneen valvonta (RM)
Voit käyttää tätä toimintoa huoneen valvonnassa. Kun tämä toiminto on käytössä, kannettava radiopuhelin
lähettää niin kauan kuin puheääniä tai muita ääniä havaitaan, ilman että PTT-painiketta [12] tarvitsee
painaa. Sen avulla kuulet nämä puheäänet tai äänet toisessa kannettavassa matkapuhelimessa.
Paina Valikko -painiketta [6] kaksitoista kertaa. Viesti ”RM OF” tulee
näkyviin ja nykyinen tila vilkkuu näytöllä.
Ota huonemonitori käyttöön painamalla Ylös -painiketta [10].
Poista toiminto käytöstä (“RM OF”) painamalla Alas -painiketta [7].
Vahvista asetus painamalla Valikko
Poistu huonemonitoritoiminnosta painamalla Valikko
yksitoista kertaa ja sitten painamalla Alas -painiketta [7] niin monta kertaa
-painiketta [6].
-painiketta [6]
Suomi - 53

SilverCrest SPMR 8000 B1
Painikelukko
kuin tarvitaan, kunnes "RM OF" on näkyvissä. Vahvista painamalla Valikko
-painiketta [6].
Aktivoi painikelukko pitämällä
sekunnin ajan. Painikelukon kuvake näkyy näytössä.
Poista painikelukko käytöstä pitämällä uudelleen
painettuna kolmen sekunnin ajan. Painikelukon kuvake häviää näytöltä.
Seuraavat painikkeet toimivat edelleen, vaikka painikelukko on käytössä:
PTT-painike [12], Kutsupainike [11] ja Virtapainike [5].
[6] -valikkopainiketta painettuna kolmen
[6] -valikkopainiketta
Kronometri
SilverCrest SPMR 8000 B1 -radiopuhelimessa on kronometritoiminto ajan mittaamista varten. Kronometrin
voi laskea aikaa 59’59”99.
Aktivoi kronometri pitämällä
sekunnin ajan. Kronometri tulee näkyviin näyttöön.
Käynnistä ajan mittaaminen painamalla [10] -ylöspainiketta.
Lopeta ajan mittaaminen painamalla [10] -ylöspainiketta.
Nollaa ajan mittaaminen painamalla [7] -alaspainiketta.
Poistu kronometrista pitämällä
sekunnin ajan.
Kronometri ei ole käytettävissä, kun kanavaseuranta on käytössä.
[11] -kutsupainiketta painettuna kolmen
[11] -kutsupainiketta painettuna kolmen
Näytön taustavalo
Pimeässä käytön helpottamiseksi PMR-radiopuhelimen näytössä [1] on taustavalo. Taustavalo syttyy
automaattisesti, kun painetaan mitä tahansa painiketta, lukuun ottamatta PTT-painiketta (12) ja
kutsupainiketta (11). Virtapainike [5] aktivoi taustavalon, vain kun laitteeseen kytketään virta päälle.
Taustavalo sammuu automaattisesti kuuden sekunnin kuluttua.
54 - Suomi
-

SilverCrest SPMR 8000 B1
Vianetsintä
Voit itse selvittää yleisimmät ongelmatilanteet oheisen taulukon avulla. Ellei ongelma ratkea esitetyillä
ratkaisuohjeilla, ota yhteyttä huollon asiakaspalveluun. Yhteystiedot ovat käyttöoppaan lopussa kohdassa
Takuu- ja huoltotiedot. Älä yritä itse korjata laitetta.
Ongelma Ratkaisu
PMR-radiopuhelimen virta ei
kytkeydy päälle
Lähetys ei toimi Viritä molemmat radiopuhelimet samalle kanavalle ja tarvittaessa
Lyhyt kantama, yhteydessä
häiriöitä
Vastaanotossa häiriöitä Siirry kauemmaksi sähkömagneettisista kentistä (korkeajännitelinjat,
Paina virtapainiketta [5] vähintään kolmen sekunnin ajan.
Lataa radiopuhelimen akku tai vaihda siihen uudet akut tai paristot.
samalle CTCSS- tai DCS-koodille.
Pidä PTT-painiketta [12] painettuna koko ajan, kun puhut.
Jos lähetyksessä on häiriöitä, vaihda toiselle kanavalle.
Kantama määräytyy käyttöympäristön mukaan. Teräsrakenteet,
betonirakennukset ja laitteen käyttö ajoneuvon sisällä lyhentävät
kantamaa. Jos mahdollista, siirry paikkaan, josta on näköyhteys
vastaanottavaan asemaan.
sähkömoottorit, ym.)
Lähettävä ja vastaanottava laite ovat liian lähellä toisiaan. Pidä
laitteiden välillä vähintään 1,5 m etäisyys.
Kokeile, toimiiko yhteys paremmin toisella kanavalla.
Suomi - 55

SilverCrest SPMR 8000 B1
Kunnossapito ja puhdistaminen
Kunnossapito
Korjaukset ovat tarpeen, jos radiopuhelin on millään tavoin vahingoittunut, esim. jos nestettä on joutunut
laitteen sisään, laite on altistunut sateelle tai kosteudelle, se ei toimi normaalisti tai se on pudonnut.
Jos havaitset savua, outoa ääntä tai hajua, irrota latausteline välittömästi virtalähteestä tai poista akut tai
paristot radiopuhelimista. Näissä tapauksissa laitetta ei saa enää käyttää, ja valtuutetun huollon on
tarkastettava se.
Vain valtuutettu erikoishuolto saa suorittaa huoltotyöt.
Älä avaa itse radiopuhelimen laitekoteloa, sillä voit vahingoittaa sitä.
Älä yritä itse korjata laitetta.
Jos virtajohto on vahingoittunut, saatat saada sähköiskun.
Puhdistaminen
Kytke PMR-radiopuhelinsetti verkkovirrasta ennen sen puhdistamista.
Käytä pehmeää, nukkaamatonta liinaa.
Älä käytä mitään puhdistusaineita tai liuottimia, sillä ne voivat päästä kotelon sisään ja aiheuttaa
laitteelle pysyviä vahinkoja.
Pinttyneen lian poistoon voi käyttää hieman kostutettua liinaa.
Puhdista akkujen navat silloin tällöin kuivalla, nukkaamattomalla pyyhkeellä.
Jos radiopuhelin kastuu, katkaise heti sen virta ja poista ladattavat akut tai tavalliset paristot. Kuivaa
paristokotelo pehmeällä pyyhkeellä. Jätä paristokotelo auki kunnes kosteus on haihtunut siitä kokonaan.
Älä käytä laitetta, ennen kuin se on täysin kuivunut.
56 - Suomi

SilverCrest SPMR 8000 B1
Käytöstä poistetun laitteen hävittäminen ja ympäristöstä
huolehtiminen
Jos tuote on merkitty yliviivatulla roskakorilla, se on eurooppalaisen direktiivin
2012/19/EU määräysten alainen. Sähkö- ja elektroniikkaromu on toimitettava
viralliseen kierrätyspisteeseen erillään kotitalousjätteistä. Käytöstä poistettujen laitteiden
oikealla hävittämisellä estetään vahingot ympäristölle ja omalle terveydelle. Lisätietoja
oikeasta hävitystavasta saa viranomaisilta, kierrätyspisteistä tai myymälästä, josta laite
on ostettu.
Pidä huoli ympäristöstä. Vanhat paristot ja akut eivät kuulu talousjätteiden joukkoon.
Ne on vietävä käytettyjen akkujen ja paristojen keräyspisteeseen. Muista, että loppuun käytetyt paristot ja
akut on toimitettava asianmukaiseen kierrätyspaikkaan. Jos hävitettävät akut eivät ole aivan tyhjiä, suojaa
niiden navat oikosulkujen estämiseksi.
Hävitä pakkaukset ympäristöystävällisesti. Pahviset pakkauslaatikot voidaan viedä niille tarkoitettuihin
keräyspaikkoihin tai julkisiin kierrätyspisteisiin. Pakkauksen sisältämät kalvot ja muovit kuuluvat yleisiin
jätteenkeräyspisteisiin.
Vaatimustenmukaisuusilmoitus
Tämä laite on testattu RTT&E-direktiivin 1999/5/EC vaatimusten mukaisesti.
Vaatimustenmukaisuusvakuutus on nähtävänä tämän käyttöoppaan lopussa. CEmerkintä on radiopuhelimen akkukotelon sisällä ja lataustelineen pohjassa. Tuote
täyttää myös ekologisen suunnittelun direktiivin 2009/125/EC ja sen täydennyksen
278/2009 sekä RoHS-direktiivin 2011/65/EU määräykset.
Suomi - 57

SilverCrest SPMR 8000 B1
Takuu- ja huoltotiedot
TARGA GmbH:n takuu
Hyvä asiakas
Tällä laitteella on 3 vuoden takuu ostopäivästä alkaen. Jos laitteessa ilmenee puutteita, ostajan
lainmukaiset oikeudet ovat voimassa. Seuraavassa esitetyt takuuehdot eivät rajoita näitä lainmukaisia
oikeuksia.
Takuuehdot
Takuuaika alkaa ostopäivästä. Säilytä alkuperäinen ostokuitti tallessa. Se toimii ostotodistuksena. Jos
tuotteessa ilmenee materiaali- tai valmistusvirhe kolmen vuoden kuluessa ostopäivästä, korjaamme tai
vaihdamme tuotteen valintamme mukaan veloituksetta.
Takuuaika ja lainmukaiset ilmoitukset puutteista
Takuuaikaa ei voi pidentää. Tämä koskee myös vaihdettuja ja korvattuja osia. Jo ostohetkellä olemassa
olleista vioista ja puutteista on ilmoitettava heti pakkauksen avaamisen jälkeen. Takuuajan päätyttyä
korjaukset ovat maksullisia.
Takuun kattavuus
Laite on valmistettu huolellisesti tiukkojen laatuohjeiden mukaan ja tarkastettu ennen toimitusta. Takuu
koskee materiaali- ja valmistusvirheitä. Takuu ei koske tuotteen sellaisia osia, jotka altistuvat normaalille
kulumiselle ja jotka siten katsotaan kuluviksi osiksi, eikä herkästi rikkoutuvien osien, kuten kytkimien,
akkujen tai lasiosien vaurioita. Takuu mitätöityy, jos tuote vaurioituu tai sitä käytetään tai huolletaan
epäasianmukaisesti. Tuotteen asianmukainen käyttö edellyttää kaikkien käyttöohjeen sisältämien ohjeiden
tarkkaa noudattamista. Käyttö ohjeen vastaisiin tarkoituksiin tai varoitusten noudattamatta jättäminen on
kielletty. Tuote on tarkoitettu vain yksityiseen käyttöön, eikä sitä saa käyttää kaupallisiin tarkoituksiin.
Virheellinen tai epäasianmukainen käyttö, voimankäyttö ja muiden kuin valtuuttamiemme
huoltopalveluiden suorittamat korjaukset mitätöivät takuun. Tuotteen korjaus tai vaihto ei aloita uutta
takuuaikaa.
Takuutapausten käsittely
Noudata seuraavia ohjeita asiasi nopean käsittelyn varmistamiseksi:
- Lue tuotteen mukana tuleva dokumentaatio huolellisesti ennen tuotteen käyttöönottoa.
Ongelmatilanteissa, jotka eivät ratkea ohjeita noudattamalla, soita asiakaspalveluumme.
- Pidä ostokuitti ja tuotenumero tai mahd. sarjanumero saatavilla tiedustelujen yhteydessä.
- Jos ongelma ei ratkea puhelimitse, asiakaspalvelumme järjestää tarvittaessa jatkopalvelun
virheen syyn mukaan.
58 - Suomi

SilverCrest SPMR 8000 B1
Palvelu
Puhelin: 09 - 74790368
Sähköposti: service.FI@targa-online.com
IAN: 270811
Valmistaja
Seuraava osoite ei ole palveluosoite. Palvelun yhteystiedot on mainittu edempänä.
TARGA GmbH
Coesterweg 45
59494 SOEST
GERMANY
Suomi - 59

SilverCrest SPMR 8000 B1
Innehåll
Inledning .................................................................................................................. 62
Avsedd användning ................................................................................................. 62
Förpackningens innehåll .......................................................................................... 63
Tekniska specifikationer ........................................................................................... 64
Säkerhetsinstruktioner ............................................................................................. 66
Upphovsrätt ............................................................................................................. 69
Översikt ................................................................................................................... 70
Bärbar sändare ............................................................................................................................................ 70
Skärmalternativ ............................................................................................................................................. 71
Laddningsenhet............................................................................................................................................. 71
Innan du börjar ........................................................................................................ 72
Sätta i de laddningsbara/vanliga batterierna ........................................................................................... 72
Ladda batterierna ......................................................................................................................................... 72
Förbereda laddningsenheten .................................................................................................................. 72
Ladda batterierna .................................................................................................................................... 73
Fästa/ta bort bältesklämman ...................................................................................................................... 74
Fästa bältesklämman ............................................................................................................................... 74
Ta bort bältesklämman ............................................................................................................................ 74
Ansluta öronsnäckorna ................................................................................................................................ 74
Komma igång ........................................................................................................... 75
Slå på/av de bärbara sändarna ................................................................................................................ 75
Slå på den bärbara sändaren ................................................................................................................ 75
Stänga av den bärbara sändaren ......................................................................................................... 75
Justera volymen ............................................................................................................................................ 75
Ställa in en annan kanal .............................................................................................................................. 76
Mottagning ................................................................................................................................................... 76
Överföring .................................................................................................................................................... 76
60 - Svenska

SilverCrest SPMR 8000 B1
Batteristatusindikator .................................................................................................................................... 77
Avancerad funktion .................................................................................................. 77
CTCSS- (Continuous Tone Coded Squelch System)/DCS-kod (Digital Coded Squelch) ........................ 77
Ställa in CTCSS-koden ............................................................................................................................ 78
Ställa in DCS-koden ................................................................................................................................ 78
Avaktivera CTCSS/DCS-koden .............................................................................................................. 78
Kanalövervakning ........................................................................................................................................ 78
Röststyrd sändningsfunktion (VOX) ............................................................................................................. 78
Kanalsökning ................................................................................................................................................ 79
Söka efter en aktiv kanal ........................................................................................................................ 79
Söka efter en CTCSS-kod ........................................................................................................................ 79
Söka efter en DCS-kod ............................................................................................................................ 80
Dubbelsökning .............................................................................................................................................. 81
Anropssignaler .............................................................................................................................................. 81
Välja en anropssignal ............................................................................................................................. 81
Sända en anropssignal ........................................................................................................................... 82
Ställa in klarsignalen till på/av ................................................................................................................... 82
Ställa in knappljudet till på/av .................................................................................................................... 82
RM (rumsövervakare)................................................................................................................................... 82
Knapplåsning ................................................................................................................................................ 83
Kronometer ................................................................................................................................................... 83
Bildskärmens bakgrundsbelysning .............................................................................................................. 84
Felsökning ................................................................................................................ 84
Underhåll/rengöring ................................................................................................ 85
Underhåll ...................................................................................................................................................... 85
Rengöring ...................................................................................................................................................... 85
Miljöbestämmelser och kasseringsinformation......................................................... 86
Meddelande om överensstämmelse ......................................................................... 86
Garanti- och serviceinformation ............................................................................... 87
Svenska - 61

SilverCrest SPMR 8000 B1
Inledning
Tack för att du valt en produkt från SilverCrest.
Din SilverCrest SPMR 8000 B1 består av två bärbara radiosändare med en räckvidd på 8 km. Det är
gratis att använda denna kommunikationsradio, du behöver inte betala licensavgift osv. Det går att välja
mellan 8 kanaler för att kommunicera mellan de två stationerna. De bärbara sändarna skyddas mot lätt
regn.
Du kan var du vill använda din kommunikationsradio för att kommunicera med andra personer. Du kan
t.ex. hålla kontakten med dina barn när de leker i trädgården. När du har hittat en störningsfri kanal
begränsas kommunikationen endast av hinder och maximal räckvidd.
Avsedd användning
Denna bärbara radiosändare är en elektronisk enhet för konsument. SilverCrest SPMR 8000 B1 bärbara
radiosändare har utformats för kommunikation med andra personer. Den bärbara radiosändaren får
endast användas för privat bruk, inte för industriellt eller kommersiellt bruk. Den bör inte användas i
tropiska klimat. Endast kablar och externa enheter som efterföljer säkerhetsstandarder och denna enhets
elektromagnetiska kompatibilitet och skyddskvalitet får användas.
Denna bärbara radiosändare uppfyller alla relevanta normer och standarder vad gäller CEöverensstämmelse. Eventuella modifieringar av den bärbara radiosändaren kan betyda att dessa normer
inte längre uppfylls. Tillverkaren ska inte hållas ansvarig för eventuell skada eller bristfällig funktion till följd
av detta. Använd enbart tillbehör som rekommenderas av tillverkaren. All annan användning utöver den
som nämns ovan motsvarar inte den avsedda användningen.
Följ de bestämmelser och lagar som gäller i det land där du använder apparaten.
Stäng av din kommunikationsradio när du befinner dig på ett flygplan och kabinpersonalen
ber dig göra det. Du måste följa flygbolagets och kabinpersonalens instruktioner när du
använder produkten.
Stäng av produkten när du ser skyltar som ber dig om det. Sjukhus och medicinska
anläggningar använder ofta enheter som är känsliga för radiokommunikation.
I vissa länder är det förbjudet att använda din kommunikationsradio samtidigt som du kör ett
fordon. Du måste då istället stanna fordonet vid sidan av vägen före användning.
Rör inte vid antennen under sändning eftersom det kan leda till att räckvidden minskar.
62 - Svenska

SilverCrest SPMR 8000 B1
Förpackningens innehåll
Ta ut alla medföljande enheter och tillbehör ur förpackningen och inspektera om de skadats eller om
något saknas:
2 SPMR 8000 B1 bärbara radiosändare
2 bältesklämmor
1 laddningsenhet
1 nätadapter
6 laddningsbara NiMH-batterier av AAA-storlek
Bruksanvisning med säkerhetsinstruktioner
Ring vår hotline om delar saknas eller om de är skadade. Du hittar telefonnumret i det sista kapitlet under
"Garanti- och serviceinformation".
Ta bort skyddsfilmen från skärmen (1) på sändarna.
Svenska - 63

SilverCrest SPMR 8000 B1
Tekniska specifikationer
Märke SilverCrest
Modellnamn SPMR 8000 B1
Kanaler 8
Underkod CTCSS 38/DCS 83
Frekvens 446,00625 - 446,09375 MHz
Räckvidd Upp till 8 km (i öppet fält)
Per bärbar sändare:
Vanliga/laddningsbara batterier
Sändningseffekt ≤ 500 mW ERP
Moduleringstyp FM – F3E
Kanalseparation 12,5 kHz
Nätadapter för dubbel laddningsenhet
Mått
Vikt (utan batterier/laddningsbara batterier)
Miljö
IP-standard IPX2-skydd mot vattenstänk
3 x batterier av AAA-storlek eller 3 x
laddningsbara NiMH-batterier av AAA-storlek
(1,2 V / 600
Tillverkare: O Real
Typ: TGE050P055
Inmatning: 100 - 240 V växelström, 50 / 60 Hz
Utmatning: 5 V/550 mA
Effekt: max. 2,75 W
Bärbar sändare: 55 x 103 x 36 mm
Laddningsenhet: 102 x 60 x 35 mm
Bärbar sändare: 90 g
Laddningsenhet: 60 g
Nätadapter: 55 g
Drift:
0 till 30 °C, max. 85 % relativ luftfuktighet
Förvaring:
-20 till 55 °C, max. 90 % relativ luftfuktighet
mAh
)
64 - Svenska

SilverCrest SPMR 8000 B1
Frekvenstabell CTCSS-kod
Kanal Frekvens (MHz) Kod
1 446,00625 0
2 446,01875 1 67,0 11 97,4 21 136,5 31 192,8
3 446,03125 2 71,9 12 100,0 22 141,3 32 203,5
4 446,04375 3 74,4 13 103,5 23 146,2 33 210,7
5 446,05625 4 77,0 14 107,2 24 151,4 34 218,1
6 446,06875 5 79,7 15 110,9 25 156,7 35 225,7
7 446,08125 6 82,5 16 114,8 26 162,2 36 233,6
8 446,09375 7 85,4 17 118,8 27 167,9 37 241,8
DCS-koder
Nr. DCS-kod Nr. DCS-kod Nr. DCS-kod Nr. DCS-kod Nr. DCS-kod
1 23 18 125 35 245 52 412 69 624
2 25 19 131 36 251 53 413 70 627
3 26 20 132 37 261 54 423 71 631
4 31 21 134 38 263 55 431 72 632
5 32 22 143 39 265 56 432 73 654
6 43 23 152 40 271 57 445 74 662
7 47 24 155 41 306 58 464 75 664
8 51 25 156 42 311 59 465 76 703
9 54 26 162 43 315 60 466 77 712
10 65 27 165 44 331 61 503 78 723
11 71 28 172 45 343 62 506 79 731
12 72 29 174 46 346 63 516 80 732
13 73 30 205 47 351 64 532 81 734
14 74 31 223 48 364 65 546 82 743
15 114 32 226 49 365 66 565 83 754
16 115 33 243 50 371 67 606
17 116 34 244 51 411 68 612
Frekvens
(Hz)
Avaktiverad
8 88,5 18 123,0 28 173,8 38 250,3
9 91,5 19 127,3 29 179,9
Kod
10 94,8 20 131,8 30 186,2
Frekvens
(Hz)
Kod
Frekvens
(Hz)
Kod
Frekvens
(Hz)
Svenska - 65

SilverCrest SPMR 8000 B1
Säkerhetsinstruktioner
Innan du använder denna enhet för första gången ska du läsa igenom följande bruksanvisning och
beakta alla varningar, även om du är van vid att hantera elektroniska enheter. Spara denna
bruksanvisning på en säker plats för framtida referens. Om du säljer produkten eller ger bort den är det
viktigt att du även överlämnar denna handbok.
Denna symbol anger viktig information gällande säker användning av produkten samt
användarens säkerhet.
Denna symbol betecknar ytterligare information i ämnet.
Denna ikon varnar dig om att användarens hörsel kan ta skada.
Använd endast den medföljande nätadaptern (tillverkare: O Real/modellnummer:
TGE050P055) för laddningsenheten.
Allmänna säkerhetsanvisningar
Elektriska enheter bör inte användas av barn eller personer med nedsatt förmåga. Låt inte sådana
personer använda elektriska enheter utan tillsyn. De förstår inte alltid att de kan vara farliga.
Små delar kan utgöra en kvävningsrisk. Notera också att det finns en kvävningsrisk om luftvägarna
blockeras av förpackningsplasten.
Om du noterar rök, ovanliga ljud eller dofter, ska alla kablar omedelbart dras ur. Om detta sker ska
den bärbara radiosändaren inte längre användas och den måste inspekteras av behörig
servicepersonal. Rök från enheten får inte inandas. Om du mot förmodan skulle andas in rök bör läkare
uppsökas. Du kan skada din hälsa vid inandning av rök.
66 - Svenska

Driftsmiljö/miljöförhållanden
Placera den bärbara radiosändaren på en stabil och jämn yta och placera inte några tunga objekt
ovanpå enheten.
Håll den bärbara radiosändaren borta från fukt. Placera inga behållare som innehåller vätska (drycker,
vaser m.m.) intill eller på enheten. Undvik vibrationer, värme och direkt solljus så att inte den bärbara
radiosändaren skadas.
Den bärbara radiosändaren är inte konstruerad för att användas i miljöer med hög temperatur eller
luftfuktighet (t ex badrum), eller på platser där det finns mer damm än normalt. Driftstemperatur och
luftfuktighet: 0 till 30 °C, max. 85% relativ luftfuktighet.
Om den bärbara radiosändaren utsätts för stora temperaturförändringar kan det bildas kondens och
fukt, vilket kan leda till kortslutning. Om detta sker använder du endast den bärbara radiosändaren när
den uppnått omgivande temperatur.
Se till att inga eldkällor (t.ex. brinnande stearinljus) placeras på eller i närheten av den bärbara
radiosändaren.
SilverCrest SPMR 8000 B1
Kablar
Håll alltid i kablarnas kontakt och dra aldrig i själva kabeln när kontakten tas ur. Placera aldrig tunga
föremål eller möbler på kablarna och se till att de inte skadas, speciellt vid kontakterna och vid eluttag.
Slå aldrig knut på en kabel och bind inte ihop den med andra kablar. Alla sladdar måste placeras så att
inte någon snubblar på dem eller blir hindrad av dem.
En skadad strömkabel kan orsaka brand eller ge elektriska stötar. Kontrollera nätkabeln regelbundet.
Använd aldrig adapterkontakter eller förlängningskablar som inte uppfyller de aktuella
säkerhetsföreskrifterna i ditt land och ändra inte nätadaptern eller nätkabeln på egen hand.
Svenska - 67

SilverCrest SPMR 8000 B1
Vanliga och laddningsbara batterier
Placera batterierna/laddningsbara batterierna rättvända enligt polerna. Se markeringarna på insidan
av batterifacket.
Försök inte ladda upp batterierna igen och kasta inte batterierna i en öppen eld.
Använd bara batterier/laddningsbara batterier av samma typ.
Ta ur batterier/laddningsbara batterier när enheten inte ska användas under en längre tid.
Batterier/laddningsbara batterier måste kasseras vid speciella insamlingsplatser. Mer information om
kassering av batterier/laddningsbara batterier finns i kapitlet ”Miljöbestämmelser och information om
kassering”.
Var försiktig – risk för explosion
Byt aldrig några batterier/laddningsbara batterier i en explosionskänslig miljö. Vid isättning och
urtagning av batterierna (eller laddningsbara batterier) kan en gnista skapas som kan orsaka en
explosion.
Stäng av din kommunikationsradio när du befinner dig i en explosionskänslig miljö. Om en gnista
skapas i en sådan miljö kan det orsaka en explosion eller brand. Detta kan leda till skada eller dödsfall.
Explosionskänsliga områden brukar normalt var utmärkta (men inte alltid). Dessa inkluderar alla
bränslelagringsområden såsom under däck på en båt, vid bränsleledningar eller tankområden, miljöer
där luften innehåller lättantändliga substanser (t.ex. spannmål eller metalldamm) och alla områden där
du normalt sett måste stänga av bilens motor.
Släng inte batterier eller laddningsbara batteriet i öppen eld eftersom de kan explodera.
Försök inte att ladda vanliga (icke laddningsbara) batterier. Använd bara batterier/laddningsbara
batterier av samma typ. Använd alltid två batterier/laddningsbara batterier av samma typ och
kapacitet. Denna information hittar du i kapitlet ”Tekniska specifikationer”.
68 - Svenska

Fara – risk för brännskada
Rör inte vid antennen om antennens isolering är skadad. När antennen kommer i kontakt med huden
kan du få mindre brännskador vid sändning.
Batterier och laddningsbara batterier kan orsaka materialskador och brännskador om ledande föremål,
t.ex. smycken, nycklar eller kedjor kommer i kontakt med batteriets poler. Det kan hända att ledande
material orsakar en kortslutning och blir på så sätt väldigt varma. Var försiktig när du hanterar batterier
eller laddningsbara batterier, speciellt vid förvaring i en ficka, handväska eller annan väska som
innehåller metallföremål.
SilverCrest SPMR 8000 B1
Fara – risk för skada
Placera inte produkten inom utvecklingsområdet för luftkudden i fordonet. Luftkuddar fylls väldigt snabbt.
Om en kommunikationsradio placeras inom utvecklingsområdet för en luftkudde kan det hända att
kommunikationsradion kastas genom bilen och kan skada resenärerna.
Håll radiosändarna minst 15 cm från pacemakers.
Stäng av kommunikationsradion om du upplever störningar på medicinsk utrustning.
Risker sammanhängande med höga ljudnivåer
Fara när hörlurar används (medföljer inte). Att lyssna på musik med hög volym kan skada
din hörsel.
Upphovsrätt
Allt innehåll i denna bruksanvisning är copyrightskyddat och tillhandahålls till läsaren endast i
informationssyfte.
Kopiering av data och information utan föregående skriftligt och uttryckligt godkännande av författaren är
strängt förbjudet. Detta gäller även all kommersiell användning av innehållet och informationen.
Alla texter och diagram är gällande på utskriftsdatumet. Kan ändras utan meddelande.
Svenska - 69

SilverCrest SPMR 8000 B1
Översikt
I den här bruksanvisningen finns det ett försättsblad som går att vika ut. På omslagets insida finns de olika
komponenterna med siffror angivna. Siffrorna betyder följande:
Bärbar sändare
1 Skärm
2 Uttag för nätadapter (med gummiskydd)
3 Anslutning för hörlurar (med gummiskydd)
4 Antenn
5
ON/OFF-knapp
6 Menyknapp
- Öppna menyinställningarna
7 Nerknapp
- Sänker högtalarvolymen
- Väljer föregående menyalternativ
8 Laddningskontakter
9 Mikrofon
10
Uppknapp
- Höjer högtalarvolymen
- Väljer nästa menyalternativ
11 Anropsknapp
12 PTT-knapp
70 - Svenska

Skärmalternativ
13 RM-indikator
14 CTCSS-indikator
15 DCS-indikator
16 CTCSS/DCS-kod/kronometersekunder/värde menyalternativ
17 Kronometer 1/100 sekund
18 VOX-ikon
19 DCM-ikon
20 Indikation kanal/menyalternativ
21 Högtalarvolym
22 Knapplåsikon
23 Indikator för batterinivå
24 Mottagningsikon (RX)
25 Sändningsikon (TX)
26 Sökningsikon
Laddningsenhet
27 Nätadapteruttag
28 Indikator för batterinivå
29 Laddningskontakter
SilverCrest SPMR 8000 B1
Svenska - 71

SilverCrest SPMR 8000 B1
Innan du börjar
Sätta i de laddningsbara/vanliga batterierna
(Bilden är bara ett exempel)
Ta vid behov bort bältesklämman (se kapitlet "Ta bort bältesklämman").
Tryck på det räfflade området på batterifackets lock och skjut det nedåt. Lyft sedan batterifackets lock
uppåt.
Sätt i två batterier/laddningsbara batterier av AAA-storlek i batterifacket med polerna vända åt rätt håll.
Kontrollera symbolerna + och – på batterierna och på insidan av batterifacket.
Stäng batterifacket. Sätt in batterifackets lucka i motsvarande skåra på radiosändarens hölje och skjut
sedan upp batterifackets lucka tills den klickar på plats.
Sätt tillbaka bältesklämman (se "Fästa bältesklämman").
Ladda batterierna
Läs noggrant igenom detta kapitel om du använder laddningsbara batterier för att driva din SilverCrest
SPMR 8000 B1 bärbara radiosändare.
Förbereda laddningsenheten
Placera laddningsenheten på en stabil, jämn yta.
Koppla in nätadaptern i strömanslutningen [27] på laddningsenheten.
Anslut nätadaptern till vägguttaget.
72 - Svenska

VARNING
!
Se till att vägguttaget finns i närheten och är lättåtkomligt så att du vid nödfall
snabbt kan dra ur nätadaptern. Annars kan kortslutning eller brand uppstå.
Laddningsenhetens nätadapter konsumerar ström även om det inte finns någon
bärbar radiosändare i den. Du bör därför koppla från nätadaptern från
vägguttaget för att helt skilja den från huvudströmmen och för att undvika onödig
strömförbrukning.
Ladda batterierna
Ladda de båda radiosändarnas batterier helt innan du använder dem för första
gången. Laddningen tar ungefär 8 till 10 timmar.
Placera de bärbara radiosändarna i laddningsenheten enligt
vad som visas.
Laddningsindikatorn [28] längst upp på laddningsenheten
lyser när en sändare har placerats på rätt sätt och batteriet
laddas. Laddningen tar ungefär 8 till 10 timmar.
Laddningsindikatorn [28] lyser fortfarande när batterierna är
fulladdade.
Du kan också ladda den bärbara radiosändaren utan laddningsenheten. Det gör
du genom att sätta nätadapterns kontakt i den bärbara radiosändarens
nätadapteruttag [2]. Öppna först gummiskyddet som sitter över nätadapteruttaget
[2].
SilverCrest SPMR 8000 B1
(Bilden är bara ett exempel)
Det går inte att använda de bärbara radiosändarna när de laddas.
Svenska - 73

SilverCrest SPMR 8000 B1
Fästa/ta bort bältesklämman
Fästa bältesklämman
Sätt i bältesklämman i skåran som sitter på den bärbara sändarens
bakre panel. Bältesklämman måste klicka på plats.
Ta bort bältesklämman
Om du vill ta bort bältesklämman från den bärbara radiosändaren
ska du använda ditt finger för att släppa på bältesklämmans lås (se
pilen). När låset släppts kan bältesklämman skjutas upp ur
styrspåret.
(Bilden är bara ett exempel)
Ansluta öronsnäckorna
Du kan använda dina bärbara radiosändare tillsammans med lämpliga hörlurar (medföljer inte).
Anslutningen för hörlurarna [3] finns bakom ett skyddshölje.
VARNING!
Innan du ansluter hörlurarna måste du sänka volymen (se sidan 75) annars finns det risk
för att du skadar din hörsel på grund av en högt inställd volym.
1. Öppna gummiskyddet som skyddar anslutningen till hörlurarna [3] för att ansluta dem.
2. Sätt i hörlurarnas 2,5 mm-kontakt i anslutningen för hörlurar [3].
När du använder hörlurarna kan det hända att IPX2-skyddet med vinklat hölje mot vertikalt
fallande vattendroppar inte fungerar.
74 - Svenska

SilverCrest SPMR 8000 B1
Komma igång
För att du ska kunna kommunicera mellan två kommunikationsradioenheter måste de ställas in på samma
kanal och samma CTCSS- eller DCS-kod. Dessutom måste de befinna sig inom mottagningsområdet (max
8 km öppet fält).
Radiokommunikationen sker på en öppen (okodad) kanal dvs. andra personer som har en
kommunikationsradio eller mottagare inställd på samma kanal kan lyssna på dina anrop. Det finns åtta
olika kanaler.
Illustrationerna av skärmen i denna bruksanvisning visar endast den information som är
relevant till de funktioner eller inställningar som beskrivs.
Slå på/av de bärbara sändarna
Slå på den bärbara sändaren
Håll På/Av-knappen [5] intryckt i minst tre sekunder. En ljudsignal hörs och
den inställda kanalen visas på skärmen [1].
Den bärbara sändaren befinner sig i mottagningsläge så länge den är påslagen
och inte sänder (inaktivt läge).
Stänga av den bärbara sändaren
Håll På/Av-knappen [5] intryckt i minst tre sekunder. En ljudsignal hörs och skärmen [1] blir svart.
Justera volymen
Tryck på uppknappen [10] för att höja ljudvolymen. Högtalarens volym
Tryck på nerknappen [7] för att sänka ljudvolymen.
indikeras av antalet fält [21] (ett fält = låg volym, fyra fält = hög volym).
Svenska - 75

SilverCrest SPMR 8000 B1
Ställa in en annan kanal
Om du vill ställa in en annan kanal måste den ställas in för båda kommunikationsenheterna för att du ska
kunna anropa fjärrstationen.
Tryck på menyknappen
skärmen.
Tryck på uppknappen [10] eller nerknappen [7] för att ställa in en
annan kanal.
Tryck på PTT-knappen [12] för att bekräfta inställningen.
[6] en gång. Aktuellt kanalnummer blinkar på
Om du inte trycker på någon knapp under fem sekunder när inställningen ändras återgår
den bärbara sändaren till inaktivt läge och använder föregående inställning.
Mottagning
Den bärbara sändaren befinner sig i mottagningsläge så länge den är påslagen och inte sänder (inaktivt
läge).
Överföring
Håll PTT-knappen [12] intryckt. TX-ikonen visas på skärmen [1].
Tala i mikrofonen [9]. Håll den bärbara sändaren vertikalt och ca 10 cm från
munnen.
Släpp PTT-knappen [12] när du pratat klart.
76 - Svenska

SilverCrest SPMR 8000 B1
Batteristatusindikator
När sändaren är påslagen visas antalet fält på batteristatusindikatorn [23] på skärmen [1] vilket indikerar
det laddningsbara eller isatta batteriets laddningsnivå.
Laddningsbara batterier/batterier helt laddade
Laddningsbara batterier/batterier laddade till två tredjedelar
Laddningsbara batterier/batterier laddade till en tredjedel
När batterikapaciteten är slut i de laddningsbara eller isatta batterierna hörs en ljudsignal då batterierna
bör bytas eller laddas, om laddningsbara batterier används.
Laddningsbara batterier/batterier tomma
Avancerad funktion
Med menyknappen [6] kan du anpassa din kommunikationsradio efter eget önskemål. Se följande
sidor för mer information om funktionerna.
Om du inte trycker på någon knapp under fem sekunder när inställningen ändras återgår
den bärbara sändaren till inaktivt läge och använder föregående inställning.
CTCSS- (Continuous Tone Coded Squelch System)/DCS-kod (Digital
Coded Squelch)
Troligtvis använder andra personer samma kanal som du om flera bärbara sändare används i din närhet.
CTCSS- eller DCS-koder kan användas för att undvika att ta emot signaler från andra enheter.
Den 3-siffriga CTCSS/CDCSS-koden är en tonfrekvens som sänds från kommunikationsradion. De två
stationerna som ställts in på samma kanal och samma CTCSS- eller DCS-kod kan lyssna till varandra. Inga
andra stationer kommer åt denna kanal om de inte använder samma CTCSS- eller DCS-kod. SilverCrest
SPMR 8000 B1 stöder 38 analoga CTCSS-koder (1 till 38) och 83 digitala DCS-koder (1 till 83).
Alla mottagare som ställts in på samma kanal och som använder samma CTCSS- eller DCSkod kan lyssna på din konversation.
Att använda en CTCSS- eller DCS-kod förhindrar inte att din konversation avlyssnas av
andra parter: Radiosändare eller –mottagare som är inställda på samma kanal som inte
använder CTCSS- eller DCS-kod kan lyssna på all kommunikation på denna kanal.
Svenska - 77

SilverCrest SPMR 8000 B1
Ställa in CTCSS-koden
Tryck två gånger på menyknappen
CTCSS-kod blinkar på skärmen.
Tryck på uppknappen [10] eller nerknappen [7] för att ställa in en
annan CTCSS-kod.
Tryck på PTT-knappen [12] för att bekräfta inställningen.
[6]. Indikationen ”CTCSS” och aktuell
Ställa in DCS-koden
Tryck tre gånger på menyknappen
DCS-kod blinkar på skärmen.
Tryck på uppknappen [10] eller nerknappen [7] för att ställa in en
annan DCS-kod.
Tryck på PTT-knappen [12] för att bekräfta inställningen.
[6]. Indikationen ”DCS” och aktuell
Avaktivera CTCSS/DCS-koden
För att avaktivera CTCSS- eller DCS-koden väljer du koden ”00”. ”OF” visas i menyn.
Kanalövervakning
Du kan använda denna funktion för att söka efter svaga signaler på aktuell kanal.
Håll menyknappen
Tryck på menyknappen
Under kanalövervakning kan du lyssna på valfri kommunikation över aktuell kanal oavsett
vilken CTCSS- eller DCS-kod som ställts in.
[5] och nerknappen [6] intryckta samtidigt för att aktivera kanalövervakning.
[6] för att avbryta kanalövervakningen.
Röststyrd sändningsfunktion (VOX)
Denna funktion liknar din mobiltelefons handsfreefunktion. Kommunikationsradion startar sändningen när
din röst identifieras (eller annat ljud). På detta sätt kan du sända ett meddelande utan att trycka på PTTknappen [12]. Denna funktion bör inte användas när du befinner dig i en bullrig eller blåsig miljö.
78 - Svenska

SilverCrest SPMR 8000 B1
Tryck fyra gånger på menyknappen
VOX-inställning blinkar på skärmen.
Tryck på uppknappen [10] för att aktivera VOX-funktionen eller höja VOX-
känsligheten.
Tryck på nerknappen [7] för att sänka VOX-känsligheten eller avaktivera
VOX-funktionen (”OF”).
Tryck på PTT-knappen [12] för att bekräfta inställningen.
[6]. Indikationen ”VOX” och aktuell
Kanalsökning
Vid en kanalsökning söks alla tillgängliga kanaler (1 till 8) igenom i följd efter aktiva stationer.
Om en aktiv kanal hittas kan du söka efter CTCSS- eller DCS-koden som stationen använder för kanalen.
Söka efter en aktiv kanal
Tryck fem gånger på menyknappen
kanalnummer blinkar på skärmen.
Tryck på uppknappen [10] eller nerknappen [7] för att starta
kanalsökningen.
Sökningen stoppas automatiskt när en aktiv kanal har hittats. Du kan sedan lyssna på kommunikationen.
När kommunikationen på den aktiva kanalen avslutas fortsätter kanalsökningen.
Genom att trycka på PTT-knappen [12] när du lyssnar på en uppsökt kanal använder den
bärbara sändaren den kanalen och återgår till inaktivt läge.
[6]. Indikationen ”SC” och aktuellt
Söka efter en CTCSS-kod
Om en aktiv kanal hittas trycker du på PTT-knappen [12] för att använda kanalen. Du kan därefter söka
efter CTCSS- eller DCS-koden som används.
Tryck sex gånger på menyknappen [6]. Indikationen ”SC” och ”CTCSS
00” blinkar på skärmen. Aktuellt kanalnummer visas också.
Tryck på uppknappen [10] eller nerknappen [7] för att söka på vald
kanal.
Svenska - 79

SilverCrest SPMR 8000 B1
När en kommunikation identifieras för vald kanal identifieras också CTCSS-koden (om sådan finns) och
visas.
Genom att trycka på PTT-knappen [12] använder den bärbara sändaren den koden och
återgår till inaktivt läge.
Söka efter en DCS-kod
Tryck sju gånger på menyknappen
blinkar på skärmen. Aktuellt kanalnummer visas också.
Tryck på uppknappen [10] eller nerknappen [7] för att söka på vald
kanal.
När en kommunikation identifieras för vald kanal identifieras också DCS-koden (om sådan finns) och
visas.
Genom att trycka på PTT-knappen [12] använder den bärbara sändaren den koden och
återgår till inaktivt läge.
[6]. Indikationen ”SC” och ”DCS 00”
80 - Svenska

SilverCrest SPMR 8000 B1
Dubbelsökning
Normalt sett tar din kommunikationsradio endast emot en kanal (med eller utan CTCSS- eller DCS-kod).
Med dubbelsökningsfunktionen kan en andra kanal med CTCSS- eller DCS-kod övervakas.
När dubbelsökning aktiverats växlar kommunikationsradion mellan två kanaler.
Tryck elva gånger på menyknappen
på skärmen.
Tryck på uppknappen [10] eller nerknappen [7] för att ställa in en
annan kanal.
Tryck på menyknappen
val av CTCSS-kod. Tryck igen på menyknappen
DCS-kod.
Tryck på uppknappen [10] eller nerknappen [7] för att ställa in en
annan CTCSS- eller DCS-kod.
Tryck på PTT-knappen [12] för att bekräfta inställningen och återgå till inaktivt
läge.
[6] för att bekräfta vald kanal och förtsätta med
Välj ”OF” när du väljer DCM-kanal för att avaktivera denna funktion.
[6]. Indikationen ”DCM OF” blinkar
[6] för att gå till val av
Anropssignaler
Anropssignalen är en ljudsignal som uppmärksammar andra stationer du vill sända ett meddelande till.
SilverCrest SPMR 8000 B1 har stöd för 15 anropssignaler.
Välja en anropssignal
Tryck åtta gånger på menyknappen
skärmen, numret på aktuell anropssignal blinkar och anropssignalen hörs.
Tryck på uppknappen [10] eller nerknappen [7] för att ställa in en
annan anropssignal.
[6]. Indikationen ”CA” visas på
Svenska - 81

SilverCrest SPMR 8000 B1
Sända en anropssignal
Tryck kort på anropsknappen [11] för att skicka anropssignalen över aktuell kanal.
Ställa in klarsignalen till på/av
När du släpper PTT-knappen [12] efter att du sänt ditt meddelande, sänder enheten en klarsignal som
indikerar att sändningen från dig är slut. Du kan vid behov avaktivera denna klarsignal.
Tryck nio gånger på menyknappen
status blinkar på skärmen.
Tryck på uppknappen [10] för att aktivera (ON) eller nerknappen [7]
för att avaktivera (OF) klarsignalen.
Tryck på PTT-knappen [12] för att bekräfta inställningen och återgå till inaktivt
läge.
Ställa in knappljudet till på/av
Normalt sett hörs en ljudsignal varje gång du trycker på någon av knapparna. Denna funktion gäller inte
På/Av-knappen
[5] eller PTT-knappen [12]. Du kan vid behov avaktivera knappljudet.
Tryck tio gånger på menyknappen
status blinkar på skärmen.
Tryck på uppknappen [10] för att aktivera (ON) eller nerknappen [7]
för att avaktivera (OF) knappljudet.
Tryck på PTT-knappen [12] för att bekräfta inställningen och återgå till inaktivt
läge.
[6]. Indikationen ”rO” visas och aktuell
[6]. Indikationen ”tO” visas och aktuell
RM (rumsövervakare)
Du kan använda denna funktion för att övervaka ett rum. När denna funktion är aktiverad kommer den
bärbara sändaren att sända så länge som röster eller andra ljud detekteras och utan att PTT-knappen [12]
behöver tryckas in. Detta ger dig möjlighet att höra dessa röster eller ljud på den andra bärbara
sändaren.
Tryck tolv gånger på menyknappen
aktuell status blinkar på skärmen.
Tryck på uppåtknappen [10] för att aktivera rumsövervakningen.
82 - Svenska
[6]. Indikationen ”RM OF” visas och

Knapplåsning
SilverCrest SPMR 8000 B1
Tryck på nedåtknappen [7] för att avaktivera funktionen (”RM OF”).
Tryck på menyknappen
[6] för att bekräfta inställningen.
Om du vill avsluta rumsövervakningsfunktionen trycker du elva gånger på
menyknappen
nedåtknappen [7] tills ”RM OF” visas. Tryck på menyknappen
[6] och därefter så många gånger som behövs på
[6] för
att bekräfta.
Håll menyknappen
[6] intryckt i tre sekunder för att aktivera knapplåset.
Knapplåsikonen visas på skärmen.
Håll menyknappen
knapplåset. Knapplåsikonen försvinner.
Följande knappar fungerar fortfarande när knapplåset är aktivt:
PTT-knappen [12], anropsknappen [11] och På/Av-knappen [5].
[6] intryckt igen i tre sekunder för att avaktivera
Kronometer
På SilverCrest SPMR 8000 B1 finns en kronometerfunktion för tidsmätning. Kronometern kan räkna till
59’59’’99.
Håll anropsknappen
kronometern. Kronometern visas på skärmen.
Tryck på uppknappen [10] för att starta tidsmätningen.
Tryck på uppknappen [10] för att stoppa tidsmätningen.
Tryck på nerknappen [7] för att återställa tidsmätningen.
Håll anropsknappen
Kronometern är inte tillgänglig när kanalövervakning aktiverats.
[11] intryckt i tre sekunder för att aktivera
[11] intryckt i tre sekunder för att stänga kronometern.
Svenska - 83

SilverCrest SPMR 8000 B1
Bildskärmens bakgrundsbelysning
Kommunikationsradions skärm [1] har en bakgrundsbelysning när du behöver använda enheten i mörker.
Bakgrundsbelysningen tänds automatiskt när du trycker på någon av knapparna förutom PTT-knappen
[12] och anropsknappen
enheten startas.
Bakgrundsbelysningen slocknar automatiskt efter sex sekunder.
[11]. Via På/Av-knappen [5] aktiveras endast bakgrundsbelysningen när
Felsökning
Du kan lösa de flesta vanliga problem själv med hjälp av tabellen nedan. Om problemet kvarstår efter att
du kontrollerat den lösning som föreslås bör du kontakta vår Service-hotline. Du hittar telefonnumret i det
sista kapitlet under "Garanti- och serviceinformation". Försök inte att reparera produkten själv.
Problem Lösning
Kan inte starta
kommunikationsradion
Ingen sändning Ställ in båda radiosändarna till samma kanal och till samma CTCSS-
Kort räckvidd,
kommunikationsstörning
Mottagningsstörning Flytta dig från elektromagnetiska källor (högspänningsledningar,
Håll På/Av-knappen [5] intryckt i minst tre sekunder.
Ladda kommunikationsradions batterier eller sätt i nya batterier.
eller DCS-kod, om det går.
Håll PTT-knappen [12] intryckt helt när du pratar.
Växla till en annan kanal om störning sker i sändningen.
Räckvidden beror på miljön. Stålkonstruktioner, byggnader av betong
eller om du använder enheten i ett fordon gör att räckvidden kan
minska. Försök, om möjligt, att flytta dig till en plats där du har fri sikt
till mottagningsstationen.
maskiner med elmotorer osv.).
Sändande och mottagande enhet finns för nära varandra. Håll dem
minst 1,5 meter från varandra.
Pröva om kommunikationskvaliteten är bättre på en annan kanal.
84 - Svenska

SilverCrest SPMR 8000 B1
Underhåll/rengöring
Underhåll
Kommunikationsradion behöver repareras om den skadats på något sätt, t.ex. om vätska har trängt in i
produkten, produkten har utsatts för regn eller fukt, om produkten inte längre fungerar normalt eller om
produkten har tappats.
Om du uppmärksammar rök, ovanligt ljud eller konstig lukt bör du koppla från laddningsenheten från
nätströmmen omedelbart eller ta ur det laddningsbara batteriet eller de vanliga batterierna från
radiosändarna. I dessa fall bör inte enheten användas längre och bör undersökas av auktoriserad
personal.
Allt reparationsarbete måste utföras av kvalificerad servicepersonal.
Öppna aldrig den bärbara radiosändarens chassi eftersom den då kan skadas.
Försök inte att reparera produkten själv.
Om nätkabeln skadas löper du risk att få en elektrisk stöt.
Rengöring
Koppla från kommunikationsenheten från nätströmmen före rengöring.
Använd en mjuk, luddfri trasa vid rengöring.
Använd inte rengöringsmedel eller lösningsmedel på produkten eftersom det kan läcka in i höljet och
därigenom orsaka bestående skador.
Använd en något fuktad trasa för envisa fläckar.
Torka av batteriets poler då och då med en torr, luddfri trasa.
Om den bärbara radiosändaren blir våt måste den omedelbart stängas av och de laddningsbara eller
vanliga batterierna måste tas ut. Torka batterifacket med en mjuk trasa. Låt batterifacket vara öppet tills
fukten har avdunstat. Använd inte produkten förrän den är helt torr.
Svenska - 85

SilverCrest SPMR 8000 B1
Miljöbestämmelser och kasseringsinformation
Om produkten är märkt med en överkryssad papperskorg lyder den under EU-direktivet
2012/19/EU. Alla elektriska och elektroniska enheter måste kasseras separat från
hushållsavfallet vid officiella miljöstationer. Om gamla enheter kasseras på rätt sätt
undviks skador på miljön och på din hälsa. Kontakta ditt kommunkontor,
renhållningsverket eller butiken där du har köpt enheten för mer information om korrekt
kassering.
Respektera miljön! Gamla och laddningsbara batterier hör inte hemma bland
hushållssoporna! De måste lämnas vid en återvinningsstation för batterier. Observera att
batterier/laddningsbara batterier måste kasseras helt urladdade på en plats för insamling av gamla
batterier. Om batterier som inte är helt urladdade ska kasseras, ska du se till att de inte oavsiktligt kan
kortslutas.
Kassera alla förpackningar på ett miljövänligt sätt. Kartongen kan lämnas till pappersinsamlingar eller vid
offentliga återvinningscentraler. Film och plast i förpackningen ska slängas på offentliga insamlingsplatser.
Meddelande om överensstämmelse
Denna enhet har testats för överensstämmelse med relevanta krav i RTT&E-direktivet
1999/5/EC. Motsvarande uttalande om överensstämmelse finns även i slutet av
denna bruksanvisning. CE-märket finns på batterifacket på de bärbara
kommunikationsenheterna och på undersidan av laddningsenheten. Produkten
uppfyller också kraven i direktivet för ekologisk utformning 2009/125/EC med
implementeringsorder 278/2009 samt RoHS-direktivet 2011/65/EU.
86 - Svenska

SilverCrest SPMR 8000 B1
Garanti- och serviceinformation
Garanti för TARGA GmbH
Ärade kund,
Du får tre års garanti på denna apparat, börjande från det datum den köptes. Om denna produkt är
felaktig har du lagliga rättigheter gentemot försäljaren av denna produkt. Dessa lagliga rättigheter
inskränks inte av den garanti som beskrivs i det följande.
Garantivillkor
Garantitiden börjar från inköpsdatumet. Var vänlig och spara kassakvittot! Kvittot behövs som bevis på
köpet. Om ett material- eller fabrikationsfel uppträder inom tre år från inköpsdatumet, blir produkten av
oss – enligt vårt godtycke – kostnadsfritt reparerad eller utbytt.
Garantitid och lagstadgade anspråk vid defekter
Garantitiden förlängs inte därför att garantin tas i anspråk. Det gäller också för utbytta och reparerade
delar. Skador och defekter som eventuellt förekommer redan vid köpet måste rapporteras genast när
produkten har packats upp. Reparationer efter garantitidens slut är kostnadspliktiga.
Garantins omfattning
Apparaten är omsorgsfullt tillverkad enligt stränga kvalitetsstandarder och har kontrollerats noggrant
innan den levererades. Garantin gäller för material- eller tillverkningsfel. Denna garanti gäller inte för
delar av produkten som utsätts för normalt slitage och därför kan anses vara slitdelar eller för skador på
bräckliga delar, t.ex. brytare, batterier eller sådana delar som är tillverkade av glas. Denna garanti
upphör att gälla när produkten tillfogas skada, inte används eller underhålls korrekt. Att använda
produkten korrekt betyder att alla anvisningar som ges i bruksanvisningen måste hållas till punkt och
pricka. Användningsändamål och handlingar som det avråds ifrån eller som det varnas för i
bruksanvisningen måste absolut undvikas. Denna apparat endast avsedd för privat bruk och inte för
kommersiell användning. Vid felaktig och osaklig behandling, när våld brukas och vid ingrepp som inte
har genomförts av en servicefilial som är auktoriserad av oss, upphör garantin att gälla. I och med att
produkten repareras eller byts ut startar inte en ny garantiperiod.
Förfarande i garantifall
Följ vänligen följande anvisningar för att ditt ärende ska kunna bearbetas snabbt:
- Läs medföljande dokumentation innan produkten tas i bruk. Om det uppstår ett problem som
inte kan lösas på detta sätt, tag vänligen kontakt med vår Hotline.
- Ha vid alla förfrågningar kassakvittot, artikelnumret resp. om befintligt serienumret till hands som
bevis på köpet.
Svenska - 87

SilverCrest SPMR 8000 B1
- I det fall att problemet inte kan lösas per telefon, föranstaltar vår Hotline beroende på
felorsaken en service som för ärendet vidare.
Service
Telefon: 08 – 40 83 63 23
E-post: service.SE@targa-online.com
IAN: 270811
Tillverkare
Ta i beaktande att följande adress inte är en serviceadress. Kontakta först ovan nämnda serviceställe.
TARGA GmbH
Coesterweg 45
59494 SOEST
GERMANY
88 - Svenska

SilverCrest SPMR 8000 B1
Table des matières
Introduction .............................................................................................................. 91
Utilisation prévue ..................................................................................................... 91
Contenu de l'emballage ............................................................................................ 92
Spécifications techniques .......................................................................................... 93
Instructions de sécurité ............................................................................................. 95
Droits d’auteur ......................................................................................................... 98
Description de l’appareil .......................................................................................... 99
Émetteur-récepteur portatif ........................................................................................................................... 99
Éléments apparaissant à l’écran ............................................................................................................... 100
Socle de chargement ................................................................................................................................. 100
Avant de commencer .............................................................................................. 101
Insertion des piles rechargeables / des piles classiques ......................................................................... 101
Chargement des piles ................................................................................................................................ 101
Préparation du socle de chargement ................................................................................................... 101
Chargement des piles ........................................................................................................................... 102
Installation/retrait du clip de ceinture ....................................................................................................... 103
Installation du clip de ceinture .............................................................................................................. 103
Retrait du clip de ceinture ..................................................................................................................... 103
Branchement des oreillettes ....................................................................................................................... 103
Prise en main .......................................................................................................... 104
Mise en marche et arrêt des émetteurs-récepteurs portatifs .................................................................... 104
Mise en marche de l’émetteur-récepteur ............................................................................................. 104
Mise en marche de l’émetteur-récepteur ............................................................................................. 104
Réglage du volume .................................................................................................................................... 104
Changement de canal ............................................................................................................................... 105
Réception .................................................................................................................................................... 105
Émission ....................................................................................................................................................... 105
Français - 89

SilverCrest SPMR 8000 B1
Voyant d’état de batterie ........................................................................................................................... 106
Options avancées ................................................................................................... 106
Code CTCSS (Continuous Tone Coded Squelch System) / Code DCS (Digital Coded Squelch)....... 106
Réglage du code CTCSS ...................................................................................................................... 107
Réglage du code DCS .......................................................................................................................... 107
Désactivation du CTCSS/DCS ............................................................................................................. 107
Surveillance du canal ................................................................................................................................. 107
Fonction d'émission à commande vocale (VOX) ..................................................................................... 108
Recherche des chaînes ............................................................................................................................... 108
Recherche d’un canal actif ................................................................................................................... 108
Recherche d’un code CTCSS ................................................................................................................ 109
Recherche d’un code DCS .................................................................................................................... 109
Double recherche ....................................................................................................................................... 110
Tonalité d’appel.......................................................................................................................................... 110
Sélection de la tonalité d'appel ............................................................................................................ 110
Envoi de la tonalité d'appel .................................................................................................................. 111
Activation/désactivation du bip Roger ..................................................................................................... 111
Activation/désactivation des bips des touches ........................................................................................ 111
RM (Surveillance) ....................................................................................................................................... 111
Verrouillage des touches ........................................................................................................................... 112
Chronomètre ............................................................................................................................................... 112
Rétroéclairage de l’écran .......................................................................................................................... 113
Résolution des problèmes ...................................................................................... 114
Entretien / nettoyage ............................................................................................. 115
Entretien ...................................................................................................................................................... 115
Nettoyage ................................................................................................................................................... 115
Réglementation environnementale et informations sur la mise au rebut ................ 116
Avis de conformité .................................................................................................. 116
Informations relatives à la garantie et aux services ............................................... 117
90 - Français

SilverCrest SPMR 8000 B1
Introduction
Nous vous remercions d'avoir choisi ce produit SilverCrest.
Votre SilverCrest SPMR 8000 B1 se compose de deux émetteurs-récepteurs radio portatifs d'une portée
maximale de 8 km. L'utilisation de cette radio personnelle mobile ou PMR est gratuite (elle n'est soumise à
aucun frais de licence ou autre). Vous disposez d'un choix de huit canaux pour la communication entre les
deux stations. Les émetteurs-récepteurs portatifs sont protégés contre la pluie fine.
Vous pouvez utiliser les appareils PMR partout où vous avez besoin de communiquer avec d'autres
personnes. Vous pouvez par exemple rester en contact avec vos enfants pendant qu’ils jouent dans le
jardin. Dès lors que vous avez trouvé un canal exempt d'interférences, la communication n'est limitée que
par les obstacles et la portée maximale de l'appareil.
Utilisation prévue
Cet émetteur-récepteur radio portatif est un appareil électronique grand public. L’émetteur-récepteur radio
portatif SilverCrest SPMR 8000 B1 a été conçu pour communiquer avec d’autres personnes. L’émetteurrécepteur radio portatif est destiné à un usage exclusivement privé, et en aucun cas à un usage industriel
ou commercial. Il ne doit pas être utilisé sous des climats tropicaux. Utilisez uniquement des câbles et des
périphériques externes conformes aux normes de sécurité, de compatibilité électromagnétique et de
blindage de l’appareil.
Cet émetteur-récepteur radio portatif satisfait à toutes les normes et standards de conformité CE. Toute
modification apportée à l’émetteur-récepteur radio portatif peut avoir pour conséquence que ces normes
ne sont plus respectées. Le fabricant ne pourra pas être tenu pour responsable des dommages ou
dysfonctionnements pouvant résulter de ces modifications. Utilisez uniquement les accessoires
recommandés par le fabricant. Toute utilisation autre que celle mentionnée ci-dessus ne correspond pas à
l’utilisation prévue.
Veuillez respecter les réglementations et législations en vigueur dans le pays d’utilisation.
Éteignez la PMR à bord des avions si le personnel de cabine vous le demande. Vous devez
suivre les instructions du personnel de bord pour l'utilisation du produit.
Éteignez l'appareil chaque fois que vous rencontrez des panneaux vous l'indiquant. Les
hôpitaux et établissements médicaux peuvent utiliser des appareils sensibles aux champs de
radiofréquences.
Selon le pays, il peut être interdit d'utiliser la PMR tout en conduisant un véhicule. Le cas
échéant, arrêtez votre véhicule sur le bas-côté avant d'utiliser la PMR.
Français - 91

SilverCrest SPMR 8000 B1
Ne touchez pas l'antenne lors de l'émission ; la portée pourrait en être diminuée.
Contenu de l'emballage
Sortez tous les appareils et accessoires fournis de l'emballage et vérifiez qu'ils ne sont pas endommagés
et qu'il ne manque aucun élément :
2 émetteurs-récepteurs radio portatifs SPMR 8000 B1
2 clips pour ceinture
1 socle de chargement
1 adaptateur secteur
6 piles Ni-MH rechargeables de type AAA
Mode d’emploi avec consignes de sécurité
Si vous constatez qu’il manque certains éléments ou que certains éléments sont endommagés, veuillez
contacter notre assistance téléphonique. Vous trouverez le numéro de téléphone au dernier chapitre
« Informations relatives à la garantie et aux services ».
Retirez le film protecteur des écrans (1) des deux émetteurs-récepteurs.
92 - Français

SilverCrest SPMR 8000 B1
Spécifications techniques
Marque SilverCrest
Nom du modèle SPMR 8000 B1
Canaux 8
Sous-code CTCSS 38 / DCS 83
Fréquence 446,00625 – 446,09375 MHz
Portée Jusqu’à 8 km (en terrain dégagé)
Pour chaque émetteur-récepteur portatif :
Piles conventionnelles / rechargeables
Puissance d'émission ≤ 500 mW PAR
Type de modulation FM – F3E
Espacement des canaux 12,5 kHz
Adaptateur secteur pour double socle de
chargement
Dimensions
Poids (sans les piles / piles rechargeables)
Conditions ambiantes
Norme IP Protection IPX2 contre les gouttes d’eau
3 piles de type AAA ou 3 piles rechargeables
NiMH de type AAA, (1,2 V / 600 mAh)
Fabricant : O Real
Type : TGE050P055
Entrée : 100 - 240 V CA, 50 / 60 Hz
Sortie : 5 V / 550 mA
Puissance : 2,75 W maxi
Émetteur-récepteur : 55 x 103 x 36 mm
Socle de chargement : 102 x 60 x 35 mm
Émetteur-récepteur : 90 g
Socle de chargement : 60 g
Adaptateur secteur : 55 g
Fonctionnement :
0 à 30 ºC, 85 % d’humidité relative maxi
Stockage :
-20 à 55 ºC, 90% d’humidité relative maxi
Français - 93

SilverCrest SPMR 8000 B1
Tableau de
fréquences
Canal Fréquence
(MHz)
1 446,00625 0 Désactivé 10 94,8 20 131,8 30 186,2
2 446,01875 1 67,0 11 97,4 21 136,5 31 192,8
3 446,03125 2 71,9 12 100,0 22 141,3 32 203,5
4 446,04375 3 74,4 13 103,5 23 146,2 33 210,7
5 446,05625 4 77,0 14 107,2 24 151,4 34 218,1
6 446,06875 5 79,7 15 110,9 25 156,7 35 225,7
7 446,08125 6 82,5 16 114,8 26 162,2 36 233,6
8 446,09375 7 85,4 17 118,8 27 167,9 37 241,8
Codes DCS
Code
Nº
DCS
1 23 18 125 35 245 52 412 69 624
2 25 19 131 36 251 53 413 70 627
3 26 20 132 37 261 54 423 71 631
4 31 21 134 38 263 55 431 72 632
5 32 22 143 39 265 56 432 73 654
6 43 23 152 40 271 57 445 74 662
7 47 24 155 41 306 58 464 75 664
8 51 25 156 42 311 59 465 76 703
9 54 26 162 43 315 60 466 77 712
10 65 27 165 44 331 61 503 78 723
11 71 28 172 45 343 62 506 79 731
12 72 29 174 46 346 63 516 80 732
13 73 30 205 47 351 64 532 81 734
14 74 31 223 48 364 65 546 82 743
15 114 32 226 49 365 66 565 83 754
16 115 33 243 50 371 67 606
17 116 34 244 51 411 68 612
Code CTCSS
Fréquence
Code
(Hz)
8 88,5 18 123,0 28 173,8 38 250,3
9 91,5 19 127,3 29 179,9
Code
Nº
DCS
Nº
Code
Fréquence
(Hz)
Code
DCS
Nº
Code
Fréquence (Hz)
Code
DCS
Code
Nº
Fréquence (Hz)
Code
DCS
94 - Français

SilverCrest SPMR 8000 B1
Instructions de sécurité
Avant d’utiliser cet appareil pour la première fois, veuillez lire attentivement ce manuel d’utilisation et tenir
compte de tous les avertissements, même si vous avez l’habitude de manipuler des appareils
électroniques. Conservez ce manuel d’utilisation en lieu sûr afin de pouvoir vous y reporter à tout moment.
Si vous vendez ou cédez l'appareil à une autre personne, veillez également à lui remettre ce manuel
Ce symbole indique la présence d'informations importantes concernant l'utilisation
sans risque de ce produit et la sécurité de l'utilisateur.
Ce symbole signale la présence d'informations supplémentaires sur le sujet.
Cette icône signale le risque d'altération des capacités auditives de l'utilisateur.
Veuillez utiliser exclusivement l’adaptateur d’alimentation fourni (fabricant : O Real /
numéro du modèle : TGE050P055) pour le socle de chargement.
Consignes générales de sécurité
Les enfants ou les personnes souffrant d'un handicap mental ou physique ne doivent pas utiliser les
appareils électriques. Ne laissez jamais ces personnes utiliser sans surveillance des appareils
électriques. Elles ne comprennent pas toujours qu’ils peuvent être dangereux.
Les petites pièces impliquent un risque d'étouffement. Notez également que les voies respiratoires
peuvent être obstruées par les films d’emballage, avec pour conséquence un risque de suffocation.
Si vous remarquez de la fumée, des odeurs ou des bruits inhabituels, déconnectez immédiatement tous
les câbles. Si une telle situation se produit, cessez d’utiliser l’émetteur-récepteur radio portatif et faites-le
réviser par un service technique agréé. Ne respirez jamais la fumée provenant d’un appareil
probablement en feu. Si vous avez accidentellement respiré de la fumée, consultez immédiatement un
médecin. L’inhalation de fumée est dangereuse pour la santé.
Français - 95

SilverCrest SPMR 8000 B1
Conditions/environnement d’utilisation
Installez l’émetteur-récepteur radio portatif sur une surface plane et stable. Ne placez aucun objet lourd
dessus.
Conservez l’émetteur-récepteur radio portatif à l’abri de l’humidité. Ne placez aucun récipient
contenant du liquide (boissons, vases, etc.) à proximité de ou sur les composants. Évitez les vibrations,
la chaleur et l’exposition au soleil sous peine d’endommager l’émetteur-récepteur radio portatif.
L’émetteur-récepteur radio portatif n’a pas été conçu pour être utilisé dans des environnements
poussiéreux ou exposés à une température ou une humidité excessive (salle de bain, par exemple).
Température et humidité en fonctionnement : 0 à 30 °C, 85 % d’humidité relative maxi.
Si l’émetteur-récepteur radio portatif est exposé à d’importantes variations de température, de la
condensation peut se former et causer une humidité susceptible de provoquer des courts-circuits. Dans
ce cas, utilisez à nouveau l’émetteur-récepteur radio portatif uniquement lorsqu’il est revenu à
température ambiante.
Veillez à ne pas placer de sources incandescentes (bougies allumées, etc.) sur l’émetteur-récepteur
radio portatif.
Câbles
Pour débrancher les câbles, tirez toujours sur leur fiche et non sur les câbles eux-mêmes. Ne placez pas
de meubles ou d’autres objets lourds sur les câbles et veillez à ce que les câbles ne soient pas
endommagés, notamment au niveau des prises et des connecteurs. Ne faites jamais de nœuds avec les
câbles et ne les raccordez à aucun autre câble. Tous les câbles doivent être placés de façon à ne pas
gêner le passage et à ne pas trébucher dessus.
Un câble d'alimentation endommagé peut être à l'origine d'un incendie ou d'une électrocution. Vérifiez
régulièrement l'état du câble. N'utilisez jamais d'adaptateurs ou de rallonges non conformes aux normes
de sécurité en vigueur dans votre pays et ne modifiez aucun adaptateur secteur ou câble d’alimentation
vous-même.
96 - Français

Piles conventionnelles et rechargeables
Insérez les piles (classiques ou rechargeables) dans l'appareil en respectant la polarité indiquée.
indiquée à l'intérieur du compartiment des piles.
N'essayez jamais de recharger les piles et ne les jetez pas au feu.
Utilisez uniquement des piles (classiques ou rechargeables) du même type.
Retirez les piles (classiques ou rechargeables) si vous ne comptez pas utiliser l’appareil pendant une
longue période.
Les piles classiques ou rechargeables usagées doivent être déposées dans des points de collecte
spécifiques. Pour plus d’informations sur la mise au rebut des piles classiques ou rechargeables, veuillez
consulter le chapitre « Réglementation environnementale et informations sur la mise au rebut ».
SilverCrest SPMR 8000 B1
Attention ! Risque d'explosion !
Ne remplacez jamais les piles (classiques ou rechargeables) dans un lieu propice aux explosions. Lors
de l'insertion ou du retrait des piles (classiques ou rechargeables), une étincelle peut se produire et
provoquer une explosion.
Éteignez la PMR si vous vous trouvez dans un environnement présentant des risques d'explosion car des
étincelles pourraient provoquer une explosion ou un incendie. Une telle situation présenterait en outre
un risque de blessure, voire un danger de mort.
Les zones dangereuses présentant un risque d’explosion sont généralement signalées (mais pas
toujours). Cela inclut, entre autres, les zones de stockage de combustible (sous le pont d'un bateau, par
exemple, ou encore les conduites de carburant ou zones de stockage), les environnements dont l'air
contient des substances inflammables (par exemple, poussière de céréales, poussière ou poudre
métallique) et tous les lieux dans lesquels vous devez en principe arrêter le moteur de votre véhicule.
Ne jetez pas les piles ou les batteries rechargeables au feu car elles pourraient exploser.
N'essayez pas de recharger des piles classiques (non rechargeables). Utilisez uniquement des piles
classiques ou rechargeables du même type. Utilisez toujours deux piles classiques ou rechargeables du
même type et de la même capacité. Vous trouverez ces informations dans le chapitre « Spécifications
techniques ».
Français - 97

SilverCrest SPMR 8000 B1
Attention ! Risques de brûlure
Ne touchez jamais l'antenne lorsque son isolation est endommagée. L'antenne peut en effet provoquer
une légère brûlure de la peau si elle entre en contact avec elle pendant l'émission.
Les piles (classiques ou rechargeables) peuvent endommager le matériel et provoquer des brûlures en
cas de contact de conducteurs tels que des bijoux, des clés ou des chaînes avec les bornes des piles. Le
matériau conducteur risque de provoquer un court-circuit en fermant un circuit électrique et de devenir
très chaud. Manipulez les piles rechargeables et les piles classiques avec précaution, en particulier lors
de leur rangement dans une poche, un porte-monnaie ou tout sac contenant des objets métalliques.
Attention ! Risque de blessure
Ne placez pas le produit dans le rayon de déploiement de l'airbag de votre véhicule. Les airbags se
gonflent très rapidement. Si la PMR se trouve dans le rayon de déploiement de l'airbag, elle risque
d'être projetée à travers l'habitacle et de blesser les passagers.
Maintenez les émetteurs-récepteurs radio à au moins 15 cm des stimulateurs cardiaques.
Éteignez la PMR si vous observez toute interférence avec du matériel médical.
Risques associés aux volumes sonores élevés
Attention lors de l’utilisation d’oreillettes (non fournies). Vous risquez d’endommager votre
système auditif si vous réglez le volume trop fort.
Droits d’auteur
L’ensemble du présent manuel d’utilisation est protégé par copyright et est fourni au lecteur uniquement à
titre d’information.
La copie des données et des informations, sans l’autorisation écrite et explicite préalable de l’auteur, est
strictement interdite. Cela s’applique également à toute utilisation commerciale du contenu et des
informations.
Tous les textes et les illustrations sont à jour à la date d’impression. Ils peuvent faire l’objet de
modifications sans préavis.
98 - Français
 Loading...