


WATER JET FLOSSER SMD 24 A1
WATER JET FLOSSER
Operating instructions and safety instructions
IAN 359279_2007
MUNDDUSCHE
Bedienungsanleitung und Sicherheitshinweise

Before reading, unfold the page containing the illustrations and familiarise yourself with all functions of
the device.
Klappen Sie vor dem Lesen die Seite mit den Abbildungen aus und machen Sie sich anschließend mit allen
Funktionen des Gerätes vertraut.
GB / IE / NI Operating instructions and safety instructions Page 1
DE / AT / CH Bedienungsanleitung und Sicherheitshinweise Seite 21

600 ml
500 ml
400 ml
300 ml
200 ml
100 ml
2
1
3
04
5
600 ml
500 ml
400 ml
300 ml
200 ml
100 ml
I
0

Contents
Introduction ..................................................... 2
Information about these operating instructions .....................................2
Copyright ..................................................................2
Intended use ...............................................................2
Safety information ...............................................3
Package contents and transport inspection ........................... 5
Description of the appliance ....................................... 6
Before first use ..................................................7
Requirements for the set-up location .............................................7
Wall mounting ..............................................................7
Handling and operation ........................................... 8
Attaching/removing nozzle attachments ..........................................8
Adjusting the nozzle control ...................................................9
Using the oral irrigator .......................................................10
After use. . . . . . . . . . . . . . . . . . . . . . . . . . . . . . . . . . . . . . . . . . . . . . . . . . . . . . . . . . . . . . . . . . 12
Cleaning and care ...............................................13
Storage .......................................................13
Ordering replacement parts ......................................14
Troubleshooting ................................................15
Disposal .......................................................16
Disposal of the appliance ....................................................16
Disposal of the packaging ....................................................16
Appendix ...................................................... 17
Technical data .............................................................17
Kompernass Handels GmbH warranty ..........................................17
Service ...................................................................19
Importer ..................................................................19
GB│IE│NI
│
1 ■SMD 24 A1

Introduction
Information about these operating instructions
Congratulations on the purchase of your new appliance.
You have selected a high-quality product. The operating instructions are part of this product.
They contain important information about safety, usage and disposal. Before using the
product, please familiarise yourself with all operating and safety instructions. Use the
product only as described and for the range of applications specified. Please also pass
these operating instructions on to any future owner.
Copyright
This documentation is protected by copyright.
Any copying or reproduction, including in the form of extracts, or any reproduction of
images (even in a modified state), is permitted only with the written authorisation of the
manufacturer.
Intended use
This appliance is intended exclusively for dental care and mouth hygiene in humans. The
appliance is not intended for use in industrial or medical environments. It is not suitable
for animal care. This appliance is intended solely for use in private households. It is not
intended for any other purpose nor for use beyond the scope described.
Claims of any kind for damage resulting from misuse, incompetent repairs, unauthorised
modification or the use of unauthorised replacement parts will not be accepted.
The operator bears sole liability.
■ 2 │ GB
│IE│
NI SMD 24 A1

Safety information
DANGER! ELECTRIC SHOCK!
► Connect the appliance only to a properly installed and easily
accessible mains power socket supplying a mains power
voltage of 100–240V ∼, 50/60 Hz.
► Ensure that the power cable is not damaged. Keep it out of hot
areas and route it in such a way that it cannot be damaged.
► Before use, check the appliance for visible external damage.
Never use the appliance if the cable, plug or housing are
damaged.
► To avoid potential risks, if the appliance power cable is dam-
aged, it must be replaced by the manufacturer, its customer
service or by a qualified technician.
► Have all repairs carried out by a specialist workshop. Under
no circumstances should you open the appliance yourself.
Repairs that are not carried out by a specialist workshop
could lead to physical injuries.
► Do not use the appliance in the vicinity of a bathtub/shower
or a sink filled with water. The proximity of moisture presents
a danger even when the appliance is switched off.
► Never touch the appliance if it has fallen into water. Always
disconnect the power plug from the power socket first!
► Never immerse the connected appliance in water or other
liquids.
► Never touch the power cable or the appliance with wet or
damp hands.
GB│IE│NI
│
3 ■SMD 24 A1

DANGER! ELECTRIC SHOCK!
► Ensure that the power cable can never become wet or damp
during operation. Route the power cable in such a way that
it cannot become trapped or damaged in any other way.
► Do not use the power cable with an extension cable; connect
the power cable directly to a power socket.
WARNING! RISK OF INJURY!
► Do not change any accessories while the appliance is
switched on.
► Always store the appliance indoors. To prevent accidents,
keep the appliance in a dry location when not in use.
► Oral irrigators may be used by children over the age of 8
and by persons with reduced physical, sensory or mental
capabilities or lack of experience and/or knowledge if they
are supervised.
► Switch off the appliance before you put it down or change
accessories.
► Lay the power cable so that nobody can step on it or trip over
it.
► Always pull out the plug before cleaning the appliance. Do
not pull on the power cable. Always grip the power plug to
disconnect the appliance from the power supply.
■ 4 │ GB
│IE│
NI SMD 24 A1

ATTENTION! PROPERTY DAMAGE!
► Use only accessories recommended by the manufacturer.
► Do not make any unauthorised modifications or alterations to
the appliance.
► Never put down the appliance next to radiators, ovens or
other heated appliances or surfaces.
► The appliance may only be used with cold or lukewarm tap
water up to a maximum of 40°C . If necessary, add a few
drops of mouthwash. The water tank should never be completely filled with additives such as mouthwash or mouth rinse.
These can damage the appliance.
Package contents and transport inspection
♦ Remove all parts of the appliance and the operating instructions from the carton.
♦ Remove all packaging materials and any films and labels.
DANGER
Do not allow children to play with packaging materials. There is a risk of suffocation!
►
The package contents include the following components (see fold-out page for illustrations):
▯ Water jet flosser (main unit with hand unit and water tank)
▯ 4 nozzle attachments
▯ 2 wall plugs (∅ 5 mm)
▯ 2 screws (3 mm)
▯ Operating instructions (not shown)
NOTE
Check the package for completeness and for signs of visible damage.
►
► If the delivery is incomplete or damage has occurred as a result of defective
packaging or during transport, contact the service hotline (see section Service).
GB│IE│NI
│
5 ■SMD 24 A1

Description of the appliance
(See fold-out page for illustrations)
1 Nozzle control
2 Nozzle attachment
3 On/Off switch for the water jet I/0
4 Hand unit
5 Cradle for hand unit
6 Hangers
7 Locking pin
8 Screw
9 Wall plug
0
Release button for nozzle attachment
q Power cable (with mains plug)
w Main unit
e Water tank
r Rotary switch (On/Off switch and water pressure control)
t Water tank lid
z Storage compartment for nozzle attachments
u Storage compartment lid
■ 6 │ GB
│IE│
NI SMD 24 A1

Before first use
Requirements for the set-up location
To ensure safe and trouble-free operation of the appliance, the set-up location must fulfil
the following requirements:
► The appliance may only be operated free-standing if used in dry rooms. The set-up
location must be a horizontal, level and stable surface.
► In damp rooms, especially in the vicinity of water, the appliance must be firmly fixed
to the wall to protect it from falling into water.
► The mains power socket must be easily accessible so that the power cable can be
quickly disconnected in an emergency.
Wall mounting
NOTE
► Before mounting to the wall, make sure that there are no electric cables, wires or
pipes running behind the wall surface where you plan to hang the appliance.
1. Mark two drill holes on the wall 7.2cm apart and drill the marked holes with a 5mm
bit. Ensure that there is a power socket in the immediate vicinity.
2. Push the two supplied wall plugs
screws 8 into the wall plugs 9. Take care that the screws 8 still protrude about
3 mm out of the holes.
3. On the back side of the appliance, the right hanger
the appliance from coming free of the screws 8. Press the locking pin 7 back somewhat
until you hear a click. Then pull the locking pin 7 down slightly out of the hanger 6
(see Fig. 1).
9 into the drilled holes and screw the two supplied
6 has a locking pin 7 to prevent
Fig. 1
1.
2.
GB│IE│NI
│
7 ■SMD 24 A1

4. Push the appliance onto the screws 8 so that the screws 8 enter into the hangers 6
on the back side of the appliance. Then press the appliance downward so that the
screws
8 slide into the rails of the hangers 6 and the appliance rests firmly on the
8.
screws
5. Slide the locking pin
6. Plug the mains plug of the power cable
7 upwards until it audibly engages with the hanger 6.
q into a socket.
Handling and operation
Attaching/removing nozzle attachments
NOTE
► If used daily, replace the nozzle attachments
► Use only original nozzle attachments
nozzle attachments 2 can be found in the section Ordering replacement parts.
♦ Make certain that the appliance is switched off before attaching or removing the
nozzle attachment 2.
♦ Fit a nozzle attachment
into the opening until the nozzle attachment 2 audibly engages in the hand unit 4.
Ensure that the guide tab on the lower end of the nozzle attachment 2 is aligned
with the corresponding groove in the opening on the hand unit 4 (see Fig. 2).
♦ To remove the nozzle attachment
and then pull the nozzle attachment 2 out of the hand unit 4 (see Fig. 3).
2 onto the hand unit 4. Press the nozzle attachment 2
2, press the release button 0 on the hand unit 4
2 after no more than six months.
2. Information on ordering replacement
Fig. 2 Fig. 3
■ 8 │ GB
2.
Click
│IE│
NI SMD 24 A1
1.

Adjusting the nozzle control
You can use the nozzle control 1 on the head of the nozzle attachment 2 to switch
between two different nozzle functions:
♦ Turn the nozzle control 1 anti-clockwise with your fingers to obtain a single jet for
targeted removal of food remnants from hard-to-reach areas (see Fig. 4 and 5).
Fig. 4 Fig. 5
♦ Turn the nozzle control 1 clockwise with your fingers to obtain multiple jets for
massaging the gums (see Fig. 6 and 7).
Fig. 6 Fig. 7
GB│IE│NI
│
9 ■SMD 24 A1

Using the oral irrigator
CAUTION – PROPERTY DAMAGE!
► Fill the water tank
wash. The water tank
mouthwash or mouth rinse.
► Use only cold or lukewarm water with a maximum temperature of 40°C. Do not fill
the water tank e with hot water.
NOTE
► Use of the appliance is not a replacement for daily tooth cleaning with a toothbrush
and toothpaste. Use the appliance only as a supplement to daily tooth cleaning with
toothbrush and toothpaste.
► Only use the appliance for a maximum of 2 minutes or only long enough to use
up one full tank of water (600 ml). One full tank of water (600 ml) is sufficient to
operate the appliance for about 150 seconds at level 1 or about 110 seconds at
level 5.
► The unfamiliar stimulation may cause some gum bleeding at first, which is not
unusual. If this continues for more than two weeks, you should consult your dentist.
► Consult your dentist before using the appliance if you suffer from severe periodontitis,
have injuries or abscesses in the mucous membrane of the oral cavity or underwent
dental surgery within the last two months.
♦ Remove the water tank
tank e. Fill the water tank e with cold or lukewarm water. Take care not to fill the
water tank e past the maximum fill mark of 600 ml. Then close the water tank e
again with the lid t and place the water tank e in the main unit w.
♦ Fit a nozzle attachment 2 onto the hand unit 4. Press the nozzle attachment 2
into the opening until the nozzle attachment 2 audibly engages in the hand unit 4.
Ensure that the guide tab on the lower end of the nozzle attachment 2 is aligned with
the corresponding groove in the opening on the hand unit 4.
♦ Switch on the main unit
level 1‒5 (1 = gentle, 5 = strong).
♦ Open your mouth slightly and insert the nozzle attachment 2. Bend over a washbasin
to allow the water to run into the basin.
e with pure tap water. If necessary, add a few drops of mouth-
e should never be completely filled with additives such as
e from the main unit w and open the lid t of the water
w by setting the rotary switch r to the desired water pressure
■ 10 │ GB
│IE│
NI SMD 24 A1
NOTE
► Begin with a lower level to allow your gums to become accustomed to the water
jet. Increase the strength of the water jet in stages. If the pressure is uncomfortable,
select a lower level again.
► To avoid splashes, do not switch on the hand unit
4 until it is in your mouth.
♦ Switch on the hand unit 4 by moving the On/Off switch for the water jet I/0 3 on
the hand unit 4 to I.
♦ Direct the water jet at the gaps between your teeth and the edges of your teeth to
clean them. Position the nozzle attachment
2 so that the water jet can rinse the food
remnants away from the gums (see Fig. 8). Move the nozzle attachment 2 slowly
along the edge of the teeth from gap to gap (see Fig. 9). Clean all the front and back
sides of your teeth in this way.
Fig. 8 Fig. 9
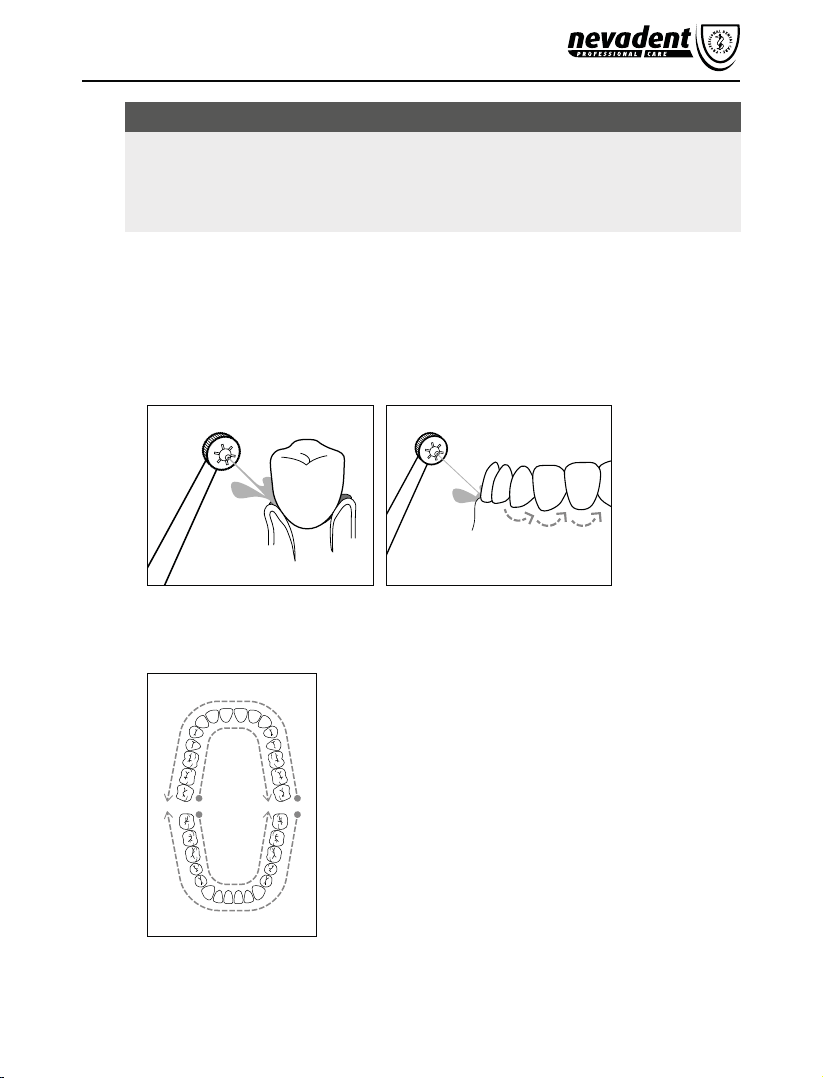
♦ You can use the image below as a guide for the order of cleaning (see Fig. 10).
The numbers in the image indicate the order in which to clean the different areas:
1
Fig. 10
2
1. Front of upper teeth
2. Back of upper teeth
3. Back of lower teeth
4. Front of lower teeth
3
4
GB│IE│NI
│
11 ■SMD 24 A1
 Loading...