

Page 1
MINIBAR SMB 70 A1
MINIBAR
Instrucciones de uso
MINI-BAR
Bedienungsanleitung
IAN 90980
MINI BAR
Operating instructions
Page 2
Antes de empezar a leer abra la página que contiene las imágenes y, en seguida, familiarícese con todas
las funciones del dispositivo.
Before reading, unfold the page containing the illustrations and familiarise yourself with all functions of
the device.
Klappen Sie vor dem Lesen die Seite mit den Abbildungen aus und machen Sie sich anschließend mit allen
Funktionen des Gerätes vertraut.
ES Instrucciones de uso Página 1
GB / MT Operating instructions Page 9
DE / AT / CH Bedienungsanleitung Seite 17
Page 3
Page 4
Índice
Introducción . . . . . . . . . . . . . . . . . . . . . . . . . . . . . . . . . . . . . . . . . . . . . . . . . . . . . . . . . . .2
Uso previsto . . . . . . . . . . . . . . . . . . . . . . . . . . . . . . . . . . . . . . . . . . . . . . . . . . . . . . . . . . .2
Volumen de suministro . . . . . . . . . . . . . . . . . . . . . . . . . . . . . . . . . . . . . . . . . . . . . . . . . . .2
Descripción del aparato . . . . . . . . . . . . . . . . . . . . . . . . . . . . . . . . . . . . . . . . . . . . . . . . . .2
Características técnicas . . . . . . . . . . . . . . . . . . . . . . . . . . . . . . . . . . . . . . . . . . . . . . . . . .2
Indicaciones de seguridad . . . . . . . . . . . . . . . . . . . . . . . . . . . . . . . . . . . . . . . . . . . . . . . .2
Antes del primer uso . . . . . . . . . . . . . . . . . . . . . . . . . . . . . . . . . . . . . . . . . . . . . . . . . . . .3
Colocación de las rejillas para botellas . . . . . . . . . . . . . . . . . . . . . . . . . . . . . . . . . . . . . . . . . . . . . . . . . . 3
Instalación . . . . . . . . . . . . . . . . . . . . . . . . . . . . . . . . . . . . . . . . . . . . . . . . . . . . . . . . . . . . . . . . . . . . . . . . . 3
Tamaños de las botellas . . . . . . . . . . . . . . . . . . . . . . . . . . . . . . . . . . . . . . . . . . . . . . . . . . . . . . . . . . . . . . 4
Manejo . . . . . . . . . . . . . . . . . . . . . . . . . . . . . . . . . . . . . . . . . . . . . . . . . . . . . . . . . . . . . . .4
Atemperación de las bebidas . . . . . . . . . . . . . . . . . . . . . . . . . . . . . . . . . . . . . . . . . . . . . . . . . . . . . . . . . . 4
Iluminación . . . . . . . . . . . . . . . . . . . . . . . . . . . . . . . . . . . . . . . . . . . . . . . . . . . . . . . . . . . . . . . . . . . . . . . . 4
Temperaturas recomendadas . . . . . . . . . . . . . . . . . . . . . . . . . . . . . . . . . . . . . . . . . . . . .5
Limpieza y mantenimiento . . . . . . . . . . . . . . . . . . . . . . . . . . . . . . . . . . . . . . . . . . . . . . .5
Eliminación de fallos . . . . . . . . . . . . . . . . . . . . . . . . . . . . . . . . . . . . . . . . . . . . . . . . . . . . .6
ES
Garantía y asistencia técnica . . . . . . . . . . . . . . . . . . . . . . . . . . . . . . . . . . . . . . . . . . . . . .7
Desecho . . . . . . . . . . . . . . . . . . . . . . . . . . . . . . . . . . . . . . . . . . . . . . . . . . . . . . . . . . . . . . .7
Importador . . . . . . . . . . . . . . . . . . . . . . . . . . . . . . . . . . . . . . . . . . . . . . . . . . . . . . . . . . . .7
SMB 70 A1
1
Page 5
MINIBAR SMB 70 A1
ES
Introducción
Felicidades por la compra de su aparato nuevo.
Ha adquirido un producto de alta calidad. Las
instrucciones de uso forman parte del producto y
contienen indicaciones importantes acerca de la
seguridad, el uso y el desecho de este aparato.
Antes de usar el producto, familiarícese con todas
las indicaciones de manejo y de seguridad. Utilice
el producto únicamente como se describe y para
los ámbitos de aplicación indicados. Entregue todos los documentos cuando transfi era el producto
a terceros.
Uso previsto
Este aparato está diseñado exclusivamente para
atemperar bebidas embotelladas cerradas (vino,
refrescos, agua mineral, etc.) en lugares cerrados
en el hogar. Este aparato no ha sido concebido
para su uso comercial ni industrial.
Tenga en cuenta que el minibar está previsto
exclusivamente para la conservación de bebidas
embotelladas cerradas. ¡El aparato no es apto
para la conservación de botellas abiertas o para
alimentos no envasados o abiertos!
Volumen de suministro
Minibar
3 rejillas para botellas:
2 rejillas para botellas,
1 rejilla doble para botellas
Instrucciones de uso
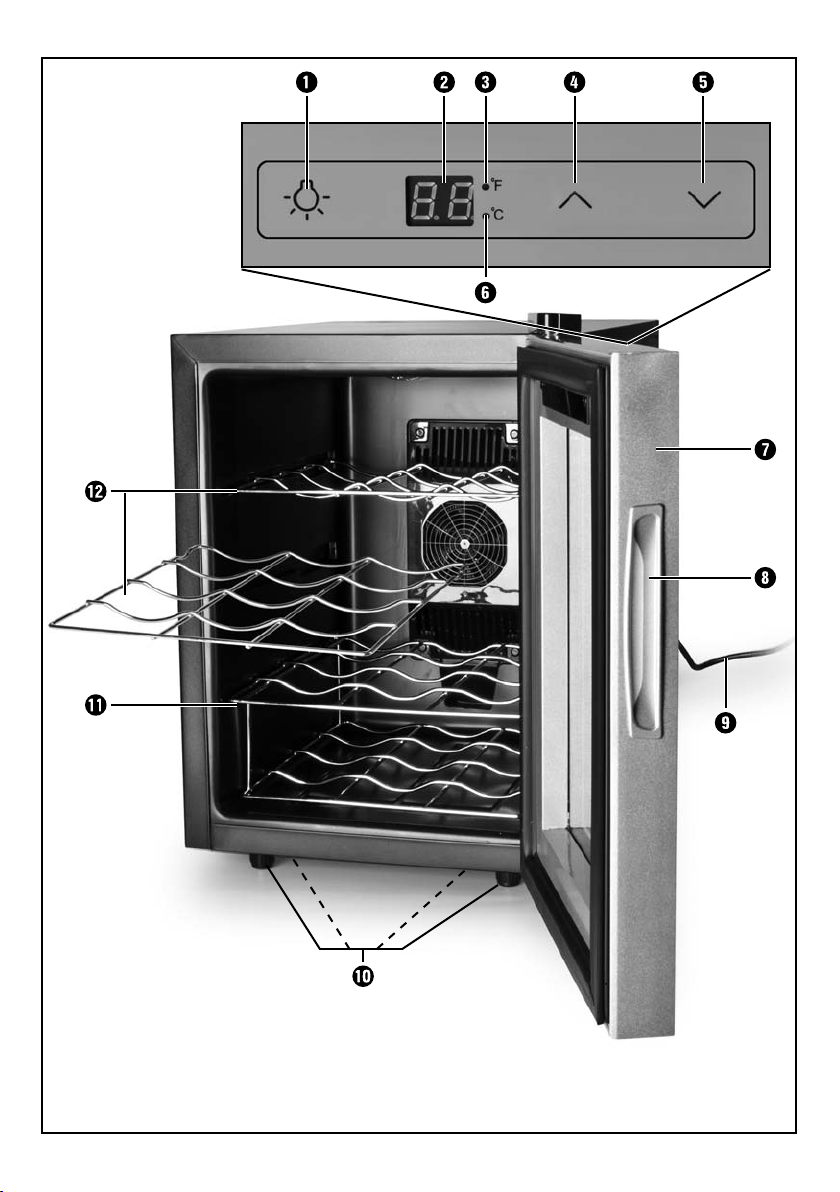
Descripción del aparato
1 Tecla de iluminación
2 Pantalla
3 Indicador de unidades "grados Fahrenheit" (°F)
4 Tecla de aumento de la temperatura
5 Tecla de disminución de la temperatura
6 Indicador de unidades "grados Celsius" (°C)
7 Puerta
8 Asidero
9 Cable de red con clavija de red
0 Patas de ajuste
q Rejilla doble para botellas
w Rejillas para botellas
Características técnicas
Tensión nominal: 220 - 240 V ~, 50 Hz
Máx. consumo
de potencia:
70 W
Rango de temperatura: 4 - 22 °C
39 - 72 °F
Clase de efi ciencia
energética:
A
Clase climática: N
Indicaciones de seguridad
¡PELIGRO DE DESCARGA ELÉCTRICA!
No utilice el aparato a la intemperie.
►
► Si la clavija de red o el cable de red están
dañados, encomiende su sustitución al
personal técnico autorizado o al servicio de
asistencia técnica con el fi n de evitar riesgos.
► No doble ni aplaste el cable de red. Man-
tenga el cable de red alejado de fuentes de
calor.
► No toque nunca la clavija ni el cable de red
con las manos húmedas.
No sumerja nunca el aparato en agua ni
en otros líquidos.
2
SMB 70 A1
Page 6
¡ADVERTENCIA!
¡PELIGRO DE LESIONES!
► No permita utilizar el aparato a personas
(incluidos los niños) con facultades físicas,
sensoriales o mentales limitadas o que carezcan de experiencia y/o conocimientos a
menos que les vigile una persona responsable de su seguridad o hayan sido instruidas
por esta en el uso del aparato.
► Vigile a los niños para asegurarse de que
no jueguen con el aparato.
► No utilice alargadores de cable para poder
acceder rápidamente a la clavija de red en
caso de emergencia.
¡ATENCIÓN!
¡PELIGRO DE DAÑOS MATERIALES!
¡No coloque jarrones ni otros recipientes
►
que contengan líquidos sobre el aparato!
► Asegúrese de que las rejillas de ventilación
no estén tapadas durante el funcionamiento.
¡Peligro de sobrecalentamiento! Mantenga
una distancia de al menos 15 cm entre las
rejillas de ventilación y otros objetos.
► No ponga el aparato en funcionamiento en
lugares con alta humedad ambiental (cuartos
de baño, etc.) ni en lugares donde se almacenen materiales explosivos ni materiales o
gases fácilmente infl amables. Tampoco son
adecuados los lugares con una defi ciente
circulación del aire, como, p. ej., garajes.
► Transporte el minibar exclusivamente cuando
esté vacío. Retire todas las botellas antes del
transporte.
► No coloque el aparato cerca de llamas abier-
tas ni otras fuentes de calor (calefacción, luz
directa del sol, hornos de gas, etc.).
► No coloque nunca el aparato en un armario
empotrado, en huecos o en espacios similares.
Antes del primer uso
Colocación de las rejillas para
botellas
INDICACIÓN
Para insertar o extraer las rejillas para botellas,
►
la puerta 7 del aparato debe estar abierta
en un ángulo de 90°. Así tendrá el máximo
espacio para extraer/insertar las rejillas para
botellas q/w de forma recta.
■ Introduzca las rejillas para botellas w en los
carriles.
Compruebe que las ondulaciones para las
botellas apunten hacia abajo.
Asegúrese de que los pequeños soportes de
fi jación de las rejillas para botellas w encajen
en los huecos de la parte posterior de los
carriles.
■ Coloque la rejilla para botellas doble q en
el carril inferior.
Instalación
¡ATENCIÓN!
¡PELIGRO DE DAÑOS MATERIALES!
Asegúrese de no cubrir las rejillas de ventila-
►
ción ni el ventilador durante el funcionamiento.
¡Peligro de sobrecalentamiento! Mantenga una
distancia de al menos 15 cm entre las rejillas
de ventilación y otros objetos.
■ Coloque el aparato sobre una superfi cie limpia
y plana.
■ Si el aparato no está posado de forma nive-
lada, puede salvar las irregularidades de la
superfi cie por medio de las patas de ajuste 0.
Para ello, gire las patas de ajuste 0 correspondientes hasta que el aparato esté posado de
forma segura.
ES
SMB 70 A1
3
Page 7
Tamaños de las botellas
En este minibar, caben las bebidas embotelladas
ES
habituales en el mercado con una longitud máxima
de aprox. 31 cm y una anchura de aprox. 7,6 cm
(p. ej., botellas de vino de 0,75 l u otras bebidas
embotelladas con la misma altura/anchura).
También pueden colocarse las botellas erguidas en
el minibar. Así también cabrán botellas más altas.
Para ello, extraiga las rejillas para botellas q/w.
INDICACIÓN
Las botellas más anchas caben mejor en el
►
minibar si gira las rejillas para botellas w de
forma que la parte inferior apunte hacia arriba y la superior hacia abajo y las introduce
en los carriles.
Manejo
Atemperación de las bebidas
Este minibar permite el ajuste de temperaturas de
entre 4 °C y 22 °C (39 - 72 °F).
INDICACIONES
Partiendo de la temperatura ambiente, el
►
aparato puede enfriar su contenido hasta un
máximo de 14 °C menos. La temperatura más
baja alcanzable es de 4 °C; es decir, si desea
obtener una temperatura de 4 °C, la temperatura ambiente no debe superar los 18 °C.
Por lo tanto, coloque el minibar en el lugar
más fresco posible y evite su exposición al
calor del sol.
No coloque el minibar cerca de aparatos que
emitan calor como calefactores o cocinas.
► El aparato no puede producir calor. Si la tem-
peratura de la habitación es inferior a la temperatura ajustada, el sistema de refrigeración
se apagará. La temperatura alcanzará como
máximo la temperatura de la habitación.
► Para lograr una buena refrigeración, intro-
duzca al menos tres botellas en el aparato.
1) Conecte la clavija de red 9 auna base de
enchufe.
Compruebe que la tensión de la base de enchufe se corresponda con la tensión indicada
en la placa de características.
En la pantalla 2, se muestra la temperatura
actual del aparato. El indicador de unidades
"grados Celsius" (°C) 6 se ilumina.
INDICACIÓN
Si desea cambiar la unidad de "°C" a "°F",
►
mantenga pulsadas simultáneamente las
teclas de aumento de la temperatura 4 y de
disminución de la temperatura 5 hasta que
se ilumine el indicador de unidades "grados
Fahrenheit" (°F) 3.
2) Pulse la tecla de aumento de la temperatura 4
o la tecla de disminución de la temperatura 5
para ajustar la temperatura deseada.
La pantalla 2 parpadea y muestra la tempe-
ratura ajustada. Si no pulsa ninguna otra tecla,
se detiene el parpadeo y en la pantalla 2
se vuelve a mostrar la temperatura actual. El
minibar se enfriará lentamente hasta alcanzar
la temperatura ajustada.
3) Para apagar el minibar, deberá extraer la
clavija de red 9 de la base de enchufe.
Iluminación
Si lo desea, puede activar la luz del interior del
minibar.
Para ello, pulse la tecla de iluminación 1.
Si desea volver a apagar la luz, vuelva a pulsar
la tecla de iluminación 1.
¡ATENCIÓN!
¡PELIGRO DE DAÑOS MATERIALES!
Dado que los diodos luminosos del interior del
►
minibar tienen una vida útil extremadamente
larga, no es necesario ni posible cambiarlos.
Los diodos luminosos están montados de forma permanente en el sistema de iluminación.
¡No abra nunca el sistema de iluminación! De
lo contrario, puede ocasionar daños irreparables en el aparato.
4
SMB 70 A1
Page 8
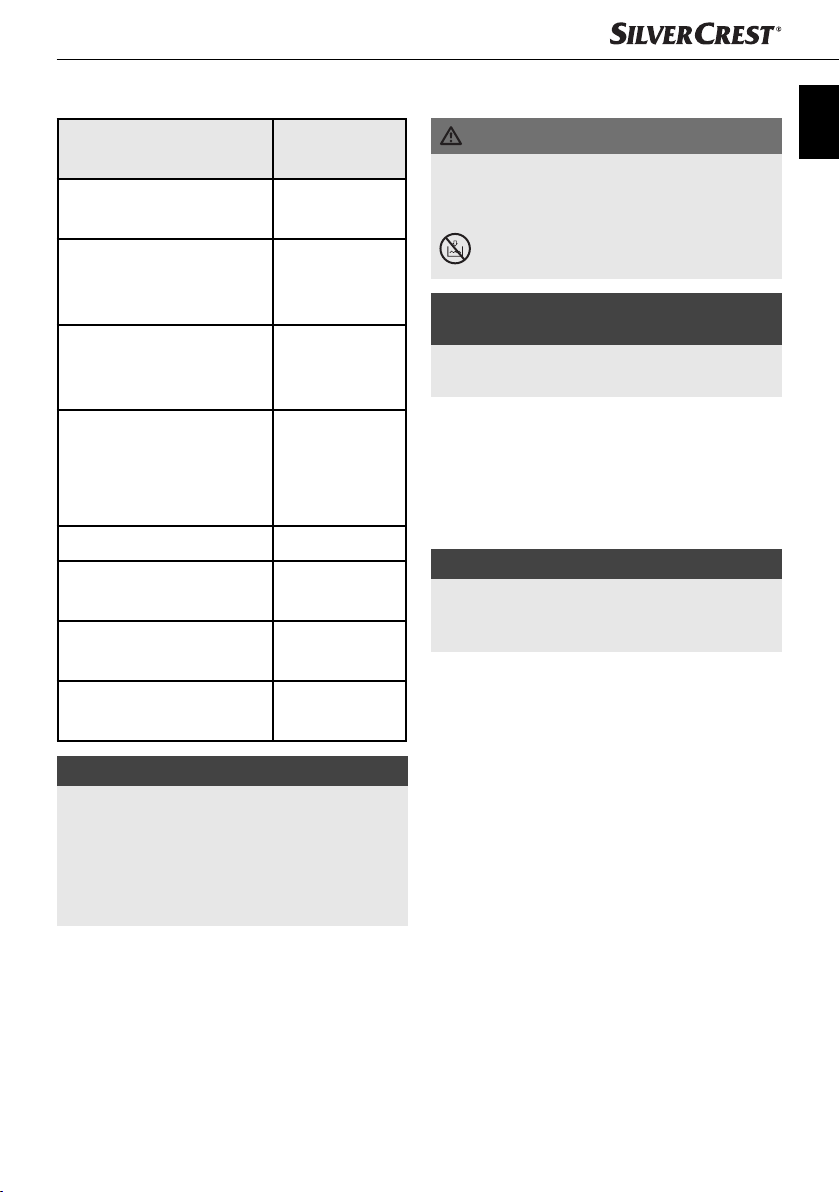
Temperaturas recomendadas
Bebida
Champán
Cava
Vinos blancos de mesa
sencillos, vinos secos y de
alta acidez
Vinos blancos intensos, de
gran bouquet, vendimia tar-
día, cosecha seleccionada
Vinos blancos con un dulzor
acentuado, Trockenbeeren-
auslesen (vinos alemanes de
uvas secas seleccionadas),
vinos de hielo
Rosados 6 - 8 °C
Vinos tintos de mesa
sencillos
Vinos tintos con mucho
cuerpo, secos
Temperatura
recomendada
5 - 8 °C
7 - 9 °C
10 - 12 °C
12 - 14 °C
10 - 14 °C
14 - 16 °C
Limpieza y mantenimiento
¡PELIGRO DE DESCARGA ELÉCTRICA!
¡Antes de la limpieza extraiga siempre la
►
clavija de red 9 de la base de enchufe!
¡Riesgo de descarga eléctrica!
No sumerja nunca el aparato en agua ni
en otros líquidos.
¡ATENCIÓN!
¡PELIGRO DE DAÑOS MATERIALES!
No utilice productos de limpieza abrasivos ni
►
agresivos. ¡Podrían dañar la superfi cie!
■ Limpie el minibar y las rejillas para botellas q/w
con un paño húmedo.
■ En caso de suciedad persistente, añada un
producto de limpieza suave al paño.
■ Seque las rejillas q/w y el minibar tras la
limpieza.
INDICACIÓN
Según la temperatura y la humedad ambiental,
►
puede formarse agua de condensación en el
interior del minibar. Séquela con un paño seco.
ES
Vinos tintos intensos,
de gran bouquet
INDICACIÓN
► Estos datos son solo recomendaciones, al fi n
y al cabo, la temperatura correcta depende
del propio gusto.
► Dado que el vino se calienta rápidamente en
el vidrio, es mejor servir el vino demasiado
frío que demasiado caliente.
16 - 18 °C
SMB 70 A1
5
Page 9
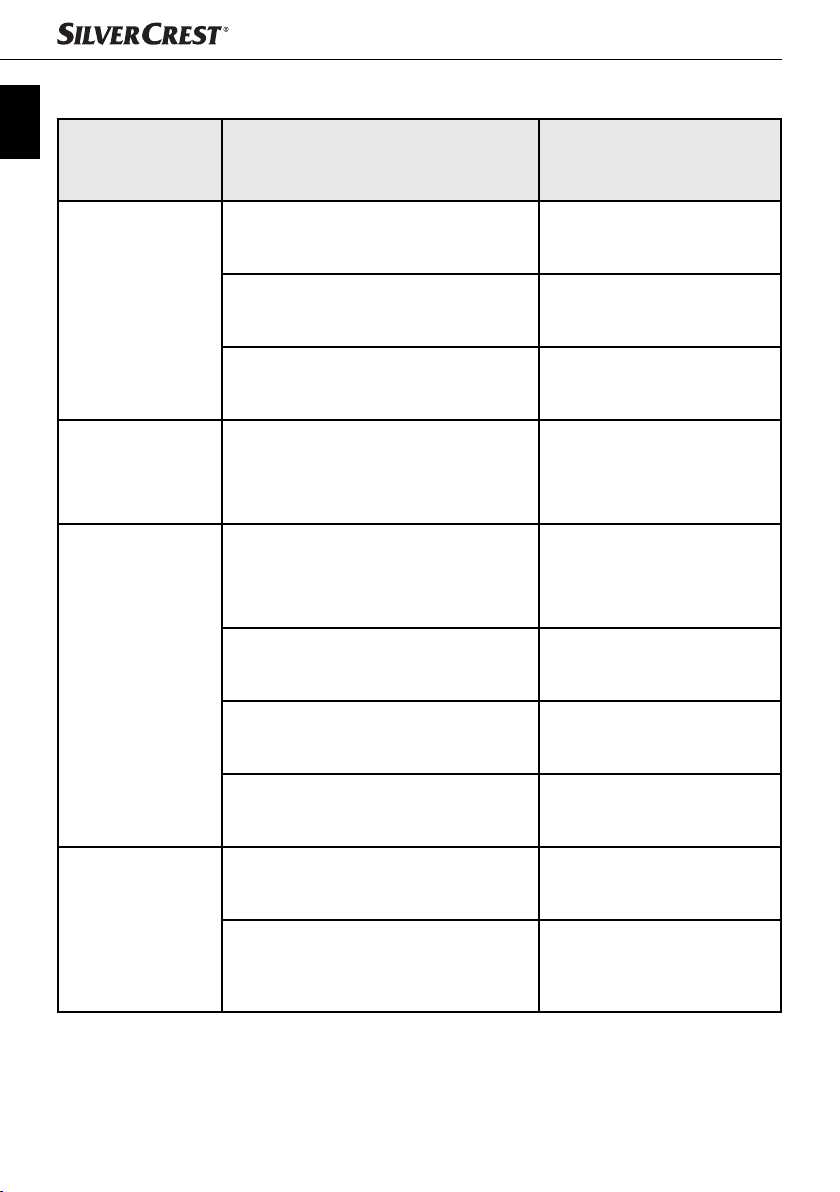
Eliminación de fallos
ES
Error Causa Solución
El aparato no
funciona.
El aparato vibra y
se balancea.
El aparato no
produce frío.
La clavija de red 9 no está conectada
a la red eléctrica.
La base de enchufe está defectuosa.
El aparato está defectuoso.
El aparato está colocado sobre un suelo
irregular.
No ha transcurrido el tiempo sufi ciente
para alcanzar la temperatura deseada.
La temperatura está mal ajustada.
El lugar de emplazamiento no es adecuado.
Se han colocado muchas botellas en el
minibar.
Conecte la clavija de red 9
a una base de enchufe.
Utilice una base de enchufe
distinta.
Póngase en contacto con el
servicio postventa.
Procure que el aparato quede en
una posición nivelada al regular
las patas de ajuste 0.
Espere un poco.
Compruebe la temperatura
ajustada.
Coloque el aparato
en un lugar fresco.
El aparato necesita más tiempo
para enfriarse.
La puerta 7 se cierra
con difi cultad o no
cierra en absoluto.
6
Las rejillas para botellas q/w o las
botellas no están bien colocadas.
El aparato no está colocado sobre una
superfi cie nivelada.
Coloque las rejillas para botellas
q/w o las botellas correctamente.
Coloque el aparato sobre una
base adecuada y plana.
SMB 70 A1
Page 10

Garantía y asistencia técnica
Este aparato tiene 3 años de garantía desde la
fecha de compra. El aparato ha sido fabricado
cuidadosamente y examinado en profundidad
antes de su entrega. Guarde el comprobante de
caja como justifi cante de compra. Si necesitara
hacer uso de la garantía, póngase en contacto
por teléfono con su punto de servicio habitual.
Este es el único modo de garantizar un envío
gratuito.
La garantía cubre los defectos de fabricación o
del material, pero no los daños de transporte, las
piezas sujetas a desgaste ni los daños sufridos por
las piezas frágiles (p. ej., interruptores o pilas). Este
producto ha sido diseñado exclusivamente para el
uso particular y no para el uso industrial.
En caso de manipulación indebida e incorrecta,
uso de la fuerza y apertura del aparato por personas ajenas a nuestros centros de asistencia técnica
autorizados, la garantía pierde su validez.
Sus derechos legales no se ven limitados por esta
garantía.
La duración de la garantía no se prolonga por
hacer uso de ella. Este principio rige también para
las piezas sustituidas y reparadas. Si después de
la compra del aparato, se detecta la existencia
de daños o de defectos al desembalarlo, deben
notifi carse de inmediato o, como muy tarde, dos
días después de la fecha de compra. Cualquier
reparación que se realice una vez fi nalizado el
plazo de garantía está sujeta a costes.
Servicio España
Tel.: 902 59 99 22
(0,08 EUR/Min. + 0,11 EUR/llamada
(tarifa normal))
(0,05 EUR/Min. + 0,11 EUR/llamada
(tarifa reducida))
E-Mail: kompernass@lidl.es
IAN 90980
Disponibilidad de la línea de atención al
cliente:
de lunes a viernes de 8.00 a 20.00 h (CET)
Desecho
No deseche nunca el apara-
to con la basura doméstica.
Este aparato está sujeto a
la Directiva europea
2012/19/EU.
Deseche el aparato en un centro de residuos autorizado a través de las instalaciones de desecho
de residuos comunitarias. Observe las normas
vigentes. En caso de duda, póngase en contacto
con las instalaciones municipales de desecho de
residuos.
PELIGRO
¡Riesgo de incendio por los
materiales de aislamiento!
El gas de los materiales de aislamiento es muy
infl amable.
► El aparato debe desecharse de forma
adecuada.
El embalaje consta de materiales ecoló-
gicos que pueden desecharse a través
de los centros de reciclaje locales.
Importador
KOMPERNASS HANDELS GMBH
BURGSTRASSE 21
44867 BOCHUM
GERMANY
www.kompernass.com
ES
SMB 70 A1
7
Page 11

8
SMB 70 A1
Page 12

Table of Contents
Introduction . . . . . . . . . . . . . . . . . . . . . . . . . . . . . . . . . . . . . . . . . . . . . . . . . . . . . . . . . . .10
Proper use . . . . . . . . . . . . . . . . . . . . . . . . . . . . . . . . . . . . . . . . . . . . . . . . . . . . . . . . . . . .10
Package contents . . . . . . . . . . . . . . . . . . . . . . . . . . . . . . . . . . . . . . . . . . . . . . . . . . . . . .10
Appliance description . . . . . . . . . . . . . . . . . . . . . . . . . . . . . . . . . . . . . . . . . . . . . . . . . . .10
Technical details . . . . . . . . . . . . . . . . . . . . . . . . . . . . . . . . . . . . . . . . . . . . . . . . . . . . . . .10
Safety instructions . . . . . . . . . . . . . . . . . . . . . . . . . . . . . . . . . . . . . . . . . . . . . . . . . . . . .10
Before fi rst use . . . . . . . . . . . . . . . . . . . . . . . . . . . . . . . . . . . . . . . . . . . . . . . . . . . . . . . .11
Placement of the bottle racks . . . . . . . . . . . . . . . . . . . . . . . . . . . . . . . . . . . . . . . . . . . . . . . . . . . . . . . . . . 11
Setting up . . . . . . . . . . . . . . . . . . . . . . . . . . . . . . . . . . . . . . . . . . . . . . . . . . . . . . . . . . . . . . . . . . . . . . . . . 11
Bottle sizes . . . . . . . . . . . . . . . . . . . . . . . . . . . . . . . . . . . . . . . . . . . . . . . . . . . . . . . . . . . . . . . . . . . . . . . . 12
Operation . . . . . . . . . . . . . . . . . . . . . . . . . . . . . . . . . . . . . . . . . . . . . . . . . . . . . . . . . . . .12
Cooling the drinks . . . . . . . . . . . . . . . . . . . . . . . . . . . . . . . . . . . . . . . . . . . . . . . . . . . . . . . . . . . . . . . . . . 12
Illumination . . . . . . . . . . . . . . . . . . . . . . . . . . . . . . . . . . . . . . . . . . . . . . . . . . . . . . . . . . . . . . . . . . . . . . . 12
Recommended temperatures . . . . . . . . . . . . . . . . . . . . . . . . . . . . . . . . . . . . . . . . . . . .13
Cleaning and care . . . . . . . . . . . . . . . . . . . . . . . . . . . . . . . . . . . . . . . . . . . . . . . . . . . . . .13
Troubleshooting . . . . . . . . . . . . . . . . . . . . . . . . . . . . . . . . . . . . . . . . . . . . . . . . . . . . . . .14
GB
MT
Warranty and Service . . . . . . . . . . . . . . . . . . . . . . . . . . . . . . . . . . . . . . . . . . . . . . . . . .15
Disposal . . . . . . . . . . . . . . . . . . . . . . . . . . . . . . . . . . . . . . . . . . . . . . . . . . . . . . . . . . . . . .15
Importer . . . . . . . . . . . . . . . . . . . . . . . . . . . . . . . . . . . . . . . . . . . . . . . . . . . . . . . . . . . . .15
SMB 70 A1
9
Page 13

MINI BAR SMB 70 A1
Introduction
Congratulations on the purchase of your new
GB
appliance.
MT
You have selected a high-quality product. The
operating instructions are part of this product.
They contain important information on safety, use
and disposal. Before using the product, familiarise
yourself with all operating and safety instructions.
Use this product only as described and only for
the specifi ed areas of application. Please also
pass these operating instructions on to any future
owner(s).
Proper use
This appliance is intended exclusively for cooling
closed drinks bottles (wine, lemonade, mineral
water etc.) in the indoor rooms of domestic households. The appliance is not designed for use in
commercial or industrial applications.
Please take note that the minibar must only be used
to store closed drinks bottles. The appliance is not
suitable for storing open bottles and unpacked or
opened food products!
Appliance description
1 Light button
2 Display
3 Units indicator "Degrees Fahrenheit" (°F)
4 Temperature increase button
5 Temperature decrease button
6 Units indicator "Degrees Centigrade" (°C)
7 Door
8 Handle
9 Power cable with power plug
0 Adjustable feet
q Double bottle rack
w Bottle racks
Technical details
Rated voltage: 220 - 240 V ~, 50 Hz
Max. power
consumption: 70 W
Temperature range: 4 - 22°C
39 - 72°F
Energy effi ciency class: A
Climate zone: N
Package contents
Mini Bar
3 bottle racks:
2 bottle racks, 1 double bottle rack
Operating instructions
10
Safety instructions
DANGER – ELECTRIC SHOCK!
Do not use the appliance outdoors.
►
► To avoid risks, arrange for defective plugs
and/or power cables to be replaced at once
by qualifi ed technicians or our Customer
Service Department.
► Do not fold or crush the power cable. Keep
the power cable well away from sources of
heat.
► NEVER grasp the mains cable or the plug
with wet hands.
NEVER immerse the appliance in water or
other liquids!
SMB 70 A1
Page 14

WARNING! RISK OF INJURY!
► This device is not intended for use by persons
(including children) with limited physical,
physiological or intellectual abilities or lack
of experience and/or knowledge unless they
are supervised by a person who is responsible for their safety, or receive instructions from
this person on how to use the appliance.
► Children should be supervised to ensure that
they do not play with the appliance.
► To ensure that you can disconnect the appli-
ance quickly in the event of an emergency,
do not use extension cables.
ATTENTION! DAMAGE TO PROPERTY!
Do not place vases or other containers fi lled
►
with liquid on the appliance!
► Ensure that the ventilation slits are not covered
when the appliance is in use. Risk of overheating! Maintain a clear distance of at least
15 cm between the ventilation slits and other
objects.
► Do not operate the appliance in rooms with
high humidity (bathrooms etc.) or rooms
in which explosives or easily infl ammable
materials or gases are stored. Rooms which
may have poor air circulation, e.g. garages,
are also unsuitable.
► Do not transport the minibar unless it is
empty. Remove all bottles before the transportation.
► Do not place the appliance close to open
fl ames or other sources of heat (heating,
direct sunlight, gas stoves, etc.).
► Never place the appliance in a fi tted cup-
board, recess or the like.
Before fi rst use
Placement of the bottle racks
NOTE
In order to insert or remove the bottle racks, the
►
door 7 of the appliance must be opened by
90°. This provides maximum room for removing or inserting the bottle racks q/w.
■ Slide the bottle racks w into the rails:
Ensure that the recesses for the bottles point
downwards.
Ensure that the small locking brackets at the
bottle racks w are in the recesses at the rear
end of the rails.
■ Slide the double bottle rack q into the lower rail.
Setting up
ATTENTION! DAMAGE TO PROPERTY!
Ensure that the ventilation slits and the fan
►
are not covered when the appliance is in
use. Risk of overheating! Maintain a clear
distance of at least 15 cm between the ventilation slits and other objects.
■ Place the appliance on a clean and level
surface.
■ If the appliance is slightly unstable, the uneven-
ness of the surface upon which it has been
placed can be compensated for using the
adjustable feet 0. To do this, turn the relevant
adjustable feet 0 until the appliance is stable.
GB
MT
SMB 70 A1
11
Page 15

Bottle sizes
Normal commercial drinks bottles with a maximum
length of approx. 31 cm and width of approx.
7.6cm (e.g. 0.75 l wine bottles or other drinks bot-
GB
tles of the same height/width) fi t into the minibar.
MT
Bottles can also be stood upright in the minibar. This
makes it possible to store longer bottles in the appliance. To do this, remove the bottle racks q/w.
NOTE
Wider bottles will fi t into the minibar better
►
if you turn over the bottle racks w so that
the underside is on top and the top is facing
downwards and slide them into the rails.
Operation
Cooling the drinks
You can set the minibar temperature to between
4°C and 22°C (39 - 72°F).
TIPS
Subject to the ambient temperature, the
►
appliance eff ects a maximum cooling of 14°C.
The lowest temperature that can be achieved is
about 4°C. This means that if you want to cool
beverages down to 4°C, the ambient temperature must be no higher than 18°C.
The minibar should therefore be placed at a
location that is as cool as possible and not
warmed up by the sun.
Do not place it in the vicinity of heat-radiating
appliances such as heaters or stoves.
► The appliance cannot be used for heating.
If the room temperature is cooler than the adjusted temperature, the refrigeration switches
itself off . The temperature then comes to a
maximum of the ambient room temperature.
► To achieve good cooling performance, place
at least three bottles in the appliance.
1) Insert the plug 9 into a wall socket.
Ensure that the power being supplied from the
wall socket tallies with the power details given
on the type plate.
The current temperature in the appliance
appears in the display 2. The units indicator
"Degrees Centigrade" (°C) 6 illuminates.
NOTE
If you would like to change the units from
►
"°C" to "°F", press and hold the temperature
increase button 4 and the temperature
decrease button 5 simultaneously until the
units indicator "Degrees Fahrenheit" (°F) 3
illuminates.
2) Press the temperature increase button 4 or
the temperature decrease button 5 to set the
required temperature.
The display 2 blinks and shows the programmed temperature. When you stop pressing
the button the blinking stops and the display 2
shows once again the current interior temperature. The minibar now slowly cools down to the
selected temperature.
3) To switch off the minibar, remove the plug 9
from the power socket.
Illumination
If you wish, you can switch on a light in the inside
of the minibar.
To do this, press the light button 1.
If you wish to switch the light off again press the
light button 1 again.
ATTENTION! DAMAGE TO PROPERTY!
Since the LEDs in the interior of the minibar
►
have an extremely long service life, it is
neither necessary nor possible to replace
them. The LEDs are a fi xed constituent of the
light. Do not open the light under any circumstances! This could irreparably damage the
appliance.
12
SMB 70 A1
Page 16

Recommended temperatures
Cleaning and care
Type of drink
Champagne
sparkling wine
simple white table wine,
dry acidic wines
substantial, bouquet rich
white wine, Spätlese,
Auslese
white wine with pronounced
residual sweetness, Trocken-
beerenauslese, ice wine
Rosé wine 6 - 8°C
simple red table wine 10 - 14°C
full-bodied, dry red wine 14 - 16°C
substantial, bouquet rich
red wine
Recommended
temperature
5 - 8°C
7 - 9°C
10 - 12°C
12 - 14°C
16 - 18°C
DANGER – ELECTRIC SHOCK!
Always remove the plug 9 from the power
►
socket before cleaning the appliance! Risk of
electric shock!
NEVER immerse the appliance in water or
other liquids!
ATTENTION! DAMAGE TO PROPERTY!
Do not use abrasive or aggressive cleaning
►
materials. These could damage the surfaces!
■ Clean the minibar and the bottle racks q/w
with a damp cloth.
■ For stubborn residues use a mild detergent on
the cloth.
■ Dry the racks q/w and the minibar after
cleaning.
NOTE
Subject to the ambient temperature and
►
humidity, condensation may occur in the
interior of the minibar. Wipe it off with a
dry cloth.
GB
MT
NOTE
These details are only recommendations, at
►
the end of the day the correct temperature for
wine is purely a question of personal taste.
► Since wine warms up quickly in a glass, it is
better to serve it a little too cool than a little
too warm.
SMB 70 A1
13
Page 17

Troubleshooting
Defect Cause Solution
GB
MT
The plug 9 is not connected to the power
supply.
Insert the plug 9 into a wall
socket.
The appliance is
not working.
The appliance vibrates
and shudders.
The appliance is
not cooling.
The door 7 is not
closing properly or
not at all.
The mains power socket is defective.
The appliance is defective.
The appliance is standing on an uneven
surface.
The time passed is not yet suffi cient to
achieve the desired temperature.
The temperature is incorrectly set.
The location is unsuitable.
There are many bottles in the minibar.
The bottle racks q/w or the bottles are
incorrectly inserted.
The appliance is not standing on a level
surface.
Use a diff erent mains power
socket.
In this case, contact the
Customer Service.
Stabilise the appliance by
adjusting the feet 0.
Wait for a short period.
Check the programmed
temperature.
Place the appliance at a
cooler location.
The appliance needs longer to
cool down.
Insert the bottle racks
q/w or the bottles correctly.
Place the appliance on a
suitable and level surface.
14
SMB 70 A1
Page 18

Warranty and Service
The warranty provided for this appliance is
3 years from the date of purchase. This appliance has been manufactured with care and
inspected meticulously prior to delivery. Please
retain your receipt as proof of purchase. In the
event of a warranty claim, please contact your
Customer Service by telephone. This is the only
way to guarantee free return of your goods.
The warranty covers only claims for material and
manufacturing defects, not for transport damage,
wearing parts or for damage to fragile components, e.g. switches or batteries. This appliance is
intended solely for private use and not for commercial purposes.
The warranty is deemed void if this product has
been subjected to improper or inappropriate handling, abuse or modifi cations that were not carried
out by one of our authorised service centres.
Your statutory rights are not restricted in any way
by this warranty.
The warranty period is not prolonged by repairs
made under the warranty. This also applies to
replaced and repaired parts. Damage and defects
present at the time of purchase must be reported
immediately after unpacking, or no later than two
days after the date of purchase. Repairs made
after expiry of the warranty period are chargeable.
Service Great Britain
Tel.: 0871 5000 720 (£ 0.10/Min.)
E-Mail: kompernass@lidl.co.uk
IAN 90980
Service Malta
Tel.: 80062230
E-Mail: kompernass@lidl.com.mt
IAN 90980
Hotline availability:
Monday to Friday 08:00 - 20:00 (CET)
Disposal
Never dispose of the ap-
pliance in normal domestic
waste. This product is subject
to the provisions of European
Directive 2012/19/EU.
Dispose of the appliance via an approved disposal
company or your municipal waste facility. Please
observe the currently applicable regulations.
Please contact your waste disposal centre if you
are in any doubt.
DANGER
Fire risk due to insulating
material!
The insulation gas in the insulation is highly
fl ammable.
► Take the appliance for proper disposal.
The packaging is made from environ-
mentally friendly material and can be
disposed of at your local recycling plant.
Importer
KOMPERNASS HANDELS GMBH
BURGSTRASSE 21
44867 BOCHUM
GERMANY
www.kompernass.com
GB
MT
SMB 70 A1
15
Page 19

16
SMB 70 A1
Page 20

Inhaltsverzeichnis
Einleitung . . . . . . . . . . . . . . . . . . . . . . . . . . . . . . . . . . . . . . . . . . . . . . . . . . . . . . . . . . . . .18
Bestimmungsgemäßer Gebrauch . . . . . . . . . . . . . . . . . . . . . . . . . . . . . . . . . . . . . . . . .18
Lieferumfang . . . . . . . . . . . . . . . . . . . . . . . . . . . . . . . . . . . . . . . . . . . . . . . . . . . . . . . . . .18
Gerätebeschreibung. . . . . . . . . . . . . . . . . . . . . . . . . . . . . . . . . . . . . . . . . . . . . . . . . . . .18
Technische Daten . . . . . . . . . . . . . . . . . . . . . . . . . . . . . . . . . . . . . . . . . . . . . . . . . . . . . .18
Sicherheitshinweise . . . . . . . . . . . . . . . . . . . . . . . . . . . . . . . . . . . . . . . . . . . . . . . . . . . .18
Vor dem ersten Gebrauch . . . . . . . . . . . . . . . . . . . . . . . . . . . . . . . . . . . . . . . . . . . . . . .19
Einsetzen der Flaschenroste . . . . . . . . . . . . . . . . . . . . . . . . . . . . . . . . . . . . . . . . . . . . . . . . . . . . . . . . . . . 19
Aufstellen . . . . . . . . . . . . . . . . . . . . . . . . . . . . . . . . . . . . . . . . . . . . . . . . . . . . . . . . . . . . . . . . . . . . . . . . . 19
Flaschengrößen . . . . . . . . . . . . . . . . . . . . . . . . . . . . . . . . . . . . . . . . . . . . . . . . . . . . . . . . . . . . . . . . . . . . 20
Bedienen . . . . . . . . . . . . . . . . . . . . . . . . . . . . . . . . . . . . . . . . . . . . . . . . . . . . . . . . . . . . .20
Getränke temperieren . . . . . . . . . . . . . . . . . . . . . . . . . . . . . . . . . . . . . . . . . . . . . . . . . . . . . . . . . . . . . . . 20
Beleuchtung . . . . . . . . . . . . . . . . . . . . . . . . . . . . . . . . . . . . . . . . . . . . . . . . . . . . . . . . . . . . . . . . . . . . . . . 20
Empfohlene Temperaturen . . . . . . . . . . . . . . . . . . . . . . . . . . . . . . . . . . . . . . . . . . . . . .21
Reinigung und Pfl ege . . . . . . . . . . . . . . . . . . . . . . . . . . . . . . . . . . . . . . . . . . . . . . . . . . .21
Fehlerbehebung . . . . . . . . . . . . . . . . . . . . . . . . . . . . . . . . . . . . . . . . . . . . . . . . . . . . . . .22
Garantie und Service . . . . . . . . . . . . . . . . . . . . . . . . . . . . . . . . . . . . . . . . . . . . . . . . . . .23
Entsorgung . . . . . . . . . . . . . . . . . . . . . . . . . . . . . . . . . . . . . . . . . . . . . . . . . . . . . . . . . . .23
Importeur . . . . . . . . . . . . . . . . . . . . . . . . . . . . . . . . . . . . . . . . . . . . . . . . . . . . . . . . . . . .23
DE
AT
CH
SMB 70 A1
17
Page 21

MINI-BAR SMB 70 A1
Einleitung
Herzlichen Glückwunsch zum Kauf Ihres neuen
Gerätes.
Sie haben sich damit für ein hochwertiges Produkt
entschieden. Die Bedienungsanleitung ist Bestand-
DE
teil dieses Produkts. Sie enthält wichtige Hinweise
AT
für Sicherheit, Gebrauch und Entsorgung. Machen
CH
Sie sich vor der Benutzung des Produkts mit allen
Bedien- und Sicherheitshinweisen vertraut. Benutzen Sie das Produkt nur wie beschrieben und für
die angegebenen Einsatzbereiche. Händigen Sie
alle Unterlagen bei Weitergabe des Produkts an
Dritte mit aus.
Gerätebeschreibung
1 Taste Licht
2 Display
3 Einheitenanzeige „Grad Fahrenheit“ (°F)
4 Taste Temperatur erhöhen
5 Taste Temperatur verringern
6 Einheitenanzeige „Grad Celsius“ (°C)
7 Tür
8 Griff
9 Netzkabel mit Netzstecker
0 Justierfüße
q doppelter Flaschenrost
w Flaschenroste
Bestimmungsgemäßer
Gebrauch
Dieses Gerät ist ausschließlich zum Temperieren von
geschlossenen Getränkefl aschen (Wein, Limonade,
Mineralwasser etc.) in geschlossenen Räumen, im
privaten Haushalt vorgesehen. Das Gerät ist nicht
für den gewerblichen oder industriellen Gebrauch
konzipiert.
Beachten Sie, dass die Minibar ausschließlich für die
Aufbewahrung von geschlossenen Getränkefl aschen
gedacht ist - für die Aufbewahrung von geöff neten
Flaschen, unverpackten oder off enen Lebensmitteln
ist das Gerät nicht geeignet!
Lieferumfang
Minibar
3 Flaschenroste:
2 Flaschenroste, 1 doppelter Flaschenrost
Bedienungsanleitung
Technische Daten
Nennspannung: 220 - 240 V ~, 50 Hz
max. Leistungsaufnahme: 70 W
Temperaturbereich: 4 - 22°C
39 - 72°F
Energieeffi zienzklasse: A
Klimazone: N
Sicherheitshinweise
GEFAHR - ELEKTRISCHER SCHLAG!
► Benutzen Sie das Gerät nicht im Freien.
► Lassen Sie beschädigte Netzstecker oder
Netzkabel sofort von autorisiertem Fachpersonal oder dem Kundenservice austauschen,
um Gefährdungen zu vermeiden.
► Knicken oder quetschen Sie das Netzkabel
nicht. Halten Sie das Netzkabel von Hitzequellen fern.
► Fassen Sie Netzstecker oder Netzkabel nie
mit nassen Händen an.
Tauchen Sie das Gerät niemals in Wasser
oder andere Flüssigkeiten!
18
SMB 70 A1
Page 22

WARNUNG! VERLETZUNGSGEFAHR!
► Dieses Gerät ist nicht dafür bestimmt, durch
Personen (einschließlich Kinder) mit eingeschränkten physischen, sensorischen oder
geistigen Fähigkeiten oder mangels Erfahrung
und/oder mangels Wissen benutzt zu werden,
es sei denn, sie werden durch eine für ihre Sicherheit zuständige Person beaufsichtigt oder
erhielten von ihr Anweisungen, wie das Gerät
zu benutzen ist.
► Kinder sollten beaufsichtigt werden, um sicher-
zustellen, dass sie nicht mit dem Gerät spielen.
► Benutzen Sie kein Verlängerungskabel, im
Notfall muss der Netzstecker schnell zu
erreichen sein.
ACHTUNG! SACHSCHADEN!
Stellen Sie keine Vasen oder andere mit Flüs-
►
sigkeit gefüllten Behälter auf das Gerät!
► Achten Sie darauf, dass die Lüftungsschlitze
während des Betriebes nicht abgedeckt werden. Überhitzungsgefahr! Halten Sie an den
Lüftungsschlitzen mindestens einen Abstand
von 15 cm zu anderen Gegenständen ein.
► Betreiben Sie das Gerät nicht in Räumen
mit hoher Luftfeuchtigkeit (Badezimmer etc.)
oder Räumen, in denen Explosivstoff e oder
leicht entzündliche Stoff e oder Gase lagern.
Räume, die über eine schlechte Luftzirkulation
verfügen, z.B. Garagen, sind ebenfalls nicht
geeignet.
► Transportieren Sie nur die leere Minibar. Ent-
nehmen Sie alle Flaschen vor dem Transport.
► Stellen Sie das Gerät nicht in die Nähe von
off enen Flammen oder anderen Wärmequellen (Heizung, direktes Sonnenlicht, Gasöfen
etc.).
► Stellen Sie das Gerät keinesfalls in einen
Einbauschrank, Nischen o.Ä.
Vor dem ersten Gebrauch
Einsetzen der Flaschenroste
HINWEIS
Um die Flaschenroste einzusetzen oder her-
►
aus zu nehmen, muss die Tür 7 des Gerätes
um 90° geöff net sein. So haben Sie den
meisten Platz, um die Flaschenroste q/w
gerade herauszuziehen/einzusetzen.
■ Schieben Sie die Flaschenroste w in die
Schienen:
Achten Sie darauf, dass die Ausbuchtungen für
die Flaschen nach unten weisen.
Achten Sie darauf, dass die kleinen Arretierungsbügel an den Flaschenrosten w in den Vertiefungen am hinteren Ende der Schienen liegen.
■ Schieben Sie den doppelten Flaschenrost q in
die untere Schiene.
Aufstellen
ACHTUNG! SACHSCHADEN!
Achten Sie darauf, dass die Lüftungsschlitze
►
und der Lüfter während des Betriebes nicht
abgedeckt werden. Überhitzungsgefahr!
Halten Sie an den Lüftungsschlitzen mindestens einen Abstand von 15 cm zu anderen
Gegenständen ein.
■ Stellen Sie das Gerät auf eine saubere und
ebene Fläche.
■ Sollte das Gerät wackeln, können Sie mit Hilfe
der Justierfüße 0 die Unebenheiten der Stellfl äche ausgleichen. Drehen Sie hierfür solange
an den entsprechenden Justierfüßen 0, bis das
Gerät sicher steht.
DE
AT
CH
SMB 70 A1
19
Page 23

Flaschengrößen
In diese Minibar passen handelsübliche Getränkefl aschen mit einer maximalen Länge von ca. 31 cm
und Breite von ca. 7,6 cm (z.B. 0,75 l - Weinfl aschen oder andere Getränkefl aschen mit der
gleichen Höhe/Breite).
Sie können Flaschen auch aufrecht in die Minibar
DE
stellen. So passen auch höhere Flaschen hinein.
AT
Nehmen Sie hierfür die Flaschenroste q/w
CH
heraus.
HINWEIS
Dickere Flaschen passen besser in die
►
Minibar, wenn Sie die Flaschenroste w
umdrehen, so dass die Unterseite nach oben
weist und die Oberseite nach unten, und in
die Schienen schieben.
Bedienen
Getränke temperieren
Sie können mit der Minibar Temperaturen zwischen
4°C und 22°C (39 - 72°F) einstellen.
HINWEISE
Ausgehend von der Raumtemperatur kühlt
►
das Gerät um maximal 14°C herunter. Die
niedrigste erreichbare Temperatur liegt bei
4°C. Das heißt, wenn Sie auf 4°C herunterkühlen wollen, darf die Raumtemperatur nicht
mehr als 18°C betragen.
Stellen Sie die Minibar daher an einen möglichst kühlen Platz, der nicht von der Sonne
aufgeheizt wird.
Stellen Sie ihn nicht in die Nähe von hitzeabstrahlenden Geräten wie Heizungen oder
Herden auf.
► Das Gerät kann nicht aufwärmen. Ist die
Zimmertemperatur kühler als die eingestellte
Temperatur, schaltet sich die Kühlung ab.
Die Temperatur erreicht dann höchstens die
Zimmertemperatur.
► Um eine gute Kühlleistung zu erreichen, legen
Sie mindestens drei Flaschen ins Gerät.
1) Stecken Sie den Netzstecker 9 in eine Netzsteckdose.
Achten Sie darauf, dass die Spannung der
Netzsteckdose der auf dem Typenschild angegebenen Spannung entspricht.
Im Display 2 wird die aktuelle Temperatur im
Gerät angezeigt. Die Einheitenanzeige „Grad
Celsius“ (°C) 6 leuchtet.
HINWEIS
Wenn Sie die Einheit von „°C“ in „°F“
►
wechseln möchten, drücken und halten Sie
die Taste Temperatur erhöhen 4 und die
Taste Temperatur verringern 5 gleichzeitig,
bis die Einheitenanzeige „Grad Fahrenheit“
(°F) 3 leuchtet.
2) Drücken Sie die Taste Temperatur erhöhen 4
oder die Taste Temperatur verringern 5, um
die gewünschte Temperatur einzustellen.
Das Display 2 blinkt und zeigt die eingestellte
Temperatur an. Wenn Sie keine weitere Taste
drücken, stoppt das Blinken und das Display 2
zeigt wieder die aktuelle Temperatur an. Die
Minibar kühlt nun langsam auf die eingestellte
Temperatur runter.
3) Um die Minibar auszuschalten, müssen Sie den
Netzstecker 9 aus der Netzsteckdose ziehen.
Beleuchtung
Wenn Sie möchten, können Sie im Inneren der
Minibar eine Beleuchtung einschalten.
Drücken Sie hierfür die Taste Licht 1.
Wenn Sie das Licht wieder ausschalten wollen,
drücken Sie die Taste Licht 1 noch einmal.
ACHTUNG! SACHSCHADEN!
Da die Leuchtdioden im Innern der Minibar
►
eine extrem lange Lebensdauer haben, ist es
nicht nötig, und auch nicht möglich, sie zu
wechseln. Die Leuchtdioden sind fest in der
Beleuchtung montiert. Öff nen Sie auf keinen
Fall die Beleuchtung! Das führt zu irreparablen Schäden am Gerät.
20
SMB 70 A1
Page 24

Empfohlene Temperaturen
Reinigung und Pfl ege
Getränk
Champagner
Sekt
einfache weiße Tafelweine,
trockene säurereiche Weine
gehaltvolle, bukettreiche
Weißweine, Spätlesen,
Auslesen
Weißweine mit ausgeprägter
Restsüße, Trockenbeerenaus-
lesen, Eisweine
Roséweine 6 - 8°C
einfache rote Tafelweine 10 - 14°C
vollmundige, trockene
Rotweine
gehaltvolle, bukettreiche
Rotweine
empfohlene
Temperatur
5 - 8°C
7 - 9°C
10 - 12°C
12 - 14°C
14 - 16°C
16 - 18°C
GEFAHR - ELEKTRISCHER SCHLAG!
Ziehen Sie vor jeder Reinigung den Netzste-
►
cker 9 aus der Netzsteckdose! Es besteht
die Gefahr eines elektrischen Schlages!
Tauchen Sie das Gerät niemals in Wasser
oder andere Flüssigkeiten!
ACHTUNG! SACHSCHADEN!
Verwenden Sie keine scheuernden oder
►
aggressiven Reinigungsmittel. Diese können
die Oberfl äche beschädigen!
■ Reinigen Sie die Minibar und die Flaschenroste
q/w mit einem feuchten Tuch.
■ Bei hartnäckigen Verschmutzungen geben Sie
ein mildes Spülmittel auf das Tuch.
■ Trocknen Sie die Roste q/w und die Minibar
nach dem Reinigen ab.
HINWEIS
Je nach Umgebungstemperatur und Luftfeuch-
►
tigkeit kann sich Kondenswasser im Inneren
der Minibar niederschlagen. Wischen Sie es
mit einem trockenen Tuch ab.
DE
AT
CH
HINWEIS
Diese Angeben sind nur Empfehlungen, die
►
richtige Temperatur ist letztendlich eine Frage
des Geschmackes.
► Da sich Wein im Glas schnell erwärmt, sollten
Sie Wein lieber etwas zu kühl als zu warm
servieren.
SMB 70 A1
21
Page 25

Fehlerbehebung
Fehler Ursache Lösung
DE
AT
CH
Das Gerät kühlt nicht.
Das Gerät funktio-
niert nicht.
Das Gerät vibriert
und wackelt.
Der Netzstecker 9 ist nicht mit dem Stromnetz verbunden.
Die Netzsteckdose ist defekt.
Das Gerät ist defekt.
Das Gerät steht auf unebenen Boden.
Die Zeit reichte noch nicht aus, um die
gewünschte Temperatur zu erreichen.
Die Temperatur ist falsch eingestellt.
Der Standort ist ungeeignet.
Es sind viele Flaschen in der Minibar.
Stecken Sie den Netzstecker 9
in eine Netzsteckdose.
Benutzen Sie eine andere Netzsteckdose.
Wenden Sie sich an den Kundendienst.
Sorgen Sie für einen festen
Stand, indem Sie die Justierfüße 0
einstellen.
Warten Sie noch einige Zeit.
Kontrollieren Sie die eingestellte
Temperatur.
Stellen Sie das Gerät an einen
kühleren Ort.
Das Gerät braucht länger zum
Herunterkühlen.
Die Tür 7 schließt
schlecht oder gar
nicht.
22
Die Flaschenroste q/w oder die Flaschen
sind nicht richtig eingesetzt.
Das Gerät steht nicht auf einer ebenen
Fläche.
Setzen Sie die Flaschenroste
q/w oder die Flaschen richtig
ein.
Stellen Sie das Gerät auf einen
geeigneten, ebenen Untergrund.
SMB 70 A1
Page 26

Garantie und Service
Sie erhalten auf dieses Gerät 3 Jahre Garantie
ab Kaufdatum. Das Gerät wurde sorgfältig
produziert und vor Anlieferung gewissenhaft
geprüft. Bitte bewahren Sie den Kassenbon als
Nachweis für den Kauf auf. Bitte setzen Sie sich
im Garantiefall mit Ihrer Servicestelle telefonisch
in Verbindung. Nur so kann eine kostenlose
Einsendung Ihrer Ware gewährleistet werden.
Die Garantieleistung gilt nur für Material- oder
Fabrikationsfehler, nicht aber für Transportschäden,
Verschleißteile oder für Beschädigungen an zerbrechlichen Teilen, z. B. Schalter oder Akkus. Das Produkt
ist lediglich für den privaten und nicht für den
gewerblichen Gebrauch bestimmt.
Bei missbräuchlicher und unsachgemäßer Behandlung, Gewaltanwendung und bei Eingriff en, die
nicht von unserer autorisierten Service-Niederlassung vorgenommen wurden, erlischt die Garantie.
Ihre gesetzlichen Rechte werden durch diese Garantie nicht eingeschränkt.
Die Garantiezeit wird durch die Gewährleistung
nicht verlängert. Dies gilt auch für ersetzte und reparierte Teile. Eventuell schon beim Kauf vorhandene
Schäden und Mängel müssen sofort nach dem
Auspacken gemeldet werden, spätestens aber zwei
Tage nach Kaufdatum. Nach Ablauf der Garantiezeit anfallende Reparaturen sind kostenpfl ichtig.
Service Deutschland
Tel.: 0800 5435 111
E-Mail: kompernass@lidl.de
IAN 90980
Entsorgung
Werfen Sie das Gerät kei-
nesfalls in den normalen
Hausmüll. Dieses Produkt
unterliegt der europäischen
Richtlinie 2012/19/EU.
Entsorgen Sie das Gerät über einen zugelassenen
Entsorgungsbetrieb oder über Ihre kommunale
Entsorgungseinrichtung. Beachten Sie die aktuell
geltenden Vorschriften. Setzen Sie sich im Zweifelsfall mit Ihrer Entsorgungseinrichtung in Verbindung.
GEFAHR
Brandgefahr durch
Isolationsmittel!
Das in der Isolierung enthaltene Isolationsgas ist
leicht entzündlich.
► Führen Sie das Gerät einer geeigneten
Entsorgung zu.
Die Verpackung besteht aus umwelt-
freundlichen Materialien, die Sie über
die örtlichen Recyclingstellen entsorgen
können.
Importeur
KOMPERNASS HANDELS GMBH
BURGSTRASSE 21
44867 BOCHUM
GERMANY
www.kompernass.com
DE
AT
CH
Service Österreich
Tel.: 0820 201 222 (0,15 EUR/Min.)
E-Mail: kompernass@lidl.at
IAN 90980
Service Schweiz
Tel.: 0842 665566 (0,08 CHF/Min.,
Mobilfunk max. 0,40 CHF/Min.)
E-Mail: kompernass@lidl.ch
IAN 90980
Erreichbarkeit Hotline: Montag bis Freitag von
8:00 Uhr – 20:00 Uhr (MEZ)
SMB 70 A1
23
Page 27

KOMPERNASS HANDELS GMBH
BURGSTRASSE 21
44867 BOCHUM
DEUTSCHLAND / GERMANY
www.kompernass.com
Estado de las informaciones · Last Information Update
Stand der Informationen:
08 / 2013 · Ident.-No.: SMB70A1-042013-2
IAN 90980
5
 Loading...